job manager’s 8 billing options
TRANSCRIPT

1
Job Manager’s 8 Billing Options
There are the eight billing options available in “Job Manager" (probably more).
Find the best fit(s) and then use only those.
Option 1: “One Planned Contract Amount at end of Job” (Fixed Contract)
1. Sub Job exists first.
2. Select Planning button, and select “Estimating.”
a. View Estimated Cost totals and pricing totals
b. Go back to Job Card.
3. Enter a Total Contract Amount.
a. Box Pops-Up: Update the Contract amounts on the task/routers? Click Yes
4. Mention Job is setup for single contract invoice at end of job.

2
5. Select Planning button, and select “Estimating.”
a. Select Job/Tasks button, mention with the correct template setup, you
could automatically create contract lines using the “Auto create contract
planning lines” option.
b. Instead manually enter a Contract line:
i. Go to the task that you are using for billing
ii. Select Job/Tasks button, “Edit Planning Lines”
iii. Enter a Contract line.
1. Make sure that Line Type is “Contract”
iv. Select Function, “Create Invoice.”
1. You do get the option here to “append” to another invoice.
2. Drill down to the created invoice. You can add additional
text line if you want.
3. Now Post.
a. Some people do Post and Print and have modified
the Post and Print
b. Do Preview instead of printing for demonstration
purposes only.
c. Esc to Planning Lines
i. Press Page Up (refreshes list)
ii. Drill on the Posted Invoice
iii. Print Preview from Posted Invoice
**If you have Created a Sales Quote from the Contract Planning lines and then
click “Make Order” from the Quote, than the Sales Order already exists vs.
you needing to Run the Create Sales Invoice.
Watch Ben demonstrate “One Planned Amount” (If a blank page opens press F5 “refresh”)

3
Option 2: “Free Form Invoice”
One or more “Ad Hoc” Sales Order or Sales Invoice lines
1. Job exists first.
2. Go to Sales Document (Sales Order or Sales Invoice)
a. Create New(F3/Insert) Sales Order/Invoice
b. Enter billing line, or lines if terms
c. Enter Qty 1, and amount in Unit Price
d. Enter Job No. and Job Task No.
i. Make sure that the Task is flagged to “Allow Auto Insert Contract
Line” back on the Job Task/Router setup.
e. Now Post.
i. Some people do “Post and Print” and have modified the “Post and
Print” to Preview instead of printing for demonstration purposes
only.
Watch Ben demonstrate “Free Form Invoice” (If a blank page opens press F5 “refresh”)
4
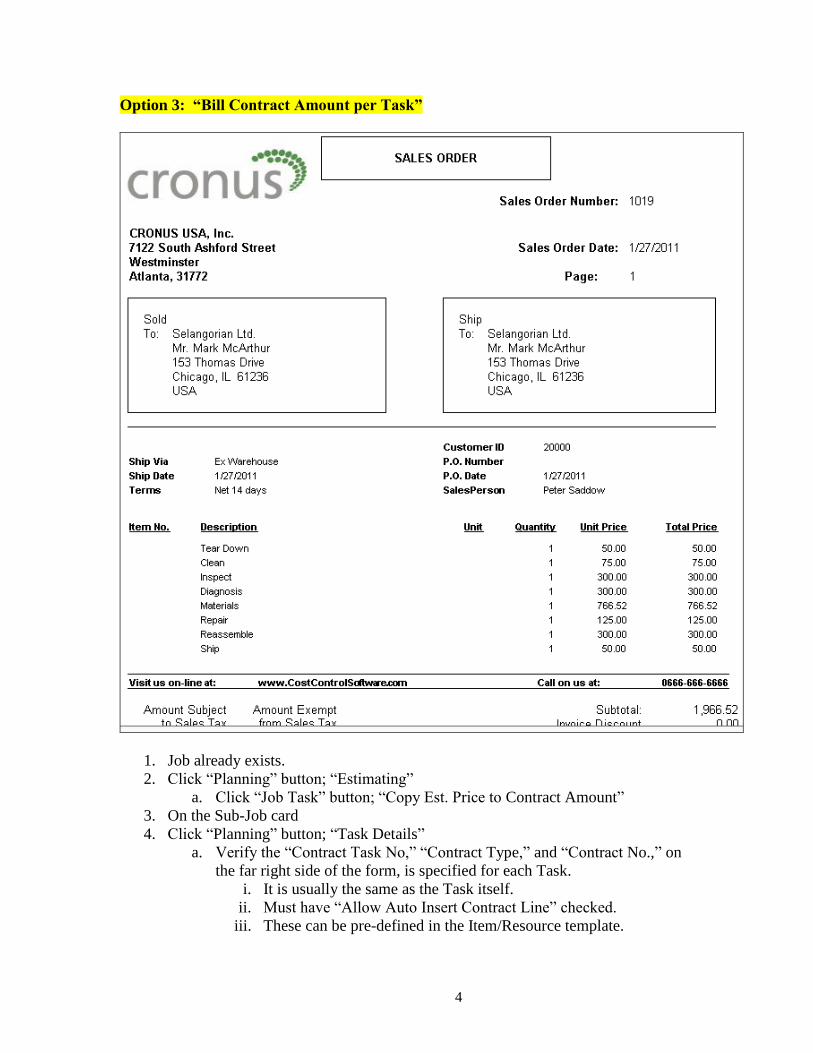
Option 3: “Bill Contract Amount per Task”
1. Job already exists.
2. Click “Planning” button; “Estimating”
a. Click “Job Task” button; “Copy Est. Price to Contract Amount”
3. On the Sub-Job card
4. Click “Planning” button; “Task Details”
a. Verify the “Contract Task No,” “Contract Type,” and “Contract No.,” on
the far right side of the form, is specified for each Task.
i. It is usually the same as the Task itself.
ii. Must have “Allow Auto Insert Contract Line” checked.
iii. These can be pre-defined in the Item/Resource template.

5
b. Click “Task/Router” button; run “Auto Create Contract Planning Lines”
You should see one Contract Planning line created per task that had the
previous columns specified.
5. Invoice Option 1: Bill by Job
a. On Sub-Job Card
b. Click “Planning” button; select “Task/Router Setup”
i. Click “Functions” button; select “Create Sales Invoice”
1. This is for invoicing Per Job or Per Task*
2. No highlighting of tasks, only filtering
3. No option to append to another invoice
4. System will tell you one invoice created successfully.
c. Click “Functions” button; select “Edit Planning Lines”
i. Must be on a posting line
ii. Go to the far Right to see the Invoice number that was created and
drill down to the Invoice.
1. You can add additional text line(s) if you want.
2. You may “Post,” or Post and Print (if preview modification
is in place)
* You can set filters here but the default is the sub job that you are on and all tasks. As
you Create Sales Invoice, go to the options tab. You have the option to create one
invoice or multiple invoices by Job or by Job Tasks. If a job has two tasks, and you
select by Job Task, and both tasks have un-invoiced contract lines, then the system will
create two invoices, one for each task. Click OK, this will create the invoice or invoices
without highlighting lines.
.
6. Invoice Option 2: Selective Billing by individual tasks
a. On the Sub-Job Card
b. Click “Planning” button; select “Task Details”
i. Select the Task line you wish to bill.
ii. Click “Task/Router” button; select “View Planning lines”
1. Select the Contract Planning Line
2. Click “Functions” button; select “Create Sales Invoice”
a. This is billing by Task Only
b. You do have the option to append to another
invoice.
iii. Drill down to Sales Invoice from Planning Lines
iv. Click “Posting” button; select “Post”
7. Invoice Option 3: Selective Billing across multiple tasks
a. On the Sub-Job Card
b. Click “Planning” button; select “All Planning Lines”
i. Filter on “Line Type;” for “Contract”
ii. Highlight the line(s) you want to bill.
iii. This option allows you to highlight multiple tasks at one time.
iv. You do have the option to append to another invoice.

6
c. Drill down to Sales Invoice from Planning Lines
d. Click “Posting” button; select “Post”
**If you have created a Sales Quote from the Contract Planning lines and then done
“Make Order” from the Quote, then the Sales Order may already exist.
Tip: If you use this type of billing we recommend on “All Planning Lines,” Show the
following columns to improve readability (5 second change):
Watch Ben demonstrate “Amount per Task” (If a blank page opens press F5 “refresh”)

7
Option 4: Bill for a Group of Tasks (Milestones/Terms)
1. Sub-Job exists.
2. Go to Planning Button; “Estimating”
a. Enter the Contract Amounts per Task (Can use Copy Price Function).
b. The Group Subtotal will show.
3. Go to Sub-Job Card
4. Go to Planning Button; “Task Details”
a. Enter the Task Number for your billing Milestones in the “Contract Task
No.” column (far right) of the associated Milestone sub-totals row.
b. Enter “Contract Type:” G/L Account
c. Enter “Contract No.” = Chart of Account Number (example: 41200 – Job
Sales).
8
d. All of the above can be pre-defined in the Template.
5. Use “Task/Router” button to run “Auto Create Contract Planning Lines”
6. Option 1: Make Contract Line Sales Quote
a. Use “Task/Router” button to “Make Contract Line Sales Quote”
i. Do not “append” if given option (but can mention possibility)
b. Go to Sales Quote
i. Click Make Order Button
c. Go to Sales Order from Sub-Job Card
i. Blank all milestones that are not being billed.
ii. Use “Posting” button; “Post”
iii. Print Preview the document before you post or find the Posted
Invoice and Print Preview it.
7. Option 2: Create Invoice from Planning Lines
a. Go to “All Planning Lines” and filter on Line Type = Contract.
b. Land on the Milestone you want to Invoice.
i. From “Function;” run “Create Sales Invoice.”**
c. Go to Sales Invoice, Verify, and Post & Print
**If you have created a Sales Quote from the Contract Planning lines and then done
“Make Order” from the Quote, then the Sales Order may already exist.
Watch Ben demonstrate “Milestone Billing” (If a blank page opens press F5 “refresh”)

9
Option 5: “Time and Materials”
1. Job exists.
2. Post your normal cost entries in the Job Journal(s) (**Line type = blank)
3. On Sub-Job Card; “Jobs” Button; “Ledger Entries”
a. Highlight the lines you want to bill; “Function” button; “Transfer to
Planning Lines”
i. Set “Transfer To” as Contract
4. Click “Planning” button; “All Planning Lines”
a. Highlight the line(s) you want to bill.
b. Click “Function” button; Create Sales Invoice
c. “Sales Invoice No” auto-fills; Drill down to Invoice
i. Verify and Post
**Slight variation:
When entering cost entries, you can indicate what is billable by setting the “Line
Type” to “Contract.” When you post the cost entries the system will

10
create the contract lines for billing along with posting the cost to the Job
Ledger entry. In this variation, you would not do the Transfer from the
Job Ledger Entry as the contract lines would already exist.
Watch Ben demonstrate “Time and Materials” (If a blank page opens press F5 “refresh”)

11
Option 6: “Sales Order” Creating Job and Billing
1. Create a new Sales Order
a. Enter the Finished Good* or Service** on the SO Line
b. Enter Qty (Usually 1 for Service)
2. Click “Jobs” button; “Make one job for this Line” or “Make a Job for every Line”
a. Enter the Job Task No. for Billing on the SO Line (Task must “Allow
Auto Create Contract Line)
3. Click the “Posting” button; “Post”
*If Job is making a Finished Good item, then post Qty produced to Inventory, Ship and
Invoice the Item from the Sales Order Line. (Qty. to Ship & Qty. to Invoice must be
equal.)

12
If you need to post a partial quantity, then split the line. I.e. two lines, the first line with
the partial quantity being shipped and invoiced, and the second line with the remaining
quantity. Enter the same Job No. and Job Task No. on the second line as was on the first
line.
**If Job is a “Service Job” (Type = Resource) then you do not need to post finished good
production. You just need to post the invoice. Quantity on a Resource Job and sales line
is typically one (1). If you need to split up the billing, then split the lines with the
quantity of one (1) on each line, and enter the amount to bill in the Unit Price.
Watch Ben demonstrate “Sales Order” Billing (If a blank page opens press F5 “refresh”)

13
Option 7: “Percentage of Completion” (requires Job Enhanced Billing Granule)
1. Job exists and Costs have occurred
2. On Sub-Job Card; “Enhanced Billing” box (lower left corner of card)
a. Set Billing Type to “% Complete”
b. Set Billing Task to a posting task (i.e. Shipping, Billing, etc)
3. Go to “Enhanced Billing” folder in the left menu
a. Click on the “Earned Rev. Worksheet”
i. Click the “Function” button; “Create Worksheet Lines”
1. Enter your Sub-Job No. in the Filter Column
2. Go to the Options Tab
a. Enter “w” (work date) in “Calculation as of Date”
b. Enter any Document Number; Click “Ok”
ii. This auto-creates the entry in the Billing Worksheet; Review the
Line (editable)
iii. Verify the “Billing Format Code” is set to desired format (far right
side of worksheet).
iv. Click “Function” button; “Create Invoice”
4. Go to Sales Invoice and Post.
5. Other options are available too.

14
Watch Ben demonstrate “Percent Complete Billing” (If a blank page opens press F5 “refresh”)

15
Option 8: “Cost Plus” (requires Enhanced Billing granule)
Invoice will look identical to those above, based on billing method. You just let the Job
Manager calculate the “Price” based on your Jobs “Plus Percentage”.
1. Create new Sub-Job
2. Go to the Enhanced Billing Box (bottom left corner)
a. Select Billing Option; “Cost Plus”
b. Select your Billing Task (must be a posting line)
c. Set your Cost Plus Percentage (“10” = 10% mark-up)
3. Optional: If you need a smaller or larger mark-up for certain “Items” etc:
a. Click “Prices” button; select “Item”
i. Enter a line for each specific item and set the “Unit Cost Factor”
(“1.15” = 15% mark-up)

16
b. Repeat this step Selecting Resource to set-up your Resource’s “Unit Cost
Factor”
c. Repeat this step Selecting G/L Account as needed
4. On Job Card
a. “Functions” Button
i. “Adjust Planning Line Prices…”
All pricing can be based on Job Task too, i.e. a professional resource doing drafting can
be priced using one factor, than the same resource doing project management (different
task) is priced at another factor.
As usage transactions are entered the system will default the price based on the Job
Prices. Job prices take priority over all other pricing options.
Watch Ben demonstrate “Cost Plus”
(If a blank page opens press F5 “refresh”)