job costing - cnp-x.com · job costing. 4-2 job costing ... tech notes, and video tutorials ... ing...
TRANSCRIPT

Job Costing

4-2
JOB COSTING
4-4 Purchase Orders4-8 Adding Purchase Orders4-10 Printing Purchase Orders4-12 Printing Purchase Order Reports4-14 Accounts Payable4-16 The Accounts Payable Window4-18 Job Cost Invoices4-20 Overhead Invoices4-22 Media Accrual Invoices4-24 Add Credit Card Statement4-26 Importing Credit Card Statements4-28 Printing Accounts Payable Reports4-30 Time Cards4-32 Time Sheets4-34 Time Sheet Window4-36 Adding Time Sheets4-38 Import Time4-40 Time Reports4-42 Checkbook4-44 The Checkbook Window4-46 Vendor Checks4-48 Autopay Payables4-50 Job Cost Checks4-52 Add Online Payment4-54 Overhead Expense Checks4-56 Employee Advance Checks4-58 Printing Checks4-60 Checkbook Reports4-62 Bank Reconciliation4-64 Expense Reports4-66 The My Daily Expense Reports Window4-68 Internal Charges4-70 Job Cost Transfers
Chapter 4
4-3
This chapter shows how to track purchase orders, costs, time, and expenses with job tickets. It explains how costs are tracked against clients, jobs, and tasks—and how costs are totaled for billing. In this chapter you’ll learn about:
■ adding and printing purchase orders■ tracking staff hours with the daily/weekly time card■ adding vendor invoices in Accounts Payable■ tracking overhead expenses■ writing checks for vendor payments, job costs, and overhead expenses■ reconciling bank accounts■ adding employee expense reports■ tracking internal charges, like CD duplication■ transferring costs between jobs and tasks
Introduction
For help using any part of Clients & Profits X, click the button from any
window to open the on-line user guide. This web-based user guide features
step-by-step instructions, explanations, tips, demonstrations, and links to
FAQs, tech notes, and video tutorials from www.cnp-x.com/support. It’s
continually updated, so it’s more timely and helpful than a printed user
guide.

4-4
Purchase Orders
Purchase, insertion, and broadcast orders account for purchases you make from vendors on a client’s behalf. They are not required by Clients & Profits X, but give you control over your purchases. That’s because purchase orders provide written verification for the goods and services you order.
Anyone can add their own purchase orders, up to a user-defined dollar limit. POs have at least one job and task, but can contain several for better cost ac-counting. Amounts from the purchase order update job tickets automatically. Up to five copies of a purchase order can then be printed on plain paper, so special forms aren’t needed. When the vendor’s invoice is posted and the PO is referenced, the PO is reconciled automatically.
Tracking purchase orders can be essentially paperless, since you can add, change, and see everything about a PO directly from your computer. The cost of your orders will appear on job reports. Purchase orders aren’t true job costs; instead, they are commitments you’ve made for a job cost. They are essential for accurate cost accounting, since they track the purchases you’ve made throughout the month, but still haven’t received the vendor’s invoice. Purchase orders can be billed individually or by task in Accounts Receivable.
A job ticket can have hundreds of purchase orders; there’s no real limit. Job commitment reports can be quickly printed (or reviewed directly from your computer) showing just what you’ve ordered—and whether or not it has been invoiced by the vendor. Many parts of the purchase order are customizable to save time. Templates, which contain basic details about a kind of purchase, can be applied to a new purchase order, for faster data entry. Cloning dupli-cates an existing purchase order when you’re ordering the same or similar thing again.
When the cost is eventually invoiced by the vendor, the purchase order’s balance decreases. The purchase order keeps a running balance of open com-mitments, showing you how much you’ve purchased from vendors that hasn’t been invoiced. Once the invoice is posted in Accounts Payable, a purchase order can’t be changed.
■ Many users can add purchase orders at the same time. Sometimes your cursor becomes a padlock, indicating that someone else is using a record that you need. In these cases, the padlock will disappear—and your purchase order can be entered—when the other user saves his or her work.
■ For information about adding broadcast, print, interactive, and outdoor orders, please see the Media chapter.
Purchase Orders
Job tickets track both the net and gross amounts of your purchase orders. These totals, which are up-dated whenever you add and save a purchase order, show the balance of the commitments you’ve made for job costs.
When a purchase order is added, you’ll enter a net amount and (optionally) a gross amount. The net amount is the actual cost of the purchase, before markups and com-missions. The gross amount is what you’ll eventually bill the client for this purchase. Each line item on a PO can have a different net and gross amount. The PO’s totals are based on all of its line items.
Saving the purchase order increases the job’s committed total—but the cost total is unchanged. This is because a purchase order isn’t a real job cost yet. It will be, once the vendor does its job, sending an invoice. Posting the vendor’s invoice in Accounts Payable moves the amount from the commitment column to the cost column on the job ticket. The job’s Net and Gross PO balances decrease, since they have been invoiced.
Posting the PO isn’t required, since it doesn’t affect the General Ledger. Purchase orders don’t affect the vendor’s balance, either. They can be freely edited until the vendor’s invoices are posted into Accounts Payable. Changing a purchase order updates its job tasks accordingly.
How Clients & Profits X manages purchase orders
Standard information for purchase orders can be customized to save time. These settings, called de-faults, are copied to new purchase orders automatically. Purchase order default settings can be edited anytime in Preferences.
Purchase order preferences include: a standard distribution list for printing copies of a purchase order; three standard approval names; five standard user-defined fields for tracking special details; a standard disclaimer that prints at the bottom of the printed purchase order; your company logo (which prints at the top of the printed purchase order); margins for printed purchase orders; and the option to show the client’s name on the PO.
These settings can be copied to all users, or they can be personalized for each user. Giving different users their own special defaults saves them time; when they add their own purchase orders, their settings are entered automatically.
The automatic PO numbering setting is changed in Preferences, too. To change your purchase order defaults, choose Purchase Orders from the Preferences pop-up menu under Setup.
The PO heading, can be customized to Work Order or Change Order in Names preferences (see page 9-46).
Purchase order defaults

4-5
POs are automatically numbered when they’re added based on a starting number from Prefer-ences. This eliminates the need for preprinted PO forms or a purchase order log book.
Anyone with the right access privileges can add (up to their dollar limit), edit, and print their own POs from any workstation. Access is based on settings in the User Access Privileges win-dow.
When a user adds a purchase order, Clients & Profits X automatically checks for the user’s order limit. This is the maximum amount for which a user can place an order. Order limits are flex-ible, so can be changed as a user is authorized to make larger purchases.
Purchase orders can be written for any kind of purchase, from billable client production costs to agency overhead expenses (printing, advertising, etc.). POs can update any job and task.
When the vendor’s invoice is added into Accounts Payable, it can be self-reconciled with its purchase order. The order’s vendor, job, task, and amounts are copied to the invoice window as a shortcut (which also makes verifying the order vs. actual cost easier). The vendor’s actual cost amounts from the invoice are posted automatically back to the purchase order. POs show outstanding balances (i.e., order amounts vs. actual costs) so you’ll always know which ones are still open.
Purchase orders are designed to print on plain paper, so no expensive forms are needed.
Up to 5 copies of each PO can be printed without using multipart forms. Each printed copy shows a user-defined distribution name (e.g., Vendor, Job Jacket, Accounting, etc.) at the bot-tom of the page. Once a purchase order is revised, the revision counter increments automatically. The current revision number appears on the printed order.
Selected users can be authorized to approve purchase orders in their Access Privileges. These users can approve POs on-line from any computer running Clients & Profits X. When a purchase order is printed, the scanned image of approver’s signature appears at the bottom of the page.
The details from routine purchase orders can be added to PO templates. When a user adds a new purchase order and chooses a template, its details are copied to the new order. This saves time as well as making common purchase orders more consistent.
Existing POs can be “cloned” to instantly make new orders. Cloning saves time, since the origi-nal order’s details (including specs, jobs, tasks, and cost amounts) are copied to the new one.
User-defined alerts can warn users that their purchase order is close to or actually exceed-ing the job’s budget—before they can save the order. This can’t prevent a job from going over budget, but it means users can’t say they didn’t realize it was happening.
Every open purchase order can have a user-defined status to help track outstanding orders.
A single mouse click pre-bills a purchase or insertion order.
Purchase orders that will be used repeatedly for multiple purchases from the same vendor can be marked as blanket POs. These purchase orders won’t close automatically when applied to A/P invoices.
Information about the vendor, including the address, A/P invoices, and the vendor diary, are all accessible with a single mouse click.
Purchase Orders
Purchase Order Features
Feature How it works, how it’s used
Automatic numbering
Anyone can add purchase orders
User-based order limits
Order anything
Self-reconciles with invoices
No preprinted forms needed
Print distribution copies
Automatic revision tracking
On-line approvals
Purchase order templates
Clone purchase orders
Budget alerts
Open order status tracking
Pre-bill purchase orders
Blanket POs
Vendor links

4-6
Purchase Orders
Purchase Orders
1 Use the previous and next buttons to scroll through pur-chase orders.
2 Purchase orders can be easily added, cloned, edited, or deleted. Click the add new purchase order button to add a new purchase order. Or click on the clone purchase order button to make an exact copy of an existing purchase order. Click the edit button to edit the purchase order’s key details, such as the status, description, or approvals. Click the delete
button to delete the purchase order. Once a purchase order has been invoiced by the vendor or pre-billed to the client it can’t be deleted—even if it was only partially invoiced. Like jobs, this feature prevents billable purchase orders from being inadvertently deleted and, therefore, not billed. Always let Clients & Profits X automati-cally number the next purchase order to avoid confusion from using the numbers of deleted purchase orders over again.
q w e r t
y u
i
o
p
s
a
d
h
g
j
f
lk
3 Click the add amounts button to add new amounts to an order. The remove amounts button deletes one or more selected costs from an order. Only line items that haven’t been invoiced by the vendor or pre-billed to the client can be deleted. Once a line item is removed, it is gone forever: its net cost and gross amounts are deducted from the job task permanently. However, if needed, the same line item can be added back to the purchase order later.
Tracking purchase orders can be essentially paperless, since you can add, change, and see everything about a PO directly from your computer.
;

4-7Purchase Orders
8 Use these links to edit the order’s description/status, vendor information, or delivery details and to view vendor in-voices or the vendor diary. The description/status window can be used to edit the purchase order’s key details, such as the description, order date, ordered by, due date, status, or sales tax exemption. The vendor in-formation window can be used to customize the vendor’s name and address on this purchase order only. The delivery infor-mation/options window contains special delivery instructions, a due date, a disclaimer, and a delivery address that can be edited. The vendor invoices window lists the accounts pay-ables invoices that have been applied to the purchase order. The vendor diary window can be used to view, add, or edit diary entries for the purchase order’s vendor.
9 Every order has a unique number. New orders are numbered automatically, but custom, user-defined numbers can be entered instead.
10 The order date is the date the PO was added. The client number does not show on the printed PO; there is an option in PO Preferences to show the cli-ent name. The ordered by field shows the initials of the person who added the order. POs can be printed in batches by user. The due date shows when the goods or services are due to be delivered or performed.
4 Any purchase order can be pre-billed using the Pre-bill button. Pre-billing automati-cally creates an invoice for the purchase order’s gross amounts and shows the job and task like any other invoice. The pre-billing invoice is unposted, so it can be proofed, posted, and then printed with other invoices. There are two options available when pre-billing an order. The show totals only option combines all of the pur-chase order’s amounts together, so that the invoice shows only one billing amount. The show item-by-item detail creates a separate billing amount for every line item on the purchase order. Also, the purchase order’s billing can be added to an existing unposted pre-billing invoice by entering the number of the existing pre-billing invoice into the pre-bill dialog box.
5 The print reports and print orders buttons are used to print purchase order reports and forms.
6 If you know the purchase order number you want to find, simply enter the number into the find order field. Use the find more link to find one or more purchase orders by se-quence, vendor, number, date, or job.
7 The history pop-up menu can be used to jump to a previously viewed purchase order.
11 The vendor’s name and address are copied to the purchase order, but can be changed. This lets you send a PO to a different address for the same vendor. A PO can include only one vendor; if you’re buy-ing something from multiple vendors, each vendor gets its own PO. 12 The PO amount is the total amount of the purchase order’s line items.
13 The balance amount shows the amount remaining on the purchase order that has not been invoiced to vendor invoic-es. When the purchase order is closed, the balance amount will automatically change to $0.00.
14 The PO will be closed automatically when applied to a payable for the full balance due. If a PO needs to be closed for any reason, click on the closed box.
15 Each order can have dozens of different order amounts (i.e., line items), each with its own job, task, description, and net and gross amount. Line items are sorted on the printed purchase order by line number. Net cost is the amount you’re paying for the goods or services, before markups or commis-sions. Gross is the amount you’ll eventually bill your client, including markups and com-missions.
16 A lengthy description pro-vides a detailed explanation of the order to the vendor.
Anything purchased from a vendor should be tracked with purchase orders. They are es-sential for job costing, since they allow a cost to be committed to a job ticket before the vendor’s invoice is posted.
17 POs that are used repeat-edly for the same vendor can be marked as a Blanket PO. They are not automatically closed when applied to payables.
18 The order’s current revision number increments auto-matically each time someone edits the order. To start the automatic revision numbering, a “1” must be entered into the revision box in the specifica-tions window.
19 The status is user-defined note that describes the order’s current progress and appears on the printed purchase order. PO reports can be printed showing only orders with a certain status (i.e., on-hold, change order, etc.).
20 If an order has been approved, the approver’s initials and date appear on the Purchase Order window. Once approved, purchase orders can’t be edited. Only the user who approved the PO can unapprove the PO.

4-8 Adding Purchase Orders
Adding Purchase Orders
1 The order number identifies a PO on windows, reports, and forms. New POs are numbered automatically, or a user-defined number can be entered.
2 Choosing a PO template copies details about routine purchases to the new purchase order. 3 Purchase orders are added for only one vendor.
4 The order date shows when the purchase order was added. Due date shows when the work
is to be delivered or performed.
5 POs that will be used repeat-edly by the same vendor can be added as a blanket PO to prevent them from being closed automatically when applied to payables.
6 The description explains what is being ordered. It ap-pears at the top of the printed purchase order, above the line items. The label Description: can be customized by entering a new label.
7 The charge to many job tickets and tasks option lets you add many jobs and tasks to this order.
8 If this order applies to only one job and task, both are entered here. When this order is saved, its net and gross amount will appear on the job ticket.
9 Net cost is the amount you’ll pay the vendor, before commis-sions and markups. Vendors see only the net cost. Markup is used to calculate the gross
q
w
e
r
t
y
u
i
op
a s
d
Adding the purchase order doesn’t have to be complicated, since all that a purchase order needs is a number, an order date, a vendor, a job and task, and an amount.

4-9
amount and is copied from the vendor first, then from the task. The task rate overrides the vendor rate. The billable option, is copied from the job task. The order’s gross amount is the amount you’ll eventually bill your client, including markups and commissions. The vendor doesn’t see the gross amount.
10 The item description is cop-ied from the task’s description, but can be changed. It appears on the printed purchase order, so vendors will see it.
11 User-defined fields track special information unique to each purchase order, from production specifications to account codes.
12 The sales tax exempt op-tion, if selected, prints “Sales Tax Exempt” on the printed purchase order so the vendor doesn’t include sales tax on your invoice. Clicking the hold (don’t print) option prevents the purchase order from being printed. Use it to keep unap-proved POs from being acciden-tally printed. Once the order is saved, the hold option can be deselected in the Specifications window.
13 A PO can be printed show-ing more or less detail by choosing a form option. The simple form hides the unit and unit cost, showing just the line item’s total. The detailed form shows the PO’s full details.
Adding Purchase Orders
Anything purchased from a vendor should be tracked with purchase orders. They are essential for job costing, since they allow a cost to be committed to a job ticket before the vendor’s invoice is posted.
q
we
r t y u i o p a
s
The Add Order Amounts window lists the PO’s existing line items. Every order amount (i.e., line item) has a line number that identifies the amount.
1 The clear button removes all amounts from the purchase order.
2 The PO number and vendor are listed here for reference.
3 Click the notes button to add detailed information about the purchase order line item. The notes will print on the PO under the line item description.
4 Every item on the PO is assigned a line number, which tracks the amount through the system for accurate job costing.
5 Assign a job number to attach the cost to the job for profitability reporting.
6 Enter the task code for the job’s task. If you don’t remem-ber the task code, press Tab to open the job’s Lookup Job Tasks window.
7 Enter the quantity of materi-als being purchased.
8 The description automati-cally fills in from the task code. If you want more detail, use the notes tool.
9 Enter the cost for each item purchased. The unit is how many individual item are in each unit (e.g., each, dozen, or gross).
10 The net cost is automati-cally calculated by multiplying the quantity times the unit cost.
11 The markup percent is automatically copied from the task table to compute the gross amount.
12 The net and gross costs are totaled here.

4-10
Printing Purchase Orders
Printing Purchase Orders
Printing purchase orders is fast and easy. You can print one order at a time, or print several in batches. Anyone who can access purchase orders can print them from any computer running Clients & Profits X.
The printed purchase order is designed for plain paper, so no special pre-printed forms are required. Purchase orders can be printed using either laser, inkjet, or a continuous-form dot matrix printers.
■ POs print much faster using a laser printer but can’t print mul-tipart forms. Clients & Profits X can print up to five copies of each purchase order, based on a customizable distribution list.
The design and layout of the printed purchase order can’t be changed. If you use your own preprinted form for purchase orders, design it around a typical printed purchase order printed from Clients & Profits X.
■ Purchase orders don’t have to be printed. Printing does not affect the purchase order in any way, so it isn’t necessary. Also, a purchase order can be reprinted as needed without affecting your database.
■ Purchase orders that have the Hold (don’t print) option selected will not print.
To print a purchase order
1 Click the (i.e., Print Orders) but-ton, or choose File > Print Purchase Orders.
The Print Purchase/Insertion Orders window opens, prompting you to enter a range of order numbers and options for printing.
2 Enter an order number, or a range of order numbers.
The currently-displayed order’s number is entered by default. Any number of orders can be selected and printed in one batch. Any purchase, broadcast, or insertion order that has a number within this range will be printed. Randomly-numbered purchase orders (e.g., 99, 1025, 837, etc.) and order numbers that contain letters (e.g., 222a) can’t be printed together and must be printed individually.
Print your POs only. You can print your own purchase orders by entering your initials into the and added by field. Everyone else’s POs will be skipped, printing hard-copies of only the purchase orders you’ve added. A copy of the job’s printing specifications can be included with the printed PO, if applicable.
3 To print only orders added by one person, enter their initials. To print all orders, enter the initials as ALL.
4 Choose an order type from the pop-up menu, or choose All Orders.
This option lets you print a batch of only insertion orders, for example.
5 Select the print options, if needed.
The show gross amounts only option replaces the purchase order’s net cost with the gross amount. Use it when you don’t want the vendor to see the cost amount before commissions. The print distribution copies option prints up to five copies of each purchase order on plain paper (expensive multipart forms aren’t needed).
6 Choose a destination for these orders from the print to pop-up menu, then click Print.
Purchase orders can be printed to screen for a quick preview.
Once they appear on screen, you can print the orders to paper by clicking the Print Page button.
■ If you have Adobe Acrobat, purchase orders can be printed as PDF files and attached to e-mails sent directly to vendor contacts from Clients & Profits X. To save or e-mail a purchase order as a PDF file, choose File > Print Destination > PDF.
4-11
Purchase Order
Advertising Agency, Inc.10001 Century Blvd., Suite 1100Los Angeles, CA 90010213 555-5555 Number 1582
Date 04/02/94TO Ordered by DFAdvanced Printing and Litho, Inc. Due date June 4 1996Attn: Anne White Vendor LITHO1020 Airport Parkway Charge #: --Irvine, CA 92147
Description: Use PMS 412/PMS 412 + PMS 540 (1c/2c)Need 1 set of Matchprints + 1 Blueline for final approvalSeparated lasers, Output sheet, Disc Index & Disc included
Line Qty Job Description Unit Cost Unit Amount
1 50000 94-CB-288 Sale Postcard printing 0.1579 each $7,895.00Process Syquest Disk named: Artwork 12(Please return this cartridge with proof.)
2 1 94-CB-288 Cutting, folding, scoring 0.0000 Each $1,000.00
3 1 94-CB-288 Shipping 0.0000 Each $175.00
TOTAL NOT TO EXCEED: $9,070.00Flat Size: 8" x 8-3/4"Folded Size: 4" x 8-3/4"Colors: 3 PMS + varnishStock: 65# CoverQuantity: 50,000Instructions:(1) Ship 10,000 to: David James, Cole Stores/Los Angeles, 100 Mission Rd., Los Angeles, 90010(2) Ship 20,000 to: Advaned Mailing Services, 230 Victory Blvd., N. Hollywood.(3) Ship 100 to: Advertising Agency, Inc. as samples.(4) Ship remaining to warehouse:
Deliver to: Warehouse:Cole Stores4500 Engineer Road - MS 4Los Angeles, CA 90011
Approvals
Account Exec Date:
Art Director Date:
Advertising Agency, Inc. is acting strictly as an agency for this work on behalf of the client. As such, Advertising Agency, Inc. makes no claim of direct financial liability for this work.Partial shipments are not accepted. Please contact Advertising Agency, Inc. prior to shipment. Please provide two copies of all invoices. To ensure prompt payment, this purchase ordernumber must appear on all deliveries, invoices, and statements.
Vendor
Printing Purchase Orders
The printed purchase order
Purchase OrderRUSH
Original Recipe DesignNumber 2598Date 03/02/07Ordered by MSW
TODue date 03/21/07
Applied GraphicsVendor AG
Attn: Pat SmithCharge #: 12-99333
8417 El Camino Real #203Date printed 05/21/07
San Diego CA 92038REVISION: Original
Description: Use PMS 412/PMS 412 + PMS 540 (1c/2c).Need 1 set of matchprints + 1 blueline for final approval.
** Separated laser proofs, output sheet, disk index + disk are included **
Line Qty Job Description Unit Cost Unit Amount
1 15 MLI-678 Mechanical Art Assembly 123.0000 Each $1,845.00notes for mech art can go here
2 10000 MLI-678 Typesetting 0.2500 Each $2,500.00notes for typesetting can go here
TOTAL NOT TO EXCEED: $4,345.00Flat size 8" x 5-1/2"Folded size 4" x 5-1/2"Colors 3 PMS + varnishStock 65# coverQuantity 50,000Instructions:Please deliver to our warehouse. Their direct phone number is: 619/234-9090. Ask for Mel Jones if you havequestions.
Deliver to: 1200 Main Street
Building 2
Approvals
05/21/07 3:51 PM
AE: Date
DateProd Mgr:Outrageous Ad Agency is acting strictly as an agency for this work on behalf of the client. As such, Outrageous Ad Agency makes no claim of direct financial liability for this work. Please provide two copies of all invoices. To ensure prompt payment, this purchase order number must appear on all deliveries, invoices, and statements.

4-12
Printing PO Reports
Printing PO Reports
Purchase order reports review, summarize, and analyze what you’re ordering from vendors. Reports can be printed showing one type (such as insertion orders only) or all types. Purchase orders are selected for a range of dates (us-ing date added or due date) and either vendor, client, status, or by the buyer (i.e., ordered by initials).
The Print Purchase Order Reports window shows the different purchase order reports types (i.e., Lists, Summaries, Analysis). Clicking on a report type shows the different reports along with options for selecting POs for printing. Reports are printed by selecting a report name. Reports can be printed then reprinted with different selections, as often as needed.
■ Purchase orders aren’t posted, so they always appear on PO reports. For this reason, there’s also no proof list for purchase orders.
Use the Print to pop-up menu to choose where you want these reports printed. Reports can be printed to the printer (for a hard copy on paper), the window (so you can preview the reports on-screen first), or exported to disk (to create a text file that can be opened and edited in a spreadsheet).
Tips for printing PO reports
Reports select purchase orders primarily by the date ordered. By entering a range of dates, you can select all purchase orders added today, last week, or all month. There’s no limit to the range you can use.
■ To see only purchase orders with the same status (e.g., on-hold), choose “status” from the select orders by pop-up menu, then enter a status. To see all purchase orders, regardless of status, enter the status as “ALL”.
■ To see only one type of order, such as insertion orders, select Insertion Orders from the ...and for type pop-up menu.
■ To see the description for each purchase order on the reports, select the show description option.
■ The PO Lists can be selected by vendor, client, ordered by, or status by selecting the select orders by pop-up menu.
To print purchase order reports
1 Click the (i.e., Print Reports) button, or choose File > Print PO Reports.
2 Select a type of report (e.g., Lists, Summaries, or Analysis).
3 Choose date added or due date from the pop-up menu, then enter a range of dates.
4 Choose a selection option to print orders by vendor, client, status, or ordered by initials, then enter a selection value.
The selection value is either a vendor number, client number, status, or a buyer’s initials. To print only your orders, for example, choose Ordered by from the pop-up menu then enter your initials.
6 Select the report you wish to print.
7 Choose any additional op-tions.
The show description option can make the report very long, depending on the length of your PO descriptions.
8 Click Print.
4-13Printing PO Reports
The PO Log lists orders by order number.
The PO List by Type lists orders by type, showing separate sections for purchase orders, insertion orders, and broadcast orders.
The PO List by Vendor lists orders by vendor. Use this report to analyze purchases or-dered for each vendor for the last quarter, for example.
The PO Status List lists orders by order number, displaying each order’s current status.
The PO Summary shows the orders and their line items, instead of showing totals only.
The Unapproved Orders report gives managers a list of orders awaiting their approval.
The Open Orders report is a comprehensive listing of the shop’s outstanding orders.
The Over & Under Orders report shows only orders that have balances. The balance can be a positive or negative amount.
The Blanket PO report shows the line items, instead of totals only for purchase orders marked as blanket POs.
PO Log
PO List by Type
PO List by Vendor
PO Status List
PO Summary
Unapproved Orders
Open Orders
Over & Under Orders
Blanket POs
Purchase Order Reports
Lists
Summaries
Analysis

4-14 Accounts Payable
Accounts Payable
Everything you buy from a vendor on account, whether for a job or for the shop, is an accounts payable entry. These purchases, which are usually recorded from vendor invoices, are added into Accounts Payable. Since Accounts Payable is integrated with the General Ledger, there’s no double-entry—information entered on invoices becomes part of the G/L. The A/P file tracks everything about your purchases:
■ What you’ve bought ■ From whom it was purchased ■ How much it cost ■ When the invoice should be paid ■ The purchase’s markup and gross amount ■ When the invoice was paid
Vendor invoices should be added daily, to keep your accounting files and job cost reports timely and accurate. Invoices with job costs can be billable or unbillable, or any combination. They can contain one or more jobs and tasks for flexible job costing. Invoices for overhead (which are unbillable by nature) can debit any number of G/L accounts.
Accounts Payable is seamlessly integrated with the vendor files, jobs and tasks, and the general ledger. This means that when an invoice is posted, many things are updated at once: the vendor balance increases; the invoice’s cost and gross amounts increase the job’s totals; and debit and credit entries are created in the General Ledger. Vendor invoices are also integrated with purchase orders. When an invoice is added with a purchase order number, the PO’s job and cost information is copied to the invoice automatically—sav-ing entry time. Posting the invoice updates the purchase order’s balance, automatically closing open POs. Posting the A/P invoice also reconciles the committed totals on jobs and tasks.
Vendor invoices don’t update vendors, jobs, or the G/L until they are posted. Invoices are saved as unposted entries, and can be changed or deleted; however, unposted invoices only appear on the proof list, and not on cost or accounting reports. Posting makes invoices permanent, for better account-ability. Once posted, an invoice can not be changed—only adjusting entries can be made against it. Or an invoice can be unposted, edited, and reposted.
■ Invoices from vendors shouldn’t be added into Accounts Payable if they’ve been prepaid with a check. Instead, write the check as a job cost.
Debit and credit journal entries are created automatically when payables are posted. Every invoice makes a credit entry (usually A/P) and one or more debit entries (ei-ther job cost or overhead expense). Default debit and credit accounts are entered for you automatically.
■ The invoice’s credit account is always a payable account, which is copied from the G/L preferences or from the vendor’s default cGL.
■ Invoice line items have debit ac-counts (the “dGL”). An invoice can have many line items, distributing a cost to dozens of debit (i.e., cost or expense) accounts. The debit account for job costs is copied from the job task’s dGL. Vendors can have default expense dGL accounts, which are copied to overhead invoices. The dGL will be copied from G/L Preferences, if no other default is set up.
■ Journal entries from payables are posted into the Purchases journal. The entry’s reference number is a combination of the prefix, AP#, and the invoice number.
■ Journal entries aren’t created, and the G/L account balances aren’t updated, until an invoice is posted. In the General Ledger, the Purchases journal can be printed showing the journal entries posted from Accounts Payable.
Accounts Payable and the General Ledger
Cloning duplicates an existing accounts payable invoice creating a new invoice. The cloned invoice has all of the descriptions, instruc-tions, options, and line items of the original. Cloning is especially useful when you’re purchasing the same kind of products or services routine-ly. Since cloning copies an invoice completely, you’ll spend much less time keying in the details.
Any job cost or overhead invoice can be cloned. The cloned invoice has the same vendor, but it can be changed. In fact, anything about the cloned invoice can be changed. The cloned invoice gets its own unique invoice number.
Cloning an accounts payable invoice is simple: First, find the invoice you wish to copy. Choose Clone from the Edit menu, enter any changes, then save the new invoice. The original invoice’s line items will be copied, too, but they can be changed. The original accounts payable invoice is unaf-fected by cloning. An invoice can be cloned any number of times.
The Clone window closely resem-bles the Add Job Cost Invoice or Add Overhead Invoice window (de-pending on which type of invoice you are cloning). Information from the original invoice, including the vendor, description, and amounts is copied automatically from the original invoice. Changing the new invoice doesn’t affect the original invoice.
Cloning A/P Invoices

4-15
A/P Features
Accounts Payable
Every kind of invoice for any kind of cost or expense is added into Accounts Payable. Invoices update the G/L, job tickets, and vendor account balances automatically.
Vendor invoices for job costs are added with job numbers and tasks for easy job costing. An invoice can be split between dozens of different clients, jobs, and tasks—each with their own customizable markup for your commission (or billed at net for your fee-based clients).
Vendor invoices for overhead expenses are added without job numbers or tasks. An over-head invoice can be distributed among dozens of different debit G/L accounts, making it easy to split expenses between departments.
Media invoices automatically post media WIP accrual entries into the General Ledger, offsetting the accrual entries posted from the client’s media billing. This helps automate WIP accounting for media clients.
An invoice amount can be split between job costs and overhead expenses. The same invoice can contain both billable client costs as well as unbillable overhead expenses. There’s no need to enter the invoice twice.
A/P invoices are dynamically linked to POs. When an invoice is added with a PO number and line item number, Clients & Profits X self-reconciles the actual cost with the order amounts. The PO’s balance is updated automatically each time an invoice is posted.
If a vendor offers early payment discounts, its terms are copied to invoices automatically. The invoice will calculate the day it should be paid to take the discount, then show this information on the A/P aging reports.
Routine payables, such as insurance, rent, and office services, can be scheduled for the entire year. Any overhead expense can be made into recurring payables very easily.
An existing vendor invoice can be duplicated, or cloned, to make a new copy into the cur-rent accounting period. This saves time, since commonly-used invoices don’t have to be rekeyed each month. A cloned invoice can be easily modified, proofed, then posted.
Invoice balances are updated automatically when checks are posted. Users can see up-to-the-minute balances whenever needed, such as when a vendor calls asking about payment. A user can look up an invoice’s payment history with a single mouse click.
The diary records the when, where, and who was involved for major events and meetings. Because the diary is easily accessed, details of conversations and events are preserved. The record can also be e-mailed for streamlined communication.
Credit invoices can be added to adjust cost and gross amounts from A/P invoices. They are added just like regular invoices, but have negative amounts, to adjust for mistakes, over-billings, or returns by vendors. They lower vendor account balances, job cost balances, job cost totals, and the General Ledger when they’re posted.
Credit card statements can be easily imported into Clients & Profits X. A special window in Preferences allows you to enter in your credit card accounts and merchants/payees. Once a credit card is entered, statements can be imported into Accounts Payable and paid through the checkbook like any other payable.
A/P tracks everything
Job costing
Overhead cost accounting
Media accruals
Mix costs and overhead expenses
Self-reconciling POs
Intelligent payment terms
Recurring payables
Cloning payables
On-line, real-time queries
Vendor diary
Credit invoice
Importing credit card statements
Feature: How it works, how it’s used

4-16 Accounts Payable
The Accounts Payable window
the edit button to edit the invoice’s details. You can edit the invoice’s date, accounting period, credit G/L account, number and amount until it is unposted. Once the invoice is posted, only the description can be edited. Click the delete button to delete an unposted accounts payable invoice.
3 To change the distribution of an invoice, click on the redistribute button. Redistrib-uting an invoice will delete all the line items allowing you to
1 Use these toolbar buttons to find the previous and next accounts payable invoice.
2 Accounts payable invoices can be easily added, cloned, edited, and deleted. Click the add new invoice button to add a job cost payable. (To add an overhead expense, media accrual invoice or to import credit card statements , go to Edit > Add New Invoice.) An existing payable can be cloned into a new payable, by clicking on the clone button. Click
y
i
o
s
u
ap
d
fhg
k
eq w r t
j
l
read them with a new distribu-tion. Only use this option if you have to completely redo the entire distribution or add new amounts. If you only need to remove an amount from the invoice, click on the remove button. Removing an amount from the accounts payable invoice automatically updates the invoice’s total amount.
4 The repeat button can be used to create recurring entries for an overhead expense invoice. This is a useful
Vendor invoices should be added daily, to keep your accounting files and job cost reports timely and accurate.
;z
2@
2#

4-17Accounts Payables
feature for monthly or quarterly payments such as rent, insur-ance, or an equipment lease. Whenever the Accounts Payable window is opened, Clients & Profits X checks for the day’s scheduled recurring payables. If found, the user is prompted to convert them to regular invoices which can be proofed and posted with other invoices.
5 Use the Print button to print accounts payable reports.
6 Accounts payable invoices can be found by entering in the invoice number here. Or the find more link can be used to find payables by sequence, invoice number, date, or vendor.
7 History keeps track of the accounts payable invoices that you previously viewed. Use the pop-up menu to jump to another invoice.
8 Vendor diary entries can be viewed or added by clicking on the vendor diary link. An accounts payable invoice’s pay-ments can be viewed by click-ing on the payments link.
9 The vendor’s invoice number is entered from the printed invoice. It appears on all cost and G/L reports, identifying the invoice. The same number can’t be used twice for the same vendor. If an invoice doesn’t have a number, create one that contains the vendor number (e.g., ABC090194).
10 There are four kinds of A/P
invoices: Job Costs, Overhead, Media Accruals, or Credit Card Statement.
11 The vendor number identi-fies from whom something was purchased. An invoice has only one vendor.
12 The date is from the invoice itself, not when the invoice was added. It is used by the aging reports to calculate the age of your payables.
13 Payment terms are copied from the vendor account. They are used to calculate early-pay-ment discounts (if taken), as well as the invoice’s pay date. Pay date is the date on which you plan to pay the invoice. This date is used to schedule payments by the cash flow reports.
14 The invoice’s description is user-defined and explains what was purchased. It appears on cost, A/P, and G/L reports.
15 The amount is the total cost of the invoice. It’s the amount you’ll pay the vendor, before discounts and adjustments. It is not the amount you’ll bill to your client.
16 The cGL is the invoice’s credit G/L account, usually A/P.
17 The invoice’s balance due decreases when the vendor’s check is posted.
18 The posted date shows when the invoice updated the
When an invoice is added with a purchase order number, the PO’s job and cost infor-mation is copied to the invoice automatically—saving entry time.
General Ledger.
19 The accounting period shows which G/L period was updated when the invoice was posted.
20 The client paid date shows if this job cost has been billed to the client and when or if it has been paid.
21 The days until due box shows a countdown to the ac-counts payable invoice’s due date.
22 A invoice can be distrib-uted to dozens of jobs, tasks, POs, and dGL accounts. Any combination of billable, unbill-able, and overhead costs can be included on the same invoice. Net cost is the cost amount before commissions. This is what the work cost the shop. The net amount is posted to the G/L. Gross is the billable cost amount, including markups and commissions. This is what the client will be eventually billed. The gross amount does not affect the G/L. The dGL is the invoice line item’s debit G/L account, usually a job cost or overhead expense account. All of this can be edited while the invoice is unposted. In the Edit Invoice Cost Amount window, the cost’s billing information can be viewed, which includes: the billing status, when it was billed, the A/R invoice number, invoice date, and billing amount.
23 The user’s initials who
added the invoice are appear on the Accounts Payable window.

4-18
Job Cost Invoices
A job cost invoice can have one or many invoice line items. Each line item is a separate job cost, and contains a job, task, net amount, billable amount, and debit G/L account.
Job Cost Invoices
y
u
t
o
re
w
q
i
1 If the job cost invoice is for a purchase order, enter the PO number here. If the invoice is for more than one PO number, leave this field blank. If a PO is entered, the details from the purchase order will be copied to the invoice’s distribution box.
2 Every invoice needs a vendor number which links the invoice with the vendor account.
3 The invoice number identi-fies the payable everywhere—cost reports, journal entries,
and vendor account agings. For this reason, the invoice number must be unique. You will get a warning message if you enter in a number that has already been used for the same vendor.
4 The invoice date should be entered from the invoice itself. It is the date the vendor issued the invoice and is used to calculate the age of your unpaid payables on aging reports.
5 The invoice can be posted into any unlocked accounting
period. The period determines which month will be updated when the invoice is posted.
6 The invoice’s payment terms tell when and how the invoice should be paid, including what discounts can be taken if paid early. The pay date is the date you plan to pay this invoice. Cash flow reports show unpaid invoices for a range of pay dates and checks can be written au-tomatically for invoices selected through a pay date. Pay date doesn’t affect the G/L, so it is not required.
1) 1! 1@ 1# 1$ 1% 1^ 1&

4-19Job Cost Invoices
7 This is the amount that you will pay the vendor. It should include sales tax, shipping, and any other additional charges.
8 The credit G/L account should always be a liability account, usually your Accounts Payable account. If a liability account is not used, your sub-sidiary ledger won’t equal your balance sheet.
9 The description explains what was purchased and ap-pears everywhere, including job cost reports and the General Ledger.
10 If a purchase order number has already been entered, the line numbers will automatically appear here. If a purchase or-der wasn’t already entered, you can enter the PO number here. If you don’t know the exact PO number, click the Lookup button to see the vendor’s open orders. Double-clicking on an order number copies it to the invoice line item.
11 The line number is auto-matically entered as 1. (Most
POs typically have only one line item.) The line number is im-portant, because it points to the exact line item on the purchase order. It’s used to reconcile the PO’s order amount with the actual cost from the invoice.
12 The job number is essential for accurate cost accounting. If you entered a PO number, its job number is copied to the invoice automatically. Tabbing past the job number verifies that the job is valid. The jobs lookup list can be used to find a specific job.
13 The task is important for job costing, since it tracks both the planned cost and actual cost for each purchase order.
14 The net cost is the amount the agency will pay for this purchase. It doesn’t include commissions or markups. The client doesn’t see the net cost.
15 The markup is copied from the vendor and the job task. The invoice’s gross amount is calculated using the net cost and the markup. It is customiz-
When an invoice is distributed to jobs and tasks, the amount distributed must equal the invoice’s total amount. If not, the user will be prompted to adjust the invoice’s distribution amounts until they balance.
able, so any percentage markup can be entered.
16 The gross amount is what the client will eventually be billed for this purchase. It includes markups and commis-sions. The client will see the gross amount on the job’s bill-ing, as well as on the optional Invoice Detail Report. The invoice’s gross amount can be modified by simply typing in a new amount over the automatic amount.
17 The dGL is a job cost G/L account. It is copied from the job task, but can be changed. A debit journal entry will be cre-ated for this G/L account when the invoice is posted.

4-20 Overhead Invoices
q
we r
t
y
u
i
o
p a
fies from whom something was purchased.
3 The vendor’s invoice number is entered from the printed invoice. It appears on all cost and G/L reports, identifying the invoice. The same number can’t be used twice for the same vendor. If an invoice doesn’t have a number, create one that contains the vendor number (e.g., ABC090194).
4 The date is from the invoice itself, not when the invoice was
1 If the overhead expense invoice is for a purchase order, enter the PO number here. If the invoice is for more than one PO number, leave this field blank. If a PO is entered, the details from the purchase order will be copied to the invoice’s distribution box.
2 The vendor is copied from the purchase order, if appli-cable. If a PO wasn’t used, enter the vendor number or use the Vendors lookup list to select one. The vendor number identi-
added. It is used by the aging reports to calculate the age of your payables.
5 The accounting period indicates which G/L period will be updated when the invoice was posted. Any unlocked period can be chosen to better match this cost with the client’s billing.
6 Payment terms are copied from the vendor account. They are used to calculate early-pay-ment discounts (if taken), as
Overhead Invoices
s d f
Like job costs, vendor invoices for overhead expenses are added into Accounts Pay-able as they are received in the mail. They can have one or many invoice line items.

4-21
well the invoice’s pay date. Pay date is the date on which you plan to pay the invoice. This date is used to schedule pay-ments by the cash flow reports.
7 The amount due is the total cost of the invoice. It is what you’ll pay the vendor, before discounts.
8 The cGL is one of your Ac-counts Payable G/L accounts. The default A/P account is cop-ied from Preferences, but can be changed. When the invoice is posted, its amount due will be credited to the A/P account.
9 Use the invoice’s description to explains what was purchased. It appears on cost, A/P, and G/L reports.
10 If a purchase order number has already been entered, the line numbers will automatically appear here. If a purchase or-der wasn’t already entered, you can enter the PO number here. If you don’t know the exact PO number, click the Lookup
Overhead invoices are added without jobs and tasks, since they don’t affect clients. These invoices won’t affect your profitability reports, instead they will be included only on your agency’s financials.
Overhead Invoices
button to see the vendor’s open orders. Double-clicking on an order number copies it to the invoice line item.
11 The line number is auto-matically entered as 1. (Most POs typically have only one line item.) The line number is im-portant, because it points to the exact line item on the purchase order. It’s used to reconcile the PO’s order amount with the actual cost from the invoice.
12 A description can be entered for each invoice line item to explain what is being purchased.
13 The cost amount is the amount that you are paying the vendor for this invoice line item.
14 The dGL would be one of your overhead expense ac-counts, such as Office Supplies. When an overhead invoice is posted, its amount due will be debited to an expense G/L account.

4-22 Media Accrual Invoices
q
w
e
r t
y
u i o p a s
4 Payment terms are copied from the vendor. They are used to calculate early-payment discounts (if offered), as well the invoice’s pay date. Pay date is the date on which you plan to pay the invoice. This date is used to schedule payments by the cash flow reports.
5 The amount due is the total cost of the invoice. It is what you’ll pay the vendor, before discounts. It is the net amount, not the gross amount that the client pays. It does not include commissions.
1 The vendor number identifies the station or publication from whom the media was ordered.
2 The vendor’s invoice number is entered from the printed invoice. It appears on all cost and G/L reports, identifying the invoice.
3 The accounting period indicates which G/L period will be updated when the invoice is posted. Any unlocked period can be chosen to better match this cost with the client’s bill-ing.
6 The cGL is your Media Payables G/L account. The default A/P account is copied from Preferences, but can be changed. When the invoice is posted, its amount due will be credited to the A/P account. If you have a separate AP liability account for Media Payables. Each vendor can be setup with a different AP account that will be used instead of the default account in Preferences.
7 Enter the invoice’s insertion order or broadcast order number
Media Accrual Invoices
Before media accrual invoices can be entered, the insertion order or broadcast order must be pre-billed.
4-23
here. If the vendor’s invoice doesn’t show order numbers, press Tab to open the vendor’s POs lookup list. The lookup list show the vendor’s open orders. Double-clicking on an order from the lookup list copies it to the invoice line item.
8 A media invoice can be distributed to many different broadcast or insertion order me-dia buys. Buys are reconciled with invoices using the order’s line number. The line number links the ordered amount with the invoice’s actual cost.
9 For broadcast orders, enter the number of spots that actual-ly ran here. These actual spots will be reconciled with order’s planned spots.
10 The invoice’s gross amount is the total cost of all of the spots on the line item, includ-ing your commission. The difference between the invoice’s gross amount and the order’s gross amount will be billed (or
When the “automatic WIP accrual” option is enabled, accrual entries are created from media billings for the media’s estimated cost, and then reconciled with the actual costs from the vendor’s invoices—the media accrual invoices.
Media Accrual Invoices
credited, if fewer spots actually ran) to the client.
11 The commission percent-age is used to calculate the invoice’s net amount. The net cost is what the agency pays for media, not what the client was billed.
12 The dGL is the media cost account, which is debited with the invoice’s net cost when the invoice is posted.

4-24
Add Credit Card Statement
Add Credit Card Statement
i
p
o
y u
t
rew
q
1 Choose the credit card that corresponds to the statement being entered. This list is generated from the Credit Cards Preferences window. When selecting a credit card it will automatically enter the vendor code and cGL account associ-ated with this credit card.
2 Enter the statement’s closing date here. This date will also be used to auto-generate the invoice number.
3 This pay date prints on the
invoice aging as well as being used in the Auto-Pay Payables feature in Checkbook where a user can choose to list all invoices due through a certain pay date. Make sure a date is entered to allow enough time for the payment to post against the credit card to avoid a late charge or interest to be changed against the card.
4 Enter the invoice number here. Clients & Profits X will auto-generate an invoice number that’s a combination of
the vendor code and the state-ment’s closing date, which will always ensures a unique invoice number. However, this number can be overwritten if so desired. 5 Enter the invoice period here. Choose into which accounting period this statement should go. It will default to the cur-rent accounting period in the Accounting Periods preference window.
6 New activity includes charg-es, refunds/credits, and interest
Clients & Profits X has made this process of paying open A/P invoices with a credit card easy to do through the Add Credit Card Statement window.
a
s
Adding a credit card statement has all the benefits of adding a job cost A/P invoice, where job costs & overhead charges can be added on one invoice. However, it has an additional benefit: it can pay any A/P invoice with an outstanding balance. It’s not uncommon in today’s agency to pay off A/P invoices with a credit card for reasons such as earning credit cardbenefits (e.g. frequent ffllier miles) to addressing a temporary cash f low pinch.
4-25
Paying open A/P invoices with a credit card is done when adding the monthly credit card statement, not at the time the invoice was paid by the credit card. An A/P in-voice can be marked as paid by a credit card when it is added to expedite this process by pre-selecting this invoice as paid in the Add Credit Card Statement window.
for the statement period. New activity does not include prior payments applied or the previ-ous balance, which are used to calculate the statement’s new ending balance. However, the statement’s ending balance should equal the balance of this credit card’s cGL account in the general ledger after this state-ment is posted. The only time the statement’s ending balance will equal the statement’s new activity amount is when the card is paid off in full each month, preventing an interest charge.
7 When selecting a credit card it will automatically enter the vendor code and cGL account associated with this credit card. It’s recommended to have a unique cGL for each credit card.
8 Enter an invoice description here. Any notes pertinent to this statement may be entered here, such as explanations for certain credits, late charges, etc. one
may find helpful if this invoice were later reviewed by another person. The distribution on a credit card statement includes three areas. Interest, paying invoices, and the job cost/over-head distribution.
9 Clients & Profits X will auto-select those open invoices entered as being paid by this credit card. However, if an in-voice was not entered as being paid by this credit card, but was later paid by this credit card, it can be manually selected for payment in this window. The balance due on the invoice will be automatically entered into the amount field.
10 The remaining charges on the statement had not already been entered as A/P invoices, so they will be added for the first time through the credit card statement. Enter them against job tasks and overhead expense account accordingly. When selecting a job and a task, the auto-entered markup
Add Credit Card Statement
percentage and job cost dGL account will pull from this task’s settings on that job ticket. For overhead charges, enter the job number as NONE and press tab. C&P X will move the cursor to the Net Amount field (since job tasks don’t ap-ply to overhead costs), and after a Net Amount is added, when pressing tab it will jump the cursor to the dGL field to enter the overhead expense account (since markups also don’t apply to overhead costs).
11 The total amount of unen-tered charges appears here.
12 Once the statement’s new activity amount equals the total interest, the amount paid column in the invoice selection window, and the net amount column in the job cost/overhead distribution window, then the invoice can be saved.

4-26
Importing Credit Card Statements
Importing Credit Card Statements
od
s
ap
r
ew
q
t
u
y
i
Credit card statements imported as unposted A/P invoices. Once posted, they are paid from the checkbook just like other vendor invoices.
1 Choose a credit card from the account pop-up menu. This will be the account you will be reconciling.
2 Date is entered as either the date when the statement was imported or as the date printed on the statement.
3 Pay date indicates when you plan to pay the invoice. This date is used to schedule pay-ments by the cash flow reports and appears on the Accounting calendar.
4 The accounting period indicates which G/L period will be updated when the invoice is posted. Any unlocked period can be chosen.
5 The invoice number identi-fies the payable on accounting reports. Since credit card statements aren’t numbered like conventional invoices, the number is calculated as the vendor code plus the file name. You can change it, but the invoice number you enter must be unique. A warning appears if you enter in a number that has
already been used for the same account.
6 The cGL is one of your Ac-counts Payable G/L accounts. The default A/P account is cop-ied from Preferences, but can be changed. When the invoice is posted, its amount due will be credited to the A/P account.
7 Use the description to describe the purchases . It appears on the A/P list but not on job reports (which show the notes entered for each cost entry).
Clients & Profits X can import Quicken-formatted credit card statements into Accounts Payable. These statements, which are downloaded from the credit card company’s web site, contain every transaction made on the account for the billing period. Importing is faster since it saves you from manually typing in each transaction every month.
f
4-27Importing Credit Card Statements
8 The amount due is the bal-ance owed to the credit card company.
8 Click on the notecard button to enter a note documenting a selected credit card job cost or expense. For billable job costs, these notes appear on job cost reports and on the client’s invoice detail report.
9 The imported transactions are listed by merchant and amount just as the appear on the printed statement.
10 The job and task are es-sential for accurate accounting of job costs purchased on credit cards. . Tabbing past the job number verifies that the job is valid. The jobs lookup list can be used to find a specific job. If the credit card expense is for overhead, enter “NONE” as the job number. The task identifies where the cost goes on the job ticket.
11 Each purchase’s descrip-
Every one of your company’s credit cards should be set up as an account in Preferences. As statements are import-ed, Clients & Profits X builds a list of the merchants you use. By entering each merchant’s job, task, and debit G/L account, future statements will be imported more accurately and completely.
1 Each of the company’s credit cards should be added as its own account with its own cG/L. This account will then be used automatically each time the account’s statement is imported.
2 Use the add, edit, and delete links to add new credit card ac-counts as well as make changes to existing accounts.
3 The names of the mer-chants/payees from which you purchase are imported into Preferences each time you import a statement. Any job, task, and dGL (either a job cost or expense account) you enter for a merchant will be used automatically next month when the new statement is imported. Jobs and tasks are only needed
for merchants that supply bill-able goods and services; leave those fields blank for overhead suppliers.
4 Click the delete link to delete the selected merchant/payee. This won’t affect any existing statements. Without a merchant, you’ll always have to enter a job, task, and dGL each time a statement is imported.
Merchant names are imported into Preferences automatically. Giving them default jobs, tasks, and dGL accounts will automate your cost accounting.
tion is imported directly from the credit card statement. For accountability reasons it can’t be changed, since it needs to match exactly what’s on your printed statement. However, you can enter a note about the pur-chase by clicking the Notecard button (see below).
12 Click on the notecard but-ton to enter a lengthy descrip-tion for a selected credit card expense.
13 The cost is the amount that you were charge for each trans-action by the merchant.
r
e
wq
14 Each transaction gets a debit G/L account, or dGL. When the statement is im-ported, the default expense account is copied from Prefer-ences. If the merchant has a default dGL, then it is used instead. A debit JE is created for each transaction when the invoice is posted.
4-28
Printing A/P Reports
Printing A/P Reports
Accounts payable reports summarize invoices, showing what you’ve pur-chased from vendors, by job and G/L account.A/P reports can be used for reporting job costs, tracking invoices by vendor, and auditing your purchases by G/L account. There are several different reports that show your payables from various perspectives.
Invoices can be summarized for any period of time (choosing either invoice date or date posted), for one period or all periods, and for one vendor or all vendors. These options let you find the invoices for a specific purpose, such as the quarter’s purchases for vendor ABC.
A/P reports show only posted invoices; un-posted invoices appear only on proof lists.
■ Accounts payable reports are different from vendor account agings, since they show both paid and unpaid invoices (aging reports show only unpaid invoices).
Tips for printing A/P reports
■ Invoices are selected primarily by invoice date or date posted. This option lets you show only invoices added in July, for example, instead of the entire year. By entering a range of dates, you can select all invoices added today, last week, or all month—whatever time period you need. There’s no limit to which range of dates you can use.
■ One or more reports can be printed at once by clicking on a report’s name, but all reports will use the same selections. Reports can be printed then reprinted with different selections, as often as needed.
■ You can print A/P reports to screen (for a quick on-screen preview), the printer (for a hard copy), or to disk (to create a text file that can be opened and edited in a spreadsheet) by choosing an option from the print to pop-up menu.
■ To show the invoice description, click on the Show Description option. This option makes your A/P reports longer, but more descriptive.
To print A/P reports
1 Click the (i.e., Print Reports) button, or choose File > Print A/P Reports.
2 Select invoice date or date posted from the From pop-up menu, then enter a range of dates. 3 Select an account-ing period, or choose All Periods to see invoices by date only.
4 Enter a client number, or leave the selection as ALL.
To see invoices for one accounting period only, regardless of date, choose a period from the pop-up menu then enter a very large range of dates (e.g., 1/1/02 - 12/31/02).
5 Select the report you wish to print.
6 Click Print.
Printing Payables A/P reports can be printed to the screen, the printer, to the computer’s Clip-board, or exported to a Microsoft Excel using the Print to pop-up menu.

4-29Printing A/P Reports
Accounts Payable Reports
The A/P List - Invoices by Date provides a concise checklist of all invoices added for a time period, but does not show the line item detail.
The A/P List - Invoices by Vendor shows all invoices added for a time period and subto-tals by vendor number.
The A/P Journal shows invoices along with line item and G/L details. Use the A/P Journal to get a detailed listing of costs for a time period.
The A/P Summary (Costs by dGL) shows all invoices added for a time period and subto-tals by the debit general ledger account.
The Vendor Discounts Analysis shows all invoices added for a time period, their current balance, and whether or not a payment discount was taken.
The Open Client-Paid Payables report shows unpaid vendor invoices that have been billed to and paid by clients. If you only pay vendors once the client has paid you, then this report is essential. Together with the Vendor Aging report, it’s how you’ll know which invoices to pay now.
The Vendor Purchases Analysis summarizes by vendor total purchases for a time period and what percentage of total purchases each amount represents.
The Recurring Payables Pending report shows all pending invoices for a vendor within a specified time period. Once an invoice is created, it no longer appears on this report.
The Vendor Last A/P report lists active vendors and the date of their last purchase. It’s an easy way to see which vendors need to be made inactive—or used again.
A/P List - Invoices by Date
A/P List - Invoice by Vendor
A/P Journal
A/P Summary (Costs by dGL)
Vendor Discounts Analysis
Open Client-Paid Payables
Vendor Purchases Analysis
Recurring Payable Pending
Vendor Last A/P
Lists
Journals
Analysis
Miscellaneous

4-30
1 Since time cards are meant to be used throughout the day, today’s time card appears automatically. You can see the week’s time cards by clicking on the previous day and next day arrows.
2 The time card has a stopwatch that can track your time on a project while you’re working. The stopwatch works by remembering when you’ve clicked the start and stop but-tons for a selected job and task on the Time Card. To use the
stopwatch function, you first need to enter a job and task. Make sure that either the job or task is selected, then click the start button to start the clock. Later, click on the same job and task again then click the stop button to stop the clock. The elapsed time will be calculated and entered for you.
The stopwatch is just a short-cut, so it doesn’t dictate how your time is spent. You can still change the time worked on a job and task by changing the
hours—replacing the hours entered on the time card. 3 Click remove to delete an unsaved entry from the timecard. 4 Click print timecard to print a report showing today’s time card, for quick reference.
5 To find the timecard for a specific day, enter the date into this field and click on the find button.
6 These links can be used
q w e r
t
y
ui
o
p
a
Time Cards
s
Time Cards
The daily time card keeps a daily record of the jobs and tasks on which you work for both billable and/or unbillable time for any client, including agency time.

4-31Time Cards
to see your tasks and update information for a job task. The show my tasks link can be used to automatically copy in all job tasks that are due for the user. All the user needs to do is fill in the hours. The show schedule link lets you see (and maybe edit) the job task’s due date, status specifications, and other details. Clicking the Finished checkbox removes the task from schedule and work to do reports. Any changes you make are saved immedi-ately. The show traffic link lets you see (and maybe edit) the job’s production status, billing status, milestones and traffic notes/next steps. The show notes button allows the user to add a lengthy description for the time entry.
7 Your name appears here for reference. You can only see and use your own time card. Your time card will open regardless of which computer you’re using anywhere in the shop.
8 The hours to go box shows the number of hours needed to meet the user’s planned hours for the day. Planned hours can be set in the Staff file for each day of the week.
9 Many different jobs and tasks can a be entered onto the day’s time card. If you don’t know a job number or a job task, leave the field blank, then press Tab to open the Lookup List.
10 Each time entry can be marked as overtime. Overtime
Time is entered in numbers (e.g., 2.75 hours) and not in minutes (e.g., 35 minutes). Cost and billing rates are applied automatically when the time card is saved; they can’t be seen or changed on the time card.
is billed at different (and usu-ally higher) rates than regular time, using an overtime rate from the Staff file.
11 Today’s hours shows how many hours are entered so far. An option can be set in your Staff record to force you to ac-count for a minimum number of hours each day.
12 Click cancel to stop entering time. Clicking Cancel doesn’t erase any time previous-ly saved on the time card, just the hours you’ve entered now. Previously saved time entries are marked with an X. Click save to save the jobs, tasks, and hours you’ve just entered. The time will automatically post when it is saved.
The weekly time card works similarly to the daily time card, but has fewer options for track-ing billable time to jobs and tasks. It’s designed to help staff members who routinely do the same work all week enter their time with little effort.
1 A staff member can use either the daily or weekly time
card (but not both) based on the access privilege set by the system manager. Anyone can use the weekly time card, but it’s more useful to administra-tive employees who work on relatively few jobs.
2 Any job and task can be entered onto the weekly time card. All hours will be saved as
billable or unbillable depend-ing on the job or task settings. Any notes entered applies to all entries for that job and task.
3 The staffer’s remaining hours to go are calculated automati-cally as hours are entered onto the weekly time card.
The weeky time card is a particularly handy way for administrative staffers to track their time quickly and easily.
e
w
q

4-32
Time Sheets
The need to keep detailed, accurate records of how everyone in the shop spends their time is vital to staffing, billing, productivity, and profitability. Unlike other accounting systems, time keeping is a fundamental feature in Clients & Profits X. That’s why there are so many ways to track time, whether it’s billable or unbillable.
Time can be tracked either through daily time cards, weekly time cards or time sheets. There’s no real difference between them; in fact, time entered on time cards becomes a time sheet when the time card is saved. But the time card has the advantage of being available to users all day, while they’re working. The time sheet, in comparison, is designed for users who enter their time weekly, not daily, or in agencies that have one person input the time for all staff members.
Time added into a time sheet is posted as it is saved—so jobs, tasks, and cost reports are updated immediately. Unlike time cards, the time sheet has the option to show cost and billing rates. This option, which can be set for each user, lets a user adjust cost and billing rates. Time entries can be added, edited, and deleted as needed—any time, if the user has the necessary access privileges. There are no limits to how many time entries can be added. Any time entry can be made unbillable by unchecking the Billable checkbox; if so, the time’s cost amount will appear on the job, but the billable amount will be zero.
Time reports can be printed daily, weekly, or for any period of time. Time reports can show time by staff member or for one job number. The time card reports analyze the week’s time by department or team, for better account-ability. Productivity reports, which are printed from Snapshots, show total hours by staffer, task, client, or job—and are excellent ways to analyze how people work.
As a time saver, Clients & Profits X can import Tab-delimited time entries exported from applications such as Microsoft Excel, Timeslip’s LapTrack, FileMaker, and even custom programs created just for tracking hours. While importing time has it’s benefits, keep in mind that users aren’t con-nected to the Clients & Profits X database so there is nothing to prevent users from entering incorrect information (i.e., wrong job number, wrong tasks, entering the same hours twice, etc.) nor will they see the over-budget alerts for time.
If you choose to import time, you need to use a program that saves hours into a generic “text” file. This text file, which has a special format and contains only the raw data and no column headings or calculations, is then copied into Clients & Profits X as unposted “imported” time entries. Each time entry is validated as it is imported and billing rates are automatically added. If any kind of error is found (such as an invalid job number, nonexistent task, wrong initials), the entry is marked as “bad” and won’t be posted so that it can be edited or deleted. These imported time entries become regular Clients & Profits X time sheets once they are verified and posted.
Time Sheets
In most shops, freelancers are treated like employees—their hours are added into time sheets. But what about the freelancer’s invoice? The answer depends on the freelancer’s time sheets: if you give the freelancer a billing rate, but no cost rate, then just his or her billable hours are posted to the job as an unbilled cost. Since the billable time is already on the job, the freelancer’s invoice is added as a non-billable A/P invoice (it will only have a cost amount). The freelancer is added as both a staff member and a vendor, but with different numbers (ex: staff initials ABC vs. vendor number AC) to keep them separate on cost reports.
■ Time sheets don’t affect the General Ledger. Clients & Profits X uses time sheets for productivity and job costing, but not payroll. Your financial statements show payroll costs from the checkbook or manual journal entries.
Time sheets, freelancers, and the General Ledger
Time sheets and billing rates
Clients & Profits X gives you a variety of ways to program rates on time sheets, especially billing rates. This means you have the flexibility to set rates by staff member, job task, or client. They are applied automatically, making your time accounting more accurate.
Cost rates: Cost rates are set by staff member. Each staffer has a standard cost rate plus an overtime cost rate. Cost rates don’t vary by client, job, or task (since someone usually makes the same salary re-gardless of what they do). You can change the cost rate while adding a time sheet if you have the proper access privileges.
Billing rates: Billing rates are much more variable. To accommodate different clients, you can create special rates for staff members or clients. Or, job tasks can have special rates that guarantee the same billing rates regardless of who works on the task.
Jobs are assigned a billing rate based on the option always pull billing rate from task, staff or cli-ent. This option can be set up as a default in general Preferences, as well as by job type and even job task. This rate is then used on timesheets

4-33
Time Sheet Features
Feature How it works, how it’s used
Unlike the daily time card, time sheets let users enter their hours for the entire week at the same time. Entering weekly time sheets is fast and easy, even for the most computer-phobic creative.
Time sheets are designed for batch entry, which lets one person enter the time from many people. If users insist on keeping paper time slips, their hours can be entered weekly by an accounting clerk quickly and easily.
The integrated Import Time window imports specially-formatted text files from Excel, FileMaker, and any other custom time keeping program. These time entries are verified for accuracy during the importing process, and bad entries (i.e., entries with invalid clients, jobs, tasks, etc.) are flagged. Only accurate time entries are then posted to time sheets. Bad entries can be fixed then posted.
Each morning the C&P TimeCop checks every user’s previous day’s time card/time sheet, comparing their actual hours worked with their planned hours. Users who haven’t logged enough hours are notified by e-mail to finish yesterday’s time card (and so is their supervi-sor). The C&P TimeCop can be set to check a user’s daily time card/time sheet when they quit Clients & Profits X, prompting them to finish entering their hours before the application can quit.
Every user can have an automatic budget alert that warns them when they’re spending too much time on any particular job task. Every user’s budget setting can be customized, so different users can have different kinds of warnings (i.e., some more hostile than others, depending on the person).
Any time entry can be marked as overtime. Special overtime rates can be set up for each user, which are applied to overtime entries. Overtime reports will show who’s working the most overtime.
Every time entry can contain a long description to explain the work performed. These notes appear on job cost and invoice detail reports. They can be invaluable for documenting your hours to clients.
Users have special access privilege settings to time sheets, including the ability to see (or not see) and change their billing rates.
If a user can see billing rates on time sheets, he or she can enter custom billing rates on particular time entries. This flexibility gives you precise control over how time is billed to clients.
Time sheets for freelancers can be summarized on special time and productivity reports, helping you analyze the value of freelance time vs. staff time on each client.
Routine time sheets for administrative staff can be cloned into the current week. For people who’s time keeping doesn’t vary much, cloning saves the effort of rekeying the same hours every week.
Every time entry tracks its billing status. Billable time tracks when it was billed, displaying the client’s A/R invoice number, billed date, and billing amount. When the client eventually pays the invoice, the payment date is posted back to the time sheet.
Time and productivity reports analyze staff time from many perspectives, for any day, week, month, or year. These reports provide invaluable insights into how people spend their time.
Users enter time for entire week
Batch time entry
Import time
TimeCop
Budget warnings
Overtime
Time entry notes
Show/hide cost/bill rates
Customizable billing rates
Freelance time tracking
Clone time sheets
Billing status
Time, productivity reports
Time Sheets

4-34
The Time Sheet window
Time Sheets
1 Use the arrow buttons to find the previous and next time entries for the selected staff member.
2 Time sheets can be eas-ily added, cloned, edited, or deleted. Click the add new time sheet button to add a new time sheet for a staff member. Or click on the clone time sheet button to make an exact copy of an existing time sheet. Click the edit button to edit the selected time entry. If the time entry has already been billed, nothing can be changed.
However, if the time entry is unbilled, almost everything can be changed. If you change the job number and task, the time will be removed from the original job task and posted to the new one. Changing the hours or rates recalculates the net cost and gross amounts. (If you don’t have access to rates, they’ll be invisible.) You can change the entry’s billing status (from unbilled to unbillable, for example) by simply typing over the existing status. Any unbilled time entry can be de-
q w e r t
y
u
i o p a s
leted by clicking on the remove button. Once a time entry has been billed it can’t be deleted. When a time entry is deleted, the cost and gross amounts are deducted from the job task. To delete the entire time sheet, click the delete time sheet button. Any unbilled time entry on the time sheet will be deleted (if a time entry has been billed, it will be skipped). When a time sheet is deleted, the cost and gross amounts are deducted from the job task for each time entry. Remember, deleting a time sheet is perma-
fd
The Time Sheets window shows both hours entered from weekly time sheets as well as from daily time cards.

4-35
nent, although the time can be reentered again.
3 Time entries can be imported from other applications such as Microsoft Excel, Filemaker, or custom programs by using the Import button.
4 Time sheets can be approved on-line by a department man-ager, by clicking on the approve button.
5 Click on the print reports button to print time sheet reports.
6 To find your time sheet for a specific date, enter in the date here. To find time for a differ-ent staff member or by time entry number, click on the find more link.
7 If at least one time entry has been approved on a time sheet, the approval box will appear in the Time Sheet window with the user’s initials who approved the time entry and the date it was approved.
8 The staff member’s name appears here for reference.
9 Each time entry on a time sheet has a date that shows when the work was performed. To see a time entry’s complete details, double-click on a time entry.
10 Every time entry, even unbillable staff time, has a job number. Time and productivity reports can analyze time by job using this number.
11 Every time entry has a job task. When a time entry is saved, its cost and gross amounts (hours x cost and billing rates, respectively) are posted back to the job task’s totals.
12 The client number is copied from the job ticket when the time entry is added. Time re-ports can be printed by client.
13 Hours are entered as num-bers with two decimal places
Time Sheets
A time sheet is a collection of a day’s time entries for one person. Each time entry is a separate record of a person’s work containing the date, job number, task, the num-ber of hours, cost and billing rates, and a short description.
(e.g., 2.75 hours), letting you bill in as small as 5 minute increments. Overtime entries will appear with an “X” in the checkbox.
14 Net is the cost amount of the time entry, based on its hours and cost rate. The net cost increases the job task’s labor total. Clients don’t see the net cost amount. Unbillable time has a net amount (since it is an actual cost), but no gross amount.
15 Gross is the billable amount of the time entry, based on its hours and billing rate. The gross amount increases the job task’s unbilled total. This is the amount the client will eventu-ally be billed. Unbillable time has no gross amount.
16 Each time entry can be a descriptive note to explain what work was performed for these hours. These notes appear on job cost reports, as well as the Invoice Detail report that the client can get with their invoice.
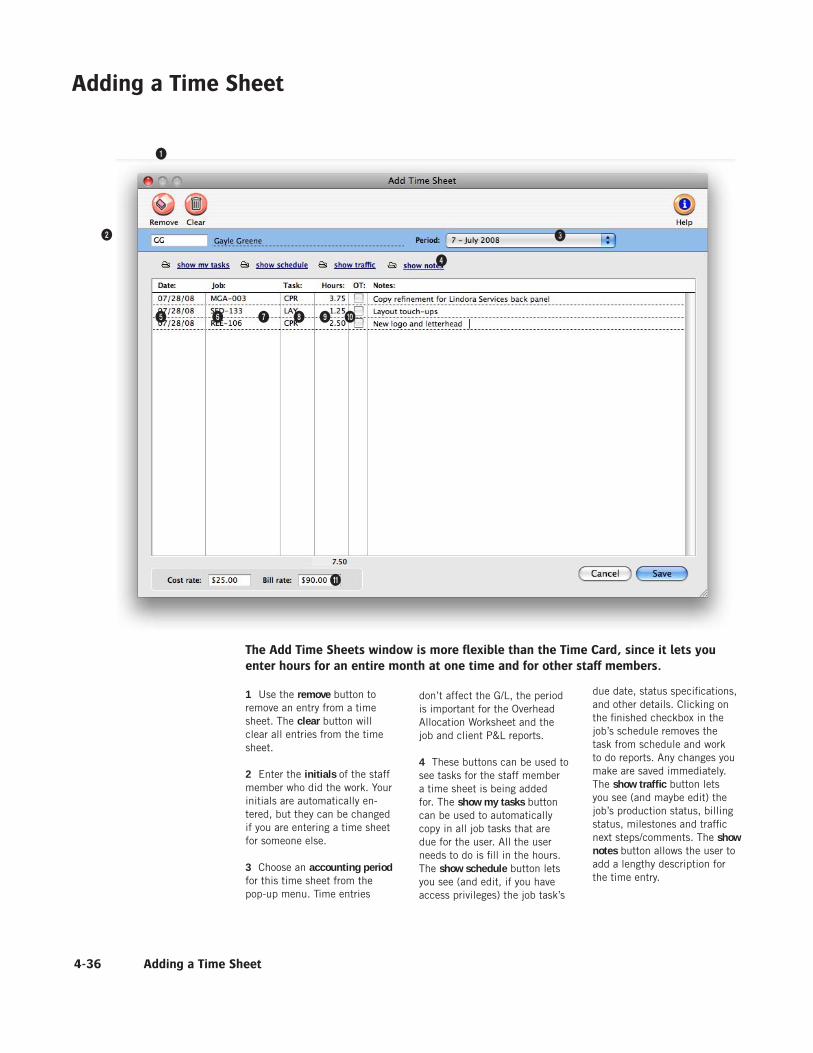
4-36 Adding a Time Sheet
ut
q
w
r
y o
e
i
Adding a Time Sheet
p
a
1 Use the remove button to remove an entry from a time sheet. The clear button will clear all entries from the time sheet.
2 Enter the initials of the staff member who did the work. Your initials are automatically en-tered, but they can be changed if you are entering a time sheet for someone else.
3 Choose an accounting period for this time sheet from the pop-up menu. Time entries
don’t affect the G/L, the period is important for the Overhead Allocation Worksheet and the job and client P&L reports.
4 These buttons can be used to see tasks for the staff member a time sheet is being added for. The show my tasks button can be used to automatically copy in all job tasks that are due for the user. All the user needs to do is fill in the hours. The show schedule button lets you see (and edit, if you have access privileges) the job task’s
due date, status specifications, and other details. Clicking on the finished checkbox in the job’s schedule removes the task from schedule and work to do reports. Any changes you make are saved immediately. The show traffic button lets you see (and maybe edit) the job’s production status, billing status, milestones and traffic next steps/comments. The show notes button allows the user to add a lengthy description for the time entry.
The Add Time Sheets window is more flexible than the Time Card, since it lets you enter hours for an entire month at one time and for other staff members.

4-37Adding a Time Sheet
Helpful, thoughtful, or just nasty warning alerts can appear when a staffer is near or over the job task’s estimated hours. Each user can have their own customizable message. Note, that a user’s alerts don’t appear if you are entering time for another staff member.
5 Each time sheet entry has a date. It’s important to use the time entry’s actual work date, since all of the job costs, productivity, and profitability reports use it. An accurate work date makes your time sheets more like a daily time log, which makes it easier to be account-able to clients.
6 Enter the job number here. If you’re not sure about a job number, leave it blank and press Tab. The jobs lookup list opens, listing the open jobs. Double-clicking on a job copies it to the time sheet.
7 If you have a standard task in your Staff record, it will be cop-ied to the time sheet automati-cally. You can change the task by typing over the standard task.
8 Enter the hours worked. Every time entry, including un-billable time, has some amount of hours. Enter the hours as numbers with up to two decimal places.
9 Click the OT checkbox to make a time entry “overtime.” Overtime entries can be billed at an overtime rate, which is defined for each user. Overtime entries can be analyzed sepa-rately on time and productivity reports.
10 Enter a short description of the work done in the notes field.
11 If you have access privi-leges to see rates, you’ll see the entry’s cost rate and bill rate here. These rates are used to calculate the time entry’s net and gross amounts. To make an entry unbillable, enter the bill-ing rate as zero. These amounts are calculated when the time sheet is saved.

4-38 Impost Time
Import Time
1 Use the arrow buttons to find the previous and next imported time entries.
2 Click the import button to begin importing time data from a standard “text” file, such as Microsoft Excel, Timeslip’s Lap Track, FileMaker, or your custom program. If you are synchroniz-ing time entries from the Clients & Profits X Palm O/S-based time card, click the import button to begin synchronizing. Once the files have been imported, the entries can be proofed, edited,
then posted.
3 Click the verify button to verify the client, job, task, and rates on imported time entries.
4 Use the edit button to make any changes to time entries. The remove button will remove one time entry, while the delete all button will clear all imported time entries that haven’t been posted yet. The save button saves and posts all imported time entries. Bad time entries won’t be posted.
q
w e r t y
u
i
5 Click the print proof list but-ton to print a list of imported time entries. Since saved imported time entries become regular Clients & Profits X time sheet once they are verified and posted, proofing before saving is a good idea.
6 Use the setup sync button to setup and edit the synchro-nization settings of your Palm O/S hand-held computer. You’ll need to edit the Setup Palm Sync - Time window periodically to update it with current jobs and tasks.
Clients & Profits X imports a standard “text” file to capture time sheet, or synchro-nizes with the Clients & Profits X Palm O/S-based time card.

4-39
7 The name of the staffer you are importing time for appears here.
8 Every imported time entry lists the entry’s work date, job number, task, client, hours, and a time entry note. The cost and billing rates are calculated au-tomatically based on the same formulas as regular time sheets. Entries marked as “bad” con-tain invalid data (e.g., invalid job numbers, nonexistent tasks, or wrong user initials). Bad en-tries can be edited or deleted.
Import Time
If you change the job number and task, the time will be removed from the original job task and posted to the new one automatically.

4-40
Time Reports
Time Reports
Time reports summarize hours from time cards and time sheets, showing where and how the staff spent their time. They can be used to analyze time by job, client, staffer, or task. Time can be summarized for any range of dates (e.g., this week, last month, year-to-date, etc.) by work date or date posted, for one period or all periods, and for one staffer or all staff members. These options let you find the time for a specific person, for example, to check their total hours.
Time entries are selected by work date or date posted using the ...from pop-up menu. You can also print time for only one accounting period by using the period pop-up menu. This option lets you show only time added in July, for example, in addition to the work dates.
Tips for printing time reports
■ By entering a range of dates, you can select all time added today, last week, or all month—whatever time period you need. There’s no limit to which range of dates you can use.
■ The summary reports are differentbecause time list reports show day-to-day time in detail, while the summary reports show totals only.So the time summary reports are much smaller (and probably easier to read)than the time list reports. But if you need the most detail, print time list reports instead.
■ You can print time reports to the window (for a quick on-screen preview), the printer (for a hard copy), or to disk (to create a text file that can be opened and edited in a spreadsheet).
■ To show the time entry notes, click on the show notes option. This option makes your time reports longer, but more descriptive.
To print time reports
1 Choose Accounting > Time Sheets.
2 Click the (i.e., Print Reports) button, or choose File > Print Time Reports.
3 Select work date or date posted from the from pop-up menu, then enter a range of dates. 4 Select an accounting pe-riod, or choose All Periods to see time by date only.
5 Enter a staff member’s initials or leave the selec-tion as ALL to select time for all staffers.
To see time for one ac-counting period only, regardless of date, choose a period from the pop-up menu then enter a very large range of dates (e.g., 1/1/08 - 12/31/08).
6 Click on a report then select the report’s options.
To show the time entry notes, click on the show notes option. To hide the rates on the time reports, click on the show hours only option. Use this option when printing time summaries for your staff members. They’ll see the hours but not the rates or dollar amounts. If you don’t have access to rates, this option will be checked automatically. Select to show freelance time only to have only the staff members marked as freelancers appear on the time report.
7 Click Print.
Time reports can be printed to the screen, the printer, to the computer’s Clipboard, or ex-ported to disk using the Print to pop-up menu. Any report export to disk can be opened and edited in a spreadsheet program like Microsoft Excel.

4-41Time Reports
Time Reports
The Time by Staff report lists all time entries in detail, for a select period of time, and subtotals the entries by staff.
The Time by Task report lists all time entries in detail, for a select period of time, and subtotals the entries by task.
The Time by Job report lists all time entries in detail, for a select period of time, and subtotals the entries by job.
The Time by Client report lists all time entries in detail, for a select period of time, and subtotals the entries by date, then by client.
The Time Audit List shows all time entries in detail, for a select period of time, and subtotals the entries by date. This list shows which entries are marked as overtime.
The Unbillable Time report shows only those time entries marked as ‘Unbillable’.
The Staff Time by Client report shows the total hours each staff member worked and summarizes their time by client.
The Staff Time by Job report shows the total hours each staff member worked and sum-marizes their time by job.
The Staff Time by Task report shows the total hours each staff member worked and summarizes their time by task.
The Client Time by Staff report summarizes the total hours worked by staff for each client.
The Client Time by Task report summarizes the total hours worked by task for each client.
The Job Time by Staff report shows the total hours worked on each job and summarizes the time by staff.
Time by Staff
Time by Task
Time by Job
Time by Client
Time Audit List
Unbillable Time
Staff Time by Client
Staff Time by Job
Staff Time by Task
Client Time by Staff
Client Time by Task
Job Time by Staff
Lists
Summaries
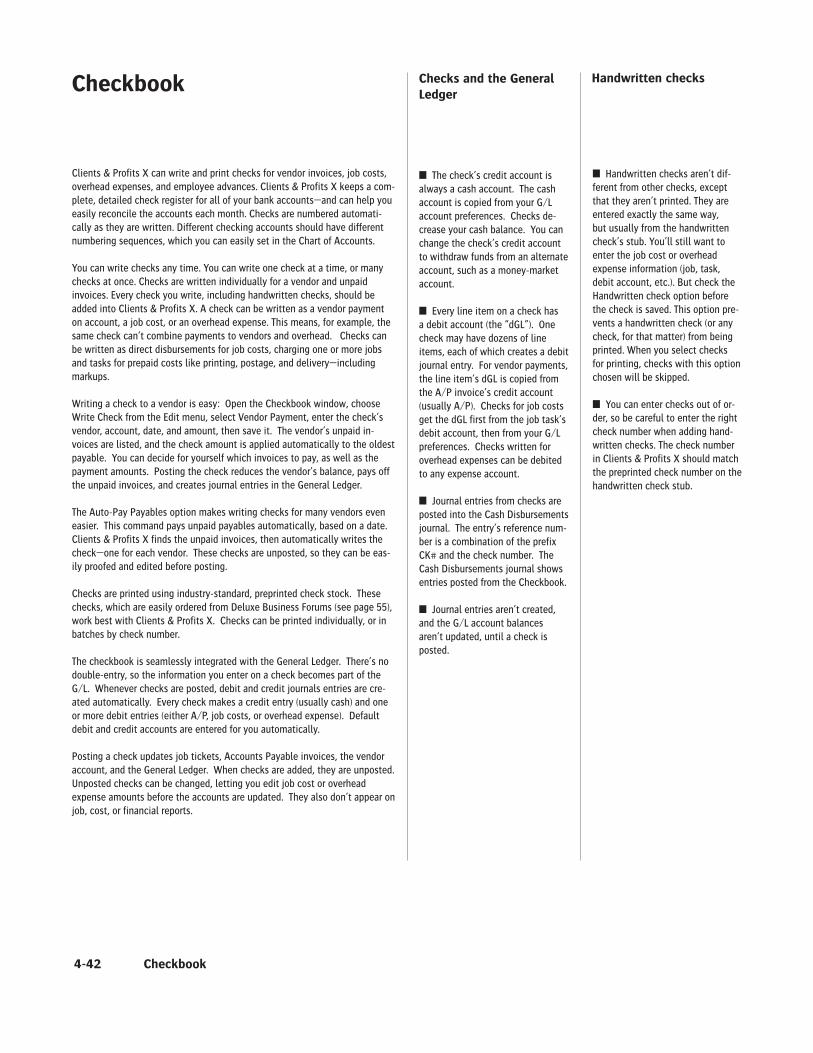
4-42
Checkbook
Checkbook
Clients & Profits X can write and print checks for vendor invoices, job costs, overhead expenses, and employee advances. Clients & Profits X keeps a com-plete, detailed check register for all of your bank accounts—and can help you easily reconcile the accounts each month. Checks are numbered automati-cally as they are written. Different checking accounts should have different numbering sequences, which you can easily set in the Chart of Accounts.
You can write checks any time. You can write one check at a time, or many checks at once. Checks are written individually for a vendor and unpaid invoices. Every check you write, including handwritten checks, should be added into Clients & Profits X. A check can be written as a vendor payment on account, a job cost, or an overhead expense. This means, for example, the same check can’t combine payments to vendors and overhead. Checks can be written as direct disbursements for job costs, charging one or more jobs and tasks for prepaid costs like printing, postage, and delivery—including markups.
Writing a check to a vendor is easy: Open the Checkbook window, choose Write Check from the Edit menu, select Vendor Payment, enter the check’s vendor, account, date, and amount, then save it. The vendor’s unpaid in-voices are listed, and the check amount is applied automatically to the oldest payable. You can decide for yourself which invoices to pay, as well as the payment amounts. Posting the check reduces the vendor’s balance, pays off the unpaid invoices, and creates journal entries in the General Ledger.
The Auto-Pay Payables option makes writing checks for many vendors even easier. This command pays unpaid payables automatically, based on a date. Clients & Profits X finds the unpaid invoices, then automatically writes the check—one for each vendor. These checks are unposted, so they can be eas-ily proofed and edited before posting.
Checks are printed using industry-standard, preprinted check stock. These checks, which are easily ordered from Deluxe Business Forums (see page 55), work best with Clients & Profits X. Checks can be printed individually, or in batches by check number.
The checkbook is seamlessly integrated with the General Ledger. There’s no double-entry, so the information you enter on a check becomes part of the G/L. Whenever checks are posted, debit and credit journals entries are cre-ated automatically. Every check makes a credit entry (usually cash) and one or more debit entries (either A/P, job costs, or overhead expense). Default debit and credit accounts are entered for you automatically.
Posting a check updates job tickets, Accounts Payable invoices, the vendor account, and the General Ledger. When checks are added, they are unposted. Unposted checks can be changed, letting you edit job cost or overhead expense amounts before the accounts are updated. They also don’t appear on job, cost, or financial reports.
Checks and the General Ledger
Handwritten checks
■ Handwritten checks aren’t dif-ferent from other checks, except that they aren’t printed. They are entered exactly the same way, but usually from the handwritten check’s stub. You’ll still want to enter the job cost or overhead expense information (job, task, debit account, etc.). But check the Handwritten check option before the check is saved. This option pre-vents a handwritten check (or any check, for that matter) from being printed. When you select checks for printing, checks with this option chosen will be skipped.
■ You can enter checks out of or-der, so be careful to enter the right check number when adding hand-written checks. The check number in Clients & Profits X should match the preprinted check number on the handwritten check stub.
■ The check’s credit account is always a cash account. The cash account is copied from your G/L account preferences. Checks de-crease your cash balance. You can change the check’s credit account to withdraw funds from an alternate account, such as a money-market account.
■ Every line item on a check has a debit account (the “dGL”). One check may have dozens of line items, each of which creates a debit journal entry. For vendor payments, the line item’s dGL is copied from the A/P invoice’s credit account (usually A/P). Checks for job costs get the dGL first from the job task’s debit account, then from your G/L preferences. Checks written for overhead expenses can be debited to any expense account.
■ Journal entries from checks are posted into the Cash Disbursements journal. The entry’s reference num-ber is a combination of the prefix CK# and the check number. The Cash Disbursements journal shows entries posted from the Checkbook.
■ Journal entries aren’t created, and the G/L account balances aren’t updated, until a check is posted.

4-43
Checkbook Features
Feature How it works, how it’s used
The Auto-Pay Payables window automatically cuts checks for unpaid payables. Unpaid invoices can be selected by vendor, A/P account (such as Media Payables), and up through a scheduled pay date.
Checks can be written for vendor payments, which are distributed automatically to a vendor’s unpaid invoices. You’ve got complete control over which invoices are marked for payment by each check. The invoices paid for a check appear on the check stub.
Checks can be written directly for job costs when there is no Accounts Payable invoice, such as postage. These checks can be distributed to dozens of different jobs and task, and include markups.
Checks can be written for overhead expenses, like rent. One overhead check can be ex-pensed to dozens of different debit accounts, for flexible cost accounting.
Checks can be written for employee expense advances. Advance checks update a special G/L account so that employee receivables appear on the financial statements. Expense advance checks are reconciled through the special Employee Expense Reports window in Expenses. When a employee enters their expense report, they are either prompted for a personal check (if they owe the company money) or a check is cut to them (if they spent more than their expense advance) automatically.
Any check can be marked as “handwritten” when added, which prevents it from being printed during the next check printing run.
Checks can be written for dozens of different checking accounts. Each account is set up as a separate G/L number. Checks are numbered separately for each checking account.
Each bank account can be reconciled on-line. The Bank Reconciliation window lists the account’s checks, deposits, etc. Clicking on an entry clears it, removing it from next month’s reconciliation.
When a vendor payment is distributed to invoices, adjustments and discounts can be taken without making separate entries. When the check is posted, special JEs will be created for the adjustments.
These useful tools let you renumber a batch of misprinted checks, void one or more checks, and add vendor credits.
Year-end 1099 reports and forms are printed using vendor information entered onto the year’s checks, including the vendor’s tax ID.
The diary records the when, where, and who was involved for major events and meetings. Because the diary is easily accessed, details of conversations and events are preserved. The record can also be e-mailed for streamlined communication.
Auto-pay payables
Vendor checks
Job cost checks
Overhead expense checks
Employee expense advances
Handwritten checks
Multiple checking accounts
Bank reconciliation
Adjustments, discounts
Check tools
Year-end 1099s
Vendor diary
Checkbook

4-44 Checkbook
The Checkbook Window
1 Use the arrow buttons to find the previous and next checks.
2 The auto-pay button can be used to automatically cut checks for unpaid payables selected by vendor and A/P account for through a selected pay date.
3 Checks can be easily added, edited, deleted, and redistrib-uted in the Checkbook window. Click the add button to write a vendor check. To add a dif-ferent type of check, use Edit
> Write Check. Checks can be edited by clicking on the edit button. To keep the check from becoming unbalanced, only the check date, memo, payee address, and 1099 information can be edited. To change the payee, amounts, jobs and tasks, paid invoices, or G/L numbers you’ll need to delete the check then reenter it. To delete a check click on the delete but-ton. Unposted checks will be deleted from the system. If it was the last-added check, its number will be reused. If the
check has already been posted, clicking the Delete button will instead void the check. Voiding a check leaves the original check intact, but changes the amount to “***VOID***” and makes reversing G/L entries. If the check’s distribution is wrong, click on the redistribute button.
4 Click on the print reports button to print checkbook re-ports. To print checks, click on the print checks button.
q
u
a
p
i o
s
d
f
g
l
y
trew
h
j
k
Clients & Profits X keeps a complete, detailed check register for all of your bank accounts—and can help you easily reconcile the accounts each month.

4-45
5 These toolbar buttons can be used to print cash disbursement reports and checks.
6 To find a specific check, enter the check number here. Use the find more link to find one or more checks by se-quence, check number, vendor, payee, or date.
7 Click on history to jump to a previously viewed check.
8 Your checking accounts are listed here. Any asset account from your Chart of Accounts can be marked as a checking account. Choosing an account from this pop-up menu displays its last-written check.
9 Click on the see checks but-ton to display a list of recently added checks for this checking account (see below right). Click-ing on a check in the list will display its details.
10 Checks are numbered au-tomatically as they are added. Each checking account has its own numbering series.
11 The check’s paid to (i.e., payee) name is copied from the vendor account, and is usually the vendor name. It indicates to whom the check was written. Check reports can be printed by payee as an option.
12 The date shows the date the check was added. It ap-pears on the printed check. Reports select checks by date.
13 The amount is the check’s total amount.
14 Checks have line items that contain the job cost, overhead expense, or A/P invoice informa-tion. A check’s distribution can be changed until the check is posted. Double-clicking on a line item shows the distribution item’s details.
15 The memo is a short description of the check. It appears on the printed check, checkbook reports, and on journal entries.
16 Checks that are marked as 1099 payments appear on the year-end 1099 report.
17 Checks that are marked as cleared have already been reconciled in the bank recon-ciliation.
18 The cGL is the check’s credit G/L account. Checks can be written from many different bank accounts simultaneously. Each checking account has its
Checkbook
Checks are numbered automatically as they are written. Different checking accounts should have different numbering sequences, which you can easily set in the Chart of Accounts.
own check numbering series. A check can be written for any open accounting period. The period determines which month is updated when the check is posted. The posted date is when the check updated A/P and the General Ledger. The posted date can be different from the check date. Check re-ports can be printed by posted date or check date.
19 The initials of the person who wrote the check appears here for reference.
The checking account’s recently activity can displays by clicking on the see checks button.

4-46
1 Enter the cG/L number for the bank account from which the check is written here. Each bank account has its own check numbering sequence, so the check is numbered automati-cally.
2 The bank account’s current account balance shows here for reference. The balance does not include unposted checks or deposits.
3 Checks are numbered automatically in sequence
as they are added. The next check number, which you can set, is copied from the Chart of Accounts.
4 Handwritten checks aren’t printed during check runs. 5 The date shows when the check was added. It appears on the printed check. Reports select checks by date added or date posted.
6 A check can be written for any open accounting period.
The period determines which month is updated when the check is posted.
7 Checks can be written to vendors for unpaid payables by entering a vendor number. Paid to lists the name of the company the check is written to, and is usually the vendor’s name.
8 The check’s amount will be applied to the vendor’s unpaid payables. The written amount is calculated automatically as you tab past the dollar amount.
q w
e r
t
yu
i o
p
a
Vendor Checks
Vendor Checks
Vendor checks can be written to one vendor only. Tabbing past the vendor code auto-matically copies in the vendor address and account balance to the check.
s
A vendor check pays off unpaid invoices from Accounts Payable. Oldest invoices are paid off first, using the auto-al-locate option, but can be changed. So you can decide which invoices should be paid with a check—and which ones shouldn’t. Vendor payments credit the cash account and debit the A/P liability account.

4-47
9 The auto-allocate option se-lects and pays unpaid invoices automatically. The vendor’s oldest invoices are paid first. When the check is saved, you’ll have an opportunity to fine-tune the check’s payments. To apply payment to selected invoices, uncheck the auto-allocate box. After saving, the Apply Vendor Payment window opens.
10 The check’s memo is a short description that appears on the printed check, check-book reports, and on journal entries.
11 The check’s address is cop-ied from the vendor account, but can be customized. Chang-ing the check’s address doesn’t affect the vendor file. The year-end 1099 report uses this address on its printed forms.
12 The option to include on year-end 1099 report flags this check as a vendor payment for tax reporting purposes. The 1099 setting is copied from the vendor automatically.
Vendor Checks
Discounts or other adjustments can be included with each payment, making it easy to track early-payment discounts offered by vendors. Adjustments and discounts debit your A/P account and credit your earned discounts account.
q
w
e r t y u i o
Vendor payments can be added for multiple vendor invoices and adjusted as added.
1 The check number and vendor name appear here for reference.
2 The check amount appears here.
3 Invoices with balances due are listed here. To pay an invoice (all or part), click on the checkbox.
4 The invoice date appears here. Invoices are automatically listed oldest to newest.
5 The unpaid invoice balance appears here.
6 Add any invoice adjustment amount here. When an adjust-ment is entered, Clients & Prof-its X automatically recalculates the payment amount to equal the invoice balance less the adjustment.
7 The general ledger account that will be credited is copied from the vendor account infor-
mation. It can be changed if needed.
8 Enter the amount of the invoice to pay. The invoice does not need to be paid in full, but the total payments need to equal the amount the check is written for.
9 The general ledger account that will be debited appears here and can be changed if needed.

4-48
q
w
e
r
t
y
Auto-Pay Payables
Auto-Pay Payables
The Auto-Pay Payables function automatically writes checks for unpaid vendor invoices. Invoices are selected by pay date, which is entered in Accounts Payable when invoices are added. Clients & Profits X then searches for ev-ery unpaid invoice through this pay date, groups them by vendor, then writes one check for each vendor. There’s no difference no difference between an automatically-written check and one you’ve added yourself. The checks aren’t posted, so they can be proofed and edited (or even deleted) before posting.
The Auto-pay function writes checks for selected payables, paying off the invoices automatically.
1 The pay through date lets you select payables you plan to pay up to a specified pay date. The pay date is scheduled when the vendor invoice was added, usually based on the vendor’s payment terms.
2 Invoices can be selected in three different ways. The all A/P G/L accounts option will se-lect all invoices through the pay date selected. The for one G/L option lets you auto-pay only overhead expense payables, for example, instead of all pay-ables, by entering the overhead
payables G/L number. The for one vendor option allows you to quickly write checks for a specific vendor only.
3 There are two other auto-pay options available. The auto-pay everything options selects all invoices for payment, creates check line items for each invoice’s balance due; if unchecked, you’ll be prompted to select which invoices should be paid. The select only A/P’s paid by clients option allows you to just select invoices that
have been billed to a client and the client’s payment has been received.
4 The checking account num-ber is entered in automatically from preferences, but can be changed.
5 The next starting check num-ber is entered in automatically, but it can be changed.
6 Checks can be written for any open accounting period. The period determines which month is updated when the check is posted.

4-49Auto-Pay Payables
q
w e
rt
y
ui
1 Click the print button to print a hard-copy printout of the Auto-Pay Payables window. Click the find button to choose a different set of invoices.
2 Unpaid invoices are selected for payment using the pay invoices through pay date. Any invoices without pay dates will be also be included.
3 Today’s date is automatically used as the check date, but it can be changed.
4 You can change the sort order of the unpaid invoices by clicking on a column heading.
5 Unpaid invoices are grouped by vendor, then sorted by pay date. You can change the order of the invoices by clicking on the column headings.
6 Click on the invoice’s check-box to select it for payment.
7 Each invoice is listed with their vendor code, vendor name, invoice number, pay date, and
balance due. 8 The amount paid is copied from the invoice’s balance, but can be changed.
9 An early-payment discount can be taken on each invoice by entering the discount amount.
o
The Auto-Pay Payables report can be printed out to show the invoices you have se-lected for payment.

4-50
Job Cost Checks
Job Cost Checks
i p
o
y
u
tre
wq
1 Enter the cG/L number for the bank account from which the check is written here. Each bank account has its own check numbering sequence, so the check is numbered automati-cally.
2 The bank account’s current account balance shows here for reference. The balance does not include unposted checks or deposits.
3 Checks are numbered automatically in sequence as they are added. The next
check number, which you can set, is copied from the Chart of Accounts.
4 Handwritten checks aren’t printed during check runs. 5 The date shows when the check was added. It appears on the printed check. Reports select checks by date added or date posted.
6 A check can be written for any open accounting period. The period determines which month is updated when the
check is posted.
7 Job Cost checks can be writ-ten to any payee. If the check is for a vendor, entering the vendor number will copy in the vendor name and address.
8 The check’s amount will be applied to the vendor’s unpaid payables. The written amount is calculated automatically as you tab past the dollar amount.
9 The check’s memo is a short description that appears on the printed check, checkbook
The job and task are essential for accurate cost accounting. Tabbing past the job num-ber verifies that the job number exists.
a
s
d f g h
Writing checks for job costs is similar to writing checks to vendors, but checks for job costs don’t pay outstanding A/P invoices. Otherwise, everything you’ll enter about a check is the same for all checks. A check can be written to anyone; they don’t have to be vendors, either. One check can be split over dozens of jobs and tasks. Any line item on a check can include a markup and a gross amount—which will be billed to clients. These checks appear on job cost reports.
j k
l

4-51
Writing checks for job costs saves you the step of entering the vendor’s invoice into Account Payable. If you pay job costs directly with checks, no invoice is necessary—just make sure no one adds the invoice by mistake.
reports, and on journal entries.
10 The check’s address is cop-ied from the vendor account, but can be customized. Chang-ing the check’s address doesn’t affect the vendor file. The year-end 1099 report uses this address on its printed forms.
11 The option to include on year-end 1099 report flags this check as a vendor payment for tax reporting purposes. The 1099 setting is copied from the vendor automatically.
12 Each job cost will be en-tered individually here for this invoice. A job cost check can be distributed among dozens of different jobs, tasks, and job cost G/L accounts.
13 The job and task are essential for accurate cost accounting. Tabbing past the job number verifies that the job number exists; if it isn’t cor-rect, the job Lookup List opens listing open jobs. Information
from the job task, such as the markup and billable status, will be copied automatically to the job cost line item. If you are mixing overhead expenses and job costs, enter in “NONE” for the job number.
14 The task determines which line on the job ticket will be charges for this cost. If you don’t know the task, leave the field blank then press Tab to open the job’s task lookup list.
15 This is the net cost amount the agency will pay. It is what this work cost the shop, before markups, fees, or commissions.
16 Enter the markup as a num-ber (i.e., 17.65, not .1765). You can use any markup per-centage. The gross amount is calculated automatically as the net times the markup percent-age.
17 Enter the gross (i.e., billable) amount. The gross amount will be automatically
Job Cost Checks
calculated for you, but it can be changed. To make the line item unbillable, enter the gross amount as zero. The invoice’s cost amount will update the job task, but it will not have an amount to bill the client. Also, if the job task is unbillable, the billable amount will be zero—and can’t be changed.
18 The debit G/L (i.e., dGL) is a job cost or expense account. It is copied from the job task, but can be changed.
19 The payment to go field shows the remaining check amount that needs to be distrib-uted in order to save the check. A check can be saved only when the total check amount matches the total net cost of the check line amounts.

4-52
Add Online Payment
Job Cost Checks
i
p
oy u
tr
ew
q
1 Enter the checking account’s G/L number here. The G/L ac-count number determines from which bank account this online payment was made.
2 Enter the online payment number. Online payments are numbered automatically based on the cash account’s G/L number. You can change the number by typing in a new number over the old. Changing the online payment’s number doesn’t affect the next pay-ment’s number -- it will be the
next online payment number in sequence.
3 Enter the check date here. This is the date the online payment was added. It does not affect posting or the General Ledger (unlike the period).
4 The accounting period deter-mines how this check will affect your financial statements. The current period is copied from Preferences > Accounting Pe-riods, but can be changed. An online payment can be posted
into any unlocked accounting period. 5 If the bank gave you a confir-mation (or transaction) number for this online payment, enter it here for reference. A confirma-tion number isn’t required.
6 The vendor number associates this check with a vendor ac-count. A check can only be writ-ten to one vendor. Tabbing past the vendor number copies the address and account balance to the check. The check’s address
Online payments affect the general ledger exactly like conventional printed checks, crediting a cash account and debiting a payables account.
a s
The online payments feature in Clients & Profits X lets you track payments made to electronically though your bank, in-stead of writing checks to vendors. Clients & Profits X does not make electronic payments directly. Instead, you’ll make the electronic payments from your bank’s online banking or bill-pay service then record the payments in Clients & Profits X. Online payments are added into Clients & Profits X through the checkbook, just like a conventional printed check.
1# 1$
a
1%

4-53
Each checking account has a separate numbering sequence for printed checks and online payments. You can record online payments into C&P X as soon as you make them, or record them later from your bank statement.
(which appears on the printed check) can be changed without affecting the vendor account. The vendor’s account balance is copied into the check amount; Clients & Profits makes an assumption that you’re paying off the vendor’s balance in full, as a shortcut. The vendor name is copied into the paid to (i.e., payee) name, but can be changed.
7 The paid to name appears on the printed check, so it can be edited to include an account number, mail stop, or some other kind of information.
8 Enter the amount you elec-tronically paid to the vendor, less any discounts or adjust-ments. that will be distributed to the vendor’s unpaid invoices. Tabbing past the check amount displays the written amount, which can’t be edited. You can write a check for more than the vendor’s balance; if so, one of the vendor’s invoices will be overpaid. When the online pay-ment is posted, the vendor will
have a credit balance. Later, this credit balance can be ap-plied to upcoming invoices.
9 The auto-allocate option will automatically pay off the ven-dor’s oldest invoices first. Using this option saves time when paying off many invoices for vendors like Federal Express, who send many invoices during the month. Even with the auto-allocate option, you can still change which invoices are paid with this online payment.
10 The memo describes the payment’s purpose (e.g., pay-ment on account, credit, etc.) on cash reports and G/L reports. A default memo can be set up on the vendor account. The memo is user-defined, and can be changed later.
11 This checkbox controls if this check will be included in the total amount printed on the 1099 for this vendor. It will be checked by default if this vendor is set to include checks and online payments on the
Job Cost Checks
1099 (Setup > Vendors, then select this option setting in the Account Info window).
12 Click on an invoice to select it for payment. 13 If your vendor offers dis-counts for early payments, you can enter them when applying the payment amount. Discounts decrease the invoice’s bal-ance due, just like a payment amount. The debit to A/P in the General Ledger will be the amount of your discount plus the amount of the check. You can enter discounts on any invoice, without limitations. The credit goes to the early-payment discount account. 14 The dGL is the invoice’s Accounts Payable (i.e., its cGL), and is copied from the invoice itself -- not your G/L prefer-ences.
15 The unallocated payment amount is the total that has yet to be paid to balance the amount you’re paying the vendor.
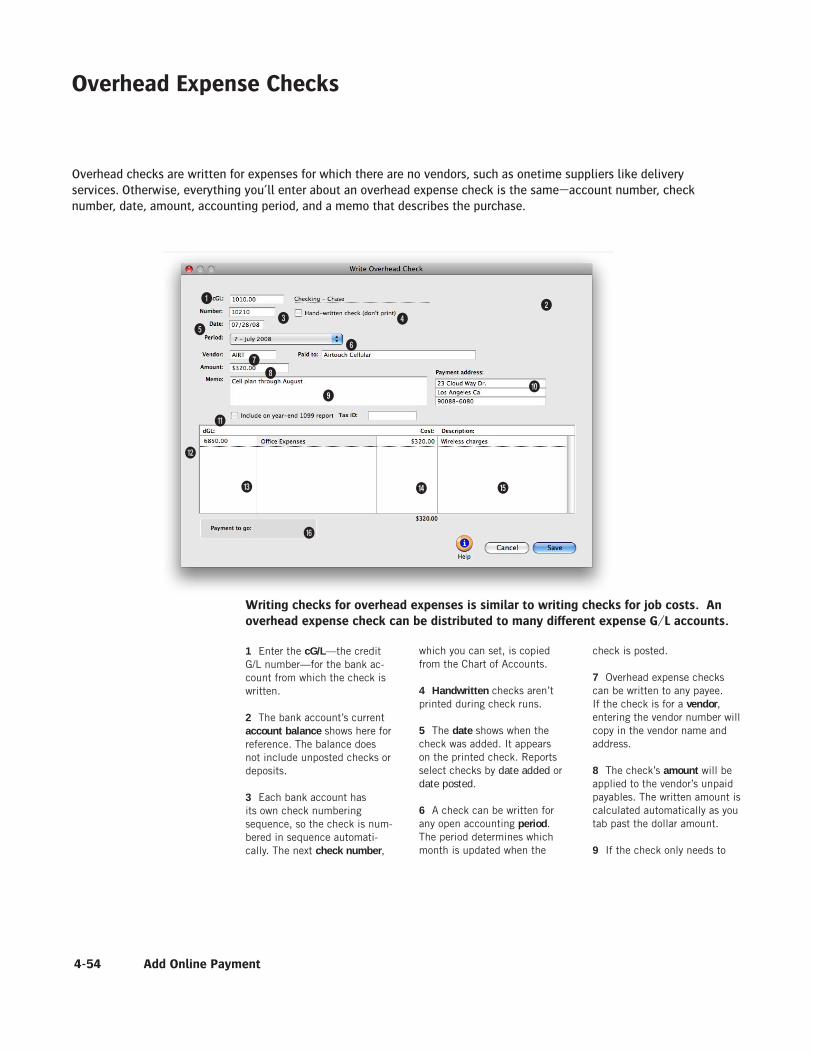
4-54
Overhead Expense Checks
Writing checks for overhead expenses is similar to writing checks for job costs. An overhead expense check can be distributed to many different expense G/L accounts.
Add Online Payment
1 Enter the cG/L—the credit G/L number—for the bank ac-count from which the check is written.
2 The bank account’s current account balance shows here for reference. The balance does not include unposted checks or deposits.
3 Each bank account has its own check numbering sequence, so the check is num-bered in sequence automati-cally. The next check number,
which you can set, is copied from the Chart of Accounts.
4 Handwritten checks aren’t printed during check runs. 5 The date shows when the check was added. It appears on the printed check. Reports select checks by date added or date posted.
6 A check can be written for any open accounting period. The period determines which month is updated when the
check is posted.
7 Overhead expense checks can be written to any payee. If the check is for a vendor, entering the vendor number will copy in the vendor name and address.
8 The check’s amount will be applied to the vendor’s unpaid payables. The written amount is calculated automatically as you tab past the dollar amount.
9 If the check only needs to
po
iu
te
wq
r
y
a
s
d f g
h
Overhead checks are written for expenses for which there are no vendors, such as onetime suppliers like delivery services. Otherwise, everything you’ll enter about an overhead expense check is the same—account number, check number, date, amount, accounting period, and a memo that describes the purchase.

4-55
be distributed to one debit G/L account, enter it into the dGL field here.
9 The check’s memo is a short description that appears on the printed check, checkbook reports, and on journal entries.
10 The check’s address is cop-ied from the vendor account, but can be customized. Chang-ing the check’s address doesn’t affect the vendor file. The year-end 1099 report uses this address on its printed forms.
11 The option to include on year-end 1099 report flags this check as a vendor payment for tax reporting purposes. The 1099 setting is copied from the vendor automatically.
12 The amounts on overhead expense checks can be split be-tween any number of different expense debit G/L accounts.
13 The dGL is the expense ac-
The only difference is overhead checks are written for expenses for which there are no vendors, such as onetime suppliers like delivery services. The distribution total must equal the check amount in order to be saved.
Add Online Payment
count that will be debited when this check is posted. If you’re not sure about a G/L account number, leave the field empty then press Tab. The Chart of Accounts lookup list opens, listing your G/L accounts. When you find the right account, double-click on it to copy it to this expense item.
14 This is the amount of the expense charged to the line item’s dGL.
15 Use the expense’s optional description to document what was being purchased. This description is added to the check’s debit JEs when it is posted.
16 The payment to go field shows the remaining check amount that needs to be distrib-uted in order to save the check. A check can be saved only when the total check amount matches the total net cost of the check line amounts.
4-56
Employee Advance Checks
Employee Advance Checks
o
p
i
u
yt
re
wq
1 Enter the cG/L number for the bank account from which the employee expense advance check is written here. Each bank account has its own check numbering sequence, so the check is numbered automati-cally.
2 The bank account’s current account balance shows here for reference. The balance does not include unposted checks or deposits.
3 Checks are numbered automatically in sequence as they are added. The next check number, which you can set, is copied from the Chart of Accounts.
4 Handwritten checks aren’t printed during check runs. 5 The date shows when the check was added. It appears on the printed check. Reports
a
select checks by date added or date posted.
6 A check can be written for any open accounting period. The period determines which month is updated when the check is posted.
7 Employee expense advances are written for active staff members only. Tabbing past the staff member’s initials will
Before writing employee expense advances, you must create a G/L account to track employee receivables. This account number, which is an asset, also need to be en-tered into your accounting preferences.
Clients & Profits X automates the entire process of employee expense reporting. There are two parts to employee expense accounting: (1) writing the expense advance check, then (2) adding the employee’s expense report. The expense advances are added in the Checkbook, while the expense reports at added in Expense Reports.

4-57
automatically copy in their name and address from the staff file.
8 The amount of the advance is the amount that will need to be reconciled with an employee expense report in Accounting > Expenses.
9 The dGL account should be the employee receivables G/L account.
10 The memo is a short description of what the advance is for. It appears on the printed check, checkbook reports, and on journal entries.
11 The check’s address is cop-ied from the staff file, but can be customized. Changing the check’s address doesn’t affect the staff file.
Employee Advance Checks
Before writing employee expense advances, you must create a G/L account to track employee receivables. This account number, which is an asset, also need to be en-tered into your accounting preferences.

4-58
Printing Checks
Printing Checks
Checks can be printed to any laser, inkjet, or dot matrix printer. Printing checks on laser printers is faster, cleaner, and less troublesome. Laser print-ers are very easy to load with check forms, and rarely jam like dot-matrix printers. (There are no form-feeds to remove from laser checks, too.) Ink jet printers have the same advantages as laser printers, but can be slower. The only disadvantage to printing checks on laser or ink jet printers is that they can’t print copies. The only way to get copies of printed checks is to print a separate set of checks on plain paper after they are printed on check stock.
■ If you need copies of checks, try this: instead of reprinting checks on plain paper, consider making photocopies of the actual signed checks. Not only will you have a hard-copy of the check to attach to invoices, but you’ll have a copy of the signature, too.
Your check stock should be preprinted with a check number. When a check is printed, the check number will be printed from Clients & Profits X beneath the preprinted number. For better account-ability, these numbers should match. This means you should print checks in the same order as the pre-printed checks. If a check jams, you should renumber the check in the Checkbook then re-print it using the next check number.
■ The check stock used by Clients & Profits X is easily available from Deluxe Business Systems. If you order checks from a bank or a third-party supplier, the alignment cannot be guaranteed—use them at your own risk. Be sure to test print several checks on your check stock before accepting them. Note: checks are not customizable.
■ Clients & Profits X will remember the check form you selected last time checks were printed.
■ Consider dedicating a printer just for printing checks. Sharing the same printer with other users, especially graphic artists, can cause problems (it’s very easy for them to accidentally print something while you’re printing checks).
To renumber misprinted checks
When a batch of checks misprints, they need to be voided, reentered, then reprinted on fresh check forms. The Renumber tool does it all in a single step: it voids the batch of checks then reenters exact copies of the checks, giving them brand-new check numbers. A complete audit trail of the voids and new checks will be posted to the General Ledger, and none of the
renumbered check JEs are affected.
1 Find the check you wish to renumber.
2 Choose Edit > Check Tools > Renumber Checks.
3 Enter the checking G/L account, then the range of check numbers to renumber.
4 Enter the starting num-ber for the new batch of checks, then click OK.
Ordering checks
Clients & Profits X uses standard laser-compatible check stock. You can order checks from Deluxe Business Forms by calling (800) 328-0304 (see below). If you order checks from a bank or a third-party supplier, the alignment cannot be guaranteed—use them at your own risk. Note: checks are not customizable.
Print checks any time. Checks can be printed individually or in batches for a range of check numbers. They can be printed at any time, but should be posted first.
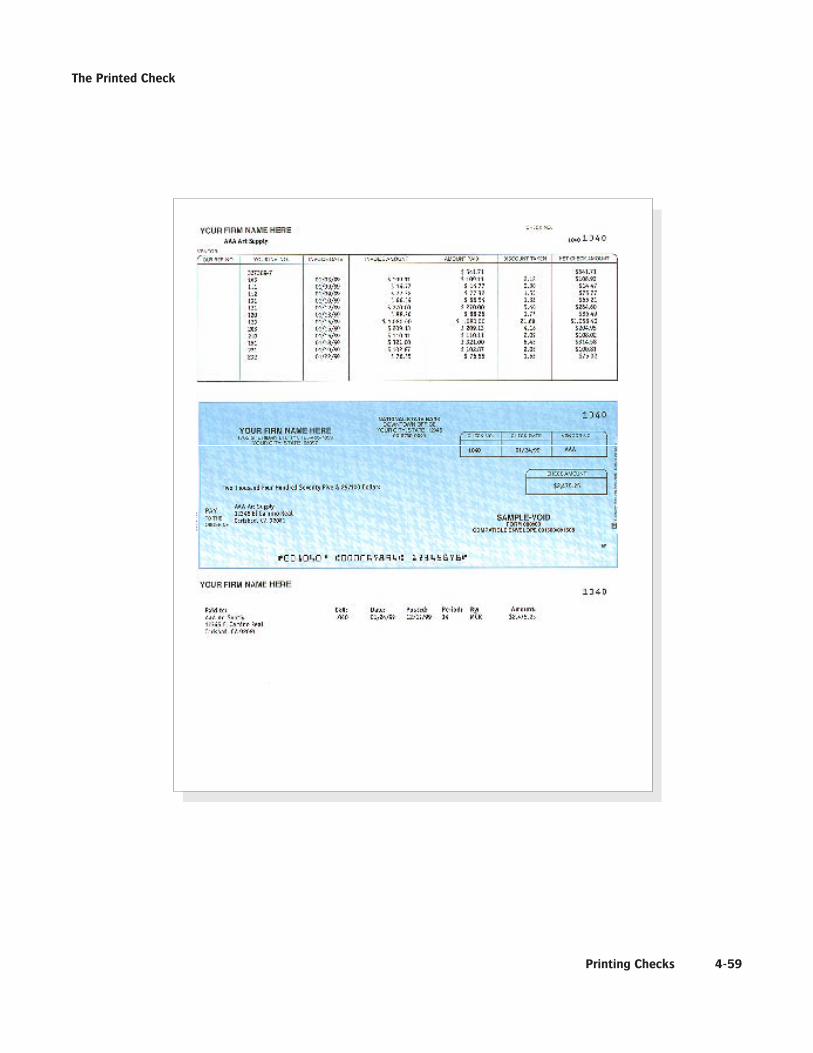
4-59Printing Checks
The Printed Check

4-60
Checkbook Reports
Checkbook Reports
Cash disbursement reports summarize checks, showing what you’ve paid to vendors (using the payee field), jobs and tasks, and G/L accounts.
Checkbook reports can be used for reporting overhead expenses, tracking payments to vendors, and auditing your accounting. There are several differ-ent reports that show your cash disbursements from various perspectives; all reports, however, are based on posted checks.
Checks (including vendor credits) can be summarized for any period of time (choos-ing either check date or date posted), for one period or all periods, and for one payee or all payees. These options let you find the checks for a specific payee, such as the year’s payments for a freelancer.
Checkbook reports show only posted checks; unposted checks appear only on proof lists. You can print check-book reports to the window (for a quick on-screen pre-view), the printer (for a hard copy), or to disk (to create a text file that can be opened and edited in a spreadsheet).
■ Cash disbursement reports are different from A/P reports, since they show only the payments, and not the invoice’s job costs. They show you what you paid to vendors. But they don’t show what the invoices originally bought.
Tips for printing checkbook reports
■ Cash reports select checks by date added (i.e., check date) or date posted. This option lets you show only checks added in July, for example, instead of the entire year. By entering a range of dates, you can select all checks added today, last week, or all month—whatever time period you need. There’s no limit to which range of dates you can use.
■ You can print checkbook reports to the window (for a quick on-screen preview), the printer (for a hard copy), or exported to disk (to create a text file that can be opened and edited in a spreadsheet).
■ To show the check description (i.e., memo), click on the show description option. This option makes your check reports longer, but more descriptive.
To print checkbook reports
1 Click the (i.e., Print Reports) button, or choose File > Print Cash Reports.
2 Select date added or date posted from the From pop-up menu, then enter a range of dates. 3 Select an accounting period, or choose All Periods to see checks by date only.
To see invoices for one accounting period only, regardless of date, choose a period from the pop-up menu then enter a very large range of dates (e.g., 11/1/08 - 12/31/08).
4 Enter a payee (i.e., paid to) name, or leave the selection as ALL.
5 Enter a checking account’s G/L number to print checks for a specific checking account, or leave the field blank to select checks for all accounts.
6 Select the report you wish to print.
7 Click Print.
Printing cash reports. Check-book reports can be printed to the screen, the printer, to the computer’s Clipboard, or exported to disk using the Print to pop-up menu. Any report exported to disk can be opened and edited in a spreadsheet program like Microsoft Excel.

4-61Checkbook Reports
Checkbook Reports
This check register lists checks sorted by type (i.e., checks, vendor credits, etc.) then by check number. A new page prints for each type of check. The report does not include job cost or vendor payment details.
This check register lists checks sorted by payee then by check number. The report does not include job cost or vendor payment details.
The Voided Checks report is a check register listing voided checks only.
This report provides a detailed listing of checks, including job costing and vendor payment information (i.e., line items).
The Checkbook Summary shows only check line items (i.e., job costs, vendor pay-ments) and is used for auditing.
This report lists employee expense advance checks only.
Check List (Checks by Type)
Check List (Checks by Payee)
Voided Checks
Cash Disbursement Journal
Checkbook Summary
Employee Advances
Lists
Journals
Analysis

4-62
Bank Reconciliation
There are two parts to bank reconciliation: selecting the bank account, then choosing which entries have (or haven’t) cleared. The first step involves entering the G/L account number and the bank statement’s ending balance. Clients & Profits X lists the account’s uncleared checks, client payments, and adjusting entries from the General Ledger. Un-cleared items (or cleared items; it’s your choice) are marked as cleared until the account balance is correct—then the entries are saved.m Reconciliation doesn’t affect your G/L or checking accounts.
w
e
tr
q
1 This is the G/L account num-ber that you want to reconcile. Your default checking account number will be automati-cally copied in, but it can be changed.
2 The statement ending date is the date that is on your actual bank statement.
3 The statement ending bal-ance is the amount on your bank statement that the bank has specified as the ending bal-ance amount.
4 The clear all entries option will mark all entries as cleared automatically. It should be used if most of the account’s items are likely to be cleared, which saves time. Otherwise, leave it unchecked to manually clear the account’s entries.
5 To save time the show depos-its by batch number option can be selected. It will group the deposits from one batch into a single line item.
Bank Reconciliation
Any bank account can be quickly reconciled with your monthly bank statement using the Reconciliation function. Clients & Profits X reconciles bank accounts separately, so you’ll enter one account’s balance at a time.

4-63Bank Reconciliation
1 Click the print button to print one of three bank recon-ciliation reports: Outstanding Items Only shows entries that have not been marked as cleared. Cleared Items Only shows all entries that have been marked cleared. Bank Reconciliation Worksheet (Out-standing and Cleared Items) shows all entries listed in the bank reconciliation window with their transaction amount and outstanding amount. 2 This is the name of the checking account being recon-ciled.
3 The ending date is shown for reference. It doesn’t affect how entries are reconciled.
4 The account’s uncleared client payments and bank deposits are listed by refer-ence number. Payments can be sorted by clicking on the column headings. If the entry hasn’t cleared, click on it to re-move the “X”—the entry won’t be cleared when the reconcilia-tion is saved.
5 The total amount of out-standing payments changes as payments are cleared.
6 The account’s uncleared checks are listed by check number.
7 This is the amount of out-standing checks remaining.
8 The account’s uncleared JEs are listed by reference number along with the date and amount.
9 The outstanding JEs are totaled here.
10 When the difference equals zero, the account is reconciled and can be saved.
q
w e
r
t
y
u
i
o
p
The bank reconciliation is precise—your account balance must equal the ac-count’s outstanding items exactly or it can’t be permanently saved.

4-64
Expense Reports
Expense Reports
Expenses are job costs that you incur while getting work done: faxes, computers, scanners, CDs, telephone calls, videotapes, color output, mat board, etc. They aren’t payables, since there isn’t an invoice. And they aren’t checks, since you’re not actually paying for them. Expenses are unique because you’ve already paid for them in the course of running the agency, so there’s no check to write or invoice to add.
There are three kinds of expenses: in-house expenses, employee expense reports, and internal charges.
In-house expenses: In-house expenses include charges for supplies and services such as telephone calls, faxes, and other out-of-pocket costs. Unlike vendor purchases, in-house expenses charge clients for services that the agency has already paid for, like fax machines. By tracking these expenses, you’ll be able to recover some of your overhead expenses for commonly-used equipment and supplies.
Employee expense reports: Employees with expense advances can enter their own expense reports on-line, tracking the inci-dental costs such as parking, travel, phone calls from home, etc. to client job and tasks. Expense reports are automatically reconciled with the employee’s expense advance check. Employee expenses can be billed at their actual cost or marked up.
Internal charges: Shops with in-house output, duplication, and production equipment can set up a price list for every kind of internal charge they’d bill to a client (e.g., videotapes, slides, film output, pre-press, etc.). The Internal Charge Items table keeps a detailed listing of items and their prices, which are then used for expense tracking. Charges for internal items can be charged to any job and task, including quantities, which then appear job cost reports—and eventually on the client invoice.
Expenses can be added in batches for the same equipment. They can be added, changed, and deleted freely (until they are posted). Expenses appear on job cost reports along with time, vendor invoices, and checks.
In-house expenses and the General Ledger
In-house expenses and internal charges don’t affect the General Ledger. They only update jobs and tasks. Journal entries are not created. Equipment like faxes or computer time are capitalized on your balance sheet already—so journal entries aren’t needed.
For example: A fax machine isn’t bought for one job. Instead, the agency bought it as office equipment, charging it to overhead. There are other costs
associated with a fax machine, like fax paper, maintenance, and depreciation, that are paid as overhead. If faxes are sent on a client’s behalf, all of these costs need to be charged to a client’s job and task. Your financial statements already show the cost of your faxes, so the cost shouldn’t affect the General Ledger. But the costs need to appear on the job tickets so they can be billed. This is what’s special about expenses—the Expenses window lets you track out-of-pocket expenses to jobs and tasks without creating G/L journal entries.
In-house expenses and internal charges do not appear on audit trails, journals, or financial statements. Instead, they appear only on job cost reports.
The only exception, however, is employee expense reports. They do affect the General Ledger in order to reconcile the employee’s expense advance. The employee advance check is recorded as a prepaid expense (an asset) in the General Ledger. Employee expense reports move this amount to the appropriate expense accounts.
Approving expenses
Approving an employee’s expense report updates job tickets. When a staff member
adds an expense report, its entries are saved as unapproved entries. Unap-proved expenses can be easily edited or deleted, letting the staff member or supervisor change them before its jobs are updated. Unapproved expenses don’t appear on job, cost, or financial reports. This offers users an opportu-nity to proof their work before posting.
Expense reports must be approved by any Clients & Profits X with the right access privileges to approve them. Each day’s expense reports are approved in whole, so certain expenses can’t be approved individually. are approved. (Approving expense reports daily posting ensures that your job, cost, and expense reports are timely and accurate.) Expense reports can be approved while others are using Clients & Profits X; however, other users may notice slower performance and possibly temporary padlocks.
If an expense is approved by mistake, or otherwise needs to be changed, it can be unapproved by un. Unposting reverses the updates made during posting: the cost is removed from the job and task. Once an expense is unapproved, it can be freely changed then approved again.

4-65Expense Reports
The Expense Reports window
1 The previous and next buttons can be used to find expense reports for a different day.
2 Use these toolbar buttons to add, edit, remove, and delete expense reports. Click the add button to add an expense report. To edit an expense’s description, click on the edit button. To remove an expense item from the expense report, click on the remove button. To delete the entire expense report, click the delete button.
3 Click on the approve button to approve on-line an expense. Once approved, an expense can’t be deleted. To reimburse
the staffer, first approve the expense report, then click the reimburse button to open the Expense Reimbursement window. From there, you can either reduce the balance on an already-issued expense advance check, enter a new reimburse-ment check, or (if the employee owes you money) add a staff payment.
4 To print expense reports, click the print reports button.
5 Expense reports can be found for one user at a time for a specific date. Enter in the user’s initials and the date you want to find an expense report for here. Or you can use the
q r
y
u
find more link to find expense reports.
6 Expenses are listed by date with their category, job, task, net cost, and description. The date shows when the expense occurred. The what describes the kind of services or supplies used by the expense. Every expense is charged to one job and task. The net cost amount shows what the expense cost the agency, before markups and commissions. The expense’s de-scription explains or documents why the expense was needed.
7 An expense listed with an “X” is an approved expense item.
w e
t

4-66 The My Daily Expense Report window
1 Use the previous and next buttons to see expense reports for sequential days.
2 As long as an expense hasn’t been approved yet, it can be removed using the remove expense button. The clear expenses button will delete the entire expense report.
3 To print this expense report, click the print button.
4 Find an expense report for a specific date by entering it in the show date field then click-ing find. The day of the week is shown for reference.
5 To see detailed informa-tion about a line item on the expense report, click the show cost notes button.
6 If the expense line item has been approved, an X will appear here.
7 The category column lists a general description of what the expense was for, such as mile-age, tolls, meals, etc.
8 Every expense is assigned to a job for accurate job costing. Every expense is charged to one task.
9 The expense description is a brief note explaining the expense. For details, click the show cost notes button.
Before writing employee expense advances, you must create a G/L account to track employee receivables. This account number, which is an asset, also need to be en-tered into your accounting preferences.
q w e
r
t
y
u i o p
The My Daily Expense Reports Window
4-67
10 The cost column shows the net amount of the expense (the shop’s cost before markup).
Employee expense advances are tracked on financial statements, as well as on a check report. These reports make it easy to manage expense advances. The checks issued for advances can be reconciled to the employees’ expense reports. This lets you track the advances to the employees and accurately distribute them to the correct job or expense account.
The My Daily Expense Report window

4-68
Internal Charges
Internal charges are out-of-pocket expenses that you charge to a client on a per-unit basis. You can track thousands of different items with different price combinations and sizes.
e
tr
Internal Charges
Each item is identified by an item code and a size code, so that thousands of different internal charge items can be added to the Internal Charge Items Table.
1 Internal charge items can be added, edited and deleted at any time using the add, edit, and delete toolbar buttons.
2 Internal charge items can be easily exported and imported from other applications by clicking on the export and import buttons.
3 A printout of the Internal Charge Items Table can be printed by clicking on the print button
4 The item code identifies the
item in general (i.e., film, CD-ROM, slides, etc.).
5 Each item is added for a size to further identify it on internal charges.
6 The description describes the particular item and size combi-nation, and appears on job cost reports and the Internal Charge price list.
7 A default task is used to indicate what task is most com-monly associated with this kind of internal charge item. This
task will be copied to internal charge expenses when added, but can be changed.
8 The unit of measure is for reference only, and is optional.
9 The unit cost is usually the average cost needed to produce the internal charge item.
10 The gross amount is the retail price of the item, which the client will be billed.
y u i o p
q w
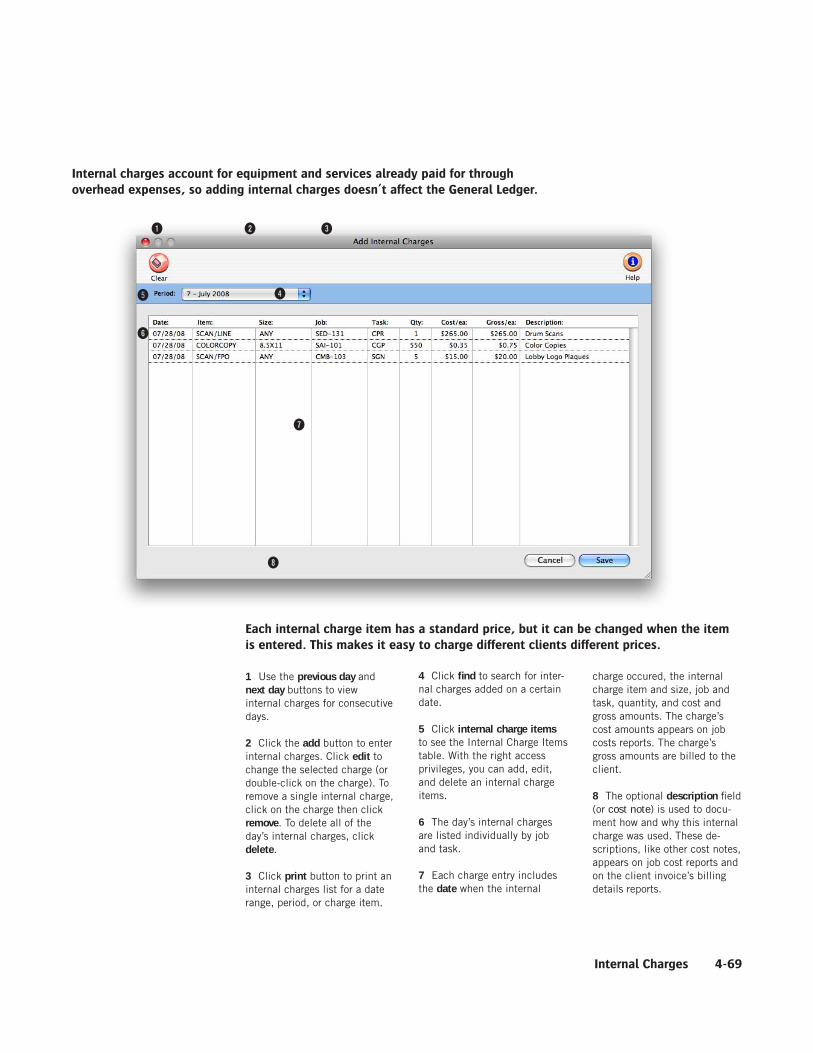
4-69Internal Charges
1 Use the previous day and next day buttons to view internal charges for consecutive days.
2 Click the add button to enter internal charges. Click edit to change the selected charge (or double-click on the charge). To remove a single internal charge, click on the charge then click remove. To delete all of the day’s internal charges, click delete.
3 Click print button to print an internal charges list for a date range, period, or charge item.
4 Click find to search for inter-nal charges added on a certain date.
5 Click internal charge items to see the Internal Charge Items table. With the right access privileges, you can add, edit, and delete an internal charge items.
6 The day’s internal charges are listed individually by job and task.
7 Each charge entry includes the date when the internal
charge occured, the internal charge item and size, job and task, quantity, and cost and gross amounts. The charge’s cost amounts appears on job costs reports. The charge’s gross amounts are billed to the client.
8 The optional description field (or cost note) is used to docu-ment how and why this internal charge was used. These de-scriptions, like other cost notes, appears on job cost reports and on the client invoice’s billing details reports.
q w e
rt
y
u
Internal charges account for equipment and services already paid for through overhead expenses, so adding internal charges doesn’t affect the General Ledger.
Each internal charge item has a standard price, but it can be changed when the item is entered. This makes it easy to charge different clients different prices.
i

4-70
1 Click add to enter a new job cost transfer. To erase a job cost transfer that hasn’t been saved and start over, click the clear button. To transfer all of the job’s costs in a single step, click the move all button. Click print report to get a hard-copy printout of the costs being transferred. The list can be used to proof the entries before they are saved.
2 The memo can be used to document why these costs were being transferred. The memo
is appended to the default description that Clients & Prof-its X adds to job cost transfer entries. These notes appear on job cost reports.
3 Enter the from job number as the job from which the costs will be transferred. Tabbing past this field lists the job’s unbilled costs—these are the costs that can be transferred.
4 Enter the to job number as the job to which these costs will be transferred.
q
w
e r
t
y
i
5 Double-clicking on a job cost moves it from the from job list to the to job list. The job cost transfers isn’t permanent until you click Save, so it’s easy to undo a cost transfer.
6 Click the move to button to move a cost from the from job to the to job. Clicking the move back button transfers the cost back to its original job.
7 The costs that will be trans-ferred appear here. To move a
Job Cost Transfers
Job Cost Transfers
Every transfer can move both a cost amount and a gross (i.e., billable) amount. However, you should move only the gross amount to keep your job cost totals more accurate.
Costs can be easily transferred between jobs and tasks. Costs transfers are always added in pairs: you’ll enter the job and task from which the cost is being transferred, then the job and task that will get the transfer. Any cost and gross amount can be transferred, up to the total unbilled cost amounts on the job task. Otherwise, there’s no limit to how costs can be transferred.
u

4-71
Hours are not moved when a time cost is transferred; only the cost and gross amounts are transferred. Instead, add adjusting time entries to move hours between jobs.
Job Cost Transfers
job cost back to its original job, double-click on it.
8 The transfer net amounts only option moves the costs’ net amounts along with the gross amounts to the new job. This option removes the costs entirely from the original job, but should be used with cau-tion. Usually, you’ll only want to move the gross (i.e., unbilled) amounts so that the original job shows its true cost. Transfer-ring only the billable amount keeps the job’s total cost ac-curate, which keeps profitability reports more accurate, too.