jfx plus series ujf-3042 clear liquid printing guide · jfx plus series ujf-3042 . clear liquid...
TRANSCRIPT

JFX plus Series
UJF-3042
Clear Liquid Printing Guide (RasterLinkPro5 v2.22)
This document explains the procedures to print special effects using UV ink clear liquid from RasterLinkPro5. For
others, refer to “Operation Manual” of each printer, “Installation Guide” and “Reference Guide” of the
RasterLinkPro5.
D202207-10
Version 1.0
MIMAKI ENGINEERING CO., LTD.

2 / 72
Caution - It is strictly prohibited to write or copy a part or whole of this document without our approval.
- The contents of this document may be changed without notice.
- The specification may be partially different from the one described in this document due to change for
improvement of this software etc., which please note.
- It is strictly prohibited to copy this software to other disk (excluding the case for making backup) or to load on the
memory for the purpose other than executing it.
- With the exception of what is provided for in the warranty provisions of Mimaki Engineering Co., Ltd., we do not
assume any liability against the damages (including but not limited to the loss of profit, indirect damage, special
damage or other monetary damages) arisen out of the use or failure to use of this product. Same applies to even
if Mimaki Engineering Co., Ltd. has been advised of the possibility of such damage. By way of example, we do
not assume any liability against the loss of the media (work) etc. by using this product, the indirect loss arisen
out of the material created by using the media, etc.
Adobe, Adobe logo, Photoshop, Illustrator and PostScript are the trademarks in the United States and the
trademarks or the registered trademarks in other countries of Adobe Systems Incorporated.
CorelDRAW is the registered trademarks of Corel Corporation or Corel Corporation Limited.
Apple, Macintosh, Mac OS and Mac OSX are the registered trademarks of Apple Inc. in the United States
and/or other countries.
Microsoft, Windows, Windows XP, Windows Vista and Windows 7 are the registered trademarks and/or the
trademarks of Microsoft Corporation in the United States and/or other countries.
Other company names and product names in this document are the trademarks or the registered trademarks of the
respective companies.
3 / 72
Table of Contents Chapter 1 Before Using --------------------------------- P.5
Chapter 2 Type of Special Print Using Clear Liquid --------------------------------- P.6
2-1 Glossy Print --------------------------------- P.6
2-2 Matte Print --------------------------------- P.6
2-3 Emboss Print --------------------------------- P.6
Chapter 3 Job Creation Method Using Clear Liquid in RasterLinkPro5 IP --------------------------------- P.7
3-1 Job Type --------------------------------- P.7
3-1-1 Auto Clear Composition --------------------------------- P.7
3-1-2 Manual Composition of Color Image and Clear Image (Grouping Multiple Jobs) -- P.8
3-1-3 Clear Image Single Job --------------------------------- P.9
3-2 Create Auto Clear Composition job. --------------------------------- P.10
3-2-1 Perform Glossy Print. (Printing Method Common to All Machine Types) -------------- P.13
3-2-2 Perform Glossy Print (Printing Method Dedicated to UJF-3042) ------------------------ P.14
3-2-3 Perform Matte Print. -------------------------------- P.15
3-2-4 Perform Emboss Print. -------------------------------- P.16
3-3 Create the job for manual composition. (Group multiple jobs.) --------------------------------- P.18
3-3-1 Perform Glossy Print. (Printing Method Common to All Machine Types) --------------- P.21
3-3-2 Perform Glossy Print. (Printing Method Dedicated to UJF-3042) ------------------------ P.22
3-3-3 Perform Matte Print. ---------------------------------- P.23
3-3-4 Perform Emboss Print. ---------------------------------- P.24
3-4 Create the single job of clear image. --------------------------------- P.26
3-4-1 Perform Glossy Print. (Printing Method Common to All Machine Types ---------------- P.29
3-4-2 Perform Glossy Print. (Printing Method Dedicated to UJF-3042) ------------------------- P.30
3-4-3 Perform Matte Print. --------------------------------- P.31
3-4-4 Perform Emboss Print. --------------------------------- P.32
Chapter 4 Supplementary Explanation --------------------------------- P.34
4-1 Setting of Other Clear Liquid --------------------------------- P.34
4-1-1 Operation Panel Setting Value --------------------------------- P.34
4-1-2 Irradiation Only --------------------------------- P.35
4-2 Creating Method of Image for Single Color Replacement to be Replaced with
Clear Liquid (Clear Image) --------------------------------- P.36
4-2-1 Create the image for single color replacement (clear image) from swatch pattern in Illustrator.
--------------------------------- P.36
4-2-2 Create the image for single color replacement (clear image) from color image in Illustrator.
--------------------------------- P.38
4-2-3 Create the image for single color replacement (clear image) from pattern in CorelDraw.
--------------------------------- P.45
4-2-4 Create the image for single color replacement (clear image) from color image in CorelDrawl.
--------------------------------- P.47
4-3 Setting Example of Special Print and Process Flow --------------------------------- P.52

4 / 72
4-3-1 In Case of Color and Clear Liquid (Glossy Print) --------------------------------- P.52
4-3-2 In Case of Color and Clear Liquid (Matte Print) --------------------------------- P.54
4-3-3 In Case of Color and Clear Liquid (Emboss Print, Surface Clear Liquid is Matte) -- P.55
4-3-4 In case of Color and Clear Liquid (Emboss Print, Surface Clear Liquid is Glossy) -- P.57
4-3-4.1 For Printing Method Dedicated to UJF-3042 --------------------------------- P.57
4-3-4.2 For Printing Method Common to All Machine Types --------------------------------- P.59
4-3-5 In Case of Special Color (White), Color and Clear Liquid (Glossy Print) --------------- P.61
4-3-6 In Case of Special Color (White), Color and Clear Liquid (Matte Print) ----------------- P.63
4-3-7 In Case of Special Color (White), Color and Clear Liquid (Three-dimensional + Surface Clear
Liquid is Matte) --------------------------------- P.65
4-3-8 In Case of Special Color (White), Color and Clear Liquid (Three-dimensional + Surface Clear
Liquid is Glossy) --------------------------------- P.67
4-3-8.1 For Printing Method Dedicated to UJF-3042 --------------------------------- P.67
4-3-8.2 For Printing Method Common to All Machine Types --------------------------------- P.69
4-4 Note on Glossy Print of UJF-3042 --------------------------------- P.71
4-5 Information on Emboss Print of UJF-3042 --------------------------------- P.72

5 / 72
Chapter 1 Before Using 1-1. Related Manual
The explanation described in this manual is based on the assumption that set-up of the printer and
RasterLinkPro5 have been completed. Before reading this manual, read the related manual below and perform the
required set-up etc. The latest version of the manual can be also downloaded from our web page.
1) “Operation Manual” of each printer
Explains the printer operation and handling about the maintenance etc.
2) “Maintenance” of each printer
Explains daily maintenance to use the printer in the better status.
3) “Installation Guide” of RasterLinkPro5
Explains the installation/the set-up procedures of RasterLinkPro5.
4) “Reference Guide” of RasterLinkPro5
Divided into Common features for every printer and the Required set-up items for using RasterLinkPro5, such
as the function and the operation procedures for each printer.
1-2. Installation of Device Profile
Right after RasterLinkPro5 installation has been completed, only required minimum of device profile has been
installed. Obtain other device profile from the profile CD attached with the product, MIMAKI’s web page for
download (http://www.mimaki.co.jp/english/download/uc_index.php) or RasterLinkPro5 [ProfileUpdate] and install
it.

6 / 72
Chapter 2 Type of Special Print Using Clear Liquid There are some types for special print using clear liquid as below.
2-1. Glossy Print
First, print color data. Next, print clear liquid without UV irradiation. By performing UV irradiation later, the
printing surface becomes smooth and you can gain shiny Glossy Print.
Media
Color
Clear Liquid
2-2. Matte Print
First, print color data. Next, print clear liquid while performing UV irradiation at the same time. By doing this,
concavity and convexity remain on the printing surface inversely with Glossy Print. You can gain Matte Print.
2-3. Emboss Print
First, print color data. Next, print clear liquid with Matte Print several times repeatedly. By overlapping clear
liquid layers to increase the thickness of the printing part, you can gain Emboss Print. You can print so that the
last clear liquid printing may be Glossy Print.
You can print so that the last clear liquid
printing may be Glossy Print.

Chapter 3 Job Creation Method Using Clear Liquid in RasterLinkPro5 IP 3-1. Job Type
To create a job using clear liquid, there are three types of “Auto Clear Composition”, “Manual Composition of
Color Image and Clear Image” (Grouping Multiple Jobs) and “Clear Image Single Job”. Each has the feature
below:
Printing Method Data to be Prepared Printing Position of Clear
Liquid
Print Density of Clear
Liquid
Settable Correction
Method of Special
Color
Auto Clear Composition Color image
Whole image of color image
Valid pixel of color image
0% to 100%
Fixed density
Size correction
Manual Composition of
Color Image and Clear
Image
Color image
Image for single color
replacement
Whole image of color image
Valid pixel of color image
Any position of color image
0% to 100%
Depending on the tone
of original image
Size correction
Position correction
Clear Image Single Job Image for single color
replacement
Any position 0% to 100%
Depending on the tone
of original image
None
3-1-1. Auto Clear Composition
Print “color image” and “single color image of clear liquid (clear image) automatically created based on color
image” so that they may be overlapped.
1) For Auto Clear Composition, when Clear Print Area is set to Valid Pixel
2) For Auto Clear Composition, when Clear Print Area is set to Whole Image
- You can combine with Auto Special Color Composition.
Ex.: For Auto Clear Composition, when Clear Print Area is set to Valid Pixel and for Auto Special Color
Composition, Special Color Print Area is Whole Image
Ex.: For Auto Clear Composition, when Clear Print Area is set to Whole Image and for Auto Special Color
Composition, Special Color Print Area is Whole Image
7 / 72

8 / 72
3-1-2. Manual Composition of Color Image and Clear Image (Grouping Multiple Jobs)
Group “color image” and “single image (clear image) replaced with clear liquid” and print so that they may be
overlapped.
1) When combining color image and clear image manually and printing clear liquid on any position
2) When combining color image and clear image manually and changing density of clear liquid depending on
printing position
- Depending on the way to create single color image (clear image), you can print clear liquid on “Whole Image”
or “Valid Pixel” of the color image same as Auto Clear Composition.
- You can combine manually including special color (white).
Ex.: When combining special color (white), color image and clear image manually and printing clear liquid on
any position
Ex.: When combining special color (white), color image and clear image manually and changing density of
clear liquid depending on printing position

9 / 72
3-1-3. Clear Image Single Job
Print “single color image (clear image) replaced with clear liquid”.
Use this when you output clear image only later against the material that has already been printed.
1) When you printed color image and clear image in advance, however, curing is not enough
-> When performing irradiation only later
Status of color image and clear image
having been printed
(Curing of clear image is not enough.)
2) When Emboss Print (printing twice) of color image and clear image has already been performed
-> When performing Glossy Print of surface clear image later (when performing Emboss Print with the
machine type other than UJF-3042)
Perform Glossy Print of surface clear image.
When Emboss Print (printing twice) of color image
and clear image has already been performed
Each job creation method is explained by following the procedures from here.

10 / 72
3-2. Create Auto Clear Composition job.
Select [Open] of the [Job List]
and enter “Color Image”.
② Select
③ Select
④ Select
⑤ Select
⑥ Click

11 / 72
Select entered “Color Image”,
and right-click. Then, select
[Edit] to display [Image edit
screen].
① Select
② Right-click
③ Select
Select Device Profile in [Print
Condition], and select “Special
Colorset” of clear in [Print
Mode].
Clear Liquid is indicated as
“Cl”.
The displayed contents differ
depending on your printer and
the device profile, therefore,
select the Special Colorset
suitable for your environment.
“Cl”: Clear liquid one color
“ClCl”: Clear liquid two colors
“WC1”: White one color
: Clear liquid one color
“WWClCl”: White two colors
: Clear liquid two colors
12 / 72
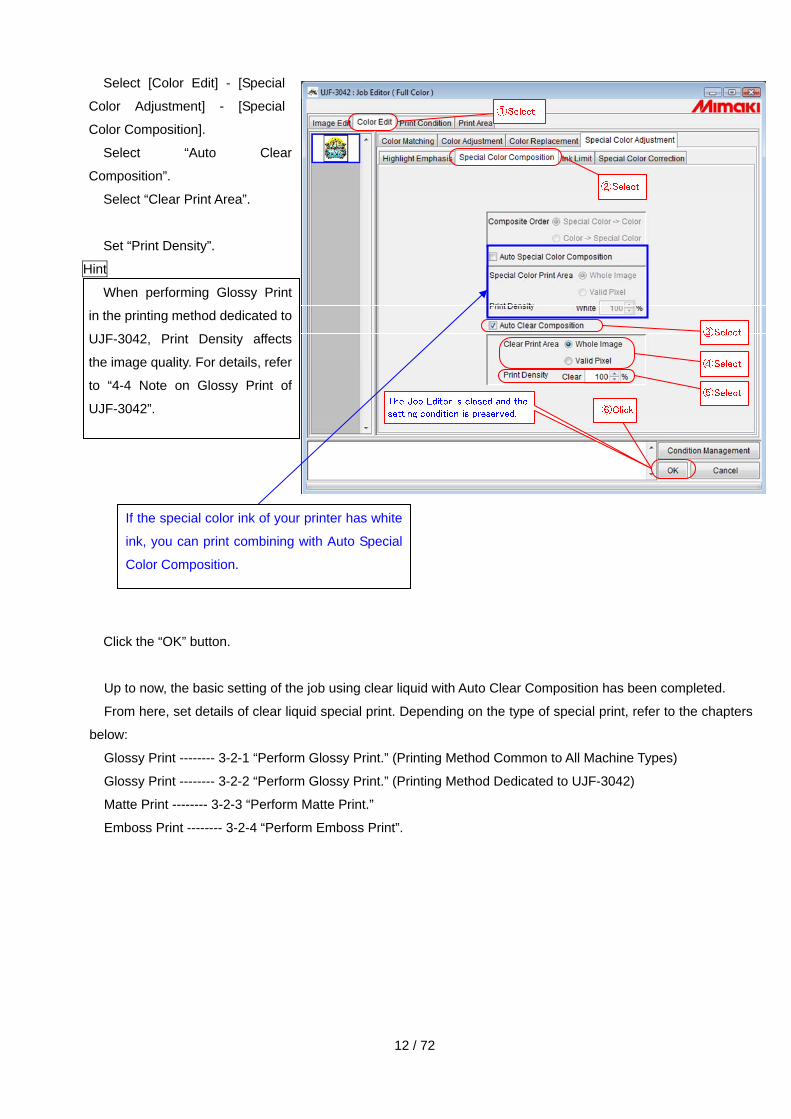
Select [Color Edit] - [Special
Color Adjustment] - [Special
Color Composition].
Select “Auto Clear
Composition”.
Select “Clear Print Area”.
Set “Print Density”.
Hint
When performing Glossy Print
in the printing method dedicated to
UJF-3042, Print Density affects
the image quality. For details, refer
to “4-4 Note on Glossy Print of
UJF-3042”.
If the special color ink of your printer has white
ink, you can print combining with Auto Special
Color Composition.
Click the “OK” button.
Up to now, the basic setting of the job using clear liquid with Auto Clear Composition has been completed.
From here, set details of clear liquid special print. Depending on the type of special print, refer to the chapters
below:
Glossy Print -------- 3-2-1 “Perform Glossy Print.” (Printing Method Common to All Machine Types)
Glossy Print -------- 3-2-2 “Perform Glossy Print.” (Printing Method Dedicated to UJF-3042)
Matte Print -------- 3-2-3 “Perform Matte Print.”
Emboss Print -------- 3-2-4 “Perform Emboss Print”.

13 / 72
3-2-1. Perform Glossy Print. (Printing Method Common to All Machine Types)
The method to perform Glossy Print of clear liquid is explained. (Here, it is based on the premise that the basic
setting explained in 3-2 “Create Auto Clear Composition job.” has been completed.)
Select [Print Condition] - [UV
Mode].
Select “Print and Irradiation” of
“Clear Liquid Irradiation Mode”.
Set “Print” to “1 time”.
Set the number of “Irradiation”
and “Illuminance” at your will.
When “Print and Irradiation” is
selected, data (printing data) to
discharge clear liquid without UV
irradiation is output to the printer.
Then, data (irradiation data) to
perform UV irradiation without
printing clear liquid is output to
the printer. “Printing data” and
“irradiation data” are output by
the number of times set on the
screen.
Hint
Press the [OK] button to
terminate the image edit screen. ① Select
② Right-click
③ Select
Select a job in the [Job List] and
right-click. Then, select [RIP and
Print] to perform printing.

14 / 72
3-2-2. Perform Glossy Print (Printing Method Dedicated to UJF-3042)
The method to perform Glossy Print of clear liquid is explained. (Here, it is based on the premise that the basic
setting explained in 3-2 “Create Auto Clear Composition job.” has been completed.)
Select [Print Condition] - [UV
Mode].
Select “Glossy Print” of “Clear
Liquid Irradiation Mode”.
Set the number of “Additional
UV Irradiation” and “Illuminance”
at your will.
As Glossy Print controls so that
the UV lamp may be turned off
partly, clear liquid curing may not
be enough. You can specify the
number of Additional UV
Irradiation to one to three and
perform curing later.
Click the [OK] button to
terminate the image edit screen.
Hint
Select a job in the [Job List] and
right-click. Then, select [RIP and
Print] to perform printing.
① Select
② Right-click
③ Select

15 / 72
3-2-3. Perform Matte Print.
The method to perform Matte Print is explained. (Here, it is based on the premise that the basic setting
explained in 3-2 “Create Auto Clear Composition job.” has been completed.)
Select [Print Condition] - [UV
Mode].
Select “Matte Print” of “Clear
Liquid Irradiation Mode”.
Set “Illuminance” at your will.
Set the number of “Additional
UV Irradiation” and “Illuminance”
at your will.
Depending on the density of
clear liquid, curing may not be
enough. In such a case, set the
Illuminance higher. Or, you can
specify the number of Additional
UV Irradiation to one to three and
perform curing later.
Hint
Click the [OK] button to
terminate the image edit screen.
Select a job in the [Job List] and
right-click. Then, select [RIP and
Print] to perform printing.
① Select
② Right-click
③ Select

16 / 72
3-2-4. Perform Emboss Print.
The method to perform Emboss Print is explained. (Here, it is based on the premise that the basic setting
explained in 3-2 “Create Auto Clear Composition job.” has been completed.)
Select [Print Condition] - [UV
Mode].
Select “Emboss Print” of “Clear
Liquid Irradiation Mode”.
Set “Illuminance” at your will.
Set the “Print time(s)” to one to
nine at your will.
The more the number of
printings becomes, the more three
dimensional the printing result
looks.
When your printer is UJF-3042,
by selecting “Glossy Print”, you
can set the printing method of the
last clear liquid.
Select: Glossy Print
Not select: Matte Print
When you select “Glossy Print“,
Print Density and the number of
printings affect the image quality.
For details, refer to “4-4 Note
on Glossy Print of UJF-3042”.
When you use the printer other
than UJF-3042, the same print can
be performed by combining
multiple jobs. For details, refer to
4-3-4.2.
Hint
Hint
Specify the number of
“Additional UV Irradiation” and
“Illuminance” at your will.

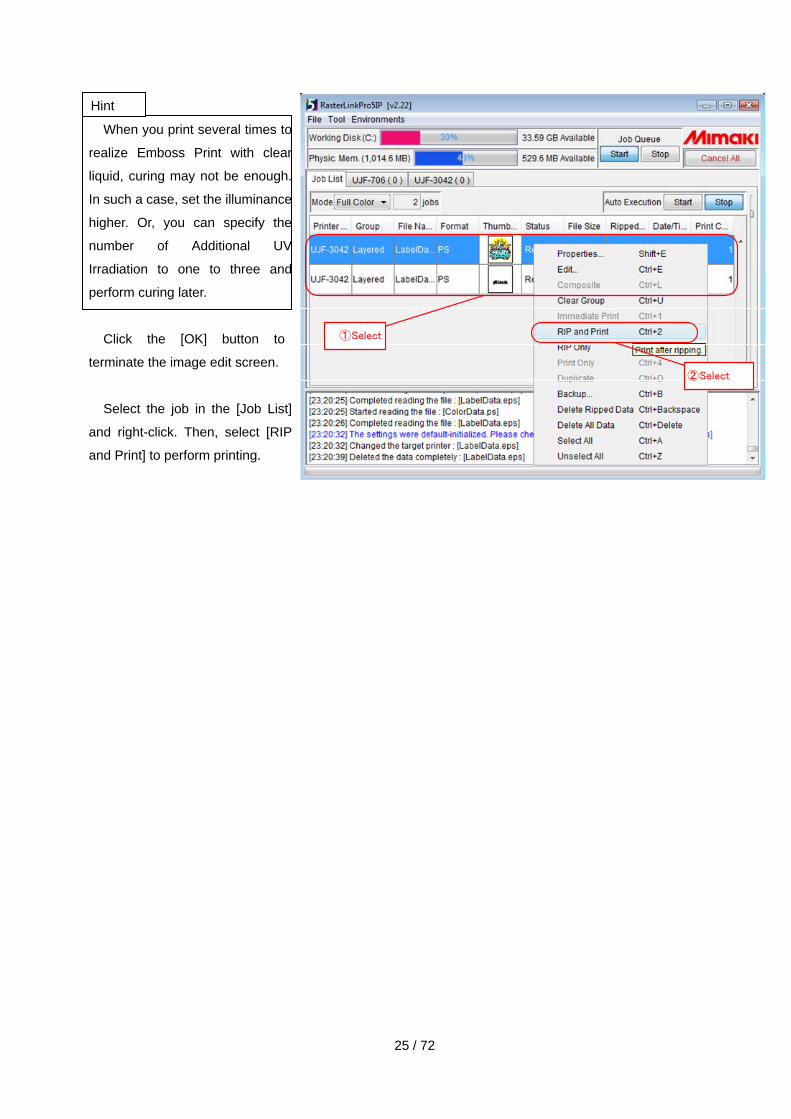
17 / 72
When you print several times to
realize Emboss Print with clear
liquid, curing may not be enough.
In such a case, set the illuminance
higher. Or, you can specify the
number of Additional UV
Irradiation to one to three and
perform curing later.
Click the [OK] button to
terminate the image edit screen.
Hint
① Select
② Right-click
③ Select
Select a job in the [Job List] and
right-click. Then, select [RIP and
Print] to perform printing.
18 / 72
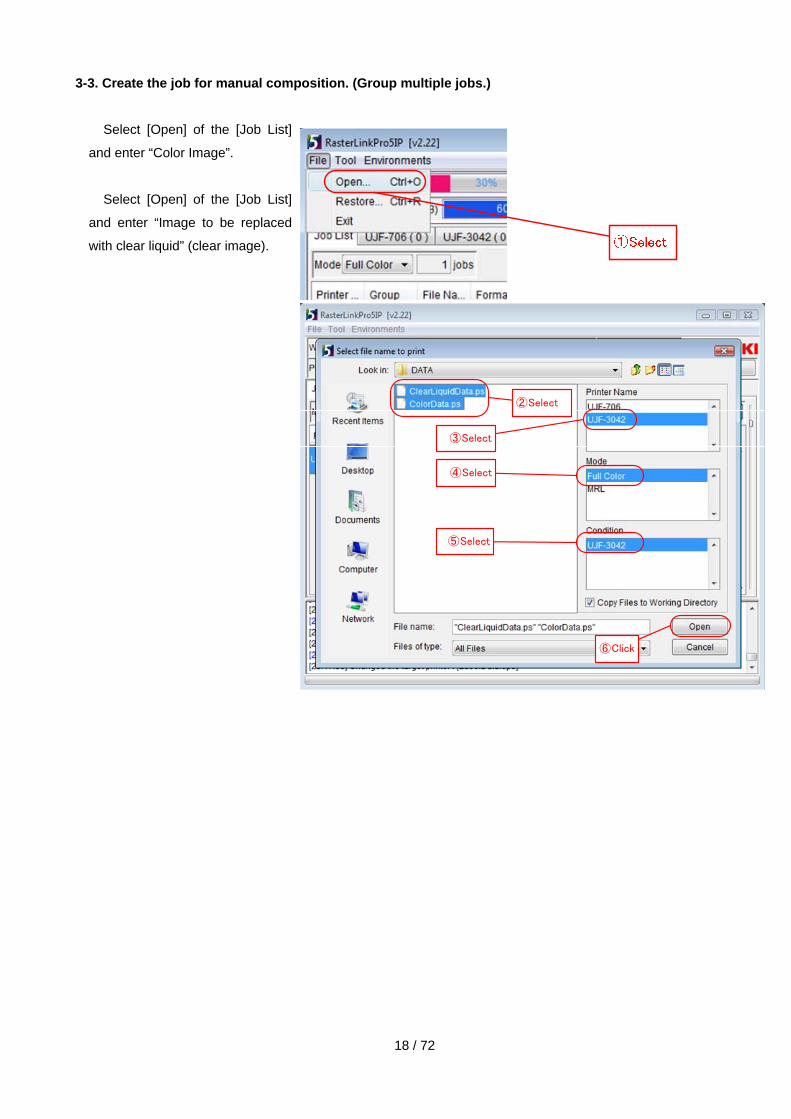
3-3. Create the job for manual composition. (Group multiple jobs.)
Select [Open] of the [Job List]
and enter “Color Image”.
Select [Open] of the [Job List]
and enter “Image to be replaced
with clear liquid” (clear image).
② Select
③ Select
④ Select
⑤ Select
⑥ Click

19 / 72
Select “Color Image” and
“Image to be replaced with clear
liquid” and right-click. Select
[Composite] to display [Image edit
screen].
You can also enter the special
color image and combine the
special image, the color image
and the clear image in this order.
Hint
Select the device profile in
[Print Condition] and select
“Special Colorset” of clear in
[Print Mode].
Clear Liquid is indicated as
“Cl”.
The displayed contents differ
depending on your printer and
the device profile, therefore,
select the Special Colorset
suitable for your environment.
“Cl”: Clear liquid one color
“ClCl”: Clear liquid two colors
“WC1”: White one color
: Clear liquid one color
“WWClCl”: White two colors
: Clear liquid two colors

20 / 72
Select [Color Edit] - [Color
Replacement] and select “Image
to be replaced with clear liquid”
from the thumbnail list.
Add the color replacement
definition file and select “Set mono
color replacement”. Replace
“Black” with “Clear” and press
[Update] button.
Hint
When performing Glossy Print
in the printing method dedicated to
UJF-3042, Print Density of “Image
to be replaced with clear liquid”
affects the image quality of Glossy
Print. For details, refer to “4-4 Note
on Glossy Print of UJF-3042”.
Click the “OK” button.
Up to now, the basic setting of the job using clear liquid with manual composition (grouping multiple jobs) has
been completed. From here, set details of clear liquid special print. Depending on the type of special print, refer to
the chapters below:
Glossy Print -------- 3-3-1 “Perform Glossy Print.” (Printing Method Common to All Machine Types)
Glossy Print -------- 3-3-2 “Perform Glossy Print.” (Printing Method Dedicated to UJF-3042)
Matte Print -------- 3-3-3 “Perform Matte Print.”
Emboss Print -------- 3-3-4 “Perform Emboss Print”.

21 / 72
3-3-1 Perform Glossy Print. (Printing Method Common to All Machine Types)
The method to perform Glossy Print of clear liquid is explained. (Here, it is based on the premise that the basic
setting explained in 3-3 “Create the job for manual composition. (Group multiple jobs.)” has been completed.)
Select [Print Condition] - [UV
Mode].
Select “Print and Irradiation” of
“Clear Liquid Irradiation Mode”.
Set “Print” to “1 time”.
Set the number of “Irradiation”
and “Illuminance” at your will.
When “Print and Irradiation” is
selected, data (printing data) to
discharge clear liquid without UV
irradiation is output to the printer.
Then, data (irradiation data) to
perform UV irradiation without
printing clear liquid is output to the
printer. “Printing data” and
“irradiation data” are output by the
number of times set on the screen.
Hint
Click the [OK] button to
terminate the image edit screen.
Select the job in the [Job List]
and right-click. Then, select [RIP
and Print] to perform printing.
① Select
② Select

22 / 72
3-3-2 Perform Glossy Print. (Printing Method Dedicated to UJF-3042)
The method to perform Glossy Print of clear liquid is explained. (Here, it is based on the premise that the basic
setting explained in 3-3 “Create the job for manual composition. (Group multiple jobs.)” has been completed.)
Select [Print Condition] - [UV
Mode].
Select “Glossy Print” of “Clear
Liquid Irradiation Mode”.
Set the number of “Additional
UV Irradiation” and “Illuminance”
at your will.
As Glossy Print controls so that
the UV lamp may be turned off
partly, clear liquid curing may not
be enough. You can specify the
number of Additional UV
Irradiation to one to three and
perform curing later.
Hint
Click the [OK] button to
terminate the image edit screen.
Select the job in the [Job List]
and right-click. Then, select [RIP
and Print] to perform printing.
① Select
② Select

23 / 72
3-3-3 Perform Matte Print.
The method to perform Matte Print of clear liquid is explained. (Here, it is based on the premise that the basic
setting explained in 3-3 “Create the job for manual composition. (Group multiple jobs.)” has been completed.)
Select [Print Condition] - [UV
Mode].
Select “Matte Print” of “Clear
Liquid Irradiation Mode”.
Set “Illuminance” at your will.
Set the number of “Additional
UV Irradiation” and “Illuminance”
at your will.
Depending on the density of
clear liquid, curing may not be
enough. In such a case, set the
Illuminance higher. Or, you can
specify the number of Additional
UV Irradiation to one to three and
perform curing later.
Hint
Click the [OK] button to
terminate the image edit screen.
Select the job in the [Job List]
and right-click. Then, select [RIP
and Print] to perform printing.
① Select
② Select

24 / 72
3-3-4 Perform Emboss Print.
The method to perform Emboss Print of clear liquid is explained. (Here, it is based on the premise that the
basic setting explained in 3-3 “Create the job for manual composition. (Group multiple jobs.)” has been
completed.)
Select [Print Condition] - [UV
Mode].
Select “Emboss Print” of “Clear
Liquid Irradiation Mode”.
Set “Illuminance” at your will.
Set the “Print time(s)” to one to
nine at your will.
The more the number of
printings becomes, the more three
dimensional the printing result
looks.
Hint
When your printer is UJF-3042,
by selecting “Glossy Print”, you
can set the printing method of the
last clear liquid.
Select: Glossy Print
Not select: Matte Print
When you select “Glossy Print“,
Print Density and the number of
printings affect the image quality.
For details, refer to “4-4 Note
on Glossy Print of UJF-3042”.
When you use the printer other
than UJF-3042, the same print can
be performed by combining
multiple jobs. For details, refer to
4-3-4.2.
Hint
Set the number of “Additional
UV Irradiation” and “Illuminance”
at your will.
25 / 72
When you print several times to
realize Emboss Print with clear
liquid, curing may not be enough.
In such a case, set the illuminance
higher. Or, you can specify the
number of Additional UV
Irradiation to one to three and
perform curing later.
Hint
① Select
② Select
Click the [OK] button to
terminate the image edit screen.
Select the job in the [Job List]
and right-click. Then, select [RIP
and Print] to perform printing.

26 / 72
3-4. Create the single job of clear image.
Select [Open] of [Job List] and
enter “Color Image”.
Select [Open] of [Job List] and
enter “Image to be replaced with
clear liquid” (clear image).
② Select
③ Select
④ Select
⑤ Select
⑥ Click

27 / 72
Select “Image to be replaced
with clear liquid”. Right-click and
select [Edit] to display [Image Edit
Screen].
① Select
② Right-click
③ Select
Select Device Profile in [Print
Condition], and select “Special
Colorset” of clear in [Print
Mode].
Clear Liquid is indicated as
“Cl”.
The displayed contents differ
depending on your printer and
the device profile, therefore,
select the Special Colorset
suitable for your environment.
“Cl”: Clear liquid one color
“ClCl”: Clear liquid two colors
“WC1”: White one color
: Clear liquid one color
“WWClCl”: White two colors
: Clear liquid two colors
28 / 72
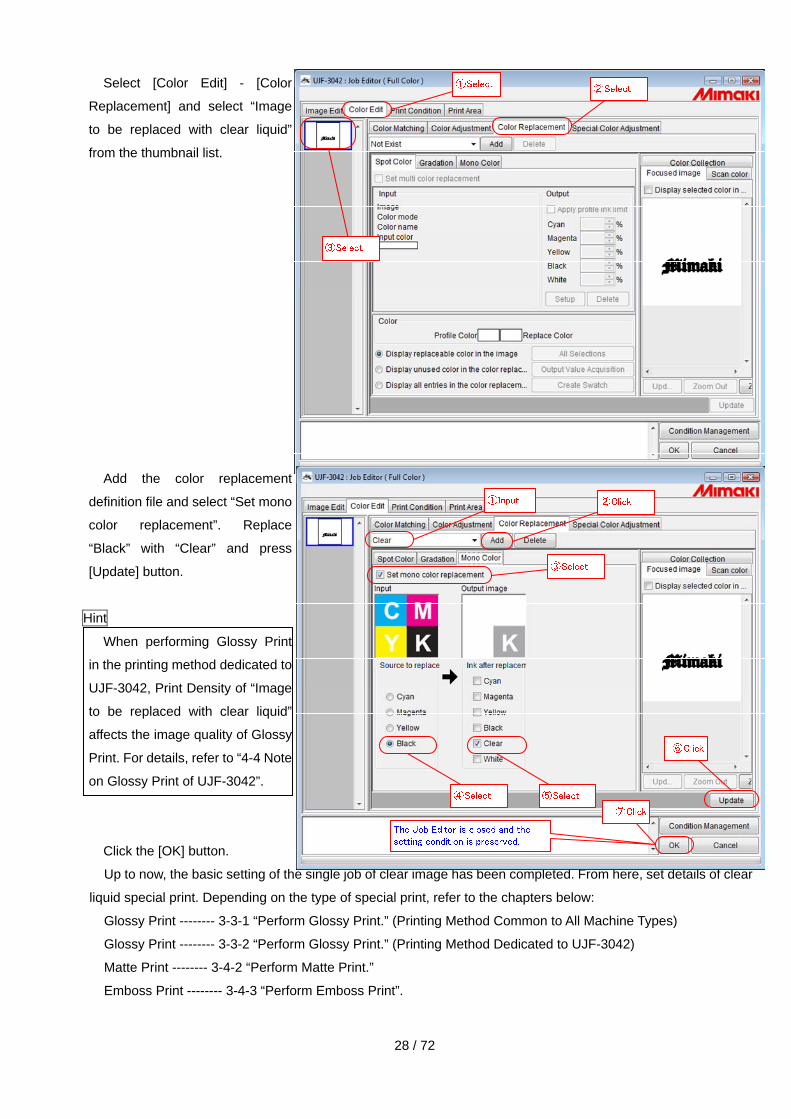
Select [Color Edit] - [Color
Replacement] and select “Image
to be replaced with clear liquid”
from the thumbnail list.
Add the color replacement
definition file and select “Set mono
color replacement”. Replace
“Black” with “Clear” and press
[Update] button.
Hint
When performing Glossy Print
in the printing method dedicated to
UJF-3042, Print Density of “Image
to be replaced with clear liquid”
affects the image quality of Glossy
Print. For details, refer to “4-4 Note
on Glossy Print of UJF-3042”.
Click the [OK] button.
Up to now, the basic setting of the single job of clear image has been completed. From here, set details of clear
liquid special print. Depending on the type of special print, refer to the chapters below:
Glossy Print -------- 3-3-1 “Perform Glossy Print.” (Printing Method Common to All Machine Types)
Glossy Print -------- 3-3-2 “Perform Glossy Print.” (Printing Method Dedicated to UJF-3042)
Matte Print -------- 3-4-2 “Perform Matte Print.”
Emboss Print -------- 3-4-3 “Perform Emboss Print”.

29 / 72
3-4-1 Perform Glossy Print. (Printing Method Common to All Machine Types)
The method to perform Glossy Print of clear liquid is explained. (Here, it is based on the premise that the basic
setting explained in 3-4 “Create the single job of clear image.” has been completed.)
Select [Print Condition] - [UV
Mode].
Select “Print and Irradiation” of
“Clear Liquid Irradiation Mode”.
Set “Print” to “1 time”.
Set the number of “Irradiation”
and “Illuminance” at your will.
When “Print and Irradiation” is
selected, data (printing data) to
discharge clear liquid without UV
irradiation is output to the printer.
Then, data (irradiation data) to
perform UV irradiation without
printing clear liquid is output to the
printer. “Printing data” and
“irradiation data” are output by the
number of times set on the screen.
Hint
Click the [OK] button to
terminate the image edit screen.
Select the job in the [Job List]
and right-click. Then, select [RIP
and Print] to perform printing.
① Select
② Right-click
③ Select

30 / 72
3-4-2 Perform Glossy Print. (Printing Method Dedicated to UJF-3042)
The method to perform Glossy Print of clear liquid is explained. (Here, it is based on the premise that the basic
setting explained in 3-4 “Create the single job of clear image.” has been completed.)
Select [Print Condition] - [UV
Mode].
Select “Glossy Print and
Irradiation” of “Clear Liquid
Irradiation Mode”.
Set the number of “Additional
UV Irradiation” and “Illuminance”
at your will.
As Glossy Print controls so that
the UV lamp may be turned off
partly, clear liquid curing may not
be enough. You can specify the
number of Additional UV
Irradiation to one to three and
perform curing later.
Hint
Click the [OK] button to
terminate the image edit screen.
Select the job in the [Job List]
and right-click. Then, select [RIP
and Print] to perform printing.

31 / 72
3-4-3 Perform Matte Print.
The method to perform Matte Print of clear liquid is explained. (Here, it is based on the premise that the basic
setting explained in 3-4 “Create the single job of clear image.” has been completed.)
Select [Print Condition] - [UV
Mode].
Select “Matte Print and
Irradiation” of “Clear Liquid
Irradiation Mode”.
Set “Illuminance” at your will.
Set the number of “Additional
UV Irradiation” and “Illuminance”
at your will.
Depending on the density of
clear liquid, curing may not be
enough. In such a case, set the
Illuminance higher. Or, you can
specify the number of Additional
UV Irradiation to one to three and
perform curing later.
Hint
Click the [OK] button to
terminate the image edit screen.
Select the job in the [Job List]
and right-click. Then, select [RIP
and Print] to perform printing.

32 / 72
3-4-4 Perform Emboss Print.
The method to perform Emboss Print of clear liquid is explained. (Here, it is based on the premise that the
basic setting explained in 3-4 “Create the single job of clear image.” has been completed.)
Select [Print Condition] - [UV
Mode].
Select “Emboss Print” of “Clear
Liquid Irradiation Mode”.
Set “Illuminance” at your will.
Set the “Print time(s)” to one to
nine at your will.
The more the number of
printings becomes, the more three
dimensional the printing result
looks.
Hint
When your printer is UJF-3042,
by selecting “Glossy Print”, you
can set the printing method of the
last clear liquid.
Select: Glossy Print
Not select: Matte Print
When you select “Glossy Print“,
Print Density and the number of
printings affect the image quality.
For details, refer to “4-4 Note
on Glossy Print of UJF-3042”.
When you use the printer other
than UJF-3042, the same print can
be performed by combining
multiple jobs. For details, refer to
4-3-4.2.
Hint
Specify the number of
“Additional UV Irradiation” and
“Illuminance” at your will.

33 / 72
When you print several times to
realize Emboss Print with clear
liquid, curing may not be enough.
In such a case, set the illuminance
higher. Or, you can specify the
number of Additional UV
Irradiation to one to three and
perform curing later.
Click the [OK] button to
terminate the image edit screen.
Select the job in the [Job List]
and right-click. Then, select [RIP
and Print] to perform printing.
Hint

34 / 72
Chapter 4 Supplementary Explanation 4-1. Setting of Other Clear Liquid
There are some settings of the clear liquid UV irradiation mode other than explained up to now. Supplementary
explanation of each setting is provided here.
1) Panel Setting
2) Irradiation Only
4-1-1. Operation Panel Setting Value
When you select “Panel Setting”, the machine operates according to the mode of “LED UV unit” of the printer
main body.
Use this when using the media being weak against heat, or, when you do not wish to light LED UV for test
drawing during cleaning etc.
Ex.: When color image was printed in advance and you set the mode of “LED UV unit” of the printer main body
to “OFF”
Clear liquid is printed without UV irradiation.
Print color image in advance.
Table
AY-Bar
Forward
① ( Clear Liquid Panel Setting)
Processing flow
Print direction

35 / 72
4-1-2. Irradiation Only
When you select “Irradiation only”, data with UV irradiation only is output. It is convenient to use this when you
perform Glossy Print with Additional UV Irradiation 1 time, however, curing was not enough etc.
Ex.: When it is irradiation only
Cure by performing UV irradiation.
You performed Glossy Print,
however, curing was not enough.

36 / 72
4-2. Creating Method of Image for Single Color Replacement to be Replaced with Clear Liquid (Clear Image)
The creating method of data to be replaced with clear liquid is explained.
4-2-1. Create the image for single color replacement (clear image) from swatch pattern in Illustrator.
The creating method of data to print clear liquid by the texture pattern on the whole or some parts of the color
image (hereinafter, referred to as clear image) is explained.
In the explanation below, create the clear image to print the texture pattern on the simple rectangle.
From New Document, select
“Rectangle Tool” and create a
rectangle.
① Select
② Create
Select a pattern from [Window] -
[Swatch Libraries] - [Patterns].
Here, select [Decorative] -
[Decorative_Geometric1].
① Select
② Select
③ Select
④ Select

37 / 72
Select a rectangle object and
set “None” to “Stroke” and any
monochrome pattern to “Fill”. ① Select② Select
③ Select
④ Select
⑤ Select
Here, select “Hexagon Tile”.
The pattern is set to the selected rectangle.
Select [File] - [Save As…] to
save it as a file.
The creation of clear image using a pattern is completed with the procedures above. Use the created clear
image with the procedures explained in “3-3 “Create the job for manual composition. (Group multiple jobs.)” or
“3-4 Create the single job of clear image”.
Hint
When printing with a pattern, if you perform Emboss Print with the number of prints “two”, the pattern looks
three dimensional and can be printed effectively.

38 / 72
4-2-2. Create the image for single color replacement (clear image) from color image in Illustrator.
4-2-2.1 Creating Clear Data
The creating method of the image to be replaced with clear liquid based on the color image (hereinafter,
referred to as clear image) when you wish to print clear liquid on some parts of the color image is explained.
In the explanation below, create the clear image to print clear liquid on the characters in the center of the color
image (“Mimaki”) only.
Select all objects of the color
image and right-click. Then, select
[Group].
Copy the color image using
[Edit] - [Copy].
① Select

39 / 72
Select “Layers” - “Create New
Layer” and paste the copied color
image on the new layer with [Edit]
- [Paste].
② t [Edi ][Paste]
① Select
New Layer is created and Layer2 is current layer.
The copied color image is displayed in Layer2.

40 / 72
Select both of the “color image”
and the “copied color image” and
align them horizontally and
vertically.
① Select
② Select
④ Select③ Select
② Select① Select
Color image and copied color image are arranged in the same location.

41 / 72
Select the “copied color image”
and right-click. Then, select
[Ungroup].
Select the objects other than
“Mimaki” in the “Layer2” and click
the “Delete Selection” button to
delete them.

42 / 72
Check that only “Mimaki”
remains in the “copied color
image”.
Enter K100% in “Stroke” and
“Fill” of “Mimaki” characters. (As
clear liquid is printed with the
density entered here, specify any
density.)
Hint
When you perform “Glossy
Print“, Print Density affects the
image quality. For details related
to the density, refer to “4-4 Note
on Glossy Print of UJF-3042”.
To replace K image with clear
liquid in the RasterLink single
color replacement, set K100% to
the part to be printed with clear
liquid.
Select [File] - [Save as…] to
save it as the AI file.

43 / 72
4-2-2.2 Output the color image and clear image to RasterLink.
The method to output the created data to RasterLink is explained below. Print the color image and the clear
image in the same size so that colors may overlap clear liquid correctly.
Print the color image.
Click the “Toggles Visibility”
button in the [Layer2].
The clear image becomes not
displayed.
Select [File] - [Print] and the
Printer of RasterLink on the Print
screen.
Select “Custom” from “Media” -
“Size” and enter any size.
Click the “Print” button.

44 / 72
Print the clear image.
Click the “Toggles Visibility”
button in the [Layer2].
The clear image is displayed.
Click the “Toggles Visibility”
button in the [Layer1].
The clear image becomes not
displayed.
Select [File] - [Print] and the
Printer of RasterLink on the Print
screen.
Select “Custom” from “Media” -
“Size” and enter any size. ① Select
② Select
③ Input
④ Click
Click the “Print” button.

45 / 72
4-2-3. Create the image for single color replacement (clear image) from pattern in CorelDraw.
The creating method of data to print clear liquid by the texture pattern on the whole or some parts of the color
image (hereinafter, referred to as clear image) is explained.
In the explanation below, create the clear image to print the texture pattern on the simple rectangle.
From New Graphic, select
“Rectangle Tool” and create a
rectangle.
Select [Fill Tool] - [Pattern Fill
Dialog] and [2-color] pattern.
Here, select the check pattern
and click the OK button.
① Select ② Select
③ Select
④ Select
⑤ Select

46 / 72
The pattern is set to the
rectangle object.
Select [File] - [Save As…] to
save it as a file.
The creation of clear image using a pattern is completed with the procedures above. Use the created clear
image with the procedures explained in “3-3 “Create the job of manual composition. (Group multiple jobs.)” or “3-4
Create the single job of clear image”.
Hint
When printing with a pattern, if you perform Emboss Print with the number of prints “two”, the pattern looks
three dimensional and can be printed effectively.

47 / 72
4-2-4. Create the image for single color replacement (clear image) from color image in CorelDraw.
4-2-4.1 Creating Clear Image Data
The creating method of the image to be replaced with clear liquid based on the color image (hereinafter,
referred to as clear image) when you wish to print clear liquid on some parts of the color image is explained.
In the explanation below, create the clear image to print clear liquid on the characters in the center of the color
image (“Mimaki”) only.
Click the [New Layer] button.
Select whole of the color image
and copy it using [Edit] - [Copy].

48 / 72
Select the “Layer2” and paste
the copied color image using [Edit]
- [Paste].
Select all objects other than
yellow stars in the “Layer2” and
click the “Delete” button to delete
them.

49 / 72
Set “Show or Hide” of the
“Layer1” to Hide and check that
only yellow stars remain in the
“Layer2”.
Enter K100% in “Fill” of the
yellow star. (As clear liquid is
printed with the density entered
here, specify any density.)
Hint
When you perform “Glossy
Print“, Print Density affects the
image quality. For details related
to the density, refer to “4-4 Note
on Glossy Print of UJF-3042”.
To replace K with clear liquid in
the RasterLink single color
replacement, set K100% to the
part to be printed with clear liquid.
Select [File] - [Save as…] to
save it as a file.
50 / 72
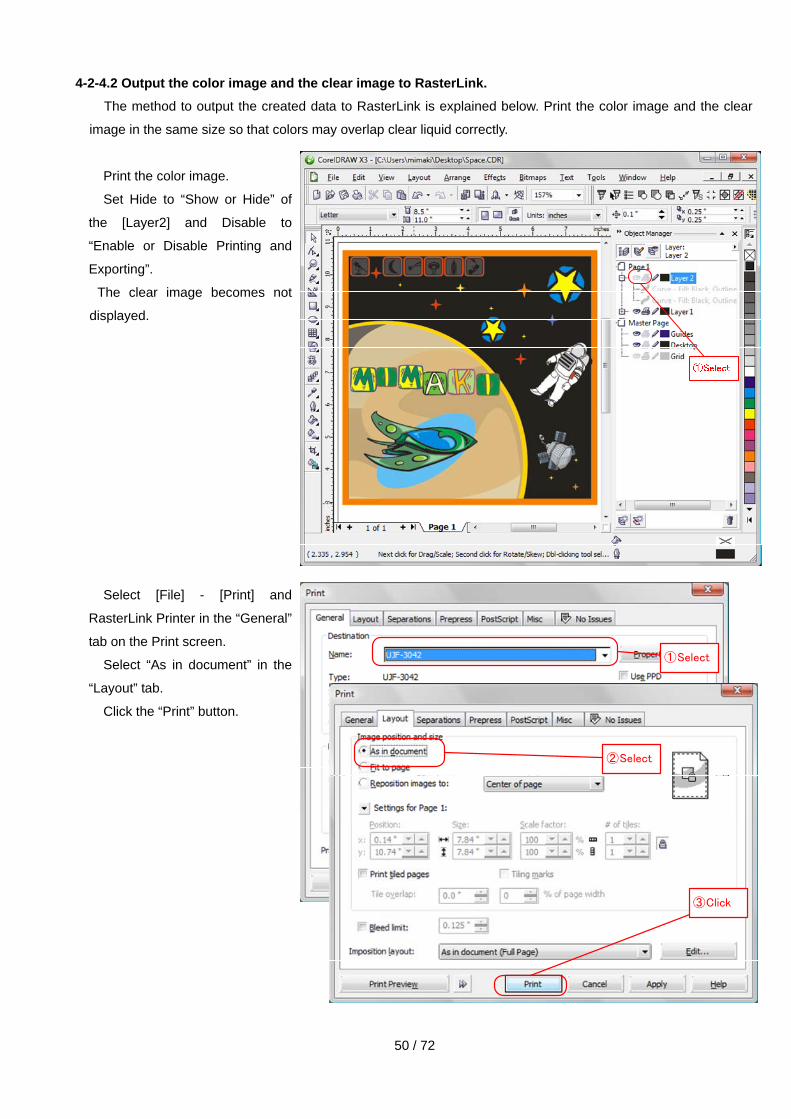
4-2-4.2 Output the color image and the clear image to RasterLink.
The method to output the created data to RasterLink is explained below. Print the color image and the clear
image in the same size so that colors may overlap clear liquid correctly.
Print the color image.
Set Hide to “Show or Hide” of
the [Layer2] and Disable to
“Enable or Disable Printing and
Exporting”.
The clear image becomes not
displayed.
Select [File] - [Print] and
RasterLink Printer in the “General”
tab on the Print screen. ① Select
② Select
③ Click
Select “As in document” in the
“Layout” tab.
Click the “Print” button.

51 / 72
Print the clear image.
Set Show to “Show or Hide” in
the [Layer2] and Enable to
“Enable or Disable Printing and
Exporting“.
The clear image is displayed.
Set Hide to “Show or Hide” in
the [Layer1] and Disable to
“Enable or Disable Printing and
Exporting”.
The color image becomes not
displayed.
Select [File] - [Print] and
RasterLink Printer in the “General”
tab on the Print screen.
Select “As in document” in the
“Layout” tab.
① Select
② Select
③ Click
Click the “Print” button.
52 / 72
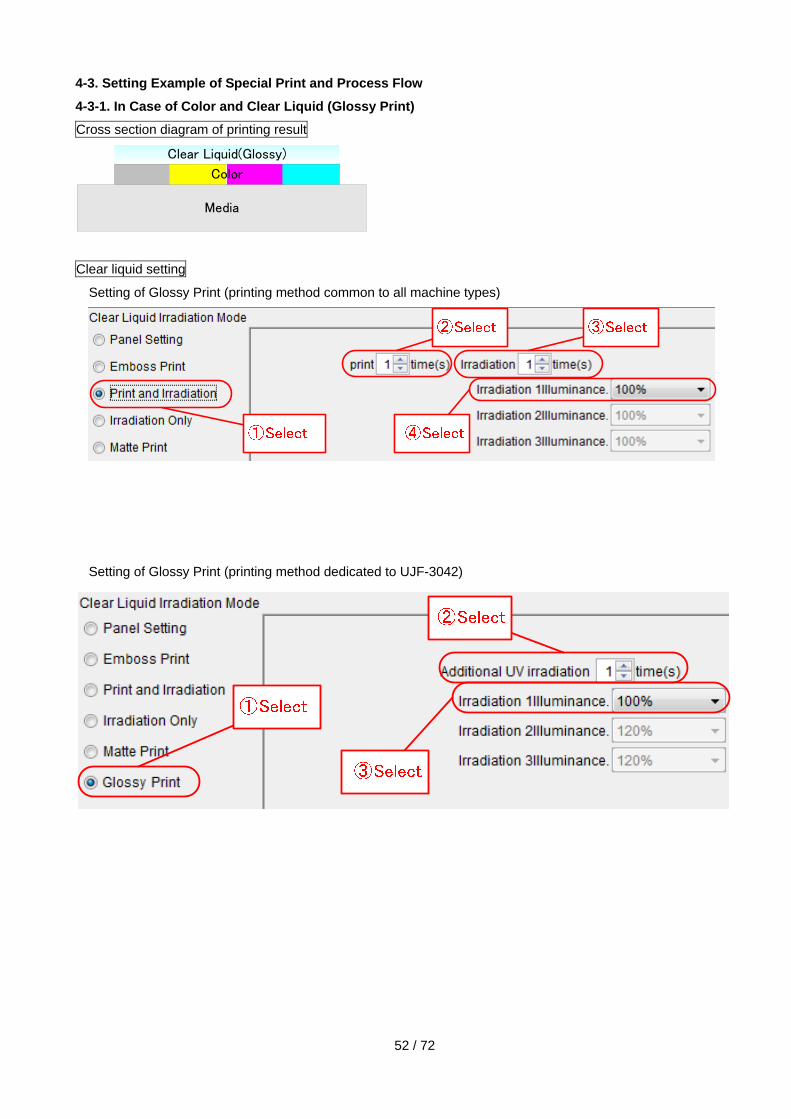
4-3. Setting Example of Special Print and Process Flow
4-3-1. In Case of Color and Clear Liquid (Glossy Print)
Cross section diagram of printing result
Clear liquid setting
Setting of Glossy Print (printing method common to all machine types)
Setting of Glossy Print (printing method dedicated to UJF-3042)
Media
Clear Liquid(Glossy)
Color

53 / 72
Process flow
Supplementation
- Clear liquid (Glossy Print) is fixed to Reverse print direction.
- Clear liquid (without irradiation) is fixed to Forward print direction.

54 / 72
4-3-2. In Case of Color and Clear Liquid (Matte Print)
Cross section diagram of printing result
Clear liquid setting
Matte Print setting
Process flow
Supplementation
- Color + clear liquid (Matte Print) is fixed to Forward print direction.

55 / 72
4-3-3. In Case of Color and Clear Liquid (Emboss Print, Surface Clear Liquid is Matte)
Cross section diagram of printing result
Clear liquid setting
Emboss Print (surface clear liquid is matte) setting

56 / 72
Process flow
Supplementation
- Color + clear liquid (Matte Print) is fixed to Forward print direction.

57 / 72
4-3-4. In case of Color and Clear Liquid (Emboss Print, Surface Clear Liquid is Glossy)
4-3-4.1 For Printing Method Dedicated to UJF-3042
Cross section diagram of printing result
Clear liquid setting
Emboss Print (surface clear liquid is glossy) setting

58 / 72
Process flow
Supplementation
- Color + clear liquid (Matte Print) is fixed to Forward print direction.
- Clear liquid (Glossy Print) is fixed to Reverse print direction.
59 / 72
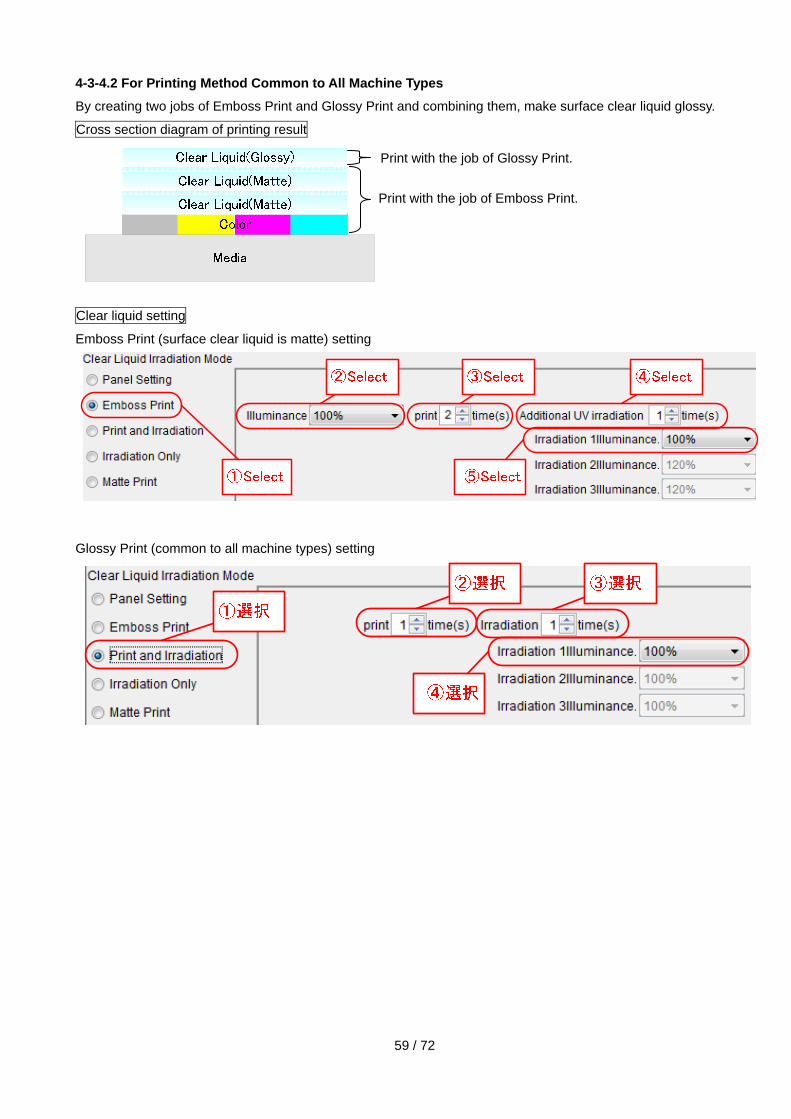
4-3-4.2 For Printing Method Common to All Machine Types
By creating two jobs of Emboss Print and Glossy Print and combining them, make surface clear liquid glossy.
Cross section diagram of printing result
Print with the job of Glossy Print.
Print with the job of Emboss Print.
Clear liquid setting
Emboss Print (surface clear liquid is matte) setting
Glossy Print (common to all machine types) setting

60 / 72
Process flow
From here, it is the second job.
Supplementation
- Color + clear liquid (Matte Print) is fixed to Forward print direction.
- Clear liquid (Glossy Print) is fixed to Reverse print direction.

61 / 72
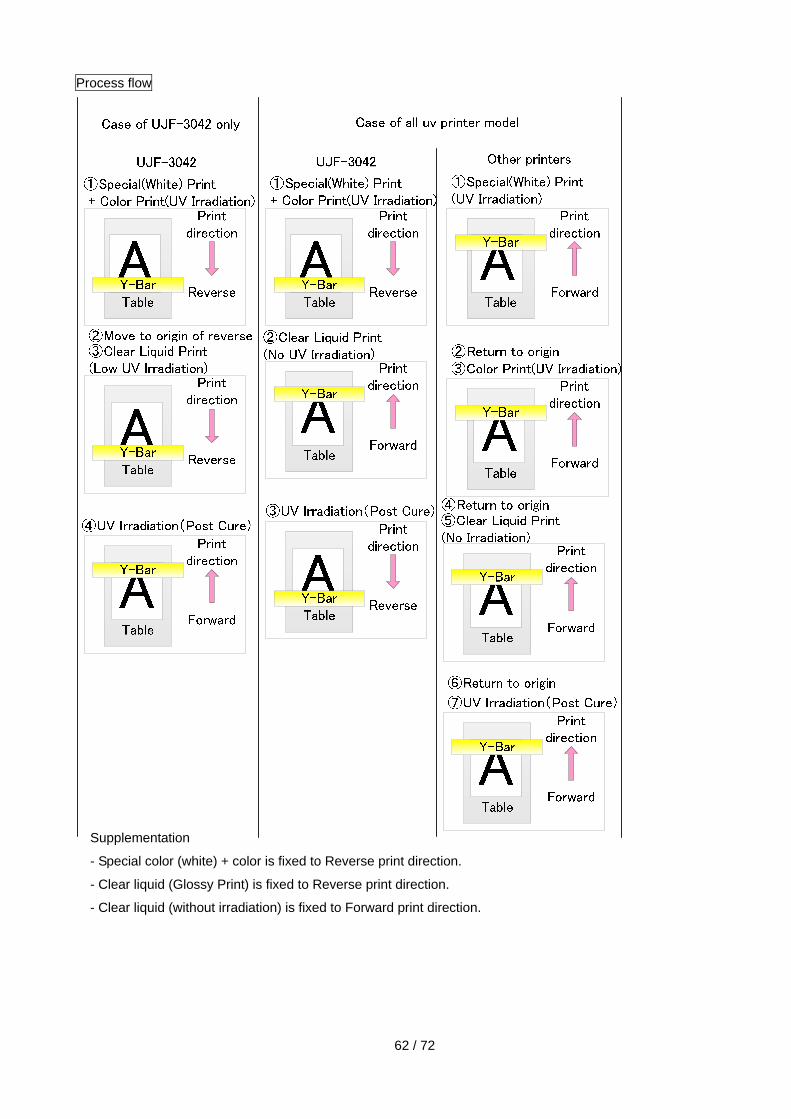
4-3-5. In Case of Special Color (White), Color and Clear Liquid (Glossy Print)
Cross section diagram of printing result
Media
Color
Clear Liquid(Glossy)
Special(White)
Clear liquid setting
Glossy Print (printing method common to all machine types) setting
Glossy Print (printing method dedicated to UJF-3042)
62 / 72
Process flow
Supplementation
- Special color (white) + color is fixed to Reverse print direction.
- Clear liquid (Glossy Print) is fixed to Reverse print direction.
- Clear liquid (without irradiation) is fixed to Forward print direction.

63 / 72
4-3-6. In Case of Special Color (White), Color and Clear Liquid (Matte Print)
Cross section diagram of printing result
Clear liquid setting
Matte Print setting

64 / 72
Process flow
Supplementation
- Special color (white) + color is fixed to Reverse print direction.

65 / 72
4-3-7. In Case of Special Color (White), Color and Clear Liquid (Three-dimensional + Surface Clear Liquid is
Matte)
Cross section diagram of printing result
Clear liquid setting
Emboss Print (surface clear liquid is matte) setting

Process flow
66 / 72
Supplementation
- Special color (white) + color is fixed to
Reverse print direction.

67 / 72
4-3-8. In Case of Special Color (White), Color and Clear Liquid (Three-dimensional + Surface Clear Liquid is
Glossy)
4-3-8.1 For Printing Method Dedicated to UJF-3042
Cross section diagram of printing result
Clear liquid setting
Emboss Print (surface clear liquid is glossy) setting

68 / 72
Process flow
Supplementation
- Special color (white) + color is fixed to Reverse print direction.
- Clear liquid (Glossy Print) is fixed to Reverse print direction.

69 / 72
4-3-8.2 For Printing Method Common to All Machine Types
By creating two jobs of Emboss Print and Glossy Print and combining them, make surface clear liquid glossy.
Cross section diagram of printing result
Clear liquid setting
Emboss Print (surface clear liquid is matte) setting
Glossy Print (common to all machine types) setting

Process flow
Other printersUJF-3042
70 / 72
Table
AY-Bar
Forward
② Clear Liquid Print(UV Irradiation)
Table
AY-Bar
Reverse
③ Clear Liquid Print(UV Irradiation)
Printdirection
Printdirection
Table
AY-Bar
Forward
③ Color Print(UV Irradiation)
Table
AY-Bar
Forward
⑤ Clear Liquid Print(UV Irradiation)
Table
AY-Bar
Forward
⑦ Clear Liquid Print(UV Irradiation)
Printdirection
Printdirection
Printdirection
④ Return to origin
⑥ Return to origin
Table
AY-Bar
Forward
(No UV Irradiation)④ Clear Liquid Print
Table
AY-Bar
Reverse
⑤ ( ) UV Irradiation Post Cure
Printdirection
Printdirection
Table
AY-Bar
Forward
⑧ Clear Liquid Print(No UV Irradiation)
Table
AY-Bar
Forward
⑩ ( ) UV Irradiation Post Cure
Printdirection
Printdirection
⑨ Return to origin
Table
AY-Bar
Reverse
① Special(White) Print + Color Print(UV Irradiation)
Printdirection
② Return to origin
Table
AY-Bar
Forward
① Special(White) Print (UV Irradiation)
Printdirection
From here, it is the second job.
Supplementation
- Special color (white) + color is fixed
to Reverse print direction.
- Clear liquid (Glossy Print) is fixed to
Reverse print direction.

71 / 72
4-4. Note on Glossy Print of UJF-3042
About Media
You might not be able to print smooth gloss by the media you use. Please confirm Glossy Print by the media you use
beforehand.
About pass
To perform Glossy Print of clear liquid, it is necessary to print with the most suitable number of passes according the
resolution of feeding direction.
When performing Glossy Print on the surface with Glossy Print/Emboss Print in RasterLinkPro5, the number of
passes selected in the print mode is used for the color image, the special color image (white), the clear image (Matte
Print) during Emboss Print and UV irradiation, however, when performing Glossy Print, the pass below is used
(RasterLinkPro5 changes the pass automatically.)
No Printing Resolution of
Feeding Direction
Pass
1 600 Dpi 4
2 900 Dpi 6
3 1200 Dpi 8
About density
When perform Glossy Print of clear liquid, the density and the media affect the image quality. In addition, when
making the surface glossy in the Emboss Print, the number of printings also affects. The recommended setting
values under the checked conditions are as below:
Profile media name: Lumirror WhiteBackv3.1
Ink: LH-100 ink
Others: Clear liquid was discharged on the part printed with color ink of LH-100 ink.
Emboss Print (Glossy Print on surface) Glossy Print
When density is lower When density is 100%
No Printing
Resolution
Pass
Dot size
(L, M, S)
Pass Density Pass Density No. of printings Pass Density No. of printings
1 720 x 600VD 16 3,2,1 4 95% 4 95% 2,4,6,8,10 4 100% 2,4,6,8,10
2 720 x 900VD 24 3,2,1 6 70% 6 70% 2,4,6 6 100% NG
3 720 x 1200VD 32 3,2,1 8 70% 8 70% NG 8 100% NG
4 1440 x 1200VD 32 3,2,1 8 85% 8 85% NG 8 100% NG
Profile media name: UV-PETv3.1
Ink: LH-100 ink
Others: Clear liquid was discharged on the part printed with color ink of LH-100 ink.
Emboss Print (Glossy Print on surface) Glossy Print
When density is lower When density is 100%
No Printing
Resolution
Pass
Dot size
(L, M, S)
Pass Density Pass Density No. of printings Pass Density No. of printings
1 720 x 600VD 8 3,2,1 4 95% 4 95% NG 4 100% 2,4,6
2 720 x 900VD 12 3,2,1 6 80% 6 80% 4,6,8,10 6 100% NG
3 720 x 1200VD 16 3,2,1 8 80% 8 80% 2,4 8 100% NG
4 1440 x 1200VD 16 3,2,1 8 100% 8 100% NG

72 / 72
Even if you select the pass in blue, RasterLinkPro5 changes it to the one in red automatically for Glossy Print. (Refer
to “About pass” above.)
4-5. Information on Emboss Print of UJF-3042
The thickness of ink when a clear liquid is printed 100 times is as follows.
Media Name: Lumirror
Ink Consumption Print Condition Thickness
Maximum
Ink Consumption
Profile: UJF30426CLH100_Lumirror_F103025.icc
Resolution:720x900VD
Pass:24
Emboss Print Count: 10 times
Print Count of Job:10 times
1.6173mm
Minimum
Ink Consumption
Profile: UJF30426CLH100_Lumirror_F103117.icc
Resolution:720x1200VD
Pass:32
Emboss Print Count: 10 times
Print Count of Job:10 times
1.3998mm
Media Name: UV-PET
Ink Consumption Print Condition Thickness
Maximum
Ink Consumption
Profile: UJF30426CLH100_PET_F103024.icc
Resolution:720x900VD
Pass:12
Emboss Print Count: 10 times
Print Count of Job:10 times
1.6145mm
Minimum
Ink Consumption
Profile: UJF30426CLH100_PET_F103144.icc
Resolution:720x600VD
Pass:8
Emboss Print Count: 10 times
Print Count of Job:10 times
1.1038mm

Ⓒ2011 MIMAKI ENGINEERING CO., LTD. All rights reserved. D202207-10-28022011