jerry’s word processing reviews for the past several
TRANSCRIPT

1
JERRY’S WORD PROCESSING REVIEWS FOR THE PAST SEVERAL MONTHS
FOLLOW For quick access, just click on a topic listed below
Contents REVIEW for MAY 09 ...................................................................................................... 3
DRAWING LINES ............................................................................................. 3 NUMBERING ITEMS ........................................................................................ 3
SEQUENCE OF NUMBERING ...................................................................... 4
BORDERS AROUND TEXT ............................................................................. 4 HIDING THE TASK BAR .................................................................................. 5 HELP FOR THE VISUALLY IMPAIRED ........................................................... 5
REVIEW for APRIL 09 .................................................................................................... 6 CREATING A URL ............................................................................................ 6 SHOW / HIDE FEATURE – (NON-PRINTING CHARACTERS) ....................... 6
ADDING WORDS TO YOUR CUSTOM DICTIONARY .................................... 6 UNDERSTANDING PARAGRAPHS INDENTS AND LINE SPACING ............. 7 WORKING WITH TOOLBARS ......................................................................... 8
DOCKING STANDARD AND FORMATTING TOOLBARS SIDE BY SIDE ... 8
LOCATING ICONS ON WORD 2007 RIBBON BAR ........................................ 8
EMOTICONS..................................................................................................... 9 CHARACTER CODES (unicode) ..................................................................... 9
WORKING WITH TEXT BOXES ....................................................................... 9 CAUSE TEXT TO FLOW AROUND YOUR TEXT BOX .............................. 10 MOVING THE TEXT BOX ........................................................................... 11
SEVERAL TEXT BOXES MAY BE LINKED TOGETHER ........................... 11 REVIEW for MARCH 09 ............................................................................................... 12
TWO SESSIONS ............................................................................................. 12
USING TASK PANES ..................................................................................... 12 MAIL MERGE TIPS ........................................................................................ 12 READ ONLY FILES ........................................................................................ 12 DESKTOP ICONS DON’T STAY PUT ............................................................ 13 VISIT THE CKCS WEB SITE REGULARLY................................................... 13
PASTE OPTION TAGS ................................................................................... 14 WANT A LAUGH, GOOGLE THESE TWO ITEMS ........................................ 14
WORDS SHOW HIDE FEATURE ................................................................... 14 USE WINGDINGS FOR CHECK BOXES ....................................................... 15 SEVERAL Vista QUESTIONS ........................................................................ 15 MS WORD MAY BE PURCHASED SEPARATELY ....................................... 15 THE SIMPLEST WAY TO BURN A FILE TO A DISK .................................... 15
FOUR SHORTCUT KEYS YOU NEED TO REMEMBER ............................... 16 THE PREVIEW PANE IN MICROSOFT OUTLOOK EXPRESS (Win XP) OR WINDOWS MAIL (Win Vista) ......................................................................... 16

2
ALPHABETIZING LISTS IN WORD ............................................................... 17
AUTO CORRECT FEATURE .......................................................................... 18 REVIEW for FEBRUARY 09 ......................................................................................... 21
BEST WAYS TO BACK UP YOUR IMPORTANT DOCUMENTS .................. 21 THREE MOST FREQUENTLY USED KEYBOARD SHORTCUTS ................ 21 THE BEST WAY TO SEND A WORD DOCUMENT (or text from it) BY EMAIL ............................................................................................................. 22
PLACING TEXT VERTICALLY ON A PAGE.................................................. 22 HOW TO ELIMINATE A BLANK PAGE ......................................................... 22 UPGRADING YOUR WORD PROCESSOR ................................................... 23 RECEIVED A WORD DOCUMENT YOU CAN’T VIEW? ............................... 23 USING THE DRAWING TOOLBAR ................................................................ 23
VIDEO’S SHOWN THIS SESSION ................................................................. 24 REVIEW for JANUARY 09 ........................................................................................... 25
EVERY FEW LINES ON DISPLAY OVERLAP............................................... 25 TROUBLE PRINTING AN EMAILED PHOTO ................................................ 25 USING BORDERS AND SHADING ................................................................ 25
BORDERS ................................................................................................... 25 SHADING .................................................................................................... 26
PRINTING DOCUMENTS WITH SHADING ................................................ 26 PAGE BORDERS ........................................................................................ 27
INSERTING PICTURES IN TEXT ................................................................... 27 CHANGING THE IMAGE SIZE .................................................................... 28 CROPPING YOUR PICTURE ...................................................................... 28
LET TEXT FLOW AROUND YOUR PICTURE ............................................ 28
DRAWING LINES ........................................................................................... 29 CAN’T DELETE ONE OF THE LINES? ....................................................... 29
REVIEW for DECEMBER 2008 .................................................................................... 31 RESIZING A PICTURE THAT IS TOO BIG TO EMAIL .................................. 31 TYPE SIZE IS TOO SMALL TO READ .......................................................... 32
TIP ABOUT DOWNLOADING A PROGRAM TO YOUR COMPUTER .......... 32 SAVE VS SAVE AS ........................................................................................ 33 PROTECTING A SPECIAL DOCUMENT ....................................................... 33
LET WORD CREATE AUTOMATIC BACKUP OF YOUR DOCUMENTS ..... 34 FINDING YOUR BACKUP COPY ................................................................ 34
THERE WAS NO NOVEMBER 2008 SIG ..................................................................... 35 REVIEW for OCTOBER 2008 ....................................................................................... 36
PAGE IS TOO WIDE TO VIEW THE RIGHT PART OF THE TEXT ............... 36 HOW DO YOU ADD VOICE (A NARRATIVE) TO A SLIDE SHOW ............... 36
MERGING FILES AND TEXT ......................................................................... 36 PREPARING YOUR ADDRESS LIST ............................................................. 37
PREPARING YOUR WORD MERGE DOCUMENT .................................... 38 MERGING FILES AND TEXT TO PRODUCE LABELS ............................... 41
UNDERSTANDING PARAGRAPHS INDENTS AND LINE SPACING ........... 42

3
REVIEW for MAY 09 CKCS Word Processing Review #78 Jerry Heaton, MS Word SIG Leader
DRAWING LINES All you have to do to have a line drawn from the left to the right margin of your paper, is to type three or more dashes --- or underscore marks ___ or equal signs === or number signs ### or tildes‘ ~~~ in a row and then touch the space bar. That produces lines like these:
If, however, when you type those three keystrokes in a row as discussed above, and press the enter key and NOTHING HAPPENS, it s because you have that feature turned off. You turn this feature on by going to TOOLS > AUTO CORRECT OPTIONS select the AUTOFORMAT AS YOU TYPE tab and place a checkmark in BORDER LINES checkbox:
NUMBERING ITEMS Should you have a list, the following is an example: STEPS TO USING A TV REMOTE CONTROL. Pick up the remote Find the POWER button Point the remote in the general direction of the TV Press the Power button Next step Next step Etc. Word can automatically number your list in sequence if you selected FORMAT > BULLETS AND NUMBERING >select the NUMBERED tab and select the style of

4
numbering you desire > the click OK. The dialog box shows here.
The same may be accomplished by clicking on the numbering icon on the FORMATTING TOOLBAR (at right). This will use the last numbering style you used.
1. Pick up the remote 2. Find the POWER button 3. Point the remote in the general direction of the TV 4. Press the Power button 5. Next step 6. Next step 7. Etc.
SEQUENCE OF NUMBERING On the BULLETS AND NUMBERING dialog box pictured above, note that, when you number several items in one document, you have the option of RESTARTING NUMBERING of CONTINUE PREVIOUS LIST. Selecting restarting numbering makes the second group in one document start with 1 again. The continue previous list numbering selection starts with the next number in sequence from the first list in your document.
BORDERS AROUND TEXT
5
This month we had another discussion about using Borders, a subject we covered in our January 09 review. Please check the January review below for information on this subject.
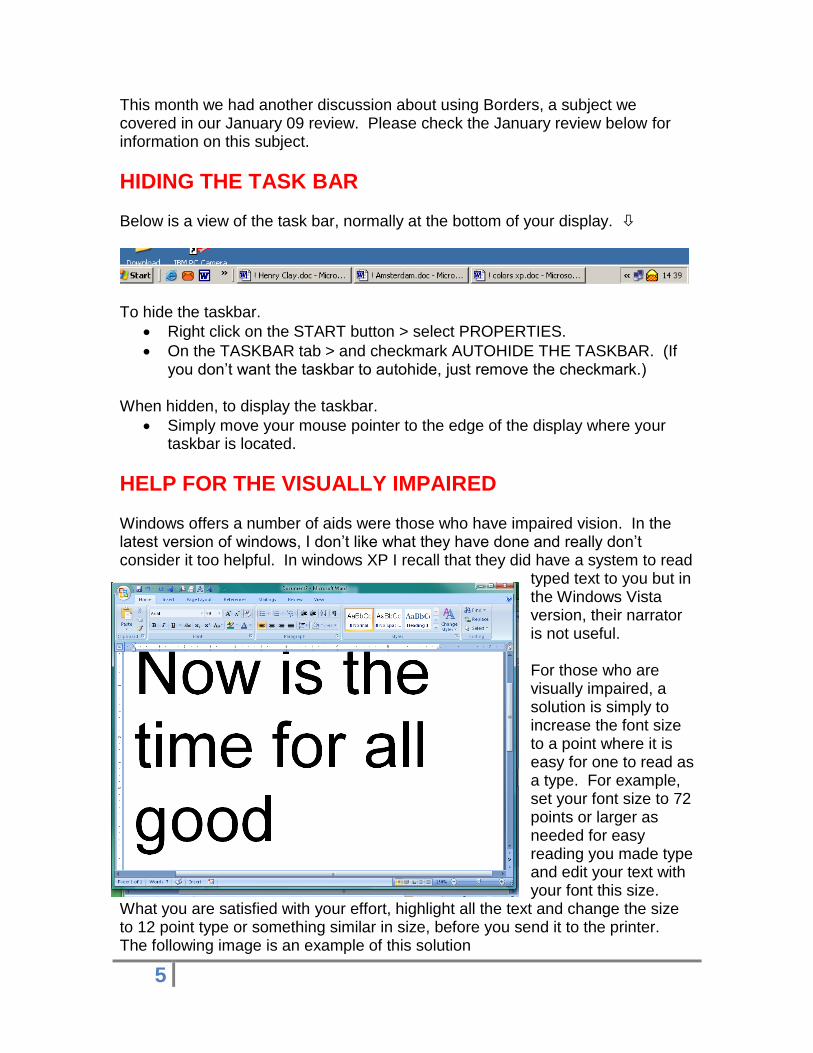
HIDING THE TASK BAR Below is a view of the task bar, normally at the bottom of your display.
To hide the taskbar.
Right click on the START button > select PROPERTIES.
On the TASKBAR tab > and checkmark AUTOHIDE THE TASKBAR. (If you don‘t want the taskbar to autohide, just remove the checkmark.)
When hidden, to display the taskbar.
Simply move your mouse pointer to the edge of the display where your taskbar is located.
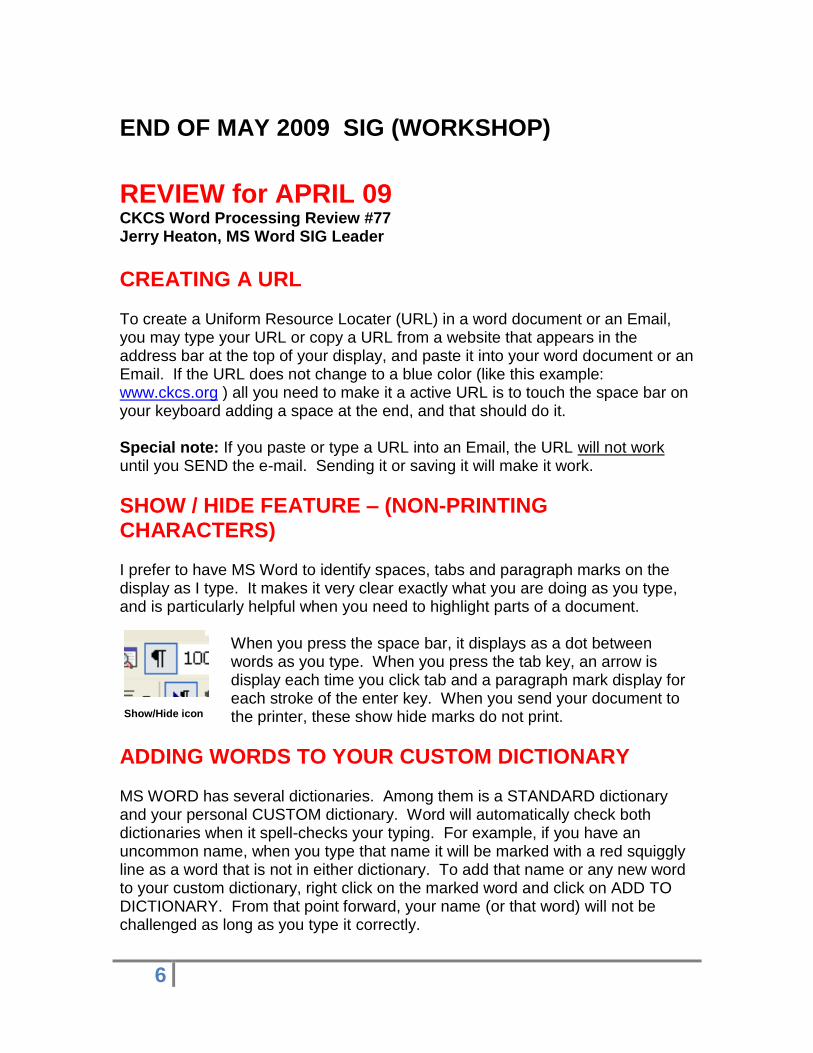
HELP FOR THE VISUALLY IMPAIRED Windows offers a number of aids were those who have impaired vision. In the latest version of windows, I don‘t like what they have done and really don‘t consider it too helpful. In windows XP I recall that they did have a system to read
typed text to you but in the Windows Vista version, their narrator is not useful. For those who are visually impaired, a solution is simply to increase the font size to a point where it is easy for one to read as a type. For example, set your font size to 72 points or larger as needed for easy reading you made type and edit your text with your font this size.
What you are satisfied with your effort, highlight all the text and change the size to 12 point type or something similar in size, before you send it to the printer. The following image is an example of this solution
6
END OF MAY 2009 SIG (WORKSHOP)
REVIEW for APRIL 09 CKCS Word Processing Review #77 Jerry Heaton, MS Word SIG Leader
CREATING A URL To create a Uniform Resource Locater (URL) in a word document or an Email, you may type your URL or copy a URL from a website that appears in the address bar at the top of your display, and paste it into your word document or an Email. If the URL does not change to a blue color (like this example: www.ckcs.org ) all you need to make it a active URL is to touch the space bar on your keyboard adding a space at the end, and that should do it. Special note: If you paste or type a URL into an Email, the URL will not work until you SEND the e-mail. Sending it or saving it will make it work.
SHOW / HIDE FEATURE – (NON-PRINTING CHARACTERS) I prefer to have MS Word to identify spaces, tabs and paragraph marks on the display as I type. It makes it very clear exactly what you are doing as you type, and is particularly helpful when you need to highlight parts of a document.
When you press the space bar, it displays as a dot between words as you type. When you press the tab key, an arrow is display each time you click tab and a paragraph mark display for each stroke of the enter key. When you send your document to the printer, these show hide marks do not print.
ADDING WORDS TO YOUR CUSTOM DICTIONARY MS WORD has several dictionaries. Among them is a STANDARD dictionary and your personal CUSTOM dictionary. Word will automatically check both dictionaries when it spell-checks your typing. For example, if you have an uncommon name, when you type that name it will be marked with a red squiggly line as a word that is not in either dictionary. To add that name or any new word to your custom dictionary, right click on the marked word and click on ADD TO DICTIONARY. From that point forward, your name (or that word) will not be challenged as long as you type it correctly.
Show/Hide icon
7
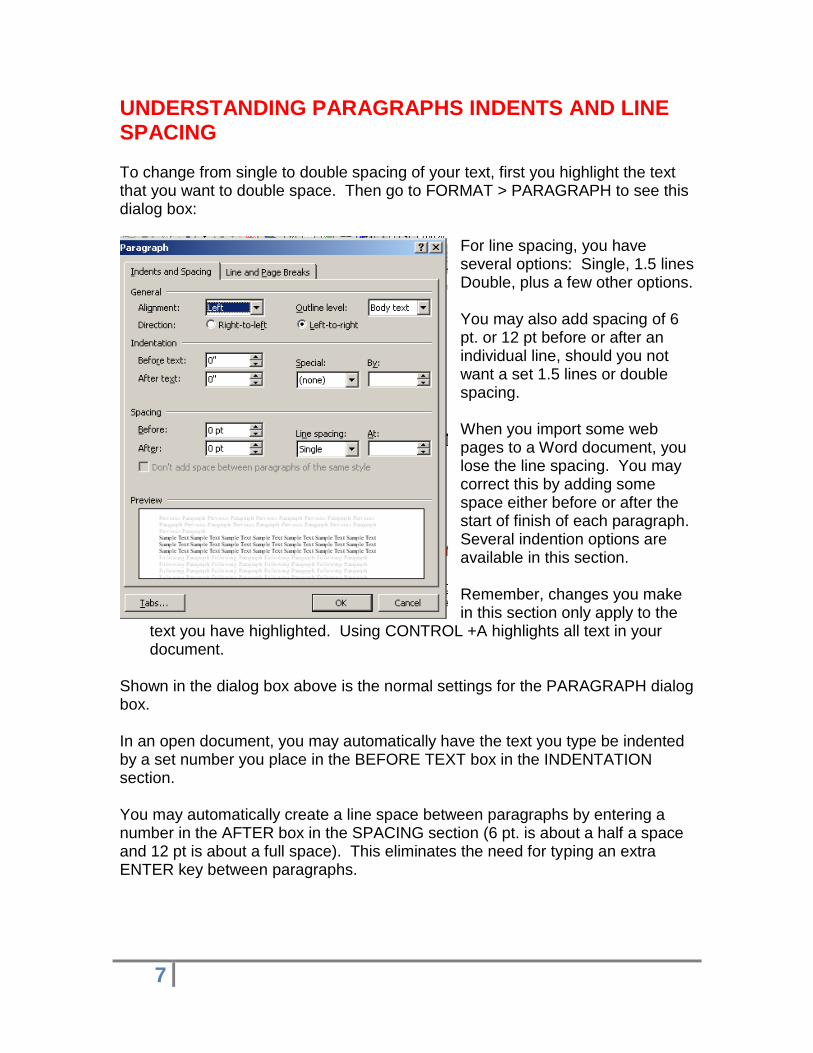
UNDERSTANDING PARAGRAPHS INDENTS AND LINE SPACING To change from single to double spacing of your text, first you highlight the text that you want to double space. Then go to FORMAT > PARAGRAPH to see this dialog box:
For line spacing, you have several options: Single, 1.5 lines Double, plus a few other options. You may also add spacing of 6 pt. or 12 pt before or after an individual line, should you not want a set 1.5 lines or double spacing. When you import some web pages to a Word document, you lose the line spacing. You may correct this by adding some space either before or after the start of finish of each paragraph. Several indention options are available in this section. Remember, changes you make in this section only apply to the
text you have highlighted. Using CONTROL +A highlights all text in your document.
Shown in the dialog box above is the normal settings for the PARAGRAPH dialog box. In an open document, you may automatically have the text you type be indented by a set number you place in the BEFORE TEXT box in the INDENTATION section. You may automatically create a line space between paragraphs by entering a number in the AFTER box in the SPACING section (6 pt. is about a half a space and 12 pt is about a full space). This eliminates the need for typing an extra ENTER key between paragraphs.

8
WORKING WITH TOOLBARS There are 30 toolbars available for your use. Each has its specific purpose. For example, you would want to display a picture toolbar if working with pictures. If all the toolbars were displayed at once, there would hardly be enough workspace in which to type two or three lines of text.
The default arrangements of toolbars shown above are: At the top is the TITLE BAR Next is the MENU BAR Next is the STANDARD TOOLBAR Next is the FORMATTING TOOL BAR At the bottom is the RULER. DOCKING STANDARD AND FORMATTING TOOLBARS SIDE BY SIDE You have the option to display the Standard and Formatting toolbars separately on two rows or they may be displayed side by side. To make your selection, go to TOOLS > CUSTOMIZE and check (or uncheck) the ―SHOW STANDARD AND FORMATTING TOOLBARS ON TWO ROWS. I do not recommend that these two toolbars be on one row, because half of the icons you may need are covered until you slide one of the toolbars to the left or to the right.
LOCATING ICONS ON WORD 2007 RIBBON BAR Once you purchase and install Word 2007 the standard toolbars previously discussed are replaced with a RIBBON BAR. You will need to learn where old familiar icons from a 2003 (or earlier version), are placed on the ribbon bar in 2007. Microsoft has created a terrific guide to assist you in learning the new locations of icons. To download this guide to your desktop, go to Google and type ―Word 2003 to 2007‖ without the quotes. This will offer a Microsoft‘s site for, Interactive Word 2003 to Word 2O07 Command Reference Guide. Click on that and in the middle of the page select .START THE GUIDE. When you start this program, it displays the original toolbars you see in word 2003. Select a familiar icon from the 2003 toolbar, click on that icon and immediately the 2007 ribbon bar appears and the located of that icon feature is displayed on the 2007 ribbon bar. Then, clicking anywhere in the 2007 display

9
will immediately take you back to the 2003 display for more searching. Try this feature, it is very helpful. You may want to create a shortcut on your desktop that will take you directly to this command reference guide. To do this, following the 5 steps below. HOW DO YOU PUT THIS SHORTCUT ON YOUR DESKTOP?
1. Copy this link: http://office.microsoft.com/assistance/asstvid.aspx?assetid=XT100766331033&vwidth=1044&vheight=788&type=flash&CTT=11&Origin=HA100744321033
2. Right click on the desktop and select NEW > SHORTCUT 3. Paste the copied link in the space provided and click NEXT 4. Give it a name I chose Word 2003 to 2007 5. Click Finish
EMOTICONS Emoticons were first used only in Emails, however they are now sometimes placed in Word documents. An example of an Emoticon is typing a colon : plus a dash - plus a close parentheses ) to produce a smiley face in an Email.
: - )
If you do this in MS Word, it automatically will produce an drawn smiley face .
Wikipedia has a long list of emoticons you may create using your keyboard: http://en.wikipedia.org/wiki/List_of_emoticons . There are similar sites, which you may visit. Use Google search;‖emoticons
CHARACTER CODES (unicode) Certain symbols that are not on your keyboard may be placed in your document using the Alternate key and your number keypad. For example, holding down the Alternate key and using the number keypad, type 167. This will produce a degree symbol º which is not found on your keyboard.
WORKING WITH TEXT BOXES The purpose of text boxes is to allow you to easily place blocks of text in and around other unrelated blocks of text, yet keeping them separate. For example, with a story written by someone, you may wish to include a biographical sketch of the author to one side and have the author‘s story flow around the biographical sketch. You may create a text box and type inside it or copy text and
(This is an example of
the use of a text box)
Jerry Heaton has
been leading the
Word Processing
SIG at CKCS for
several years
now.
10
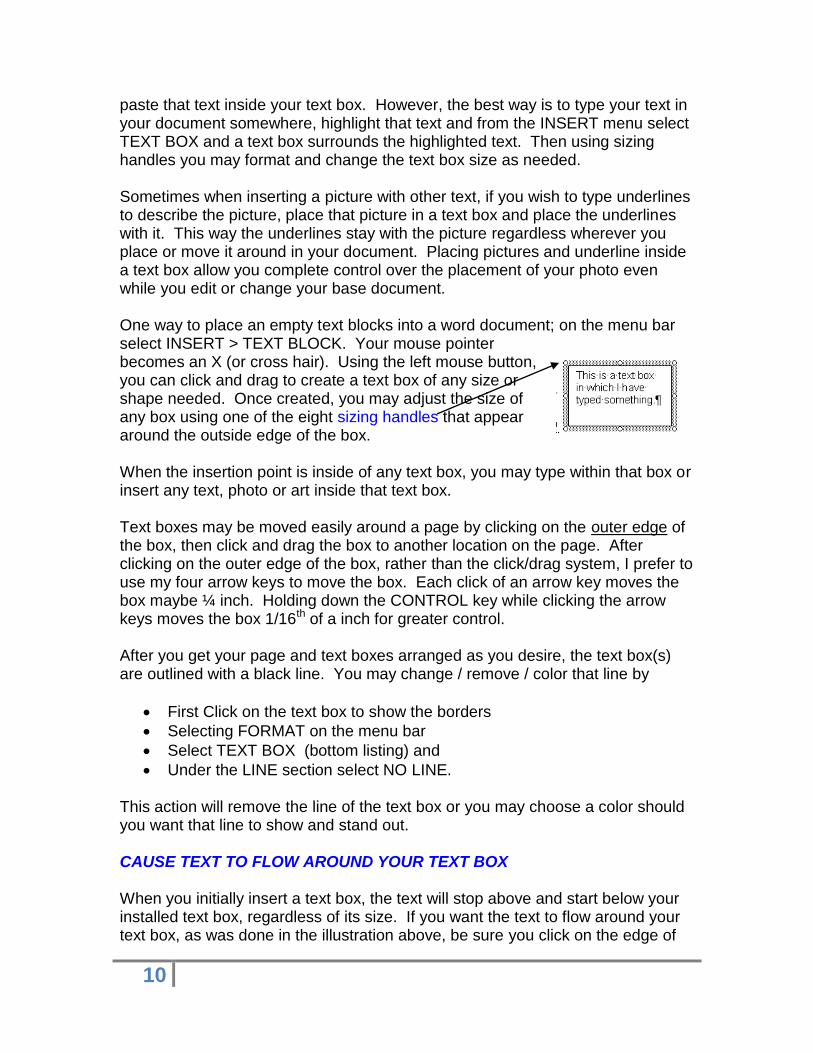
paste that text inside your text box. However, the best way is to type your text in your document somewhere, highlight that text and from the INSERT menu select TEXT BOX and a text box surrounds the highlighted text. Then using sizing handles you may format and change the text box size as needed. Sometimes when inserting a picture with other text, if you wish to type underlines to describe the picture, place that picture in a text box and place the underlines with it. This way the underlines stay with the picture regardless wherever you place or move it around in your document. Placing pictures and underline inside a text box allow you complete control over the placement of your photo even while you edit or change your base document. One way to place an empty text blocks into a word document; on the menu bar select INSERT > TEXT BLOCK. Your mouse pointer becomes an X (or cross hair). Using the left mouse button, you can click and drag to create a text box of any size or shape needed. Once created, you may adjust the size of any box using one of the eight sizing handles that appear around the outside edge of the box. When the insertion point is inside of any text box, you may type within that box or insert any text, photo or art inside that text box. Text boxes may be moved easily around a page by clicking on the outer edge of the box, then click and drag the box to another location on the page. After clicking on the outer edge of the box, rather than the click/drag system, I prefer to use my four arrow keys to move the box. Each click of an arrow key moves the box maybe ¼ inch. Holding down the CONTROL key while clicking the arrow keys moves the box 1/16th of a inch for greater control. After you get your page and text boxes arranged as you desire, the text box(s) are outlined with a black line. You may change / remove / color that line by
First Click on the text box to show the borders
Selecting FORMAT on the menu bar
Select TEXT BOX (bottom listing) and
Under the LINE section select NO LINE. This action will remove the line of the text box or you may choose a color should you want that line to show and stand out. CAUSE TEXT TO FLOW AROUND YOUR TEXT BOX When you initially insert a text box, the text will stop above and start below your installed text box, regardless of its size. If you want the text to flow around your text box, as was done in the illustration above, be sure you click on the edge of

11
your text box, click on FORMAT > TEXT BOX and on the LAYOUT tab, select SQUARE and the text will flow around the text box regardless where you move it. MOVING THE TEXT BOX To move the text box, you first must double click on the text box border, then you can move it. You can click and drag the box using the border or you may use your arrow keys on your keyboard to move the text box. The latter give you considerable control. SEVERAL TEXT BOXES MAY BE LINKED TOGETHER Should you have more text than can fit into a text box on page one of a document, you may create another text box on a subsequent page and link the second text box to the first. This is done by clicking on the border of the first text box, then right click on that border and select CREATE A TEXT BOX LINK. Once you do that, your pointer will change to an image that looks like a measuring cup. Take your measuring cup to the second text box and the image will pour the overflow text from the first text box to the second text box. If necessary you may link multiple text boxes together, in this fashion.
END OF APRIL 2009 SIG (WORKSHOP)

12
REVIEW for MARCH 09 CKCS Word Processing Review #76 Jerry Heaton, MS Word SIG Leader
TWO SESSIONS We had an fantastic turnout for our first afternoon‘s session in over two years. I truly appreciate our dedicated and interested members in participating in these sessions. The first session was at 1:30 PM on March 3 and the second session was 7:30 PM that same day. My classmates pretty much control the direction these classes take with all their good questions and I think we all learn something from each other. I look forward to doing two sessions again in April.
USING TASK PANES When you start Microsoft Word, a blank document page appears and generally the task pane will open to the right of that blank document page. You may turn that task pane on an off by going to VIEW and select TASK PANE or use the shortcut: CONTROL + F1. The task pane provides easy access to recently used documents, clip art, the clipboard, and it serves other purposes.
MAIL MERGE TIPS Mail merge is used in Word to take information from a word table or a database and enter it into letters, envelopes, labels or to provide you a printed list (called a directory) of selected information from your table or database. If you choose the LETTERS, ENVELOPES or LABELS option, you obtain information from one file on one page or one label or one envelope. If you want selected information from your table or database listed one under the other, you need to select the option of DIRECTORY. Directory does provide you a continuous list, one after the other of selected information from your table or database.
READ ONLY FILES If you have a file in your computer that you are unable to edit and save over the top of the original document, that likely will be because it has been given an attribute of a READ ONLY file, which means you cannot change the original file. For example let‘s say you have a Master Packing Checklist which has every item you might take when you travel. One would open the master list and create an abbreviated list of those items that you want to pack just for a particular

13
upcoming trip, If you save your master packing list as a read only file, word will allow you to modify that list on the display, but word will require you to save the modified list under a new name. This keeps the original intact and prevents your accidental lost of the original file. To make a document a read only file, go to DOCUMENTS, find the file, right click on it, and at the bottom under ATTRIBUTES checkmark read only. Another attribute you may use is a HIDDEN file. Although you usually can't see a hidden file, it's an ordinary file in all other respects. You can choose whether a file is hidden or visible by changing its properties to designate it as hidden. You can hide rarely used files to reduce clutter, but keep in mind that hidden files still take up space on your hard disk.
DESKTOP ICONS DON’T STAY PUT Microsoft word comes with a feature turned on to automatically arrange your icons on your desktop. In the Default setting, they are set to align upon a grid so that all icons are aligned one with the other according to type. You can generally place icons at different locations on your desktop, but when you shut down and restart your computer, they will be rearrange according to their type and the grid. Should you desire that your icon stay where you put them even after you shut down your computer, you should right click on your desktop, select VIEW, and remove the check mark from in front of AUTO ARRANGE.
VISIT THE CKCS WEB SITE REGULARLY In March 2007, CKCS discontinued its monthly newsletter which was mailed to each member‘s home. As a computer society, it is appropriate that we use our online web site as the primary means of communications with members. For this reason, you are encouraged to regularly check the web site for its many features, many of which change every week. On the web site you will find:
The calendar under MEETING SCHEDULE
The Mac Corner, Joe Does Windows, Joe‘s Top 50 Tips, Jerry‘s MS Word Reviews have their individual links.
The upcoming classes are listed there
You may check the online newsletter by clicking on the NEWSLETTER link.
There is much good information found on our website. Some of the information is only available to you for a limited period; therefore if you find an article of interest, that you might like to save, feel free to copy and paste it into a word document on your computer. That way you will have it the next time you need that information. The newsletter itself may be easily be printed so you may maintain a record copy of it for your files. Be sure to check our web site every few days.
14
PASTE OPTION TAGS When you wish to move or copy text from a web site or from another word document, when you press control + V to paste it there at the end of the pasted item will be a paste option tag which is shown below.
If you click on the paste option tag (icon of a clipboard with text in front of it) you have the option of
1. Keeping the source formatting or 2. Matching the destination formatting or 3. Paste text only.
If you choose number one, the font and font size used in the copied document will be kept. Choice number two allows what you have copied text to look just like the formatting of the document in into which you are pasting that text. When copying something from a webpage you may not want the images and other art to be included therefore choice three is the one you would choose.
WANT A LAUGH, GOOGLE THESE TWO ITEMS
WORDS SHOW HIDE FEATURE I use the show hide feature virtually all the time. I like it because it clearly indicates how many spaces I have between words and after the end of a sentence. I can tell right off if I pressed the space bar the correct number of times of if I have inserted a tab somewhere. When I am highlighting text in order to copy it I can decide how many of the paragraph marks (which occurs each time I press the enter key) I might want to include in my highlighting.

15
USE WINGDINGS FOR CHECK BOXES Word offers you hundreds of symbols you may use for specialize purposes in any word document.. If you are developing a questionnaire and wished place boxes like this
YES NO for persons to check mark their selections. These are available to you from Wingdings. There are hundreds of items to choose from in Wingdings, Wingdings 2, Wingdings 3 and Webdings Go to the INSERT menu and click on SYMBOLS. Check them out.
SEVERAL Vista QUESTIONS WHERE DID RUN GO? Go to the MICROSOFT BUTTON and type RUN and it is available to you. WHERE DO YOU GO TO ADD AND REMOVE PROGRAMS IN VISTA In the control panel they have split the add programs from the remove programs and renamed them. To remove a program on the control panel you select PROGRAMS AND FEATURES and there you find a list of all your installed programs. To add a new program, you select ADD HARDWARE
MS WORD MAY BE PURCHASED SEPARATELY Microsoft Word can be purchased separately, but if you have a use for other MS programs you may want to consider an office suite. I would recommend Microsoft office 2007 Home And Student, (Excel 2007 One Note 2007 PowerPoint 2007 Word 2007)which I have seen for $73.00 and web sites plus tax and shipping. If you choose the Office Professional 2007 version, you additionally will get Access 2007, Accounting Express 2008, Outlook 2007 and Publisher 2007 and I have seen web prices on it from $120 to $200.
THE SIMPLEST WAY TO BURN A FILE TO A DISK To copy a file or photo to a disk, open my computer, the icons usually on your desktop, and it will show the hard drive and devices‘ with removable storage capabilities I find the document or photos that I won on the disk and simply drag them or my DVD or CD removable storage device and let go of them on top of that device. It will immediately burn them to that disk. You can do that with multiple documents and photos as long as you don‘t exceed the capacity of the
16
disk. When you finish and push the button to remove the disk it will finalize that disk before the door opens. Finalizing a desk allows it to be used in viewed on it any other computer. A disk that has not been finalized and generally only be viewed on the computer on which it was made. This is the simple way to get this job done, however if you want to make multiple copies of the same combination of files/photos you need to create a burn a list and use a CD\DVD burning program so that each new disc you burn will be identical.
FOUR SHORTCUT KEYS YOU NEED TO REMEMBER Control + X =cut Control + C = copy Control + V = paste Control + A = highlight everything in your document
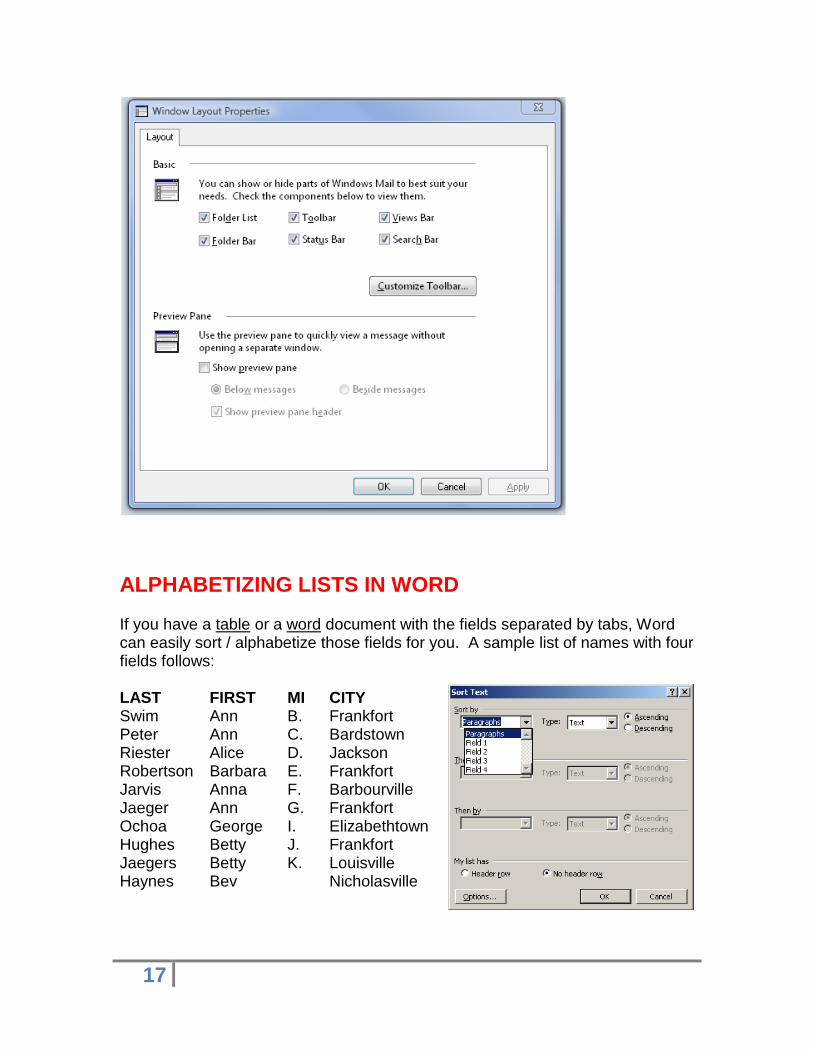
THE PREVIEW PANE IN MICROSOFT OUTLOOK EXPRESS (Win XP) OR WINDOWS MAIL (Win Vista) Some people like having the preview page showing in the above two programs. You view the subject of an e-mail on your list and, with the preview pane active, you automatically look at that document as you simply click on the title For various reason, some like this feature and some dislike it. The Preview Pane may be turned on or turned off by these steps Open your Email program. Click on VIEW > LAYOUT and in the PREVIEW PANE section, remove the checkmark in the SHOW PREVIEW PANE to remove that view or add a checkmark to view and use the preview pane. See below:
17
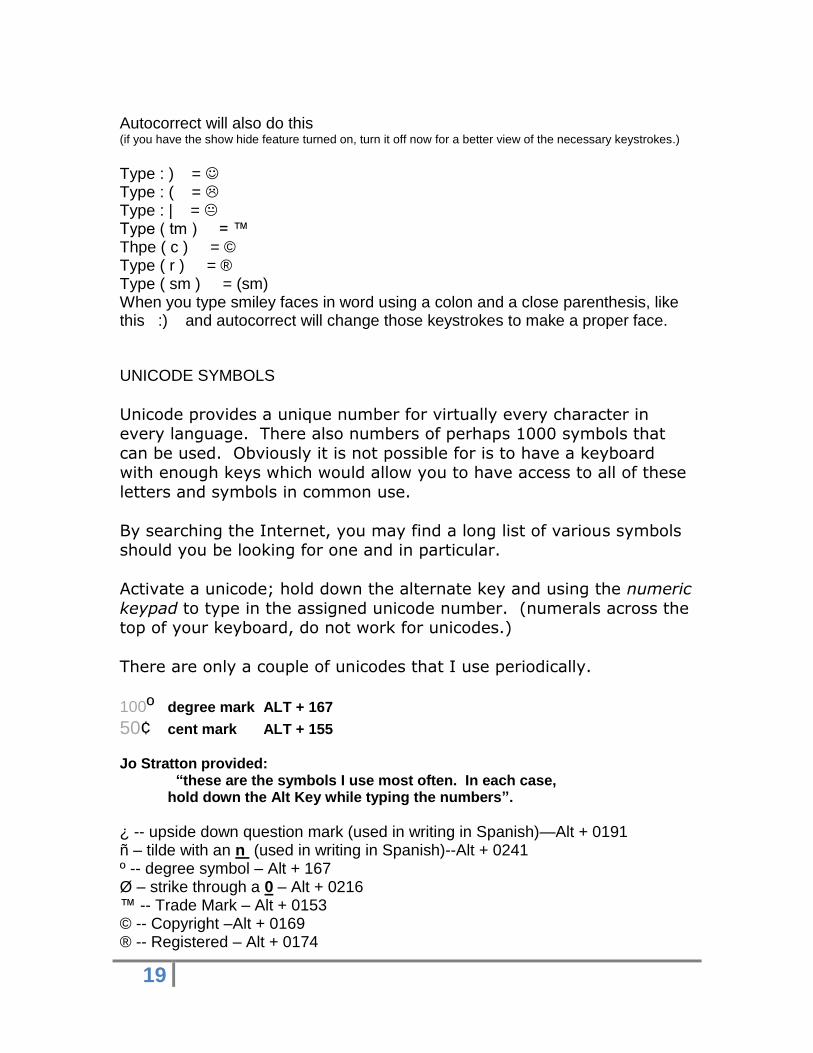
ALPHABETIZING LISTS IN WORD If you have a table or a word document with the fields separated by tabs, Word can easily sort / alphabetize those fields for you. A sample list of names with four fields follows: LAST FIRST MI CITY Swim Ann B. Frankfort Peter Ann C. Bardstown Riester Alice D. Jackson Robertson Barbara E. Frankfort Jarvis Anna F. Barbourville Jaeger Ann G. Frankfort Ochoa George I. Elizabethtown Hughes Betty J. Frankfort Jaegers Betty K. Louisville Haynes Bev Nicholasville

18
To alphabetize the above sample list, you would HIGHLIGHT the text to be sorted, go to TABLE > click on SORT. Notice that at the bottom of the (above) dialog box, in the MY LIST HAS area the NO HEADER ROW has been checked. This is appropriate only if there is no header row. Since my list above does have a header row, (last first mi and city) once you select HEADER ROW, instead of field 1, field 2, etc. which shows in the SORT BY section, the name of each field would be listed in the sort by, then by, then by sections of the dialog box. You may sort this list in any order you desire, using the three sections of the dialog box. To sort the list by city and the individual‘s name, you would start with CITY, then by LAST, then by FIRST. Remember; it is important to select HEADER ROW when you do have a header row otherwise the header row will be included in the sort and likely be placed in the middle of your list along with the other names.
AUTO CORRECT FEATURE AUTOCORRECT is located under the TOOLS > AUTOCORRECT. This is a WORD feature, which automatically corrects common typing errors people make. For example if you intend to type the word across but accidentally press the ―c‖ twice, (accross) word will automatically remove the extra c so the word is spelled correctly. Also if you accidentally type aUTOMOBILE , the autocorrect feature would change that to Automobile once you touch the space bar. With some thought and planning you may put this tool to good use for your situation. Don‘t forget to add any words you typically misspell (which are not already on the autocorrect list). Then autocorrect will correct them as you type. Go to TOOL > AUTOCORRECT and select the AUTOCORRECT tab and look over the two boxes in the center of that menu. I prefer to keep all options check marked in this section. You may customize the autocorrect feature. For example if you constantly had to type Central Kentucky Computer Society (about 33 keystrokes), you could add to the autocorrect list of words, a key word, but not a real word, such as ckcsx -- after which you would type Central Kentucky Computer Society. Then every time you type ckcsx and touch the space bar, those 5 letters would be converted to the full name of the organization. Note: A shortcut to accomplish this task, type the words you want to autotext (part of autocorrect), highlight them. You may want to use mysig as a key word to insert, automatically, your full name within your document.
19
Autocorrect will also do this (if you have the show hide feature turned on, turn it off now for a better view of the necessary keystrokes.)
Type : ) = Type : ( = Type : | = Type ( tm ) = ™ Thpe ( c ) = © Type ( r ) = ® Type ( sm ) = (sm) When you type smiley faces in word using a colon and a close parenthesis, like this :) and autocorrect will change those keystrokes to make a proper face. UNICODE SYMBOLS
Unicode provides a unique number for virtually every character in every language. There also numbers of perhaps 1000 symbols that
can be used. Obviously it is not possible for is to have a keyboard with enough keys which would allow you to have access to all of these
letters and symbols in common use.
By searching the Internet, you may find a long list of various symbols should you be looking for one and in particular.
Activate a unicode; hold down the alternate key and using the numeric
keypad to type in the assigned unicode number. (numerals across the top of your keyboard, do not work for unicodes.)
There are only a couple of unicodes that I use periodically.
100º degree mark ALT + 167
50¢ cent mark ALT + 155
Jo Stratton provided:
“these are the symbols I use most often. In each case, hold down the Alt Key while typing the numbers”.
¿ -- upside down question mark (used in writing in Spanish)—Alt + 0191 ñ – tilde with an n (used in writing in Spanish)--Alt + 0241 º -- degree symbol – Alt + 167 Ø – strike through a 0 – Alt + 0216 ™ -- Trade Mark – Alt + 0153 © -- Copyright –Alt + 0169 ® -- Registered – Alt + 0174

20
§ -- Section symbol (usually appears in legal documents) – Alt + 0167 é – accented e (I use this in typing the word "résumé") – Alt + 130
END OF MARCH 2009 SIG (WORKSHOP)

21
REVIEW for FEBRUARY 09 CKCS Word Processing Review #75 Jerry Heaton, MS Word SIG Leader
We had a great group tonight on an unusual day for Word Processing – a Monday. Our numbers were down but the quality of the group was first class. There were several questions, but my recorder was not turned on and I don‘t recall all the questions.
BEST WAYS TO BACK UP YOUR IMPORTANT DOCUMENTS Consider purchasing a portable hard drive that connects to your computer via a USB Port. There are a number of good backup programs out there that will automatically back up your documents on a regular schedule with no specific action on your part. A combination of one of these programs and a portable drive works really well. A second option, still using a good backup program, would be to back up your important documents to a DVD drive. You, though, do have to install a DVD when it asks you to so Option number three would be to back up the most important documents to a flash drive, since some new flash drives are capable of storing several gigabytes of information on them.
THREE MOST FREQUENTLY USED KEYBOARD SHORTCUTS There are three frequently use keyboard shortcuts that are very useful. It is important that you understand how each of them work. Control + X. This is a keyboard shortcut to cuts any highlighted text from your document. It puts the ‗cut‘ text on to your clipboard where it may be pasted elsewhere in your document or perhaps to an e-mail.

22
Control + C. This keyboard shortcut copies any text you have highlighted in a document and places it on the clipboard. Once there, it may be pasted elsewhere in your document or perhaps to an EMAIL. Control + V. This keyboard shortcut allows you to paste into a document or an e-mail, anything that has been cut or copied to your clipboard.
THE BEST WAY TO SEND A WORD DOCUMENT (or text from it) BY EMAIL The best way is to attach a word document you have prepared to your Email. By attaching it, all the formatting the pictures the art the colors and the text will be viewed exactly as you had them in your document. An alternate way, it is to copy and then paste into the body of your Email the text you want to send. The slight disadvantage of this is that some of your original formatting may be lost, and sometimes pictures or art may not go with your text. Word wrapping will also change according to the width of the body of your Email page. I do not know of a way to adjust the width of the page in your Email.
PLACING TEXT VERTICALLY ON A PAGE You may place text vertically on your page by using a text box. Once you draw all your text box to a tall slender style, you may change the direction of the text from top to bottom are bottom to top by going to format > text direction. The vertical text they be placed in the typing area are in the margin outside the normal margin of the page. When you click on the edge of the text box, a dialog box appears that allows you to select color and lines of your text and the background. You also have an option to have a lined around the outside of your text box are to have no line.
HOW TO ELIMINATE A BLANK PAGE If you find that you have typed one full page of text and suddenly determined that your word processor has added a blank page at the endl, this is likely caused by the fact that you have one or more paragraph marks (enter keystrokes) on the blank page. Unless you have turned on your show hide feature (located on the standard toolbar), those paragraph marks will not be visible to you. Be sure to turn on your show hide feature and then delete the extra paragraph
marks on the blank page. If there is only one paragraph mark there, it may be the end of tax mark and cannot be deleted, and that case you must delete a line in on your main pay each of text. Once you do this, your blank page will disappear.
U
SE
A V
ER
TIC
AL
HE
AD
LIN
E

23
UPGRADING YOUR WORD PROCESSOR If you are considering buying a new version of word, you of course should shop for the best price either local lee or online. I would recommend that you consider buying a Microsoft Office Home And Student Version. This product also includes a copy of Excel and also PowerPoint. You then have these extra programs should you later decide you need them. Be sure to look online at Amazon and Ebay. I would personally want to buy the latest version which is 2007. You note that about every three or four years Microsoft puts out an upgrade to their word processing program, so I would recommend you get the latest version because it is going to be the one that will be used for the longest period of time for you. Take the time to learn the program and the different features of it. Consider buying a Professor Teaches disc which will speed your learning process. It is cheaper if you download the program from the Internet but sometimes you have to buy a license and an original desk in addition to the download. Personally I prefer to have a disk and in my possession in case the program fouls up and has to be reinstalled.
RECEIVED A WORD DOCUMENT YOU CAN’T VIEW? In 2007 Microsoft developed to a new file format for Word in order to improve the ability of their corporate customers to transfer files among programs and to provide more security. The new format is identified with the extension .docx compared with the extension ‗.doc‘ used in the 2003 version and before. This creates a problem for persons using the 2003 and older versions to open the new format. People who have the 2007 version do have the option of saving the document in a .doc format so that those who have not upgraded to the new version can still view the document. Microsoft does offer a solution to this problem. It is called the Microsoft Compatibility Pack. It may be downloaded from the Microsoft web site, and it is free. It is a rather large download so it would be best if you have high-speed Internet access. Go here and look for the download instructions about the middle of the page for Windows users, office 2000 and office XP and office 2003 users. http://office.microsoft.com/en-us/products/HA101686761033.aspx
USING THE DRAWING TOOLBAR Word offers you a drawing toolbar which when turned on (VIEW > TOOLBARS and click on DRAWING) appears at the bottom of your display. You may click on the square or the oval icons to draw those shapes within your word document. The arrow icon allows you to draw lines with an arrow pointing

24
to different items on your page. The AUTO SHAPES area allows you to draw stars, boxes, triangles, cylinders, heart, moon and other shapes. Once you have them in your document, you may write click on them and format them to color the lines and to fill the inside with the color of your choice. Try them, they will spruce up your document – you will like them
VIDEO’S SHOWN THIS SESSION Some requested these videos: Go to Google, type: Jerry_dog.wmv The men in the elevator with the cell phone. I will have to send you this by Email. Just send me an Email to ask for it. 50 strange building of the world Use this link: 50 Strange Buildings of the World | Village of Joy
If the links above don’t work, just copy and paste the links into your internet search engine.)
END OF FEBRUARY 2009 SIG (WORKSHOP)

25
REVIEW for JANUARY 09 CKCS Word Processing Review #74 Jerry Heaton, MS Word SIG Leader
EVERY FEW LINES ON DISPLAY OVERLAP One person purchased a new flat screen monitor and stated every 7th or 8th or 9th line of text overlaps the previous line. Possible solutions:
1. Reinstall old monitor and see if that problem exists on old monitor – that would determine if it is the program or the monitor. Another possibility:
2. You may need a different video card. Another possibility, 3. Try changing the settings for your monitor. Right click on the desktop
display and select PERSONALIZE > DISPLAY SETTINGS , if it set for 1280 by 960 pixels or something larger, try a different setting, such as 1024 by 768 pixels.
TROUBLE PRINTING AN EMAILED PHOTO Should you receive a large photo that was one pasted into an EMAIL (so big you can‘t view all of it at once), you may find that only part of that photo might print should send that e-mail to the printer. The solution may be to click on the image, copy that image, then paste it into a word document. The image in a Word document should not extend beyond the left and right margins of the page. The Word page should be redy to print. There is an excellent discussion by Joe Dietz on in the MS Word review # 73 (Dec 08) explaining how to resample a picture that is a large size. This would be something good to review.
USING BORDERS AND SHADING MS WORD provides you some tools to "dress up" your documents rather than just sticking with plain text. One way is to use borders and shading.
BORDERS To put a border around a heading, first you select the heading by highlighting it. Then go to FORMAT select BORDERS AND SHADING and select the BORDERS tab. You

26
have several buttons, offering a box, a shadow box or 3D etc. You select the style line from the STYLE section and there are probably 20 types of lines to select. In the COLOR section you may assign a certain color to the line or leave it black. In the WIDTH section you determine how wide to make the line - something from ½ point to 6 points in width. Once you click on OK the style of the line, the color and width you have selected will appear around the whole word to form a box from the left margin to the right margin. An example is our next heading SHADING If you desire that the borders not be the full width of the page margins, all you have to do is change your margins for bordered text. A yellow background draws your eye to this text for emphasis. You may use any color you choose. The following is an example of a shadow box adding color to the line.
YOU MAY USE THIS TO DRESS UP A HEADING
PRINTING DOCUMENTS WITH SHADING If you choose to print a document or an Email with a background color which you copy and paste into Word, it may consume a lot of your color ink cartridge. Before you print it, highlight the text that has the color background and go to FORMAT > BORDERS AND SHADING > and with the SHADING tab selected, click on NONE.

27
PAGE BORDERS You may add a page border around an entire page. To do this go to FORMAT, select BORDERS AND SHADING, be sure you have selected the PAGE BORDERS tab, then select a border you like under ART section click OK and that selected border appears all around the outside of your page. It is about 3/8th inch from the outside edge of the page. On some printers this prints just fine. I have a laser printer and it works great - all sides of the page borders do print. I have a color printer which uses an ink cartridge and on it, the bottom border is too close to the bottom of the page and does not print. If this happens, you need to adjust the distance of the border from the edge of the page. This is accomplished by going to FORMAT > BORDERS AND SHADING > select the PAGE BOARDER tab > then click on OPTIONS which will produce the BORDER AND SHADING OPTIONS dialog box shown at right. Increase the size of the bottom margin from maybe 24 to 48 points and try printing again. Keep adjusting the bottom margin until your border prints on all four sides of the page.
INSERTING PICTURES IN TEXT
It is easy to insert a picture in with your text. The picture must be scanned to create a digital image or taken with a digital camera and transferred into your computer. Another source for digital pictures include many various web sites.

28
This picture was taken in 1952 of a new Kelvinator refrigerator – one of the early side by
side home refrigerators.
Take note of the file name of the picture you wish to insert, go to INSERT on the menu bar > PICTURE > FROM FILE. Then we browse to find the scanned image – in this example it was refrigerator.jpg. Once found, click on INSERT and the image appears at the insertion point in your document. The image will likely almost fill most of your page. If you need to change the size of the picture, just click on the image and eight "sizing handles" appear around the outside edge of the image.
CHANGING THE IMAGE SIZE By grabbing a corner sizing handle with your mouse pointer, and holding the left mouse button down you are able to decrease the size of the image by moving the sizing handle toward the middle of the picture until it is the size you desire. The picture will maintain the correct ratio (height and width) if you use a corner sizing handle. If you choose to use the center sizing handles, the picture will become distorted like it was viewed in a fun house mirror, so don't use the middle sizing handles unless you desire a funny looking image. CROPPING YOUR PICTURE When wor king with pictures you should tur n the PICTUR E tool bar on by g oing to VIEW > TOOLBAR S > PICTUR E
(Thanks to Lilly C rawley for this tip on how to use the cropping tool).
, To crop your picture, just click on the cropping tool icon. You then must center the cropping icon over a sizing handle you want to move. Then pressing your left mouse button and moving the mouse toward the middle of the picture, you may crop out any part of your picture you desire to make the image more eye appealing. You may use any one of the 8 sizing handles. LET TEXT FLOW AROUND YOUR PICTURE

29
If you desire your text to flow around your pictures as was done on the previous page, first CLICK ON THE PICTURE then go to FORMAT > PICTURE > select the FORMAT tab > select SQUARE and click OK.
DRAWING LINES If you need to draw lines from the left margin to the right margin in a Word document, all you need to do is type a few dashes (-) or underscore marks (_) and press the enter key. The result is shown below -- a single line from margin to margin:
If you type several equal signs (=) in a row and press an ENTER key, you get the following results:
If you type several asterisks (*) in a row and press an ENTER key, you get the following results:
If you type several number signs (#) in a row and press an ENTER key, you get the following results:
If you type several tildes (~) in a row and press an ENTER key, you get the following results.
TIP 1: If you wish to put a few dashes in a word document but not have it draw a line, simply put a space at the end of the line dashes and Word will not automatically draw a line for you. TIP 2: If when you type several dashes or underscore marks and nothing happens, go to TOOLS> AUTOCORRECT OPTIONS > select the AUTOFORMAT AS YOU TYPE OPTION and in the APPLY AS YOU TYPE section, be sure BORDERS or BORDER LINES is check marked. CAN’T DELETE ONE OF THE LINES? When you automatically place a line from margin to margin, we think of those as lines, like underscore lines. Normally they can be deleted by highlight the space before the line and the line and touching the DELETE key. Should you run across a line in which this system does not work, you may be looking at a BORDER, not a line. Two things to try:
30
1. The way to delete that line is to highlight the space before the line and CUT that space and the line. It helps to have the SHOW/HIDE feature turned ON, to determine better what you have highlighted.
2. If that does not work, place your insertion point in front of the paragraph mark above your line, but don‘t highlight the paragraph mark itself. Go to FORMAT > BORDERS AND SHADING > select the BORDERS tab, click on NONE > OK.
My advice, don‘t give up, keep trying, sooner or later you will have success. This is a problem that surely will be fixed in future versions of MS Word.
END OF JANUARY 2009 SIG (WORKSHOP)

31
REVIEW for DECEMBER 2008 CKCS Word Processing Review #73 Jerry Heaton, MS Word SIG Leader
RESIZING A PICTURE THAT IS TOO BIG TO EMAIL Q: if I have a picture that is too big to send to a friend by Email what should I do? A: When I snap a picture with my digital camera (it is a 7 megapixel (MP) camera) the file size is huge. I keep the camera setting at the largest possible in case I want to print a large print. For example a typical 7 MP picture averages about 3.6 megabytes (MB) on my hard drive. If I sent that picture by Email to a friend with dial up internet service, it possibly might take 30 minutes or more to download one picture. It would not be practical to Email images that size. That is how you lose a friend. Some Email providers might even reject very large file sizes. The solution is to ‗RESIZE or RESAMPLE‘ your picture. You may use photo programs such as Paint Shop Pro or Adobe Photoshop to do this if you own one of them. That would be the best way to do this. However, another program you may use is IRFANVIEW which you may download to your computer for free. I turned to our CKCS photo expert Joe Dietz for help with these instructions. Thank you Joe for the following information: First resize and resample are two different things. When you resize an image, you either push the pixels closer together (make the image smaller) or farther apart make the image larger). Doing this does not change the size of the file. It can allow you to print larger or smaller prints without making any changes to the original image. When you resample an image you either upsample (add pixels) or downsample (throwaway pixels). Typically, when you want to e-mail an image you resample down it to reduce the size of the file. Example: Open a picture that you want to e-mail. (To experiment you may just want to send it to yourself). In Paint Shop or Photo Shop there is a "make duplicate process" but not in Irfanview. Be sure to follow these steps closely to assure you do not lose your original image.
32
With the picture open go to: Image Resize/resample Look to the lower right side of that window and make sure that resample is checked. On the left top is the size of the image in pixels. Underneath that is the new size. Considering the size of the original image - take the largest size and change 500. Everything else will remain proportionally the same. Click on OK. and your image will have a new size. NEXT and very important so as not to lose your original image. Click on file and then save as. Give the image a new name. (Example - if the original image was named boy.jpg then name this one boyresampled.jpg. This way you will recognize that this image has been altered. Close the image. To verify - go to the folder that holds these two images - boy and boyresampled. Hold your mouse over the original and check out the size of the file. Then hold your mouse over the resampled file and check the size of that file. It should be considerably less than the original. Now open your e-mail program, prepare an e-mail to yourself and then attached the resampled image. Hit the send button and it show go swiftly on its way.
TYPE SIZE IS TOO SMALL TO READ At times, you may encounter a situation of receiving an Email or viewing a web site that has very tiny type, (i.e. 6 point type or less), which is difficult to read. Also tiny type gives you very long lines of text which again adds to your reading difficulty. The solution is use MS Word. Simply highlight and copy the tiny type, open a new Word document and paste that text into it. There you have the ability to easily increase the size of the text by highlighting the text in Word and use the keyboard shortcut (CONTROL + SHIFT + > (the greater than caret [>] which is above the period). Each time you use that keyboard combination, the type size increases one step. Another advantage, long lines, in word, will automatically ‗word wrap‘ into easily readable lines that fit the page margins. Try it, it eases the eyestrain and makes reading the text more enjoyable.
TIP ABOUT DOWNLOADING A PROGRAM TO YOUR COMPUTER Should you have a need to download a program to your computer, it is always a good idea to download that file to your desktop. If you choose to download that program to your ‗MY DOCUMENTS‘ file, the first thing you need to do is write

33
down the name of that file. Years ago, I would download a new program to the My Document folder and then end up not finding it again, because I could not remember the name. If you don‘t have many files in MyDocuments, that may not be much of a problem, but in my case, I have just under 1700 documents there.
SAVE VS SAVE AS What is the difference between save and save as is a question I often hear. The first time you save any document you are asked to give it a name you can easily recall so you might find that document at some future date. After that, anytime you use any of the techniques described previously to save that document, it saves the latest version of the document over the top of the original saved document. After you first save a document, and then make additional change, there may be a need to keep the first version of your document and keep the changed document separately. This is when you use SAVE AS (go to FILE > SAVE AS) you are then asked to provide a new name for the (save as) document. Once you click OK, you then will be working with the newly named document, and your original saved document will be intact under the original name. Changes made to the renamed (save as) document will not affect the original document.
PROTECTING A SPECIAL DOCUMENT Should you create a document that you don‘t want to accidentally modify with new changes, you should then save it as a ―read only‖ file. For example; should you create a MASTER PACKING LIST that would include items to pack if going on a trip to a hotel plus items you would need if going camping, plus items for the car should you be driving plus items you should take when you are flying to your destination, etc.. In such a case, you would want to preserve your master packing list. Then when ready to make a trip you would want to modify your master list by deleting those items from that master list that you won‘t need for your current trip. You could you could use your modified list to check off items as you pack. You would want to keep your master list intact and save your modified list with a name just for your current trip. Microsoft word offers a way to protect your master list in this case. To prevent accidental modification, your master packing list should be a READ-ONLY file. When you modify and try to save a READ-ONLY file Microsoft Word will remind you that the original was a READ-ONLY file an you must to save your modifications with a new name. This keeps your master list intact. This is a really valuable feature.

34
HOW DO YOU DO THIS? Once you complete your master list and have it exactly as you want it, close it, then find it among your documents and right click on the title. Select PROPERTIES > select the GENERAL tab and at the bottom check READ-ONLY. That is all there is to it.
LET WORD CREATE AUTOMATIC BACKUP OF YOUR DOCUMENTS MS Word has a feature which you may activate to automatically create a backup document of everything document you save. If you have ever just about finished an important document and then done something which causes you to lose it, you will love this feature. Just for safety, I keep this feature active on my system. It works this way. Let's say you are typing a document named FAMILY REUNION.doc. As a smart computer user, about every paragraph or two you SAVE your document. With this "Always create a backup copy" feature turned on, WORD saves the previously saved version of your document into a back up file named BACKUP OF FAMILY REUNION.wbk. (Notice the different extension .wbk which I assume stands for ―word back‖). Stating it another way, if you type two paragraphs in your .doc and save it, then type a third paragraph, and save that, the latest version with three paragraphs will be in your .doc file. The version with only two paragraphs will be in your .wbk file. Then if you lose the important document (.doc) with which you are working, and you have saved your work regularly, you may always go to your .wbk document and at least will only lose your most recent work (in the example, just the third paragraph). Remember; always save your document every paragraph or two as you type. CONTROL+S will save your document. Here is how to activate automatic backup: Open up a blank or other word document Go to TOOLS > OPTIONS > select the SAVE tab. The top item is ALWAYS CREATE A BACKUP COPY be sure that is check marked. The second item is ALLOW FAST SAVES and that will automatically be unchecked when you turn on the backup copy feature. Click OK From then on, all previously saved text of all future documents you create will go to a backup (wbk) file for all documents you create and save. FINDING YOUR BACKUP COPY Then to view your back up copy, use the OPEN icon on your standard toolbar, and be sure that the FILES OF TYPE box is set for ALL FILES in the bottom box, otherwise you won't be able to see files ending in the extension .wbk. You should find your backup copy there.

35
Every few weeks you may want to delete all your backup files to regain the space they take up (although the space used is not excessive). To do this, with the ALL FILES showing in that bottom box, find your BACKUPs, highlight them and touch delete. If later you choose to turn this feature off, just put a checkmark in the ALLOW FAST SAVES box. That removes the checkmark from the backup feature.
END OF DECEMBER 2008 SIG (WORKSHOP) THERE WAS NO NOVEMBER 2008 SIG
BECAUSE OF THE ELECTION NIGHT RETURNS
36
REVIEW for OCTOBER 2008
CKCS Word Processing Review #72
Jerry Heaton, MS Word SIG Leader
PAGE IS TOO WIDE TO VIEW THE RIGHT PART OF THE TEXT We discussed a very unusual situation where a document was received but the right portion of the document out of sight – off the edge of the document. During the class, we had no solid solution to this situation, but in our December workshop, (Dec 2) I hope to offer some suggestions that might work should you this problem occur at some future time.
HOW DO YOU ADD VOICE (A NARRATIVE) TO A SLIDE SHOW Using a headset microphone we were able to add voice to a PowerPoint slide show by going to INSERT > MOVIES AND SOUND and one of the options is RECORD SOUND. Clicking this you may record the narrative for that slide and an emblem is there when that slide is shown to start the narrative. There is a way to automatically start the sound without the mouse. Another way to add sound to your slides is to create a sound file, such as a WAV file or an MP3 file and attach it to your slide show.
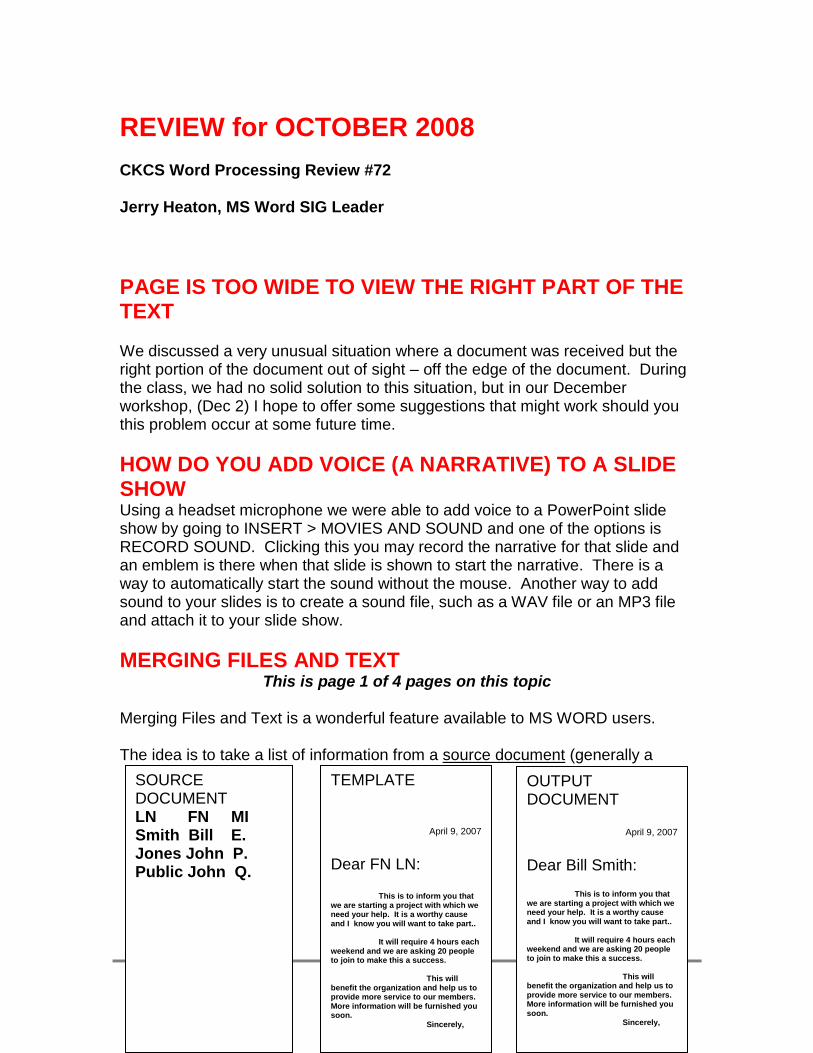
MERGING FILES AND TEXT This is page 1 of 4 pages on this topic
Merging Files and Text is a wonderful feature available to MS WORD users. The idea is to take a list of information from a source document (generally a
TEMPLATE
April 9, 2007
Dear FN LN: This is to inform you that we are starting a project with which we need your help. It is a worthy cause and I know you will want to take part.. It will require 4 hours each weekend and we are asking 20 people to join to make this a success.
This will benefit the organization and help us to provide more service to our members. More information will be furnished you soon. Sincerely,
OUTPUT DOCUMENT
April 9, 2007 Dear Bill Smith: This is to inform you that we are starting a project with which we need your help. It is a worthy cause and I know you will want to take part.. It will require 4 hours each weekend and we are asking 20 people to join to make this a success.
This will benefit the organization and help us to provide more service to our members. More information will be furnished you soon. Sincerely,
SOURCE DOCUMENT LN FN MI Smith Bill E. Jones John P. Public John Q.

37
database of some sort) and use a template to produce individual or multiple output document (s) The example which follows is an system one could use to produce a form letter. We Merge Files with Text to produce:
Letters (form letters)
Envelopes
Labels
Catalog (which is a directory) In our example, we will work entirely in WORD, however if you have your list of names and addresses in a database (such as Access) or a spreadsheet (such as MS Excel) it is better to use those products as the source document – only because they are easier to maintain and update. Word will also work with a Works database or with OUTLOOK EXPRESS if you have your names and addresses there. (I am unfamiliar with OE as I have never used it for this purpose.) Note: If you plan to produce multiple envelopes, make sure that your printer will accept and correctly feed the envelope size and shape you plan to use. The same goes with labels. Some printers are not very efficient with this task. It would be a waste of time to discover a printer problem after you go through all the following steps. Note 2: These instruction are based on using WORD 2000 or 2002, 2003, Word If you are using WORD 97 the menus and dialog boxes are different are different but the concept and system is much the same. Four our example, we want to create a database, in a word table, to contain the names and addresses of the members of a mythical Kentucky Garden Club. PREPARING YOUR ADDRESS LIST
1. Determine the number of fields you will need in your table (database). We assign a field for each element of information. For example, one field might contain just the last name (LN) of an individual member. Other fields might be named FN, MI, ST (for subtitle), address, city, state, zip. We could add any number of fields, like officer titles, or perhaps dues information, phone numbers, SSNs, but in our sample database I will stop with the 8 fields.
2. I would open a new Word Document and name it ―GCA MEMBERSHIP
DB.DOC‖ I would add DB to the title to make it clear this is my database. In would probably go to FILE > PAGE SETUP > and select LANDSCAPE.

38
Then I would go to TABLE > INSERT > TABLE creating 8 columns across and a large number of rows – one for each member. (For the example I will only start with two rows) In entering information, use the tab field to move from column to column (hereafter I will call them fields) by using the TAB key. When you get to the end of a row, you continue to use the TAB key (not the Enter key) to move to the next row
3. The first row in the database must be the field names like LN, FN, MI, etc.
After labeling the fields in my table, and adding some member information, my new table might look like this:
LN FN MI ST ADDRESS CITY STATE ZIP Jones John P. Jr. 123 Main
St Lexington KY 40508
Smith Mary A. 2727 Alumni Dr
Lexington KY 40511
Brown George G. III 141 Southridge Dr
Lexington KY 40505
4. When finished, save and close your document. Note: If you have a long list of names, you may want to sort them alphabetically. To accomplish this, highlight your table > go to TABLE on the menu bar, > SORT > (be sure the ‘MY LIST CONTAINS A HEADER ROW’ is selected) then select the field names by which to sort, like LN. then FN, then MI > and click OK. PREPARING YOUR WORD MERGE DOCUMENT
5. Open a new document and save it as KGC <purpose of letter> TP.doc (I use TP to indicate that this is my Word TEMPLATE document to merge with a database DB).
6. On the menu bar select VIEW > TOOLBAR and select MAIL MERGE
which will activate the mail merge toolbar usually positioned just above the ruler as shown below. (NOTE : there are other ways to accomplish these
tasks, however, based on my experience, the steps I suggest are the best.

39
Pictured above, the MAIL MERGE Toolbar is just above the ruler.
Note: by hovering over the icons on the toolbar, Word identifies the purpose of each icon. Note: initially most of the icons will be ‘grayed out’ out until you use the first two icons.
7. By clicking on the first icon (MAIN DOCUMENT SETUP), a dialog box like the one shown appears for you to identify the purpose of this main document (template), letters, envelopes, labels or directory. In this example we selected a letter.
8. The second icon (OPEN DATA SOURCE),
allows you to find and identify the document containing the Word table you plan to use – (the one I named with the DB in the title) in my example I named this doc GCA MEMBERSHIP DB.DOC
9. I would then type my letter, leaving space for the name and address
information from my database DB.
10. The third icon on the mail merge toolbar (MAIL MERGE RECIPIENTS) allows you to select those who should receive your letter. You may select all name, or just a few name or omit a few on your list. This is done by the use of checkmarks in front of the names.
11. For this step be sure the SHOW HIDE feature is turned on. I don‘t
recommend the use of the next few icons on the toolbar.Instead, just skip to the 6th icon INSERT MERGE FIELDS. Insert all fields you plan to use such as «FN»«MI»«LN»«ST»«ADD1»«CITY»«STATE»«ZIP» «FN» After closing that dialog box, add appropriate spaces between the words and appropriate enter key (paragraph marks) to result in the following:
«FN» «MI» «LN» «ST» «ADD1» «CITY», «STATE» «ZIP»

40
Dear «FN»:
12. Once I am satisfied with the appearance of my letter template (TP), I would save it and then I skip to the fourth icon from the end of the Mail Merge toolbar MERGE TO A NEW DOUCMENT.
13. Even if you have a hundred or so names in your database, in just
seconds, you will have a letter for each recipient. If you spot any error, just delete the new document and this again reveal your template (TP). Just make corrections to your template and run MERGE TO A NEW DOCUMENT again. Repeat this project until you get your letters (output document, exactly the way your want it.
14. You are ready to print. In the box that follows is an example how you might set up the beginning of your
letter.
April 9, 2007 «FN» «MI» «LN» «ST» «ADD1» «CITY», «STATE» «ZIP» Dear «FN»: I need your help with a special project etc.………………
1. Save your document(s) (TP, DB) as appropriate. Generally if I decide to save the output document, I give it the same name as the TP document but I leave the letters TP off the document. Generally I don‘t save the output document after I print it. If I need it again, I just run it again.
This is a terrific feature available to you using MS Word. Once you master it, it‘s fun and very satisfying to use. FOR YOUR INFORMATION: At left is the dialog box used for WORD 98. 1. You create your new document.

41
2. Identify your data source. Insert your fields (LN, FN, etc.) as appropriate. 3. The merge to a new document. The system is basically the same.
MERGING FILES AND TEXT TO PRODUCE LABELS The procedures mention above do apply, however a couple of tips to get labels from your data base and ready to print.
1. When you choose LABELS you first must tell the computer the NUMBER of the label you will be using. It then sets up a page of blank labels based on that number.
2. Once you identify the data base you will use, it puts the words NEXT
RECORD in each of the blank labels on that page, except the first label. There you need to insert the fields and spaces you want to use, perhaps «FN» «MI» «LN» «ST» «ADD1» «CITY», «STATE» «ZIP»
3. IMPORTANT. The next step, is one you must do to get labels in
sequence. About the middle of the MAIL MERGE toolbar is an icon, PROPAGATE LABELS hover over the different icons to determine which icon to use -- (it looks like a miniature page of labels). Once you click on it, that carries the necessary format information to each subsequent label on that page based on the first label.
4. Once you are satisfied with the appearance of your label template (TP), I
would save it and then I skip to the fourth icon from the end of the Mail Merge toolbar MERGE TO A NEW DOUCMENT.
5. You are ready to print your labels.

42
UNDERSTANDING PARAGRAPHS INDENTS AND LINE SPACING To change from single to double spacing of your text, first you highlight the text that you want to double space. Then go to FORMAT > PARAGRAPH to see this dialog box:
For line spacing, you have several options: Single, 1.5 lines and double plus a few other options. You may also add spacing before or spacing after individual line, should you not want a set 1.5 lines or double spacing When you import some web pages to a Word document, you lose the line spacing. You may correct this by adding some space either before or after the start of finish of each paragraph. Several indention options are available in this section. Remember, changes you make in this section only apply to the
text you have highlighted. Using CONTROL +A highlights all text in your document.
Shown above is the normal (starting) settings for the PARAGRAPH dialog box. In an open document, you may automatically have the text you type be indented by a set number you place in the BEFORE TEXT box in the INDENTATION section. Remember some of these changes may easily be made on the ruler. You may automatically create a line space between paragraphs by entering a number in the AFTER box in the SPACING section (6 pt. is about a half a space and 12 pt is about a full space). This eliminates the need for typing an extra ENTER key between paragraphs.
END OF OCTOBER 2008 SIG (WORKSHOP)