jazz harmony user manual - jazzimaging.com harmony manual rev a.pdf · jazz harmony user manual,...
TRANSCRIPT

JAZZ HARMONY User Manual
JAZZ HARMONY User Manual, Rev A 2
Copyright © 2017 Imaging. All rights reserved. This manual and the software described herein are protected by copyright laws and international copyright treaties, as well as other intellectual property laws and treaties. Imaging reserves the right at any time to revise this manual and the software described herein, and assumes no obligation to notify any person or entity of such revisions. Many of the designations used by manufacturers and sellers to distinguish their products are claimed as trademarks. Where those designations appear in this manual, and Imaging was aware of a trademark claim, such designations have been printed in capital or initial capital letters. The Harmony software includes the following parts copyrighted by other parties: The components reading and writing JPEG files are based on the work of the Independent JPEG Group. Interfaces to non- Harmony sensors and to panoramic equipment are based on work licensed from the respective manufacturers of the equipment. The software includes software libraries copyrighted by Microsoft, Inc.
JAZZ HARMONY User Manual, Rev A 3
1 About JAZZ Harmony ............................................................................................................................ 6
2 Home Screen ....................................................................................................................................... 7
2.1 Home Screen at a Glance .............................................................................................................. 7
2.2 A First Look at JAZZ Harmony Home Screen ................................................................................. 7
2.3 Function Icons ............................................................................................................................... 7
3 Single User Installation....................................................................................................................... 9
3.1 Installing Harmony ........................................................................................................................ 9
4 Multiple User Installation ................................................................................................................ 13
4.1 Server Installation ....................................................................................................................... 13
4.2 Workstation Installation ............................................................................................................. 16
4.3 Getting License Code .................................................................................................................. 17
5 Settings ................................................................................................................................................ 18
5.1 General Settings .......................................................................................................................... 18
5.2 Settings for JAZZ Sensor .............................................................................................................. 19
5.3 Setting Placeholder Type ............................................................................................................ 20
5.4 Setting Intraoral Camera ............................................................................................................. 21
5.5 Setting Panoramic ....................................................................................................................... 22
5.6 Setting Cephalometric ................................................................................................................ 22
5.7 Setting Export / E-mail / Print ..................................................................................................... 23
6 Autobridge .......................................................................................................................................... 24
6.1 Auto-Bridge for Practice Management Software ....................................................................... 24
7 Patients ............................................................................................................................................... 25
7.1 Patients - General ....................................................................................................................... 25
7.2 Searching a Patient ..................................................................................................................... 25
7.3 Adding a New Patient ................................................................................................................. 25
7.4 Editing a Patient .......................................................................................................................... 26
7.5 Deleting a Patient ........................................................................................................................ 26
7.6 Accessing a Patient ..................................................................................................................... 26
8 Exams .................................................................................................................................................. 27
8.1 View Exams ................................................................................................................................. 27
8.2 Viewing an Exam ......................................................................................................................... 27
8.3 Viewing an Image ........................................................................................................................ 28
8.4 Using Mini-Layout to Move to another Image ............................................................................ 28
8.5 Adjusting Brightness and Contrast .............................................................................................. 29

JAZZ HARMONY User Manual, Rev A 4
8.6 Using Image Tools ....................................................................................................................... 29
8.7 Function Icons ........................................................................................................................... 32
9 Intraoral .............................................................................................................................................. 33
9.1 Taking Intraoral Images ............................................................................................................... 33
9.2 Taking Images Automatically ...................................................................................................... 33
9.3 Taking an Image .......................................................................................................................... 35
9.4 Retaking an Existing Image ......................................................................................................... 35
9.5 Drag and Drop ............................................................................................................................. 35
10 Intraoral Camera ............................................................................................................................. 36
10.1 Taking Intraoral Camera Images ................................................................................................. 36
10.2 Taking Unlimited Intraoral Camera Images ................................................................................ 36
10.3 Taking Intraoral Camera Images Automatically .......................................................................... 37
10.4 Taking an Intraoral Camera Image .............................................................................................. 39
10.5 Retaking an Existing Intraoral Camera Image ............................................................................. 39
11 Panoramic (Pan) .............................................................................................................................. 40
11.1 Taking Pan Images ....................................................................................................................... 40
11.2 Taking a Pan Image ..................................................................................................................... 40
11.3 Retaking a Pan Image .................................................................................................................. 41
12 Cephalometric (Ceph) ..................................................................................................................... 42
12.1 Taking Ceph Images .................................................................................................................... 42
12.2 Taking a Ceph Image ................................................................................................................... 42
12.3 Retaking a Ceph Image................................................................................................................ 43
13 Importing ........................................................................................................................................ 44
13.1 Importing Image Files.................................................................................................................. 44
13.2 Importing an Image File .............................................................................................................. 45
13.3 Re-importing an Existing Image .................................................................................................. 46
14 Exporting ......................................................................................................................................... 47
14.1 Exporting Images ......................................................................................................................... 47
14.2 Exporting an Image ..................................................................................................................... 48
14.3 Exporting All Images .................................................................................................................... 49
14.4 Exporting the Exam Layout ......................................................................................................... 49
15 E-Mail .............................................................................................................................................. 50
15.1 E-mailing Images ......................................................................................................................... 50
15.2 E-mailing an Image ...................................................................................................................... 51

JAZZ HARMONY User Manual, Rev A 5
15.3 E-mailing All Images .................................................................................................................... 52
15.4 E-mailing the Exam Layout .......................................................................................................... 52
16 Printing ............................................................................................................................................ 53
16.1 Printing Images ........................................................................................................................... 53
16.2 Print Setting Bar .......................................................................................................................... 54
16.3 Print an Image ............................................................................................................................. 54
16.4 E-mailing All Images .................................................................................................................... 54
16.5 E-mailing the Exam Layout .......................................................................................................... 55
17 Editing Layouts ................................................................................................................................ 56
17.1 Adding New Layout ..................................................................................................................... 56
17.2 Size and Orientation Tools .......................................................................................................... 57
17.3 Placeholder Tools ........................................................................................................................ 57
17.4 Editing a Layout ........................................................................................................................... 58
17.5 Deleting a Layout ........................................................................................................................ 58
18 History ............................................................................................................................................. 59
19 Cart .................................................................................................................................................. 61
JAZZ HARMONY User Manual, Rev A 6
Welcome to JAZZ Harmony
Harmony is a powerful and easy-to-use dental imaging software that can track thousands of dental images and provides the dentist with high-quality image management and adjustment tools. With JAZZ Harmony, you can efficiently take intraoral /video & panoramic/Cephalometric images, import digital images, perform an image edit, adjust and retouch images, publish images for the e-mail or print, and export images for use on other dental imaging systems. Harmony lets you work with high-quality images directly from your camera or card reader and maintain that high quality throughout your workflow.
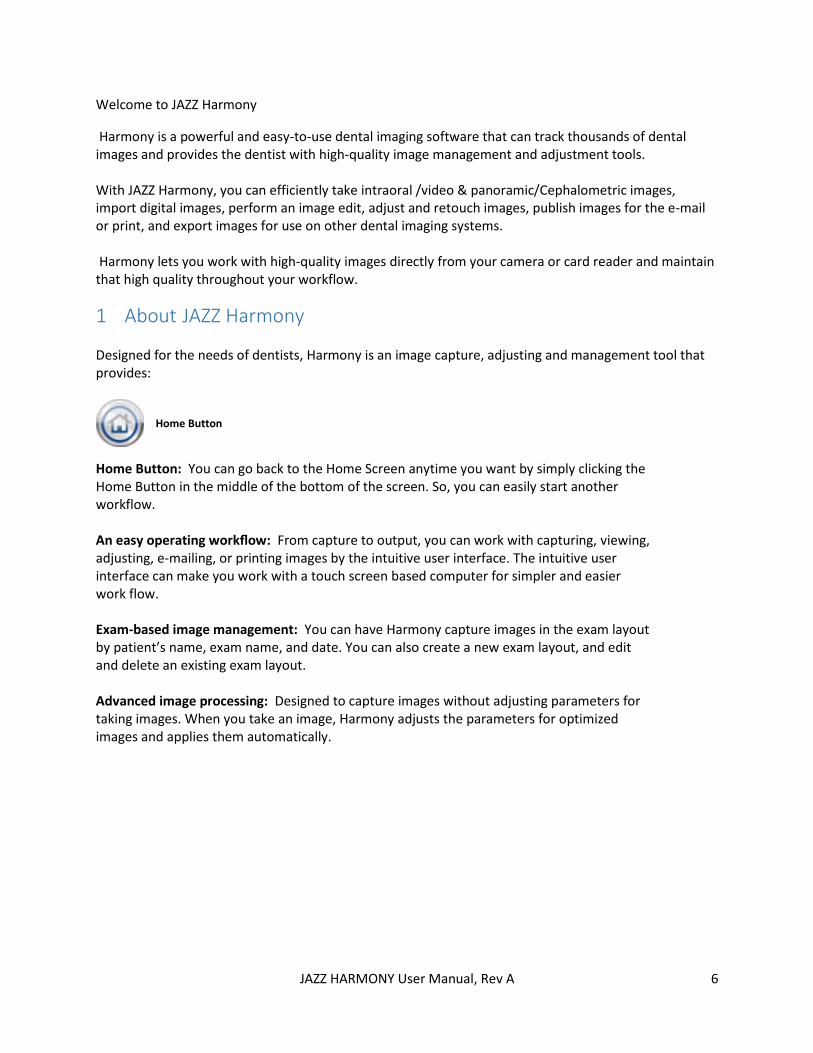
1 About JAZZ Harmony Designed for the needs of dentists, Harmony is an image capture, adjusting and management tool that provides:
Home Button: You can go back to the Home Screen anytime you want by simply clicking the Home Button in the middle of the bottom of the screen. So, you can easily start another workflow.
An easy operating workflow: From capture to output, you can work with capturing, viewing, adjusting, e-mailing, or printing images by the intuitive user interface. The intuitive user interface can make you work with a touch screen based computer for simpler and easier work flow.
Exam-based image management: You can have Harmony capture images in the exam layout by patient’s name, exam name, and date. You can also create a new exam layout, and edit and delete an existing exam layout.
Advanced image processing: Designed to capture images without adjusting parameters for taking images. When you take an image, Harmony adjusts the parameters for optimized images and applies them automatically.
Home Button
JAZZ HARMONY User Manual, Rev A 7
2 Home Screen
2.1 Home Screen at a Glance Harmony is designed to be the center of your dental imaging workflow, from capturing new images to the final delivery. This chapter provides an overview of how Harmony works and what you can do with it. However, this chapter doesn’t provide all the detailed information and instructions needed to perform work on your images. If you’re new to Harmony, this chapter is for you. If you’re familiar with the Harmony features and interface, feel free to skip this chapter. Once you’re familiar with Harmony, you’ll find in-depth explanations and instructions in later chapters.
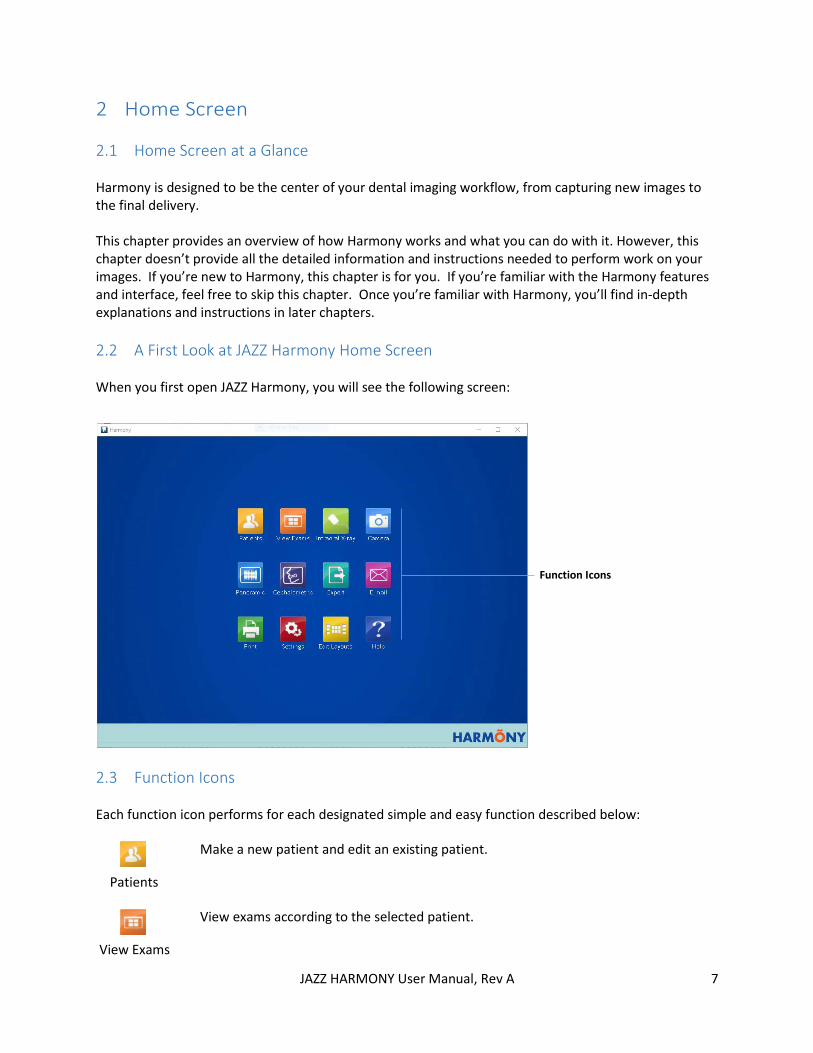
2.2 A First Look at JAZZ Harmony Home Screen When you first open JAZZ Harmony, you will see the following screen:
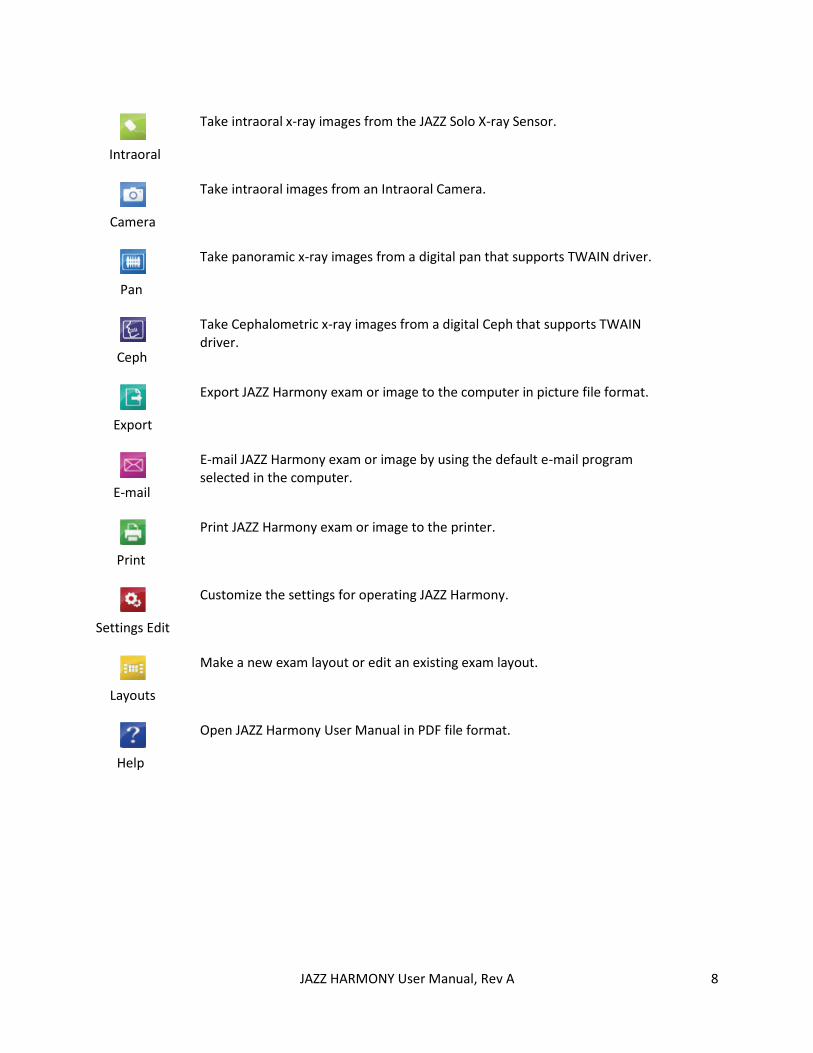
2.3 Function Icons Each function icon performs for each designated simple and easy function described below:
Patients
View Exams
Function Icons
Make a new patient and edit an existing patient.
View exams according to the selected patient.
JAZZ HARMONY User Manual, Rev A 8
Intraoral
Camera
Pan
Ceph
Export
Settings Edit
Layouts
Help
Take intraoral x-ray images from the JAZZ Solo X-ray Sensor.
Take intraoral images from an Intraoral Camera.
Take panoramic x-ray images from a digital pan that supports TWAIN driver.
Take Cephalometric x-ray images from a digital Ceph that supports TWAIN driver.
Export JAZZ Harmony exam or image to the computer in picture file format.
E-mail JAZZ Harmony exam or image by using the default e-mail program selected in the computer.
Print JAZZ Harmony exam or image to the printer.
Customize the settings for operating JAZZ Harmony.
Make a new exam layout or edit an existing exam layout.
Open JAZZ Harmony User Manual in PDF file format.
JAZZ HARMONY User Manual, Rev A 9
3 Single User Installation
3.1 Installing Harmony JAZZ Harmony has two versions, Single User and Multiple User. The Single User version is for only one computer, and the Multiple User version is for a network environment with multiple computers. If you install the Multi-user version, skip Single User Installation. Before you install Harmony, please read this guide carefully and follow the steps. Option for SQL Server database installation; call JAZZ Imaging technical support. Single User Installation
1. Insert the JAZZ IMAGING USB KEY- into the USB port of the computer.
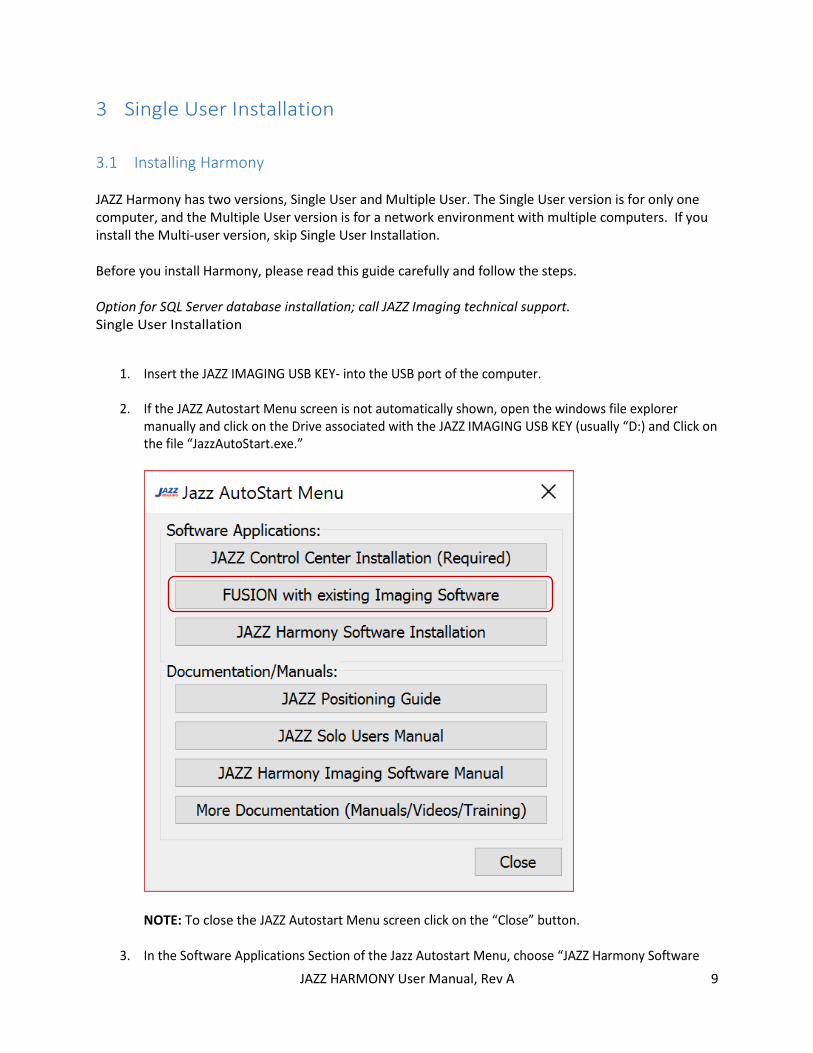
2. If the JAZZ Autostart Menu screen is not automatically shown, open the windows file explorer manually and click on the Drive associated with the JAZZ IMAGING USB KEY (usually “D:) and Click on the file “JazzAutoStart.exe.”
NOTE: To close the JAZZ Autostart Menu screen click on the “Close” button.
3. In the Software Applications Section of the Jazz Autostart Menu, choose “JAZZ Harmony Software
JAZZ HARMONY User Manual, Rev A 10
Installation”
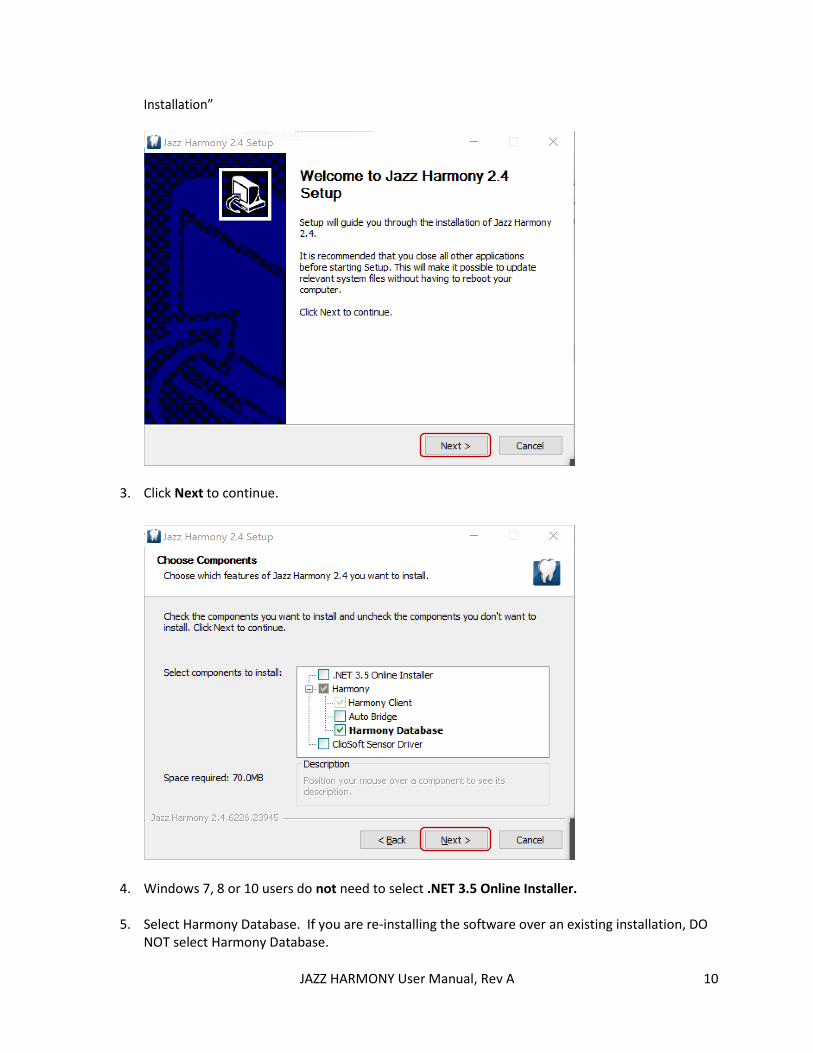
3. Click Next to continue.
4. Windows 7, 8 or 10 users do not need to select .NET 3.5 Online Installer.
5. Select Harmony Database. If you are re-installing the software over an existing installation, DO NOT select Harmony Database.
JAZZ HARMONY User Manual, Rev A 11
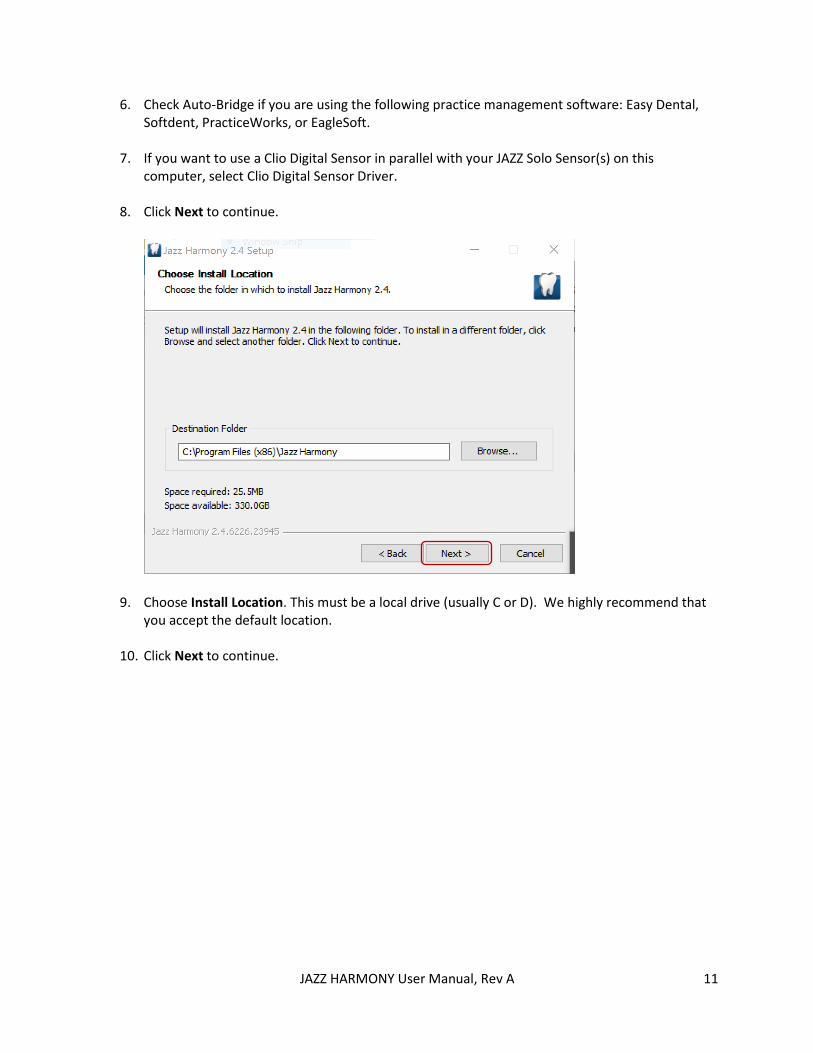
6. Check Auto-Bridge if you are using the following practice management software: Easy Dental, Softdent, PracticeWorks, or EagleSoft.
7. If you want to use a Clio Digital Sensor in parallel with your JAZZ Solo Sensor(s) on this computer, select Clio Digital Sensor Driver.
8. Click Next to continue.
9. Choose Install Location. This must be a local drive (usually C or D). We highly recommend that you accept the default location.
10. Click Next to continue.
JAZZ HARMONY User Manual, Rev A 12
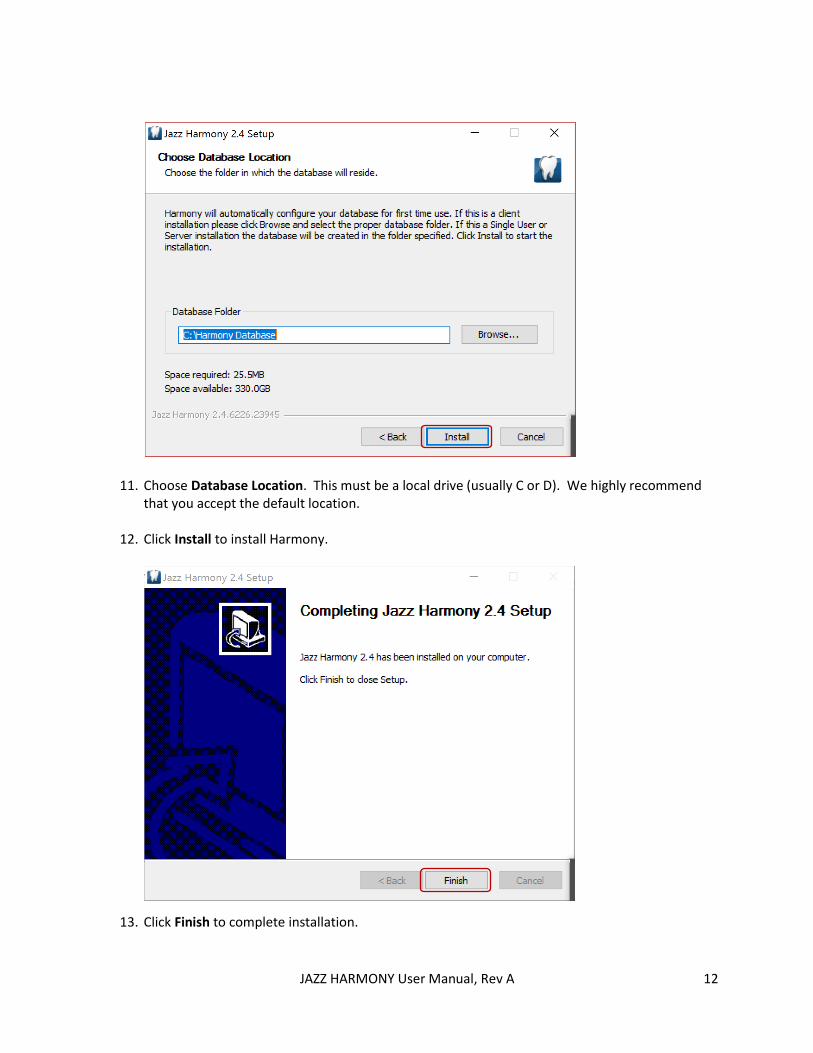
11. Choose Database Location. This must be a local drive (usually C or D). We highly recommend that you accept the default location.
12. Click Install to install Harmony.
13. Click Finish to complete installation.
JAZZ HARMONY User Manual, Rev A 13
4 Multiple User Installation
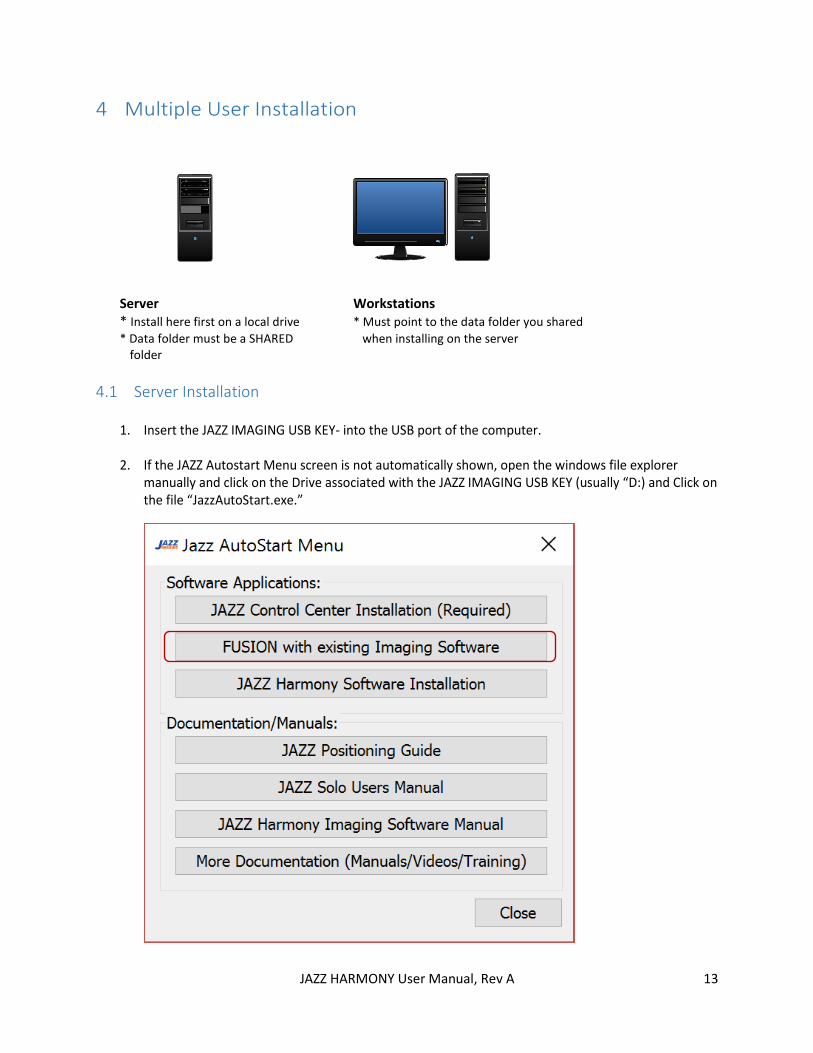
Server Workstations
* Install here first on a local drive * Must point to the data folder you shared
* Data folder must be a SHARED when installing on the server folder
4.1 Server Installation
1. Insert the JAZZ IMAGING USB KEY- into the USB port of the computer.
2. If the JAZZ Autostart Menu screen is not automatically shown, open the windows file explorer manually and click on the Drive associated with the JAZZ IMAGING USB KEY (usually “D:) and Click on the file “JazzAutoStart.exe.”
JAZZ HARMONY User Manual, Rev A 14
3. In the Software Applications Section of the Jazz Autostart Menu, choose “JAZZ Harmony Software Installation”
4. Click Next to continue.
5. Select Harmony Database.
6. Windows 7, 8 or 10 users do not need to select .NET 3.5 Online Installer.
7. If you want to use the Clio Digital Sensor in parallel with your JAZZ Solo Sensor on the server, select Clio Digital Sensor Driver.
8. Click Next to continue.
9. Choose Install Location. This must be a local drive (usually C or D). We recommend that you accept the default location.
10. Click Next to continue.
JAZZ HARMONY User Manual, Rev A 15
11. Choose Database Location. This must be a local drive (usually C or D). We highly recommend that you accept the default location. This folder must be shared. When installing on your workstations, this is the data location you will point to. (You will have to share this folder after completing the install process.)
12. Click Install to install Harmony.
13. Click Finish to complete installation.
14. Next, you need to share your data folder. Click Share the Folder to open Windows Explorer with the Harmony Database folder highlighted. Right-click the Harmony Database folder and select Properties. On the Sharing tab, select Share this folder. Note the Share Name. You will point to this when installing on your workstations.
Option for SQL Server database installation; call JAZZ Imaging technical support
JAZZ HARMONY User Manual, Rev A 16
4.2 Workstation Installation
1. Insert the JAZZ IMAGING USB KEY- into the USB port of the computer.
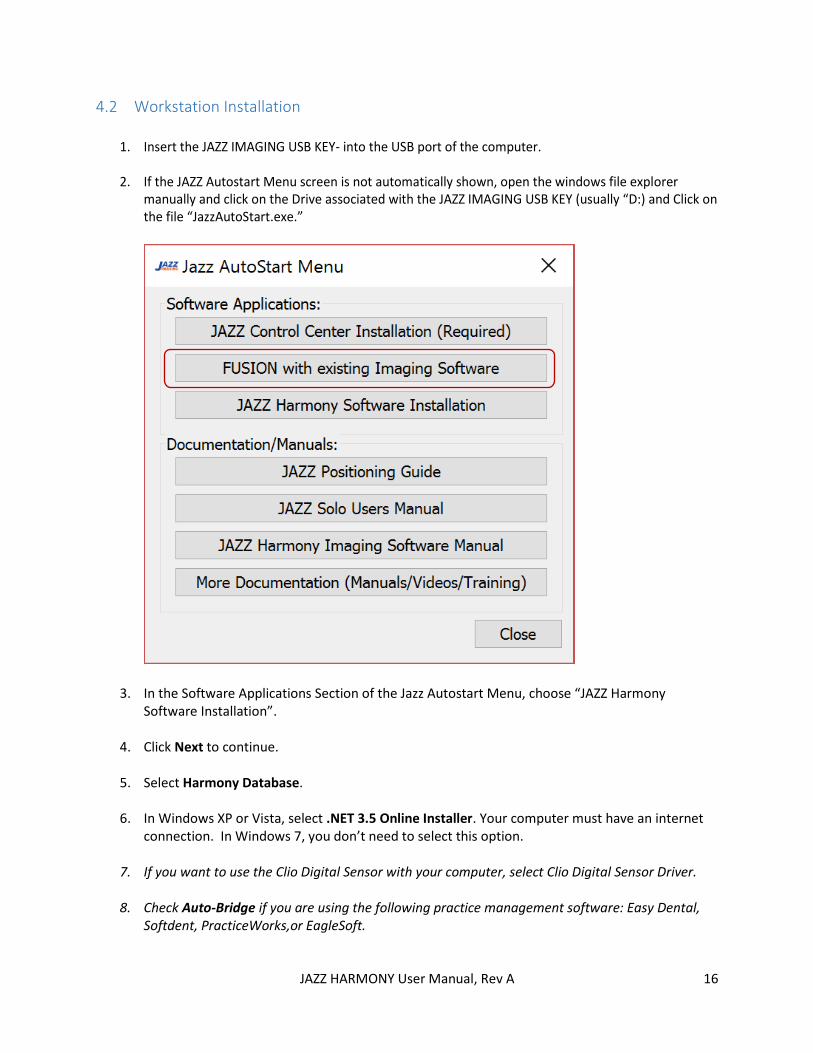
2. If the JAZZ Autostart Menu screen is not automatically shown, open the windows file explorer manually and click on the Drive associated with the JAZZ IMAGING USB KEY (usually “D:) and Click on the file “JazzAutoStart.exe.”
3. In the Software Applications Section of the Jazz Autostart Menu, choose “JAZZ Harmony Software Installation”.
4. Click Next to continue.
5. Select Harmony Database.
6. In Windows XP or Vista, select .NET 3.5 Online Installer. Your computer must have an internet connection. In Windows 7, you don’t need to select this option.
7. If you want to use the Clio Digital Sensor with your computer, select Clio Digital Sensor Driver.
8. Check Auto-Bridge if you are using the following practice management software: Easy Dental, Softdent, PracticeWorks,or EagleSoft.
JAZZ HARMONY User Manual, Rev A 17
9. Click Next to continue.
10. Choose Install Location. This must be a local drive (usually C or D). We recommend that you accept the default location.
11. Click Next to continue.
12. Choose Database Location. Click Browse... and point to the Harmony Database folder that has been shared when installing on the server.
13. Click Install to install Harmony.
14. Click Finish to complete installation.
15. Repeat these install steps on each workstation.
4.3 Getting License Code
1. Run Harmony and click Settings in the Home Screen.
2. On the General tab, Click Licensing.
3. Click Change and type your practice name. Click OK to exit.
4. Note your practice name that you typed and the customer identifier number.
5. Call JAZZ Imaging Customer Support at (567) 234 5299 extension 300 or E-mail the practice name and the customer identifier number to [email protected].
JAZZ HARMONY User Manual, Rev A 18
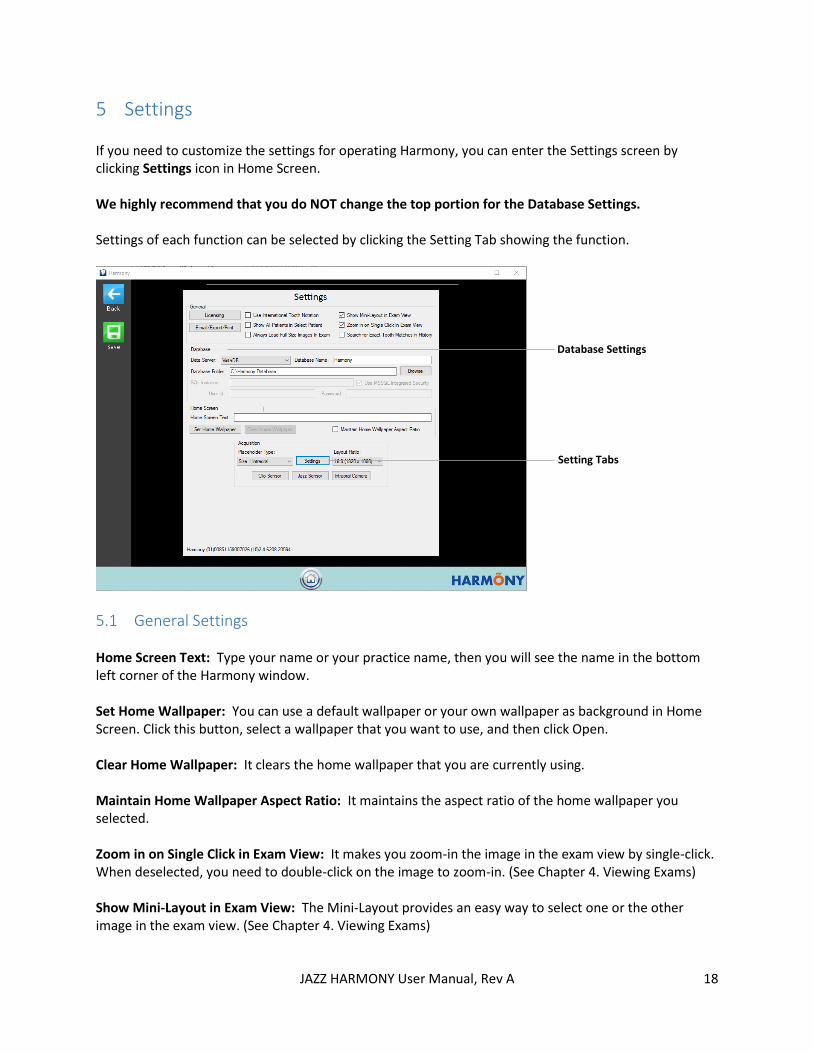
5 Settings If you need to customize the settings for operating Harmony, you can enter the Settings screen by clicking Settings icon in Home Screen. We highly recommend that you do NOT change the top portion for the Database Settings. Settings of each function can be selected by clicking the Setting Tab showing the function.
5.1 General Settings Home Screen Text: Type your name or your practice name, then you will see the name in the bottom left corner of the Harmony window. Set Home Wallpaper: You can use a default wallpaper or your own wallpaper as background in Home Screen. Click this button, select a wallpaper that you want to use, and then click Open. Clear Home Wallpaper: It clears the home wallpaper that you are currently using. Maintain Home Wallpaper Aspect Ratio: It maintains the aspect ratio of the home wallpaper you selected. Zoom in on Single Click in Exam View: It makes you zoom-in the image in the exam view by single-click. When deselected, you need to double-click on the image to zoom-in. (See Chapter 4. Viewing Exams) Show Mini-Layout in Exam View: The Mini-Layout provides an easy way to select one or the other image in the exam view. (See Chapter 4. Viewing Exams)
Database Settings
Setting Tabs
JAZZ HARMONY User Manual, Rev A 19
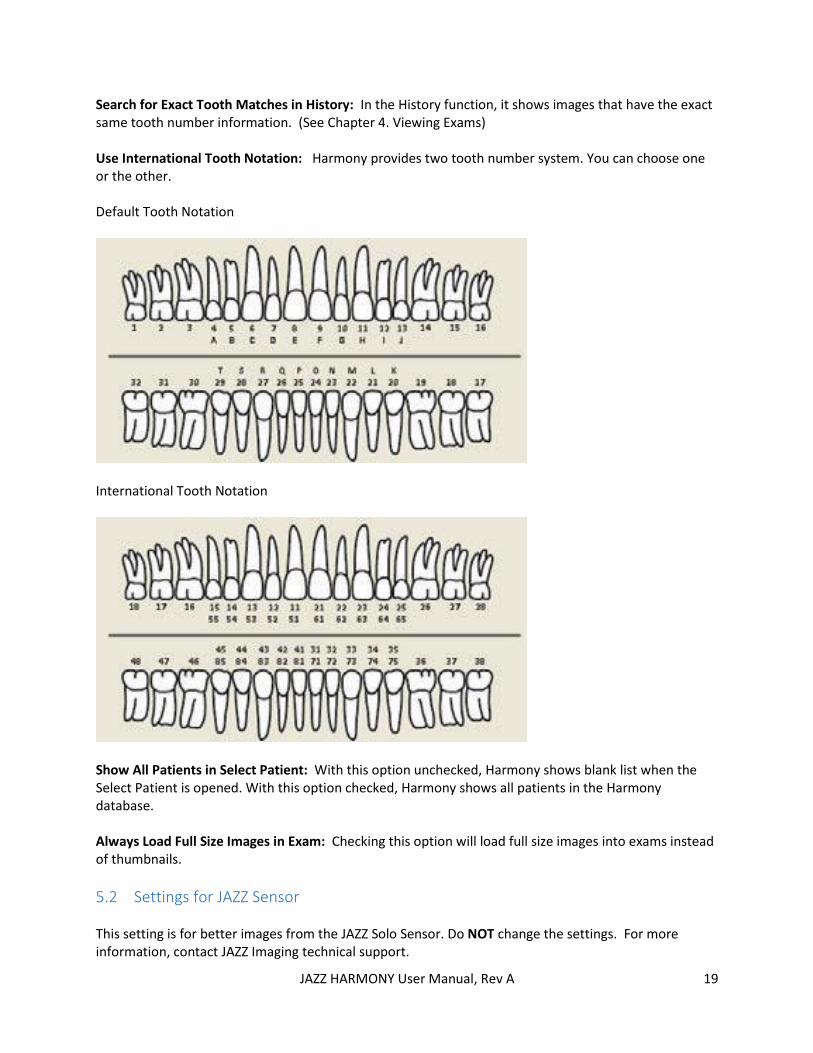
Search for Exact Tooth Matches in History: In the History function, it shows images that have the exact same tooth number information. (See Chapter 4. Viewing Exams) Use International Tooth Notation: Harmony provides two tooth number system. You can choose one or the other. Default Tooth Notation
International Tooth Notation
Show All Patients in Select Patient: With this option unchecked, Harmony shows blank list when the Select Patient is opened. With this option checked, Harmony shows all patients in the Harmony database. Always Load Full Size Images in Exam: Checking this option will load full size images into exams instead of thumbnails.
5.2 Settings for JAZZ Sensor This setting is for better images from the JAZZ Solo Sensor. Do NOT change the settings. For more information, contact JAZZ Imaging technical support.
JAZZ HARMONY User Manual, Rev A 20
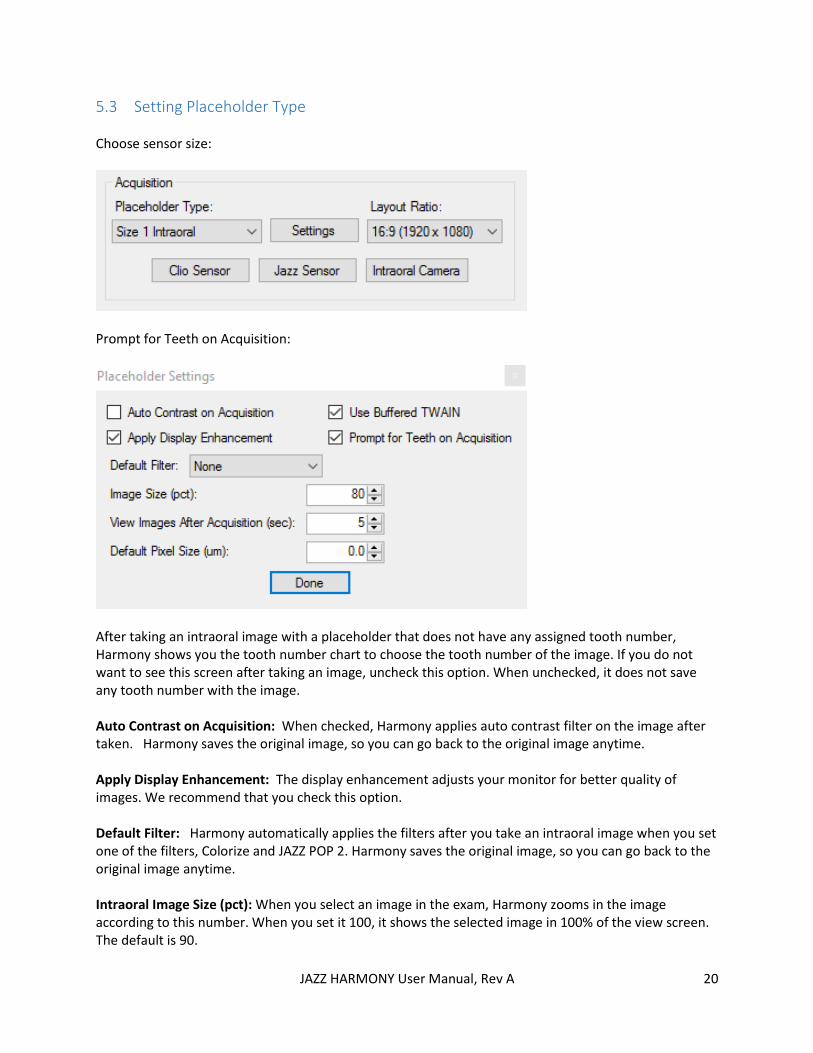
5.3 Setting Placeholder Type Choose sensor size:
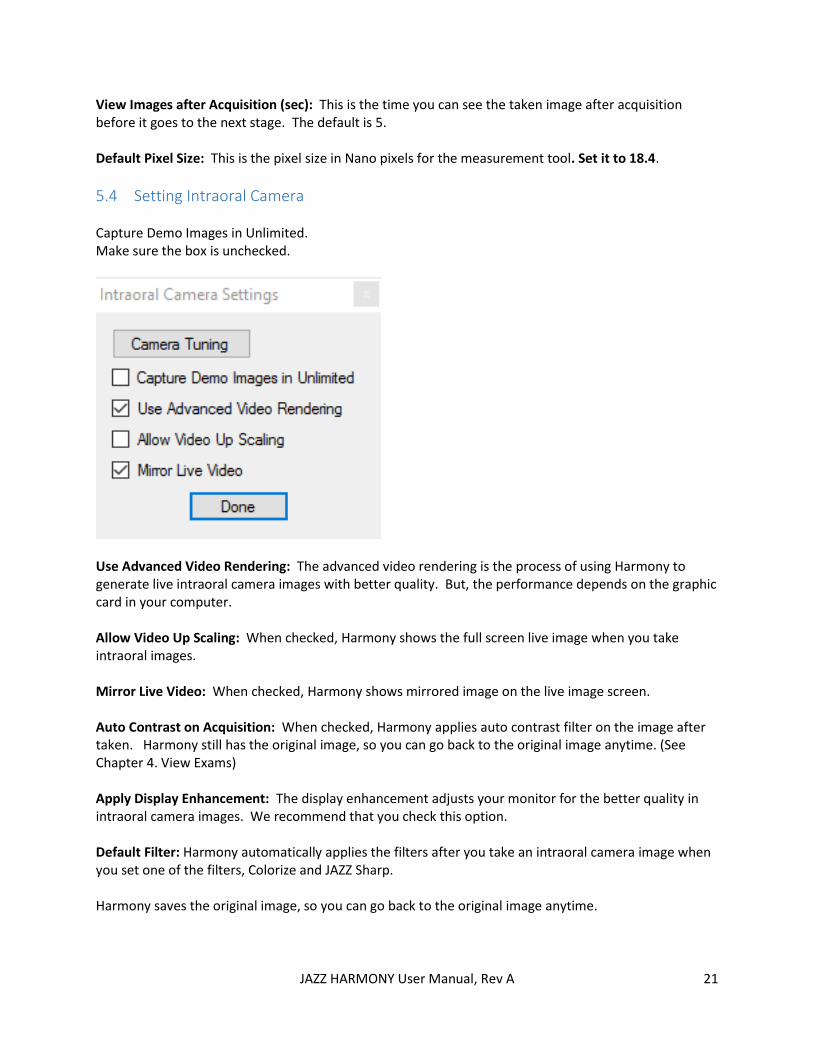
Prompt for Teeth on Acquisition:
After taking an intraoral image with a placeholder that does not have any assigned tooth number, Harmony shows you the tooth number chart to choose the tooth number of the image. If you do not want to see this screen after taking an image, uncheck this option. When unchecked, it does not save any tooth number with the image. Auto Contrast on Acquisition: When checked, Harmony applies auto contrast filter on the image after taken. Harmony saves the original image, so you can go back to the original image anytime. Apply Display Enhancement: The display enhancement adjusts your monitor for better quality of images. We recommend that you check this option. Default Filter: Harmony automatically applies the filters after you take an intraoral image when you set one of the filters, Colorize and JAZZ POP 2. Harmony saves the original image, so you can go back to the original image anytime. Intraoral Image Size (pct): When you select an image in the exam, Harmony zooms in the image according to this number. When you set it 100, it shows the selected image in 100% of the view screen. The default is 90.
JAZZ HARMONY User Manual, Rev A 21
View Images after Acquisition (sec): This is the time you can see the taken image after acquisition before it goes to the next stage. The default is 5. Default Pixel Size: This is the pixel size in Nano pixels for the measurement tool. Set it to 18.4.
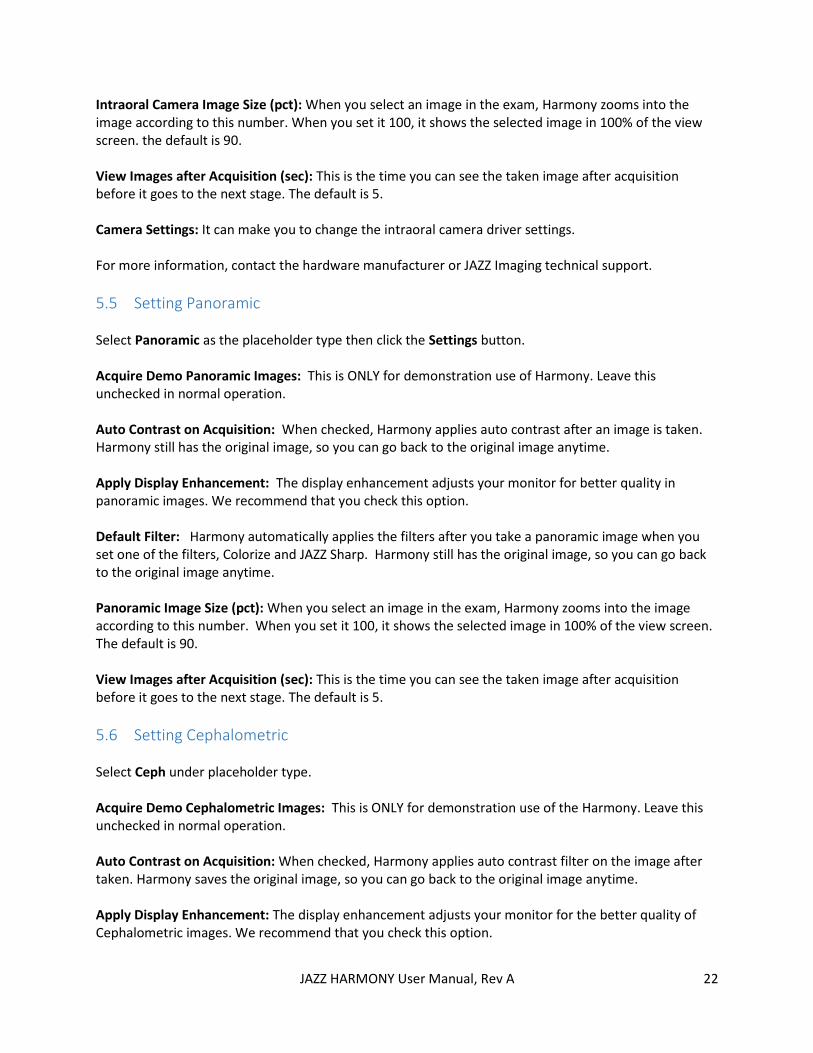
5.4 Setting Intraoral Camera Capture Demo Images in Unlimited. Make sure the box is unchecked.
Use Advanced Video Rendering: The advanced video rendering is the process of using Harmony to generate live intraoral camera images with better quality. But, the performance depends on the graphic card in your computer. Allow Video Up Scaling: When checked, Harmony shows the full screen live image when you take intraoral images. Mirror Live Video: When checked, Harmony shows mirrored image on the live image screen. Auto Contrast on Acquisition: When checked, Harmony applies auto contrast filter on the image after taken. Harmony still has the original image, so you can go back to the original image anytime. (See Chapter 4. View Exams) Apply Display Enhancement: The display enhancement adjusts your monitor for the better quality in intraoral camera images. We recommend that you check this option. Default Filter: Harmony automatically applies the filters after you take an intraoral camera image when you set one of the filters, Colorize and JAZZ Sharp. Harmony saves the original image, so you can go back to the original image anytime.
JAZZ HARMONY User Manual, Rev A 22
Intraoral Camera Image Size (pct): When you select an image in the exam, Harmony zooms into the image according to this number. When you set it 100, it shows the selected image in 100% of the view screen. the default is 90. View Images after Acquisition (sec): This is the time you can see the taken image after acquisition before it goes to the next stage. The default is 5. Camera Settings: It can make you to change the intraoral camera driver settings. For more information, contact the hardware manufacturer or JAZZ Imaging technical support.
5.5 Setting Panoramic Select Panoramic as the placeholder type then click the Settings button. Acquire Demo Panoramic Images: This is ONLY for demonstration use of Harmony. Leave this unchecked in normal operation. Auto Contrast on Acquisition: When checked, Harmony applies auto contrast after an image is taken. Harmony still has the original image, so you can go back to the original image anytime. Apply Display Enhancement: The display enhancement adjusts your monitor for better quality in panoramic images. We recommend that you check this option. Default Filter: Harmony automatically applies the filters after you take a panoramic image when you set one of the filters, Colorize and JAZZ Sharp. Harmony still has the original image, so you can go back to the original image anytime. Panoramic Image Size (pct): When you select an image in the exam, Harmony zooms into the image according to this number. When you set it 100, it shows the selected image in 100% of the view screen. The default is 90. View Images after Acquisition (sec): This is the time you can see the taken image after acquisition before it goes to the next stage. The default is 5.
5.6 Setting Cephalometric Select Ceph under placeholder type. Acquire Demo Cephalometric Images: This is ONLY for demonstration use of the Harmony. Leave this unchecked in normal operation. Auto Contrast on Acquisition: When checked, Harmony applies auto contrast filter on the image after taken. Harmony saves the original image, so you can go back to the original image anytime. Apply Display Enhancement: The display enhancement adjusts your monitor for the better quality of Cephalometric images. We recommend that you check this option.
JAZZ HARMONY User Manual, Rev A 23
Default Filter: Harmony automatically applies the filters after you take a Cephalometric image when you set one of the filters, Colorize, and JAZZ Sharp. Harmony saves the original image, so you can go back to the original image anytime. Cephalometric Image Size (pct): When you select an image in the exam, Harmony zooms in the image according to this number. When you set it 100, it shows the selected image in 100% of the view screen. The default is 90. View Images after Acquisition (sec): This is the time you can see the taken image after acquisition before it goes to the next stage. The default is 5.
5.7 Setting Export / E-mail / Print Include Information on Single Exported Images: Check this option if you want to show the header and footer text on single exported images. Include Information on Exported Exams: Check this option if you want to show the header and footer text on exported images. Include Information on Single E-mailed Images: Check this option if you want to show the header and footer text on single e-mailed images. Include Information on E-mailed Exams: Check this option if you want to show the header and footer text on e-mailed exams. Include Information on Single Printed Images: Check this option if you want to show the header and footer text on single printed images. Include Information on Printed Exams: Check this option if you want to show the header and footer text on printed exams. Header Text: Type header text when you want to show the text on exported, e-mailed, or printed images. Footer Text: Type footer text when you want to show the text on exported, e-mailed, or printed images.
JAZZ HARMONY User Manual, Rev A 24
6 Autobridge
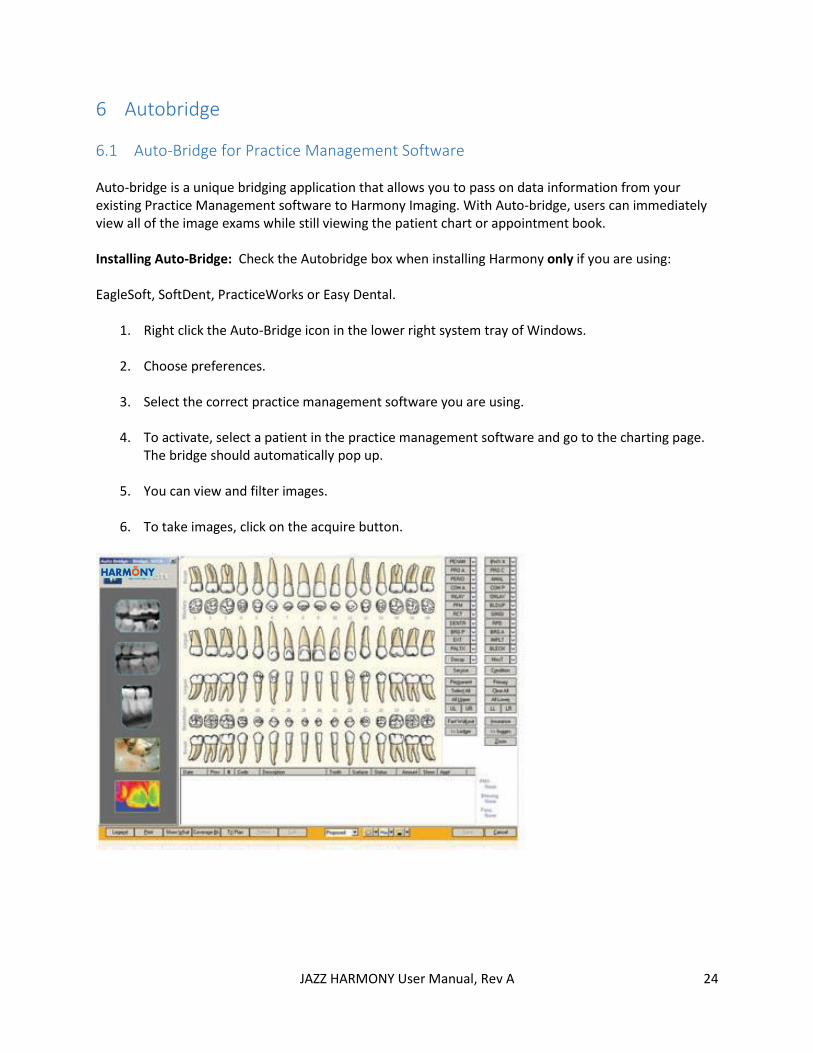
6.1 Auto-Bridge for Practice Management Software Auto-bridge is a unique bridging application that allows you to pass on data information from your existing Practice Management software to Harmony Imaging. With Auto-bridge, users can immediately view all of the image exams while still viewing the patient chart or appointment book. Installing Auto-Bridge: Check the Autobridge box when installing Harmony only if you are using: EagleSoft, SoftDent, PracticeWorks or Easy Dental.
1. Right click the Auto-Bridge icon in the lower right system tray of Windows.
2. Choose preferences.
3. Select the correct practice management software you are using.
4. To activate, select a patient in the practice management software and go to the charting page. The bridge should automatically pop up.
5. You can view and filter images.
6. To take images, click on the acquire button.
JAZZ HARMONY User Manual, Rev A 25
7 Patients
7.1 Patients - General
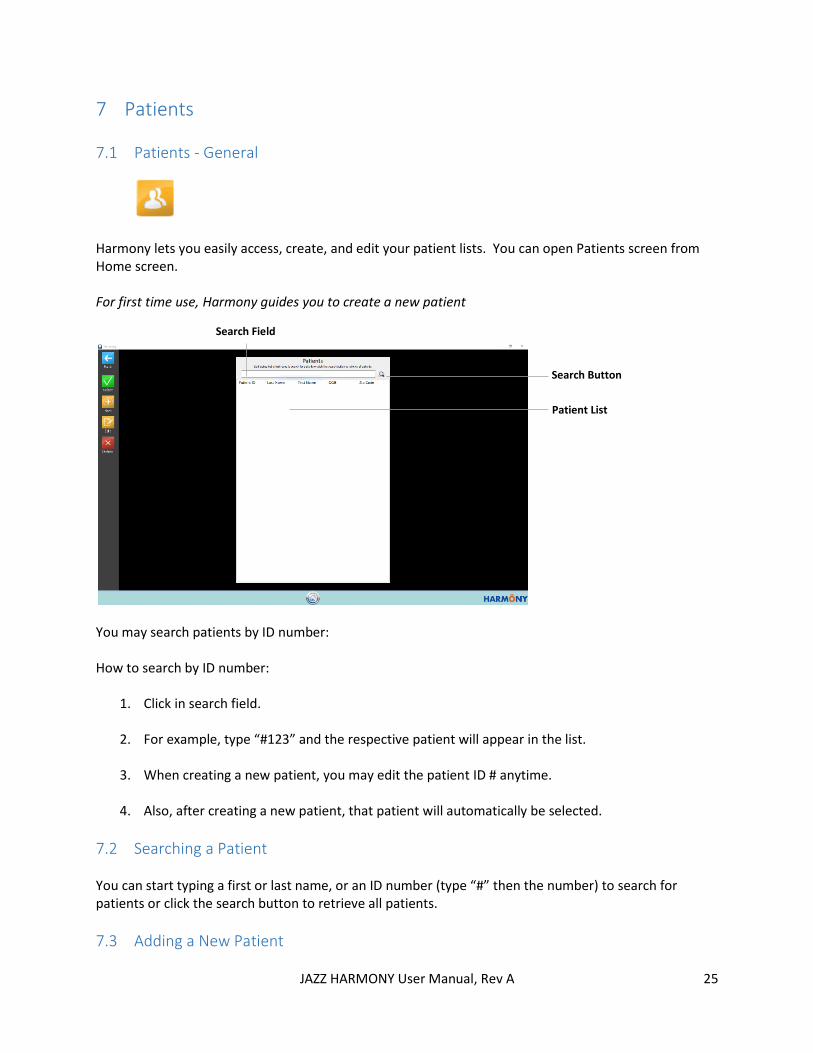
Harmony lets you easily access, create, and edit your patient lists. You can open Patients screen from Home screen. For first time use, Harmony guides you to create a new patient
You may search patients by ID number: How to search by ID number:
1. Click in search field. 2. For example, type “#123” and the respective patient will appear in the list. 3. When creating a new patient, you may edit the patient ID # anytime. 4. Also, after creating a new patient, that patient will automatically be selected.
7.2 Searching a Patient You can start typing a first or last name, or an ID number (type “#” then the number) to search for patients or click the search button to retrieve all patients.
7.3 Adding a New Patient
Patient List
Search Button
Search Field
JAZZ HARMONY User Manual, Rev A 26
Click the New button and fill out the patient information, and click the Save button.
7.4 Editing a Patient Select a patient and click the Edit button. Change the patient information and click the Save button.
7.5 Deleting a Patient Select a patient and click the Delete button. When the Warning message appears, click Yes.
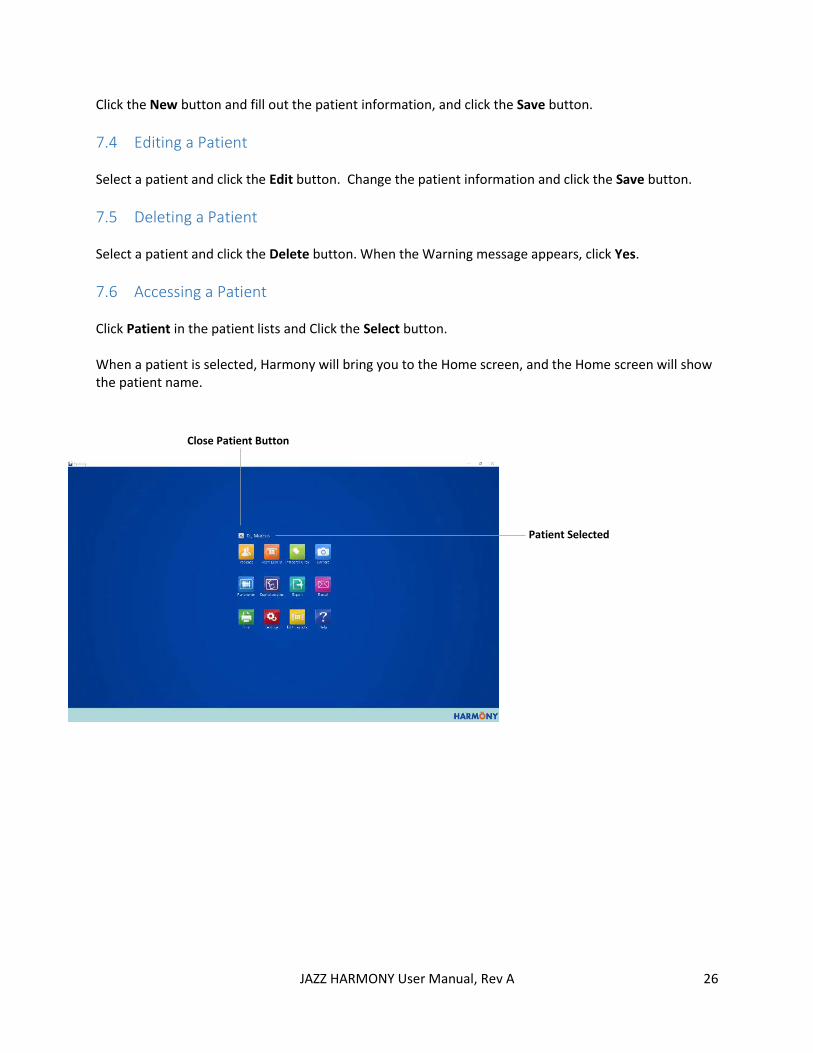
7.6 Accessing a Patient Click Patient in the patient lists and Click the Select button. When a patient is selected, Harmony will bring you to the Home screen, and the Home screen will show the patient name.
Patient Selected
Close Patient Button
JAZZ HARMONY User Manual, Rev A 27
8 Exams
8.1 View Exams
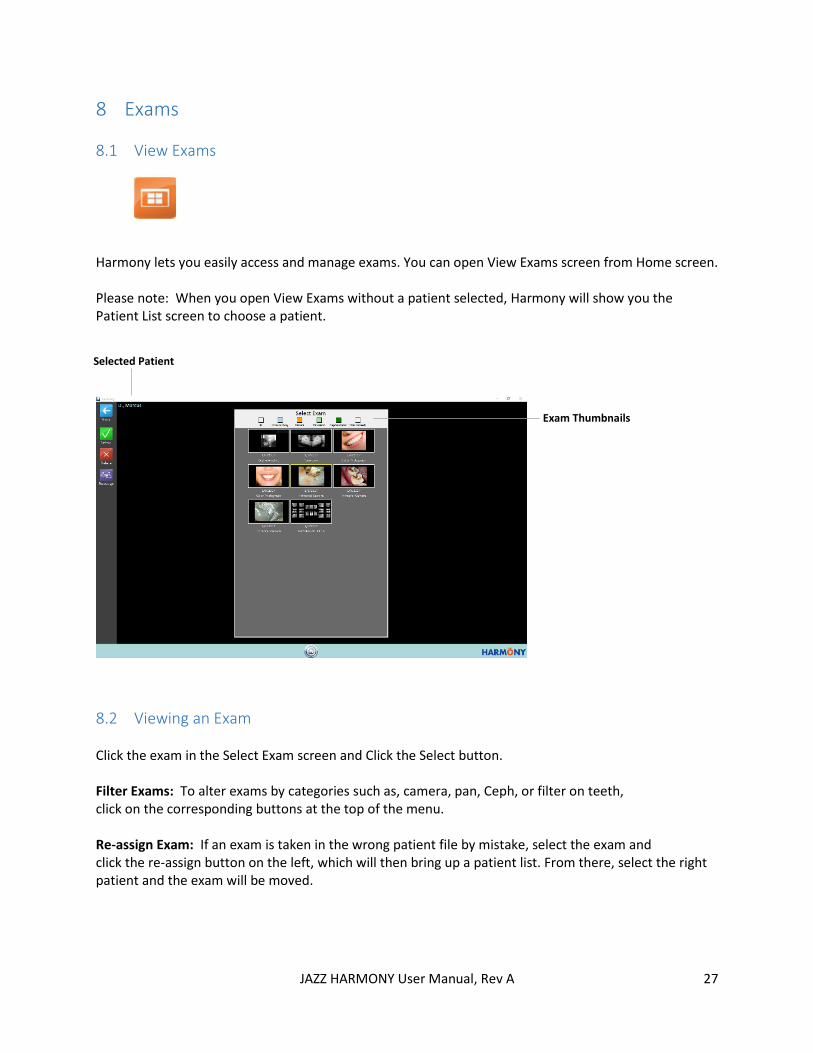
Harmony lets you easily access and manage exams. You can open View Exams screen from Home screen. Please note: When you open View Exams without a patient selected, Harmony will show you the Patient List screen to choose a patient.
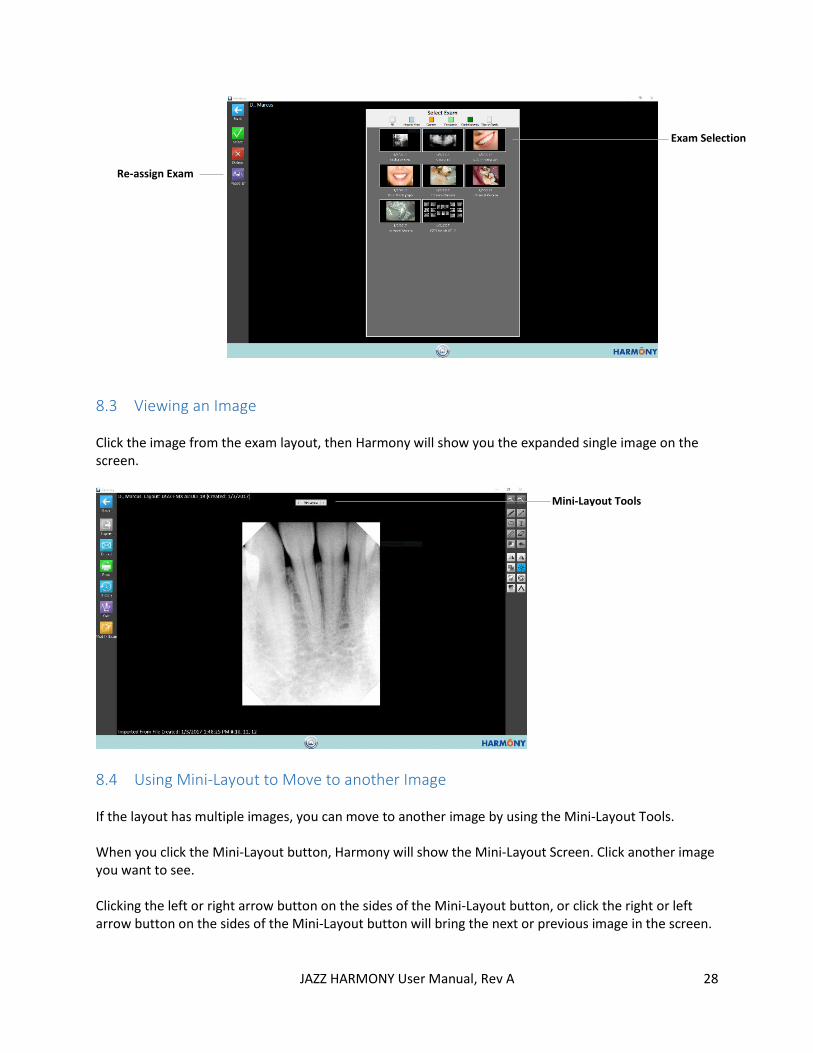
8.2 Viewing an Exam Click the exam in the Select Exam screen and Click the Select button. Filter Exams: To alter exams by categories such as, camera, pan, Ceph, or filter on teeth, click on the corresponding buttons at the top of the menu. Re-assign Exam: If an exam is taken in the wrong patient file by mistake, select the exam and click the re-assign button on the left, which will then bring up a patient list. From there, select the right patient and the exam will be moved.
Exam Thumbnails
Selected Patient
JAZZ HARMONY User Manual, Rev A 28
8.3 Viewing an Image Click the image from the exam layout, then Harmony will show you the expanded single image on the screen.
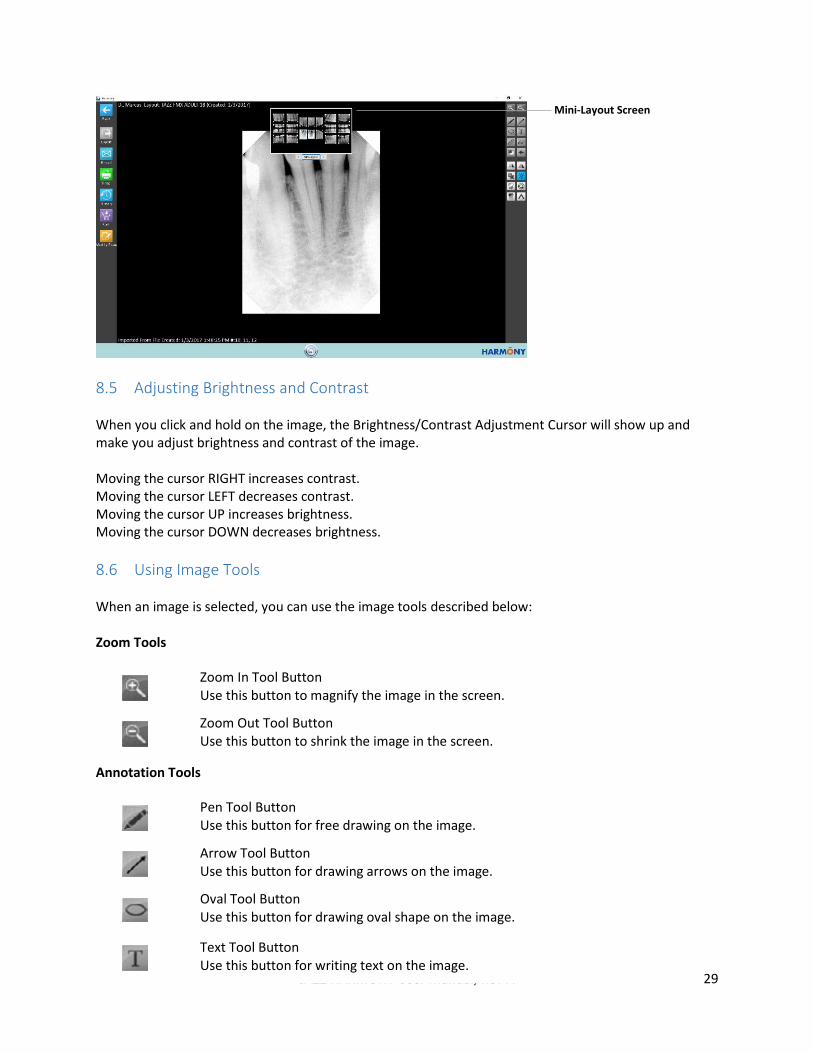
8.4 Using Mini-Layout to Move to another Image If the layout has multiple images, you can move to another image by using the Mini-Layout Tools. When you click the Mini-Layout button, Harmony will show the Mini-Layout Screen. Click another image you want to see. Clicking the left or right arrow button on the sides of the Mini-Layout button, or click the right or left arrow button on the sides of the Mini-Layout button will bring the next or previous image in the screen.
Re-assign Exam
Exam Selection
Mini-Layout Tools
JAZZ HARMONY User Manual, Rev A 29
8.5 Adjusting Brightness and Contrast When you click and hold on the image, the Brightness/Contrast Adjustment Cursor will show up and make you adjust brightness and contrast of the image. Moving the cursor RIGHT increases contrast. Moving the cursor LEFT decreases contrast. Moving the cursor UP increases brightness. Moving the cursor DOWN decreases brightness.
8.6 Using Image Tools When an image is selected, you can use the image tools described below: Zoom Tools
Annotation Tools
Mini-Layout Screen
Zoom In Tool Button Use this button to magnify the image in the screen.
Zoom Out Tool Button Use this button to shrink the image in the screen.
Pen Tool Button Use this button for free drawing on the image.
Arrow Tool Button Use this button for drawing arrows on the image.
Oval Tool Button Use this button for drawing oval shape on the image.
Text Tool Button Use this button for writing text on the image.
JAZZ HARMONY User Manual, Rev A 30
Imaging Processing Tools
Brightness / Contrast Tool Button
Colorize Tool Button
Measure Tool Button Use this button to measure from a point to another point.
Erase Tool Button Use this button to erase a portion of the annotation.
Swap Tool Button Use this button to switch the annotation color between black and white. Clear Tool Button Use this button to clear all annotations. Rotate Tool Button Use this button to rotate the image clock-wise.
Mirror Tool Button Use this button to flip the image left and right.
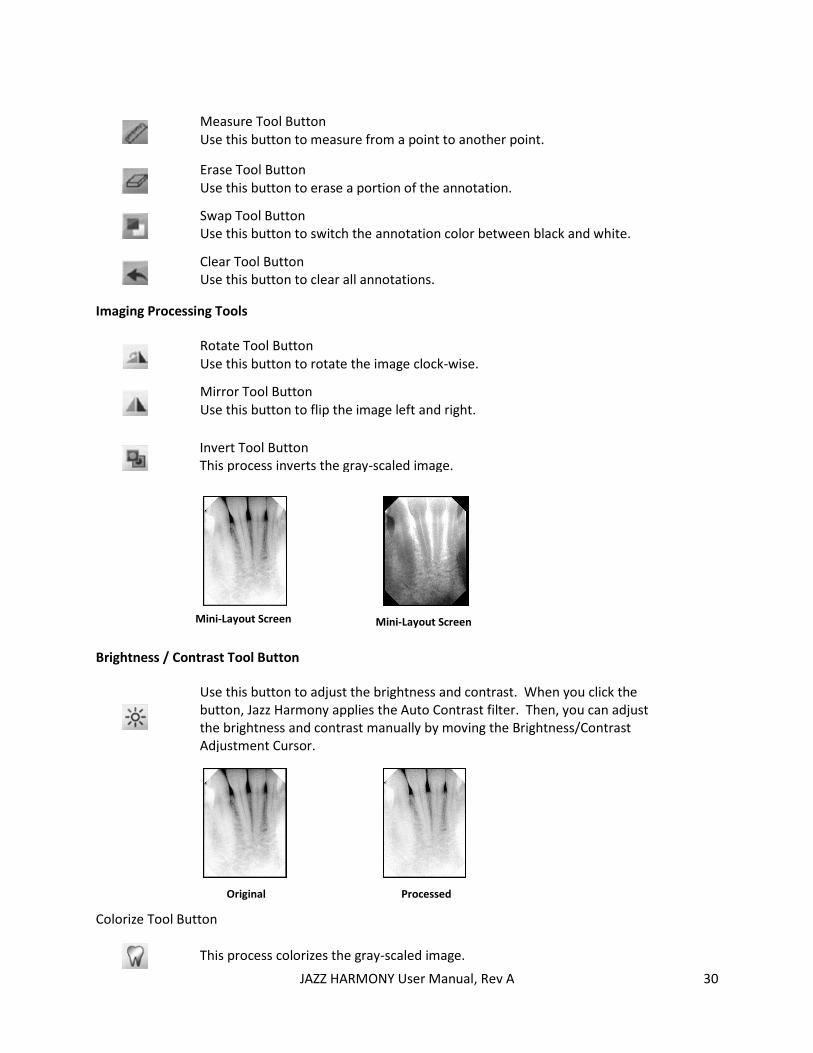
Invert Tool Button This process inverts the gray-scaled image.
Mini-Layout Screen Mini-Layout Screen
Use this button to adjust the brightness and contrast. When you click the button, Jazz Harmony applies the Auto Contrast filter. Then, you can adjust the brightness and contrast manually by moving the Brightness/Contrast Adjustment Cursor.
Original
Processed
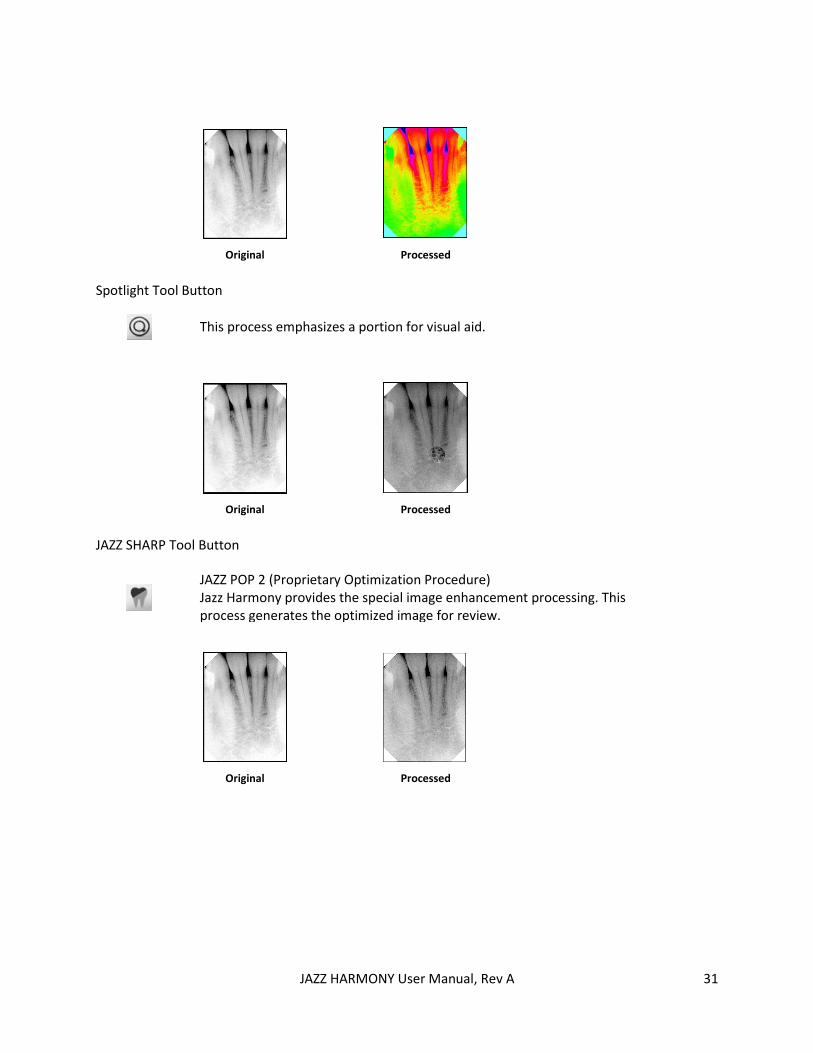
This process colorizes the gray-scaled image.
JAZZ HARMONY User Manual, Rev A 31
Spotlight Tool Button
JAZZ SHARP Tool Button
Original Processed
This process emphasizes a portion for visual aid.
Original Processed
JAZZ POP 2 (Proprietary Optimization Procedure) Jazz Harmony provides the special image enhancement processing. This process generates the optimized image for review.
Original Processed
JAZZ HARMONY User Manual, Rev A 32
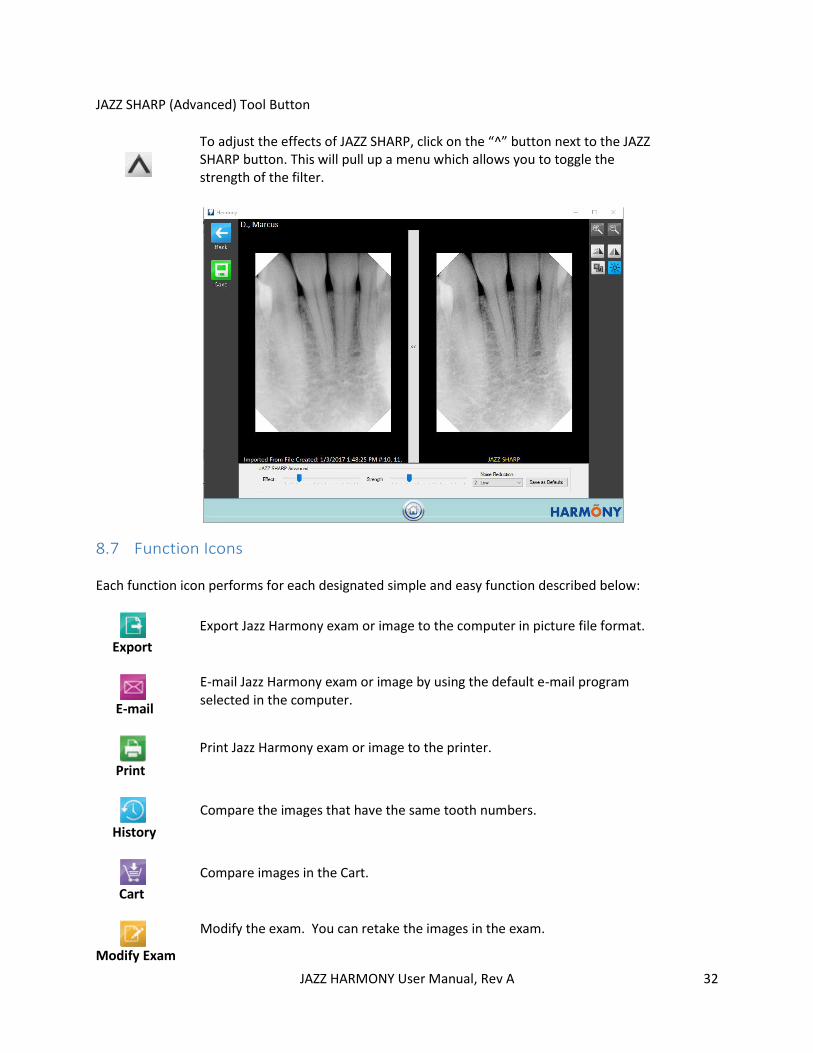
JAZZ SHARP (Advanced) Tool Button
8.7 Function Icons Each function icon performs for each designated simple and easy function described below:
Export
History
Cart
Modify Exam
To adjust the effects of JAZZ SHARP, click on the “^” button next to the JAZZ SHARP button. This will pull up a menu which allows you to toggle the strength of the filter.
Export Jazz Harmony exam or image to the computer in picture file format.
E-mail Jazz Harmony exam or image by using the default e-mail program selected in the computer.
Print Jazz Harmony exam or image to the printer.
Compare the images that have the same tooth numbers.
Compare images in the Cart.
Modify the exam. You can retake the images in the exam.
JAZZ HARMONY User Manual, Rev A 33
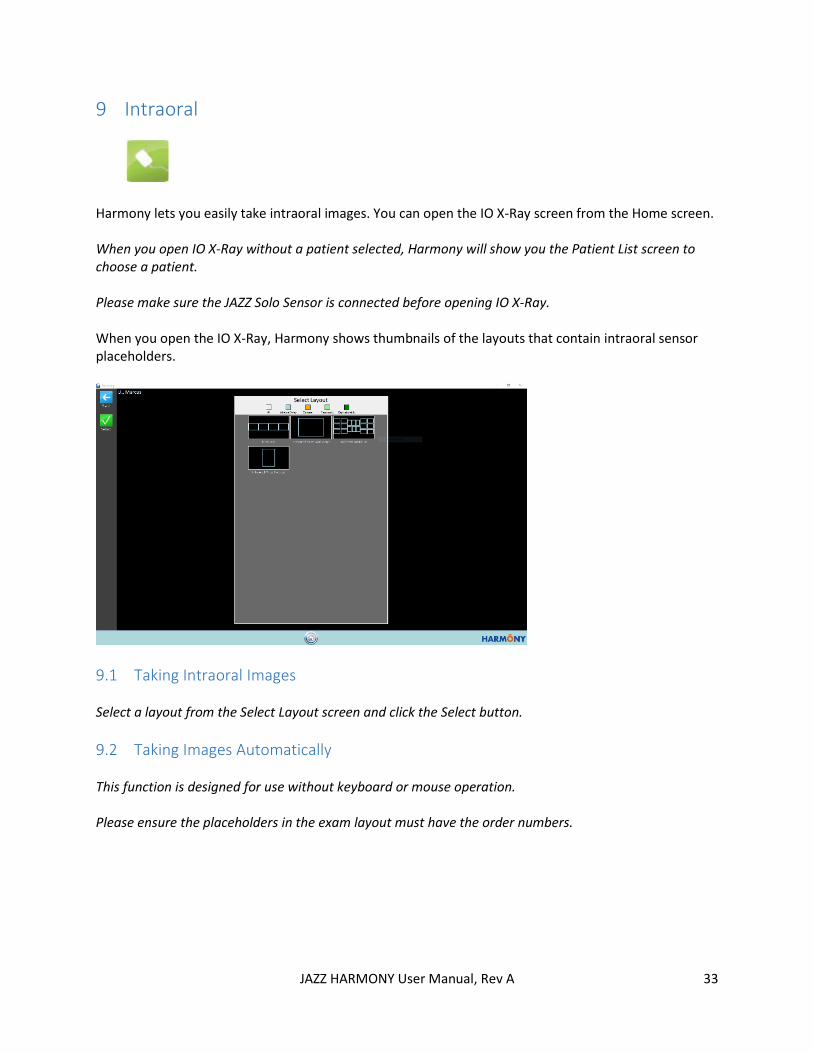
9 Intraoral
Harmony lets you easily take intraoral images. You can open the IO X-Ray screen from the Home screen. When you open IO X-Ray without a patient selected, Harmony will show you the Patient List screen to choose a patient.
Please make sure the JAZZ Solo Sensor is connected before opening IO X-Ray. When you open the IO X-Ray, Harmony shows thumbnails of the layouts that contain intraoral sensor placeholders.
9.1 Taking Intraoral Images Select a layout from the Select Layout screen and click the Select button.
9.2 Taking Images Automatically This function is designed for use without keyboard or mouse operation. Please ensure the placeholders in the exam layout must have the order numbers.
JAZZ HARMONY User Manual, Rev A 34
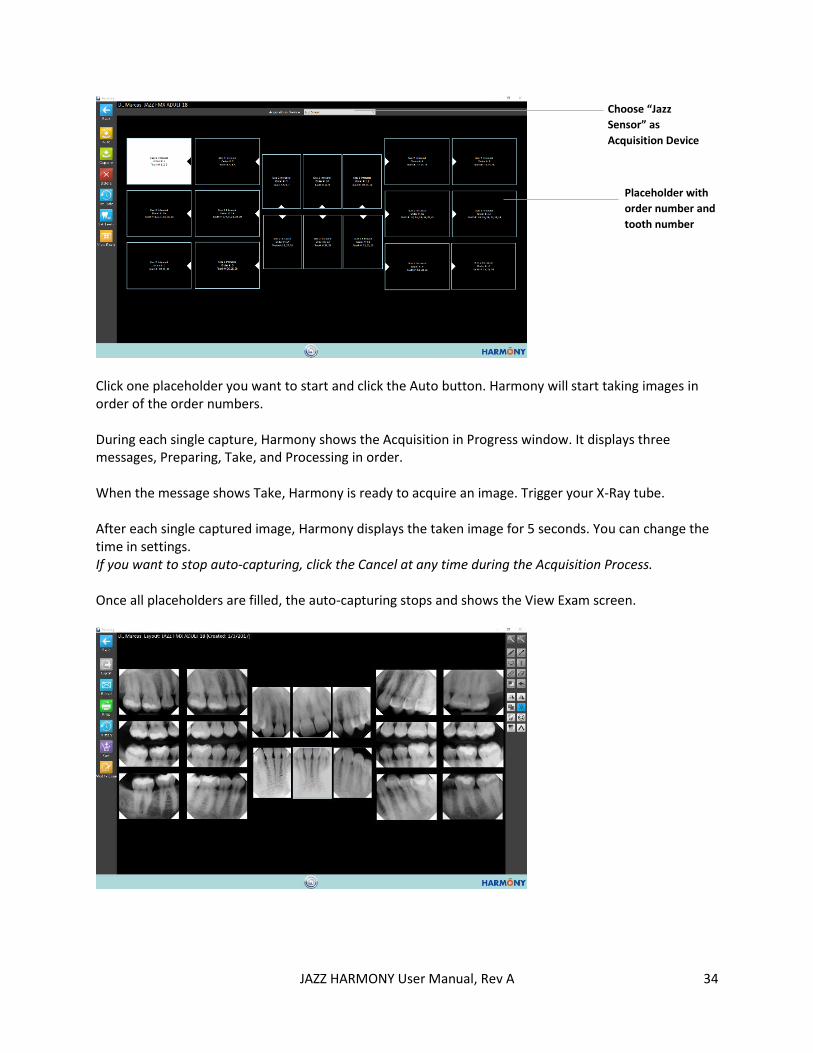
Click one placeholder you want to start and click the Auto button. Harmony will start taking images in order of the order numbers. During each single capture, Harmony shows the Acquisition in Progress window. It displays three messages, Preparing, Take, and Processing in order. When the message shows Take, Harmony is ready to acquire an image. Trigger your X-Ray tube. After each single captured image, Harmony displays the taken image for 5 seconds. You can change the time in settings. If you want to stop auto-capturing, click the Cancel at any time during the Acquisition Process. Once all placeholders are filled, the auto-capturing stops and shows the View Exam screen.
Choose “Jazz
Sensor” as
Acquisition Device
Placeholder with
order number and
tooth number
JAZZ HARMONY User Manual, Rev A 35
9.3 Taking an Image Click one placeholder you want to take and click the Capture button. When you see the Take X-Ray message, take X-Ray. Harmony shows the taken image for 5 seconds. You can change the time in settings. *If the placeholders in the exam layout do not have the tooth numbers assigned, Harmony will show the Tooth Number Chart to assign the tooth numbers. If you do not want to save the tooth numbers in the captured image, click Cancel to skip. You can also change the setting not to ask the tooth numbers in Settings.
9.4 Retaking an Existing Image While taking X-Ray images, if you want to retake an image already taken in the placeholder, click the placeholder and click the Delete button. Then, start the capturing process again.
9.5 Drag and Drop While taking X-Ray images, if you want to move or drag an image already taken in the placeholder to another placeholder, click and hold the image and drag it to the desired placeholder.
JAZZ HARMONY User Manual, Rev A 36
10 Intraoral Camera
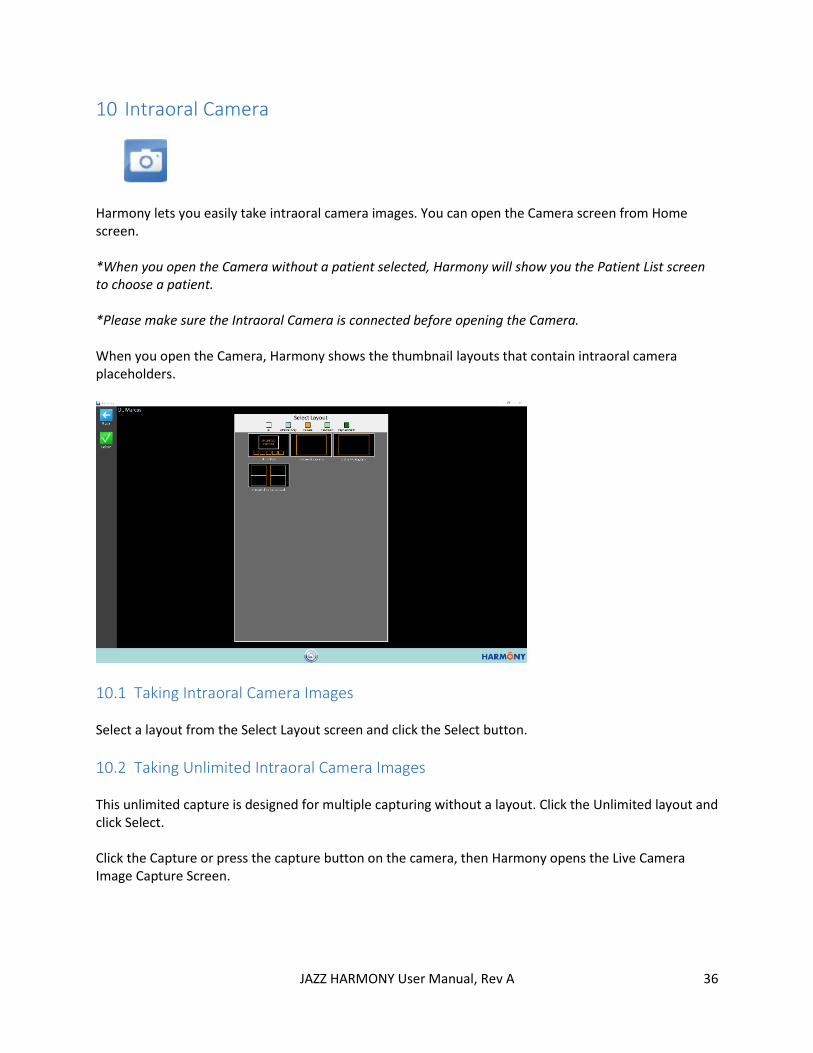
Harmony lets you easily take intraoral camera images. You can open the Camera screen from Home screen. *When you open the Camera without a patient selected, Harmony will show you the Patient List screen to choose a patient. *Please make sure the Intraoral Camera is connected before opening the Camera. When you open the Camera, Harmony shows the thumbnail layouts that contain intraoral camera placeholders.
10.1 Taking Intraoral Camera Images Select a layout from the Select Layout screen and click the Select button.
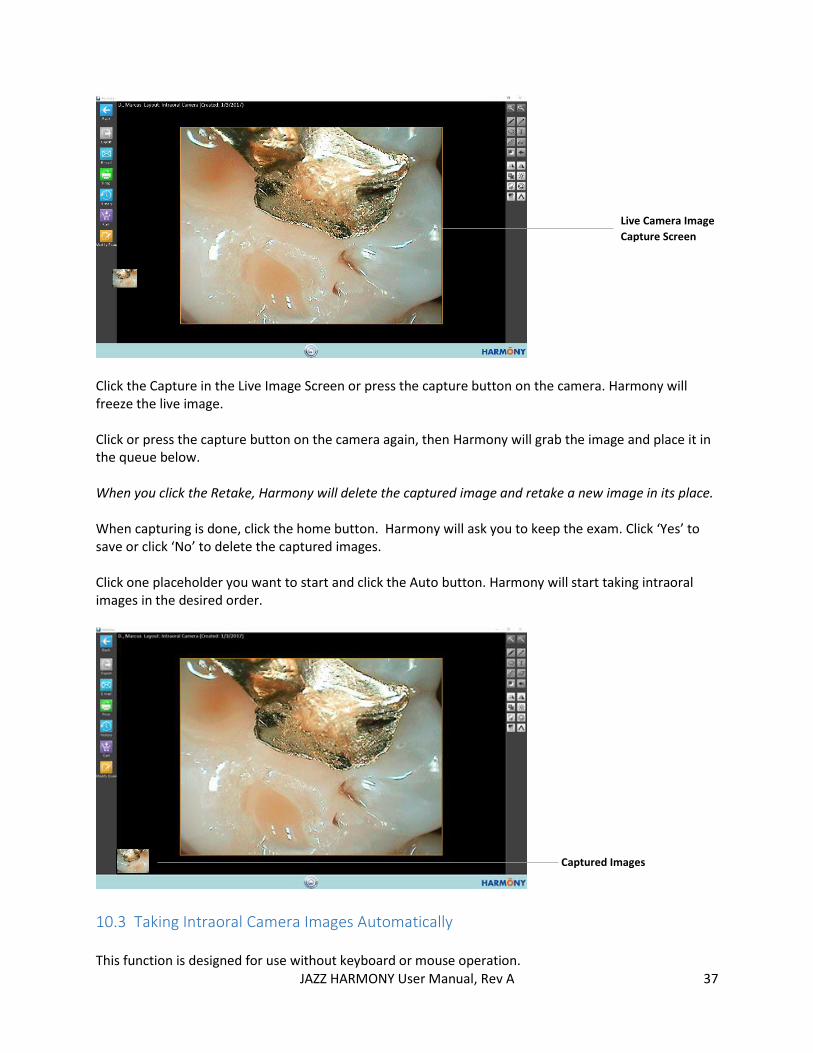
10.2 Taking Unlimited Intraoral Camera Images This unlimited capture is designed for multiple capturing without a layout. Click the Unlimited layout and click Select. Click the Capture or press the capture button on the camera, then Harmony opens the Live Camera Image Capture Screen.
JAZZ HARMONY User Manual, Rev A 37
Click the Capture in the Live Image Screen or press the capture button on the camera. Harmony will freeze the live image. Click or press the capture button on the camera again, then Harmony will grab the image and place it in the queue below. When you click the Retake, Harmony will delete the captured image and retake a new image in its place. When capturing is done, click the home button. Harmony will ask you to keep the exam. Click ‘Yes’ to save or click ‘No’ to delete the captured images. Click one placeholder you want to start and click the Auto button. Harmony will start taking intraoral images in the desired order.
10.3 Taking Intraoral Camera Images Automatically This function is designed for use without keyboard or mouse operation.
Live Camera Image
Capture Screen
Captured Images
JAZZ HARMONY User Manual, Rev A 38
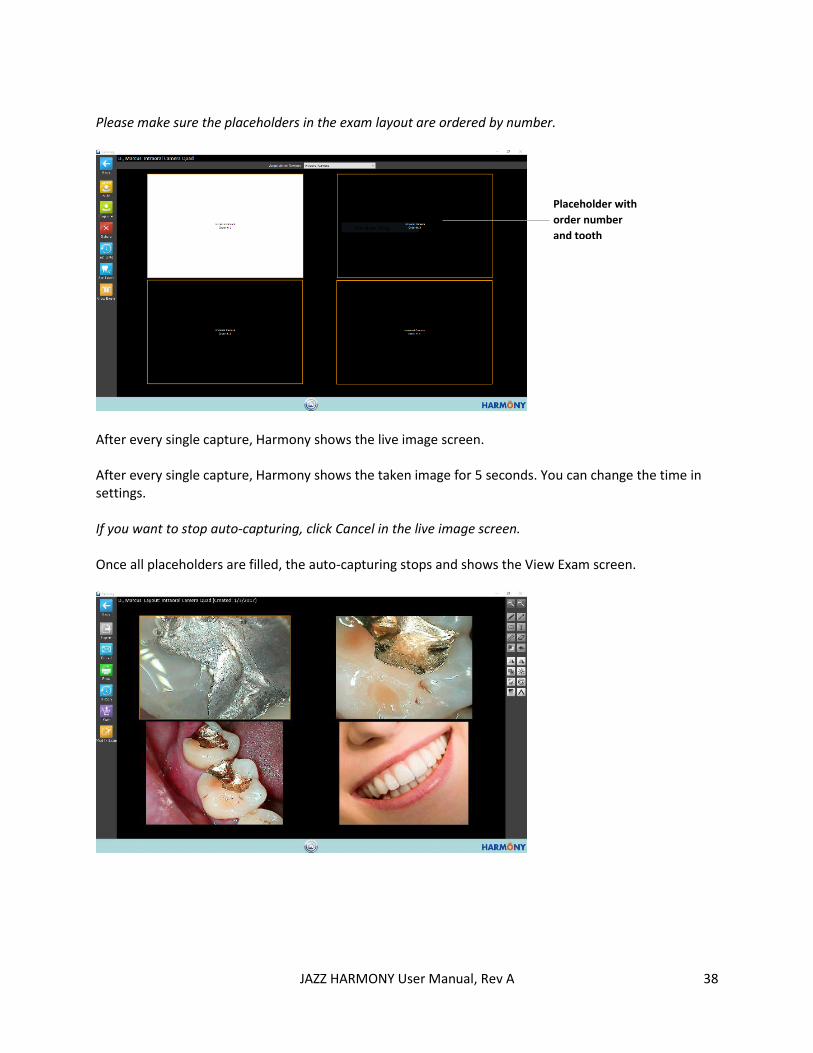
Please make sure the placeholders in the exam layout are ordered by number.
After every single capture, Harmony shows the live image screen. After every single capture, Harmony shows the taken image for 5 seconds. You can change the time in settings. If you want to stop auto-capturing, click Cancel in the live image screen. Once all placeholders are filled, the auto-capturing stops and shows the View Exam screen.
Placeholder with
order number
and tooth
number
JAZZ HARMONY User Manual, Rev A 39
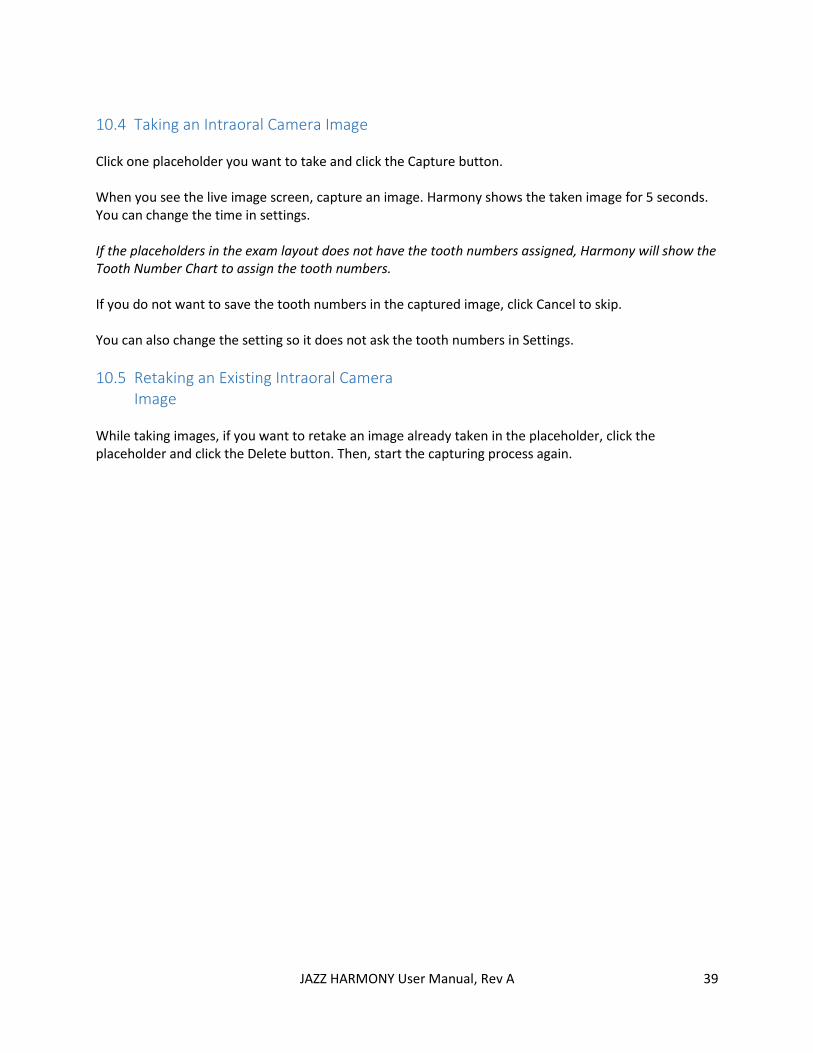
10.4 Taking an Intraoral Camera Image Click one placeholder you want to take and click the Capture button. When you see the live image screen, capture an image. Harmony shows the taken image for 5 seconds. You can change the time in settings. If the placeholders in the exam layout does not have the tooth numbers assigned, Harmony will show the Tooth Number Chart to assign the tooth numbers. If you do not want to save the tooth numbers in the captured image, click Cancel to skip. You can also change the setting so it does not ask the tooth numbers in Settings.
10.5 Retaking an Existing Intraoral Camera Image
While taking images, if you want to retake an image already taken in the placeholder, click the placeholder and click the Delete button. Then, start the capturing process again.
JAZZ HARMONY User Manual, Rev A 40
11 Panoramic (Pan)
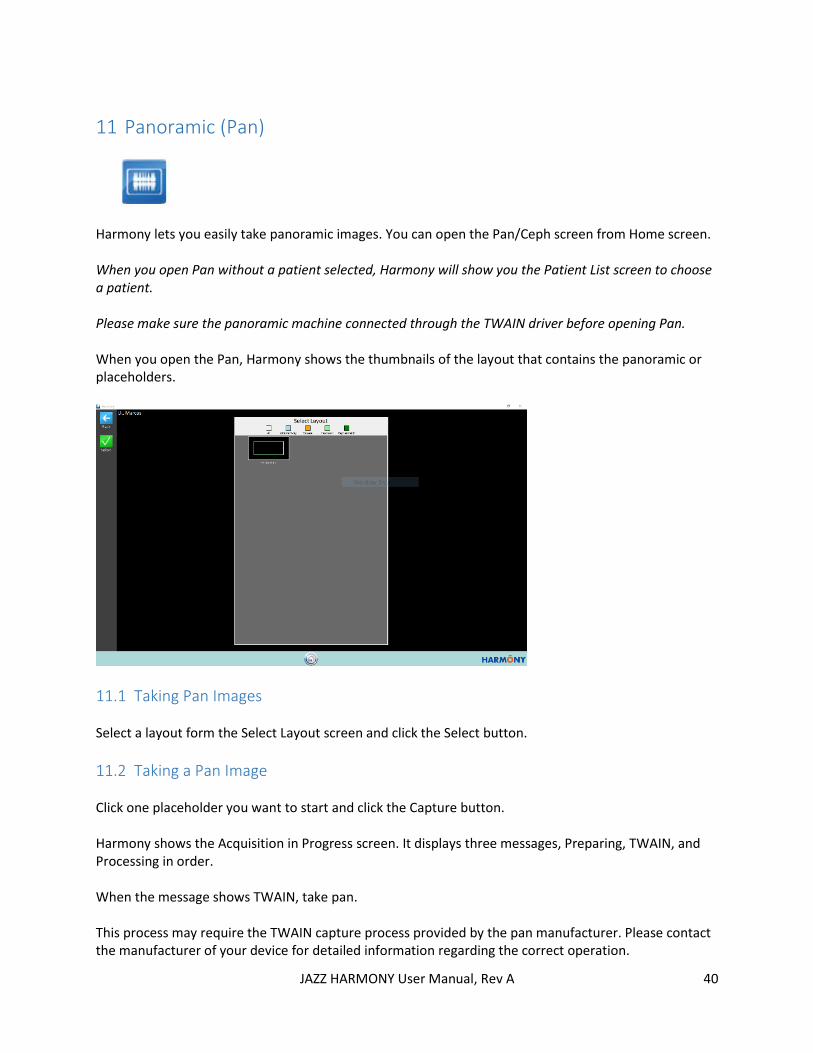
Harmony lets you easily take panoramic images. You can open the Pan/Ceph screen from Home screen. When you open Pan without a patient selected, Harmony will show you the Patient List screen to choose a patient. Please make sure the panoramic machine connected through the TWAIN driver before opening Pan. When you open the Pan, Harmony shows the thumbnails of the layout that contains the panoramic or placeholders.
11.1 Taking Pan Images Select a layout form the Select Layout screen and click the Select button.
11.2 Taking a Pan Image Click one placeholder you want to start and click the Capture button. Harmony shows the Acquisition in Progress screen. It displays three messages, Preparing, TWAIN, and Processing in order. When the message shows TWAIN, take pan. This process may require the TWAIN capture process provided by the pan manufacturer. Please contact the manufacturer of your device for detailed information regarding the correct operation.

JAZZ HARMONY User Manual, Rev A 41
After capturing, Harmony shows the taken image for 5 seconds. You can change the time in settings. If you want to stop capturing, click Cancel in the Acquisition in Progress... Once the placeholder is filled, the capturing stops and shows the View Exam screen. Once the placeholder is filled, the capturing stops and shows the View Exam screen.
11.3 Retaking a Pan Image While taking a Pan image, if you want to retake an image already taken in the placeholder, click the placeholder and click the Delete button. Then, start the capturing process again.
JAZZ HARMONY User Manual, Rev A 42
12 Cephalometric (Ceph)
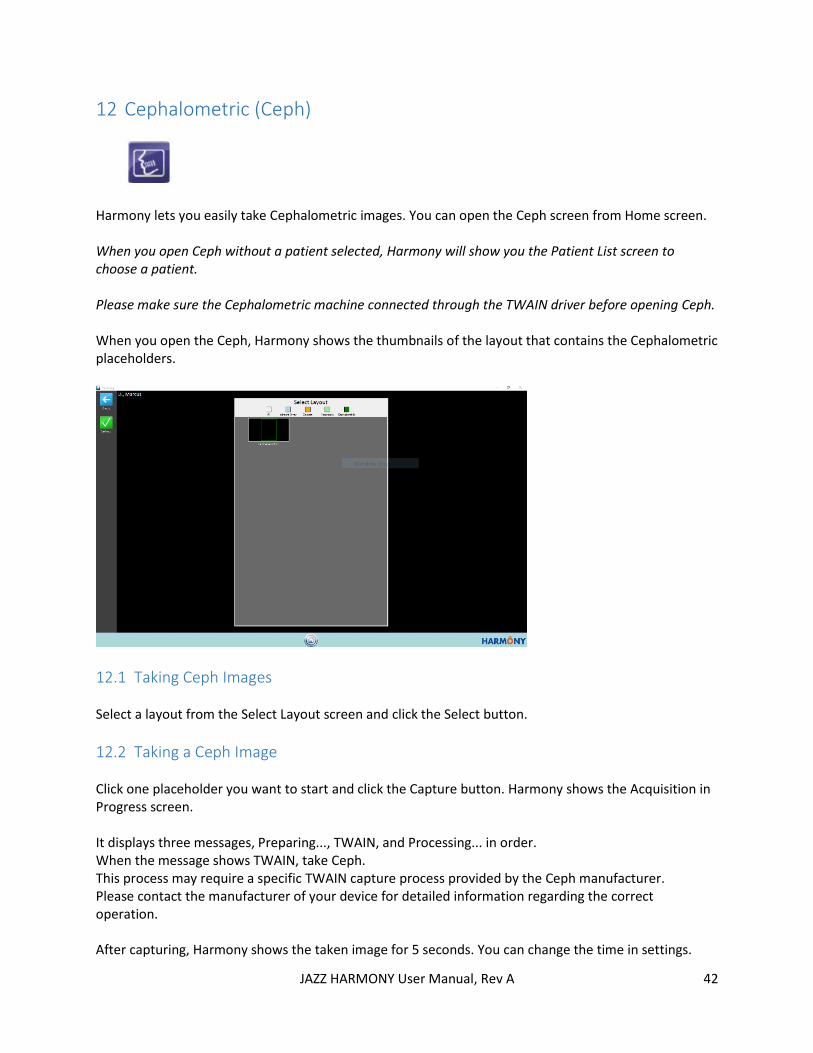
Harmony lets you easily take Cephalometric images. You can open the Ceph screen from Home screen. When you open Ceph without a patient selected, Harmony will show you the Patient List screen to choose a patient. Please make sure the Cephalometric machine connected through the TWAIN driver before opening Ceph. When you open the Ceph, Harmony shows the thumbnails of the layout that contains the Cephalometric placeholders.
12.1 Taking Ceph Images Select a layout from the Select Layout screen and click the Select button.
12.2 Taking a Ceph Image Click one placeholder you want to start and click the Capture button. Harmony shows the Acquisition in Progress screen. It displays three messages, Preparing..., TWAIN, and Processing... in order. When the message shows TWAIN, take Ceph. This process may require a specific TWAIN capture process provided by the Ceph manufacturer. Please contact the manufacturer of your device for detailed information regarding the correct operation. After capturing, Harmony shows the taken image for 5 seconds. You can change the time in settings.
JAZZ HARMONY User Manual, Rev A 43
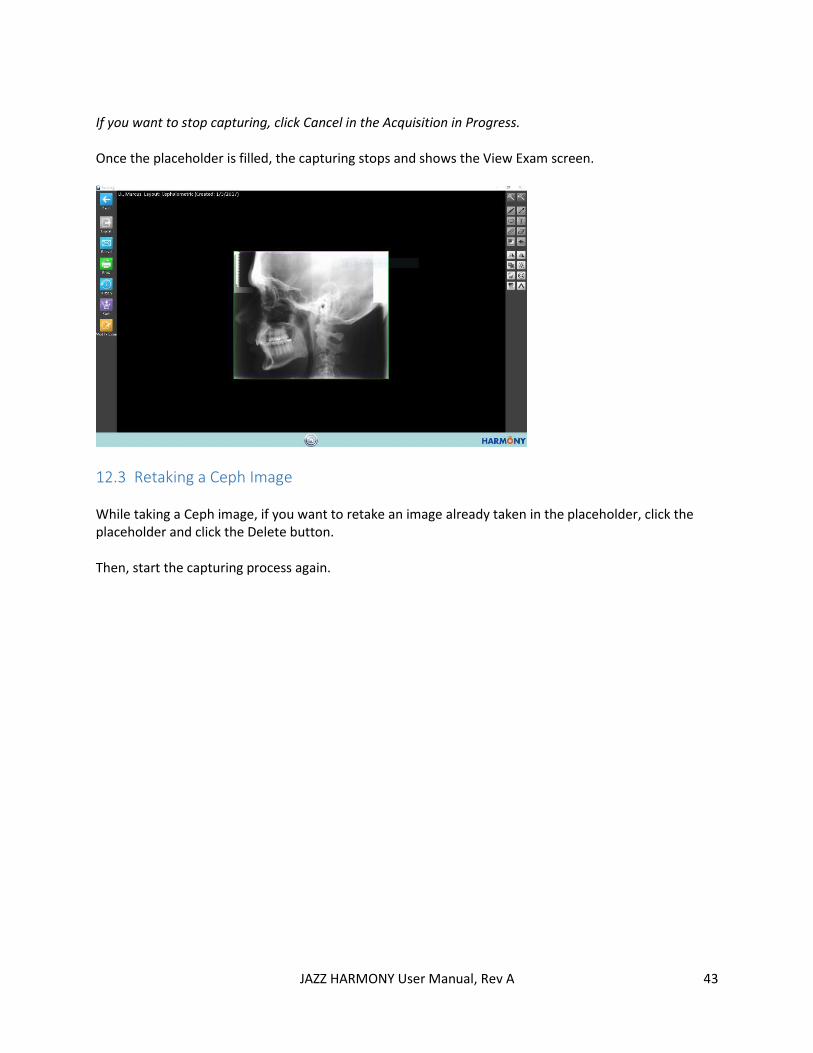
If you want to stop capturing, click Cancel in the Acquisition in Progress. Once the placeholder is filled, the capturing stops and shows the View Exam screen.
12.3 Retaking a Ceph Image While taking a Ceph image, if you want to retake an image already taken in the placeholder, click the placeholder and click the Delete button. Then, start the capturing process again.
JAZZ HARMONY User Manual, Rev A 44
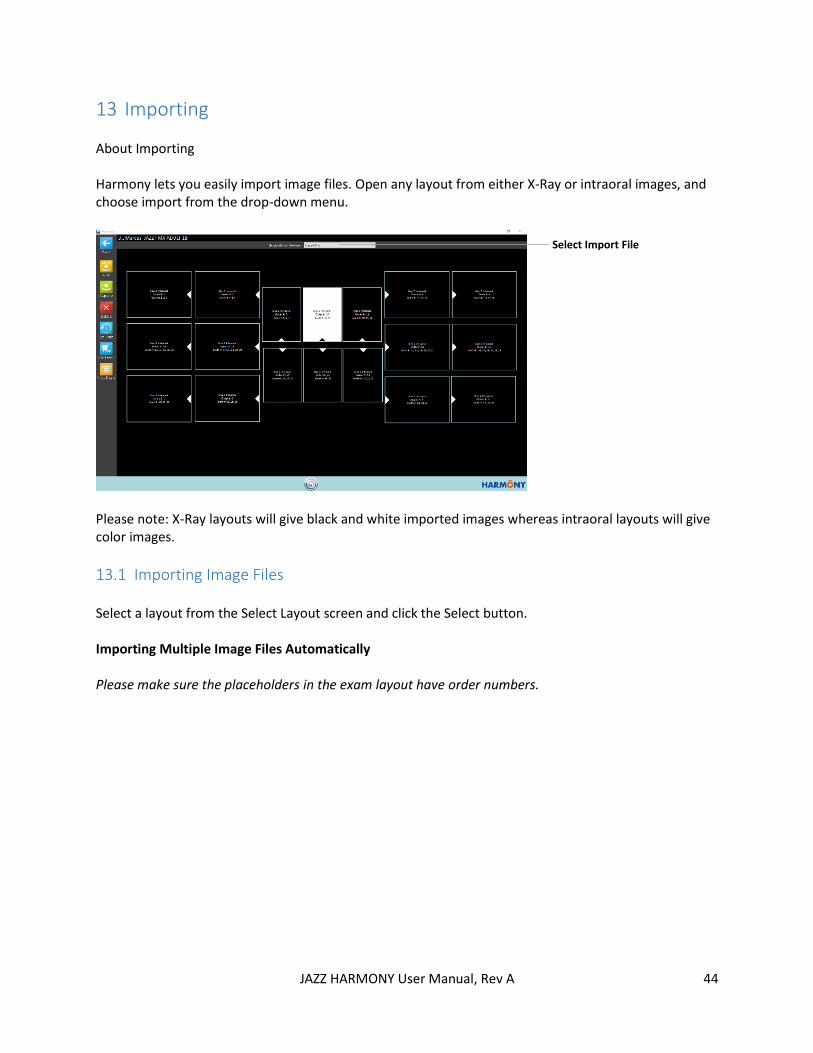
13 Importing About Importing Harmony lets you easily import image files. Open any layout from either X-Ray or intraoral images, and choose import from the drop-down menu.
Please note: X-Ray layouts will give black and white imported images whereas intraoral layouts will give color images.
13.1 Importing Image Files Select a layout from the Select Layout screen and click the Select button. Importing Multiple Image Files Automatically Please make sure the placeholders in the exam layout have order numbers.
Select Import File
JAZZ HARMONY User Manual, Rev A 45
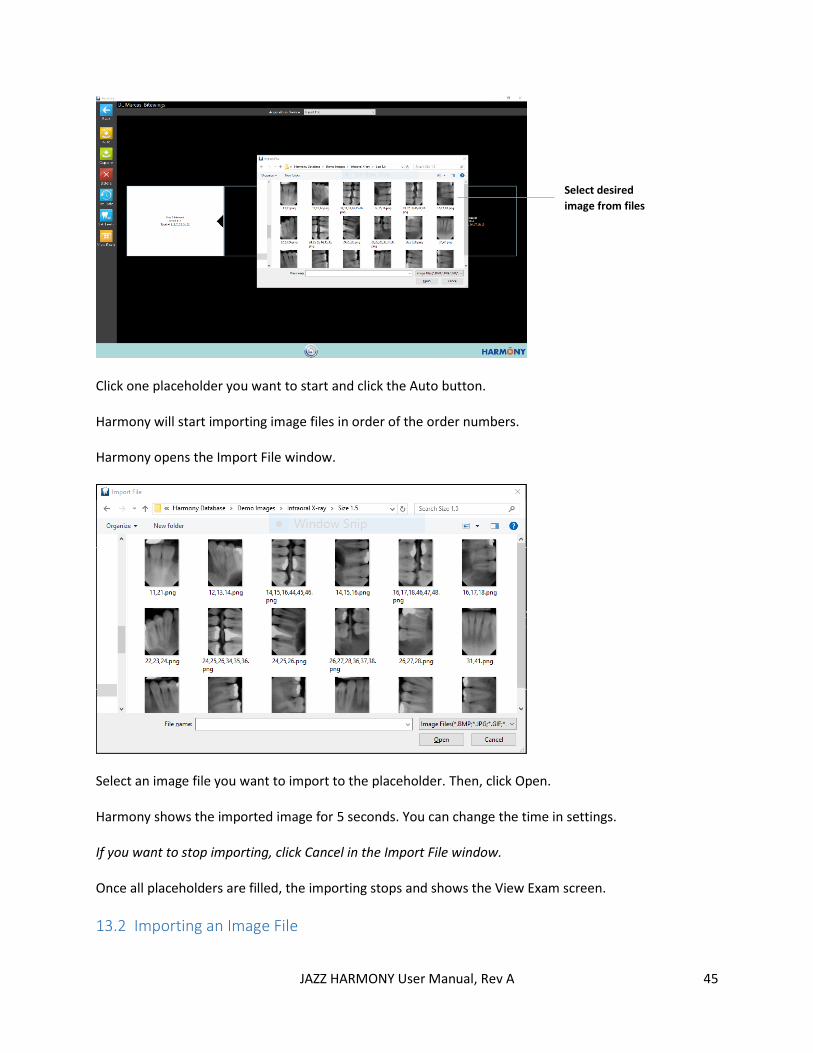
Click one placeholder you want to start and click the Auto button. Harmony will start importing image files in order of the order numbers. Harmony opens the Import File window.
Select an image file you want to import to the placeholder. Then, click Open. Harmony shows the imported image for 5 seconds. You can change the time in settings. If you want to stop importing, click Cancel in the Import File window. Once all placeholders are filled, the importing stops and shows the View Exam screen.
13.2 Importing an Image File
Select desired
image from files
JAZZ HARMONY User Manual, Rev A 46
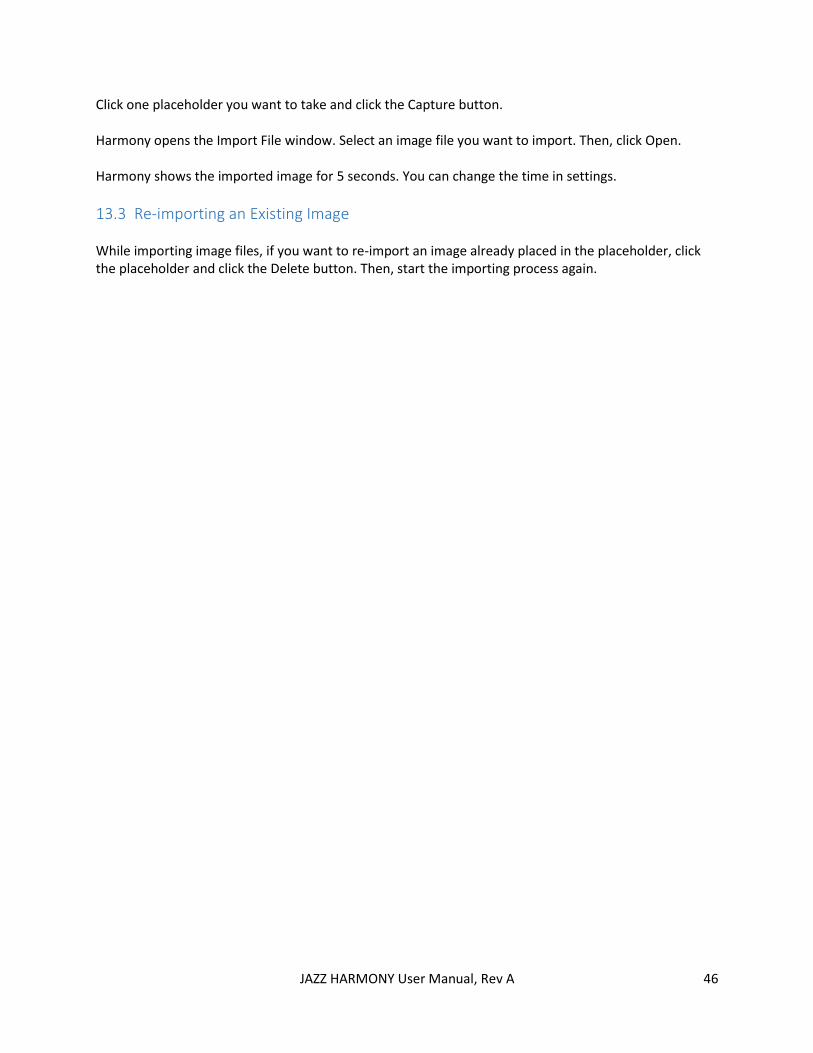
Click one placeholder you want to take and click the Capture button. Harmony opens the Import File window. Select an image file you want to import. Then, click Open. Harmony shows the imported image for 5 seconds. You can change the time in settings.
13.3 Re-importing an Existing Image While importing image files, if you want to re-import an image already placed in the placeholder, click the placeholder and click the Delete button. Then, start the importing process again.

JAZZ HARMONY User Manual, Rev A 47
14 Exporting
Harmony lets you easily export images or layouts to image files. You can open the Export screen from Home screen or Exam View screen. When you open Export without a patient selected, Harmony will show you the Patient List screen to choose a patient. When you open the Export, Harmony shows the thumbnails of the layout that contains the exams.
14.1 Exporting Images Click the exam in the Select Exam screen and Click the Select button.
JAZZ HARMONY User Manual, Rev A 48
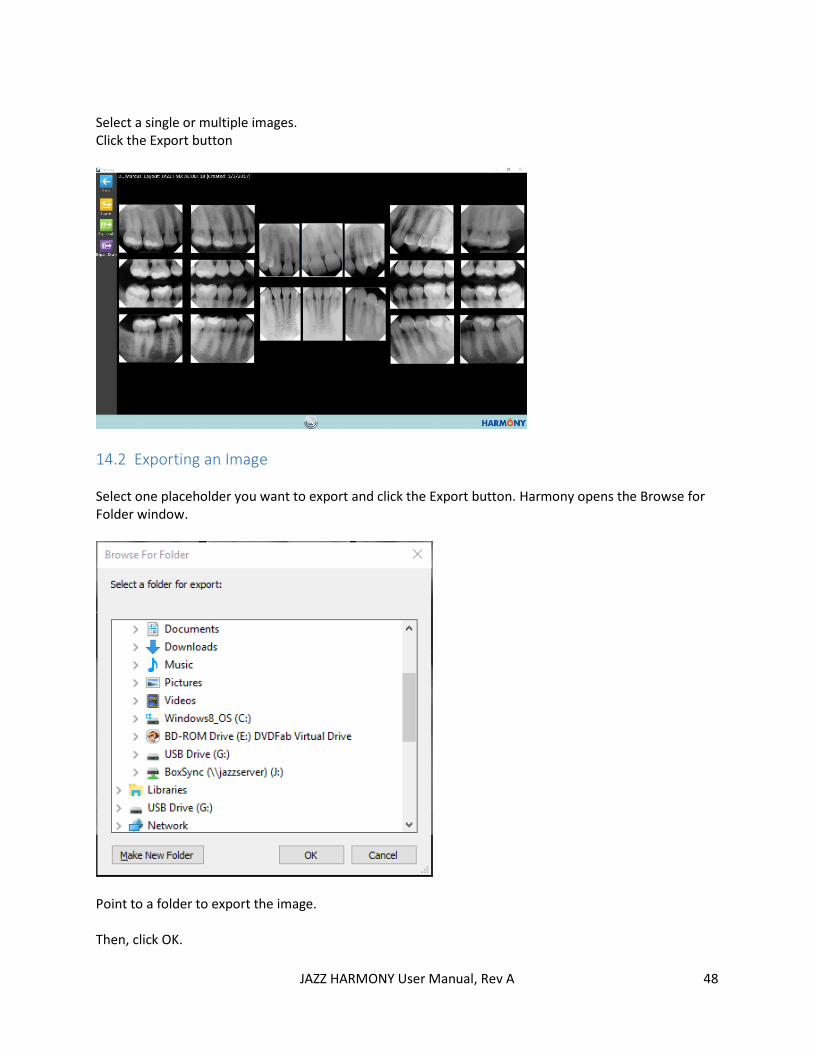
Select a single or multiple images. Click the Export button
14.2 Exporting an Image Select one placeholder you want to export and click the Export button. Harmony opens the Browse for Folder window.
Point to a folder to export the image. Then, click OK.

JAZZ HARMONY User Manual, Rev A 49
14.3 Exporting All Images Click the Export All button. Harmony opens the Browse for Folder window. Point to a folder to export all images. Then, click OK.
14.4 Exporting the Exam Layout Click the Export Exam button. Harmony opens the Browse for Folder window. Point a folder to export the exam layout. Then, click OK.
JAZZ HARMONY User Manual, Rev A 50
15 E-Mail
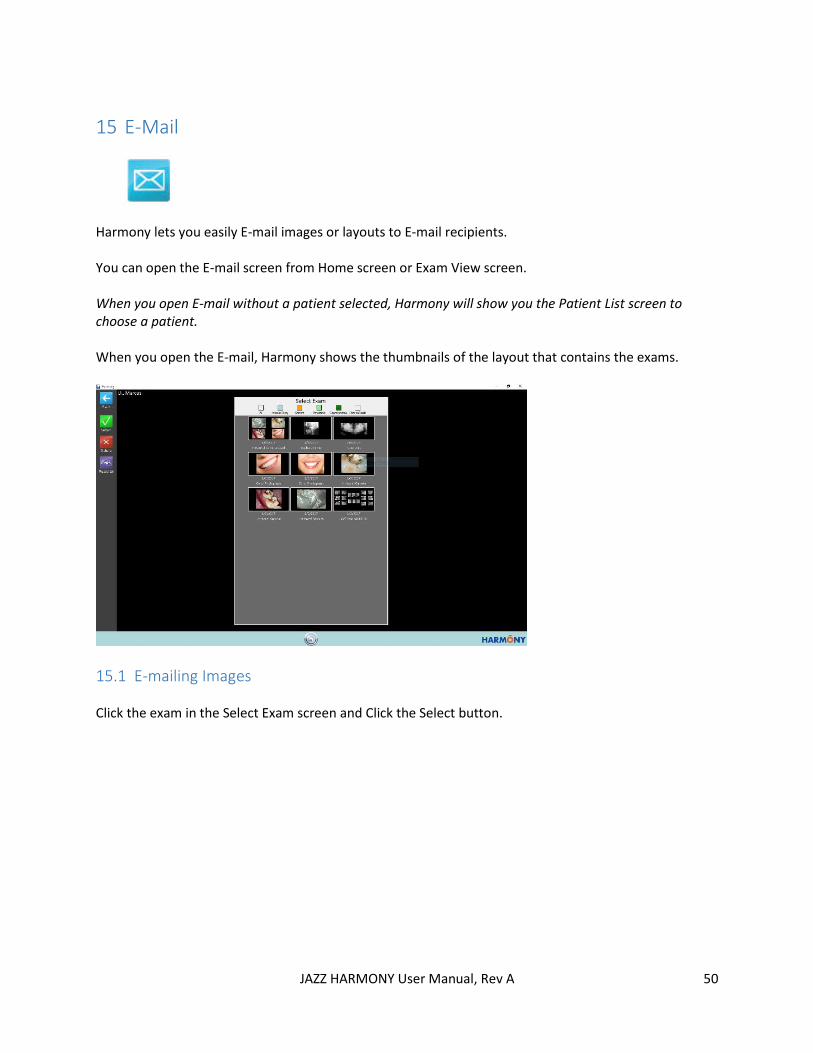
Harmony lets you easily E-mail images or layouts to E-mail recipients. You can open the E-mail screen from Home screen or Exam View screen. When you open E-mail without a patient selected, Harmony will show you the Patient List screen to choose a patient. When you open the E-mail, Harmony shows the thumbnails of the layout that contains the exams.
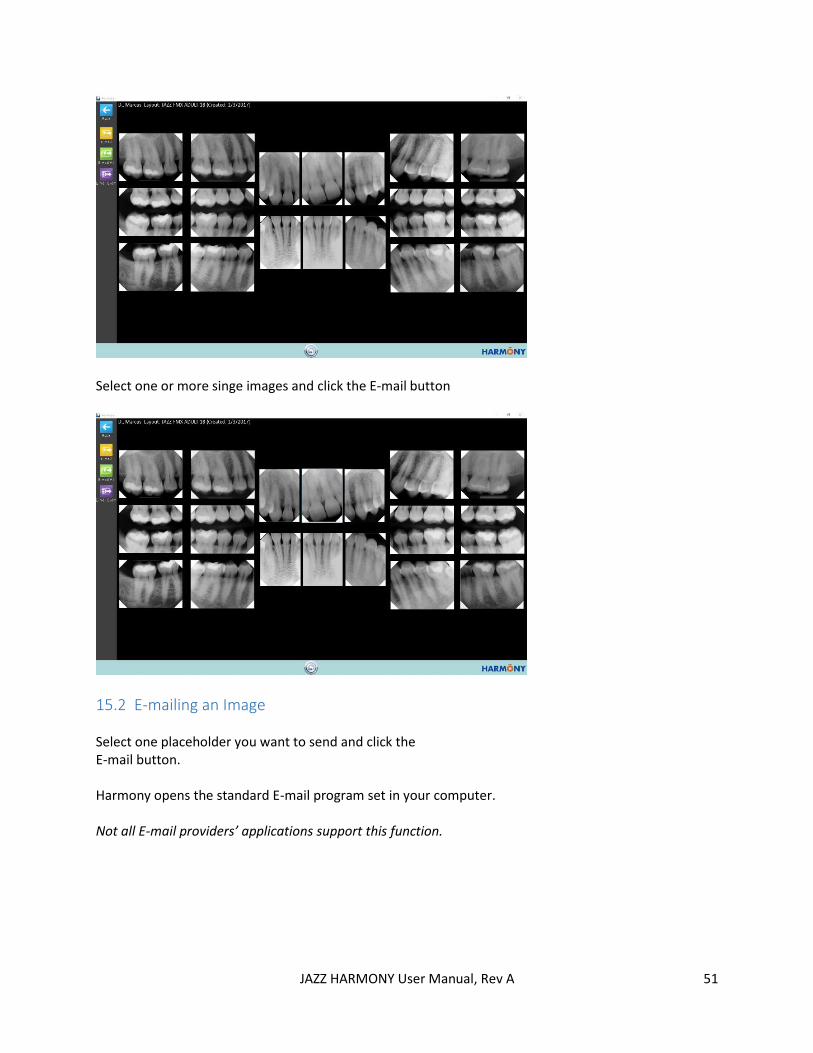
15.1 E-mailing Images Click the exam in the Select Exam screen and Click the Select button.
JAZZ HARMONY User Manual, Rev A 51
Select one or more singe images and click the E-mail button
15.2 E-mailing an Image Select one placeholder you want to send and click the E-mail button. Harmony opens the standard E-mail program set in your computer. Not all E-mail providers’ applications support this function.

JAZZ HARMONY User Manual, Rev A 52
If the selected images were transferred to your E-Mail, the following message will be displayed:
… and your email client will show the attached images.
Fill out the recipient E-mail address, subject, and message. Then, click Send.
15.3 E-mailing All Images Click the E-mail All button. Harmony opens the E-mail program set in your computer. Fill out the recipient E-mail address, subject, and messages. Then, click Send.
15.4 E-mailing the Exam Layout Click the E-mail Exam button.
Harmony opens the E-mail program set in your computer. Fill out the recipient E-mail address, subject, and messages. Then, click Send.
JAZZ HARMONY User Manual, Rev A 53
16 Printing
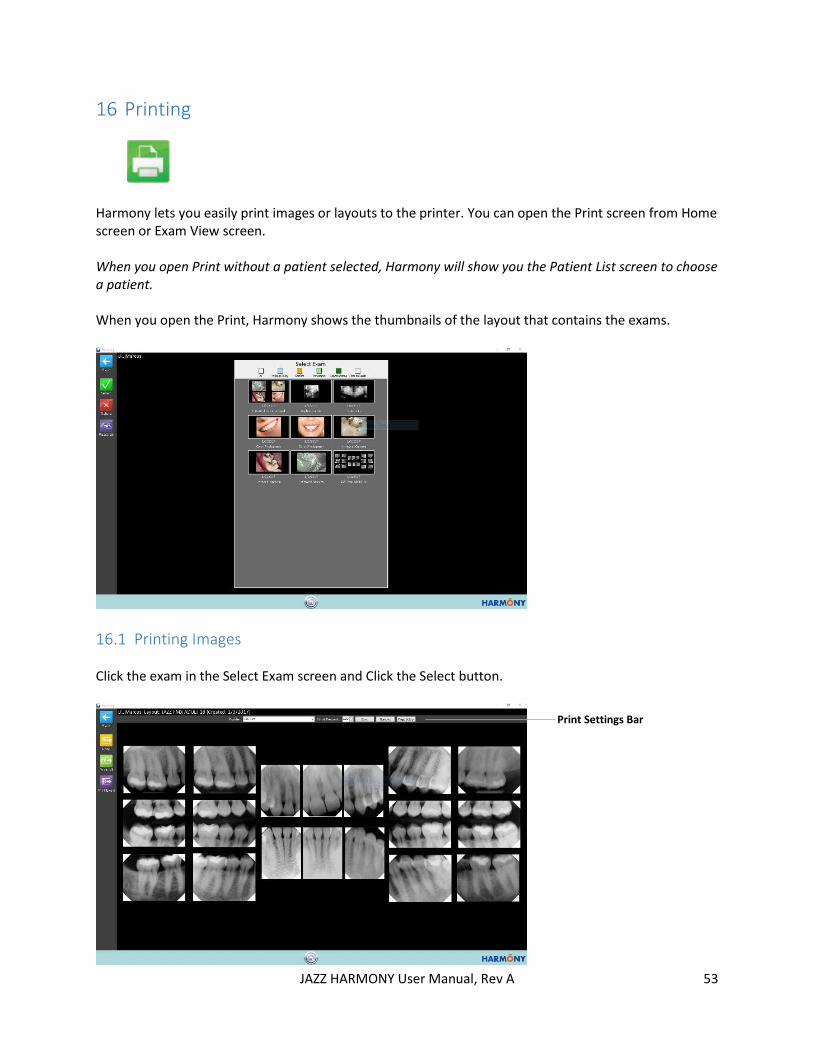
Harmony lets you easily print images or layouts to the printer. You can open the Print screen from Home screen or Exam View screen. When you open Print without a patient selected, Harmony will show you the Patient List screen to choose a patient. When you open the Print, Harmony shows the thumbnails of the layout that contains the exams.
16.1 Printing Images Click the exam in the Select Exam screen and Click the Select button.
Print Settings Bar
JAZZ HARMONY User Manual, Rev A 54
16.2 Print Setting Bar You can save your own setting for printing.
Print percentage determines how much of the paper will be used for the printed image. Default value is 100%.
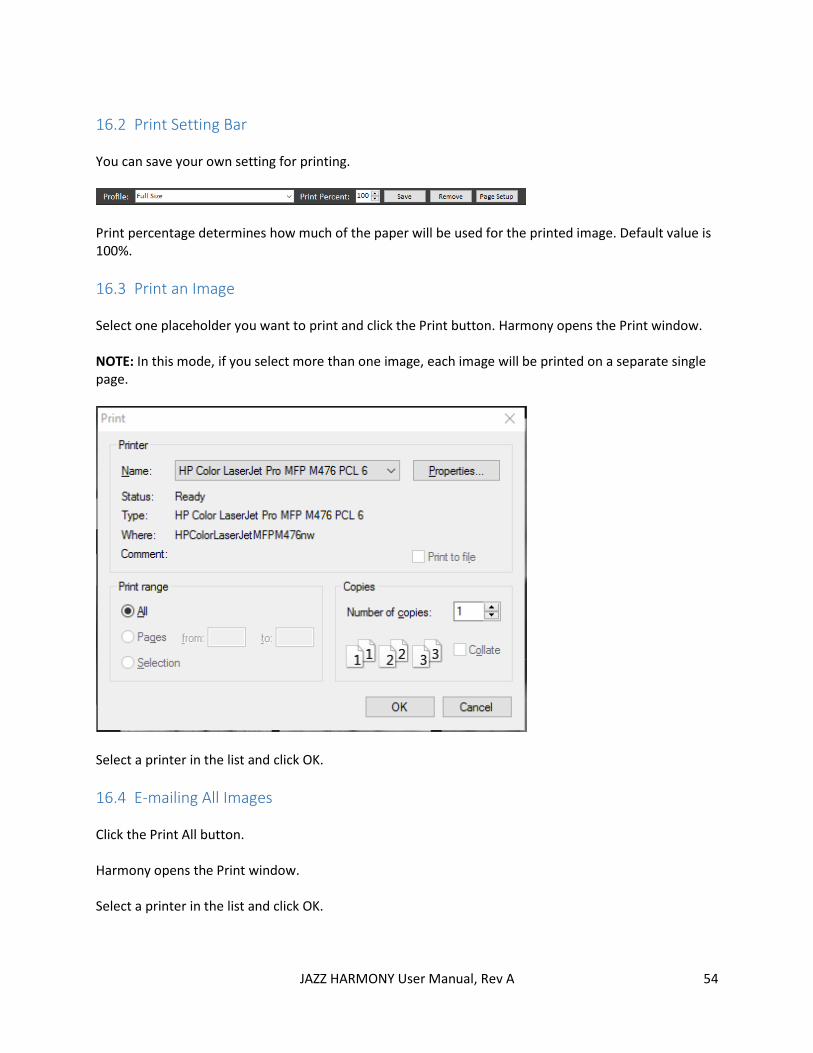
16.3 Print an Image Select one placeholder you want to print and click the Print button. Harmony opens the Print window. NOTE: In this mode, if you select more than one image, each image will be printed on a separate single page.
Select a printer in the list and click OK.
16.4 E-mailing All Images Click the Print All button. Harmony opens the Print window. Select a printer in the list and click OK.

JAZZ HARMONY User Manual, Rev A 55
16.5 E-mailing the Exam Layout Click the Print Exam button. Harmony opens the Print window. Select a printer in the list and click OK.
JAZZ HARMONY User Manual, Rev A 56
17 Editing Layouts
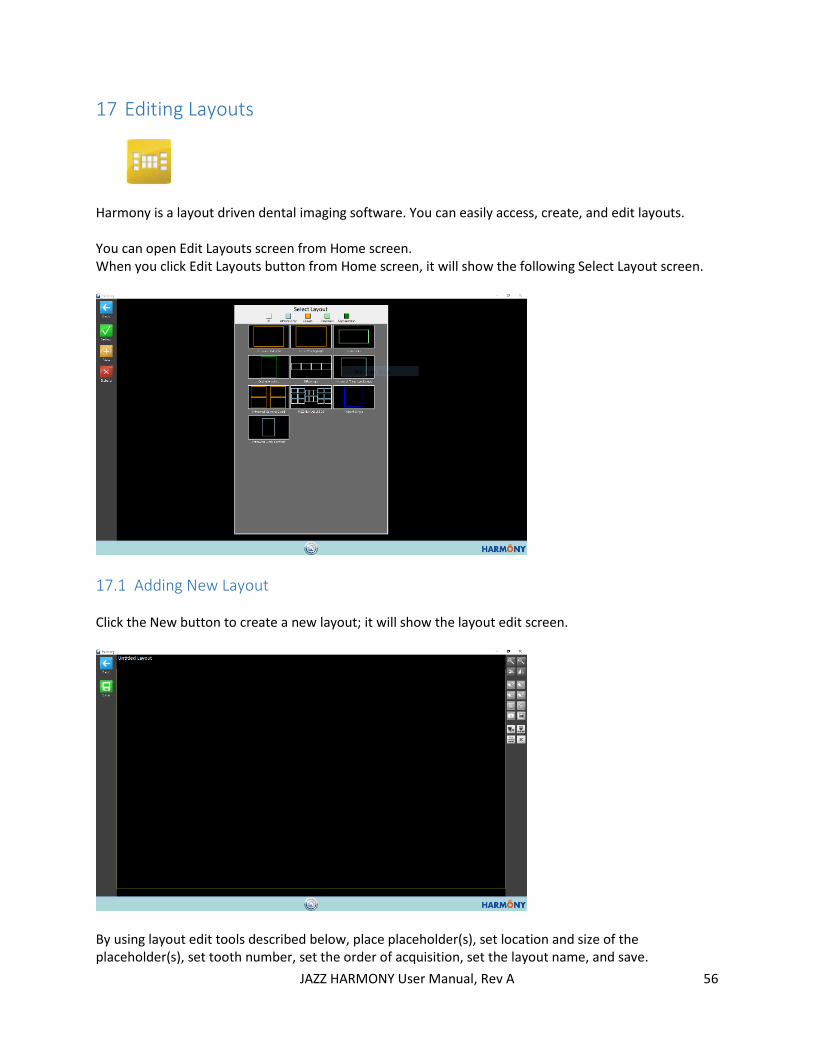
Harmony is a layout driven dental imaging software. You can easily access, create, and edit layouts. You can open Edit Layouts screen from Home screen. When you click Edit Layouts button from Home screen, it will show the following Select Layout screen.
17.1 Adding New Layout Click the New button to create a new layout; it will show the layout edit screen.
By using layout edit tools described below, place placeholder(s), set location and size of the placeholder(s), set tooth number, set the order of acquisition, set the layout name, and save.
JAZZ HARMONY User Manual, Rev A 57
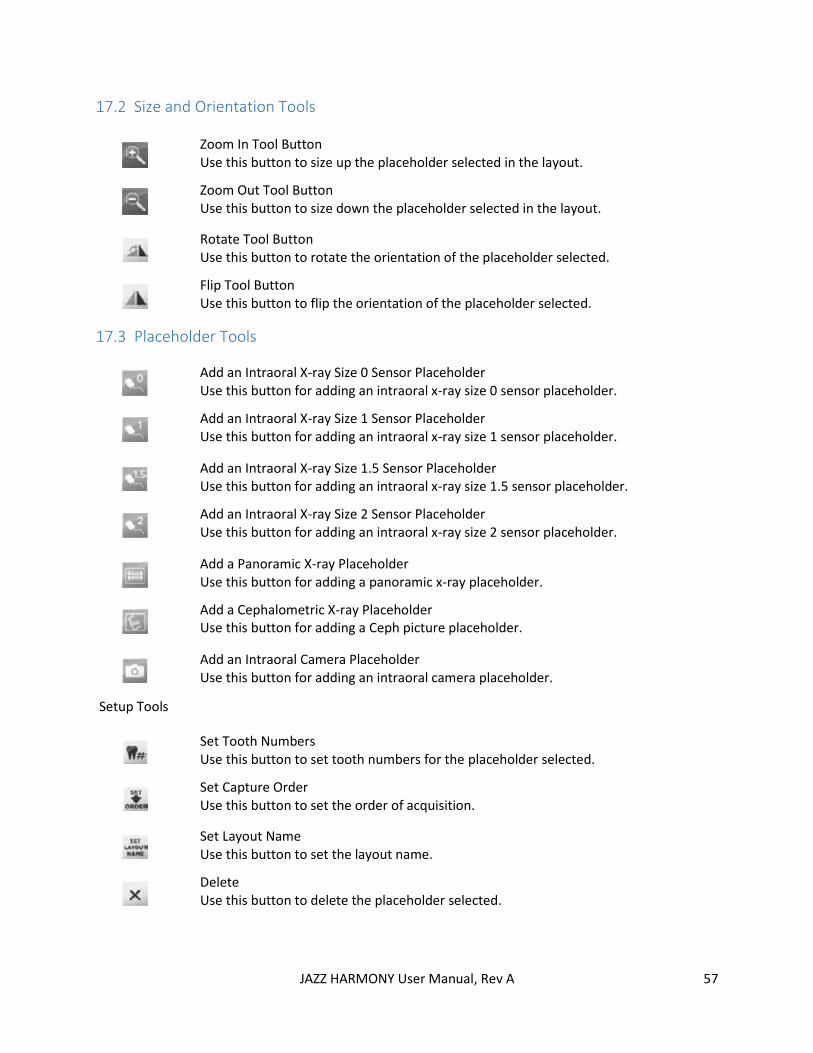
17.2 Size and Orientation Tools
17.3 Placeholder Tools
Setup Tools
Zoom In Tool Button Use this button to size up the placeholder selected in the layout.
Zoom Out Tool Button Use this button to size down the placeholder selected in the layout.
Rotate Tool Button Use this button to rotate the orientation of the placeholder selected.
Flip Tool Button Use this button to flip the orientation of the placeholder selected.
Add an Intraoral X-ray Size 0 Sensor Placeholder Use this button for adding an intraoral x-ray size 0 sensor placeholder.
Add an Intraoral X-ray Size 1 Sensor Placeholder Use this button for adding an intraoral x-ray size 1 sensor placeholder.
Add an Intraoral X-ray Size 1.5 Sensor Placeholder Use this button for adding an intraoral x-ray size 1.5 sensor placeholder.
Add an Intraoral X-ray Size 2 Sensor Placeholder Use this button for adding an intraoral x-ray size 2 sensor placeholder.
Add a Panoramic X-ray Placeholder Use this button for adding a panoramic x-ray placeholder.
Add a Cephalometric X-ray Placeholder Use this button for adding a Ceph picture placeholder.
Add an Intraoral Camera Placeholder Use this button for adding an intraoral camera placeholder.
Set Tooth Numbers Use this button to set tooth numbers for the placeholder selected.
Set Capture Order Use this button to set the order of acquisition.
Set Layout Name Use this button to set the layout name.
Delete Use this button to delete the placeholder selected.

JAZZ HARMONY User Manual, Rev A 58
17.4 Editing a Layout Select a layout in the Select Layout screen and click Select button. The selected layout will show in editing mode. (See the picture page 49)
Edit the layout by using layout edit tools and save.
17.5 Deleting a Layout Select a layout in the Select Layout screen and click Delete button. (See the picture on page 49).

JAZZ HARMONY User Manual, Rev A 59
18 History
Harmony lets you easily compare images that have the same tooth number under a patient. You can access History from any Exam View screen. Click one image you want to see within the history of the exam.
Click the History button. It will bring you to the History screen.
The bottom slide shows all images that have the same tooth number under the patient. On the left-side screen, the image you selected from the exam will show.

JAZZ HARMONY User Manual, Rev A 60
On the right-side screen, the image you choose from the bottom slide will show. In Settings, you can change to show only the exact same teeth for history.
JAZZ HARMONY User Manual, Rev A 61
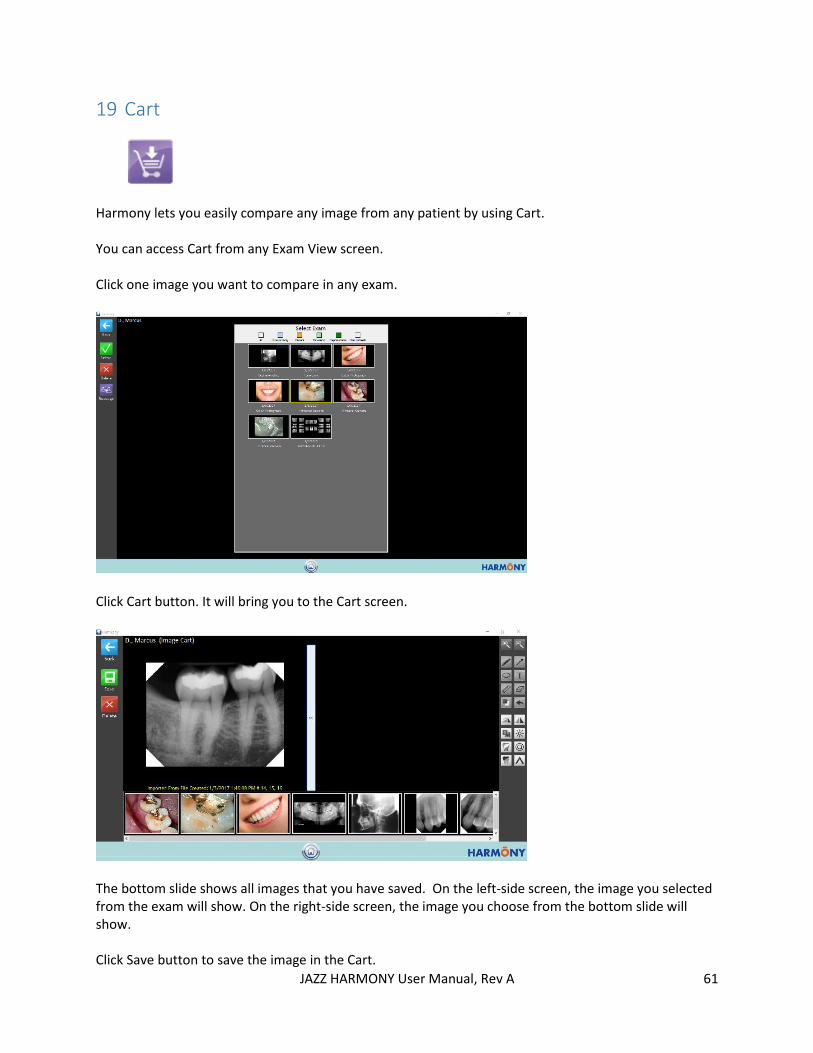
19 Cart
Harmony lets you easily compare any image from any patient by using Cart. You can access Cart from any Exam View screen. Click one image you want to compare in any exam.
Click Cart button. It will bring you to the Cart screen.
The bottom slide shows all images that you have saved. On the left-side screen, the image you selected from the exam will show. On the right-side screen, the image you choose from the bottom slide will show. Click Save button to save the image in the Cart.

JAZZ HARMONY User Manual, Rev A 62
Go back to another patient or same patient to choose an image that you want to compare side by side. Select another image and click Cart button. It will bring you to the Cart screen again. Now, you will see the previously saved image in the bottom slide and the image that you choose in the left-side screen.
When you click an image in the bottom slide, the image will show in the right-side screen. Now, you can compare two images side by side. You can save any image to the bottom slide and can delete any image from the bottom slide by clicking Save and Delete button on the left panel in the Cart screen.