java developer s guide to aspriseasprise.com/scan/files/docs/asprise-imaging-scan-dev...lab asprise!...
TRANSCRIPT

LAB Asprise! Technical Library
JAVA DEVELOPER’S GUIDE TO ASPRISE SCANNING & IMAGE CAPTURE SDK
Version 10
Last updated on June, 2014
ALL RIGHTS RESERVED BY LAB ASPRISE! © 1998, 2014.

LAB Asprise! Asprise Scanning and Image Capture
Table of Contents
1 INTRODUCTION ....................................................................................................................6
1.1 ABOUT ASIC ........................................................................................ 6
1.1.1 Support 64bit and 32bit Java on Windows & Mac ........................ 6
1.1.2 Thread-safe .................................................................................. 6
1.1.3 What about JTwain and JSane? ................................................... 7
1.2 COMPONENTS OF ASIC ......................................................................... 7
1.2.1 asprise-imaging-core .................................................................... 7
1.2.2 asprise-imaging-ui ........................................................................ 8
1.3 ASIC SDK REQUIREMENTS ................................................................... 9
1.4 DEVELOPMENT ENVIRONMENT SETUP ................................................... 10
2 SCAN WITH ASPRISE IMAGING .......................................................................................... 11
2.1 SCAN WITH SYSTEM UI ........................................................................ 11
3 ADVANCED CONTROLS OF SCANNING .................................................................................. 13
3.1 TYPICAL CODE FLOW ............................................................................ 13
Page 2 of 36

LAB Asprise! Asprise Scanning and Image Capture
3.2 GETTING A DEVICE .............................................................................. 13
3.2.1 List all sources programmatically ............................................... 13
3.2.2 Let the user select a source using UI ......................................... 13
3.3 GETTING A FUNCTIONAL UNIT ............................................................... 14
3.4 SETTING CAPABILITIES ......................................................................... 14
3.4.1 Set color, bit depth ..................................................................... 14
3.4.2 Set resolution ............................................................................. 15
3.4.3 Set paper size ............................................................................ 15
3.4.4 Set contrast and brightness ........................................................ 15
3.5 SCAN INTO A FILE ................................................................................ 15
3.6 SCAN INTO MEMORY ............................................................................ 16
3.7 SPECIFY OUTPUT FORMAT: TIFF, PDF, JPEG, PNG, ETC ...................... 16
4 AUTOMATIC DOCUMENT FEEDER ......................................................................................... 17
4.1 SET DUPLEX MODE .............................................................................. 18
5 ADVANCED TOPICS ............................................................................................................. 19
5.1 MORE ON CAPABILITIES ........................................................................ 19
5.1.1 List all capabilities ...................................................................... 19
5.1.2 Get capability by id ..................................................................... 19
Page 3 of 36

LAB Asprise! Asprise Scanning and Image Capture
5.1.3 Capability negotiation – find the validate values and default values
19
5.1.4 Set capability .............................................................................. 19
5.1.5 Refresh capabilities .................................................................... 20
5.2 CREATING SIGNED APPLETS ................................................................ 20
5.2.1 Creating a Certificate .................................................................. 20
5.2.2 Signing Jar Files ......................................................................... 21
5.2.3 Launching the Applet .................................................................. 22
6 IMAGE ACQUISITION COMPONENTS .................................................................................... 24
6.1 JIMAGEDIALOG ................................................................................... 24
6.1.1 Advantages ................................................................................ 25
6.1.2 Sample Uses .............................................................................. 26
6.1.3 Supported Image Formats .......................................................... 30
6.1.4 Compatibility ............................................................................... 32
6.1.5 Software Packaging and Distribution .......................................... 32
6.2 JIMAGEFILECHOOSER ......................................................................... 32
6.2.1 Sample Use ................................................................................ 33
6.2.2 Supported Image Formats .......................................................... 34
Page 4 of 36

LAB Asprise! Asprise Scanning and Image Capture
6.2.3 Compatibility ............................................................................... 34
6.2.4 Software Packaging and Distribution .......................................... 34
7 SUPPORT AND PROFESSIONAL SERVICES .......................................................................... 35
7.1 SUPPORT WEB SITE ............................................................................ 35
7.2 BASIC SUPPORT .................................................................................. 35
7.3 PREMIUM SUPPORT SERVICES ............................................................. 35
7.4 PROFESSIONAL SERVICES .................................................................... 36
Page 5 of 36

LAB Asprise! Asprise Scanning and Image Capture
1 Introduction
1.1 About ASIC Based on the latest technologies, Asprise Scanning and Image Capture (ASIC) SDK is a
future proof document and image scanning library for Java, .NET and other language
bindings.
1.1.1 Support 64bit and 32bit Java on Windows & Mac
ASIC runs on both 64bit and 32bit JVM (Java Virtual Machine) with support of all
popular OS: Windows 8, Windows 7, Windows Vista, Windows XP SP3 and all recent
versions of Mac OS X.
ASIC is based on Microsoft WIA and Apple ICA framework.
1.1.2 Thread-safe
Tests have shown that most of the ASIC operations are thread-safe (at least on
Windows). Thread-safe means the developer can easily access ASIC library from
anywhere without worrying about thread safety.
It also means multiple scanners can be operated simultaneously thus productivity will
be improved significantly.
Page 6 of 36
LAB Asprise! Asprise Scanning and Image Capture
1.1.3 What about JTwain and JSane?
We’ll continue to offer JTwain and JSane. However, there are some limitations with
both of them. JTwain can only runs on 32bit JVM. The main reason is that most of
device vendors do not offer any 64bit TWAIN driver. This means even if JTwain is
compiled into a 64bit library, no device will ever show up. Consumer applications like
Photoship 64bit does not offer any TWAIN acquisition either.
Currently, you need JSane to access scanners on Linux and Unix operating systems.
1.2 Components of ASIC ASIC comprises two components:
1.2.1 asprise-imaging-core
The asprise-imaging-core.jar contains all the essential classes for developers to
access scanner devices. Main packages:
• com.asprise.imaging.scan – Scanning access interface
• com.asprise.imaging.scan.mac – implementation on Mac OS X
• com.asprise.imaging.scan.win – implementation on Windows
In most cases, you only need to access com.asprise.imaging.scan. If you need to access
OS specific features, you can then use the other two packages.
For more details, please refer to the Javadoc API distributed in the kit.
Page 7 of 36
LAB Asprise! Asprise Scanning and Image Capture
You can directly access asprise-imaging-core.jar from your Java code. In many cases,
you may want to show up a GUI so that the user can configure scanning parameters,
etc. You can do it from scratch using Swing since asprise-imaging-core.jar provides all
information you need.
Alternatively, you can save tons of time by using asprise-imaging-ui.jar as a start to
customize the code according your needs.
1.2.2 asprise-imaging-ui
asprise-imaging-ui.jar provides developers a start for implementing a user friendly UI.
Double click the asprise-imaging-ui.jar file and you can bring up the UI as shown
below:
Page 8 of 36

LAB Asprise! Asprise Scanning and Image Capture
1.3 ASIC SDK Requirements First, make sure that you have already installed Java runtime version 1.6 or above on
your system. ASIC may work with Java version 1.4 and 1.5, however, these are not
officially supported.
Page 9 of 36

LAB Asprise! Asprise Scanning and Image Capture
1.4 Development Environment Setup Simply add asprise-imaging-core.jar to your classpath.
Page 10 of 36

LAB Asprise! Asprise Scanning and Image Capture
2 Scan with Asprise Imaging
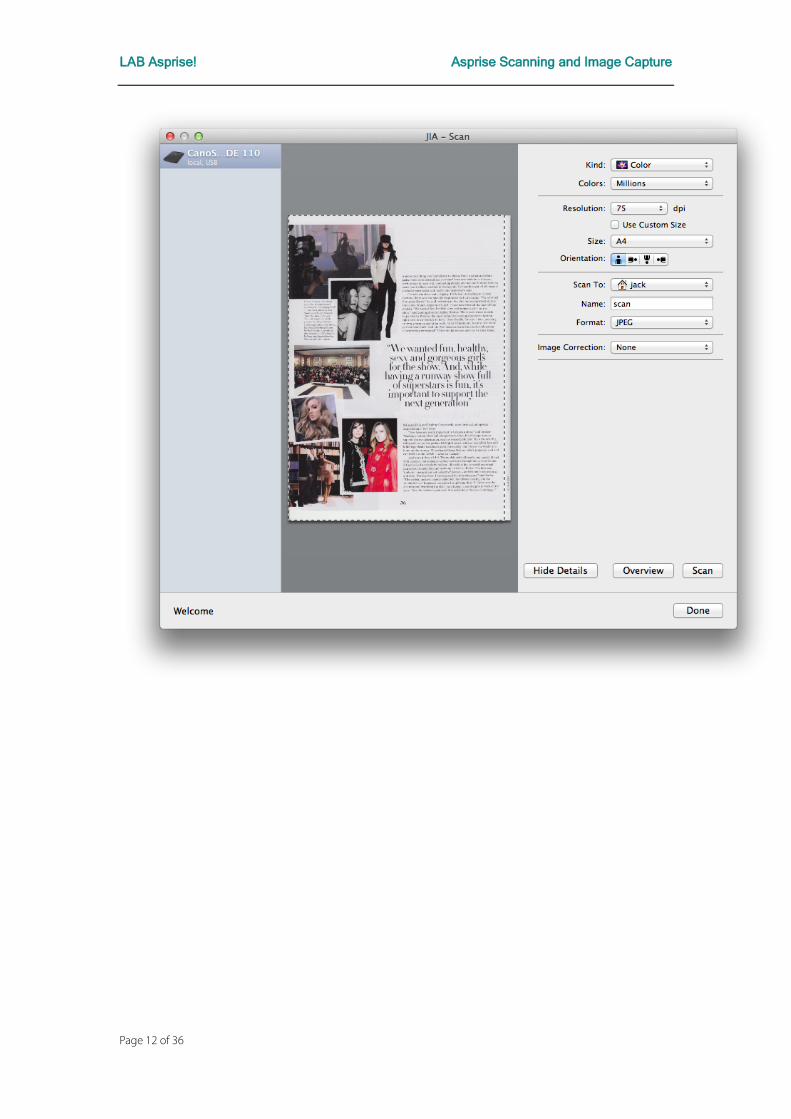
2.1 Scan with System UI With one line of code, you can obtain images from the scanner:
File[] files = ScanManager.getDefaultManager().quickScanUsingUI(new
File(“.”), null);
On Windows, the follow system UI will be shown:
On Mac OS X:
Page 11 of 36
LAB Asprise! Asprise Scanning and Image Capture
Page 12 of 36

LAB Asprise! Asprise Scanning and Image Capture
3 Advanced Controls of Scanning
Advanced controls are not available for Mac yet.
3.1 Typical code flow 1. Get the device and the functional unit;
2. Set the capabilities – color, bitdepth, paper size;
3. Scan
3.2 Getting a Device Source, or data source, is an abstraction of an image source – which can be a scanner, a
digital camera or an image database.
3.2.1 List all sources programmatically
List<Device> devices = ScanManager.getDefaultManager().getDevices();
You can inspect the device list return and select one programmatically or alternatively:
3.2.2 Let the user select a source using UI
String deviceId =
Page 13 of 36

LAB Asprise! Asprise Scanning and Image Capture
ScanManager.getDefaultManager().selectDeviceUsingUI();
Device device = Utils.searchDevice(devices, deviceId);
3.3 Getting a Functional Unit A device may have multiple functional units. For example, a high end scanner should
have at least two functional units: flatbed and document feeder. Most of scanner
should have at least a flatbed functional unit.
To get a functional unit:
FunctionalUnit flatbed = device.getFlatbed();
FunctionalUnit feeder = device.getDocumentFeeder(); // could be null
To list all functional units:
List<FunctionalUnit> functionalUnits = device.getFunctionalUnits();
3.4 Setting Capabilities
3.4.1 Set color, bit depth
functionalUnit.setPixelDataType((FunctionalUnit.PixelDataType.COLOR); functionalUnit.setBitDepth(FunctionalUnit.BitDepth.BIT_DEPTH_24_BITS);
Page 14 of 36
LAB Asprise! Asprise Scanning and Image Capture
3.4.2 Set resolution
functionalUnit.setResolution(300);
3.4.3 Set paper size
functionalUnit.setPaperSize(PaperSize.LETTER);
3.4.4 Set contrast and brightness
functionalUnit.setContrast(20);
functionalUnit.setBrightness(10);
3.5 Scan into a file functionalUnit.scanOnePage(new File(“test.jpg”), new ScanProgressListener() { @Override public void started() { // progressBarScanPureJava.setValue(0); } @Override public void progress(final int percent) { // progressBarScanPureJava.setValue(percent); } @Override public void finished(String error) { // progressBarScanPureJava.setValue(100);
Page 15 of 36

LAB Asprise! Asprise Scanning and Image Capture
} }, null);
3.6 Scan into memory ByteArrayOutputStream outputStream = new ByteArrayOutputStream(); functionalUnit.scanOnePage(outputStream, null, null); System.out.println("Size of image scanned is: " + outputStream.size());
3.7 Specify output format: TIFF, PDF, JPEG, PNG, etc
Output to PNG:
functionalUnit.scanOnePage(outputStream, null, new FunctionalUnit.PropertyBuilder().setOutputFormat(FunctionalUnit.OutputFormat.PNG).toString());
Output to TIFF:
functionalUnit.scanOnePage(outputStream, null, new FunctionalUnit.PropertyBuilder().setOutputFormat(FunctionalUnit.OutputFormat.TIFF).setTiffCompressionScheme(FunctionalUnit.TiffCompression.CCITT4).toString());
Output to PDF:
functionalUnit.scanOnePage(outputStream, null, new FunctionalUnit.PropertyBuilder().setOutputFormat(FunctionalUnit.OutputFormat.PDF).setTiffCompressionScheme(FunctionalUnit.TiffCompression.CCITT4).toString());
Page 16 of 36

LAB Asprise! Asprise Scanning and Image Capture
4 Automatic Document Feeder
ASIC makes it easy to perform automatic document feeding. The following code
should work for most document feeders:
ScanManager manager = ScanManager.getDefaultManager(); Device device = manager.getDevices().get(0); FunctionalUnit feeder = device.getDocumentFeeder(); final ByteArrayOutputStream outputStream = new ByteArrayOutputStream(); fu.scan(new AbstractScanListener() { @Override public Object getPageOutputTarget(int pageIndex, long pageId) { if(pageIndex <= 2) { return outputStream; } else { // accept max 3 pages (0, 1, 2). return 0; } } }, new FunctionalUnit.PropertyBuilder() .setAdf(true) .setOutputFormat(FunctionalUnit.OutputFormat.TIFF) .setTiffCompressionScheme(FunctionalUnit.TiffCompression.CCITT4) .setMode(FunctionalUnit.Mode.HIGH_SPEED) .toString() );
The above code will scan max 3 pages and save the content in TIFF format into the
memory. Note you use the getPageOutputTarget method to control output
destination or to stop the scan by returning null. Besides streams, you can also return
File.
Page 17 of 36

LAB Asprise! Asprise Scanning and Image Capture
For TIFF and PDF, which support multiple pages in a single file, you can return the same
output stream or file. However, for other formats like JPEG, BMP, PNG, you need to
return different output streams/files for each page. For example:
fu.scan(new AbstractScanListener() { @Override public Object getPageOutputTarget(int pageIndex, long pageId) { if(pageIndex <= 2) { return new File(“page-“ + pageIndex + “.jpg”); } else { // accept max 3 pages (0, 1, 2). return 0; } } }, new FunctionalUnit.PropertyBuilder() .setAdf(true) .setOutputFormat(FunctionalUnit.OutputFormat.JPEG) .setMode(FunctionalUnit.Mode.HIGH_SPEED) .toString() );
The following code can be used to test if the feeder has paper available for scanning:
while(device.isFeedReady() && fu.getDuplex() != null) { feeder.scan( …); feeder.refreshCapabilities(); }
4.1 Set duplex mode feeder.setDuplex(FunctionalUnit.Duplex.DUPLEX_FRONT_FIRST);
Page 18 of 36
LAB Asprise! Asprise Scanning and Image Capture
5 Advanced Topics
5.1 More on capabilities
5.1.1 List all capabilities
List<Capability> capsDevice = device.getCapabilities(); List<Capability> capsFU = functionalUnit.getCapabilities();
5.1.2 Get capability by id
Capability capBitDepth = fu.getCapability(WiaConstants.WIA_IPA_DEPTH);
5.1.3 Capability negotiation – find the validate values and
default values
Capability.ValidValuesList validValues = (Capability.ValidValuesList) capBitDepth.getValidValues(); List allValidValues = validValues.getAllValues(); long defaultValue = ((Number)validValues.getDefaultValue()).longValue();
5.1.4 Set capability
capBitDepth.setNewValue(24);
Page 19 of 36

LAB Asprise! Asprise Scanning and Image Capture
Note: capabilities will only be written to the hardware device immediately before
scanning.
5.1.5 Refresh capabilities
Capability information is only retrieved when you run
ScanManager.getDefaultManager().getDevices(). To get the latest values, you need to
refresh:
device.refreshCapabilities(); // or functionalUnit.refreshCapabilities();
5.2 Creating Signed Applets Only signed applets can be granted with all the permissions. To enable an applet to
access dll files (e.g., scanning) or other native services, you need to sign the all the jar
files required by the applet with the same certificate. This section provides a
step-by-step guide.
5.2.1 Creating a Certificate
Before you can sign jar files, you need a certificate. If you already have one, you can skip
this procedure.
First, change directory to the root directory of the project:
E:\eclipse-301\workspace\TEST
Run the following command:
Page 20 of 36

LAB Asprise! Asprise Scanning and Image Capture
E:\eclipse-301\workspace\TEST>keytool -genkey -dname "cn=YOUR NAME,
ou=ORG UNIT, o=COMPANY, c=US" -alias test -keypass testpass -validity 999
-keystore test -storepass testpass
A file named test containing the certificate is generated under the TEST folder.
5.2.2 Signing Jar Files
Use the following command to sign each jar file:
E:\eclipse-301\workspace\TEST>jarsigner -keystore test -storepass
testpass -keypass testpass program.jar test
E:\eclipse-301\workspace\TEST>jarsigner -keystore test -storepass
testpass -keypass testpass asprise-imaging-scan-core.jar test
...
Now, all the jar files have been signed. You can launch the applet with a proper HTML
page.
Page 21 of 36

LAB Asprise! Asprise Scanning and Image Capture
5.2.3 Launching the Applet
Now, you can use HTML code like the following to invoke the applet:
1. <html>
2. <head>
3. <title>TestUI</title>
4. </head>
5. <body>
6. <h1>Signed Applet Testing</h1>
7. <h3><a href="http://asprise.com">All Rights Reserved by LAB
Asprise!</a></h3>
8.
9. <applet code="com.asprise.test.TestUI.class" codebase="."
archive="program.jar, asprise-imaging-scan-core.jar" width="400"
height="300">
10. Oops, Your browser does not support Java applet!
11. </applet>
12.
13. </body>
Page 22 of 36

LAB Asprise! Asprise Scanning and Image Capture
14. </html>
The screenshot:
Page 23 of 36
LAB Asprise! Asprise Scanning and Image Capture
6 Image Acquisition Components
The image acquisition UI components are not part of Asprise ASIC SDK. They are
separated products offered by Asprise.
However, based on our customers' experience, if you need to build a front-end, they
are invaluable and could save you a lot of time. Otherwise, you may skip this chapter.
6.1 JImageDialog JImageDialog is an image acquisition UI component that allows the user to load
images and to perform basic image editing tasks. If you are developing some
applications that require the user to select/edit/input images, then JImageDialog will
make your life extremely easy – and more importantly, the user experience will be
improved dramatically.
Page 24 of 36

LAB Asprise! Asprise Scanning and Image Capture
Let say you want to build an album application, the user is required to supply photos
(i.e. images). You put a button on your panel. When the user click the button,
JImageDialog is brought up – now the user can select existing pictures files from his or
her computer or acquire images from digital cameras or scanners. And the user can
edit images before putting it into the album.
6.1.1 Advantages
Multiple image sources supported: local computer, digital cameras, scanners and the
web;
Page 25 of 36

LAB Asprise! Asprise Scanning and Image Capture
Multiple image formats: read and write BMP, PNG, JPG, GIF, PCT, PSD and many other
formats;
Platform/Virtual machine independent: Any platform, any Java virtual machine (version
1.3 or above);
Powerful features: rotation, flipping, scaling, clipping, etc.
User friendly as well as developer friendly
The user can load images from local computer or the web, he or she can also acquire
images from digital cameras and scanners. After the image has been loaded, the user
can rotate, clip, flip, and scale the image. The image has been loaded and edited, the
user can save the image or select the image - which will be used in your applications.
6.1.2 Sample Uses
6.1.2.1 Modal (synchronous) mode
15. JImageDialog dialog = new JImageDialog(frame, "Sample", true); //
Modal dialog
16. BufferedImage image = dialog.showDialog();
17. ...
Page 26 of 36

LAB Asprise! Asprise Scanning and Image Capture
Line 1 constructs the image dialog.
Line 2 brings up the image dialog and waiting for user's selection/acquisition.
Besides using JImageDialog in synchronous mode, you can also use it in:
6.1.2.2 Asynchronous mode
18. public class JImageDialogSample extends JPanel implements
JImageDialogListener {
19. ...
20. BufferedImage image;
21.
22. // Displays selected image if any.
23. public void paintComponent(Graphics g) {
24. super.paintComponent(g); // Paint background.
25. if(image != null)
26. g.drawImage(image, 0, 0, null);
27. }
28.
Page 27 of 36

LAB Asprise! Asprise Scanning and Image Capture
29. // Sets image and refreshes the panel.
30. public void setImage(BufferedImage image) {
31. this.image = image;
32. setPreferredSize(getPreferredSize());
33. revalidate();
34. repaint();
35. }
36.
37. // Methods in JImageDialogListener
38. // When the user presses cancel button, this method will be called.
39. public void onCancel() {
40. setImage(null);
41. }
42.
43. // When the user presses the selection button, will be invoked.
44. public void onImageSet(BufferedImage image) {
45. setImage(image);
46. }
Page 28 of 36

LAB Asprise! Asprise Scanning and Image Capture
47. }
48.
49. ...
50. JImageDialogSample imagePanel = new JImageDialogSample();
51.
52. JImageDialog dialog = new JImageDialog();
53. dialog.addImageDialogListener(imagePanel);
54. dialog.showDialog();
Line 1-30 implements a JimageDialogListener.
Line 33 constructs the listener.
Line 35 constructs the dialog.
Line 36 registers the listener the dialog
Line 37 brings up the dialog
When the user acquires an image and selects it, JimageDialog's listeners will be
notified. In this case, imagePanel.onImageSet(BufferedImage image) will be called and
thus the panel will display the selected image. If the user cancels the selection,
onCancel() will be called instead.
Page 29 of 36

LAB Asprise! Asprise Scanning and Image Capture
Sample application: com.asprise.util.ui.JImageDialogSample
6.1.3 Supported Image Formats
The following table shows image formats supported by JImageDialog:
Formats File extensions READ WRITE
Adobe Photoshop *.psd Y Y
Bitmap, Windows/OS2 *.bmp, *.dib Y Y
Cursor *.cur Y
Graphics Interchange Format *.gif Y
Icon *.ico Y
JPEG *.jpg, *.jpeg Y Y
Macintosh PICT Format *.pict, *.pct Y Y
Page 30 of 36

LAB Asprise! Asprise Scanning and Image Capture
PCX Format *.pcx Y Y
Portable Network Graphics *.png Y Y
Sun Raster Format *.ras Y
Tag Image File Format *.tif, *tiff Y
Targa *.tga Y Y
X Bitmap *.xbm Y Y
X PixMap *.xpm Y Y
On any Java platforms (version 1.3 or above), JImageDialog supports the above formats
(using its own library to read/write image files). JImageDialog intelligently selects the
best way to read or write files – e.g. on Java 1.4, it may invoke ImageIO to see whether
a file can be read or written; if the ImageIO can do the job then JImageDialog will let it
do; otherwise, JImageDialog will use its own library to access the file.
Note: You can only read/write image files from the JImageDialog UI component with
unlicensed image acquisition UI component package. If you want to access image files
from your Java code and/or to perform other advanced operations, you need to obtain
an affordable license from LAB Asprise!.
Page 31 of 36

LAB Asprise! Asprise Scanning and Image Capture
6.1.4 Compatibility
All Java runtimes with version 1.3 or above.
6.1.5 Software Packaging and Distribution
Mandatory: jid.jar, JTwain.jar
6.2 JImageFileChooser JImageFileChooser is an extended JFileChooser that supports image preview and
image information extraction.
Page 32 of 36

LAB Asprise! Asprise Scanning and Image Capture
When the user clicks an image file, its preview and associated information will be
displayed to assist the user to select the proper image.
6.2.1 Sample Use
55. JFileChooser fc = new JImageFileChooser(lastDirectory);
56. fc.addChoosableFileFilter(JImageFileChooser.getImageFileFilter()
);
57. int returnVal = fc.showOpenDialog(frame);
58. ...
Line 1 creates the image file chooser;
Line 2 set the file filter.
You can use it as normal JFileChooser, and it improves the user experience greatly.
Page 33 of 36

LAB Asprise! Asprise Scanning and Image Capture
6.2.2 Supported Image Formats
Please refer to Supported Image Formats in JImageDialog section.
Note: You can only preview image files from the JImageFileChooser UI component
with unlicensed image acquisition UI component package. If you want to read/write
image files from your Java code with the package and/or to perform other advanced
operations, you need to obtain an affordable license from LAB Asprise!.
6.2.3 Compatibility
All operating systems;
All Java runtimes with version 1.2 or above.
6.2.4 Software Packaging and Distribution
Mandatory: jid.jar
Page 34 of 36

LAB Asprise! Asprise Scanning and Image Capture
7 Support and professional services
7.1 Support Web Site http://www.asprise.com
7.2 Basic Support Our team provides basic support for general Asprise ASIC. Email your technical
questions to [email protected]
Advice: You are strongly recommended to subscribe our premium support service in
order to get your problems solved quickly.
7.3 Premium Support Services Free fixed period of premium support services subscription comes with every license
purchased. You may optionally extend premium support services after your
subscription expires. For more details, visit the order page.
Page 35 of 36

LAB Asprise! Asprise Scanning and Image Capture
7.4 Professional Services Our team are ready to help you to develop various applications, components. Please
send your query to [email protected]
Page 36 of 36