iway adapter for tibco rendezvous user’s guide · pdf fileiway adapter for tibco...
TRANSCRIPT

iWayiWay Adapter for TIBCO Rendezvous User’s GuideVersion 5 Release 5
DN3501494.0704

EDA, EDA/SQL, FIDEL, FOCCALC, FOCUS, FOCUS Fusion, FOCUS Vision, Hospital-Trac, Information Builders, the Information Builders logo, Parlay, PC/FOCUS, SmartMart, SmartMode, SNAPpack, TableTalk, WALDO, Web390, WebFOCUS and WorldMART are registered trademarks, and iWay and iWay Software are trademarks of Information Builders, Inc.
Sun and Java are trademarks or registered trademarks of Sun Microsystems, Inc. in the U.S. and other countries.
Due to the nature of this material, this document refers to numerous hardware and software products by their trademarks. In most, if not all cases, these designations are claimed as trademarks or registered trademarks by their respective companies. It is not this publisher’s intent to use any of these names generically. The reader is therefore cautioned to investigate all claimed trademark rights before using any of these names other than to refer to the product described.
Copyright © 2004, by Information Builders, Inc and iWay Software. All rights reserved. Patent Pending. This manual, or parts thereof, may not be reproduced in any form without the written permission of Information Builders, Inc.

PrefaceThis documentation describes how to use the iWay Adapter for TIBCO Rendezvous. It is intended for users who integrate new and existing enterprise transaction systems, procedures, and application packages.
How This Manual Is OrganizedThe following table lists the titles and numbers of the chapters for this manual with a brief description of the contents of each chapter.
Chapter Contents
1 Introducing the iWay Adapter for TIBCO Rendezvous
Introduces the iWay Adapter for TIBCO Rendezvous.
2 Creating XML Schemas or Web Services for the iWay Adapter for TIBCO Rendezvous
Describes how to create XML schemas or Web services for the iWay Adapter for TIBCO Rendezvous using Application Explorer.
3 Listening for Events for the iWay Adapter for TIBCO Rendezvous
Describes how to use iWay Servlet Application Explorer to connect to the iWay Adapter for TIBCO Rendezvous and listen for events.
4 Using Web Services Policy-Based Security
Describes how to use Web services policy-based security.
iWay Adapter for TIBCO Rendezvous User’s Guide iii

Documentation ConventionsThe following table lists the conventions with their descriptions that apply throughout this manual.
Related PublicationsTo view a current listing of our publications and to place an order, visit our World Wide Web site, http://www.iwaysoftware.com. You can also contact the Publications Order Department at (800) 969-4636.
Convention Description
THIS TYPEFACE orthis typeface
Denotes syntax that you must enter exactly as shown.
this typeface Represents a placeholder (or variable) in syntax for a value that you or the system must supply.
underscore Indicates a default setting.
this typeface Represents a placeholder (or variable) in a text paragraph, a cross-reference, or an important term.
this typeface Highlights a file name or command in a text paragraph that must be lowercase.
this typeface Indicates a button, menu item, or dialog box option you can click or select.
Key + Key Indicates keys that you must press simultaneously.
{ } Indicates two or three choices; type one of them, not the braces.
| Separates mutually exclusive choices in syntax. Type one of them, not the symbol.
... Indicates that you can enter a parameter multiple times. Type only the parameter, not the ellipsis points (…).
.
.
.
Indicates that there are (or could be) intervening or additional commands.
iv iWay Software

Preface
Customer SupportDo you have questions about the iWay Adapter for TIBCO Rendezvous?
If you bought the product from a vendor other than iWay, contact your distributor.
If you bought the product directly from iWay, call Information Builders Customer Support Services (CSS) at (800) 736-6130 or (212) 736-6130. Customer Support Consultants are available Monday through Friday between 8:00 A.M. and 8:00 P.M. EST to address all your iWay Adapter for TIBCO Rendezvous questions. Information Builders consultants can also give you general guidance regarding product capabilities and documentation. Please be ready to provide your six-digit site code (xxxx.xx) when you call.
You can also access support services electronically, 24 hours a day, with InfoResponse Online. InfoResponse Online is accessible through our World Wide Web site, http://www.informationbuilders.com. It connects you to the tracking system and known-problem database at the Information Builders support center. Registered users can open, update, and view the status of cases in the tracking system and read descriptions of reported software issues. New users can register immediately for this service. The technical support section of www.informationbuilders.com also provides usage techniques, diagnostic tips, and answers to frequently asked questions.
To learn about the full range of available support services, ask your Information Builders representative about InfoResponse Online, or call (800) 969-INFO.
Information You Should HaveTo help our consultants answer your questions most effectively, please provide the following information when you call:
• Your six-digit site code number (xxxx.xx).
• Your software configuration.
The following table lists the information you should have about your software configuration.
iWay Adapter for TIBCO Rendezvous User’s Guide v

Note: For the EIS, ensure you record the application or database name and release level, including minor versions. For example 4.6.1.
• The exact nature of the error or problem, specified as follows:
• Steps to reproduce the problem.
• Problem description (be as specific as possible).
• Error message(s).
• The following items can best help to define the problem:
• Screen shots of the error
• Error output files
• Trace files and log files
• Log transaction
• XML schemas and/or document instances
• Other input documents (for example, transformations)
• Configuration files (all are applicable):
.xch files
config.xml
base.xml
repository.xml
ibserepo.xml
.dic files
.rules files
Version-Build Date
HF/Service Pack
Patches OS Java Version
iWay Product
Third-party Application Server
EIS (adapter target)
vi iWay Software

Preface
• Environment variable settings:
IWAY55
IWAY55OEM
CLASSPATH
JAVA_HOME
ACBDIR
CBDIR (UNIX)
• Has the process, procedure, or query ever worked in its current form? Has it changed recently? If so, how (provide specific details)? How often does the problem occur?
• Can this problem be reproduced? If so, how? Can it be consistently reproduced?
• Have you tried to reproduce your problem in the simplest form possible?
• Do you have a trace file?
• How is the problem affecting your business? Is it halting development or production?
• Do you just have questions about functionality or documentation?
User FeedbackIn an effort to produce effective documentation, the Documentation Services staff welcomes your opinions regarding this manual. Please use the Reader Comments form at the end of this manual to relay suggestions for improving the publication or to alert us to corrections. You can also use the Documentation Feedback form on our Web site, http://www.iwaysoftware.com.
Thank you, in advance, for your comments.
iWay Software Training and Professional ServicesInterested in training? Our Education Department offers a wide variety of training courses for iWay Software and other Information Builders products.
For information on course descriptions, locations, and dates, or to register for classes, visit our World Wide Web site (http://www.iwaysoftware.com) or call (800) 969-INFO to speak to an Education Representative.
Interested in technical assistance for your implementation? Our Professional Services department provides expert design, systems architecture, implementation, and project management services for all your business integration projects. For information, visit our World Wide Web site (http://www.iwaysoftware.com).
iWay Adapter for TIBCO Rendezvous User’s Guide vii

viii iWay Software

Contents1. Introducing the iWay Adapter for TIBCO Rendezvous . . . . . . . . . . . . . . . . . . . . . . . .1-1
Introducing TIBCO Rendezvous . . . . . . . . . . . . . . . . . . . . . . . . . . . . . . . . . . . . . . . . . . . . . . . . . . . . . . . . . . . . . . .1-2Introducing the iWay Adapter for TIBCO Rendezvous . . . . . . . . . . . . . . . . . . . . . . . . . . . . . . . . . . . . . . . . . .1-3Features of the iWay Adapter for TIBCO Rendezvous . . . . . . . . . . . . . . . . . . . . . . . . . . . . . . . . . . . . . . . . . . .1-3How the iWay Adapter for TIBCO Rendezvous Works . . . . . . . . . . . . . . . . . . . . . . . . . . . . . . . . . . . . . . . . . . .1-4Deployment Options for the iWay Adapter for TIBCO Rendezvous . . . . . . . . . . . . . . . . . . . . . . . . . . . . . .1-5
iWay Application Explorer . . . . . . . . . . . . . . . . . . . . . . . . . . . . . . . . . . . . . . . . . . . . . . . . . . . . . . . . . . . . . . .1-5Deployment Information Roadmap . . . . . . . . . . . . . . . . . . . . . . . . . . . . . . . . . . . . . . . . . . . . . . . . . . . . . .1-5The iWay Business Services Engine (iBSE) . . . . . . . . . . . . . . . . . . . . . . . . . . . . . . . . . . . . . . . . . . . . . . . . .1-6The iWay Enterprise Connector for J2EE Connector Architecture (JCA) . . . . . . . . . . . . . . . . . . . . .1-6
2. Creating XML Schemas or Web Services for the iWay Adapter for TIBCO Rendez-vous 2-1
Overview . . . . . . . . . . . . . . . . . . . . . . . . . . . . . . . . . . . . . . . . . . . . . . . . . . . . . . . . . . . . . . . . . . . . . . . . . . . . . . . . . . . . .2-2Starting iWay Servlet Application Explorer . . . . . . . . . . . . . . . . . . . . . . . . . . . . . . . . . . . . . . . . . . . . . . . . . . . . .2-2Establishing a Target for TIBCO Rendezvous . . . . . . . . . . . . . . . . . . . . . . . . . . . . . . . . . . . . . . . . . . . . . . . . . . .2-3
Creating a New Target . . . . . . . . . . . . . . . . . . . . . . . . . . . . . . . . . . . . . . . . . . . . . . . . . . . . . . . . . . . . . . . . . . .2-3Connecting to a Target . . . . . . . . . . . . . . . . . . . . . . . . . . . . . . . . . . . . . . . . . . . . . . . . . . . . . . . . . . . . . . . . . .2-7Disconnecting From a Target . . . . . . . . . . . . . . . . . . . . . . . . . . . . . . . . . . . . . . . . . . . . . . . . . . . . . . . . . . . .2-7Deleting a Target . . . . . . . . . . . . . . . . . . . . . . . . . . . . . . . . . . . . . . . . . . . . . . . . . . . . . . . . . . . . . . . . . . . . . . . .2-8
Viewing Metadata . . . . . . . . . . . . . . . . . . . . . . . . . . . . . . . . . . . . . . . . . . . . . . . . . . . . . . . . . . . . . . . . . . . . . . . . . . . .2-9Creating an XML Schema . . . . . . . . . . . . . . . . . . . . . . . . . . . . . . . . . . . . . . . . . . . . . . . . . . . . . . . . . . . . . . . . . . . . . .2-9Generating a Business Service . . . . . . . . . . . . . . . . . . . . . . . . . . . . . . . . . . . . . . . . . . . . . . . . . . . . . . . . . . . . . . . 2-11
Testing a Business Service . . . . . . . . . . . . . . . . . . . . . . . . . . . . . . . . . . . . . . . . . . . . . . . . . . . . . . . . . . . . . 2-13
3. Listening for Events for the iWay Adapter for TIBCO Rendezvous . . . . . . . . . . . . .3-1Understanding iWay Event Functionality . . . . . . . . . . . . . . . . . . . . . . . . . . . . . . . . . . . . . . . . . . . . . . . . . . . . . .3-2Adding, Modifying, or Deleting a Port . . . . . . . . . . . . . . . . . . . . . . . . . . . . . . . . . . . . . . . . . . . . . . . . . . . . . . . . .3-2
Creating an Event Port for the iBSE Disposition . . . . . . . . . . . . . . . . . . . . . . . . . . . . . . . . . . . . . . . . . . .3-4Creating an Event Port for the MSMQ Disposition . . . . . . . . . . . . . . . . . . . . . . . . . . . . . . . . . . . . . . . . .3-6Creating an Event Port for the JMS Queue Disposition . . . . . . . . . . . . . . . . . . . . . . . . . . . . . . . . . . . .3-8Creating an Event Port for the SOAP Disposition . . . . . . . . . . . . . . . . . . . . . . . . . . . . . . . . . . . . . . . . 3-10Creating an Event Port for the HTTP Disposition . . . . . . . . . . . . . . . . . . . . . . . . . . . . . . . . . . . . . . . . 3-12Creating an Event Port for the MQ Series Disposition . . . . . . . . . . . . . . . . . . . . . . . . . . . . . . . . . . . 3-14Editing an Event Port . . . . . . . . . . . . . . . . . . . . . . . . . . . . . . . . . . . . . . . . . . . . . . . . . . . . . . . . . . . . . . . . . . 3-16Deleting an Event Port . . . . . . . . . . . . . . . . . . . . . . . . . . . . . . . . . . . . . . . . . . . . . . . . . . . . . . . . . . . . . . . . . 3-17
Adding, Modifying, or Deleting a Channel . . . . . . . . . . . . . . . . . . . . . . . . . . . . . . . . . . . . . . . . . . . . . . . . . . . 3-17Creating a Channel . . . . . . . . . . . . . . . . . . . . . . . . . . . . . . . . . . . . . . . . . . . . . . . . . . . . . . . . . . . . . . . . . . . . 3-17Modifying a Channel . . . . . . . . . . . . . . . . . . . . . . . . . . . . . . . . . . . . . . . . . . . . . . . . . . . . . . . . . . . . . . . . . . 3-21Deleting a Channel . . . . . . . . . . . . . . . . . . . . . . . . . . . . . . . . . . . . . . . . . . . . . . . . . . . . . . . . . . . . . . . . . . . . 3-22
iWay Adapter for TIBCO Rendezvous User’s Guide 1

Contents
4. Using Web Services Policy-Based Security . . . . . . . . . . . . . . . . . . . . . . . . . . . . . . . . . .4-1 Web Services Policy-Based Security . . . . . . . . . . . . . . . . . . . . . . . . . . . . . . . . . . . . . . . . . . . . . . . . . . . . . . . . . . .4-2Configuring Web Services Policy-Based Security . . . . . . . . . . . . . . . . . . . . . . . . . . . . . . . . . . . . . . . . . . . . . . .4-2
Configuring the IP and Domain Restrictions Policy Type . . . . . . . . . . . . . . . . . . . . . . . . . . . . . . . . . .4-9
2 iWay Software

CHAPTER 1
Introducing the iWay Adapter for TIBCO Rendezvous
This section introduces the iWay Adapter for TIBCO Rendezvous, providing an overview of its key features and of how you can use it to integrate TIBCO Rendezvous messages with Sun Java System Application Server.
This section includes the following topics:
• Introducing TIBCO Rendezvous
• Introducing the iWay Adapter for TIBCO Rendezvous
• Features of the iWay Adapter for TIBCO Rendezvous
• How the iWay Adapter for TIBCO Rendezvous Works
• Deployment Options for the iWay Adapter for TIBCO Rendezvous
iWay Adapter for TIBCO Rendezvous User’s Guide 1-1

Introducing TIBCO Rendezvous
Introducing TIBCO RendezvousTIBCO Rendezvous is the messaging system that is the foundation of TIBCO ActiveEnterprise. Rendezvous delivers true real-time publish or subscribe and request or reply messaging. It also supports qualities of service ranging from lightweight informational messages to certify and transactional delivery.
Rendezvous uses a distributed architecture to eliminate bottlenecks and single points of failure. Applications can select from several qualities of service including reliable and certified and transactional, as appropriate for each interaction. Messaging can be request or reply, publish or subscribe, synchronous or asynchronous, and locally delivered or sent using a WAN or the Internet. Rendezvous messages are self-describing and platform independent, with a user-extensible type system that provides support for data formats such as XML.
Rendezvous software uses subject-based addressing technology to direct messages to the destinations, so program processes can communicate without knowing the details of network addresses or connections. Subject-based addressing conventions define a uniform name space for messages and their destinations.
The locations of component processes become entirely transparent; any application component can run on any network host without modification, recompilation, or reconfiguration. Application programs migrate easily among host computers. You can dynamically add, remove, and modify components of a distributed system without affecting other components.
Subject names consist of one or more elements separated by dot characters (periods). The elements can be used to implement a subject name hierarchy that reflects the structure of information in an application system.
These strings are examples of valid subject names:
RUN.HOME
RUN.for.Elected_office.President
TIBCO Rendezvous:
• Provides a high performance, scalable platform for e-business infrastructure.
• Enables the creation of robust event-driven applications.
• Harnesses the full capabilities of high performance multi-processor servers.
• Ensures minimal integration-driven traffic as cross system requirements grow.
• Meets the reliability standards of the most demanding applications and 24x7 environments.
1-2 iWay Software

Introducing the iWay Adapter for TIBCO Rendezvous
• Provides off-the-shelf support for over 100 of the world’s leading applications, technologies, and databases.
• Simplifies administration with self-administering protocols.
Introducing the iWay Adapter for TIBCO RendezvousThe iWay Adapter for TIBCO Rendezvous integrates your TIBCO Rendezvous messages with Sun Java System Application Server in a fast, easy, and reliable way. You can use the adapter to exchange XML, non-XML, ASCII, and custom data formats between your TIBCO resources and Sun Java System Application Server to provide a tightly integrated and reliable application infrastructure.
The iWay Adapter for TIBCO Rendezvous provides:
• Guaranteed asynchronous, bidirectional message interactions between Sun Java System Application Server and native TIBCO Rendezvous destinations.
• Data transfer between a business process running within Sun Java System Application Server and a TIBCO Rendezvous Daemon.
• Service and event adapter integration operations providing end-to-end business process management using XML schemas.
• Support for many formats including:
• XML
• Comma Separated Variable (CSV)
• Excel
• Custom Data Formats (CDF).
The adapter converts non-XML files into XML formats.
Delimited, fixed length, and variable length file formats are supported.
Features of the iWay Adapter for TIBCO RendezvousThe iWay Adapter for TIBCO Rendezvous provides a means to exchange real-time business data between TIBCO systems and other application, database, or external business partner systems. The adapter enables external applications for inbound and outbound processing with TIBCO.
The adapter uses XML messages to enable non-TIBCO applications to communicate and exchange transactions with TIBCO using services and events.
• Services: Applications use this capability to initiate a TIBCO business event.
iWay Adapter for TIBCO Rendezvous User’s Guide 1-3

How the iWay Adapter for TIBCO Rendezvous Works
• Events: Applications use this capability to access TIBCO data only when a TIBCO business event occurs.
The iWay Adapter for TIBCO Rendezvous:
• Supports synchronous and asynchronous, bidirectional message interaction with TIBCO.
• Includes the iWay Application Explorer (iAE), a GUI tool that explores TIBCO metadata and builds XML schemas or Web services.
How the iWay Adapter for TIBCO Rendezvous WorksThe iWay Adapter for TIBCO Rendezvous provides transport protocol support so that it can listen for and emit documents from TIBCO queues using TIBCO’s daemon. Transaction integrity is maintained at all times. The iWay Adapter for TIBCO Rendezvous can accept messages arriving on a named queue and can route these messages to any queue or any other adapter.
The listening capability has been implemented as an event adapter within Sun Java System Application Server. When an inbound document is detected, the event adapter provides options that you can configure with the design-time Application View Console windows:
• Transformation services
XML is quickly becoming the standard for exchanging information between applications and is invaluable in integrating disparate applications. With this in mind, and acknowledging that the world does not yet speak XML exclusively, the iWay Adapter for TIBCO Rendezvous provides transformation services.
The adapter uses pre-built customizable parsers to enable the parsing and conversion of non-XML formatted documents and XSLT transformation to modify XML document formats. This ensures that any incoming document can be converted to XML as specified by your event and service schemas.
You can also use the adapter in conjunction with other adapters to handle the processing of IDoc, SWIFT, FIX, HIPAA, and HL7 message types.
• Document validation rules
During the analysis of an incoming document, you can invoke one or more user exits to examine and transform parts of the document.
For example, you can create a name and address validation exit that is called each time such a set of elements appears in the document. The same exit logic might apply to all documents, so that all names and addresses in a complete system are validated in the same manner.
1-4 iWay Software

Introducing the iWay Adapter for TIBCO Rendezvous
Validation rule specifications are stored in XML files that are freely accessible in the directory structure. Keeping each rule in an external file facilitates the maintenance of existing rules and provides an easy way to add new ones. You can also create new rules by writing custom Java code.
• Protocol emitting
The service adapter supports emitting documents to TIBCO destinations.
• Document chaining
You can use any service adapter to enhance the functionality of a document flow. You can chain any number of desired service adapters together.
For example, you can chain multiple protocol agents to send a message to multiple transports and locations.
Deployment Options for the iWay Adapter for TIBCO RendezvousThe iWay Adapter for TIBCO Rendezvous works in conjunction with the following components:
• iWay Application Explorer
and either
• iWay Business Services Engine (iBSE)
or
• iWay Enterprise Connector for J2EE™ Connector Architecture (JCA)
iWay Application ExploreriWay Application Explorer uses an explorer metaphor to browse the TIBCO Rendezvous system for metadata. The explorer enables you to create XML schemas and Web services for the associated object. In addition, you can create ports and channels to listen for events in TIBCO Rendezvous.
Deployment Information RoadmapThe following table lists the location of deployment information for the iWay Adapter for TIBCO Rendezvous. A description of the iWay Business Services Engine (iBSE) and the iWay Enterprise Connector for J2EE Connector Architecture (JCA) follow the table.
Deployed Component For more information, see
iWay Application Explorer • Chapters 2 and 3 of this guide
• iWay Installation and Configuration
iWay Adapter for TIBCO Rendezvous User’s Guide 1-5

Deployment Options for the iWay Adapter for TIBCO Rendezvous
The iWay Business Services Engine (iBSE)The iWay Business Services Engine (iBSE) exposes—as Web services—enterprise assets that are accessible from adapters regardless of the programming language or the particular operating system.
iBSE simplifies the creation and execution of Web services when running:
• Custom and legacy applications
• Database queries and stored procedures
• Packaged applications
• Terminal emulation and screen-based systems
• Transactional systems
Web services is a distributed programming architecture that solves Enterprise Application Integration (EAI) hurdles that other programming models cannot. It enables programs to communicate with one another using a text-based but platform and language independent message format called XML.
Coupled with a platform and language independent messaging protocol called SOAP (Simple Object Access Protocol), XML enables application development and integration by assembling previously built components from multiple Web services.
The iWay Enterprise Connector for J2EE Connector Architecture (JCA)The iWay Enterprise Connector for J2EE Connector Architecture (JCA) enables developers of JCA-compliant applications to deploy iWay adapters as JCA resources.
The iWay Connector for JCA is distributed as a standard Resource Adapter Archive (RAR) for deployment to the application server. Thus, the connector can be used in systems that are non-compliant, although services such as pooled connections are not available.
iWay Business Services Engine (iBSE) • iWay Installation and Configuration
iWay Enterprise Connector for J2EE Connector Architecture (JCA)
• iWay Connector for JCA User’s Guide
• iWay Installation and Configuration
Deployed Component For more information, see
1-6 iWay Software

CHAPTER 2
Creating XML Schemas or Web Services for the iWay Adapter for TIBCO Rendezvous
This section describes how to create XML schemas or Web services for TIBCO Rendezvous using iWay Servlet Application Explorer as deployed to a Sun Java System Application Server.
This section includes the following topics:
• Overview
• Starting iWay Servlet Application Explorer
• Establishing a Target for TIBCO Rendezvous
• Viewing Metadata
• Creating an XML Schema
• Generating a Business Service
iWay Adapter for TIBCO Rendezvous User’s Guide 2-1

Overview
OverviewThe iWay Adapter for TIBCO Rendezvous provides interoperability between Sun Java System Application Server and TIBCO Rendezvous services.
External applications that access TIBCO Rendezvous through the adapter use either XML schemas or Web services to pass data between the external application and the adapter. You can use Application Explorer to create the required XML schemas and Web services.
Application Explorer is a Web application running within a servlet container that is accessible through a Web browser. It is packaged as an archive located in the following directory:
drive:\iWay55\etc\setup\iwae.war
Application Explorer need not reside on the same system as the application system being accessed, but network access is required.
For more information on installing and configuring Application Explorer, see the iWay Installation and Configuration manual.
Starting iWay Servlet Application ExplorerBefore you can use iWay Servlet Application Explorer, you must start your application server.
Procedure How to Open iWay Servlet Application Explorer
To open Application Explorer:
1. Ensure that your application server is running.
2. Enter the following URL in your browser:
http://hostname:port/iwae/index.html
where:
hostname
Is the name of the machine where your application server is running.
port
Is the port number where your application server is listening. The default is 80.
2-2 iWay Software

Creating XML Schemas or Web Services for the iWay
After you start Application Explorer, the following window opens.
The following graphic shows Application Explorer, with the iWay adapters listed in the left pane and the welcome message displayed in the right pane.
On the upper right, the Available Hosts drop-down list displays the iWay Connector for JCA or Servlet iBSE instance you can access.
For more information on adding instances, see the iWay Installation and Configuration manual.
You are ready to create new targets for TIBCO Rendezvous.
Establishing a Target for TIBCO RendezvousTo browse TIBCO Rendezvous, you must create a target for the system you intend to use. The target serves as your connection point and is automatically saved after you create it. You must establish a connection to this system every time you start iWay Application Explorer or after you disconnect from the system.
When you open Application Explorer, a list of supported application systems appears in the left pane. The list is based on the iWay Adapters that you installed and have licenses to use.
Creating a New TargetTo connect to TIBCO Rendezvous for the first time, you must create a new target.
iWay Adapter for TIBCO Rendezvous User’s Guide 2-3
Establishing a Target for TIBCO Rendezvous
Procedure How to Create a New Target
To create a new target using Application Explorer:
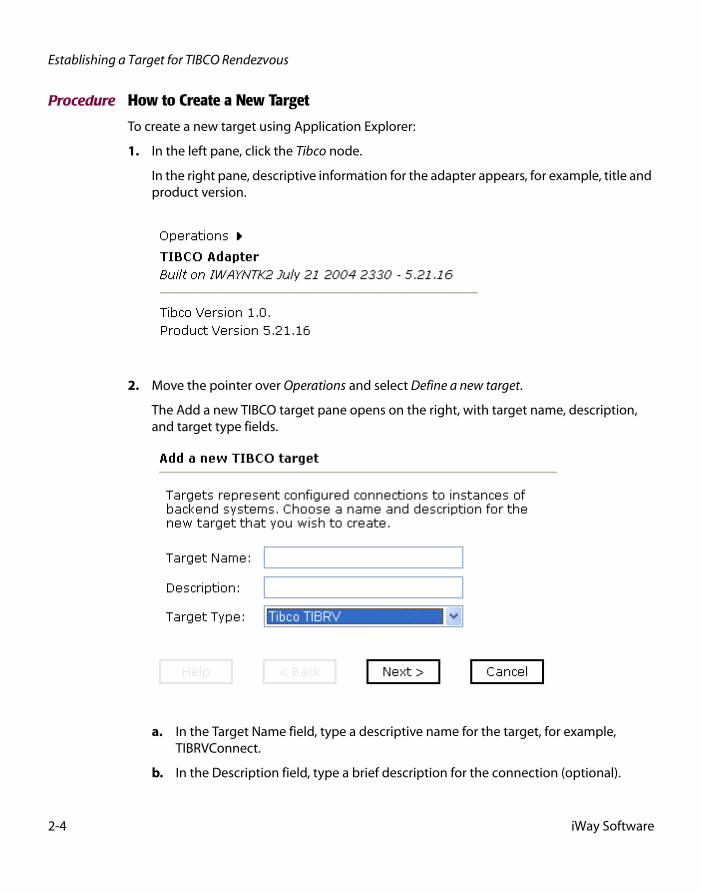
1. In the left pane, click the Tibco node.
In the right pane, descriptive information for the adapter appears, for example, title and product version.
2. Move the pointer over Operations and select Define a new target.
The Add a new TIBCO target pane opens on the right, with target name, description, and target type fields.
a. In the Target Name field, type a descriptive name for the target, for example, TIBRVConnect.
b. In the Description field, type a brief description for the connection (optional).
2-4 iWay Software

Creating XML Schemas or Web Services for the iWay
c. From the Target Type drop-down list, select Tibco TIBRV.
3. Click Next.
The Set connection info pane appears on the right.
4. Type information for the parameters, described in the following table:
Parameter Definition
Network Network parameter instructing the Rendezvous daemon to use a particular network for all communications involving this transport. This parameter may be a host name, IP address, or network name. Consult the TIBCO Rendezvous administration manual for more information regarding this property. This parameter may be omitted if the daemon is running on the local host.
iWay Adapter for TIBCO Rendezvous User’s Guide 2-5

Establishing a Target for TIBCO Rendezvous
5. Click Finish.
Service UDP service on which to listen for TIBCO Rendezvous messages. This parameter accepts a service name or a port number. The default TIBCO Rendezvous port during installation is 7500. If service, network, or daemon are not present, the listener attempts to connect to a local instance of running TIBCO Rendezvous service. Otherwise, specify the TIBCO Rendezvous instance in the form host:<port>.
Daemon RV Daemon information to find the TIBCO Rendezvous daemon and establish a connection.
Send Subject Each Rendezvous messages bears a subject name. The subject name is used by data consumers to receive all messages labeled with a given name. If the parameter is left blank, the TIBCO Rendezvous listener listens on subject *. For more information on the send subject parameter, see the Subject Names section in the TIBCO Rendezvous Concepts manual.
Reply Subject Return subject of the message.
Field Name Custom field name on which the listener filters.
Should any preemitter be avoided?
Select the check box, if required.
Message Datatype Select the type of data for emission from the drop-down list. The choices are:
• Opaque
• String
• TibrvMsg
• TibrvXML
Return Status or Input Document
Select Status or Input.
Parameter Definition
2-6 iWay Software
Creating XML Schemas or Web Services for the iWay
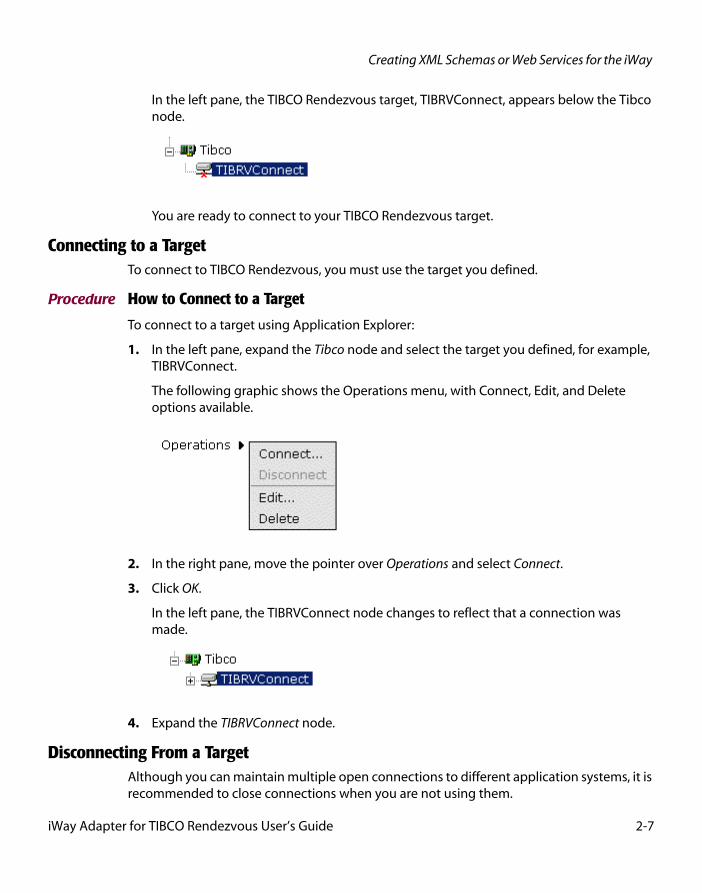
In the left pane, the TIBCO Rendezvous target, TIBRVConnect, appears below the Tibco node.
You are ready to connect to your TIBCO Rendezvous target.
Connecting to a TargetTo connect to TIBCO Rendezvous, you must use the target you defined.
Procedure How to Connect to a Target
To connect to a target using Application Explorer:
1. In the left pane, expand the Tibco node and select the target you defined, for example, TIBRVConnect.
The following graphic shows the Operations menu, with Connect, Edit, and Delete options available.
2. In the right pane, move the pointer over Operations and select Connect.
3. Click OK.
In the left pane, the TIBRVConnect node changes to reflect that a connection was made.
4. Expand the TIBRVConnect node.
Disconnecting From a TargetAlthough you can maintain multiple open connections to different application systems, it is recommended to close connections when you are not using them.
iWay Adapter for TIBCO Rendezvous User’s Guide 2-7

Establishing a Target for TIBCO Rendezvous
Procedure How to Disconnect From a Target
To disconnect from a target using Application Explorer:
1. In the left pane, click the target to which you are connected, for example, TIBRVConnect.
The following graphic shows the Operations menu, with Disconnect and Delete options available.
2. In the right pane, move the pointer over Operations and select Disconnect.
Disconnecting from the application system drops the connection, but the node remains.
The TIBRVConnect node in the left pane changes to reflect that a connection was closed.
Deleting a TargetIn addition to closing a target, you can delete a target that is no longer required. You can delete it whether or not it is closed. If open, the target automatically closes before it is deleted.
Procedure How to Delete a Target
To delete a target using Application Explorer:
1. In the left pane, click the target, for example, TIBRVConnect.
2. In the right pane, move the pointer over Operations and select Delete.
2-8 iWay Software

Creating XML Schemas or Web Services for the iWay
The following Delete confirmation dialog box opens.
3. To delete the target you selected, click OK.
The TIBRVConnect node disappears from the left pane.
Viewing MetadataAfter you are connected to TIBCO Rendezvous, iWay Servlet Application Explorer enables you to explore and browse metadata
Procedure How to View Metadata
To view metadata:
1. Click the icon to the left of the target name, for example, TIBRVConnect.
The target expands to expose the available system objects.
The following graphic shows a list of the TIBCO Rendezvous target transactions.
2. To expand the desired TIBCO node, click the icon to the left of the repository name, for example, Generic Transaction.
You can now generate schemas. For more information, see Creating an XML Schema.
Creating an XML SchemaAfter you browse TIBCO Rendezvous, you can generate XML request and response schemas for the object you want to use with your adapter.
iWay Adapter for TIBCO Rendezvous User’s Guide 2-9

Creating an XML Schema
Procedure How to Create XML Schemas
To create XML request and response schemas for TIBCO Rendezvous using Application Explorer:
The following graphic shows the service transaction selected under the TIBCO node in the left pane.
1. From the list of transactions, select Service.
The following graphic shows the Operations menu with the Create iWay Business Service and Generate Schema options.
2. In the right pane, move the pointer over Operations and select Generate Schema.
The Schemas pane opens on the right, with three columns: Part, Root Tag, and Schema.
A table defines the root tag for each schema and provides hyperlinks.
3. Click the hyperlink associated with the type of schema you want to view.
2-10 iWay Software

Creating XML Schemas or Web Services for the iWay
For example, if you click the Request schema, the XML schema appears in the right pane.
4. Click the Back button on your Web browser to return to the previous window.
After you create schemas, you can generate a business service.
Generating a Business Service You can generate a business service (also known as a Web service) for TIBCO Rendezvous. To generate a business service, you must deploy the adapter in a business services environment using iWay Business Services Engine (iBSE). iBSE exposes functionality as Web services and serves as a gateway to heterogeneous back-end applications and databases.
A Web service is a self-contained, modularized function that can be published and accessed across a network using open standards. It is the implementation of an interface by a component and is an executable entity. For the caller or sender, a Web service can be considered a “black box” that may require input and delivers a result. Web services can be integrated within an enterprise as well as across enterprises on any communication technology stack, whether asynchronous or synchronous, in any format.
You can make a Web service available to other services within a host server by generating WSDL (Web Services Description Language) from the Web service.
iWay Adapter for TIBCO Rendezvous User’s Guide 2-11

Generating a Business Service
Procedure How to Create an iWay Business Service
To create an iWay business service for TIBCO Rendezvous:
1. If you have not already done so, connect to a TIBCO Rendezvous target as described in Establishing a Target for TIBCO Rendezvous on page 2-3.
2. In the left pane of Application Explorer, open the target node to display its modules.
The list includes all modules currently supported by TIBCO Rendezvous.
The following graphic shows the Operations menu with the Create iWay Business Service and Generate Schema options.
3. In the right pane, move the pointer over Operations and select Create iWay Business Service.
The Create Web Service pane opens on the right, with three fields: Service Name, Description, and License.
2-12 iWay Software

Creating XML Schemas or Web Services for the iWay
a. In the Service Name field, type a descriptive name for the iWay Business Service.
b. In the Description field, type a brief description of the iWay Business Service.
c. From the License field list, select a license definition.
4. Click Next.
The following graphic displays the Create Web Service pane, which prompts you for information about the method of the service.
a. In the Method Name field, type a descriptive name for the method.
b. In the Description field, type a brief description of the method.
5. Click Finish.
Application Explorer switches the view to the iWay Business Services tab, and the new business service appears in the left pane.
Testing a Business ServiceAfter a business service is created, test it to ensure that it functions properly. iWay provides a test tool for testing the business service.
Procedure How to Test a Business Service
To test a business service:
1. If you are not on the iWay Business Services tab of Application Explorer, click the tab to access business services.
2. If it is not expanded, expand the list of business services under iWay Business Services.
iWay Adapter for TIBCO Rendezvous User’s Guide 2-13

Generating a Business Service
3. Expand the Services node.
4. Select the name of the business service you want to test.
The business service name appears as a link in the right pane.
5. In the right pane, click the named business services link.
The test option appears in the right pane.
If you are testing a Web service that requires XML input, an input xml field appears.
6. In the input xml field, either type a sample XML document that queries the service, or browse to the location of an XML instance and click Open.
7. Click Invoke.
2-14 iWay Software

Creating XML Schemas or Web Services for the iWay
Application Explorer displays the results in the right pane.
The following graphic shows sample XML returned by the Business Services Engine:
iWay Adapter for TIBCO Rendezvous User’s Guide 2-15

Generating a Business Service
2-16 iWay Software

CHAPTER 3
Listening for Events for the iWay Adapter for TIBCO Rendezvous
iWay Servlet Application Explorer deployed to Sun Java System Application Server enables you to listen for events in a TIBCO Rendezvous system.
This section includes the following topics:
• Understanding iWay Event Functionality
• Adding, Modifying, or Deleting a Port
• Adding, Modifying, or Deleting a Channel
iWay Adapter for TIBCO Rendezvous User’s Guide 3-1

Understanding iWay Event Functionality
Understanding iWay Event FunctionalityEvents are generated as a result of activity in an application system. You can use events to trigger an action in your application. For example, TIBCO Rendezvous may generate an event when customer information is updated. If your application performs an action when this happens, your application is a consumer of this event.
After you create a connection to your application system, you can add events using iWay Servlet Application Explorer. To create an iWay event, you must create a port and a channel.
• Port
A port associates a particular business object exposed by an adapter with a particular disposition. A disposition defines the protocol and location of the event data. The port defines the end point of the event consumption. For more information, see Adding, Modifying, or Deleting a Port.
• Channel
A channel represents configured connections to particular instances of back-end or other types of systems. A channel binds one or more event ports to a particular listener managed by an adapter. For more information, see Adding, Modifying, or Deleting a Channel on page 3-17.
Adding, Modifying, or Deleting a PortThe following procedures describe how to create an event port using iWay Servlet Application Explorer. You can create a port for TIBCO Rendezvous from the iWay Adapters tab or from the iWay Events tab.
When you use Application Explorer with an iWay Business Services Engine (iBSE) implementation, the following port dispositions are available:
• File
• iBSE
• MSMQ
• JMSQ
• SOAP
• HTTP
• MQ Series
Note: The MAIL disposition option will be supported in a future release.
3-2 iWay Software

Listening for Events for the iWay Adapter for TIBCO
With a JCA implementation, the following port dispositions are available:
• File
• JMS
• MQ
• HTTP
• iXTE
Creating an Event Port for the File Disposition
The File disposition uses a file URL to specify the destination file name or directory where the event document will be written. During run time, the destination file name may require indexing to avoid overwriting.
Procedure How to Create an Event Port for the File Disposition
To create a specific event port for the File disposition using Application Explorer:
1. Click the iWay Events tab and expand the TIBCO node.
2. Select the ports node.
3. In the right pane, move the pointer over Operations and select Add a new port.
The Create New Port pane opens on the right.
a. In the Port Name field, type a name.
iWay Adapter for TIBCO Rendezvous User’s Guide 3-3
Adding, Modifying, or Deleting a Port
b. In the Description field, type a brief description.
c. From the Disposition Protocol drop-down list, select FILE.
d. In the Disposition field, type a File destination to which event data is written.
When pointing Application Explorer to an iBSE deployment, specify the destination file using the following format:
ifile://[location];errorTo=[pre-defined port name or another disposition url]
When pointing Application Explorer to a JCA deployment, provide the full path to the directory.
The following table describes the parameters for the disposition.
4. Click OK.
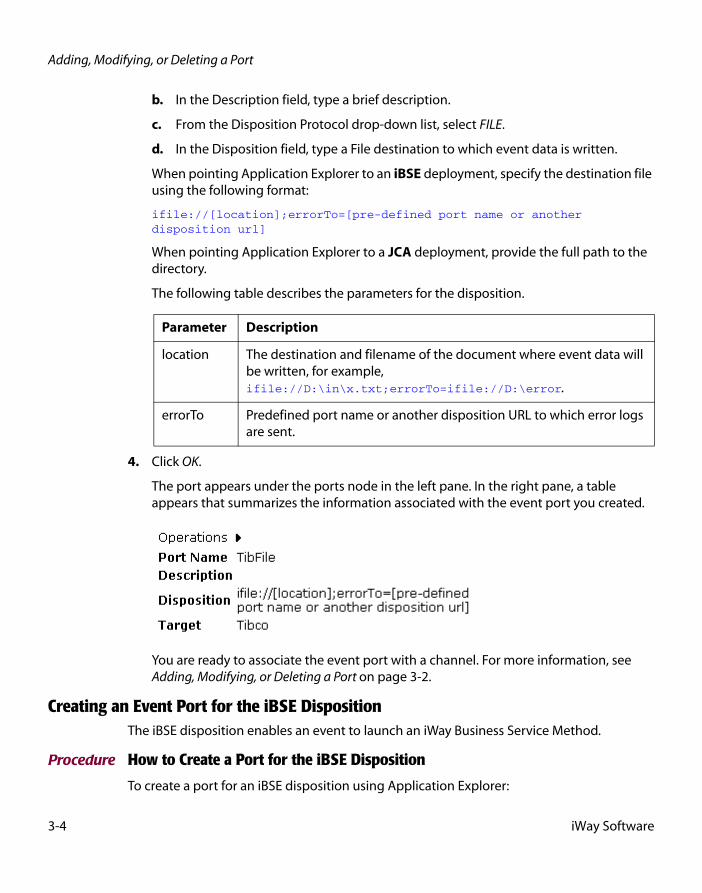
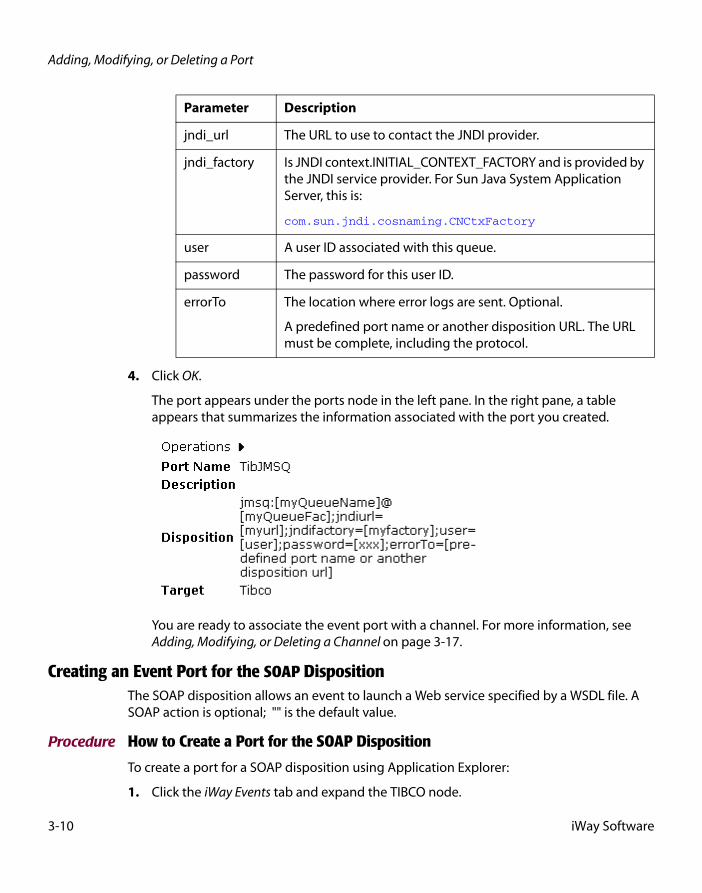
The port appears under the ports node in the left pane. In the right pane, a table appears that summarizes the information associated with the event port you created.
You are ready to associate the event port with a channel. For more information, see Adding, Modifying, or Deleting a Port on page 3-2.
Creating an Event Port for the iBSE DispositionThe iBSE disposition enables an event to launch an iWay Business Service Method.
Procedure How to Create a Port for the iBSE Disposition
To create a port for an iBSE disposition using Application Explorer:
Parameter Description
location The destination and filename of the document where event data will be written, for example, ifile://D:\in\x.txt;errorTo=ifile://D:\error.
errorTo Predefined port name or another disposition URL to which error logs are sent.
3-4 iWay Software

Listening for Events for the iWay Adapter for TIBCO
1. Click the iWay Events tab and expand the TIBCO node.
2. Select the ports node.
3. In the right pane, move the pointer over Operations and select Add a new port.
The Create New Port pane opens on the right.
a. In the Port Name field, type a name.
b. In the Description field, type a brief description.
c. From the Disposition Protocol drop-down list, select IBSE.
d. In the Disposition field, enter an iBSE destination in the form of:
ibse:svcName.mthName;responseTo=[pre-defined port name or another disposition url];errorTo=[pre-defined port name or another disposition url]
The following table defines the parameters for the disposition.
Parameter Description
svcName Name of the service created with iBSE.
mthName Name of the method created for the Web service.
responseTo Location where responses to the Web service are posted. A predefined port name or another full URL. Optional.
iWay Adapter for TIBCO Rendezvous User’s Guide 3-5
Adding, Modifying, or Deleting a Port
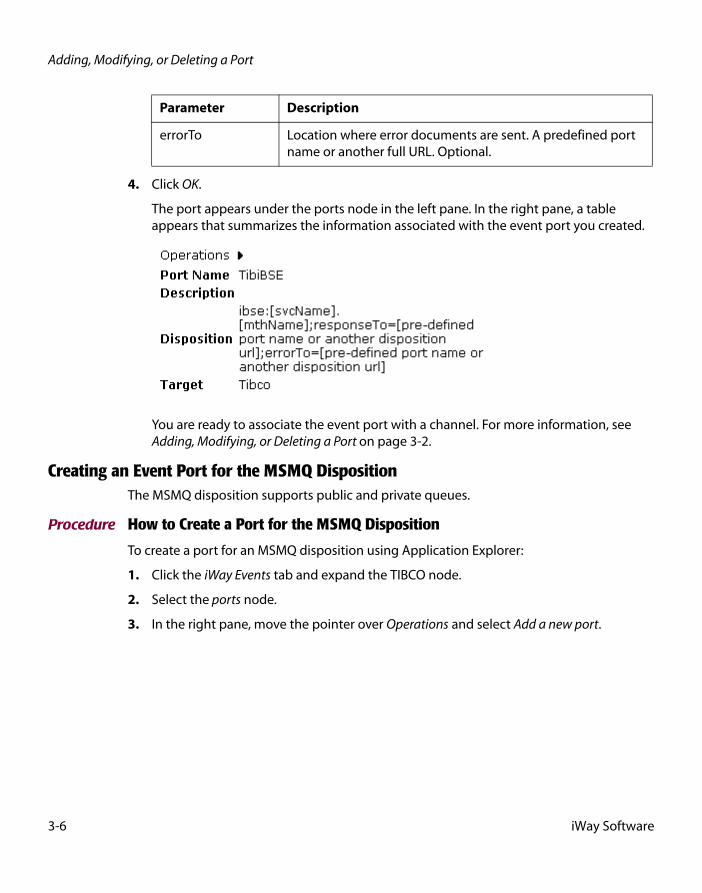
4. Click OK.
The port appears under the ports node in the left pane. In the right pane, a table appears that summarizes the information associated with the event port you created.
You are ready to associate the event port with a channel. For more information, see Adding, Modifying, or Deleting a Port on page 3-2.
Creating an Event Port for the MSMQ DispositionThe MSMQ disposition supports public and private queues.
Procedure How to Create a Port for the MSMQ Disposition
To create a port for an MSMQ disposition using Application Explorer:
1. Click the iWay Events tab and expand the TIBCO node.
2. Select the ports node.
3. In the right pane, move the pointer over Operations and select Add a new port.
errorTo Location where error documents are sent. A predefined port name or another full URL. Optional.
Parameter Description
3-6 iWay Software

Listening for Events for the iWay Adapter for TIBCO
The Create New Port pane opens on the right.
a. In the Port Name field, type a name.
b. In the Description field, type a brief description.
c. From the Disposition Protocol drop-down list, select MSMQ.
d. In the Disposition field, enter an MSMQ destination in the format:
msmq:/host/queueType/queueName[;errorTo=errorDest]
The following table defines the disposition parameters.
Parameter Description
host The name of the host on which the Microsoft Queuing system runs.
queueType The type of queue. For private queues, enter Private$.
Private queues are queues that are not published in Active Directory. They appear only on the local computer that contains them. Private queues are accessible only by Message Queuing applications that recognize the full path name or format name of the queue.
queueName The name of the queue in which messages are placed.
iWay Adapter for TIBCO Rendezvous User’s Guide 3-7

Adding, Modifying, or Deleting a Port
4. Click OK.
The port appears under the ports node in the left pane. In the right pane, a table appears that summarizes the information associated with the event port you created.
You are ready to associate the event port with a channel. For more information, see Adding, Modifying, or Deleting a Port on page 3-2.
Creating an Event Port for the JMS Queue DispositionThe Sun Java System Message Queue disposition allows an event to be enqueued to a JMS queue.
Procedure How to Create a Port for the JMS Queue Disposition
To create a port for a Sun Java System Message Queue disposition using Application Explorer:
1. Click the iWay Events tab and expand the TIBCO node.
2. Select the ports node.
3. In the right pane, move the pointer over Operations and select Add a new port.
errorDest The location to which error logs are sent. This is optional.
This can be a pre-defined port name or another disposition URL. The URL must be complete, including the protocol.
Parameter Description
3-8 iWay Software

Listening for Events for the iWay Adapter for TIBCO
The Create New Port pane opens on the right.
a. In the Port Name field, type a name.
b. In the Description field, type a brief description.
c. From the Disposition Protocol drop-down list, select JMSQ.
d. In the Disposition field, enter a JMS destination.
When pointing Application Explorer to an iBSE deployment, use the following format:
jmsq:myQueueName@myQueueFac;jndiurl=[myurl];jndifactory=[myfactory];user=[user];password=[xxx];errorTo=[pre-defined port name or another disposition url]
When pointing Application Explorer to a JCA deployment, use the following format:
jms:jmsqueue@jmsfactory;jndiurl=;jndifactory=;
The following table defines the parameters for the disposition.
Parameter Description
queue Name of a queue to which events are emitted.
Connection Factory
A resource that contains information about the JMS Server. You must create the connection factory, for example,
sampleQCF.
iWay Adapter for TIBCO Rendezvous User’s Guide 3-9
Adding, Modifying, or Deleting a Port
4. Click OK.
The port appears under the ports node in the left pane. In the right pane, a table appears that summarizes the information associated with the port you created.
You are ready to associate the event port with a channel. For more information, see Adding, Modifying, or Deleting a Channel on page 3-17.
Creating an Event Port for the SOAP DispositionThe SOAP disposition allows an event to launch a Web service specified by a WSDL file. A SOAP action is optional; "" is the default value.
Procedure How to Create a Port for the SOAP Disposition
To create a port for a SOAP disposition using Application Explorer:
1. Click the iWay Events tab and expand the TIBCO node.
jndi_url The URL to use to contact the JNDI provider.
jndi_factory Is JNDI context.INITIAL_CONTEXT_FACTORY and is provided by the JNDI service provider. For Sun Java System Application Server, this is:
com.sun.jndi.cosnaming.CNCtxFactory
user A user ID associated with this queue.
password The password for this user ID.
errorTo The location where error logs are sent. Optional.
A predefined port name or another disposition URL. The URL must be complete, including the protocol.
Parameter Description
3-10 iWay Software
Listening for Events for the iWay Adapter for TIBCO
2. Select the ports node.
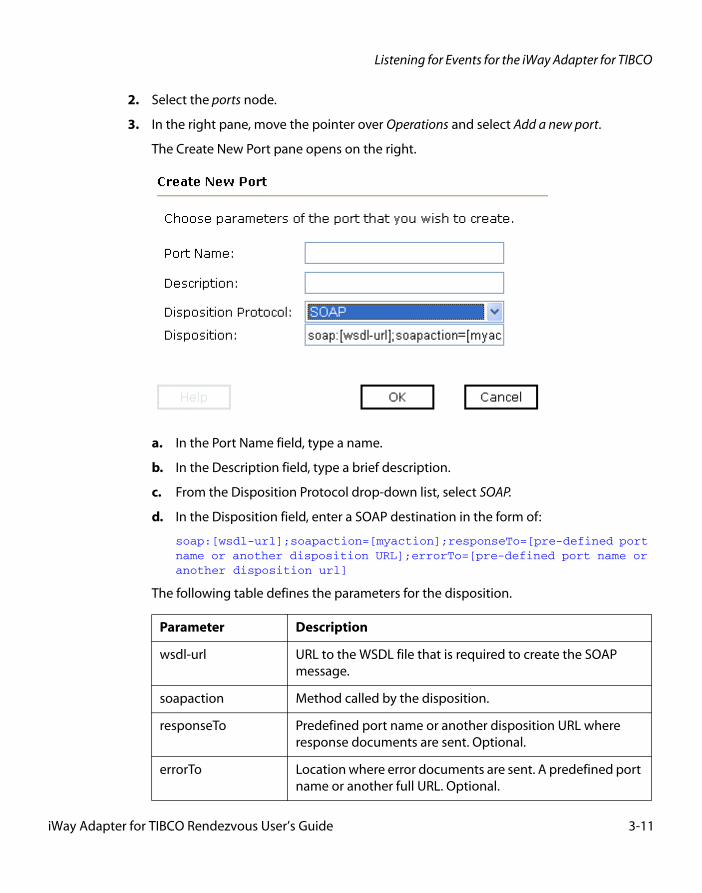
3. In the right pane, move the pointer over Operations and select Add a new port.
The Create New Port pane opens on the right.
a. In the Port Name field, type a name.
b. In the Description field, type a brief description.
c. From the Disposition Protocol drop-down list, select SOAP.
d. In the Disposition field, enter a SOAP destination in the form of:
soap:[wsdl-url];soapaction=[myaction];responseTo=[pre-defined port name or another disposition URL];errorTo=[pre-defined port name or another disposition url]
The following table defines the parameters for the disposition.
Parameter Description
wsdl-url URL to the WSDL file that is required to create the SOAP message.
soapaction Method called by the disposition.
responseTo Predefined port name or another disposition URL where response documents are sent. Optional.
errorTo Location where error documents are sent. A predefined port name or another full URL. Optional.
iWay Adapter for TIBCO Rendezvous User’s Guide 3-11

Adding, Modifying, or Deleting a Port
4. Click OK.
The port appears under the ports node in the left pane. In the right pane, a table appears that summarizes the information associated with the port you created.
You are ready to associate the event port with a channel. For more information, see Adding, Modifying, or Deleting a Channel on page 3-17.
Creating an Event Port for the HTTP DispositionThe HTTP disposition uses an HTTP URL to specify an HTTP end point to which the event document is posted.
Procedure How to Create a Port for the HTTP Disposition
To create a port for an HTTP disposition using iWay Application Explorer:
1. Click the iWay Events tab and expand the TIBCO node.
2. Select the ports node.
3. In the right pane, move the pointer over Operations and select Add a new port.
3-12 iWay Software

Listening for Events for the iWay Adapter for TIBCO
The Create New Port pane opens on the right.
a. In the Port Name field, type a name.
b. In the Description field, type a brief description.
c. From the Disposition Protocol drop-down list, select HTTP.
d. In the Disposition field, enter a HTTP destination.
When pointing Application Explorer to an iBSE deployment, use the following format:
ihttp://[myurl];responseTo=[pre-defined port name or another disposition url];
where:
url
Is the URL target for the post operation, for example,http://myhost:1234/docroot
responseTo
Is the location where responses are posted, if desired.
When pointing Application Explorer to a JCA deployment, use the following format:
http://host:port/uri
where:
iWay Adapter for TIBCO Rendezvous User’s Guide 3-13

Adding, Modifying, or Deleting a Port
host:port
Is the combination of the name of the host on which the Web server resides and the port on which the server is listening for the post operation.
uri
Is the universal resource identifier that completes the url specification.
4. Click OK.
The port appears under the ports node in the left pane. In the right pane, a table appears that summarizes the information associated with the event port you created.
You are ready to associate the event port with a channel. For more information, see Adding, Modifying, or Deleting a Channel on page 3-17.
Creating an Event Port for the MQ Series DispositionThe MQ Series disposition enables an event to be enqueued to an MQ Series queue. Both queue manager and queue name may be specified.
Procedure How to Create a Port for the MQ Series Disposition
To create a port for an MQ Series disposition using iWay Application Explorer:
1. Click the iWay Events tab and expand the TIBCO node.
2. Select the ports node.
3. In the right pane, move the pointer over Operations and select Add a new port.
3-14 iWay Software

Listening for Events for the iWay Adapter for TIBCO
The Create New Port pane opens on the right.
a. In the Port Name field, type a name.
b. In the Description field, type a brief description.
c. From the Disposition Protocol drop-down list, select MQ Series.
d. In the Disposition field, enter a MQ Series destination.
When pointing Application Explorer to an iBSE deployment, use the following format:
mqseries:/qManager/qName;host=[hostname];port=[port];channel=[channnelname];errorTo=[pre-defined port name or another disposition url]
When pointing Application Explorer to a JCA deployment, use the following format:
mq:qmanager@respqueue;host=;port=;channel=
The following table defines the parameters for the disposition.:
Parameter Description
qManager Name of the queue manager to which the server must connect.
qNameorrespqueue
Name of the queue where messages are placed.
host Host on which the MQ server is located (for the MQ Client only).
iWay Adapter for TIBCO Rendezvous User’s Guide 3-15

Adding, Modifying, or Deleting a Port
4. Click Finish.
The port appears under the ports node in the left pane. In the right pane, a table appears that summarizes the information associated with the event port you created.
You are ready to associate the event port with a channel. For more information, see Adding, Modifying, or Deleting a Channel on page 3-17.
Editing an Event PortYou can edit an existing event port.
Procedure How to Edit an Event Port
To edit an event port:
1. Select the event port you want to edit.
2. In the right pane, move the pointer over Operations and select Edit.
The Edit Port pane opens on the right.
3. Make the required changes to the event port configuration fields.
4. Click OK.
port Number to connect to an MQ server queue manager (for the MQ client only).
channel Case-sensitive name of the channel that connects with the remote MQ server queue manager (for the MQ client only). The default channel name for MQSeries is SYSTEM.DEF.SVRCONN.
errorTo Location where error documents are sent. A predefined port name or another full URL. Optional.
Parameter Description
3-16 iWay Software

Listening for Events for the iWay Adapter for TIBCO
Deleting an Event PortYou can delete an existing event port.
Procedure How to Delete an Event Port
To delete an event port:
1. Select the event port you want to delete.
2. In the right pane, move the pointer over Operations and select Delete.
The following confirmation dialog box opens.
3. To delete the event port you selected, click OK.
The event port disappears from the list in the left pane.
Adding, Modifying, or Deleting a ChannelThe following topics describe how to create, modify, or remove a channel for your event adapter. All defined event ports must be associated with a channel.
Creating a ChannelYou can create a channel using iWay Servlet Application Explorer. The following procedure also describes how to start or stop a channel.
You can create a TIBRV listener channel using iWay Servlet Application Explorer:
Procedure How to Create a Channel for SCPO Using File
To create a channel using Application Explorer:
1. Click the iWay Events tab.
The iWay Event Adapters window opens.Figure 0-1 Expanded Connection Node
The list of iWay adapters that support events appears in the left pane.
2. Expand the TIBCO node.
iWay Adapter for TIBCO Rendezvous User’s Guide 3-17

Adding, Modifying, or Deleting a Channel
The ports and channels nodes appear in the left pane.
3. Select the channels node.
4. In the right pane, move the pointer over Operations and select Add a new channel.
The Add a new TIBCO channel pane opens on the right.
a. In the Channel Name field, type a name, for example, TEST_CHANNEL.
b. In the Description field, type a brief description.
c. From the Channel Type drop-down list, select TIBRV Listener.
5. Click Next.
3-18 iWay Software

Listening for Events for the iWay Adapter for TIBCO
The Edit channels pane opens on the right.
6. Enter values for the parameters listed in the following table. The table includes a description of each parameter.
Parameter Description
Daemon RV Daemon information to find the TIBCO Rendezvous daemon and establish a connection.
Network Network parameter instructing the Rendezvous daemon to use a particular network for all communications involving this transport. This parameter may be a host name, IP address, or network name. Consult the TIBCO Rendezvous administration manual for more information regarding this property. This parameter may be omitted if the daemon is running on the local host.
iWay Adapter for TIBCO Rendezvous User’s Guide 3-19

Adding, Modifying, or Deleting a Channel
7. Click Next.
Service UDP service on which to listen for TIBCO Rendezvous messages. This parameter accepts a service name or a port number. The default TIBCO Rendezvous port during installation is 7500. If service, network, or daemon are not present, the listener attempts to connect to a local instance of running TIBCO Rendezvous service. Otherwise, specify the TIBCO Rendezvous instance in the form host:<port>.
Field Name Custom field name on which the listener filters.
Send Subject Send subject of the message.
Reply Subject Return subject of the message.
Message Datatype Select the type of data for emission from the drop-down list. The choices are:
• Opaque
• String
• TibrvMsg
• TibrvXML
Java Encoding Default encoding if the incoming message is not self declaratory (XML).
Parameter Description
3-20 iWay Software

Listening for Events for the iWay Adapter for TIBCO
The Select Ports pane opens on the right, with available and current ports.
a. Select an event port from the list of current ports.
b. Click the single right (>) arrow button to transfer the port to the list of available ports. To associate all the event ports, click the double right (>>) arrow button.
8. Click Finish.
The summary window opens.
A summary provides the channel description, channel status, and available ports. All the information is associated with the channel you created.
The channel also appears under the channels node in the left pane. An X over the icon indicates that the channel is currently disconnected. You must start the channel to activate your event configuration.
9. In the right pane, move the pointer over Operations and select Start the channel.
The channel you created becomes active.
The X that was over the icon disappears.
10. To stop the channel, move the pointer over Operations and select Stop the channel.
Modifying a ChannelYou can edit an existing channel.
iWay Adapter for TIBCO Rendezvous User’s Guide 3-21

Adding, Modifying, or Deleting a Channel
Procedure How to Edit a Channel
To edit an existing channel:
1. In the left pane, select the channel you want to edit.
2. In the right pane, move the pointer over Operations and select Edit.
3. Make the required changes to the channel configuration fields and click Finish.
Deleting a ChannelYou can remove an existing channel.
Procedure How to Delete a Channel
To delete an existing channel:
1. In the left pane, select the channel you want to delete.
2. In the right pane, move the pointer over Operations and select Delete.
The following confirmation dialog box opens.
3. To delete the channel you selected, click OK.
The channel disappears from the list in the left pane.
3-22 iWay Software

CHAPTER 4
4.Using Web Services Policy-Based Security
iWay Servlet Application Explorer provides a security feature called Web services policy-based security. The following topics describe how this feature works and how to configure it.
This section contains the following topics:
• Web Services Policy-Based Security
• Configuring Web Services Policy-Based Security
iWay Adapter for TIBCO Rendezvous User’s Guide 4-1

Web Services Policy-Based Security
Web Services Policy-Based SecurityWeb services provide a layer of abstraction between the back-end business logic they invoke and the user or application running the Web service. This enables easy application integration but raises the issue of controlling the use and execution of critical and sensitive business logic that is run as a Web service.
iWay Servlet Application Explorer controls the use of Web services that use iWay adapters using a feature called policy-based security. This feature enables an administrator to apply “policies” to iWay Business Services (Web services) to deny or permit their execution.
A policy is a set of privileges dealing with the execution of an iWay Business Service (iBS) that can be applied to an existing or new iBS. When you set specific rights or privileges inside a policy, you do not have to recreate privileges for every iBS that has security concerns in common with other iWay Business Services. Instead, you can use one policy for many iWay Business Services.
The goal of the feature is to secure requests at both the transport and the SOAP request level transmitted on the wire. Some policies do not deal with security issues directly but do effect the run-time behavior of the Web services to which they are applied.
The iBS administrator creates an “instance” of a policy type, names it, associates individual users and/or groups (a collection of users), and then applies that policy to one or more iWay Business Services.
You can assign a policy to an iBS, or to a method within an iBS. If a policy is applied only to a method, other methods in that iBS are not governed by it. However, if a policy is applied to the iBS, all methods are governed by it. At run time, the user ID and password that are sent to iBSE in the SOAP request message are checked against the list of users for all policies applied to that specific iBS. The policy type that is supported is Resource Execution, which dictates who can or cannot execute the iBS.
When a policy is not applied, the default value for an iBS is to “grant all”. For example, anybody can execute the iBS, until the Resource Execution policy is associated to the iBS. At that time, only those granted execution permission, or users who are not part of a group that was denied execution permissions, have access to the iBS.
Configuring Web Services Policy-Based SecurityThe following procedure describes how to configure iBSE policy-based security.
Procedure How to Create and Associate a User With a Policy
Before you create instances of policies, you must have a minimum of one user or one group to associate to an instance. You can create users and groups using iWay Servlet Application Explorer.
4-2 iWay Software

Using Web Services Policy-Based Security
1. Open iWay Servlet Application Explorer.
a. Select the iWay Business Services tab.
b. Expand the Configuration node.
c. Expand the Security node.
d. Expand the Users and Groups node.
e. Select Users.
2. In the right pane, move the pointer over Operations and select Add.
iWay Adapter for TIBCO Rendezvous User’s Guide 4-3

Configuring Web Services Policy-Based Security
The Add a new user pane opens.
a. In the Name field, type a user ID.
b. In the Password field, type the password associated with the user ID.
c. In the Description field, type a description of the user (optional).
3. Click OK.
The new user is added to the configuration.
4-4 iWay Software

Using Web Services Policy-Based Security
Procedure How to Create a Group to Use With a Policy
To create a group to use with a policy:
1. Open iWay Servlet Application Explorer.
a. Select the iWay Business Services tab.
b. Expand the Configuration node.
c. Expand the Security node.
d. Expand the Users and Groups node.
e. Select Groups.
2. In the right pane, move the pointer over Operations and click Add.
The Add new group pane opens.
a. In the Name field, type a a name for the group.
b. In the Description field, type a description for the group (optional).
3. Click Next.
iWay Adapter for TIBCO Rendezvous User’s Guide 4-5

Configuring Web Services Policy-Based Security
The Modify Group Membership pane opens.
You can either highlight a single user in the list of available users and add it by clicking the left arrow, or you can click the double left arrow to add all users in the list of available users to the group.
4. After you select a minimum of one user, click Finish.
The new group is added to the configuration.
Procedure How to Create an Execution Policy
An execution policy governs who can execute the iBS to which the policy is applied.
To create a group to use with a policy:
1. Open iWay Servlet Application Explorer.
a. Select the iWay Business Services tab.
4-6 iWay Software

Using Web Services Policy-Based Security
b. Expand the Configuration node.
c. Select Policies.
2. In the right pane, move the pointer over Operations and click Add.
The Add a new policy pane opens.
a. In the Name field, type a a name for the policy.
b. From the Type drop-down list, select Execution.
c. In the Description field, type a description for the policy (optional).
3. Click Next.
iWay Adapter for TIBCO Rendezvous User’s Guide 4-7

Configuring Web Services Policy-Based Security
The Modify policy targets pane opens.
4. Select a minimum of one user or group from the Available pane.
Note: This user ID is checked against the value in the user ID element of the SOAP header sent to iBSE in a SOAP request.
5. Click Next.
The Modify policy permissions pane opens.
You select whether users or groups may execute the iBS.
6. From the Permission drop-down lists, select Grant to permit execution or Deny to restrict execution.
7. Click Finish.
4-8 iWay Software
Using Web Services Policy-Based Security
The following pane summarizes your configuration.
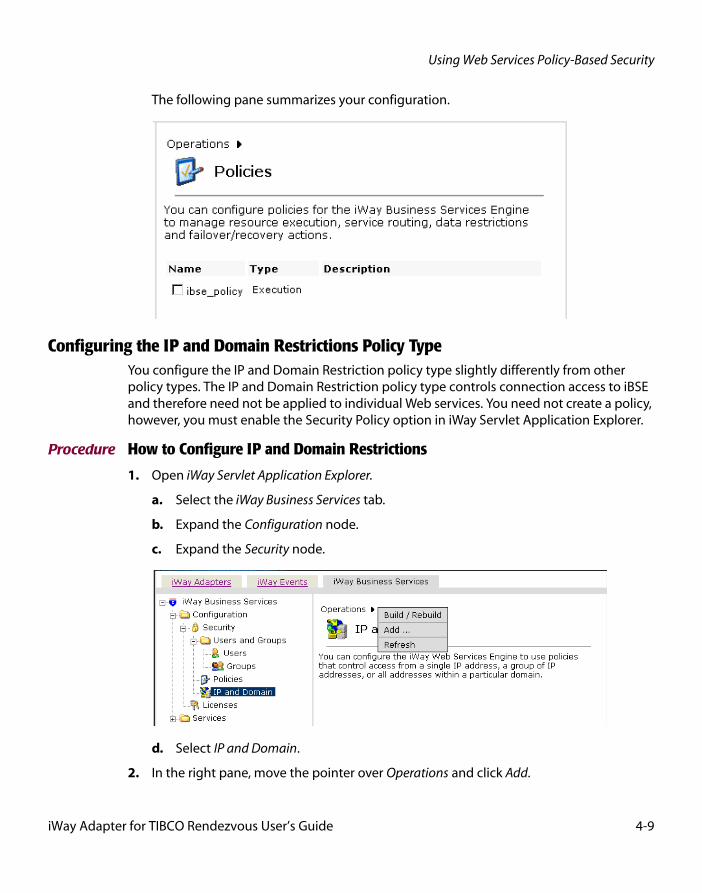
Configuring the IP and Domain Restrictions Policy TypeYou configure the IP and Domain Restriction policy type slightly differently from other policy types. The IP and Domain Restriction policy type controls connection access to iBSE and therefore need not be applied to individual Web services. You need not create a policy, however, you must enable the Security Policy option in iWay Servlet Application Explorer.
Procedure How to Configure IP and Domain Restrictions
1. Open iWay Servlet Application Explorer.
a. Select the iWay Business Services tab.
b. Expand the Configuration node.
c. Expand the Security node.
d. Select IP and Domain.
2. In the right pane, move the pointer over Operations and click Add.
iWay Adapter for TIBCO Rendezvous User’s Guide 4-9

Configuring Web Services Policy-Based Security
The Add a new IP/Domain pane opens.
a. From the Type drop-down list, select the type of restriction.
b. In the IP(Mask)/Domain field, type the IP or domain name using the following guidelines.
If you select Single (Computer) from the Type drop-down list, you must provide the IP address for that computer. If you only know the DNS name for the computer, click DNS Lookup to obtain the IP Address based on the DNS name.
If you select Group (of Computers), you must provide the IP address and subnet mask for the computer group.
If you select Domain, you must provide the domain name, for example, yahoo.com.
3. From the Access Control drop-down list, select Grant to permit access or Deny to restrict access for the IP addresses and domain names you are adding.
4. Click OK.
4-10 iWay Software

Using Web Services Policy-Based Security
The following pane summarizes your configuration.
iWay Adapter for TIBCO Rendezvous User’s Guide 4-11

Configuring Web Services Policy-Based Security
4-12 iWay Software

Reader Comments
In an ongoing effort to produce effective documentation, the Documentation Services staff at Information Builders welcomes any opinion you can offer regarding this manual.Please use this form to relay suggestions for improving this publication or to alert us to corrections. Identify specific pages where applicable. You can contact us through the following methods:
Name:_________________________________________________________________________________
Company:______________________________________________________________________________
Address:_______________________________________________________________________________
Telephone:____________________________________Date:_____________________________________
E-mail:_________________________________________________________________________________
Comments:
Mail: Documentation Services - Customer SupportInformation Builders, Inc. Two Penn Plaza New York, NY 10121-2898
Fax: (212) 967-0460
E-mail: [email protected]
Web form: http://www.informationbuilders.com/bookstore/derf.html
Information Builders, Two Penn Plaza, New York, NY 10121-2898 (212) 736-4433
iWay Adapter for TIBCO Rendezvous User’s Guide DN3501494.0704Version 5 Release 5

Reader Comments
Information Builders, Two Penn Plaza, New York, NY 10121-2898 (212) 736-4433
iWay Adapter for TIBCO Rendezvous User’s Guide DN3501494.0704Version 5 Release 5