itrainonline mmtk linux based infrastructure … fileitrainonline mmtk linux based infrastructure...
TRANSCRIPT
ITRAINONLINE MMTKLINUX BASED INFRASTRUCTURE HANDOUT
Developed by: Tomas B. Krag / wire.less.dk
Table of Contents1. About this document..............................................................................................................................................1
1.1 Copyright information......................................................................................................................................21.2 Prerequisites...................................................................................................................................................21.3 Degree of difficulty..........................................................................................................................................2
2. Introduction...........................................................................................................................................................23. The role of Linux in network infrastructure.............................................................................................................24. Assumptions..........................................................................................................................................................3
4.1 Software..........................................................................................................................................................34.2 Hardware........................................................................................................................................................4
5. Scenario 1: Masquerading access point................................................................................................................45.1 Step 0: Initial setup..........................................................................................................................................45.2 Step 1: Setting up the interfaces.....................................................................................................................55.3 Step 2: Setting up masquerading in the kernel................................................................................................55.4 Step 3: Setting up the DHCP server...............................................................................................................65.5 Step 4: Adding extra security by setting up a firewall......................................................................................7
6. Scenario 2: Transparent bridging access point......................................................................................................76.1 Step 0: Initial setup..........................................................................................................................................76.2 Step 1: Setting up the interfaces.....................................................................................................................86.3 Step 2: Starting the bridge..............................................................................................................................9
7. Scenario 1 & 2 the easy way.................................................................................................................................98. Scenario 3: A central firewall with authentication...................................................................................................9
8.1 An overview of the setup...............................................................................................................................108.1.1 Hardware requirements..........................................................................................................................10
8.2 Step 0: Basic software installation.................................................................................................................108.3 Step 1: Configuring Apache2 for SSL............................................................................................................118.4 Step 2: Setting up ChilliSpot..........................................................................................................................128.5 Step 3: Configuring the software...................................................................................................................13
8.5.1 Network and firewall setup.....................................................................................................................138.5.2 Configuring the ChilliSpot conf file.........................................................................................................138.5.3 Configuring FreeRADIUS.......................................................................................................................148.5.4 Customizing hotspot login script............................................................................................................148.5.5 Using ChilliSpot......................................................................................................................................15
9. Conclusions.........................................................................................................................................................15
1. About this documentThese materials are part of the ItrainOnline Multimedia Training Kit (MMTK). The MMTK provides an integrated set of multimedia training materials and resources to support community media, community multimedia centres, telecentres, and other initiatives using information and communications technologies (ICTs) to empower communities and support development work.
18_en_mmtk_wireless_linuxinfrastructure_handout.odtLast updated 30 June 2006Available online from http://www.itrainonline.org/itrainonline.org/mmtk/
1

1.1 Copyright information
This unit is made available under the Creative Commons AttributionShareAlike 2.5 License. To find out how you may use these materials please read the copyright statement included with this unit or see http://creativecommons.org/licenses/bysa/2.5/.
1.2 Prerequisites
In order to get the maximum benefit from this handout the reader should be familiar with Linux from a user's perspective, and be capable of installing the GNU/Linux distribution of their choice. A basic understanding of the command line interface (terminal) in Linux is also required.
In order to follow the access point configurations in this document, a Linux computer is required with one or ore wireless cards already installed. The examples use a specific card and driver, but there are a number of different cards that should work equally well. See the MMTK Module Linux Client Installation for tips on how to install a wireless interface under Linux.
Finally, an understanding of TCP/IP networking (see the MMTK unit on “Advanced Networking”) is necessary.
1.3 Degree of difficulty
The degree of difficulty of this unit is Advanced.
2. IntroductionThis unit gives an overview of the different roles in a network that can be filled with a Linux computer. The document considers three different scenarios that are presented with brief runthroughs of configuration and example of software packages.
The three scenarios targets :1. Access point masquerading2. Transparent bridge access point3. Central Firewall/Gateway
3. The role of Linux in network infrastructureIn general, the GNU/Linux Operating System (unlike Windows) gives the network administrator the potential for full access to the networking stack. One can access the networking packets at both the Data Link sublayer, the networking layer and of course the application layer.
Taken together with the proven flexibility of GNU/Linux in terms of the wide variety of hardware it will run on, GNU/Linux is a very powerful tool that can fill a broad variety of roles in a network infrastructure.
The following diagram shows the scenario that is the basis of this handout but it is important to note that it describes only some select roles in a network. Primarily, all the roles in the diagram could be integrated into a single computer, or split up in different ways. However, for simplicity and overview the roles have been separated out in the text below.
18_en_mmtk_wireless_linuxinfrastructure_handout.odtLast updated 30 June 2006Available online from http://www.itrainonline.org/itrainonline.org/mmtk/
2
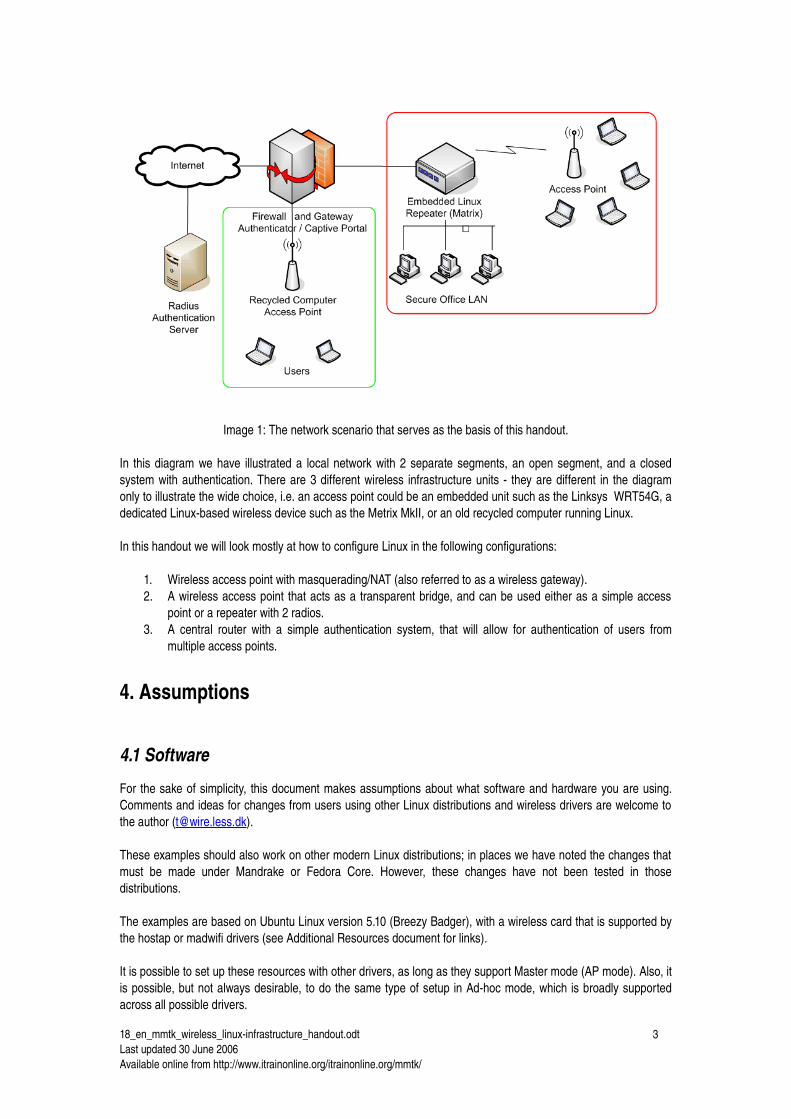
Image 1: The network scenario that serves as the basis of this handout.
In this diagram we have illustrated a local network with 2 separate segments, an open segment, and a closed system with authentication. There are 3 different wireless infrastructure units they are different in the diagram only to illustrate the wide choice, i.e. an access point could be an embedded unit such as the Linksys WRT54G, a dedicated Linuxbased wireless device such as the Metrix MkII, or an old recycled computer running Linux.
In this handout we will look mostly at how to configure Linux in the following configurations:
1. Wireless access point with masquerading/NAT (also referred to as a wireless gateway).2. A wireless access point that acts as a transparent bridge, and can be used either as a simple access
point or a repeater with 2 radios.3. A central router with a simple authentication system, that will allow for authentication of users from
multiple access points.
4. Assumptions
4.1 Software
For the sake of simplicity, this document makes assumptions about what software and hardware you are using. Comments and ideas for changes from users using other Linux distributions and wireless drivers are welcome to the author ([email protected]).
These examples should also work on other modern Linux distributions; in places we have noted the changes that must be made under Mandrake or Fedora Core. However, these changes have not been tested in those distributions.
The examples are based on Ubuntu Linux version 5.10 (Breezy Badger), with a wireless card that is supported by the hostap or madwifi drivers (see Additional Resources document for links).
It is possible to set up these resources with other drivers, as long as they support Master mode (AP mode). Also, it is possible, but not always desirable, to do the same type of setup in Adhoc mode, which is broadly supported across all possible drivers.
18_en_mmtk_wireless_linuxinfrastructure_handout.odtLast updated 30 June 2006Available online from http://www.itrainonline.org/itrainonline.org/mmtk/
3
Running under the Linux, the following software is required to complete these three installations:
1. wireless tools (iwconfig, iwlist commands)2. iptables firewall3. dnsmasq (caching DNS server, and DHCP server)
4.2 Hardware
There are few requirements in terms of hardware. A standard computer, laptop or desktop, with one Ethernet interface and one wireless interface (or 2 wireless interfaces) is required for the access point and masquerading access point setups. For these devices, no particular processing power is really needed. They are implementable on embedded boxes, singleboard computers, or even repurposed access points running Linux (such as the Linksys WRT54G).
The Additional Resources document contains links to some suggested (not recommended) hardware vendors, which are suitable for this purpose.
The firewall/authentication scenario requires some more hardware, but will comfortably run on a 500 MHz x86 with a 10 Gb hard disk (or even a 2 Gb Compact Flash Card), and 128 Mb RAM. This of course depends on the expected load on the system (depending on user load).
5. Scenario 1: Masquerading access pointThis is the simplest of the scenarios, and is especially useful in situations where you want a single access point for an office, and either
1. there is an existing dedicated firewall and gateway running Linux, and you just want to add a wireless interface
2. you have an old refurbished computer or laptop available, and prefer to use that as an access point3. you require more power in terms of monitoring, logging and/or security setup than most commercial
access points provide, but don't want the expense of an enterprise access point. (also see Scenario 3)4. you would like a single machine to act as 2 access points (and firewall) so that you can offer both a
secure network access to the intranet, as well as open access to guests (also see Scenario 3).
5.1 Step 0: Initial setup
Start of with an already configured computer running GNU/Linux. This could be an Ubuntu Server installation, or Fedora Core. The computer must have at least 2 interfaces for this to work, and at least one of these interfaces should be wireless. The rest of this description assumes that your cabled Ethernet port (eth0) is connected to the Internet (where it gets an IP address from a DHCP server), and that there is a wireless interface (wlan0) that will provide the access point functionality. As mentioned earlier, the Master mode (or Access point mode) feature has only been tested with the madwifi driver (Atheros chipset) and the hostap driver (Intersil Prism2/2.5/3 chipset).
To find out if your chipset supports master mode, try the following command as root:
# iwconfig wlan0 mode Master
Replace wlan0 with the name of your interface.If you do not get an error message, your card should be fine (but there are no guarantees).
18_en_mmtk_wireless_linuxinfrastructure_handout.odtLast updated 30 June 2006Available online from http://www.itrainonline.org/itrainonline.org/mmtk/
4

If you do get an error message, you can try the same setup in Adhoc mode, which is supported by all chipsets. This requires you to set all the laptops that are connecting to this “access point” into Adhoc mode as well, and may not work quite the way you are expecting.
Before continuing make sure you install dnsmasq on your machine (use the graphical package manager of your distribution). In Ubuntu you can do the following (after setting up your package repositories. see http://www.ubuntuguide.org/ ):
# sudo aptget install dnsmasq
5.2 Step 1: Setting up the interfaces
Set up your server so that eth0 is connected to the Internet (use the graphical tool of your distribution or try the following command as root):
# dhclient eth0
Set up your wireless interface in master mode and give it a name of your choice:
# iwconfig wlan0 essid “my network” mode Master enc off
The “enc off” turns off WEP encryption. To enable WEP, we must add a hexkey sting of the relevant length after the keyword enc instead , i.e.
# iwconfig wlan0 essid “my network” mode Master enc 1A2B3C4D5E
Now, give your wireless interface an IP address in a private subnet, but make sure it is not the same subnet as that of your Ethernet adapter:
# ifconfig wlan0 10.0.0.1 netmask 255.255.255.0 broadcast 10.0.0.255 up
5.3 Step 2: Setting up masquerading in the kernel
In order for us to be able to translate addresses between the 2 interfaces on the computer, we need to enable masquerading (NAT) in the Linux kernel. First we load the relevant kernel module:
# modprobe ipt_MASQUERADE
Now we will flush all existing firewall rules to ensure that the firewall is not blocking us from forwarding packets between the two interfaces. If you have an existing firewall running make sure you know how to restore the existing rules later.
# iptables F
Enable the NAT functionality between the two interfaces:
# iptables t nat A POSTROUTING o eth0 j MASQUERADE
Finally we need to enable the kernel to forward packets between interfaces:
# echo 1 > /proc/sys/net/ipv4/ip_forward
On Debianbased Linux distributions such as Ubuntu, this change can also be made by editing the file
18_en_mmtk_wireless_linuxinfrastructure_handout.odtLast updated 30 June 2006Available online from http://www.itrainonline.org/itrainonline.org/mmtk/
5
/etc/network/options
and changing the line:
ip_forward=no
to
ip_forward=yes
and then restarting the network interfaces with:
# /etc/init.d/network restart
or
# /etc/init.d/networking restart
5.4 Step 3: Setting up the DHCP server
At this point we actually should have a working access point, and it can be tested by connecting wirelessly with a separate machine and giving that machine an address in the same address range as our wireless interface on the server (10.0.0.0/24 if you followed the examples).
In order to make it easier for people to connect to the server without knowing the ip address range, we will set up a DHCP server to hand out ip addresses automatically to wireless clients.
We use the program dnsmasq for this purpose. As the name indicates, this program was developed especially for NAT firewalls, and besides DHCP also provides a caching DNS server. Having a caching DNS server is especially helpful if you internet connection is a highlatency and/or lowbandwidth connection, such as a VSAT or dialup. It means that many DNS queries can be resolved locally, saving a lot of traffic on the internet connection, and also making the connection feel noticeably faster for those connecting.
Install dnsmasq with your distributions package manager, or download the source code from the web site (see Additional Resources).
All that is required for us to run dnsmasq is to edit a few lines of the dnsmasq configuration file, which should be found here:
/etc/dnsmasq.conf
The configuration file is well commented, and has many options for various types of configuration. To get the basic DHCP server up and running we just need to uncomment and/or edit 2 lines.
Find the lines that starts with:
interface=
and make sure it reads
interface=wlan0
then find the line that starts
#dhcprange=
18_en_mmtk_wireless_linuxinfrastructure_handout.odtLast updated 30 June 2006Available online from http://www.itrainonline.org/itrainonline.org/mmtk/
6

uncomment the line and edit it to suit the ip addresses being used, i.e.
dhcprange=10.0.0.10,10.0.0.110,255.255.255.0,6h
save the file and start dnsmasq:
# /etc/init.d/dnsmasq start
That's it you should now be able to connect to the server as an access point, and get an IP address using DHCP. This should let you connect to the Internet through the server.
5.5 Step 4: Adding extra security by setting up a firewall
Once this is set up and tested you can add extra firewall rules using whatever firewall tool is included in your distribution. Some typical front ends for setting up firewall rules include:
• firestarter a graphical client for gnome, which requires that your server is running GNOME• KNetfilter – a graphical client for KDE, which requires that your server is running KDE• Shorewall – a set of scripts and configuration files that will make it easier to set up an iptables firewall.
There are also front ends for shorewall such as webminshorewall• fwbuilder a powerful, but slightly complex graphical tool that will let you create iptables scripts on a
machine separate from your server, and then transfer them to the server later. This does not require you to be running a graphical desktop on the server, and is a strong option for the security conscious.
For more information on setting up additional security systems, see also Scenario 3.
6. Scenario 2: Transparent bridging access pointThis scenario can be used for a 2radio repeater, or for an access point connected to an Ethernet, on which we want both sides of the access point to be on the same subnet. This can be particularly useful in set ups with multiple access points where we prefer to have a single, central firewall and perhaps authentication server. Because all clients behind multiple access points are on the same subnet they can be managed with a single dhcp server and firewall.
As an example, you could set up a server like the one in Scenario 1, but use 2 wired Ethernet interfaces instead of one wired and one wireless. One interface would be your Internet connection, and the other would connect to a switch. Then connect as many access points as you require to the same switch, set them up as transparent bridges, and everyone will pass through the same firewall and use the same DHCP server. Later we can follow Scenario 3 to add authentication to the central server.
6.1 Step 0: Initial setup
Apart from not requiring dnsmasq, the initial setup for a bridging access point is similar to that of a masquerading access point. (see Step 0 under Scenario 1).
In addition to this setup the package bridgeutils is required for this to work. This package exists for Ubuntu and other Debianbased distributions, as well as for Fedora Core. Make sure it is installed and that the command brctl is available before proceeding.
18_en_mmtk_wireless_linuxinfrastructure_handout.odtLast updated 30 June 2006Available online from http://www.itrainonline.org/itrainonline.org/mmtk/
7

6.2 Step 1: Setting up the interfaces
On Ubuntu or Debian we set up the interfaces by editing the file
/etc/network/interfaces
Add a section like the following, but change the names of interfaces and the IP addresses accordingly. The IP address and netmask must match that of your existing network. This example assumes you are building a wireless repeater with 2 wireless interfaces (wlan0 and wlan1), but this could be done also for one wired and one wireless interface (eth0 and wlan0).
Add the following to the file:
auto br0iface br0 inet static
preup ifconfig wlan 0 0.0.0.0 up preup ifconfig wlan1 0.0.0.0 up preup iwconfig wlan0 essid “client” preup iwconfig wlan1 essid “AP” mode Master address 192.168.1.2 network 192.168.1.0 netmask 255.255.255.0 broadcast 192.168.1.255 gateway 192.168.1.1 bridge_ports wlan0 wlan1 postdown ifconfig wlan1 down postdown ifconfig wlan0 down
Comment out any other sections in the file that refer to wlan0 or wlan1 to make sure that they don't interfere with our setup.
This syntax for setting up bridges via /etc/network/interfaces is specific to Debianbased distributions, and the details of actually setting up the bridge are handled by a couple of scripts, namely:
/etc/network/ifpreup.d/bridge/etc/network/ifpostdown.d/bridge
and the documentation for these scripts is found here:
/usr/share/doc/bridgeutils/
If those scripts don't exist on you distribution (such as Fedora Core), here is an alternative setup for /etc/network/interfaces which will achieve the same thing with only marginally more hassle:
iface br0 inet static preup ifconfig wlan 0 0.0.0.0 up preup ifconfig wlan1 0.0.0.0 up preup iwconfig wlan0 essid “client” preup iwconfig wlan1 essid “AP” mode Master preup brctl addbr br0 preup brctl addif br0 wlan0 preup brctl addif br0 wlan1 bridge_ports wlan0 wlan1 postdown ifconfig wlan1 down postdown ifconfig wlan0 down postdown brctl delif br0 wlan0 postdown brctl delif br0 wlan1 postdown brctl delbr br0
18_en_mmtk_wireless_linuxinfrastructure_handout.odtLast updated 30 June 2006Available online from http://www.itrainonline.org/itrainonline.org/mmtk/
8

6.3 Step 2: Starting the bridge
Once the bridge is defined as an interface starting the bridge is as simple as typing:
# ifup v br0
The “v” means verbose output and will give you information to what is going on.
On Fedora Core (i.e. nonDebian distributions) you still need to give your bridge interface an ip address and add a default route to the rest of the network:
# ifconfig br0 192.168.1.2 netmask 255.255.255.0 broadcast 192.168.1.255# route add default gw 192.168.1.1
You should now be able to connect a wireless laptop to this new access point, and connect to the internet (or at least to the rest of your network) through this box.
If you want more information about what your bridge and what it is doing, take a look at the brctl command. For example the command:
# brctl show br0
should show you some information about what your bridge is doing.
7. Scenario 1 & 2 the easy wayInstead of installing a Linux distribution and then setting up your computer to be either a masquerading or a transparently bridging access point, you may also prefer looking at dedicated distributions of Linux, which are specially tailored for this purpose, and can be as simple as booting off a particular CD on some hardware with a wireless interface.
Examples include the singleCD Debianbased Pebble distribution developed by NYC Wireless, or the enhanced version of the same distribution developed by Metrix Communications for their singleboard computer hardware.
m0n0wall is a firewall distribution which makes it very easy to set up a masquerading and firewalling access point, and will also run on dedicated hardware such as WRAP boards.
Linux, and hence these scenario's can also run on dedicated access point hardware such as the Linksys WRT54G, which can be flashed with custom firmware that let's you install more features than those it ships with.
See the Additional Resources document for links to various dedicated distributions.
8. Scenario 3: A central firewall with authenticationThe goal is to setup a gateway that will force users to login (via a captive portal webpage). Once setup the machine will have 2 network interfaces (we will use eth0 and eth1 in this example). One interface is connected to the internet (eth0) the other is an internal interface through which we connect our other machines (eth1) this could be a Ethernet port with a switch to which we attach a number of other machines or wireless access points (layer 2 transparent bridges), or it could be a wireless interface, automatically turning the gateway into an access point (see Scenario 1).
18_en_mmtk_wireless_linuxinfrastructure_handout.odtLast updated 30 June 2006Available online from http://www.itrainonline.org/itrainonline.org/mmtk/
9
In this scenario, we will add an authentication system that requires users to login with a username and password, before they can access network resources (i.e. internet and/or printers etc.)
8.1 An overview of the setup
ChilliSpot takes control of the internal interface (eth1) using a vtun kernel module to bring up a virtual interface (tun0). In fact the vtun kernel module is used to move IP packets from the kernel to user mode, in such a way that ChilliSpot can function without any nonstandard kernel modules. ChilliSpot then sets up a DHCP server (this can be disabled from the ChilliSpot conf file) on the tun0 interface.
A client connecting to this interface has all packets rejected until it is authorized though the ChilliSpot login page (acting as a supplicant for authentication). When a nonauthenticated client tries to connect to a webpage (on port 80 or 443) the request is intercepted by chilli and redirected to a Perl script called hotspotlogin.cgi (served by Apache over https).
hotspotlogin.cgi serves a page to the enduser with a username and password field. These authentication data are then forwarded to the FreeRADIUS server, which matches them with information in it's backend (using either PAP or CHAP). The backend in this case will initially be a text file, but could be any number of services such as LDAP, Kerberos, Unix passwd files or even Active Directory (probably).
A user is then either rejected or authenticated by FreeRADIUS, prompting hotspotlogin.cgi to present either a rejection message or a page with a success message and a logout link to the user.
Once we've installed and tested this with text file, we will replace the FreeRADIUS backed with a MySQL database, which allows us to add features such as prepaid cards for internet access.
8.1.1 Hardware requirements
Any PC with 2 network interfaces should work, but unlike Scenario 1 and 2, this computer should probably have a hard disk, or at least a Compact Flash card with room for storage, since running a MySQL server requires some storage.
8.2 Step 0: Basic software installation
This is basically a repeat of the first steps of Scenario 1, i.e. we need a computer with 2 interfaces running a Linux distribution. But we also need some different package that must be installed for this to work.
For this How To we start with an installation of Ubuntu Linux. We've used the Hoary release of Ubuntu, but this should work equally well with other versions, and with other GNU/Linux distributions such as Fedora Core, Mandriva etc.
This has been tested with both server and desktop installs of Ubuntu. The base installation is beyond the scope of this document, but the Ubuntu Website has plenty of documentation on installing Ubuntu from scratch.
Once Ubuntu is installed, we need to install some extra packages that are not installed by default. If you do not know how to install software under Ubuntu read this before proceeding, or if you're familiar with the Linux commandline read the man page for the aptget command. There is a How To on adding the Universe repository to your Ubuntu installation, which is required for some of the packages that need to be installed (See Additional Resource: Unofficial Ubuntu Guide).
18_en_mmtk_wireless_linuxinfrastructure_handout.odtLast updated 30 June 2006Available online from http://www.itrainonline.org/itrainonline.org/mmtk/
10
You need to install the following extra packages (and their dependencies) via synaptic or the aptget command before proceeding. some of these may not be necessary, or may be installed already by default.
• mysqlserver• apache2• freeradius• freeradiusmysql• phpmyadmin
Finally you need to get the ChilliSpot package (which is not in the Ubuntu repositories) from the ChilliSpot webpage.administer (See Additional Resource: ChilliSpot)
Once you have downloaded that file, open a terminal, go to the directory it was downloaded to and type:
$ sudo dpkg i chillispot_1.0RC31_i386.deb
Using the name of the ChilliSpot package version you downloaded.
8.3 Step 1: Configuring Apache2 for SSL
For security reasons we want to present the login page only via an encrypted (https) connection, so we need to configure apache2 to serve SSL encrypted pages. This section is adapted from this post on the Ubuntu forums: http://ubuntuforums.org/showpost.php?p=19832&postcount=4
First we need to generate an SSL certificate for apache2:
$ sudo apache2sslcertificate
This will ask you a series of questions about the name of your organisation and email information, which will be included in the certificate that is shown to people who log in to your site.
To enable the SSL extensions for apache 2 type:
$ sudo a2enmod ssl
Now configure SSL by adding a config file for SSL sites. Create a new file in your favourite editor (as root).
$ sudo pico /etc/apache2sitesavailable/ssl
The following is an example of an ssl file that enables ssl for the apache2 default directories and cgibin directory:
18_en_mmtk_wireless_linuxinfrastructure_handout.odtLast updated 30 June 2006Available online from http://www.itrainonline.org/itrainonline.org/mmtk/
11
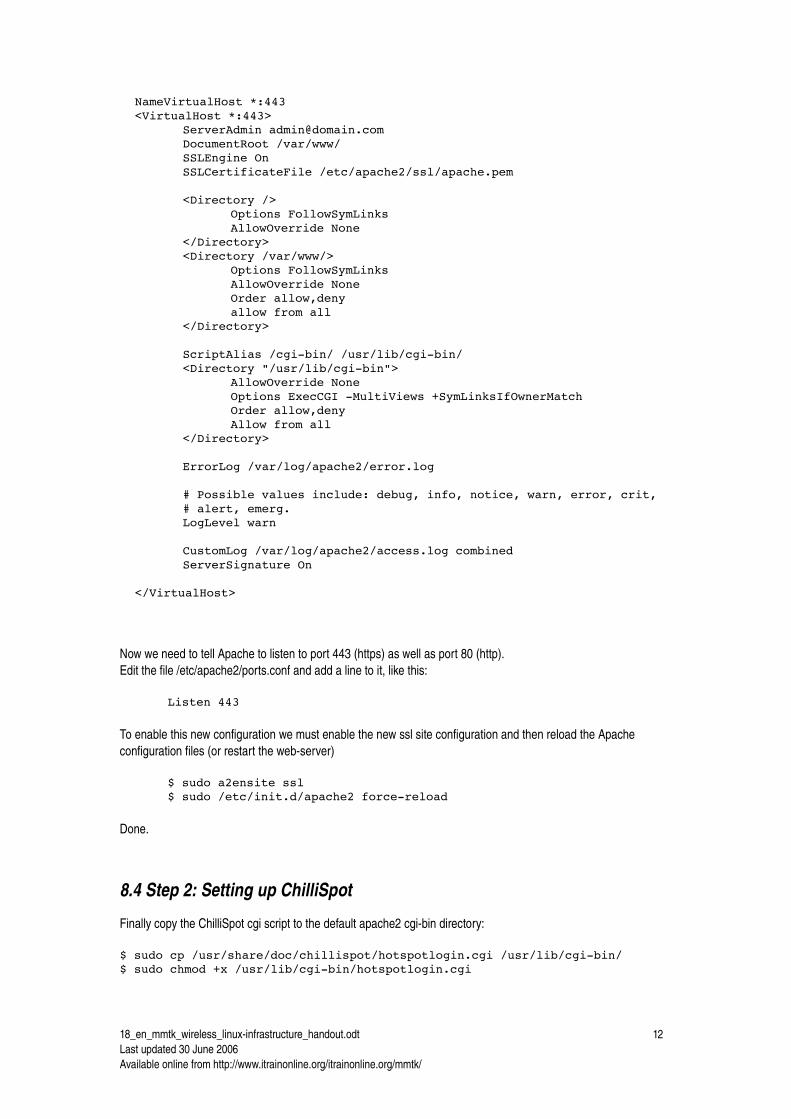
Now we need to tell Apache to listen to port 443 (https) as well as port 80 (http).Edit the file /etc/apache2/ports.conf and add a line to it, like this:
Listen 443
To enable this new configuration we must enable the new ssl site configuration and then reload the Apache configuration files (or restart the webserver)
$ sudo a2ensite ssl$ sudo /etc/init.d/apache2 forcereload
Done.
8.4 Step 2: Setting up ChilliSpot
Finally copy the ChilliSpot cgi script to the default apache2 cgibin directory:
$ sudo cp /usr/share/doc/chillispot/hotspotlogin.cgi /usr/lib/cgibin/$ sudo chmod +x /usr/lib/cgibin/hotspotlogin.cgi
18_en_mmtk_wireless_linuxinfrastructure_handout.odtLast updated 30 June 2006Available online from http://www.itrainonline.org/itrainonline.org/mmtk/
12
NameVirtualHost *:443<VirtualHost *:443>
ServerAdmin [email protected] DocumentRoot /var/www/SSLEngine OnSSLCertificateFile /etc/apache2/ssl/apache.pem
<Directory />Options FollowSymLinksAllowOverride None
</Directory><Directory /var/www/>
Options FollowSymLinksAllowOverride NoneOrder allow,denyallow from all
</Directory>
ScriptAlias /cgibin/ /usr/lib/cgibin/<Directory "/usr/lib/cgibin">
AllowOverride NoneOptions ExecCGI MultiViews +SymLinksIfOwnerMatchOrder allow,denyAllow from all
</Directory>
ErrorLog /var/log/apache2/error.log
# Possible values include: debug, info, notice, warn, error, crit,# alert, emerg.LogLevel warn
CustomLog /var/log/apache2/access.log combinedServerSignature On
</VirtualHost>

8.5 Step 3: Configuring the software
Most of the following sections were adapted from the ChilliSpot installation for Debian Sarge (and parts of the Fedora Core instructions).
8.5.1 Network and firewall setup
We are assuming 2 network interfaces,
• eth0 is connected to the internet and should be configured for this purpose (use ifconfig, /etc/network/interfaces, or the graphical network configuration tool under System>Administration>Networking).
• eth1 is the interface that other computers should connect to. This interface should not be configured, but should be brought up.
$ sudo ifconfig 0.0.0.0 up
In order to enable packet forwarding you should change the following line in /etc/network/options:
ip_forward=yes
And restart networking:
$ sudo /etc/init.d/network restart
In order to configure the firewall and NAT you can use the firewall script in "/usr/share/doc/chillispot/firewall.iptables" as a starting point. As a minimum you must edit the file and ensure that the names of the 2 interfaces match the names on your system.Find the lines that start with INTIF= and EXTIF= respectively, and edit them to match your system. INTIF is the interface that people connect to, in this case eth1, and EXTIF is the interface with the Internet connection (eth0). After you have reviewed the firewall rules you execute the script by issuing the command:
$ sudo sh /usr/share/doc/chillispot/firewall.iptables
The firewall script needs to be executed every time the computer is restarted. One way to make sure this happens is to copy the file to /etc/init.d/
$ sudo cp /usr/share/doc/chillispot/firewall.iptables/etc/init.d/chili.iptables$ sudo chmod u+x /etc/init.d/chilli.iptables$ ln s /etc/init.d/chilli.iptables /etc/rcS.d/S40chilli.iptables
8.5.2 Configuring the ChilliSpot conf file
You need to tell ChilliSpot about the location of the authentication server (which in this scenario is on the same machine as ChilliSpot). This is done by uncommenting and editing the following line in "/etc/chilli.conf":
uamserver https://192.168.182.1/cgibin/hotspotlogin.cgi
192.168.182.1 is the default IP address that ChilliSpot gives the virtual tun0 interface, and you can safely leave it as is. For added password security, we need to add a shared secret between the hotspotlogin.cgi and chilli. Find the line in "/etc/chilli.conf" that reads
#uamsecret ht2eb8ej6s4et3rg1ulp
18_en_mmtk_wireless_linuxinfrastructure_handout.odtLast updated 30 June 2006Available online from http://www.itrainonline.org/itrainonline.org/mmtk/
13

Uncomment this line (remove the #) and CHANGE the secret to something equally weird but different. Remember the secret as it needs to also go into the hotspotlogin.cgi script (we will do this later).
Since we are also running the radius server (FreeRADIUS) on the same machine, we need to find and edit the lines that point to the radius server in "/etc/chilli.conf". They should read:
radiusserver1 127.0.0.1radiusserver2 127.0.0.1
You should also change the line in "/etc/chilli.conf" that starts radiussecret, so that it does not use the default secret to encrypt traffic between chilli and radius.
radiussecret somethingReallyDifficultToGuess
Remember this secret, as it needs to be added to the FreeRADIUS configuration files as well.
8.5.3 Configuring FreeRADIUS
The FreeRADIUS configuration files are all in the /etc/freeradius/ directory. To start with, and for testing purposes, we will use the "/etc/freeradius/users" text file, to enable a single test user (steve). Later we can change the configuration to useMySQL for storing usernames and passwords, but first we want to make sure that the whole thing works in the simplest possible setup.
Edit "/etc/freeradius/clients.conf".Find the section that contains the line
client 127.0.0.1 {
make sure it is uncommented, and then, in the section between the { and the following }, change the following lines:
secret = testing123
change testing123 to match the radiussecret you chose for "/etc/chilli.conf" (somethingReallyDifficultToGuess)
Edit "/etc/freeradius/users" by uncomment the following line in the file
#steve AuthType := Local, UserPassword == "testing"
This will be the test user and password we will use to make sure everything works.
8.5.4 Customizing hotspot login script
To improve password security, we need to add the "uamsecret" from "/etc/chilli.conf" to the hotspot login script. Edit "/usr/lib/cgibin/hotspotlogin.cgi".Find the line that reads:
#$uamsecret = "ht2eb8ej6s4et3rg1ulp";
Uncomment this line and edit the secret to match the one in "/etc/chilli.conf" (The uamsecret, NOT the radiussecret).
18_en_mmtk_wireless_linuxinfrastructure_handout.odtLast updated 30 June 2006Available online from http://www.itrainonline.org/itrainonline.org/mmtk/
14

Also uncomment the line that reads:
#$userpassword=1;
Now, just to be sure all these changes have taken effect, restart apache2, freeradius and chilli
$ /etc/init.d/apache2 forcereload$ /etc/init.d/freeradius restart$ /etc/init.d/chilli restart
8.5.5 Using ChilliSpot
You should now have a simple authentication server that allows a computer to log in and gain access to the network. Plug a computer into the eth1 interface on the ChilliSpot machine, either via a switch or hub, or using a crossover UTP cable (or by plugging a transparent bridge wireless access point into the eth1 interface). We will call this machine the "client" machine.
On the client machine, bring up the network interface with DHCP. ChilliSpot should give you an IP address in the 192.168.182.0/24 network.
Open your browser, and try to go to any web page.
You should be redirected to a login page with a field for username and password. Log in using "steve" and "testing", and you should get a message that says you have successfully logged in. You should now have full access to the internet until you click the logout link in the ChilliSpot web page.
9. Conclusions
The five main issues you should remember from this unit can be summarized as:
1. The GNU/Linux Operating System gives the network administrator full access to the networking stack which implies great flexibility.
2. Due to the nature of GNU/Linux, it can fill a broad variety of roles in a network infrastructure.3. A wireless access point can run masquerading/NAT which is especially useful in situations where you
want to share a single access point for an office4. A wireless access point can act as a transparent bridge and can be used either as a simple access point
or a repeater with 2 radios. This can be particularly useful in setups with multiple access points where we prefer to have a single, central firewall and perhaps authentication server.
5. A central router can provide authentication of users by acting as a gateway that will force users to login via a captive portal webpage.
18_en_mmtk_wireless_linuxinfrastructure_handout.odtLast updated 30 June 2006Available online from http://www.itrainonline.org/itrainonline.org/mmtk/
15