issue nineteen: august 2012bustleandsew.com/freepatterns/issue19august2012preview.pdf · and...
TRANSCRIPT
1
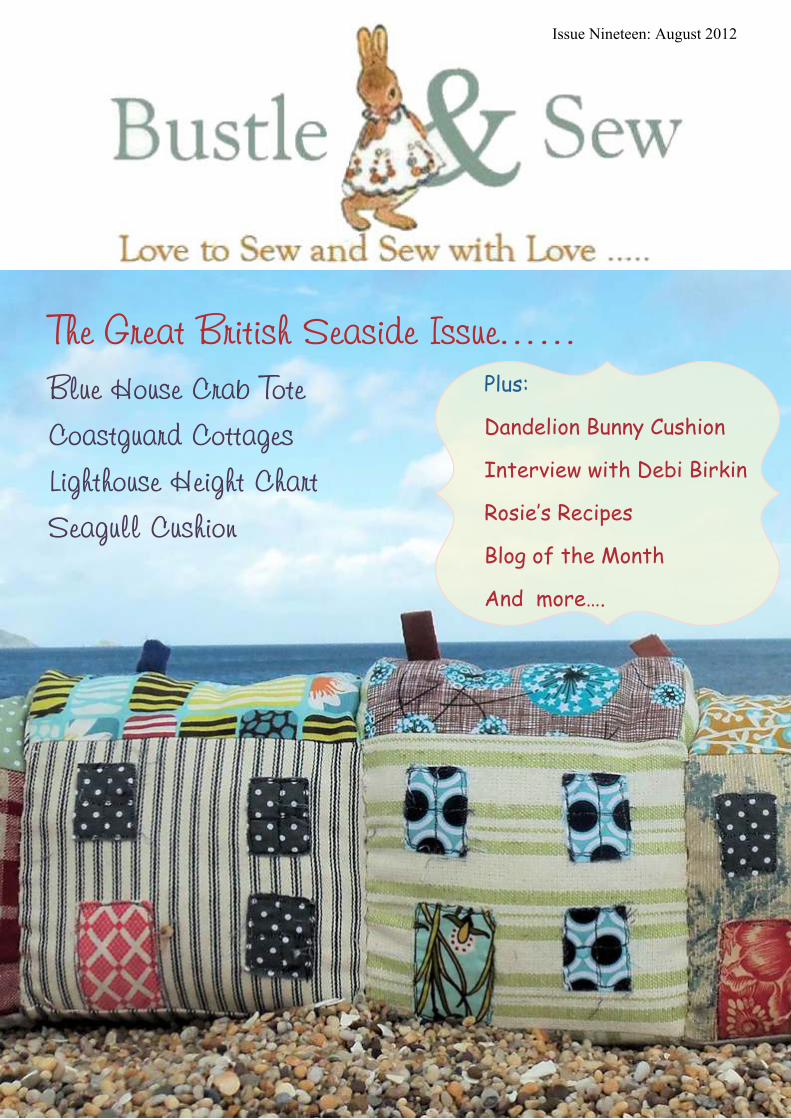
Issue Nineteen: August 2012
Plus:
Dandelion Bunny Cushion
Interview with Debi Birkin
Rosie’s Recipes
Blog of the Month
And more….

2
Hello,
And welcome to the August 2012 issue of the Bustle & Sew Magazine. This month’s project theme isthe Great British Seaside… as August is the month for holidays, whether that’s on a breezy British beachor a more exotic destination. We’ve stayed close to home though with a selection of coastal-themedprojects that I hope you’ll enjoy creating.
As well as this, I’m delighted to be able to bring you an interview with the amazingly-talented knittingdesigner, Debi Birkin, and a chance to win one of her creations - Betsy the bunny - hand-knitted byme. Rosie is back with some delicious chocolate recipes (yum!) and you’ll find lots more too.
That’s all from me - I hope you enjoy this month’s issue - and have a wonderful August wherever youare and whatever you’re doing!
Best wishes
Helen xx
2
3
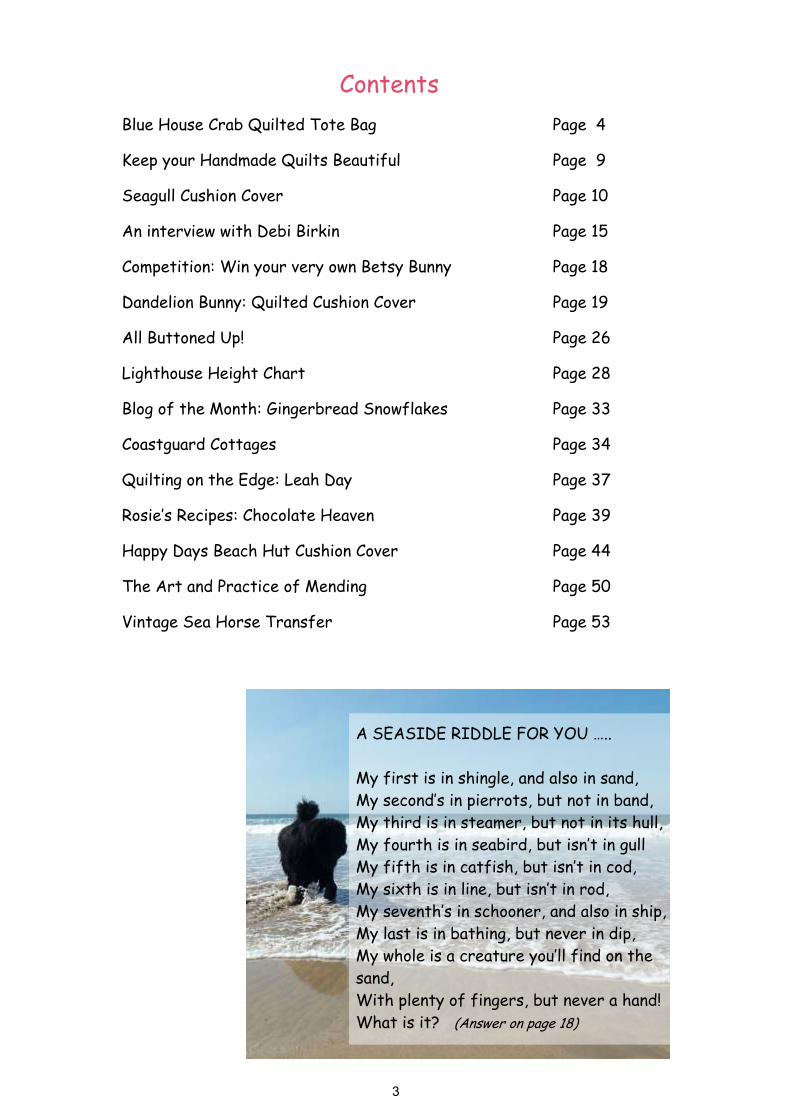
ContentsBlue House Crab Quilted Tote Bag Page 4
Keep your Handmade Quilts Beautiful Page 9
Seagull Cushion Cover Page 10
An interview with Debi Birkin Page 15
Competition: Win your very own Betsy Bunny Page 18
Dandelion Bunny: Quilted Cushion Cover Page 19
All Buttoned Up! Page 26
Lighthouse Height Chart Page 28
Blog of the Month: Gingerbread Snowflakes Page 33
Coastguard Cottages Page 34
Quilting on the Edge: Leah Day Page 37
Rosie’s Recipes: Chocolate Heaven Page 39
Happy Days Beach Hut Cushion Cover Page 44
The Art and Practice of Mending Page 50
Vintage Sea Horse Transfer Page 53
A SEASIDE RIDDLE FOR YOU …..
My first is in shingle, and also in sand,My second’s in pierrots, but not in band,My third is in steamer, but not in its hull,My fourth is in seabird, but isn’t in gullMy fifth is in catfish, but isn’t in cod,My sixth is in line, but isn’t in rod,My seventh’s in schooner, and also in ship,My last is in bathing, but never in dip,My whole is a creature you’ll find on thesand,With plenty of fingers, but never a hand!What is it?

4
A Bustle & Sew Pattern
Blue House Crab Tote
5
Nancy S Ball
Whether it was a gift, a family heirloom or yourown creation, many hours have gone into themaking of your handmade quilt. Much thoughtwent into the selection of the colors and fabric.The pieces were no doubt cut with precision andsewn together with a great deal of care. Countlesshours went into the quilting and then finallyfinishing off the binding.
With all that done, the finished project was abeautiful handmade quilt. This lovely creation canlast for years, even decades, but proper care isessential. The following suggestions for tenderloving care will assure that your handmade quiltwill be as beautiful for years to come as it waswhen the last stitch of the binding was tied off.
o Wash your quilt rather than having it drycleaned. The chemicals used in dry cleaning are tooharsh for the thread and fabrics typically used.
o Always wash your handmade quilt in warm orcold water using the delicate cycle on yourwashing machine. The individual blocks may bemade up of slightly different fabrics which willshrink differently. Also, the vibrant colors may fadeover time from hot water.
o Gentle detergent should be used when washing.A gentle and inexpensive alternative to special"quilt wash" crystals is baby shampoo.
o Spin using the gentle cycle. If you need toremove excess water, roll the quilt in an oldblanket or large towels placed side by side beforeputting it into the dryer.
o Always use the low setting on your dryer. It isokay to hang your quilt outside for a short periodof time, or you can spread it out flat to finishdrying. Make sure it is completely dry beforefolding or storing.
o When you store your handmade quilt in a closetor drawer, if you feel the need to wrap it up insomething, use tissue paper rather than a plasticbag. Storing it in a plastic bag for a long period oftime may result in yellowing and discoloration.
o Be especially careful not to store your quilt in aplace where there could be a problem with bugsor unwanted visitors that would like to eat awayat it. Some brands of fabric softener sheets havebeen credited with repelling these unwantedcritters. In addition, the fabric softener sheet willkeep it smelling fresh. A cedar chest is an idealstorage place for your handmade quilt.
o By all means, display your lovely handmade quiltto give your home a personal touch. You can becreative in the way you show off your handmadequilt for decoration in your home.
o Display your handmade quilt in a place where itis not exposed to direct sunlight for long periodsof time. This will eventually cause fading anddeterioration of the delicate fabrics.
o Don't be afraid to use your handmade quilt. Thelayers and the warmth of the batting make itperfect for keeping you warm cold winter nights.Even after many years of use, this author hasseveral quilts that are still in excellent condition.
o Refold your quilt every few months. If it is foldedthe same way for long periods of time, the battingwill become permanently creased and thinnerwhere it is folded.
A lovely handmade quilt is something you canshow off with pride. It should be used, displayedand enjoyed. However, the many tedious hoursspent in making it would be wasted if it becameshabby due to lack of proper care. Tender lovingcare will assure that it will last a lifetime and evenbe passed down to your children andgrandchildren.
The author has had many years of experience increating and caring for handmade quilts. A feelingof satisfaction and accomplishment awaits anyonewho enters the creative world of quilting.
Find quilting tips and information and the bestquilting frames and supplies athttp://www.bestquiltingsupplies.com.
6
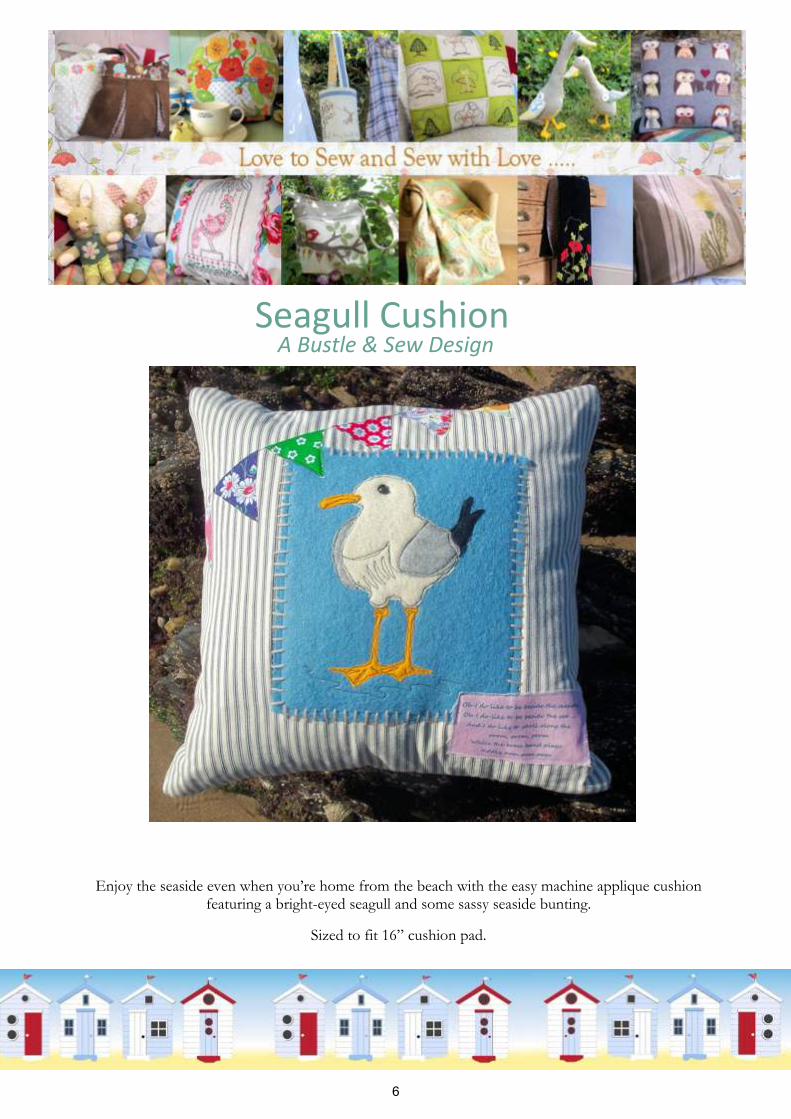
A Bustle & Sew DesignSeagull Cushion
Enjoy the seaside even when you’re home from the beach with the easy machine applique cushionfeaturing a bright-eyed seagull and some sassy seaside bunting.
Sized to fit 16” cushion pad.

7
Childhood seaside memories …….
8
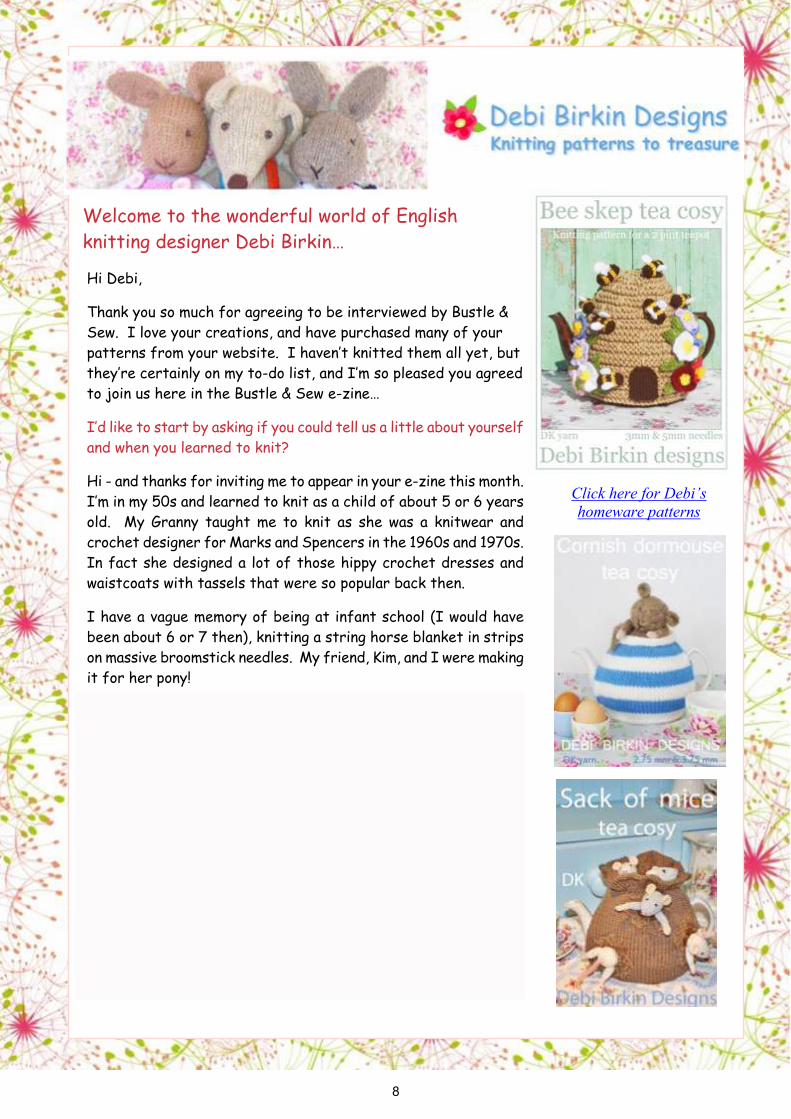
Welcome to the wonderful world of Englishknitting designer Debi Birkin…
Hi Debi,
Thank you so much for agreeing to be interviewed by Bustle &Sew. I love your creations, and have purchased many of yourpatterns from your website. I haven’t knitted them all yet, butthey’re certainly on my to-do list, and I’m so pleased you agreedto join us here in the Bustle & Sew e-zine…
I’d like to start by asking if you could tell us a little about yourselfand when you learned to knit?
Hi - and thanks for inviting me to appear in your e-zine this month.I’m in my 50s and learned to knit as a child of about 5 or 6 yearsold. My Granny taught me to knit as she was a knitwear andcrochet designer for Marks and Spencers in the 1960s and 1970s.In fact she designed a lot of those hippy crochet dresses andwaistcoats with tassels that were so popular back then.
I have a vague memory of being at infant school (I would havebeen about 6 or 7 then), knitting a string horse blanket in stripson massive broomstick needles. My friend, Kim, and I were makingit for her pony!
How did you discover your talent for pattern design?
I didn’t really knit much other than scarves until my sisters wereborn and my Mum and I made them a few cardigans. I reallystarted designing and making knitted and crocheted clothing formyself in my teens, then I made heaps of baby items for mydaughter and have never stopped since!
Have you had any formal training, or did you become a designerby another route?
I left school with a few ‘O’ levels and then attended day classesat Medway College of Art. I found I just wasn’t into drawing orfashion really, so I dropped it and began freelancing my patternsto magazines and teaching patchwork and quilting at night school
Click here for Debi’shomeware patterns

9
Betsy the Little Knitted RabbitCompetition
Betsy has been made by me from pure new Shetlandwool. Her body is knitted to Debi Birkin’s BuntyBunny pattern and her dress, which is made frompure cotton is my own design.
Betsy is all ready for a lovely day out in the sun withher new family - all she needs is someone to loveher and give her a kind new home.
If you’d like the chance to adopt Betsy, then pleaseemail me:
With your answers to the seaside puzzle belowbefore Tuesday 28 August 2012. The winner willbe announced in the September issue of the Bustle& Sew e-zine.

10
A Bustle & Sew DesignDandelion Bunny Cushion
This little bunny is simply stitched, then appliqued onto a quilted patchwork background. The spiral textand fluffy dandelion seed that’s escaped from the main design make this cushion really special. The
patchwork back is not quilted and has a simple envelope closure.
Dimensions given to fit 18” cushion pad.
11
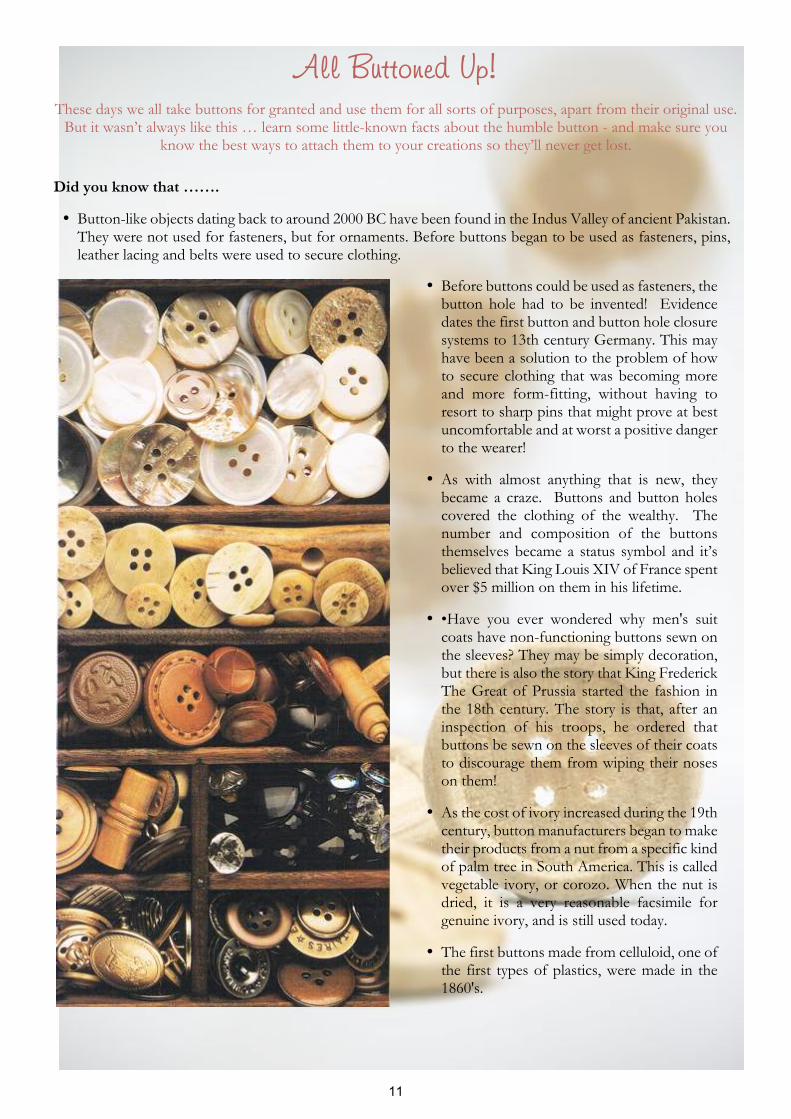
These days we all take buttons for granted and use them for all sorts of purposes, apart from their original use.But it wasn’t always like this … learn some little-known facts about the humble button - and make sure you
know the best ways to attach them to your creations so they’ll never get lost.
Did you know that …….
� Button-like objects dating back to around 2000 BC have been found in the Indus Valley of ancient Pakistan.They were not used for fasteners, but for ornaments. Before buttons began to be used as fasteners, pins,leather lacing and belts were used to secure clothing.
� Before buttons could be used as fasteners, thebutton hole had to be invented! Evidencedates the first button and button hole closuresystems to 13th century Germany. This mayhave been a solution to the problem of howto secure clothing that was becoming moreand more form-fitting, without having toresort to sharp pins that might prove at bestuncomfortable and at worst a positive dangerto the wearer!
� As with almost anything that is new, theybecame a craze. Buttons and button holescovered the clothing of the wealthy. Thenumber and composition of the buttonsthemselves became a status symbol and it’sbelieved that King Louis XIV of France spentover $5 million on them in his lifetime.
� •Have you ever wondered why men's suitcoats have non-functioning buttons sewn onthe sleeves? They may be simply decoration,but there is also the story that King FrederickThe Great of Prussia started the fashion inthe 18th century. The story is that, after aninspection of his troops, he ordered thatbuttons be sewn on the sleeves of their coatsto discourage them from wiping their noseson them!
� As the cost of ivory increased during the 19thcentury, button manufacturers began to maketheir products from a nut from a specific kindof palm tree in South America. This is calledvegetable ivory, or corozo. When the nut isdried, it is a very reasonable facsimile forgenuine ivory, and is still used today.
� The first buttons made from celluloid, one ofthe first types of plastics, were made in the1860's.
12
A Bustle & Sew Design
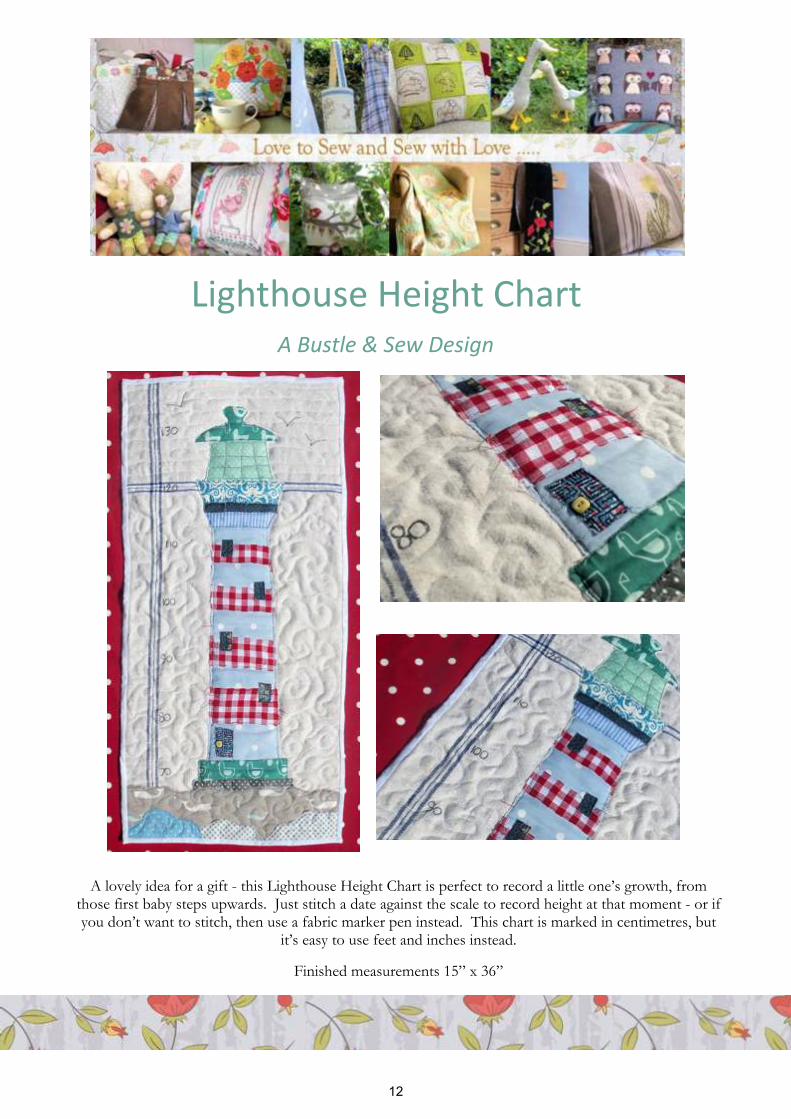
Lighthouse Height Chart
A lovely idea for a gift - this Lighthouse Height Chart is perfect to record a little one’s growth, fromthose first baby steps upwards. Just stitch a date against the scale to record height at that moment - or ifyou don’t want to stitch, then use a fabric marker pen instead. This chart is marked in centimetres, but
it’s easy to use feet and inches instead.
Finished measurements 15” x 36”

13
Gingerbread Snowflakes (don’t you just love the name!?) is the wonderfullyeclectic blog created by Pam Harris, to celebrate art, craft, cooking,homemaking and traditional celebrations from all over the world.
As well as her own designs, recipes and crafting, Pam showcases other artistsand crafters in her colourful posts, seeking out the best of the web for us allto enjoy….
….. Whether it’s her own Felted Dala Horse pattern - a must have for the well-dressed Christmas treeeverywhere I think, or her vintage-inspired Marshmallow Men … or perhaps something a little moreunusual like her Punched Tin Dragonfly, you’ll always find something to inspire you to get crafting overon Gingerbread Snowflakes. And if you’re in a more relaxed frame of mind, then you can simply sit backand enjoy her wonderful photography…..
Visit Pam for loads moregoodies and lots of fun (she hasgreat giveaways too!) over onGingerbread Snowflakes. Butbe sure to pull up a comfy chairand have a nice cup of tea byyour side as you’re sure to bethere for quite a while!
14
A Bustle & Sew Design
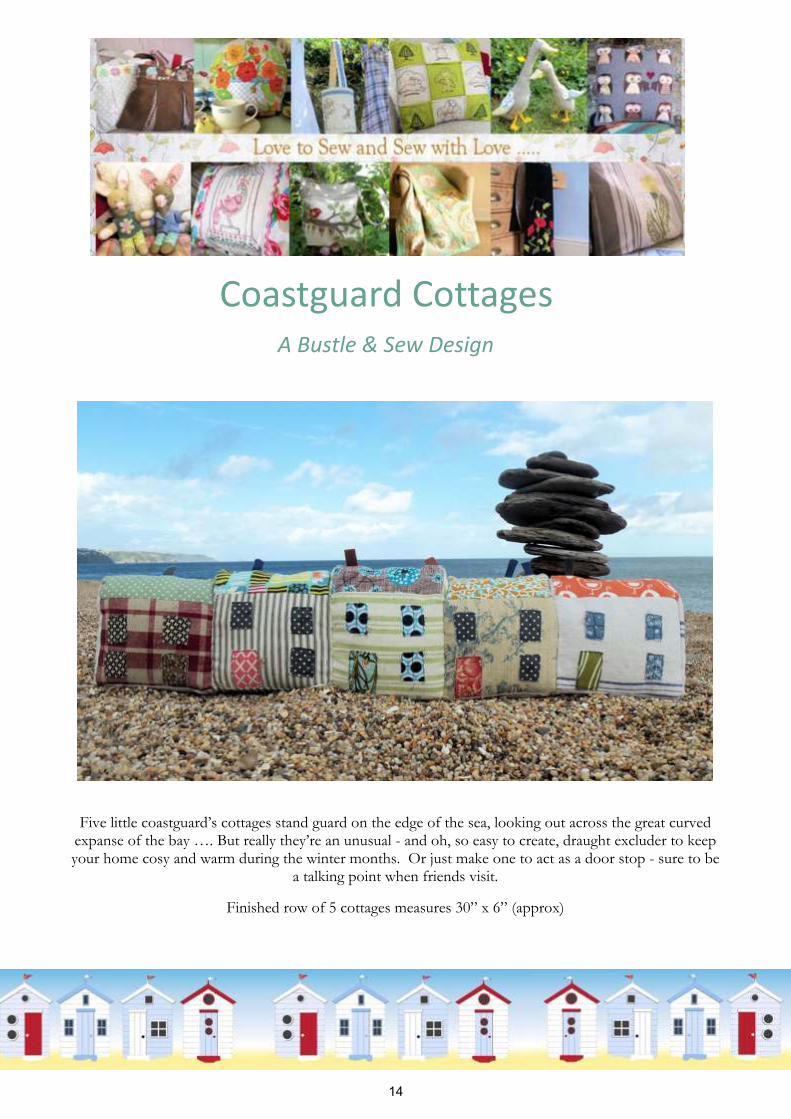
Coastguard Cottages
Five little coastguard’s cottages stand guard on the edge of the sea, looking out across the great curvedexpanse of the bay …. But really they’re an unusual - and oh, so easy to create, draught excluder to keepyour home cosy and warm during the winter months. Or just make one to act as a door stop - sure to be
a talking point when friends visit.
Finished row of 5 cottages measures 30” x 6” (approx)

15
Leah Day
This month - how do you stitch right up close to the edge of yourquilt and still control the quilting? ….Here’s Leah to tell us how:
This is a really good question because the edges of your quilts are potentialminefields of issues.
You might be quilting along just fine in the middle of a quilt, but get righton the edge and suddenly your design will go out the window along withstitch quality as the edges shift and wiggle under your hands.
But this is NORMAL!
You're on the edge of your quilt so you shouldhave a few inches of batting and backing fabricunder your hands, but the quilt will end andstabilization of all 3 layers stacked togetherends with it.
So here's a few solutions. There are probablyhundreds of ways to circumvent or fix thisissue, but we'll start with just 2:
#1 - Don't quilt to the edges - Just don't to it.Add an extra 2 inch strip of fabric all aroundyour quilt and mark a line right through themiddle of it. Quilt to that line leaving 1 inch offabric between you and the raw edge of thequilt at all times.
As you can see from my fabric samples ofdesigns, this is how I quilted each 4 inch square- within a 6 inch quilt sandwich so I always had1 inch of fabric all around the edges.
This extra inch of fabric gives you the addedstabilization you will need. All three layers staytogether beautifully and there's hardly anyissues of the design going crazy because thequilt remains stable.
2. Cut wider borders - This is basically the sameanswer as #1, but an alternative method.Instead of adding an extra 2 inch strip to yourquilt, which most quilters simply won't want todo, you can instead simply cut your borders 1inch wider.
Again, mark 1 inch inside the edge of the quilttop and take your stitching to the LINE, not tothe edges of your quilt.

16
This is my favorite solution because I can't countthe number of times I've quilted my free motionfoot over and under and INTO my quilt top. Ican't count the number of times I've gotten sostuck on a quilt edge I had to break thread,usually ready to tear my hair out the whole time.
It's annoying and frustrating and just notnecessary. Make your life easier and lesscomplicated by NOT quilting to the edges ofyour quilts.
Note to Extra Stubborn Quilters:
If you absolute, positively, MUST quilt to theedges of a particular quilt top, use your handsto really flatten out the space you're stitching,then quilt OVER the edge of your quilt top intothe batting.
This area will be cut off when you apply yourbinding, but your design will remain moreconsistent and you should be able to maintainmore control, but only if you really FLATTENeverything with your hands.
I work from right to left, always smoothing thequilt out, flattening out the edge so it's squisheddown and not flipping up for my foot to catch on.Then I carefully stitch over the edge and into thebatting, then back over the quilt, keeping thedesign simple, but consistent.
This month’s Free Motion Quilting Video is:
STARFISH
Click here for the free video to see how to createthis seaside pattern …
Leah Day
17
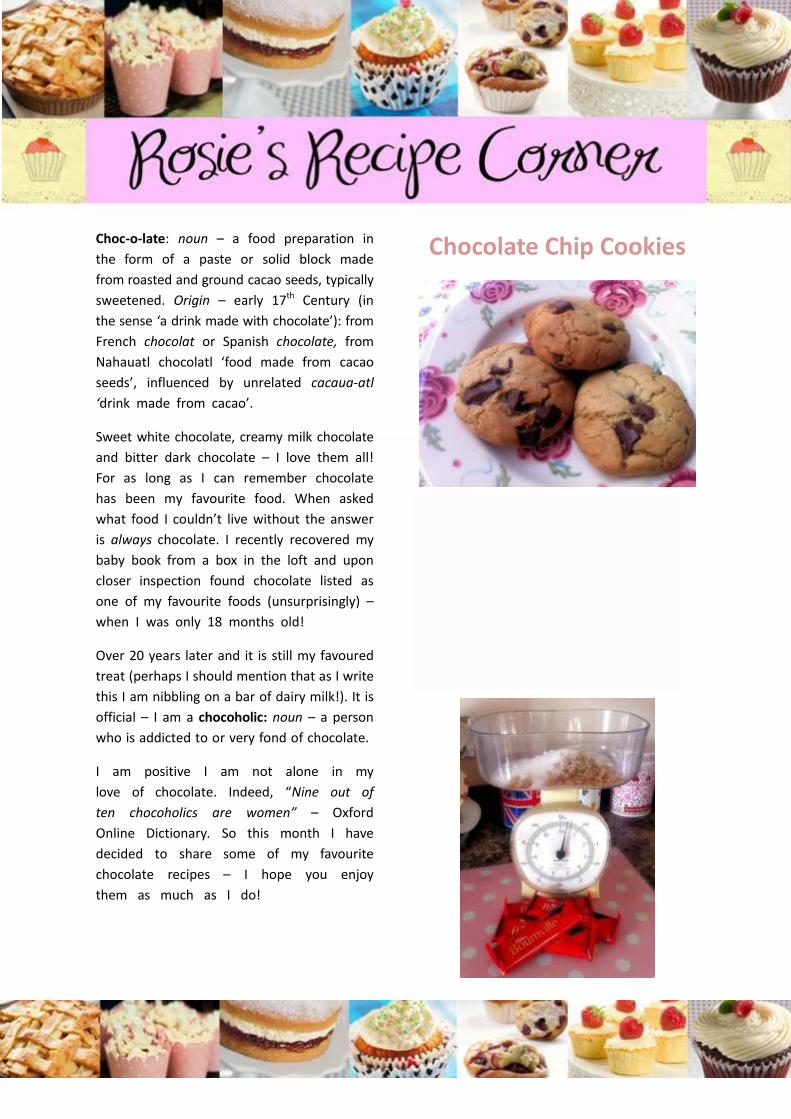
Choc-o-late: noun – a food preparation inthe form of a paste or solid block madefrom roasted and ground cacao seeds, typicallysweetened. Origin – early 17th Century (inthe sense ‘a drink made with chocolate’): fromFrench chocolat or Spanish chocolate, fromNahauatl chocolatl ‘food made from cacaoseeds’, influenced by unrelated cacaua-atl‘drink made from cacao’.
Sweet white chocolate, creamy milk chocolateand bitter dark chocolate – I love them all!For as long as I can remember chocolatehas been my favourite food. When askedwhat food I couldn’t live without the answeris always chocolate. I recently recovered mybaby book from a box in the loft and uponcloser inspection found chocolate listed asone of my favourite foods (unsurprisingly) –when I was only 18 months old!
Over 20 years later and it is still my favouredtreat (perhaps I should mention that as I writethis I am nibbling on a bar of dairy milk!). It isofficial – I am a chocoholic: noun – a personwho is addicted to or very fond of chocolate.
I am positive I am not alone in mylove of chocolate. Indeed, “Nine out often chocoholics are women” – OxfordOnline Dictionary. So this month I havedecided to share some of my favouritechocolate recipes – I hope you enjoythem as much as I do!
Chocolate Chip Cookies
Ingredients:
170g roughly chopped dark chocolate½ tsp of bicarbonate of soda1 egg240g plain flower75g granulated sugar75g light brown sugar ½tsp of vanilla extract120g butter

You will need:
Piece of plain fabric for embroidery 11” x 9”Scraps of fabric for appliqueEmbroidery floss in 3 colours to tone with your fabric choices plus very dark brown andsandy orange3 small buttons
Piece of ticking or deckchair strip fabric 12” x 10” (optional)
3 pieces of dotty fabric (or pattern of your choice) 1 piece 18” x 18” square, 2 pieces15” x 18”
18” cotton ribbon (optional)
1 cushion pad 18 x 18” square
Fabric spray adhesive or Bonadweb, whichever you prefer using. Air-fade or washable fabric markerPinking shears
19
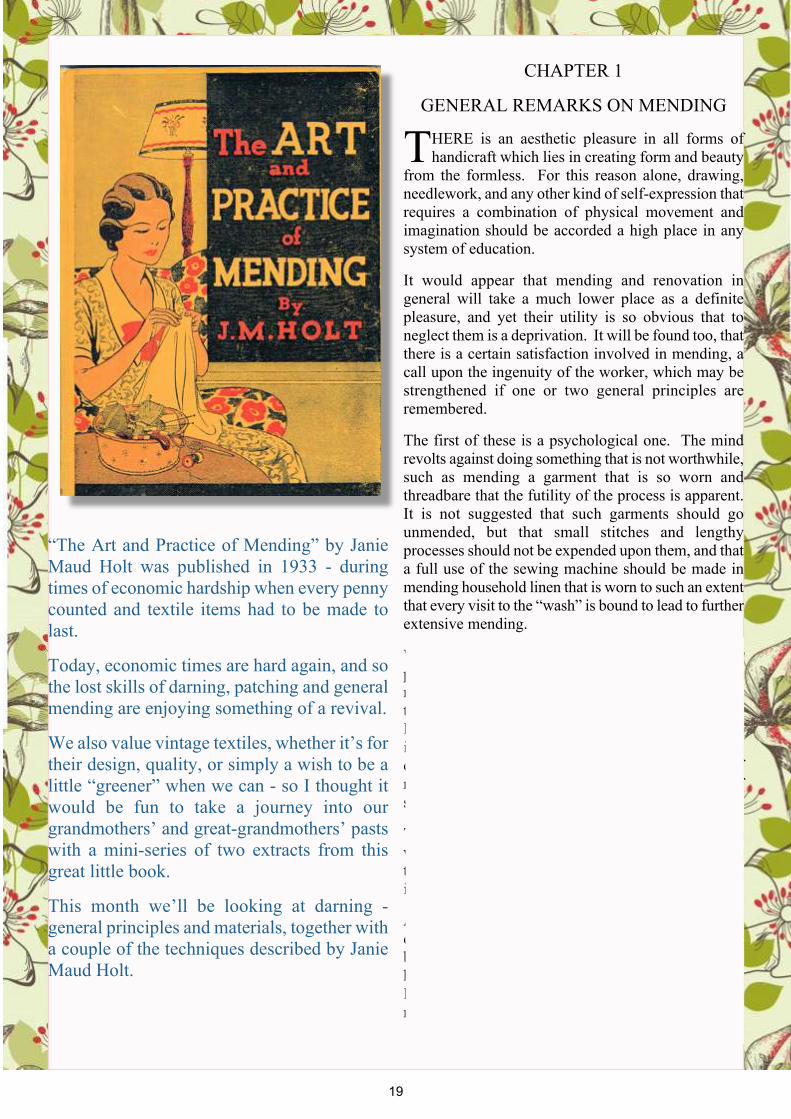
“The Art and Practice of Mending” by JanieMaud Holt was published in 1933 - duringtimes of economic hardship when every pennycounted and textile items had to be made tolast.
Today, economic times are hard again, and sothe lost skills of darning, patching and generalmending are enjoying something of a revival.
We also value vintage textiles, whether it’s fortheir design, quality, or simply a wish to be alittle “greener” when we can - so I thought itwould be fun to take a journey into ourgrandmothers’ and great-grandmothers’ pastswith a mini-series of two extracts from thisgreat little book.
This month we’ll be looking at darning -general principles and materials, together witha couple of the techniques described by JanieMaud Holt.
CHAPTER 1
GENERAL REMARKS ON MENDING
THERE is an aesthetic pleasure in all forms ofhandicraft which lies in creating form and beauty
from the formless. For this reason alone, drawing,needlework, and any other kind of self-expression thatrequires a combination of physical movement andimagination should be accorded a high place in anysystem of education.
It would appear that mending and renovation ingeneral will take a much lower place as a definitepleasure, and yet their utility is so obvious that toneglect them is a deprivation. It will be found too, thatthere is a certain satisfaction involved in mending, acall upon the ingenuity of the worker, which may bestrengthened if one or two general principles areremembered.
The first of these is a psychological one. The mindrevolts against doing something that is not worthwhile,such as mending a garment that is so worn andthreadbare that the futility of the process is apparent.It is not suggested that such garments should gounmended, but that small stitches and lengthyprocesses should not be expended upon them, and thata full use of the sewing machine should be made inmending household linen that is worn to such an extentthat every visit to the “wash” is bound to lead to furtherextensive mending.
Where garments are torn by accident, or where someparticular place suffers unusual wear or strain, themending should be done with great care and attentionto detail in order that the work may satisfactorilylengthen the life of the garment. In such a case thereis an artistic pleasure to be obtained fromcontemplating a successful piece of work, almost, ifnot quite, equal to that found in the creation ofsomething new.
The first requirements of good mending are @ that theworn part should be strengthened or replaced (b) thatthe mend, especially on garments, should be asinvisible as possible.
As a general rule, darning can be attempted at a muchearlier stage than patching when the garment firstbegins to show signs of wear. The housewife shouldkeep a watchful eye on undergarments and householdlinen and repair them before they require extensivemending.

20
VINTAGE SEAHORSE TRANSFERAnd, as the Great British Seaside issue comes to an end .. .I have one final pattern for you … a vintage
sea horse design. The original is enormous - about 18” long - here he’s smaller - but I do hope youlike him…

21
That’s all for this month folks - I do hope you’ve enjoyed this, theeighteenth issue of the Bustle & Sew magazine. Next month isSeptember - Season of Mists and Mellow Fruitfulness - and back toschool as well - so lots to look forward to next time!
Copyright © 2012 Bustle & Sew
The copyright of this magazine (including without limitation the text,artwork, photographs and images) is owned by Bustle & Sew. Youmay download and copy this magazine and the material in it andprint pages from it for your own personal and non-commercial use.You are not granted any other rights in relation to this publicationand the material within it. In other words, all other rights arereserved.
Haven’t subscribed yet? You can do so for just $5.50 per month- andyour magazine will be automatically delivered to your in-box onpublication day.
CLICK HERE to learn more and to subscribe to the magazine.
Buy your back issues from the Bustle & Sew website.
http://www.bustleandsew.com
And keep up to date with all the latest news from Devon, England onthe Bustle & Sew blog
http://www.bustleandsew.blogspot.com
62