isilon onefs cli administration guide · introduction to this guide 21 about this guide..... 22...
TRANSCRIPT

Isilon OneFSVersion 8.2.0
CLI Administration GuideJune 2019
Copyright © 2013-2019 Dell Inc. or its subsidiaries. All rights reserved.
Dell believes the information in this publication is accurate as of its publication date. The information is subject to change without notice.
THE INFORMATION IN THIS PUBLICATION IS PROVIDED “AS-IS.” DELL MAKES NO REPRESENTATIONS OR WARRANTIES OF ANY KIND
WITH RESPECT TO THE INFORMATION IN THIS PUBLICATION, AND SPECIFICALLY DISCLAIMS IMPLIED WARRANTIES OF
MERCHANTABILITY OR FITNESS FOR A PARTICULAR PURPOSE. USE, COPYING, AND DISTRIBUTION OF ANY DELL SOFTWARE DESCRIBED
IN THIS PUBLICATION REQUIRES AN APPLICABLE SOFTWARE LICENSE.
Dell Technologies, Dell, EMC, Dell EMC and other trademarks are trademarks of Dell Inc. or its subsidiaries. Other trademarks may be the property
of their respective owners. Published in the USA.
Dell EMCHopkinton, Massachusetts 01748-91031-508-435-1000 In North America 1-866-464-7381www.DellEMC.com
2 Isilon OneFS CLI Administration Guide

Introduction to this guide 21About this guide......................................................................................... 22Isilon scale-out NAS overview.................................................................... 22Where to go for support............................................................................. 22
Remote Support............................................................................ 23
Isilon scale-out NAS 25OneFS storage architecture....................................................................... 26Isilon node components.............................................................................. 26Internal and external networks....................................................................27Isilon cluster............................................................................................... 27
Cluster administration....................................................................27Quorum......................................................................................... 28Splitting and merging.....................................................................29Storage pools................................................................................ 29
The OneFS operating system..................................................................... 29Data-access protocols...................................................................30Identity management and access control.......................................30
Structure of the file system........................................................................ 31Data layout.....................................................................................31Writing files................................................................................... 32Reading files.................................................................................. 32Metadata layout.............................................................................32Locks and concurrency..................................................................33Striping..........................................................................................33
Data protection overview........................................................................... 33N+M data protection..................................................................... 34Data mirroring............................................................................... 35The file system journal...................................................................35Virtual hot spare (VHS)................................................................. 35Balancing protection with storage space....................................... 35
VMware integration....................................................................................36Software modules...................................................................................... 36
Introduction to the OneFS command-line interface 39OneFS command-line interface overview................................................... 40Syntax diagrams.........................................................................................40Universal options.........................................................................................41Command-line interface privileges..............................................................42SmartLock compliance command permissions............................................42OneFS time values......................................................................................44
General cluster administration 47General cluster administration overview..................................................... 48User interfaces........................................................................................... 48Connecting to the cluster...........................................................................49
Log in to the web administration interface.....................................49Open an SSH connection to a cluster............................................ 49
Chapter 1
Chapter 2
Chapter 3
Chapter 4
CONTENTS
Isilon OneFS CLI Administration Guide 3
Licensing.................................................................................................... 50Software licenses.......................................................................... 50Hardware tiers............................................................................... 51License status................................................................................ 51Adding and removing licenses........................................................52Activating trial licenses..................................................................54
Certificates................................................................................................ 54Replacing or renewing the TLS certificate.....................................54Verify an SSL certificate update....................................................59TLS certificate data example.........................................................59
Cluster identity...........................................................................................60Set the cluster name .................................................................... 60
Cluster contact information........................................................................ 61Cluster date and time..................................................................................61
Set the cluster date and time......................................................... 61Specify an NTP time server........................................................... 62
SMTP email settings.................................................................................. 63Configure SMTP email settings .................................................... 63View SMTP email settings............................................................. 63
Configuring the cluster join mode...............................................................64Specify the cluster join mode ........................................................64
File system settings....................................................................................64Specify the cluster character encoding......................................... 65Enable or disable access time tracking ......................................... 65
Security hardening..................................................................................... 66STIG hardening profile...................................................................66Apply a security hardening profile..................................................67Revert a security hardening profile................................................68View the security hardening status................................................69
Cluster monitoring......................................................................................69Monitor the cluster........................................................................ 70View node status........................................................................... 70
Monitoring cluster hardware.......................................................................70View node hardware status............................................................70Chassis and drive states................................................................. 71Check battery status..................................................................... 73SNMP monitoring.......................................................................... 73
Events and alerts........................................................................................ 77Events overview.............................................................................77Alerts overview.............................................................................. 78Channels overview.........................................................................78Event groups overview.................................................................. 78Viewing and modifying event groups..............................................78View an event.................................................................................81Managing alerts............................................................................. 82Managing channels........................................................................ 84Maintenance and testing............................................................... 86
Cluster maintenance...................................................................................88Replacing node components..........................................................88Upgrading node components......................................................... 88Automatic Replacement Recognition (ARR) for drives.................. 89Managing drive firmware............................................................... 90Managing cluster nodes.................................................................94Upgrading OneFS.......................................................................... 96
Remote support..........................................................................................97Configuring Secure Remote Services support............................... 97
Contents
4 Isilon OneFS CLI Administration Guide

Remote support scripts................................................................ 101Enable and configure Secure Remote Services support .............. 105Disable (E)SRS support................................................................107View (E)SRS configuration settings............................................. 107
Access zones 109Access zones overview ............................................................................. 110Base directory guidelines........................................................................... 110Access zones best practices.......................................................................111Access zones on a SyncIQ secondary cluster............................................ 112Access zone limits..................................................................................... 112Quality of service....................................................................................... 112Zone-based Role-based Access Control (zRBAC)..................................... 113
Non-System access zone privileges.............................................. 114Built-in roles in non-System zones................................................115
Zone-specific authentication providers......................................................115Managing access zones............................................................................. 116
Create an access zone.................................................................. 116Assign an overlapping base directory............................................ 116Manage authentication providers in an access zone......................117Associate an IP address pool with an access zone.........................117Modify an access zone..................................................................118Delete an access zone...................................................................118View a list of access zones............................................................118Create one or more access zones................................................. 119Create local users in an access zone............................................. 119Access files through the RESTful Access to Namespace (RAN) innon-System zones....................................................................... 120
Authentication 123Authentication overview............................................................................124Authentication provider features...............................................................124Security Identifier (SID) history overview................................................. 124Supported authentication providers.......................................................... 125Active Directory........................................................................................ 125LDAP.........................................................................................................126NIS............................................................................................................126Kerberos authentication............................................................................ 127
Keytabs and SPNs overview.........................................................128MIT Kerberos protocol support.................................................... 128
File provider.............................................................................................. 128Local provider........................................................................................... 129Multi-factor Authentication (MFA)........................................................... 129Multi-instance active directory................................................................. 129LDAP public keys...................................................................................... 130Managing Active Directory providers........................................................ 130
Configure an Active Directory provider........................................ 130Modify an Active Directory provider............................................. 131Delete an Active Directory provider.............................................. 131
Managing LDAP providers..........................................................................131Configure an LDAP provider..........................................................131Modify an LDAP provider............................................................. 132Delete an LDAP provider.............................................................. 132
Managing NIS providers............................................................................ 132
Chapter 5
Chapter 6
Contents
Isilon OneFS CLI Administration Guide 5

Configure an NIS provider............................................................ 133Modify an NIS provider................................................................ 133Delete an NIS provider................................................................. 133
Managing MIT Kerberos authentication.....................................................133Managing MIT Kerberos realms.................................................... 133Managing MIT Kerberos providers................................................136Managing MIT Kerberos domains................................................. 138Managing SPNs and keys............................................................. 140
Managing file providers............................................................................. 142Configure a file provider............................................................... 143Generate a password file.............................................................. 143Modify a file provider................................................................... 143Delete a file provider.................................................................... 144Password file format.................................................................... 144Group file format..........................................................................145Netgroup file format.....................................................................146
Managing local users and groups...............................................................146View a list of users and groups by provider...................................146Create a local user........................................................................147Create a local group..................................................................... 147Naming rules for local users and groups....................................... 147Configure or modify a local password policy.................................148Local password policy settings..................................................... 148Modify a local user....................................................................... 150Modify a local group.....................................................................150Delete a local user........................................................................ 150Delete a local group...................................................................... 151
SSH Authentication and Configuration...................................................... 151Pre-requisites for Multi-factor Authentication (MFA).................. 151SSH configuration using password............................................... 151SSH Configuration using public keys............................................ 152
Administrative roles and privileges 155Role-based access.................................................................................... 156Roles.........................................................................................................156
Custom roles................................................................................ 156Built-in roles................................................................................. 157
Privileges.................................................................................................. 160Supported OneFS privileges......................................................... 161Data backup and restore privileges...............................................164Command-line interface privileges............................................... 164
Managing roles..........................................................................................168View roles.....................................................................................168View privileges............................................................................. 168Create and modify a custom role..................................................169Delete a custom role.................................................................... 169Add a user to built-in roles............................................................170Create a new role and add a user..................................................172
Identity management 175Identity management overview................................................................. 176Identity types............................................................................................ 176Access tokens........................................................................................... 177Access token generation........................................................................... 178
Chapter 7
Chapter 8
Contents
6 Isilon OneFS CLI Administration Guide
ID mapping................................................................................... 178User mapping............................................................................... 180On-disk identity............................................................................182
Managing ID mappings.............................................................................. 183Create an identity mapping.......................................................... 184Modify an identity mapping.......................................................... 184Delete an identity mapping........................................................... 184View an identity mapping............................................................. 185Flush the identity mapping cache................................................. 185View a user token......................................................................... 186Configure identity mapping settings.............................................186View identity mapping settings.....................................................187
Managing user identities........................................................................... 187View user identity......................................................................... 187Create a user-mapping rule.......................................................... 189Merge Windows and UNIX tokens................................................ 190Retrieve the primary group from LDAP......................................... 191Mapping rule options.................................................................... 191Mapping rule operators................................................................ 192
Home directories 197Home directories overview........................................................................198Home directory permissions......................................................................198Authenticating SMB users........................................................................ 198Home directory creation through SMB..................................................... 198
Create home directories with expansion variables........................ 199Create home directories with the --inheritable-path-acl option...200Create special home directories with the SMB share %U variable....201
Home directory creation through SSH and FTP....................................... 202Set the SSH or FTP login shell ....................................................202Set SSH/FTP home directory permissions.................................. 203Set SSH/FTP home directory creation options........................... 204Provision home directories with dot files..................................... 205
Home directory creation in a mixed environment......................................205Interactions between ACLs and mode bits................................................206Default home directory settings in authentication providers.....................206Supported expansion variables................................................................. 207Domain variables in home directory provisioning...................................... 209
Data access control 211Data access control overview....................................................................212ACLs......................................................................................................... 212UNIX permissions......................................................................................213Mixed-permission environments................................................................213
NFS access of Windows-created files.......................................... 213SMB access of UNIX-created files............................................... 213
Managing access permissions................................................................... 214View expected user permissions...................................................214Configure access management settings....................................... 215Modify ACL policy settings...........................................................215Run the PermissionsRepair job..................................................... 216
File sharing 219
Chapter 9
Chapter 10
Chapter 11
Contents
Isilon OneFS CLI Administration Guide 7
File sharing overview................................................................................ 220Mixed protocol environments...................................................... 220Write caching with SmartCache...................................................221
SMB......................................................................................................... 222SMB shares in access zones........................................................ 223SMB Multichannel....................................................................... 223SMB share management through MMC.......................................225SMBv3 encryption.......................................................................226SMB server-side copy..................................................................227SMB continuous availability......................................................... 228SMB file filtering..........................................................................228Symbolic links and SMB clients....................................................229Anonymous access to SMB shares.............................................. 230Managing SMB settings............................................................... 231Managing SMB shares................................................................. 233
NFS.......................................................................................................... 240NFS exports................................................................................ 240NFS aliases...................................................................................241NFS log files.................................................................................241Managing the NFS service...........................................................242Managing NFS exports................................................................ 243Managing NFS aliases..................................................................246
FTP.......................................................................................................... 248View FTP settings........................................................................248Enable FTP file sharing................................................................ 249Configure FTP file sharing........................................................... 249
HTTP and HTTPS.....................................................................................250Enable and configure HTTP......................................................... 250Enable HTTPS through the Apache service................................. 250Disable HTTPS through the Apache service................................. 251
File filtering 253File filtering in an access zone.................................................................. 254Enable and configure file filtering in an access zone................................. 254Disable file filtering in an access zone.......................................................254View file filtering settings......................................................................... 255
Auditing and logging 257Auditing overview.....................................................................................258Syslog...................................................................................................... 258
Syslog forwarding........................................................................259Protocol audit events............................................................................... 259Supported audit tools............................................................................... 259Delivering protocol audit events to multiple CEE servers..........................260Supported event types............................................................................. 260Sample audit log........................................................................................261Managing audit settings........................................................................... 262
Enable protocol access auditing...................................................262Forward protocol access events to syslog .................................. 263Enable system configuration auditing.......................................... 264Set the audit hostname............................................................... 264Configure protocol audited zones................................................265Forward system configuration changes to syslog........................ 265Configure protocol event filters...................................................265
Chapter 12
Chapter 13
Contents
8 Isilon OneFS CLI Administration Guide

Integrating with the Common Event Enabler............................................ 266Install CEE for Windows.............................................................. 266Configure CEE for Windows........................................................ 267Configure CEE servers to deliver protocol audit events...............268
Tracking the delivery of protocol audit events..........................................268View the time stamps of delivery of events to the CEE server andsyslog.......................................................................................... 268Display a global view of delivery of protocol audit events to the CEEserver and syslog.........................................................................269Move the log position of the CEE forwarder................................269View the rate of delivery of protocol audit events to the CEE server.................................................................................................... 270
Snapshots 271Snapshots overview..................................................................................272Data protection with SnapshotIQ..............................................................272Snapshot disk-space usage.......................................................................272Snapshot schedules..................................................................................273Snapshot aliases....................................................................................... 273File and directory restoration....................................................................273Best practices for creating snapshots.......................................................274Best practices for creating snapshot schedules........................................274File clones.................................................................................................275
Shadow-store considerations...................................................... 276Snapshot locks......................................................................................... 276Snapshot reserve......................................................................................277SnapshotIQ license functionality...............................................................277Creating snapshots with SnapshotIQ........................................................ 277
Create a SnapRevert domain....................................................... 278Create a snapshot schedule......................................................... 278Create a snapshot........................................................................278Snapshot naming patterns........................................................... 279
Managing snapshots ................................................................................282Reducing snapshot disk-space usage...........................................282Delete a snapshot........................................................................ 282Modify snapshot attributes..........................................................283Modify a snapshot alias ...............................................................283View snapshots............................................................................283Snapshot information.................................................................. 284
Restoring snapshot data...........................................................................285Revert a snapshot .......................................................................285Restore a file or directory using Windows Explorer......................285Restore a file or directory through a UNIX command line............ 286Clone a file from a snapshot........................................................ 286
Managing snapshot schedules.................................................................. 287Modify a snapshot schedule ........................................................287Delete a snapshot schedule .........................................................287View snapshot schedules ............................................................ 288
Managing snapshot aliases....................................................................... 288Configure a snapshot alias for a snapshot schedule.....................288Assign a snapshot alias to a snapshot.......................................... 289Reassign a snapshot alias to the live file system.......................... 289View snapshot aliases.................................................................. 289Snapshot alias information...........................................................290
Managing with snapshot locks..................................................................290
Chapter 14
Contents
Isilon OneFS CLI Administration Guide 9
Create a snapshot lock................................................................ 290Modify a snapshot lock expiration date........................................ 291Delete a snapshot lock................................................................. 291Snapshot lock information........................................................... 292
Configure SnapshotIQ settings ................................................................292SnapshotIQ settings ................................................................... 293
Set the snapshot reserve..........................................................................294Managing changelists............................................................................... 294
Create a changelist......................................................................294Delete a changelist...................................................................... 295View a changelist.........................................................................295Changelist information.................................................................295
Deduplication with SmartDedupe 297Deduplication overview.............................................................................298Deduplication jobs.................................................................................... 298Data replication and backup with deduplication........................................ 299Snapshots with deduplication...................................................................299Deduplication considerations....................................................................300Shadow-store considerations................................................................... 300SmartDedupe license functionality............................................................301Managing deduplication............................................................................ 301
Assess deduplication space savings .............................................301Specify deduplication settings .................................................... 302View deduplication space savings ............................................... 302View a deduplication report ........................................................ 303Deduplication job report information............................................303Deduplication information............................................................304
Data replication with SyncIQ 307SyncIQ data replication overview............................................................. 308Replication policies and jobs..................................................................... 308
Automated replication policies.....................................................309Source and target cluster association.......................................... 310Configuring SyncIQ source and target clusters with NAT............. 311Full and differential replication..................................................... 312Controlling replication job resource consumption......................... 312Replication policy priority............................................................. 313Replication reports....................................................................... 313
Replication snapshots............................................................................... 313Source cluster snapshots............................................................. 313Target cluster snapshots..............................................................314
Data failover and failback with SyncIQ...................................................... 314Data failover.................................................................................315Data failback................................................................................ 315SmartLock compliance mode failover and failback....................... 316SmartLock replication limitations................................................. 316
Recovery times and objectives for SyncIQ................................................ 318RPO Alerts................................................................................... 318
Replication policy priority..........................................................................319SyncIQ license functionality...................................................................... 319Creating replication policies...................................................................... 319
Excluding directories in replication............................................... 319Excluding files in replication.........................................................320
Chapter 15
Chapter 16
Contents
10 Isilon OneFS CLI Administration Guide
File criteria options...................................................................... 320Configure default replication policy settings ............................... 322Create a replication policy........................................................... 323Create a SyncIQ domain.............................................................. 324Assess a replication policy .......................................................... 324
Managing replication to remote clusters...................................................324Start a replication job.................................................................. 325Pause a replication job ................................................................ 325Resume a replication job ............................................................. 325Cancel a replication job ...............................................................325View active replication jobs .........................................................326Replication job information ......................................................... 326
Initiating data failover and failback with SyncIQ....................................... 327Fail over data to a secondary cluster ...........................................327Revert a failover operation.......................................................... 328Fail back data to a primary cluster .............................................. 328Run the ComplianceStoreDelete job in a Smartlock compliancemode domain............................................................................... 330
Performing disaster recovery for older SmartLock directories................. 330Recover SmartLock compliance directories on a target cluster .. 330Migrate SmartLock compliance directories ................................. 331
Managing replication policies....................................................................332Modify a replication policy .......................................................... 332Delete a replication policy ........................................................... 333Enable or disable a replication policy ...........................................334View replication policies ..............................................................334Replication policy information .....................................................335
Managing replication to the local cluster.................................................. 335Cancel replication to the local cluster ......................................... 336Break local target association ..................................................... 336View replication policies targeting the local cluster......................336Remote replication policy information .........................................337
Managing replication performance rules................................................... 337Create a network traffic rule .......................................................337Create a file operations rule ........................................................338Modify a performance rule ..........................................................338Delete a performance rule ...........................................................338Enable or disable a performance rule .......................................... 339View performance rules .............................................................. 339
Managing replication reports.................................................................... 340Configure default replication report settings .............................. 340Delete replication reports............................................................ 340View replication reports ..............................................................340Replication report information..................................................... 342
Managing failed replication jobs................................................................342Resolve a replication policy .........................................................343Reset a replication policy ............................................................ 343Perform a full or differential replication....................................... 343
Data Encryption with SyncIQ 345SyncIQ data encryption overview............................................................. 346SyncIQ traffic encryption......................................................................... 346
Configure certificates..................................................................346Create encrypted SyncIQ policies................................................348
Per-policy throttling overview.................................................................. 348
Chapter 17
Contents
Isilon OneFS CLI Administration Guide 11
Create a bandwidth rule...............................................................348Troubleshooting SyncIQ encryption..........................................................348
Data layout with FlexProtect 351FlexProtect overview............................................................................... 352File striping...............................................................................................352Requested data protection....................................................................... 352FlexProtect data recovery........................................................................353
Smartfail......................................................................................353Node failures............................................................................... 354
Requesting data protection...................................................................... 354Requested protection settings................................................................. 355Requested protection disk space usage....................................................356
Administering NDMP 359NDMP backup and recovery overview......................................................360NDMP two-way backup........................................................................... 360NDMP three-way backup..........................................................................361Supportability of NDMP sessions on 6th Generation hardware................. 361Setting preferred IPs for NDMP three-way operations............................. 361NDMP multi-stream backup and recovery.................................................361Snapshot-based incremental backups...................................................... 362NDMP backup and restore of SmartLink files........................................... 363NDMP protocol support........................................................................... 364Supported DMAs......................................................................................365NDMP hardware support..........................................................................365NDMP backup limitations......................................................................... 365NDMP performance recommendations.....................................................366Excluding files and directories from NDMP backups.................................367Configuring basic NDMP backup settings.................................................368
Configure and enable NDMP backup........................................... 368Disable NDMP backup ................................................................ 369NDMP backup settings ...............................................................369View NDMP backup settings ...................................................... 369
Managing NDMP user accounts............................................................... 369Create an NDMP user account ................................................... 370Modify the password of an NDMP user account .........................370Delete an NDMP user account ....................................................370View NDMP user accounts ......................................................... 370
Managing NDMP backup devices.............................................................. 371Detect NDMP backup devices ..................................................... 371Modify an NDMP backup device entry name ............................... 371Delete a device entry for a disconnected NDMP backup device... 371View NDMP backup devices ....................................................... 372
Managing NDMP Fibre Channel ports.......................................................372Modify NDMP backup port settings ............................................372Enable or disable an NDMP backup port...................................... 372View NDMP backup ports ........................................................... 373NDMP backup port settings ........................................................373
Managing NDMP preferred IP settings..................................................... 374Create an NDMP preferred IP setting..........................................374Modify an NDMP preferred IP setting......................................... 374List NDMP preferred IP settings..................................................375View NDMP preferred IP settings................................................375
Chapter 18
Chapter 19
Contents
12 Isilon OneFS CLI Administration Guide

Delete NDMP preferred IP settings............................................. 375Managing NDMP sessions........................................................................ 375
End an NDMP session .................................................................375View NDMP sessions .................................................................. 376NDMP session information ..........................................................376
Managing NDMP restartable backups.......................................................378Configure NDMP restartable backups for NetWorker..................378View NDMP restartable backup contexts.................................... 379Delete an NDMP restartable backup context...............................379Configure NDMP restartable backup settings..............................379View NDMP restartable backup settings..................................... 380
NDMP restore operations.........................................................................380NDMP parallel restore operation................................................. 380NDMP serial restore operation.................................................... 380Specify a NDMP serial restore operation.....................................380
Managing default NDMP variables............................................................ 381Specify the default NDMP variable settings for a path.................381Modify the default NDMP variable settings for a path..................381View the default NDMP settings for a path................................. 382NDMP environment variables...................................................... 382Setting environment variables for backup and restore operations388
Managing snapshot based incremental backups....................................... 389Enable snapshot-based incremental backups for a directory....... 389Delete snapshots for snapshot-based incremental backups.........389View snapshots for snapshot-based incremental backups........... 390
Managing cluster performance for NDMP sessions.................................. 390Enable NDMP Redirector to manage cluster performance.......... 390
Managing CPU usage for NDMP sessions................................................. 391Enable NDMP Throttler................................................................391
View NDMP backup logs .......................................................................... 391
File retention with SmartLock 393SmartLock overview.................................................................................394Compliance mode..................................................................................... 394Enterprise mode....................................................................................... 394SmartLock directories.............................................................................. 395Replication and backup with SmartLock...................................................395SmartLock license functionality................................................................396SmartLock considerations........................................................................ 396Delete WORM domain and directories...................................................... 397Set the compliance clock..........................................................................398View the compliance clock....................................................................... 398Creating a SmartLock directory................................................................398
Retention periods........................................................................ 398Autocommit time periods.............................................................399Create an enterprise directory for a non-empty directory........... 399Create a SmartLock directory..................................................... 400
Managing SmartLock directories..............................................................400Modify a SmartLock directory..................................................... 400Exclude a SmartLock directory.................................................... 401Delete a SmartLock directory.......................................................401View SmartLock directory settings..............................................402SmartLock directory configuration settings.................................402
Managing files in SmartLock directories...................................................405Set a retention period through a UNIX command line.................. 406
Chapter 20
Contents
Isilon OneFS CLI Administration Guide 13

Set a retention period through Windows Powershell................... 406Commit a file to a WORM state through a UNIX command line... 407Commit a file to a WORM state through Windows Explorer.........407Override the retention period for all files in a SmartLock directory....407Delete a file committed to a WORM state .................................. 408View WORM status of a file.........................................................408
Protection domains 411Protection domains overview.................................................................... 412Protection domain considerations............................................................. 412Create a protection domain ......................................................................413Delete a protection domain ...................................................................... 413
Data-at-rest-encryption 415Data-at-rest encryption overview............................................................. 416Self-encrypting drives...............................................................................416Data security on self-encrypting drives.....................................................416Data migration to a cluster with self-encrypting drives............................. 417Chassis and drive states............................................................................ 417Smartfailed drive REPLACE state............................................................. 419Smartfailed drive ERASE state................................................................. 420
SmartQuotas 423SmartQuotas overview............................................................................. 424Quota types..............................................................................................424Default quota type....................................................................................425Usage accounting and limits..................................................................... 427Disk-usage calculations............................................................................ 429Quota notifications................................................................................... 430Quota notification rules.............................................................................431Quota reports............................................................................................431Creating quotas........................................................................................ 432
Create an accounting quota.........................................................432Create an enforcement quota...................................................... 432
Managing quotas...................................................................................... 433Search for quotas........................................................................ 433Manage quotas............................................................................ 433Export a quota configuration file..................................................434Import a quota configuration file..................................................435Managing quota notifications.......................................................435Email quota notification messages............................................... 437Managing quota reports...............................................................440Basic quota settings..................................................................... 441Advisory limit quota notification rules settings.............................442Soft limit quota notification rules settings................................... 443Hard limit quota notification rules settings.................................. 445Limit notification settings............................................................ 446Quota report settings.................................................................. 446
Storage Pools 449Storage pools overview............................................................................ 450Storage pool functions............................................................................. 450
Chapter 21
Chapter 22
Chapter 23
Chapter 24
Contents
14 Isilon OneFS CLI Administration Guide

Autoprovisioning.......................................................................................452Node pools............................................................................................... 453
Node class compatibilities............................................................453SSD compatibilities......................................................................454Manual node pools.......................................................................455
Virtual hot spare.......................................................................................455Spillover................................................................................................... 456Suggested protection...............................................................................456Protection policies....................................................................................456SSD strategies..........................................................................................457Other SSD mirror settings........................................................................458Global namespace acceleration................................................................ 458L3 cache overview....................................................................................459
Migration to L3 cache..................................................................460L3 cache on archive-class node pools..........................................460
Tiers..........................................................................................................461File pool policies........................................................................................ 461
FilePolicy job............................................................................... 462Managing node pools through the command-line interface...................... 462
Create a node class compatibility................................................ 463Merge compatible node pools...................................................... 464Delete a node class compatibility................................................. 464Create an SSD compatibility........................................................465Delete an SSD compatibility........................................................ 466Create a node pool manually........................................................ 467Add a node to a manually managed node pool..............................467Change the name or protection policy of a node pool.................. 467Remove a node from a manually managed node pool................... 468Modify default storage pool settings........................................... 468SmartPools settings.................................................................... 469
Managing L3 cache from the command-line interface.............................. 472Set L3 cache as the default for new node pools...........................472Enable L3 cache on a specific node pool ..................................... 472Restore SSDs to storage drives for a node pool...........................473
Managing tiers..........................................................................................473Create a tier.................................................................................473Add or move node pools in a tier.................................................. 473Rename a tier...............................................................................474Delete a tier................................................................................. 474
Creating file pool policies..........................................................................474Create a file pool policy................................................................475Valid wildcard characters.............................................................475Default file pool requested protection settings............................ 476Default file pool I/O optimization settings....................................477
Managing file pool policies........................................................................ 478Modify a file pool policy............................................................... 478Configure default file pool policy settings.................................... 479Prioritize a file pool policy............................................................480Delete a file pool policy................................................................480
Monitoring storage pools.......................................................................... 481Monitor storage pools.................................................................. 481View the health of storage pools.................................................. 481View results of a SmartPools job................................................. 482
System jobs 483Chapter 25
Contents
Isilon OneFS CLI Administration Guide 15

System jobs overview...............................................................................484System jobs library................................................................................... 484Job operation............................................................................................487Job performance impact...........................................................................488Job priorities............................................................................................ 489Managing system jobs.............................................................................. 489
Start a job....................................................................................489Pause a job.................................................................................. 490Modify a job.................................................................................490Resume a job................................................................................491Cancel a job..................................................................................491Modify job type settings.............................................................. 492View active jobs...........................................................................492View job history........................................................................... 493
Managing impact policies......................................................................... 493Create an impact policy............................................................... 494View impact policy settings......................................................... 494Modify an impact policy...............................................................495Delete an impact policy................................................................495
Viewing job reports and statistics.............................................................496View statistics for a job in progress............................................. 496View a report for a completed job................................................ 497
Small Files Storage Efficiency for archive workloads 499Overview ................................................................................................. 500Requirements...........................................................................................500Upgrades and rollbacks............................................................................. 501Interoperability..........................................................................................501Managing Small Files Storage Efficiency.................................................. 502
Implementation overview ............................................................502Enable Small Files Storage Efficiency..........................................503View and configure global settings.............................................. 503Specify selection criteria for files to pack ...................................504Disable packing............................................................................506
Reporting features .................................................................................. 506Estimate possible storage savings............................................... 507View packing and unpacking activity by SmartPools jobs............ 508Monitor storage efficiency with FSAnalyze ................................ 509View ShadowStore information....................................................510Monitor storage efficiency on a small data set..............................511
File system structure................................................................................. 511Viewing file attributes.................................................................. 512
Defragmenter overview.............................................................................513Managing the defragmenter......................................................................513
Enable the defragmenter..............................................................513Configure the defragmenter ........................................................514Run the defragmenter ................................................................. 516View estimated storage savings before defragmenting ................517
CLI commands for Small Files Storage Efficiency..................................... 518isi_sfse_assess.............................................................................518isi_gconfig -t defrag-config.........................................................523isi_packing...................................................................................525isi_sstore .................................................................................... 528isi_sstore defrag .........................................................................532isi_storage_efficiency................................................................. 535
Chapter 26
Contents
16 Isilon OneFS CLI Administration Guide

Troubleshooting Small Files Storage Efficiency ....................................... 536Log files.......................................................................................536Fragmentation issues...................................................................536
Networking 539Networking overview................................................................................540About the internal network.......................................................................540
Internal IP address ranges........................................................... 540Internal network failover.............................................................. 541
About the external network.......................................................................541Groupnets.................................................................................... 541Subnets....................................................................................... 542IP address pools.......................................................................... 543SmartConnect module.................................................................544Node provisioning rules................................................................547Routing options........................................................................... 547
Managing internal network settings..........................................................549Add or remove an internal IP address range.................................549Modify an internal network netmask............................................549Configure and enable internal network failover............................550Disable internal network failover.................................................. 551
Managing groupnets................................................................................. 551Create a groupnet........................................................................ 551Modify a groupnet....................................................................... 552Delete a groupnet........................................................................ 552View groupnets............................................................................553
Managing external network subnets.........................................................553Create a subnet........................................................................... 554Modify a subnet...........................................................................554Delete a subnet........................................................................... 555View subnets............................................................................... 555Configure a SmartConnect service IP address............................ 556Enable or disable VLAN tagging................................................... 557Add or remove a DSR address..................................................... 558
Managing IP address pools....................................................................... 558Create an IP address pool............................................................558Modify an IP address pool........................................................... 559Delete an IP address pool............................................................ 559View IP address pools..................................................................560Add or remove an IP address range..............................................561Configure IP address allocation.................................................... 561
Managing SmartConnect Settings............................................................562Configure a SmartConnect DNS zone......................................... 562Specify a SmartConnect service subnet......................................563Suspend or resume a node...........................................................564Configure a connection balancing policy......................................564Configure an IP failover policy..................................................... 565
Managing connection rebalancing............................................................ 566Configure an IP rebalance policy................................................. 566Manually rebalance IP addresses................................................. 566
Managing network interface members..................................................... 567Add or remove a network interface..............................................567Specify a link aggregation mode.................................................. 568View network interfaces..............................................................569
Managing node provisioning rules.............................................................570
Chapter 27
Contents
Isilon OneFS CLI Administration Guide 17
Create a node provisioning rule....................................................570Modify a node provisioning rule................................................... 570Delete a node provisioning rule.....................................................571View node provisioning rules........................................................ 571
Managing routing options......................................................................... 572Enable or disable source-based routing........................................572Add or remove a static route....................................................... 573
Managing DNS cache settings..................................................................574DNS cache settings..................................................................... 574
Antivirus 575Antivirus overview.................................................................................... 576On-access scanning..................................................................................576Antivirus policy scanning...........................................................................577Individual file scanning.............................................................................. 577WORM files and antivirus......................................................................... 577Antivirus scan reports...............................................................................577ICAP servers.............................................................................................578Antivirus threat responses........................................................................578Configuring global antivirus settings.........................................................579
Include specific files in antivirus scans ........................................ 579Configure on-access scanning settings ...................................... 580Configure antivirus threat response settings .............................. 580Configure antivirus report retention settings...............................580Enable or disable antivirus scanning............................................ 580
Managing ICAP servers.............................................................................581Add and connect to an ICAP server .............................................581Temporarily disconnect from an ICAP server .............................. 581Reconnect to an ICAP server ...................................................... 581Remove an ICAP server .............................................................. 582
Create an antivirus policy ........................................................................ 582Managing antivirus policies.......................................................................582
Modify an antivirus policy ........................................................... 582Delete an antivirus policy ............................................................ 582Enable or disable an antivirus policy ............................................583View antivirus policies .................................................................583
Managing antivirus scans......................................................................... 583Scan a file....................................................................................583Manually run an antivirus policy................................................... 583Stop a running antivirus scan.......................................................584
Managing antivirus threats....................................................................... 584Manually quarantine a file ........................................................... 584Rescan a file................................................................................ 584Remove a file from quarantine .................................................... 584Manually truncate a file............................................................... 585View threats ............................................................................... 585Antivirus threat information.........................................................585
Managing antivirus reports.......................................................................586View antivirus reports .................................................................586View antivirus events...................................................................586
VMware integration 587VMware integration overview...................................................................588VAAI......................................................................................................... 588
Chapter 28
Chapter 29
Contents
18 Isilon OneFS CLI Administration Guide

VASA........................................................................................................588Isilon VASA alarms.......................................................................588VASA storage capabilities............................................................589
Configuring VASA support........................................................................589Enable VASA............................................................................... 590Download the Isilon vendor provider certificate...........................590Create a self-signed certificate................................................... 590Add the Isilon vendor provider..................................................... 592
Disable or re-enable VASA........................................................................592Troubleshooting VASA storage display failures.........................................593
Contents
Isilon OneFS CLI Administration Guide 19

Contents
20 Isilon OneFS CLI Administration Guide
CHAPTER 1
Introduction to this guide
This section contains the following topics.
l About this guide................................................................................................. 22l Isilon scale-out NAS overview............................................................................ 22l Where to go for support.....................................................................................22
Isilon OneFS CLI Administration Guide 21

About this guideThis guide describes how the Isilon OneFS command-line interface provides access tocluster configuration, management, and monitoring functionality.
OneFS commands extend the standard UNIX command set. For an alphabetical listand description of all OneFS commands, see the OneFS CLI Command Reference.
Your suggestions help us to improve the accuracy, organization, and overall quality ofthe documentation. Send your feedback to https://www.research.net/s/isi-docfeedback. If you cannot provide feedback through the URL, send an email messageto [email protected].
Isilon scale-out NAS overviewThe Isilon scale-out NAS storage platform combines modular hardware with unifiedsoftware to harness unstructured data. Powered by the OneFS operating system, acluster delivers a scalable pool of storage with a global namespace.
The unified software platform provides centralized web-based and command-lineadministration to manage the following features:
l A cluster that runs a distributed file system
l Scale-out nodes that add capacity and performance
l Storage options that manage files and tiering
l Flexible data protection and high availability
l Software modules that control costs and optimize resources
Where to go for supportThis topic contains resources for getting answers to questions about Isilon products.
Online support l Live Chat
l Create a Service Request
For questions about accessing online support, send an email to [email protected].
Telephonesupport
l United States: 1-800-SVC-4EMC (1-800-782-4362)
l Canada: 1-800-543-4782
l Worldwide: 1-508-497-7901
l Local phone numbers for a specific country are available at DellEMC Customer Support Centers.
IsilonCommunityNetwork
The Isilon Community Network connects you to a central hub ofinformation and experts to help you maximize your current storagesolution. From this site, you can demonstrate Isilon products, askquestions, view technical videos, and get the latest Isilon productdocumentation.
Isilon Info Hubs For the list of Isilon info hubs, see the Isilon Info Hubs page on theIsilon Community Network. Use these info hubs to find product
Introduction to this guide
22 Isilon OneFS CLI Administration Guide

documentation, troubleshooting guides, videos, blogs, and otherinformation resources about the Isilon products and features you'reinterested in.
Remote Support
For information about remote support, see the OneFS 8.2.0 Web AdministrationGuide.
Introduction to this guide
Isilon OneFS CLI Administration Guide 23

Introduction to this guide
24 Isilon OneFS CLI Administration Guide

CHAPTER 2
Isilon scale-out NAS
This section contains the following topics:
l OneFS storage architecture...............................................................................26l Isilon node components......................................................................................26l Internal and external networks........................................................................... 27l Isilon cluster....................................................................................................... 27l The OneFS operating system.............................................................................29l Structure of the file system................................................................................ 31l Data protection overview................................................................................... 33l VMware integration........................................................................................... 36l Software modules.............................................................................................. 36
Isilon OneFS CLI Administration Guide 25

OneFS storage architectureIsilon takes a scale-out approach to storage by creating a cluster of nodes that runs adistributed file system. OneFS combines the three layers of storage architecture—filesystem, volume manager, and data protection—into a scale-out NAS cluster.
Each node adds resources to the cluster. Because each node contains globallycoherent RAM, as a cluster becomes larger, it becomes faster. Meanwhile, the filesystem expands dynamically and redistributes content, which eliminates the work ofpartitioning disks and creating volumes.
Nodes work as peers to spread data across the cluster. Segmenting and distributingdata—a process known as striping—not only protects data, but also enables a userconnecting to any node to take advantage of the entire cluster's performance.
OneFS uses distributed software to scale data across commodity hardware. Masterdevices do not control the cluster, and slave devices do not invoke dependencies.Each node helps to control data requests, boost performance, and expand clustercapacity.
Isilon node componentsAs a rack-mountable appliance, a pre-Generation 6 storage node includes thefollowing components in a 2U or 4U rack-mountable chassis with an LCD front panel:CPUs, RAM, NVRAM, network interfaces, InfiniBand adapters, disk controllers, andstorage media. An Isilon cluster is made up of three or more nodes, up to 144. The 4Uchassis is always used for Generation 6. There are four nodes in one 4U chassis inGeneration 6, therefore a quarter chassis makes up one node.
When you add a node to a pre-Generation 6 cluster, you increase the aggregate disk,cache, CPU, RAM, and network capacity. OneFS groups RAM into a single coherentcache so that a data request on a node benefits from data that is cached anywhere.NVRAM is grouped to write data with high throughput and to protect write operationsfrom power failures. As the cluster expands, spindles and CPU combine to increasethroughput, capacity, and input-output operations per second (IOPS). The minimumcluster for Generation 6 is four nodes and Generation 6 does not use NVRAM.Journals are stored in RAM and M.2 flash is used for a backup in case of node failure.
There are several types of nodes, all of which can be added to a cluster to balancecapacity and performance with throughput or IOPS:
Node Use Case
Gen-6 Hardware F800 All flash solution
Gen-6 Hardware H-Series l H600, performance spinning solution
l H500, performance capacity
l H400, capacity performance
Gen-6 Hardware A-Series l A200, active archive
l A2000, deep archive
S-Series IOPS-intensive applications
X-Series High-concurrency and throughput-drivenworkflows
Isilon scale-out NAS
26 Isilon OneFS CLI Administration Guide

Node Use Case
NL-Series Near-primary accessibility, with near-tapevalue
HD-Series Maximum capacity
The following Dell EMC Isilon nodes improve performance:
Node Function
A-Series Performance Accelerator Independent scaling for high performance
A-Series Backup Accelerator High-speed and scalable backup-and-restoresolution for tape drives over Fibre Channelconnections
Internal and external networksA cluster includes two networks: an internal network to exchange data between nodesand an external network to handle client connections.
Nodes exchange data through the internal network with a proprietary, unicastprotocol over InfiniBand. Each node includes redundant InfiniBand ports for a secondinternal network in case the first one fails.
Clients reach the cluster with 1 GigE or 10 GigE Ethernet. Since every node includesEthernet ports, the cluster bandwidth scales with performance and capacity nodes areadded.
CAUTION Only Isilon nodes should be connected to the InfiniBand switch.Information that is exchanged on the back-end network is not encrypted.Connecting anything other than Isilon nodes to the InfiniBand switch creates asecurity risk.
Isilon clusterAn Isilon cluster consists of three or more hardware nodes, up to 144. Each node runsthe Isilon OneFS operating system, the distributed file-system software that unitesthe nodes into a cluster. The storage capacity of a cluster ranges from a minimum of18 TB to a maximum of 50 PB.
Cluster administrationOneFS centralizes cluster management through a web administration interface and acommand-line interface. Both interfaces provide methods to activate licenses, checkthe status of nodes, configure the cluster, upgrade the system, generate alerts, viewclient connections, track performance, and change various settings.
In addition, OneFS simplifies administration by automating maintenance with a JobEngine. You can schedule jobs that scan for viruses, inspect disks for errors, reclaimdisk space, and check the integrity of the file system. The engine manages the jobs tominimize impact on the cluster's performance.
With SNMP versions 2c and 3, you can remotely monitor hardware components, CPUusage, switches, and network interfaces. Dell EMC Isilon supplies managementinformation bases (MIBs) and traps for the OneFS operating system.
Isilon scale-out NAS
Isilon OneFS CLI Administration Guide 27
OneFS also includes an application programming interface (API) that is divided intotwo functional areas: One area enables cluster configuration, management, andmonitoring functionality, and the other area enables operations on files and directorieson the cluster. You can send requests to the OneFS API through a RepresentationalState Transfer (REST) interface, which is accessed through resource URIs andstandard HTTP methods. The API integrates with OneFS role-based access control(RBAC) to increase security. See the Isilon Platform API Reference.
QuorumAn Isilon cluster must have a quorum to work correctly. A quorum prevents dataconflicts—for example, conflicting versions of the same file—in case two groups ofnodes become unsynchronized. If a cluster loses its quorum for read and writerequests, you cannot access the OneFS file system.
For a quorum, more than half the nodes must be available over the internal network. Aseven-node cluster, for example, requires a four-node quorum. A 10-node clusterrequires a six-node quorum. If a node is unreachable over the internal network, OneFSseparates the node from the cluster, an action referred to as splitting. After a clusteris split, cluster operations continue as long as enough nodes remain connected to havea quorum.
In a split cluster, the nodes that remain in the cluster are referred to as the majoritygroup. Nodes that are split from the cluster are referred to as the minority group.
When split nodes can reconnect with the cluster and re-synchronize with the othernodes, the nodes rejoin the cluster's majority group, an action referred to as merging.
A OneFS cluster contains two quorum properties:
l read quorum (efs.gmp.has_quorum)
l write quorum (efs.gmp.has_super_block_quorum)
By connecting to a node with SSH and running the sysctl command-line tool asroot, you can view the status of both types of quorum. Here is an example for acluster that has a quorum for both read and write operations, as the command outputindicates with a 1, for true:
sysctl efs.gmp.has_quorum efs.gmp.has_quorum: 1 sysctl efs.gmp.has_super_block_quorum efs.gmp.has_super_block_quorum: 1
The degraded states of nodes—such as smartfail, read-only, offline—effect quorumin different ways. A node in a smartfail or read-only state affects only write quorum. Anode in an offline state, however, affects both read and write quorum. In a cluster, thecombination of nodes in different degraded states determines whether read requests,write requests, or both work.
A cluster can lose write quorum but keep read quorum. Consider a four-node cluster inwhich nodes 1 and 2 are working normally. Node 3 is in a read-only state, and node 4 isin a smartfail state. In such a case, read requests to the cluster succeed. Writerequests, however, receive an input-output error because the states of nodes 3 and 4break the write quorum.
A cluster can also lose both its read and write quorum. If nodes 3 and 4 in a four-nodecluster are in an offline state, both write requests and read requests receive an input-output error, and you cannot access the file system. When OneFS can reconnect withthe nodes, OneFS merges them back into the cluster. Unlike a RAID system, an Isilonnode can rejoin the cluster without being rebuilt and reconfigured.
Isilon scale-out NAS
28 Isilon OneFS CLI Administration Guide

Splitting and mergingSplitting and merging optimize the use of nodes without your intervention.
OneFS monitors every node in a cluster. If a node is unreachable over the internalnetwork, OneFS separates the node from the cluster, an action referred to assplitting. When the cluster can reconnect to the node, OneFS adds the node back intothe cluster, an action referred to as merging.
When a node is split from a cluster, it will continue to capture event informationlocally. You can connect to a split node with SSH and run the isi event eventslist command to view the local event log for the node. The local event log can helpyou troubleshoot the connection issue that resulted in the split. When the split noderejoins the cluster, local events gathered during the split are deleted. You can still viewevents generated by a split node in the node's event log file located at /var/log/isi_celog_events.log.
If a cluster splits during a write operation, OneFS might need to reallocate blocks forthe file on the side with the quorum, which leads allocated blocks on the side without aquorum to become orphans. When the split nodes reconnect with the cluster, theOneFS Collect system job reclaims the orphaned blocks.
Meanwhile, as nodes split and merge with the cluster, the OneFS AutoBalance jobredistributes data evenly among the nodes in the cluster, optimizing protection andconserving space.
Storage poolsStorage pools segment nodes and files into logical divisions to simplify themanagement and storage of data.
A storage pool comprises node pools and tiers. Node pools group equivalent nodes toprotect data and ensure reliability. Tiers combine node pools to optimize storage byneed, such as a frequently used high-speed tier or a rarely accessed archive.
The SmartPools module groups nodes and files into pools. If you do not activate aSmartPools license, the module provisions node pools and creates one file pool. If youactivate the SmartPools license, you receive more features. You can, for example,create multiple file pools and govern them with policies. The policies move files,directories, and file pools among node pools or tiers. You can also define how OneFShandles write operations when a node pool or tier is full. SmartPools reserves a virtualhot spare to reprotect data if a drive fails regardless of whether the SmartPoolslicense is activated.
The OneFS operating systemA distributed operating system based on FreeBSD, OneFS presents an Isilon cluster'sfile system as a single share or export with a central point of administration.
The OneFS operating system does the following:
l Supports common data-access protocols, such as SMB and NFS.
l Connects to multiple identity management systems, such as Active Directory andLDAP.
l Authenticates users and groups.
l Controls access to directories and files.
Isilon scale-out NAS
Isilon OneFS CLI Administration Guide 29

Data-access protocolsWith the OneFS operating system, you can access data with multiple file-sharing andtransfer protocols. As a result, Microsoft Windows, UNIX, Linux, and Mac OS X clientscan share the same directories and files.
OneFS supports the following protocols:
SMB
The Server Message Block (SMB) protocol enables Windows users to access thecluster. OneFS works with SMB 1, SMB 2, and SMB 2.1, as well as SMB 3.0 forMultichannel only. With SMB 2.1, OneFS supports client opportunity locks(oplocks) and large (1 MB) MTU sizes. The default file share is /ifs.
NFS
The Network File System (NFS) protocol enables UNIX, Linux, and Mac OS Xsystems to remotely mount any subdirectory, including subdirectories created byWindows users. OneFS works with NFS versions 3 and 4. The default export is /ifs.
HDFS
The Hadoop Distributed File System (HDFS) protocol enables a cluster to workwith Apache Hadoop, a framework for data-intensive distributed applications.HDFS integration requires you to activate a separate license.
FTP
FTP allows systems with an FTP client to connect to the cluster and exchangefiles.
HTTP and HTTPS
HTTP and its secure variant, HTTPS, give systems browser-based access toresources. OneFS includes limited support for WebDAV.
Swift
Swift enables you to access file-based data stored on your Dell EMC Isilon clusteras objects. The Swift API is implemented as a set of Representational StateTransfer (REST) web services over HTTP or secure HTTP (HTTPS). Content andmetadata can be ingested as objects and concurrently accessed through othersupported Dell EMC Isilon protocols. For more information, see the Isilon SwiftTechnical Note.
Identity management and access controlOneFS works with multiple identity management systems to authenticate users andcontrol access to files. In addition, OneFS features access zones that allow users fromdifferent directory services to access different resources based on their IP address.Meanwhile, role-based access control (RBAC) segments administrative access by role.
OneFS authenticates users with the following identity management systems:
l Microsoft Active Directory (AD)
l Lightweight Directory Access Protocol (LDAP)
l Network Information Service (NIS)
l Local users and local groups
Isilon scale-out NAS
30 Isilon OneFS CLI Administration Guide
l A file provider for accounts in /etc/spwd.db and /etc/group files. With thefile provider, you can add an authoritative third-party source of user and groupinformation.
You can manage users with different identity management systems; OneFS maps theaccounts so that Windows and UNIX identities can coexist. A Windows user accountmanaged in Active Directory, for example, is mapped to a corresponding UNIX accountin NIS or LDAP.
To control access, an Isilon cluster works with both the access control lists (ACLs) ofWindows systems and the POSIX mode bits of UNIX systems. When OneFS musttransform a file's permissions from ACLs to mode bits or from mode bits to ACLs,OneFS merges the permissions to maintain consistent security settings.
OneFS presents protocol-specific views of permissions so that NFS exports displaymode bits and SMB shares show ACLs. You can, however, manage not only mode bitsbut also ACLs with standard UNIX tools, such as the chmod and chown commands. Inaddition, ACL policies enable you to configure how OneFS manages permissions fornetworks that mix Windows and UNIX systems.
Access zones
OneFS includes an access zones feature. Access zones allow users from differentauthentication providers, such as two untrusted Active Directory domains, toaccess different OneFS resources based on an incoming IP address. An accesszone can contain multiple authentication providers and SMB namespaces.
RBAC for administration
OneFS includes role-based access control for administration. In place of a root oradministrator account, RBAC lets you manage administrative access by role. Arole limits privileges to an area of administration. For example, you can createseparate administrator roles for security, auditing, storage, and backup.
Structure of the file systemOneFS presents all the nodes in a cluster as a global namespace—that is, as thedefault file share, /ifs.
In the file system, directories are inode number links. An inode contains file metadataand an inode number, which identifies a file's location. OneFS dynamically allocatesinodes, and there is no limit on the number of inodes.
To distribute data among nodes, OneFS sends messages with a globally routable blockaddress through the cluster's internal network. The block address identifies the nodeand the drive storing the block of data.
Note: We recommend that you do not save data to the root /ifs file path but indirectories below /ifs. The design of your data storage structure should beplanned carefully. A well-designed directory optimizes cluster performance andcluster administration.
Data layoutOneFS evenly distributes data among a cluster's nodes with layout algorithms thatmaximize storage efficiency and performance. The system continuously reallocatesdata to conserve space.
OneFS breaks data down into smaller sections called blocks, and then the systemplaces the blocks in a stripe unit. By referencing either file data or erasure codes, a
Isilon scale-out NAS
Isilon OneFS CLI Administration Guide 31

stripe unit helps safeguard a file from a hardware failure. The size of a stripe unitdepends on the file size, the number of nodes, and the protection setting. AfterOneFS divides the data into stripe units, OneFS allocates, or stripes, the stripe unitsacross nodes in the cluster.
When a client connects to a node, the client's read and write operations take place onmultiple nodes. For example, when a client connects to a node and requests a file, thenode retrieves the data from multiple nodes and rebuilds the file. You can optimizehow OneFS lays out data to match your dominant access pattern—concurrent,streaming, or random.
Writing filesOn a node, the input-output operations of the OneFS software stack split into twofunctional layers: A top layer, or initiator, and a bottom layer, or participant. In readand write operations, the initiator and the participant play different roles.
When a client writes a file to a node, the initiator on the node manages the layout ofthe file on the cluster. First, the initiator divides the file into blocks of 8 KB each.Second, the initiator places the blocks in one or more stripe units. At 128 KB, a stripeunit consists of 16 blocks. Third, the initiator spreads the stripe units across thecluster until they span a width of the cluster, creating a stripe. The width of the stripedepends on the number of nodes and the protection setting.
After dividing a file into stripe units, the initiator writes the data first to non-volatilerandom-access memory (NVRAM) and then to disk. NVRAM retains the informationwhen the power is off.
During the write transaction, NVRAM guards against failed nodes with journaling. If anode fails mid-transaction, the transaction restarts without the failed node. When thenode returns, it replays the journal from NVRAM to finish the transaction. The nodealso runs the AutoBalance job to check the file's on-disk striping. Meanwhile,uncommitted writes waiting in the cache are protected with mirroring. As a result,OneFS eliminates multiple points of failure.
Reading filesIn a read operation, a node acts as a manager to gather data from the other nodes andpresent it to the requesting client.
Because an Isilon cluster's coherent cache spans all the nodes, OneFS can storedifferent data in each node's RAM. By using the internal InfiniBand network, a nodecan retrieve file data from another node's cache faster than from its own local disk. Ifa read operation requests data that is cached on any node, OneFS pulls the cacheddata to serve it quickly.
In addition, for files with an access pattern of concurrent or streaming, OneFS pre-fetches in-demand data into a managing node's local cache to further improvesequential-read performance.
Metadata layoutOneFS protects metadata by spreading it across nodes and drives.
Metadata—which includes information about where a file is stored, how it isprotected, and who can access it—is stored in inodes and protected with locks in a B+tree, a standard structure for organizing data blocks in a file system to provide instantlookups. OneFS replicates file metadata across the cluster so that there is no singlepoint of failure.
Isilon scale-out NAS
32 Isilon OneFS CLI Administration Guide
Working together as peers, all the nodes help manage metadata access and locking. Ifa node detects an error in metadata, the node looks up the metadata in an alternatelocation and then corrects the error.
Locks and concurrencyOneFS includes a distributed lock manager that orchestrates locks on data across allthe nodes in a cluster.
The lock manager grants locks for the file system, byte ranges, and protocols,including SMB share-mode locks and NFS advisory locks. OneFS also supports SMBopportunistic locks.
Because OneFS distributes the lock manager across all the nodes, any node can act asa lock coordinator. When a thread from a node requests a lock, the lock manager'shashing algorithm typically assigns the coordinator role to a different node. Thecoordinator allocates a shared lock or an exclusive lock, depending on the type ofrequest. A shared lock allows users to share a file simultaneously, typically for readoperations. An exclusive lock allows only one user to access a file, typically for writeoperations.
StripingIn a process known as striping, OneFS segments files into units of data and thendistributes the units across nodes in a cluster. Striping protects your data andimproves cluster performance.
To distribute a file, OneFS reduces it to blocks of data, arranges the blocks into stripeunits, and then allocates the stripe units to nodes over the internal network.
At the same time, OneFS distributes erasure codes that protect the file. The erasurecodes encode the file's data in a distributed set of symbols, adding space-efficientredundancy. With only a part of the symbol set, OneFS can recover the original filedata.
Taken together, the data and its redundancy form a protection group for a region offile data. OneFS places the protection groups on different drives on different nodes—creating data stripes.
Because OneFS stripes data across nodes that work together as peers, a userconnecting to any node can take advantage of the entire cluster's performance.
By default, OneFS optimizes striping for concurrent access. If your dominant accesspattern is streaming—that is, lower concurrency, higher single-stream workloads,such as with video—you can change how OneFS lays out data to increase sequential-read performance. To better handle streaming access, OneFS stripes data acrossmore drives. Streaming is most effective on clusters or subpools serving large files.
Data protection overviewAn Isilon cluster is designed to serve data even when components fail. By default,OneFS protects data with erasure codes, enabling you to retrieve files when a node ordisk fails. As an alternative to erasure codes, you can protect data with two to eightmirrors.
When you create a cluster with five or more nodes, erasure codes deliver as much as80 percent efficiency. On larger clusters, erasure codes provide as much as four levelsof redundancy.
Isilon scale-out NAS
Isilon OneFS CLI Administration Guide 33

In addition to erasure codes and mirroring, OneFS includes the following features tohelp protect the integrity, availability, and confidentiality of data:
Feature Description
Antivirus OneFS can send files to servers running theInternet Content Adaptation Protocol (ICAP)to scan for viruses and other threats.
Clones OneFS enables you to create clones thatshare blocks with other files to save space.
NDMP backup and restore OneFS can back up data to tape and otherdevices through the Network DataManagement Protocol. Although OneFSsupports both three-way and two-waybackup, two-way backup requires an IsilonBackup Accelerator Node.
Protection domains You can apply protection domains to files anddirectories to prevent changes.
The following software modules also help protect data, but they require you toactivate a separate license:
Licensed Feature Description
SyncIQ SyncIQ replicates data on another Isiloncluster and automates failover and failbackoperations between clusters. If a clusterbecomes unusable, you can fail over toanother Isilon cluster.
SnapshotIQ You can protect data with a snapshot—alogical copy of data stored on a cluster.
SmartLock The SmartLock tool prevents users frommodifying and deleting files. You can commitfiles to a write-once, read-many state: The filecan never be modified and cannot be deleteduntil after a set retention period. SmartLockcan help you comply with Securities andExchange Commission Rule 17a-4.
N+M data protectionOneFS uses data redundancy across the entire cluster to prevent data loss resultingfrom drive or node failures. Protection is built into the file system structure and can beapplied down to the level of individual files.
Protection in OneFS is modeled on the Reed-Solomon algorithm, which uses forwarderror correction (FEC). Using FEC, OneFS allocates data in 128KB chunks. For each Ndata chunk, OneFS writes M protection, or parity, chunks. Each N+M chunk, referredto as a protection group, is written on an independent disk in an independent node.This process is referred to as data striping. By striping data across the entire cluster,OneFS is able to recover files in cases where drives or nodes fail.
In OneFS, the concepts of protection policy and protection level are different. Theprotection policy is the protection setting that you specify for storage pools on your
Isilon scale-out NAS
34 Isilon OneFS CLI Administration Guide

cluster. The protection level is the actual protection that OneFS achieves for data,based on the protection policy and the actual number of writable nodes.
For example, if you have a three-node cluster, and you specify a protection policy of[+2d:1n], OneFS is able to tolerate the failure of two drives or one node without dataloss. However, on that same three-node cluster, if you specify a protection policy of[+4d:2n], OneFS cannot achieve a protection level that would allow for four drivefailures or two node failures. This is because N+M must be less than or equal to thenumber of nodes in the cluster.
By default, OneFS calculates and sets a recommended protection policy based on yourcluster configuration. The recommended protection policy achieves the optimalbalance between data integrity and storage efficiency.
You can set a protection policy that is higher than the cluster can support. In a four-node cluster, for example, you can set the protection policy at [5x]. However, OneFSwould protect the data at 4x until you add a fifth node to the cluster, after whichOneFS would automatically re-protect the data at 5x.
Data mirroringYou can protect on-disk data with mirroring, which copies data to multiple locations.OneFS supports two to eight mirrors. You can use mirroring instead of erasure codes,or you can combine erasure codes with mirroring.
Mirroring, however, consumes more space than erasure codes. Mirroring data threetimes, for example, duplicates the data three times, which requires more space thanerasure codes. As a result, mirroring suits transactions that require high performance.
You can also mix erasure codes with mirroring. During a write operation, OneFSdivides data into redundant protection groups. For files protected by erasure codes, aprotection group consists of data blocks and their erasure codes. For mirrored files, aprotection group contains all the mirrors of a set of blocks. OneFS can switch the typeof protection group as it writes a file to disk. By changing the protection groupdynamically, OneFS can continue writing data despite a node failure that prevents thecluster from applying erasure codes. After the node is restored, OneFS automaticallyconverts the mirrored protection groups to erasure codes.
The file system journalA journal, which records file-system changes in a battery-backed NVRAM card,recovers the file system after failures, such as a power loss. When a node restarts, thejournal replays file transactions to restore the file system.
Virtual hot spare (VHS)When a drive fails, OneFS uses space reserved in a subpool instead of a hot sparedrive. The reserved space is known as a virtual hot spare.
In contrast to a spare drive, a virtual hot spare automatically resolves drive failures andcontinues writing data. If a drive fails, OneFS migrates data to the virtual hot spare toreprotect it. You can reserve as many as four disk drives as a virtual hot spare.
Balancing protection with storage spaceYou can set protection levels to balance protection requirements with storage space.
Higher protection levels typically consume more space than lower levels because youlose an amount of disk space to storing erasure codes. The overhead for the erasure
Isilon scale-out NAS
Isilon OneFS CLI Administration Guide 35

codes depends on the protection level, the file size, and the number of nodes in thecluster. Since OneFS stripes both data and erasure codes across nodes, the overheaddeclines as you add nodes.
VMware integrationOneFS integrates with several VMware products, including vSphere, vCenter, andESXi.
For example, OneFS works with the VMware vSphere API for Storage Awareness(VASA) so that you can view information about an Isilon cluster in vSphere. OneFSalso works with the VMware vSphere API for Array Integration (VAAI) to support thefollowing features for block storage: hardware-assisted locking, full copy, and blockzeroing. VAAI for NFS requires an ESXi plug-in.
With the Isilon Storage Replication Adapter, OneFS integrates with the VMwarevCenter Site Recovery Manager to recover virtual machines that are replicatedbetween Isilon clusters.
Software modulesYou can access advanced features by activating licenses for Dell EMC Isilon softwaremodules.
SmartLock
SmartLock protects critical data from malicious, accidental, or prematurealteration or deletion to help you comply with SEC 17a-4 regulations. You canautomatically commit data to a tamper-proof state and then retain it with acompliance clock.
HDFS
OneFS works with the Hadoop Distributed File System protocol to help clientsrunning Apache Hadoop, a framework for data-intensive distributed applications,analyze big data.
SyncIQ automated failover and failback
SyncIQ replicates data on another Isilon cluster and automates failover andfailback between clusters. If a cluster becomes unusable, you can fail over toanother Isilon cluster. Failback restores the original source data after the primarycluster becomes available again.
Security hardening
Security hardening is the process of configuring your system to reduce oreliminate as many security risks as possible. You can apply a hardening policy thatsecures the configuration of OneFS, according to policy guidelines.
SnapshotIQ
SnapshotIQ protects data with a snapshot—a logical copy of data stored on acluster. A snapshot can be restored to its top-level directory.
SmartDedupe
You can reduce redundancy on a cluster by running SmartDedupe. Deduplicationcreates links that can impact the speed at which you can read from and write tofiles.
Isilon scale-out NAS
36 Isilon OneFS CLI Administration Guide

SmartPools
SmartPools enables you to create multiple file pools governed by file-poolpolicies. The policies move files and directories among node pools or tiers. Youcan also define how OneFS handles write operations when a node pool or tier isfull.
CloudPools
Built on the SmartPools policy framework, CloudPools enables you to archive datato cloud storage, effectively defining the cloud as another tier of storage.CloudPools supports Dell EMC Isilon, Dell EMC ECS Appliance, VirtustreamStorage Cloud, Amazon S3, and Microsoft Azure as cloud storage providers.
SmartConnect Advanced
If you activate a SmartConnect Advanced license, you can balance policies toevenly distribute CPU usage, client connections, or throughput. You can alsodefine IP address pools to support multiple DNS zones in a subnet. In addition,SmartConnect supports IP failover, also known as NFS failover.
InsightIQ
The InsightIQ virtual appliance monitors and analyzes the performance of yourIsilon cluster to help you optimize storage resources and forecast capacity.
SmartQuotas
The SmartQuotas module tracks disk usage with reports and enforces storagelimits with alerts.
Isilon Swift
Isilon Swift is an object storage gateway compatible with the OpenStack Swift 1.0API. Through Isilon Swift, you can access existing file-based data stored on yourDell EMC Isilon cluster as objects. The Swift API is implemented as a set ofRESTful web services over HTTP or HTTPS. Since the Swift API is considered asa protocol, content and metadata can be ingested as objects and concurrentlyaccessed through other supported Dell EMC Isilon protocols.
Isilon scale-out NAS
Isilon OneFS CLI Administration Guide 37

Isilon scale-out NAS
38 Isilon OneFS CLI Administration Guide
CHAPTER 3
Introduction to the OneFS command-lineinterface
This section contains the following topics:
l OneFS command-line interface overview...........................................................40l Syntax diagrams................................................................................................ 40l Universal options................................................................................................ 41l Command-line interface privileges..................................................................... 42l SmartLock compliance command permissions................................................... 42l OneFS time values............................................................................................. 44
Isilon OneFS CLI Administration Guide 39

OneFS command-line interface overviewThe OneFS command-line interface extends the standard UNIX command set toinclude commands that enable you to manage an Isilon cluster outside of the webadministration interface or LCD panel. You can access the command-line interface byopening a secure shell (SSH) connection to any node in the cluster.
You can run isi commands to configure, monitor, and manage Isilon clusters and theindividual nodes in a cluster.
This publication provides conceptual and task information about CLI commands. Foran alphabetical listing of all CLI commands, see the OneFS CLI Command Reference.
Syntax diagramsThe format of each command is described in a syntax diagram.
The following conventions apply for syntax diagrams:
Element Description
[ ] Square brackets indicate an optional element.If you omit the contents of the squarebrackets when specifying a command, thecommand still runs successfully.
< > Angle brackets indicate a placeholder value.You must replace the contents of the anglebrackets with a valid value, otherwise thecommand fails.
{ } Braces indicate a group of elements. If thecontents of the braces are separated by avertical bar, the contents are mutuallyexclusive. If the contents of the braces arenot separated by a bar, the contents must bespecified together.
| Vertical bars separate mutually exclusiveelements within the braces.
... Ellipses indicate that the preceding elementcan be repeated more than once. If ellipsesfollow a brace or bracket, the contents of thebraces or brackets can be repeated more thanonce.
Each isi command is broken into three parts: command, required options, andoptional options. Required options are positional, meaning that you must specify themin the order that they appear in the syntax diagram. However, you can specify arequired option in an alternative order by preceding the text displayed in angle
Introduction to the OneFS command-line interface
40 Isilon OneFS CLI Administration Guide

brackets with a double dash. For example, consider isi snapshot snapshotscreate.
isi snapshot snapshots create <name> <path> [--expires <timestamp>] [--alias <string>] [--verbose]
If the <name> and <path> options are prefixed with double dashes, the options canbe moved around in the command. For example, the following command is valid:
isi snapshot snapshots create --verbose --path /ifs/data --alias newSnap_alias --name newSnap
Shortened versions of commands are accepted as long as the command isunambiguous and does not apply to multiple commands. For example, isi snapsnap c newSnap /ifs/data is equivalent to isi snapshot snapshotscreate newSnap /ifs/data because the root of each word belongs to onecommand exclusively. If a word belongs to more than one command, the commandfails. For example, isi sn snap c newSnap /ifs/data is not equivalent to isisnapshot snapshots create newSnap /ifs/data because the root of isisn could belong to either isi snapshot or isi snmp.
If you begin typing a word and then press TAB, the rest of the word automaticallyappears as long as the word is unambiguous and applies to only one command. Forexample, isi snap completes to isi snapshot because that is the only validpossibility. However, isi sn does not complete, because it is the root of both isisnapshot and isi snmp.
Universal optionsSome options are valid for all commands.
Syntax
isi [--timeout <integer>] [--debug] <command> [--help]
--timeout <integer>
Specifies the number of seconds before the command times out.
--debug
Displays all calls to the Isilon OneFS Platform API. If a traceback occurs, displaystraceback in addition to error message.
--help
Displays a basic description of the command and all valid options for thecommand.
Introduction to the OneFS command-line interface
Isilon OneFS CLI Administration Guide 41

Examples
The following command causes the isi sync policies list command totimeout after 30 seconds:
isi --timeout 30 sync policies list
The following command displays help output for isi sync policies list:
isi sync policies list --help
Command-line interface privilegesYou can perform most tasks granted by a privilege through the command-lineinterface (CLI). Some OneFS commands require root access.
SmartLock compliance command permissionsIf a cluster is running in SmartLock compliance mode, root access is disabled on thecluster. Because of this, if a command requires root access, you can run the commandonly through the sudo program.
In compliance mode, you can run all isi commands that are followed by a spacethrough sudo. For example, you can run isi sync policies create throughsudo. In addition, you can also run the following isi_ commands through sudo; thesecommands are internal and are typically run only by Isilon Technical Support:
l isi_auth_expert
l isi_bootdisk_finish
l isi_bootdisk_provider_dev
l isi_bootdisk_status
l isi_bootdisk_unlock
l isi_checkjournal
l isi_clean_idmap
l isi_client_stats
l isi_cpr
l isi_cto_update
l isi_disk_firmware_reboot
l isi_dmi_info
l isi_dmilog
l isi_dongle_sync
l isi_drivenum
l isi_dsp_install
l isi_dumpjournal
l isi_eth_mixer_d
l isi_evaluate_provision_drive
Introduction to the OneFS command-line interface
42 Isilon OneFS CLI Administration Guide
l isi_fcb_vpd_tool
l isi_flexnet_info
l isi_flush
l isi_for_array
l isi_fputil
l isi_gather_info
l isi_gather_auth_info
l isi_gather_cluster_info
l isi_gconfig
l isi_get_itrace
l isi_get_profile
l isi_hangdump
l isi_hw_check
l isi_hw_status
l isi_ib_bug_info
l isi_ib_fw
l isi_ib_info
l isi_ilog
l isi_imdd_status
l isi_inventory_tool
l isi_ipmicmc
l isi_job_d
l isi_kill_busy
l isi_km_diag
l isi_lid_d
l isi_linmap_mod
l isi_logstore
l isi_lsiexputil
l isi_make_abr
l isi_mcp
l isi_mps_fw_status
l isi_netlogger
l isi_nodes
l isi_ntp_config
l isi_ovt_check
l isi_patch_d
l isi_phone_home
l isi_promptsupport
l isi_radish
l isi_rbm_ping
Introduction to the OneFS command-line interface
Isilon OneFS CLI Administration Guide 43
l isi_repstate_mod
l isi_restill
l isi_rnvutil
l isi_sasphymon
l isi_save_itrace
l isi_savecore
l isi_sed
l isi_send_abr
l isi_smbios
l isi_stats_tool
l isi_transform_tool
l isi_ufp
l isi_umount_ifs
l isi_update_cto
l isi_update_serialno
l isi_vitutil
l isi_vol_copy
l isi_vol_copy_vnx
In addition to isi commands, you can run the following UNIX commands through sudo:
l date
l gcore
l ifconfig
l kill
l killall
l nfsstat
l ntpdate
l nvmecontrol
l pciconf
l pkill
l ps
l pwd_mkdb
l renice
l shutdown
l sysctl
l tcpdump
l top
OneFS time valuesOneFS uses different values for time depending on the application.
You can specify time periods, such as a month, for multiple OneFS applications.However, because some time values have more than one meaning, OneFS defines time
Introduction to the OneFS command-line interface
44 Isilon OneFS CLI Administration Guide

values based on the application. The following table describes the time values forOneFS applications:
Module Month Year
SnapshotIQ 30 days 365 days (does not account for leap year)
SmartLock 31 days 365 days (does not account for leap year)
SyncIQ 30 days 365 days (does not account for leap year)
Introduction to the OneFS command-line interface
Isilon OneFS CLI Administration Guide 45

Introduction to the OneFS command-line interface
46 Isilon OneFS CLI Administration Guide
CHAPTER 4
General cluster administration
This section contains the following topics:
l General cluster administration overview.............................................................48l User interfaces...................................................................................................48l Connecting to the cluster...................................................................................49l Licensing............................................................................................................50l Certificates........................................................................................................ 54l Cluster identity.................................................................................................. 60l Cluster contact information................................................................................61l Cluster date and time......................................................................................... 61l SMTP email settings.......................................................................................... 63l Configuring the cluster join mode.......................................................................64l File system settings........................................................................................... 64l Security hardening.............................................................................................66l Cluster monitoring............................................................................................. 69l Monitoring cluster hardware.............................................................................. 70l Events and alerts................................................................................................77l Cluster maintenance.......................................................................................... 88l Remote support................................................................................................. 97
Isilon OneFS CLI Administration Guide 47
General cluster administration overviewYou can manage general OneFS settings and module licenses for your Isilon cluster.
General cluster administration covers several areas. You can:
l manage general settings such as cluster name, date and time, and email
l monitor the cluster status and performance, including hardware components
l configure how events and notifications are handled
l perform cluster maintenance such as adding, removing, and restarting nodes
Most management tasks are accomplished through both the web administration orcommand-line interface; however, you will occasionally encounter a task that can onlybe managed by one or the other.
User interfacesOneFS provides several interfaces for managing Isilon clusters.
Interface Description Comment
OneFS web administrationinterface
The browser-based OneFSweb administration interfaceprovides secure access withOneFS-supported browsers.Use this interface to viewrobust graphical monitoringdisplays and to performcluster-management tasks.
The OneFS webadministration interface usesport 8080 as its default port.
OneFS command-lineinterface
Run OneFS isi commands in
the command-line interface toconfigure, monitor, andmanage the cluster. Access tothe command-line interface isthrough a secure shell (SSH)connection to any node in thecluster.
The OneFS command-lineinterface provides anextended standard UNIXcommand set for managingthe cluster.
OneFS API The OneFS applicationprogramming interface (API)is divided into two functionalareas: one area enablescluster configuration,management, and monitoringfunctionality, and the otherarea enables operations onfiles and directories on thecluster. You can sendrequests to the OneFS APIthrough a RepresentationalState Transfer (REST)interface, which is accessedthrough resource URIs andstandard HTTP methods.
You should have a solidunderstanding of HTTP/1.1and experience writing HTTP-based client software beforeyou implement client-basedsoftware through the OneFSAPI.
General cluster administration
48 Isilon OneFS CLI Administration Guide

Interface Description Comment
Node front panel With the exception ofaccelerator nodes, the frontpanel of each node containsan LCD screen with fivebuttons that you can use tomonitor node and clusterdetails.
Node status, events, clusterdetails, capacity, IP and MACaddresses, throughput, anddrive status are availablethrough the node front panel.
Connecting to the clusterIsilon cluster access is provided through the web administration interface or throughSSH. You can use a serial connection to perform cluster administration tasks throughthe command-line interface.
You can also access the cluster through the node front panel to accomplish a subsetof cluster management tasks. For information about connecting to the node frontpanel, see the installation documentation for your node.
Log in to the web administration interfaceYou can monitor and manage your Isilon cluster from the browser-based webadministration interface.
Procedure
1. Open a browser window and type the URL for your cluster in the address field,replacing <yourNodeIPaddress> with the first IP address you provided whenyou configured ext-1 in the one of the following examples:
IPv4
https://<yourNodeIPaddress>:8080IPv6
https://[<yourNodeIPaddress>]:8080
The system displays a message if your security certificates have not beenconfigured. Resolve any certificate configurations and continue to the web site.
2. Log in to OneFS by typing your OneFS credentials in the Username andPassword fields.
After you log into the web administration interface, there is a 4-hour logintimeout.
Open an SSH connection to a clusterYou can use any SSH client such as OpenSSH or PuTTY to connect to an Isiloncluster.
Before you begin
You must have valid OneFS credentials to log in to a cluster after the connection isopen.
Procedure
1. Open a secure shell (SSH) connection to any node in the cluster, using the IPaddress of the node and port number 22.
General cluster administration
Isilon OneFS CLI Administration Guide 49
2. Log in with your OneFS credentials.
At the OneFS command line prompt, you can use isi commands to monitorand manage your cluster.
LicensingAll Isilon software and hardware must be licensed through Dell EMC SoftwareLicensing Central (SLC).
A record of your active licenses and your cluster hardware is contained in a license filethat is stored in two locations: one copy of the license file is stored in the SLCrepository, and another copy of the license file is stored on your cluster. The licensefile contains a record of the following license types:
l OneFS
l Additional software modules
The license file on your cluster, and the license file in the SLC repository, must matchyour installed hardware and software. Therefore, you must submit a request to updateyour license file when you:
l Upgrade for the first time to OneFS 8.1 or later
l Add new hardware or upgrade the existing hardware in your cluster
l Require the activation of an optional software module
To request a change to your license file, you must create a file that contains anupdated list of your required hardware and software licenses and submit it to Dell EMCSoftware Licensing Central (SLC). You can generate that file, known as an activationfile, from your OneFS interface.
Licenses are created after you generate an activation file, submit the file to Dell EMCSoftware Licensing Central (SLC), receive a license file back from SLC, and uploadthe license file to your cluster.
Software licensesYour OneFS license and optional software module licenses are included in the licensefile on your cluster and must match your license record in the Dell EMC SoftwareLicensing Central (SLC) repository.
You must make sure that the license file on your cluster, and your license file in theSLC repository, match your upgraded version of OneFS.
Advanced cluster features are available when you activate licenses for the followingOneFS software modules:
l CloudPools
l Security hardening
l HDFS
l Isilon Swift
l SmartConnect Advanced
l SmartDedupe
l SmartLock
l SmartPools
l SmartQuotas
General cluster administration
50 Isilon OneFS CLI Administration Guide

l SnapshotIQ
l SyncIQ
For more information about optional software modules, contact your Isilon salesrepresentative.
Hardware tiersYour license file contains information about the Isilon hardware installed in yourcluster.
Nodes are listed by tiers in your license file. Nodes are placed into a tier according totheir compute performance level, capacity, and drive type.
Note: Your license file will contain line items for every node in your cluster.However, pre-Generation 6 hardware is not included in the OneFS licensing model.
License statusThe status of a OneFS license indicates whether the license file on your clusterreflects your current version of OneFS. The status of a OneFS module licenseindicates whether the functionality provided by a module is available on the cluster.
Licenses exist in one of the following states:
Status Description
Unsigned The license has not been updated in Dell EMCSoftware Licensing Central (SLC). You mustgenerate and submit an activation file toupdate your license file with your new versionof OneFS.
Inactive The license has not been activated on thecluster. You cannot access the featuresprovided by the corresponding module.
Evaluation The license has been temporarily activated onthe cluster. You can access the featuresprovided by the corresponding module for 90days.
Activated The license has been activated on the cluster.You can access the features provided by thecorresponding module.
Expired The license has expired on the cluster. Afterthe license expires, you must generate andsubmit an activation file to update yourlicense file.
General cluster administration
Isilon OneFS CLI Administration Guide 51
View license informationYou can view information about the current license status for OneFS, hardware, andoptional Isilon software modules.
Procedure
1. Run the following command:
isi license list
Adding and removing licensesYou can update your license file by generating an activation file, submitting theactivation file to Dell EMC Software Licensing Central (SLC), then uploading anupdated license file to your cluster.
You can add or remove licenses from your license file by submitting an activation fileto SLC.
You must update your license file after you:
l Add or remove hardware
l Add or remove optional software modules
Generate a license activation fileTo update your license file, you must first generate a license activation file thatcontains the changes you want to make to your license file.
Procedure
1. Run the isi license generate command to add or remove licenses fromyour activation file, and designate a location to save your activation file.
The following command adds a OneFS license and saves the activation file,named <cluster-name>_activation.xml to the/ifs directory on yourcluster:
isi license generate--include OneFS --file /ifs/<cluster-name>_activation.xml
The following command adds OneFS and SyncIQ licenses, removes yourCloudpools license, and saves the new activation file to /ifs/local:
isi license generate--include OneFS --include SyncIQ --exclude Cloudpools--file ifs/local
2. Save the activation file to your local machine.
After you have a copy of the activation file on your local machine, you cansubmit the file to Dell EMC Software Licensing Central (SLC).
General cluster administration
52 Isilon OneFS CLI Administration Guide

Submit a license activation file to SLCAfter you generate an activation file in OneFS, submit the activation file to Dell EMCSoftware Licensing Central (SLC) to receive a signed license file for your cluster.
Before you begin
Before you submit your activation file to SLC, you must generate the activation filethrough OneFS and save the file to your local machine.
Procedure
1. From your local, internet-connected system, go to Dell EMC Software LicensingCentral (SLC).
2. Log into the system using your Dell EMC credentials.
3. Click ACTIVATE at the top of the page.
A menu will appear with two options: Activate and Activate by File.
4. Click Activate by File
The Upload Activation File page appears.
5. Confirm that your company name is listed next to Company.
If your company name is not displayed, click Select a Company and search withyour company name and ID.
6. Click Upload.
7. Locate the activation file on your local machine and click Open.
8. Click the Start the Activation Process button.
The Apply License Authorization Code (LAC) page appears.
9. In the Missing Product & Quantities Summary table, confirm that there is agreen check in the column on the far right.
If any row is missing a green check in that column, you can search for adifferent LAC by clicking the Search button and selecting a different availableLAC.
10. Click the Next: Review button.
11. Click the Activate button.
When the signed license file is available, SLC will send it to you as anattachment to an email.
Note: Your signed license file may not be available immediately.
12. After you receive the signed license file from SLC, download the signed licensefile to your local machine.
Upload the updated license fileAfter you receive an updated license file from Dell EMC Software Licensing Central(SLC), upload the updated file to your cluster.
Procedure
1. Run the isi license add command.
General cluster administration
Isilon OneFS CLI Administration Guide 53
The following command adds the /ifs/local license file to the cluster:
isi license add --path /ifs/local
Activating trial licensesYou can activate a trial license that allows you to evaluate an optional software modulefor 90 days.
Activate a trial licenseYou can activate a trial license to evaluate a OneFS software module.
Procedure
1. Run the isi license add command.
The following command activates a trial license for the Cloudpools and SyncIQmodules:
isi license add --evaluation Cloudpools --evaluation SyncIQ
CertificatesAll OneFS API communication, which includes communication through the webadministration interface, is over Transport Layer Security (TLS). You can renew theTLS certificate for the OneFS web administration interface or replace it with a third-party TLS certificate.
To replace or renew a TLS certificate, you must be logged in as root.
Note: OneFS defaults to the best supported version of TLS against the clientrequest.
Replacing or renewing the TLS certificateThe Transport Layer Security (TLS) certificate is used to access the cluster through abrowser. The cluster initially contains a self-signed certificate for this purpose. Youcan continue to use the existing self-signed certificate, or you can replace it with athird-party certificate authority (CA)-issued certificate.
If you continue to use the self-signed certificate, you must replace it when it expires,with either:
l A third-party (public or private) CA-issued certificate
l Another self-signed certificate that is generated on the cluster
The following folders are the default locations for the server.crt and server.keyfiles.
l TLS certificate: /usr/local/apache2/conf/ssl.crt/server.crtl TLS certificate key: /usr/local/apache2/conf/ssl.key/server.key
General cluster administration
54 Isilon OneFS CLI Administration Guide
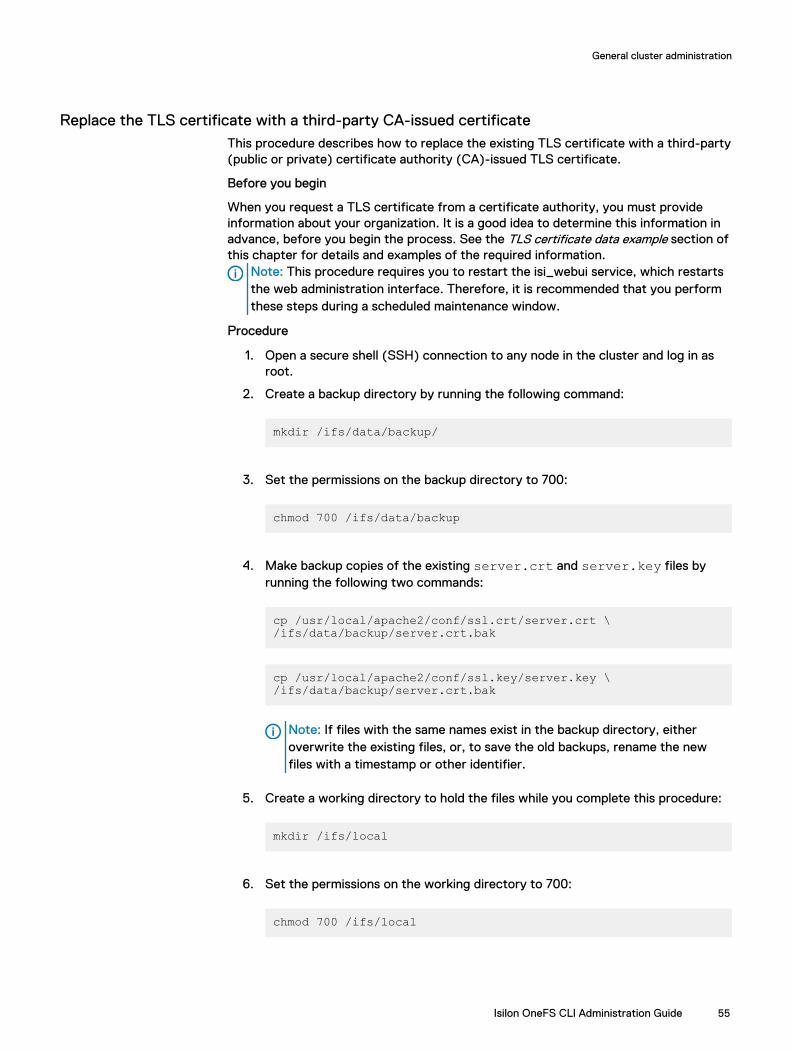
Replace the TLS certificate with a third-party CA-issued certificateThis procedure describes how to replace the existing TLS certificate with a third-party(public or private) certificate authority (CA)-issued TLS certificate.
Before you begin
When you request a TLS certificate from a certificate authority, you must provideinformation about your organization. It is a good idea to determine this information inadvance, before you begin the process. See the TLS certificate data example section ofthis chapter for details and examples of the required information.
Note: This procedure requires you to restart the isi_webui service, which restartsthe web administration interface. Therefore, it is recommended that you performthese steps during a scheduled maintenance window.
Procedure
1. Open a secure shell (SSH) connection to any node in the cluster and log in asroot.
2. Create a backup directory by running the following command:
mkdir /ifs/data/backup/
3. Set the permissions on the backup directory to 700:
chmod 700 /ifs/data/backup
4. Make backup copies of the existing server.crt and server.key files byrunning the following two commands:
cp /usr/local/apache2/conf/ssl.crt/server.crt \/ifs/data/backup/server.crt.bak
cp /usr/local/apache2/conf/ssl.key/server.key \/ifs/data/backup/server.crt.bak
Note: If files with the same names exist in the backup directory, eitheroverwrite the existing files, or, to save the old backups, rename the newfiles with a timestamp or other identifier.
5. Create a working directory to hold the files while you complete this procedure:
mkdir /ifs/local
6. Set the permissions on the working directory to 700:
chmod 700 /ifs/local
General cluster administration
Isilon OneFS CLI Administration Guide 55
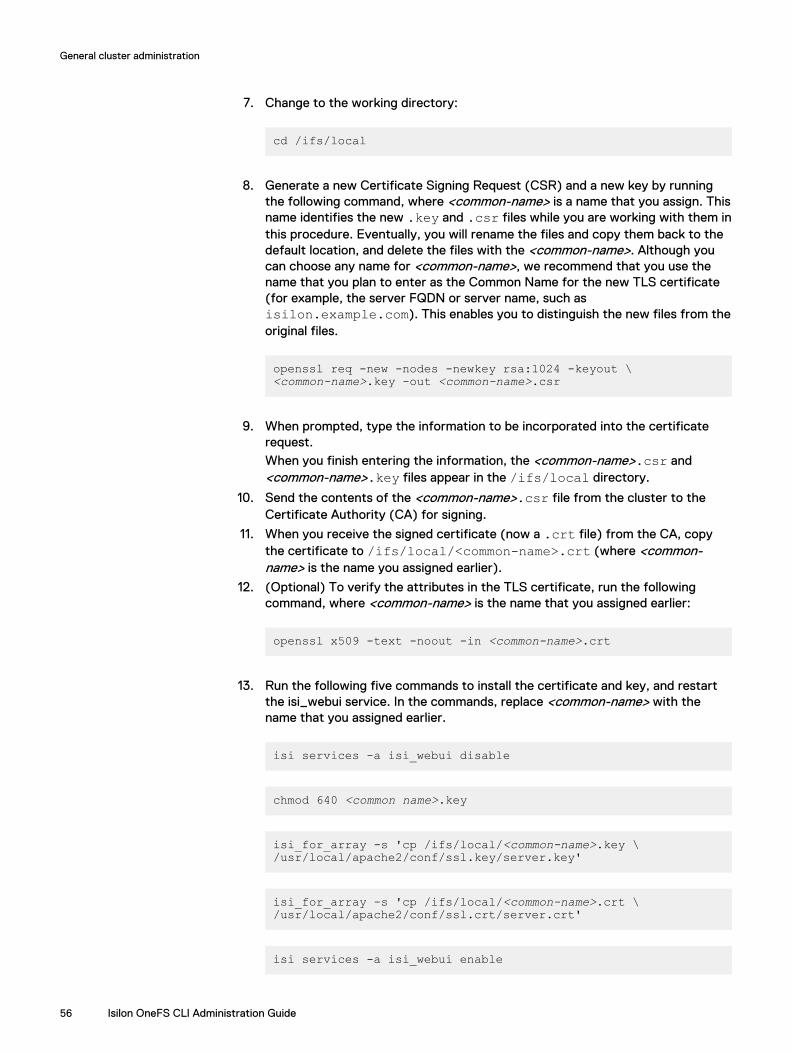
7. Change to the working directory:
cd /ifs/local
8. Generate a new Certificate Signing Request (CSR) and a new key by runningthe following command, where <common-name> is a name that you assign. Thisname identifies the new .key and .csr files while you are working with them inthis procedure. Eventually, you will rename the files and copy them back to thedefault location, and delete the files with the <common-name>. Although youcan choose any name for <common-name>, we recommend that you use thename that you plan to enter as the Common Name for the new TLS certificate(for example, the server FQDN or server name, such asisilon.example.com). This enables you to distinguish the new files from theoriginal files.
openssl req -new -nodes -newkey rsa:1024 -keyout \<common-name>.key -out <common-name>.csr
9. When prompted, type the information to be incorporated into the certificaterequest.When you finish entering the information, the <common-name>.csr and<common-name>.key files appear in the /ifs/local directory.
10. Send the contents of the <common-name>.csr file from the cluster to theCertificate Authority (CA) for signing.
11. When you receive the signed certificate (now a .crt file) from the CA, copythe certificate to /ifs/local/<common-name>.crt (where <common-name> is the name you assigned earlier).
12. (Optional) To verify the attributes in the TLS certificate, run the followingcommand, where <common-name> is the name that you assigned earlier:
openssl x509 -text -noout -in <common-name>.crt
13. Run the following five commands to install the certificate and key, and restartthe isi_webui service. In the commands, replace <common-name> with thename that you assigned earlier.
isi services -a isi_webui disable
chmod 640 <common name>.key
isi_for_array -s 'cp /ifs/local/<common-name>.key \/usr/local/apache2/conf/ssl.key/server.key'
isi_for_array -s 'cp /ifs/local/<common-name>.crt \/usr/local/apache2/conf/ssl.crt/server.crt'
isi services -a isi_webui enable
General cluster administration
56 Isilon OneFS CLI Administration Guide

14. Verify that the installation succeeded. For instructions, see the Verify a TLScertificate update section of this guide.
15. Delete the temporary working files from the /ifs/local directory:
rm /ifs/local/<common-name>.csr \/ifs/local/<common-name>.key /ifs/local/<common-name>.crt
16. (Optional) Delete the backup files from the /ifs/data/backup directory:
rm /ifs/data/backup/server.crt.bak \/ifs/data/backup/server.key.bak
Renew the self-signed TLS certificateThis procedure describes how to replace an expired self-signed TLS certificate bygenerating a new certificate that is based on the existing (stock) server key.
Before you begin
When you generate a self-signed certificate, you must provide information about yourorganization. It is a good idea to determine this information in advance, before youbegin the process. See the TLS certificate data example section of this chapter fordetails and examples of the required information.
Note: This procedure requires you to restart the isi_webui service, which restartsthe web administration interface. Therefore, it is recommended that you performthese steps during a scheduled maintenance window.
Procedure
1. Open a secure shell (SSH) connection to any node in the cluster and log in asroot.
2. Create a backup directory by running the following command:
mkdir /ifs/data/backup/
3. Set the permissions on the backup directory to 700:
chmod 700 /ifs/data/backup
4. Make backup copies of the existing server.crt and server.key files byrunning the following two commands:
cp /usr/local/apache2/conf/ssl.crt/server.crt \/ifs/data/backup.bak
cp /usr/local/apache2/conf/ssl.key/server.key \/ifs/data/backup.bak
General cluster administration
Isilon OneFS CLI Administration Guide 57

Note: If files with the same names exist in the backup directory, eitheroverwrite the existing files, or, to save the old backups, rename the newfiles with a timestamp or other identifier.
5. Create a working directory to hold the files while you complete this procedure:
mkdir /ifs/local/
6. Set the permissions on the working directory to 700:
chmod 700 /ifs/local
7. Change to the working directory:
cd /ifs/local/
8. At the command prompt, run the following two commands to create acertificate that will expire in 2 years (730 days). Increase or decrease the valuefor -days to generate a certificate with a different expiration date.
cp /usr/local/apache2/conf/ssl.key/server.key ./
openssl req -new -days 730 -nodes -x509 -key \server.key -out server.crt
Note: the -x509 value is a certificate format.
9. When prompted, type the information to be incorporated into the certificaterequest.
When you finish entering the information, a renewal certificate is created, basedon the existing (stock) server key. The renewal certificate is namedserver.crt and it appears in the /ifs/local directory.
10. (Optional) To verify the attributes in the TLS certificate, run the followingcommand:
openssl x509 -text -noout -in server.crt
General cluster administration
58 Isilon OneFS CLI Administration Guide

11. Run the following five commands to install the certificate and key, and restartthe isi_webui service:
isi services -a isi_webui disable
chmod 640 server.key
isi_for_array -s 'cp /ifs/local/server.key \/usr/local/apache2/conf/ssl.key/server.key'
isi_for_array -s 'cp /ifs/local/server.crt \/usr/local/apache2/conf/ssl.crt/server.crt'
isi services -a isi_webui enable
12. Verify that the installation succeeded. For instructions, see the Verify a TLScertificate update section of this guide.
13. Delete the temporary working files from the /ifs/local directory:
rm /ifs/local/<common-name>.csr \/ifs/local/<common-name>.key /ifs/local/<common-name>.crt
14. (Optional) Delete the backup files from the /ifs/data/backup directory:
rm /ifs/data/backup/server.crt.bak \/ifs/data/backup/server.key.bak
Verify an SSL certificate updateYou can verify the details stored in a Secure Sockets Layer (SSL) certificate.
Procedure
1. Run the following command to open and verify the attributes in an SSLcertificate:
echo QUIT | openssl s_client -connect localhost:8080
TLS certificate data exampleTLS certificate renewal or replacement requires you to provide data such as a fullyqualified domain name and a contact email address.
When you renew or replace a TLS certificate, you are asked to provide data in theformat that is shown in the following example:
You are about to be asked to enter information that will be incorporated
General cluster administration
Isilon OneFS CLI Administration Guide 59

into your certificate request.What you are about to enter is what is called a Distinguished Name or a DN.There are quite a few fields but you can leave some blankFor some fields there will be a default value,If you enter '.', the field will be left blank.-----Country Name (2 letter code) [AU]:USState or Province Name (full name) [Some-State]:WashingtonLocality Name (eg, city) []:SeattleOrganization Name (eg, company) [Internet Widgits Pty Ltd]:CompanyOrganizational Unit Name (eg, section) []:System AdministrationCommon Name (e.g. server FQDN or YOUR name) []:localhost.example.orgEmail Address []:[email protected]
In addition, if you are requesting a third-party CA-issued certificate, you shouldinclude additional attributes that are shown in the following example:
Please enter the following 'extra' attributesto be sent with your certificate requestA challenge password []:passwordAn optional company name []:Another Name
Cluster identityYou can specify identity attributes for an Isilon cluster.
Cluster name
The cluster name appears on the login page, and it makes the cluster and itsnodes more easily recognizable on your network. Each node in the cluster isidentified by the cluster name plus the node number. For example, the first nodein a cluster named Images may be named Images-1.
Cluster description
The cluster description appears below the cluster name on the login page. Thecluster description is useful if your environment has multiple clusters.
Login message
The login message appears as a separate box on the login page of the OneFS webadministration interface, or as a line of text under the cluster name in the OneFScommand-line interface. The login message can convey cluster information, logininstructions, or warnings that a user should know before logging into the cluster.Set this information in the Cluster Identity page of the OneFS webadministration interface
Set the cluster nameYou can specify a name, description, and login message for your Isilon cluster.
About this task
Cluster names must begin with a letter and can contain only numbers, letters, andhyphens. The cluster name is added to the node number to identify each node in thecluster. For example, the first node in a cluster named Images may be namedImages-1.
General cluster administration
60 Isilon OneFS CLI Administration Guide
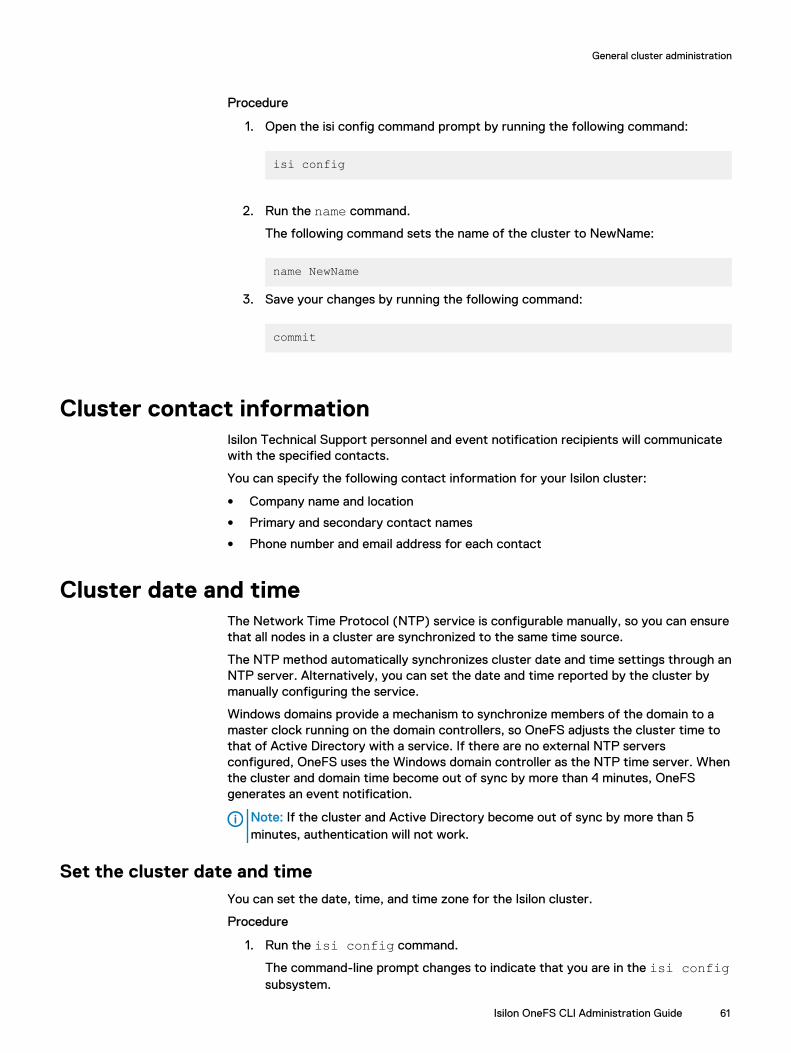
Procedure
1. Open the isi config command prompt by running the following command:
isi config
2. Run the name command.
The following command sets the name of the cluster to NewName:
name NewName
3. Save your changes by running the following command:
commit
Cluster contact informationIsilon Technical Support personnel and event notification recipients will communicatewith the specified contacts.
You can specify the following contact information for your Isilon cluster:
l Company name and location
l Primary and secondary contact names
l Phone number and email address for each contact
Cluster date and timeThe Network Time Protocol (NTP) service is configurable manually, so you can ensurethat all nodes in a cluster are synchronized to the same time source.
The NTP method automatically synchronizes cluster date and time settings through anNTP server. Alternatively, you can set the date and time reported by the cluster bymanually configuring the service.
Windows domains provide a mechanism to synchronize members of the domain to amaster clock running on the domain controllers, so OneFS adjusts the cluster time tothat of Active Directory with a service. If there are no external NTP serversconfigured, OneFS uses the Windows domain controller as the NTP time server. Whenthe cluster and domain time become out of sync by more than 4 minutes, OneFSgenerates an event notification.
Note: If the cluster and Active Directory become out of sync by more than 5minutes, authentication will not work.
Set the cluster date and timeYou can set the date, time, and time zone for the Isilon cluster.
Procedure
1. Run the isi config command.
The command-line prompt changes to indicate that you are in the isi configsubsystem.
General cluster administration
Isilon OneFS CLI Administration Guide 61
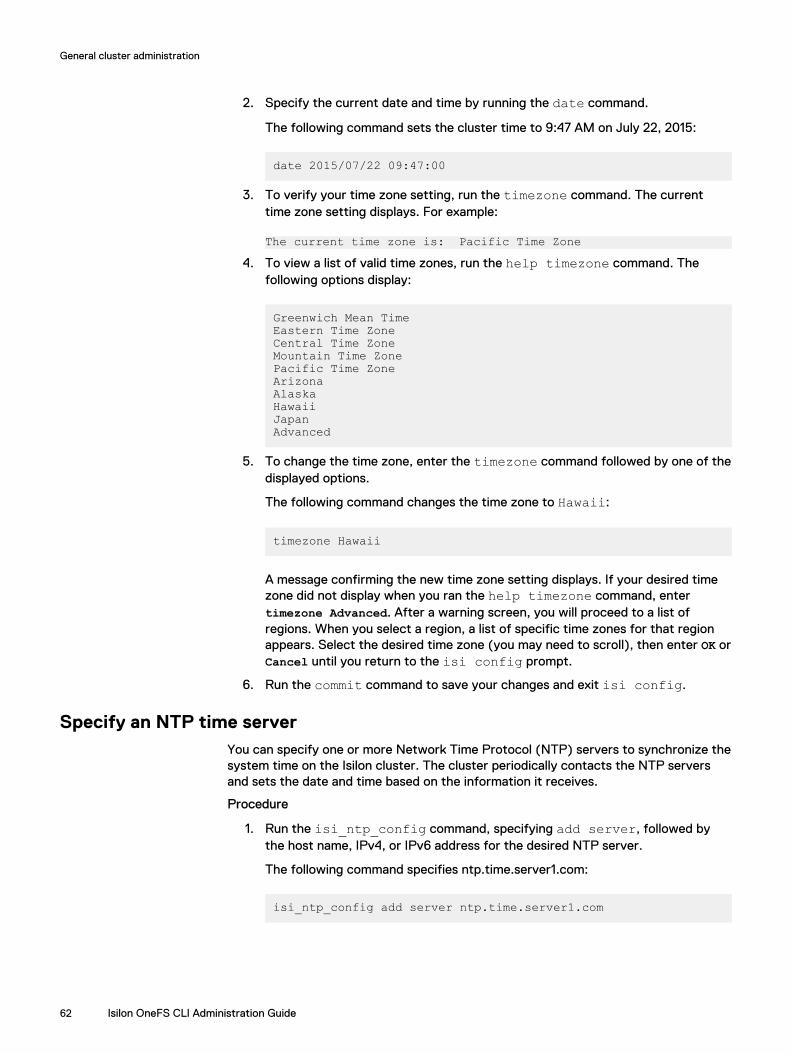
2. Specify the current date and time by running the date command.
The following command sets the cluster time to 9:47 AM on July 22, 2015:
date 2015/07/22 09:47:00
3. To verify your time zone setting, run the timezone command. The currenttime zone setting displays. For example:
The current time zone is: Pacific Time Zone4. To view a list of valid time zones, run the help timezone command. The
following options display:
Greenwich Mean TimeEastern Time ZoneCentral Time ZoneMountain Time ZonePacific Time ZoneArizonaAlaskaHawaiiJapanAdvanced
5. To change the time zone, enter the timezone command followed by one of thedisplayed options.
The following command changes the time zone to Hawaii:
timezone Hawaii
A message confirming the new time zone setting displays. If your desired timezone did not display when you ran the help timezone command, entertimezone Advanced. After a warning screen, you will proceed to a list ofregions. When you select a region, a list of specific time zones for that regionappears. Select the desired time zone (you may need to scroll), then enter OK orCancel until you return to the isi config prompt.
6. Run the commit command to save your changes and exit isi config.
Specify an NTP time serverYou can specify one or more Network Time Protocol (NTP) servers to synchronize thesystem time on the Isilon cluster. The cluster periodically contacts the NTP serversand sets the date and time based on the information it receives.
Procedure
1. Run the isi_ntp_config command, specifying add server, followed bythe host name, IPv4, or IPv6 address for the desired NTP server.
The following command specifies ntp.time.server1.com:
isi_ntp_config add server ntp.time.server1.com
General cluster administration
62 Isilon OneFS CLI Administration Guide

SMTP email settingsIf your network environment requires the use of an SMTP server or if you want toroute Isilon cluster event notifications with SMTP through a port, you can configureSMTP email settings.
SMTP settings include the SMTP relay address and port number that email is routedthrough. You can specify an origination email and subject line for all event notificationemails sent from the cluster.
If your SMTP server is configured to support authentication, you can specify ausername and password. You can also specify whether to apply encryption to theconnection.
Configure SMTP email settingsYou can send event notifications through the SMTP mail server. You can also enableSMTP authentication if your SMTP server is configured to use it.
About this task
You can configure SMTP email settings if your network environment requires the useof an SMTP server or if you want to route Isilon cluster event notifications with SMTPthrough a port.
Procedure
1. Run the isi email command.
The following example configures SMTP email settings:
isi email settings modify --mail-relay 10.7.180.45 \--mail-sender [email protected] \--mail-subject "Isilon cluster event" --use-smtp-auth yes \--smtp-auth-username SMTPuser --smtp-auth-passwd Password123 \--use-encryption yes
View SMTP email settingsYou can view SMTP email settings.
Procedure
1. Run the following command:
isi email settings view
The system displays information similar to the following example:
Mail Relay: - SMTP Port: 25 Mail Sender: - Mail Subject: - Use SMTP Auth: No SMTP Auth Username: - Use Encryption: No Batch Mode: none User Template: -
General cluster administration
Isilon OneFS CLI Administration Guide 63
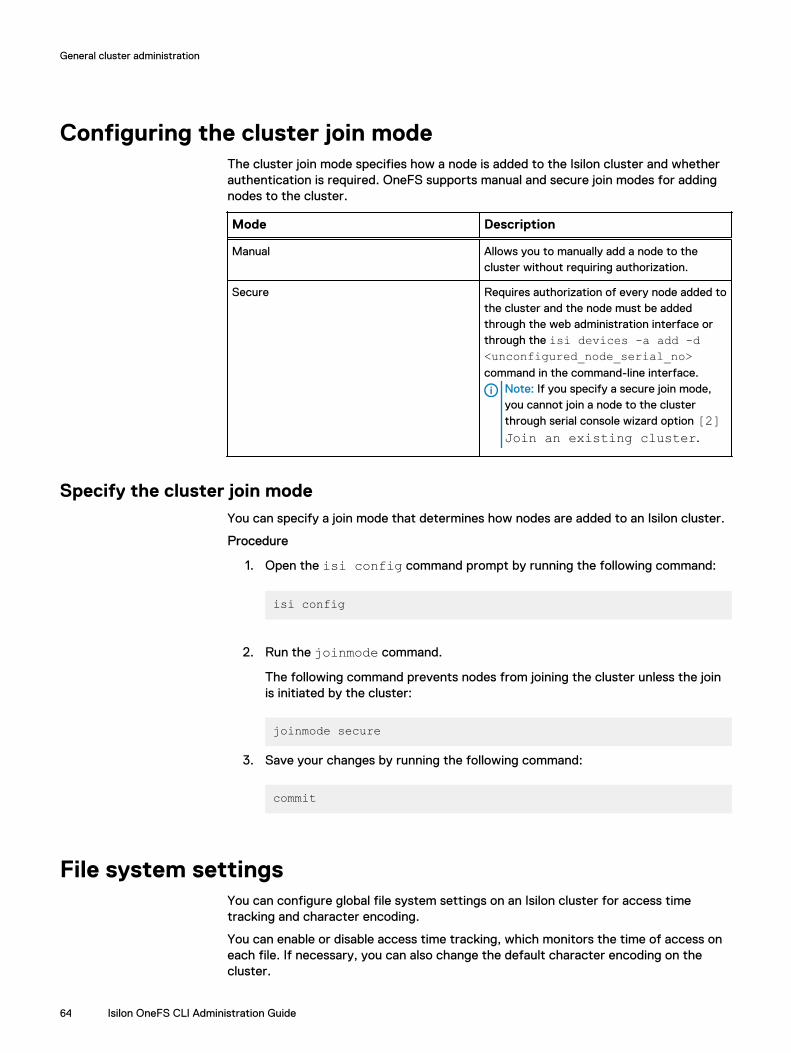
Configuring the cluster join modeThe cluster join mode specifies how a node is added to the Isilon cluster and whetherauthentication is required. OneFS supports manual and secure join modes for addingnodes to the cluster.
Mode Description
Manual Allows you to manually add a node to thecluster without requiring authorization.
Secure Requires authorization of every node added tothe cluster and the node must be addedthrough the web administration interface orthrough the isi devices -a add -d<unconfigured_node_serial_no>command in the command-line interface.
Note: If you specify a secure join mode,you cannot join a node to the clusterthrough serial console wizard option [2]Join an existing cluster.
Specify the cluster join modeYou can specify a join mode that determines how nodes are added to an Isilon cluster.
Procedure
1. Open the isi config command prompt by running the following command:
isi config
2. Run the joinmode command.
The following command prevents nodes from joining the cluster unless the joinis initiated by the cluster:
joinmode secure
3. Save your changes by running the following command:
commit
File system settingsYou can configure global file system settings on an Isilon cluster for access timetracking and character encoding.
You can enable or disable access time tracking, which monitors the time of access oneach file. If necessary, you can also change the default character encoding on thecluster.
General cluster administration
64 Isilon OneFS CLI Administration Guide
Specify the cluster character encodingYou can modify the character encoding set for an Isilon cluster after installation.
About this task
Only OneFS-supported character sets are available for selection. UTF-8 is the defaultcharacter set for OneFS nodes.
Note: If the cluster character encoding is not set to UTF-8, SMB share names arecase-sensitive.
You must restart the cluster to apply character encoding changes.
CAUTION Character encoding is typically established during installation of thecluster. Modifying the character encoding setting after installation may renderfiles unreadable if done incorrectly. Modify settings only if necessary afterconsultation with Isilon Technical Support
Procedure
1. Run the isi config command.
The command-line prompt changes to indicate that you are in the isi configsubsystem.
2. Modify the character encoding by running the encoding command.
The following command sets the encoding for the cluster to ISO-8859-1:
encoding ISO-8859-1
3. Run the commit command to save your changes and exit the isi configsubsystem.
4. Restart the cluster to apply character encoding modifications.
Enable or disable access time trackingYou can enable access time tracking to support features that require it.
About this task
By default, an Isilon cluster does not track the timestamp when files are accessed. Youcan enable this feature to support OneFS features that use it. For example, access-time tracking must be enabled to configure SyncIQ policy criteria that match filesbased on when they were last accessed.
Note: Enabling access-time tracking may affect cluster performance.
Procedure
1. Enable or disable access time tracking by setting the atime_enabled systemcontrol.
l To enable access time tracking, run the following command:
sysctl efs.bam.atime_enabled=1
l To disable access time tracking, run the following command:
sysctl efs.bam.atime_enabled=0
General cluster administration
Isilon OneFS CLI Administration Guide 65

2. To specify how often to update the last-accessed time, set theatime_grace_period system control.
Specify the amount of time as a number of milliseconds.
The following command configures OneFS to update the last-accessed timeevery two weeks:
sysctl efs.bam.atime_grace_period=1209600000
Security hardeningSecurity hardening is the process of configuring a system to reduce or eliminate asmany security risks as possible.
When you apply a hardening profile on an Isilon cluster, OneFS reads the securityprofile file and applies the configuration defined in the profile to the cluster. Ifrequired, OneFS identifies configuration issues that prevent hardening on the nodes.For example, the file permissions on a particular directory might not be set to theexpected value, or the required directories might be missing. When an issue is found,you can choose to allow OneFS to resolve the issue, or you can defer resolution andfix the issue manually.
Note: The intention of the hardening profile is to support the Security TechnicalImplementation Guides (STIGs) that are defined by the Defense InformationSystems Agency (DISA) and applicable to OneFS. Currently, the hardening profileonly supports a subset of requirements defined by DISA in STIGs. The hardeningprofile is meant to be primarily used in Federal accounts.
If you determine that the hardening configuration is not right for your system, OneFSallows you to revert the security hardening profile. Reverting a hardening profilereturns OneFS to the configuration achieved by resolving issues, if any, prior tohardening.
You must have an active security hardening license and be logged in to the Isiloncluster as the root user to apply hardening to OneFS. To obtain a license, contact yourIsilon sales representative.
STIG hardening profileThe OneFS STIG hardening profile contains a subset of the configurationrequirements set by the Department of Defense and is designed for Isilon clusters thatsupport Federal Government accounts. An Isilon cluster that is installed with a STIGprofile relies on the surrounding ecosystem also being secure.
After you apply the OneFS STIG hardening profile, the OneFS configuration ismodified to make the Isilon cluster more secure and support some of the controls thatare defined by the DISA STIGs. Some examples of the many system changes are asfollows:
l After you log in through SSH or the web interface, the system displays a messagethat you are accessing a U.S. Government Information System and displays theterms and conditions of using the system.
l On each node, SSH and the web interface listen only on the node's external IPaddress.
General cluster administration
66 Isilon OneFS CLI Administration Guide

l Password complexity requirements increase for local user accounts. Passwordsmust be at least 14 characters and contain at least one of each of the followingcharacter types: numeric, uppercase, lowercase, symbol.
l Root SSH is disabled. You can log in as root only through the web interface orthrough a serial console session.
Apply a security hardening profileYou can apply the OneFS STIG hardening profile to the Isilon cluster.
Before you begin
Security hardening requires root privileges and can be performed only through thecommand-line interface.
Once hardening has been successfully applied to the cluster, root SSH is not allowedon a hardened cluster. To log in as the root user on a hardened cluster, you mustconnect through the web interface or a serial console session.
You must have an active security hardening license to apply a hardening profile toOneFS. To obtain a license, contact your Isilon sales representative.
Procedure
1. Open a secure shell (SSH) connection to any node in the cluster and log in asroot.
2. Run the isi hardening apply command.
The following command directs OneFS to apply the hardening profile to theIsilon cluster.
isi hardening apply --profile=STIG
Note: STIG is a tag, not a file.
OneFS checks whether the system contains any configuration issues that mustbe resolved before hardening can be applied.
l If OneFS does not encounter any issues, the hardening profile is applied.
l If OneFS encounters issues, the system displays output similar to thefollowing example:
Found the following Issue(s) on the cluster:Issue #1 (Isilon Control_id:isi_GEN001200_01)Node: test-cluster-21: /etc/syslog.conf: Actual permission 0664; Expected permission 0654
Issue #2 (Isilon Control_id:isi_GEN001200_02)Node: test-cluster-31: /usr/bin/passwd: Actual permission 4555; Expected permission 05552: /usr/bin/yppasswd: Actual permission 4555; Expected permission 0555Node: test-cluster-21: /usr/bin/passwd: Actual permission 4555; Expected permission 05552: /usr/bin/yppasswd: Actual permission 4555; Expected permission 0555
Total: 2 issue(s)Do you want to resolve the issue(s)?[Y/N]:
General cluster administration
Isilon OneFS CLI Administration Guide 67

3. Resolve any configuration issues. At the prompt Do you want to resolvethe issue(s)?[Y/N], choose one of the following actions:
l To allow OneFS to resolve all issues, type Y. OneFS fixes the issues and thenapplies the hardening profile.
l To defer resolution and fix all of the found issues manually, type N. After youhave fixed all of the deferred issues, run the isi hardening applycommand again.
Note: If OneFS encounters an issue that is considered catastrophic, thesystem prompts you to resolve the issue manually. OneFS cannot resolve acatastrophic issue.
Revert a security hardening profileYou can revert a hardening profile that has been applied to the Isilon cluster.
Before you begin
Reverting security hardening requires root privileges and can be performed onlythrough the command-line interface. To log in as the root user on a hardened cluster,you must connect through a serial console session. Root SSH is not allowed on ahardened cluster.You must have an active security hardening license to revert a hardening profile onOneFS. To obtain a license, contact your Isilon sales representative.
Procedure
1. Open a serial console session on any node in the cluster and log in as root.
2. Run the isi hardening revert command.
OneFS checks whether the system is in an expected state.
l If OneFS does not encounter any issues, the hardening profile is reverted.
l If OneFS encounters any issues, the system displays output similar to thefollowing example:
Found the following Issue(s) on the cluster:Issue #1 (Isilon Control_id:isi_GEN001200_01)Node: test-cluster-21: /etc/syslog.conf: Actual permission 0664; Expected permission 0654
Issue #2 (Isilon Control_id:isi_GEN001200_02)Node: test-cluster-31: /usr/bin/passwd: Actual permission 4555; Expected permission 05552: /usr/bin/yppasswd: Actual permission 4555; Expected permission 0555Node: test-cluster-21: /usr/bin/passwd: Actual permission 4555; Expected permission 05552: /usr/bin/yppasswd: Actual permission 4555; Expected permission 0555
Total: 2 issue(s)Do you want to resolve the issue(s)?[Y/N]:
3. Resolve any configuration issues. At the prompt Do you want to resolvethe issue(s)?[Y/N], choose one of the following actions:
l To allow OneFS to resolve all issues, type Y. OneFS sets the affectedconfigurations to the expected state and then reverts the hardening profile.
General cluster administration
68 Isilon OneFS CLI Administration Guide

l To defer resolution and fix all of the found issues manually, type N. OneFShalts the revert process until all of the issues are fixed. After you have fixedall of the deferred issues, run the isi hardening revert commandagain.
Note: If OneFS encounters an issue that is considered catastrophic, thesystem will prompt you to resolve the issue manually. OneFS cannot resolvea catastrophic issue.
View the security hardening statusYou can view the security hardening status of the Isilon cluster and each cluster node.A cluster is not considered hardened until all of its nodes are hardened. During thehardening process, if OneFS encounters issues that must be resolved manually, or ifyou defer issues to resolve them manually, the nodes on which the issues occur arenot hardened until the issues are resolved and the hardening profile is appliedsuccessfully. If you need help resolving these issues, contact Isilon Technical Support.
Before you begin
Viewing the security hardening status of the cluster requires root privileges and can beperformed only through the command-line interface. To log in as the root user on ahardened cluster, you must connect through a serial console session. Root SSH is notallowed on a hardened cluster.
About this task
You do not need a security hardening license to view the hardening status of thecluster.
Procedure
1. Open a console session on any node in the cluster and log in as root.
2. Run the isi hardening status command to view the status of securityhardening on the Isilon cluster and each of the nodes.
The system displays output similar to the following example:
Cluster Name: test-clusterHardening Status: Not HardenedProfile: STIGNode status:test-cluster-1: Disabledtest-cluster-2: Enabledtest-cluster-3: Enabled
Cluster monitoringYou can view health and status information for the Isilon cluster and monitor clusterand node performance.
Run the isi status command to review the following information:
l Cluster, node, and drive health
l Storage data such as size and amount used
l IP addresses
l Throughput
General cluster administration
Isilon OneFS CLI Administration Guide 69

l Critical events
l Job status
Additional commands are available to review performance information for thefollowing areas:
l General cluster statistics
l Statistics by protocol or by clients connected to the cluster
l Performance data by drive
l Historical performance data
Advanced performance monitoring and analytics are available through the InsightIQmodule, which requires you to activate a separate license. For more information aboutoptional software modules, contact your Isilon sales representative.
Monitor the clusterYou can monitor the health and performance of a cluster with charts and tables.
Procedure
1. Run the following command:
isi status
View node statusYou can view the status of a node.
Procedure
1. (Optional) Run the isi status command:
The following command displays information about a node with a logical nodenumber (LNN) of 1:
isi status -n 1
Monitoring cluster hardwareYou can manually check the status of hardware on the Isilon cluster as well as enableSNMP to remotely monitor components.
View node hardware statusYou can view the hardware status of a node.
Procedure
1. Click Dashboard > Cluster Overview > Cluster Status.
2. (Optional) In the Status area, click the ID number for a node.
3. In the Chassis and drive status area, click Platform.
General cluster administration
70 Isilon OneFS CLI Administration Guide
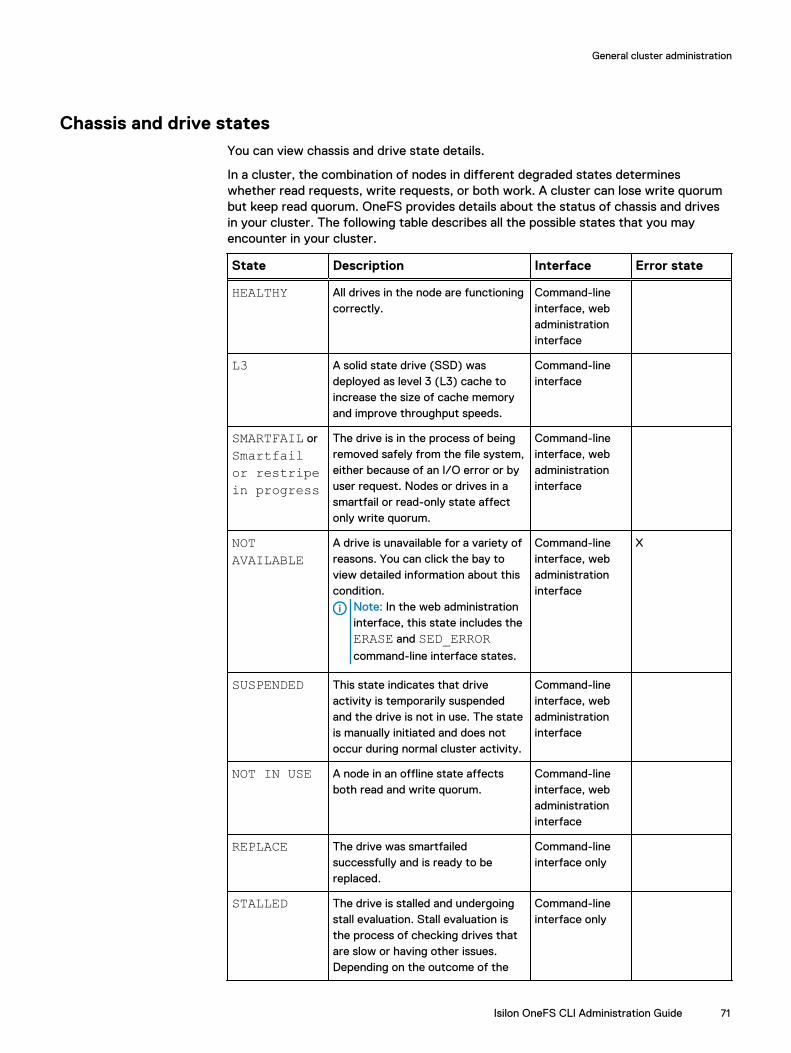
Chassis and drive statesYou can view chassis and drive state details.
In a cluster, the combination of nodes in different degraded states determineswhether read requests, write requests, or both work. A cluster can lose write quorumbut keep read quorum. OneFS provides details about the status of chassis and drivesin your cluster. The following table describes all the possible states that you mayencounter in your cluster.
State Description Interface Error state
HEALTHY All drives in the node are functioningcorrectly.
Command-lineinterface, webadministrationinterface
L3 A solid state drive (SSD) wasdeployed as level 3 (L3) cache toincrease the size of cache memoryand improve throughput speeds.
Command-lineinterface
SMARTFAIL or
Smartfailor restripein progress
The drive is in the process of beingremoved safely from the file system,either because of an I/O error or byuser request. Nodes or drives in asmartfail or read-only state affectonly write quorum.
Command-lineinterface, webadministrationinterface
NOTAVAILABLE
A drive is unavailable for a variety ofreasons. You can click the bay toview detailed information about thiscondition.
Note: In the web administrationinterface, this state includes theERASE and SED_ERRORcommand-line interface states.
Command-lineinterface, webadministrationinterface
X
SUSPENDED This state indicates that driveactivity is temporarily suspendedand the drive is not in use. The stateis manually initiated and does notoccur during normal cluster activity.
Command-lineinterface, webadministrationinterface
NOT IN USE A node in an offline state affectsboth read and write quorum.
Command-lineinterface, webadministrationinterface
REPLACE The drive was smartfailedsuccessfully and is ready to bereplaced.
Command-lineinterface only
STALLED The drive is stalled and undergoingstall evaluation. Stall evaluation isthe process of checking drives thatare slow or having other issues.Depending on the outcome of the
Command-lineinterface only
General cluster administration
Isilon OneFS CLI Administration Guide 71

State Description Interface Error state
evaluation, the drive may return toservice or be smartfailed. This is atransient state.
NEW The drive is new and blank. This isthe state that a drive is in when yourun the isi dev command with the
-a add option.
Command-lineinterface only
USED The drive was added and containedan Isilon GUID but the drive is notfrom this node. This drive likely willbe formatted into the cluster.
Command-lineinterface only
PREPARING The drive is undergoing a formatoperation. The drive state changesto HEALTHY when the format issuccessful.
Command-lineinterface only
EMPTY No drive is in this bay. Command-lineinterface only
WRONG_TYPE The drive type is wrong for thisnode. For example, a non-SED drivein a SED node, SAS instead of theexpected SATA drive type.
Command-lineinterface only
BOOT_DRIVE Unique to the A100 drive, which hasboot drives in its bays.
Command-lineinterface only
SED_ERROR The drive cannot be acknowledgedby the OneFS system.
Note: In the web administrationinterface, this state is includedin Not available.
Command-lineinterface, webadministrationinterface
X
ERASE The drive is ready for removal butneeds your attention because thedata has not been erased. You canerase the drive manually toguarantee that data is removed.
Note: In the web administrationinterface, this state is includedin Not available.
Command-lineinterface only
INSECURE Data on the self-encrypted drive isaccessible by unauthorizedpersonnel. Self-encrypting drivesshould never be used for non-encrypted data purposes.
Note: In the web administrationinterface, this state is labeledUnencrypted SED.
Command-lineinterface only
X
UNENCRYPTED Data on the self-encrypted drive isaccessible by unauthorizedpersonnel. Self-encrypting drives
Webadministrationinterface only
X
General cluster administration
72 Isilon OneFS CLI Administration Guide
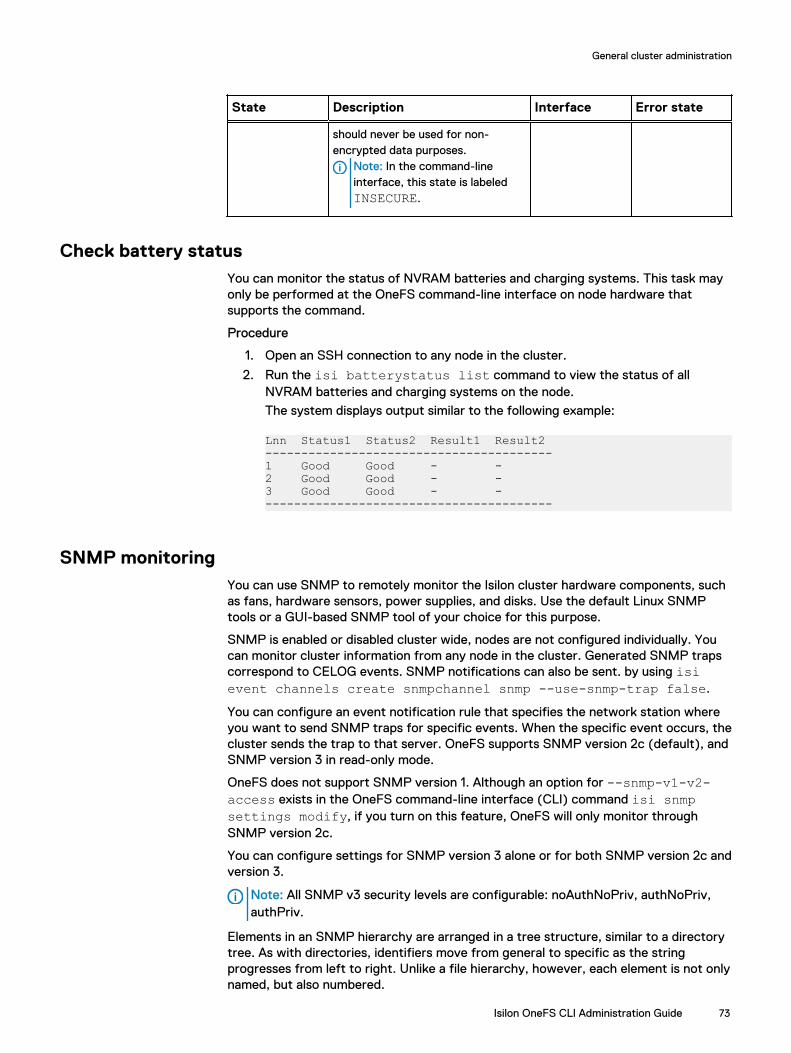
State Description Interface Error state
should never be used for non-encrypted data purposes.
Note: In the command-lineinterface, this state is labeledINSECURE.
Check battery statusYou can monitor the status of NVRAM batteries and charging systems. This task mayonly be performed at the OneFS command-line interface on node hardware thatsupports the command.
Procedure
1. Open an SSH connection to any node in the cluster.
2. Run the isi batterystatus list command to view the status of allNVRAM batteries and charging systems on the node.
The system displays output similar to the following example:
Lnn Status1 Status2 Result1 Result2----------------------------------------1 Good Good - -2 Good Good - -3 Good Good - -----------------------------------------
SNMP monitoringYou can use SNMP to remotely monitor the Isilon cluster hardware components, suchas fans, hardware sensors, power supplies, and disks. Use the default Linux SNMPtools or a GUI-based SNMP tool of your choice for this purpose.
SNMP is enabled or disabled cluster wide, nodes are not configured individually. Youcan monitor cluster information from any node in the cluster. Generated SNMP trapscorrespond to CELOG events. SNMP notifications can also be sent. by using isievent channels create snmpchannel snmp --use-snmp-trap false.
You can configure an event notification rule that specifies the network station whereyou want to send SNMP traps for specific events. When the specific event occurs, thecluster sends the trap to that server. OneFS supports SNMP version 2c (default), andSNMP version 3 in read-only mode.
OneFS does not support SNMP version 1. Although an option for --snmp-v1-v2-access exists in the OneFS command-line interface (CLI) command isi snmpsettings modify, if you turn on this feature, OneFS will only monitor throughSNMP version 2c.
You can configure settings for SNMP version 3 alone or for both SNMP version 2c andversion 3.
Note: All SNMP v3 security levels are configurable: noAuthNoPriv, authNoPriv,authPriv.
Elements in an SNMP hierarchy are arranged in a tree structure, similar to a directorytree. As with directories, identifiers move from general to specific as the stringprogresses from left to right. Unlike a file hierarchy, however, each element is not onlynamed, but also numbered.
General cluster administration
Isilon OneFS CLI Administration Guide 73

For example, the SNMP entityiso.org.dod.internet.private.enterprises.isilon.cluster.clusterStatus.clusterName.0 maps to .1.3.6.1.4.1.12124.1.1.1.0. The part ofthe name that refers to the OneFS SNMP namespace is the 12124 element. Anythingfurther to the right of that number is related to OneFS-specific monitoring.
Management Information Base (MIB) documents define human-readable names formanaged objects and specify their data types and other properties. You can downloadMIBs that are created for SNMP-monitoring of an Isilon cluster from the OneFS webadministration interface or manage them using the command line interface (CLI).MIBs are stored in /usr/share/snmp/mibs/ on a OneFS node. The OneFSISILON-MIBs serve two purposes:
l Augment the information available in standard MIBs
l Provide OneFS-specific information that is unavailable in standard MIBs
ISILON-MIB is a registered enterprise MIB. Isilon clusters have two separate MIBs:
ISILON-MIB
Defines a group of SNMP agents that respond to queries from a networkmonitoring system (NMS) called OneFS Statistics Snapshot agents. As the nameimplies, these agents snapshot the state of the OneFS file system at the time thatit receives a request and reports this information back to the NMS.
ISILON-TRAP-MIB
Generates SNMP traps to send to an SNMP monitoring station when thecircumstances occur that are defined in the trap protocol data units (PDUs).
The OneFS MIB files map the OneFS-specific object IDs with descriptions. Downloador copy MIB files to a directory where your SNMP tool can find them, such as /usr/share/snmp/mibs/.
To enable Net-SNMP tools to read the MIBs to provide automatic name-to-OIDmapping, add -m All to the command, as in the following example:
snmpwalk -v2c I$ilonpublic -m All <node IP> isilon
During SNMP configuration, it is recommended that you change the mapping tosomething similar to the following:
isi snmp settings modify -c <newcommunitystring>
If the MIB files are not in the default Net-SNMP MIB directory, you may need tospecify the full path, as in the following example. All three lines are a single command.
snmpwalk -m /usr/local/share/snmp/mibs/ISILON-MIB.txt:/usr \/share/snmp/mibs/ISILON-TRAP-MIB.txt:/usr/share/snmp/mibs \/ONEFS-TRAP-MIB.txt -v2c -C c -c public isilon
Note: The previous examples are run from the snmpwalk command on a cluster.Your SNMP version may require different arguments.
General cluster administration
74 Isilon OneFS CLI Administration Guide
Managing SNMP settingsYou can use SNMP to monitor cluster hardware and system information. You canconfigure settings through either the web administration interface or the command-line interface.
The default SNMP v3 username (general) and password, can be changed to anythingfrom the CLI or the WebUI. The username is only required when SNMP v3 is enabledand making SNMP v3 queries.
Configure a network monitoring system (NMS) to query each node directly through astatic IPv4 address. If a node is configured for IPv6, you can communicate with SNMPover IPv6.
The SNMP proxy is enabled by default, and the SNMP implementation on each node isconfigured automatically to proxy for all other nodes in the cluster except itself. Thisproxy configuration allows the Isilon Management Information Base (MIB) andstandard MIBs to be exposed seamlessly through the use of context strings forsupported SNMP versions. This approach allows you to query a node through anothernode by appending _node_<node number> to the community string of the query. Forexample, snmpwalk -m /usr/share/snmp/mibs/ISILON-MIB.txt -v 2c -c'I$ilonpublic_node_1' localhost <nodename>.
Configure SNMP settingsYou can configure SNMP monitoring settings.
About this task
Note: When SNMP v3 is used, OneFS requires the SNMP-specific security levelof AuthNoPriv as the default value when querying the Isilon cluster. The securitylevel AuthPriv is not supported.
Procedure
l The following isi snmp settings modify command enables SNMP v3access:
isi snmp settings modify --snmp-v3-access=yes
l The following isi snmp settings modify command configures the securitylevel, the authentication password and protocol, and the privacy password andprotocol:
isi snmp settings modify --help ... [--snmp-v3-access ][{--snmp-v3-read-only-user | -u} ] [--snmp-v3-auth-protocol (SHA |MD5)] [--snmp-v3-priv-protocol (AES | DES)][--snmp-v3-security-level (noAuthNoPriv | authNoPriv | authPriv)][{--snmp-v3-password | -p} ] [--snmp-v3-priv-password ][--set-snmp-v3-password] [--set-snmp-v3-priv-password]
General cluster administration
Isilon OneFS CLI Administration Guide 75

Configure the cluster for SNMP monitoringYou can configure your Isilon cluster to remotely monitor hardware components usingSNMP.
Procedure
1. Click Cluster Management > General Settings > SNMP Monitoring.
2. In the SNMP Service Settings, click the Enable SNMP Service check box.The SNMP service is enabled by default.
3. Download the MIB file you want to use (base or trap).
Follow the download process that is specific to your browser.
4. Copy the MIB files to a directory where your SNMP tool can find them, suchas /usr/share/snmp/mibs/.
To have Net-SNMP tools read the MIBs to provide automatic name-to-OIDmapping, add -m All to the command, as in the following example:
snmpwalk -v2c -c public -m All <node IP> isilon
5. If your protocol is SNMPv2, ensure that the Allow SNMPv2 Access check boxis selected. SNMPv2 is selected by default.
6. In the SNMPv2 Read-Only Community Name field, enter the appropriatecommunity name. The default is I$ilonpublic.
7. To enable SNMPv3, click the Allow SNMPv3 Access check box.
8. Configure SNMP v3 Settings:
a. In the SNMPv3 Read-Only User Name field, type the SNMPv3 securityname to change the name of the user with read-only privileges.
The default read-only user is general.
b. In the SNMPv3 Read-Only Password field, type the new password for theread-only user to set a new SNMPv3 authentication password.
The default password is password. We recommend that you change thepassword to improve security. The password must contain at least eightcharacters and no spaces.
c. Type the new password in the Confirm password field to confirm the newpassword.
9. In the SNMP Reporting area, enter a cluster description in the ClusterDescription field.
10. In the System Contact Email field, enter the contact email address.
11. Click Save Changes.
View SNMP settingsYou can review SNMP monitoring settings.
Procedure
l Run the following command:
isi snmp settings view
General cluster administration
76 Isilon OneFS CLI Administration Guide

This is an example of the output generated by the command:
$ isi snmp settings view System Location: unset System Contact: [email protected] SNMP V1 V2C Access: Yes Read Only Community: I$ilonpublic SNMP V3 Access: NoSNMP V3 Read Only User: general SNMP V3 Auth Protocol: MD5 SNMP V3 Priv Protocol: AESSNMP V3 Security Level: authNoPriv SNMP Service Enabled: Yes
Events and alertsOneFS continuously monitors the health and performance of your cluster andgenerates events when situations occur that might require your attention.
Events can be related to file system integrity, network connections, jobs, hardware,and other vital operations and components of your cluster. After events are captured,they are analyzed by OneFS. Events with similar root causes are organized into eventgroups.
An event group is a single point of management for numerous events related to aparticular situation. You can determine which event groups you want to monitor,ignore, or resolve.
An alert is the message that reports on a change that has occurred in an event group.
You can control how alerts related to an event group are distributed. Alerts aredistributed through channels. You can create and configure a channel to send alerts toa specific audience, control the content the channel distributes, and limit frequency ofthe alerts.
Events overviewEvents are individual occurrences or conditions related to the data workflow,maintenance operations, and hardware components of your cluster.
Throughout OneFS there are processes that are constantly monitoring and collectinginformation on cluster operations.
When the status of a component or operation changes, the change is captured as anevent and placed into a priority queue at the kernel level.
Every event has two ID numbers that help to establish the context of the event:
l The event type ID identifies the type of event that has occurred.
l The event instance ID is a unique number that is specific to a particular occurrenceof an event type. When an event is submitted to the kernel queue, an eventinstance ID is assigned. You can reference the instance ID to determine the exacttime that an event occurred.
You can view individual events. However, you manage events and alerts at the eventgroup level.
General cluster administration
Isilon OneFS CLI Administration Guide 77

Alerts overviewAn alert is a message that describes a change that has occurred in an event group.
At any point in time, you can view event groups to track situations occurring on yourcluster. However, you can also create alerts that will proactively notify you if there is achange in an event group.
For example, you can generate an alert when a new event is added to an event group,when an event group is resolved, or when the severity of an event group changes.
You can configure your cluster to only generate alerts for specific event groups,conditions, severity, or during limited time periods.
Alerts are delivered through channels. You can configure a channel to determine whowill receive the alert and when.
Channels overviewChannels are pathways by which event groups send alerts.
When an alert is generated, the channel that is associated with the alert determineshow the alert is distributed and who receives the alert.
You can configure a channel to deliver alerts with one of the following mechanisms:SMTP, SNMP, or Connect Home. You can also specify the required routing andlabeling information for the delivery mechanism.
Event groups overviewEvent groups are collections of individual events that are related symptoms of a singlesituation on your cluster. Event groups provide a single point of management formultiple event instances that are generated in response to a situation on your cluster.
For example, if a chassis fan fails in a node, OneFS might capture multiple eventsrelated both to the failed fan itself, and to exceeded temperature thresholds withinthe node. All events related to the fan will be represented in a single event group.Because there is a single point of contact, you do not need to manage numerousindividual events. You can handle the situation as a single, coherent issue.
All management of events is performed at the event group level. You can mark anevent group as resolved or ignored. You can also configure how and when alerts aredistributed for an event group.
Viewing and modifying event groupsYou can view event and modify the status of event groups.
View an event group
About this task
Use the isi event groups list command to view event groups.
Procedure
1. (Optional) To identify the group ID of the event group that you want to view,run the following command:
isi event groups list
General cluster administration
78 Isilon OneFS CLI Administration Guide

2. To view the details of a specific event group, run the isi event groupsview command and specify the event group ID.
The following example command displays the details for an event group with theevent group ID of 65686:
isi event groups view 65686
The system displays output similar to the following example:
ID: 65686 Started: 08/15 02:12Causes Long: Node 2 offline Last Event: 2015-08-15T03:01:17 Ignore: NoIgnore Time: Never Resolved: Yes Ended: 08/15 02:46 Events: 6 Severity: critical
Stop alerts for a single event groupYou can stop alerts for a single event group by running a script for OneFS 8.0.0.4 andearlier.
About this task
This procedure provides an example for specifically excluding event 400160001.
Procedure
1. (Optional) Create a script with the file name, eventgroups.py:
#!/usr/bin/pythonimport json
efile="/etc/celog/events.json"egfile="/etc/celog/eventgroups.json"
with open(efile, "r") as ef: e = json.loads(ef.read())with open(egfile, "r") as egf: eg = json.loads(egf.read())
out = []symptoms = []for eg,v in eg.iteritems(): if eg != v["name"]: print "warning.. name not same %s" % eg out += [eg] for s in v["symptoms"]: symptoms += [s]
for e,v in e.iteritems(): if e not in symptoms: out += [e]
print ",".join(out)
2. To stop alerts for a single event group type 400160001(SW_AUDIT_CEE_UNREACHABLE):
General cluster administration
Isilon OneFS CLI Administration Guide 79
a. Configure email alerts for all event groups except 400160001:
isi event channels create mychannel smtp --address [email protected] --smtp_host smtp.isilon.comisi event alert create myalert NEW mychannel --eventgroup `./eventgroups.py | sed 's/,400160001//'
b. View the alert configuration:
csmithhart-rt4x-1# isi event alert view myalert Name: myalertEventgroup: synciq, storage_transport, hwmon, windows_auth, overheating, physmem, reboot, powersupply, reboot-fail, avscan, filesystem, windows_idmap, external_network, toocold, windows_networking, 400050001, 400050002, 400050003, 400050004, 400110001, 900150001, 500010005, 500010004, 900130014, 500010001, 500010003, 500010002, 400140002, 900010012, 800010009, 400040012, 400140001, 600010003, 900130005, 600010001, 400060004, 900100009, 900100008, 200010002, 200010003, 600010004, 200010001, 200010006, 900100002, 900100001, 200010005, 900060033, 900060032, 900130011, 900130010, 400130001, 900100005, 900130015, 400040020, 910100007, 400210002, 900060030, 900010013, 600010005, 900060037, 910100006, 900060035, 400150003, 400150002, 400150001, 900060034, 900140001, 400150005, 400150004, 1100000008, 900100011, 900080033, 900100013, 900100016, 900100017, 900100018, 1100000001, 1100000002, 1100000003, 1100000004, 1100000005, 1100000006, 1100000007, 900130008, 900130009, 700100001, 900130004, 900100007, 900130006, 900130007, 100010009, 900040055, 400210001, 100010001, 900090023, 100010003, 100010002, 900020033, 400070004, 900100006, 400070005, 900110004, 400030002, 400120001, 400030001, 400130002, 100010018, 800010006, 100010012, 100010013, 100010010, 100010011, 600010002, 100010017, 100010014, 100010015, 900100004, 900140005, 200020003, 920100002, 400100004, 400100005, 400100002, 400100003, 400100001, 900100003, 400080001, 900010008, 920100005, 900090046, 100010029, 100010028, 100010027, 100010026, 100010025, 100010024, 100010023, 900100010, 700020003, 900060038, 700030005, 900060031, 900060036, 900100021, 900100020, 900100015, 900110005, 800010008, 100010030, 100010031, 900010003, 900010002, 900010005, 900010004, 900010007, 900010006, 900010009, 400100011, 700010005, 920100009, 400090001, 400090002, 400090003, 900060027, 900100026, 900040033, 100010045, 100010044, 900010010, 900010011, 100010041, 100010040, 100010043, 100010042, 900120005, 900120004, 900100012, 900100014, 400020002, 400020001, 900060029, 700040001, 900100022, 900100027, 700050001, 920100008, 900100019, 920100001, 920100000, 920100003, 920100004, 920100007, 920100006 Category: - Sev: * Channel: mychannelCondition: NEW
General cluster administration
80 Isilon OneFS CLI Administration Guide

c. Verify that alert 400160001 does not send:
/usr/bin/isi_celog/celog_send_events.py -o 400160001
d. Verify that other alerts send:
/usr/bin/isi_celog/celog_send_events.py -o 400050001
Change the status of an event groupYou can ignore or resolve an event group.
Procedure
1. (Optional) To identify the group ID of the event group that you want modify,run the following command:
isi event groups list
2. To change the status of an event group, run the isi event groups modifycommand. To change the status of all event groups at once, run the isievent groups bulk command.
The following example command modifies an event group with the event groupID of 7 to a status of ignored:
isi event groups modify 7 --ignored true
The following example command changes the status of all event groups toresolved:
isi event groups bulk --resolved true
View an eventYou can view the details of a specific event.
Procedure
1. (Optional) To identify the instance ID of the event that you want to view, runthe following command:
isi event events list
2. To view the details of a specific event, run the isi event events viewcommand and specify the event instance ID.
The following example command displays the details for an event with theinstance ID of 3.121:
isi event events view 3.121
General cluster administration
Isilon OneFS CLI Administration Guide 81

The system displays output similar to the following example:
ID: 3.121Eventgroup ID: 7 Event Type: 200020001 Message: Gigabit Ethernet link ext-1 (vmx1) running below capacity Devid: 3 Lnn: 3 Time: 2015-08-04T16:02:10 Severity: warning Value: 1.0
Managing alertsYou can view, create, modify, or delete alerts to determine the information you deliverabout event groups.
View an alertYou can view the details of a specific alert.
Procedure
1. (Optional) To identify the alert ID of the alert that you want to view, run thefollowing command:
isi event alerts list
2. To view the details of a specific alert, run the isi event alerts viewcommand and specify the name of the alert.
The following example command displays the details for an event with the nameNewExternal:
isi event alerts view NewExternal
The name of the alert is case-sensitive.
The system displays output similar to the following example:
Name: NewExternalEventgroup: 3 Category: 200000000, 700000000, 900000000 Channel: RemoteSupport Condition: NEW
Create a new alertYou can create new alerts to provide specific updates on event groups.
Procedure
1. Run the isi event alerts create command.
General cluster administration
82 Isilon OneFS CLI Administration Guide

The following command creates an alert named Hardware, sets the alertcondition to NEW_EVENTS, and sets the channel that will broadcast the eventas RemoteSupport:
isi event alerts create Hardware NEW-EVENTS --channel RemoteSupport
The following command creates an alert named ExternalNetwork, sets the alertcondition to NEW, sets the source event group to the event group with the IDnumber 3, sets the channel that will broadcast the event as RemoteSupport,sets the severity level to critical, and sets the maximum alert limit to 10:
isi event alerts create ExternalNetwork NEW --eventgroup 3 --channel RemoteSupport --severity critical --limit 10
Modify an alertYou can modify an alert that you created.
Procedure
1. (Optional) To identify the name of the alert that you want to modify, run thefollowing command:
isi event alerts list
2. Modify an alert by running the isi event alerts modify command.
The following example command modifies the alert named ExternalNetwork bychanging the name of the alert to ExtNetwork, adding the event group with anevent group ID number of 131091, and filtering so that alerts will only be sent forevent groups with a severity value of critical:
isi event alerts modify ExternalNetwork --name ExtNetwork --add-eventgroup 131091 --severity critical
Delete an alertYou can delete alerts that you created.
Procedure
1. (Optional) To identify the name of the alert that you want to delete, run thefollowing command:
isi event alerts list
2. Delete an alert by running the isi event alerts delete command.
The following example command deletes the alert named ExtNetwork:
isi event alerts delete ExtNetwork
The name of the alert is case-sensitive.
General cluster administration
Isilon OneFS CLI Administration Guide 83
3. Type yes to confirm deletion.
Managing channelsYou can view, create, modify, or delete channels to determine how you deliverinformation about event groups.
View a channelYou can view the details of a specific channel.
Procedure
1. (Optional) To identify the name of the channel that you want to view, run thefollowing command:
isi event channels list
2. To view the details of a channel, run the isi event channels viewcommand and specify the name of the channel.
The following example command displays the details for a channel with thename Support:
isi event channels view Support
The name of the channel is case-sensitive.
The system displays output similar to the following example:
ID: 3 Name: Support Type: smtp Enabled: YesExcluded Nodes: 2 Address: [email protected] Send As: [email protected] Subject: Support Request SMTP Host: - SMTP Port: 25 SMTP Use Auth: No SMTP Username: - SMTP Password: - SMTP Security: - Batch: NONE Enabled: Yes Allowed Nodes: 1
Create a channelYou can create and configure new channels to send out alert information.
About this task
You can configure a channel to deliver alerts with one of the following:
l SMTP
l SNMP
l Connect Home
Run the isi event channels create command to create an events channel. Theauth-protocol can be SHA or MD5, and the priv-protocol can be AES or DES.
General cluster administration
84 Isilon OneFS CLI Administration Guide

The command must include the following information:
$ isi event channels create snmpchannel snmp --host <snmptrap daemon ip address>$ isi event channels modify snmpchannel --use-snmp-trap True --snmp-use-v3 True$ isi event channels modify snmpchannel --snmp-auth-protocol SHA --snmp-auth-password mypassword1$ isi event channels modify snmpchannel --snmp-priv-protocol AES --snmp-priv-password mypassword2$ isi event channels modify snmpchannel --snmp-engine-id 0x80002F5C809104C90F67E95B4C$ isi event channels modify snmpchannel --snmp-security-level authPriv --snmp-security-namev3user
Modify a channelYou can modify a channel that you created.
Procedure
1. (Optional) To identify the name of the channel that you want to modify, run thefollowing command:
isi event channels list
2. Modify a channel by running the isi event channels modify command.
The following example command modifies the channel named Support bychanging the send-from email address to [email protected]:
isi event channels modify Support --send-as [email protected]
The following example command modifies the channel named Support bychanging the SMTP username to admin, and the SMTP password to p@ssword:
isi event channels modify Support --smtp-username admin --smtp-password p@ssword
Delete a channelYou can delete channels that you created.
Before you begin
You will not be able to delete a channel that is currently in use by an alert. Remove achannel from an alert by running the isi event alerts modify command.
Procedure
1. (Optional) To identify the name of the channel that you want to delete, run thefollowing command:
isi event channels list
2. Delete a channel by running the isi event channels delete command.
General cluster administration
Isilon OneFS CLI Administration Guide 85
The following example command deletes the alert named Support:
isi event channels delete Support
The name of the channel is case-sensitive.
3. Type yes to confirm deletion.
Maintenance and testingYou can modify event settings to specify retention and storage limits for event data,schedule maintenance windows, and send test events.
Event data retention and storage limitsYou can modify settings to determine how event data is handled on your cluster.
By default, data related to resolved event groups is retained indefinitely. You can set aretention limit to make the system automatically delete resolved event group dataafter a certain number of days.
You can also limit the amount of memory that event data can occupy on your cluster.By default, the limit is 1 megabyte of memory for every 1 terabyte of total memory onthe cluster. You can adjust this limit to be between 1 and 100 megabytes of memory.For smaller clusters, the minimum amount of memory that will be set aside is 1gigabyte.
When your cluster reaches a storage limit, the system will begin deleting the oldestevent group data to accommodate new data.
View event storage settings
You can view your storage and maintenance settings.
Procedure
1. To view , run the isi event settings view command.
The system displays output similar to the following example:
Retention Days: 90 Storage Limit: 1 Maintenance Start: 2015-08-05T08:00:00Maintenance Duration: 4H Heartbeat Interval: daily
Modify event storage settings
You can modify your storage and maintenance settings.
Procedure
1. Modify your settings by running the isi event settings modifycommand.
The following example command changes the number of days that resolvedevent groups are saved to 120:
isi event settings modify --retention-days 120
General cluster administration
86 Isilon OneFS CLI Administration Guide
The following example command changes the storage limit for event data to 5MB for every 1 TB of total cluster storage:
isi event settings modify --storage-limit 5
Maintenance windowsYou can schedule a maintenance window by setting a maintenance start time andduration.
During a scheduled maintenance window, the system will continue to log events, butno alerts will be generated. Scheduling a maintenance window will keep channels frombeing flooded by benign alerts associated with cluster maintenance procedures.
Active event groups will automatically resume generating alerts when the scheduledmaintenance period ends.
Schedule a maintenance window
You can schedule a maintenance window to discontinue alerts while you areperforming maintenance on your cluster.
Procedure
1. Schedule a maintenance window by running the isi event settingsmodify command.
The following example command schedules a maintenance window that beginson September 1, 2015 at 11:00pm and lasts for two days:
isi event settings modify --maintenance-start 2015-09-01T23:00:00 --maintenance-duration 2D
Test events and alertsTest events called heartbeat events are automatically generated. You can alsomanually generate test alerts.
In order to confirm that the system is operating correctly, test events areautomatically sent every day, one event from each node in your cluster. These arereferred to as heartbeat events and are reported to an event group named HeartbeatEvent.
To test the configuration of channels, you can manually send a test alert through thesystem.
Create a test alert
You can manually generate a test alert.
Procedure
1. Manually generate a test alert by running the isi event test createcommand.
The following example command creates a test alert with the message Testmessage:
isi event test create "Test message"
General cluster administration
Isilon OneFS CLI Administration Guide 87
Modify the heartbeat event
You can change the frequency that a heartbeat event is generated.
About this task
This procedure is available only through the command-line interface.
Procedure
1. Open a secure shell (SSH) connection to any node in the cluster and log in.
2. Modify the heartbeat event interval by running the isi event settingsmodify command.
The following example command modifies the heartbeat event so that it is senton a weekly basis:
isi event settings modify --heartbeat-interval weekly
Cluster maintenanceTrained service personnel can replace or upgrade components in Isilon nodes.
Isilon Technical Support can assist you with replacing node components or upgradingcomponents to increase performance.
Replacing node componentsIf a node component fails, Isilon Technical Support will work with you to quicklyreplace the component and return the node to a healthy status.
Trained service personnel can replace the following field replaceable units (FRUs):
l battery
l boot flash drive
l SATA/SAS Drive
l memory (DIMM)
l fan
l front panel
l intrusion switch
l network interface card (NIC)
l InfiniBand card
l NVRAM card
l SAS controller
l power supply
If you configure your cluster to send alerts to Isilon, Isilon Technical Support willcontact you if a component needs to be replaced. If you do not configure your clusterto send alerts to Isilon, you must initiate a service request.
Upgrading node componentsYou can upgrade node components to gain additional capacity or performance.
Trained service personnel can upgrade the following components in the field:
General cluster administration
88 Isilon OneFS CLI Administration Guide

l drive
l memory (DIMM)
l network interface card (NIC)
If you want to upgrade components in your nodes, contact Isilon Technical Support.
Automatic Replacement Recognition (ARR) for drivesWhen a drive is replaced in a node, OneFS automatically formats and adds the drive tothe cluster.
If you are replacing a drive in a node, either to upgrade the drive or to replace a faileddrive, you do not need to take additional actions to add the drive to the cluster. OneFSwill automatically format the drive and add it.
ARR will also automatically update the firmware on the new drive to match the currentdrive support package installed on the cluster. Drive firmware will not be updated forthe entire cluster, only for the new drive.
If you prefer to format and add drives manually, you can disable ARR.
View Automatic Replacement Recognition (ARR) statusYou can confirm whether ARR is enabled on your cluster.
Procedure
1. To confirm whether ARR is enabled on your cluster, run the following command:
isi devices config view --node-lnn all
The system displays configuration information for each node by Logical NodeNumber (LNN). As part of the configuration display, you will see the ARR statusfor each node:
Automatic Replacement Recognition:Enabled : True
2. To view the ARR status of a specific node, run the isi devices configview command and specify the LNN of the node you want to view.
If you don't specify a node LNN, the configuration information for the localnode you are connecting through will display.
The following example command displays the ARR status for the node with theLNN of 2:
isi devices config view --node-lnn 2
Enable or Disable Automatic Replacement Recognition (ARR)You can enable or disable ARR for your entire cluster, or just for specific nodes.
About this task
By default, ARR is enabled on all nodes.
General cluster administration
Isilon OneFS CLI Administration Guide 89

Procedure
1. To disable ARR for your entire cluster, run the following command:
isi devices config modify --automatic-replacement-recognition no
2. To enable ARR for your entire cluster, run the following command:
isi devices config modify --automatic-replacement-recognition yes
3. To disable ARR for a specific node, run the isi devices config modifycommand with the ARR parameter and specify the LNN of the node.
If you don't specify a node LNN, the command will be applied to the entirecluster.
The following example command disables ARR for the node with the LNN of 2:
isi devices config modify --automatic-replacement-recognition no --node-lnn 2
Note: We recommend that you keep your ARR settings consistent across allnodes. Changing ARR settings on specific nodes can lead to confusionduring drive maintenance.
4. To enable ARR for a specific node, run the isi devices config modifycommand with the ARR parameter and specify the LNN of the node.
If you don't specify a node LNN, the command will be applied to the entirecluster.
The following example command enables ARR for the node with the LNN of 2:
isi devices config modify --automatic-replacement-recognition yes --node-lnn 2
Managing drive firmwareIf the firmware of any drive in a cluster becomes obsolete, the cluster performance orhardware reliability might get affected. To ensure overall data integrity, you mayupdate the drive firmware to the latest revision by installing the drive support packageor the drive firmware package.
You can determine whether the drive firmware on your cluster is of the latest revisionby viewing the status of the drive firmware.
Note: We recommend that you contact Isilon Technical Support before updatingthe drive firmware.
General cluster administration
90 Isilon OneFS CLI Administration Guide
Drive firmware update overviewYou can update the drive firmware through drive support packages or drive firmwarepackages.
Download and install either of these packages from Online Support depending on theOneFS version running on your cluster and the type of drives on the nodes.
Drive Support Package
For clusters running OneFS 7.1.1 and later, install a drive support package to updatethe drive firmware. You do not need to reboot the affected nodes to complete thefirmware update. A drive support package provides the following additionalcapabilities:
l Updates the following drive configuration information:
n List of supported drives
n Drive firmware metadata
n SSD wear monitoring data
n SAS and SATA settings and attributes
l Automatically updates the drive firmware for new and replacement drives to thelatest revision before those drives are formatted and used in a cluster. This isapplicable only for clusters running OneFS 7.2 and later.
Note: Firmware of drives in use cannot be updated automatically.
Drive Firmware Package
For clusters running OneFS versions earlier than 7.1.1, or for clusters with non-bootflash nodes, install a cluster-wide drive firmware package to update the drivefirmware. You must reboot the affected nodes to complete the firmware update.
Install a drive support packageThe following instructions are for performing a non-disruptive firmware update(NDFU) with a drive support package (DSP).
About this task
CAUTION Please refer to the table in the System requirements section above toconfirm that you are performing the correct procedure for your node type andOneFS version.
Procedure
1. Go to the Dell EMC Support page that lists all the available versions of the drivesupport package.
2. Click the latest version of the drive support package and download the file.
Note: If you are unable to download the package, contact Isilon TechnicalSupport for assistance.
3. Open a secure shell (SSH) connection to any node in the cluster and log in.
4. Create or check for the availability of the directory structure /ifs/data/Isilon_Support/dsp.
5. Copy the downloaded file to the dsp directory through SCP, FTP, SMB, NFS,or any other supported data-access protocols.
General cluster administration
Isilon OneFS CLI Administration Guide 91

6. Unpack the file by running the following command:
tar -zxvf Drive_Support_<version>.tgz
7. Install the package by running the following command:
isi_dsp_install Drive_Support_<version>.tar
Note:
l You must run the isi_dsp_install command to install the drivesupport package. Do not use the isi pkg command.
l Running isi_dsp_install will install the drive support package on theentire cluster.
l The installation process takes care of installing all the necessary filesfrom the drive support package followed by the uninstallation of thepackage. You do not need to delete the package after its installation orprior to installing a later version.
Drive firmware status informationYou can view information about the status of the drive firmware through the OneFScommand-line interface.
The following example shows the output of the isi devices drive firmwarelist command:
your-cluster-1# isi devices drive firmware listLnn Location Firmware Desired Model------------------------------------------------------2 Bay 1 A204 - HGST HUSMM1680ASS2002 Bay 2 A204 - HGST HUSMM1680ASS2002 Bay 3 MFAOABW0 MFAOAC50 HGST HUS724040ALA6402 Bay 4 MFAOABW0 MFAOAC50 HGST HUS724040ALA6402 Bay 5 MFAOABW0 MFAOAC50 HGST HUS724040ALA6402 Bay 6 MFAOABW0 MFAOAC50 HGST HUS724040ALA6402 Bay 7 MFAOABW0 MFAOAC50 HGST HUS724040ALA6402 Bay 8 MFAOABW0 MFAOAC50 HGST HUS724040ALA6402 Bay 9 MFAOABW0 MFAOAC50 HGST HUS724040ALA6402 Bay 10 MFAOABW0 MFAOAC50 HGST HUS724040ALA6402 Bay 11 MFAOABW0 MFAOAC50 HGST HUS724040ALA6402 Bay 12 MFAOABW0 MFAOAC50 HGST HUS724040ALA640------------------------------------------------------Total: 12
Where:
LNN
Displays the LNN for the node that contains the drive.
Location
Displays the bay number where the drive is installed.
Firmware
Displays the version number of the firmware currently running on the drive.
Desired
If the drive firmware should be upgraded, displays the version number of the drivefirmware that the firmware should be updated to.
General cluster administration
92 Isilon OneFS CLI Administration Guide

Model
Displays the model number of the drive.
Note: The isi devices drive firmware list command displays firmwareinformation for the drives in the local node only. You can display drive firmwareinformation for the entire cluster, not just the local cluster, by running thefollowing command:isi devices drive firmware list --node-lnn all
Update the drive firmwareYou can update the drive firmware to the latest revision; updating the drive firmwareensures overall data integrity.
About this taskThis procedure explains how to update the drive firmware on nodes that havebootflash drives after you have installed the latest drive support package. For a list ofnodes with bootflash drives, see the System requirements section of the Isilon DriveSupport Package Release Notes.
To update the drive firmware on nodes without bootflash drives, download and installthe latest drive firmware package. For more information, see the latest drive firmwarepackage release notes at Online Support.
Note: Power cycling drives during a firmware update might return unexpectedresults. As a best practice, do not restart or power off nodes when the drivefirmware is being updated in a cluster.
Procedure
1. Open a secure shell (SSH) connection to any node in the cluster and log in.2. Run the following command to update the drive firmware for your entire cluster:
isi devices drive firmware update start all --node-lnn allTo update the drive firmware for a specific node only, run the followingcommand:
isi devices drive firmware update start all --node-lnn<node-number>
CAUTION You must wait for one node to finish updating before you initiatean update on the next node. To confirm that a node has finished updating,run the following command:isi devices drive firmware update listA drive that is still updating will display a status of FWUPDATE.
Updating the drive firmware of a single drive takes approximately 15 seconds,depending on the drive model. OneFS updates drives sequentially.
Verify a drive firmware updateAfter you update the drive firmware in a node, confirm that the firmware is updatedproperly and that the affected drives are operating correctly.
Procedure
1. Ensure that no drive firmware updates are currently in progress by running thefollowing command:
isi devices drive firmware update list
General cluster administration
Isilon OneFS CLI Administration Guide 93

If a drive is currently being updated, [FW_UPDATE] appears in the statuscolumn.
2. Verify that all drives have been updated by running the following command:
isi devices drive firmware list --node-lnn all
If all drives have been updated, the Desired FW column is empty.
3. Verify that all affected drives are operating in a healthy state by running thefollowing command:
isi devices drive list --node-lnn all
If a drive is operating in a healthy state, [HEALTHY] appears in the statuscolumn.
Automatic update of drive firmwareFor clusters running OneFS 7.2 or later, install the latest drive support package on anode to automatically update the firmware for a new or replacement drive.
The information within the drive support package determines whether the firmware ofa drive must be updated before the drive is formatted and used. If an update isavailable, the drive is automatically updated with the latest firmware.
Note: New and replacement drives added to a cluster are formatted regardless ofthe status of their firmware revision. You can identify a firmware update failure byviewing the firmware status for the drives on a specific node. In case of a failure,run the isi devices command with the fwupdate action on the node toupdate the firmware manually. For example, run the following command tomanually update the firmware on node 1:
isi devices -a fwupdate -d 1
Managing cluster nodesYou can add and remove nodes from a cluster. You can also shut down or restart theentire cluster.
Add a node to a clusterYou can add a new node to an existing Isilon cluster.
Before you begin
Before you add a node to a cluster, verify that an internal IP address is available. AddIP addresses as necessary before you add a new node.
About this task
If a new node is running a different version of OneFS than a cluster, the systemchanges the node version of OneFS to match the cluster.
Note: For specific information about version compatibility between OneFS andIsilon hardware, refer to the Isilon Supportability and Compatibility Guide.
General cluster administration
94 Isilon OneFS CLI Administration Guide

Procedure
1. To identify the serial number of the node to be added, run the followingcommand:
isi devices node list
2. To join the node to the cluster, run the following command:
isi devices node add <serial-number>
For example, the following command joins a node to the cluster with a serialnumber of 43252:
isi devices node add 43252
Remove a node from the clusterYou can remove a node from a cluster. When you remove a node, the systemsmartfails the node to ensure that data on the node is transferred to other nodes inthe cluster.
About this task
Removing a storage node from a cluster deletes the data from that node. Before thesystem deletes the data, the FlexProtect job safely redistributes data across thenodes remaining in the cluster.
Procedure
1. Run the isi devices command.
The following command removes a node with a logical node number (LNN) of 2from the cluster:
isi devices --action smartfail --device 2
Modify the LNN of a nodeYou can modify the logical node number (LNN) of a node. This procedure is availableonly through the command-line interface (CLI).
About this task
The nodes within your cluster can be renamed to any name/integer between 1 and144. By changing the name of your node, you are resetting the LNN.
Note: Although you can specify any integer as an LNN, we recommend that youdo not specify an integer greater than 144. Specifying LNNs above 144 can resultin significant performance degradation.
Procedure
1. Open a secure shell (SSH) connection to any node in the cluster and log in.
2. Open the isi config command prompt by running the following command:
isi config
General cluster administration
Isilon OneFS CLI Administration Guide 95

3. Run the lnnset command.
The following command switches the LNN of a node from 12 to 73:
lnnset 12 73
4. Enter commit .
Results
You might need to reconnect to your SSH session before the new node name isautomatically changed.
Restart or shut down the clusterYou can restart or shut down the Isilon cluster.
Procedure
1. Run the isi config command.
The command-line prompt changes to indicate that you are in the isi configsubsystem
2. Restart or shutdown nodes on the cluster.
l To restart a single node or all nodes on the cluster, run the rebootcommand.
The following command restarts a single node by specifying the LNN (logicalnode number):
reboot 7
l To shut down a single node or all nodes on the cluster, run the shutdowncommand.
The following command shuts down all nodes on the cluster:
shutdown all
Upgrading OneFSTwo options are available for upgrading the OneFS operating system: a rolling upgradeor a simultaneous upgrade. Before upgrading OneFS software, a pre-upgrade checkmust be performed.
A rolling upgrade individually upgrades and restarts each node in the Isilon clustersequentially. During a rolling upgrade, the cluster remains online and continues servingclients with no interruption in service, although some connection resets may occur onSMB clients. Rolling upgrades are performed sequentially by node number, so a rollingupgrade takes longer to complete than a simultaneous upgrade. The final node in theupgrade process is the node that you used to start the upgrade process.
Note: Rolling upgrades are not available for all clusters. For instructions on how toplan an upgrade, prepare the cluster for upgrade, and perform an upgrade of theoperating system, see the OneFS Upgrades – Isilon Info Hub
A simultaneous upgrade installs the new operating system and restarts all nodes in thecluster at the same time. Simultaneous upgrades are faster than rolling upgrades butrequire a temporary interruption of service during the upgrade process. Your data isinaccessible during the time that it takes to complete the upgrade process.
General cluster administration
96 Isilon OneFS CLI Administration Guide
Before beginning either a simultaneous or rolling upgrade, OneFS compares thecurrent cluster and operating system with the new version to ensure that the clustermeets certain criteria, such as configuration compatibility (SMB, LDAP, SmartPools),disk availability, and the absence of critical cluster events. If upgrading puts thecluster at risk, OneFS warns you, provides information about the risks, and promptsyou to confirm whether to continue the upgrade.
If the cluster does not meet the pre-upgrade criteria, the upgrade does not proceed,and the unsupported statuses are listed.
Note: We recommend that you run the optional pre-upgrade checks. Beforestarting an upgrade, OneFS checks that your cluster is healthy enough tocomplete the upgrade process. Some of the pre-upgrade checks are mandatory,and will be performed even if you choose to skip the optional checks. All pre-upgrade checks contribute to a safer upgrade.
Remote supportOneFS allows remote support through Secure Remote Services ((E)SRS), whichmonitors the cluster, and with permission, provides remote access to Isilon TechnicalSupport personnel to gather cluster data and troubleshoot issues. (E)SRS is a secure,Customer Support system that includes 24x7 remote monitoring and secureauthentication with AES 256-bit encryption and RSA digital certificates.
Although (E)SRS is not a licensed feature, the OneFS cluster must be licensed for(E)SRS to be enabled.
When configured, (E)SRS monitors the Isilon cluster and sends alerts about the healthof the devices. Isilon Technical Support personnel can establish remote sessionsthrough SSH or the Dell EMC back end interface. During remote sessions, supportpersonnel can run remote support scripts that gather diagnostic data about clustersettings and operations. Diagnostic data is sent over the secure (E)SRS connection toDell EMC (E)SRS.
If you enable remote support, Isilon Technical Support personnel can establish asecure SSH session with the cluster through the (E)SRS connection. Remote accessto the cluster is only in the context of an open support case. You can allow or deny theremote session request by Isilon Technical Support personnel.
Note: The remote support user credentials are required for access to the cluster,not the general cluster user, or system Admin credentials. OneFS does not storethe required user credentials.
A complete description of (E)SRS features and functionality is available in the mostrecent version of the EMC Secure Remote Services Technical Description. Additional(E)SRS documentation is available on Dell EMC Support by Product.
Configuring Secure Remote Services supportYou can configure support for Secure Remote Services ((E)SRS) on the Isilon cluster.(E)SRS is now configured for the entire cluster with a single registration, as opposedto one node at a time as in previous versions of OneFS.
Before configuring (E)SRS on OneFS, at least one (E)SRS Virtual Edition Gatewayserver (ESRS v3 server) must be installed and configured. The ESRS v3 server acts asthe single point of entry and exit for remote support activities and monitoringnotifications. If required, set up a secondary (E)SRS v3 server as a fail over.
General cluster administration
Isilon OneFS CLI Administration Guide 97

(E)SRS does not support IPv6 communications. To support (E)SRS transmissions andremote connections, at least one subnet on the Isilon cluster must be configured forIPv4 addresses. All nodes to be managed by (E)SRS must have at least one networkinterface that is a member of an IPv4 address pool.
When you enable support for (E)SRS on a cluster, you can optionally create rules forremote support connections to the Isilon cluster with the (E)SRS Policy Manager. ThePolicy Manager set up is separate from the ESRS v3 system.
Details on the Policy Manager are available in the most current EMC Secure RemoteServices Installation Guide.
The following table lists the features and enhancements available with (E)SRS forOneFS 8.1 and later.
Table 1 (E)SRS features and enhancements
Feature Description
Consolidation (E)SRS consolidates access points fortechnical support by providing a uniform,standards-based architecture for remoteaccess across Dell EMC product lines. Thebenefits include reduced costs through theelimination of modems and phone lines,controlled authorization of access for remoteservices events, and consolidated logging ofremote access for audit review.
Enhanced security l Comprehensive digital security —(E)SRS security includes Transport LayerSecurity (TLS) data encryption, TLS v1.2tunneling with Advanced EncryptionStandard (AES) 256-bit data encryptionSHA-2, entity authentication (privatedigital certificates), and remote accessuser authentication verified through DellEMC network security.
l Authorization controls — Policy controlsenable customized authorization toaccept, deny, or require dynamic approvalfor connections to your Dell EMC deviceinfrastructure at the support applicationand device level, with the use of PolicyManager.
l Secure remote access session tunnels —(E)SRS establishes remote sessions usingsecure IP and application port assignmentbetween source and target endpoints.
Licensing Usage Data Transfer (E)SRS v3 supports the transfer of licensingusage data to Dell EMC, from Dell EMCProducts. Such products must be managed by(E)SRS v3, and be enabled for UsageIntelligence to send usage data. Dell EMCprocesses usage data and provides UsageIntelligence reports, visible to customers and
General cluster administration
98 Isilon OneFS CLI Administration Guide

Table 1 (E)SRS features and enhancements (continued)
Feature Description
Dell EMC, to better track product usage, andmanage compliance.
Automatic Software Updates (gatewaysoftware)
(E)SRS v3 automatically checks for Dell EMC(E)SRS VE gateway software updates, andnotifies users via email as they becomeavailable. In addition, the (E)SRS v3 Web UIDashboard displays the latest availableupdates when it becomes available. Users canapply updates as they choose from the(E)SRS v3 Web UI.
Managed File Transfer (MFT) MFT is a bidirectional file transfer mechanismthat is provided as part of (E)SRS v3. You canuse MFT to send or receive large files, such aslog files, microcode, firmware, scripts, or largeinstallation files between the product and DellEMC. A distribution "locker" is used for bi-direction file staging.
Isilon (E)SRS Managed File Transfer supportManaged File Transfer (MFT) support for OneFS provides the ability for customers todownload suggested files and updates directly from Dell EMC Isilon by using (E)SRS.
MFT is not a licensed feature of OneFS, but does require that (E)SRS is enabled.
Currently, MFT is only available from the CLI, and is integrated with the OneFS jobengine. No more than one file at a time is downloaded to the cluster. Files can includepackages, patches, and scripts.
The isi_job can be used to view job details. Troubleshooting data is written tothe /var/log/isi_job_d.log and the /var/log/isi_esrs_d.log log files. Use the isiesrs modify command to set the MFT options that are listed in the following table.
Note: The MFT download setting defaults for the options that are listed in thefollowing table might not need to be adjusted.
Table 2 Configurable MFT options
MFT option Description
Download Enabled Download must be enabled to use MFT.
ESRS File Download Timeout Period Specify the length of time in seconds for eachfile chunk to finish downloading.
ESRS File Download Error Retries Specify the number of retries before the jobfails.
ESRS File Download Chunk Size Set the size in Kb for each file chunk.
ESRS Download Filesystem Limit Set the file system limit (percentage) atwhich MFT does not send any more files.
Use the isi esrs view command to check that the MFT options are set correctly.The following figure is an example of the command output.
General cluster administration
Isilon OneFS CLI Administration Guide 99
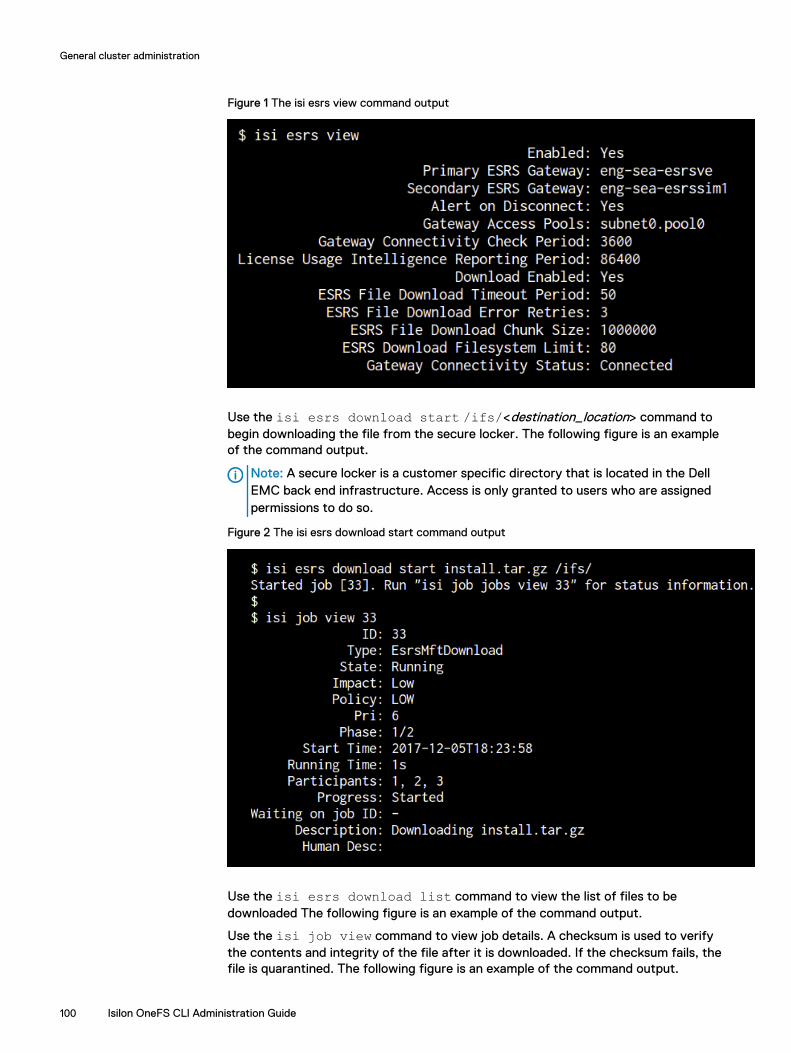
Figure 1 The isi esrs view command output
Use the isi esrs download start /ifs/<destination_location> command tobegin downloading the file from the secure locker. The following figure is an exampleof the command output.
Note: A secure locker is a customer specific directory that is located in the DellEMC back end infrastructure. Access is only granted to users who are assignedpermissions to do so.
Figure 2 The isi esrs download start command output
Use the isi esrs download list command to view the list of files to bedownloaded The following figure is an example of the command output.
Use the isi job view command to view job details. A checksum is used to verifythe contents and integrity of the file after it is downloaded. If the checksum fails, thefile is quarantined. The following figure is an example of the command output.
General cluster administration
100 Isilon OneFS CLI Administration Guide

Figure 3 isi job view command output
Use the isi job reports view command to view job status.
Figure 4 The isi job reports view command output
Remote support scriptsAfter you enable remote support through (E)SRS, Isilon Technical Support personnelcan request logs with scripts that gather cluster data and then upload the data.
The remote support scripts that are based on the isi diagnostics gatherstart and isi diagnostics netlogger tools are located in the /ifs/data/Isilon_Support/ directory on each node.
Note: The isi diagnostics gather, and isi diagnostics netloggercommands replace the isi_gather_info command.
Additionally, If (E)SRS is enabled then isi_phone_home, a tool that focuses oncluster and node-specific data, is enabled. This tool is pre-set to send informationabout a cluster to Isilon Technical Support on a weekly basis. You can disable or enableisi_phone_home from the OneFS command-line interface.
General cluster administration
Isilon OneFS CLI Administration Guide 101

The following tables list the data-gathering activities that remote support scriptsperform. At the request of an Isilon Technical Support representative, these scriptscan be run automatically to collect information about the configuration settings andoperations of a cluster. Information is sent to (E)SRS over the secure (E)SRSconnection, so that it is available for Isilon Technical Support personnel to analyze.The remote support scripts do not affect cluster services or data availability.
Table 3 Commands and subcommands for isi diagnostics gather
Command Description
isi diagnostics gather start Begins the collection, and uploads all recentcluster log information.
isi diagnostics gather stop Stops the collection of cluster information.
isi diagnostics gather status Provides the cluster status.
isi diagnostics gather view View the information.
isi diagnostics gather settingsmodify --clear ftp host
Clear the value of the FTP host for which toupload.
isi diagnostics gather settingsmodify --clear ftp pass
Clear the value for FTP users password.
isi diagnostics gather settingsmodify --clear ftp path
Clear the value for path on FTP server for theupload.
isi diagnostics gather settingsmodify --clear ftp proxy
Clear the value for proxy server for FTP.
isi diagnostics gather settingsmodify --clear ftp proxy port
Clear the value for port for proxy server forFTP.
isi diagnostics gather settingsmodify --clear ftp ftp user
Clear the value for FTP user.
isi diagnostics gather settingsmodify --clear http host
Clear the value for HTTP host to which ituploads.
isi diagnostics gather settingsmodify --clear htttp path
Clear the value for path for the upload.
isi diagnostics gather settingsmodify --clear htttp proxy
Clear the value for proxy to use for HTTPupload.
isi diagnostics gather settingsmodify --clear htttp proxy port
Clear the value for proxy port to use for HTTPUpload.
isi diagnostics gather settingsmodify --esrs
Use ESRS for gather upload.
isi diagnostics gather settingsmodify --ftp-host
Use the FTP host to which it uploads.
isi diagnostics gather settingsmodify --ftp-pass
The FTP users password.
isi diagnostics gather settingsmodify --ftp-path
The path on FTP server for the upload.
isi diagnostics gather settingsmodify --ftp-proxy
Proxy server for FTP.
General cluster administration
102 Isilon OneFS CLI Administration Guide

Table 3 Commands and subcommands for isi diagnostics gather (continued)
Command Description
isi diagnostics gather settingsmodify --ftp-proxy-port
The port for proxy server for FTP.
isi diagnostics gather settingsmodify --ftp-upload
Whether to use FTP upload on completedgather.
isi diagnostics gather settingsmodify --ftp-user
The FTP user.
isi diagnostics gather settingsmodify --ftp-gather-mode
Type of gather: incremental, or full.
isi diagnostics gather settingsmodify --help
Display help for this command.
isi diagnostics gather settingsmodify --http-host
The HTTP host to upload to.
isi diagnostics gather settingsmodify --http-path
The path for the upload.
isi diagnostics gather settingsmodify --http-proxy
The proxy to use for HTTP upload.
isi diagnostics gather settingsmodify --http-proxy-port
The proxy port to use for HTTP Upload.
isi diagnostics gather settingsmodify --http-upload
Whether to use HTTP upload on completedgather.
isi diagnostics gather settingsmodify --upload
Enable gather upload.
Table 4 Commands and subcommands for isi diagnostics netlogger
Command Description
isi diagnostics netlogger start Starts the netlogger process.
isi diagnostics netlogger stop Stops the netlogger process.
isi diagnostics netlogger status Provides the netlogger status.
isi diagnostics netlogger view View the netlogger capture files.
isi diagnostics netloggersettings modify --clients
Client IP address or addresses for which tofilter.
isi diagnostics netloggersettings modify --count
The number of capture files to keep after theyreach the duration limit. Defaults to the last 3files.
isi diagnostics netloggersettings modify --duration
How long to run the capture before rotatingthe capture file. The default is10 minutes.
isi diagnostics netloggersettings modify --help
Displays help for this command.
General cluster administration
Isilon OneFS CLI Administration Guide 103
Table 4 Commands and subcommands for isi diagnostics netlogger (continued)
Command Description
isi diagnostics netloggersettings modify --interfaces
Specify the network interfaces on which tocapture.
isi diagnostics netloggersettings modify --nodelist
List of nodes on which to run capture.
isi diagnostics netloggersettings modify --ports
TCP or UDP port or ports for which to filter.
isi diagnostics netloggersettings modify --protocols
Protocols to filter: TCP, UDP, IP, ARP.
isi diagnostics netloggersettings modify --snaplength
Specify how much of the packet to display.The default is 320 bytes, a 0 value shows allof the packet.
Table 5 Cluster information scripts
Action Description
Clean watch folder Clears the contents of /var/crash.
Get application data Collects and uploads information aboutOneFS application programs.
Generate dashboard file daily Generates daily dashboard information.
Generate dashboard file sequence Generates dashboard information in thesequence that it occurred.
Get ABR data (as built record) Collects as-built information abouthardware.
Get ATA control and GMirror status Collects system output and invokes ascript when it receives an event thatcorresponds to a predeterminedeventid.
Get cluster data Collects and uploads information aboutoverall cluster configuration andoperations.
Get cluster events Gets the output of existing criticalevents and uploads the information.
Get cluster status Collects and uploads cluster statusdetails.
Get contact info Extracts contact information anduploads a text file that contains it.
Get contents (var/crash) Uploads the contents of /var/crash.
Get job status Collects and uploads details on a job thatis being monitored.
General cluster administration
104 Isilon OneFS CLI Administration Guide

Table 5 Cluster information scripts (continued)
Action Description
Get domain data Collects and uploads information aboutthe cluster’s Active Directory Services(ADS) domain membership.
Get file system data Collects and uploads information aboutthe state and health of the OneFS /ifs/ file system.
Get IB data Collects and uploads information aboutthe configuration and operation of theInfiniBand back-end network.
Get logs data Collects and uploads only the mostrecent cluster log information.
Get messages Collects and uploads active /var/log/messages files.
Get network data Collects and uploads information aboutcluster-wide and node-specific networkconfiguration settings and operations.
Get NFS clients Runs a command to check if nodes arebeing used as NFS clients.
Get node data Collects and uploads node-specificconfiguration, status, and operationalinformation.
Get protocol data Collects and uploads network statusinformation and configuration settingsfor the NFS, SMB, HDFS, FTP, andHTTP protocols.
Get Pcap client stats Collects and uploads client statistics.
Get readonly status Warns if the chassis is open and uploadsa text file of the event information.
Get usage data Collects and uploads current andhistorical information about nodeperformance and resource usage.
Enable and configure Secure Remote Services supportYou can enable support for Secure Remote Services ((E)SRS) on an Isilon cluster.
Before you begin
Install and configure an (E)SRS v3 server before you can enable (E)SRS on an Isiloncluster. Complete details for installing and upgrading (E)SRS v3 are available in the EMC Secure Remote Services documentation. The IP address pools that handlegateway connections must exist in the system and must belong to a subnet undergroupnet0, which is the default system groupnet.
General cluster administration
Isilon OneFS CLI Administration Guide 105
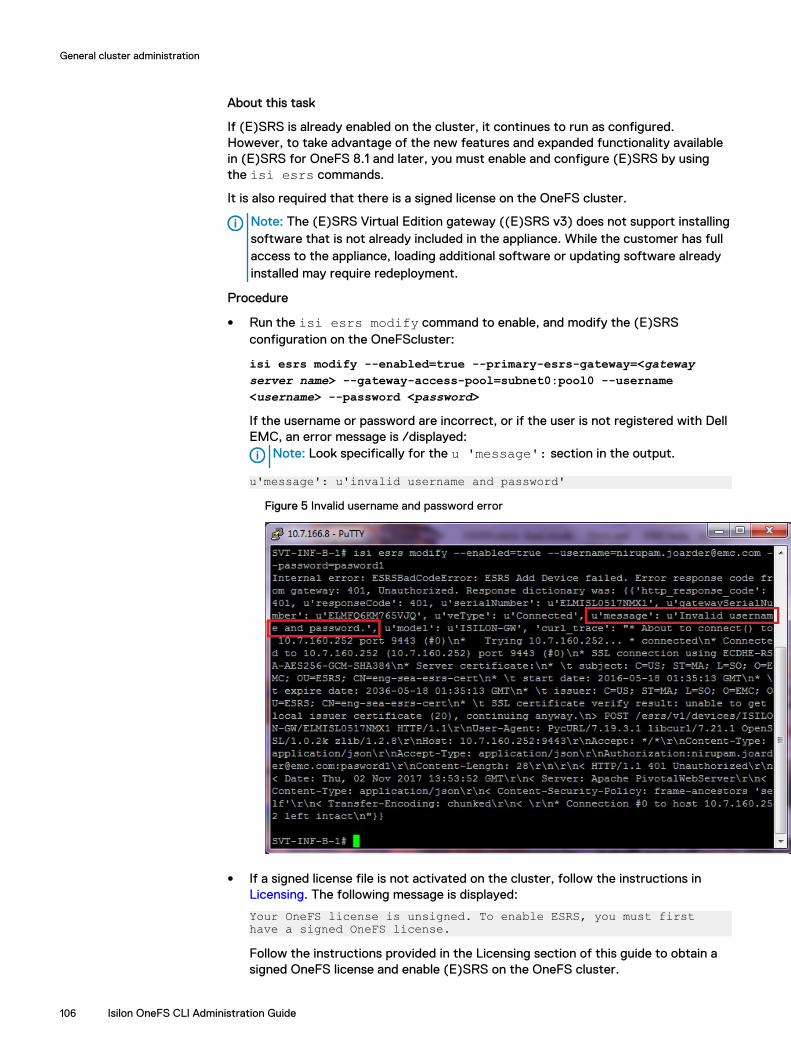
About this task
If (E)SRS is already enabled on the cluster, it continues to run as configured.However, to take advantage of the new features and expanded functionality availablein (E)SRS for OneFS 8.1 and later, you must enable and configure (E)SRS by usingthe isi esrs commands.
It is also required that there is a signed license on the OneFS cluster.
Note: The (E)SRS Virtual Edition gateway ((E)SRS v3) does not support installingsoftware that is not already included in the appliance. While the customer has fullaccess to the appliance, loading additional software or updating software alreadyinstalled may require redeployment.
Procedure
l Run the isi esrs modify command to enable, and modify the (E)SRSconfiguration on the OneFScluster:
isi esrs modify --enabled=true --primary-esrs-gateway=<gatewayserver name> --gateway-access-pool=subnet0:pool0 --username<username> --password <password>If the username or password are incorrect, or if the user is not registered with DellEMC, an error message is /displayed:
Note: Look specifically for the u 'message': section in the output.
u'message': u'invalid username and password'Figure 5 Invalid username and password error
l If a signed license file is not activated on the cluster, follow the instructions in Licensing. The following message is displayed:
Your OneFS license is unsigned. To enable ESRS, you must first have a signed OneFS license.
Follow the instructions provided in the Licensing section of this guide to obtain asigned OneFS license and enable (E)SRS on the OneFS cluster.
General cluster administration
106 Isilon OneFS CLI Administration Guide
l When (E)SRS is configured, and you are prompted for your Username andPassword.
Disable (E)SRS supportYou can disable support for (E)SRS on the Isilon cluster.
About this task
Disable (E)SRS on an Isilon OneFS cluster by running the following command:
isi esrs modify -enabled=false
View (E)SRS configuration settingsYou can view (E)SRS settings that are specified on an Isilon cluster.
About this task
The out put for the following commands includes Primary and Secondary (E)SRSGateways ((E)SRS v3), SMTP status (enabled, or disabled) if email notification isenabled for failover, and Gateway Access Pools details.Run the isi esrs view command to view (E)SRS configuration details.
General cluster administration
Isilon OneFS CLI Administration Guide 107

General cluster administration
108 Isilon OneFS CLI Administration Guide
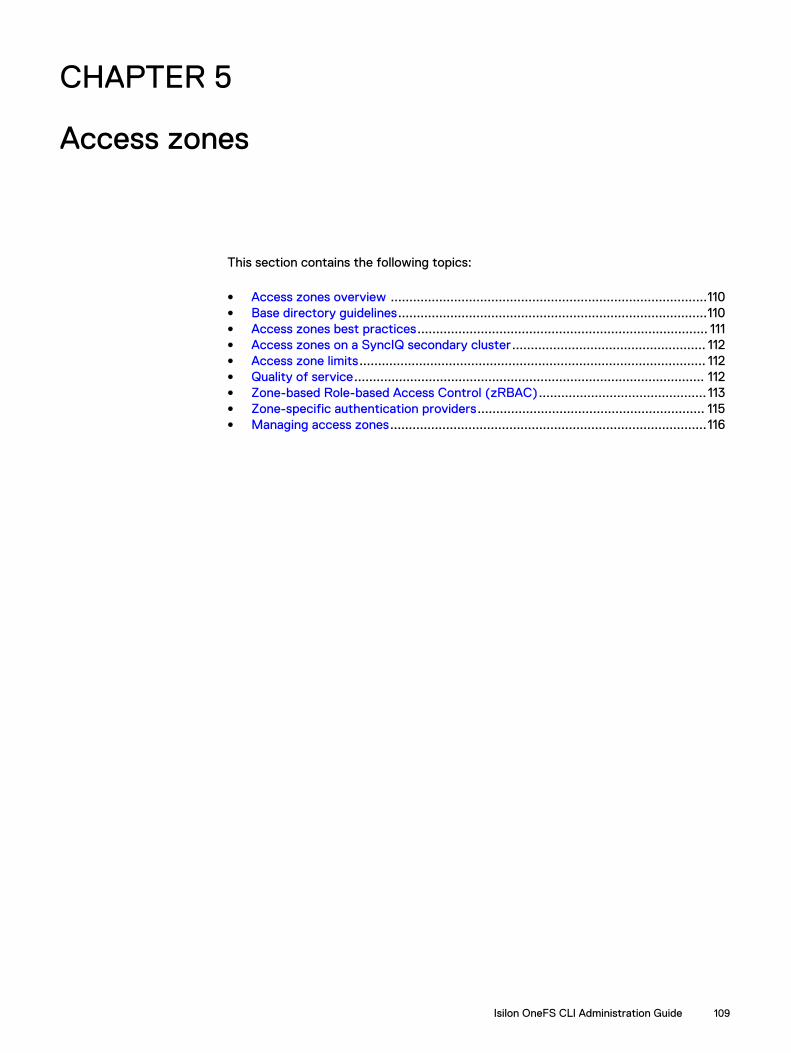
CHAPTER 5
Access zones
This section contains the following topics:
l Access zones overview .....................................................................................110l Base directory guidelines...................................................................................110l Access zones best practices.............................................................................. 111l Access zones on a SyncIQ secondary cluster.................................................... 112l Access zone limits............................................................................................. 112l Quality of service.............................................................................................. 112l Zone-based Role-based Access Control (zRBAC)............................................. 113l Zone-specific authentication providers............................................................. 115l Managing access zones.....................................................................................116
Isilon OneFS CLI Administration Guide 109
Access zones overviewAlthough the default view of an Isilon cluster is that of one physical machine, you canpartition a cluster into multiple virtual containers called access zones. Access zonesallow you to isolate data and control who can access data in each zone.
Access zones support configuration settings for authentication and identitymanagement services on a cluster, so you can configure authentication providers andprovision protocol directories such as SMB shares and NFS exports on a zone-by-zone basis. When you create an access zone, a local provider is automatically created,which allows you to configure each access zone with a list of local users and groups.You can also authenticate through a different authentication provider in each accesszone.
To control data access, you associate the access zone with a groupnet, which is a top-level networking container that manages DNS client connection settings and containssubnets and IP address pools. When you create an access zone, you must specify agroupnet. If a groupnet is not specified, the access zone will reference the defaultgroupnet. Multiple access zones can reference a single groupnet. You can directincoming connections to the access zone through a specific IP address pool in thegroupnet. Associating an access zone with an IP address pool restricts authenticationto the associated access zone and reduces the number of available and accessibleSMB shares and NFS exports.
An advantage to multiple access zones is the ability to configure audit protocol accessfor individual access zones. You can modify the default list of successful and failedprotocol audit events and then generate reports through a third-party tool for anindividual access zone.
A cluster includes a built-in access zone named System where you manage all aspectsof a cluster and other access zones. By default, all cluster IP addresses connect to theSystem zone. Role-based access, which primarily allows configuration actions, isavailable through only the System zone. All administrators, including those givenprivileges by a role, must connect to the System zone to configure a cluster. TheSystem zone is automatically configured to reference the default groupnet on thecluster, which is groupnet0.
Configuration management of a non-System access zone is not permitted throughSSH, the OneFS API, or the web administration interface. However, you can createand delete SMB shares in an access zone through the Microsoft Management Console(MMC).
Base directory guidelinesA base directory defines the file system tree exposed by an access zone. The accesszone cannot grant access to any files outside of the base directory. You must assign abase directory to each access zone.
Base directories restrict path options for several features such as SMB shares, NFSexports, the HDFS root directory, and the local provider home directory template. Thebase directory of the default System access zone is /ifs and cannot be modified.
To achieve data isolation within an access zone, we recommend creating a uniquebase directory path that is not identical to or does not overlap another base directory,with the exception of the System access zone. For example, do not specify /ifs/data/hr as the base directory for both the zone2 and zone3 access zones, or
Access zones
110 Isilon OneFS CLI Administration Guide

if /ifs/data/hr is assigned to zone2, do not assign /ifs/data/hr/personnelto zone3.
OneFS supports overlapping data between access zones for cases where yourworkflows require shared data; however, this adds complexity to the access zoneconfiguration that might lead to future issues with client access. For the best resultsfrom overlapping data between access zones, we recommend that the access zonesalso share the same authentication providers. Shared providers ensures that users willhave consistent identity information when accessing the same data through differentaccess zones.
If you cannot configure the same authentication providers for access zones withshared data, we recommend the following best practices:
l Select Active Directory as the authentication provider in each access zone. Thiscauses files to store globally unique SIDs as the on-disk identity, eliminating thechance of users from different zones gaining access to each other's data.
l Avoid selecting local, LDAP, and NIS as the authentication providers in the accesszones. These authentication providers use UIDs and GIDs, which are notguaranteed to be globally unique. This results in a high probability that users fromdifferent zones will be able to access each other's data
l Set the on-disk identity to native, or preferably, to SID. When user mappings existbetween Active Directory and UNIX users or if the Services for Unix optionis enabled for the Active Directory provider, OneFS stores SIDs as the on-diskidentity instead of UIDs.
Access zones best practicesYou can avoid configuration problems on the Isilon cluster when creating access zonesby following best practices guidelines.
Best practice Details
Create unique base directories. To achieve data isolation, the base directorypath of each access zone should be uniqueand should not overlap or be nested inside thebase directory of another access zone.Overlapping is allowed, but should only beused if your workflows require shared data.
Separate the function of the System zonefrom other access zones.
Reserve the System zone for configurationaccess, and create additional zones for dataaccess. Move current data out of the Systemzone and into a new access zone.
Create access zones to isolate data access fordifferent clients or users.
Do not create access zones if a workflowrequires data sharing between differentclasses of clients or users.
Assign only one authentication provider ofeach type to each access zone.
An access zone is limited to a single ActiveDirectory provider; however, OneFS allowsmultiple LDAP, NIS, and file authenticationproviders in each access zone. It isrecommended that you assign only one typeof each provider per access zone in order tosimplify administration.
Access zones
Isilon OneFS CLI Administration Guide 111

Best practice Details
Avoid overlapping UID or GID ranges forauthentication providers in the same accesszone.
The potential for zone access conflicts isslight but possible if overlapping UIDs/GIDsare present in the same access zone.
Access zones on a SyncIQ secondary clusterYou can create access zones on a SyncIQ secondary cluster used for backup anddisaster recovery, with some limitations.
If you have an active SyncIQ license, you can maintain a secondary Isilon cluster forbackup and failover purposes in case your primary server should go offline. When yourun a replication job on the primary server, file data is replicated to the backup server,including directory paths and other metadata associated with those files.
However, system configuration settings, such as access zones, are not replicated tothe secondary server. In a failover scenario, you probably want the primary andsecondary clusters' configuration settings to be similar, if not identical.
In most cases, including with access zones, we recommend that you configure systemsettings prior to running a SyncIQ replication job. The reason is that a replication jobplaces target directories in read-only mode. If you attempt to create an access zonewhere the base directory is already in read-only mode, OneFS prevents this andgenerates an error message.
Access zone limitsYou can follow access zone limits guidelines to help size the workloads on the OneFSsystem.
If you configure multiple access zones on an Isilon cluster, limits guidelines arerecommended for best system performance. The limits that are described in the IsilonOneFS Technical Specifications Guide are recommended for heavy enterprise workflowson a cluster, treating each access zone as a separate physical server. You can find thistechnical specifications guide and related Isilon documentation on the OneFS 8.1.0Documentation - Isilon Info Hub.
Quality of serviceYou can set upper bounds on quality of service by assigning specific physicalresources to each access zone.
Quality of service addresses physical hardware performance characteristics that canbe measured, improved, and sometimes guaranteed. Characteristics measured forquality of service include but are not limited to throughput rates, CPU usage, and diskcapacity. When you share physical hardware in an Isilon cluster across multiple virtualinstances, competition exists for the following services:
l CPU
l Memory
l Network bandwidth
l Disk I/O
l Disk capacity
Access zones
112 Isilon OneFS CLI Administration Guide

Access zones do not provide logical quality of service guarantees to these resources,but you can partition these resources between access zones on a single cluster. Thefollowing table describes a few ways to partition resources to improve quality ofservice:
Use Notes
NICs You can assign specific NICs on specificnodes to an IP address pool that is associatedwith an access zone. By assigning these NICs,you can determine the nodes and interfacesthat are associated with an access zone. Thisenables the separation of CPU, memory, andnetwork bandwidth.
SmartPools SmartPools are separated by node hardwareequivalence classes, usually into multiple tiersof high, medium, and low performance. Thedata written to a SmartPool is written only tothe disks in the nodes of that pool.Associating an IP address pool with only thenodes of a single SmartPool enablespartitioning of disk I/O resources.
SmartQuotas Through SmartQuotas, you can limit diskcapacity by a user or a group or in a directory.By applying a quota to an access zone's basedirectory, you can limit disk capacity used inthat access zone.
Zone-based Role-based Access Control (zRBAC)You can assign roles and a subset of privileges to users on a per-access-zone basis.
Role-based Access Control (RBAC) supports granting users with privileges and theability to perform certain tasks. Tasks can be performed through the Platform API,such as creating or modifying or viewing NFS exports, SMB shares, authenticationproviders, and various cluster settings.
Users may want to perform these tasks inside a single access zone, enabling a localadministrator to create SMB shares for a specific access zone, for example, butdisallowing that administrator from modifying configuration that would affect otheraccess zones.
Previous to zRBAC, only users in the System Access Zone were given privileges.These users could view and modify configuration in all other access zones. Thus, auser with a specific privilege was a global administrator for configuration that wasaccessible through that privilege.
zRBAC enables you to assign roles and a subset of privileges that must be assigned ona per-access-zone basis. Administrative tasks that the zone-aware privileges coverscan be delegated to an administrator of a specific access zone. As a result, you get theability to create a local administrator who is responsible for a single access zone. Auser in the System Access Zone can affect all other access zones, and remains aglobal administrator.
Access zones
Isilon OneFS CLI Administration Guide 113
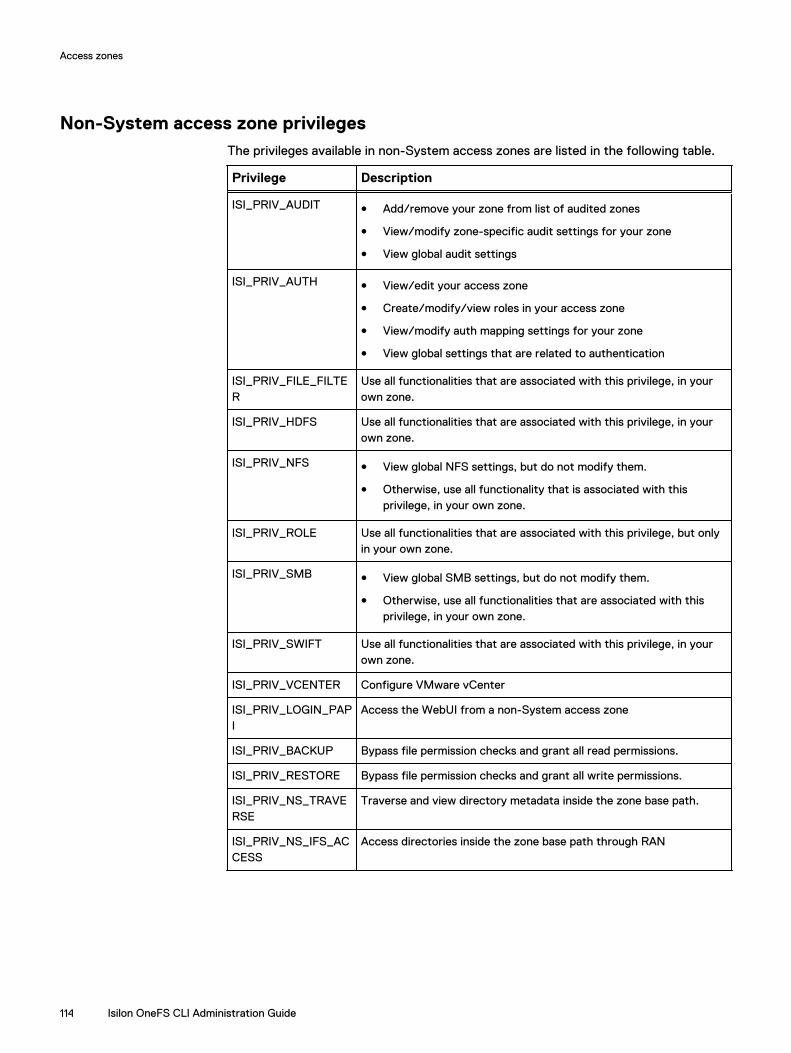
Non-System access zone privilegesThe privileges available in non-System access zones are listed in the following table.
Privilege Description
ISI_PRIV_AUDIT l Add/remove your zone from list of audited zones
l View/modify zone-specific audit settings for your zone
l View global audit settings
ISI_PRIV_AUTH l View/edit your access zone
l Create/modify/view roles in your access zone
l View/modify auth mapping settings for your zone
l View global settings that are related to authentication
ISI_PRIV_FILE_FILTER
Use all functionalities that are associated with this privilege, in yourown zone.
ISI_PRIV_HDFS Use all functionalities that are associated with this privilege, in yourown zone.
ISI_PRIV_NFS l View global NFS settings, but do not modify them.
l Otherwise, use all functionality that is associated with thisprivilege, in your own zone.
ISI_PRIV_ROLE Use all functionalities that are associated with this privilege, but onlyin your own zone.
ISI_PRIV_SMB l View global SMB settings, but do not modify them.
l Otherwise, use all functionalities that are associated with thisprivilege, in your own zone.
ISI_PRIV_SWIFT Use all functionalities that are associated with this privilege, in yourown zone.
ISI_PRIV_VCENTER Configure VMware vCenter
ISI_PRIV_LOGIN_PAPI
Access the WebUI from a non-System access zone
ISI_PRIV_BACKUP Bypass file permission checks and grant all read permissions.
ISI_PRIV_RESTORE Bypass file permission checks and grant all write permissions.
ISI_PRIV_NS_TRAVERSE
Traverse and view directory metadata inside the zone base path.
ISI_PRIV_NS_IFS_ACCESS
Access directories inside the zone base path through RAN
Access zones
114 Isilon OneFS CLI Administration Guide

Built-in roles in non-System zonesIn the non-System access zone, two integrated roles are provided. The roles with theirprivileges are listed below:
Role Description Privileges
ZoneAdmin Allows administration ofconfiguration aspects that arerelated to the current accesszone.
l ISI_PRIV_LOGIN_PAPI
l ISI_PRIV_AUDIT
l ISI_PRIV_FILE_FILTER
l ISI_PRIV_HDFS
l ISI_PRIV_NFS
l ISI_PRIV_SMB
l ISI_PRIV_SWIFT
l ISI_PRIV_VCENTER
l ISI_PRIV_NS_TRAVERSE
l ISI_PRIV_NS_IFS_ACCESS
ZoneSecurityAdmin Allows administration ofsecurity configuration aspectsthat are related to the currentaccess zone.
l ISI_PRIV_LOGIN_PAPI
l ISI_PRIV_AUTH
l ISI_PRIV_ROLE
Note: These roles do not have any default users who are automatically assigned tothem.
Zone-specific authentication providersSome information about how authentication providers work with zRBAC.
Authentication providers are global objects in a OneFS cluster. However, as part ofthe zRBAC feature, an authentication provider is implicitly associated with the accesszone from which it was created, and has certain behaviors that are based on thatassociation.
l All access zones can view and use an authentication provider that is created fromthe System zone. However, only a request from the System access zone canmodify or delete it.
l An authentication provider that is created from (or on behalf of) a non-Systemaccess zone can only be viewed or modified or deleted by that access zone andthe System zone.
l A local authentication provider is implicitly created whenever an access zone iscreated, and is associated with that access zone.
l A local authentication provider for a non-System access zone may no longer beused by another access zone. If you would like to share a local authenticationprovider among access zones, then it must be the System zone's local provider.
Access zones
Isilon OneFS CLI Administration Guide 115

l The name of an authentication provider is still global. Therefore, authenticationproviders must have unique names. Thus, you cannot create two LDAP providersnamed ldap5 in different access zones, for example.
l The Kerberos provider can only be created from the System access zone.
l Creating two distinct Active Directory (AD) providers to the same AD may requirethe use of the AD multi-instancing feature. To assign a unique name to the ADprovider, use --instance.
Managing access zonesYou can create access zones on an Isilon cluster, view and modify access zonesettings, and delete access zones.
Create an access zoneYou can create an access zone to isolate data and restrict which users can access thedata.
Procedure
1. Run the isi zone zones create command.
The following command creates an access zone named zone3 and sets the basedirectory to /ifs/hr/data:
isi zone zones create zone3 /ifs/hr/data
The following command creates an access zone named zone3, sets the basedirectory to /ifs/hr/data and creates the directory on the cluster if it doesnot already exist:
isi zone zones create zone3 /ifs/hr/data --create-path
The following command creates an access zone named zone3, sets the basedirectory to /ifs/hr/data, and associates the access zone with groupnet2:
isi zone zones create zone3 /ifs/hr/data --groupnet=groupnet2
Assign an overlapping base directoryYou can create overlapping base directories between access zones for cases whereyour workflows require shared data.
Procedure
1. Run the isi zone zones create command.
The following command creates an access zone named zone5 and sets the basedirectory to /ifs/hr/data even though the same base directory was set forzone3:
isi zone zones create zone5 --path=/ifs/hr/data --force-overlap
Access zones
116 Isilon OneFS CLI Administration Guide

Manage authentication providers in an access zoneYou modify an access zone to add and remove authentication providers. When youadd an authentication provider, it must belong to the same groupnet referenced by theaccess zone. When you remove an authentication provider from an access zone, theprovider is not removed from the system and remains available for future use.
About this task
The order in which authentication providers are added to access zone designates theorder in which providers are searched during authentication and user lookup.
Procedure
1. To add an authentication provider, run the isi zone zones modifycommand with the --add-auth-providers option.
You must specify the name of the authentication provider in the followingformat: <provider-type>:<provider-name>.
The following command adds a file authentication provider named HR-Users tothe zone3 access zone:
isi zone zones modify zone3 --add-auth-providers=file:hr-users
2. To remove an authentication provider, run the isi zone zones modifycommand with the --remove-auth-providers option.
You must specify the name of the authentication provider in the followingformat: <provider-type>:<provider-name>.
The following command removes the file authentication provider named HR-Users from the zone3 access zone:
isi zone zones modify zone3 --remove-auth-providers=file:hr-users
The following command removes all authentication providers from the zone3access zone:
isi zone zones modify zone3 --clear-auth-providers
Associate an IP address pool with an access zoneYou can associate an IP address pool with an access zone to ensure that clients canconnect to the access zone only through the range of IP addresses assigned to thepool.
Before you begin
The IP address pool must belong to the same groupnet referenced by the access zone.Procedure
1. Run the isi network pools modify command.
Specify the pool ID you want to modify in the following format:
<groupnet_name>.<subnet_name>.<pool_name>
Access zones
Isilon OneFS CLI Administration Guide 117

The following command associates zone3 with pool1 which is under groupnet1and subnet1:
isi network pools modify groupnet1.subnet1.pool1 --access-zone=zone3
Modify an access zoneYou can modify the properties of any access zone except the name of the built-inSystem zone.
Procedure
1. Run the isi zone zones modify command.
The following command renames the zone3 access zone to zone5 and removesall current authentication providers from the access zone:
isi zone zones modify zone3 --name=zone5 --clear-auth-providers
Delete an access zoneYou can delete any access zone except the built-in System zone. When you delete anaccess zone, all associated authentication providers remain available to other accesszones, but IP addresses are not reassigned to other access zones. SMB shares, NFSexports, and HDFS data paths are deleted when you delete an access zone; however,the directories and data still exist, and you can map new shares, exports, or paths inanother access zone.
Procedure
1. Run the isi zone zones delete command.
The following command deletes the zone3 access zone :
isi zone zones delete zone3
View a list of access zonesYou can view a list of all access zones on a cluster, or you can view details for aspecific access zone.
Procedure
1. To view a list of all access zones on the cluster, run the isi zone zoneslist command.
The system displays output similar to the following example:
Name Path------------------------System /ifszone3 /ifs/hr/benefitszone5 /ifs/marketing/collateral------------------------
2. To view the details of a specific access zone, run the isi zone zones viewcommand and specify the zone name.
Access zones
118 Isilon OneFS CLI Administration Guide

The following command displays the setting details of zone5:
isi zone zones view zone5
The system displays output similar to the following example:
Name: zone5 Path: /ifs/marketing/collateral Groupnet: groupnet0 Map Untrusted: - Auth Providers: lsa-local-provider:zone5 NetBIOS Name: - User Mapping Rules: -Home Directory Umask: 0077 Skeleton Directory: /usr/share/skel Cache Entry Expiry: 4H Zone ID: 3
Create one or more access zonesYou can create one or more access zones.
Procedure
1. Run the isi zone zones create command.
The following commands create three access zones, named zone1, zone2, andzone3, sets the base directory to /ifs/access-zones/zone1,ifs/access-zones/zone2, and ifs/access-zones/zone3 and creates thedirectory on the cluster in case it does not exist:
isi zone zones create zone1 /ifs/access-zones/zone1 --create-pathisi zone zones create zone2 /ifs/access-zones/zone2 --create-pathisi zone zones create zone3 /ifs/access-zones/zone3 --create-path
2. Run the isi zone list command to view all the zones you have created:
isi zone listName Path------------------------------System /ifszone1 /ifs/access-zones/zone1zone2 /ifs/access-zones/zone2zone3 /ifs/access-zones/zone3------------------------------Total: 4
Create local users in an access zoneYou can create local users for different access zones.
Procedure
1. Run the isi auth users create command.
Access zones
Isilon OneFS CLI Administration Guide 119

The following commands create three users in each access zone.
isi auth users create z1-user1 --enabled yes --password a --zone zone1isi auth users create z1-user2 --enabled yes --password a --zone zone1isi auth users create z1-user3 --enabled yes --password a --zone zone1isi auth users create z2-user1 --enabled yes --password a --zone zone2isi auth users create z2-user2 --enabled yes --password a --zone zone2 isi auth users create z2-user3 --enabled yes --password a --zone zone2isi auth users create z3-user1 --enabled yes --password a --zone zone3isi auth users create z3-user2 --enabled yes --password a --zone zone3isi auth users create z3-user3 --enabled yes --password a --zone zone3
2. Run the isi auth users list command to view all users created in zone1:
isi auth users list --zone zone1Name--------Guestz1-user1z1-user2z1-user3rootnobody--------Total: 6
Note: To view users in zone2 and zone3, use the isi auth users list--zone zone2 and isi auth users list --zone zone3commands respectively.
Access files through the RESTful Access to Namespace (RAN) in non-System zones
You can access data on the OneFS file system through RAN.
Procedure
1. To access a file, you must make an HTTP call to /namespace/<path>.
curl -u user:password -k https://cluster.ip.addr:8080/namespace/ifs/data/file.txt
2. When accessing files through a non-System zone, the path name must bewithin the base path of the access zone through which you are accessing thedata.
For example, if IP address 1.2.3.4 is in zone2, which has a base path of /ifs/data/zone2, and then the following error is displayed:
Access zones
120 Isilon OneFS CLI Administration Guide
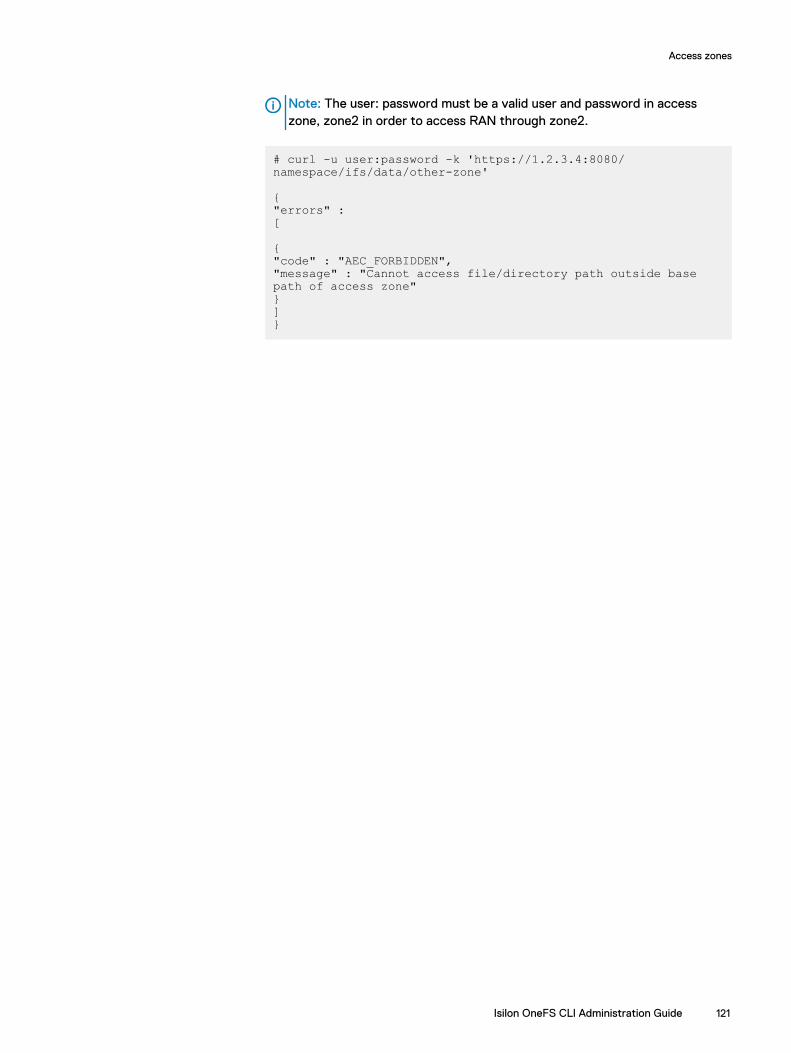
Note: The user: password must be a valid user and password in accesszone, zone2 in order to access RAN through zone2.
# curl -u user:password -k 'https://1.2.3.4:8080/namespace/ifs/data/other-zone'
{"errors" : [
{"code" : "AEC_FORBIDDEN","message" : "Cannot access file/directory path outside base path of access zone"}]}
Access zones
Isilon OneFS CLI Administration Guide 121

Access zones
122 Isilon OneFS CLI Administration Guide

CHAPTER 6
Authentication
This section contains the following topics:
l Authentication overview................................................................................... 124l Authentication provider features...................................................................... 124l Security Identifier (SID) history overview.........................................................124l Supported authentication providers..................................................................125l Active Directory................................................................................................125l LDAP................................................................................................................ 126l NIS................................................................................................................... 126l Kerberos authentication....................................................................................127l File provider......................................................................................................128l Local provider................................................................................................... 129l Multi-factor Authentication (MFA)...................................................................129l Multi-instance active directory......................................................................... 129l LDAP public keys.............................................................................................. 130l Managing Active Directory providers................................................................130l Managing LDAP providers................................................................................. 131l Managing NIS providers....................................................................................132l Managing MIT Kerberos authentication............................................................ 133l Managing file providers.....................................................................................142l Managing local users and groups...................................................................... 146l SSH Authentication and Configuration..............................................................151
Isilon OneFS CLI Administration Guide 123
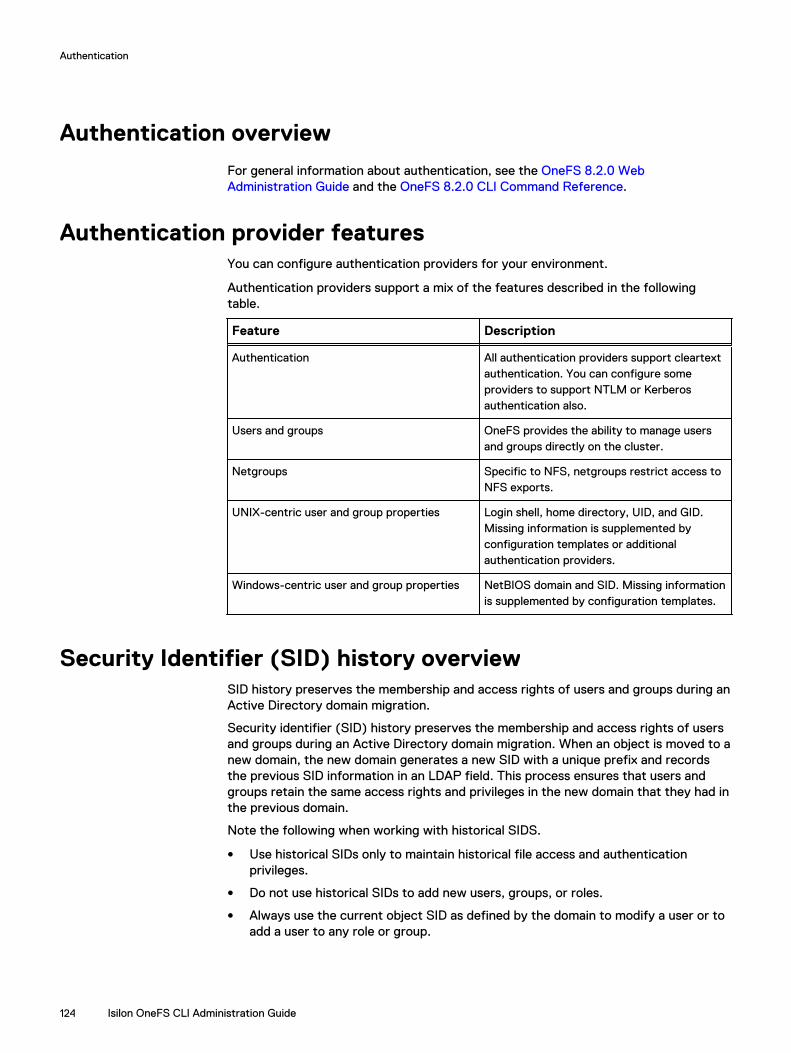
Authentication overview
For general information about authentication, see the OneFS 8.2.0 WebAdministration Guide and the OneFS 8.2.0 CLI Command Reference.
Authentication provider featuresYou can configure authentication providers for your environment.
Authentication providers support a mix of the features described in the followingtable.
Feature Description
Authentication All authentication providers support cleartextauthentication. You can configure someproviders to support NTLM or Kerberosauthentication also.
Users and groups OneFS provides the ability to manage usersand groups directly on the cluster.
Netgroups Specific to NFS, netgroups restrict access toNFS exports.
UNIX-centric user and group properties Login shell, home directory, UID, and GID.Missing information is supplemented byconfiguration templates or additionalauthentication providers.
Windows-centric user and group properties NetBIOS domain and SID. Missing informationis supplemented by configuration templates.
Security Identifier (SID) history overviewSID history preserves the membership and access rights of users and groups during anActive Directory domain migration.
Security identifier (SID) history preserves the membership and access rights of usersand groups during an Active Directory domain migration. When an object is moved to anew domain, the new domain generates a new SID with a unique prefix and recordsthe previous SID information in an LDAP field. This process ensures that users andgroups retain the same access rights and privileges in the new domain that they had inthe previous domain.
Note the following when working with historical SIDS.
l Use historical SIDs only to maintain historical file access and authenticationprivileges.
l Do not use historical SIDs to add new users, groups, or roles.
l Always use the current object SID as defined by the domain to modify a user or toadd a user to any role or group.
Authentication
124 Isilon OneFS CLI Administration Guide

Supported authentication providersYou can configure local and remote authentication providers to authenticate or denyuser access to a cluster.
The following table compares features that are available with each of theauthentication providers that OneFS supports. In the following table, an x indicatesthat a feature is fully supported by a provider; an asterisk (*) indicates that additionalconfiguration or support from another provider is required.
Authenticationprovider
NTLM Kerberos User/groupmanagement
Netgroups
UNIXproperties (RFC2307)
Windowsproperties
ActiveDirectory
x x * x
LDAP * x x x *
NIS x x
Local x x x x
File x x x
MITKerberos
x * * *
Active DirectoryActive Directory is a Microsoft implementation of Lightweight Directory AccessProtocol (LDAP), Kerberos, and DNS technologies that can store information aboutnetwork resources. Active Directory can serve many functions, but the primary reasonfor joining the cluster to an Active Directory domain is to perform user and groupauthentication.
You can join the cluster to an Active Directory (AD) domain by specifying the fullyqualified domain name, which can be resolved to an IPv4 or an IPv6 address, and auser name with join permission. When the cluster joins an AD domain, a single ADmachine account is created. The machine account establishes a trust relationship withthe domain and enables the cluster to authenticate and authorize users in the ActiveDirectory forest. By default, the machine account is named the same as the cluster. Ifthe cluster name is more than 15 characters long, the name is hashed and displayedafter joining the domain.
OneFS supports NTLM and Microsoft Kerberos for authentication of Active Directorydomain users. NTLM client credentials are obtained from the login process and thenpresented in an encrypted challenge/response format to authenticate. MicrosoftKerberos client credentials are obtained from a key distribution center (KDC) and thenpresented when establishing server connections. For greater security andperformance, we recommend that you implement Kerberos, according to Microsoftguidelines, as the primary authentication protocol for Active Directory.
Each Active Directory provider must be associated with a groupnet. The groupnet is atop-level networking container that manages hostname resolution against DNSnameservers and contains subnets and IP address pools. The groupnet specifies which
Authentication
Isilon OneFS CLI Administration Guide 125

networking properties the Active Directory provider will use when communicating withexternal servers. The groupnet associated with the Active Directory provider cannotbe changed. Instead you must delete the Active Directory provider and create it againwith the new groupnet association.
You can add an Active Directory provider to an access zone as an authenticationmethod for clients connecting through the access zone. OneFS supports multipleinstances of Active Directory on an Isilon cluster; however, you can assign only oneActive Directory provider per access zone. The access zone and the Active Directoryprovider must reference the same groupnet. Configure multiple Active Directoryinstances only to grant access to multiple sets of mutually-untrusted domains.Otherwise, configure a single Active Directory instance if all domains have a trustrelationship. You can discontinue authentication through an Active Directory providerby removing the provider from associated access zones.
LDAPThe Lightweight Directory Access Protocol (LDAP) is a networking protocol thatenables you to define, query, and modify directory services and resources.
OneFS can authenticate users and groups against an LDAP repository in order to grantthem access to the cluster. OneFS supports Kerberos authentication for an LDAPprovider.
The LDAP service supports the following features:
l Users, groups, and netgroups.
l Configurable LDAP schemas. For example, the ldapsam schema allows NTLMauthentication over the SMB protocol for users with Windows-like attributes.
l Simple bind authentication, with and without TLS.
l Redundancy and load balancing across servers with identical directory data.
l Multiple LDAP provider instances for accessing servers with different user data.
l Encrypted passwords.
l IPv4 and IPv6 server URIs.
Each LDAP provider must be associated with a groupnet. The groupnet is a top-levelnetworking container that manages hostname resolution against DNS nameserversand contains subnets and IP address pools. The groupnet specifies which networkingproperties the LDAP provider will use when communicating with external servers. Thegroupnet associated with the LDAP provider cannot be changed. Instead you mustdelete the LDAP provider and create it again with the new groupnet association.
You can add an LDAP provider to an access zone as an authentication method forclients connecting through the access zone. An access zone may include at most oneLDAP provider. The access zone and the LDAP provider must reference the samegroupnet. You can discontinue authentication through an LDAP provider by removingthe provider from associated access zones.
NISThe Network Information Service (NIS) provides authentication and identityuniformity across local area networks. OneFS includes an NIS authentication providerthat enables you to integrate the cluster with your NIS infrastructure.
NIS, designed by Sun Microsystems, can authenticate users and groups when theyaccess the cluster. The NIS provider exposes the passwd, group, and netgroup maps
Authentication
126 Isilon OneFS CLI Administration Guide
from an NIS server. Hostname lookups are also supported. You can specify multipleservers for redundancy and load balancing.
Each NIS provider must be associated with a groupnet. The groupnet is a top-levelnetworking container that manages hostname resolution against DNS nameserversand contains subnets and IP address pools. The groupnet specifies which networkingproperties the NIS provider will use when communicating with external servers. Thegroupnet associated with the NIS provider cannot be changed. Instead you mustdelete the NIS provider and create it again with the new groupnet association.
You can add an NIS provider to an access zone as an authentication method for clientsconnecting through the access zone. An access zone may include at most one NISprovider. The access zone and the NIS provider must reference the same groupnet.You can discontinue authentication through an NIS provider by removing the providerfrom associated access zones.
Note: NIS is different from NIS+, which OneFS does not support.
Kerberos authenticationKerberos is a network authentication provider that negotiates encryption tickets forsecuring a connection. OneFS supports Microsoft Kerberos and MIT Kerberosauthentication providers on a cluster. If you configure an Active Directory provider,support for Microsoft Kerberos authentication is provided automatically. MIT Kerberosworks independently of Active Directory.
For MIT Kerberos authentication, you define an administrative domain known as arealm. Within this realm, an authentication server has the authority to authenticate auser, host, or service; the server can resolve to either IPv4 or IPv6 addresses. You canoptionally define a Kerberos domain to allow additional domain extensions to beassociated with a realm.
The authentication server in a Kerberos environment is called the Key DistributionCenter (KDC) and distributes encrypted tickets. When a user authenticates with anMIT Kerberos provider within a realm, an encrypted ticket with the user's serviceprincipal name (SPN) is created and validated to securely pass the user's identificationfor the requested service.
Each MIT Kerberos provider must be associated with a groupnet. The groupnet is atop-level networking container that manages hostname resolution against DNSnameservers and contains subnets and IP address pools. The groupnet specifies whichnetworking properties the Kerberos provider will use when communicating withexternal servers. The groupnet associated with the Kerberos provider cannot bechanged. Instead you must delete the Kerberos provider and create it again with thenew groupnet association.
You can add an MIT Kerberos provider to an access zone as an authentication methodfor clients connecting through the access zone. An access zone may include at mostone MIT Kerberos provider. The access zone and the Kerberos provider mustreference the same groupnet. You can discontinue authentication through an MITKerberos provider by removing the provider from associated access zones.
Authentication
Isilon OneFS CLI Administration Guide 127

Keytabs and SPNs overviewA Key Distribution Center (KDC) is an authentication server that stores accounts andkeytabs for users connecting to a network service within a cluster. A keytab is a keytable that stores keys to validate and encrypt Kerberos tickets.
One of the fields in a keytab entry is a service principal name (SPN). An SPN identifiesa unique service instance within a cluster. Each SPN is associated with a specific keyin the KDC. Users can use the SPN and its associated keys to obtain Kerberos ticketsthat enable access to various services on the cluster. A member of the SecurityAdminrole can create new keys for the SPNs and modify them later as necessary. An SPNfor a service typically appears as <service>/<fqdn>@<realm>.
Note: SPNs must match the SmartConnect zone name and the FQDN hostnameof the cluster. If the SmartConnect zone settings are changed, you must updatethe SPNs on the cluster to match the changes.
MIT Kerberos protocol supportMIT Kerberos supports certain standard network communication protocols such asHTTP, HDFS, and NFS. MIT Kerberos does not support SMB, SSH, and FTPprotocols.
For the NFS protocol support, MIT Kerberos must be enabled for an export and also aKerberos provider must be included within the access zone.
File providerA file provider enables you to supply an authoritative third-party source of user andgroup information to an Isilon cluster. A third-party source is useful in UNIX and Linuxenvironments that synchronize /etc/passwd, /etc/group, and etc/netgroupfiles across multiple servers.
Standard BSD /etc/spwd.db and /etc/group database files serve as the fileprovider backing store on a cluster. You generate the spwd.db file by running thepwd_mkdb command in the OneFS command-line interface (CLI). You can scriptupdates to the database files.
On an Isilon cluster, a file provider hashes passwords with libcrypt. For the bestsecurity, we recommend that you use the Modular Crypt Format in the source /etc/passwd file to determine the hashing algorithm. OneFS supports the followingalgorithms for the Modular Crypt Format:
l MD5
l NT-Hash
l SHA-256
l SHA-512
For information about other available password formats, run the man 3 cryptcommand in the CLI to view the crypt man pages.
Note: The built-in System file provider includes services to list, manage, andauthenticate against system accounts such as root, admin, and nobody. Werecommended that you do not modify the System file provider.
Authentication
128 Isilon OneFS CLI Administration Guide
Local providerThe local provider provides authentication and lookup facilities for user accountsadded by an administrator.
Local authentication is useful when Active Directory, LDAP, or NIS directory servicesare not configured or when a specific user or application needs access to the cluster.Local groups can include built-in groups and Active Directory groups as members.
In addition to configuring network-based authentication sources, you can manage localusers and groups by configuring a local password policy for each node in the cluster.OneFS settings specify password complexity, password age and re-use, andpassword-attempt lockout policies.
Multi-factor Authentication (MFA)Multi-factor authentication (MFA) is a method of computer access control in whichyou are only granted access after successfully presenting several separate pieces ofevidence to an authentication mechanism. Typically, authentication uses at least twoof the following categories: Knowledge (something you know); possession (somethingyou have), and inherence (something you are).
MFA is a great way to increase the security of a cluster. Increasing the security ofprivileged account access (For example, administrators) to a cluster is the best way toprevent unauthorized access.
MFA enables the LSASS daemon to require and accept multiple forms of credentialsother than a username or password combination for some forms of authentication.There exist many ways to implement MFA with the most common being public orprivate key authentication.
The MFA feature adds PAPI support for SSH configuration using public keys that arestored in LDAP and Multi-Factor Authentication support for SSH through the Duosecurity platform. Duo MFA supports the Duo App, SMS, and Voice.
The use of Duo requires an account with the Duo service. Duo provides a host, ikey,and skey to use for configuration (skey should be treated as a secure credential).
Duo MFA is on top of existing password and/or public key requirements. If the SSHconfiguration type is set to any or custom, Duo cannot be configured. Only specificusers or groups may be enabled to bypass MFA if specified on the Duo server. Duoenables the creation of one time or date/time limited bypass keys for a specific user.Also, the bypass keys can be permanent.
Multi-instance active directoryIf you are a zone-local administrator, you can create your own AD instance, even if theAD instance for the same domain is already created globally or in another access zone.
Previously, only one connection to Active Directory was enabled, and the name of theActive Directory provider had to be the same as the name of the domain to which itwas connecting. With the introduction of zone-local authentication providers, zone-local administrators can create their own Active Directory provider, and be able tomodify its parameters. To perform this action, you must do two things:
l Create a new provider instance name for this provider
l Create a new machine account for this provider connection
Authentication
Isilon OneFS CLI Administration Guide 129

An AD provider may have a name different than its domain name, using -instance.Then commands can use the instance name to find the particular AD provider. Eachaccess zone can have only one AD provider.
LDAP public keys
You can now use public SSH keys from LDAP rather than that of user's homedirectory on the OneFS cluster.
The LDAP create and modify commands support the --ssh-public-key-attribute option.
You can view your public key by adding --show-ssh-key.
Multiple keys may be specified in the LDAP configuration. The key that corresponds tothe private key that is presented in the ssh session is used.
Nonetheless, you need a home directory on the cluster or you could get an error whenyou log in.
Managing Active Directory providersYou can view, configure, modify, and delete Active Directory providers. OneFSincludes a Kerberos configuration file for Active Directory in addition to the globalKerberos configuration file, both of which you can configure through the command-line interface. You can discontinue authentication through an Active Directory providerby removing it from all access zones that are using it.
Configure an Active Directory providerYou can configure one or more Active Directory providers, each of which must bejoined to a separate Active Directory domain. By default, when you configure anActive Directory provider, it is automatically added to the System access zone.
About this task
Note: Consider the following information when you configure an Active Directory(AD) provider:
l When you join Active Directory from OneFS, cluster time is updated from theActive Directory server, as long as an NTP server has not been configured forthe cluster.
l The Active Directory provider must be associated with a groupnet.
l The Active Directory domain can be resolved to an IPv4 or an IPv6 address.
Procedure
1. Run the isi auth ads create command to create an Active Directoryprovider by specifying the domain name of the Active Directory server and thename of an AD user that has permission to join machines to the AD domain.
The following command specifies adserver.company.com as the fully-qualifieddomain name of the Active Directory server to be created in the system,
Authentication
130 Isilon OneFS CLI Administration Guide

specifies "administrator" as the AD user that has permission to join the clusterto the AD domain, and associates the provider with groupnet3:
isi auth ads create --name=adserver.company.com \ --user=administrator --groupnet=groupnet3
Modify an Active Directory providerYou can modify the advanced settings for an Active Directory provider.
Procedure
1. Run the following command to modify an Active Directory provider, where<provider-name> is a placeholder for the name of the provider that you want tomodify.
isi auth ads modify <provider-name>
Delete an Active Directory providerWhen you delete an Active Directory provider, you disconnect the cluster from theActive Directory domain that is associated with the provider, disrupting service forusers who are accessing it. After you leave an Active Directory domain, users can nolonger access the domain from the cluster.
Procedure
1. Run the following command to Delete an Active Directory provider, where<name> is a placeholder for the Active Directory name that you want to delete.
isi auth ads delete <name>
Managing LDAP providersYou can view, configure, modify, and delete LDAP providers. You can discontinueauthentication through an LDAP provider by removing it from all access zones that areusing it.
Configure an LDAP providerBy default, when you configure an LDAP provider, it is automatically added to theSystem access zone.
Procedure
1. Run the isi auth ldap create command to create an LDAP provider.
The following command creates an LDAP provider called test-ldap andassociates it with groupnet3. The command also sets a base distinguishedname, which specifies the root of the tree in which to search for identities, andspecifies ldap://2001:DB8:170:7cff::c001 as the server URI:
isi auth ldap create test-ldap \ --base-dn="dc=test-ldap,dc=example,dc=com" \ --server-uris="ldap://[2001:DB8:170:7cff::c001]" \ --groupnet=groupnet3
Authentication
Isilon OneFS CLI Administration Guide 131

Note: The base distinguished name is specified as a sequence of relativedistinguished name values, separated by commas. Specify a basedistinguished name if the LDAP server allows anonymous queries.
The following command creates an LDAP provider called test-ldap andassociates it with groupnet3. It also specifies a bind distinguished name andbind password, which are used to join the LDAP server, and specifies ldap://test-ldap.example.com as the server URI:
isi auth ldap create test-ldap \ --base-dn="dc=test-ldap,dc=example,dc=com" \ --bind-dn="cn=test,ou=users,dc=test-ldap,dc=example,dc=com" \ --bind-password="mypasswd" \ --server-uris="ldap://test-ldap.example.com" \ --groupnet=groupnet3
Note: The bind distinguished name is specified as a sequence of relativedistinguished name values, separated by commas, and must have the properpermissions to join the LDAP server to the cluster. Specify a binddistinguished name if the LDAP server does not allow anonymous queries.
Modify an LDAP providerYou can modify any setting for an LDAP provider except its name. You must specify atleast one server for the provider to be enabled.
Procedure
1. Run the following command to modify an LDAP provider, where <provider-name> is a placeholder for the name of the provider that you want to modify:
isi auth ldap modify <provider-name>
Delete an LDAP providerWhen you delete an LDAP provider, it is removed from all access zones. As analternative, you can stop using an LDAP provider by removing it from each accesszone that contains it so that the provider remains available for future use.
About this task
For information about the parameters and options that are available for thisprocedure, run the isi auth ldap delete --help command.
Procedure
1. Run the following command to delete an LDAP provider, where <name> is aplaceholder for the name of the LDAP provider that you want to delete.
isi auth ldap delete <name>
Managing NIS providersYou can view, configure, and modify NIS providers or delete providers that are nolonger needed. You can discontinue authentication through an NIS provider byremoving it from all access zones that are using it.
Authentication
132 Isilon OneFS CLI Administration Guide
Configure an NIS providerYou can configure multiple NIS providers, each with its own settings, and add them toone or more access zones.
Procedure
1. Configure an NIS provider by running the isi auth nis create command.
The following example creates an NIS provider called nistest that is associatedwith groupnet3, specifies nistest.company.com as the NIS server andcompany.com as the domain:
isi auth nis create nistest --groupnet=groupnet3\--servers="nistest.example.com" --nis-domain="example.com"
Modify an NIS providerYou can modify any setting for an NIS provider except its name. You must specify atleast one server for the provider to be enabled.
Procedure
1. Run the following command to modify an NIS provider, where <provider-name>is a placeholder for provider that you want to modify.
isi auth nis modify <provider-name>
Delete an NIS providerWhen you delete an NIS provider, it is removed from all access zones. As analternative, you can stop using an NIS provider by removing it from each access zonethat contains it, so that the provider remains available for future use.
Procedure
1. Run the following command to delete an NIS provider, where <name> is aplaceholder for the name of the NIS provider that you want to delete.
isi auth nis delete <name>
Managing MIT Kerberos authenticationYou can configure an MIT Kerberos provider for authentication without ActiveDirectory. Configuring an MIT Kerberos provider involves creating an MIT Kerberosrealm, creating a provider, and joining a predefined realm. Optionally, you canconfigure an MIT Kerberos domain for the provider. You can also update theencryption keys if there are any configuration changes to the Kerberos provider. Youcan include the provider in one or more access zones.
Managing MIT Kerberos realmsAn MIT Kerberos realm is an administrative domain that defines the boundaries withinwhich an authentication server has the authority to authenticate a user or service. You
Authentication
Isilon OneFS CLI Administration Guide 133
can create, view, edit, or delete a realm. As a best practice, specify a realm nameusing uppercase characters.
Create an MIT Kerberos realmYou can create an MIT Kerberos realm by defining a Key Distribution Center (KDC)and an administrative server.
Before you begin
You must be a member of a role that has ISI_PRIV_AUTH privileges to create an MITKerberos realm.Procedure
1. Run the isi auth krb5 realm create command to create an MITKerberos realm.
The following command creates an MIT Kerberos realm calledTEST.COMPANY.COM, specifies admin.test.company.com as theadministrative server, and specifies keys.test.company.com as a key distributioncenter:
isi auth krb5 realm create --realm=TEST.COMPANY.COM \ --kdc=keys.test.company.com --admin-server=admin.test.company.com
The realm name is case-sensitive and must be specified in uppercase letters.The administrative server and key distribution center can be specified as anIPv4 address, an IPv6 address, or a hostname.
Modify an MIT Kerberos realmYou can modify an MIT Kerberos realm by modifying the Key Distribution Center(KDC), the domain (optional), and the administrative server settings for that realm.
Before you begin
You must be a member of a role that has ISI_PRIV_AUTH privileges to delete an MITKerberos provider.Procedure
1. Run the isi auth krb5 realm modify command to modify an MITKerberos realm.
The following command modifies the MIT Kerberos realm calledTEST.COMPANY.COM by adding a KDC specified as an IPv6 address:
isi auth krb5 realm modify --realm=TEST.COMPANY.COM \ --kdc=2001:DB8:170:7cff::c001
The realm name is case-sensitive and must be specified in uppercase letters.The key distribution center can be specified as an IPv4 address, an IPv6address, or a host name.
Authentication
134 Isilon OneFS CLI Administration Guide

View an MIT Kerberos realmYou can view details related to the name, Key Distribution Centers (KDCs), and theadministrative server associated with an MIT Kerberos realm.
Procedure
1. To view a list of all Kerberos realms configured on the cluster, run the isiauth krb5 realm list command.
The system displays output similar to the following example:
Realm---------------TEST.COMPANY.COMENGKERB.COMPANY.COMOPSKERB.COMPANY.COM---------------Total: 3
2. To view the setting details for a specific Kerberos realm, run the isi authkrb5 realm view command followed by the realm name.
The specified realm name is case-sensitive.
The following command displays setting details for the realm calledTEST.COMPANY.COM:
isi auth krb realm view TEST.COMPANY.COM
The systems displays output similar to the following example:
Realm: TEST.COMPANY.COMIs Default Realm: Yes KDC: 2001:DB8:170:7cff::c001, keys.test.company.com Admin Server: admin.test.company.com
Note: The KDC and the admin server can be specified as an IPv4 or IPv6address, or a hostname.
Delete an MIT Kerberos realmYou can delete one or more MIT Kerberos realms and all the associated MIT Kerberosdomains.
Before you begin
Kerberos realms are referenced by Kerberos providers. Before you can delete a realmfor which you have created a provider, you must first delete that provider.You must be a member of a role that has ISI_PRIV_AUTH privileges to delete an MITKerberos realm.
Procedure
1. Run the isi auth krb5 realm delete command to delete an MITKerberos realm.
Authentication
Isilon OneFS CLI Administration Guide 135

For example, run the following command to delete a realm:
isi auth krb5 realm delete <realm>
Managing MIT Kerberos providersYou can create view, delete, or modify an MIT Kerberos provider. You can alsoconfigure the Kerberos provider settings.
Creating an MIT Kerberos providerYou can create an MIT Kerberos provider by obtaining the credentials for accessing acluster through the Key Distribution Center (KDC) of the Kerberos realm. This processis also known as joining a realm. Thus when you create a Kerberos provider you alsojoin a realm that has been previously defined.
Depending on how OneFS manages your Kerberos environment, you can create aKerberos provider through one of the following methods:
l Accessing the Kerberos administration server and creating keys for services on theOneFS cluster.
l Manually transferring the Kerberos key information in the form of keytabs.
Create an MIT Kerberos provider and join a realm with administratorcredentials
You can create an MIT Kerberos provider and join an MIT Kerberos realm using thecredentials authorized to access the Kerberos administration server. You can thencreate keys for the various services on the cluster. This is the recommended methodfor creating a Kerberos provider and joining a Kerberos realm.
Before you begin
You must be a member of a role that has ISI_PRIV_AUTH privileges to access theKerberos administration server.Procedure
1. Run the isi auth krb5 create command to create a Kerberos providerand join a Kerberos realm; , where <realm> is the name of the Kerberos realmwhich already exists or is created if it does not exist:
The realm name is case-sensitive and must be specified in uppercase letters.
In the following example command, the Kerberos realm TEST.COMPANY.COMis created and joined to the provider, which is associated with groupnet3. Thecommand also specifies admin.test.company.com as the administrative serverand keys.test.company.com as the KDC, and specifies a username andpassword that are authorized to access to the administration server:
isi auth krb5 create --realm=TEST.COMPANY.COM \--user=administrator --password=secretcode \--kdc=keys.test.company.com \--admin-server=admin.test.company.com \--groupnet=groupnet3
Authentication
136 Isilon OneFS CLI Administration Guide

Note: The KDC and the admin server can be specified as an IPv4 or IPv6address, or a hostname.
Create an MIT Kerberos provider and join a realm with a keytab file
You can create an MIT Kerberos provider and join an MIT Kerberos realm through akeytab file. Follow this method only if your Kerberos environment is managed bymanually transferring the Kerberos key information through the keytab files.
Before you begin
Make sure that the following prerequisites are met:
l The Kerberos realm must already exist on the cluster
l A keytab file must exist on the cluster.
l You must be a member of a role that has ISI_PRIV_AUTH privileges to access theKerberos administration server.
Procedure
1. Run the isi auth krb5 create command.
The following command creates a Kerberos provider that is associated withgroupnet3, joins the Kerberos realm called cluster-name.company.com andspecifies a keytab file located at /tmp/krb5.keytab:
isi auth krb5 create cluster-name.company.com \--keytab-file=/tmp/krb5.keytab --groupnet=groupnet3
View an MIT Kerberos providerYou can view the properties of an MIT Kerberos provider after creating it.
Procedure
1. Run the following command to view the properties of a Kerberos provider:
isi auth krb5 view <provider-name>
List the MIT Kerberos providersYou can list one or more MIT Kerberos providers and display the list in a specificformat. You can also specify a limit for the number of providers to be listed.
Procedure
1. Run the isi auth krb5 list command to list one or more Kerberosproviders.
For example, run the following command to list the first five Kerberos providersin a tabular format without any headers or footers:
isi auth krb5 list -l 5 --format table --no-header --no-footer
Authentication
Isilon OneFS CLI Administration Guide 137
Delete an MIT Kerberos providerYou can delete an MIT Kerberos provider and remove it from all the referenced accesszones. When you delete a provider, you also leave an MIT Kerberos realm.
Before you begin
You must be a member of a role that has ISI_PRIV_AUTH privileges to delete aKerberos provider.
Procedure
1. Run the isi auth krb5 delete command as follows to delete a Kerberosprovider.
isi auth krb5 delete <provider-name>
Configure MIT Kerberos provider settingsYou can configure the settings of a Kerberos provider to allow the DNS records tolocate the Key Distribution Center (KDC), Kerberos realms, and the authenticationservers associated with a Kerberos realm. These settings are global to all Kerberosusers across all nodes, services, and zones. Some settings are applicable only toclient-side Kerberos and are independent of the Kerberos provider.
Before you begin
You must be a member of a role that has ISI_PRIV_AUTH privileges to view ormodify the settings of a Kerberos provider.
Procedure
1. Run the isi auth settings krb5 command with the view or modifysubcommand.
2. Specify the settings to modify.
Managing MIT Kerberos domainsYou can optionally define MIT Kerberos domains to allow additional domain extensionsto be associated with an MIT Kerberos realm. You can always specify a default domainfor a realm.
You can create, modify, delete, and view an MIT Kerberos domain. A Kerberos domainname is a DNS suffix that you specify typically using lowercase characters.
Add an MIT Kerberos domain to a realmYou can optionally add an MIT Kerberos domain to an MIT Kerberos realm to enableadditional Kerberos domain extensions to be associated with a Kerberos realm.
Before you begin
You must be a member of a role that has ISI_PRIV_AUTH privileges to associate aKerberos domain with a Kerberos realm.
Procedure
1. Add a Kerberos domain by running the isi auth krb5 domain createcommand.
Authentication
138 Isilon OneFS CLI Administration Guide

For example, run the following command to add a Kerberos domain to aKerberos realm:
isi auth krb5 domain create <domain>
Modify an MIT Kerberos domainYou can modify an MIT Kerberos domain by modifying the realm settings.
Before you begin
You must be a member of a role that has ISI_PRIV_AUTH privileges to modify an MITKerberos domain.
Procedure
1. Run the isi auth krb5 domain modify command to modify a Kerberosdomain.
For example, run the following command to modify a Kerberos domain byspecifying an alternate Kerberos realm:
isi auth krb5 domain modify <domain> --realm <realm>
View an MIT Kerberos domain mappingYou can view the properties of an MIT Kerberos domain mapping.
Procedure
1. Run the isi auth krb5 domain view command with a value specified forthe <domain> variable to view the properties of a Kerberos domain mapping:
isi auth krb5 domain view <domain>
List MIT Kerberos domainsYou can list one or more MIT Kerberos domains and display the list in a tabular, JSON,CSV, or list format. You can also specify a limit for the number of domains to be listed.
Procedure
1. Run the isi auth krb5 domain list command to list one or more MITKerberos domains.
For example, run the following command to list the first ten MIT Kerberosdomains in a tabular format without any headers or footers:
isi auth krb5 domain list -l=10 --format=table --no-header --no-footer
Authentication
Isilon OneFS CLI Administration Guide 139
Delete an MIT Kerberos domain mappingYou can delete one or more MIT Kerberos domain mappings.
Before you begin
You must be a member of a role that has ISI_PRIV_AUTH privileges to delete an MITKerberos domain mapping.
Procedure
1. Run the isi auth krb5 domain delete command to delete an MITKerberos domain mapping.
For example, run the following command to delete a domain mapping:
isi auth krb5 domain delete <domain>
Managing SPNs and keysA service principal name (SPN) is the name referenced by a client to identify aninstance of a service on a cluster. An MIT Kerberos provider authenticates services ona cluster through SPNs.
You can perform the following operations on SPNs and their associated keys:
l Update the SPNs if there are any changes to the SmartConnect zone settings thatare based on those SPNs
l List the registered SPNs to compare them against a list of discovered SPNs
l Update keys associated with the SPNs either manually or automatically
l Import keys from a keytab table
l Delete specific key versions or delete all the keys associated with an SPN
View SPNs and keysYou can view the service principal names (SPNs) and their associated keys that areregistered for an MIT Kerberos provider. Clients obtain Kerberos tickets and accessservices on clusters through SPNs and their associated keys.
Before you begin
You must be a member of a role that has ISI_PRIV_AUTH privileges to view SPNs andkeys.
Procedure
1. Run the isi auth krb5 spn list command to list one or more SPNs andtheir associated keys and the Key version numbers (Kvnos).
For example, run the following command to list the first five SPNs for an MITKerberos provider in a tabular format without any headers or footers:
isi auth krb5 list <provider-name> -l 5 --format table --no-header --no-footer <spn-list>
Authentication
140 Isilon OneFS CLI Administration Guide

Delete keysYou can delete specific key versions or all the keys associated with a service principalname (SPN).
Before you begin
You must be a member of a role that has ISI_PRIV_AUTH privileges to delete keys.
About this task
After creating new keys due to security reasons or to match configuration changes,follow this procedure to delete older version of the keys so that the keytab table is notpopulated with redundant keys.
Procedure
1. Run the isi auth krb5 spn delete command to delete all keys for aspecified SPN or a specific version of a key.
For example, run the following command to delete all the keys associated withan SPN for an MIT Kerberos provider:
isi auth krb5 spn delete <provider-name> <spn> --all
The <provider-name> is the name of the MIT Kerberos provider. You can deletea specific version of the key by specifying a key version number value for thekvno argument and including that value in the command syntax.
Manually add or update a key for an SPNYou can manually add or update keys for a service principal name (SPN). This processcreates a new key for the specified SPN.
Before you begin
You must be a member of a role that has ISI_PRIV_AUTH privileges to add or update akey for an SPN.
Procedure
1. Run the isi auth krb5 spn create command to add or update keys foran SPN.
For example, run the following command to add or update a key for an SPN byspecifying the <provider-name>, <user>, and <spn> positional arguments:
isi auth krb5 spn create <provider-name> <user> <spn>
Automatically update an SPNYou can automatically update or add a service principal name (SPN) if it is registeredwith an MIT Kerberos provider but does not appear in the list of discovered SPNs.
Before you begin
You must be a member of a role that has ISI_PRIV_AUTH privileges to automaticallyupdate an SPN.
Authentication
Isilon OneFS CLI Administration Guide 141

Procedure
1. Run the isi auth krb5 spn check command to compare the list ofregistered SPNs against the list of discovered SPNs.
Proceed to the next step if the comparison does not show similar results.
2. Run the isi auth krb5 spn fix command to fix the missing SPNs.
For example, run the following command to add missing SPNs for an MITKerberos service provider:
isi auth krb5 spn fix <provider-name> <user>
You can optionally specify a password for <user> which is the placeholder for auser who has the permission to join clients to the given domain.
Import a keytab fileAn MIT Kerberos provider joined through a legacy keytab file might not have the abilityto manage keys through the Kerberos admin credentials. In such a case, import a newkeytab file and then add the keytab file keys to the provider.
Before you begin
Make sure that the following pre-requisites are met before you import a keytab file:
l You must create and copy a keytab file to a node on the cluster where you willperform this procedure.
l You must be a member of a role that has ISI_PRIV_AUTH privileges to import akeytab file.
Procedure
1. Import the keys of a keytab file by running the isi auth krb5 spn importcommand.
For example, run the following command to import the keys of the <keytab-file>to the provider referenced as <provider-name>:
isi auth krb5 spn import <provider-name> <keytab-file>
Managing file providersYou can configure one or more file providers, each with its own combination ofreplacement files, for each access zone. Password database files, which are also calleduser database files, must be in binary format.
Each file provider pulls directly from up to three replacement database files: a groupfile that has the same format as /etc/group; a netgroups file; and a binary passwordfile, spwd.db, which provides fast access to the data in a file that has the /etc/master.passwd format. You must copy the replacement files to the cluster andreference them by their directory path.
Note: If the replacement files are located outside the /ifs directory tree, youmust distribute them manually to every node in the cluster. Changes that are
Authentication
142 Isilon OneFS CLI Administration Guide

made to the system provider's files are automatically distributed across thecluster.
Configure a file providerYou can specify replacement files for any combination of users, groups, andnetgroups.
Procedure
1. Run the following command to configure a file provider, where <name> is yourname for the file provider.
isi auth file create <name>
Generate a password filePassword database files, which are also called user database files, must be in binaryformat.
About this task
This procedure must be performed through the command-line interface (CLI). Forcommand-usage guidelines, run the man pwd_mkdb command.
Procedure
1. Establish an SSH connection to any node in the cluster.
2. Run the pwd_mkdb <file> command, where <file> is the location of the sourcepassword file.
Note: By default, the binary password file, spwd.db, is created in the /etcdirectory. You can override the location to store the spwd.db file byspecifying the -d option with a different target directory.
The following command generates an spwd.db file in the /etc directory froma password file that is located at /ifs/test.passwd:
pwd_mkdb /ifs/test.passwd
The following command generates an spwd.db file in the /ifs directory froma password file that is located at /ifs/test.passwd:
pwd_mkdb -d /ifs /ifs/test.passwd
Modify a file providerYou can modify any setting for a file provider, including its name.
About this task
Note: Although you can rename a file provider, there are two caveats: you canrename a file provider through only the web administration interface and youcannot rename the System file provider.
Authentication
Isilon OneFS CLI Administration Guide 143
Procedure
1. Run the following command to modify a file provider, where <provider-name> isa placeholder for the name that you supplied for the provider.
isi auth file modify <provider-name>
Delete a file providerTo stop using a file provider, you can clear all of its replacement file settings or youcan permanently delete the provider.
About this task
Note: You cannot delete the System file provider.
Procedure
1. Run the following command to delete a file provider, where <name> is aplaceholder for the name of the provider that you want to delete.
isi auth file delete <name>
Password file formatThe file provider uses a binary password database file, spwd.db. You can generate abinary password file from a master.passwd-formatted file by running thepwd_mkdb command.
The master.passwd file contains ten colon-separated fields, as shown in thefollowing example:
admin:*:10:10::0:0:Web UI Administrator:/ifs/home/admin:/bin/zsh
The fields are defined below in the order in which they appear in the file.
Note: UNIX systems often define the passwd format as a subset of these fields,omitting the Class, Change, and Expiry fields. To convert a file from passwd tomaster.passwd format, add :0:0: between the GID field and the Gecos field.
Username
The user name. This field is case-sensitive. OneFS does not limit the length; manyapplications truncate the name to 16 characters, however.
Password
The user’s encrypted password. If authentication is not required for the user, youcan substitute an asterisk (*) for a password. The asterisk character isguaranteed to not match any password.
UID
The UNIX user identifier. This value must be a number in the range0-4294967294 that is not reserved or already assigned to a user. Compatibilityissues occur if this value conflicts with an existing account's UID.
Authentication
144 Isilon OneFS CLI Administration Guide

GID
The group identifier of the user’s primary group. All users are a member of at leastone group, which is used for access checks and can also be used when creatingfiles.
Class
This field is not supported by OneFS and should be left empty.
Change
OneFS does not support changing the passwords of users in the file provider. Thisfield is ignored.
Expiry
OneFS does not support the expiration of user accounts in the file provider. Thisfield is ignored.
Gecos
This field can store a variety of information but is usually used to store the user’sfull name.
Home
The absolute path to the user’s home directory, beginning at /ifs.
Shell
The absolute path to the user’s shell. If this field is set to /sbin/nologin, theuser is denied command-line access.
Group file formatThe file provider uses a group file in the format of the /etc/group file that exists onmost UNIX systems.
The group file consists of one or more lines containing four colon-separated fields, asshown in the following example:
admin:*:10:root,admin
The fields are defined below in the order in which they appear in the file.
Group name
The name of the group. This field is case-sensitive. Although OneFS does not limitthe length of the group name, many applications truncate the name to 16characters.
Password
This field is not supported by OneFS and should contain an asterisk (*).
GID
The UNIX group identifier. Valid values are any number in the range0-4294967294 that is not reserved or already assigned to a group. Compatibilityissues occur if this value conflicts with an existing group's GID.
Group members
A comma-delimited list of user names.
Authentication
Isilon OneFS CLI Administration Guide 145
Netgroup file formatA netgroup file consists of one or more netgroups, each of which can containmembers. Hosts, users, or domains, which are members of a netgroup, are specified ina member triple. A netgroup can also contain another netgroup.
Each entry in a netgroup file consists of the netgroup name, followed by a space-delimited set of member triples and nested netgroup names. If you specify a nestednetgroup, it must be defined on a separate line in the file.A member triple takes the following form:
(<host>, <user>, <domain>)
Where <host> is a placeholder for a machine name, <user> is a placeholder for a username, and <domain> is a placeholder for a domain name. Any combination is validexcept an empty triple: (,,).
The following sample file contains two netgroups. The rootgrp netgroup contains fourhosts: two hosts are defined in member triples and two hosts are contained in thenested othergrp netgroup, which is defined on the second line.
rootgrp (myserver, root, somedomain.com) (otherserver, root, somedomain.com) othergrpothergrp (other-win,, somedomain.com) (other-linux,, somedomain.com)
Note: A new line signifies a new netgroup. You can continue a long netgroup entryto the next line by typing a backslash character (\) in the right-most position ofthe first line.
Managing local users and groupsWhen you create an access zone, each zone includes a local provider that allows youto create and manage local users and groups. Although you can view the users andgroups of any authentication provider, you can create, modify, and delete users andgroups in the local provider only.
View a list of users and groups by providerYou can view users and groups by a provider type.
Procedure
1. Run the following command to view a list of users and groups for a specifiedprovider, where <provider-type> is a placeholder for your provider-type stringand <provider-name> is a placeholder for the name that you assigned thespecific provider:
isi auth users list --provider="<provider-type>:<provider-name>"
Authentication
146 Isilon OneFS CLI Administration Guide

2. To list users and groups for an LDAP provider type that is named Unix LDAP,run a command similar to the following example:
isi auth users list --provider="lsa-ldap-provider:Unix LDAP"
Create a local userEach access zone includes a local provider that allows you to create and manage localusers and groups. When creating a local user account, you can configure its namepassword, home directory, UNIX user identifier (UID), UNIX login shell, and groupmemberships.
Procedure
1. Run the following command to create a local user, where <name> is your namefor the user, <provider-name> specifies the provider for this user, and <string>is the password for this user.
isi auth users create <name> --provider="local:<provider-name>" \ --password="<string>"
Note: A user account is disabled if no password is specified. If you do notcreate a password when you create the user account, you can add apassword later by running the isi auth users modify command,specifying the appropriate user by username, UID, or SID.
Create a local groupIn the local provider of an access zone, you can create groups and assign members tothem.
Procedure
1. Run the following command to create a local group, where <name> and<provider-name> are values that you provide to define the group.
isi auth groups create <name> --provider "local:<provider-name>"
Naming rules for local users and groupsLocal user and group names must follow naming rules in order to ensure properauthentication and access to the cluster.
You must adhere to the following naming rules when creating and modifying localusers and groups:
l The maximum name length is 104 characters. It is recommended that names do notexceed 64 characters.
l Names cannot contain the following invalid characters:" / \ [ ] : ; | = , + * ? < >
l Names can contain any special character that is not in the list of invalidcharacters. It is recommend that names do not contain spaces.
Authentication
Isilon OneFS CLI Administration Guide 147
l Names are not case sensitive.
Configure or modify a local password policyYou can configure and modify a local password policy for a local provider.
About this task
This procedure must be performed through the command-line interface (CLI).Note: Separate password policies are configured for each access zone. Eachaccess zone in the cluster contains a separate instance of the local provider,which allows each access zone to have its own list of local users who canauthenticate. Password complexity is configured for each local provider, not foreach user.
Procedure
1. Establish an SSH connection to any node in the cluster.
2. (Optional) Run the following command to view the current password settings:
isi auth local view system
3. Run the isi auth local modify command, choosing from the parametersdescribed in Local password policy default settings.
The --password-complexity parameter must be specified for each setting.
isi auth local modify system --password-complexity=lowercase \ --password-complexity=uppercase -–password-complexity=numeric \ --password-complexity=symbol
The following command configures a local password policy for a local provider:
isi auth local modify <provider-name> \ --min-password-length=20 \ --lockout-duration=20m \ --lockout-window=5m \ --lockout-threshold=5 \ --add-password-complexity=uppercase \ --add-password-complexity=numeric
Local password policy settingsYou can configure local password policy settings and specify the default for eachsetting through the isi auth local modify command. Password complexityincreases the number of possible passwords that an attacker must check before thecorrect password is guessed.
Setting Description Comments
min-password-length Minimum password lengthin characters.
Long passwords are best. Theminimum length should not be so
Authentication
148 Isilon OneFS CLI Administration Guide
Setting Description Comments
long that users have a difficult timeentering or remembering thepassword.
password-complexity A list of cases that a newpassword must contain. Bydefault, the list is empty.
You can specify as many as fourcases. The following cases are valid:
l uppercase
l lowercase
l numeric
l symbol (excluding # and @)
min-password-age The minimum passwordage. You can set this valueusing characters for units;for example, 4W for 4weeks, 2d for 2 Days.
A minimum password age ensuresthat a user cannot enter atemporary password and thenimmediately change it to theprevious password. Attempts tocheck or set a password before thetime expires are denied.
max-password-age The maximum passwordage. You can set this valueusing characters for units;for example, 4W for 4weeks, 2d for 2 Days.
Attempts to login after a passwordexpires forces a password change. Ifa password change dialog cannot bepresented, the user is not allowed tologin.
password-history-length
The number of historicalpasswords to keep. Newpasswords are checkedagainst this list andrejected if the password isalready present. The maxhistory length is 24.
To avoid recycling of passwords,you can specify the number ofprevious passwords to remember. Ifa new password matches aremembered previous password, it isrejected.
lockout-duration The length of time inseconds that an account islocked after a configurablenumber of bad passwordsare entered.
After an account is locked, it isunavailable from all sources until it isunlocked. OneFS provides twoconfigurable options to avoidadministrator interaction for everylocked account:
l Specify how much time mustelapse before the account isunlocked.
l Automatically reset theincorrect-password counterafter a specified time, inseconds.
lockout-threshold The number of incorrectpassword attempts beforean account is locked. Avalue of zero disablesaccount lockout.
After an account is locked, it isunavailable from all sources until it isunlocked.
Authentication
Isilon OneFS CLI Administration Guide 149

Setting Description Comments
lockout-window The time that elapsesbefore the incorrectpassword attempts countis reset.
If the configured number ofincorrect password attempts isreached, the account is locked andlockout-duration determines thelength of time that the account islocked. A value of zero disables thewindow.
Modify a local userYou can modify any setting for a local user account except the user name.
Procedure
1. Run the following command to modify a local group, where<name> or <gid> or<sid> are placeholders for the user identifiers and <provider-name> is aplaceholder for the name of the local provider associated with the user:
isi auth users modify (<name> or --gid <gid> or --sid <sid>) \ --provider "local:<provider-name>"
Modify a local groupYou can add or remove members from a local group.
Procedure
1. Run the following command to modify a local group, where <name> or <gid> or<sid> are placeholders for the group identifiers and <provider-name> is aplaceholder for the name of the local provider associated with the group:
isi auth groups modify (<name> or --gid <gid> or --sid <sid>) \ --provider "local:<provider-name>"
Delete a local userA deleted user can no longer access the cluster through the command-line interface,web administration interface, or file access protocol. When you delete a local useraccount, its home directory remains in place.
Procedure
1. Run the following command to delete a local user, where <uid> and <sid> areplaceholders for the UID and SID of the user that you want to delete, and<provider-name> is a placeholder for the local provider associated with theuser.
isi auth users delete <name> --uid <uid> --sid <sid> \ --provider "local:<provider-name>"
Authentication
150 Isilon OneFS CLI Administration Guide

Delete a local groupYou can delete a local group even if members are assigned to it. Deleting a group doesnot affect the members of that group.
Procedure
1. Run the following command to delete a local group, where <group> is aplaceholder for the name of the group that you want to delete:
isi auth groups delete <group>
Note: You can run the command with <gid> or <sid> instead of <group>.
SSH Authentication and ConfigurationMulti-Factor Authentication (MFA) adds PAPI support for SSH configuration usingpublic keys stored in LDAP and Multi-Factor Authentication support for SSH via theDuo security platform.
Pre-requisites for Multi-factor Authentication (MFA)In order to successfully authenticate through the MFA feature, the following must betrue regarding the target user:
l The user identity on cluster must belong to a role that enables SSH access.
l The auth-settings-template SSH setting must be set to anything but any orcustom.
l If the user-auth-method SSH setting is set to publickey, all users that need SSHaccess must have a valid public key value for sshPublicKey in their LDAP entry.
l If the user-auth-method SSH setting is set to password, all users that need SSHaccess must have a valid password value for userPassword in their LDAP entry.
Also, the host, ikey, and skey must be set. You must set the enabled option in the isiauth duo command.
Note: This feature will only work as expected if the previous conditions are met. Ifany of the conditions above are not met, you could risk locking yourself out ofyour node.
SSH configuration using passwordYou can provide CLI support for SSH configuration using a password.
Procedure
1. To provide support for SSH configuration using a password, run the isi sshsettings modify command.
isi ssh settings modify --auth-settings-template=password
Authentication
Isilon OneFS CLI Administration Guide 151
2. To configure the Duo security platform, run the isi auth duo modifycommand.
isi auth duo modify --ikey=<key> --host=api-example.duosecurity.com
You are asked to enter the secret key and confirm the same.
Enter skey: Confirm:
3. To enable the Duo provider, run the isi auth duo modify command.
isi auth duo modify --enabled=true
4. To establish an SSH connection to a cluster node, run the following commands:
$ ssh [email protected] Duo two-factor login for someuser Enter a passcode or select one of the following options: 1. Duo Push to XXX-XXX-XXXX 2. Phone call to XXX-XXX-XXXX 3. SMS passcodes to XXX-XXX-XXXX Passcode or option (1-3): 1
If the SSH connection is established, it logs you in and asks for the password.
Success. Logging you in... Password:
SSH Configuration using public keysYou can provide CLI support for SSH configuration using public keys that are stored inLDAP.
Procedure
1. To provide support for SSH configuration using a public key, run the isi sshsettings modify command.
isi ssh settings modify --auth-settings-template=publickey
2. To configure the Duo security platform, run the isi auth duo modifycommand.
isi auth duo modify --ikey=<key> --host=api-example.duosecurity.com
You are asked to enter the secret key and confirm the same.
Enter skey: Confirm:
Authentication
152 Isilon OneFS CLI Administration Guide

3. To enable the Duo provider, run the isi auth duo modify command.
isi auth duo modify --enabled=true
4. To establish an SSH connection to a cluster node, run the following commands:
$ ssh [email protected] -i<location of the public key> Duo two-factor login for someuser Enter a passcode or select one of the following options: 1. Duo Push to XXX-XXX-XXXX 2. Phone call to XXX-XXX-XXXX 3. SMS passcodes to XXX-XXX-XXXX Passcode or option (1-3): 1
If the SSH connection is established, it logs you in.
Success. Logging you in...
Authentication
Isilon OneFS CLI Administration Guide 153

Authentication
154 Isilon OneFS CLI Administration Guide

CHAPTER 7
Administrative roles and privileges
This section contains the following topics:
l Role-based access............................................................................................156l Roles................................................................................................................ 156l Privileges.......................................................................................................... 160l Managing roles................................................................................................. 168
Isilon OneFS CLI Administration Guide 155

Role-based accessYou can assign role-based access to delegate administrative tasks to selected users.
Role based access control (RBAC) allows the right to perform particularadministrative actions to be granted to any user who can authenticate to a cluster.Roles are created by a Security Administrator, assigned privileges, and then assignedmembers. All administrators, including those given privileges by a role, must connectto the System zone to configure the cluster. When these members log in to thecluster through a configuration interface, they have these privileges. All administratorscan configure settings for access zones, and they always have control over all accesszones on the cluster.
Roles also give you the ability to assign privileges to member users and groups. Bydefault, only the root user and the admin user can log in to the web administrationinterface through HTTP or the command-line interface through SSH. Using roles, theroot and admin users can assign others to built-in or custom roles that have login andadministrative privileges to perform specific administrative tasks.
Note: As a best practice, assign users to roles that contain the minimum set ofnecessary privileges. For most purposes, the default permission policy settings,system access zone, and built-in roles are sufficient. You can create role-basedaccess management policies as necessary for your particular environment.
RolesYou can permit and limit access to administrative areas of your cluster on a per-userbasis through roles. OneFS includes several built-in administrator roles withpredefined sets of privileges that cannot be modified. You can also create customroles and assign privileges.
The following list describes what you can and cannot do through roles:
l You can assign privileges to a role.
l You can create custom roles and assign privileges to those roles.
l You can copy an existing role.
l You can add any user or group of users, including well-known groups, to a role aslong as the users can authenticate to the cluster.
l You can add a user or group to more than one role.
l You cannot assign privileges directly to users or groups.
Note: When OneFS is first installed, only users with root- or admin-level accesscan log in and assign users to roles.
Custom rolesCustom roles supplement built-in roles.
You can create custom roles and assign privileges mapped to administrative areas inyour cluster environment. For example, you can create separate administrator rolesfor security, auditing, storage provisioning, and backup.
You can designate certain privileges as read-only or read/write when adding theprivilege to a role. You can modify this option at any time to add or remove privilegesas user responsibilities grow and change.
Administrative roles and privileges
156 Isilon OneFS CLI Administration Guide

Built-in rolesBuilt-in roles are included in OneFS and have been configured with the most likelyprivileges necessary to perform common administrative functions. You cannot modifythe list of privileges assigned to each built-in role; however, you can assign users andgroups to built-in roles.
SecurityAdmin built-in roleThe SecurityAdmin built-in role enables security configuration on the cluster, includingauthentication providers, local users and groups, and role membership.
Privileges Read/write access
ISI_PRIV_LOGIN_CONSOLE N/A
ISI_PRIV_LOGIN_PAPI N/A
ISI_PRIV_LOGIN_SSH N/A
ISI_PRIV_AUTH Read/write
ISI_PRIV_ROLE Read/write
SystemAdmin built-in roleThe SystemAdmin built-in role enables administration of all cluster configuration thatis not specifically handled by the SecurityAdmin role.
Privileges Read/write access
ISI_PRIV_LOGIN_CONSOLE N/A
ISI_PRIV_LOGIN_PAPI N/A
ISI_PRIV_LOGIN_SSH N/A
ISI_PRIV_SYS_SHUTDOWN N/A
ISI_PRIV_SYS_SUPPORT N/A
ISI_PRIV_SYS_TIME Read/write
ISI_PRIV_SYS_UPGRADE Read/write
ISI_PRIV_ANTIVIRUS Read/write
ISI_PRIV_AUDIT Read/write
ISI_PRIV_CLOUDPOOLS Read/write
ISI_PRIV_CLUSTER Read/write
ISI_PRIV_DEVICES Read/write
ISI_PRIV_EVENT Read/write
ISI_PRIV_FILE_FILTER Read/write
ISI_PRIV_FTP Read/write
ISI_PRIV_HARDENING Read/write
ISI_PRIV_HDFS Read/write
Administrative roles and privileges
Isilon OneFS CLI Administration Guide 157
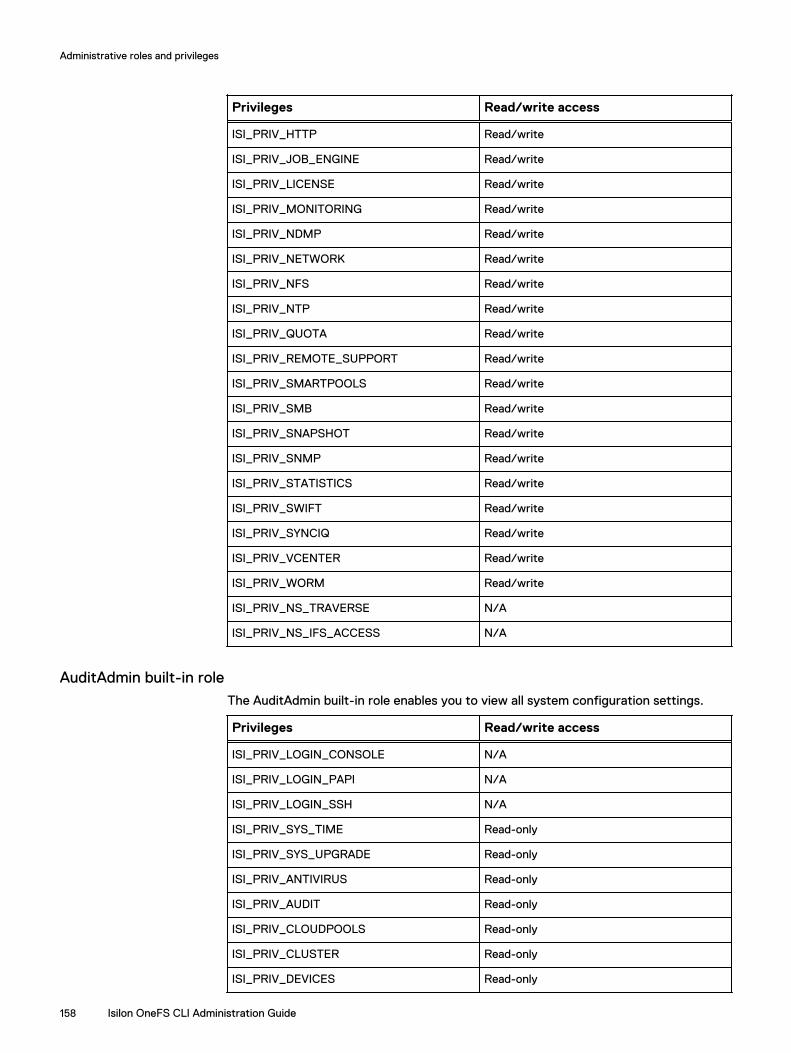
Privileges Read/write access
ISI_PRIV_HTTP Read/write
ISI_PRIV_JOB_ENGINE Read/write
ISI_PRIV_LICENSE Read/write
ISI_PRIV_MONITORING Read/write
ISI_PRIV_NDMP Read/write
ISI_PRIV_NETWORK Read/write
ISI_PRIV_NFS Read/write
ISI_PRIV_NTP Read/write
ISI_PRIV_QUOTA Read/write
ISI_PRIV_REMOTE_SUPPORT Read/write
ISI_PRIV_SMARTPOOLS Read/write
ISI_PRIV_SMB Read/write
ISI_PRIV_SNAPSHOT Read/write
ISI_PRIV_SNMP Read/write
ISI_PRIV_STATISTICS Read/write
ISI_PRIV_SWIFT Read/write
ISI_PRIV_SYNCIQ Read/write
ISI_PRIV_VCENTER Read/write
ISI_PRIV_WORM Read/write
ISI_PRIV_NS_TRAVERSE N/A
ISI_PRIV_NS_IFS_ACCESS N/A
AuditAdmin built-in roleThe AuditAdmin built-in role enables you to view all system configuration settings.
Privileges Read/write access
ISI_PRIV_LOGIN_CONSOLE N/A
ISI_PRIV_LOGIN_PAPI N/A
ISI_PRIV_LOGIN_SSH N/A
ISI_PRIV_SYS_TIME Read-only
ISI_PRIV_SYS_UPGRADE Read-only
ISI_PRIV_ANTIVIRUS Read-only
ISI_PRIV_AUDIT Read-only
ISI_PRIV_CLOUDPOOLS Read-only
ISI_PRIV_CLUSTER Read-only
ISI_PRIV_DEVICES Read-only
Administrative roles and privileges
158 Isilon OneFS CLI Administration Guide

Privileges Read/write access
ISI_PRIV_EVENT Read-only
ISI_PRIV_FILE_FILTER Read-only
ISI_PRIV_FTP Read-only
ISI_PRIV_HARDENING Read-only
ISI_PRIV_HDFS Read-only
ISI_PRIV_HTTP Read-only
ISI_PRIV_JOB_ENGINE Read-only
ISI_PRIV_LICENSE Read-only
ISI_PRIV_MONITORING Read-only
SI_PRIV_NDMP Read-only
ISI_PRIV_NETWORK Read-only
ISI_PRIV_NFS Read-only
ISI_PRIV_NTP Read-only
ISI_PRIV_QUOTA Read-only
ISI_PRIV_REMOTE_SUPPORT Read-only
ISI_PRIV_SMARTPOOLS Read-only
ISI_PRIV_SMB Read-only
ISI_PRIV_SNAPSHOT Read-only
ISI_PRIV_SNMP Read-only
ISI_PRIV_STATISTICS Read-only
ISI_PRIV_SWIFT Read-only
ISI_PRIV_SYNCIQ Read-only
ISI_PRIV_VCENTER Read-only
ISI_PRIV_WORM Read-only
BackupAdmin built-in roleThe BackupAdmin built-in role enables backup and restore of files from /ifs.
Privileges Read/write access
ISI_PRIV_IFS_BACKUP Read-only
ISI_PRIV_IFS_RESTORE Read/write
Administrative roles and privileges
Isilon OneFS CLI Administration Guide 159

VMwareAdmin built-in roleThe VMwareAdmin built-in role enables remote administration of storage needed byVMware vCenter.
Privileges Read/write access
ISI_PRIV_LOGIN_PAPI N/A
ISI_PRIV_NETWORK Read/write
ISI_PRIV_SMARTPOOLS Read/write
ISI_PRIV_SNAPSHOT Read/write
ISI_PRIV_SYNCIQ Read/write
ISI_PRIV_VCENTER Read/write
ISI_PRIV_NS_TRAVERSE N/A
ISI_PRIV_NS_IFS_ACCESS N/A
PrivilegesPrivileges permit users to complete tasks on a cluster.
Privileges are associated with an area of cluster administration such as Job Engine,SMB, or statistics.
Privileges have one of two forms:
Action
Allows a user to perform a specific action on a cluster. For example, theISI_PRIV_LOGIN_SSH privilege allows a user to log in to a cluster through anSSH client.
Read/Write
Allows a user to view or modify a configuration subsystem such as statistics,snapshots, or quotas. For example, the ISI_PRIV_SNAPSHOT privilege allows anadministrator to create and delete snapshots and snapshot schedules. A read/write privilege can grant either read-only or read/write access. Read-only accessallows a user to view configuration settings; read/write access allows a user toview and modify configuration settings.
Privileges are granted to the user on login to a cluster through the OneFS API, theweb administration interface, SSH, or a console session. A token is generated for theuser, which includes a list of all privileges granted to the user. Each URI, web-administration interface page, and command requires a specific privilege to view ormodify the information available through any of these interfaces.
In some cases, privileges cannot be granted or there are privilege limitations.
l Privileges are not granted to users that do not connect to the System Zone duringlogin or to users that connect through the deprecated Telnet service, even if theyare members of a role.
l Privileges do not provide administrative access to configuration paths outside ofthe OneFS API. For example, the ISI_PRIV_SMB privilege does not grant a userthe right to configure SMB shares using the Microsoft Management Console(MMC).
Administrative roles and privileges
160 Isilon OneFS CLI Administration Guide

l Privileges do not provide administrative access to all log files. Most log filesrequire root access.
Supported OneFS privilegesPrivileges supported by OneFS are categorized by the type of action or access that isgranted to the user—for example, login, security, and configuration privileges.
Login privilegesThe login privileges listed in the following table either allow the user to performspecific actions or grants read or write access to an area of administration on thecluster.
Privilege Description Type
ISI_PRIV_LOGIN_CONSOLE Log in from the console. Action
ISI_PRIV_LOGIN_PAPI Log in to the Platform API andthe web administrationinterface.
Action
ISI_PRIV_LOGIN_SSH Log in through SSH. Action
System privilegesThe system privileges listed in the following table either allow the user to performspecific actions or grants read or write access to an area of administration on thecluster.
Privilege Description Type
ISI_PRIV_SYS_SHUTDOWN Shut down the system. Action
ISI_PRIV_SYS_SUPPORT Run cluster diagnostic tools. Action
ISI_PRIV_SYS_TIME Change the system time. Read/write
ISI_PRIV_SYS_UPGRADE Upgrades the OneFS system. Read/write
Security privilegesThe security privileges listed in the following table either allow the user to performspecific actions or grants read or write access to an area of administration on thecluster.
Privilege Description Type
ISI_PRIV_AUTH Configure externalauthentication providers,including root-level accounts.
Read/write
ISI_PRIV_ROLE Create new roles and assignprivileges, including root-levelaccounts.
Read/write
Administrative roles and privileges
Isilon OneFS CLI Administration Guide 161

Configuration privilegesThe configuration privileges listed in the following table either allow the user toperform specific actions or grants read or write access to an area of administration onthe cluster.
Privilege Description Type
ISI_PRIV_ANTIVIRUS Configure antivirus scanning. Read/write
ISI_PRIV_AUDIT Configure audit capabilities. Read/write
ISI_PRIV_CLOUDPOOLS Configure CloudPools. Read/write
ISI_PRIV_CLUSTER Configure cluster identity andgeneral settings.
Read/write
ISI_PRIV_DEVICES Create new roles and assignprivileges.
Read/write
ISI_PRIV_EVENT View and modify systemevents.
Read/write
ISI_PRIV_FILE_FILTER Configure file filteringsettings.
Read/write
ISI_PRIV_FTP Configure FTP server. Read/write
ISI_PRIV_HDFS Configure HDFS server. Read/write
ISI_PRIV_HTTP Configure HTTP server. Read/write
ISI_PRIV_JOB_ENGINE Schedule cluster-wide jobs. Read/write
ISI_PRIV_LICENSE Activate OneFS softwarelicenses.
Read/write
ISI_PRIV_MONITORING Register applicationsmonitoring the cluster.
Read/write
ISI_PRIV_NDMP Configure NDMP server. Read/write
ISI_PRIV_NETWORK Configure network interfaces. Read/write
ISI_PRIV_NFS Configure the NFS server. Read/write
ISI_PRIV_NTP Configure NTP. Read/write
ISI_PRIV_QUOTA Configure file system quotas. Read/write
ISI_PRIV_REMOTE_SUPPORT
Configure remote support. Read/write
ISI_PRIV_SMARTPOOLS Configure storage pools. Read/write
ISI_PRIV_SMB Configure the SMB server. Read/write
ISI_PRIV_SNAPSHOT Schedule, take, and viewsnapshots.
Read/write
ISI_PRIV_SNMP Configure SNMP server. Read/write
ISI_PRIV_STATISTICS View file system performancestatistics.
Read/write
ISI_PRIV_SWIFT Configure Swift. Read/write
Administrative roles and privileges
162 Isilon OneFS CLI Administration Guide
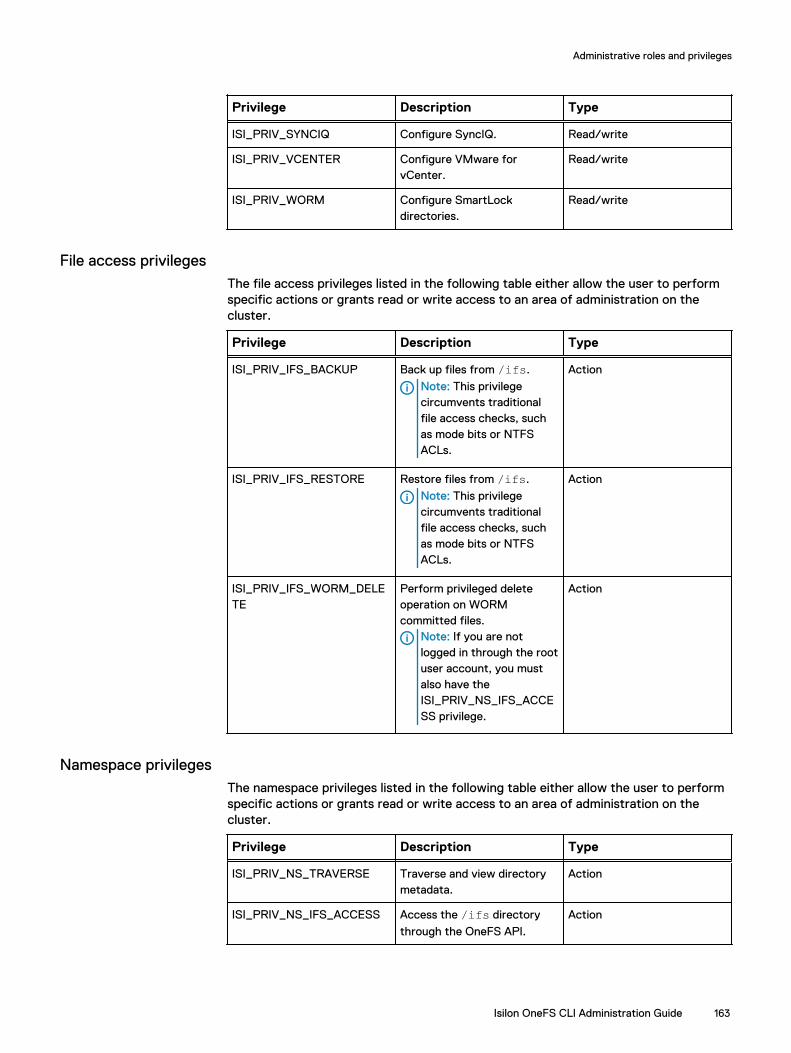
Privilege Description Type
ISI_PRIV_SYNCIQ Configure SyncIQ. Read/write
ISI_PRIV_VCENTER Configure VMware forvCenter.
Read/write
ISI_PRIV_WORM Configure SmartLockdirectories.
Read/write
File access privilegesThe file access privileges listed in the following table either allow the user to performspecific actions or grants read or write access to an area of administration on thecluster.
Privilege Description Type
ISI_PRIV_IFS_BACKUP Back up files from /ifs.
Note: This privilegecircumvents traditionalfile access checks, suchas mode bits or NTFSACLs.
Action
ISI_PRIV_IFS_RESTORE Restore files from /ifs.
Note: This privilegecircumvents traditionalfile access checks, suchas mode bits or NTFSACLs.
Action
ISI_PRIV_IFS_WORM_DELETE
Perform privileged deleteoperation on WORMcommitted files.
Note: If you are notlogged in through the rootuser account, you mustalso have theISI_PRIV_NS_IFS_ACCESS privilege.
Action
Namespace privilegesThe namespace privileges listed in the following table either allow the user to performspecific actions or grants read or write access to an area of administration on thecluster.
Privilege Description Type
ISI_PRIV_NS_TRAVERSE Traverse and view directorymetadata.
Action
ISI_PRIV_NS_IFS_ACCESS Access the /ifs directory
through the OneFS API.
Action
Administrative roles and privileges
Isilon OneFS CLI Administration Guide 163
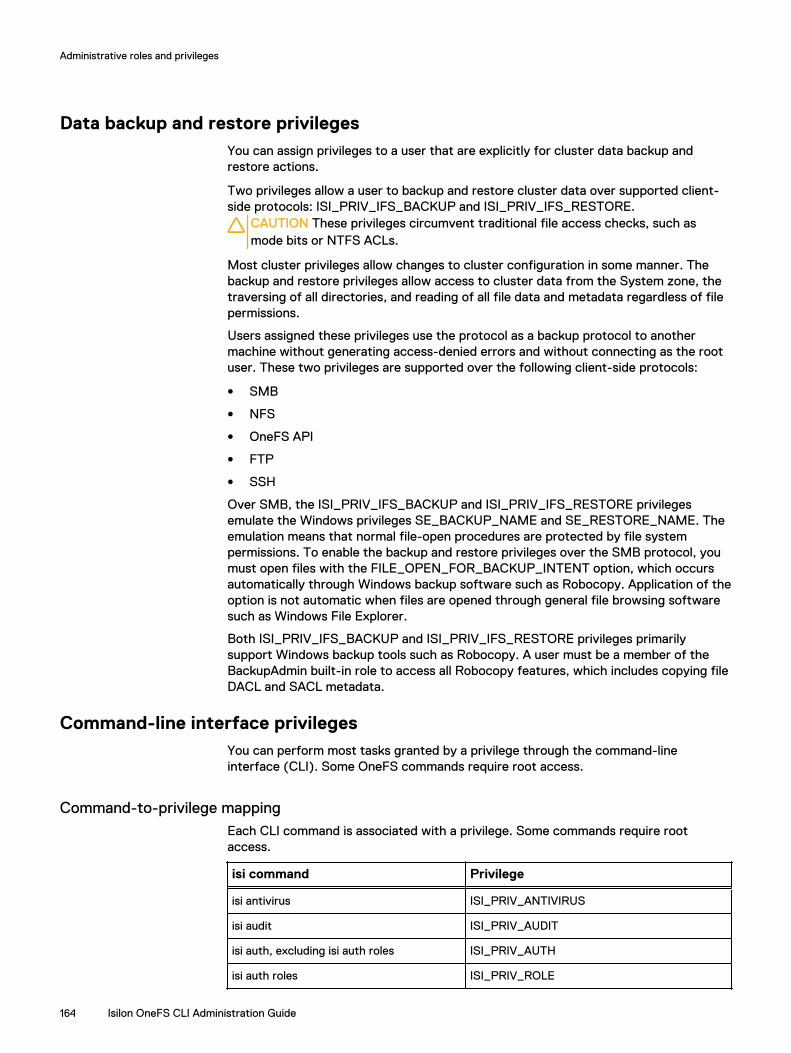
Data backup and restore privilegesYou can assign privileges to a user that are explicitly for cluster data backup andrestore actions.
Two privileges allow a user to backup and restore cluster data over supported client-side protocols: ISI_PRIV_IFS_BACKUP and ISI_PRIV_IFS_RESTORE.
CAUTION These privileges circumvent traditional file access checks, such asmode bits or NTFS ACLs.
Most cluster privileges allow changes to cluster configuration in some manner. Thebackup and restore privileges allow access to cluster data from the System zone, thetraversing of all directories, and reading of all file data and metadata regardless of filepermissions.
Users assigned these privileges use the protocol as a backup protocol to anothermachine without generating access-denied errors and without connecting as the rootuser. These two privileges are supported over the following client-side protocols:
l SMB
l NFS
l OneFS API
l FTP
l SSH
Over SMB, the ISI_PRIV_IFS_BACKUP and ISI_PRIV_IFS_RESTORE privilegesemulate the Windows privileges SE_BACKUP_NAME and SE_RESTORE_NAME. Theemulation means that normal file-open procedures are protected by file systempermissions. To enable the backup and restore privileges over the SMB protocol, youmust open files with the FILE_OPEN_FOR_BACKUP_INTENT option, which occursautomatically through Windows backup software such as Robocopy. Application of theoption is not automatic when files are opened through general file browsing softwaresuch as Windows File Explorer.
Both ISI_PRIV_IFS_BACKUP and ISI_PRIV_IFS_RESTORE privileges primarilysupport Windows backup tools such as Robocopy. A user must be a member of theBackupAdmin built-in role to access all Robocopy features, which includes copying fileDACL and SACL metadata.
Command-line interface privilegesYou can perform most tasks granted by a privilege through the command-lineinterface (CLI). Some OneFS commands require root access.
Command-to-privilege mappingEach CLI command is associated with a privilege. Some commands require rootaccess.
isi command Privilege
isi antivirus ISI_PRIV_ANTIVIRUS
isi audit ISI_PRIV_AUDIT
isi auth, excluding isi auth roles ISI_PRIV_AUTH
isi auth roles ISI_PRIV_ROLE
Administrative roles and privileges
164 Isilon OneFS CLI Administration Guide
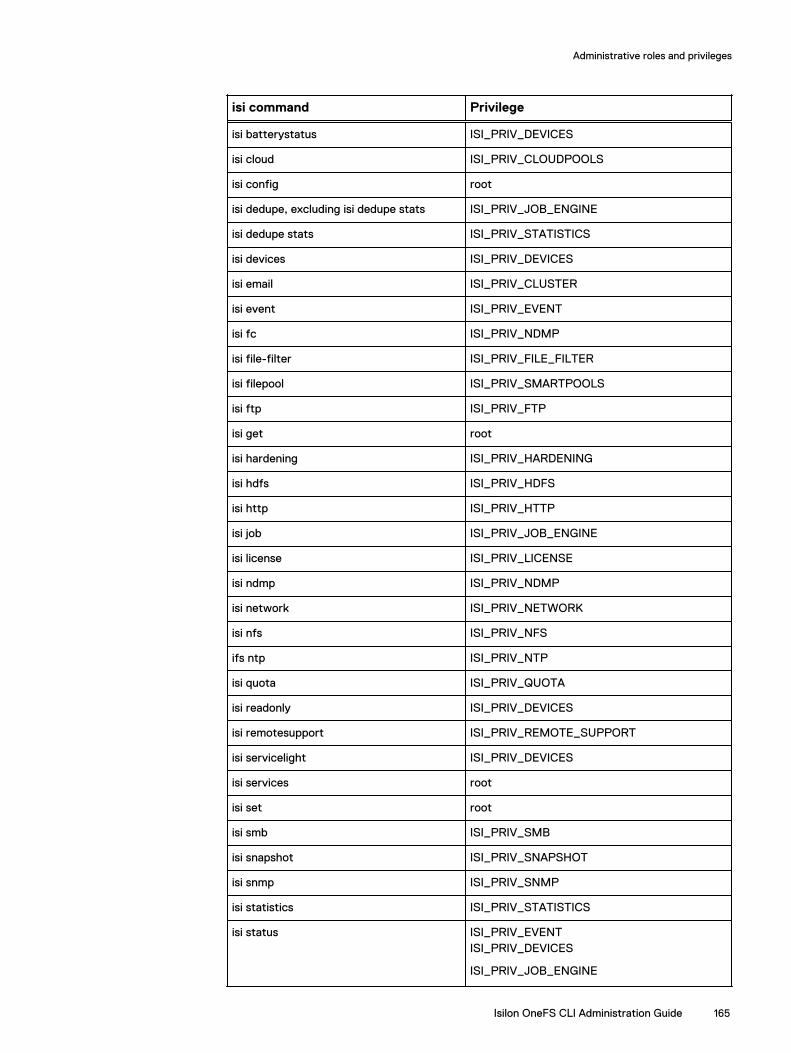
isi command Privilege
isi batterystatus ISI_PRIV_DEVICES
isi cloud ISI_PRIV_CLOUDPOOLS
isi config root
isi dedupe, excluding isi dedupe stats ISI_PRIV_JOB_ENGINE
isi dedupe stats ISI_PRIV_STATISTICS
isi devices ISI_PRIV_DEVICES
isi email ISI_PRIV_CLUSTER
isi event ISI_PRIV_EVENT
isi fc ISI_PRIV_NDMP
isi file-filter ISI_PRIV_FILE_FILTER
isi filepool ISI_PRIV_SMARTPOOLS
isi ftp ISI_PRIV_FTP
isi get root
isi hardening ISI_PRIV_HARDENING
isi hdfs ISI_PRIV_HDFS
isi http ISI_PRIV_HTTP
isi job ISI_PRIV_JOB_ENGINE
isi license ISI_PRIV_LICENSE
isi ndmp ISI_PRIV_NDMP
isi network ISI_PRIV_NETWORK
isi nfs ISI_PRIV_NFS
ifs ntp ISI_PRIV_NTP
isi quota ISI_PRIV_QUOTA
isi readonly ISI_PRIV_DEVICES
isi remotesupport ISI_PRIV_REMOTE_SUPPORT
isi servicelight ISI_PRIV_DEVICES
isi services root
isi set root
isi smb ISI_PRIV_SMB
isi snapshot ISI_PRIV_SNAPSHOT
isi snmp ISI_PRIV_SNMP
isi statistics ISI_PRIV_STATISTICS
isi status ISI_PRIV_EVENTISI_PRIV_DEVICES
ISI_PRIV_JOB_ENGINE
Administrative roles and privileges
Isilon OneFS CLI Administration Guide 165
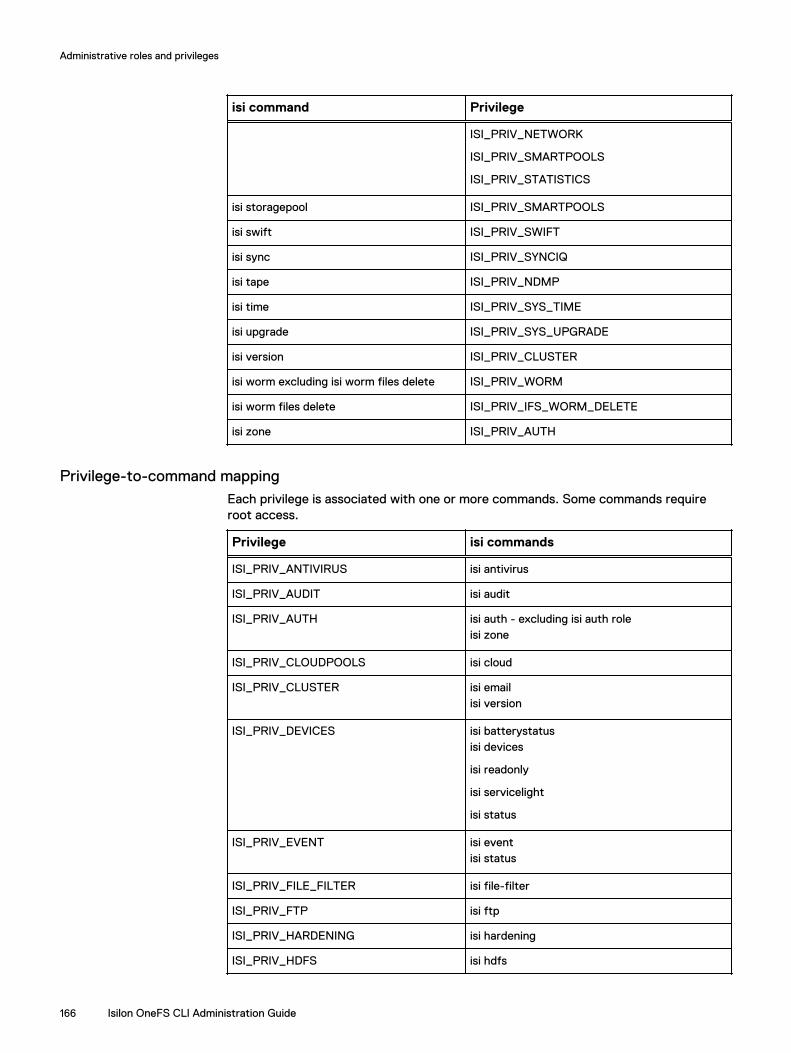
isi command Privilege
ISI_PRIV_NETWORK
ISI_PRIV_SMARTPOOLS
ISI_PRIV_STATISTICS
isi storagepool ISI_PRIV_SMARTPOOLS
isi swift ISI_PRIV_SWIFT
isi sync ISI_PRIV_SYNCIQ
isi tape ISI_PRIV_NDMP
isi time ISI_PRIV_SYS_TIME
isi upgrade ISI_PRIV_SYS_UPGRADE
isi version ISI_PRIV_CLUSTER
isi worm excluding isi worm files delete ISI_PRIV_WORM
isi worm files delete ISI_PRIV_IFS_WORM_DELETE
isi zone ISI_PRIV_AUTH
Privilege-to-command mappingEach privilege is associated with one or more commands. Some commands requireroot access.
Privilege isi commands
ISI_PRIV_ANTIVIRUS isi antivirus
ISI_PRIV_AUDIT isi audit
ISI_PRIV_AUTH isi auth - excluding isi auth roleisi zone
ISI_PRIV_CLOUDPOOLS isi cloud
ISI_PRIV_CLUSTER isi emailisi version
ISI_PRIV_DEVICES isi batterystatusisi devices
isi readonly
isi servicelight
isi status
ISI_PRIV_EVENT isi eventisi status
ISI_PRIV_FILE_FILTER isi file-filter
ISI_PRIV_FTP isi ftp
ISI_PRIV_HARDENING isi hardening
ISI_PRIV_HDFS isi hdfs
Administrative roles and privileges
166 Isilon OneFS CLI Administration Guide

Privilege isi commands
ISI_PRIV_HTTP isi http
ISI_PRIV_JOB_ENGINE isi jobisi dedupe
isi status
ISI_PRIV_LICENSE isi license
ISI_PRIV_NDMP isi fcisi tape
isi ndmp
ISI_PRIV_NETWORK isi networkisi status
ISI_PRIV_NFS isi nfs
ISI_PRIV_NTP isi ntp
ISI_PRIV_QUOTA isi quota
ISI_PRIV_REMOTE_SUPPORT isi remotesupport
ISI_PRIV_ROLE isi auth role
ISI_PRIV_SMARTPOOLS isi filepoolisi storagepool
isi status
ISI_PRIV_SMB isi smb
ISI_PRIV_SNAPSHOT isi snapshot
ISI_PRIV_SNMP isi snmp
ISI_PRIV_STATISTICS isi statusisi statistics
isi dedupe stats
ISI_PRIV_SWIFT isi swift
ISI_PRIV_SYNCIQ isi sync
ISI_PRIV_SYS_TIME isi time
ISI_PRIV_SYS_UPGRADE isi upgrade
ISI_PRIV_WORM isi worm excluding isi worm files delete
ISI_PRIV_IFS_WORM_DELETE isi worm files delete
root l isi config
l isi get
l isi services
l isi set
Administrative roles and privileges
Isilon OneFS CLI Administration Guide 167

Managing rolesYou can view, add, or remove members of any role. Except for built-in roles, whoseprivileges you cannot modify, you can add or remove OneFS privileges on a role-by-role basis.
Note: Roles take both users and groups as members. If a group is added to a role,all users who are members of that group are assigned the privileges associatedwith the role. Similarly, members of multiple roles are assigned the combinedprivileges of each role.
View rolesYou can view information about built-in and custom roles.
Procedure
1. Run one of the following commands to view roles.
l To view a basic list of all roles on the cluster, run the following command:
isi auth roles list
l To view detailed information about each role on the cluster, includingmember and privilege lists, run the following command:
isi auth roles list --verbose
l To view detailed information about a single role, run the following command,where <role> is the name of the role:
isi auth roles view <role>
View privilegesYou can view user privileges.
About this task
This procedure must be performed through the command-line interface (CLI). You canview a list of your privileges or the privileges of another user using the followingcommands:
Procedure
1. Establish an SSH connection to any node in the cluster.
2. To view privileges, run one of the following commands.
l To view a list of all privileges, run the following command:
isi auth privileges --verbose
l To view a list of your privileges, run the following command:
isi auth id
Administrative roles and privileges
168 Isilon OneFS CLI Administration Guide
l To view a list of privileges for another user, run the following command,where <user> is a placeholder for another user by name:
isi auth mapping token <user>
Create and modify a custom roleYou can create an empty custom role and then add users and privileges to the role.
Procedure
1. Establish an SSH connection to any node in the cluster.
2. Run the following command to create a role, where <name> is the name thatyou want to assign to the role and <string> specifies an optional description:
isi auth roles create <name> [--description <string>]
3. Run the following command to add a user to the role, where <role> is the nameof the role and <string> is the name of the user:
isi auth roles modify <role> [--add-user <string>]
Note: You can also modify the list of users assigned to a built-in role.
4. Run the following command to add a privilege with read/write access to therole, where <role> is the name of the role and <string> is the name of theprivilege:
isi auth roles modify <role> [--add-priv <string>]
5. Run the following command to add a privilege with read-only access to the role,where <role> is the name of the role and <string> is the name of the privilege:
isi auth roles modify <role> [--add-priv-ro <string>]
Delete a custom roleDeleting a role does not affect the privileges or users that are assigned to it. Built-inroles cannot be deleted.
Procedure
1. Run the following command to delete a custom role, where <name> is the nameof the role that you want to delete:
isi auth roles delete <name>
Administrative roles and privileges
Isilon OneFS CLI Administration Guide 169

Add a user to built-in rolesYou can assign a built-in role to a new user.
Procedure
1. To view the list of roles, run the isi auth roles list command.
The following authentication roles' list is displayed:
isi auth roles listName---------------AuditAdminBackupAdminSecurityAdminStatisticsAdminSystemAdminVMwareAdmin---------------Total: 6
2. Run the isi auth roles list --zone zone1 command to view the rolesavailable in zone1
The roles available in zone1 are displayed:
isi auth roles list --zone zone1Name-----------------ZoneAdminZoneSecurityAdmin-----------------Total: 2
3. Run the isi auth roles view ZoneAdmin --zone zone1 command toview the privileges associated with the ZoneAdmin role in zone1.
The details that are associated with the ZoneAdmin role are displayed:
isi auth roles view ZoneAdmin --zone zone1 Name: ZoneAdminDescription: Administer aspects of configuration related to current access zone. Members: - Privileges ID: ISI_PRIV_LOGIN_PAPI Read Only: True
ID: ISI_PRIV_AUDIT Read Only: False
ID: ISI_PRIV_FILE_FILTER Read Only: False
ID: ISI_PRIV_HDFS Read Only: False
ID: ISI_PRIV_NFS Read Only: False
ID: ISI_PRIV_SMB Read Only: False
Administrative roles and privileges
170 Isilon OneFS CLI Administration Guide

ID: ISI_PRIV_SWIFT Read Only: False
ID: ISI_PRIV_VCENTER Read Only: False
ID: ISI_PRIV_NS_TRAVERSE Read Only: True
ID: ISI_PRIV_NS_IFS_ACCESS Read Only: True
4. Run the isi auth roles view ZoneSecurityAdmin --zone zone1command to view the privileges associated with the ZoneSecurityAdmin role inzone1.
The details that are associated with the ZoneSecurityAdmin role are displayed:
isi auth roles view ZoneSecurityAdmin --zone zone1 Name: ZoneSecurityAdminDescription: Administer aspects of security configuration related to current access zone. Members: - Privileges ID: ISI_PRIV_LOGIN_PAPI Read Only: True
ID: ISI_PRIV_AUTH Read Only: False
ID: ISI_PRIV_ROLE Read Only: False
5. Run the isi auth roles modify command to add a user to the ZoneAdminrole.
isi auth roles modify --zone zone1 ZoneAdmin --add-user z1-user1
6. Run the isi auth roles view command to view whether the new user hasbeen added to the ZoneAdmin role.
isi auth roles view --zone zone1 ZoneAdmin Name: ZoneAdminDescription: Administer aspects of configuration related to current access zone. Members: z1-user1 Privileges ID: ISI_PRIV_LOGIN_PAPI Read Only: True
ID: ISI_PRIV_AUDIT Read Only: False
ID: ISI_PRIV_FILE_FILTER Read Only: False
ID: ISI_PRIV_HDFS Read Only: False
ID: ISI_PRIV_NFS Read Only: False
ID: ISI_PRIV_SMB Read Only: False
Administrative roles and privileges
Isilon OneFS CLI Administration Guide 171

ID: ISI_PRIV_SWIFT Read Only: False
ID: ISI_PRIV_VCENTER Read Only: False
ID: ISI_PRIV_NS_TRAVERSE Read Only: True
ID: ISI_PRIV_NS_IFS_ACCESS Read Only: True
7. Run the isi auth roles modify command to add a user to theZoneSecurityAdmin role.
isi auth roles modify --zone zone1 ZoneSecurityAdmin --add-user z1-user2
8. Run the isi auth roles view command to view whether the new user hasbeen added to the ZoneSecurityAdmin role.
isi auth roles view ZoneSecurityAdmin --zone zone1 Name: ZoneSecurityAdminDescription: Administer aspects of security configuration related to current access zone. Members: z1-user2 Privileges ID: ISI_PRIV_LOGIN_PAPI Read Only: True
ID: ISI_PRIV_AUTH Read Only: False
ID: ISI_PRIV_ROLE Read Only: False
Create a new role and add a userYou can create a new role and then add a user to the new role.
Procedure
1. To create a new role, run the isi auth roles create command in zone1.
isi auth roles create --name Zone1SMBAdmin --zone zone1
2. To view the newly added role in the authentication list, run the isi authroles list command.
isi auth roles list --zone zone1Name-----------------Zone1SMBAdminZoneAdminZoneSecurityAdmin-----------------Total: 3
Administrative roles and privileges
172 Isilon OneFS CLI Administration Guide
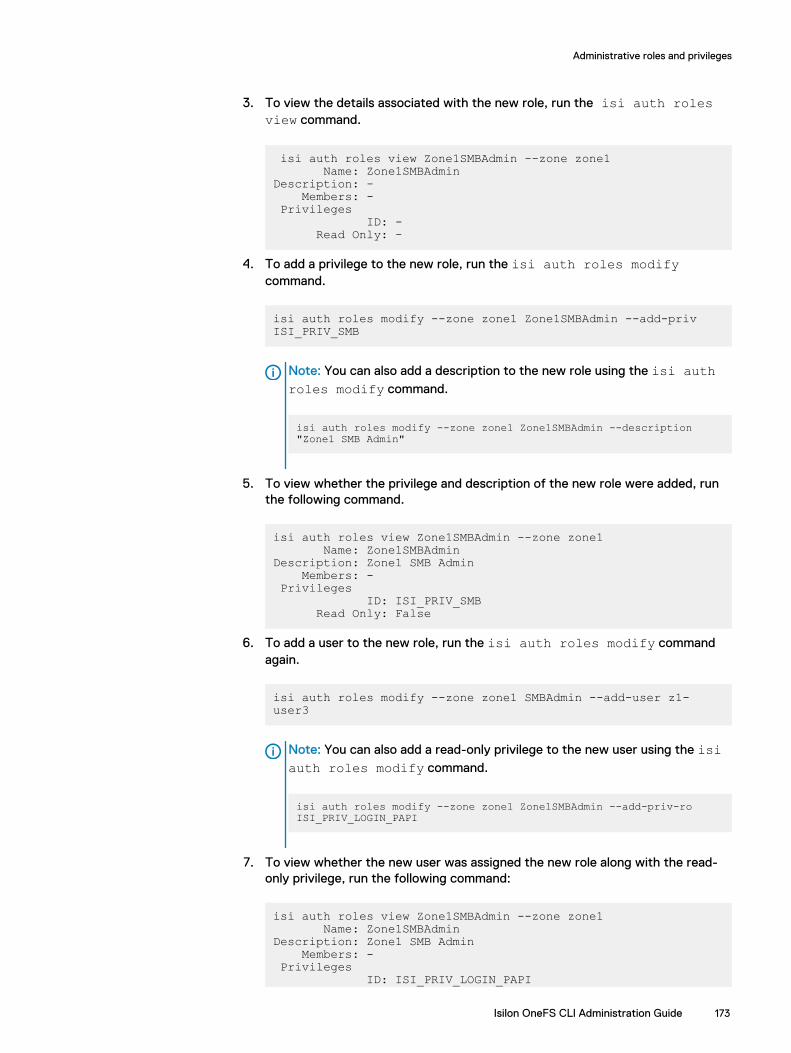
3. To view the details associated with the new role, run the isi auth rolesview command.
isi auth roles view Zone1SMBAdmin --zone zone1 Name: Zone1SMBAdminDescription: - Members: - Privileges ID: - Read Only: -
4. To add a privilege to the new role, run the isi auth roles modifycommand.
isi auth roles modify --zone zone1 Zone1SMBAdmin --add-priv ISI_PRIV_SMB
Note: You can also add a description to the new role using the isi authroles modify command.
isi auth roles modify --zone zone1 Zone1SMBAdmin --description "Zone1 SMB Admin"
5. To view whether the privilege and description of the new role were added, runthe following command.
isi auth roles view Zone1SMBAdmin --zone zone1 Name: Zone1SMBAdminDescription: Zone1 SMB Admin Members: - Privileges ID: ISI_PRIV_SMB Read Only: False
6. To add a user to the new role, run the isi auth roles modify commandagain.
isi auth roles modify --zone zone1 SMBAdmin --add-user z1-user3
Note: You can also add a read-only privilege to the new user using the isiauth roles modify command.
isi auth roles modify --zone zone1 Zone1SMBAdmin --add-priv-ro ISI_PRIV_LOGIN_PAPI
7. To view whether the new user was assigned the new role along with the read-only privilege, run the following command:
isi auth roles view Zone1SMBAdmin --zone zone1 Name: Zone1SMBAdminDescription: Zone1 SMB Admin Members: - Privileges ID: ISI_PRIV_LOGIN_PAPI
Administrative roles and privileges
Isilon OneFS CLI Administration Guide 173

Read Only: True
ID: ISI_PRIV_SMB Read Only: False
Administrative roles and privileges
174 Isilon OneFS CLI Administration Guide
CHAPTER 8
Identity management
This section contains the following topics:
l Identity management overview......................................................................... 176l Identity types....................................................................................................176l Access tokens................................................................................................... 177l Access token generation...................................................................................178l Managing ID mappings......................................................................................183l Managing user identities................................................................................... 187
Isilon OneFS CLI Administration Guide 175
Identity management overviewIn environments with several different types of directory services, OneFS maps theusers and groups from the separate services to provide a single unified identity on acluster and uniform access control to files and directories, regardless of the incomingprotocol. This process is called identity mapping.
Isilon clusters are frequently deployed in multiprotocol environments with multipletypes of directory services, such as Active Directory and LDAP. When a user withaccounts in multiple directory services logs in to a cluster, OneFS combines the user’sidentities and privileges from all the directory services into a native access token.
You can configure OneFS settings to include a list of rules for access tokenmanipulation to control user identity and privileges. For example, you can set a usermapping rule to merge an Active Directory identity and an LDAP identity into a singletoken that works for access to files stored over both SMB and NFS. The token caninclude groups from Active Directory and LDAP. The mapping rules that you createcan solve identity problems by manipulating access tokens in many ways, including thefollowing examples:
l Authenticate a user with Active Directory but give the user a UNIX identity.
l Select a primary group from competing choices in Active Directory or LDAP.
l Disallow login of users that do not exist in both Active Directory and LDAP.
For more information about identity management, see the white paper Managingidentities with the Isilon OneFS user mapping service at .
Identity typesOneFS supports three primary identity types, each of which you can store directly onthe file system. Identity types are user identifier and group identifier for UNIX, andsecurity identifier for Windows.
When you log on to a cluster, the user mapper expands your identity to include yourother identities from all the directory services, including Active Directory, LDAP, andNIS. After OneFS maps your identities across the directory services, it generates anaccess token that includes the identity information associated with your accounts. Atoken includes the following identifiers:
l A UNIX user identifier (UID) and a group identifier (GID). A UID or GID is a 32-bitnumber with a maximum value of 4,294,967,295.
l A security identifier (SID) for a Windows user account. A SID is a series ofauthorities and sub-authorities ending with a 32-bit relative identifier (RID). MostSIDs have the form S-1-5-21-<A>-<B>-<C>-<RID>, where <A>, <B>, and <C> arespecific to a domain or computer and <RID> denotes the object in the domain.
l A primary group SID for a Windows group account.
l A list of supplemental identities, including all groups in which the user is a member.
The token also contains privileges that stem from administrative role-based accesscontrol.
On an Isilon cluster, a file contains permissions, which appear as an access control list(ACL). The ACL controls access to directories, files, and other securable systemobjects.
When a user tries to access a file, OneFS compares the identities in the user’s accesstoken with the file’s ACL. OneFS grants access when the file’s ACL includes an access
Identity management
176 Isilon OneFS CLI Administration Guide

control entry (ACE) that allows the identity in the token to access the file and thatdoes not include an ACE that denies the identity access. OneFS compares the accesstoken of a user with the ACL of a file.
Note: For more information about access control lists, including a description ofthe permissions and how they correspond to POSIX mode bits, see the whitepaper titled EMC Isilon Multiprotocol Data Access with a Unified Security Model onthe Dell EMC Isilon Technical Support web site.
When a name is provided as an identifier, it is converted into the corresponding user orgroup object and the correct identity type. You can enter or display a name in variousways:
l UNIX assumes unique case-sensitive namespaces for users and groups. Forexample, Name and name represent different objects.
l Windows provides a single, case-insensitive namespace for all objects and alsospecifies a prefix to target an Active Directory domain; for example, domain\name.
l Kerberos and NFSv4 define principals, which require names to be formatted thesame way as email addresses; for example, [email protected].
Multiple names can reference the same object. For example, given the name supportand the domain example.com, support, EXAMPLE\support and [email protected] all names for a single object in Active Directory.
Access tokensAn access token is created when the user first makes a request for access.
Access tokens represent who a user is when performing actions on the cluster andsupply the primary owner and group identities during file creation. Access tokens arealso compared against the ACL or mode bits during authorization checks.
During user authorization, OneFS compares the access token, which is generatedduring the initial connection, with the authorization data on the file. All user andidentity mapping occurs during token generation; no mapping takes place duringpermissions evaluation.
An access token includes all UIDs, GIDs, and SIDs for an identity, in addition to allOneFS privileges. OneFS reads the information in the token to determine whether auser has access to a resource. It is important that the token contains the correct listof UIDs, GIDs, and SIDs. An access token is created from one of the following sources:
Source Authentication
Username l SMB impersonate user
l Kerberized NFSv3
l Kerberized NFSv4
l NFS export user mapping
l HTTP
l FTP
l HDFS
Privilege Attribute Certificate (PAC) l SMB NTLM
l Active Directory Kerberos
Identity management
Isilon OneFS CLI Administration Guide 177

Source Authentication
User identifier (UID) l NFS AUTH_SYS mapping
Access token generationFor most protocols, the access token is generated from the username or from theauthorization data that is retrieved during authentication.
The following steps present a simplified overview of the complex process throughwhich an access token is generated:
Step 1: User identity lookup
Using the initial identity, the user is looked up in all configured authenticationproviders in the access zone, in the order in which they are listed. The useridentity and group list are retrieved from the authenticating provider. Next,additional group memberships that are associated with the user and group list arelooked up for all other authentication providers. All of these SIDs, UIDs, or GIDsare added to the initial token.
Note: An exception to this behavior occurs if the AD provider is configured tocall other providers, such as LDAP or NIS.
Step 2: ID mapping
The user's identifiers are associated across directory services. All SIDs areconverted to their equivalent UID/GID and vice versa. These ID mappings are alsoadded to the access token.
Step 3: User mapping
Access tokens from other directory services are combined. If the usernamematches any user mapping rules, the rules are processed in order and the token isupdated accordingly.
Step 4: On-disk identity calculation
The default on-disk identity is calculated from the final token and the globalsetting. These identities are used for newly created files.
ID mappingThe Identity (ID) mapping service maintains relationship information between mappedWindows and UNIX identifiers to provide consistent access control across file sharingprotocols within an access zone.
Note: ID mapping and user mapping are different services, despite the similarity innames.
During authentication, the authentication daemon requests identity mappings from theID mapping service in order to create access tokens. Upon request, the ID mappingservice returns Windows identifiers mapped to UNIX identifiers or UNIX identifiersmapped to Windows identifiers. When a user authenticates to a cluster over NFS witha UID or GID, the ID mapping service returns the mapped Windows SID, allowingaccess to files that another user stored over SMB. When a user authenticates to thecluster over SMB with a SID, the ID mapping service returns the mapped UNIX UIDand GID, allowing access to files that a UNIX client stored over NFS.
Identity management
178 Isilon OneFS CLI Administration Guide

Mappings between UIDs or GIDs and SIDs are stored according to access zone in acluster-distributed database called the ID map. Each mapping in the ID map is storedas a one-way relationship from the source to the target identity type. Two-waymappings are stored as complementary one-way mappings.
Mapping Windows IDs to UNIX IDsWhen a Windows user authenticates with an SID, the authentication daemon searchesthe external Active Directory provider to look up the user or group associated with theSID. If the user or group has only an SID in the Active Directory, the authenticationdaemon requests a mapping from the ID mapping service.
Note: User and group lookups may be disabled or limited, depending on the ActiveDirectory settings. You enable user and group lookup settings through the isiauth ads modify command.
If the ID mapping service does not locate and return a mapped UID or GID in the IDmap, the authentication daemon searches other external authentication providersconfigured in the same access zone for a user that matches the same name as theActive Directory user.
If a matching user name is found in another external provider, the authenticationdaemon adds the matching user's UID or GID to the access token for the ActiveDirectory user, and the ID mapping service creates a mapping between the UID or GIDand the Active Directory user's SID in the ID map. This is referred to as an externalmapping.
Note: When an external mapping is stored in the ID map, the UID is specified asthe on-disk identity for that user. When the ID mapping service stores a generatedmapping, the SID is specified as the on-disk identity.
If a matching user name is not found in another external provider, the authenticationdaemon assigns a UID or GID from the ID mapping range to the Active Directory user'sSID, and the ID mapping service stores the mapping in the ID map. This is referred toas a generated mapping. The ID mapping range is a pool of UIDs and GIDs allocated inthe mapping settings.
After a mapping has been created for a user, the authentication daemon retrieves theUID or GID stored in the ID map upon subsequent lookups for the user.
Mapping UNIX IDs to Windows IDsThe ID mapping service creates temporary UID-to-SID and GID-to-SID mappings onlyif a mapping does not already exist. The UNIX SIDs that result from these mappingsare never stored on disk.
UIDs and GIDs have a set of predefined mappings to and from SIDs.
If a UID-to-SID or GID-to-SID mapping is requested during authentication, the IDmapping service generates a temporary UNIX SID in the format S-1-22-1-<UID> orS-1-22-2-<GID> by applying the following rules:
l For UIDs, the ID mapping service generates a UNIX SID with a domain of S-1-22-1and a resource ID (RID) matching the UID. For example, the UNIX SID for UID 600is S-1-22-1-600.
l For GIDs, the ID mapping service generates a UNIX SID with a domain of S-1-22-2and an RID matching the GID. For example, the UNIX SID for GID 800 isS-1-22-2-800.
Identity management
Isilon OneFS CLI Administration Guide 179

ID mapping rangesIn access zones with multiple external authentication providers, such as ActiveDirectory and LDAP, it is important that the UIDs and GIDs from different providersthat are configured in the same access zone do not overlap. Overlapping UIDs andGIDs between providers within an access zone might result in some users gainingaccess to other users' directories and files.
The range of UIDs and GIDs that can be allocated for generated mappings isconfigurable in each access zone through the isi auth settings mappingsmodify command. The default range for both UIDs and GIDs is 1000000–2000000 ineach access zone.
Do not include commonly used UIDs and GIDs in your ID ranges. For example, UIDs andGIDs below 1000 are reserved for system accounts and should not be assigned tousers or groups.
User mappingUser mapping provides a way to control permissions by specifying a user's securityidentifiers, user identifiers, and group identifiers. OneFS uses the identifiers to checkfile or group ownership.
With the user-mapping feature, you can apply rules to modify which user identityOneFS uses, add supplemental user identities, and modify a user's group membership.The user-mapping service combines a user’s identities from different directoryservices into a single access token and then modifies it according to the rules that youcreate.
Note: You can configure mapping rules on a per-zone basis. Mapping rules must beconfigured separately in each access zone that uses them. OneFS maps users onlyduring login or protocol access.
Default user mappingsDefault user mappings determine access if explicit user-mapping rules are not created.
If you do not configure rules, a user who authenticates with one directory servicereceives the identity information in other directory services when the account namesare the same. For example, a user who authenticates with an Active Directory domainas Desktop\jane automatically receives identities in the final access token for thecorresponding UNIX user account for jane from LDAP or NIS.
In the most common scenario, OneFS is connected to two directory services, ActiveDirectory and LDAP. In such a case, the default mapping provides a user with thefollowing identity attributes:
l A UID from LDAP
l The user SID from Active Directory
l An SID from the default group in Active Directory
The user's groups come from Active Directory and LDAP, with the LDAP groups andthe autogenerated group GID added to the list. To pull groups from LDAP, themapping service queries the memberUid attribute. The user’s home directory, gecos,and shell come from Active Directory.
Elements of user-mapping rulesYou combine operators with user names to create a user-mapping rule.
The following elements affect how the user mapper applies a rule:
Identity management
180 Isilon OneFS CLI Administration Guide

l The operator, which determines the operation that a rule performs
l Fields for usernames
l Options
l A parameter
l Wildcards
User-mapping best practicesYou can follow best practices to simplify user mapping.
Use Active Directory with RFC 2307 and Windows Services for UNIX
Use Microsoft Active Directory with Windows Services for UNIX and RFC 2307attributes to manage Linux, UNIX, and Windows systems. Integrating UNIX andLinux systems with Active Directory centralizes identity management and easesinteroperability, reducing the need for user-mapping rules. Make sure yourdomain controllers are running Windows Server 2003 or later.
Employ a consistent username strategy
The simplest configurations name users consistently, so that each UNIX usercorresponds to a similarly named Windows user. Such a convention allows ruleswith wildcard characters to match names and map them without explicitlyspecifying each pair of accounts.
Do not use overlapping ID ranges
In networks with multiple identity sources, such as LDAP and Active Directorywith RFC 2307 attributes, you should ensure that UID and GID ranges do notoverlap. It is also important that the range from which OneFS automaticallyallocates UIDs and GIDs does not overlap with any other ID range. OneFSautomatically allocates UIDs and GIDs from the range 1,000,000-2,000,000. IfUIDs and GIDs overlap multiple directory services, some users might gain accessto other users’ directories and files.
Avoid common UIDs and GIDs
Do not include commonly used UIDs and GIDs in your ID ranges. For example,UIDs and GIDs below 1000 are reserved for system accounts; do not assign themto users or groups.
Do not use UPNs in mapping rules
You cannot use a user principal name (UPN) in a user mapping rule. A UPN is anActive Directory domain and username that are combined into an Internet-stylename with an @ symbol, such as an email address: jane@example. If you include aUPN in a rule, the mapping service ignores it and may return an error. Instead,specify names in the format DOMAIN\user.com.
Group rules by type and order them
The system processes every mapping rule by default, which can present problemswhen you apply a deny-all rule—for example, to deny access to all unknownusers. In addition, replacement rules might interact with rules that containwildcard characters. To minimize complexity, it is recommended that you grouprules by type and organize them in the following order:
1. Replacement rules: Specify all rules that replace an identity first to ensurethat OneFS replaces all instances of the identity.
2. Join, add, and insert rules: After the names are set by any replacementoperations, specify join, add, and insert rules to add extra identifiers.
Identity management
Isilon OneFS CLI Administration Guide 181

3. Allow and deny rules: Specify rules that allow or deny access last.
Note: Stop all processing before applying a default deny rule. To do so,create a rule that matches allowed users but does nothing, such as an addoperator with no field options, and has the break option. Afterenumerating the allowed users, you can place a catchall deny at the endto replace anybody unmatched with an empty user.
To prevent explicit rules from being skipped, in each group of rules, order explicitrules before rules that contain wildcard characters.
Add the LDAP or NIS primary group to the supplemental groups
When an Isilon cluster is connected to Active Directory and LDAP, a best practiceis to add the LDAP primary group to the list of supplemental groups. This letsOneFS honor group permissions on files created over NFS or migrated from otherUNIX storage systems. The same practice is advised when an Isilon cluster isconnected to both Active Directory and NIS.
On-disk identityAfter the user mapper resolves a user's identities, OneFS determines an authoritativeidentifier for it, which is the preferred on-disk identity.
OnesFS stores either UNIX or Windows identities in file metadata on disk. On-diskidentity types are UNIX, SID, and native. Identities are set when a file is created or afile's access control data is modified. Almost all protocols require some level ofmapping to operate correctly, so choosing the preferred identity to store on disk isimportant. You can configure OneFS to store either the UNIX or the Windows identity,or you can allow OneFS to determine the optimal identity to store.
On-disk identity types are UNIX, SID, and native. Although you can change the type ofon-disk identity, the native identity is best for a network with UNIX and Windowssystems. In native on-disk identity mode, setting the UID as the on-disk identityimproves NFS performance.
Note: The SID on-disk identity is for a homogeneous network of Windows systemsmanaged only with Active Directory. When you upgrade from a version earlier thanOneFS 6.5, the on-disk identity is set to UNIX. When you upgrade from OneFS 6.5or later, the on-disk identity setting is preserved. On new installations, the on-diskidentity is set to native.
The native on-disk identity type allows the OneFS authentication daemon to select thecorrect identity to store on disk by checking for the identity mapping types in thefollowing order:
Order Mapping type Description
1 Algorithmic mapping An SID that matchesS-1-22-1-UID or S-1-22-2-GIDin the internal ID mappingdatabase is converted back tothe corresponding UNIXidentity, and the UID and GIDare set as the on-disk identity.
2 External mapping A user with an explicit UIDand GID defined in a directoryservice (such as Active
Identity management
182 Isilon OneFS CLI Administration Guide

Order Mapping type Description
Directory with RFC 2307attributes, LDAP, NIS, or theOneFS file provider or localprovider) has the UNIXidentity set as the on-diskidentity.
3 Persistent mapping Mappings are storedpersistently in the identitymapper database. An identitywith a persistent mapping inthe identity mapper databaseuses the destination of thatmapping as the on-diskidentity, which occursprimarily with manual IDmappings. For example, ifthere is an ID mapping ofGID:10000 to S-1-5-32-545, arequest for the on-diskstorage of GID:10000 returnsS-1-5-32-545.
4 No mapping If a user lacks a UID or GIDeven after querying the otherdirectory services and identitydatabases, its SID is set asthe on-disk identity. Inaddition, to make sure a usercan access files over NFS,OneFS allocates a UID andGID from a preset range of1,000,000 to 2,000,000. Innative on-disk identity mode,a UID or GID that OneFSgenerates is never set as theon-disk identity.
Note: If you change the on-disk identity type, you should run the PermissionRepairjob with the Convert repair type selected to make sure that the diskrepresentation of all files is consistent with the changed setting. For moreinformation, see the Run the PermissionRepair job section.
Managing ID mappingsYou can create, modify, and delete identity mappings and configure ID mappingsettings.
Identity management
Isilon OneFS CLI Administration Guide 183

Create an identity mappingYou can create a manual identity mapping between source and target identities orautomatically generate a mapping for a source identity.
About this task
This procedure is available only through the command-line interface.
Procedure
1. Open a secure shell (SSH) connection to any node in the cluster and log in.
2. Run the isi auth mapping create command.
The following command specifies IDs of source and target identities in thezone3 access zone to create a two-way mapping between the identities:
isi auth mapping create --2way --source-sid=S-1-5-21-12345 \--target-uid=5211 --zone=zone3
Modify an identity mappingYou can modify the configuration of an identity mapping.
About this task
This procedure is available only through the command-line interface.
Procedure
1. Open a secure shell (SSH) connection to any node in the cluster and log in.
2. Run the isi auth mapping modify command.
The following command modifies the mapping of the user with UID 4236 in thezone3 access zone to include a reverse, 2-way mapping between the sourceand target identities:
isi auth mapping modify --source-uid=4236 \--target-sid=S-1-5-21-12345 --zone=zone3 --2way
Delete an identity mappingYou can delete one or more identity mappings.
About this task
This procedure is available only through the command-line interface.
Procedure
1. Open a secure shell (SSH) connection to any node in the cluster and log in.
2. Run the isi auth mapping delete command.
The following command deletes all identity mappings in the zone3 access zone:
isi auth mapping delete --all --zone=zone3
Identity management
184 Isilon OneFS CLI Administration Guide

The following command deletes all identity mappings in the zone3 access zonethat were both created automatically and include a UID or GID from an externalauthentication source:
isi auth mapping delete --all --only-external --zone=zone3
The following command deletes the identity mapping of the user with UID 4236in the zone3 access zone:
isi auth mapping delete --source-uid=4236 --zone=zone3
View an identity mappingYou can display mapping information for a specific identity.
About this task
This procedure is available only through the command-line interface.
Procedure
1. Open a secure shell (SSH) connection to any node in the cluster and log in.
2. Run the isi auth mapping view command.
The following command displays mappings for the user with UID 4236 in thezone3 access zone:
isi auth mapping view --uid=4236 --zone=zone3
The system displays output similar to the following example:
Name: user_36 On-disk: UID: 4236Unix uid: 4236Unix gid: -100000 SMB: S-1-22-1-4236
Flush the identity mapping cacheYou can flush the ID map cache to remove in-memory copies of all or specific identitymappings.
About this task
Modifications to ID mappings may cause the cache to become out of sync and usersmight experience slowness or stalls when authenticating. You can flush the cache tosynchronize the mappings.
This procedure is available only through the command-line interface.
Procedure
1. Open a secure shell (SSH) connection to any node in the cluster and log in.
2. Run the isi auth mapping flush command.
The following command flushes all identity mappings on the cluster:
isi auth mapping flush --all
Identity management
Isilon OneFS CLI Administration Guide 185
The following command flushes the mapping of the user with UID 4236 in thezone3 access zone:
isi auth mapping flush --source-uid-4236 --zone=zone3
View a user tokenYou can view the contents of an access token generated for a user duringauthentication.
About this task
This procedure is available only through the command-line interface.
Procedure
1. Open a secure shell (SSH) connection to any node in the cluster and log in.
2. Run the isi auth mapping token command.
The following command displays the access token of a user with UID 4236 inthe zone3 access zone:
isi auth mapping token --uid=4236 --zone=zone3
The system displays output similar to the following example:
User Name: user_36 UID: 4236 SID: S-1-22-1-4236 On Disk: 4236ZID: 3Zone: zone3Privileges: -Primary Group Name: user_36 GID: 4236 SID: S-1-22-2-4236 On Disk: 4236
Configure identity mapping settingsYou can enable or disable automatic allocation of UIDs and GIDS and customize therange of ID values in each access zone. The default range is 1000000–2000000.
About this task
This procedure is available only through the command-line interface.
Procedure
1. Open a secure shell (SSH) connection to any node in the cluster and log in.
2. Run the isi auth settings mapping modify command.
The following command enables automatic allocation of both UIDs and GIDs inthe zone3 access zone and sets their allocation ranges to 25000–50000:
isi auth settings mapping modify --gid-range-enabled=yes \--gid-range-min=25000 --gid-range-max=50000 --uid-range-
Identity management
186 Isilon OneFS CLI Administration Guide
enabled=yes \--uid-range-min=25000 --uid-range-max=50000 --zone=zone3
View identity mapping settingsYou can view the current configuration of identity mapping settings in each zone.
About this task
This procedure is available only through the command-line interface.
Procedure
1. Open a secure shell (SSH) connection to any node in the cluster and log in.
2. Run the isi auth settings mapping view command.
The following command displays the current settings in the zone3 access zone:
isi auth settings mapping view --zone=zone3
The system displays output similar to the following example:
GID Range Enabled: Yes GID Range Min: 25000 GID Range Max: 50000UID Range Enabled: Yes UID Range Min: 25000 UID Range Max: 50000
Managing user identitiesYou can manage user identities by creating user-mapping rules.
When you create user-mapping rules, it is important to remember the followinginformation:
l You can only create user-mapping rules if you are connected to the clusterthrough the System zone; however, you can apply user-mapping rules to specificaccess zones. If you create a user-mapping rule for a specific access zone, the ruleapplies only in the context of its zone.
l When you change user-mapping on one node, OneFS propagates the change tothe other nodes.
l After you make a user-mapping change, the OneFS authentication service reloadsthe configuration.
View user identityYou can view the identities and group membership that a specified user has within theActive Directory and LDAP directory services, including the user's security identifier(SID) history.
About this task
This procedure must be performed through the command-line interface (CLI).
Note: The OneFS user access token contains a combination of identities fromActive Directory and LDAP if both directory services are configured. You can run
Identity management
Isilon OneFS CLI Administration Guide 187
the following commands to discover the identities that are within each specificdirectory service.
Procedure
1. Establish an SSH connection to any node in the cluster.
2. View a user identity from Active Directory only by running the isi authusers view command.
The following command displays the identity of a user named stand in theActive Directory domain named YORK:
isi auth users view --user=YORK\\stand --show-groups
The system displays output similar to the following example:
Name: YORK\stand DN: CN=stand,CN=Users,DC=york,DC=hull,DC=example,DC=com DNS Domain: york.hull.example.com Domain: YORK Provider: lsa-activedirectory-provider:YORK.HULL.EXAMPLE.COMSam Account Name: stand UID: 4326 SID: S-1-5-21-1195855716-1269722693-1240286574-591111 Primary Group ID : GID:1000000 Name : YORK\york_sh_udg Additional Groups: YORK\sd-york space group YORK\york_sh_udg YORK\sd-york-group YORK\sd-group YORK\domain users
3. View a user identity from LDAP only by running the isi auth users viewcommand.
The following command displays the identity of an LDAP user named stand:
isi auth user view --user=stand --show-groups
The system displays output similar to the following example:
Name: stand DN: uid=stand,ou=People,dc=colorado4,dc=hull,dc=example,dc=comDNS Domain: - Domain: LDAP_USERS Provider: lsa-ldap-provider:Unix LDAPSam Account Name: stand UID: 4326 SID: S-1-22-1-4326 Primary Group ID : GID:7222 Name : stand Additional Groups: stand sd-group sd-group2
Identity management
188 Isilon OneFS CLI Administration Guide

Create a user-mapping ruleYou can create user-mapping rules to manage user identities on the cluster.
About this task
You can create the first mapping rule with the --user-mapping-rules option forthe isi zone zones modify System command. If you try to add a second rulewith the command above, however, it replaces the existing rule rather than adding thenew rule to the list of rules. To add more rules to the list of rules, you must use the --add-user-mapping-rules option with the isi zone zones modify Systemcommand.
Note: If you do not specify an access zone, user-mapping rules are created in theSystem zone.
Procedure
1. To create a rule to merge the Active Directory user with a user from LDAP, runthe following command, where <user-a> and <user-b> are placeholders for theidentities to be merged; for example, user_9440 and lduser_010, respectively:
isi zone zones modify System --add-user-mapping-rules \ "<DOMAIN> <user-a> &= <user-b>"
Run the following command to view the rule:
isi zone zones view System
If the command runs successfully, the system displays the mapping rule, whichis visible in the User Mapping Rules line of the output:
Name: System Cache Size: 4.77M Map Untrusted: SMB Shares: - Auth Providers: - Local Provider: Yes NetBIOS Name: All SMB Shares: Yes All Auth Providers: Yes User Mapping Rules: <DOMAIN>\<user_a> &= <user_b>Home Directory Umask: 0077 Skeleton Directory: /usr/share/skel Zone ID: 1
2. To verify the changes to the token, run a command similar to the followingexample:
isi auth mapping token <DOMAIN>\\<user-a>
If the command runs successfully, the system displays output similar to thefollowing example:
User Name : <DOMAIN>\<user-a> UID : 1000201
Identity management
Isilon OneFS CLI Administration Guide 189
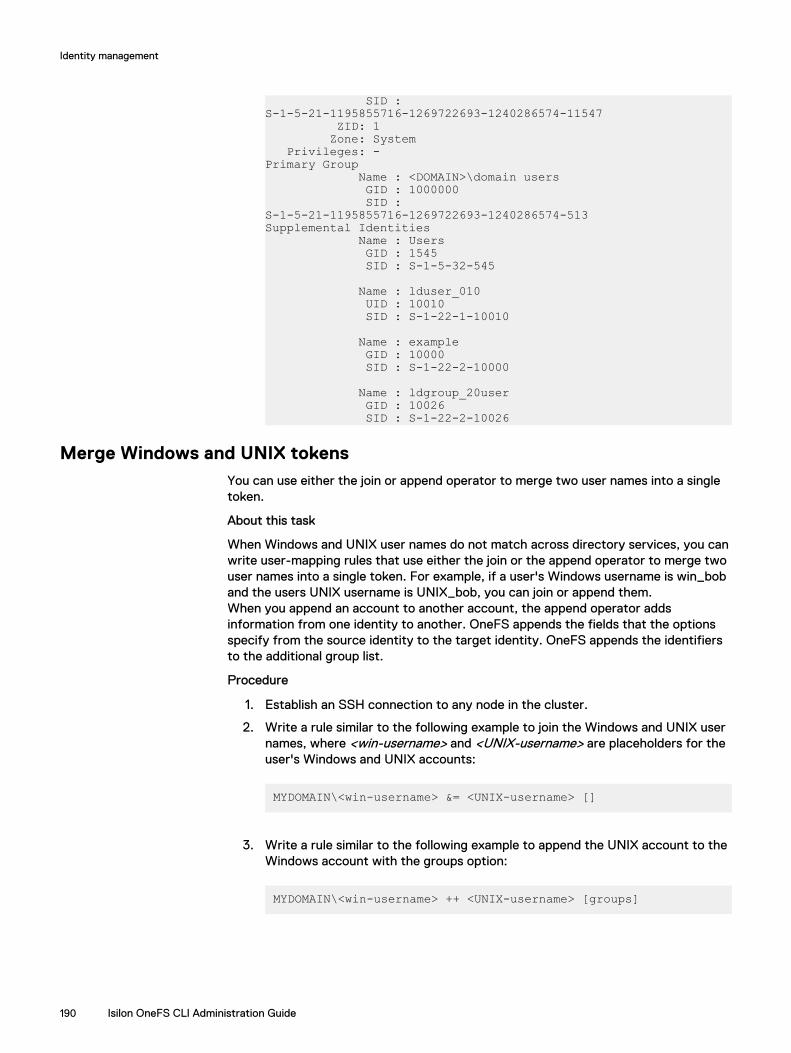
SID : S-1-5-21-1195855716-1269722693-1240286574-11547 ZID: 1 Zone: System Privileges: -Primary Group Name : <DOMAIN>\domain users GID : 1000000 SID : S-1-5-21-1195855716-1269722693-1240286574-513Supplemental Identities Name : Users GID : 1545 SID : S-1-5-32-545
Name : lduser_010 UID : 10010 SID : S-1-22-1-10010
Name : example GID : 10000 SID : S-1-22-2-10000
Name : ldgroup_20user GID : 10026 SID : S-1-22-2-10026
Merge Windows and UNIX tokensYou can use either the join or append operator to merge two user names into a singletoken.
About this task
When Windows and UNIX user names do not match across directory services, you canwrite user-mapping rules that use either the join or the append operator to merge twouser names into a single token. For example, if a user's Windows username is win_boband the users UNIX username is UNIX_bob, you can join or append them.When you append an account to another account, the append operator addsinformation from one identity to another. OneFS appends the fields that the optionsspecify from the source identity to the target identity. OneFS appends the identifiersto the additional group list.
Procedure
1. Establish an SSH connection to any node in the cluster.
2. Write a rule similar to the following example to join the Windows and UNIX usernames, where <win-username> and <UNIX-username> are placeholders for theuser's Windows and UNIX accounts:
MYDOMAIN\<win-username> &= <UNIX-username> []
3. Write a rule similar to the following example to append the UNIX account to theWindows account with the groups option:
MYDOMAIN\<win-username> ++ <UNIX-username> [groups]
Identity management
190 Isilon OneFS CLI Administration Guide

Retrieve the primary group from LDAPYou can create a user-mapping rule to insert or append primary group informationfrom LDAP into a user's access token.
About this task
By default, the user-mapping service combines information from AD and LDAP butgives precedence to the information from AD. Mapping rules control how OneFScombines the information. You can retrieve the primary group information from LDAPinstead of AD.
Procedure
1. Establish an SSH connection to any node in the cluster.
2. Write a rule similar to the following example to insert information from LDAPinto a user's access token:
*\* += * [group]
3. Write a rule similar to the following example to append other information fromLDAP to a user's access token:
*\* ++ * [user,groups]
Mapping rule optionsMapping rules can contain options that target the fields of an access token.
A field represents an aspect of a cross-domain access token, such as the primary UIDand primary user SID from a user that you select. You can see some of the fields in theOneFS web administration interface. User in the web administration interface is thesame as username. You can also see fields in an access token by running the commandisi auth mapping token.
When you create a rule, you can add an option to manipulate how OneFS combinesaspects of two identities into a single token. For example, an option can force OneFSto append the supplement groups to a token.
A token includes the following fields that you can manipulate with user mapping rules:
l username
l unix_name
l primary_uid
l primary_user_sid
l primary_gid
l primary_group_sid
l additional_ids (includes supplemental groups)
Options control how a rule combines identity information in a token. The break optionis the exception: It stops OneFS from processing additional rules.
Although several options can apply to a rule, not all options apply to all operators. Thefollowing table describes the effect of each option and the operators that they workwith.
Identity management
Isilon OneFS CLI Administration Guide 191

Option Operator Description
user insert, append Copies the primary UID andprimary user SID, if they exist,to the token.
groups insert, append Copies the primary GID andprimary group SID, if theyexist, to the token.
groups insert, append Copies all the additionalidentifiers to the token. Theadditional identifiers excludethe primary UID, the primaryGID, the primary user SID,and the primary group SID.
default_user all operators except removegroups
If the mapping service fails tofind the second user in a rule,the service tries to find theusername of the default user.The name of the default usercannot include wildcards.When you set the option forthe default user in a rule withthe command-line interface,you must set it with anunderscore: default_user.
break all operators Stops the mapping servicefrom applying rules thatfollow the insertion point ofthe break option. Themapping service generatesthe final token at the point ofthe break.
Mapping rule operatorsThe operator determines what a mapping rule does.
You can create user-mapping rules through either the web-administration interface,where the operators are spelled out in a list, or from the command-line interface.
When you create a mapping rule with the OneFS command-line interface (CLI), youmust specify an operator with a symbol. The operator affects the direction in whichthe mapping service processes a rule. For more information about creating a mappingrule, see the white paper Managing identities with the Isilon OneFS user mapping service.The following table describes the operators that you can use in a mapping rule.
A mapping rule can contain only one operator.
Operator Web interface CLI Direction Description
append Append fieldsfrom a user
++ Left-to-right Modifies anaccess token byadding fields toit. The mappingservice appends
Identity management
192 Isilon OneFS CLI Administration Guide
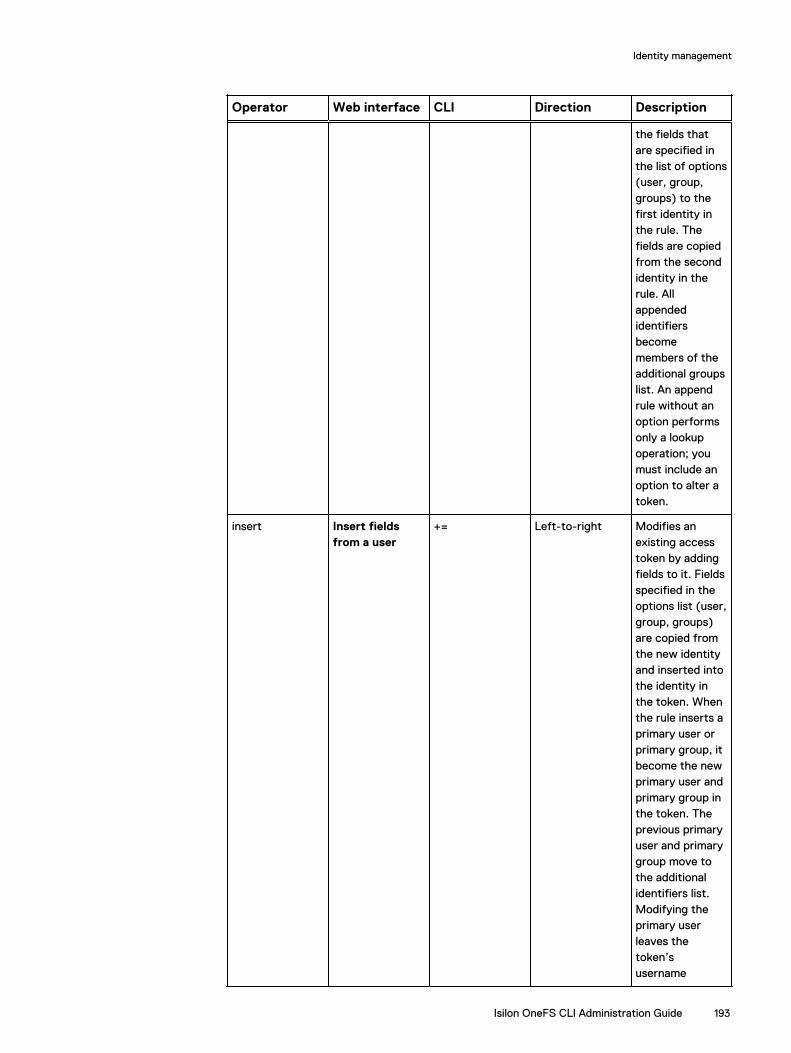
Operator Web interface CLI Direction Description
the fields thatare specified inthe list of options(user, group,groups) to thefirst identity inthe rule. Thefields are copiedfrom the secondidentity in therule. Allappendedidentifiersbecomemembers of theadditional groupslist. An appendrule without anoption performsonly a lookupoperation; youmust include anoption to alter atoken.
insert Insert fieldsfrom a user
+= Left-to-right Modifies anexisting accesstoken by addingfields to it. Fieldsspecified in theoptions list (user,group, groups)are copied fromthe new identityand inserted intothe identity inthe token. Whenthe rule inserts aprimary user orprimary group, itbecome the newprimary user andprimary group inthe token. Theprevious primaryuser and primarygroup move tothe additionalidentifiers list.Modifying theprimary userleaves thetoken’susername
Identity management
Isilon OneFS CLI Administration Guide 193

Operator Web interface CLI Direction Description
unchanged.When insertingthe additionalgroups from anidentity, theservice adds thenew groups tothe existinggroups.
replace Replace oneuser with adifferent user
=> Left-to-right Removes thetoken andreplaces it withthe new tokenthat is identifiedby the secondusername. If thesecond usernameis empty, themapping serviceremoves the firstusername in thetoken, leaving nousername. If atoken containsno username,OneFS deniesaccess with a nosuch usererror.
remove groups Removesupplementalgroups from auser
-- Unary Modifies a tokenby removing thesupplementalgroups.
join Join two userstogether
&= Bidirectional Inserts the newidentity into thetoken. If the newidentity is thesecond user, themapping serviceinserts it afterthe existingidentity;otherwise, theservice inserts itbefore theexisting identity.The location ofthe insertionpoint is relevantwhen theexisting identityis already the
Identity management
194 Isilon OneFS CLI Administration Guide

Operator Web interface CLI Direction Description
first in the listbecause OneFSuses the firstidentity todetermine theownership ofnew file systemobjects.
Identity management
Isilon OneFS CLI Administration Guide 195

Identity management
196 Isilon OneFS CLI Administration Guide

CHAPTER 9
Home directories
This section contains the following topics:
l Home directories overview............................................................................... 198l Home directory permissions............................................................................. 198l Authenticating SMB users................................................................................ 198l Home directory creation through SMB............................................................. 198l Home directory creation through SSH and FTP............................................... 202l Home directory creation in a mixed environment............................................. 205l Interactions between ACLs and mode bits....................................................... 206l Default home directory settings in authentication providers............................ 206l Supported expansion variables......................................................................... 207l Domain variables in home directory provisioning.............................................. 209
Isilon OneFS CLI Administration Guide 197
Home directories overviewWhen you create a local user, OneFS automatically creates a home directory for theuser. OneFS also supports dynamic home directory provisioning for users who accessthe cluster by connecting to an SMB share or by logging in through FTP or SSH.
Regardless of the method by which a home directory was created, you can configureaccess to the home directory through a combination of SMB, SSH, and FTP.
Home directory permissionsYou can set up a user's home directory with a Windows ACL or with POSIX mode bits,which are then converted into a synthetic ACL. The method by which a homedirectory is created determines the initial permissions that are set on the homedirectory.
When you create a local user, the user's home directory is created with mode bits bydefault.
For users who authenticate against external sources, you can specify settings tocreate home directories dynamically at login time. If a home directory is created duringa login through SSH or FTP, it is set up with mode bits; if a home directory is createdduring an SMB connection, it receives either mode bits or an ACL. For example, if anLDAP user first logs in through SSH or FTP, the user's home directory is created withmode bits. If the same user first connects through an SMB share, the home directoryis created with the permissions indicated by the configured SMB settings. If the --inheritable-path-acl option is enabled, an ACL is generated; otherwise, modebits are used.
Authenticating SMB usersYou can authenticate SMB users from authentication providers that can handle NThashes.
SMB sends an NT password hash to authenticate SMB users, so only users fromauthentication providers that can handle NT hashes can log in over SMB. Thefollowing OneFS-supported authentication providers can handle NT hashes:
l Active Directory
l Local
l LDAPSAM (LDAP with Samba extensions enabled)
Home directory creation through SMBYou can create SMB shares by including expansion variables in the share path.Expansion variables give users to access their home directories by connecting to theshare. You can also enable dynamic provisioning of home directories that do not existat SMB connection time.
Note: Share permissions are checked when files are accessed, before theunderlying file system permissions are checked. Either of these permissions canprevent access to the file or directory.
Home directories
198 Isilon OneFS CLI Administration Guide

Create home directories with expansion variablesYou can configure settings with expansion variables to create SMB share homedirectories.
About this task
When users access the cluster over SMB, home directory access is through SMBshares. You can configure settings with a path that uses a variable expansion syntax,allowing a user to connect to their home directory share.
Note: Home directory share paths must begin with /ifs/ and must be in the rootpath of the access zone in which the home directory SMB share is created.
In the following commands, the --allow-variable-expansion option is enabledto indicate that %U should be expanded to the user name, which is user411 in thisexample. The --auto-create-directory option is enabled to create the directoryif it does not exist:
isi smb shares create HOMEDIR --path=/ifs/home/%U \ --allow-variable-expansion=yes --auto-create-directory=yes isi smb shares permission modify HOMEDIR --wellknown Everyone \ --permission-type allow --permission full isi smb shares view HOMEDIR
The system displays output similar to the following example:
Share Name: HOMEDIR Path: /ifs/home/%U Description: Client-side Caching Policy: manualAutomatically expand user names or domain names: TrueAutomatically create home directories for users: True Browsable: TruePermissions:Account Account Type Run as Root Permission Type Permission------------------------------------------------------------Everyone wellknown False allow full ------------------------------------------------------------Total: 1...
When user411 connects to the share with the net use command, the user's homedirectory is created at /ifs/home/user411. On user411's Windows client, the netuse m: command connects /ifs/home/user411 through the HOMEDIR share:
net use m: \\cluster.company.com\HOMEDIR /u:user411
Procedure
1. Run the following commands on the cluster with the --allow-variable-expansion option enabled. The %U expansion variable expands to the username, and the --auto-create-directory option is enabled to create thedirectory if it does not exist:
isi smb shares create HOMEDIR --path=/ifs/home/%U \ --allow-variable-expansion=yes --auto-create-directory=yes isi smb shares permission modify HOMEDIR --wellknown Everyone
Home directories
Isilon OneFS CLI Administration Guide 199

\ --permission-type allow --permission full
2. Run the following command to view the home directory settings:
isi smb shares view HOMEDIR
The system displays output similar to the following example:
Share Name: HOMEDIR Path: /ifs/home/%U Description: Client-side Caching Policy: manualAutomatically expand user names or domain names: TrueAutomatically create home directories for users: True Browsable: TruePermissions:Account Account Type Run as Root Permission Type Permission------------------------------------------------------------Everyone wellknown False allow full ------------------------------------------------------------Total: 1...
If user411 connects to the share with the net use command, user411's homedirectory is created at /ifs/home/user411. On user411's Windows client, thenet use m: command connects /ifs/home/user411 through theHOMEDIR share, mapping the connection similar to the following example:
net use m: \\cluster.company.com\HOMEDIR /u:user411
Create home directories with the --inheritable-path-acl optionYou can enable the --inheritable-path-acl option on a share to specify that itis to be inherited on the share path if the parent directory has an inheritable ACL.
Before you begin
To perform most configuration tasks, you must log on as a member of theSecurityAdmin role.
About this task
By default, an SMB share's directory path is created with a synthetic ACL based onmode bits. You can enable the --inheritable-path-acl option to use theinheritable ACL on all directories that are created, either at share creation time or forthose dynamically provisioned when connecting to that share.
Procedure
1. Run commands similar to the following examples to enable the --inheritable-path-acl option on the cluster to dynamically provision a userhome directory at first connection to a share on the cluster:
isi smb shares create HOMEDIR_ACL --path=/ifs/home/%U \ --allow-variable-expansion=yes --auto-create-directory=yes
Home directories
200 Isilon OneFS CLI Administration Guide
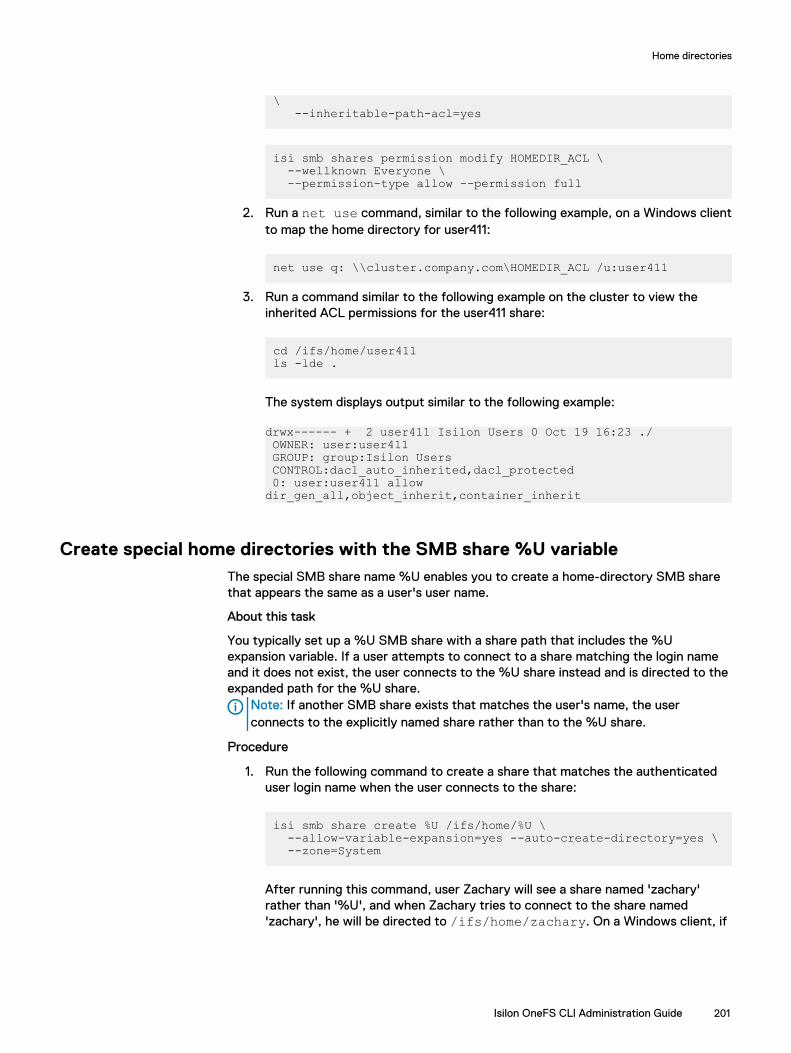
\ --inheritable-path-acl=yes
isi smb shares permission modify HOMEDIR_ACL \ --wellknown Everyone \ --permission-type allow --permission full
2. Run a net use command, similar to the following example, on a Windows clientto map the home directory for user411:
net use q: \\cluster.company.com\HOMEDIR_ACL /u:user411
3. Run a command similar to the following example on the cluster to view theinherited ACL permissions for the user411 share:
cd /ifs/home/user411ls -lde .
The system displays output similar to the following example:
drwx------ + 2 user411 Isilon Users 0 Oct 19 16:23 ./ OWNER: user:user411 GROUP: group:Isilon Users CONTROL:dacl_auto_inherited,dacl_protected 0: user:user411 allow dir_gen_all,object_inherit,container_inherit
Create special home directories with the SMB share %U variableThe special SMB share name %U enables you to create a home-directory SMB sharethat appears the same as a user's user name.
About this task
You typically set up a %U SMB share with a share path that includes the %Uexpansion variable. If a user attempts to connect to a share matching the login nameand it does not exist, the user connects to the %U share instead and is directed to theexpanded path for the %U share.
Note: If another SMB share exists that matches the user's name, the userconnects to the explicitly named share rather than to the %U share.
Procedure
1. Run the following command to create a share that matches the authenticateduser login name when the user connects to the share:
isi smb share create %U /ifs/home/%U \ --allow-variable-expansion=yes --auto-create-directory=yes \ --zone=System
After running this command, user Zachary will see a share named 'zachary'rather than '%U', and when Zachary tries to connect to the share named'zachary', he will be directed to /ifs/home/zachary. On a Windows client, if
Home directories
Isilon OneFS CLI Administration Guide 201
Zachary runs the following commands, he sees the contents of his /ifs/home/zachary directory:
net use m: \\cluster.ip\zachary /u:zachary cd m:dir
Similarly, if user Claudia runs the following commands on a Windows client, shesees the directory contents of /ifs/home/claudia:
net use m: \\cluster.ip\claudia /u:claudia cd m: dir
Zachary and Claudia cannot access one another's home directory because onlythe share 'zachary' exists for Zachary and only the share 'claudia' exists forClaudia.
Home directory creation through SSH and FTPYou can configure home directory support for users who access the cluster throughSSH or FTP by modifying authentication provider settings.
Set the SSH or FTP login shellYou can use the --login-shell option to set the default login shell for the user.
About this task
By default, the --login-shell option, if specified, overrides any login-shellinformation provided by the authentication provider, except with Active Directory. Ifthe --login-shell option is specified with Active Directory, it simply representsthe default login shell if the Active Directory server does not provide login-shellinformation.
Note: The following examples refer to setting the login shell to /bin/bash. Youcan also set the shell to /bin/rbash.
Procedure
1. Run the following command to set the login shell for all local users to /bin/bash:
isi auth local modify System --login-shell /bin/bash
2. Run the following command to set the default login shell for all Active Directoryusers in your domain to /bin/bash:
isi auth ads modify YOUR.DOMAIN.NAME.COM --login-shell /bin/bash
Home directories
202 Isilon OneFS CLI Administration Guide
Set SSH/FTP home directory permissionsYou can specify home directory permissions for a home directory that is accessedthrough SSH or FTP by setting a umask value.
Before you begin
To perform most configuration tasks, you must log on as a member of theSecurityAdmin role.
About this task
When a user's home directory is created at login through SSH or FTP, it is createdusing POSIX mode bits. The permissions setting on a user's home directory is set to0755, then masked according to the umask setting of the user's access zone tofurther limit permissions. You can modify the umask setting for a zone with the --home-directory-umask option, specifying an octal number as the umask value.
Procedure
1. Run the following command to view umask setting:
isi zone zones view System
The system displays output similar to the following example:
Name: System Path: /ifs Groupnet: groupnet0 Map Untrusted: - Auth Providers: lsa-local-provider:System, lsa-file-provider:System NetBIOS Name: - User Mapping Rules: - Home Directory Umask: 0077 Skeleton Directory: /usr/share/skel Cache Entry Expiry: 4H Negative Cache Entry Expiry: 1m Zone ID: 1
In the command result, you can see the default setting for Home DirectoryUmask for the created home directory is 0700, which is equivalent to (0755 &~(077)). You can modify the Home Directory Umask setting for a zone withthe --home-directory-umask option, specifying an octal number as theumask value. This value indicates the permissions that are to be disabled, solarger mask values indicate fewer permissions. For example, a umask value of000 or 022 yields created home directory permissions of 0755, whereas aumask value of 077 yields created home directory permissions of 0700.
2. Run a command similar to the following example to allow a group/others write/execute permission in a home directory:
isi zone zones modify System --home-directory-umask=022
In this example, user home directories will be created with mode bits 0755masked by the umask field, set to the value of 022. Therefore, user home
Home directories
Isilon OneFS CLI Administration Guide 203

directories will be created with mode bits 0755, which is equivalent to (0755 &~(022)).
Set SSH/FTP home directory creation optionsYou can configure home directory support for a user who accesses the cluster throughSSH or FTP by specifying authentication provider options.
Procedure
1. Run the following command to view settings for an Active Directoryauthentication provider on the cluster:
isi auth ads list
The system displays output similar to the following example:
Name Authentication Status DC Name Site ---------------------------------------------------------YOUR.DOMAIN.NAME.COM Yes online - SEA---------------------------------------------------------Total: 1
2. Run the isi auth ads modify command with the --home-directory-template and --create-home-directory options.
isi auth ads modify YOUR.DOMAIN.NAME.COM \--home-directory-template=/ifs/home/ADS/%D/%U \--create-home-directory=yes
3. Run the isi auth ads view command with the --verbose option.
The system displays output similar to the following example:
Name: YOUR.DOMAIN.NAME.COM NetBIOS Domain: YOUR ... Create Home Directory: Yes Home Directory Template: /ifs/home/ADS/%D/%U Login Shell: /bin/sh
4. Run the id command.
The system displays output similar to the following example:
uid=1000008(<your-domain>\user_100) gid=1000000(<your-domain>\domain users) groups=1000000(<your-domain>\domain users),1000024(<your-domain>\c1t),1545(Users)
5. (Optional) To verify this information from an external UNIX node, run the sshcommand from an external UNIX node.
For example, the following command would create /ifs/home/ADS/<your-domain>/user_100 if it did not previously exist:
ssh <your-domain>\\[email protected]
Home directories
204 Isilon OneFS CLI Administration Guide

Provision home directories with dot filesYou can provision home directories with dot files.
Before you begin
To perform most configuration tasks, you must log on as a member of theSecurityAdmin role.
About this task
The skeleton directory, which is located at /usr/share/skel by default, contains aset of files that are copied to the user's home directory when a local user is created orwhen a user home directory is dynamically created during login. Files in the skeletondirectory that begin with dot. are renamed to remove the dot prefix when they arecopied to the user's home directory. For example, dot.cshrc is copied to the user'shome directory as .cshrc. This format enables dot files in the skeleton directory tobe viewable through the command-line interface without requiring the ls -acommand.For SMB shares that might use home directories that were provisioned with dot files,you can set an option to prevent users who connect to the share through SMB fromviewing the dot files.
Procedure
1. Run the following command to display the default skeleton directory in theSystem access zone:
isi zone zones view System
The system displays output similar to the following example:
Name: System... Skeleton Directory: /usr/share/skel
2. Run the isi zone zones modify command to modify the default skeletondirectory.
The following command modifies the default skeleton directory, /usr/share/skel, in an access zone, where System is the value for the <zone> optionand /usr/share/skel2 is the value for the <path> option:
isi zone zones modify System --skeleton-directory=/usr/share/skel2
Home directory creation in a mixed environmentIf a user logs in through both SMB and SSH, it is recommended that you configurehome directory settings so the path template is the same for the SMB share and eachauthentication provider against which the user is authenticating through SSH.
Home directories
Isilon OneFS CLI Administration Guide 205

Interactions between ACLs and mode bitsHome directory setup is determined by several factors, including how usersauthenticate and the options that specify home directory creation.
A user's home directory may be set up with either ACLs or POSIX mode bits, whichare converted into a synthetic ACL. The directory of a local user is created when thelocal user is created, and the directory is set up with POSIX mode bits by default.Directories can be dynamically provisioned at log in for users who authenticate againstexternal sources, and in some cases for users who authenticate against the Fileprovider. In this situation, the user home directory is created according to how theuser first logs in.
For example, if an LDAP user first logs in through SSH or FTP and the user homedirectory is created, it is created with POSIX mode bits. If that same user firstconnects through an SMB home directory share, the home directory is created asspecified by the SMB option settings. If the --inherited-path-acl option isenabled, ACLs are generated. Otherwise, POSIX mode bits are used.
Default home directory settings in authentication providersThe default settings that affect how home directories are set up differ, based on theauthentication provider that the user authenticates against.
Authenticationprovider
Home directory Home directorycreation
UNIX login shell
Local l --home-directory-template=/ifs/home/%U
l --create-home-directory=yes
l --login-shell=/bin/sh
Enabled /bin/sh
File l --home-directory-template=""
l --create-home-directory=no
Disabled None
Active Directory l --home-directory-template=/ifs/home/%D/%U
l --create-home-directory=no
Disabled /bin/sh
Home directories
206 Isilon OneFS CLI Administration Guide

Authenticationprovider
Home directory Home directorycreation
UNIX login shell
l --login-shell=/bin/shNote: If available,providerinformationoverrides thisvalue.
LDAP l --home-directory-template=""
l --create-home-directory=no
Disabled None
NIS l --home-directory-template=""
l --create-home-directory=no
Disabled None
Supported expansion variablesYou can include expansion variables in an SMB share path or in an authenticationprovider's home directory template.
OneFS supports the following expansion variables. You can improve performance andreduce the number of shares to be managed when you configure shares withexpansion variables. For example, you can include the %U variable for a share ratherthan create a share for each user. When a %U is included in the name so that eachuser's path is different, security is still ensured because each user can view and accessonly his or her home directory.
Note: When you create an SMB share through the web administration interface,you must select the Allow Variable Expansion check box or the string isinterpreted literally by the system.
Variable Value Description
%U User name (for example,user_001)
Expands to the user name toallow different users to usedifferent home directories.This variable is typicallyincluded at the end of thepath. For example, for a usernamed user1, the path /ifs/home/%U is mapped
to /ifs/home/user1.
Home directories
Isilon OneFS CLI Administration Guide 207

Variable Value Description
%D NetBIOS domain name (forexample, YORK forYORK.EAST.EXAMPLE.COM)
Expands to the user's domainname, based on theauthentication provider:
l For Active Directoryusers, %D expands to theActive Directory NetBIOSname.
l For local users, %Dexpands to the clustername in uppercasecharacters. For example,for a cluster namedcluster1, %D expands toCLUSTER1.
l For users in the Systemfile provider, %D expandsto UNIX_USERS.
l For users in other fileproviders, %D expands toFILE_USERS.
l For LDAP users, %Dexpands toLDAP_USERS.
l For NIS users, %Dexpands to NIS_USERS.
%Z Zone name (for example,ZoneABC)
Expands to the access zonename. If multiple zones areactivated, this variable isuseful for differentiating usersin separate zones. Forexample, for a user nameduser1 in the System zone, thepath /ifs/home/%Z/%U is
mapped to /ifs/home/System/user1.
%L Host name (cluster host namein lowercase)
Expands to the host name ofthe cluster, normalized tolowercase. Limited use.
%0 First character of the username
Expands to the first characterof the user name.
%1 Second character of the username
Expands to the secondcharacter of the user name.
%2 Third character of the username
Expands to the thirdcharacter of the user name.
Note: If the user name includes fewer than three characters, the %0, %1, and %2variables wrap around. For example, for a user named ab, the variables maps to a,b, and a, respectively. For a user named a, all three variables map to a.
Home directories
208 Isilon OneFS CLI Administration Guide

Domain variables in home directory provisioningYou can use domain variables to specify authentication providers when provisioninghome directories.
The domain variable (%D) is typically used for Active Directory users, but it has avalue set that can be used for other authentication providers. %D expands asdescribed in the following table for the various authentication providers.
Authenticateduser
%D expansion
Active Directory user Active Directory NetBIOS name—for example, YORK for providerYORK.EAST.EXAMPLE.COM.
Local user The cluster name in all-uppercase characters—for example, if thecluster is named MyCluster, %D expands to MYCLUSTER.
File user l UNIX_USERS (for System file provider)
l FILE_USERS (for all other file providers)
LDAP user LDAP_USERS (for all LDAP authentication providers)
NIS user NIS_USERS (for all NIS authentication providers)
Home directories
Isilon OneFS CLI Administration Guide 209

Home directories
210 Isilon OneFS CLI Administration Guide

CHAPTER 10
Data access control
This section contains the following topics:
l Data access control overview........................................................................... 212l ACLs.................................................................................................................212l UNIX permissions..............................................................................................213l Mixed-permission environments....................................................................... 213l Managing access permissions........................................................................... 214
Isilon OneFS CLI Administration Guide 211

Data access control overviewOneFS supports two types of permissions data on files and directories that controlwho has access: Windows-style access control lists (ACLs) and POSIX mode bits(UNIX permissions). You can configure global policy settings that enable you tocustomize default ACL and UNIX permissions to best support your environment.
The OneFS file system installs with UNIX permissions as the default. You can give afile or directory an ACL by using Windows Explorer or OneFS administrative tools.Typically, files created over SMB or in a directory that has an ACL, receive an ACL. Ifa file receives an ACL, OneFS stops enforcing the file's mode bits; the mode bits areprovided for only protocol compatibility, not for access control.
OneFS supports multiprotocol data access over Network File System (NFS) andServer Message Block (SMB) with a unified security model. A user is granted ordenied the same access to a file when using SMB for Windows file sharing as whenusing NFS for UNIX file sharing.
NFS enables Linux and UNIX clients to remotely mount any subdirectory, includingsubdirectories created by Windows or SMB users. Linux and UNIX clients also canmount ACL-protected subdirectories created by a OneFS administrator. SMB providesWindows users access to files, directories and other file system resources stored byUNIX and Linux systems. In addition to Windows users, ACLs can affect local, NIS, andLDAP users.
By default, OneFS maintains the same file permissions regardless of the client’soperating system, the user’s identity management system, or the file sharing protocol.When OneFS must transform a file’s permissions from ACLs to mode bits or viceversa, it merges the permissions into an optimal representation that uniquely balancesuser expectations and file security.
ACLsIn Windows environments, file and directory permissions, referred to as access rights,are defined in access control lists (ACLs). Although ACLs are more complex thanmode bits, ACLs can express much more granular sets of access rules. OneFS checksthe ACL processing rules commonly associated with Windows ACLs.
A Windows ACL contains zero or more access control entries (ACEs), each of whichrepresents the security identifier (SID) of a user or a group as a trustee. In OneFS, anACL can contain ACEs with a UID, GID, or SID as the trustee. Each ACE contains a setof rights that allow or deny access to a file or folder. An ACE can optionally contain aninheritance flag to specify whether the ACE should be inherited by child folders andfiles.
Note: Instead of the standard three permissions available for mode bits, ACLshave 32 bits of fine-grained access rights. Of these, the upper 16 bits are generaland apply to all object types. The lower 16 bits vary between files and directoriesbut are defined in a way that allows most applications to apply the same bits forfiles and directories.
Rights grant or deny access for a given trustee. You can block user access explicitlythrough a deny ACE or implicitly by ensuring that a user does not directly, or indirectlythrough a group, appear in an ACE that grants the right.
Data access control
212 Isilon OneFS CLI Administration Guide
UNIX permissionsIn a UNIX environment, file and directory access is controlled by POSIX mode bits,which grant read, write, or execute permissions to the owning user, the owning group,and everyone else.
OneFS supports the standard UNIX tools for viewing and changing permissions, ls,chmod, and chown. For more information, run the man ls, man chmod, and manchown commands.
All files contain 16 permission bits, which provide information about the file ordirectory type and the permissions. The lower 9 bits are grouped as three 3-bit sets,called triples, which contain the read, write, and execute (rwx) permissions for eachclass of users—owner, group, and other. You can set permissions flags to grantpermissions to each of these classes.
Unless the user is root, OneFS checks the class to determine whether to grant or denyaccess to the file. The classes are not cumulative: The first class matched is applied. Itis therefore common to grant permissions in decreasing order.
Mixed-permission environmentsWhen a file operation requests an object’s authorization data, for example, with the ls-l command over NFS or with the Security tab of the Properties dialog box inWindows Explorer over SMB, OneFS attempts to provide that data in the requestedformat. In an environment that mixes UNIX and Windows systems, some translationmay be required when performing create file, set security, get security, or accessoperations.
NFS access of Windows-created filesIf a file contains an owning user or group that is a SID, the system attempts to map itto a corresponding UID or GID before returning it to the caller.
In UNIX, authorization data is retrieved by calling stat(2) on a file and examining theowner, group, and mode bits. Over NFSv3, the GETATTR command functionssimilarly. The system approximates the mode bits and sets them on the file wheneverits ACL changes. Mode bit approximations need to be retrieved only to service thesecalls.
Note:SID-to-UID and SID-to-GID mappings are cached in both the OneFS ID mapperand the stat cache. If a mapping has recently changed, the file might reportinaccurate information until the file is updated or the cache is flushed.
SMB access of UNIX-created filesNo UID-to-SID or GID-to-SID mappings are performed when creating an ACL for a file;all UIDs and GIDs are converted to SIDs or principals when the ACL is returned.
OneFS initiates a two-step process for returning a security descriptor, which containsSIDs for the owner and primary group of an object:
1. The current security descriptor is retrieved from the file. If the file does not have adiscretionary access control list (DACL), a synthetic ACL is constructed from the
Data access control
Isilon OneFS CLI Administration Guide 213

file’s lower 9 mode bits, which are separated into three sets of permission triples—one each for owner, group, and everyone. For details about mode bits, see theUNIX permissions topic.
2. Two access control entries (ACEs) are created for each triple: the allow ACEcontains the corresponding rights that are granted according to the permissions;the deny ACE contains the corresponding rights that are denied. In both cases, thetrustee of the ACE corresponds to the file owner, group, or everyone. After all ofthe ACEs are generated, any that are not needed are removed before thesynthetic ACL is returned.
Managing access permissionsThe internal representation of identities and permissions can contain information fromUNIX sources, Windows sources, or both. Because access protocols can process theinformation from only one of these sources, the system may need to makeapproximations to present the information in a format the protocol can process.
View expected user permissionsYou can view the expected permissions for user access to a file or directory.
About this task
This procedure must be performed through the command-line interface (CLI).
Procedure
1. Establish an SSH connection to any node in the cluster.
2. View expected user permissions by running the isi auth access command.
The following command displays permissions in /ifs/ for the user that youspecify in place of <username>:
isi auth access <username> /ifs/
The system displays output similar to the following example:
User Name : <username> UID : 2018 SID : SID:S-1-5-21-2141457107-1514332578-1691322784-1018 File Owner : user:root Group : group:wheel Mode : drwxrwxrwx Relevant Mode : d---rwx--- Permissions Expected : user:<username> \ allow dir_gen_read,dir_gen_write,dir_gen_execute,delete_child
3. View mode-bits permissions for a user by running the isi auth accesscommand.
The following command displays verbose-mode file permissions information in /ifs/ for the user that you specify in place of <username>:
isi auth access <username> /ifs/ -v
Data access control
214 Isilon OneFS CLI Administration Guide

The system displays output similar to the following example:
User Name : <username> UID \: 2018 SID : SID:S-1-5-21-2141457107-1514332578-1691322784-1018 File Owner : user:root Group : group:wheel Mode : drwxrwxrwx Relevant Mode : d---rwx--- Permissions Expected : user:<username>allow dir_gen_read,dir_gen_write,dir_gen_execute,delete_child
4. View expected ACL user permissions on a file for a user by running the isiauth access command.
The following command displays verbose-mode ACL file permissions for the filefile_with_acl.tx in /ifs/data/ for the user that you specify in place of<username>:
isi auth access <username> /ifs/data/file_with_acl.tx -v
The system displays output similar to the following example:
User Name : <username> \UID : 2097 SID : SID:S-1-7-21-2141457107-1614332578-1691322789-1018 File Owner : user:<username> Group : group:wheel Permissions Expected : user:<username> allow file_gen_read,file_gen_write,std_write_dac Relevant Acl: group:<group-name> Users allow file_gen_read user:<username> allow std_write_dac,file_write,append,file_write_ext_attr,file_write_attr group:wheel allow file_gen_read,file_gen_write
Configure access management settingsDefault access settings include whether to send NTLMv2 responses for SMBconnections, the identity type to store on disk, the Windows workgroup name forrunning in local mode, and character substitution for spaces encountered in user andgroup names.
Procedure
1. Configure access management settings by running the isi auth settingsglobal modify command.
The following command modifies global settings for a workgroup:
isi auth settings global modify \ --send-ntlmv2=false --on-disk-identity=native \ --space-replacement="_" --workgroup=WORKGROUP
Modify ACL policy settingsYou can modify ACL policy settings but the default ACL policy settings are sufficientfor most cluster deployments.
About this task
CAUTION Because ACL policies change the behavior of permissions throughoutthe system, they should be modified only as necessary by experienced
Data access control
Isilon OneFS CLI Administration Guide 215
administrators with advanced knowledge of Windows ACLs. This is especially truefor the advanced settings, which are applied regardless of the cluster'senvironment.
For UNIX, Windows, or balanced environments, the optimal permission policy settingsare selected and cannot be modified. You can choose to manually configure thecluster's default permission settings if necessary to support your particularenvironment, however.
Procedure
1. Run the following command to modify ACL policy settings:
isi auth settings acls modify
Run the PermissionsRepair jobYou can update file and directory permissions or ownership by running the RepairPermissions job. To prevent permissions issues that can occur after changing the on-disk identity, run this job with the Convert Permissions job to ensure that the changesare fully propagated throughout the cluster.
About this task
To prevent permissions issues that can occur after changing the on-disk identity, runthis authentication and access control job with convert mode specified to ensurethat the changes are fully propagated throughout the cluster.
Procedure
1. Update cluster permissions by running the isi job jobs start commandwith the following syntax.
The following command updates cluster permissions, wherepermissionrepair specifies the job type, where variables in angle bracketsare placeholders for values specific to your environment:
isi job start permissionrepair --priority <1-10> \ --policy <policy> --mode <clone | inherit | convert > \ --mapping-type=<system | sid | unix | native> --zone <zone-name>
Note: You cannot combine the --template parameter with the convertmode option, but you can combine the parameter with the clone andinherit mode options. Conversely, you cannot combine the --mapping-type and --zone parameters with the clone and inherit mode options,but you can combine the parameters with the convert mode option.
Example 1 Examples
The following example updates cluster permissions, where permissionrepairspecifies the job type, the priority is 3, the chosen mode is convert, and the mappingtype is unix:
Data access control
216 Isilon OneFS CLI Administration Guide

Example 1 Examples (continued)
isi job jobs start permissionrepair --priority=3 \ --policy myPolicy --mode=convert --mapping-type=unix \ --template <isi path> --path </ifs directory> --zone zone2
Data access control
Isilon OneFS CLI Administration Guide 217

Data access control
218 Isilon OneFS CLI Administration Guide

CHAPTER 11
File sharing
This section contains the following topics:
l File sharing overview........................................................................................220l SMB.................................................................................................................222l NFS..................................................................................................................240l FTP.................................................................................................................. 248l HTTP and HTTPS............................................................................................ 250
Isilon OneFS CLI Administration Guide 219

File sharing overviewMulti-protocol support in OneFS enables files and directories on the Isilon cluster tobe accessed through SMB for Windows file sharing, NFS for UNIX file sharing, secureshell (SSH), FTP, and HTTP. By default, only the SMB and NFS protocols are enabled.
OneFS creates the /ifs directory, which is the root directory for all file system dataon the cluster. The /ifs directory is configured as an SMB share and an NFS exportby default. You can create additional shares and exports within the /ifs directorytree.
Note: We recommend that you do not save data to the root /ifs file path but indirectories below /ifs. The design of your data storage structure should beplanned carefully. A well-designed directory structure optimizes clusterperformance and administration.
You can set Windows- and UNIX-based permissions on OneFS files and directories.Users who have the required permissions and administrative privileges can create,modify, and read data on the cluster through one or more of the supported file sharingprotocols.
l SMB. Allows Microsoft Windows and Mac OS X clients to access files that arestored on the cluster.
l NFS. Allows Linux and UNIX clients that adhere to the RFC1813 (NFSv3) andRFC3530 (NFSv4) specifications to access files that are stored on the cluster.
l HTTP and HTTPS (with optional DAV). Allows clients to access files that arestored on the cluster through a web browser.
l FTP. Allows any client that is equipped with an FTP client program to access filesthat are stored on the cluster through the FTP protocol.
Mixed protocol environmentsThe /ifs directory is the root directory for all file system data in the cluster, servingas an SMB share, an NFS export, and a document root directory. You can createadditional shares and exports within the /ifs directory tree. You can configure yourOneFS cluster to use SMB or NFS exclusively, or both. You can also enable HTTP,FTP, and SSH.
Access rights are consistently enforced across access protocols on all securitymodels. A user is granted or denied the same rights to a file whether using SMB orNFS. Clusters running OneFS support a set of global policy settings that enable you tocustomize the default access control list (ACL) and UNIX permissions settings.
OneFS is configured with standard UNIX permissions on the file tree. ThroughWindows Explorer or OneFS administrative tools, you can give any file or directory anACL. In addition to Windows domain users and groups, ACLs in OneFS can includelocal, NIS, and LDAP users and groups. After a file is given an ACL, the mode bits areno longer enforced and exist only as an estimate of the effective permissions.
Note: We recommend that you configure ACL and UNIX permissions only if youfully understand how they interact with one another.
File sharing
220 Isilon OneFS CLI Administration Guide

Write caching with SmartCacheWrite caching accelerates the process of writing data to the cluster. OneFS includes awrite-caching feature called SmartChache, which is enabled by default for all files anddirectories.
If write caching is enabled, OneFS writes data to a write-back cache instead ofimmediately writing the data to disk. OneFS can write the data to disk at a time that ismore convenient.
Note: We recommend that you keep write caching enabled. You should also enablewrite caching for all file pool policies.
OneFS interprets writes to the cluster as either synchronous or asynchronous,depending on a client's specifications. The impacts and risks of write caching dependon what protocols clients use to write to the cluster, and whether the writes areinterpreted as synchronous or asynchronous. If you disable write caching, clientspecifications are ignored and all writes are performed synchronously.
The following table explains how clients' specifications are interpreted, according tothe protocol.
Protocol Synchronous Asynchronous
NFS The stable field is set todata_sync or file_sync.
The stable field is set tounstable.
SMB The write-through flag
has been applied.
The write-through flag
has not been applied.
Write caching for asynchronous writesWriting to the cluster asynchronously with write caching is the fastest method ofwriting data to your cluster.
Write caching for asynchronous writes requires fewer cluster resources than writecaching for synchronous writes, and will improve overall cluster performance for mostworkflows. However, there is some risk of data loss with asynchronous writes.
The following table describes the risk of data loss for each protocol when writecaching for asynchronous writes is enabled:
Protocol Risk
NFS If a node fails, no data will be lost except inthe unlikely event that a client of that nodealso crashes before it can reconnect to thecluster. In that situation, asynchronous writesthat have not been committed to disk will belost.
SMB If a node fails, asynchronous writes that havenot been committed to disk will be lost.
We recommend that you do not disable write caching, regardless of the protocol thatyou are writing with. If you are writing to the cluster with asynchronous writes, andyou decide that the risks of data loss are too great, we recommend that you configureyour clients to use synchronous writes, rather than disable write caching.
File sharing
Isilon OneFS CLI Administration Guide 221

Write caching for synchronous writesWrite caching for synchronous writes costs cluster resources, including a negligibleamount of storage space. Although it is not as fast as write caching with asynchronouswrites, unless cluster resources are extremely limited, write caching with synchronouswrites is faster than writing to the cluster without write caching.
Write caching does not affect the integrity of synchronous writes; if a cluster or anode fails, none of the data in the write-back cache for synchronous writes is lost.
SMBOneFS includes a configurable SMB service to create and manage SMB shares. SMBshares provide Windows clients network access to file system resources on thecluster. You can grant permissions to users and groups to carry out operations such asreading, writing, and setting access permissions on SMB shares.
The /ifs directory is configured as an SMB share and is enabled by default. OneFSsupports both user and anonymous security modes. If the user security mode isenabled, users who connect to a share from an SMB client must provide a valid username with proper credentials.
SMB shares act as checkpoints, and users must have access to a share in order toaccess objects in a file system on a share. If a user has access granted to a file system,but not to the share on which it resides, that user will not be able to access the filesystem regardless of privileges. For example, assume a share named ABCDocscontains a file named file1.txt in a path such as: /ifs/data/ABCDocs/file1.txt. If a user attempting to access file1.txt does not have shareprivileges on ABCDocs, that user cannot access the file even if originally granted readand/or write privileges to the file.
The SMB protocol uses security identifiers (SIDs) for authorization data. All identitiesare converted to SIDs during retrieval and are converted back to their on-diskrepresentation before they are stored on the cluster.
When a file or directory is created, OneFS checks the access control list (ACL) of itsparent directory. If the ACL contains any inheritable access control entries (ACEs), anew ACL is generated from those ACEs. Otherwise, OneFS creates an ACL from thecombined file and directory create mask and create mode settings.
OneFS supports the following SMB clients:
SMB version Supported operating systems
3.0 - Multichannel only Windows 8 or laterWindows Server 2012 or later
2.1 Windows 7 or laterWindows Server 2008 R2 or later
2.0 Windows Vista or laterWindows Server 2008 or later
Mac OS X 10.9 or later
1.0 Windows 2000 or laterWindows XP or later
Mac OS X 10.5 or later
File sharing
222 Isilon OneFS CLI Administration Guide

SMB shares in access zonesYou can create and manage SMB shares within access zones.
You can create access zones that partition storage on the cluster into multiple virtualcontainers. Access zones support all configuration settings for authentication andidentity management services on the cluster, so you can configure authenticationproviders and provision SMB shares on a zone-by-zone basis. When you create anaccess zone, a local provider is created automatically, which allows you to configureeach access zone with a list of local users and groups. You can also authenticatethrough a different Active Directory provider in each access zone, and you can controldata access by directing incoming connections to the access zone from a specific IPaddress in a pool. Associating an access zone with an IP address pool restrictsauthentication to the associated access zone and reduces the number of available andaccessible SMB shares.
Here are a few ways to simplify SMB management with access zones:
l Migrate multiple SMB servers, such as Windows file servers or NetApp filers, to asingle Isilon cluster, and then configure a separate access zone for each SMBserver.
l Configure each access zone with a unique set of SMB share names that do notconflict with share names in other access zones, and then join each access zone toa different Active Directory domain.
l Reduce the number of available and accessible shares to manage by associating anIP address pool with an access zone to restrict authentication to the zone.
l Configure default SMB share settings that apply to all shares in an access zone.
The cluster includes a built-in access zone named System, where you manage allaspects of the cluster and other access zones. If you don't specify an access zonewhen managing SMB shares, OneFS will default to the System zone.
SMB MultichannelSMB Multichannel supports establishing a single SMB session over multiple networkconnections.
SMB Multichannel is a feature of the SMB 3.0 protocol that provides the followingcapabilities:
Increased throughput
OneFS can transmit more data to a client through multiple connections over highspeed network adapters or over multiple network adapters.
Connection failure tolerance
When an SMB Multichannel session is established over multiple networkconnections, the session is not lost if one of the connections has a network fault,which enables the client to continue to work.
Automatic discovery
SMB Multichannel automatically discovers supported hardware configurations onthe client that have multiple available network paths and then negotiates andestablishes a session over multiple network connections. You are not required toinstall components, roles, role services, or features.
File sharing
Isilon OneFS CLI Administration Guide 223
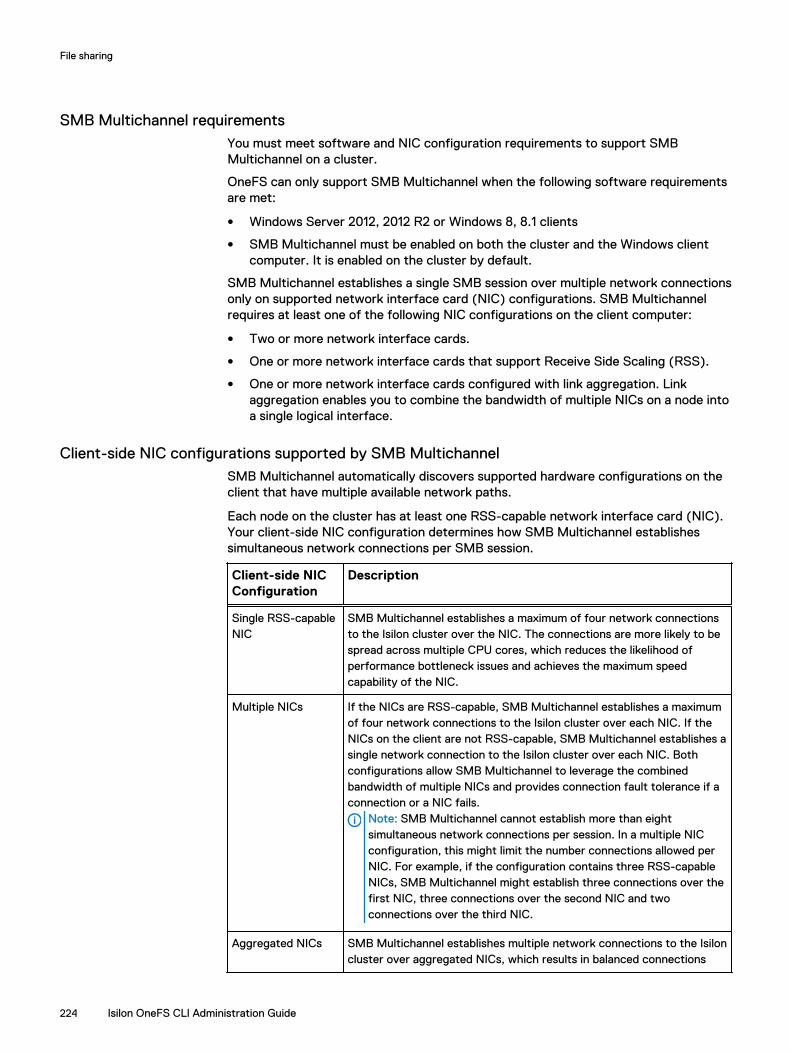
SMB Multichannel requirementsYou must meet software and NIC configuration requirements to support SMBMultichannel on a cluster.
OneFS can only support SMB Multichannel when the following software requirementsare met:
l Windows Server 2012, 2012 R2 or Windows 8, 8.1 clients
l SMB Multichannel must be enabled on both the cluster and the Windows clientcomputer. It is enabled on the cluster by default.
SMB Multichannel establishes a single SMB session over multiple network connectionsonly on supported network interface card (NIC) configurations. SMB Multichannelrequires at least one of the following NIC configurations on the client computer:
l Two or more network interface cards.
l One or more network interface cards that support Receive Side Scaling (RSS).
l One or more network interface cards configured with link aggregation. Linkaggregation enables you to combine the bandwidth of multiple NICs on a node intoa single logical interface.
Client-side NIC configurations supported by SMB MultichannelSMB Multichannel automatically discovers supported hardware configurations on theclient that have multiple available network paths.
Each node on the cluster has at least one RSS-capable network interface card (NIC).Your client-side NIC configuration determines how SMB Multichannel establishessimultaneous network connections per SMB session.
Client-side NICConfiguration
Description
Single RSS-capableNIC
SMB Multichannel establishes a maximum of four network connectionsto the Isilon cluster over the NIC. The connections are more likely to bespread across multiple CPU cores, which reduces the likelihood ofperformance bottleneck issues and achieves the maximum speedcapability of the NIC.
Multiple NICs If the NICs are RSS-capable, SMB Multichannel establishes a maximumof four network connections to the Isilon cluster over each NIC. If theNICs on the client are not RSS-capable, SMB Multichannel establishes asingle network connection to the Isilon cluster over each NIC. Bothconfigurations allow SMB Multichannel to leverage the combinedbandwidth of multiple NICs and provides connection fault tolerance if aconnection or a NIC fails.
Note: SMB Multichannel cannot establish more than eightsimultaneous network connections per session. In a multiple NICconfiguration, this might limit the number connections allowed perNIC. For example, if the configuration contains three RSS-capableNICs, SMB Multichannel might establish three connections over thefirst NIC, three connections over the second NIC and twoconnections over the third NIC.
Aggregated NICs SMB Multichannel establishes multiple network connections to the Isiloncluster over aggregated NICs, which results in balanced connections
File sharing
224 Isilon OneFS CLI Administration Guide
Client-side NICConfiguration
Description
across CPU cores, effective consumption of combined bandwidth, andconnection fault tolerance.
Note: The aggregated NIC configuration inherently provides NICfault tolerance that is not dependent upon SMB.
SMB share management through MMCOneFS supports the Shared Folders snap-in for the Microsoft Management Console(MMC), which allows SMB shares on the cluster to be managed using the MMC tool.
Typically, you connect to the global System zone through the web administrationinterface or the command line interface to manage and configure shares. If youconfigure access zones, you can connect to a zone through the MMC Shared Folderssnap-in to directly manage all shares in that zone.
You can establish a connection through the MMC Shared Folders snap-in to an Isilonnode and perform the following SMB share management tasks:
l Create and delete shared folders
l Configure access permission to an SMB share
l View a list of active SMB sessions
l Close open SMB sessions
l View a list of open files
l Close open files
When you connect to a zone through the MMC Shared Folders snap-in, you can viewand manage all SMB shares assigned to that zone; however, you can only view activeSMB sessions and open files on the specific node that you are connected to in thatzone. Changes you make to shares through the MMC Shared Folders snap-in arepropagated across the cluster.
MMC connection requirementsYou can connect to a cluster through the MMC Shared Folders snap-in if you meetaccess requirements.
The following conditions are required to establish a connection through the MMCShared Folders snap-in:
l You must run the Microsoft Management Console (MMC) from a Windowsworkstation that is joined to the domain of an Active Directory (AD) providerconfigured on the cluster.
l You must be a member of the local <cluster>\Administrators group.Note: Role-based access control (RBAC) privileges do not apply to the MMC.A role with SMB privileges is not sufficient to gain access.
l You must log in to a Windows workstation as an Active Directory user that is amember of the local <cluster>\Administrators group.
File sharing
Isilon OneFS CLI Administration Guide 225

SMBv3 encryptionCertain Microsoft Windows and Apple Mac client/server combinations can supportdata encryption in SMBv3 environments.
You can configure SMBv3 encryption on a per-share, per-zone, or cluster-wide basis.You can allow encrypted and unencrypted clients access. Globally and for accesszones, you can also require that all client connections are encrypted.
If you set encryption settings on a per-zone basis, those settings will override globalserver settings.
Note: Per-zone and per-share encryption settings can only be configured throughthe OneFS command line interface.
Enable SMBv3 encryption for an SMB shareYou can enable or disable SMBv3 encryption on a share.
About this task
To enable SMBv3 encryption for an share:
Procedure
l isi smb settings shares modify --support-smb3-encryption yesSMBv3 encryption is enabled. To disable SMBv3 encryption, use the --revert-support-smb3-encryption option.
Enable SMBv3 encryption for an access zoneYou can enable SMBv3 encryption on a per access zone basis. Zone-specificencryption settings override global encryption settings.
About this task
To enable SMBv3 encryption for an access zone:
Procedure
l isi smb settings zone modify --zone=<zone> --support-smb3-encryption yesSMBv3 encryption is enabled for the specific access zone. To disable SMBv3encryption, use the --revert-support-smb3-encryption option.
Enable SMBv3 encryption globallyYou can enable SMBv3 encryption on a global basis. However, if you later set ormodify encryption settings on an access zone level, those settings will override theglobal settings.
About this task
To enable SMBv3 encryption globally:
Procedure
l isi smb settings global modify --support-smb3-encryption yesSMBv3 encryption is enabled globally on the cluster. To disable SMBv3encryption, use the --revert-support-smb3-encryption option.
File sharing
226 Isilon OneFS CLI Administration Guide

Enforce SMBv3 encryptionYou can require that all client connections to a cluster or access zone are encryptedfor SMBv3.
About this task
For example, to require that all connections to an access zone are encrypted:
Procedure
l isi smb settings zone modify --zone=<zone> --reject-unencrypted-access yesSMBv3 encryption is required for a client to connect to the specific access zone.To disable SMBv3 encryption requirement, use the --revert-reject-unencrypted access option.
SMB server-side copyIn order to increase system performance, SMB 2 and later clients can utilize theserver-side copy feature in OneFS.
Windows clients making use of server-side copy support may experience performanceimprovements for file copy operations, because file data no longer needs to traversethe network. The server-side copy feature reads and writes files only on the server,avoiding the network round-trip and duplication of file data. This feature only affectsfile copy or partial copy operations in which the source and destination file handles areopen on the same share, and does not work for cross-share operations.
This feature is enabled by default across OneFS clusters, and can only be disabledsystem-wide across all zones. Additionally, server-side copy in OneFS is incompatiblewith the SMB continuous availability feature. If continuous availability is enabled for ashare and the client opens a persistent file handle, server-side copy is automaticallydisabled for that file.
Note: You can only disable or enable SMB server-side copy for OneFS using thecommand line interface (CLI).
Enable or disable SMB server-side copyYou can enable or disable the SMB server-side copy feature.
About this task
The SMB server-side copy feature is enabled in OneFS by default.
Procedure
1. Open a secure shell (SSH) connection to the cluster.
2. Run the isi smb settings global modify command.
3. Modify the --server-side-copy option as necessary.
This feature is enabled by default.
For example, the following command disables SMB server-side copy:
isi smb settings global modify --server-side-copy=no
File sharing
Isilon OneFS CLI Administration Guide 227

SMB continuous availabilityIf you are running OneFS in an SMB 3.0 environment, you allow certain Windowsclients to open files on a server with continuous availability enabled.
If a server is using Windows 8 or Windows Server 2012, clients can create persistentfile handles that can be reclaimed after an outage such as a network-relateddisconnection or a server failure. You can specify how long the persistent handle isretained after a disconnection or server failure, and also force strict lockouts on usersattempting to open a file belonging to another handle. Furthermore, through theOneFS command-line interface (CLI), you can configure write integrity settings tocontrol the stability of writes to the share.
If continuous availability is enabled for a share and the client opens a persistent filehandle, server-side copy is automatically disabled for that file.
Note: You can only enable continuous availability when creating a share, but youcan update timeout, lockout, and write integrity settings when creating ormodifying a share.
Enable SMB continuous availabilityYou can enable SMB 3.0 continuous availability and configure settings when youcreate a share.
About this task
You can also update continuous availability timeout, lockout, and write integritysettings when you modify a share.
Procedure
l Run isi smb shares create to enable this feature and configure settings,and isi smb shares modify or isi smb settings shares modify tochange settings.
The following command enables continuous availability on a new share namedShare4, sets the timeout for the handle to three minutes (180 seconds), enforcesa strict lockout, and changes the write integrity setting to full:
isi smb shares create --name=Share4 --path=/ifs/data/Share4 \--continuously-available=yes --ca-timeout=180 \--strict-ca-lockout=yes --ca-write-integrity=full
SMB file filteringYou can use SMB file filtering to allow or deny file writes to a share or access zone.
This feature enables you to deny certain types of files that might cause throughputissues, security problems, storage clutter, or productivity disruptions. You can restrictwrites by allowing writes of certain file types to a share.
l If you choose to deny file writes, you can specify file types by extension that arenot allowed to be written. OneFS permits all other file types to be written to theshare.
l If you choose to allow file writes, you can specify file types by extension that areallowed to be written. OneFS denies all other file types to be written to the share.
You can add or remove file extensions if your restriction policies change.
File sharing
228 Isilon OneFS CLI Administration Guide

Enable SMB file filteringYou can enable or disable SMB file filtering when you create or modify a share.
Procedure
l Run isi smb shares create or isi smb shares modify.
The following command enables file filtering on a share named Share2 and denieswrites by the file types .wav and .mpg:
isi smb shares modify Share2 --file-filtering-enabled=yes \file-filter-extensions=.wav,.mpg
The following command enables file filtering on a share named Share3, specifiesthe file type .xml, and specifies to allow writes for that file type:
isi smb shares modify Share3 --file-filtering-enabled=yes \file-filter-extensions=.xml --file-filter-type=allow
Symbolic links and SMB clientsOneFS enables SMB2 clients to access symbolic links in a seamless manner. Manyadministrators deploy symbolic links to virtually reorder file system hierarchies,especially when crucial files or directories are scattered around an environment.
In an SMB share, a symbolic link (also known as a symlink or a soft link) is a type of filethat contains a path to a target file or directory. Symbolic links are transparent toapplications running on SMB clients, and they function as typical files and directories.Support for relative and absolute links is enabled by the SMB client. The specificconfiguration depends on the client type and version.
A symbolic link that points to a network file or directory that is not in the path of theactive SMB session is referred to as an absolute (or remote) link. Absolute links alwayspoint to the same location on a file system, regardless of the present workingdirectory, and usually contain the root directory as part of the path. Conversely, arelative link is a symbolic link that points directly to a user's or application's workingdirectory, so you do not have to specify the full absolute path when creating the link.
OneFS exposes symbolic links through the SMB2 protocol, enabling SMB2 clients toresolve the links instead of relying on OneFS to resolve the links on behalf of theclients. To transverse a relative or absolute link, the SMB client must be authenticatedto the SMB shares that the link can be followed through. However, if the SMB clientdoes not have permission to access the share, access to the target is denied andWindows will not prompt the user for credentials.
SMB2 and NFS links are interoperable for relative links only. For maximumcompatibility, create these links from a POSIX client.
Note: SMB1 clients (such as Windows XP or 2002) may still use relative links, butthey are traversed on the server side and referred to as "shortcut files." Absolutelinks do not work in these environments.
Enabling symbolic linksBefore you can fully use symbolic links in an SMB environment, you must enable them.
For Windows SMB clients to traverse each type of symbolic link, you must enablethem on the client. Windows supports the following link types:
File sharing
Isilon OneFS CLI Administration Guide 229
l local to local
l remote to remote
l local to remote
l remote to local
You must run the following Windows command to enable all four link types:
fsutil behavior set SymlinkEvaluation L2L:1 R2R:1 L2R:1 R2L:1
For POSIX clients using Samba, you must set the following options in the [global]section of your Samba configuration file (smb.conf) to enable Samba clients totraverse relative and absolute links:
follow symlinks=yes wide links=yes
In this case, "wide links" in the smb.conf file refers to absolute links. The defaultsetting in this file is no.
Managing symbolic linksAfter enabling symbolic links, you can create or delete them from the Windowscommand prompt or a POSIX command line.
Create symbolic links using the Windows mklink command on an SMB2 client or theln command from a POSIX command-line interface. For example, an administratormay want to give a user named User1 access to a file named File1.doc in the /ifs/data/ directory without giving specific access to that directory by creating a linknamed Link1:
mklink \ifs\home\users\User1\Link1 \ifs\data\Share1\File1.doc
When you create a symbolic link, it is designated as a file link or directory link. Oncethe link is set, the designation cannot be changed. You can format symbolic link pathsas either relative or absolute.
To delete symbolic links, use the del command in Windows, or the rm command in aPOSIX environment.
Keep in mind that when you delete a symbolic link, the target file or directory stillexists. However, when you delete a target file or directory, a symbolic link continuesto exist and still points to the old target, thus becoming a broken link.
Anonymous access to SMB sharesYou can configure anonymous access to SMB shares by enabling the local Guest userand allowing impersonation of the guest user.
For example, if you store files such as browser executables or other data that is publicon the internet, anonymous access allows any user to access the SMB share withoutauthenticating.
File sharing
230 Isilon OneFS CLI Administration Guide

Managing SMB settingsYou can enable or disable the SMB service, configure global settings for the SMBservice, and configure default SMB share settings that are specific to each accesszone.
View global SMB settingsYou can view the global SMB settings that are applied to all nodes on the cluster. Thistask can only be performed through the OneFS command-line interface.
Procedure
1. Establish an SSH connection to any node in the cluster.
2. Run the isi smb settings global view command.
The system displays output similar to the following example:
Access Based Share Enum: No Dot Snap Accessible Child: Yes Dot Snap Accessible Root: Yes Dot Snap Visible Child: No Dot Snap Visible Root: Yes Enable Security Signatures: No Guest User: nobody Ignore Eas: No Onefs Cpu Multiplier: 4 Onefs Num Workers: 0Require Security Signatures: No Server Side Copy: Yes Server String: Isilon Server Srv Cpu Multiplier: 4 Srv Num Workers: 0 Support Multichannel: Yes Support NetBIOS: No Support Smb2: Yes Support Smb3 Encryption: No
Configure global SMB settingsYou can configure global settings for SMB file sharing. This task can only beperformed through the OneFS command-line interface.
About this task
CAUTION Modifying global SMB file sharing settings could result in operationalfailures. Be aware of the potential consequences before modifying these settings.
Procedure
1. Establish an SSH connection to any node in the cluster.
2. Run the isi smb settings global modify command.
The following example command disables SMB server-side copy:
isi smb settings global modify --server-side-copy=no
File sharing
Isilon OneFS CLI Administration Guide 231

Enable or disable the SMB serviceThe SMB service is enabled by default.
About this task
Note: You can determine whether the service is enabled or disabled by running theisi services -l command.
Procedure
l Run the isi services command.
The following command disables the SMB service:
isi services smb disable
The following command enables the SMB service:
isi services smb enable
Enable or disable SMB MultichannelSMB Multichannel is required for multiple, concurrent SMB sessions from a Windowsclient computer to a node in a cluster. SMB Multichannel is enabled in the cluster bydefault.
About this task
You can enable or disable SMB Multichannel only through the command-line interface.
Procedure
1. Open a secure shell (SSH) connection to any node in the cluster and log in.
2. Run the isi smb settings global modify command.
The following command enables SMB Multichannel on the cluster:
isi smb settings global modify –-support-multichannel=yes
The following command disables SMB Multichannel on the cluster:
isi smb settings global modify –-support-multichannel=no
View default SMB share settingsYou can view the default SMB share settings specific to an access zone.
Procedure
l Run the isi smb settings shares view command.
The following example command displays the default SMB share settingsconfigured for zone5 :
isi smb settings shares view --zone=zone5
File sharing
232 Isilon OneFS CLI Administration Guide

The system displays output similar to the following example:
Access Based Enumeration: NoAccess Based Enumeration Root Only: No Allow Delete Readonly: No Allow Execute Always: No Ca Timeout: 120 Strict Ca Lockout: No Change Notify: norecurse Create Permissions: default acl Directory Create Mask: 0700 Directory Create Mode: 0000 File Create Mask: 0700 File Create Mode: 0100 File Filtering Enabled: Yes File Filter Extensions: .wav File Filter Type: deny Hide Dot Files: No Host ACL: - Impersonate Guest: never Impersonate User: - Mangle Byte Start: 0XED00 Mangle Map: 0x01-0x1F:-1, 0x22:-1, 0x2A:-1, 0x3A:-1, 0x3C:-1, 0x3E:-1, 0x3F:-1, 0x5C:-1 Ntfs ACL Support: Yes Oplocks: Yes Strict Flush: Yes Strict Locking: No
Configure default SMB share settingsYou can configure SMB share settings specific to each access zone.
About this task
The default settings are applied to all new shares that are added to the access zone.CAUTION If you modify the default settings, the changes are applied to all existingshares in the access zone.
Procedure
1. Run the isi smb settings shares modify command.
The following command specifies that guests are never allowed access toshares in zone5:
isi smb settings global modify --zone=zone5 --impersonate-guest=never
Managing SMB sharesYou can configure the rules and other settings that govern the interaction betweenyour Windows network and individual SMB shares on the cluster.
OneFS supports %U, %D, %Z, %L, %0, %1, %2, and %3 variable expansion andautomatic provisioning of user home directories.
You can configure the users and groups that are associated with an SMB share, andview or modify their share-level permissions.
Note: We recommend that you configure advanced SMB share settings only if youhave a solid understanding of the SMB protocol.
File sharing
Isilon OneFS CLI Administration Guide 233

Create an SMB shareWhen you create an SMB share, you can override the default permissions,performance, and access settings. You can configure SMB home directoryprovisioning by including expansion variables in the share path to automatically createand redirect users to their own home directories.
Before you begin
You must specify a path to use as the SMB share. Shares are specific to access zonesand the share path must exist under the zone path. You can specify an existing path orcreate the path at the time you create the share. Create access zones before youcreate SMB shares.
About this task
You can specify one or more expansion variables in the directory path but you mustset the flags to true for both the --allow-variable-expansion and --auto-create-directory parameters. If you do not specify these settings, the variableexpansion string is interpreted literally by the system.
Procedure
1. Run the isi smb shares create command.
The following commands creates a directory at /ifs/zone5/data/share1,creates a share named share1 using that path, and adds the share to theexisting access zone named zone5:
mkdir /ifs/data/share1 isi smb shares create --name=share1 \--path=/ifs/data/share1 --zone=zone5 --browsable=true \--description="Example Share 1"
Note: Share names can contain up to 80 characters, except for thefollowing: " \ / [ ] : | < > + = ; , * ?Also, if the cluster character encoding is not set to UTF-8, SMB sharenames are case-sensitive.
The following command creates a directory at /ifs/data/share2, convertsit to an SMB share, and adds the share to the default System zone because nozone is specified:
isi smb shares create share2 --path=/ifs/data/share2 \--create-path --browsable=true --description="Example Share 2"
The following command creates a directory at /ifs/data/share3 andconverts it to an SMB share. The command also applies an ACL to the share:
isi smb shares create share3 --path=/ifs/data/share3 \--create-path --browsable=true --description="Example Share 3" \ --inheritable-path-acl=true --create-permissions="default acl"
Note: If no default ACL is configured and the parent directory does nothave an inheritable ACL, an ACL is created for the share with thedirectory-create-mask and directory-create-mode settings.
File sharing
234 Isilon OneFS CLI Administration Guide
The following command creates the directory /ifs/data/share4 andconverts it to a non-browsable SMB share. The command also configures theuse of mode bits for permissions control:
isi smb shares create --name=share4 --path=/ifs/data/share4 \--create-path --browsable=false --description="Example Share 4" \--inheritable-path-acl=true --create-permissions="use create \mask and mode"
2. The following command creates home directories for each user that connectsto the share, based on the user's NetBIOS domain and user name.
In this example, if a user is in a domain named DOMAIN and has a username ofuser_1, the path /ifs/home/%D/%U expands to /ifs/home/DOMAIN/user_1.
isi smb shares modify HOMEDIR --path=/ifs/home/%D/%U \--allow-variable-expansion=yes --auto-create-directory=yes
The following command creates a share named HOMEDIR with the existingpath /ifs/share/home:
isi smb shares create HOMEDIR /ifs/share/home
3. Run the isi smb shares permission modify command to enable accessto the share.
The following command allows the well-known user Everyone full permissions tothe HOMEDIR share:
isi smb shares permission modify HOMEDIR --wellknown Everyone \ --permission-type allow --permission full
Modify an SMB shareYou can modify the settings of individual SMB shares.
Before you begin
SMB shares are zone-specific. When you modify a share, you must identify the accesszone that the share belongs to. If you do not identify the access zone, OneFS defaultsto the System zone. If the share you want to modify has the same name as a share inthe System zone, the share in the System zone is modified.Procedure
1. Run the isi smb shares modify command.
In the following example, the file path for share1 in zone5 points to /ifs/zone5/data. The following commands modifies the file path of share1to /ifs/zone5/etc, which is another directory in the zone5 path:
isi smb shares modify share1 --zone=zone5 \ --path=/ifs/zone5/etc
File sharing
Isilon OneFS CLI Administration Guide 235

Note: If the cluster character encoding is not set to UTF-8, SMB sharenames are case-sensitive.
Delete an SMB shareYou can delete SMB shares that are no longer needed.
Before you begin
SMB shares are zone-specific. When you delete a share, you must identify the accesszone that the share belongs to. If you do not identify the access zone, OneFS defaultsto the System zone. If the share you want to delete has the same name as a share inthe System zone, the share in the System zone is deleted.
About this task
If you delete an SMB share, the share path is deleted but the directory it referencedstill exists. If you create a new share with the same path as the share that wasdeleted, the directory that the previous share referenced will be accessible againthrough the new share.
Procedure
1. Run the isi smb shares delete command.
The following command deletes a share named Share1 from the access zonenamed zone-5:
isi smb shares delete Share1 --zone=zone-5
2. Type yes at the confirmation prompt.
Limit access to /ifs share for the Everyone accountBy default, the /ifs root directory is configured as an SMB share in the Systemaccess zone. It is recommended that you restrict the Everyone account of this shareto read-only access.
Procedure
1. Run the isi smb shares permission modify command.
The following example changes the Everyone account permissions to read-onlyon the SMB share configured for the /ifs directory:
isi smb shares permission modify ifs --wellknown=Everyone \ -d allow -p read
2. (Optional) Verify the change by running the following command to listpermissions on the share:
isi smb shares permission list ifs
File sharing
236 Isilon OneFS CLI Administration Guide

Configure anonymous access to a single SMB shareYou can configure anonymous access to data stored on a single share through Guestuser impersonation.
Procedure
1. Enable the Guest user account in the access zone that contains the share youwant by running the isi auth users modify command.
The following command enables the guest user in the access zone namedzone3:
isi auth users modify Guest --enabled=yes --zone=zone3
2. Set guest impersonation on the share you want to allow anonymous access toby running the isi smb share modify command.
The following command configures guest impersonation on a share namedshare1 in zone3:
isi smb share modify share1 --zone=zone3 \--impersonate-guest=always
3. Verify that the Guest user account has permission to access the share byrunning the isi smb share permission list command.
The following command list the permissions for share1 in zone3:
isi smb share permission list share1 --zone=zone3
The system displays output similar to the following example
Account Account Type Run as Root Permission Type Permission----------------------------------------------------------------Everyone wellknown False allow readGuest user False allow full----------------------------------------------------------------
Configure anonymous access to all SMB shares in an access zoneYou can configure anonymous access to data stored in an access zone through Guestuser impersonation.
Procedure
1. Enable the Guest user account in the access zone that contains the share youwant by running the isi auth users modify command.
The following command enables the guest user in the access zone namedzone3:
isi auth users modify Guest --enabled=yes --zone=zone3
2. Set guest impersonation as the default value for all shares in the access zone byrunning the isi smb settings share modify command.
File sharing
Isilon OneFS CLI Administration Guide 237

The following command configures guest impersonation for all shares in zone3:
isi smb settings share modify --zone=zone3 \--impersonate-guest=always
3. Verify that the Guest user account has permission to each share in the accesszone by running the isi smb share permission list command.
The following command list the permissions for share1 in zone3:
isi smb share permission list share1 --zone=zone3
The system displays output similar to the following example
Account Account Type Run as Root Permission Type Permission----------------------------------------------------------------Everyone wellknown False allow readGuest user False allow full----------------------------------------------------------------
Configure multi-protocol home directory accessFor users who will access this share through FTP or SSH, you can make sure that theirhome directory path is the same whether they connect through SMB or they log inthrough FTP or SSH. This task may only be performed at the OneFS command-lineinterface.
About this task
This command directs the SMB share to use the home directory template that isspecified in the user's authentication provider. This procedure is available only throughthe command-line interface.
Procedure
1. Establish an SSH connection to any node in the cluster.
2. Run the following command, where <share> is the name of the SMB share and--path is the directory path of the home directory template specified by theuser's authentication provider:
isi smb shares modify <share> --path=""
Supported expansion variablesYou can include expansion variables in an SMB share path or in an authenticationprovider's home directory template.
OneFS supports the following expansion variables. You can improve performance andreduce the number of shares to be managed when you configure shares withexpansion variables. For example, you can include the %U variable for a share ratherthan create a share for each user. When a %U is included in the name so that eachuser's path is different, security is still ensured because each user can view and accessonly his or her home directory.
Note: When you create an SMB share through the web administration interface,you must select the Allow Variable Expansion check box or the string isinterpreted literally by the system.
File sharing
238 Isilon OneFS CLI Administration Guide

Variable Value Description
%U User name (for example,user_001)
Expands to the user name toallow different users to usedifferent home directories.This variable is typicallyincluded at the end of thepath. For example, for a usernamed user1, the path /ifs/home/%U is mapped
to /ifs/home/user1.
%D NetBIOS domain name (forexample, YORK forYORK.EAST.EXAMPLE.COM)
Expands to the user's domainname, based on theauthentication provider:
l For Active Directoryusers, %D expands to theActive Directory NetBIOSname.
l For local users, %Dexpands to the clustername in uppercasecharacters. For example,for a cluster namedcluster1, %D expands toCLUSTER1.
l For users in the Systemfile provider, %D expandsto UNIX_USERS.
l For users in other fileproviders, %D expands toFILE_USERS.
l For LDAP users, %Dexpands toLDAP_USERS.
l For NIS users, %Dexpands to NIS_USERS.
%Z Zone name (for example,ZoneABC)
Expands to the access zonename. If multiple zones areactivated, this variable isuseful for differentiating usersin separate zones. Forexample, for a user nameduser1 in the System zone, thepath /ifs/home/%Z/%U is
mapped to /ifs/home/System/user1.
%L Host name (cluster host namein lowercase)
Expands to the host name ofthe cluster, normalized tolowercase. Limited use.
File sharing
Isilon OneFS CLI Administration Guide 239

Variable Value Description
%0 First character of the username
Expands to the first characterof the user name.
%1 Second character of the username
Expands to the secondcharacter of the user name.
%2 Third character of the username
Expands to the thirdcharacter of the user name.
Note: If the user name includes fewer than three characters, the %0, %1, and %2variables wrap around. For example, for a user named ab, the variables maps to a,b, and a, respectively. For a user named a, all three variables map to a.
NFSOneFS provides an NFS server so you can share files on your cluster with NFS clientsthat adhere to the RFC1813 (NFSv3) and RFC3530 (NFSv4) specifications.
In OneFS, the NFS server is fully optimized as a multi-threaded service running in userspace instead of the kernel. This architecture load balances the NFS service across allnodes of the cluster, providing the stability and scalability necessary to manage up tothousands of connections across multiple NFS clients.
NFS mounts execute and refresh quickly, and the server constantly monitorsfluctuating demands on NFS services and makes adjustments across all nodes toensure continuous, reliable performance. Using a built-in process scheduler, OneFShelps ensure fair allocation of node resources so that no client can seize more than itsfair share of NFS services.
The NFS server also supports access zones defined in OneFS, so that clients canaccess only the exports appropriate to their zone. For example, if NFS exports arespecified for Zone 2, only clients assigned to Zone 2 can access these exports.
To simplify client connections, especially for exports with large path names, the NFSserver also supports aliases, which are shortcuts to mount points that clients canspecify directly.
For secure NFS file sharing, OneFS supports NIS and LDAP authentication providers.
NFS exportsYou can manage individual NFS export rules that define mount-points (paths) availableto NFS clients and how the server should perform with these clients.
In OneFS, you can create, delete, list, view, modify, and reload NFS exports.
NFS export rules are zone-aware. Each export is associated with a zone, can only bemounted by clients on that zone, and can only expose paths below the zone root. Bydefault, any export command applies to the client's current zone.
Each rule must have at least one path (mount-point), and can include additional paths.You can also specify that all subdirectories of the given path or paths are mountable.Otherwise, only the specified paths are exported, and child directories are notmountable.
An export rule can specify a particular set of clients, enabling you to restrict access tocertain mount-points or to apply a unique set of options to these clients. If the ruledoes not specify any clients, then the rule applies to all clients that connect to theserver. If the rule does specify clients, then that rule is applied only to those clients.
File sharing
240 Isilon OneFS CLI Administration Guide

NFS aliasesYou can create and manage aliases as shortcuts for directory path names in OneFS. Ifthose path names are defined as NFS exports, NFS clients can specify the aliases asNFS mount points.
NFS aliases are designed to give functional parity with SMB share names within thecontext of NFS. Each alias maps a unique name to a path on the file system. NFSclients can then use the alias name in place of the path when mounting.
Aliases must be formed as top-level Unix path names, having a single forward slashfollowed by name. For example, you could create an alias named /q4 that mapsto /ifs/data/finance/accounting/winter2015 (a path in OneFS). An NFSclient could mount that directory through either of:
mount cluster_ip:/q4
mount cluster_ip:/ifs/data/finance/accounting/winter2015
Aliases and exports are completely independent. You can create an alias withoutassociating it with an NFS export. Similarly, an NFS export does not require an alias.
Each alias must point to a valid path on the file system. While this path is absolute, itmust point to a location beneath the zone root (/ifs on the System zone). If the aliaspoints to a path that does not exist on the file system, any client trying to mount thealias would be denied in the same way as attempting to mount an invalid full pathname.
NFS aliases are zone-aware. By default, an alias applies to the client's current accesszone. To change this, you can specify an alternative access zone as part of creating ormodifying an alias.
Each alias can only be used by clients on that zone, and can only apply to paths belowthe zone root. Alias names are unique per zone, but the same name can be used indifferent zones—for example, /home.
When you create an alias in the web administration interface, the alias list displays thestatus of the alias. Similarly, using the --check option of the isi nfs aliasescommand, you can check the status of an NFS alias (status can be: good, illegal path,name conflict, not exported, or path not found).
NFS log filesOneFS writes log messages associated with NFS events to a set of files in /var/log.
With the log level option, you can now specify the detail at which log messages areoutput to log files. The following table describes the log files associated with NFS.
Log file Description
nfs.log Primary NFS server functionality (v3, v4, mount)
rpc_lockd.log NFS v3 locking events through the NLM protocol
rpc_statd.log NFS v3 reboot detection through the NSM protocol
isi_netgroup_d.log Netgroup resolution and caching
File sharing
Isilon OneFS CLI Administration Guide 241

Managing the NFS serviceYou can enable or disable the NFS service and specify the NFS versions to support,including NFSv3 and NFSv4. NFS settings are applied across all nodes in the cluster.
Note: NFSv4 can be enabled non-disruptively on a OneFS cluster, and it will runconcurrently with NFSv3. Any existing NFSv3 clients will not be impacted byenabling NFSv4.
View NFS settingsYou can view the global NFS settings that are applied to all nodes in the cluster.
Procedure
l Run the isi nfs settings global view command.
The system displays output similar to the following example:
NFSv3 Enabled: Yes NFSv4 Enabled: No NFS Service Enabled: Yes
Configure NFS file sharingYou can enable or disable the NFS service, and set the lock protection level andsecurity type. These settings are applied across all nodes in the cluster. You canchange the settings for individual NFS exports that you define.
Procedure
l Run the isi nfs settings global modify command.
The following command enables NFSv4 support:
isi nfs settings global modify --nfsv4-enabled=yes
Enable or disable the NFS serviceIn OneFS, the NFSv3 service is enabled by default. You can also enable NFSv4.
About this task
Note: You can determine whether NFS services are enabled or disabled by runningthe isi nfs settings global view command.
Procedure
l Run the isi nfs settings global modify command.
The following command disables the NFSv3 service:
isi nfs settings global modify --nfsv3-enabled=no
The following command enables the NFSv4 service:
isi nfs settings global modify --nfsv4-enabled=yes
File sharing
242 Isilon OneFS CLI Administration Guide
Managing NFS exportsYou can create NFS exports, view and modify export settings, and delete exports thatare no longer needed.
The /ifs directory is the top-level directory for data storage in OneFS, and is alsothe path defined in the default export. By default, the /ifs export disallows rootaccess, but allows other UNIX clients to mount this directory and any subdirectoriesbeneath it.
Note: We recommend that you modify the default export to limit access only totrusted clients, or to restrict access completely. To help ensure that sensitive datais not compromised, other exports that you create should be lower in the OneFSfile hierarchy, and can be protected by access zones or limited to specific clientswith either root, read-write, or read-only access, as appropriate.
Configure default NFS export settingsThe default NFS export settings are applied to new NFS exports. You can overridethese settings when you create or modify an export.
About this task
You can view the current default export settings by running the isi nfs settingsexport view command.
CAUTION We recommend that you not modify default export settings unless youare sure of the result.
Procedure
l Run the isi nfs settings export modify command.
The following command specifies a maximum export file size of one terabyte:
isi nfs settings export modify --max-file-size 1099511627776
The following command restores the maximum export file size to the systemdefault:
isi nfs settings export modify --revert-max-file-size
Create a root-squashing rule for an exportBy default, the NFS service implements a root-squashing rule for the default NFSexport. This prevents root users on NFS clients from exercising root privileges on theNFS server.
About this task
In OneFS, the default NFS export is /ifs, the top-level directory where cluster datais stored.
Procedure
1. Use the isi nfs exports view command to view the current settings ofthe default export.
The following command displays the settings of the default export:
isi nfs exports view 1
File sharing
Isilon OneFS CLI Administration Guide 243

2. Confirm the following default values for these settings, which show that root ismapped to nobody, thereby restricting root access:
Map Root Enabled: True User: Nobody Primary Group: -Secondary Groups: -
3. If the root-squashing rule, for some reason, is not in effect, you can implementit for the default NFS export by running the isi nfs export modifycommand, as follows:
isi nfs exports modify 1 --map-root-enabled true --map-root nobody
Results
With these settings, regardless of the users' credentials on the NFS client, they wouldnot be able to gain root privileges on the NFS server.
Create an NFS exportYou can create NFS exports to share files in OneFS with UNIX-based clients.
Before you begin
Each directory path that you designate for an export must already exist in the /ifsdirectory tree. A directory path can be used by more than one export, provided thoseexports do not have any of the same explicit clients.
About this task
The NFS service runs in user space and distributes the load across all nodes in thecluster. This enables the service to be highly scalable and support thousands ofexports. As a best practice, however, you should avoid creating a separate export foreach client on your network. It is more efficient to create fewer exports, and to useaccess zones and user mapping to control access.
Procedure
1. Run the isi nfs exports create command.
The following command creates an export supporting client access to multiplepaths and their subdirectories:
isi nfs exports create /ifs/data/projects,/ifs/home --all-dirs=yes
2. (Optional) To view the export ID, which is required for modifying or deleting theexport, run the isi nfs exports list command.
Check NFS exports for errorsYou can check for errors in NFS exports, such as conflicting export rules, invalidpaths, and unresolvable hostnames and netgroups. This task may be performed onlythrough the OneFS command-line interface.
Procedure
1. Establish an SSH connection to any node in the cluster.
File sharing
244 Isilon OneFS CLI Administration Guide

2. Run the isi nfs exports check command.
In the following example output, no errors were found:
ID Message--------------------Total: 0
In the following example output, export 1 contains a directory path that doesnot currently exist:
ID Message-----------------------------------1 '/ifs/test' does not exist-----------------------------------Total: 1
Modify an NFS exportYou can modify the settings for an existing NFS export.
About this task
CAUTION Changing export settings may cause performance issues. Make sureyou understand the potential impact of any settings alterations prior tocommitting any changes.
Procedure
1. Run the isi nfs exports modify command.
For example, the following adds a client with read-write access to NFS export2:
isi nfs exports modify 2 --add-read-write-clients 10.1.249.137
This command would override the export's access-restriction setting if therewas a conflict. For example, if the export was created with read-write accessdisabled, the client, 10.1.249.137, would still have read-write permissions on theexport.
Delete an NFS exportYou can delete unneeded NFS exports. Any current NFS client connections to theseexports become invalid.
Before you begin
You need the export ID number to delete the export. Run the isi nfs exportslist command to display a list of exports and their ID numbers.
Procedure
1. Run the isi nfs exports delete command.
In the following example, the command deletes an export whose ID is 2:
isi nfs exports delete 2
File sharing
Isilon OneFS CLI Administration Guide 245

In the following example, isi nfs exports delete deletes an exportwhose ID is 3 without displaying a confirmation prompt. Be careful when usingthe --force option.
isi nfs exports delete 3 --force
2. If you did not specify the --force option, type yes at the confirmationprompt.
Managing NFS aliasesYou can create NFS aliases to simplify exports that clients connect to. An NFS aliasmaps an absolute directory path to a simple directory path.
For example, suppose you created an NFS export to /ifs/data/hq/home/archive/first-quarter/finance. You could create the alias /finance1 tomap to that directory path.
NFS aliases can be created in any access zone, including the System zone.
Create an NFS aliasYou can create an NFS alias to map a long directory path to a simple pathname.
About this task
Aliases must be formed as a simple Unix-style directory path, for example, /home.
Procedure
1. Run the isi nfs aliases create command.
The following command creates an alias to a full pathname in OneFS in anaccess zone named hq-home:
isi nfs aliases create /home /ifs/data/offices/hq/home --zone hq-home
When you create an NFS alias, OneFS performs a health check. If, for example,the full path that you specify is not a valid path, OneFS issues a warning:
Warning: health check on alias '/home' returned 'path not found'
Nonetheless, the alias is created, and you can create the directory that the aliaspoints to at a later time.
Modify an NFS aliasYou can modify an NFS alias, for example, if an export directory path has changed.
About this task
Aliases must be formed as a simple Unix-style directory path, for example, /home.
Procedure
1. Run the isi nfs aliases modify command.
The following command changes the name of an alias in the access zone hq-home:
isi nfs aliases modify /home --zone hq-home --name /home1
File sharing
246 Isilon OneFS CLI Administration Guide

When you modify an NFS alias, OneFS performs a health check. If, for example,the path to the alias is not valid, OneFS issues a warning:
Warning: health check on alias '/home' returned 'not exported'
Nonetheless, the alias is modified, and you can create the export at a later time.
Delete an NFS aliasYou can delete an NFS alias.
About this task
If an NFS alias is mapped to an NFS export, deleting the alias can disconnect clientsthat used the alias to connect to the export.
Procedure
1. Run the isi nfs aliases delete command.
The following command deletes the alias /home in an access zone named hq-home:
isi nfs aliases delete /home --zone hq-home
When you delete an NFS alias, OneFS asks you to confirm the operation:
Are you sure you want to delete NFS alias /home? (yes/[no])
2. Type yes, and then press ENTER.
The alias is deleted, unless an error condition was found, for example, you typedthe name of the alias incorrectly.
List NFS aliasesYou can view a list of NFS aliases that have already been defined for a particular zone.Aliases in the system zone are listed by default.
Procedure
1. Run the isi nfs aliases list command.
In the following example, the command lists aliases that have been created inthe system zone (the default):
isi nfs aliases list
In the following example, isi nfs aliases list lists aliases that have beencreated in an access zone named hq-home:
isi nfs aliases list --zone hq-home
Output from isi nfs aliases list looks similar to the following example:
Zone Name Path -------------------------------------------------hq-home /home /ifs/data/offices/newyork
File sharing
Isilon OneFS CLI Administration Guide 247

hq-home /root_alias /ifs/data/officeshq-home /project /ifs/data/offices/project-------------------------------------------------Total: 3
View an NFS aliasYou can view the settings of an NFS alias in the specified access zone.
Procedure
1. Run the isi nfs aliases view command.
The following command provides information on an alias in the access zone,hq-home, including the health of the alias:
isi nfs aliases view /projects --zone hq-home --check
Output from the command looks similar to the following example:
Zone Name Path Health--------------------------------------------------------hq-home /projects /ifs/data/offices/project good--------------------------------------------------------Total: 1
FTPOneFS includes a secure FTP service called vsftpd, which stands for Very Secure FTPDaemon, that you can configure for standard FTP and FTPS file transfers.
View FTP settingsYou can view a list of current FTP configuration settings.
Procedure
l Run the isi ftp settings view command.
The system displays output similar to the following example:
Accept Timeout: 1m Allow Anon Access: No Allow Anon Upload: Yes Allow Dirlists: Yes Allow Downloads: Yes Allow Local Access: Yes Allow Writes: Yes Always Chdir Homedir: Yes Anon Chown Username: root Anon Password List: - Anon Root Path: /ifs/home/ftp Anon Umask: 0077 Ascii Mode: offChroot Exception List: - Chroot Local Mode: none Connect Timeout: 1m Data Timeout: 5m Denied User List: - Dirlist Localtime: No Dirlist Names: hide File Create Perm: 0666 Limit Anon Passwords: Yes
File sharing
248 Isilon OneFS CLI Administration Guide
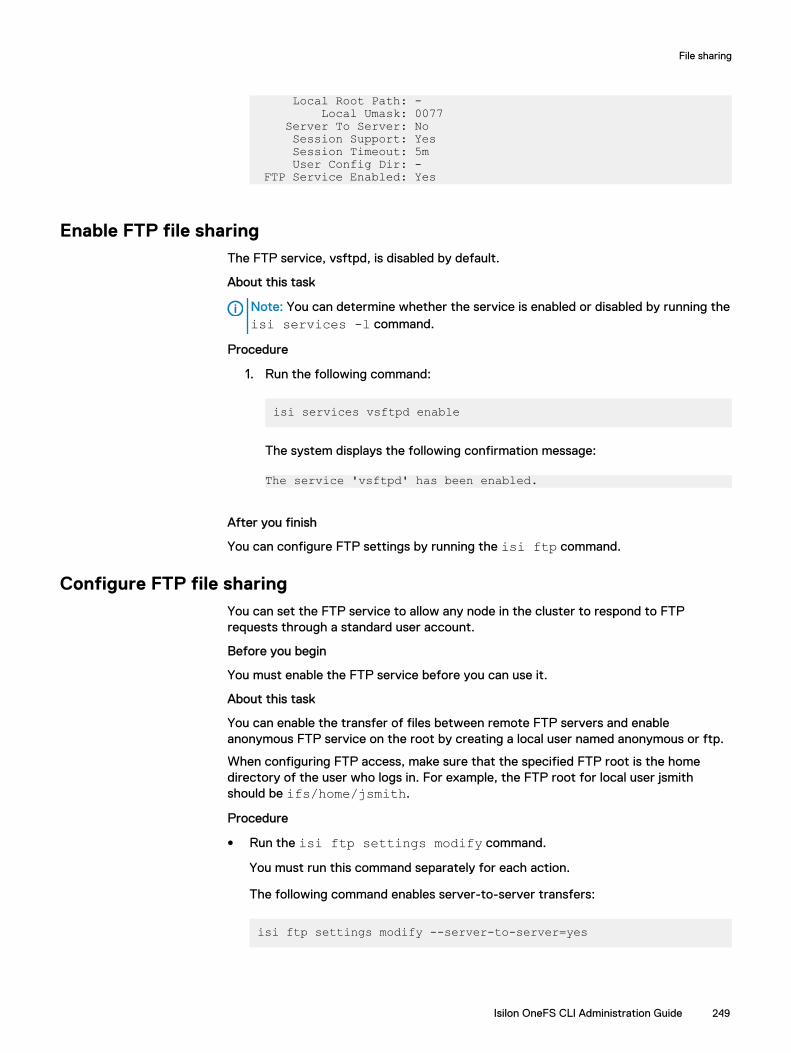
Local Root Path: - Local Umask: 0077 Server To Server: No Session Support: Yes Session Timeout: 5m User Config Dir: - FTP Service Enabled: Yes
Enable FTP file sharingThe FTP service, vsftpd, is disabled by default.
About this task
Note: You can determine whether the service is enabled or disabled by running theisi services -l command.
Procedure
1. Run the following command:
isi services vsftpd enable
The system displays the following confirmation message:
The service 'vsftpd' has been enabled.
After you finish
You can configure FTP settings by running the isi ftp command.
Configure FTP file sharingYou can set the FTP service to allow any node in the cluster to respond to FTPrequests through a standard user account.
Before you begin
You must enable the FTP service before you can use it.
About this task
You can enable the transfer of files between remote FTP servers and enableanonymous FTP service on the root by creating a local user named anonymous or ftp.
When configuring FTP access, make sure that the specified FTP root is the homedirectory of the user who logs in. For example, the FTP root for local user jsmithshould be ifs/home/jsmith.
Procedure
l Run the isi ftp settings modify command.
You must run this command separately for each action.
The following command enables server-to-server transfers:
isi ftp settings modify --server-to-server=yes
File sharing
Isilon OneFS CLI Administration Guide 249

The following command disables anonymous uploads:
isi ftp settings modify --allow-anon-upload=no
You must run this command separately for each action.
HTTP and HTTPSOneFS includes a configurable Hypertext Transfer Protocol (HTTP) service, which isused to request files that are stored on the cluster and to interact with the webadministration interface.
OneFS supports both HTTP and its secure variant, HTTPS. Each node in the clusterruns an instance of the Apache HTTP Server to provide HTTP access. You canconfigure the HTTP service to run in different modes.
Both HTTP and HTTPS are supported for file transfer, but only HTTPS is supportedfor API calls. The HTTPS-only requirement includes the web administration interface.In addition, OneFS supports a form of the web-based DAV (WebDAV) protocol thatenables users to modify and manage files on remote web servers. OneFS performsdistributed authoring, but does not support versioning and does not perform securitychecks. You can enable DAV in the web administration interface.
Enable and configure HTTPYou can configure HTTP and WebDAV to enable users to edit and manage filescollaboratively across remote web servers.
About this task
You can use the isi http settings modify command to configure HTTP relatedsettings.
Procedure
l Run the isi http settings modify command.
The following command enables the HTTP service, WebDAV, and basicauthentication:
isi http settings modify --service=enabled --dav=yes \basic-authentication=yes
Enable HTTPS through the Apache serviceYou can access an Isilon cluster through the Apache service over HTTPS.
Procedure
l To enable HTTPS, run the following command:
isi_gconfig -t http-config https_enabled=true
Results
The HTTPS service is enabled.Note: It might take up to 10 seconds for the configuration change to take effect.As a result, data transfers that are in progress over HTTP might be interrupted.
File sharing
250 Isilon OneFS CLI Administration Guide

Disable HTTPS through the Apache serviceYou can disable access to an Isilon cluster through the Apache service over HTTPS.
Procedure
l To disable HTTPS, run the following command:
isi_gconfig -t http-config https_enabled=false
Results
The HTTPS service is disabled.Note: It might take up to 10 seconds for the configuration change to take effect.As a result, data transfers that are in progress over HTTP might be interrupted.
File sharing
Isilon OneFS CLI Administration Guide 251

File sharing
252 Isilon OneFS CLI Administration Guide

CHAPTER 12
File filtering
This section contains the following topics:
l File filtering in an access zone..........................................................................254l Enable and configure file filtering in an access zone.........................................254l Disable file filtering in an access zone.............................................................. 254l View file filtering settings.................................................................................255
Isilon OneFS CLI Administration Guide 253

File filtering in an access zoneIn an access zone, you can use file filtering to allow or deny file writes based on filetype.
If some file types might cause throughput issues, security problems, storage clutter,or productivity disruptions on your cluster, or if your organizations must adhere tospecific file policies, you can restrict writes to specified file types or only allow writesto a specified list of file types. When you enable file filtering in an access zone, OneFSapplies file filtering rules only to files in that access zone.
l If you choose to deny file writes, you can specify file types by extension that arenot allowed to be written. OneFS permits all other file types to be written.
l If you choose to allow file writes, you can specify file types by extension that areallowed to be written. OneFS denies all other file types to be written.
OneFS does not take into consideration which file sharing protocol was used toconnect to the access zone when applying file filtering rules; however, you can applyadditional file filtering at the SMB share level. See "SMB file filtering" in the Filesharing chapter of this guide.
Enable and configure file filtering in an access zoneYou can enable file filtering per access zone and specify which file types users aredenied or allowed write access to within the access zone.
Procedure
1. Run the isi file-filter settings modify command.
The following command enables file filtering in the zone3 access zone andallows users to write only to specific file types:
isi file-filter settings modify --zone=zone3 \ file-filtering-enabled=yes file-filter-type=allow \ file-filter-extensions=.xml,.html,.txt
File types are designated by their extension and should start with a "." suchas .txt.
The following command enables file filtering in zone3 and denies users writeaccess only to specific file types:
isi file-filter settings modify --zone=zone3 \ file-filtering-enabled=yes file-filter-type=deny \ file-filter-extensions=.xml,.html,.txt
Disable file filtering in an access zoneYou can disable file filtering per access zone. Previous settings that specify filter typeand file type extensions are preserved but no longer applied.
Procedure
1. Run the isi file-filter settings modify command.
File filtering
254 Isilon OneFS CLI Administration Guide
The following command disables file filtering in the zone3 access zone:
isi file-filter settings modify --zone=zone3 \ file-filtering-enabled=no
View file filtering settingsYou can view file filtering settings in an access zone.
Procedure
1. Run the isi file-filter settings view command.
The following command displays file filtering settings in the zone3 access zone:
isi file-filter settings view --zone=zone3
The system displays output similar to the following example:
File Filtering Enabled: YesFile Filter Extensions: xml, html, txt File Filter Type: deny
File filtering
Isilon OneFS CLI Administration Guide 255

File filtering
256 Isilon OneFS CLI Administration Guide

CHAPTER 13
Auditing and logging
This section contains the following topics:
l Auditing overview.............................................................................................258l Syslog.............................................................................................................. 258l Protocol audit events.......................................................................................259l Supported audit tools.......................................................................................259l Delivering protocol audit events to multiple CEE servers................................. 260l Supported event types.....................................................................................260l Sample audit log............................................................................................... 261l Managing audit settings................................................................................... 262l Integrating with the Common Event Enabler....................................................266l Tracking the delivery of protocol audit events................................................. 268
Isilon OneFS CLI Administration Guide 257

Auditing overviewYou can audit system configuration changes and protocol activity on an Isilon cluster.All audit data is stored and protected in the cluster file system and organized by audittopics.
Auditing can detect many potential sources of data loss, including fraudulentactivities, inappropriate entitlements, and unauthorized access attempts. Customersin industries such as financial services, health care, life sciences, and media andentertainment, as well as in governmental agencies, must meet stringent regulatoryrequirements developed to protect against these sources of data loss.
System configuration auditing tracks and records all configuration events that arehandled by the OneFS HTTP API. The process involves auditing the command-lineinterface (CLI), web administration interface, and OneFS APIs. When you enablesystem configuration auditing, no additional configuration is required. Systemconfiguration auditing events are stored in the config audit topic directories.
Protocol auditing tracks and stores activity performed through SMB, NFS, and HDFSprotocol connections. You can enable and configure protocol auditing for one or moreaccess zones in a cluster. If you enable protocol auditing for an access zone, file-access events through the SMB, NFS, and HDFS protocols are recorded in theprotocol audit topic directories. You can specify which events to log in each accesszone. For example, you might want to audit the default set of protocol events in theSystem access zone but audit only successful attempts to delete files in a differentaccess zone.
The audit events are logged on the individual nodes where the SMB, NFS, or HDFSclient initiated the activity. The events are then stored in a binary file under /ifs/.ifsvar/audit/logs. The logs automatically roll over to a new file after thesize reaches 1 GB. The logs are then compressed to reduce space.
The protocol audit log file is consumable by auditing applications that support theCommon Event Enabler (CEE).
SyslogSyslog is a protocol that is used to convey certain event notification messages. Youcan configure an Isilon cluster to log audit events and forward them to syslog by usingthe syslog forwarder.
By default, all protocol events that occur on a particular node are forwarded tothe /var/log/audit_protocol.log file, regardless of the access zone the eventoriginated from. All the config audit events are logged to /var/log/audit_config.log by default.
Syslog is configured with an identity that depends on the type of audit event that isbeing sent to it. It uses the facility daemon and a priority level of info. The protocolaudit events are logged to syslog with the identity audit_protocol. The configaudit events are logged to syslog with the identity audit_config.
To configure auditing on an Isilon cluster, you must either be a root user or you mustbe assigned to an administrative role that includes auditing privileges(ISI_PRIV_AUDIT).
Auditing and logging
258 Isilon OneFS CLI Administration Guide

Syslog forwardingThe syslog forwarder is a daemon that, when enabled, retrieves configuration changesand protocol audit events in an access zone and forwards the events to syslog. Onlyuser-defined audit success and failure events are eligible for being forwarded tosyslog.
On each node there is an audit syslog forwarder daemon running that will log auditevents to the same node's syslog daemon.
Protocol audit eventsBy default, audited access zones track only certain events on the Isilon cluster,including successful and failed attempts to access files and directories.
The default tracked events are create, close, delete, rename, and set_security.
The names of generated events are loosely based on the Windows I/O request packet(IRP) model in which all operations begin with a create event to obtain a file handle. Acreate event is required before all I/O operations, including the following: close,create, delete, get_security, read, rename, set_security, and write. A close eventmarks when the client is finished with the file handle that was produced by a createevent.
Note: For the NFS and HDFS protocols, the rename and delete events might notbe enclosed with the create and close events.
These internally stored events are translated to events that are forwarded through theCEE to the auditing application. The CEE export facilities on OneFS perform thismapping. The CEE can be used to connect to any third party application that supportsthe CEE.
Note: The CEE does not support forwarding HDFS protocol events to a third-party application.
Different SMB, NFS, and HDFS clients issue different requests, and one particularversion of a platform such as Windows or Mac OS X using SMB might differ fromanother. Similarly, different versions of an application such as Microsoft Word orWindows Explorer might make different protocol requests. For example, a client with aWindows Explorer window open might generate many events if an automatic ormanual refresh of that window occurs. Applications issue requests with the logged-inuser's credentials, but you should not assume that all requests are purposeful useractions.
When enabled, OneFS audit will track all changes that are made to the files anddirectories in SMB shares, NFS exports, and HDFS data.
Supported audit toolsYou can configure OneFS to send protocol auditing logs to servers that support theCommon Event Enabler (CEE).
CEE has been tested and verified to work on several third-party software vendors.Note: We recommend that you install and configure third-party auditingapplications before you enable the OneFS auditing feature. Otherwise, all theevents that are logged are forwarded to the auditing application, and a largebacklog causes a delay in receiving the most current events.
Auditing and logging
Isilon OneFS CLI Administration Guide 259

Delivering protocol audit events to multiple CEE serversOneFS supports concurrent delivery of protocol audit events to multiple CEE serversrunning the CEE service.
You can establish up to 20 HTTP 1.1 connections across a subset of CEE servers. Eachnode in an Isilon cluster can select up to five CEE servers for delivery. The CEEservers are shared in a global configuration and are configured with OneFS by addingthe URI of each server to the OneFS configuration.
After configuring the CEE servers, a node in an Isilon cluster automatically selects theCEE servers from a sorted list of CEE URIs. The servers are selected starting from thenode's logical node number offset within the sorted list. When a CEE server isunavailable, the next available server is selected in the sorted order. All theconnections are evenly distributed between the selected servers. When a node ismoved because a CEE server was previously unavailable, checks are made every 15minutes for the availability of the CEE server. The node is moved back as soon as theCEE Server is available.
Follow some of these best practices before configuring the CEE servers:
l We recommend that you provide only one CEE server per node. You can use extraCEE servers beyond theIsilon cluster size only when the selected CEE server goesoffline.
Note: In a global configuration, there should be one CEE server per node.
l Configure the CEE server and enable protocol auditing at the same time. If not, abacklog of events might accumulate causing stale delivery for a period of time.
You can either receive a global view of the progress of delivery of the protocol auditevents or you can receive a logical node number view of the progress by running theisi audit progress view command.
Supported event typesYou can view or modify the event types that are audited in an access zone.
Event name Example protocolactivity
Audited bydefault
Can beexportedthrough CEE
Cannot beexportedthrough CEE
create l Create a file ordirectory
l Open a file,directory, orshare
l Mount a share
l Delete a fileNote: Whilethe SMBprotocolallows you toset a file fordeletion withthe create
X X
Auditing and logging
260 Isilon OneFS CLI Administration Guide

Event name Example protocolactivity
Audited bydefault
Can beexportedthrough CEE
Cannot beexportedthrough CEE
operation,you mustenable thedelete eventin order forthe auditingtool to logthe event.
close l Close a directory
l Close a modifiedor unmodified file
X X
rename Rename a file ordirectory
X X
delete Delete a file ordirectory
X X
set_security Attempt to modifyfile or directorypermissions
X X
read The first readrequest on an openfile handle
X
write The first writerequest on an openfile handle
X
get_security The client readssecurity informationfor an open filehandle
X
logon SMB session createrequest by a client
X
logoff SMB session logoff X
tree_connect SMB first attempt toaccess a share
X
Sample audit logYou can view both configuration audit and protocol audit logs by running theisi_audit_viewer command on any node in the Isilon cluster.
You can view protocol access audit logs by running isi_audit_viewer -tprotocol. You can view system configuration logs by running isi_audit_viewer-t config. The following output is an example of a system configuration log:
Auditing and logging
Isilon OneFS CLI Administration Guide 261
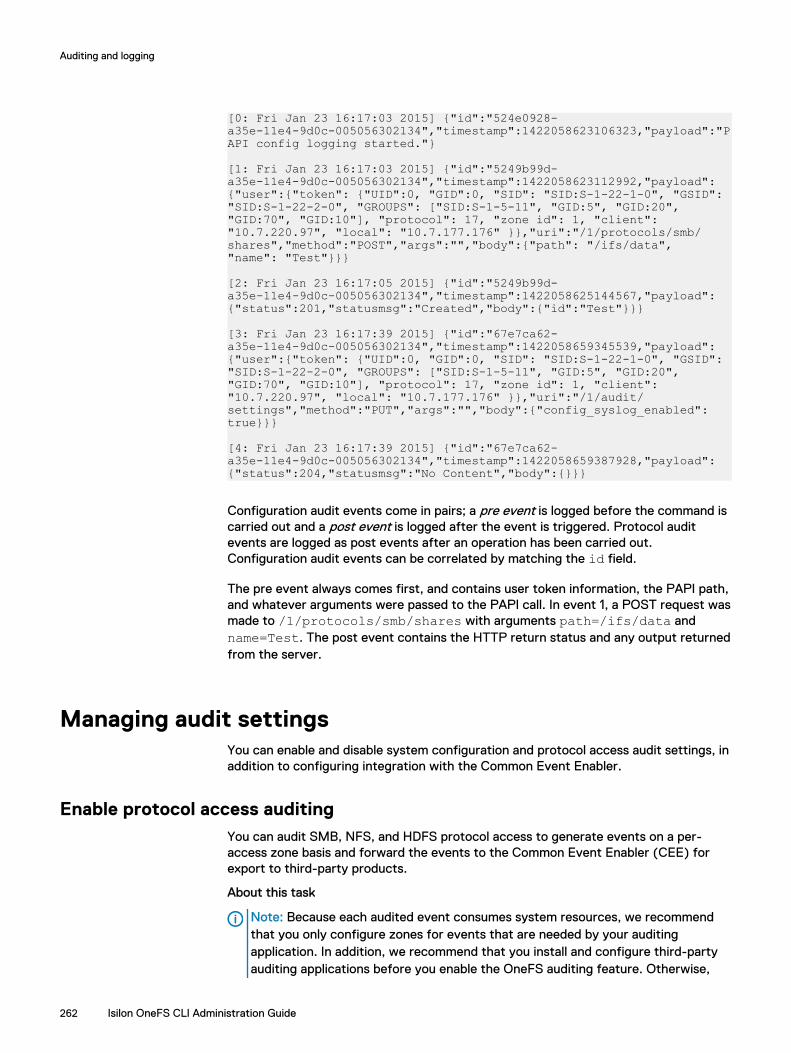
[0: Fri Jan 23 16:17:03 2015] {"id":"524e0928-a35e-11e4-9d0c-005056302134","timestamp":1422058623106323,"payload":"PAPI config logging started."}
[1: Fri Jan 23 16:17:03 2015] {"id":"5249b99d-a35e-11e4-9d0c-005056302134","timestamp":1422058623112992,"payload":{"user":{"token": {"UID":0, "GID":0, "SID": "SID:S-1-22-1-0", "GSID": "SID:S-1-22-2-0", "GROUPS": ["SID:S-1-5-11", "GID:5", "GID:20", "GID:70", "GID:10"], "protocol": 17, "zone id": 1, "client": "10.7.220.97", "local": "10.7.177.176" }},"uri":"/1/protocols/smb/shares","method":"POST","args":"","body":{"path": "/ifs/data", "name": "Test"}}}
[2: Fri Jan 23 16:17:05 2015] {"id":"5249b99d-a35e-11e4-9d0c-005056302134","timestamp":1422058625144567,"payload":{"status":201,"statusmsg":"Created","body":{"id":"Test"}}}
[3: Fri Jan 23 16:17:39 2015] {"id":"67e7ca62-a35e-11e4-9d0c-005056302134","timestamp":1422058659345539,"payload":{"user":{"token": {"UID":0, "GID":0, "SID": "SID:S-1-22-1-0", "GSID": "SID:S-1-22-2-0", "GROUPS": ["SID:S-1-5-11", "GID:5", "GID:20", "GID:70", "GID:10"], "protocol": 17, "zone id": 1, "client": "10.7.220.97", "local": "10.7.177.176" }},"uri":"/1/audit/settings","method":"PUT","args":"","body":{"config_syslog_enabled": true}}}
[4: Fri Jan 23 16:17:39 2015] {"id":"67e7ca62-a35e-11e4-9d0c-005056302134","timestamp":1422058659387928,"payload":{"status":204,"statusmsg":"No Content","body":{}}}
Configuration audit events come in pairs; a pre event is logged before the command iscarried out and a post event is logged after the event is triggered. Protocol auditevents are logged as post events after an operation has been carried out.Configuration audit events can be correlated by matching the id field.
The pre event always comes first, and contains user token information, the PAPI path,and whatever arguments were passed to the PAPI call. In event 1, a POST request wasmade to /1/protocols/smb/shares with arguments path=/ifs/data andname=Test. The post event contains the HTTP return status and any output returnedfrom the server.
Managing audit settingsYou can enable and disable system configuration and protocol access audit settings, inaddition to configuring integration with the Common Event Enabler.
Enable protocol access auditingYou can audit SMB, NFS, and HDFS protocol access to generate events on a per-access zone basis and forward the events to the Common Event Enabler (CEE) forexport to third-party products.
About this task
Note: Because each audited event consumes system resources, we recommendthat you only configure zones for events that are needed by your auditingapplication. In addition, we recommend that you install and configure third-partyauditing applications before you enable the OneFS auditing feature. Otherwise,
Auditing and logging
262 Isilon OneFS CLI Administration Guide

the large backlog performed by this feature may cause results to not be up-to-date for a considerable amount of time. Additionally, you can manually configurethe time that you want audit events to be forwarded by running the isi auditsettings global modify --cee-log-time command.
Procedure
1. Run the isi audit settings global modify command.
The following command enables auditing of protocol access events in the zone3and zone5 access zones, and forwards logged events to a CEE server:
isi audit settings global modify --protocol-auditing-enabled=yes \ --cee-server-uris=http://sample.com:12228/cee \ --hostname=cluster.domain.com --audited-zones=zone3,zone5
OneFS logs audited protocol events to a binary file within /ifs/.ifsvar/audit/logs. The CEE service forwards the logged events through an HTTPPUT operation to a defined endpoint.
After you finish
You can modify the types of protocol access events to be audited by running the isiaudit settings modify command. You can also enable forwarding of protocolaccess events to syslog by running the isi audit settings modify commandwith the --syslog-forwarding-enabled option.
Forward protocol access events to syslogYou can enable or disable forwarding of audited protocol access events to syslog ineach access zone. Forwarding is not enabled by default when protocol access auditingis enabled. This procedure is available only through the command-line interface.
Before you begin
To enable forwarding of protocol access events in an access zone, you must firstenable protocol access auditing in the access zone.
About this task
The --audit-success and --audit-failure options define the event types thatare audited, and the --syslog-audit-events option defines the event types thatare forwarded to syslog. Only the audited event types are eligible for forwarding tosyslog. If syslog forwarding is enabled, protocol access events are written tothe /var/log/audit_protocol.log file.
Procedure
1. Open a Secure Shell (SSH) connection to any node in the cluster and log in.
2. Run the isi audit settings modify command with the --syslog-forwarding-enabled option to enable or disable audit syslog.
The following command enables forwarding of the audited protocol accessevents in the zone3 access zone and specifies that the only event typesforwarded are close, create, and delete events:
isi audit settings modify --syslog-forwarding-enabled=yes --syslog-audit-events=close,create,delete --zone=zone3
Auditing and logging
Isilon OneFS CLI Administration Guide 263

The following command disables forwarding of audited protocol access eventsfrom the zone3 access zone:
isi audit settings modify --syslog-forwarding-enabled=no --zone=zone3
Enable system configuration auditingOneFS can audit system configuration events on your Isilon cluster. When enabled,OneFS records all system configuration events that are handled by the platform APIincluding writes, modifications, and deletions. System configuration change logs arepopulated in the config topic in the audit back-end store under /ifs/.ifsvar/audit.
About this task
Note: Configuration events are not forwarded to the Common Event Enabler(CEE).
Procedure
1. Open a Secure Shell (SSH) connection to any node in the cluster and log in.
2. Run the isi audit settings global modify command.
The following command enables system configuration auditing on the cluster:
isi audit settings global modify --config-auditing-enabled=yes
After you finish
You can enable forwarding of system configuration changes to syslog by running theisi audit settings global modify command with the --config-syslog-enabled option.
Set the audit hostnameYou can optionally set the audit hostname for some of the third-party auditingapplications that require a unified hostname. If you do not set a hostname for theseapplications, each node in an Isilon cluster sends its hostname as the server name tothe CEE server. Otherwise, the configured audit hostname is used as the global servername.
Procedure
1. Open a Secure Shell (SSH) connection to any node in the cluster and log in.
2. Run the isi audit settings global modify command with the --hostname option to set the audit hostname.
The following command sets mycluster as the audit hostname:
isi audit settings global modify --hostname=mycluster
Auditing and logging
264 Isilon OneFS CLI Administration Guide

Configure protocol audited zonesOnly the protocol audit events within an audited zone are captured and sent to theCEE server. Therefore, you must configure a protocol audited zone to send auditevents.
Procedure
1. Open a Secure Shell (SSH) connection to any node in the cluster and log in.
2. Run the isi audit settings global modify command with the --audited-zones option to configure protocol audited zones.
The following command configures HomeDirectory and Misc as the protocolaudited zones:
isi audit settings global modify --audited-zones=HomeDirectory,Misc
Forward system configuration changes to syslogYou can enable or disable forwarding of system configuration changes on the Isiloncluster to syslog, which is saved to /var/log/audit_config.log. This procedureis available only through the command-line interface.
Before you begin
Forwarding is not enabled by default when system configuration auditing is enabled.To enable forwarding of system configuration changes to syslog, you must first enablesystem configuration auditing on the cluster.Procedure
1. Open a Secure Shell (SSH) connection to any node in the cluster and log in.
2. Run the isi audit settings global modify command with the --config-syslog-enabled option to enable or disable forwarding of systemconfiguration changes.
The following command enables forwarding of system configuration changes tosyslog:
isi audit settings global modify --config-syslog-enabled=yes
The following command disables forwarding of system configuration changes tosyslog:
isi audit settings global modify --config-syslog-enabled=no
Configure protocol event filtersYou can filter the types of protocol access events to be audited in an access zone. Youcan create filters for successful events and failed events. The following protocolevents are collected for audited access zones by default: create, delete, rename,
Auditing and logging
Isilon OneFS CLI Administration Guide 265

close, and set_security. This procedure is available only through the command-lineinterface.
Before you begin
To create protocol event filters, you should first enable protocol access auditing in theaccess zone.Procedure
1. Open a Secure Shell (SSH) connection to any node in the cluster and log in.
2. Run the isi audit settings modify command
The following command creates a filter that audits the failure of create, close,and delete events in the zone3 access zone:
isi audit settings modify --audit-failure=create,close,delete --zone=zone3
The following command creates a filter that audits the success of create, close,and delete events in the zone5 access zone:
isi audit settings modify --audit-success=create,close,delete --zone=zone5
Integrating with the Common Event EnablerOneFS integration with the Common Event Enabler (CEE) enables third-party auditingapplications to collect and analyze protocol auditing logs.
OneFS supports the Common Event Publishing Agent (CEPA) component of CEE forWindows. For integration with OneFS, you must install and configure CEE forWindows on a supported Windows client.
Note: We recommend that you install and configure third-party auditingapplications before you enable the OneFS auditing feature. Otherwise, the largebacklog performed by this feature may cause results to not be up-to-date for aconsiderable time.
Install CEE for WindowsTo integrate CEE with OneFS, you must first install CEE on a computer that is runningthe Windows operating system.
Before you begin
Be prepared to extract files from the .iso file, as described in the following steps. Ifyou are not familiar with the process, consider choosing one of the following methods:
1. Install WinRAR or another suitable archival program that can open .iso files as anarchive, and copy the files.
2. Burn the image to a CD-ROM, and then copy the files.
3. Install SlySoft Virtual CloneDrive, which allows you to mount an ISO image as adrive that you can copy files from.
Auditing and logging
266 Isilon OneFS CLI Administration Guide
About this task
Note: You should install a minimum of two servers. We recommend that you installCEE 6.6.0 or later.
Procedure
1. Download the CEE framework software from Online Support:
a. Go to Online Support.
b. In the search field, type Common Event Enabler for Windows, and thenclick the Search icon.
c. Click Common Event Enabler <Version> for Windows, where <Version> is6.2 or later, and then follow the instructions to open or save the .iso file.
2. From the .iso file, extract the 32-bit or 64-bit EMC_CEE_Pack executable filethat you need.
After the extraction completes, the CEE installation wizard opens.
3. Click Next to proceed to the License Agreement page.
4. Select the I accept... option to accept the terms of the license agreement, andthen click Next.
5. On the Customer Information page, type your user name and organization,select your installation preference, and then click Next.
6. On the Setup Type page, select Complete, and then click Next.
7. Click Install to begin the installation.
The progress of the installation is displayed. When the installation is complete,the InstallShield Wizard Completed page appears.
8. Click Finish to exit the wizard.
9. Restart the system.
Configure CEE for WindowsAfter you install CEE for Windows on a client computer, you must configure additionalsettings through the Windows Registry Editor (regedit.exe).
Procedure
1. Open the Windows Registry Editor.
2. Configure the following registry keys, if supported by your audit application:
Setting Registry location Key Value
CEE HTTPlisten port
[HKEY_LOCAL_MACHINE\SOFTWARE\EMC\CEE\Configuration]
HttpPort 12228
Enableauditremoteendpoints
[HKEY_LOCAL_MACHINE\SOFTWARE\EMC\CEE\CEPP\Audit\Configuration]
Enabled 1
Auditremoteendpoints
[HKEY_LOCAL_MACHINE\SOFTWARE\EMC\CEE\CEPP\Audit\Configuration]
EndPoint <EndPoint>
Note:
Auditing and logging
Isilon OneFS CLI Administration Guide 267
l The HttpPort value must match the port in the CEE URIs that youspecify during OneFS protocol audit configuration.
l The EndPoint value must be in the format<EndPoint_Name>@<IP_Address>. You can specify multiple endpointsby separating each value with a semicolon (;).
The following key specifies a single remote endpoint:[HKEY_LOCAL_MACHINE\SOFTWARE\EMC\CEE\CEPP\Audit\Configuration] EndPoint = [email protected] following key specifies multiple remote endpoints:[HKEY_LOCAL_MACHINE\SOFTWARE\EMC\CEE\CEPP\Audit\Configuration] EndPoint [email protected];[email protected]
3. Close the Windows Registry Editor.
Configure CEE servers to deliver protocol audit eventsYou can configure CEE servers with OneFS to deliver protocol audit events by addingthe URI of each server to the OneFS configuration.
Procedure
l Run the isi audit settings global modify command with the --cee-server-uris option to add the URIs of the CEE servers to the OneFSconfiguration.
The following command adds the URIs of three CEE servers to the OneFSconfiguration:
isi audit settings global modify --cee-server-uris=http://server1.example.com:12228/vee,http://server2.example.com:12228/vee,http://server3.example.com:12228/vee
Tracking the delivery of protocol audit eventsThe processes of capturing protocol audit events and their delivery to the CEE serverdo not happen simultaneously. Therefore, even when no CEE servers are available,protocol audit events are still captured and stored for delivery to the CEE server at alater time.
You can view the time of the last captured protocol audit event and the event time ofthe last event that was sent to the CEE server. You can also move the log position ofthe CEE forwarder to a desired time.
View the time stamps of delivery of events to the CEE server and syslogYou can view the time stamps of delivery of events to the CEE server and syslog onthe node on which you are running the isi audit progress view command.
About this task
This setting is available only through the command-line interface.
Auditing and logging
268 Isilon OneFS CLI Administration Guide
Procedure
l Run the isi audit progress view command to view the time stamps ofdelivery of events to the CEE server and syslog on the node on which you arerunning the command.
A sample output of the isi audit progress view is shown:
Protocol Audit Log Time: Tue Mar 29 13:32:38 2016Protocol Audit Cee Time: Tue Mar 29 13:32:38 2016Protocol Audit Syslog Time: Fri Mar 25 17:00:28 2016
You can run the isi audit progress view command with the --lnn optionto view the time stamps of delivery of the audit events on a node specifiedthrough its logical node number.
The following command displays the progress of delivery of the audit events on anode with logical node number 2:
isi audit progress view --lnn=2
The output appears as shown:
Protocol Audit Log Time: Tue Mar 29 13:32:38 2016Protocol Audit Cee Time: Tue Mar 29 13:32:38 2016Protocol Audit Syslog Time: Fri Mar 25 17:00:28 2016
Display a global view of delivery of protocol audit events to the CEE serverand syslog
You can display the latest protocol audit event log time for a cluster. You can also viewthe time stamp of delivery of the oldest unsent protocol audit event to the CEE serverand the time stamp of delivery of the oldest non-forwarded protocol audit event tosyslog in the cluster.
About this task
This setting is available only through the command-line interface.
Procedure
l Run the isi audit progress global view command to view the timestamps of delivery of the oldest unsent protocol audit events to the CEE serverand the oldest unsent syslog in the cluster.
A sample output of the isi audit progress global view is shown:
Protocol Audit Latest Log Time: Fri Sep 2 10:06:36 2016Protocol Audit Oldest Cee Time: Fri Sep 2 10:02:28 2016Protocol Audit Oldest Syslog Time: Fri Sep 2 10:02:28 2016
Move the log position of the CEE forwarderYou can manually move the log position of the CEE forwarder if the event time in theaudit log indicates a lag in comparison to the current time. This action globally moves
Auditing and logging
Isilon OneFS CLI Administration Guide 269

the event time in all of the logs of the CEE forwarder within an Isilon cluster to theclosest time.
About this task
Note: The events that are skipped will not be forwarded to the CEE server eventhough they might still be available on the cluster.
Procedure
l Run the isi audit settings global modify command with the --cee-log-time option to move the log position of the CEE forwarder.
The following command moves the log position of the CEE forwarder manually:
isi audit settings global modify --cee-log-time='protocol@2016-01-27 01:03:02'
View the rate of delivery of protocol audit events to the CEE serverYou can view the rate of delivery of protocol audit events to the CEE server.
Procedure
l Run the isi statistics query command to view the current rate of deliveryof the protocol audit events to the CEE server on a node.
The following command displays the current rate of delivery of the protocol auditevents to the CEE server:
isi statistics query current list --keys=node.audit.cee.export.rate
The output appears as shown:
Node node.audit.cee.export.rate--------------------------------- 1 3904.600000---------------------------------Total: 1
Auditing and logging
270 Isilon OneFS CLI Administration Guide
CHAPTER 14
Snapshots
This section contains the following topics:
l Snapshots overview......................................................................................... 272l Data protection with SnapshotIQ..................................................................... 272l Snapshot disk-space usage.............................................................................. 272l Snapshot schedules..........................................................................................273l Snapshot aliases...............................................................................................273l File and directory restoration........................................................................... 273l Best practices for creating snapshots.............................................................. 274l Best practices for creating snapshot schedules............................................... 274l File clones........................................................................................................ 275l Snapshot locks.................................................................................................276l Snapshot reserve............................................................................................. 277l SnapshotIQ license functionality...................................................................... 277l Creating snapshots with SnapshotIQ................................................................277l Managing snapshots ........................................................................................282l Restoring snapshot data.................................................................................. 285l Managing snapshot schedules..........................................................................287l Managing snapshot aliases...............................................................................288l Managing with snapshot locks......................................................................... 290l Configure SnapshotIQ settings ....................................................................... 292l Set the snapshot reserve................................................................................. 294l Managing changelists.......................................................................................294
Isilon OneFS CLI Administration Guide 271

Snapshots overviewA OneFS snapshot is a logical pointer to data that is stored on a cluster at a specificpoint in time.
A snapshot references a directory on a cluster, including all data stored in thedirectory and its subdirectories. If the data referenced by a snapshot is modified, thesnapshot stores a physical copy of the data that was modified. Snapshots are createdaccording to user specifications or are automatically generated by OneFS to facilitatesystem operations.
To create and manage snapshots, you must activate a SnapshotIQ license on thecluster. Some applications must generate snapshots to function but do not require youto activate a SnapshotIQ license; by default, these snapshots are automaticallydeleted when OneFS no longer needs them. However, if you activate a SnapshotIQlicense, you can retain these snapshots. You can view snapshots generated by othermodules without activating a SnapshotIQ license.
You can identify and locate snapshots by name or ID. A snapshot name is specified bya user and assigned to the virtual directory that contains the snapshot. A snapshot IDis a numerical identifier that OneFS automatically assigns to a snapshot.
Data protection with SnapshotIQYou can create snapshots to protect data with the SnapShotIQ software module.Snapshots protect data against accidental deletion and modification by enabling youto restore deleted and modified files. To use SnapshotIQ, you must activate aSnapshotIQ license on the cluster.
Snapshots are less costly than backing up your data on a separate physical storagedevice in terms of both time and storage consumption. The time required to move datato another physical device depends on the amount of data being moved, whereassnapshots are always created almost instantaneously regardless of the amount of datareferenced by the snapshot. Also, because snapshots are available locally, end-userscan often restore their data without requiring assistance from a system administrator.Snapshots require less space than a remote backup because unaltered data isreferenced rather than recreated.
Snapshots do not protect against hardware or file-system issues. Snapshots referencedata that is stored on a cluster, so if the data on the cluster becomes unavailable, thesnapshots will also be unavailable. Because of this, it is recommended that you backup your data to separate physical devices in addition to creating snapshots.
Snapshot disk-space usageThe amount of disk space that a snapshot consumes depends on both the amount ofdata stored by the snapshot and the amount of data the snapshot references fromother snapshots.
Immediately after OneFS creates a snapshot, the snapshot consumes a negligibleamount of disk space. The snapshot does not consume additional disk space unlessthe data referenced by the snapshot is modified. If the data that a snapshotreferences is modified, the snapshot stores read-only copies of the original data. Asnapshot consumes only the space that is necessary to restore the contents adirectory to the state it was in when the snapshot was taken.
Snapshots
272 Isilon OneFS CLI Administration Guide
To reduce disk-space usage, snapshots that reference the same directory referenceeach other, with older snapshots referencing newer snapshots. If a file is deleted, andseveral snapshots reference the file, a single snapshot stores a copy the file, and theother snapshots reference the file from the snapshot that stored the copy. Thereported size of a snapshot reflects only the amount of data stored by the snapshotand does not include the amount of data referenced by the snapshot.
Because snapshots do not consume a set amount of storage space, there is noavailable-space requirement for creating a snapshot. The size of a snapshot growsaccording to how the data referenced by the snapshot is modified. A cluster cannotcontain more than 20,000 snapshots.
Snapshot schedulesYou can automatically generate snapshots according to a snapshot schedule.
With snapshot schedules, you can periodically generate snapshots of a directorywithout having to manually create a snapshot every time. You can also assign anexpiration period that determines when SnapshotIQ deletes each automaticallygenerated snapshot.
Snapshot aliasesA snapshot alias is a logical pointer to a snapshot. If you specify an alias for a snapshotschedule, the alias will always point to the most recent snapshot generated by thatschedule. Assigning a snapshot alias allows you to quickly identify and access the mostrecent snapshot generated according to a snapshot schedule.
If you allow clients to access snapshots through an alias, you can reassign the alias toredirect clients to other snapshots. In addition to assigning snapshot aliases tosnapshots, you can also assign snapshot aliases to the live version of the file system.This can be useful if clients are accessing snapshots through a snapshot alias, and youwant to redirect the clients to the live version of the file system.
File and directory restorationYou can restore the files and directories that are referenced by a snapshot alias bycopying data from the snapshot, cloning a file from the snapshot, or reverting theentire snapshot.
Copying a file from a snapshot duplicates the file, which roughly doubles the amountof storage space consumed. Even if you delete the original file from the non-snapshotdirectory, the copy of the file remains in the snapshot.
Cloning a file from a snapshot also duplicates the file. However, unlike a copy, whichimmediately consumes additional space on the cluster, a clone does not consume anyadditional space on the cluster unless the clone or cloned file is modified.
Reverting a snapshot replaces the contents of a directory with the data stored in thesnapshot. Before a snapshot is reverted, SnapshotIQ creates a snapshot of thedirectory that is being replaced, which enables you to undo the snapshot revert later.Reverting a snapshot can be useful if you want to undo a large number of changesthat you made to files and directories. If new files or directories have been created in adirectory since a snapshot of the directory was created, those files and directories aredeleted when the snapshot is reverted.
Snapshots
Isilon OneFS CLI Administration Guide 273
Note: If you move a directory, you cannot revert snapshots of the directory thatwere taken before the directory was moved.
Best practices for creating snapshotsConsider the following snapshot best practices when working with a large number ofsnapshots.
It is recommended that you do not create more than 1,000 snapshots of a singledirectory to avoid performance degradation. If you create a snapshot of a rootdirectory, that snapshot counts towards the total number of snapshots for anysubdirectories of the root directory. For example, if you create 500 snapshotsof /ifs/data and 500 snapshots of /ifs/data/media, you have created 1,000snapshots of /ifs/data/media. Avoid creating snapshots of directories that arealready referenced by other snapshots.
It is recommended that you do not create more than 1,000 hard links per file in asnapshot to avoid performance degradation. Always attempt to keep directory pathsas shallow as possible. The deeper the depth of directories referenced by snapshots,the greater the performance degradation.
Creating snapshots of directories higher on a directory tree will increase the amountof time it takes to modify the data referenced by the snapshot and require morecluster resources to manage the snapshot and the directory. However, creatingsnapshots of directories lower on directories trees will require more snapshotschedules, which can be difficult to manage. It is recommended that you do not createsnapshots of /ifs or /ifs/data.
You can create up to 20,000 snapshots on a cluster at a time. If your workflowrequires a large number of snapshots on a consistent basis, you might find thatmanaging snapshots through the OneFS command-line interface is preferable tomanaging snapshots through the OneFS web administration Interface. In the CLI, youcan apply a wide variety of sorting and filtering options and redirect lists into text files.
You should mark snapshots for deletion when they are no longer needed, and makesure that the SnapshotDelete system job is enabled. Disabling the SnapshotDelete jobprevents unused disk space from being recaptured and can also cause performancedegradation over time.
If the system clock is set to a time zone other than Coordinated Universal Time(UTC), SnapShotIQ modifies snapshot duration periods to match Daylight SavingsTime (DST). Upon entering DST, snapshot durations are increased by an hour toadhere to DST; when exiting DST, snapshot durations are decreased by an hour toadhere to standard time.
Best practices for creating snapshot schedulesSnapshot schedule configurations can be categorized by how they delete snapshots:ordered deletions and unordered deletions.
An ordered deletion is the deletion of the oldest snapshot of a directory. An unordereddeletion is the deletion of a snapshot that is not the oldest snapshot of a directory.Unordered deletions take approximately twice as long to complete and consume morecluster resources than ordered deletions. However, unordered deletions can savespace by retaining a smaller total number of snapshots.
The benefits of unordered deletions versus ordered deletions depend on how often thedata referenced by the snapshots is modified. If the data is modified frequently,
Snapshots
274 Isilon OneFS CLI Administration Guide
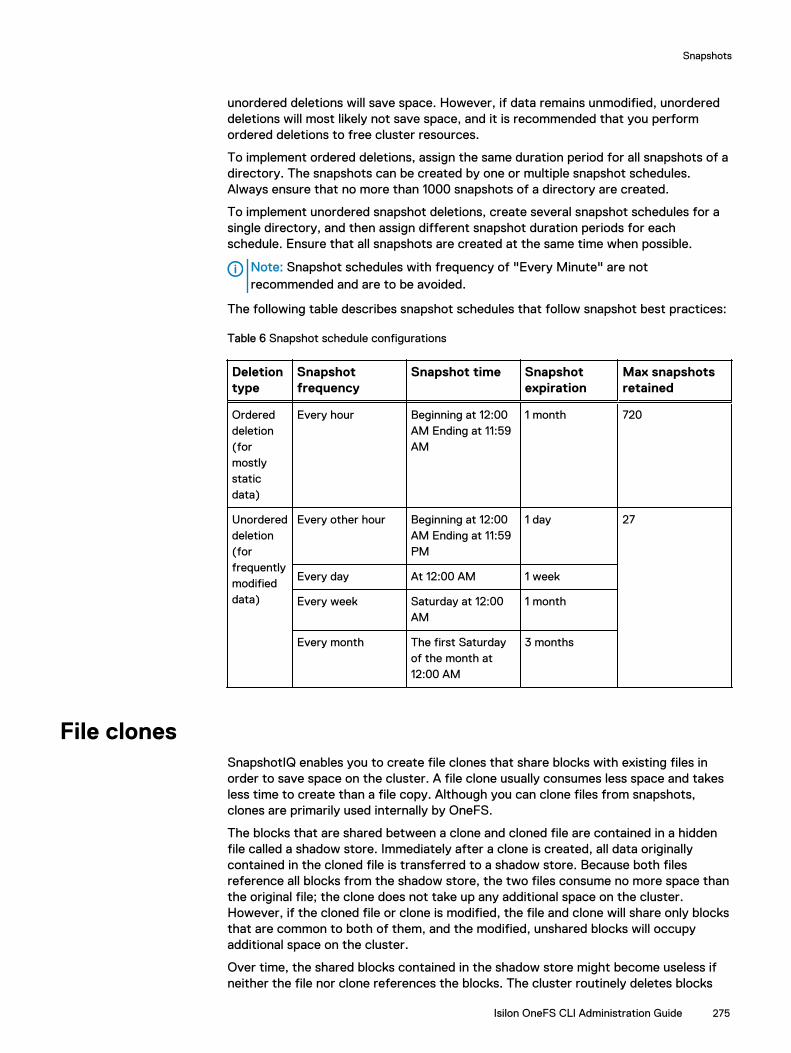
unordered deletions will save space. However, if data remains unmodified, unordereddeletions will most likely not save space, and it is recommended that you performordered deletions to free cluster resources.
To implement ordered deletions, assign the same duration period for all snapshots of adirectory. The snapshots can be created by one or multiple snapshot schedules.Always ensure that no more than 1000 snapshots of a directory are created.
To implement unordered snapshot deletions, create several snapshot schedules for asingle directory, and then assign different snapshot duration periods for eachschedule. Ensure that all snapshots are created at the same time when possible.
Note: Snapshot schedules with frequency of "Every Minute" are notrecommended and are to be avoided.
The following table describes snapshot schedules that follow snapshot best practices:
Table 6 Snapshot schedule configurations
Deletiontype
Snapshotfrequency
Snapshot time Snapshotexpiration
Max snapshotsretained
Ordereddeletion(formostlystaticdata)
Every hour Beginning at 12:00AM Ending at 11:59AM
1 month 720
Unordereddeletion(forfrequentlymodifieddata)
Every other hour Beginning at 12:00AM Ending at 11:59PM
1 day 27
Every day At 12:00 AM 1 week
Every week Saturday at 12:00AM
1 month
Every month The first Saturdayof the month at12:00 AM
3 months
File clonesSnapshotIQ enables you to create file clones that share blocks with existing files inorder to save space on the cluster. A file clone usually consumes less space and takesless time to create than a file copy. Although you can clone files from snapshots,clones are primarily used internally by OneFS.
The blocks that are shared between a clone and cloned file are contained in a hiddenfile called a shadow store. Immediately after a clone is created, all data originallycontained in the cloned file is transferred to a shadow store. Because both filesreference all blocks from the shadow store, the two files consume no more space thanthe original file; the clone does not take up any additional space on the cluster.However, if the cloned file or clone is modified, the file and clone will share only blocksthat are common to both of them, and the modified, unshared blocks will occupyadditional space on the cluster.
Over time, the shared blocks contained in the shadow store might become useless ifneither the file nor clone references the blocks. The cluster routinely deletes blocks
Snapshots
Isilon OneFS CLI Administration Guide 275

that are no longer needed. You can force the cluster to delete unused blocks at anytime by running the ShadowStoreDelete job.
Clones cannot contain alternate data streams (ADS). If you clone a file that containsalternate data streams, the clone will not contain the alternate data streams.
Shadow-store considerationsShadow stores are hidden files that are referenced by cloned and deduplicated files.Files that reference shadow stores behave differently than other files.
l Reading shadow-store references might be slower than reading data directly.Specifically, reading non-cached shadow-store references is slower than readingnon-cached data. Reading cached shadow-store references takes no more timethan reading cached data.
l When files that reference shadow stores are replicated to another Isilon cluster orbacked up to a Network Data Management Protocol (NDMP) backup device, theshadow stores are not transferred to the target Isilon cluster or backup device.The files are transferred as if they contained the data that they reference fromshadow stores. On the target Isilon cluster or backup device, the files consume thesame amount of space as if they had not referenced shadow stores.
l When OneFS creates a shadow store, OneFS assigns the shadow store to astorage pool of a file that references the shadow store. If you delete the storagepool that a shadow store resides on, the shadow store is moved to a pool occupiedby another file that references the shadow store.
l OneFS does not delete a shadow-store block immediately after the last referenceto the block is deleted. Instead, OneFS waits until the ShadowStoreDelete job isrun to delete the unreferenced block. If a large number of unreferenced blocksexist on the cluster, OneFS might report a negative deduplication savings until theShadowStoreDelete job is run.
l Shadow stores are protected at least as much as the most protected file thatreferences it. For example, if one file that references a shadow store resides in astorage pool with +2 protection and another file that references the shadow storeresides in a storage pool with +3 protection, the shadow store is protected at +3.
l Quotas account for files that reference shadow stores as if the files contained thedata referenced from shadow stores; from the perspective of a quota, shadow-store references do not exist. However, if a quota includes data protectionoverhead, the quota does not account for the data protection overhead of shadowstores.
Snapshot locksA snapshot lock prevents a snapshot from being deleted. If a snapshot has one ormore locks applied to it, the snapshot cannot be deleted and is referred to as a lockedsnapshot. If the duration period of a locked snapshot expires, OneFS will not deletethe snapshot until all locks on the snapshot have been deleted.
OneFS applies snapshot locks to ensure that snapshots generated by OneFSapplications are not deleted prematurely. For this reason, it is recommended that youdo not delete snapshot locks or modify the duration period of snapshot locks.
A limited number of locks can be applied to a snapshot at a time. If you createsnapshot locks, the limit for a snapshot might be reached, and OneFS could be unableto apply a snapshot lock when necessary. For this reason, it is recommended that youdo not create snapshot locks.
Snapshots
276 Isilon OneFS CLI Administration Guide
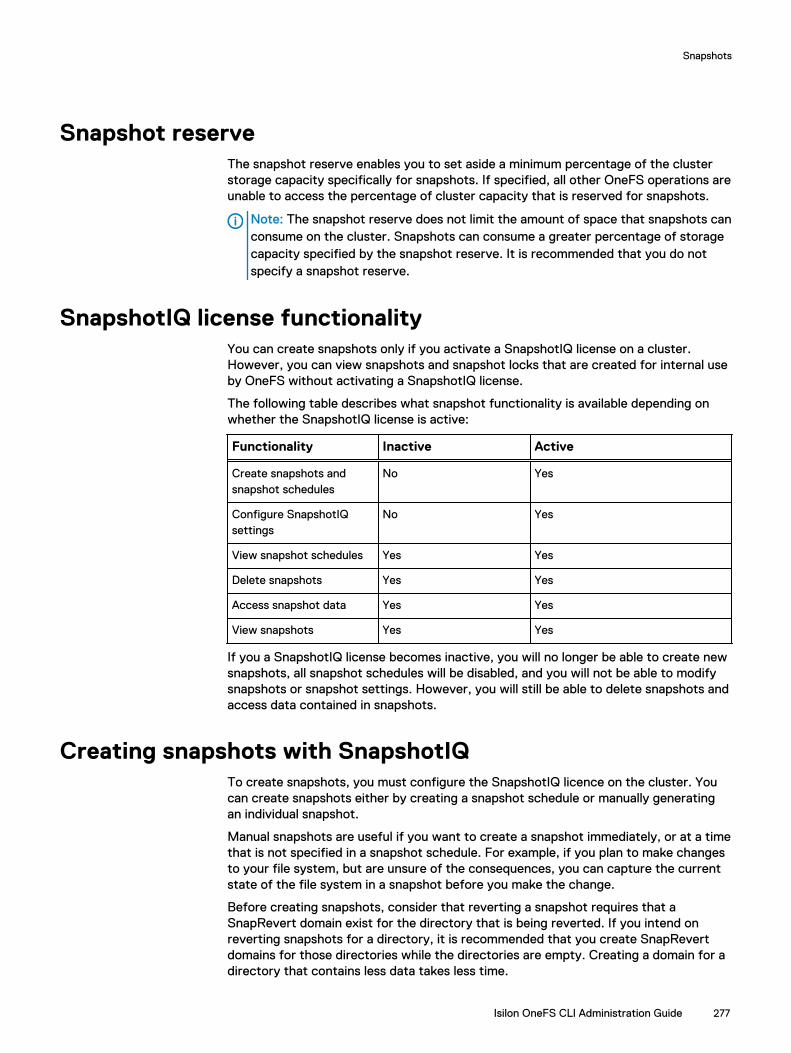
Snapshot reserveThe snapshot reserve enables you to set aside a minimum percentage of the clusterstorage capacity specifically for snapshots. If specified, all other OneFS operations areunable to access the percentage of cluster capacity that is reserved for snapshots.
Note: The snapshot reserve does not limit the amount of space that snapshots canconsume on the cluster. Snapshots can consume a greater percentage of storagecapacity specified by the snapshot reserve. It is recommended that you do notspecify a snapshot reserve.
SnapshotIQ license functionalityYou can create snapshots only if you activate a SnapshotIQ license on a cluster.However, you can view snapshots and snapshot locks that are created for internal useby OneFS without activating a SnapshotIQ license.
The following table describes what snapshot functionality is available depending onwhether the SnapshotIQ license is active:
Functionality Inactive Active
Create snapshots andsnapshot schedules
No Yes
Configure SnapshotIQsettings
No Yes
View snapshot schedules Yes Yes
Delete snapshots Yes Yes
Access snapshot data Yes Yes
View snapshots Yes Yes
If you a SnapshotIQ license becomes inactive, you will no longer be able to create newsnapshots, all snapshot schedules will be disabled, and you will not be able to modifysnapshots or snapshot settings. However, you will still be able to delete snapshots andaccess data contained in snapshots.
Creating snapshots with SnapshotIQTo create snapshots, you must configure the SnapshotIQ licence on the cluster. Youcan create snapshots either by creating a snapshot schedule or manually generatingan individual snapshot.
Manual snapshots are useful if you want to create a snapshot immediately, or at a timethat is not specified in a snapshot schedule. For example, if you plan to make changesto your file system, but are unsure of the consequences, you can capture the currentstate of the file system in a snapshot before you make the change.
Before creating snapshots, consider that reverting a snapshot requires that aSnapRevert domain exist for the directory that is being reverted. If you intend onreverting snapshots for a directory, it is recommended that you create SnapRevertdomains for those directories while the directories are empty. Creating a domain for adirectory that contains less data takes less time.
Snapshots
Isilon OneFS CLI Administration Guide 277

Create a SnapRevert domainBefore you can revert a snapshot that contains a directory, you must create aSnapRevert domain for the directory. It is recommended that you create SnapRevertdomains for a directory while the directory is empty.
About this task
The root path of the SnapRevert domain must be the same root path of the snapshot.For example, a domain with a root path of /ifs/data/media cannot be used torevert a snapshot with a root path of /ifs/data/media/archive. Torevert /ifs/data/media/archive, you must create a SnapRevert domain with aroot path of /ifs/data/media/archive.
Procedure
1. Run the isi job jobs start command.
The following command creates a SnapRevert domain for /ifs/data/media:
isi job jobs start domainmark --root /ifs/data/media \--dm-type SnapRevert
Create a snapshot scheduleYou can create a snapshot schedule to continuously generate snapshots of directories.
Procedure
1. Run the isi snapshot schedules create command.
The following command creates a snapshot schedule for /ifs/data/media:
isi snapshot schedules create hourly /ifs/data/media \HourlyBackup_%m-%d-%Y_%H:%M "Every day every hour" \--duration 1M
The following commands create multiple snapshot schedules for /ifs/data/media that generate and expire snapshots at different rates:
isi snapshot schedules create every-other-hour \/ifs/data/media EveryOtherHourBackup_%m-%d-%Y_%H:%M \"Every day every 2 hours" --duration 1Disi snapshot schedules create daily /ifs/data/media \Daily_%m-%d-%Y_%H:%M "Every day at 12:00 AM" --duration 1Wisi snapshot schedules create weekly /ifs/data/media \Weekly_%m-%d-%Y_%H:%M "Every Saturday at 12:00 AM" --duration 1M isi snapshot schedules create monthly /ifs/data/media \Monthly_%m-%d-%Y_%H:%M \"The 1 Saturday of every month at 12:00 AM" --duration 3M
Create a snapshotYou can create a snapshot of a directory.
Procedure
1. Run the isi snapshot snapshots create command.
Snapshots
278 Isilon OneFS CLI Administration Guide
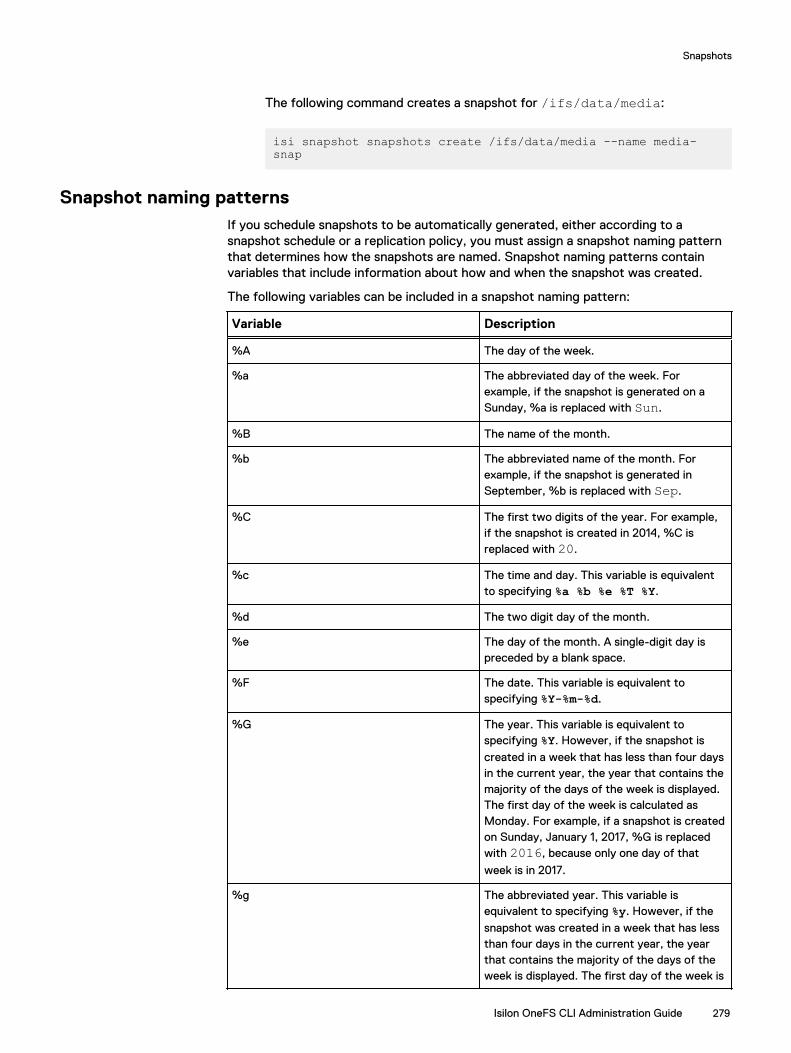
The following command creates a snapshot for /ifs/data/media:
isi snapshot snapshots create /ifs/data/media --name media-snap
Snapshot naming patternsIf you schedule snapshots to be automatically generated, either according to asnapshot schedule or a replication policy, you must assign a snapshot naming patternthat determines how the snapshots are named. Snapshot naming patterns containvariables that include information about how and when the snapshot was created.
The following variables can be included in a snapshot naming pattern:
Variable Description
%A The day of the week.
%a The abbreviated day of the week. Forexample, if the snapshot is generated on aSunday, %a is replaced with Sun.
%B The name of the month.
%b The abbreviated name of the month. Forexample, if the snapshot is generated inSeptember, %b is replaced with Sep.
%C The first two digits of the year. For example,if the snapshot is created in 2014, %C isreplaced with 20.
%c The time and day. This variable is equivalentto specifying %a %b %e %T %Y.
%d The two digit day of the month.
%e The day of the month. A single-digit day ispreceded by a blank space.
%F The date. This variable is equivalent tospecifying %Y-%m-%d.
%G The year. This variable is equivalent tospecifying %Y. However, if the snapshot is
created in a week that has less than four daysin the current year, the year that contains themajority of the days of the week is displayed.The first day of the week is calculated asMonday. For example, if a snapshot is createdon Sunday, January 1, 2017, %G is replacedwith 2016, because only one day of that
week is in 2017.
%g The abbreviated year. This variable isequivalent to specifying %y. However, if the
snapshot was created in a week that has lessthan four days in the current year, the yearthat contains the majority of the days of theweek is displayed. The first day of the week is
Snapshots
Isilon OneFS CLI Administration Guide 279
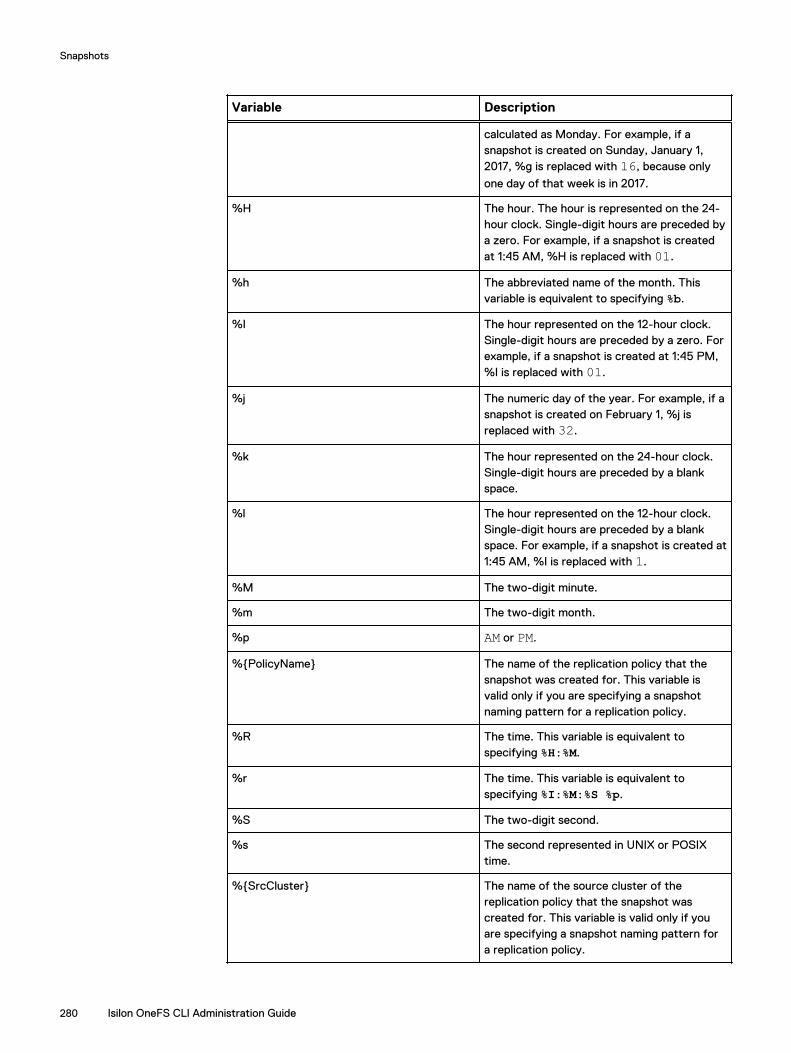
Variable Description
calculated as Monday. For example, if asnapshot is created on Sunday, January 1,2017, %g is replaced with 16, because only
one day of that week is in 2017.
%H The hour. The hour is represented on the 24-hour clock. Single-digit hours are preceded bya zero. For example, if a snapshot is createdat 1:45 AM, %H is replaced with 01.
%h The abbreviated name of the month. Thisvariable is equivalent to specifying %b.
%I The hour represented on the 12-hour clock.Single-digit hours are preceded by a zero. Forexample, if a snapshot is created at 1:45 PM,%I is replaced with 01.
%j The numeric day of the year. For example, if asnapshot is created on February 1, %j isreplaced with 32.
%k The hour represented on the 24-hour clock.Single-digit hours are preceded by a blankspace.
%l The hour represented on the 12-hour clock.Single-digit hours are preceded by a blankspace. For example, if a snapshot is created at1:45 AM, %I is replaced with 1.
%M The two-digit minute.
%m The two-digit month.
%p AM or PM.
%{PolicyName} The name of the replication policy that thesnapshot was created for. This variable isvalid only if you are specifying a snapshotnaming pattern for a replication policy.
%R The time. This variable is equivalent tospecifying %H:%M.
%r The time. This variable is equivalent tospecifying %I:%M:%S %p.
%S The two-digit second.
%s The second represented in UNIX or POSIXtime.
%{SrcCluster} The name of the source cluster of thereplication policy that the snapshot wascreated for. This variable is valid only if youare specifying a snapshot naming pattern fora replication policy.
Snapshots
280 Isilon OneFS CLI Administration Guide

Variable Description
%T The time. This variable is equivalent tospecifying %H:%M:%S
%U The two-digit numerical week of the year.Numbers range from 00 to 53. The first day
of the week is calculated as Sunday.
%u The numerical day of the week. Numbersrange from 1 to 7. The first day of the week
is calculated as Monday. For example, if asnapshot is created on Sunday, %u is replaced
with 7.
%V The two-digit numerical week of the year thatthe snapshot was created in. Numbers rangefrom 01 to 53. The first day of the week is
calculated as Monday. If the week of January1 is four or more days in length, then thatweek is counted as the first week of the year.
%v The day that the snapshot was created. Thisvariable is equivalent to specifying %e-%b-%Y.
%W The two-digit numerical week of the year thatthe snapshot was created in. Numbers rangefrom 00 to 53. The first day of the week is
calculated as Monday.
%w The numerical day of the week that thesnapshot was created on. Numbers rangefrom 0 to 6. The first day of the week is
calculated as Sunday. For example, if thesnapshot was created on Sunday, %w isreplaced with 0.
%X The time that the snapshot was created. Thisvariable is equivalent to specifying %H:%M:%S.
%Y The year that the snapshot was created in.
%y The last two digits of the year that thesnapshot was created in. For example, if thesnapshot was created in 2014, %y is replaced
with 14.
%Z The time zone that the snapshot was createdin.
%z The offset from coordinated universal time(UTC) of the time zone that the snapshot wascreated in. If preceded by a plus sign, the timezone is east of UTC. If preceded by a minussign, the time zone is west of UTC.
%+ The time and date that the snapshot wascreated. This variable is equivalent tospecifying %a %b %e %X %Z %Y.
Snapshots
Isilon OneFS CLI Administration Guide 281
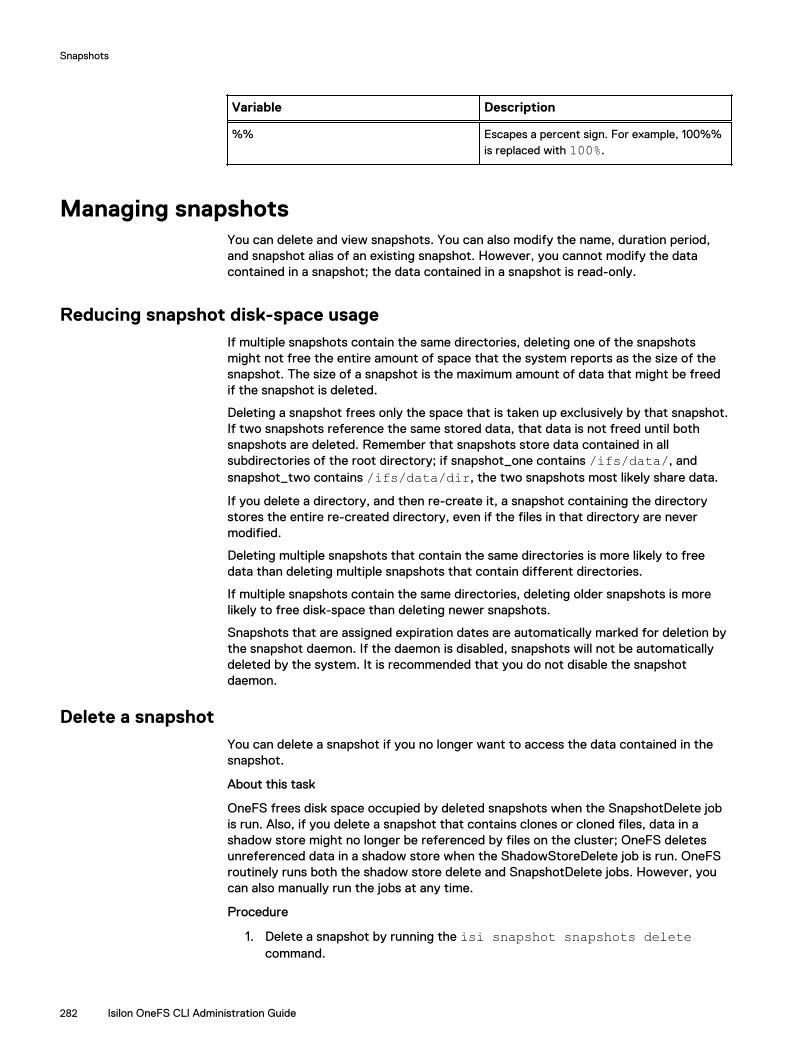
Variable Description
%% Escapes a percent sign. For example, 100%%is replaced with 100%.
Managing snapshotsYou can delete and view snapshots. You can also modify the name, duration period,and snapshot alias of an existing snapshot. However, you cannot modify the datacontained in a snapshot; the data contained in a snapshot is read-only.
Reducing snapshot disk-space usageIf multiple snapshots contain the same directories, deleting one of the snapshotsmight not free the entire amount of space that the system reports as the size of thesnapshot. The size of a snapshot is the maximum amount of data that might be freedif the snapshot is deleted.
Deleting a snapshot frees only the space that is taken up exclusively by that snapshot.If two snapshots reference the same stored data, that data is not freed until bothsnapshots are deleted. Remember that snapshots store data contained in allsubdirectories of the root directory; if snapshot_one contains /ifs/data/, andsnapshot_two contains /ifs/data/dir, the two snapshots most likely share data.
If you delete a directory, and then re-create it, a snapshot containing the directorystores the entire re-created directory, even if the files in that directory are nevermodified.
Deleting multiple snapshots that contain the same directories is more likely to freedata than deleting multiple snapshots that contain different directories.
If multiple snapshots contain the same directories, deleting older snapshots is morelikely to free disk-space than deleting newer snapshots.
Snapshots that are assigned expiration dates are automatically marked for deletion bythe snapshot daemon. If the daemon is disabled, snapshots will not be automaticallydeleted by the system. It is recommended that you do not disable the snapshotdaemon.
Delete a snapshotYou can delete a snapshot if you no longer want to access the data contained in thesnapshot.
About this task
OneFS frees disk space occupied by deleted snapshots when the SnapshotDelete jobis run. Also, if you delete a snapshot that contains clones or cloned files, data in ashadow store might no longer be referenced by files on the cluster; OneFS deletesunreferenced data in a shadow store when the ShadowStoreDelete job is run. OneFSroutinely runs both the shadow store delete and SnapshotDelete jobs. However, youcan also manually run the jobs at any time.
Procedure
1. Delete a snapshot by running the isi snapshot snapshots deletecommand.
Snapshots
282 Isilon OneFS CLI Administration Guide
The following command deletes a snapshot named OldSnapshot:
isi snapshot snapshots delete OldSnapshot
2. (Optional) To increase the speed at which deleted snapshot data is freed on thecluster, start the SnapshotDelete job by running the following command:
isi job jobs start snapshotdelete
3. To increase the speed at which deleted data shared between deduplicated andcloned files is freed on the cluster, start the ShadowStoreDelete job by runningthe following command:
isi job jobs start shadowstoredelete
Modify snapshot attributesYou can modify the name and expiration date of a snapshot.
Procedure
1. Run the isi snapshot snapshots modify command.
The following command causes HourlyBackup_07-15-2014_22:00 to expire on1:30 PM on July 25th, 2014:
isi snapshot snapshots modify HourlyBackup_07-15-2014_22:00 \--expires 2014-07-25T01:30
Modify a snapshot aliasYou can modify the alias of a snapshot to assign an alternative name for the snapshot.
Procedure
1. Run the isi snapshot snapshots modify command.
The following command assigns an alias of LastKnownGood toHourlyBackup_07-15-2013_22:00:
isi snapshot snapshots modify HourlyBackup_07-15-2013_22:00 \--alias LastKnownGood
View snapshotsYou can view a list of snapshots or detailed information about a specific snapshot.
Procedure
1. View all snapshots by running the following command:
isi snapshot snapshots list
Snapshots
Isilon OneFS CLI Administration Guide 283

The system displays output similar to the following example:
ID Name Path-------------------------------------------------------------------2 SIQ-c68839394a547b3fbc5c4c4b4c5673f9-latest /ifs/data/source6 SIQ-c68839394a547b3fbc5c4c4b4c5673f9-restore /ifs/data/target8 SIQ-Failover-newPol-2013-07-11_18-47-08 /ifs/data/target12 HourlyBackup_07-15-2013_21:00 /ifs/data/media14 HourlyBackup_07-15-2013_22:00 /ifs/data/media16 EveryOtherHourBackup_07-15-2013_22:00 /ifs/data/media18 HourlyBackup_07-15-2013_23:00 /ifs/data/media20 HourlyBackup_07-16-2013_15:00 /ifs/data/media22 EveryOtherHourBackup_07-16-2013_14:00 /ifs/data/media-------------------------------------------------------------------
2. (Optional) To view detailed information about a specific snapshot, run the isisnapshot snapshots view command.
The following command displays detailed information aboutHourlyBackup_07-15-2013_22:00:
isi snapshot snapshots view HourlyBackup_07-15-2013_22:00
The system displays output similar to the following example:
ID: 14 Name: HourlyBackup_07-15-2013_22:00 Path: /ifs/data/media Has Locks: No Schedule: hourly Alias: - Created: 2013-07-15T22:00:10 Expires: 2013-08-14T22:00:00 Size: 0bShadow Bytes: 0b % Reserve: 0.00%% Filesystem: 0.00% State: active
Snapshot informationYou can view information about snapshots through the output of the isi snapshotsnapshots list command.
ID
The ID of the snapshot.
Name
The name of the snapshot.
Path
The path of the directory contained in the snapshot.
Snapshots
284 Isilon OneFS CLI Administration Guide

Restoring snapshot dataYou can restore snapshot data through various methods. You can revert a snapshot oraccess snapshot data through the snapshots directory.
From the snapshots directory, you can either clone a file or copy a directory or a file.The snapshots directory can be accessed through Windows Explorer or a UNIXcommand line. You can disable and enable access to the snapshots directory for any ofthese methods through snapshots settings.
Revert a snapshotYou can revert a directory back to the state it was in when a snapshot was taken.
Before you begin
l Create a SnapRevert domain for the directory.
l Create a snapshot of a directory.
Procedure
1. (Optional) To identify the ID of the snapshot you want to revert, run the isisnapshot snapshots view command.
The following command displays the ID of HourlyBackup_07-15-2014_23:00:
isi snapshot snapshots view HourlyBackup_07-15-2014_23:00
The system displays output similar to the following example:
ID: 18 Name: HourlyBackup_07-15-2014_23:00 Path: /ifs/data/media Has Locks: No Schedule: hourly Alias: - Created: 2014-07-15T23:00:05 Expires: 2014-08-14T23:00:00 Size: 0bShadow Bytes: 0b % Reserve: 0.00%% Filesystem: 0.00% State: active
2. Revert a snapshot by running the isi job jobs start command.
The following command reverts HourlyBackup_07-15-2014_23:00:
isi job jobs start snaprevert --snapid 18
Restore a file or directory using Windows ExplorerIf the Microsoft Shadow Copy Client is installed on your computer, you can use it torestore files and directories that are stored in snapshots.
About this task
This method of restoring files and directories does not preserve the originalpermissions. Instead, this method assigns the file or directory the same permissions asthe directory you are copying that file or directory into. To preserve permissions while
Snapshots
Isilon OneFS CLI Administration Guide 285
restoring data from a snapshot, run the cp command with the -a option on a UNIXcommand line.
Note: You can access up to 64 snapshots of a directory through Windowsexplorer, starting with the most recent snapshot. To access more than 64snapshots for a directory, access the cluster through a UNIX command line.
Procedure
1. In Windows Explorer, navigate to the directory that you want to restore or thedirectory that contains the file that you want to restore.
If the directory has been deleted, you must recreate the directory.
2. Right-click the folder, and then click Properties.
3. In the Properties window, click the Previous Versions tab.
4. Select the version of the folder that you want to restore or the version of thefolder that contains the version of the file that you want to restore.
5. Restore the version of the file or directory.
l To restore all files in the selected directory, click Restore.
l To copy the selected directory to another location, click Copy, and thenspecify a location to copy the directory to.
l To restore a specific file, click Open, and then copy the file into the originaldirectory, replacing the existing copy with the snapshot version.
Restore a file or directory through a UNIX command lineYou can restore a file or directory from a snapshot through a UNIX command line.
Procedure
1. Open a connection to the cluster through a UNIX command line.
2. (Optional) To view the contents of the snapshot you want to restore a file ordirectory from, run the ls command for a directory contained in the snapshotsroot directory.
For example, the following command displays the contents of the /archivedirectory contained in Snapshot2014Jun04:
ls /ifs/.snapshot/Snapshot2014Jun04/archive
3. Copy the file or directory by using the cp command.
For example, the following command creates a copy of the file1 file:
cp -a /ifs/.snapshot/Snapshot2014Jun04/archive/file1 \ /ifs/archive/file1_copy
Clone a file from a snapshotYou can clone a file from a snapshot.
About this task
Procedure
1. Open a secure shell (SSH) connection to any node in the cluster and log in.
Snapshots
286 Isilon OneFS CLI Administration Guide

2. To view the contents of the snapshot you want to restore a file or directoryfrom, run the ls command for a subdirectory of the snapshots root directory.
For example, the following command displays the contents of the /archivedirectory contained in Snapshot2014Jun04:
ls /ifs/.snapshot/Snapshot2014Jun04/archive
3. Clone a file from the snapshot by running the cp command with the -c option.
For example, the following command clones test.txt from Snapshot2014Jun04:
cp -c /ifs/.snapshot/Snapshot2014Jun04/archive/test.txt \/ifs/archive/test_clone.text
Managing snapshot schedulesYou can modify, delete, and view snapshot schedules.
Modify a snapshot scheduleYou can modify a snapshot schedule. Any changes to a snapshot schedule are appliedonly to snapshots generated after the modifications are made. Existing snapshots arenot affected by schedule modifications.
About this task
If you modify the alias of a snapshot schedule, the alias is assigned to the nextsnapshot generated based on the schedule. However, if you do this, the old alias is notremoved from the last snapshot that it was assigned to. Unless you manually removethe old alias, the alias will remain attached to the last snapshot that it was assigned to.
Procedure
1. Run the isi snapshot schedules modify command.
The following command causes snapshots created according to the snapshotschedule hourly_media_snap to be deleted 15 days after they are created:
isi snapshot schedules modify hourly_media_snap --duration 15D
Delete a snapshot scheduleYou can delete a snapshot schedule. Deleting a snapshot schedule will not deletesnapshots that were previously generated according to the schedule.
Procedure
1. Run the isi snapshot schedules delete command.
The following command deletes a snapshot schedule namedhourly_media_snap:
isi snapshot schedules delete hourly_media_snap
Snapshots
Isilon OneFS CLI Administration Guide 287

View snapshot schedulesYou can view snapshot schedules.
Procedure
1. View snapshot schedules by running the following command:
isi snapshot schedules list
The system displays output similar to the following example:
ID Name---------------------1 every-other-hour2 daily3 weekly4 monthly---------------------
2. (Optional) View detailed information about a specific snapshot schedule byrunning the isi snapshot schedules view command.
The following command displays detailed information about the snapshotschedule every-other-hour:
isi snapshot schedules view every-other-hour
The system displays output similar to the following example:
ID: 1 Name: every-other-hour Path: /ifs/data/media Pattern: EveryOtherHourBackup_%m-%d-%Y_%H:%M Schedule: Every day every 2 hours Duration: 1D Alias: - Next Run: 2013-07-16T18:00:00Next Snapshot: EveryOtherHourBackup_07-16-2013_18:00
Managing snapshot aliasesYou can configure snapshot schedules to assign a snapshot alias to the most recentsnapshot created by a snapshot schedule. You can also manually assign snapshotaliases to specific snapshots or the live version of the file system.
Configure a snapshot alias for a snapshot scheduleYou can configure a snapshot schedule to assign a snapshot alias to the most recentsnapshot created by the schedule.
About this task
If you configure an alias for a snapshot schedule, the alias is assigned to the nextsnapshot generated based on the schedule. However, if you do this, the old alias is notremoved from the last snapshot that it was assigned to. Unless you manually removethe old alias, the alias will remain attached to the last snapshot that it was assigned to.
Snapshots
288 Isilon OneFS CLI Administration Guide

Procedure
1. Run the isi snapshot schedules modify command.
The following command configures the alias LatestWeekly for the snapshotschedule WeeklySnapshot:
isi snapshot schedules modify WeeklySnapshot --alias LatestWeekly
Assign a snapshot alias to a snapshotYou can assign a snapshot alias to a snapshot.
Procedure
1. Run the isi snapshot aliases create command.
The following command creates a snapshot alias for Weekly-01-30-2015:
isi snapshot aliases create latestWeekly Weekly-01-30-2015
Reassign a snapshot alias to the live file systemYou can reassign a snapshot alias to redirect clients from a snapshot to the live filesystem.
About this task
This procedure is available only through the command-line interface (CLI).
Procedure
1. Open a secure shell (SSH) connection to any node in the cluster and log in.
2. Run the isi snapshot aliases modify command.
The following command reassigns the latestWeekly alias to the live file system:
isi snapshot aliases modify latestWeekly --target LIVE
View snapshot aliasesYou can view a list of all snapshot aliases.
About this task
This procedure is available only through the command-line interface (CLI).
Procedure
1. Open a secure shell (SSH) connection to any node in the cluster and log in.
2. View a list of all snapshot aliases by running the following command:
isi snapshot aliases list
If a snapshot alias references the live version of the file system, the TargetID is -1.
Snapshots
Isilon OneFS CLI Administration Guide 289

3. (Optional) View information about a specific snapshot by running the isisnapshot aliases view command.
The following command displays information about latestWeekly:
isi snapshot aliases view latestWeekly
Snapshot alias informationYou can view information about snapshot aliases through the output of the isisnapshot aliases view command.
ID
The numerical ID of the snapshot alias.
Name
The name of the snapshot alias.
Target ID
The numerical ID of the snapshot that is referenced by the alias.
Target Name
The name of the snapshot that is referenced by the alias.
Created
The date that the snapshot alias was created.
Managing with snapshot locksYou can delete, create, and modify the expiration date of snapshot locks.
CAUTIONIt is recommended that you do not create, delete, or modify snapshot locks unlessyou are instructed to do so by Isilon Technical Support.
Deleting a snapshot lock that was created by OneFS might result in data loss. If youdelete a snapshot lock that was created by OneFS, it is possible that thecorresponding snapshot might be deleted while it is still in use by OneFS. If OneFScannot access a snapshot that is necessary for an operation, the operation willmalfunction and data loss might result. Modifying the expiration date of a snapshotlock created by OneFS can also result in data loss because the correspondingsnapshot can be deleted prematurely.
Create a snapshot lockYou can create snapshot locks that prevent snapshots from being deleted.
About this task
Although you can prevent a snapshot from being automatically deleted by creating asnapshot lock, it is recommended that you do not create snapshot locks. To prevent asnapshot from being automatically deleted, it is recommended that you extend theduration period of the snapshot.This procedure is available only through the command-line interface (CLI).
Procedure
1. Open a secure shell (SSH) connection to any node in the cluster and log in.
Snapshots
290 Isilon OneFS CLI Administration Guide

2. Create a snapshot lock by running the isi snapshot locks createcommand.
For example, the following command applies a snapshot lock toSnapshotApril2016, sets the lock to expire in one month, and adds a descriptionof "Maintenance Lock":
isi snapshot locks create SnapshotApril2016 --expires 1M \--comment "Maintenance Lock"
Modify a snapshot lock expiration dateYou can modify the expiration date of a snapshot lock.
About this task
CAUTION It is recommended that you do not modify the expiration dates ofsnapshot locks.
This procedure is available only through the command-line interface (CLI).
Procedure
1. Open a secure shell (SSH) connection to any node in the cluster and log in.
2. Run the isi snapshot locks modify command.
The following command sets an expiration date two days from the present datefor a snapshot lock with an ID of 1 that is applied to a snapshot namedSnapshotApril2014:
isi snapshot locks modify SnapshotApril2014 1 --expires 2D
Delete a snapshot lockYou can delete a snapshot lock.
About this task
CAUTION It is recommended that you do not delete snapshot locks.
This procedure is available only through the command-line interface (CLI).
Procedure
1. Open a secure shell (SSH) connection to any node in the cluster and log in.
2. Delete a snapshot lock by running the isi snapshot locks deletecommand.
The following command deletes a snapshot lock that is applied toSnapshotApril2014 and has a lock ID of 1:
isi snapshot locks delete Snapshot2014Apr16 1
The system prompts you to confirm that you want to delete the snapshot lock.
3. Type yes and then press ENTER.
Snapshots
Isilon OneFS CLI Administration Guide 291
Snapshot lock informationYou can view snapshot lock information through the isi snapshot locks viewand isi snapshot locks list commands.
ID
Numerical identification number of the snapshot lock.
Comment
Description of the snapshot lock. This can be any string specified by a user.
Expires
The date that the snapshot lock will be automatically deleted by OneFS.
Count
The number of times the snapshot lock is held.The file clone operation can hold a single snapshot lock multiple times. If multiplefile clones are created simultaneously, the file clone operation holds the same lockmultiple times, rather than creating multiple locks. If you delete a snapshot lockthat is held more than once, you will delete only one of the instances that the lockis held. In order to delete a snapshot lock that is held multiple times, you mustdelete the snapshot lock the same number of times as displayed in the count field.
Configure SnapshotIQ settingsYou can configure SnapshotIQ settings that determine how snapshots can be createdand the methods that users can access snapshot data.
Procedure
1. (Optional) View current SnapshotIQ settings by running the followingcommand:
isi snapshot settings view
The system displays output similar to the following example:
Service: Yes Autocreate: Yes Autodelete: Yes Reserve: 0.00%Global Visible Accessible: Yes NFS Root Accessible: Yes NFS Root Visible: Yes NFS Subdir Accessible: Yes SMB Root Accessible: Yes SMB Root Visible: Yes SMB Subdir Accessible: Yes Local Root Accessible: Yes Local Root Visible: Yes Local Subdir Accessible: Yes
2. Configure SnapshotIQ settings by running the isi snapshot settingsmodify command:
Snapshots
292 Isilon OneFS CLI Administration Guide
The following command prevents snapshots from being created on the cluster:
isi snapshot settings modify --service disable
SnapshotIQ settingsSnapshotIQ settings determine how snapshots behave and can be accessed.
The following settings are displayed in the output of the isi snapshot settingsview command:
Service
Determines whether SnapshotIQ is enabled on the cluster.
Autocreate
Determines whether snapshots are automatically generated according tosnapshot schedules.
Note: Disabling snapshot generation might cause some OneFS operations tofail. It is recommended that you do not disable this setting.
Autodelete
Determines whether snapshots are automatically deleted according to theirexpiration dates.
Reserve
Specifies the percentage of disk space on the cluster that is reserved forsnapshots.
NFS Root Accessible
Determines whether snapshot directories are accessible through NFS.
NFS Root Visible
Determines whether snapshot directories are visible through NFS.
NFS Subdir Accessible
Determines whether snapshot subdirectories are accessible through NFS.
SMB Root Accessible
Determines whether snapshot directories are accessible through SMB.
SMB Root Visible
Determines whether snapshot directories are visible through SMB.
SMB Subdir Accessible
Determines whether snapshot subdirectories are accessible through SMB.
Local Root Accessible
Determines whether snapshot directories are accessible through an SSHconnection or the local console.
Local Root Visible
Determines whether snapshot directories are visible through the an SSHconnection or the local console.
Snapshots
Isilon OneFS CLI Administration Guide 293
Local Subdir Accessible
Determines whether snapshot subdirectories are accessible through an SSHconnection or the local console.
Set the snapshot reserveYou can specify a minimum percentage of cluster-storage capacity that you want toreserve for snapshots.
About this task
The snapshot reserve does not limit the amount of space that snapshots are allowedto consume on the cluster. Snapshots can consume more than the percentage ofcapacity specified by the snapshot reserve. It is recommended that you do not specifya snapshot reserve.
This procedure is available only through the command-line interface (CLI).
Procedure
1. Open a secure shell (SSH) connection to any node in the cluster and log in.
2. Set the snapshot reserve by running the isi snapshot settings modifycommand with the --reserve option.
For example, the following command sets the snapshot reserve to 20%:
isi snapshot settings modify --reserve 20
Managing changelistsYou can create and view changelists that describe the differences between twosnapshots. You can create a changelist for any two snapshots that have a commonroot directory.
Changelists are most commonly accessed by applications through the OneFS PlatformAPI. For example, a custom application could regularly compare the two most recentsnapshots of a critical directory path to determine whether to back up the directory,or to trigger other actions.
Create a changelistYou can create a changelist that shows what data was changed between snapshots.
Procedure
1. (Optional) To view the IDs of the snapshots you want to create a changelist for,run the following command:
isi snapshot snapshots list
2. Create a changelist by running the isi job jobs start command with theChangelistCreate option.
Snapshots
294 Isilon OneFS CLI Administration Guide
The following command creates a changelist:
isi job jobs start ChangelistCreate --older-snapid 2 --newer-snapid 6
Delete a changelistYou can delete a changelist
Procedure
1. Run the isi_changelist_mod command with the -k option.
The following command deletes changelist 22_24:
isi_changelist_mod -k 22_24
View a changelistYou can view a changelist that describes the differences between two snapshots. Thisprocedure is available only through the command-line interface (CLI).
Procedure
1. View the IDs of changelists by running the following command:
isi_changelist_mod -l
Changelist IDs include the IDs of both snapshots used to create the changelist.If OneFS is still in the process of creating a changelist, inprog is appended tothe changelist ID.
2. (Optional) View all contents of a changelist by running theisi_changelist_mod command with the -a option.
The following command displays the contents of a changelist named 2_6:
isi_changelist_mod -a 2_6
Changelist informationYou can view the information contained in changelists.
Note: The information contained in changelists is meant to be consumed byapplications through the OneFS Platform API.
The following information is displayed for each item in the changelist when you run theisi_changelist_mod command:
st_ino
Displays the inode number of the specified item.
st_mode
Displays the file type and permissions for the specified item.
st_size
Displays the total size of the item in bytes.
Snapshots
Isilon OneFS CLI Administration Guide 295

st_atime
Displays the POSIX timestamp of when the item was last accessed.
st_mtime
Displays the POSIX timestamp of when the item was last modified.
st_ctime
Displays the POSIX timestamp of when the item was last changed.
cl_flags
Displays information about the item and what kinds of changes were made to theitem.
01
The item was added or moved under the root directory of the snapshots.
02
The item was removed or moved out of the root directory of the snapshots.
04
The path of the item was changed without being removed from the rootdirectory of the snapshot.
10
The item either currently contains or at one time contained Alternate DataStreams (ADS).
20
The item is an ADS.
40
The item has hardlinks.
Note: These values are added together in the output. For example, if an ADSwas added, the code would be cl_flags=021.
path
The absolute path of the specified file or directory.
Snapshots
296 Isilon OneFS CLI Administration Guide

CHAPTER 15
Deduplication with SmartDedupe
This section contains the following topics:
l Deduplication overview.................................................................................... 298l Deduplication jobs............................................................................................ 298l Data replication and backup with deduplication................................................299l Snapshots with deduplication.......................................................................... 299l Deduplication considerations........................................................................... 300l Shadow-store considerations...........................................................................300l SmartDedupe license functionality................................................................... 301l Managing deduplication.................................................................................... 301
Isilon OneFS CLI Administration Guide 297

Deduplication overviewSmartDedupe enables you to save storage space on your cluster by reducingredundant data. Deduplication maximizes the efficiency of your cluster by decreasingthe amount of storage required to store multiple files with identical blocks.
The SmartDedupe software module deduplicates data by scanning an Isilon cluster foridentical data blocks. Each block is 8 KB. If SmartDedupe finds duplicate blocks,SmartDedupe moves a single copy of the blocks to a hidden file called a shadow store.SmartDedupe then deletes the duplicate blocks from the original files and replaces theblocks with pointers to the shadow store.
Deduplication is applied at the directory level, targeting all files and directoriesunderneath one or more root directories. SmartDedupe not only deduplicates identicalblocks in different files, it also deduplicates identical blocks within a single file.
You can first assess a directory for deduplication and determine the estimated amountof space you can expect to save. You can then decide whether to deduplicate thedirectory. After you begin deduplicating a directory, you can monitor how much spaceis saved by deduplication in real time.
For two or more files to be deduplicated, the files must have the same disk pool policyID and protection policy. If one or both of these attributes differs between two ormore identical files, or files with identical 8K blocks, the files are not deduplicated.
Because it is possible to specify protection policies on a per-file or per-directory basis,deduplication can further be impacted. Consider the example of two files, /ifs/data/projects/alpha/logo.jpg and /ifs/data/projects/beta/logo.jpg. Even though the logo.jpg files in both directories are identical, if onehas a different protection policy from the other, the two files would not bededuplicated.
In addition, if you have activated a SmartPools license on your cluster, you can specifycustom file pool policies. These file pool polices might cause files that are identical orhave identical 8K blocks to be stored in different node pools. Consequently, those fileswould have different disk pool policy IDs and would not be deduplicated.
SmartDedupe also does not deduplicate files that are 32 KB or smaller, because doingso would consume more cluster resources than the storage savings are worth. Thedefault size of a shadow store is 2 GB. Each shadow store can contain up to 256,000blocks. Each block in a shadow store can be referenced up to 32,000 times.
Deduplication jobsDeduplication is performed by a system maintenance job referred to as a deduplicationjob. You can monitor and control deduplication jobs as you would any othermaintenance job on the cluster. Although the overall performance impact ofdeduplication is minimal, the deduplication job consumes 400 MB of memory per node.
When a deduplication job runs for the first time on a cluster, SmartDedupe samplesblocks from each file and creates index entries for those blocks. If the index entries oftwo blocks match, SmartDedupe scans the blocks adjacent to the matching pair andthen deduplicates all duplicate blocks. After a deduplication job samples a file once,new deduplication jobs will not sample the file again until the file is modified.
The first deduplication job that you run might take significantly longer to completethan subsequent deduplication jobs. The first deduplication job must scan all filesunder the specified directories to generate the initial index. If subsequent
Deduplication with SmartDedupe
298 Isilon OneFS CLI Administration Guide

deduplication jobs take a long time to complete, this most likely indicates that a largeamount of data is being deduplicated. However, it can also indicate that users arestoring large amounts of new data on the cluster. If a deduplication job is interruptedduring the deduplication process, the job will automatically restart the scanningprocess from where the job was interrupted.
Note: You should run deduplication jobs when users are not modifying data on thecluster. If users are continually modifying files on the cluster, the amount of spacesaved by deduplication is minimal because the deduplicated blocks are constantlyremoved from the shadow store.
How frequently you should run a deduplication job on your Isilon cluster varies,depending on the size of your data set, the rate of changes, and opportunity. For mostclusters, we recommend that you start a deduplication job every 7-10 days. You canstart a deduplication job manually or schedule a recurring job at specified intervals. Bydefault, the deduplication job is configured to run at a low priority. However, you canspecify job controls, such as priority and impact, on deduplication jobs that runmanually or by schedule.
The permissions required to modify deduplication settings are not the same as thoseneeded to run a deduplication job. Although a user must have the maintenance jobpermission to run a deduplication job, the user must have the deduplication permissionto modify deduplication settings. By default, the root user and SystemAdmin userhave the necessary permissions for all deduplication operations.
Data replication and backup with deduplicationWhen deduplicated files are replicated to another Isilon cluster or backed up to a tapedevice, the deduplicated files no longer share blocks on the target Isilon cluster orbackup device. However, although you can deduplicate data on a target Isilon cluster,you cannot deduplicate data on an NDMP backup device.
Shadows stores are not transferred to target clusters or backup devices. Because ofthis, deduplicated files do not consume less space than non-deduplicated files whenthey are replicated or backed up. To avoid running out of space, you must ensure thattarget clusters and tape devices have enough free space to store deduplicated data asif the data had not been deduplicated. To reduce the amount of storage spaceconsumed on a target Isilon cluster, you can configure deduplication for the targetdirectories of your replication policies. Although this will deduplicate data on thetarget directory, it will not allow SyncIQ to transfer shadow stores. Deduplication isstill performed by deduplication jobs running on the target cluster.
The amount of cluster resources required to backup and replicate deduplicated data isthe same as for non-deduplicated data. You can deduplicate data while the data isbeing replicated or backed up.
Snapshots with deduplicationYou cannot deduplicate the data stored in a snapshot. However, you can createsnapshots of deduplicated data.
If you create a snapshot for a deduplicated directory, and then modify the contents ofthat directory, the references to shadow stores will be transferred to the snapshotover time. Therefore, if you enable deduplication before you create snapshots, you willsave more space on your cluster. If you implement deduplication on a cluster thatalready has a significant amount of data stored in snapshots, it will take time beforethe snapshot data is affected by deduplication. Newly created snapshots can contain
Deduplication with SmartDedupe
Isilon OneFS CLI Administration Guide 299

deduplicated data, but snapshots created before deduplication was implementedcannot.
If you plan on reverting a snapshot, it is best to revert the snapshot before running adeduplication job. Restoring a snapshot can overwrite many of the files on the cluster.Any deduplicated files are reverted back to normal files if they are overwritten by asnapshot revert. However, after the snapshot revert is complete, you can deduplicatethe directory and the space savings persist on the cluster.
Deduplication considerationsDeduplication can significantly increase the efficiency at which you store data.However, the effect of deduplication varies depending on the cluster.
You can reduce redundancy on a cluster by running SmartDedupe. Deduplicationcreates links that can impact the speed at which you can read from and write to files.In particular, sequentially reading chunks smaller than 512 KB of a deduplicated file canbe significantly slower than reading the same small, sequential chunks of a non-deduplicated file. This performance degradation applies only if you are reading non-cached data. For cached data, the performance for deduplicated files is potentiallybetter than non-deduplicated files. If you stream chunks larger than 512 KB,deduplication does not significantly impact the read performance of the file. If youintend on streaming 8 KB or less of each file at a time, and you do not plan onconcurrently streaming the files, it is recommended that you do not deduplicate thefiles.
Deduplication is most effective when applied to static or archived files and directories.The less files are modified, the less negative effect deduplication has on the cluster.For example, virtual machines often contain several copies of identical files that arerarely modified. Deduplicating a large number of virtual machines can greatly reduceconsumed storage space.
Shadow-store considerationsShadow stores are hidden files that are referenced by cloned and deduplicated files.Files that reference shadow stores behave differently than other files.
l Reading shadow-store references might be slower than reading data directly.Specifically, reading non-cached shadow-store references is slower than readingnon-cached data. Reading cached shadow-store references takes no more timethan reading cached data.
l When files that reference shadow stores are replicated to another Isilon cluster orbacked up to a Network Data Management Protocol (NDMP) backup device, theshadow stores are not transferred to the target Isilon cluster or backup device.The files are transferred as if they contained the data that they reference fromshadow stores. On the target Isilon cluster or backup device, the files consume thesame amount of space as if they had not referenced shadow stores.
l When OneFS creates a shadow store, OneFS assigns the shadow store to astorage pool of a file that references the shadow store. If you delete the storagepool that a shadow store resides on, the shadow store is moved to a pool occupiedby another file that references the shadow store.
l OneFS does not delete a shadow-store block immediately after the last referenceto the block is deleted. Instead, OneFS waits until the ShadowStoreDelete job isrun to delete the unreferenced block. If a large number of unreferenced blocks
Deduplication with SmartDedupe
300 Isilon OneFS CLI Administration Guide

exist on the cluster, OneFS might report a negative deduplication savings until theShadowStoreDelete job is run.
l Shadow stores are protected at least as much as the most protected file thatreferences it. For example, if one file that references a shadow store resides in astorage pool with +2 protection and another file that references the shadow storeresides in a storage pool with +3 protection, the shadow store is protected at +3.
l Quotas account for files that reference shadow stores as if the files contained thedata referenced from shadow stores; from the perspective of a quota, shadow-store references do not exist. However, if a quota includes data protectionoverhead, the quota does not account for the data protection overhead of shadowstores.
SmartDedupe license functionalityYou can deduplicate data only if you activate a SmartDedupe license on a cluster.However, you can assess deduplication savings without activating a SmartDedupelicense.
If you activate a SmartDedupe license, and then deduplicate data, the space savingsare not lost if the license becomes inactive. You can also still view deduplicationsavings while the license is inactive. However, you will not be able to deduplicateadditional data until you re-activate the SmartDedupe license.
Managing deduplicationYou can manage deduplication on a cluster by first assessing how much space you cansave by deduplicating individual directories. After you determine which directories areworth deduplicating, you can configure SmartDedupe to deduplicate those directoriesspecifically. You can then monitor the actual amount of disk space you are saving.
Assess deduplication space savingsYou can assess the amount of disk space you will save by deduplicating a directory.
Procedure
1. Specify which directory to assess by running the isi dedupe settingsmodify command.
The following command configures SmartDedupe to assess deduplicationsavings for /ifs/data/archive:
isi dedupe settings modify --assess-paths /ifs/data/archive
If you assess multiple directories, disk savings will not be differentiated bydirectory in the deduplication report.
2. Start the assessment job by running the following command:
isi job jobs start DedupeAssessment
Deduplication with SmartDedupe
Isilon OneFS CLI Administration Guide 301
3. Identify the ID of the assessment report by running the following command:
isi dedupe reports list
4. View prospective space savings by running the isi dedupe reports viewcommand:
The following command displays the prospective savings recorded in adeduplication report with an ID of 46:
isi dedupe reports view 46
Specify deduplication settingsYou can specify which directories you want to deduplicate.
Procedure
1. Specify which directories you want to deduplicate by running the isi dedupesettings modify command.
The following command targets /ifs/data/archive and /ifs/data/media for deduplication:
isi dedupe settings modify --paths /ifs/data/media,/ifs/data/archive
2. (Optional) To modify the settings of the deduplication job, run the isi jobtypes modify command.
The following command configures the deduplication job to be run every Fridayat 10:00 PM:
isi job types modify Dedupe --schedule "Every Friday at 10:00 PM"
View deduplication space savingsYou can view the amount of disk space that you are currently saving withdeduplication.
Procedure
1. Run the following command:
isi dedupe stats
Deduplication with SmartDedupe
302 Isilon OneFS CLI Administration Guide
View a deduplication reportAfter a deduplication job completes, you can view information about the job in adeduplication report.
Procedure
1. (Optional) To identify the ID of the deduplication report you want to view, runthe following command:
isi dedupe reports list
2. View a deduplication report by running the isi dedupe reports viewcommand.
The following command displays a deduplication report with an ID of 44:
isi dedupe reports view 44
Deduplication job report informationYou can view the following deduplication specific information in deduplication jobreports:
Start time
The time the deduplication job started.
End time
The time the deduplication job ended.
Iteration Count
The number of times that SmartDedupe interrupted the sampling process. IfSmartDedupe is sampling a large amount of data, SmartDedupe might interruptsampling in order to start deduplicating the data. After SmartDedupe finishesdeduplicating the sampled data, SmartDedupe will continue sampling theremaining data.
Scanned blocks
The total number of blocks located underneath the specified deduplicateddirectories.
Sampled blocks
The number of blocks that SmartDedupe created index entries for.
Deduped blocks
The number of blocks that were deduplicated.
Dedupe percent
The percentage of scanned blocks that were deduplicated.
Created dedupe requests
The total number of deduplication requests created. A deduplication request iscreated for each matching pair of data blocks. For example, if you have 3 datablocks that all match, SmartDedupe creates 2 requests. One of the requests
Deduplication with SmartDedupe
Isilon OneFS CLI Administration Guide 303
could pair file1 and file2 together and the other request could pair file2 and file3together.
Successful dedupe requests
The number of deduplication requests that completed successfully.
Failed dedupe requests
The number of deduplication requests that failed. If a deduplication request fails,it doesn't mean that the job failed too. A deduplication request can fail for anynumber of reasons. For example, the file might have been modified since it wassampled.
Skipped files
The number of files that were not scanned by the deduplication job. SmartDedupeskips files for a number of reasons. For example, SmartDedupe skips files thathave already been scanned and haven't been modified since. SmartDedupe alsoskips all files that are smaller than 4 KB.
Index entries
The number of entries that currently exist in the index.
Index lookup attempts
The total number of lookups that have been done by earlier deduplication jobsplus the number of lookups done by this deduplication job. A lookup is when thededuplication job attempts to match a block that was indexed with a block thathasn't been indexed.
Index lookup hits
The number of blocks that matched index entries.
Deduplication informationYou can view information about how much disk space is being saved by deduplication.
The following information is displayed in the output of the isi dedupe statscommand:
Cluster Physical Size
The total amount of physical disk space on the cluster.
Cluster Used Size
The total amount of disk space currently occupied by data on the cluster.
Logical Size Deduplicated
The amount of disk space that has been deduplicated in terms of reported filesizes. For example, if you have three identical files that are all 5 GB, the logicalsize deduplicated is 15 GB.
Logical Saving
The amount of disk space saved by deduplication in terms of reported file sizes.For example, if you have three identical files that are all 5 GB, the logical saving is10 GB.
Estimated Size Deduplicated
The total amount of physical disk space that has been deduplicated, includingprotection overhead and metadata. For example, if you have three identical files
Deduplication with SmartDedupe
304 Isilon OneFS CLI Administration Guide

that are all 5 GB, the estimated size deduplicated would be greater than 15 GB,because of the disk space consumed by file metadata and protection overhead.
Estimated Physical Saving
The total amount of physical disk space saved by deduplication, includingprotection overhead and metadata. For example, if you have three identical filesthat are all 5 GB, the estimated physical saving would be greater than 10 GB,because deduplication saved space that would have been occupied by filemetadata and protection overhead.
Deduplication with SmartDedupe
Isilon OneFS CLI Administration Guide 305

Deduplication with SmartDedupe
306 Isilon OneFS CLI Administration Guide

CHAPTER 16
Data replication with SyncIQ
This section contains the following topics:
l SyncIQ data replication overview.....................................................................308l Replication policies and jobs.............................................................................308l Replication snapshots....................................................................................... 313l Data failover and failback with SyncIQ..............................................................314l Recovery times and objectives for SyncIQ........................................................318l Replication policy priority................................................................................. 319l SyncIQ license functionality..............................................................................319l Creating replication policies..............................................................................319l Managing replication to remote clusters.......................................................... 324l Initiating data failover and failback with SyncIQ............................................... 327l Performing disaster recovery for older SmartLock directories.........................330l Managing replication policies........................................................................... 332l Managing replication to the local cluster..........................................................335l Managing replication performance rules...........................................................337l Managing replication reports............................................................................340l Managing failed replication jobs....................................................................... 342
Isilon OneFS CLI Administration Guide 307

SyncIQ data replication overviewOneFS enables you to replicate data from one Isilon cluster to another through theSyncIQ software module. You must activate a SyncIQ license on both Isilon clustersbefore you can replicate data between them.
You can replicate data at the directory level while optionally excluding specific filesand sub-directories from being replicated. SyncIQ creates and references snapshotsto replicate a consistent point-in-time image of a source directory. Metadata such asaccess control lists (ACL) and alternate data streams (ADS) are replicated along withdata.
SyncIQ enables you to maintain a consistent replica of your data on another Isiloncluster and to control the frequency of data replication. For example, you couldconfigure SyncIQ to back up data from your primary cluster to a secondary clusteronce a day at 10 PM. Depending on the size of your data set, the first replicationoperation could take considerable time. After that, however, replication operationswould complete more quickly.
SyncIQ also offers automated failover and failback capabilities so you can continueoperations on the secondary Isilon cluster should your primary cluster becomeunavailable.
Replication policies and jobsData replication is coordinated according to replication policies and replication jobs.Replication policies specify what data is replicated, where the data is replicated to,and how often the data is replicated. Replication jobs are the operations that replicatedata from one Isilon cluster to another. SyncIQ generates replication jobs according toreplication policies.
A replication policy specifies two clusters: the source and the target. The cluster onwhich the replication policy exists is the source cluster. The cluster that data is beingreplicated to is the target cluster. When a replication policy starts, SyncIQ generates areplication job for the policy. When a replication job runs, files from a directory tree onthe source cluster are replicated to a directory tree on the target cluster; thesedirectory trees are known as source and target directories.
After the first replication job created by a replication policy finishes, the targetdirectory and all files contained in the target directory are set to a read-only state, andcan be modified only by other replication jobs belonging to the same replication policy.We recommend that you do not create more than 1,000 policies on a cluster.
Note: To prevent permissions errors, make sure that ACL policy settings are thesame across source and target clusters.
You can create two types of replication policies: synchronization policies and copypolicies. A synchronization policy maintains an exact replica of the source directory onthe target cluster. If a file or sub-directory is deleted from the source directory, thefile or directory is deleted from the target cluster when the policy is run again.
You can use synchronization policies to fail over and fail back data between source andtarget clusters. When a source cluster becomes unavailable, you can fail over data ona target cluster and make the data available to clients. When the source clusterbecomes available again, you can fail back the data to the source cluster.
A copy policy maintains recent versions of the files that are stored on the sourcecluster. However, files that are deleted on the source cluster are not deleted from the
Data replication with SyncIQ
308 Isilon OneFS CLI Administration Guide

target cluster. Failback is not supported for copy policies. Copy policies are mostcommonly used for archival purposes.
Copy policies enable you to remove files from the source cluster without losing thosefiles on the target cluster. Deleting files on the source cluster improves performanceon the source cluster while maintaining the deleted files on the target cluster. This canbe useful if, for example, your source cluster is being used for production purposesand your target cluster is being used only for archiving.
After creating a job for a replication policy, SyncIQ must wait until the job completesbefore it can create another job for the policy. Any number of replication jobs can existon a cluster at a given time; however, no more than 50 replication jobs can run on asource cluster at the same time. If more than 50 replication jobs exist on a cluster, thefirst 50 jobs run while the others are queued to run.
There is no limit to the number of replication jobs that a target cluster can supportconcurrently. However, because more replication jobs require more cluster resources,replication will slow down as more concurrent jobs are added.
When a replication job runs, OneFS generates workers on the source and targetcluster. Workers on the source cluster read and send data while workers on the targetcluster receive and write data.
You can replicate any number of files and directories with a single replication job. Youcan prevent a large replication job from overwhelming the system by limiting theamount of cluster resources and network bandwidth that data synchronization isallowed to consume. Because each node in a cluster is able to send and receive data,the speed at which data is replicated increases for larger clusters.
Automated replication policiesYou can manually start a replication policy at any time, but you can also configurereplication policies to start automatically based on source directory modifications orschedules.
You can configure a replication policy to run according to a schedule, so that you cancontrol when replication is performed. You can also configure policies to replicate thedata captured in snapshots of a directory. You can also configure a replication policyto start when SyncIQ detects a modification to the source directory, so that SyncIQmaintains a more current version of your data on the target cluster.
Scheduling a policy can be useful under the following conditions:
l You want to replicate data when user activity is minimal
l You can accurately predict when modifications will be made to the data
If a policy is configured to run according to a schedule, you can configure the policynot to run if no changes have been made to the contents of the source directory sincethe job was last run. However, if changes are made to the parent directory of thesource directory or a sibling directory of the source directory, and then a snapshot ofthe parent directory is taken, SyncIQ will create a job for the policy, even if nochanges have been made to the source directory. Also, if you monitor the clusterthrough the File System Analytics (FSA) feature of InsightIQ, the FSA job will createsnapshots of /ifs, which will most likely cause a replication job to start whenever theFSA job is run.
Replicating data contained in snapshots of a directory can be useful under thefollowing conditions:
l You want to replicate data according to a schedule, and you are already generatingsnapshots of the source directory through a snapshot schedule
Data replication with SyncIQ
Isilon OneFS CLI Administration Guide 309

l You want to maintain identical snapshots on both the source and target cluster
l You want to replicate existing snapshots to the target clusterTo do this, you must enable archival snapshots on the target cluster. This settingcan only been enabled when the policy is created.
If a policy is configured to replicate snapshots, you can configure SyncIQ to replicateonly snapshots that match a specified naming pattern.
Configuring a policy to start when changes are made to the source directory can beuseful under the following conditions:
l You want to retain a up-to-date copy of your data at all times
l You are expecting a large number of changes at unpredictable intervals
For policies that are configured to start whenever changes are made to the sourcedirectory, SyncIQ checks the source directories every ten seconds. SyncIQ checks allfiles and directories underneath the source directory, regardless of whether those filesor directories are excluded from replication, so SyncIQ might occasionally run areplication job unnecessarily. For example, assume that newPolicy replicates /ifs/data/media but excludes /ifs/data/media/temp. If a modification is madeto /ifs/data/media/temp/file.txt, SyncIQ will run newPolicy, eventhough /ifs/data/media/temp/file.txt will not be replicated.
If a policy is configured to start whenever changes are made to the source directory,and a replication job fails, SyncIQ waits one minute before attempting to run the policyagain. SyncIQ increases this delay exponentially for each failure up to a maximum ofeight hours. You can override the delay by running the policy manually at any time.After a job for the policy completes successfully, SyncIQ will resume checking thesource directory every ten seconds.
If a policy is configured to start whenever changes are made to the source directory,you can configure SyncIQ to wait a specified period of time after the source directoryis modified before starting a job.
Note: To avoid frequent synchronization of minimal sets of changes, andovertaxing system resources, we strongly advise against configuring continuousreplication when the source directory is highly active. In such cases, it is oftenbetter to configure continuous replication with a change-triggered delay of severalhours to consolidate groups of changes.
Source and target cluster associationSyncIQ associates a replication policy with a target cluster by marking the targetcluster when the job runs for the first time. Even if you modify the name or IP addressof the target cluster, the mark persists on the target cluster. When a replication policyis run, SyncIQ checks the mark to ensure that data is being replicated to the correctlocation.
On the target cluster, you can manually break an association between a replicationpolicy and target directory. Breaking the association between a source and targetcluster causes the mark on the target cluster to be deleted. You might want tomanually break a target association if an association is obsolete. If you break theassociation of a policy, the policy is disabled on the source cluster and you cannot runthe policy. If you want to run the disabled policy again, you must reset the replicationpolicy.
Breaking a policy association causes either a full replication or differential replicationto occur the next time you run the replication policy. During a full or differentialreplication, SyncIQ creates a new association between the source and target clusters.
Data replication with SyncIQ
310 Isilon OneFS CLI Administration Guide
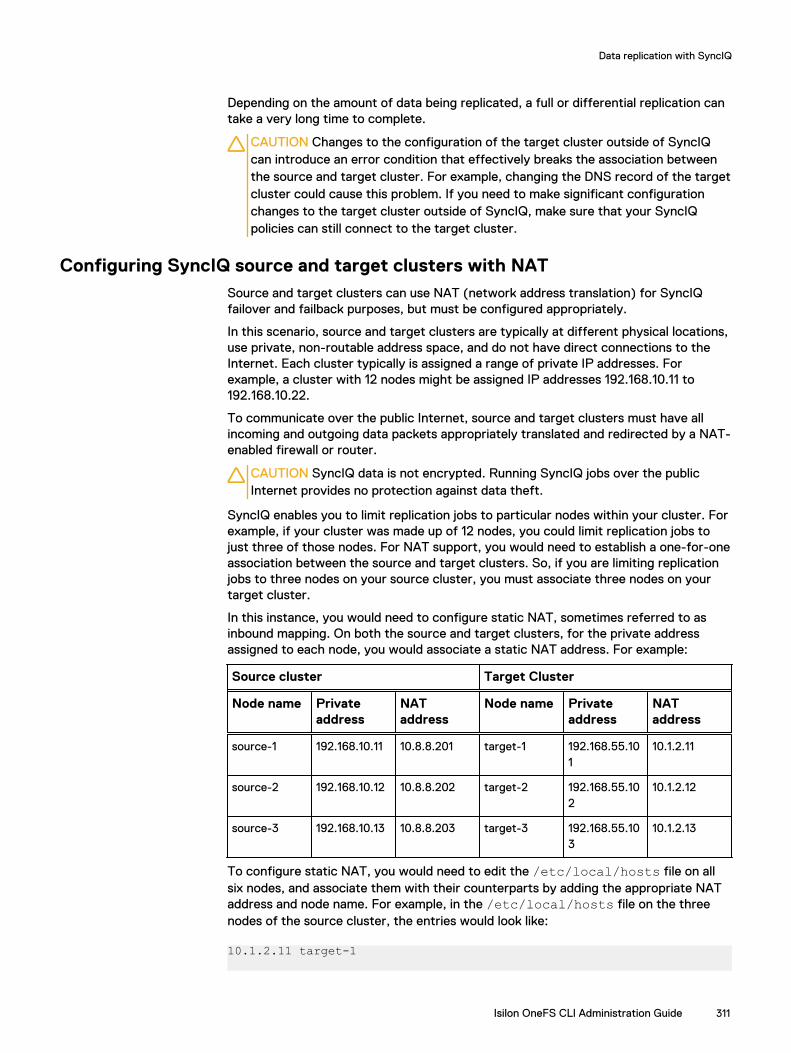
Depending on the amount of data being replicated, a full or differential replication cantake a very long time to complete.
CAUTION Changes to the configuration of the target cluster outside of SyncIQcan introduce an error condition that effectively breaks the association betweenthe source and target cluster. For example, changing the DNS record of the targetcluster could cause this problem. If you need to make significant configurationchanges to the target cluster outside of SyncIQ, make sure that your SyncIQpolicies can still connect to the target cluster.
Configuring SyncIQ source and target clusters with NATSource and target clusters can use NAT (network address translation) for SyncIQfailover and failback purposes, but must be configured appropriately.
In this scenario, source and target clusters are typically at different physical locations,use private, non-routable address space, and do not have direct connections to theInternet. Each cluster typically is assigned a range of private IP addresses. Forexample, a cluster with 12 nodes might be assigned IP addresses 192.168.10.11 to192.168.10.22.
To communicate over the public Internet, source and target clusters must have allincoming and outgoing data packets appropriately translated and redirected by a NAT-enabled firewall or router.
CAUTION SyncIQ data is not encrypted. Running SyncIQ jobs over the publicInternet provides no protection against data theft.
SyncIQ enables you to limit replication jobs to particular nodes within your cluster. Forexample, if your cluster was made up of 12 nodes, you could limit replication jobs tojust three of those nodes. For NAT support, you would need to establish a one-for-oneassociation between the source and target clusters. So, if you are limiting replicationjobs to three nodes on your source cluster, you must associate three nodes on yourtarget cluster.
In this instance, you would need to configure static NAT, sometimes referred to asinbound mapping. On both the source and target clusters, for the private addressassigned to each node, you would associate a static NAT address. For example:
Source cluster Target Cluster
Node name Privateaddress
NATaddress
Node name Privateaddress
NATaddress
source-1 192.168.10.11 10.8.8.201 target-1 192.168.55.101
10.1.2.11
source-2 192.168.10.12 10.8.8.202 target-2 192.168.55.102
10.1.2.12
source-3 192.168.10.13 10.8.8.203 target-3 192.168.55.103
10.1.2.13
To configure static NAT, you would need to edit the /etc/local/hosts file on allsix nodes, and associate them with their counterparts by adding the appropriate NATaddress and node name. For example, in the /etc/local/hosts file on the threenodes of the source cluster, the entries would look like:
10.1.2.11 target-1
Data replication with SyncIQ
Isilon OneFS CLI Administration Guide 311

10.1.2.12 target-2
10.1.2.13 target-3
Similarly, on the three nodes of the target cluster, you would edit the /etc/local/hosts file, and insert the NAT address and name of the associated node on thesource cluster. For example, on the three nodes of the target cluster, the entrieswould look like:
10.8.8.201 source-1
10.8.8.202 source-2
10.8.8.203 source-3
When the NAT server receives packets of SyncIQ data from a node on the sourcecluster, the NAT server replaces the packet headers and the node's port number andinternal IP address with the NAT server's own port number and external IP address.The NAT server on the source network then sends the packets through the Internet tothe target network, where another NAT server performs a similar process to transmitthe data to the target node. The process is reversed when the data fails back.
With this type of configuration, SyncIQ can determine the correct addresses toconnect with, so that SyncIQ can send and receive data. In this scenario, noSmartConnect zone configuration is required.
For information about the ports used by SyncIQ, see the OneFS Security ConfigurationGuide for your OneFS version.
Full and differential replicationIf a replication policy encounters an issue that cannot be fixed (for example, if theassociation was broken on the target cluster), you might need to reset the replicationpolicy. If you reset a replication policy, SyncIQ performs either a full replication or adifferential replication the next time the policy is run. You can specify the type ofreplication that SyncIQ performs.
During a full replication, SyncIQ transfers all data from the source cluster regardless ofwhat data exists on the target cluster. A full replication consumes large amounts ofnetwork bandwidth and can take a very long time to complete. However, a fullreplication is less strenuous on CPU usage than a differential replication.
During a differential replication, SyncIQ first checks whether a file already exists onthe target cluster and then transfers only data that does not already exist on thetarget cluster. A differential replication consumes less network bandwidth than a fullreplication; however, differential replications consume more CPU. Differentialreplication can be much faster than a full replication if there is an adequate amount ofavailable CPU for the replication job to consume.
Controlling replication job resource consumptionYou can create rules that limit the network traffic created by replication jobs, the rateat which files are sent by replication jobs, the percent of CPU used by replication jobs,and the number of workers created for replication jobs.
If you limit the percentage of total workers that SyncIQ can create, the limit is appliedto the total amount of workers that SyncIQ could create, which is determined bycluster hardware. Workers on the source cluster read and send data while workers onthe target cluster receive and write data.
Data replication with SyncIQ
312 Isilon OneFS CLI Administration Guide

Note: File-operation rules might not work accurately for files that can take morethan a second to transfer and for files that are not predictably similar in size.
Replication policy priorityWhen creating a replication policy, you can configure a policy to have priority overother jobs.
If multiple replication jobs are queued to be run because the maximum number of jobsare already running, jobs created by policies with priority will be run before jobswithout priorities. For example, assume that 50 jobs are currently running. A jobwithout priority is the created and queued to run; next, a job with priority is createdand queued to run. The job with priority will run next, even though the job withoutpriority has been queued for a longer period of time.
SyncIQ will also pause replication jobs without priority to allow jobs with priority torun. For example, assume that 50 jobs are already running, and one of them does nothave priority. If a replication job with priority is created, SyncIQ will pause thereplication job without priority and run the job with priority.
Replication reportsAfter a replication job completes, SyncIQ generates a replication report that containsdetailed information about the job, including how long the job ran, how much data wastransferred, and what errors occurred.
If a replication report is interrupted, SyncIQ might create a subreport about theprogress of the job so far. If the job is then restarted, SyncIQ creates anothersubreport about the progress of the job until the job either completes or is interruptedagain. SyncIQ creates a subreport each time the job is interrupted until the jobcompletes successfully. If multiple subreports are created for a job, SyncIQ combinesthe information from the subreports into a single report.
SyncIQ routinely deletes replication reports. You can specify the maximum number ofreplication reports that SyncIQ retains and the length of time that SyncIQ retainsreplication reports. If the maximum number of replication reports is exceeded on acluster, SyncIQ deletes the oldest report each time a new report is created.
You cannot customize the content of a replication report.
Note: If you delete a replication policy, SyncIQ automatically deletes any reportsthat were generated for that policy.
Replication snapshotsSyncIQ generates snapshots to facilitate replication, failover, and failback betweenIsilon clusters. Snapshots generated by SyncIQ can also be used for archival purposeson the target cluster.
Source cluster snapshotsSyncIQ generates snapshots on the source cluster to ensure that a consistent point-in-time image is replicated and that unaltered data is not sent to the target cluster.
Before running a replication job, SyncIQ creates a snapshot of the source directory.SyncIQ then replicates data according to the snapshot rather than the current state ofthe cluster, allowing users to modify source directory files while ensuring that an exactpoint-in-time image of the source directory is replicated.
Data replication with SyncIQ
Isilon OneFS CLI Administration Guide 313

For example, if a replication job of /ifs/data/dir/ starts at 1:00 PM and finishes at1:20 PM, and /ifs/data/dir/file is modified at 1:10 PM, the modifications arenot reflected on the target cluster, even if /ifs/data/dir/file is not replicateduntil 1:15 PM.
You can replicate data according to a snapshot generated with the SnapshotIQsoftware module. If you replicate data according to a SnapshotIQ snapshot, SyncIQdoes not generate another snapshot of the source directory. This method can beuseful if you want to replicate identical copies of data to multiple Isilon clusters.
SyncIQ generates source snapshots to ensure that replication jobs do not transferunmodified data. When a job is created for a replication policy, SyncIQ checkswhether it is the first job created for the policy. If it is not the first job created for thepolicy, SyncIQ compares the snapshot generated for the earlier job with the snapshotgenerated for the new job.
SyncIQ replicates only data that has changed since the last time a snapshot wasgenerated for the replication policy. When a replication job is completed, SyncIQdeletes the previous source-cluster snapshot and retains the most recent snapshotuntil the next job is run.
Target cluster snapshotsWhen a replication job is run, SyncIQ generates a snapshot on the target cluster tofacilitate failover operations. When the next replication job is created for thereplication policy, the job creates a new snapshot and deletes the old one.
If a SnapshotIQ license has been activated on the target cluster, you can configure areplication policy to generate additional snapshots that remain on the target clustereven as subsequent replication jobs run.
SyncIQ generates target snapshots to facilitate failover on the target clusterregardless of whether a SnapshotIQ license has been configured on the target cluster.Failover snapshots are generated when a replication job completes. SyncIQ retainsonly one failover snapshot per replication policy, and deletes the old snapshot afterthe new snapshot is created.
If a SnapshotIQ license has been activated on the target cluster, you can configureSyncIQ to generate archival snapshots on the target cluster that are not automaticallydeleted when subsequent replication jobs run. Archival snapshots contain the samedata as the snapshots that are generated for failover purposes. However, you canconfigure how long archival snapshots are retained on the target cluster. You canaccess archival snapshots the same way that you access other snapshots generatedon a cluster.
Data failover and failback with SyncIQSyncIQ enables you to perform automated data failover and failback operationsbetween Isilon clusters. If your primary cluster goes offline, you can fail over to asecondary Isilon cluster, enabling clients to continue accessing their data. If theprimary cluster becomes operational again, you can fail back to the primary cluster.
For the purposes of SyncIQ failover and failback, the cluster originally accessed byclients is referred to as the primary cluster. The cluster that client data is replicated tois referred to as the secondary cluster.
Failover is the process that allows clients to access, view, modify, and delete data on asecondary cluster. Failback is the process that allows clients to resume their workflowon the primary cluster. During failback, any changes made to data on the secondary
Data replication with SyncIQ
314 Isilon OneFS CLI Administration Guide
cluster are copied back to the primary cluster by means of a replication job using amirror policy.
Failover and failback can be useful in disaster recovery scenarios. For example, if aprimary cluster is damaged by a natural disaster, you can migrate clients to asecondary cluster where they can continue normal operations. When the primarycluster is repaired and back online, you can migrate clients back to operations on theprimary cluster.
You can fail over and fail back to facilitate scheduled cluster maintenance, as well. Forexample, if you are upgrading the primary cluster, you might want to migrate clients toa secondary cluster until the upgrade is complete and then migrate clients back to theprimary cluster.
Note: Data failover and failback is supported both for enterprise and complianceSmartLock directories. Compliance SmartLock directories adhere to U.S.Securities and Exchange Commission (SEC) regulation 17a-4(f), which requiressecurities brokers and dealers to preserve records in a non-rewritable, non-erasable format. SyncIQ properly maintains compliance with the 17a-4(f)regulation during failover and failback.
Data failoverFailover is the process of preparing data on a secondary cluster and switching over tothe secondary cluster for normal client operations. After you fail over to a secondarycluster, you can direct clients to access, view, and modify their data on the secondarycluster.
Before failover is performed, you must create and run a SyncIQ replication policy onthe primary cluster. You initiate the failover process on the secondary cluster. Tomigrate data from the primary cluster that is spread across multiple replicationpolicies, you must initiate failover for each replication policy.
If the action of a replication policy is set to copy, any file that was deleted on theprimary cluster will still be present on the secondary cluster. When the client connectsto the secondary cluster, all files that were deleted on the primary cluster will beavailable.
If you initiate failover for a replication policy while an associated replication job isrunning, the failover operation completes but the replication job fails. Because datamight be in an inconsistent state, SyncIQ uses the snapshot generated by the lastsuccessful replication job to revert data on the secondary cluster to the last recoverypoint.
If a disaster occurs on the primary cluster, any modifications to data that were madeafter the last successful replication job started are not reflected on the secondarycluster. When a client connects to the secondary cluster, their data appears as it waswhen the last successful replication job was started.
Data failbackFailback is the process of restoring primary and secondary clusters to the roles thatthey occupied before a failover operation. After failback is complete, the primarycluster holds the latest data set and resumes normal operations, including hostingclients and replicating data to the secondary cluster through SyncIQ replicationpolicies in place.
The first step in the failback process is updating the primary cluster with all of themodifications that were made to the data on the secondary cluster. The next step ispreparing the primary cluster to be accessed by clients. The final step is resuming data
Data replication with SyncIQ
Isilon OneFS CLI Administration Guide 315

replication from the primary to the secondary cluster. At the end of the failbackprocess, you can redirect users to resume data access on the primary cluster.
To update the primary cluster with the modifications that were made on thesecondary cluster, SyncIQ must create a SyncIQ domain for the source directory.
You can fail back data with any replication policy that meets all of the followingcriteria:
l The policy has been failed over.
l The policy is a synchronization policy (not a copy policy).
l The policy does not exclude any files or directories from replication.
SmartLock compliance mode failover and failbackUsing OneFS 8.0.1 and later releases, you can replicate SmartLock compliance modedomains to a target cluster. This support includes failover and failback of theseSmartLock domains.
Because SmartLock compliance mode adheres to the U.S. Securities and ExchangeCommission (SEC) regulation 17a-4(f), failover and failback of a compliance modeWORM domain requires some planning and setup.
Most importantly, both your primary (source) and secondary (target) clusters must beconfigured at initial setup as compliance mode clusters. This process is described inthe Isilon installation guide for your node model (for example, the Isilon S210 InstallationGuide).
In addition, both clusters must have directories defined as WORM domains with thecompliance type. For example, if you are storing your WORM files in the SmartLockcompliance domain /ifs/financial-records/locked on the primary cluster,you must have a SmartLock compliance domain on the target cluster to fail over to.Although the source and target SmartLock compliance domains can have the samepathname, this is not required.
In addition, you must start the compliance clock on both clusters.
SyncIQ handles conflicts during failover/failback operations on a SmartLockcompliance mode domain by unlinking committed files from the user store and leavinga link of the file in the compliance store. The ComplianceStoreDelete job automaticallytracks and removes expired files from the compliance store if they were put there as aresult of SyncIQ conflict resolution. The job runs automatically once per month orwhen started manually. For information on how to start the ComplianceStoreDeletejob, see Run the ComplianceStoreDelete job in a Smartlock compliance mode domainon page 330.
SmartLock replication limitationsBe aware of the limitations of replicating and failing back SmartLock directories withSyncIQ.
If the source directory or target directory of a SyncIQ policy is a SmartLock directory,replication and failback might not be allowed. For more information, see the followingtable:
Sourcedirectory type
Target directory type ReplicationAllowed
Failback allowed
Non-SmartLock Non-SmartLock Yes Yes
Data replication with SyncIQ
316 Isilon OneFS CLI Administration Guide

Sourcedirectory type
Target directory type ReplicationAllowed
Failback allowed
Non-SmartLock SmartLock enterprise Yes Yes, unless files arecommitted to a WORMstate on the target cluster
Non-SmartLock SmartLock compliance No No
SmartLockenterprise
Non-SmartLock Yes; however,retention datesand commitstatus of files willbe lost.
Yes; however the files willnot have WORM status
SmartLockenterprise
SmartLock enterprise Yes Yes; any newly committedWORM files will beincluded
SmartLockenterprise
SmartLock compliance No No
SmartLockcompliance
Non-SmartLock No No
SmartLockcompliance
SmartLock enterprise No No
SmartLockcompliance
SmartLock compliance Yes Yes; any newly committedWORM files will beincluded
If you are replicating a SmartLock directory to another SmartLock directory, you mustcreate the target SmartLock directory prior to running the replication policy. AlthoughOneFS will create a target directory automatically if a target directory does notalready exist, OneFS will not create a target SmartLock directory automatically. If youattempt to replicate an enterprise directory before the target directory has beencreated, OneFS will create a non-SmartLock target directory and the replication jobwill succeed. If you replicate a compliance directory before the target directory hasbeen created, the replication job will fail.
If you replicate SmartLock directories to another Isilon cluster with SyncIQ, theWORM state of files is replicated. However, SmartLock directory configurationsettings are not transferred to the target directory.
For example, if you replicate a directory that contains a committed file that is set toexpire on March 4th, the file is still set to expire on March 4th on the target cluster.However, if the directory on the source cluster is set to prevent files from beingcommitted for more than a year, the target directory is not automatically set to thesame restriction.
In the scenario where a WORM exclusion domain has been created on an enterprisemode or compliance mode directory, replication of the SmartLock exclusion on thedirectory will occur only if the SyncIQ policy is rooted at the SmartLock domain whichcontains the exclusion. If this condition is not met, only data is replicated and theSmartLock exclusion is not created on the target directory.
Data replication with SyncIQ
Isilon OneFS CLI Administration Guide 317

Recovery times and objectives for SyncIQThe Recovery Point Objective (RPO) and the Recovery Time Objective (RTO) aremeasurements of the impacts that a disaster can have on business operations. Youcan calculate your RPO and RTO for a disaster recovery with replication policies.
RPO is the maximum amount of time for which data is lost if a cluster suddenlybecomes unavailable. For an Isilon cluster, the RPO is the amount of time that haspassed since the last completed replication job started. The RPO is never greater thanthe time it takes for two consecutive replication jobs to run and complete.
If a disaster occurs while a replication job is running, the data on the secondary clusteris reverted to the state it was in when the last replication job completed. For example,consider an environment in which a replication policy is scheduled to run every threehours, and replication jobs take two hours to complete. If a disaster occurs an hourafter a replication job begins, the RPO is four hours, because it has been four hourssince a completed job began replicating data.
RTO is the maximum amount of time required to make backup data available to clientsafter a disaster. The RTO is always less than or approximately equal to the RPO,depending on the rate at which replication jobs are created for a given policy.
If replication jobs run continuously, meaning that another replication job is created forthe policy before the previous replication job completes, the RTO is approximatelyequal to the RPO. When the secondary cluster is failed over, the data on the cluster isreset to the state it was in when the last job completed; resetting the data takes anamount of time proportional to the time it took users to modify the data.
If replication jobs run on an interval, meaning that there is a period of time after areplication job completes before the next replication job for the policy starts, therelationship between RTO and RPO depends on whether a replication job is runningwhen the disaster occurs. If a job is in progress when a disaster occurs, the RTO isroughly equal to the RPO. However, if a job is not running when a disaster occurs, theRTO is negligible because the secondary cluster was not modified since the lastreplication job ran, and the failover process is almost instantaneous.
RPO AlertsYou can configure SyncIQ to create OneFS events that alert you to the fact that aspecified Recovery Point Objective (RPO) has been exceeded. You can view theseevents through the same interface as other OneFS events.
The events have an event ID of 400040020. The event message for these alertsfollows the following format:
SW_SIQ_RPO_EXCEEDED: SyncIQ RPO exceeded for policy <replication_policy>
For example, assume you set an RPO of 5 hours; a job starts at 1:00 PM andcompletes at 3:00 PM; a second job starts at 3:30 PM; if the second job does notcomplete by 6:00 PM, SyncIQ will create a OneFS event.
Data replication with SyncIQ
318 Isilon OneFS CLI Administration Guide
Replication policy priorityWhen creating a replication policy, you can configure a policy to have priority overother jobs.
If multiple replication jobs are queued to be run because the maximum number of jobsare already running, jobs created by policies with priority will be run before jobswithout priorities. For example, assume that 50 jobs are currently running. A jobwithout priority is the created and queued to run; next, a job with priority is createdand queued to run. The job with priority will run next, even though the job withoutpriority has been queued for a longer period of time.
SyncIQ will also pause replication jobs without priority to allow jobs with priority torun. For example, assume that 50 jobs are already running, and one of them does nothave priority. If a replication job with priority is created, SyncIQ will pause thereplication job without priority and run the job with priority.
SyncIQ license functionalityYou can replicate data to another Isilon cluster only if you activate a SyncIQ license onboth the local cluster and the target cluster.
If a SyncIQ license becomes inactive, you cannot create, run, or manage replicationpolicies. Also, all previously created replication policies are disabled. Replicationpolicies that target the local cluster are also disabled. However, data that waspreviously replicated to the local cluster is still available.
Creating replication policiesYou can create replication policies that determine when data is replicated with SyncIQ.
Excluding directories in replicationYou can exclude directories from being replicated by replication policies even if thedirectories exist under the specified source directory.
Note: Failback is not supported for replication policies that exclude directories.
By default, all files and directories under the source directory of a replication policyare replicated to the target cluster. However, you can prevent directories under thesource directory from being replicated.
If you specify a directory to exclude, files and directories under the excluded directoryare not replicated to the target cluster. If you specify a directory to include, only thefiles and directories under the included directory are replicated to the target cluster;any directories that are not contained in an included directory are excluded.
If you both include and exclude directories, any excluded directories must becontained in one of the included directories; otherwise, the excluded-directory settinghas no effect. For example, consider a policy with the following settings:
l The root directory is /ifs/datal The included directories are /ifs/data/media/music and /ifs/data/
media/moviesl The excluded directories are /ifs/data/archive and /ifs/data/media/
music/working
Data replication with SyncIQ
Isilon OneFS CLI Administration Guide 319
In this example, the setting that excludes the /ifs/data/archive directory has noeffect because the /ifs/data/archive directory is not under either of theincluded directories. The /ifs/data/archive directory is not replicated regardlessof whether the directory is explicitly excluded. However, the setting that excludesthe /ifs/data/media/music/working directory does have an effect, becausethe directory would be replicated if the setting was not specified.
In addition, if you exclude a directory that contains the source directory, the exclude-directory setting has no effect. For example, if the root directory of a policy is /ifs/data, explicitly excluding the /ifs directory does not prevent /ifs/data frombeing replicated.
Any directories that you explicitly include or exclude must be contained in or under thespecified root directory. For example, consider a policy in which the specified rootdirectory is /ifs/data. In this example, you could include both the /ifs/data/media and the /ifs/data/users/ directories because they are under /ifs/data.
Excluding directories from a synchronization policy does not cause the directories tobe deleted on the target cluster. For example, consider a replication policy thatsynchronizes /ifs/data on the source cluster to /ifs/data on the target cluster.If the policy excludes /ifs/data/media from replication, and /ifs/data/media/file exists on the target cluster, running the policy does not cause /ifs/data/media/file to be deleted from the target cluster.
Excluding files in replicationIf you do not want specific files to be replicated by a replication policy, you canexclude them from the replication process through file-matching criteria statements.You can configure file-matching criteria statements during the replication-policycreation process.
Note: You cannot fail back replication policies that exclude files.
A file-criteria statement can include one or more elements. Each file-criteria elementcontains a file attribute, a comparison operator, and a comparison value. You cancombine multiple criteria elements in a criteria statement with Boolean "AND" and"OR" operators. You can configure any number of file-criteria definitions.
Configuring file-criteria statements can cause the associated jobs to run slowly. It isrecommended that you specify file-criteria statements in a replication policy only ifnecessary.
Modifying a file-criteria statement will cause a full replication to occur the next timethat a replication policy is started. Depending on the amount of data being replicated,a full replication can take a very long time to complete.
For synchronization policies, if you modify the comparison operators or comparisonvalues of a file attribute, and a file no longer matches the specified file-matchingcriteria, the file is deleted from the target the next time the job is run. This rule doesnot apply to copy policies.
File criteria optionsYou can configure a replication policy to exclude files that meet or do not meetspecific criteria.
You can specify file criteria based on the following file attributes:
Data replication with SyncIQ
320 Isilon OneFS CLI Administration Guide
Date created
Includes or excludes files based on when the file was created. This option isavailable for copy policies only.You can specify a relative date and time, such as "two weeks ago", or specificdate and time, such as "January 1, 2012." Time settings are based on a 24-hourclock.
Date accessed
Includes or excludes files based on when the file was last accessed. This option isavailable for copy policies only, and only if the global access-time-tracking optionof the cluster is enabled.You can specify a relative date and time, such as "two weeks ago", or specificdate and time, such as "January 1, 2012." Time settings are based on a 24-hourclock.
Date modified
Includes or excludes files based on when the file was last modified. This option isavailable for copy policies only.You can specify a relative date and time, such as "two weeks ago", or specificdate and time, such as "January 1, 2012." Time settings are based on a 24-hourclock.
File name
Includes or excludes files based on the file name. You can specify to include orexclude full or partial names that contain specific text.The following wildcard characters are accepted:
Note: Alternatively, you can filter file names by using POSIX regular-expression (regex) text. Isilon clusters support IEEE Std 1003.2 (POSIX.2)regular expressions. For more information about POSIX regular expressions,see the BSD man pages.
Table 7 Replication file matching wildcards
Wildcard character Description
* Matches any string in place of the asterisk.For example, m* matches movies and
m123.
[ ] Matches any characters contained in thebrackets, or a range of characters separatedby a dash.For example, b[aei]t matches bat, bet,
and bit.
For example, 1[4-7]2 matches 142, 152,
162, and 172.
You can exclude characters within bracketsby following the first bracket with anexclamation mark.
For example, b[!ie] matches bat but not
bit or bet.
Data replication with SyncIQ
Isilon OneFS CLI Administration Guide 321

Table 7 Replication file matching wildcards (continued)
Wildcard character Description
You can match a bracket within a bracket if itis either the first or last character.
For example, [[c]at matches cat and
[at.
You can match a dash within a bracket if it iseither the first or last character.
For example, car[-s] matches cars and
car-.
? Matches any character in place of thequestion mark.For example, t?p matches tap, tip, and
top.
Path
Includes or excludes files based on the file path. This option is available for copypolicies only.You can specify to include or exclude full or partial paths that contain specifiedtext. You can also include the wildcard characters *, ?, and [ ].
Size
Includes or excludes files based on their size.
Note: File sizes are represented in multiples of 1024, not 1000.
Type
Includes or excludes files based on one of the following file-system object types:
l Soft link
l Regular file
l Directory
Configure default replication policy settingsYou can configure default settings for replication policies. If you do not modify thesesettings when creating a replication policy, the specified default settings are applied.
Procedure
1. Run the isi sync settings modify command.
The following command configures SyncIQ to delete replication reports that areolder than 2 years:
isi sync settings modify --report-max-age 2Y
Data replication with SyncIQ
322 Isilon OneFS CLI Administration Guide

Create a replication policyYou can create a replication policy with SyncIQ that defines how and when data isreplicated to another Isilon cluster. A replication policy specifies the target cluster,source and target directories, and directories and files to be excluded duringreplication.
About this task
CAUTION In a SyncIQ replication policy, OneFS enables you to specify a sourcedirectory that is a target directory, or is contained within a target directory, froma different replication policy. Referred to as cascading replication, this use case isspecifically for backup purposes, and should be configured carefully. OneFS doesnot allow failback in such cases.
If you modify any of the following policy settings after a policy is run, OneFS performseither a full or differential replication the next time the policy is run.
l Source directory
l Included or excluded directories
l File-criteria statement
l Target cluster name or addressThis applies only if you modify a replication policy to specify a different targetcluster. If you modify the IP or domain name of a target cluster, and then modifythe replication policy on the source cluster to match the new IP or domain name, afull replication is not performed. Note also that SyncIQ does not supportdynamically allocated IP address pools. If a replication job connects to adynamically allocated IP address, SmartConnect might reassign the address whilea replication job is running, which would cause the job to fail.
l Target directoryNote: If you create a replication policy for a SmartLock compliance directory,the SyncIQ and SmartLock compliance domains must be configured at thesame root directory level. A SmartLock compliance directory cannot be nestedinside a SyncIQ directory.
Procedure
1. Run the isi sync policies create command.
The following command creates a policy that replicates the directory /ifs/data/source on the source cluster to /ifs/data/target on target cluster10.1.99.36 every week. The command also creates archival snapshots on thetarget cluster:
isi sync policies create mypolicy sync /ifs/data/source 10.1.99.36 /ifs/data/target --schedule "Every Sunday at 12:00 AM" --target-snapshot-archive on --target-snapshot-expiration 1Y--target-snapshot-pattern "%{PolicyName}-%{SrcCluster}-%Y-%m-%d
Data replication with SyncIQ
Isilon OneFS CLI Administration Guide 323
Create a SyncIQ domainYou can create a SyncIQ domain to increase the speed at which failback is performedfor a replication policy. Because you can fail back only synchronization policies, it isnot necessary to create SyncIQ domains for copy policies.
About this task
Failing back a replication policy requires that a SyncIQ domain be created for thesource directory. OneFS automatically creates a SyncIQ domain during the failbackprocess. However, if you intend on failing back a replication policy, it is recommendedthat you create a SyncIQ domain for the source directory of the replication policywhile the directory is empty. Creating a domain for a directory that contains less datatakes less time.
Procedure
1. Run the isi job jobs start command.
The following command creates a SyncIQ domain for /ifs/data/source:
isi job jobs start DomainMark --root /ifs/data/media \--dm-type SyncIQ
Assess a replication policyBefore running a replication policy for the first time, you can view statistics on thefiles that would be affected by the replication without transferring any files. This canbe useful if you want to preview the size of the data set that will be transferred if yourun the policy.
About this task
You can assess only replication policies that have never been run before.
Procedure
1. Run the isi sync jobs start command with the --test option.
The following command creates a report about how much data will betransferred when a sync job named weeklySync is run:
isi sync jobs start weeklySync --test
2. To view the assessment report, run the isi sync reports view command.
The following command displays the assessment report for weeklySync:
isi sync reports view weeklySync 1
Managing replication to remote clustersYou can manually run, view, assess, pause, resume, cancel, resolve, and resetreplication jobs that target other clusters.
After a policy job starts, you can pause the job to suspend replication activities.Afterwards, you can resume the job, continuing replication from the point where thejob was interrupted. You can also cancel a running or paused replication job if you wantto free the cluster resources allocated for the job. A paused job reserves cluster
Data replication with SyncIQ
324 Isilon OneFS CLI Administration Guide
resources whether or not the resources are in use. A cancelled job releases its clusterresources and allows another replication job to consume those resources. No morethan five running and paused replication jobs can exist on a cluster at a time. However,an unlimited number of canceled replication jobs can exist on a cluster. If a replicationjob remains paused for more than a week, SyncIQ automatically cancels the job.
Start a replication jobYou can manually start a replication job for a replication policy at any time. You canalso replicate data according to a snapshot created by SnapshotIQ. You cannotreplicate data according to a snapshot generated by SyncIQ.
Procedure
1. Run the isi sync jobs start command.
The following command starts weeklySync:
isi sync jobs start weeklySync
The following command replicates the source directory of weeklySyncaccording to the snapshot HourlyBackup_07-15-2013_23:00:
isi sync jobs start weeklySync \--source-snapshot HourlyBackup_07-15-2013_23:00
Pause a replication jobYou can pause a running replication job and then resume the job later. Pausing areplication job temporarily stops data from being replicated, but does not free thecluster resources replicating the data.
Procedure
1. Run the isi sync jobs pause command.
The following command pauses weeklySync:
isi sync jobs pause weeklySync
Resume a replication jobYou can resume a paused replication job.
Procedure
1. Run the isi sync jobs resume command.
The following command resumes weeklySync:
isi sync jobs resume weeklySync
Cancel a replication jobYou can cancel a running or paused replication job. Cancelling a replication job stopsdata from being replicated and frees the cluster resources that were replicating data.
Data replication with SyncIQ
Isilon OneFS CLI Administration Guide 325

You cannot resume a cancelled replication job; to restart replication, you must startthe replication policy again.
Procedure
1. Run the isi sync jobs cancel command.
The following command cancels weeklySync:
isi sync jobs cancel weeklySync
View active replication jobsYou can view information about replication jobs that are currently running or paused.
Procedure
1. View all active replication jobs by running the following command:
isi sync jobs list
2. To view detailed information about a specific replication job, run the isi syncjobs view command.
The following command displays detailed information about a replication jobcreated by weeklySync:
isi sync jobs view weeklySync
The system displays output similar to the following example:
Policy Name: weeklySync ID: 3 State: running Action: run Duration: 5s Start Time: 2013-07-16T23:12:00
Replication job informationYou can view information about replication jobs.
The following information is displayed in the output of the isi snapshotsettings view command:
Policy Name
The name of the associated replication policy.
ID
The ID of the replication job.
State
The status of the job.
Action
The type of replication policy.
Data replication with SyncIQ
326 Isilon OneFS CLI Administration Guide

Initiating data failover and failback with SyncIQYou can fail over from one Isilon cluster to another if, for example, your primarycluster becomes unavailable. You can fail back when the primary cluster becomesavailable again. You can revert failover if you decide that the failover was unnecessary,or if you failed over for testing purposes.
Note: Data failover and failback are now supported for both complianceSmartLock directories and enterprise SmartLock directories. ComplianceSmartLock directories can be created only on clusters that have been set up ascompliance mode clusters during initial configuration.
Fail over data to a secondary clusterYou can fail over to a secondary Isilon cluster if, for example, your primary clusterbecomes unavailable.
Before you begin
You must have created and successfully run a replication policy on the primary cluster.This action replicated data to the secondary cluster.
About this task
Note: Data failover is supported both for compliance and enterprise SmartLockdirectories. SmartLock compliance directories require their own replicationpolicies. Such directories cannot be nested inside non-compliance directories andreplicated as part of an overall policy.
Complete the following procedure for each replication policy that you want to failover.
Procedure
1. If your primary cluster is still online, complete the following steps:
a. Stop all writes to the replication policy's path, including both local and clientactivity.
This action ensures that new data is not written to the policy path as youprepare for failover to the secondary cluster.
b. Modify the replication policy so that it is set to run only manually.
This action prevents the policy on the primary cluster from automaticallyrunning a replication job. If the policy on the primary cluster runs areplication job while writes are allowed to the target directory, the job failsand the replication policy is deactivated. If this happens, modify the policy sothat it is set to run only manually, resolve the policy, and complete thefailback process. After you complete the failback process, you can modifythe policy to run according to a schedule again.
The following command ensures that the policy weeklySync runs onlymanually:
isi sync policies modify weeklySync --schedule ""
2. On the secondary cluster, run the isi sync recovery allow-writecommand.
Data replication with SyncIQ
Isilon OneFS CLI Administration Guide 327
The following command enables replicated directories and files specified in theweeklySync policy to be writable:
isi sync recovery allow-write weeklySync
Note: SmartLock compliance mode WORM files, although replicated, arestored in a non-writable, non-erasable format.
3. Direct your users to the secondary cluster for data access and normaloperations.
Revert a failover operationFailover reversion undoes a failover operation on a secondary cluster, enabling you toreplicate data from the primary cluster to the secondary cluster again. Failoverreversion is useful if the primary cluster becomes available before data is modified onthe secondary cluster or if you failed over to a secondary cluster for testing purposes.
Before you begin
Fail over a replication policy.
About this task
Reverting a failover operation does not migrate modified data back to the primarycluster. To migrate data that clients have modified on the secondary cluster, you mustfail back to the primary cluster.
Note:Failover reversion is not supported for SmartLock directories.
Complete the following procedure for each replication policy that you want to failover.
Procedure
1. Run the isi sync recovery allow-write command with the --revertoption.
For example, the following command reverts a failover operation for newPolicy:
isi sync recovery allow-write newPolicy --revert
Fail back data to a primary clusterAfter you fail over to a secondary cluster, you can fail back to the primary cluster.
Before you begin
Before you can fail back to the primary cluster, you must already have failed over tothe secondary cluster. Also, you must ensure that your primary cluster is back online.
Procedure
1. Create mirror policies on the secondary cluster by running the isi syncrecovery resync-prep command on the primary cluster.
The following command creates a mirror policy for weeklySync:
isi sync recovery resync-prep weeklySync
Data replication with SyncIQ
328 Isilon OneFS CLI Administration Guide

SyncIQ names mirror policies according to the following pattern:
<replication-policy-name>_mirror
2. Before beginning the failback process, prevent clients from accessing thesecondary cluster.
This action ensures that SyncIQ fails back the latest data set, including allchanges that users made to data on the secondary cluster while the primarycluster was out of service. We recommend that you wait until clients areinactive before preventing access to the secondary cluster.
3. On the secondary cluster, run the isi sync jobs start command to runthe mirror policy and replicate data to the primary cluster.
The following command runs a mirror policy named weeklySync_mirrorimmediately:
isi sync jobs start weeklySync_mirror
Alternatively, you can modify the mirror policy to run on a particular schedule.The following command schedules a mirror policy namedweeklySync_mirror to run daily at 12:01 AM:
isi sync policies modify weeklySync_mirror --enabled yes --schedule "every day at 12:01 AM"
If specifying a schedule for the mirror policy, you need only allow the mirrorpolicy to run once at the scheduled time. After that, you should set the mirrorpolicy back to a manual schedule.
4. On the primary cluster, allow writes to the target directories of the mirror policyby running the isi sync recovery allow-write command.
The following command allows writes to the directories specified in theweeklySync_mirror policy:
isi sync recovery allow-write weeklySync_mirror
5. On the secondary cluster, complete the failback process by running the isisync recovery resync-prep command for the mirror policy.
The following command completes the failback process forweeklySync_mirror by placing the secondary cluster back into read-onlymode and ensuring that the data sets are consistent on both the primary andsecondary clusters. :
isi sync recovery resync-prep weeklySync_mirror
After you finish
Direct clients back to the primary cluster for normal operations. Although not required,it is safe to remove a mirror policy after failback has completed successfully.
Data replication with SyncIQ
Isilon OneFS CLI Administration Guide 329

Run the ComplianceStoreDelete job in a Smartlock compliance mode domainSyncIQ handles conflicts during failover/failback operations on a SmartLockcompliance mode domain by unlinking committed files from the user store and leavinga link of the file in the compliance store. The ComplianceStoreDelete job automaticallytracks and removes expired files from the compliance store if they were put there as aresult of SyncIQ conflict resolution.
About this task
For example, you perform a SyncIQ failover or failback on a SmartLock compliancemode domain. The operation results in a committed file being reverted to anuncommitted state. For conflict resolution, a copy of the committed file is stored inthe compliance store. The committed file in the compliance store eventually expires.The ComplianceStoreDelete job runs automatically once a month and deletes theexpired file. Expired files that are in use (referenced from outside of compliance store)will not be deleted.
The ComplianceStoreDelete job runs automatically once per month or when startedmanually. You can run the job manually from the CLI.
Procedure
1. Run the isi job jobs start ComplianceStoreDelete command.
Performing disaster recovery for older SmartLockdirectories
If you replicated a SmartLock compliance directory to a secondary cluster runningOneFS 7.2.1 or earlier, you cannot fail back the SmartLock compliance directory to aprimary cluster running OneFS 8.0.1 or later. However, you can recover theSmartLock compliance directory stored on the secondary cluster, and migrate it backto the primary cluster.
Note: Data failover and failback with earlier versions of OneFS are supported forSmartLock enterprise directories.
Recover SmartLock compliance directories on a target clusterYou can recover compliance SmartLock directories that you have replicated to asecondary cluster running OneFS 7.2.1 or earlier versions.
About this task
Complete the following procedure for each SmartLock directory that you want torecover.
Procedure
1. On the secondary cluster, enable writes to the SmartLock directories that youwant to recover.
l If the last replication job completed successfully and a replication job is notcurrently running, run the isi sync recovery allow-write commandon the secondary cluster.For example, the following command enables writes to the target directoryof SmartLockSync:
isi sync recovery allow-write SmartLockSync
Data replication with SyncIQ
330 Isilon OneFS CLI Administration Guide

l If a replication job is currently running, wait until the replication jobcompletes, and then run the isi sync recovery allow-writecommand.
l If the primary cluster became unavailable while a replication job was running,run the isi sync target break command. Note that you should onlybreak the association if the primary cluster has been taken offlinepermanently.For example, the following command breaks the association for the targetdirectory of SmartLockSync:
isi sync target break SmartLockSync
2. If you ran isi sync target break, restore any files that are left in aninconsistent state.
a. Delete all files that are not committed to a WORM state from the targetdirectory.
b. Copy all files from the failover snapshot to the target directory.
Failover snapshots are named according to the following naming pattern:
SIQ-Failover-<policy-name>-<year>-<month>-<day>_<hour>-<minute>-<second>
Snapshots are located under the hidden directory /ifs/.snapshot.
3. If any SmartLock directory configuration settings, such as an autocommit timeperiod, were specified for the source directory of the replication policy, applythose settings to the target directory.
Because autocommit information is not transferred to the target cluster, filesthat were scheduled to be committed to a WORM state on the source clusterwould not be scheduled to be committed at the same time on the target cluster.To ensure that all files are retained for the appropriate time period, you cancommit all files in target SmartLock directories to a WORM state. For example,the following command automatically commits all files in /ifs/data/smartlock to a WORM state after one minute.
isi worm domains modify --domain /ifs/data/smartlock--autocommit-offset 1m
Migrate SmartLock compliance directoriesYou can migrate SmartLock compliance directories from a recovery cluster, either byreplicating the directories back to the original source cluster, or to a new cluster.Migration is necessary only when the recovery cluster is running OneFS 7.2.1 orearlier. These OneFS versions do not support failover and failback of SmartLockcompliance directories.
Procedure
1. On the recovery cluster, create a replication policy for each SmartLockcompliance directory that you want to migrate to another cluster (the originalprimary cluster or a new cluster).
The policies must meet the following requirements:
l The source directory on the recovery cluster is the SmartLock compliancedirectory that you are migrating.
Data replication with SyncIQ
Isilon OneFS CLI Administration Guide 331
l The target directory is an empty SmartLock compliance directory on thecluster to which the data is to be migrated. The source and targetdirectories must both be SmartLock compliance directories.
2. Replicate recovery data to the target directory by running the policies that youcreated.
You can replicate data either by manually starting the policy or by specifying apolicy schedule.
3. (Optional) To ensure that SmartLock protection is enforced for all files, commitall migrated files in the SmartLock target directory to a WORM state.
Because autocommit information is not transferred from the recovery cluster,commit all migrated files in target SmartLock directories to a WORM state.
For example, the following command automatically commits all files in /ifs/data/smartlock to a WORM state after one minute:
isi worm domains modify --domain /ifs/data/smartlock \--autocommit-offset 1m
This step is necessary only if you have not configured an autocommit timeperiod for the SmartLock directory.
4. On the target cluster, enable writes to the replication target directories byrunning the isi sync recovery allow-writes command.
For example, the following command enables writes to the SmartLockSynctarget directory:
isi sync recovery allow-writes SmartLockSync
5. If any SmartLock directory configuration settings, such as an autocommit timeperiod, were specified for the source directories of the replication policies,apply those settings to the target directories.
6. Delete the copy of the SmartLock data on the recovery cluster.
You cannot recover the space consumed by the source SmartLock directoriesuntil all files are released from a WORM state. If you want to free the spacebefore files are released from a WORM state, contact Isilon Technical Supportfor information about reformatting your recovery cluster.
Managing replication policiesYou can modify, view, enable, and disable replication policies.
Modify a replication policyYou can modify the settings of a replication policy.
About this task
If you modify any of the following policy settings after the policy runs, OneFSperforms either a full or differential replication the next time the policy runs:
l Source directory
Data replication with SyncIQ
332 Isilon OneFS CLI Administration Guide

l Included or excluded directories
l File-criteria statement
l Target clusterThis applies only if you target a different cluster. If you modify the IP or domainname of a target cluster, and then modify the replication policy on the sourcecluster to match the new IP or domain name, a full replication is not performed.
l Target directory
Procedure
1. Run the isi sync policies modify command.
Assuming that weeklySync has been reset and has not been run since it wasreset, the following command causes a differential replication to be performedthe next time weeklySync is run:
isi sync policies modify weeklySync--target-compare-initial-sync=true
Delete a replication policyYou can delete a replication policy. Once a policy is deleted, SyncIQ no longer createsreplication jobs for the policy. Deleting a replication policy breaks the targetassociation on the target cluster, and allows writes to the target directory.
About this task
If you want to temporarily suspend a replication policy from creating replication jobs,you can disable the policy, and then enable the policy again later.
Procedure
1. Run the isi sync policies delete command.
The following command deletes weeklySync from the source cluster and breaksthe target association on the target cluster:
isi sync policies delete weeklySync
Note: The operation will not succeed until SyncIQ can communicate withthe target cluster; until then, the policy will still appear in the output of theisi sync policies list command. After the connection between thesource cluster and target cluster is reestablished, SyncIQ will delete thepolicy the next time that the job is scheduled to run; if the policy isconfigured to run only manually, you must manually run the policy again. IfSyncIQ is permanently unable to communicate with the target cluster, runthe isi sync policies delete command with the --local-onlyoption. This will delete the policy from the local cluster only and not breakthe target association on the target cluster.
Data replication with SyncIQ
Isilon OneFS CLI Administration Guide 333

Enable or disable a replication policyYou can temporarily suspend a replication policy from creating replication jobs, andthen enable it again later.
About this task
Note: If you disable a replication policy while an associated replication job isrunning, the running replication job is not interrupted. However, the policy will notcreate another job until the policy is enabled.
Procedure
1. Run either the isi sync policies enable or the isi sync policiesdisable command.
The following command enables weeklySync:
isi sync policies enable weeklySync
The following command disables weeklySync:
isi sync policies disable weeklySync
View replication policiesYou can view information about replication policies.
Procedure
1. View information about all replication policies by running the followingcommand:
isi sync policies list
2. (Optional) To view detailed information about a specific replication policy, runthe isi sync policies view command.
The following command displays detailed information about weeklySync:
isi sync policies view weeklySync
The system displays output similar to the following example:
ID: dd16d277ff995a78e9affbba6f6e2919 Name: weeklySync Path: /ifs/data/archive Action: sync Enabled: No Target: localhost Description: Check Integrity: Yes Source Include Directories: - Source Exclude Directories: - Source Subnet: - Source Pool: - Source Match Criteria: Target Path: /ifs/data/sometarget Target Snapshot Archive: No
Data replication with SyncIQ
334 Isilon OneFS CLI Administration Guide

Target Snapshot Pattern: SIQ-%{SrcCluster}-%{PolicyName}-%Y-%m-%d_%H-%M-%S Target Snapshot Expiration: Never Target Snapshot Alias: SIQ-%{SrcCluster}-%{PolicyName}-latestTarget Detect Modifications: Yes Source Snapshot Archive: No Source Snapshot Pattern: Source Snapshot Expiration: Never Schedule: Manually scheduled Log Level: notice Log Removed Files: No Workers Per Node: 3 Report Max Age: 2Y Report Max Count: 2000 Force Interface: No Restrict Target Network: NoTarget Compare Initial Sync: No Disable Stf: No Disable Fofb: No Resolve: - Last Job State: finished Last Started: 2013-07-17T15:39:49 Last Success: 2013-07-17T15:39:49 Password Set: No Conflicted: No Has Sync State: Yes
Replication policy informationYou can view information about replication policies through the output of the isisync policies list command.
Name
The name of the policy.
Path
The path of the source directory on the source cluster.
Action
The type of replication policy.
Enabled
Whether the policy is enabled or disabled.
Target
The IP address or fully qualified domain name of the target cluster.
Managing replication to the local clusterYou can interrupt replication jobs that target the local cluster.
You can cancel a currently running job that targets the local cluster, or you can breakthe association between a policy and its specified target. Breaking a source and targetcluster association causes SyncIQ to perform a full replication the next time the policyis run.
Data replication with SyncIQ
Isilon OneFS CLI Administration Guide 335

Cancel replication to the local clusterYou can cancel a replication job that is targeting the local cluster.
Procedure
1. Run the isi sync target cancel command.
l To cancel a job, specify a replication policy. For example, the followingcommand cancels a replication job created according to weeklySync:
isi sync target cancel weeklySync
l To cancel all jobs targeting the local cluster, run the following command:
isi sync target cancel --all
Break local target associationYou can break the association between a replication policy and the local cluster.Breaking this association requires you to reset the replication policy before you canrun the policy again.
About this task
Note: After a replication policy is reset, SyncIQ performs a full or differentialreplication the next time the policy is run. Depending on the amount of data beingreplicated, a full or differential replication can take a very long time to complete.
Procedure
1. Run the isi sync target break command.
The following command breaks the association between weeklySync and thelocal cluster:
isi sync target break weeklySync
View replication policies targeting the local clusterYou can view information about replication policies that are currently replicating datato the local cluster.
Procedure
1. View information about all replication policies that are currently targeting thelocal cluster by running the following command:
isi sync target list
2. To view detailed information about a specific replication policy, run the isisync target view command.
The following command displays detailed information about weeklySync:
isi sync target view weeklySync
Data replication with SyncIQ
336 Isilon OneFS CLI Administration Guide

The system displays output similar to the following example:
Name: weeklySync Source: cluster Target Path: /ifs/data/sometarget Last Job State: finished FOFB State: writes_disabled Source Cluster GUID: 000c295159ae74fcde517c1b85adc03daff9Last Source Coordinator IP: 127.0.0.1 Legacy Policy: No Last Update: 2013-07-17T15:39:51
Remote replication policy informationYou can view information about replication policies that are currently targeting thelocal cluster through the output of the isi sync target list command.
Name
The name of the replication policy.
Source
The name of the source cluster.
Target Path
The path of the target directory on the target cluster.
Last Job State
The state of the most recent replication job for the policy.
FOFB State
The failover-failback state of the target directory.
Managing replication performance rulesYou can manage the impact of replication on cluster performance by creating rulesthat limit the network traffic created and the rate at which files are sent by replicationjobs.
Create a network traffic ruleYou can create a network traffic rule that limits the amount of network traffic thatreplication policies are allowed to generate during a specified time period.
Procedure
1. Run the isi sync rules create command.
The following command creates a network traffic rule that limits bandwidthconsumption to 100 KB per second from 9:00 AM to 5:00 PM every weekday:
isi sync rules create bandwidth 9:00-17:00 M-F 100
Data replication with SyncIQ
Isilon OneFS CLI Administration Guide 337

Create a file operations ruleYou can create a file-operations rule that limits the number of files that replication jobscan send per second.
Procedure
1. Run the isi sync rules create command.
The following command creates a file-operations rule that limits the file-sendrate to 3 files per second from 9:00 AM to 5:00 PM every weekday: :
isi sync rules create file_count 9:00-17:00 M-F 3
Modify a performance ruleYou can modify a performance rule.
Procedure
1. (Optional) To identify the ID of the performance rule you want to modify, runthe following command:
isi sync rules list
2. Modify a performance rule by running the isi sync rules modifycommand.
The following command causes a performance rule with an ID of bw-0 to beenforced only on Saturday and Sunday:
isi sync rules modify bw-0 --days X,S
Delete a performance ruleYou can delete a performance rule.
Procedure
1. (Optional) To identify the ID of the performance rule you want to modify, runthe following command:
isi sync rules list
2. Delete a performance rule by running the isi sync rules deletecommand.
The following command deletes a performance rule with an ID of bw-0:
isi sync rules delete bw-0
Data replication with SyncIQ
338 Isilon OneFS CLI Administration Guide

Enable or disable a performance ruleYou can disable a performance rule to temporarily prevent the rule from beingenforced. You can also enable a performance rule after it has been disabled.
Procedure
1. (Optional) To identify the ID of the performance rule you want to enable ordisable, run the following command:
isi sync rules list
2. Run the isi sync rules modify command.
The following command enables a performance rule with an ID of bw-0:
isi sync rules modify bw-0 --enabled true
The following command disables a performance rule with an ID of bw-0:
isi sync rules modify bw-0 --enabled false
View performance rulesYou can view performance rules.
Procedure
1. View information about all performance rules by running the followingcommand:
isi sync rules list
2. (Optional) To view detailed information about a specific performance rule, runthe isi sync rules view command.
The following command displays detailed information about a performance rulewith an ID of bw-0:
isi sync rules view --id bw-0
The system displays output similar to the following example:
ID: bw-0 Enabled: Yes Type: bandwidth Limit: 100 kbps Days: Sun,Sat Schedule Begin : 09:00 End : 17:00Description: Bandwidth rule for weekdays
Data replication with SyncIQ
Isilon OneFS CLI Administration Guide 339

Managing replication reportsIn addition to viewing replication reports, you can configure how long reports areretained on the cluster. You can also delete any reports that have passed theirexpiration period.
Configure default replication report settingsYou can configure the default amount of time that SyncIQ retains replication reportsfor. You can also configure the maximum number of reports that SyncIQ retains foreach replication policy.
Procedure
1. Run the isi sync settings modify command.
The following command causes OneFS to delete replication reports that areolder than 2 years:
isi sync settings modify --report-max-age 2Y
Delete replication reportsReplication reports are routinely deleted by SyncIQ after the expiration date for thereports has passed. SyncIQ also deletes reports after the number of reports exceedsthe specified limit. Excess reports are periodically deleted by SyncIQ; however, youcan manually delete all excess replication reports at any time. This procedure isavailable only through the command-line interface (CLI).
Procedure
1. Open a secure shell (SSH) connection to any node in the cluster, and log in.
2. Delete excess replication reports by running the following command:
isi sync reports rotate
View replication reportsYou can view replication reports and subreports.
Procedure
1. View a list of all replication reports by running the following command:
isi sync reports list
2. View a replication report by running the isi sync reports view command.
The following command displays a replication report for weeklySync:
isi sync reports view weeklySync 2
3. (Optional) To view a list of subreports for a report, run the isi syncreports subreports list command.
Data replication with SyncIQ
340 Isilon OneFS CLI Administration Guide

The following command displays subreports for weeklySync:
isi sync reports subreports list weeklySync 1
4. (Optional) To view a subreport, run the isi sync reports subreportsview command.
The following command displays a subreport for weeklySync:
isi sync reports subreports view weeklySync 1 2
The system displays output similar to the following example:
Policy Name: weeklySync Job ID: 1 Subreport ID: 2 Start Time: 2013-07-17T21:59:10 End Time: 2013-07-17T21:59:15 Action: run State: finished Policy ID: a358db8b248bf432c71543e0f02df64e Sync Type: initial Duration: 5s Errors: - Source Directories Visited: 0 Source Directories Deleted: 0 Target Directories Deleted: 0 Source Directories Created: 0 Target Directories Created: 0 Source Directories Linked: 0 Target Directories Linked: 0 Source Directories Unlinked: 0 Target Directories Unlinked: 0 Num Retransmitted Files: 0 Retransmitted Files: - Total Files: 0 Files New: 0 Source Files Deleted: 0 Files Changed: 0 Target Files Deleted: 0 Up To Date Files Skipped: 0 User Conflict Files Skipped: 0 Error Io Files Skipped: 0 Error Net Files Skipped: 0Error Checksum Files Skipped: 0 Bytes Transferred: 245 Total Network Bytes: 245 Total Data Bytes: 20 File Data Bytes: 20 Sparse Data Bytes: 0 Target Snapshots: SIQ-Failover-newPol123-2013-07-17_21-59-15, newPol123-Archive-cluster-17 Total Phases: 2 Phases Phase : STF_PHASE_IDMAP_SEND Start Time : 2013-07-17T21:59:11 End Time : 2013-07-17T21:59:13
Data replication with SyncIQ
Isilon OneFS CLI Administration Guide 341

Replication report informationYou can view information about replication jobs through the Reports table.
Policy Name
The name of the associated policy for the job. You can view or edit settings forthe policy by clicking the policy name.
Status
Displays the status of the job. The following job statuses are possible:
Running
The job is currently running without error.
Paused
The job has been temporarily paused.
Finished
The job completed successfully.
Failed
The job failed to complete.
Started
Indicates when the job started.
Ended
Indicates when the job ended.
Duration
Indicates how long the job took to complete.
Transferred
The total number of files that were transferred during the job run, and the totalsize of all transferred files. For assessed policies, Assessment appears.
Source Directory
The path of the source directory on the source cluster.
Target Host
The IP address or fully qualified domain name of the target cluster.
Action
Displays any report-related actions that you can perform.
Managing failed replication jobsIf a replication job fails due to an error, SyncIQ might disable the correspondingreplication policy. For example SyncIQ might disable a replication policy if the IP or
Data replication with SyncIQ
342 Isilon OneFS CLI Administration Guide

hostname of the target cluster is modified. If a replication policy is disabled, the policycannot be run.
To resume replication for a disabled policy, you must either fix the error that causedthe policy to be disabled, or reset the replication policy. It is recommended that youattempt to fix the issue rather than reset the policy. If you believe you have fixed theerror, you can return the replication policy to an enabled state by resolving the policy.You can then run the policy again to test whether the issue was fixed. If you are unableto fix the issue, you can reset the replication policy. However, resetting the policycauses a full or differential replication to be performed the next time the policy is run.
Note: Depending on the amount of data being synchronized or copied, full anddifferential replications can take a very long time to complete.
Resolve a replication policyIf SyncIQ disables a replication policy due to a replication error, and you fix the issuethat caused the error, you can resolve the replication policy. Resolving a replicationpolicy enables you to run the policy again. If you cannot resolve the issue that causedthe error, you can reset the replication policy.
Procedure
1. Run the isi sync policies resolve command.
The following command resolves weeklySync:
isi sync policies resolve weeklySync
Reset a replication policyIf a replication job encounters an error that you cannot resolve, you can reset thecorresponding replication policy. Resetting a policy causes OneFS to perform a full ordifferential replication the next time the policy is run.
About this task
Resetting a replication policy deletes the source-cluster snapshot.
Note: Depending on the amount of data being replicated, a full or differentialreplication can take a very long time to complete. Reset a replication policy only ifyou cannot fix the issue that caused the replication error. If you fix the issue thatcaused the error, resolve the policy instead of resetting the policy.
Procedure
1. Run the isi sync policies reset command.
The following command resets weeklySync:
isi sync policies reset weeklySync
Perform a full or differential replicationAfter you reset a replication policy, you must perform either a full or differentialreplication. You can do this only from the CLI.
Before you begin
Reset a replication policy.
Data replication with SyncIQ
Isilon OneFS CLI Administration Guide 343

Procedure
1. Open a secure shell (SSH) connection to any node in the cluster and log inthrough the root or compliance administrator account.
2. Specify the type of replication you want to perform by running the isi syncpolicies modify command.
l To perform a full replication, disable the --target-compare-initial-sync option.For example, the following command disables differential synchronization fornewPolicy:
isi sync policies modify newPolicy \--target-compare-initial-sync false
l To perform a differential replication, enable the --target-compare-initial-sync option.For example, the following command enables differential synchronization fornewPolicy:
isi sync policies modify newPolicy \--target-compare-initial-sync true
3. Run the policy by running the isi sync jobs start command.
For example, the following command runs newPolicy:
isi sync jobs start newPolicy
Data replication with SyncIQ
344 Isilon OneFS CLI Administration Guide

CHAPTER 17
Data Encryption with SyncIQ
This section contains the following topics:
l SyncIQ data encryption overview.....................................................................346l SyncIQ traffic encryption.................................................................................346l Per-policy throttling overview..........................................................................348l Troubleshooting SyncIQ encryption................................................................. 348
Isilon OneFS CLI Administration Guide 345

SyncIQ data encryption overviewOneFS now enables you to encrypt SyncIQ data from one Isilon cluster to another.
You can use the integrated capabilities of SyncIQ to encrypt the data during transferbetween Isilon clusters and protect the data in flight during intercluster replications.
SyncIQ policies now support end-to-end encryption for cross-cluster communications.
You can easily manage certificates with the help of the new SyncIQ store.Certification revocation is supported through an external Online Certificate StatusProtocol (OCSP) responder.
Isilon clusters may now require that all incoming and outgoing SyncIQ policies beencrypted through a simple change in the SyncIQ Global Settings.
SyncIQ traffic encryptionSyncIQ data that is transmitted between the source and target clusters is encrypted.
SyncIQ provides additional protection from man-in-the-middle attacks and preventsunauthorized source or target relationships. The standard certificate configuration forSyncIQ policy encryption requires six files:
l SourceClusterCert.pem - A single end-entity certificate that identifies the Sourcecluster
l SourceClusterKey.pem - The associated private key file that goes with the Sourcecluster identity cert
l SourceClusterCA.pem - A self-signed root CA file that issued the Source clusteridentity cert
l TargetClusterCert.pem - A single end-entity certificate that identifies the Targetcluster
l TargetClusterKey.pem - The associated private key file that goes with the Targetcluster identity cert
l TargetClusterCA.pem - A self-signed root CA file that issued the Target clusteridentity cert (may be the same as 3)
Because SyncIQ encryption requires mutual authentication SSL handshakes, eachcluster must specify its own identity certificate and the CA certificate of the peer.
Configure certificatesYou can configure certificates for SyncIQ policy encryption.
Procedure
1. On the Source cluster, install the identity certificate and private key pair to theserver certificate store.
isi sync cert server import SourceClusterCert.pem SourceClusterKey.pem --certificate-key-password <string> --name myClusterCertID
Data Encryption with SyncIQ
346 Isilon OneFS CLI Administration Guide

2. On the Source cluster, set the newly installed ID from the server store as yourSyncIQ cluster certificate. The full ID of the certificate is displayed when the -voption is used to the server store list command.
isi sync cert server list -v isi sync setting mod –cluster-certificate-id=<fullID>
3. On the Source cluster, install the Source cluster CA to the global cluster CAstore. This CA was used to issue TargetClusterCert.pem.
isi cert auth import TargetClusterCA.pem --name SyncIQTargetCA
4. On the Source cluster, add the Target’s certificate to the whitelist peercertificate store.
isi sync cert peer import TargetClusterCert.pem --name SyncIQTargetClusterCert
Note: This step requires the end-entity certificate for each SyncIQ peer beshared with the peer. This action is not an SSL requirement. It is animplementation specific requirement to add a whitelist layer of security toSyncIQ encryption policies. The associated private key for peer certificatesshould not be shared when exchanging end-entity certificates with peers.
5. On the Target cluster, install the identity certificate and private key pair to theserver certificate store.
isi sync cert server import TargetClusterCert.pem TargetClusterKey.pem --certificate-key-password<string> --name myClusterCertID
6. On the Target cluster, set the newly installed ID from the server store as yourSyncIQ cluster certificate. The full ID of the certificate is displayed when the -voption is used to the server store list command.
isi sync cert server list -v isi sync setting mod –cluster-certificate-id=<fullID>
7. On the Target cluster, install the Source cluster CA to the global cluster CAstore. This CA that was used to issue SourceClusterCert.pem.
isi cert auth import SourceClusterCA.pem --name SyncIQSourceCA
8. On the Target cluster, add the Source's certificate to the whitelist peercertificate store.
isi sync cert peer import SourceClusterCert.pem --name SyncIQSourceClusterCert
Note: This step requires the end-entity certificate for each SyncIQ peer beshared with the peer. This action is not an SSL requirement. It is animplementation specific requirement to add a whitelist layer of security to
Data Encryption with SyncIQ
Isilon OneFS CLI Administration Guide 347

SyncIQ encryption policies. The associated private key for peer certificatesshould not be shared when exchanging end-entity certificates with peers.
Create encrypted SyncIQ policiesYou can create encrypted SyncIQ policies.
Procedure
1. To enable encryption, associate the target certificate ID with the policy. Thenominated certificate is used as the whitelist check during the sync job. You cansee the full ID for a certificate when the -v option is used in the certificate listcommand.
isi sync cert peer list -v isi sync pol create foo sync /ifs/syncDir <targetIP> /ifs/syncDir –target-certificate-id=<targetFullID>
2. Optionally, force all SyncIQ policies to require encryption.
isi sync setting mod --encryption-required=True
Per-policy throttling overviewOneFS now enables you to set per-policy throttling rules.
Existing versions of OneFS enables you to configure global bandwidth throttling rulesthat are applied evenly across running policies. Now, you can set bandwidthreservations per policy, instead of the global level.
Create a bandwidth ruleYou can create a bandwidth rule for SyncIQ and configure policy-level reservation.
Procedure
1. License SyncIQ and create one or more policies.
2. Create a bandwidth rule for SyncIQ.
isi sync rules create bandwidth --limit=1000 00:00-23:59 M-F
3. Configure policy-level reservation.
isi sync policies modify test --bandwidth-reservation=500
Troubleshooting SyncIQ encryptionIf you are unable to configure the SyncIQ encryption, check the report of the SyncIQpolicy in question and follow the troubleshooting tips given below to fix the issue.
l If the failure is due to a Transport Layer Security (TLS) authentication failure, youcan find the error message from TLS library in the report.
Data Encryption with SyncIQ
348 Isilon OneFS CLI Administration Guide

l If it is a TLS authentication failure, detailed information can be foundat /var/log/messages on the source and target clusters. The detailedinformation includes:
n The ID of the certificate that caused the failure
n The subject name of the certificate that caused the failure
n The depth at which the failure occurred in the certification chain
n The error code and the reason for the failure
Data Encryption with SyncIQ
Isilon OneFS CLI Administration Guide 349

Data Encryption with SyncIQ
350 Isilon OneFS CLI Administration Guide

CHAPTER 18
Data layout with FlexProtect
This section contains the following topics:
l FlexProtect overview....................................................................................... 352l File striping...................................................................................................... 352l Requested data protection...............................................................................352l FlexProtect data recovery................................................................................353l Requesting data protection..............................................................................354l Requested protection settings.........................................................................355l Requested protection disk space usage........................................................... 356
Isilon OneFS CLI Administration Guide 351
FlexProtect overviewAn Isilon cluster is designed to continuously serve data, even when one or morecomponents simultaneously fail. OneFS ensures data availability by striping ormirroring data across the cluster. If a cluster component fails, data stored on the failedcomponent is available on another component. After a component failure, lost data isrestored on healthy components by the FlexProtect proprietary system.
Data protection is specified at the file level, not the block level, enabling the system torecover data quickly. Because all data, metadata, and parity information is distributedacross all nodes, the cluster does not require a dedicated parity node or drive. Thisensures that no single node limits the speed of the rebuild process.
File stripingOneFS uses an Isilon cluster's internal network to distribute data automatically acrossindividual nodes and disks in the cluster. OneFS protects files as the data is beingwritten. No separate action is necessary to protect data.
Before writing files to storage, OneFS breaks files into smaller logical chunks calledstripes. The size of each file chunk is referred to as the stripe unit size. Each OneFSblock is 8 KB, and a stripe unit consists of 16 blocks, for a total of 128 KB per stripeunit. During a write, OneFS breaks data into stripes and then logically places the datainto a stripe unit. As OneFS writes data across the cluster, OneFS fills the stripe unitand protects the data according to the number of writable nodes and the specifiedprotection policy.
OneFS can continuously reallocate data and make storage space more usable andefficient. As the cluster size increases, OneFS stores large files more efficiently.
To protect files that are 128KB or smaller, OneFS does not break these files intosmaller logical chunks. Instead, OneFS uses mirroring with forward error correction(FEC). With mirroring, OneFS makes copies of each small file's data (N), adds an FECparity chunk (M), and distributes multiple instances of the entire protection unit (N+M) across the cluster.
Requested data protectionThe requested protection of data determines the amount of redundant data createdon the cluster to ensure that data is protected against component failures. OneFSenables you to modify the requested protection in real time while clients are readingand writing data on the cluster.
OneFS provides several data protection settings. You can modify these protectionsettings at any time without rebooting or taking the cluster or file system offline.When planning your storage solution, keep in mind that increasing the requestedprotection reduces write performance and requires additional storage space for theincreased number of nodes.
OneFS uses the Reed Solomon algorithm for N+M protection. In the N+M dataprotection model, N represents the number of data-stripe units, and M represents thenumber of simultaneous node or drive failures—or a combination of node and drivefailures—that the cluster can withstand without incurring data loss. N must be largerthan M.
Data layout with FlexProtect
352 Isilon OneFS CLI Administration Guide

In addition to N+M data protection, OneFS also supports data mirroring from 2x to 8x,allowing from two to eight mirrors of data. In terms of overall cluster performance andresource consumption, N+M protection is often more efficient than mirroredprotection. However, because read and write performance is reduced for N+Mprotection, data mirroring might be faster for data that is updated often and is small insize. Data mirroring requires significant overhead and might not always be the bestdata-protection method. For example, if you enable 3x mirroring, the specified contentis duplicated three times on the cluster; depending on the amount of content mirrored,this can consume a significant amount of storage space.
FlexProtect data recoveryOneFS uses the FlexProtect proprietary system to detect and repair files anddirectories that are in a degraded state due to node or drive failures.
OneFS protects data in the cluster based on the configured protection policy. OneFSrebuilds failed disks, uses free storage space across the entire cluster to furtherprevent data loss, monitors data, and migrates data off of at-risk components.
OneFS distributes all data and error-correction information across the cluster andensures that all data remains intact and accessible even in the event of simultaneouscomponent failures. Under normal operating conditions, all data on the cluster isprotected against one or more failures of a node or drive. However, if a node or drivefails, the cluster protection status is considered to be in a degraded state until thedata is protected by OneFS again. OneFS reprotects data by rebuilding data in thefree space of the cluster. While the protection status is in a degraded state, data ismore vulnerable to data loss.
Because data is rebuilt in the free space of the cluster, the cluster does not require adedicated hot-spare node or drive in order to recover from a component failure.Because a certain amount of free space is required to rebuild data, it is recommendedthat you reserve adequate free space through the virtual hot spare feature.
As you add more nodes, the cluster gains more CPU, memory, and disks to use duringrecovery operations. As a cluster grows larger, data restriping operations becomefaster.
SmartfailOneFS protects data stored on failing nodes or drives through a process calledsmartfailing.
During the smartfail process, OneFS places a device into quarantine. Data stored onquarantined devices is read only. While a device is quarantined, OneFS reprotects thedata on the device by distributing the data to other devices. After all data migration iscomplete, OneFS logically removes the device from the cluster, the cluster logicallychanges its width to the new configuration, and the node or drive can be physicallyreplaced.
OneFS smartfails devices only as a last resort. Although you can manually smartfailnodes or drives, it is recommended that you first consult Isilon Technical Support.
Occasionally a device might fail before OneFS detects a problem. If a drive failswithout being smartfailed, OneFS automatically starts rebuilding the data to availablefree space on the cluster. However, because a node might recover from a failure, if anode fails, OneFS does not start rebuilding data unless the node is logically removedfrom the cluster.
Data layout with FlexProtect
Isilon OneFS CLI Administration Guide 353
Node failuresBecause node loss is often a temporary issue, OneFS does not automatically startreprotecting data when a node fails or goes offline. If a node reboots, the file systemdoes not need to be rebuilt because it remains intact during the temporary failure.
If you configure N+1 data protection on a cluster, and one node fails, all of the data isstill accessible from every other node in the cluster. If the node comes back online, thenode rejoins the cluster automatically without requiring a full rebuild.
To ensure that data remains protected, if you physically remove a node from thecluster, you must also logically remove the node from the cluster. After you logicallyremove a node, the node automatically reformats its own drives, and resets itself tothe factory default settings. The reset occurs only after OneFS has confirmed that alldata has been reprotected. You can logically remove a node using the smartfailprocess. It is important that you smartfail nodes only when you want to permanentlyremove a node from the cluster.
If you remove a failed node before adding a new node, data stored on the failed nodemust be rebuilt in the free space in the cluster. After the new node is added, OneFSdistributes the data to the new node. It is more efficient to add a replacement node tothe cluster before failing the old node because OneFS can immediately use thereplacement node to rebuild the data stored on the failed node.
Requesting data protectionYou can specify the protection of a file or directory by setting its requestedprotection. This flexibility enables you to protect distinct sets of data at higher thandefault levels.
Requested protection of data is calculated by OneFS and set automatically on storagepools within your cluster. The default setting is referred to as suggested protection,and provides the optimal balance between data protection and storage efficiency. Forexample, a suggested protection of N+2:1 means that two drives or one node can failwithout causing any data loss.
For best results, we recommend that you accept at least the suggested protection fordata on your cluster. You can always specify a higher protection level than suggestedprotection on critical files, directories, or node pools.
OneFS allows you to request protection that the cluster is currently incapable ofmatching. If you request an unmatchable protection, the cluster will continue trying tomatch the requested protection until a match is possible. For example, in a four-nodecluster, you might request a mirror protection of 5x. In this example, OneFS wouldmirror the data at 4x until you added a fifth node to the cluster, at which point OneFSwould reprotect the data at 5x.
If you set requested protection to a level below suggested protection, OneFS warnsyou of this condition.
Note:For 4U Isilon IQ X-Series and NL-Series nodes, and IQ 12000X/EX 12000combination platforms, the minimum cluster size of three nodes requires aminimum protection of N+2:1.
Data layout with FlexProtect
354 Isilon OneFS CLI Administration Guide

Requested protection settingsRequested protection settings determine the level of hardware failure that a clustercan recover from without suffering data loss.
Requested protectionsetting
Minimum number ofnodes required
Definition
[+1n] 3 The cluster can recover from onedrive or node failure withoutsustaining any data loss.
[+2d:1n] 3 The cluster can recover from twosimultaneous drive failures or onenode failure without sustaining anydata loss.
[+2n] 4 The cluster can recover from twosimultaneous drive or node failureswithout sustaining any data loss.
[+3d:1n] 3 The cluster can recover from threesimultaneous drive failures or onenode failure without sustaining anydata loss.
[+3d:1n1d] 3 The cluster can recover from threesimultaneous drive failures orsimultaneous failures of one nodeand one drive without sustainingany data loss.
[+3n] 6 The cluster can recover from threesimultaneous drive or node failureswithout sustaining any data loss.
[+4d:1n] 3 The cluster can recover from foursimultaneous drive failures or onenode failure without sustaining anydata loss.
[+4d:2n] 4 The cluster can recover from foursimultaneous drive failures or twonode failures without sustaining anydata loss.
[+4n] 8 The cluster can recover from foursimultaneous drive or node failureswithout sustaining any data loss.
Nx (Data mirroring) NFor example, 5x requiresa minimum of fivenodes.
The cluster can recover from N - 1drive or node failures withoutsustaining data loss. For example,5x protection means that thecluster can recover from four driveor node failures.
Data layout with FlexProtect
Isilon OneFS CLI Administration Guide 355

Requested protection disk space usageIncreasing the requested protection of data also increases the amount of spaceconsumed by the data on the cluster.
The parity overhead for N + M protection depends on the file size and the number ofnodes in the cluster. The percentage of parity overhead declines as the cluster getslarger.
The following table describes the estimated percentage of overhead depending on therequested protection and the size of the cluster or node pool. The table does not showrecommended protection levels based on cluster size.
Numberof nodes
[+1n] [+2d:1n] [+2n] [+3d:1n] [+3d:1n1d] [+3n] [+4d:1n] [+4d:2n] [+4n]
3 2 +1(33%)
4 + 2(33%)
— 6 + 3(33%)
3 + 3 (50%) — 8 + 4(33%)
— —
4 3 +1(25%)
6 + 2(25%)
2 + 2(50%)
9 + 3(25%)
5 + 3 (38%) — 12 + 4(25%)
4 + 4(50%)
—
5 4 +1(20%)
8 + 2(20%)
3 + 2(40%)
12 + 3(20%)
7 + 3 (30%) — 16 + 4(20%)
6 + 4(40%)
—
6 5 +1 (17%) 10 + 2(17%)
4 + 2(33%)
15 + 3(17%)
9 + 3 (25%) 3 + 3(50%)
16 + 4(20%)
8 + 4(33%)
—
7 6 +1 (14%) 12 + 2(14%)
5 + 2(29%)
15 + 3(17%)
11 + 3 (21%) 4 + 3(43%)
16 + 4(20%)
10 + 4(29%)
—
8 7 +1 (13%) 14 + 2(12.5%)
6 + 2(25%)
15 + 3(17%)
13 + 3 (19%) 5 + 3(38%)
16 + 4(20%)
12 + 4(25% )
4 + 4(50%)
9 8 +1 (11%) 16 + 2(11%)
7 + 2(22%)
15 + 3(17%)
15+3 (17%) 6 + 3(33%)
16 + 4(20%)
14 + 4(22%)
5 + 4(44%)
10 9 +1 (10%) 16 + 2(11%)
8 + 2(20%)
15 + 3(17%)
15+3 (17%) 7 + 3(30%)
16 + 4(20%)
16 + 4(20%)
6 + 4(40%)
12 11 +1 (8%) 16 + 2(11%)
10 + 2(17%)
15 + 3(17%)
15+3 (17%) 9 + 3(25%)
16 + 4(20%)
16 + 4(20%)
8 + 4(33%)
14 13 + 1(7%)
16 + 2(11%)
12 + 2(14%)
15 + 3(17%)
15+3 (17%) 11 + 3(21%)
16 + 4(20%)
16 + 4(20%)
10 + 4(29%)
16 15 + 1(6%)
16 + 2(11%)
14 + 2(13%)
15 + 3(17%)
15+3 (17%) 13 + 3(19%)
16 + 4(20%)
16 + 4(20%)
12 + 4(25%)
18 16 + 1(6%)
16 + 2(11%)
16 + 2(11%)
15 + 3(17%)
15+3 (17%) 15 + 3(17%)
16 + 4(20%)
16 + 4(20%)
14 + 4(22%)
20 16 + 1(6%)
16 + 2(11%)
16 + 2(11%)
16 + 3(16%)
16 + 3 (16%) 16 + 3(16%)
16 + 4(20%)
16 + 4(20% )
16 + 4(20%)
30 16 + 1(6%)
16 + 2(11%)
16 + 2(11%)
16 + 3(16%)
16 + 3 (16%) 16 + 3(16%)
16 + 4(20%)
16 + 4(20%)
16 + 4(20%)
The parity overhead for mirrored data protection is not affected by the number ofnodes in the cluster. The following table describes the parity overhead for requestedmirrored protection.
Data layout with FlexProtect
356 Isilon OneFS CLI Administration Guide

2x 3x 4x 5x 6x 7x 8x
50% 67% 75% 80% 83% 86% 88%
Data layout with FlexProtect
Isilon OneFS CLI Administration Guide 357

Data layout with FlexProtect
358 Isilon OneFS CLI Administration Guide

CHAPTER 19
Administering NDMP
This chapter contains the following topics:
l NDMP backup and recovery overview............................................................. 360l NDMP two-way backup................................................................................... 360l NDMP three-way backup................................................................................. 361l Supportability of NDMP sessions on 6th Generation hardware.........................361l Setting preferred IPs for NDMP three-way operations.....................................361l NDMP multi-stream backup and recovery........................................................ 361l Snapshot-based incremental backups..............................................................362l NDMP backup and restore of SmartLink files...................................................363l NDMP protocol support................................................................................... 364l Supported DMAs..............................................................................................365l NDMP hardware support................................................................................. 365l NDMP backup limitations.................................................................................365l NDMP performance recommendations............................................................ 366l Excluding files and directories from NDMP backups........................................ 367l Configuring basic NDMP backup settings........................................................ 368l Managing NDMP user accounts.......................................................................369l Managing NDMP backup devices......................................................................371l Managing NDMP Fibre Channel ports.............................................................. 372l Managing NDMP preferred IP settings.............................................................374l Managing NDMP sessions................................................................................375l Managing NDMP restartable backups.............................................................. 378l NDMP restore operations................................................................................ 380l Managing default NDMP variables....................................................................381l Managing snapshot based incremental backups...............................................389l Managing cluster performance for NDMP sessions..........................................390l Managing CPU usage for NDMP sessions.........................................................391l View NDMP backup logs ..................................................................................391
Isilon OneFS CLI Administration Guide 359

NDMP backup and recovery overviewIn OneFS, you can back up and recover file-system data through the Network DataManagement Protocol (NDMP). From a backup server, you can direct backup andrecovery processes between an Isilon cluster and backup devices such as tapedevices, media servers, and virtual tape libraries (VTLs).
Some of the NDMP features are described below:
l NDMP supports two-way and three-way backup models.
l With certain data management applications, NDMP supports backup restartableextension (BRE). The NDMP BRE allows you to resume a failed backup job fromthe last checkpoint taken prior to the failure. The failed job is restartedimmediately and cannot be scheduled or started manually.
l You do not need to activate a SnapshotIQ license on the cluster to perform NDMPbackups. If you have activated a SnapshotIQ license on the cluster, you cangenerate a snapshot through the SnapshotIQ tool, and then back up the samesnapshot. If you back up a SnapshotIQ snapshot, OneFS does not create anothersnapshot for the backup.
l You can back up WORM domains through NDMP.
NDMP two-way backupThe NDMP two-way backup is also known as the local or direct NDMP backup. Toperform NDMP two-way backups, you must connect your Isilon cluster to a BackupAccelerator node which is synonymous with a Fibre Attached Storage node, andattach a tape device to that node. You must then use OneFS to detect the tape devicebefore you can back up to that device.
You can connect supported tape devices directly to the Fibre Channel ports of a FibreAttached Storage node. Alternatively, you can connect Fibre Channel switches to theFibre Channel ports on the Fibre Attached Storage node, and connect tape and mediachanger devices to the Fibre Channel switches. For more information, see your FibreChannel switch documentation about zoning the switch to allow communicationbetween the Fibre Attached Storage node and the connected tape and media changerdevices.
If you attach tape devices to a Fibre Attached Storage node, the cluster detects thedevices when you start or restart the node or when you re-scan the Fibre Channelports to discover devices. If a cluster detects tape devices, the cluster creates anentry for the path to each detected device.
If you connect a device through a Fibre Channel switch, multiple paths can exist for asingle device. For example, if you connect a tape device to a Fibre Channel switch, andthen connect the Fibre Channel switch to two Fibre Channel ports, OneFS createstwo entries for the device, one for each path.
Note: Generation 6 nodes added to an InfiniBand back end network are supportedwith the A100 Backup Accelerator as part of an NDMP 2-way backup solution. TheA100 Backup Accelerator is not supported as part of an NDMP two-way backupsolution with an all-Generation 6 cluster with an Ethernet back end.
Administering NDMP
360 Isilon OneFS CLI Administration Guide
NDMP three-way backupThe NDMP three-way backup is also known as the remote NDMP backup.
During a three-way NDMP backup operation, a data management application (DMA)on a backup server instructs the cluster to start backing up data to a tape mediaserver that is either attached to the LAN or directly attached to the DMA. The NDMPservice runs on one NDMP Server and the NDMP tape service runs on a separateserver. Both the servers are connected to each other across the network boundary.
Supportability of NDMP sessions on 6th Generationhardware
You can enable two-way NDMP sessions on 6th Generation nodes by configuringthem with Sheba cards. A Sheba card is a Fibre Channel hybrid host bus adapter(HBA) that enables two-way NDMP sessions over the Fibre Channel port. You mustcontact Isilon Professional Services to enable the Sheba card support.
Note: Sheba card is not supported with F810 nodes.
Setting preferred IPs for NDMP three-way operationsIf you are using Avamar as your data management application (DMA) for an NDMPthree-way operation in an environment with multiple network interfaces, you can applya preferred IP setting across an Isilon cluster or to one or more subnets that aredefined in OneFS. A preferred IP setting is a list of prioritized IP addresses to which adata server or tape server connects during an NDMP three-way operation.
The IP address on the NDMP server that receives the incoming request from the DMAdecides the scope and precedence for setting the preference. If the incoming IPaddress is within a subnet scope that has a preference, then the preference setting isapplied. If a subnet-specific preference does not exist but a cluster-wide preferenceexists, the cluster-wide preference setting is applied. Subnet-specific preferencealways overrides the cluster-wide preference. If both the cluster-wide and subnet-specific preferences do not exist, the IP addresses within the subnet of the IP addressreceiving the incoming requests from the DMA are used as the preferred IP addresses.
You can have one preferred IP setting per cluster or per network subnet.
You can specify a list of NDMP preferred IPs through the isi ndmp settingspreferred-ips command.
NDMP multi-stream backup and recoveryYou can use the NDMP multi-stream backup feature, in conjunction with certain datamanagement applications (DMAs), to speed up backups.
With multi-stream backup, you can use your DMA to specify multiple streams of datato back up concurrently. OneFS considers all streams in a specific multi-streambackup operation to be part of the same backup context. A multi-stream backupcontext is deleted if a multi-stream backup session is successful. If a specific streamfails, the backup context is retained for five minutes after the backup operationcompletes and you can retry the failed stream within that time period.
Administering NDMP
Isilon OneFS CLI Administration Guide 361

If you used the NDMP multi-stream backup feature to back data up to tape drives, youcan also recover that data in multiple streams, depending on the DMA. In OneFS8.0.0.0 and later releases, multi-stream backups are supported with CommVaultSimpana version 11.0 Service Pack 3 and NetWorker version 9.0.1. If you back up datausing CommVault Simpana, a multi-stream context is created, but data is recoveredone stream at a time.
Note: OneFS multi-stream backups are not supported with the NDMP restartablebackup feature.
Snapshot-based incremental backupsYou can implement snapshot-based incremental backups to increase the speed atwhich these backups are performed.
During a snapshot-based incremental backup, OneFS checks the snapshot taken forthe previous NDMP backup operation and compares it to a new snapshot. OneFS thenbacks up all files that was modified since the last snapshot was made.
If the incremental backup does not involve snapshots, OneFS must scan the directoryto discover which files were modified. OneFS can perform incremental backupssignificantly faster if the change rate is low.
You can perform incremental backups without activating a SnapshotIQ license on thecluster. Although SnapshotIQ offers a number of useful features, it does not enhancesnapshot capabilities in NDMP backup and recovery.
Set the BACKUP_MODE environment variable to SNAPSHOT to enable snapshot-basedincremental backups. If you enable snapshot-based incremental backups, OneFSretains each snapshot taken for NDMP backups until a new backup of the same orlower level is performed. However, if you do not enable snapshot-based incrementalbackups, OneFS automatically deletes each snapshot generated after thecorresponding backup is completed or canceled.
Note: A snapshot-based incremental backup shares the dumpdates entries indumpdates database along with the other level-based backups. Therefore, makesure that you do not run snapshot-based backups and regular level-based backupsin the same backup paths. For example, make sure that you do not run a level 0backup and snapshot-based incremental backup in the same backup path or viceversa.
After setting the BACKUP_MODE environment variable, snapshot-based incrementalbackup works with certain data management applications (DMAs) as listed in the nexttable.
Table 8 DMA support for snapshot-based incremental backups
DMA DMA-integrated
Symantec NetBackup Enabled only through an environment variable.
Networker Enabled only through an environment variable.
Avamar Yes
CommVault Simpana Enabled only through a cluster-basedenvironment variable.
Tivoli Storage Manager Enabled only through a cluster-basedenvironment variable.
Administering NDMP
362 Isilon OneFS CLI Administration Guide

Table 8 DMA support for snapshot-based incremental backups (continued)
DMA DMA-integrated
Symantec Backup Exec Enabled only through a cluster-basedenvironment variable.
NetVault Enabled only through a cluster-basedenvironment variable.
ASG-Time Navigator Enabled only through a cluster-basedenvironment variable.
NDMP backup and restore of SmartLink filesYou can perform NDMP backup and restore operations on data that has been archivedto the cloud.
Backup and restore capabilities with CloudPools data include:
l Archive SmartLink files when backing up from a cluster
l Restore data, including SmartLink files, to the same cluster
l Restore data, including SmartLink files, to another cluster
l Back up version information with each SmartLink file and restore the Smartlink fileafter verifying the version compatibility on the target cluster.
You specify how files are backed up and restored by setting the NDMP environmentvariables BACKUP_OPTIONS and RESTORE_OPTIONS. See Administering NDMP fordetails about configuring the backup settings and managing NDMP environmentvariables.
Note: DeepCopy and ComboCopy backups recall file data from the cloud. The datais not stored on disks. Recall of file data may incur charges from cloud vendors.
With NDMP backup, by default, CloudPools supports backup of SmartLink files thatcontain cloud metadata such as location of the object. Other details such as versioninformation, account information, local cache state, and unsynchronized cache dataassociated with the SmartLink file are also backed up.
To prevent data loss when recovering SmartLink files with incompatible versions, youcan use the NDMP combo copy backup option to back up SmartLink files with fulldata. Full data includes metadata and user data. You can use the NDMP combo copyoption by setting the BACKUP_OPTIONS environment variable.
When performing an NDMP restore operation on SmartLink files backed up using thecombo copy option, you can use one of combo copy, shallow copy, or deep copyrestore options to recover SmartLink files. You can specify these options by settingappropriate values to the RESTORE_OPTIONS environment variable:
l The combo copy restore option restores SmartLink files from the backup streamonly if their version is compatible with the OneFS version on the target cluster. Ifthe SmartLink file version is incompatible with the OneFS version on the targetcluster, a regular file is restored.
l The shallow copy restore operation restores the backed up SmartLink file as aSmartLink file on the target cluster if the version check operation on the targetcluster is successful.
Administering NDMP
Isilon OneFS CLI Administration Guide 363

l The deep copy restore operation forces the recovery of the SmartLink files asregular files on the target cluster If the version check operation on the targetcluster fails.
l If you do not specify any restore operation, NDMP restores SmartLink files usingthe combo copy restore operation by default.
l When you specify multiple restore options, the combo copy restore operation hasthe highest priority followed by the shallow copy restore operation. The deep copyrestore operation has the lowest priority.
In CloudPools settings, you can set three retention periods that affect backed upSmartLink files and their associated cloud data:
l Full Backup Retention Period for NDMP takes effect when the SmartLink file isbacked up as part of a full backup. The default is five years.
l Incremental Backup Retention Period for Incremental NDMP Backup and SyncIQtakes effect when a SmartLink file is backed up as part of an incremental backup.The default is five years.
l Cloud Data Retention Period defines the duration that data in the cloud is keptwhen its related SmartLink file is deleted. The default is one week.
CloudPools ensures the validity of a backed-up SmartLink file within the cloud dataretention period. It is important for you to set the retention periods appropriately toensure that when the SmartLink file is restored from tape, it remains valid. CloudPoolsdisallows restoring invalid SmartLink files.
To check whether a backed-up SmartLink file is still valid, CloudPools checks theretention periods stored on tape for the file. If the retention time is past the restoretime, CloudPools prevents NDMP from restoring the SmartLink file.
CloudPools also makes sure that the account under which the SmartLink files wereoriginally created has not been deleted. If it has, both NDMP backup and restore ofSmartLink files will fail.
NDMP protocol supportYou can back up the Isilon cluster data through version 3 or 4 of the NDMP protocol.
OneFS supports the following features of NDMP versions 3 and 4:
l Full (level 0) NDMP backups
l Incremental (levels 1-9) NDMP backups and Incremental Forever (level 10)Note: In a level 10 NDMP backup, only data changed since the most recentincremental (level 1-9) backup or the last level 10 backup is copied. Byrepeating level 10 backups, you can be assured that the latest versions of filesin your data set are backed up without having to run a full backup.
l Token-based NDMP backups
l NDMP TAR backup type
l Dump backup type
l Path-based and dir/node file history format
l Direct Access Restore (DAR)
l Directory DAR (DDAR)
l Including and excluding specific files and directories from backup
l Backup of file attributes
Administering NDMP
364 Isilon OneFS CLI Administration Guide
l Backup of Access Control Lists (ACLs)
l Backup of Alternate Data Streams (ADSs)
l Backup Restartable Extension (BRE)
l Backup and restore of HDFS attributes
OneFS supports connecting to clusters through IPv4 or IPv6.
Supported DMAsNDMP backups are coordinated by a data management application (DMA) that runson a backup server.
Note: All supported DMAs can connect to an Isilon cluster through the IPv4protocol. However, only some of the DMAs support the IPv6 protocol forconnecting to an Isilon cluster.
NDMP hardware supportOneFS can back up data to and recover data from tape devices and virtual tapelibraries (VTLs).
Supported tape devices
For NDMP three-way backups, the data management application (DMA)determines the tape devices that are supported.
Supported tape libraries
For both the two-way and three-way NDMP backups, OneFS supports all of thetape libraries that are supported by the DMA.
Supported virtual tape libraries
For three-way NDMP backups, the DMA determines the virtual tape libraries thatwill be supported.
NDMP backup limitationsNDMP backups have the following limitations.
l Supports block sizes up to 512 KB.
l Does not support more than 4 KB file path length.
l Does not back up file system configuration data, such as file protection levelpolicies and quotas.
l Does not support recovering data from a file system other than OneFS. However,you can migrate data through the NDMP protocol from a NetApp or Unity storagesystem to OneFS through the isi_vol_copy tools. For more information on thesetools, see the OneFS Built-In Migration Tools Guide.
l Fibre Attached Storage nodes cannot interact with more than 4096 tape paths.
l The maximum length of the FILESYSTEM environment variable supported for abackup operation is 1024.
Administering NDMP
Isilon OneFS CLI Administration Guide 365

NDMP performance recommendationsConsider the following recommendations to optimize OneFS NDMP backups.
General performance recommendations
l Install the latest patches for OneFS and your data management application(DMA).
l Run a maximum of eight NDMP concurrent sessions per Fibre Attached Storagenode and four NDMP concurrent sessions per Isilon IQ Backup Accelerator node toobtain optimal throughput per session.
l NDMP backups result in very high Recovery Point Objectives (RPOs) andRecovery Time Objectives (RTOs). You can reduce your RPO and RTO byattaching one or more Fibre Attached Storage nodes to the cluster and thenrunning two-way NDMP backups.
l The throughput for an Isilon cluster during the backup and recovery operations isdependent on the dataset and is considerably reduced for small files.
l If you are backing up large numbers of small files, set up a separate schedule foreach directory.
l If you are performing NDMP three-way backups, run multiple NDMP sessions onmultiple nodes in your Isilon cluster.
l Recover files through Directory DAR (DDAR) if you recover large numbers of filesfrequently.
l Use the largest tape record size available for your version of OneFS to increasethroughput.
l If possible, do not include or exclude files from backup. Including or excluding filescan affect backup performance, due to filtering overhead.
l Limit the depth of nested subdirectories in your file system.
SmartConnect recommendations
l A two-way NDMP backup session with SmartConnect requires Fibre AttachedStorage node for backup and recovery operations. However, a three-way NDMPsession with SmartConnect does not require Fibre Attached Storage nodes forthese operations.
l For a NDMP two-way backup session with SmartConnect, connect to the NDMPsession through a dedicated SmartConnect zone consisting of a pool of NetworkInterface Cards (NICs) on the Fibre Attached Storage nodes.
l For a two-way NDMP backup session without SmartConnect, initiate the backupsession through a static IP address or fully qualified domain name of the FibreAttached Storage node.
l For a three-way NDMP backup operation, the front-end Ethernet network or theinterfaces of the nodes are used to serve the backup traffic. Therefore, it isrecommended that you configure a DMA to initiate an NDMP session only usingthe nodes that are not already overburdened serving other workloads orconnections.
l For a three-way NDMP backup operation with or without SmartConnect, initiatethe backup session using the IP addresses of the nodes that are identified forrunning the NDMP sessions.
Administering NDMP
366 Isilon OneFS CLI Administration Guide
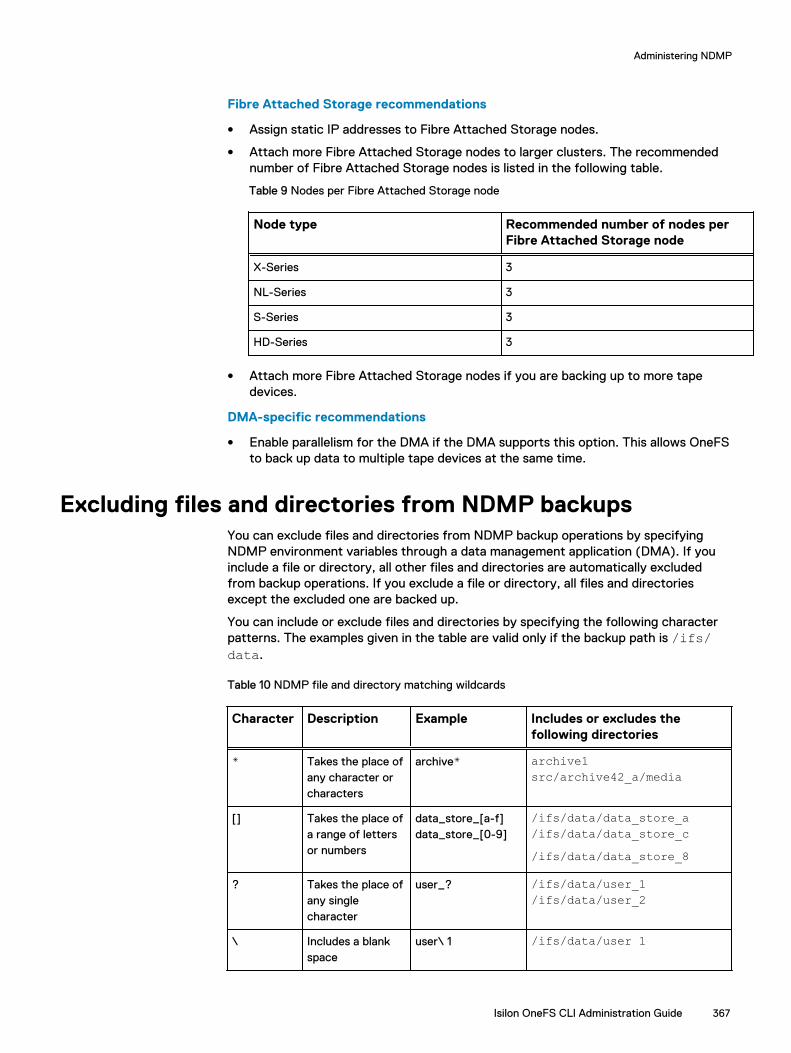
Fibre Attached Storage recommendations
l Assign static IP addresses to Fibre Attached Storage nodes.
l Attach more Fibre Attached Storage nodes to larger clusters. The recommendednumber of Fibre Attached Storage nodes is listed in the following table.
Table 9 Nodes per Fibre Attached Storage node
Node type Recommended number of nodes perFibre Attached Storage node
X-Series 3
NL-Series 3
S-Series 3
HD-Series 3
l Attach more Fibre Attached Storage nodes if you are backing up to more tapedevices.
DMA-specific recommendations
l Enable parallelism for the DMA if the DMA supports this option. This allows OneFSto back up data to multiple tape devices at the same time.
Excluding files and directories from NDMP backupsYou can exclude files and directories from NDMP backup operations by specifyingNDMP environment variables through a data management application (DMA). If youinclude a file or directory, all other files and directories are automatically excludedfrom backup operations. If you exclude a file or directory, all files and directoriesexcept the excluded one are backed up.
You can include or exclude files and directories by specifying the following characterpatterns. The examples given in the table are valid only if the backup path is /ifs/data.
Table 10 NDMP file and directory matching wildcards
Character Description Example Includes or excludes thefollowing directories
* Takes the place ofany character orcharacters
archive* archive1src/archive42_a/media
[] Takes the place ofa range of lettersor numbers
data_store_[a-f]data_store_[0-9]
/ifs/data/data_store_a/ifs/data/data_store_c/ifs/data/data_store_8
? Takes the place ofany singlecharacter
user_? /ifs/data/user_1/ifs/data/user_2
\ Includes a blankspace
user\ 1 /ifs/data/user 1
Administering NDMP
Isilon OneFS CLI Administration Guide 367
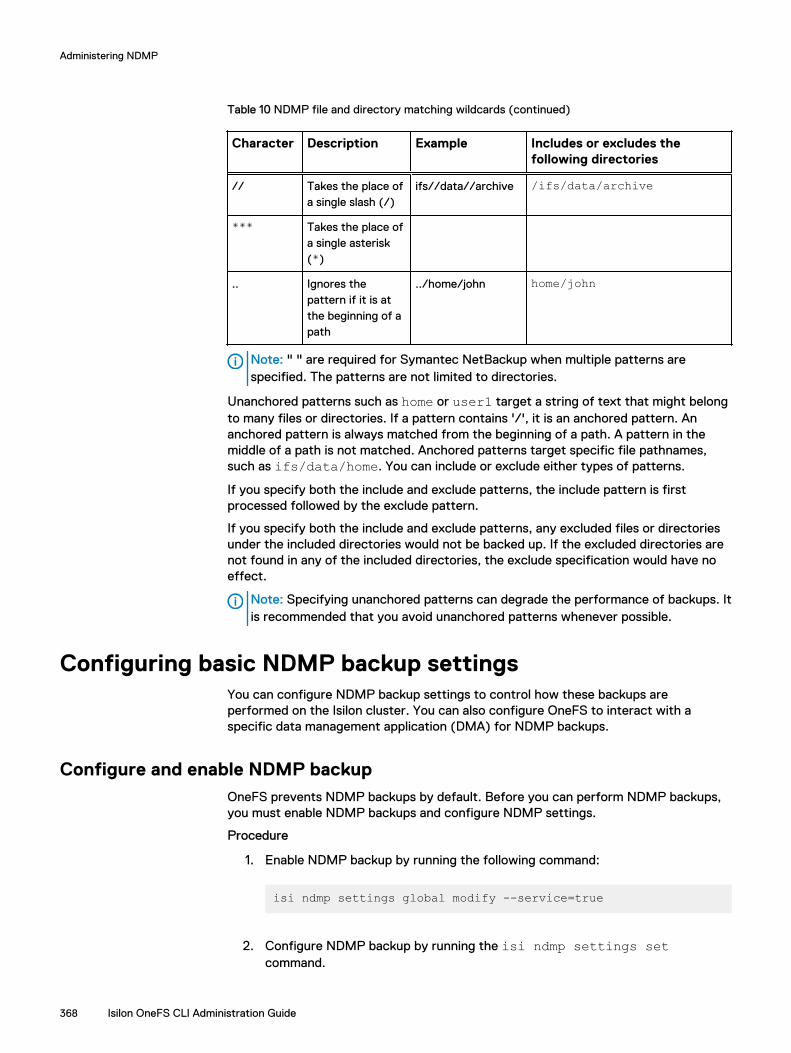
Table 10 NDMP file and directory matching wildcards (continued)
Character Description Example Includes or excludes thefollowing directories
// Takes the place ofa single slash (/)
ifs//data//archive /ifs/data/archive
*** Takes the place ofa single asterisk(*)
.. Ignores thepattern if it is atthe beginning of apath
../home/john home/john
Note: " " are required for Symantec NetBackup when multiple patterns arespecified. The patterns are not limited to directories.
Unanchored patterns such as home or user1 target a string of text that might belongto many files or directories. If a pattern contains '/', it is an anchored pattern. Ananchored pattern is always matched from the beginning of a path. A pattern in themiddle of a path is not matched. Anchored patterns target specific file pathnames,such as ifs/data/home. You can include or exclude either types of patterns.
If you specify both the include and exclude patterns, the include pattern is firstprocessed followed by the exclude pattern.
If you specify both the include and exclude patterns, any excluded files or directoriesunder the included directories would not be backed up. If the excluded directories arenot found in any of the included directories, the exclude specification would have noeffect.
Note: Specifying unanchored patterns can degrade the performance of backups. Itis recommended that you avoid unanchored patterns whenever possible.
Configuring basic NDMP backup settingsYou can configure NDMP backup settings to control how these backups areperformed on the Isilon cluster. You can also configure OneFS to interact with aspecific data management application (DMA) for NDMP backups.
Configure and enable NDMP backupOneFS prevents NDMP backups by default. Before you can perform NDMP backups,you must enable NDMP backups and configure NDMP settings.
Procedure
1. Enable NDMP backup by running the following command:
isi ndmp settings global modify --service=true
2. Configure NDMP backup by running the isi ndmp settings setcommand.
Administering NDMP
368 Isilon OneFS CLI Administration Guide
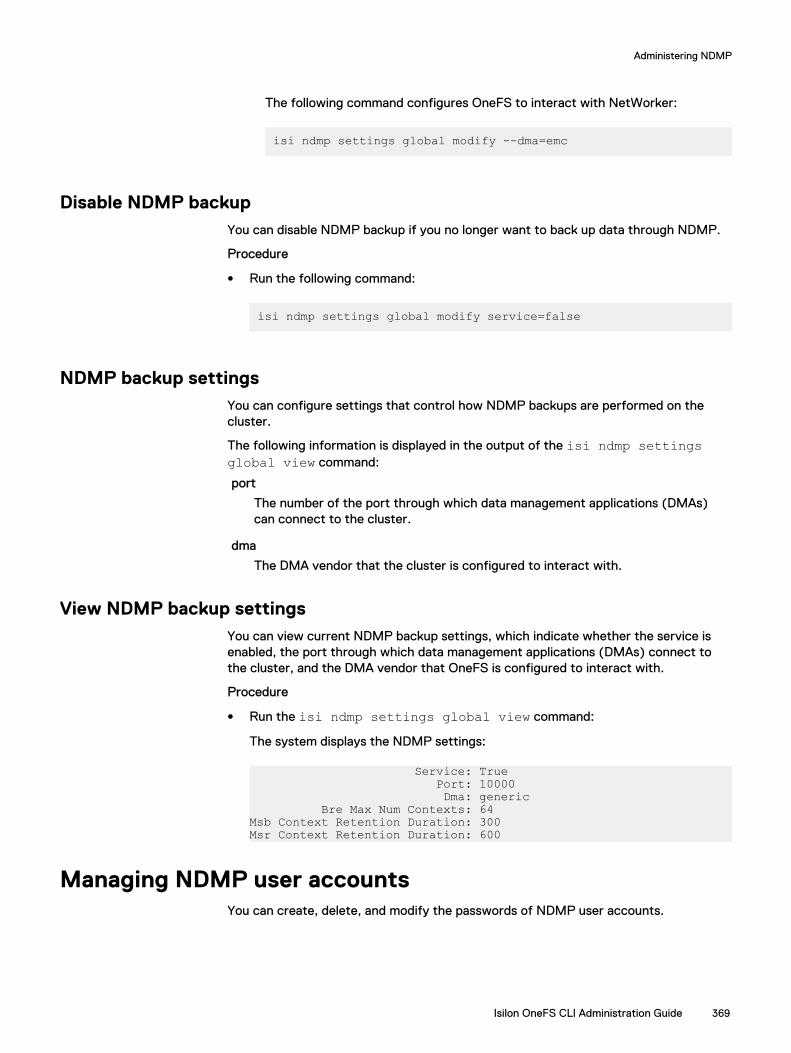
The following command configures OneFS to interact with NetWorker:
isi ndmp settings global modify --dma=emc
Disable NDMP backupYou can disable NDMP backup if you no longer want to back up data through NDMP.
Procedure
l Run the following command:
isi ndmp settings global modify service=false
NDMP backup settingsYou can configure settings that control how NDMP backups are performed on thecluster.
The following information is displayed in the output of the isi ndmp settingsglobal view command:
port
The number of the port through which data management applications (DMAs)can connect to the cluster.
dma
The DMA vendor that the cluster is configured to interact with.
View NDMP backup settingsYou can view current NDMP backup settings, which indicate whether the service isenabled, the port through which data management applications (DMAs) connect tothe cluster, and the DMA vendor that OneFS is configured to interact with.
Procedure
l Run the isi ndmp settings global view command:
The system displays the NDMP settings:
Service: True Port: 10000 Dma: generic Bre Max Num Contexts: 64Msb Context Retention Duration: 300Msr Context Retention Duration: 600
Managing NDMP user accountsYou can create, delete, and modify the passwords of NDMP user accounts.
Administering NDMP
Isilon OneFS CLI Administration Guide 369

Create an NDMP user accountBefore you can perform NDMP backups, you must create an NDMP user accountthrough which a data management application (DMA) can access the cluster.
Procedure
l Run the isi ndmp users create command.
The following command creates an NDMP user account called NDMPuser with apassword of 1234:
isi ndmp users create --name=NDMPuser --password=1234
Modify the password of an NDMP user accountYou can modify the password for an NDMP user account.
Procedure
l Run the isi ndmp users modify command.
The following command modifies the password of a user named NDMPuser to5678:
isi ndmp users modify --name=NDMPuser --password=5678
Delete an NDMP user accountYou can delete an NDMP user account.
Procedure
l Run the isi ndmp users delete command.
The following command deletes a user named NDMPuser after a confirmationmessage:
isi ndmp users delete --name=NDMPuser
View NDMP user accountsYou can view information about NDMP user accounts.
Procedure
l Run the isi ndmp users view command
The following command displays information about the account for a user namedNDMPuser:
isi ndmp users view --name=NDMPuser
Administering NDMP
370 Isilon OneFS CLI Administration Guide

Managing NDMP backup devicesAfter you attach a tape or media changer device to a Fibre Attached Storage node,you must configure OneFS to detect and establish a connection to the device. Afterthe connection between the cluster and the backup device is established, you canmodify the name that the cluster has assigned to the device, or disconnect the devicefrom the cluster.
In case the virtual tape library (VTL) device has multiple LUNs, you must configureLUN0 so that all the LUNs are detected properly.
Detect NDMP backup devicesIf you connect devices to a Backup Accelerator node, you must configure OneFS todetect the devices before OneFS can back up data to and restore data from thedevices. You can scan a specific node, a specific port, or all ports on all nodes.
Procedure
l Run the isi tape rescan command.
The following command detects devices on node 18:
isi tape rescan --node=18
Modify an NDMP backup device entry nameYou can modify the name of an NDMP device entry.
Procedure
l Run the isi tape modify command.
The following command renames tape003 to tape005:
isi tape modify --name=tape003 --new-name=tape005
Delete a device entry for a disconnected NDMP backup deviceIf you physically remove an NDMP device from a cluster, OneFS retains the entry forthe device. You can delete a device entry for a removed device. You can also removethe device entry for a device that is still physically attached to the cluster; this causesOneFS to disconnect from the device.
About this task
If you remove a device entry for a device that is connected to the cluster, and you donot physically disconnect the device, OneFS will detect the device the next time itscans the ports. You cannot remove a device entry for a device that is currently beingbacked up to or restored from.
Administering NDMP
Isilon OneFS CLI Administration Guide 371

Procedure
l The following command disconnects tape001 from the cluster:
isi tape delete --name=tape001
View NDMP backup devicesYou can view information about tape and media changer devices that are currentlyattached to the cluster through a Backup Accelerator node.
Procedure
l Run the following command to list tape devices on node 18:
isi tape list --node=18 --tape
Managing NDMP Fibre Channel portsYou can manage the Fibre Channel ports that connect tape and media changer devicesto a Fibre Attached Storage node. You can also enable, disable, or modify the settingsof an NDMP Fibre Channel port.
Modify NDMP backup port settingsYou can modify the settings of an NDMP backup port.
Procedure
l Run the isi fc settings modify command.
The following command configures port 1 on node 5 to support a point-to-pointFibre Channel topology:
isi fc settings modify --port=5.1 --topology=ptp
Enable or disable an NDMP backup portYou can enable or disable an NDMP backup port.
Procedure
l Run the isi fc settings modify command:
The following command disables port 1 on node 5:
isi fc settings modify --port=5.1 --state=disable
Administering NDMP
372 Isilon OneFS CLI Administration Guide

The following command enables port 1 on node 5:
isi fc settings modify --port=5.1 --state=enable
View NDMP backup portsYou can view information about Fibre Channel ports of Backup Accelerator nodesattached to a cluster.
Procedure
l Run the following command to view Fibre Channel port settings for port 1 on node5:
isi fc settings view --port=5.1
NDMP backup port settingsOneFS assigns default settings to each port on each Backup Accelerator nodeattached to the cluster. These settings identify each port and specify how the portinteracts with NDMP backup devices.
The following information is displayed in the output of the isi fc settings listcommand:
Port
The name of the Backup Accelerator node, and the number of the port.
WWNN
The world wide node name (WWNN) of the port. This name is the same for eachport on a given node.
WWPN
The world wide port name (WWPN) of the port. This name is unique to the port.
State
Whether the port is enabled or disabled.
Topology
The type of Fibre Channel topology that the port is configured to support.
Rate
The rate at which data is sent through the port. The rate can be set to 1 Gb/s, 2Gb/s, 4 Gb/s, 8 Gb/s, and Auto. 8 Gb/s is available for A100 nodes only. If set toAuto, OneFS automatically negotiates with the DMA to determine the rate. Autois the recommended setting.
Firmware
The firmware version for OCS ports. For Qlogic ports, the firmware versionappears blank.
Administering NDMP
Isilon OneFS CLI Administration Guide 373

Managing NDMP preferred IP settingsIf you are performing NDMP three-way operations using Avamar in an environmentwith multiple network interfaces, you can create, modify, delete, list, and view cluster-wide or subnet-specific NDMP preferred IP settings.
You can manage NDMP preferred IP settings only through the OneFS command-lineinterface.
Create an NDMP preferred IP settingIf you are performing an NDMP three-way backup or restore operation using Avamar,you can create a cluster-wide or a subnet-specific NDMP preferred IP setting.
Procedure
l Create an NDMP preferred IP setting by running the isi ndmp settingspreferred-ips create command.
For example, run the following command to apply a preferred IP setting for acluster:
isi ndmp settings preferred-ips create cluster groupnet0.subnet0,10gnet.subnet0
Run the command as shown in the following example to apply a preferred IPsetting for a subnet group:
isi ndmp settings preferred-ips create 10gnet.subnet0 10gnet.subnet0,groupnet0.subnet0
Modify an NDMP preferred IP settingIf you are performing an NDMP three-way backup or restore operation using Avamar,you can modify an NDMP preferred IP setting by adding or deleting a subnet group.
Procedure
l Modify an NDMP preferred IP setting by running the isi ndmp settingspreferred-ips modify command.
For example, run the following commands to modify the NDMP preferred IPsetting for a cluster:
isi ndmp settings preferred-ips modify 10gnet.subnet0 --add-data-subnets 10gnet.subnet0,groupnet0.subnet0
Run the command as shown in the following example to modify the NDMPpreferred IP setting for a subnet:
isi ndmp settings preferred-ips modify 10gnet.subnet0 --remove-data-subnets groupnet0.subnet0
Administering NDMP
374 Isilon OneFS CLI Administration Guide
List NDMP preferred IP settingsIf you are performing an NDMP three-way backup or restore operation using Avamar,you can list all the NDMP preferred IP settings.
Procedure
l List the NDMP preferred IP settings by running the isi ndmp settingspreferred-ips list command.
For example, run the following command to list the NDMP preferred IP settings:
isi ndmp settings preferred-ips list
View NDMP preferred IP settingsIf you are performing an NDMP three-way backup or restore operation using Avamar,you can view the NDMP preferred IP settings for a subnet or cluster.
Procedure
l View an NDMP preferred IP setting by running the isi ndmp settingspreferred-ips view command.
For example, run the following command to view the NDMP preferred IP settingfor a subnet:
isi ndmp settings preferred-ips view --scope=10gnet.subnet0
Delete NDMP preferred IP settingsIf you are performing an NDMP three-way backup or restore operation using Avamar,you can delete an NDMP preferred IP setting for a subnet or cluster.
Procedure
l Delete NDMP preferred IP settings by running the isi ndmp settingspreferred-ips delete command.
For example, run the following command to delete the preferred IP setting for asubnet:
isi ndmp settings preferred-ips delete --scope=10gnet.subnet0
Managing NDMP sessionsYou can view the status of NDMP sessions or terminate a session that is in progress.
End an NDMP sessionYou can interrupt an NDMP backup or restore operation by ending an NDMP session.
Procedure
1. To retrieve the ID of the NDMP session that you want to end, run the isindmp sessions list command.
Administering NDMP
Isilon OneFS CLI Administration Guide 375
2. Run the isi ndmp sessions delete command.
The following command ends an NDMP session with an ID of 4.36339 and skipsthe confirmation prompt:
isi ndmp sessions delete --session=4.36339 --force
View NDMP sessionsYou can view information about NDMP sessions that exist between the cluster anddata management applications (DMAs).
Procedure
l Run the isi ndmp sessions view command. The following command displaysinformation about session 4.36339.
isi ndmp sessions view --session=4.36339
NDMP session informationYou can view information about active NDMP sessions.
The following information is displayed in the output of the isi ndmp sessionslist command:
Session
Displays the unique identification number that OneFS assigned to the session.
Data
Specifies the current state of the data server.
Mover
Specifies the current state of the data mover.
OP
Specifies the type of operation (backup or restore) that is currently in progress. Ifno operation is in progress, this field is blank. A backup operation could includethe following details:
B({M} {F} [L[0-10] | T0 | Ti | S[0-10]] {r | R})
Where:
[ a ]—a is required
{ a }—a is optional
a | b—a or b but not at the same time
M—Multi-stream backup
F—File list
L—Level-based
T—Token-based
S—Snapshot mode
s—Snapshot mode and a full backup (when root dir is new)
Administering NDMP
376 Isilon OneFS CLI Administration Guide

r—Restartable backup
R—Restarted backup
0-10—Dump level
A restore operation could include the following details:
R ({M|s}[F | D | S]{h})
Where:
M—Multi-stream restore
s—Single-threaded restore (when RESTORE_OPTIONS=1)
F—Full restore
D—DAR
S—Selective restore
h—Restore hardlinks by table
Elapsed Time
Specifies the time that has elapsed since the session started.
Bytes Moved
Specifies the amount of data in bytes that was transferred during the session.
Throughput
Specifies the average throughput of the session over the past five minutes.
Example 2 NDMP backup and restore operations
Examples of active NDMP backup sessions indicated through the OP settingdescribed previously are as follows:
B(T0): Token based full backup B(Ti): Token based incremental backup B(L0): Level based full backup B(L5): Level 5 incremental backup B(S0): Snapshot based full backup B(S3): Snapshot based level 3 backup B(FT0): Token based full filelist backup B(FL4): Level 4 incremental filelist backup B(L0r): Restartable level based full backup B(S4r): Restartable snapshot based level 4 incremental backup B(L7R): Restarted level 7 backup B(FT1R): Restarted token based incremental filelist backup B(ML0): Multi-stream full backup
Examples of active NDMP restore sessions indicated through the OP settingdescribed previously are as follows:
R(F): Full restoreR(D): DARR(S): Selective restore
Administering NDMP
Isilon OneFS CLI Administration Guide 377

Example 2 NDMP backup and restore operations (continued)
R(MF): Multi-stream full restoreR(sFh): single threaded full restore with restore hardlinks by table option
Managing NDMP restartable backupsAn NDMP restartable backup also known as backup restartable extension (BRE) is atype of backup that you can enable in your data management application (DMA). If arestartable backup fails, for example, because of a power outage, you can restart thebackup from a checkpoint close to the point of failure. In contrast, when a non-restartable backup fails, you must back up all data from the beginning, regardless ofwhat was transferred during the initial backup process.
After you enable restartable backups from your DMA, you can manage restartablebackup contexts from OneFS. These contexts are the data that OneFS stores tofacilitate restartable backups. Each context represents a checkpoint that therestartable backup process can return to if a backup fails. There can be only onerestartable backup context per restartable backup session. A backup restartablecontext contains working files in the state of the latest checkpoint.
Restartable backups are supported for NetWorker 8.1 and later versions andCommVault Simpana DMAs.
Note: NDMP multi-stream backup does not support restartable backups.
Configure NDMP restartable backups for NetWorkerYou must configure NetWorker to enable NDMP restartable backups and, optionally,define the checkpoint interval.
About this task
If you do not specify a checkpoint interval, NetWorker uses the default interval of 5GB.
Procedure
1. Configure the client and the directory path that you want to back up as youwould normally.
2. In the Client Properties dialog box, enable restartable backups.
a. On the General page, click the Checkpoint enabled checkbox.
b. In the Checkpoint granularity drop-down list, select File.
3. In the Application information field, type any NDMP variables that you want tospecify.
The following variable setting specifies a checkpoint interval of 1 GB:CHECKPOINT_INTERVAL_IN_BYTES=1GB
4. Finish configuration and click OK in the Client Properties dialog box.
5. Start the backup.
6. If the backup is interrupted—for example, because of a power failure—restartit.
Administering NDMP
378 Isilon OneFS CLI Administration Guide

a. On the Monitoring page, locate the backup process in the Groups list.
b. Right-click the backup process and then, in the context menu, click Restart.
NetWorker automatically restarts the backup from the last checkpoint.
View NDMP restartable backup contextsYou can view NDMP restartable backup contexts that have been configured.
Procedure
1. List all the restartable backup contexts by running the following command:
isi ndmp contexts list --type=bre
2. To view detailed information about a specific restartable backup context, runthe isi ndmp contexts view command.
The following command displays detailed information about a backup contextwith an ID of 792eeb8a-8784-11e2-aa70-0025904e91a4:
isi ndmp contexts view bre_792eeb8a-8784-11e2-aa70-0025904e91a4
Delete an NDMP restartable backup contextAfter an NDMP restartable backup context is no longer needed, your datamanagement application (DMA) automatically requests OneFS to delete the context.You can manually delete a restartable backup context before the DMA requests it.
About this task
Note: We recommend that you do not manually delete restartable backupcontexts. Manually deleting a restartable backup context requires you to restartthe corresponding NDMP backup from the beginning.
Procedure
l Run the isi ndmp contexts delete command.
The following command deletes a restartable backup context with an ID of792eeb8a-8784-11e2-aa70-0025904e91a4:
isi ndmp contexts delete --id=bre_792eeb8a-8784-11e2-aa70-0025904e91a4
Configure NDMP restartable backup settingsYou can specify the number of restartable backup contexts that OneFS can retain at atime, up to a maximum of 1024 contexts. The default number of restartable backupcontexts is set to 64.
Procedure
l Run the isi ndmp settings global modify command.
Administering NDMP
Isilon OneFS CLI Administration Guide 379
The following command sets the maximum number of restartable backup contextsto 128:
isi ndmp settings global modify --bre_max_num_contexts=128
View NDMP restartable backup settingsYou can view the current limit of restartable backup contexts that OneFS retains atone time.
Procedure
l Run the following command:
isi ndmp settings global view
NDMP restore operationsNDMP supports the following types of restore operations:
l NDMP parallel restore (multi-threaded process)
l NDMP serial restore (single-threaded process)
NDMP parallel restore operationParallel (multi-threaded) restore enables faster full or partial restore operations bywriting data to the cluster as fast as the data can be read from the tape. Parallelrestore is the default restore mechanism in OneFS.
You can restore multiple files concurrently through the parallel restore mechanism.
NDMP serial restore operationFor troubleshooting or for other purposes, you can run a serial restore operation whichuses fewer system resources. The serial restore operation runs as a single-threadedprocess and restores one file at a time to the specified path.
Specify a NDMP serial restore operationYou can use the RESTORE_OPTIONS environment variable to specify a serial (single-threaded) restore operation.
Procedure
1. In your data management application, configure a restore operation as younormally would.
2. Make sure that the RESTORE_OPTIONS environment variable is set to 1 on yourdata management application.
If the RESTORE_OPTIONS environment variable is not already set to 1, specifythe isi ndmp settings variables modify command from the OneFS
Administering NDMP
380 Isilon OneFS CLI Administration Guide
command line. The following command specifies serial restore for the /ifs/data/projects directory:
isi ndmp settings variables modify /ifs/data/projects RESTORE_OPTIONS 1
The value of the path option must match the FILESYSTEM environmentvariable that is set during the backup operation. The value that you specify forthe name option is case sensitive.
3. Start the restore operation.
Managing default NDMP variablesIn OneFS, you can manage NDMP backup and restore operations by specifying defaultNDMP environment variables. You can specify NDMP environment variables for all thebackup and restore operations or for a specific path. When you set the path to "/BACKUP", the environment variables are applied to all the backup operations.Similarly, when you set the path to "/RESTORE", the environment variables areapplied to all the restore operations.
You can override default NDMP environment variables through your data managementapplication (DMA). For more information about specifying NDMP environmentvariables through your DMA, see the relevant DMA documentation.
Specify the default NDMP variable settings for a pathYou can specify default NDMP variable settings for a path.
Procedure
1. Open a secure shell (SSH) connection to any node in the Isilon cluster and login.
2. Set default NDMP variables by running the isi ndmp settingsvariables create command.
For example, the following command enables snapshot-based incrementalbackups for /ifs/data/media:
isi ndmp settings variables create /ifs/data/media BACKUP_MODE SNAPSHOT
Modify the default NDMP variable settings for a pathYou can modify the default NDMP variable settings for a path.
Procedure
1. Open a secure shell (SSH) connection to any node in the Isilon cluster and login.
2. Modify default NDMP variable settings by running the isi ndmp settingsvariables modify command.
For example, the following command sets the default file history format topath-based format for /ifs/data/media:
isi ndmp settings variables modify /ifs/data/media HIST F
Administering NDMP
Isilon OneFS CLI Administration Guide 381

3. (Optional) To remove a default NDMP variable setting for a path, run the isindmp settings variables delete command:
For example, the following command removes the default file history formatfor /ifs/data/media:
isi ndmp settings variables delete /ifs/data/media --name=HIST
Note: If you do not specify the --name option, all the variables for thespecified path are deleted after a confirmation.
View the default NDMP settings for a pathYou can view the default NDMP settings for a path.
Procedure
1. Open a secure shell (SSH) connection to any node in the Isilon cluster and login.
2. View the default NDMP settings by running the following command:
isi ndmp settings variables list
NDMP environment variablesYou can specify default settings of NDMP backup and recovery operations throughNDMP environment variables. You can also specify NDMP environment variablesthrough your data management application (DMA).
Symantec NetBackup and NetWorker are the only two DMAs that allow you to directlyset environment variables and propagate them to OneFS.
Table 11 NDMP environment variables
Environment variable Valid values Default Description
BACKUP_FILE_LIST <file-path> None Triggers a file list backup.Currently, only Networkerand Symantec NetBackupcan pass environmentvariables to OneFS.
BACKUP_MODE TIMESTAMPSNAPSHOT
TIMESTAMP
Enables or disablessnapshot-based incrementalbackups. To enablesnapshot-based incrementalbackups, specifySNAPSHOT.
BACKUP_OPTIONS 0x000004000x000002000x000001000x00000001
0 This environment variablecontrols the behavior of thebackup operations.The following settings areapplicable only to datasets
Administering NDMP
382 Isilon OneFS CLI Administration Guide
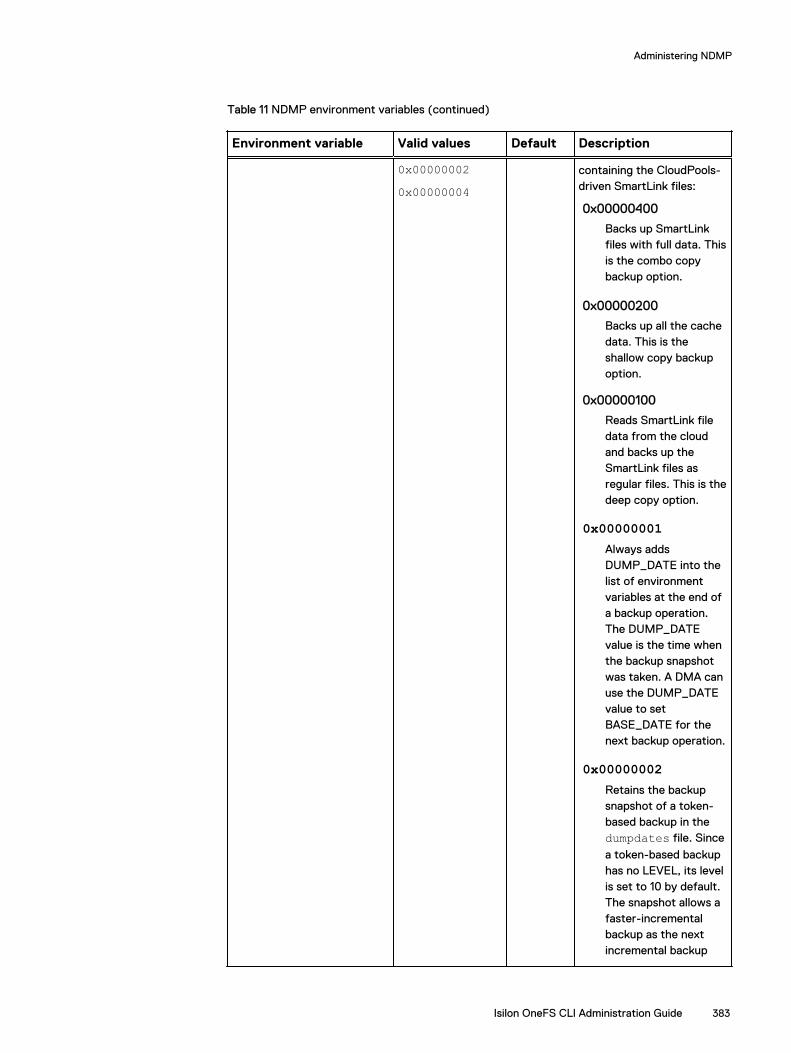
Table 11 NDMP environment variables (continued)
Environment variable Valid values Default Description
0x000000020x00000004
containing the CloudPools-driven SmartLink files:
0x00000400
Backs up SmartLinkfiles with full data. Thisis the combo copybackup option.
0x00000200
Backs up all the cachedata. This is theshallow copy backupoption.
0x00000100
Reads SmartLink filedata from the cloudand backs up theSmartLink files asregular files. This is thedeep copy option.
0x00000001Always addsDUMP_DATE into thelist of environmentvariables at the end ofa backup operation.The DUMP_DATEvalue is the time whenthe backup snapshotwas taken. A DMA canuse the DUMP_DATEvalue to setBASE_DATE for thenext backup operation.
0x00000002Retains the backupsnapshot of a token-based backup in thedumpdates file. Since
a token-based backuphas no LEVEL, its levelis set to 10 by default.The snapshot allows afaster-incrementalbackup as the nextincremental backup
Administering NDMP
Isilon OneFS CLI Administration Guide 383

Table 11 NDMP environment variables (continued)
Environment variable Valid values Default Description
after the token-basedbackup is done.
0x00000004Retains the previoussnapshot. After afaster-incrementalbackup, the priorsnapshot is saved atlevel 10. In order toavoid two snapshots atthe same level, theprior snapshot is keptat a lower level in thedumpdates file. This
allows the BASE_DATEandBACKUP_MODE=snapshot settings to trigger
a faster-incrementalbackup instead of atoken-based backup.The environmentvariable settingsprompt the NDMPserver to compare theBASE_DATE value
against the timestampin the dumpdates file
to find the priorbackup. Even thoughthe DMA fails thelatest faster-incremental backup,OneFS retains theprior snapshot. TheDMA can then retrythe faster-incrementalbackup in the nextbackup cycle using theBASE_DATE value of
the prior backup.
BASE_DATE Enables a token-basedincremental backup. Thedumpdates file will not be
updated in this case.
DIRECT YN
N Enables or disables DirectAccess Restore (DAR) and
Administering NDMP
384 Isilon OneFS CLI Administration Guide

Table 11 NDMP environment variables (continued)
Environment variable Valid values Default Description
Directory DAR (DDAR). Thefollowing values are valid:
YEnables DAR andDDAR.
NDisables DAR andDDAR.
EXCLUDE <file-matching-pattern>
None If you specify this option,OneFS does not back upfiles and directories thatmeet the specified pattern.Separate multiple patternswith a space.
FILES <file-matching-pattern>
None If you specify this option,OneFS backs up only filesand directories that meetthe specified pattern.Separate multiple patternswith a space.
Note: As a rule, files arematched first and thenthe EXCLUDE pattern isapplied.
HIST <file-history-format>
Y Specifies the file historyformat.The following values arevalid:
DSpecifies directory ornode file history.
FSpecifies path-basedfile history.
YSpecifies the defaultfile history formatdetermined by yourNDMP backupsettings.
NDisables file history.
Administering NDMP
Isilon OneFS CLI Administration Guide 385

Table 11 NDMP environment variables (continued)
Environment variable Valid values Default Description
LEVEL <integer> 0 Specifies the level of NDMPbackup to perform. Thefollowing values are valid:
0Performs a full NDMPbackup.
1 - 9Performs anincremental backup atthe specified level.
10Performs IncrementalForever backups.
MSB_RETENTION_PERIOD Integer 300 sec For a multi-stream backupsession, specifies thebackup context retentionperiod.
MSR_RETENTION_PERIOD 0 through60*60*24
600 sec For a multi-stream restoresession, specifies therecovery context retentionperiod within which arecovery session can beretried.
RECURSIVE YN
Y For restore sessions only.Specifies that the restoresession should recover filesor sub-directories under adirectory automatically.
RESTORE_BIRTHTIME YN
N Specifies whether torecover the birth time for arecovery session.
RESTORE_HARDLINK_BY_TABLE
YN
N For a single-threadedrestore session, determineswhether OneFS recovershard links by building ahard-link table duringrecovery operations.Specify this option if hardlinks are incorrectly backedup and recovery operationsare failing.If a recovery operation failsbecause hard links wereincorrectly backed up, the
Administering NDMP
386 Isilon OneFS CLI Administration Guide
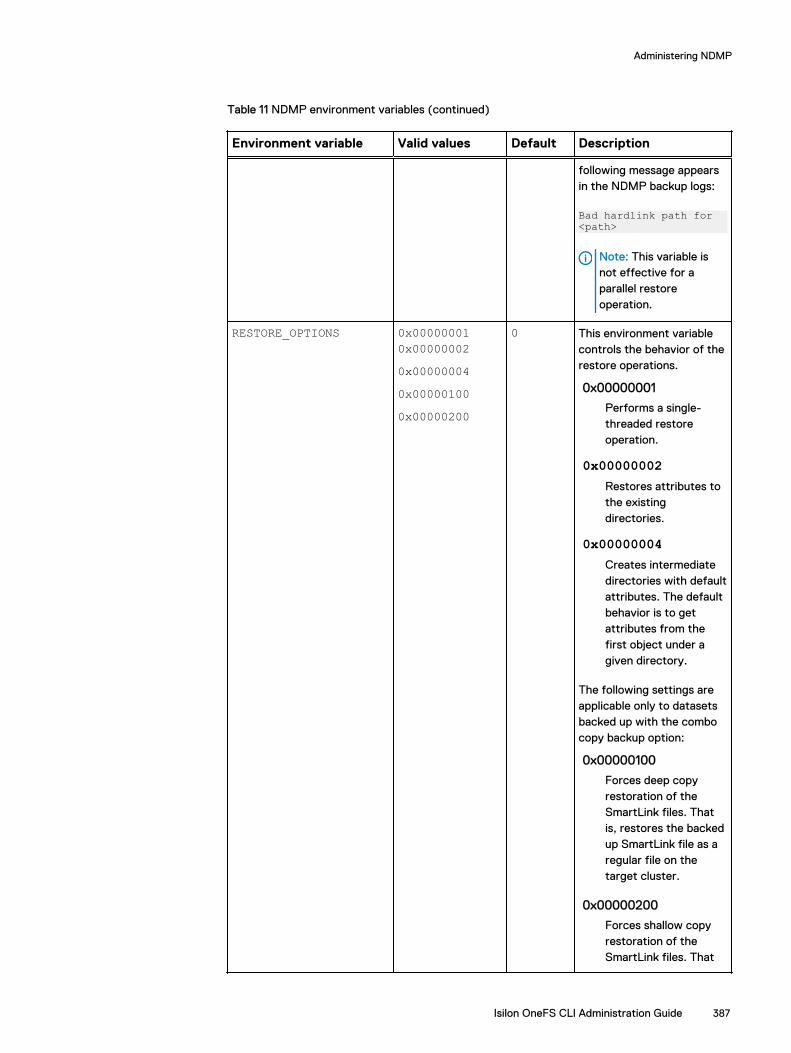
Table 11 NDMP environment variables (continued)
Environment variable Valid values Default Description
following message appearsin the NDMP backup logs:
Bad hardlink path for <path>
Note: This variable isnot effective for aparallel restoreoperation.
RESTORE_OPTIONS 0x000000010x000000020x000000040x000001000x00000200
0 This environment variablecontrols the behavior of therestore operations.
0x00000001
Performs a single-threaded restoreoperation.
0x00000002Restores attributes tothe existingdirectories.
0x00000004Creates intermediatedirectories with defaultattributes. The defaultbehavior is to getattributes from thefirst object under agiven directory.
The following settings areapplicable only to datasetsbacked up with the combocopy backup option:
0x00000100
Forces deep copyrestoration of theSmartLink files. Thatis, restores the backedup SmartLink file as aregular file on thetarget cluster.
0x00000200
Forces shallow copyrestoration of theSmartLink files. That
Administering NDMP
Isilon OneFS CLI Administration Guide 387

Table 11 NDMP environment variables (continued)
Environment variable Valid values Default Description
is, restores the backedup SmartLink file as aSmartLink file on thetarget cluster.
UPDATE YN
Y Determines whether OneFSupdates the dumpdatesfile. The default is toperform a combo copyrestore.
YOneFS updates thedumpdates file.
NOneFS does notupdate thedumpdates file.
Setting environment variables for backup and restore operationsYou can set environment variables to support the backup and restore operations foryour NDMP session.
You can set environment variables through a data management application (DMA) orthe command-line interface. Alternatively, you can set global environment variables.The precedence to apply their settings for a backup or restore operation follows:
l The environment variables specified through a DMA have the highest precedence.l Path-specific environment variables specified by the isi ndmp settings
variables take the next precedence.
l Global environment variable settings of "/BACKUP" or "/RESTORE" take thelowest precedence.
You can set environment variables to support different types of backup operations asdescribed in the following scenarios:
l If the BASE_DATE environment variable is set to any value and if you set theBACKUP_MODE environment variable to SNAPSHOT, the LEVEL environmentvariable is automatically set to 10 and an Incremental Forever backup isperformed.
l If the BASE_DATE environment variable is set to 0, a full backup is performed.
l If the BACKUP_MODE environment variable is set to snapshot and theBASE_DATE environment variable is not set to 0, the entries in the dumpdatesfile are read and compared with the BASE_DATE environment variable. If an entryis found and a prior valid snapshot is found, a faster incremental backup isperformed.
l If the BACKUP_MODE environment variable is set to snapshot, the BASE_DATEenvironment variable is not set to 0, and if no entries are found in the dumpdates
Administering NDMP
388 Isilon OneFS CLI Administration Guide

file and no prior valid snapshots are found, a token-based backup is performedusing the value of the BASE_DATE environment variable.
l If the BASE_DATE environment variable is set, the BACKUP_OPTIONSenvironment variable is set to 0x0001 by default.
l If the BACKUP_MODE environment variable is set to snapshot, theBACKUP_OPTIONS environment variable is set to 0x0002 by default.
l If the BACKUP_OPTIONS environment variable is set to 0x0004 , the snapshot issaved and maintained by the application used for the backup process.
l In order to run an Incremental Forever backup with faster incremental backups,you must set the following environment variables:
n BASE_DATE=<time>
n BACKUP_MODE=snapshotn BACKUP_OPTIONS=7
Managing snapshot based incremental backupsAfter you enable snapshot-based incremental backups, you can view and delete thesnapshots created for these backups.
Enable snapshot-based incremental backups for a directoryYou can configure OneFS to perform snapshot-based incremental backups for adirectory by default. You can also override the default setting in your datamanagement application (DMA).
Procedure
l Run the isi ndmp settings variable create command.
The following command enables snapshot-based incremental backups for /ifs/data/media:
isi ndmp settings variables create /ifs/data/media BACKUP_MODE SNAPSHOT
Delete snapshots for snapshot-based incremental backupsYou can delete snapshots created for snapshot-based incremental backups.
About this task
Note: It is recommended that you do not delete snapshots created for snapshot-based incremental backups. If all snapshots are deleted for a path, the nextbackup performed for the path is a full backup.
Procedure
1. Click Data Protection > NDMP > Environment Settings.
2. In the Dumpdates table, click Delete against the entry that you want to delete.
3. In the Confirm Delete dialog box, click Delete.
Administering NDMP
Isilon OneFS CLI Administration Guide 389

View snapshots for snapshot-based incremental backupsYou can view snapshots generated for snapshot-based incremental backups.
Procedure
1. Click Data Protection > NDMP > Environment Settings.
2. In the Dumpdates table, view information about the snapshot-basedincremental backups.
Managing cluster performance for NDMP sessionsNDMP Redirector distributes NDMP loads automatically over nodes with the Shebanetwork interface card (NIC). You can enable NDMP Redirector to automaticallydistribute NDMP two-way sessions to nodes with lesser loads. NDMP Redirectorchecks the CPU usage, number of NDMP operations already running, and theavailability of tape devices for the operation on each node before redirecting theNDMP operation. The load-distribution capability results in improved clusterperformance when multiple NDMP operations are initiated.
Enable NDMP Redirector to manage cluster performanceYou must enable NDMP Redirector in order to automatically distribute NDMP two-way sessions to nodes with lesser loads.
Before you begin
Make sure that the cluster is committed before enabling NDMP Redirector.
Procedure
1. Run the following command through the command line interface to enableNDMP Redirector:
isi ndmp settings global modify --enable-redirector true
2. View the setting change by running the following command:
isi ndmp settings global modify
A sample output of the previous command is shown:
Service: False Port: 10000 DMA: generic Bre Max Num Contexts: 64 Context Retention Duration: 300 Smartlink File Open Timeout: 10 Enable Redirector: True
Administering NDMP
390 Isilon OneFS CLI Administration Guide

Managing CPU usage for NDMP sessionsNDMP Throttler manages the CPU usage during NDMP two-way sessions on 6thGeneration nodes. The nodes are then available to adequately support other systemactivities.
Enable NDMP ThrottlerYou must enable NDMP Throttler in order to manage CPU usage of NDMP sessions on6th Generation nodes.
Procedure
1. Run the following command through the command line interface to enableNDMP Throttler:
isi ndmp settings global modify --enable-throttler true
2. View the setting change by running the following command:
isi ndmp settings global modify
A sample output of the previous command is shown:
Service: False Port: 10000 DMA: generic Bre Max Num Contexts: 64 Context Retention Duration: 600 Smartlink File Open Timeout: 10 Enable Throttler: TrueThrottler CPU Threshold: 50
3. If required, change the throttler CPU threshold as shown in the followingexample:
isi ndmp settings global modify –throttler-cpu-threshold 80
View NDMP backup logsYou can view information about NDMP backup and restore operations through NDMPbackup logs.
Procedure
1. View the contents of the /var/log/isi_ndmp_d directory by running thefollowing command:
more /var/log/isi_ndmp_d
Administering NDMP
Isilon OneFS CLI Administration Guide 391

Administering NDMP
392 Isilon OneFS CLI Administration Guide

CHAPTER 20
File retention with SmartLock
This section contains the following topics:
l SmartLock overview........................................................................................ 394l Compliance mode.............................................................................................394l Enterprise mode...............................................................................................394l SmartLock directories......................................................................................395l Replication and backup with SmartLock.......................................................... 395l SmartLock license functionality....................................................................... 396l SmartLock considerations................................................................................396l Delete WORM domain and directories..............................................................397l Set the compliance clock................................................................................. 398l View the compliance clock............................................................................... 398l Creating a SmartLock directory....................................................................... 398l Managing SmartLock directories..................................................................... 400l Managing files in SmartLock directories.......................................................... 405
Isilon OneFS CLI Administration Guide 393

SmartLock overviewWith the SmartLock software module, you can protect files on an Isilon cluster frombeing modified, overwritten, or deleted. To protect files in this manner, you mustactivate a SmartLock license.
With SmartLock, you can identify a directory in OneFS as a WORM domain. WORMstands for write once, read many. All files within the WORM domain can be committedto a WORM state, meaning that those files cannot be overwritten, modified, ordeleted.
After a file is removed from a WORM state, you can delete the file. However, you cannever modify a file that has been committed to a WORM state, even after it isremoved from a WORM state.
In OneFS, SmartLock can be deployed in one of two modes: compliance mode orenterprise mode.
Compliance modeSmartLock compliance mode enables you to protect your data in compliance with theregulations defined by U.S. Securities and Exchange Commission rule 17a-4. Thisregulation, aimed at securities brokers and dealers, specifies that records of allsecurities transactions must be archived in a non-rewritable, non-erasable manner.
Note: You can configure an Isilon cluster for SmartLock compliance mode onlyduring the initial cluster configuration process, prior to activating a SmartLocklicense. A cluster cannot be converted to SmartLock compliance mode after thecluster is initially configured and put into production.
If you configure a cluster for SmartLock compliance mode, the root user is disabled,and you are not able to log in to that cluster through the root user account. Instead,you can log in to the cluster through the compliance administrator account that isconfigured during initial SmartLock compliance mode configuration.
When you are logged in to a SmartLock compliance mode cluster through thecompliance administrator account, you can perform administrative tasks through thesudo command.
Enterprise modeYou can create SmartLock domains and apply WORM status to files by activating aSmartLock license on a cluster in standard configuration. This is referred to asSmartLock enterprise mode.
SmartLock enterprise mode does not conform to SEC regulations, but does enable youto create SmartLock directories and apply SmartLock controls to protect files so thatthey cannot be rewritten or erased. In addition, the root user account remains on yoursystem.
File retention with SmartLock
394 Isilon OneFS CLI Administration Guide

SmartLock directoriesIn a SmartLock directory, you can commit a file to a WORM state manually or you canconfigure SmartLock to commit the file automatically. Before you can createSmartLock directories, you must activate a SmartLock license on the cluster.
You can create two types of SmartLock directories: enterprise and compliance.However, you can create compliance directories only if the Isilon cluster has been setup in SmartLock compliance mode during initial configuration.
Enterprise directories enable you to protect your data without restricting your clusterto comply with regulations defined by U.S. Securities and Exchange Commission rule17a-4. If you commit a file to a WORM state in an enterprise directory, the file cannever be modified and cannot be deleted until the retention period passes.
However, if you own a file and have been assigned theISI_PRIV_IFS_WORM_DELETE privilege, or you are logged in through the root useraccount, you can delete the file through the privileged delete feature before theretention period passes. The privileged delete feature is not available for compliancedirectories. Enterprise directories reference the system clock to facilitate time-dependent operations, including file retention.
Compliance directories enable you to protect your data in compliance with theregulations defined by U.S. Securities and Exchange Commission rule 17a-4. If youcommit a file to a WORM state in a compliance directory, the file cannot be modifiedor deleted before the specified retention period has expired. You cannot deletecommitted files, even if you are logged in to the compliance administrator account.Compliance directories reference the compliance clock to facilitate time-dependentoperations, including file retention.
You must set the compliance clock before you can create compliance directories. Youcan set the compliance clock only once, after which you cannot modify the complianceclock time. You can increase the retention time of WORM committed files on anindividual basis, if desired, but you cannot decrease the retention time.
The compliance clock is controlled by the compliance clock daemon. Root andcompliance administrator users could disable the compliance clock daemon, whichwould have the effect of increasing the retention period for all WORM committedfiles. However, this is not recommended.
Note: Using WORM exclusions, files inside a WORM compliance or enterprisedomain can be excluded from having a WORM state. All the files inside theexcluded directory will behave as normal non-Smartlock protected files. For moreinformation, see Exclude a SmartLock directory on page 401.
Replication and backup with SmartLockOneFS enables both compliance and enterprise SmartLock directories to be replicatedor backed up to a target cluster.
If you are replicating SmartLock directories with SyncIQ, we recommend that youconfigure all nodes on the source and target clusters with Network Time Protocol(NTP) peer mode to ensure that the node clocks are synchronized. For complianceclusters, we recommend that you configure all nodes on the source and target clusterswith NTP peer mode before you set the compliance clocks. This sets the source andtarget clusters to the same time initially and helps to ensure compliance with U.S.Securities and Exchange Commission rule 17a-4.
File retention with SmartLock
Isilon OneFS CLI Administration Guide 395

Note: If you replicate data to a SmartLock directory, do not configure SmartLocksettings for that directory until you are no longer replicating data to the directory.Configuring an autocommit time period for a SmartLock target directory, forexample, can cause replication jobs to fail. If the target directory commits a file toa WORM state, and the file is modified on the source cluster, the next replicationjob will fail because it cannot overwrite the committed file.
If you back up data to an NDMP device, all SmartLock metadata relating to theretention date and commit status is transferred to the NDMP device. If you recoverdata to a SmartLock directory on the cluster, the metadata persists on the cluster.However, if the directory that you recover data to is not a SmartLock directory, themetadata is lost. You can recover data to a SmartLock directory only if the directory isempty.
For information on the limitations of replicating and failing back SmartLock directorieswith SyncIQ, see SmartLock replication limitations on page 316.
SmartLock license functionalityYou must activate a SmartLock license on an Isilon cluster before you can createSmartLock directories and commit files to a WORM state.
If a SmartLock license becomes inactive, you will not be able to create new SmartLockdirectories on the cluster, modify SmartLock directory configuration settings, ordelete files committed to a WORM state in enterprise directories before theirexpiration dates. However, you can still commit files within existing SmartLockdirectories to a WORM state.
If a SmartLock license becomes inactive on a cluster that is running in SmartLockcompliance mode, root access to the cluster is not restored.
SmartLock considerationsl If a file is owned exclusively by the root user, and the file exists on an Isilon cluster
that is in SmartLock compliance mode, the file will be inaccessible, because theroot user account is disabled in compliance mode. For example, this can happen ifa file is assigned root ownership on a cluster that has not been configured incompliance mode, and then the file is replicated to a cluster in compliance mode.This can also occur if a root-owned file is restored onto a compliance cluster froma backup.
l It is recommended that you create files outside of SmartLock directories and thentransfer them into a SmartLock directory after you are finished working with thefiles. If you are uploading files to a cluster, it is recommended that you upload thefiles to a non-SmartLock directory, and then later transfer the files to a SmartLockdirectory. If a file is committed to a WORM state while the file is being uploaded,the file will become trapped in an inconsistent state.
l Files can be committed to a WORM state while they are still open. If you specifyan autocommit time period for a directory, the autocommit time period iscalculated according to the length of time since the file was last modified, notwhen the file was closed. If you delay writing to an open file for more than theautocommit time period, the file is automatically committed to a WORM state, andyou will not be able to write to the file.
l In a Microsoft Windows environment, if you commit a file to a WORM state, youcan no longer modify the hidden or archive attributes of the file. Any attempt to
File retention with SmartLock
396 Isilon OneFS CLI Administration Guide
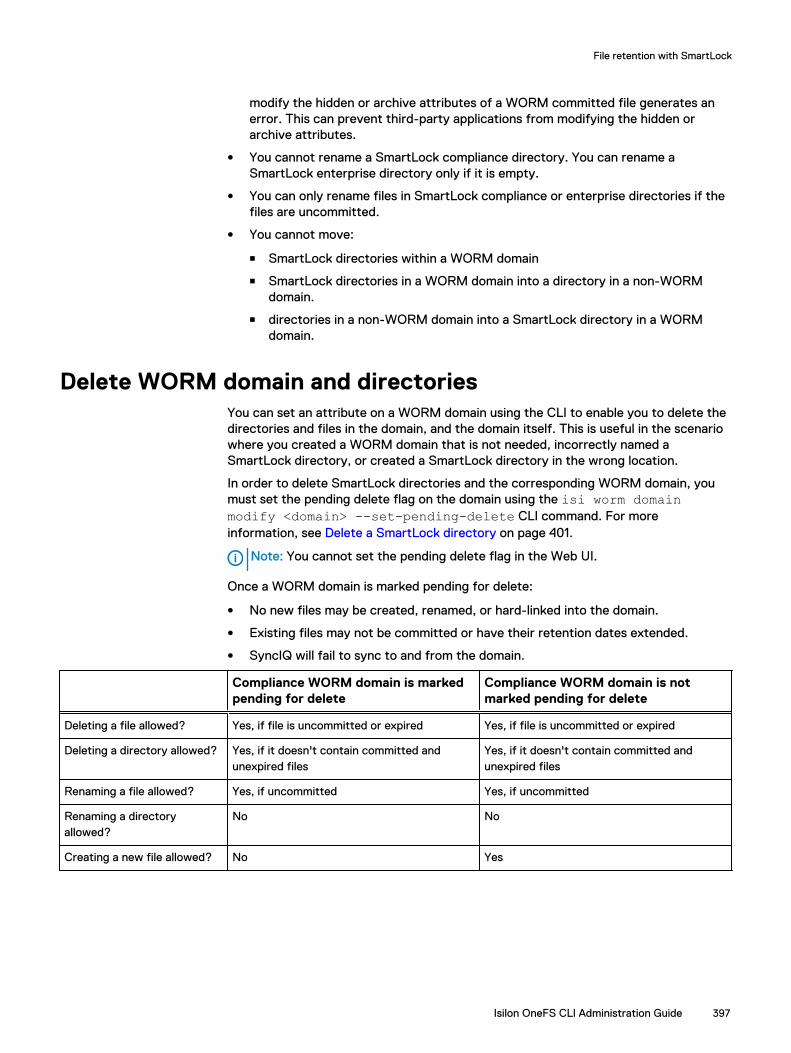
modify the hidden or archive attributes of a WORM committed file generates anerror. This can prevent third-party applications from modifying the hidden orarchive attributes.
l You cannot rename a SmartLock compliance directory. You can rename aSmartLock enterprise directory only if it is empty.
l You can only rename files in SmartLock compliance or enterprise directories if thefiles are uncommitted.
l You cannot move:
n SmartLock directories within a WORM domain
n SmartLock directories in a WORM domain into a directory in a non-WORMdomain.
n directories in a non-WORM domain into a SmartLock directory in a WORMdomain.
Delete WORM domain and directoriesYou can set an attribute on a WORM domain using the CLI to enable you to delete thedirectories and files in the domain, and the domain itself. This is useful in the scenariowhere you created a WORM domain that is not needed, incorrectly named aSmartLock directory, or created a SmartLock directory in the wrong location.
In order to delete SmartLock directories and the corresponding WORM domain, youmust set the pending delete flag on the domain using the isi worm domainmodify <domain> --set-pending-delete CLI command. For moreinformation, see Delete a SmartLock directory on page 401.
Note: You cannot set the pending delete flag in the Web UI.
Once a WORM domain is marked pending for delete:
l No new files may be created, renamed, or hard-linked into the domain.
l Existing files may not be committed or have their retention dates extended.
l SyncIQ will fail to sync to and from the domain.
Compliance WORM domain is markedpending for delete
Compliance WORM domain is notmarked pending for delete
Deleting a file allowed? Yes, if file is uncommitted or expired Yes, if file is uncommitted or expired
Deleting a directory allowed? Yes, if it doesn't contain committed andunexpired files
Yes, if it doesn't contain committed andunexpired files
Renaming a file allowed? Yes, if uncommitted Yes, if uncommitted
Renaming a directoryallowed?
No No
Creating a new file allowed? No Yes
File retention with SmartLock
Isilon OneFS CLI Administration Guide 397

Set the compliance clockBefore you can create SmartLock compliance directories, you must set thecompliance clock.
About this task
Setting the compliance clock configures the clock to the same time as the clustersystem clock. Before you set the compliance clock, ensure that the system clock is setto the correct time. If the compliance clock later becomes unsynchronized with thesystem clock, the compliance clock will slowly correct itself to match the systemclock. The compliance clock corrects itself at a rate of approximately one week peryear.
Procedure
1. Open a secure shell (SSH) connection to any node in the cluster and log inthrough the compliance administrator account.
2. Set the compliance clock by running the following command:
isi worm cdate set
View the compliance clockYou can view the current time of the compliance clock.
Procedure
1. Open a secure shell (SSH) connection to any node in the cluster and log inthrough the compliance administrator account.
2. View the compliance clock by running the following command:
isi worm cdate view
Creating a SmartLock directoryYou can create a SmartLock directory and configure settings that control how longfiles are retained in a WORM state and when files are automatically committed to aWORM state. You cannot move or rename a directory that contains a SmartLockdirectory.
Retention periodsA retention period is the length of time that a file remains in a WORM state beforebeing released from a WORM state. You can configure SmartLock directory settingsthat enforce default, maximum, and minimum retention periods for the directory.
If you manually commit a file, you can optionally specify the date that the file isreleased from a WORM state. You can configure a minimum and a maximum retentionperiod for a SmartLock directory to prevent files from being retained for too long ortoo short a time period. It is recommended that you specify a minimum retentionperiod for all SmartLock directories.
File retention with SmartLock
398 Isilon OneFS CLI Administration Guide
For example, assume that you have a SmartLock directory with a minimum retentionperiod of two days. At 1:00 PM on Monday, you commit a file to a WORM state, andspecify the file to be released from a WORM state on Tuesday at 3:00 PM. The file willbe released from a WORM state two days later on Wednesday at 1:00 PM, becausereleasing the file earlier would violate the minimum retention period.
You can also configure a default retention period that is assigned when you commit afile without specifying a date to release the file from a WORM state.
Autocommit time periodsYou can configure an autocommit time period for SmartLock directories. Anautocommit time period causes files that have been in a SmartLock directory for aperiod of time without being modified to be automatically committed to a WORMstate.
If you modify the autocommit time period of a SmartLock directory that containsuncommitted files, the new autocommit time period is immediately applied to the filesthat existed before the modification. For example, consider a SmartLock directorywith an autocommit time period of 2 hours. If you modify a file in the SmartLockdirectory at 1:00 PM, and you decrease the autocommit time period to 1 hour at 2:15PM, the file is instantly committed to a WORM state.
If a file is manually committed to a WORM state, the read-write permissions of the fileare modified. However, if a file is automatically committed to a WORM state, the read-write permissions of the file are not modified.
Create an enterprise directory for a non-empty directoryYou can make a non-empty directory into a SmartLock enterprise directory. Thisprocedure is available only through the command-line interface (CLI).
About this task
Before creating a SmartLock directory, be aware of the following conditions andrequirements:
l You cannot create a SmartLock directory as a subdirectory of an existingSmartLock directory.
l Hard links cannot cross SmartLock directory boundaries.
l Creating a SmartLock directory causes a corresponding SmartLock domain to becreated for that directory.
Procedure
1. Run the isi job jobs start command.
The following command creates a SmartLock enterprise domain for /ifs/data/smartlock:
isi job jobs start DomainMark --root /ifs/data/smartlock --dm-type Worm
File retention with SmartLock
Isilon OneFS CLI Administration Guide 399

Create a SmartLock directoryYou can create a SmartLock directory and commit files in that directory to a WORMstate.
About this task
Before creating a SmartLock directory, be aware of the following conditions andrequirements:
l You cannot create a SmartLock directory as a subdirectory of an existingSmartLock directory.
l Hard links cannot cross SmartLock directory boundaries.
l Creating a SmartLock directory causes a corresponding SmartLock domain to becreated for that directory.
Procedure
1. Run the isi worm domains create command.
If you specify the path of an existing directory, the directory must be empty.
The following command creates a compliance directory with a default retentionperiod of four years, a minimum retention period of three years, and anmaximum retention period of five years:
isi worm domains create /ifs/data/SmartLock/directory1 \ --compliance --default-retention 4Y --min-retention 3Y \ --max-retention 5Y --mkdir
The following command creates an enterprise directory with an autocommittime period of thirty minutes and a minimum retention period of three months:
isi worm domains create /ifs/data/SmartLock/directory2 \ --autocommit-offset 30m --min-retention 3M --mkdir
Managing SmartLock directoriesYou can modify SmartLock directory settings, including the default, minimum,maximum retention period and the autocommit time period.
A SmartLock enterprise directory can be renamed only if the directory is empty. ASmartLock compliance directory cannot be renamed.
Modify a SmartLock directoryYou can modify the SmartLock configuration settings for a SmartLock directory.
About this task
Note: You can modify SmartLock directory settings only 32 times per directory. Itis recommended that you set SmartLock configuration settings only once and donot modify the settings after files are added to the SmartLock directory.
Procedure
1. Open a secure shell (SSH) connection to any node in the cluster and log in.
File retention with SmartLock
400 Isilon OneFS CLI Administration Guide

2. Modify SmartLock configuration settings by running the isi worm modifycommand.
The following command sets the default retention period to one year:
isi worm domains modify /ifs/data/SmartLock/directory1 \--default-retention 1Y
Exclude a SmartLock directoryYou can exclude a SmartLock enterprise mode or compliance mode directory in aWORM domain to exempt the directory and its files within it from WORM retentionpolicies and protection. In order to do this, you must create a WORM exclusion domainon a directory. This procedure is available only through the command-line interface(CLI).
About this task
To create a WORM exclusion domain on a directory, the directory must meet all of thefollowing conditions:
l is a member of a WORM domain.
l is not the root directory of a WORM domain.
l is not the virtual .snapshot directory.
l is not within the compliance store of a WORM compliance domain.
l is not within another WORM exclusion domain (nesting).
l is empty.
Note: You cannot create WORM domains within WORM exclusion domains.
Procedure
1. Run the isi worm domain modify /ifs/data/worm_domain --exclude /ifs/data/worm_domain/dir/<excluded_dir> command.
To remove an existing exclusion domain on a directory, you must remove the directoryand all of its constituent files.
Delete a SmartLock directoryYou can delete a SmartLock compliance mode directory and its correspondingcompliance mode WORM domain (if needed). In order to do this, you must set thepending delete flag on the domain. You cannot set the pending delete flag on anenterprise mode WORM domain. This procedure is available only through the CLI.
About this task
Before marking a compliance mode WORM domain as pending delete, be aware of thefollowing conditions:
l No new files may be created, renamed, or hard-linked into the domain.
l Existing files may not be committed or have their retention dates extended.
l SyncIQ will fail to sync to and from the domain.
File retention with SmartLock
Isilon OneFS CLI Administration Guide 401
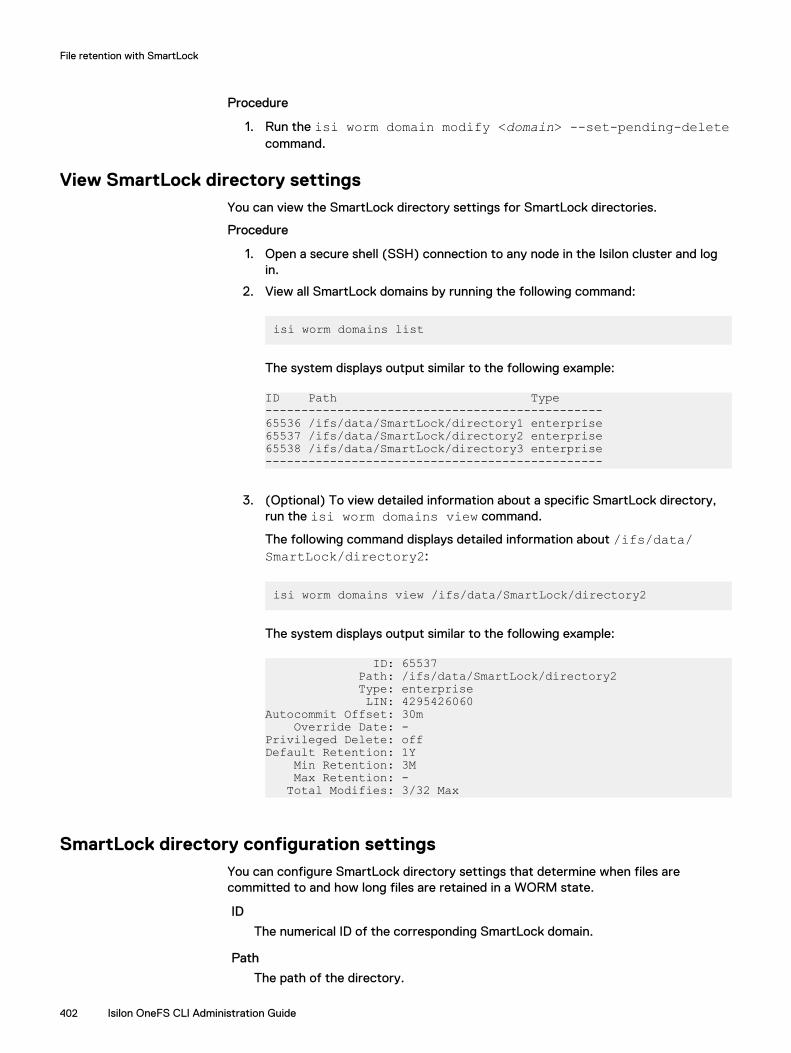
Procedure
1. Run the isi worm domain modify <domain> --set-pending-deletecommand.
View SmartLock directory settingsYou can view the SmartLock directory settings for SmartLock directories.
Procedure
1. Open a secure shell (SSH) connection to any node in the Isilon cluster and login.
2. View all SmartLock domains by running the following command:
isi worm domains list
The system displays output similar to the following example:
ID Path Type-----------------------------------------------65536 /ifs/data/SmartLock/directory1 enterprise65537 /ifs/data/SmartLock/directory2 enterprise65538 /ifs/data/SmartLock/directory3 enterprise-----------------------------------------------
3. (Optional) To view detailed information about a specific SmartLock directory,run the isi worm domains view command.
The following command displays detailed information about /ifs/data/SmartLock/directory2:
isi worm domains view /ifs/data/SmartLock/directory2
The system displays output similar to the following example:
ID: 65537 Path: /ifs/data/SmartLock/directory2 Type: enterprise LIN: 4295426060Autocommit Offset: 30m Override Date: -Privileged Delete: offDefault Retention: 1Y Min Retention: 3M Max Retention: - Total Modifies: 3/32 Max
SmartLock directory configuration settingsYou can configure SmartLock directory settings that determine when files arecommitted to and how long files are retained in a WORM state.
ID
The numerical ID of the corresponding SmartLock domain.
Path
The path of the directory.
File retention with SmartLock
402 Isilon OneFS CLI Administration Guide
Type
The type of SmartLock directory.
LIN
The inode number of the directory.
Autocommit offset
The autocommit time period for the directory. After a file exists in this SmartLockdirectory without being modified for the specified time period, the file isautomatically committed to a WORM state.Times are expressed in the format "<integer> <time>", where <time> is one ofthe following values:
Y
Specifies years
M
Specifies months
W
Specifies weeks
D
Specifies days
H
Specifies hours
m
Specifies minutes
s
Specifies seconds
Override date
The override retention date for the directory. Files committed to a WORM stateare not released from a WORM state until after the specified date, regardless ofthe maximum retention period for the directory or whether a user specifies anearlier date to release a file from a WORM state.
Privileged delete
Indicates whether files committed to a WORM state in the directory can bedeleted through the privileged delete functionality. To access the privilege deletefunctionality, you must either be assigned the ISI_PRIV_IFS_WORM_DELETEprivilege and own the file you are deleting. You can also access the privilegedelete functionality for any file if you are logged in through the root orcompadmin user account.
on
Files committed to a WORM state can be deleted through the isi wormfiles delete command.
off
Files committed to a WORM state cannot be deleted, even through the isiworm files delete command.
File retention with SmartLock
Isilon OneFS CLI Administration Guide 403

disabled
Files committed to a WORM state cannot be deleted, even through the isiworm files delete command. After this setting is applied, it cannot bemodified.
Default retention period
The default retention period for the directory. If a user does not specify a date torelease a file from a WORM state, the default retention period is assigned.Times are expressed in the format "<integer> <time>", where <time> is one ofthe following values:
Y
Specifies years
M
Specifies months
W
Specifies weeks
D
Specifies days
H
Specifies hours
m
Specifies minutes
s
Specifies seconds
Forever indicates that WORM committed files are retained permanently bydefault. Use Min indicates that the default retention period is equal to theminimum retention date. Use Max indicates that the default retention period isequal to the maximum retention date.
Minimum retention period
The minimum retention period for the directory. Files are retained in a WORMstate for at least the specified amount of time, even if a user specifies anexpiration date that results in a shorter retention period.Times are expressed in the format "<integer> <time>", where <time> is one ofthe following values:
Y
Specifies years
M
Specifies months
W
Specifies weeks
D
Specifies days
File retention with SmartLock
404 Isilon OneFS CLI Administration Guide

H
Specifies hours
m
Specifies minutes
s
Specifies seconds
Forever indicates that all WORM committed files are retained permanently.
Maximum retention period
The maximum retention period for the directory. Files cannot be retained in aWORM state for more than the specified amount of time, even if a user specifiesan expiration date that results in a longer retention period.Times are expressed in the format "<integer> <time>", where <time> is one ofthe following values:
Y
Specifies years
M
Specifies months
W
Specifies weeks
D
Specifies days
H
Specifies hours
m
Specifies minutes
s
Specifies seconds
Forever indicates that there is no maximum retention period.
Managing files in SmartLock directoriesYou can commit files in SmartLock directories to a WORM state by removing theread-write privileges of the file. You can also set a specific date at which the retentionperiod of the file expires. Once a file is committed to a WORM state, you can increasethe retention period of the file, but you cannot decrease the retention period of thefile. You cannot move a file that has been committed to a WORM state, even after theretention period for the file has expired.
The retention period expiration date is set by modifying the access time of a file. In aUNIX command line, the access time can be modified through the touch command.Although there is no method of modifying the access time through Windows Explorer,you can modify the access time through Windows Powershell. Accessing a file doesnot set the retention period expiration date.
File retention with SmartLock
Isilon OneFS CLI Administration Guide 405
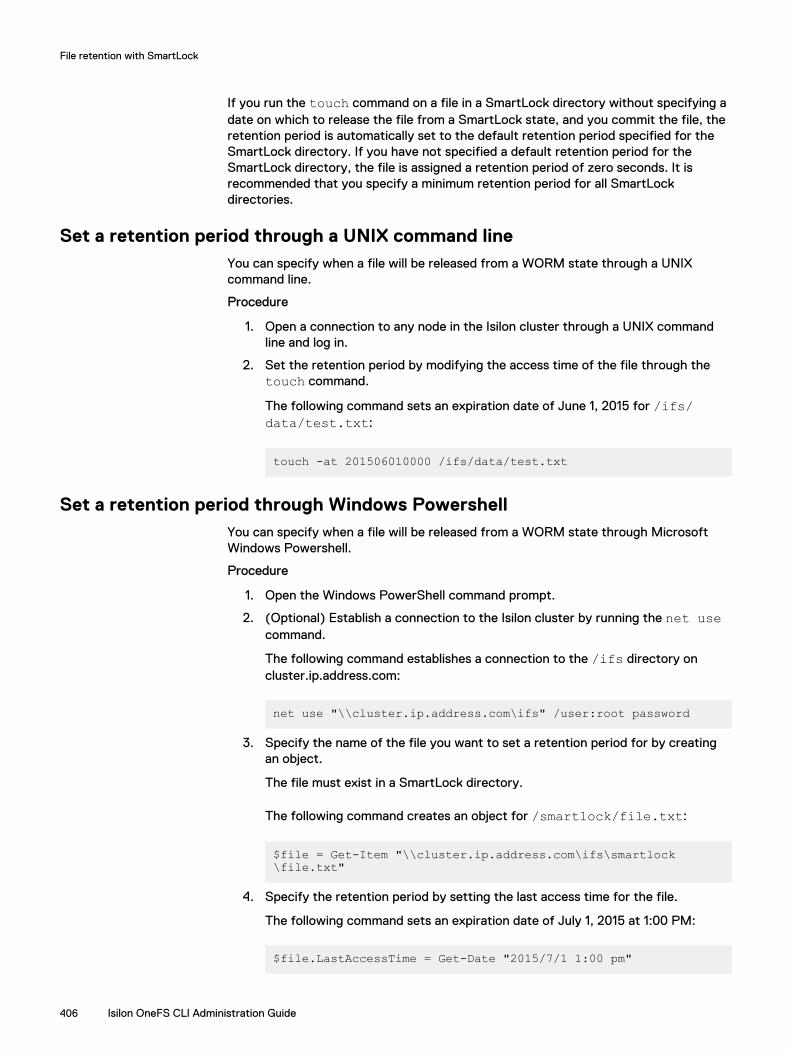
If you run the touch command on a file in a SmartLock directory without specifying adate on which to release the file from a SmartLock state, and you commit the file, theretention period is automatically set to the default retention period specified for theSmartLock directory. If you have not specified a default retention period for theSmartLock directory, the file is assigned a retention period of zero seconds. It isrecommended that you specify a minimum retention period for all SmartLockdirectories.
Set a retention period through a UNIX command lineYou can specify when a file will be released from a WORM state through a UNIXcommand line.
Procedure
1. Open a connection to any node in the Isilon cluster through a UNIX commandline and log in.
2. Set the retention period by modifying the access time of the file through thetouch command.
The following command sets an expiration date of June 1, 2015 for /ifs/data/test.txt:
touch -at 201506010000 /ifs/data/test.txt
Set a retention period through Windows PowershellYou can specify when a file will be released from a WORM state through MicrosoftWindows Powershell.
Procedure
1. Open the Windows PowerShell command prompt.
2. (Optional) Establish a connection to the Isilon cluster by running the net usecommand.
The following command establishes a connection to the /ifs directory oncluster.ip.address.com:
net use "\\cluster.ip.address.com\ifs" /user:root password
3. Specify the name of the file you want to set a retention period for by creatingan object.
The file must exist in a SmartLock directory.
The following command creates an object for /smartlock/file.txt:
$file = Get-Item "\\cluster.ip.address.com\ifs\smartlock\file.txt"
4. Specify the retention period by setting the last access time for the file.
The following command sets an expiration date of July 1, 2015 at 1:00 PM:
$file.LastAccessTime = Get-Date "2015/7/1 1:00 pm"
File retention with SmartLock
406 Isilon OneFS CLI Administration Guide

Commit a file to a WORM state through a UNIX command lineYou can commit a file to a WORM state through a UNIX command line.
About this task
To commit a file to a WORM state, you must remove all write privileges from the file.If a file is already set to a read-only state, you must first add write privileges to thefile, and then return the file to a read-only state.
Procedure
1. Open a connection to the Isilon cluster through a UNIX command line interfaceand log in.
2. Remove write privileges from a file by running the chmod command.
The following command removes write privileges of /ifs/data/smartlock/file.txt:
chmod ugo-w /ifs/data/smartlock/file.txt
Commit a file to a WORM state through Windows ExplorerYou can commit a file to a WORM state through Microsoft Windows Explorer. Thisprocedure describes how to commit a file through Windows 7.
About this task
To commit a file to a WORM state, you must apply the read-only setting. If a file isalready set to a read-only state, you must first remove the file from a read-only stateand then return it to a read-only state.
Procedure
1. In Windows Explorer, navigate to the file you want to commit to a WORM state.
2. Right-click the folder and then click Properties.
3. In the Properties window, click the General tab.
4. Select the Read-only check box, and then click OK.
Override the retention period for all files in a SmartLock directoryYou can override the retention period for files in a SmartLock directory. All filescommitted to a WORM state within the directory will remain in a WORM state untilafter the specified day.
About this task
If files are committed to a WORM state after the retention period is overridden, theoverride date functions as a minimum retention date. All files committed to a WORMstate do not expire until at least the given day, regardless of user specifications.
Procedure
1. Open a secure shell (SSH) connection to any node in the Isilon cluster and login.
2. Override the retention period expiration date for all WORM committed files in aSmartLock directory by running the isi worm modify command.
File retention with SmartLock
Isilon OneFS CLI Administration Guide 407
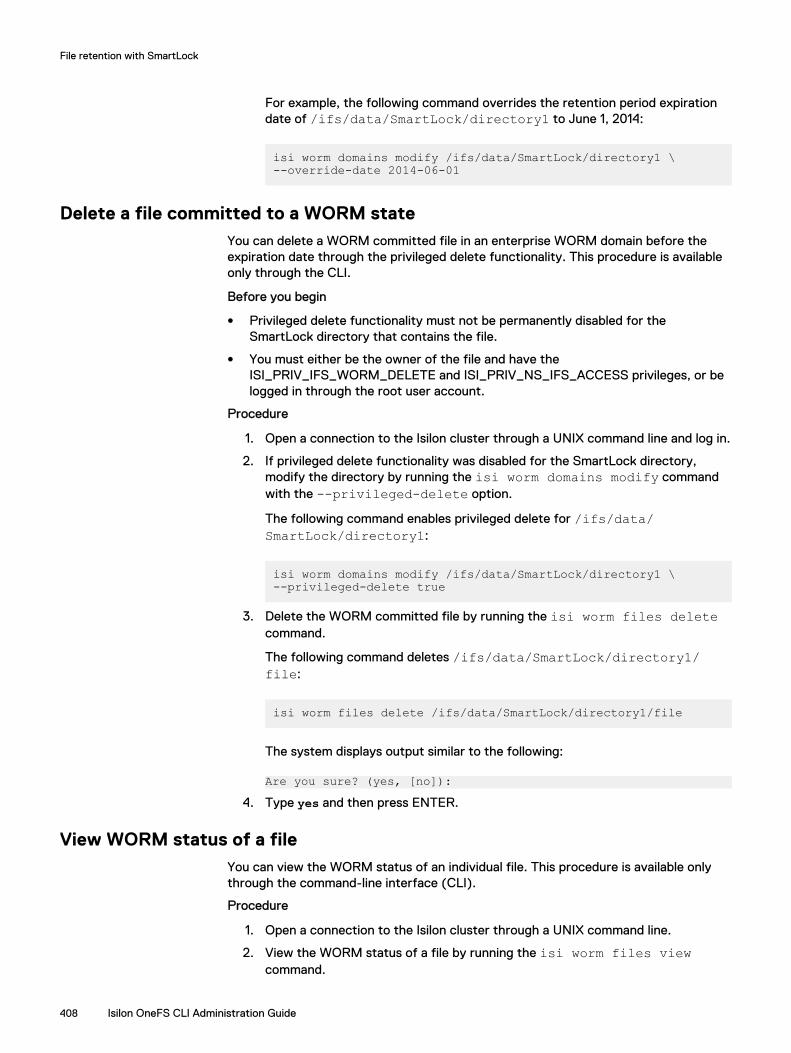
For example, the following command overrides the retention period expirationdate of /ifs/data/SmartLock/directory1 to June 1, 2014:
isi worm domains modify /ifs/data/SmartLock/directory1 \--override-date 2014-06-01
Delete a file committed to a WORM stateYou can delete a WORM committed file in an enterprise WORM domain before theexpiration date through the privileged delete functionality. This procedure is availableonly through the CLI.
Before you begin
l Privileged delete functionality must not be permanently disabled for theSmartLock directory that contains the file.
l You must either be the owner of the file and have theISI_PRIV_IFS_WORM_DELETE and ISI_PRIV_NS_IFS_ACCESS privileges, or belogged in through the root user account.
Procedure
1. Open a connection to the Isilon cluster through a UNIX command line and log in.
2. If privileged delete functionality was disabled for the SmartLock directory,modify the directory by running the isi worm domains modify commandwith the --privileged-delete option.
The following command enables privileged delete for /ifs/data/SmartLock/directory1:
isi worm domains modify /ifs/data/SmartLock/directory1 \--privileged-delete true
3. Delete the WORM committed file by running the isi worm files deletecommand.
The following command deletes /ifs/data/SmartLock/directory1/file:
isi worm files delete /ifs/data/SmartLock/directory1/file
The system displays output similar to the following:
Are you sure? (yes, [no]):4. Type yes and then press ENTER.
View WORM status of a fileYou can view the WORM status of an individual file. This procedure is available onlythrough the command-line interface (CLI).
Procedure
1. Open a connection to the Isilon cluster through a UNIX command line.
2. View the WORM status of a file by running the isi worm files viewcommand.
File retention with SmartLock
408 Isilon OneFS CLI Administration Guide
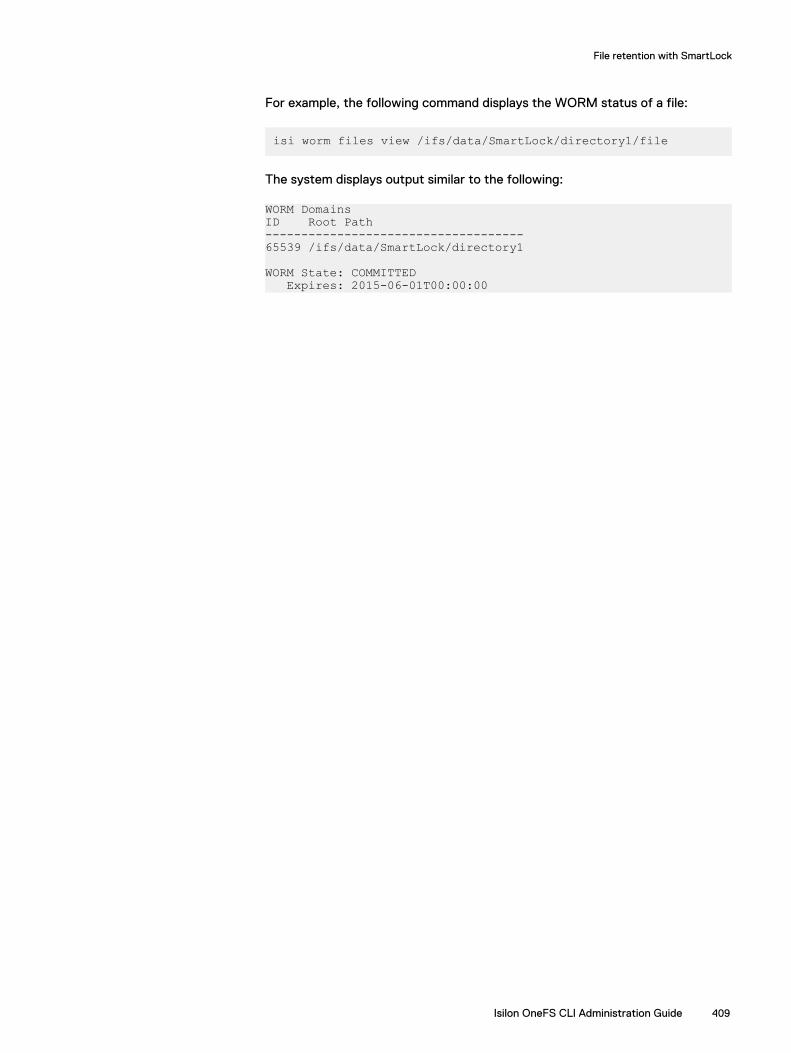
For example, the following command displays the WORM status of a file:
isi worm files view /ifs/data/SmartLock/directory1/file
The system displays output similar to the following:
WORM DomainsID Root Path------------------------------------65539 /ifs/data/SmartLock/directory1
WORM State: COMMITTED Expires: 2015-06-01T00:00:00
File retention with SmartLock
Isilon OneFS CLI Administration Guide 409

File retention with SmartLock
410 Isilon OneFS CLI Administration Guide

CHAPTER 21
Protection domains
This section contains the following topics:
l Protection domains overview............................................................................412l Protection domain considerations.....................................................................412l Create a protection domain ............................................................................. 413l Delete a protection domain .............................................................................. 413
Isilon OneFS CLI Administration Guide 411
Protection domains overviewProtection domains are markers that prevent modifications to files and directories. If adomain is applied to a directory, the domain is also applied to all of the files andsubdirectories under the directory. You can specify domains manually; however,OneFS usually creates domains automatically.
There are three types of domains: SyncIQ domains, SmartLock domains, andSnapRevert domains. SyncIQ domains can be assigned to source and targetdirectories of replication policies. OneFS automatically creates a SyncIQ domain forthe target directory of a replication policy the first time that the policy is run. OneFSalso automatically creates a SyncIQ domain for the source directory of a replicationpolicy during the failback process. You can manually create a SyncIQ domain for asource directory before you initiate the failback process by configuring the policy foraccelerated failback, but you cannot delete a SyncIQ domain that marks the targetdirectory of a replication policy.
SmartLock domains are assigned to SmartLock directories to prevent committed filesfrom being modified or deleted. OneFS automatically creates a SmartLock domainwhen a SmartLock directory is created. You cannot delete a SmartLock domain.However, if you delete a SmartLock directory, OneFS automatically deletes theSmartLock domain associated with the directory.
SnapRevert domains are assigned to directories that are contained in snapshots toprevent files and directories from being modified while a snapshot is being reverted.OneFS does not automatically create SnapRevert domains. You cannot revert asnapshot until you create a SnapRevert domain for the directory that the snapshotcontains. You can create SnapRevert domains for subdirectories of directories thatalready have SnapRevert domains. For example, you could create SnapRevert domainsfor both /ifs/data and /ifs/data/archive. You can delete a SnapRevertdomain if you no longer want to revert snapshots of a directory.
Protection domain considerationsYou can manually create protection domains before they are required by OneFS toperform certain actions. However, manually creating protection domains can limit yourability to interact with the data marked by the domain.
l Copying a large number of files into a protection domain might take a very longtime because each file must be marked individually as belonging to the protectiondomain.
l You cannot move directories in or out of protection domains. However, you canmove a directory contained in a protection domain to another location within thesame protection domain.
l Creating a protection domain for a directory that contains a large number of fileswill take more time than creating a protection domain for a directory with fewerfiles. Because of this, it is recommended that you create protection domains fordirectories while the directories are empty, and then add files to the directory.
l If a domain is currently preventing the modification or deletion of a file, you cannotcreate a protection domain for a directory that contains that file. For example,if /ifs/data/smartlock/file.txt is set to a WORM state by a SmartLockdomain, you cannot create a SnapRevert domain for /ifs/data/.
Protection domains
412 Isilon OneFS CLI Administration Guide

Note: If you use SyncIQ to create a replication policy for a SmartLock compliancedirectory, the SyncIQ and SmartLock compliance domains must be configured atthe same root directory level. A SmartLock compliance domain cannot be nestedinside a SyncIQ domain.
Create a protection domainYou can create replication or snapshot revert domains to facilitate snapshot revert andfailover operations. You cannot create a SmartLock domain. OneFS automaticallycreates a SmartLock domain when you create a SmartLock directory.
Procedure
1. Run the isi job jobs start command.
The following command creates a SyncIQ domain for /ifs/data/source:
isi job jobs start domainmark --root /ifs/data/media \--dm-type SyncIQ
Delete a protection domainYou can delete a replication or snapshot revert domain if you want to move directoriesout of the domain. You cannot delete a SmartLock domain. OneFS automaticallydeletes a SmartLock domain when you delete a SmartLock directory.
Procedure
1. Run the isi job jobs start command.
The following command deletes a SyncIQ domain for /ifs/data/source:
isi job jobs start domainmark --root /ifs/data/media \--dm-type SyncIQ --delete
Protection domains
Isilon OneFS CLI Administration Guide 413

Protection domains
414 Isilon OneFS CLI Administration Guide

CHAPTER 22
Data-at-rest-encryption
This section contains the following topics:
l Data-at-rest encryption overview.....................................................................416l Self-encrypting drives...................................................................................... 416l Data security on self-encrypting drives............................................................ 416l Data migration to a cluster with self-encrypting drives..................................... 417l Chassis and drive states....................................................................................417l Smartfailed drive REPLACE state.....................................................................419l Smartfailed drive ERASE state.........................................................................420
Isilon OneFS CLI Administration Guide 415
Data-at-rest encryption overviewYou can enhance data security on a cluster that contains only self-encrypting-drivenodes, providing data-at-rest protection.
The OneFS system is available as a cluster that is composed of OneFS nodes thatcontain only self-encrypting drives (SEDs). The system requirements andmanagement of data at rest on self-encrypting nodes are identical to that of nodesthat do not contain self-encrypting drives. Clusters of mixed node types are notsupported.
Self-encrypting drivesSelf-encrypting drives store data on a cluster that is specially designed for data-at-rest encryption.
Data-at-rest encryption on self-encrypting drives occurs when data that is stored on adevice is encrypted to prevent unauthorized data access. All data that is written to thestorage device is encrypted when it is stored, and all data that is read from thestorage device is decrypted when it is read. The stored data is encrypted with a 256-bit data AES encryption key and decrypted in the same manner. OneFS controls dataaccess by combining the drive authentication key with on-disk data-encryption keys.
Note: All nodes in a cluster must be of the self-encrypting drive type. Mixed nodesare not supported.
Data security on self-encrypting drivesSmartfailing self-encrypting drives guarantees data security after removal.
Data on self-encrypting drives is protected from unauthorized access byauthenticating encryption keys. Encryption keys never leave the drive. When a drive islocked, successful authentication unlocks the drive for data access.
The data on self-encrypting drives is rendered inaccessible in the following conditions:
l When a self-encrypting drive is smartfailed, drive authentication keys are deletedfrom the node. The data on the drive cannot be decrypted and is thereforeunreadable, which secures the drive.
l When a drive is smartfailed and removed from a node, the encryption key on thedrive is deleted. Because the encryption key for reading data from the drive mustbe the same key that was used when the data was written, it is impossible todecrypt data that was previously written to the drive. When you smartfail and thenremove a drive, it is cryptographically erased.
Note: Smartfailing a drive is the preferred method for removing a self-encrypting drive. Removing a node that has been smartfailed guarantees thatdata is inaccessible.
l When a self-encrypting drive loses power, the drive locks to prevent unauthorizedaccess. When power is restored, data is again accessible when the appropriatedrive authentication key is provided.
Data-at-rest-encryption
416 Isilon OneFS CLI Administration Guide

Data migration to a cluster with self-encrypting drivesYou can have data from your existing cluster migrated to a cluster of nodes made upof self-encrypting drives (SEDs). As a result, all migrated and future data on the newcluster will be encrypted.
Note: Data migration to a cluster with SEDs must be performed by IsilonProfessional Services. For more information, contact your Dell EMCrepresentative.
Chassis and drive statesYou can view chassis and drive state details.
In a cluster, the combination of nodes in different degraded states determineswhether read requests, write requests, or both work. A cluster can lose write quorumbut keep read quorum. OneFS provides details about the status of chassis and drivesin your cluster. The following table describes all the possible states that you mayencounter in your cluster.
State Description Interface Error state
HEALTHY All drives in the node are functioningcorrectly.
Command-lineinterface, webadministrationinterface
L3 A solid state drive (SSD) wasdeployed as level 3 (L3) cache toincrease the size of cache memoryand improve throughput speeds.
Command-lineinterface
SMARTFAIL or
Smartfailor restripein progress
The drive is in the process of beingremoved safely from the file system,either because of an I/O error or byuser request. Nodes or drives in asmartfail or read-only state affectonly write quorum.
Command-lineinterface, webadministrationinterface
NOTAVAILABLE
A drive is unavailable for a variety ofreasons. You can click the bay toview detailed information about thiscondition.
Note: In the web administrationinterface, this state includes theERASE and SED_ERRORcommand-line interface states.
Command-lineinterface, webadministrationinterface
X
SUSPENDED This state indicates that driveactivity is temporarily suspendedand the drive is not in use. The stateis manually initiated and does notoccur during normal cluster activity.
Command-lineinterface, webadministrationinterface
NOT IN USE A node in an offline state affectsboth read and write quorum.
Command-lineinterface, web
Data-at-rest-encryption
Isilon OneFS CLI Administration Guide 417

State Description Interface Error state
administrationinterface
REPLACE The drive was smartfailedsuccessfully and is ready to bereplaced.
Command-lineinterface only
STALLED The drive is stalled and undergoingstall evaluation. Stall evaluation isthe process of checking drives thatare slow or having other issues.Depending on the outcome of theevaluation, the drive may return toservice or be smartfailed. This is atransient state.
Command-lineinterface only
NEW The drive is new and blank. This isthe state that a drive is in when yourun the isi dev command with the
-a add option.
Command-lineinterface only
USED The drive was added and containedan Isilon GUID but the drive is notfrom this node. This drive likely willbe formatted into the cluster.
Command-lineinterface only
PREPARING The drive is undergoing a formatoperation. The drive state changesto HEALTHY when the format issuccessful.
Command-lineinterface only
EMPTY No drive is in this bay. Command-lineinterface only
WRONG_TYPE The drive type is wrong for thisnode. For example, a non-SED drivein a SED node, SAS instead of theexpected SATA drive type.
Command-lineinterface only
BOOT_DRIVE Unique to the A100 drive, which hasboot drives in its bays.
Command-lineinterface only
SED_ERROR The drive cannot be acknowledgedby the OneFS system.
Note: In the web administrationinterface, this state is includedin Not available.
Command-lineinterface, webadministrationinterface
X
ERASE The drive is ready for removal butneeds your attention because thedata has not been erased. You canerase the drive manually toguarantee that data is removed.
Note: In the web administrationinterface, this state is includedin Not available.
Command-lineinterface only
Data-at-rest-encryption
418 Isilon OneFS CLI Administration Guide
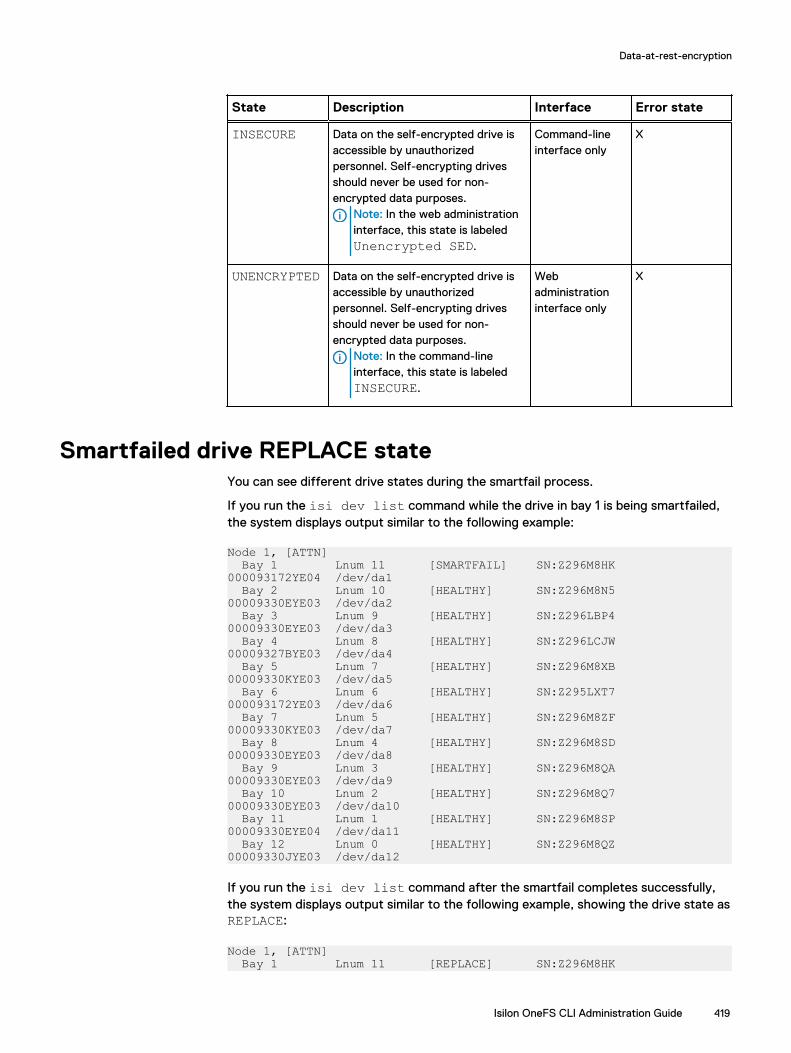
State Description Interface Error state
INSECURE Data on the self-encrypted drive isaccessible by unauthorizedpersonnel. Self-encrypting drivesshould never be used for non-encrypted data purposes.
Note: In the web administrationinterface, this state is labeledUnencrypted SED.
Command-lineinterface only
X
UNENCRYPTED Data on the self-encrypted drive isaccessible by unauthorizedpersonnel. Self-encrypting drivesshould never be used for non-encrypted data purposes.
Note: In the command-lineinterface, this state is labeledINSECURE.
Webadministrationinterface only
X
Smartfailed drive REPLACE stateYou can see different drive states during the smartfail process.
If you run the isi dev list command while the drive in bay 1 is being smartfailed,the system displays output similar to the following example:
Node 1, [ATTN] Bay 1 Lnum 11 [SMARTFAIL] SN:Z296M8HK 000093172YE04 /dev/da1 Bay 2 Lnum 10 [HEALTHY] SN:Z296M8N5 00009330EYE03 /dev/da2 Bay 3 Lnum 9 [HEALTHY] SN:Z296LBP4 00009330EYE03 /dev/da3 Bay 4 Lnum 8 [HEALTHY] SN:Z296LCJW 00009327BYE03 /dev/da4 Bay 5 Lnum 7 [HEALTHY] SN:Z296M8XB 00009330KYE03 /dev/da5 Bay 6 Lnum 6 [HEALTHY] SN:Z295LXT7 000093172YE03 /dev/da6 Bay 7 Lnum 5 [HEALTHY] SN:Z296M8ZF 00009330KYE03 /dev/da7 Bay 8 Lnum 4 [HEALTHY] SN:Z296M8SD 00009330EYE03 /dev/da8 Bay 9 Lnum 3 [HEALTHY] SN:Z296M8QA 00009330EYE03 /dev/da9 Bay 10 Lnum 2 [HEALTHY] SN:Z296M8Q7 00009330EYE03 /dev/da10 Bay 11 Lnum 1 [HEALTHY] SN:Z296M8SP 00009330EYE04 /dev/da11 Bay 12 Lnum 0 [HEALTHY] SN:Z296M8QZ 00009330JYE03 /dev/da12
If you run the isi dev list command after the smartfail completes successfully,the system displays output similar to the following example, showing the drive state asREPLACE:
Node 1, [ATTN] Bay 1 Lnum 11 [REPLACE] SN:Z296M8HK
Data-at-rest-encryption
Isilon OneFS CLI Administration Guide 419

000093172YE04 /dev/da1 Bay 2 Lnum 10 [HEALTHY] SN:Z296M8N5 00009330EYE03 /dev/da2 Bay 3 Lnum 9 [HEALTHY] SN:Z296LBP4 00009330EYE03 /dev/da3 Bay 4 Lnum 8 [HEALTHY] SN:Z296LCJW 00009327BYE03 /dev/da4 Bay 5 Lnum 7 [HEALTHY] SN:Z296M8XB 00009330KYE03 /dev/da5 Bay 6 Lnum 6 [HEALTHY] SN:Z295LXT7 000093172YE03 /dev/da6 Bay 7 Lnum 5 [HEALTHY] SN:Z296M8ZF 00009330KYE03 /dev/da7 Bay 8 Lnum 4 [HEALTHY] SN:Z296M8SD 00009330EYE03 /dev/da8 Bay 9 Lnum 3 [HEALTHY] SN:Z296M8QA 00009330EYE03 /dev/da9 Bay 10 Lnum 2 [HEALTHY] SN:Z296M8Q7 00009330EYE03 /dev/da10 Bay 11 Lnum 1 [HEALTHY] SN:Z296M8SP 00009330EYE04 /dev/da11 Bay 12 Lnum 0 [HEALTHY] SN:Z296M8QZ 00009330JYE03 /dev/da12
If you run the isi dev list command while the drive in bay 3 is being smartfailed,the system displays output similar to the following example:
Node 1, [ATTN] Bay 1 Lnum 11 [REPLACE] SN:Z296M8HK 000093172YE04 /dev/da1 Bay 2 Lnum 10 [HEALTHY] SN:Z296M8N5 00009330EYE03 /dev/da2 Bay 3 Lnum 9 [SMARTFAIL] SN:Z296LBP4 00009330EYE03 N/A Bay 4 Lnum 8 [HEALTHY] SN:Z296LCJW 00009327BYE03 /dev/da4 Bay 5 Lnum 7 [HEALTHY] SN:Z296M8XB 00009330KYE03 /dev/da5 Bay 6 Lnum 6 [HEALTHY] SN:Z295LXT7 000093172YE03 /dev/da6 Bay 7 Lnum 5 [HEALTHY] SN:Z296M8ZF 00009330KYE03 /dev/da7 Bay 8 Lnum 4 [HEALTHY] SN:Z296M8SD 00009330EYE03 /dev/da8 Bay 9 Lnum 3 [HEALTHY] SN:Z296M8QA 00009330EYE03 /dev/da9 Bay 10 Lnum 2 [HEALTHY] SN:Z296M8Q7 00009330EYE03 /dev/da10 Bay 11 Lnum 1 [HEALTHY] SN:Z296M8SP 00009330EYE04 /dev/da11 Bay 12 Lnum 0 [HEALTHY] SN:Z296M8QZ 00009330JYE03 /dev/da12
Smartfailed drive ERASE stateAt the end of a smartfail process, OneFS attempts to delete the authentication key ona drive if it is unable to reset the key.
Note:
l To securely delete the authentication key on a single drive, smartfail theindividual drive.
l To securely delete the authentication key on a single node, smartfail the node.
Data-at-rest-encryption
420 Isilon OneFS CLI Administration Guide
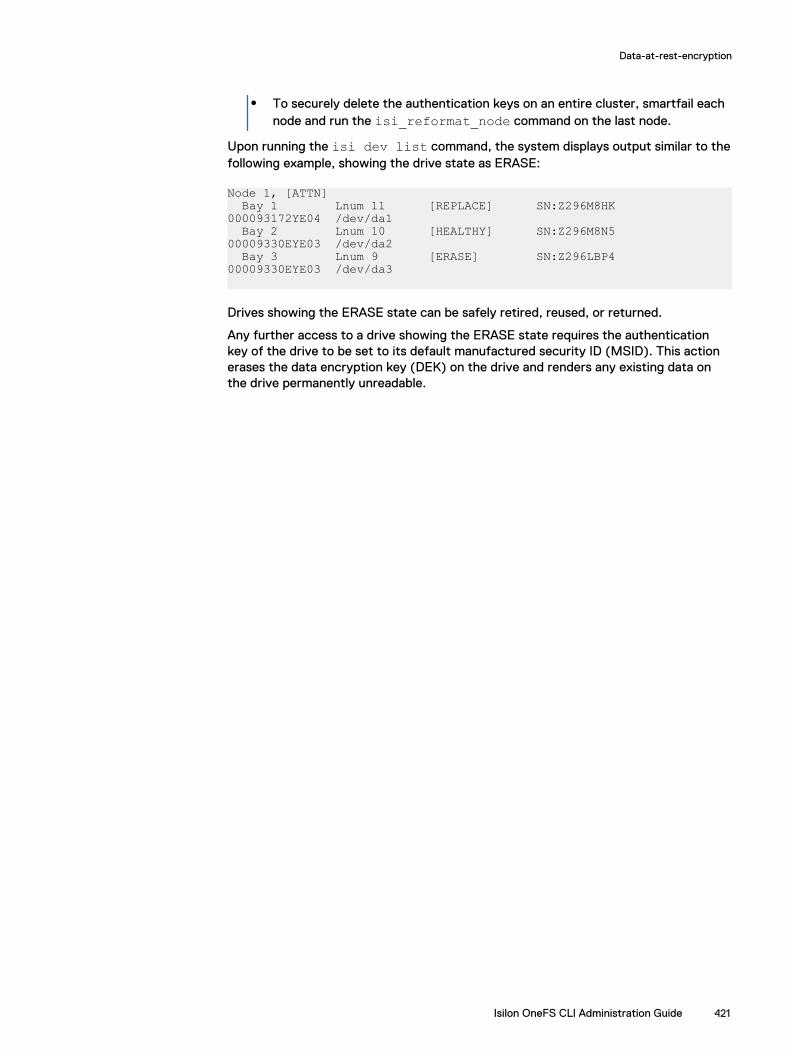
l To securely delete the authentication keys on an entire cluster, smartfail eachnode and run the isi_reformat_node command on the last node.
Upon running the isi dev list command, the system displays output similar to thefollowing example, showing the drive state as ERASE:
Node 1, [ATTN] Bay 1 Lnum 11 [REPLACE] SN:Z296M8HK 000093172YE04 /dev/da1 Bay 2 Lnum 10 [HEALTHY] SN:Z296M8N5 00009330EYE03 /dev/da2 Bay 3 Lnum 9 [ERASE] SN:Z296LBP4 00009330EYE03 /dev/da3
Drives showing the ERASE state can be safely retired, reused, or returned.
Any further access to a drive showing the ERASE state requires the authenticationkey of the drive to be set to its default manufactured security ID (MSID). This actionerases the data encryption key (DEK) on the drive and renders any existing data onthe drive permanently unreadable.
Data-at-rest-encryption
Isilon OneFS CLI Administration Guide 421

Data-at-rest-encryption
422 Isilon OneFS CLI Administration Guide

CHAPTER 23
SmartQuotas
This section contains the following topics:
l SmartQuotas overview.....................................................................................424l Quota types..................................................................................................... 424l Default quota type........................................................................................... 425l Usage accounting and limits............................................................................. 427l Disk-usage calculations.................................................................................... 429l Quota notifications...........................................................................................430l Quota notification rules.................................................................................... 431l Quota reports................................................................................................... 431l Creating quotas................................................................................................432l Managing quotas..............................................................................................433
Isilon OneFS CLI Administration Guide 423

SmartQuotas overviewThe SmartQuotas module is an optional quota-management tool that monitors andenforces administrator-defined storage limits. Using accounting and enforcementquota limits, reporting capabilities, and automated notifications, SmartQuotasmanages storage use, monitors disk storage, and issues alerts when disk-storage limitsare exceeded.
Quotas help you manage storage usage according to criteria that you define. Quotasare used for tracking—and sometimes limiting—the amount of storage that a user,group, or directory consumes. Quotas help ensure that a user or department does notinfringe on the storage that is allocated to other users or departments. In some quotaimplementations, writes beyond the defined space are denied, and in other cases, asimple notification is sent.
Note: Do not apply quotas to /ifs/.ifsvar/ or its subdirectories. If you limitthe size of the /ifs/.ifsvar/ directory through a quota, and the directoryreaches its limit, jobs such as File-System Analytics fail. A quota blocks older jobreports from being deleted from the /ifs/.ifsvar/ subdirectories to makeroom for newer reports.
The SmartQuotas module requires a separate license. For more information about theSmartQuotas module or to activate the module, contact your Dell EMC salesrepresentative.
Quota typesOneFS uses the concept of quota types as the fundamental organizational unit ofstorage quotas. Storage quotas comprise a set of resources and an accounting of eachresource type for that set. Storage quotas are also called storage domains.
Storage quotas creation requires three identifiers:
l The directory to monitorl Whether snapshots are tracked against the quota limitl The quota type (directory, user, or group)
Note: Do not create quotas of any type on the OneFS root (/ifs). A root-levelquota may significantly degrade performance.
You can choose a quota type from the following entities:
Directory
A specific directory and its subdirectories.
Note: You cannot choose a default directory quota type using the Web UI.You can only create a default directory quota using the CLI. However, you canmanage default directory quotas using the UI (modify the quota settings, link,and unlink subdirectories). All immediate subdirectories in a default directoryquota inherit the parent directory quota settings unless otherwise modified.Specific directory quotas that you configure take precedence over a defaultdirectory.
User
Either a specific user or default user (every user). Specific-user quotas that youconfigure take precedence over a default user quota.
SmartQuotas
424 Isilon OneFS CLI Administration Guide
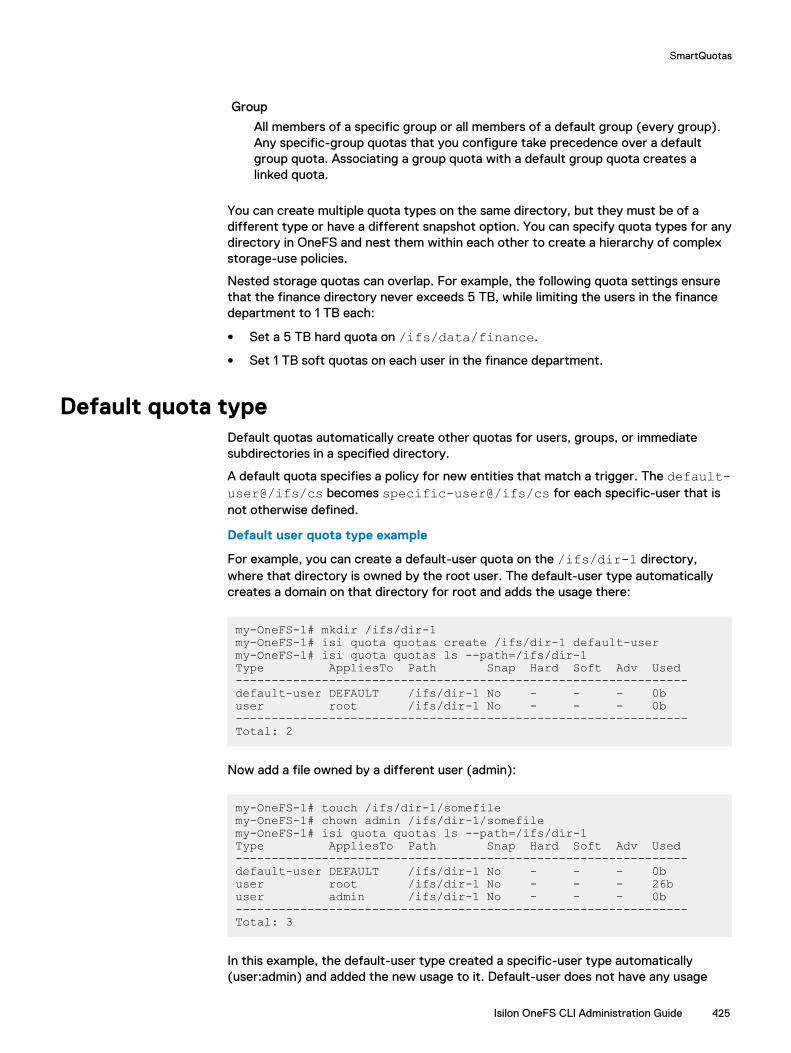
Group
All members of a specific group or all members of a default group (every group).Any specific-group quotas that you configure take precedence over a defaultgroup quota. Associating a group quota with a default group quota creates alinked quota.
You can create multiple quota types on the same directory, but they must be of adifferent type or have a different snapshot option. You can specify quota types for anydirectory in OneFS and nest them within each other to create a hierarchy of complexstorage-use policies.
Nested storage quotas can overlap. For example, the following quota settings ensurethat the finance directory never exceeds 5 TB, while limiting the users in the financedepartment to 1 TB each:
l Set a 5 TB hard quota on /ifs/data/finance.
l Set 1 TB soft quotas on each user in the finance department.
Default quota typeDefault quotas automatically create other quotas for users, groups, or immediatesubdirectories in a specified directory.
A default quota specifies a policy for new entities that match a trigger. The default-user@/ifs/cs becomes specific-user@/ifs/cs for each specific-user that isnot otherwise defined.
Default user quota type example
For example, you can create a default-user quota on the /ifs/dir-1 directory,where that directory is owned by the root user. The default-user type automaticallycreates a domain on that directory for root and adds the usage there:
my-OneFS-1# mkdir /ifs/dir-1my-OneFS-1# isi quota quotas create /ifs/dir-1 default-usermy-OneFS-1# isi quota quotas ls --path=/ifs/dir-1 Type AppliesTo Path Snap Hard Soft Adv Used---------------------------------------------------------------default-user DEFAULT /ifs/dir-1 No - - - 0buser root /ifs/dir-1 No - - - 0b---------------------------------------------------------------Total: 2
Now add a file owned by a different user (admin):
my-OneFS-1# touch /ifs/dir-1/somefilemy-OneFS-1# chown admin /ifs/dir-1/somefilemy-OneFS-1# isi quota quotas ls --path=/ifs/dir-1Type AppliesTo Path Snap Hard Soft Adv Used---------------------------------------------------------------default-user DEFAULT /ifs/dir-1 No - - - 0buser root /ifs/dir-1 No - - - 26buser admin /ifs/dir-1 No - - - 0b---------------------------------------------------------------Total: 3
In this example, the default-user type created a specific-user type automatically(user:admin) and added the new usage to it. Default-user does not have any usage
SmartQuotas
Isilon OneFS CLI Administration Guide 425
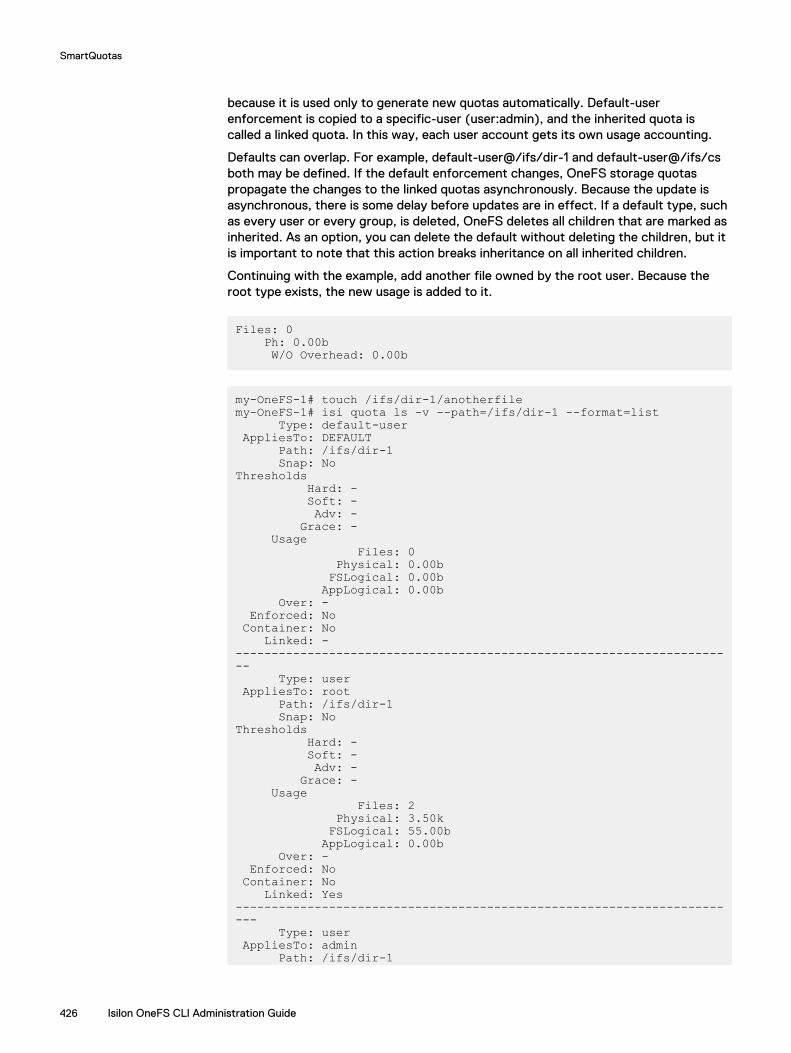
because it is used only to generate new quotas automatically. Default-userenforcement is copied to a specific-user (user:admin), and the inherited quota iscalled a linked quota. In this way, each user account gets its own usage accounting.
Defaults can overlap. For example, default-user@/ifs/dir-1 and default-user@/ifs/csboth may be defined. If the default enforcement changes, OneFS storage quotaspropagate the changes to the linked quotas asynchronously. Because the update isasynchronous, there is some delay before updates are in effect. If a default type, suchas every user or every group, is deleted, OneFS deletes all children that are marked asinherited. As an option, you can delete the default without deleting the children, but itis important to note that this action breaks inheritance on all inherited children.
Continuing with the example, add another file owned by the root user. Because theroot type exists, the new usage is added to it.
Files: 0 Ph: 0.00b W/O Overhead: 0.00b
my-OneFS-1# touch /ifs/dir-1/anotherfilemy-OneFS-1# isi quota ls -v --path=/ifs/dir-1 --format=list Type: default-user AppliesTo: DEFAULT Path: /ifs/dir-1 Snap: NoThresholds Hard: - Soft: - Adv: - Grace: - Usage Files: 0 Physical: 0.00b FSLogical: 0.00b AppLogical: 0.00b Over: - Enforced: No Container: No Linked: ----------------------------------------------------------------------- Type: user AppliesTo: root Path: /ifs/dir-1 Snap: NoThresholds Hard: - Soft: - Adv: - Grace: - Usage Files: 2 Physical: 3.50k FSLogical: 55.00b AppLogical: 0.00b Over: - Enforced: No Container: No Linked: Yes----------------------------------------------------------------------- Type: user AppliesTo: admin Path: /ifs/dir-1
SmartQuotas
426 Isilon OneFS CLI Administration Guide

Snap: NoThresholds Hard: - Soft: - Adv: - Grace: - Usage Files: 1 Physical: 1.50k FSLogical: 0.00b AppLogical: 0.00b Over: - Enforced: No Container: No Linked: Yes
The enforcement on default-user is copied to the specific-user when the specific-userallocates within the type, and the new inherited quota type is also a linked quota.
Note: Configuration changes for linked quotas must be made on the parent quotathat the linked quota is inheriting from. Changes to the parent quota arepropagated to all children. To override configuration from the parent quota, unlinkthe quota first.
Default directory quota example type
If a default directory quota is configured on the /ifs/parent folder, then anyimmediate subdirectory created within that folder automatically inherits quotaconfiguration information from the default domain. Only immediate subdirectoriesinherit default directory quotas; a subdirectory within an immediate subdirectory (asecond-level or deeper subdirectory) will not inherit the default directory quota. Forexample, you create a default-directory quota type on the /ifs/parent directory.Then you create the /ifs/parent/child subdirectory. This subdirectory inheritsthe default directory quota settings. Then you create the second-level /ifs/parent/child/grandchild subdirectory. This subdirectory does not inherit thedefault directory quota settings.
Usage accounting and limitsStorage quotas can perform two functions: they monitor storage space through usageaccounting and they manage storage space through enforcement limits.
You can configure OneFS quotas by usage type to track or limit storage use. Theaccounting option, which monitors disk-storage use, is useful for auditing, planning,and billing. Enforcement limits set storage limits for users, groups, or directories.
Track storage consumption without specifying a storage limit
The accounting option tracks but does not limit disk-storage use. Using theaccounting option for a quota, you can monitor inode count and physical andlogical space resources. Physical space refers to all of the space that is used tostore files and directories, including data, metadata, and data protection overheadin the domain. There are two types of logical space:
l File system logical size: Logical size of files as per file system. Sum of all filessizes, excluding file metadata and data protection overhead.
l Application logical size : Logical size of file apparent to the application. Usedfile capacity from the application point of view, which is usually equal to orless than the file system logical size. However, in the case of a sparse file,application logical size can be greater than file system logical size. Application
SmartQuotas
Isilon OneFS CLI Administration Guide 427

logical size includes capacity consumption on the cluster as well as data tieredto the cloud.
Storage consumption is tracked using file system logical size by default, whichdoes not include protection overhead. As an example, by using the accountingoption, you can do the following:
l Track the amount of disk space that is used by various users or groups to billeach user, group, or directory for only the disk space used.
l Review and analyze reports that help you identify storage usage patterns anddefine storage policies.
l Plan for capacity and other storage needs.
Specify storage limits
Enforcement limits include all of the functionality of the accounting option, plusthe ability to limit disk storage and send notifications. Using enforcement limits,you can logically partition a cluster to control or restrict how much storage that auser, group, or directory can use. For example, you can set hard- or soft-capacitylimits to ensure that adequate space is always available for key projects andcritical applications and to ensure that users of the cluster do not exceed theirallotted storage capacity. Optionally, you can deliver real-time email quotanotifications to users, group managers, or administrators when they areapproaching or have exceeded a quota limit.
Note:If a quota type uses the accounting-only option, enforcement limits cannot beused for that quota.
The actions of an administrator who is logged in as root may push a domain over aquota threshold. For example, changing the protection level or taking a snapshot hasthe potential to exceed quota parameters. System actions such as repairs also maypush a quota domain over the limit.
The system provides three types of administrator-defined enforcement thresholds.
Threshold type Description
Hard Limits disk usage to a size that cannot be exceeded. If an operation, such as a file write,causes a quota target to exceed a hard quota, the following events occur:
l The operation fails
l An alert is logged to the cluster
l A notification is issued to specified recipients.
Writes resume when the usage falls below the threshold.
Soft Allows a limit with a grace period that can be exceeded until the grace period expires. When asoft quota is exceeded, an alert is logged to the cluster and a notification is issued to specifiedrecipients; however, data writes are permitted during the grace period.
If the soft threshold is still exceeded when the grace period expires, data writes fail, and anotification is issued to the recipients you have specified.
Writes resume when the usage falls below the threshold.
Advisory An informational limit that can be exceeded. When an advisory quota threshold is exceeded,an alert is logged to the cluster and a notification is issued to specified recipients. Advisorythresholds do not prevent data writes.
SmartQuotas
428 Isilon OneFS CLI Administration Guide

Disk-usage calculationsFor each quota that you configure, you can specify whether physical or logical space isincluded in future disk usage calculations.
You can configure quotas to include the following types of physical or logical space:
Type of physical orlogical space toinclude in quota
Description
Physical size Total on-disk space consumed to store files inOneFS. Apart from file data, this counts usermetadata (for example, ACLs and user-specifiedextended attributes) and data protectionoverhead. Accounts for on-premise capacityconsumption with data protection.
File data blocks (non-sparse regions) + IFSmetadata (ACLs, ExAttr, inode) + dataprotection overhead
File system logical size Approximation of disk usage on other systems byignoring protection overhead. The spaceconsumed to store files with 1x protection.Accounts for on-premise capacity consumptionwithout data protection.
File data blocks (non-sparse regions) + IFSmetadata (Acls, ExAttr, inode)
Application logical size Apparent size of file that a user/applicationobserves. How an application sees spaceavailable for storage regardless of whether filesare cloud-tiered, sparse, deduped, orcompressed. It is the offset of the file's last byte(end-of-file). Application logical size isunaffected by the physical location of the data,on or off cluster, and therefore includesCloudPools capacity across multiple locations.Accounts for on-premise and off-premisecapacity consumption without data protection.
The physical size and file system logical sizequota metrics count the number of blocksrequired to store file data (block-aligned). Theapplication logical size quota metric is not block-aligned. In general, the application logical size issmaller than either the physical size or filesystem logical size, as the file system logical sizecounts the full size of the last block of the file,whereas application logical size considers thedata present in the last block. However,application logical size will be higher for sparsefiles.
Most quota configurations do not need to include data protection overheadcalculations, and therefore do not need to include physical space, but instead caninclude logical space (either file system logical size, or application logical size). If youdo not include data protection overhead in usage calculations for a quota, future diskusage calculations for the quota include only the logical space that is required to storefiles and directories. Space that is required for the data protection setting of thecluster is not included.
Consider an example user who is restricted by a 40 GB quota that does not includedata protection overhead in its disk usage calculations. (The 40 GB quota includes filesystem logical size or application logical size.) If your cluster is configured with a 2xdata protection level and the user writes a 10 GB file to the cluster, that file consumes20 GB of space but the 10GB for the data protection overhead is not counted in thequota calculation. In this example, the user has reached 25 percent of the 40 GB quotaby writing a 10 GB file to the cluster. This method of disk usage calculation isrecommended for most quota configurations.
If you include data protection overhead in usage calculations for a quota, future diskusage calculations for the quota include the total amount of space that is required tostore files and directories, in addition to any space that is required to accommodate
SmartQuotas
Isilon OneFS CLI Administration Guide 429

your data protection settings, such as parity or mirroring. For example, consider a userwho is restricted by a 40 GB quota that includes data protection overhead in its diskusage calculations. (The 40 GB quota includes physical size.) If your cluster isconfigured with a 2x data protection level (mirrored) and the user writes a 10 GB fileto the cluster, that file actually consumes 20 GB of space: 10 GB for the file and 10 GBfor the data protection overhead. In this example, the user has reached 50 percent ofthe 40 GB quota by writing a 10 GB file to the cluster.
Note: Cloned and deduplicated files are treated as ordinary files by quotas. If thequota includes data protection overhead, the data protection overhead for shareddata is not included in the usage calculation.
You can configure quotas to include the space that is consumed by snapshots. A singlepath can have two quotas applied to it: one without snapshot usage, which is thedefault, and one with snapshot usage. If you include snapshots in the quota, more filesare included in the calculation than are in the current directory. The actual disk usageis the sum of the current directory and any snapshots of that directory. You can seewhich snapshots are included in the calculation by examining the .snapshotdirectory for the quota path.
Note: Only snapshots created after the QuotaScan job finishes are included in thecalculation.
Quota notificationsQuota notifications are generated for enforcement quotas, providing users withinformation when a quota violation occurs. Reminders are sent periodically while thecondition persists.
Each notification rule defines the condition that is to be enforced and the action thatis to be executed when the condition is true. An enforcement quota can definemultiple notification rules. When thresholds are exceeded, automatic emailnotifications can be sent to specified users, or you can monitor notifications as systemalerts or receive emails for these events.
Notifications can be configured globally, to apply to all quota domains, or beconfigured for specific quota domains.
Enforcement quotas support the following notification settings. A given quota can useonly one of these settings.
Limit notification settings Description
Disable quota notifications Disables all notifications for the quota.
Use the system settings for quotanotifications
Uses the global default notification for thespecified type of quota.
Create custom notifications rules Enables the creation of advanced, customnotifications that apply to the specific quota.Custom notifications can be configured forany or all of the threshold types (hard, soft, oradvisory) for the specified quota.
SmartQuotas
430 Isilon OneFS CLI Administration Guide

Quota notification rulesYou can write quota notification rules to generate alerts that are triggered by eventthresholds.
When an event occurs, a notification is triggered according to your notification rule.For example, you can create a notification rule that sends an email when a disk-spaceallocation threshold is exceeded by a group.
You can configure notification rules to trigger an action according to event thresholds(a notification condition). A rule can specify a schedule, such as "every day at 1:00AM," for executing an action or immediate notification of certain state transitions.When an event occurs, a notification trigger may execute one or more actions, such assending an email or sending a cluster alert to the interface. The following examplesdemonstrate the types of criteria that you can use to configure notification rules.
l Notify when a threshold is exceeded; at most, once every 5 minutesl Notify when allocation is denied; at most, once an hourl Notify while over threshold, daily at 2 AMl Notify while grace period expired weekly, on Sundays at 2 AM
Notifications are triggered for events grouped by the following categories:
Instant notifications
Includes the write-denied notification, triggered when a hard threshold denies awrite, and the threshold-exceeded notification, triggered at the moment a hard,soft, or advisory threshold is exceeded. These are one-time notifications becausethey represent a discrete event in time.
Ongoing notifications
Generated on a scheduled basis to indicate a persisting condition, such as a hard,soft, or advisory threshold being over a limit or a soft threshold's grace periodbeing expired for a prolonged period.
Quota reportsThe OneFS SmartQuotas module provides reporting options that enableadministrators to manage cluster resources and analyze usage statistics.
Storage quota reports provide a summarized view of the past or present state of thequota domains. After raw reporting data is collected by OneFS, you can produce datasummaries by using a set of filtering parameters and sort types. Storage-quotareports include information about violators, grouped by threshold types. You cangenerate reports from a historical data sample or from current data. In either case, thereports are views of usage data at a given time. OneFS does not provide reports ondata aggregated over time, such as trending reports, but you can use raw data toanalyze trends. There is no configuration limit on the number of reports other than thespace needed to store them.
OneFS provides the following data-collection and reporting methods:
l Scheduled reports are generated and saved on a regular interval.l Ad hoc reports are generated and saved at the request of the user.l Live reports are generated for immediate and temporary viewing.
Scheduled reports are placed by default in the /ifs/.isilon/smartquotas/reports directory, but the location is configurable to any directory under /ifs. Each
SmartQuotas
Isilon OneFS CLI Administration Guide 431

generated report includes quota domain definition, state, usage, and globalconfiguration settings. By default, ten reports are kept at a time, and older reports arepurged. You can create ad hoc reports at any time to view the current state of thestorage quotas system. These live reports can be saved manually. Ad hoc reports aresaved to a location that is separate from scheduled reports to avoid skewing thetimed-report sets.
Creating quotasYou can create two types of storage quotas to monitor data: accounting quotas andenforcement quotas. Storage quota limits and restrictions can apply to specific users,groups, or directories.
The type of quota that you create depends on your goal.
l Enforcement quotas monitor and limit disk usage. You can create enforcementquotas that use any combination of hard limits, soft limits, and advisory limits.
Note: Enforcement quotas are not recommended for snapshot-tracking quotadomains.
l Accounting quotas monitor, but do not limit, disk usage.
Note: Before using quota data for analysis or other purposes, verify that noQuotaScan jobs are running.
Create an accounting quotaYou can create an accounting quota to monitor but not limit disk usage.
About this task
Optionally, you can include snapshot data, data-protection overhead, or both in theaccounting quota.
For information about the parameters and options that you can use for this procedure,run the isi quota quotas create --help command.
Procedure
1. Run the isi quota quotas create command to create an accountingquota.
The following command creates a quota for the /quota_test_1 directory.The quota sets an advisory threshold that is informative rather than enforced.
isi quota quotas create /ifs/data/quota_test_1 directory \ --advisory-threshold=10M --enforced=false
After you finish
Before using quota data for analysis or other purposes, verify that no QuotaScan jobsare in progress by running the isi job events list --job-type quotascancommand.
Create an enforcement quotaYou can create an enforcement quota to monitor and limit disk usage.
About this task
You can create enforcement quotas that set hard, soft, and advisory limits.
SmartQuotas
432 Isilon OneFS CLI Administration Guide
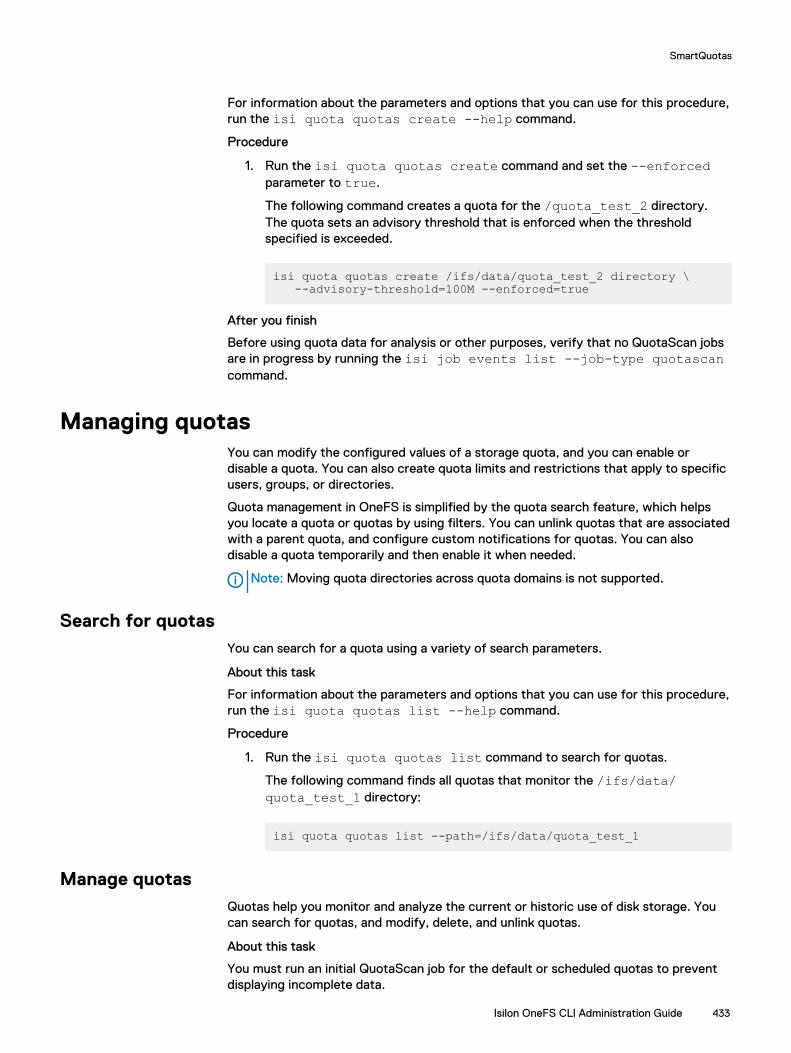
For information about the parameters and options that you can use for this procedure,run the isi quota quotas create --help command.
Procedure
1. Run the isi quota quotas create command and set the --enforcedparameter to true.
The following command creates a quota for the /quota_test_2 directory.The quota sets an advisory threshold that is enforced when the thresholdspecified is exceeded.
isi quota quotas create /ifs/data/quota_test_2 directory \ --advisory-threshold=100M --enforced=true
After you finish
Before using quota data for analysis or other purposes, verify that no QuotaScan jobsare in progress by running the isi job events list --job-type quotascancommand.
Managing quotasYou can modify the configured values of a storage quota, and you can enable ordisable a quota. You can also create quota limits and restrictions that apply to specificusers, groups, or directories.
Quota management in OneFS is simplified by the quota search feature, which helpsyou locate a quota or quotas by using filters. You can unlink quotas that are associatedwith a parent quota, and configure custom notifications for quotas. You can alsodisable a quota temporarily and then enable it when needed.
Note: Moving quota directories across quota domains is not supported.
Search for quotasYou can search for a quota using a variety of search parameters.
About this task
For information about the parameters and options that you can use for this procedure,run the isi quota quotas list --help command.
Procedure
1. Run the isi quota quotas list command to search for quotas.
The following command finds all quotas that monitor the /ifs/data/quota_test_1 directory:
isi quota quotas list --path=/ifs/data/quota_test_1
Manage quotasQuotas help you monitor and analyze the current or historic use of disk storage. Youcan search for quotas, and modify, delete, and unlink quotas.
About this task
You must run an initial QuotaScan job for the default or scheduled quotas to preventdisplaying incomplete data.
SmartQuotas
Isilon OneFS CLI Administration Guide 433

Before you modify a quota, consider how the changes will affect the file system andend users.
For information about the parameters and options that you can use for this procedure,run the isi quota quotas list --help command.
Note:
l You can edit or delete a quota report only when the quota is not linked to adefault quota.
l You can unlink a quota only when the quota is linked to a default quota.
Procedure
1. To monitor and analyze current disk storage, run the isi quota quotasview command.
The following example provides current usage information for the root user onthe specified directory and includes snapshot data. For more information aboutthe parameters for this command, run the isi quota quotas list --help command.
isi quota quotas list -v --path=/ifs/data/quota_test_2 \ --include-snapshots="yes"
2. To view all information in the quota report, run the isi quota reportslist command.
To view specific information in a quota report, run the isi quota quotaslist --help command to view the filter parameters. The following commandlists all information in the quota report:
isi quota reports list -v
3. (Optional) To delete a quota, run the isi quota quotas delete command.
The following command deletes the specified directory-type quota. Forinformation about parameters for this command, run the isi quota quotasdelete --help command:
isi quota quotas delete /ifs/data/quota_test_2 directory
4. To unlink a quota, run the isi quota quotas modify command.
The following command example unlinks a user quota:
isi quota quotas modify /ifs/dir-1 user --linked=false --user=admin
Note: Configuration changes for linked quotas must be made on the parent(default) quota that the linked quota is inheriting from. Changes to theparent quota are propagated to all children. If you want to overrideconfiguration from the parent quota, you must first unlink the quota.
Export a quota configuration fileYou can export quota settings as a configuration file, which can then be imported forreuse to another Isilon cluster. You can also store the exported quota configurations in
SmartQuotas
434 Isilon OneFS CLI Administration Guide
a location outside of the cluster. This task may only be performed from the OneFScommand line interface.
About this task
You can pipe the XML report to a file or directory. The file can then be imported toanother cluster.
Procedure
1. Open a secure shell (SSH) connection to any node in the cluster and log in.
2. At the command prompt, run the following command:
isi_classic quota list --export
The quota configuration file displays as raw XML.
Import a quota configuration fileYou can import quota settings in the form of a configuration file that has beenexported from another Isilon cluster. This task can only be performed from the OneFScommand-line interface.
Procedure
1. Open a secure shell (SSH) connection to any node in the cluster and log in.
2. Navigate to the location of the exported quota configuration file.
3. At the command prompt, run the following command, where <filename> is thename of an exported configuration file:
isi_classic quota import --from-file=<filename>
The system parses the file and imports the quota settings from theconfiguration file. Quota settings that you configured before importing thequota configuration file are retained, and the imported quota settings areeffective immediately.
Managing quota notificationsQuota notifications can be enabled or disabled, modified, and deleted.
By default, a global quota notification is already configured and applied to all quotas.You can continue to use the global quota notification settings, modify the globalnotification settings, or disable or set a custom notification for a quota.
Enforcement quotas support four types of notifications and reminders:
l Threshold exceeded
l Over-quota reminder
l Grace period expired
l Write access denied
If a directory service is used to authenticate users, you can configure notificationmappings that control how email addresses are resolved when the cluster sends aquota notification. If necessary, you can remap the domain that is used for quota email
SmartQuotas
Isilon OneFS CLI Administration Guide 435
notifications and you can remap Active Directory domains, local UNIX domains, orboth.
Configure default quota notification settingsYou can configure default global quota notification settings that apply to all quotas ofa specified threshold type.
About this task
The custom notification settings that you configure for a quota take precedence overthe default global notification settings.
For information about the parameters and options that you can use for this procedure,run the isi quota settings notifications modify --help command.
Procedure
1. Run the isi quota settings notifications modify command.
The following command configures the default quota notification settings togenerate an alert when the advisory threshold is exceeded:
isi quota settings notifications modify advisory exceeded \ --action-alert=true
After you finish
Before using quota data for analysis or other purposes, verify that no QuotaScan jobsare in progress by running the isi job events list --job-type quotascancommand.
Configure custom quota notification rulesYou can configure custom quota notification rules that apply only to a specified quota.
Before you begin
An enforcement quota must exist or be in the process of being created. To configurenotifications for an existing enforcement quota, follow the procedure to modify aquota and then use these steps.
About this task
Quota-specific custom notification rules must be configured for that quota. Ifnotification rules are not configured for a quota, the default event notificationconfiguration is used.
For information about the parameters and options that you can use for this procedure,run the isi quota quotas notifications create --help command.
Procedure
1. To configure custom quota notification rules, run the isi quota quotasnotifications create command.
The following command creates an advisory quota notification rule forthe /ifs/data/quota_test_2 directory that uses the --holdoffparameter to specify the length of time to wait before generating a notification:
isi quota quotas notifications create /ifs/data/quota_test_2 \ directory advisory exceeded --holdoff=10W
SmartQuotas
436 Isilon OneFS CLI Administration Guide

After you finish
Before using quota data for analysis or other purposes, verify that no QuotaScan jobsare in progress by running the isi job events list --job-type quotascancommand.
Map an email notification rule for a quotaEmail notification mapping rules control how email addresses are resolved when thecluster sends a quota notification.
About this task
If required, you can remap the domain that is used for SmartQuotas emailnotifications. You can remap Active Directory Windows domains, local UNIX domains,or NIS domains.
Note: You must be logged in to the web administration interface to perform thistask.
Procedure
1. Click File System > SmartQuotas > Settings.
2. (Optional) In the Email Mapping area, click Add a Mapping Rule.
3. From the Type list, select the authentication provider type for this notificationrule. The default is Local. To determine which authentication providers areavailable on the cluster, browse to Access > Authentication Providers.
4. From the Current domain list, select the domain that you want to use for themapping rule. If the list is blank, browse to Cluster Management > NetworkConfiguration, and then specify the domains that you want to use for mapping.
5. In the Map to domain field, type the name of the domain that you want to mapemail notifications to. This can be the same domain name that you selectedfrom the Current domain list. To specify multiple domains, separate the domainnames with commas.
6. Click Create Rule.
Email quota notification messagesIf email notifications for exceeded quotas are enabled, you can customize Isilontemplates for email notifications or create your own.
There are three email notification templates provided with OneFS. The templates arelocated in /etc/ifs and are described in the following table:
Template Description
quota_email_template.txt A notification that disk quota has beenexceeded.
quota_email_grace_template.txt A notification that disk quota has beenexceeded (also includes a parameter to definea grace period in number of days).
quota_email_test_template.txt A notification test message you can use toverify that a user is receiving emailnotifications.
If the default email notification templates do not meet your needs, you can configureyour own custom email notification templates by using a combination of text andSmartQuotas variables. Whether you choose to create your own templates or modify
SmartQuotas
Isilon OneFS CLI Administration Guide 437

the existing ones, make sure that the first line of the template file is a Subject: line.For example:
Subject: Disk quota exceeded
If you want to include information about the message sender, include a From: lineimmediately under the subject line. If you use an email address, include the full domainname for the address. For example:
From: [email protected]
In this example of the quota_email_template.txt file, a From: line is included.Additionally, the default text "Contact your system administrator for details" at theend of the template is changed to name the administrator:
Subject: Disk quota exceededFrom: [email protected]
The <ISI_QUOTA_DOMAIN_TYPE> quota on path <ISI_QUOTA_PATH> owned by <ISI_QUOTA_OWNER> has exceeded the <ISI_QUOTA_TYPE> limit.The quota limit is <ISI_QUOTA_THRESHOLD>, and <ISI_QUOTA_USAGE>is currently in use. You may be able to free some disk space bydeleting unnecessary files. If your quota includes snapshot usage,your administrator may be able to free some disk space by deletingone or more snapshots. Contact Jane Anderson ([email protected])for details.
This is an example of a what a user will see as an emailed notification (note that theSmartQuotas variables are resolved):
Subject: Disk quota exceededFrom: [email protected]
The advisory disk quota on directory /ifs/data/sales_tools/collateralowned by jsmith on production-Boris was exceeded.
The quota limit is 10 GB, and 11 GB is in use. You may be able to free some disk space by deleting unnecessary files. If your quota includes snapshot usage, your administrator may be able to free some disk space by deleting one or more snapshots. Contact Jane Anderson ([email protected]) for details.
Custom email notification template variable descriptionsAn email template contains text, and, optionally, variables that represent values. Youcan use any of the SmartQuotas variables in your templates.
Variable Description Example
ISI_QUOTA_DOMAIN_TYPE Quota type. Valid values are: directory, user, group,default-directory, default-user, default-group
default-directory
ISI_QUOTA_EXPIRATION Expiration date of grace period Fri May 22 14:23:19 PST 2015
ISI_QUOTA_GRACE Grace period, in days 5 days
ISI_QUOTA_HARD_LIMIT Includes the hard limit information of the quota tomake advisory/soft email notifications moreinformational.
You have 30 MB left until you hitthe hard quota limit of 50 MB.
ISI_QUOTA_NODE Hostname of the node on which the quota eventoccurred
someHost-prod-wf-1
SmartQuotas
438 Isilon OneFS CLI Administration Guide

Variable Description Example
ISI_QUOTA_OWNER Name of quota domain owner jsmith
ISI_QUOTA_PATH Path of quota domain /ifs/data
ISI_QUOTA_THRESHOLD Threshold value 20 GB
ISI_QUOTA_TYPE Threshold type Advisory
ISI_QUOTA_USAGE Disk space in use 10.5 GB
Customize email quota notification templatesYou can customize Isilon templates for email notifications. Customizing templates canbe performed only from the OneFS command line interface.
About this task
This procedure assumes that you are using the Isilon templates, which are located inthe /etc/ifs directory.
Note: It is recommend that you do not edit the templates directly. Instead, copythem to another directory to edit and deploy them.
Procedure
1. Open a secure shell (SSH) connection to any node in the cluster and log in.
2. Copy one of the default templates to a directory in which you can edit the fileand later access it through the OneFS web administration interface. Forexample:
cp /etc/ifs/quota_email_template.txt /ifs/data/quotanotifiers/quota_email_template_copy.txt
3. Open the template file in a text editor. For example:
edit /ifs/data/quotanotifiers/quota_email_template_copy.txt
The template appears in the editor.
4. Edit the template. If you are using or creating a customized template, ensurethe template has a Subject: line.
5. Save the changes. Template files must be saved as .txt files.
6. In the web administration interface, browse to File System > SmartQuotas >Settings.
7. In the Notification Rules area, click Add a Notification Rule.
The Create a Notification Rule dialog box appears.
8. From the Rule type list, select the notification rule type that you want to usewith the template.
9. In the Rule Settings area, select a notification type option.
10. Depending on the rule type that was selected, a schedule form might appear.Select the scheduling options that you want to use.
11. In the Message template field, type the path for the message template, or clickBrowse to locate the template.
SmartQuotas
Isilon OneFS CLI Administration Guide 439

12. (Optional) Click Create Rule
Managing quota reportsYou can configure and schedule reports to help you monitor, track, and analyzestorage use on an Isilon cluster.
You can view and schedule reports and customize report settings to track, monitor,and analyze disk storage use. Quota reports are managed by configuring settings thatgive you control over when reports are scheduled, how they are generated, where andhow many are stored, and how they are viewed. The maximum number of scheduledreports that are available for viewing in the web-administration interface can beconfigured for each report type. When the maximum number of reports are stored,the system deletes the oldest reports to make space for new reports as they aregenerated.
Create a quota report scheduleYou can configure quota report settings to generate the quota report on a specifiedschedule.
About this task
Quota report settings determine whether and when scheduled reports are generated,and where and how the reports are stored. If you disable a scheduled report, you canstill run unscheduled reports at any time.For information about the parameters and options that you can use for this procedure,run the isi quota reports list --help command.
Procedure
1. To configure a quota report schedule, run the isi quota settingsreports modify command.
The following command creates a quota report schedule that runs every twodays. For more information about date pattern or other schedule parameters,see man isi-schedule.
isi quota settings reports modify --schedule="Every 2 days"
Results
Reports are generated according to the criteria and can be viewed by running the isiquota reports list command.
Generate a quota reportIn addition to scheduled quota reports, you can generate a report to capture usagestatistics at any time.
Before you begin
Before you can generate a quota report, quotas must exist and no QuotaScan jobs canbe running.
About this task
For information about the parameters and options that you can use for this procedure,run the isi quota reports create --help command.
SmartQuotas
440 Isilon OneFS CLI Administration Guide
Procedure
1. To generate a quota report, run the isi quota reports create command.
The following command creates an ad hoc quota report.
isi quota reports create -v
Results
You can view the quota report by running the isi quota reports list -vcommand.
Locate a quota reportYou can locate quota reports, which are stored as XML files, and use your own toolsand transforms to view them. This task can only be performed from the OneFScommand-line interface.
Procedure
1. Open a secure shell (SSH) connection to any node in the cluster and log in.
2. Navigate to the directory where quota reports are stored. The following path isthe default quota report location:
/ifs/.isilon/smartquotas/reportsNote: If quota reports are not in the default directory, you can run the isiquota settings command to find the directory where they are stored.
3. At the command prompt, run the ls command.
l To view a list of all quota reports in the directory, run the followingcommand:
ls -a *.xml
l To view a specific quota report in the directory, run the following command:
ls <filename>.xml
Basic quota settingsWhen you create a storage quota, the following attributes must be defined, at aminimum. When you specify usage limits, additional options are available for definingthe quota.
Option Description
Path The directory that the quota is on.
Directory Quota Set storage limits on a directory.
User Quota Create a quota for every current or futureuser that stores data in the specifieddirectory.
SmartQuotas
Isilon OneFS CLI Administration Guide 441

Option Description
Group Quota Create a quota for every current or futuregroup that stores data in the specifieddirectory.
Include snapshots in the storage quota Count all snapshot data in usage limits. Thisoption cannot be changed after the quota iscreated.
Enforce the limits for this quota based onphysical size
Base quota enforcement on storage usagewhich includes metadata and dataprotection.
Enforce the limits for this quota based on filesystem logical size
Base quota enforcement on storage usagewhich does not include metadata and dataprotection.
Enforce the limits for this quota based onapplication logical size
Base quota enforcement on storage usagewhich includes capacity consumption on thecluster as well as data tiered to the cloud.
Track storage without specifying a storage limit Account for usage only.
Specify storage limits Set and enforce advisory, soft, or absolutelimits.
Advisory limit quota notification rules settingsYou can configure custom quota notification rules for advisory limits for a quota.These settings are available when you select the option to use custom notificationrules.
Option Description Exceeded Remains exceeded
Notify owner Select to send an emailnotification to the owner ofthe entity.
Yes Yes
Notify other contact(s) Select to send emailnotifications to otherrecipient(s) and type therecipient's email address(es).
Note: You can only enterone email address beforethe cluster is committed.After the cluster iscommitted, you can entermultiple comma-separated emailaddresses. Duplicateemail addresses areidentified and only uniqueaddresses are stored. Youcan enter a maximum of1,024 characters of
Yes Yes
SmartQuotas
442 Isilon OneFS CLI Administration Guide
Option Description Exceeded Remains exceeded
comma-separated emailaddresses.
Message template Type the path for the customtemplate, or click Browse tolocate the custom template.Leave the field blank to usethe default template.
Yes Yes
Create cluster event Select to generate an eventnotification for the quotawhen exceeded.
Yes Yes
Minimum notification interval Specify the time interval towait (in hours, days, orweeks) before generating thenotification. This minimizesduplicate notifications.
Yes No
Schedule Specify the notification andalert frequency: daily, weekly,monthly, yearly. Depending onthe selection, specifyintervals, day to send, time ofday, multiple email messagesper rule.
No Yes
Soft limit quota notification rules settingsYou can configure custom soft limit notification rules for a quota. These settings areavailable when you select the option to use custom notification rules.
Option Description Exceeded Remainsexceeded
Grace periodexpired
Write accessdenied
Notify owner Select to send anemail notificationto the owner of theentity.
Yes Yes Yes Yes
Notify othercontact(s)
Select to sendemail notificationsto otherrecipient(s) andtype the recipient'semail address(es).
Note: You canonly enter oneemail addressbefore thecluster iscommitted.After thecluster iscommitted, you
Yes Yes Yes Yes
SmartQuotas
Isilon OneFS CLI Administration Guide 443

Option Description Exceeded Remainsexceeded
Grace periodexpired
Write accessdenied
can entermultiplecomma-separated emailaddresses.Duplicate emailaddresses areidentified andonly uniqueaddresses arestored. You canenter amaximum of1,024characters ofcomma-separated emailaddresses.
Message template Type the path forthe customtemplate, or clickBrowse to locatethe customtemplate.Leave the fieldblank to use thedefault template.
Yes Yes Yes Yes
Create clusterevent
Select to generatean eventnotification for thequota.
Yes Yes Yes Yes
Minimumnotification interval
Specify the timeinterval to wait (inhours, days, orweeks) beforegenerating thenotification. Thisminimizes duplicatenotifications.
Yes No No Yes
Schedule Specify thenotification andalert frequency:daily, weekly,monthly, yearly.Depending on theselection, specifyintervals, day tosend, time of day,
No Yes Yes No
SmartQuotas
444 Isilon OneFS CLI Administration Guide
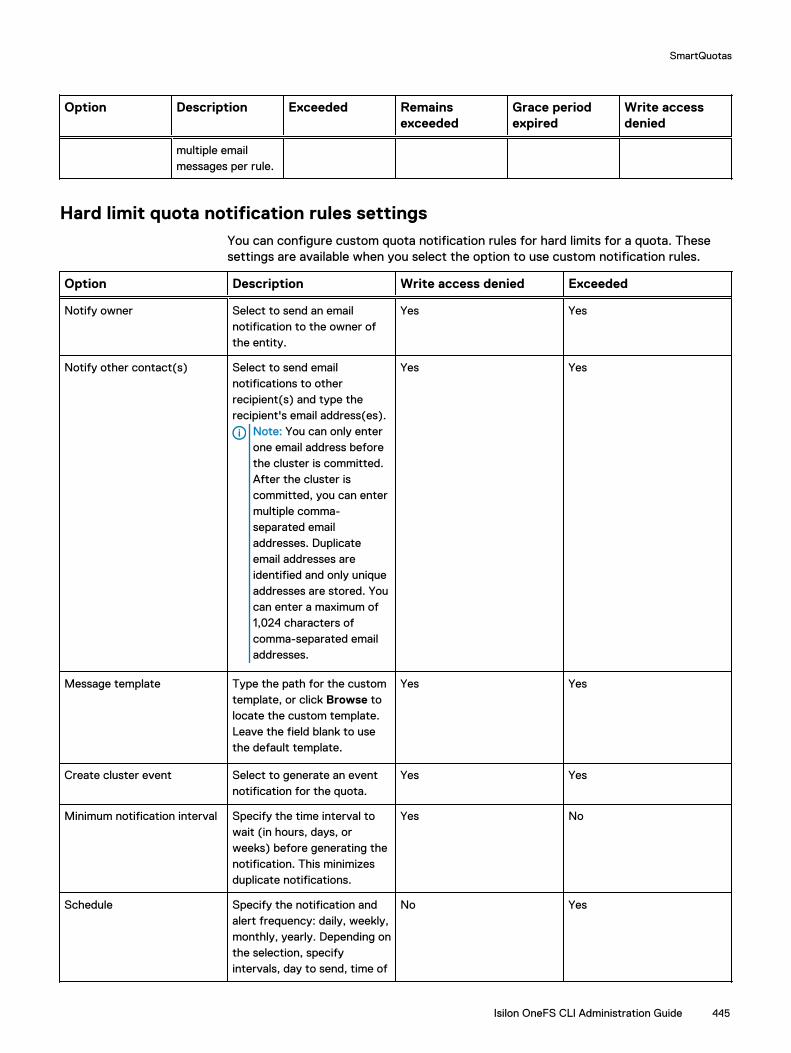
Option Description Exceeded Remainsexceeded
Grace periodexpired
Write accessdenied
multiple emailmessages per rule.
Hard limit quota notification rules settingsYou can configure custom quota notification rules for hard limits for a quota. Thesesettings are available when you select the option to use custom notification rules.
Option Description Write access denied Exceeded
Notify owner Select to send an emailnotification to the owner ofthe entity.
Yes Yes
Notify other contact(s) Select to send emailnotifications to otherrecipient(s) and type therecipient's email address(es).
Note: You can only enterone email address beforethe cluster is committed.After the cluster iscommitted, you can entermultiple comma-separated emailaddresses. Duplicateemail addresses areidentified and only uniqueaddresses are stored. Youcan enter a maximum of1,024 characters ofcomma-separated emailaddresses.
Yes Yes
Message template Type the path for the customtemplate, or click Browse tolocate the custom template.Leave the field blank to usethe default template.
Yes Yes
Create cluster event Select to generate an eventnotification for the quota.
Yes Yes
Minimum notification interval Specify the time interval towait (in hours, days, orweeks) before generating thenotification. This minimizesduplicate notifications.
Yes No
Schedule Specify the notification andalert frequency: daily, weekly,monthly, yearly. Depending onthe selection, specifyintervals, day to send, time of
No Yes
SmartQuotas
Isilon OneFS CLI Administration Guide 445

Option Description Write access denied Exceeded
day, multiple email messagesper rule.
Limit notification settingsEnforcement quotas support the following notification settings for each thresholdtype. A quota can use only one of these settings.
Notification setting Description
Disable quota notifications Disable all notifications for the quota.
Use the system settings for quotanotifications
Use the default notification rules that youconfigured for the specified threshold type.
Create custom notification rules Provide settings to create basic customnotifications that apply only to this quota.
Quota report settingsYou can configure quota report settings that track disk usage. These settingsdetermine whether and when scheduled reports are generated, and where and howreports are stored. When the maximum number of reports are stored, the systemdeletes the oldest reports to make space for new reports as they are generated.
Setting Description
Scheduled reporting Enables or disables the scheduled reporting feature.
l Off. Manually generated on-demand reports can be run atany time.
l On. Reports run automatically according to the schedulethat you specify.
Report frequency Specifies the interval for this report to run: daily, weekly,monthly, or yearly. You can use the following options tofurther refine the report schedule.
Generate report every. Specify the numeric value for theselected report frequency; for example, every 2 months.
Generate reports on. Select the day or multiple days togenerate reports.
Select report day by. Specify date or day of the week togenerate the report.
Generate one report per specified by. Set the time of day togenerate this report.
Generate multiple reports per specified day. Set theintervals and times of day to generate the report for that day.
Scheduled report archiving Determines the maximum number of scheduled reports thatare available for viewing on the SmartQuotas Reports page.
SmartQuotas
446 Isilon OneFS CLI Administration Guide
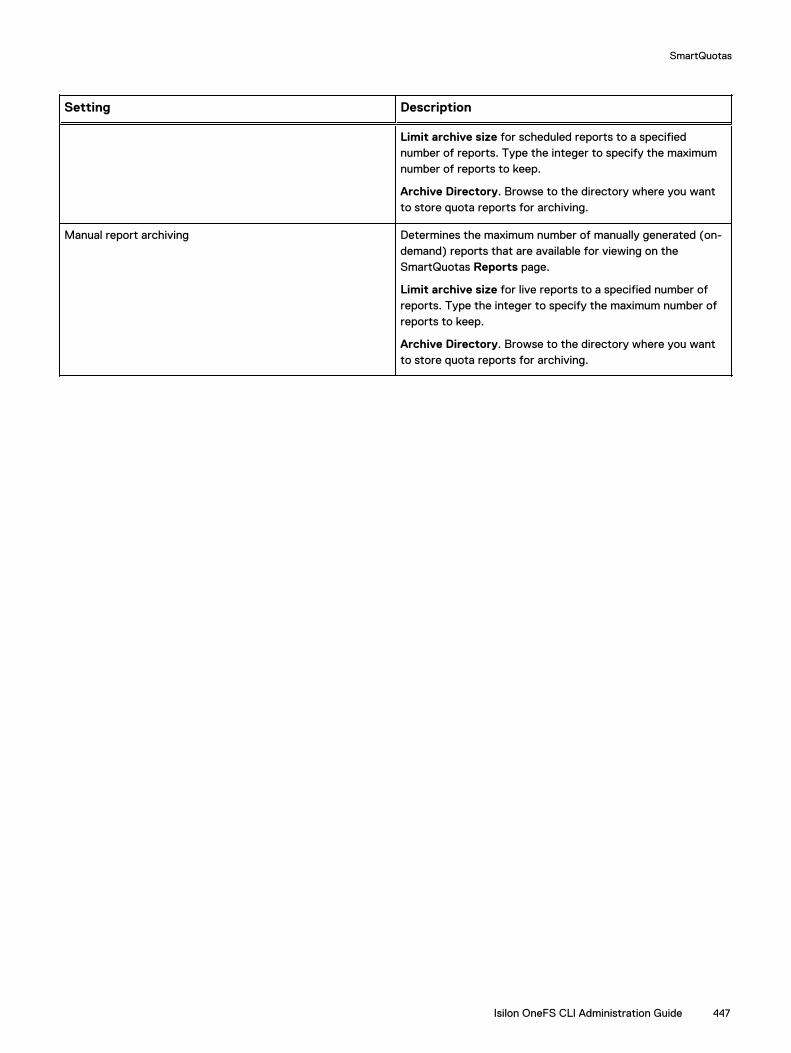
Setting Description
Limit archive size for scheduled reports to a specifiednumber of reports. Type the integer to specify the maximumnumber of reports to keep.
Archive Directory. Browse to the directory where you wantto store quota reports for archiving.
Manual report archiving Determines the maximum number of manually generated (on-demand) reports that are available for viewing on theSmartQuotas Reports page.
Limit archive size for live reports to a specified number ofreports. Type the integer to specify the maximum number ofreports to keep.
Archive Directory. Browse to the directory where you wantto store quota reports for archiving.
SmartQuotas
Isilon OneFS CLI Administration Guide 447

SmartQuotas
448 Isilon OneFS CLI Administration Guide
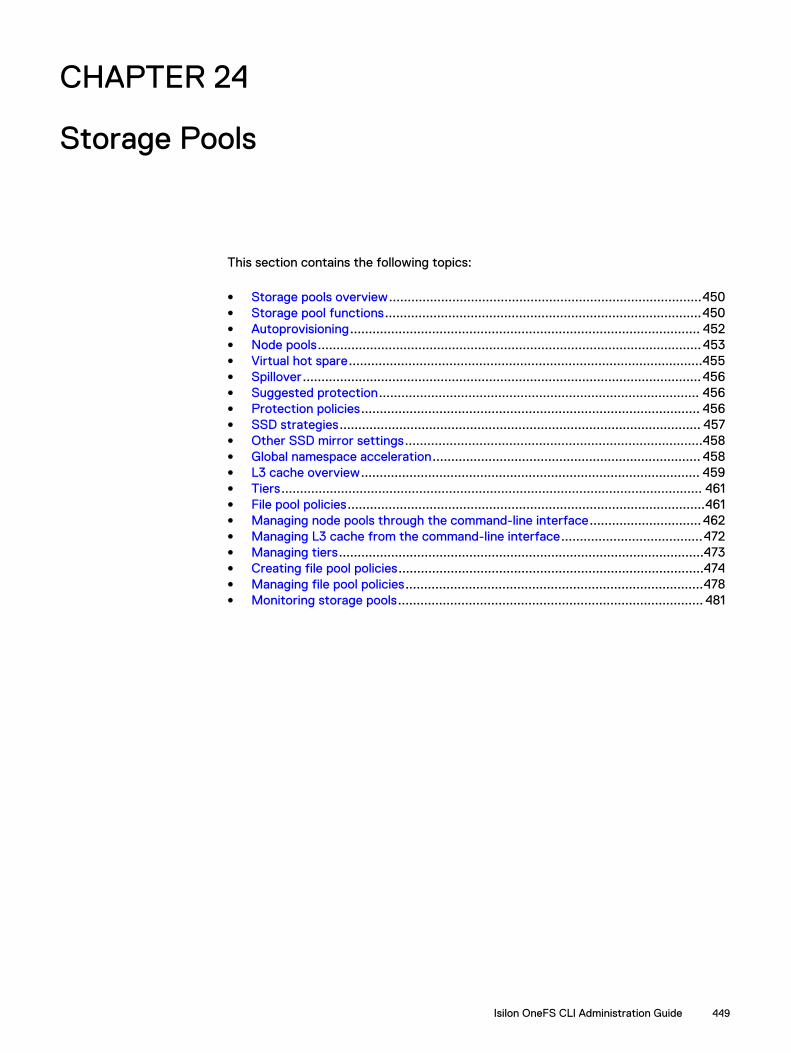
CHAPTER 24
Storage Pools
This section contains the following topics:
l Storage pools overview....................................................................................450l Storage pool functions.....................................................................................450l Autoprovisioning.............................................................................................. 452l Node pools....................................................................................................... 453l Virtual hot spare...............................................................................................455l Spillover...........................................................................................................456l Suggested protection...................................................................................... 456l Protection policies........................................................................................... 456l SSD strategies................................................................................................. 457l Other SSD mirror settings................................................................................458l Global namespace acceleration........................................................................ 458l L3 cache overview........................................................................................... 459l Tiers................................................................................................................. 461l File pool policies................................................................................................461l Managing node pools through the command-line interface.............................. 462l Managing L3 cache from the command-line interface......................................472l Managing tiers..................................................................................................473l Creating file pool policies..................................................................................474l Managing file pool policies................................................................................478l Monitoring storage pools.................................................................................. 481
Isilon OneFS CLI Administration Guide 449

Storage pools overviewOneFS organizes different node types into separate node pools. In addition, you canorganize these node pools into logical tiers of storage. By activating a SmartPoolslicense, you can create file pool policies that store files in these tiers automatically,based on file-matching criteria that you specify.
Without an active SmartPools license, OneFS manages all node pools as a single poolof storage. File data and metadata is striped across the entire cluster so that data isprotected, secure, and readily accessible. All files belong to the default file pool andare governed by the default file pool policy. In this mode, OneFS provides functionssuch as autoprovisioning, compatibilities, virtual hot spare (VHS), SSD strategies,global namespace acceleration (GNA), L3 cache, and storage tiers.
When you activate a SmartPools license, additional functions become available,including custom file pool policies and spillover management. With a SmartPoolslicense, you can manage your data set with more granularity to improve theperformance of your cluster.
The following table summarizes storage pool functions based on whether aSmartPools license is active.
Function Inactive SmartPoolslicense
Active SmartPoolslicense
Automatic storage poolprovisioning
Yes Yes
Node class compatibilities(node equivalency)
Yes Yes
SSD capacity compatibilities Yes Yes
SSD count compatibilities Yes Yes
Virtual hot spare Yes Yes
SSD strategies Yes Yes
L3 cache Yes Yes
Tiers Yes Yes
GNA Yes Yes
File pool policies No Yes
Spillover management No Yes
Storage pool functionsWhen a cluster is installed, and whenever nodes are added to the cluster, OneFSautomatically groups nodes into node pools. Autoprovisioning of nodes into node poolsenables OneFS to optimize performance, reliability, and data protection on the cluster.
Without an active SmartPools license, OneFS applies a default file pool policy toorganize all data into a single file pool. With this policy, OneFS distributes data acrossthe entire cluster so that data is protected and readily accessible. When you activate aSmartPools license, additional functions become available.
Storage Pools
450 Isilon OneFS CLI Administration Guide
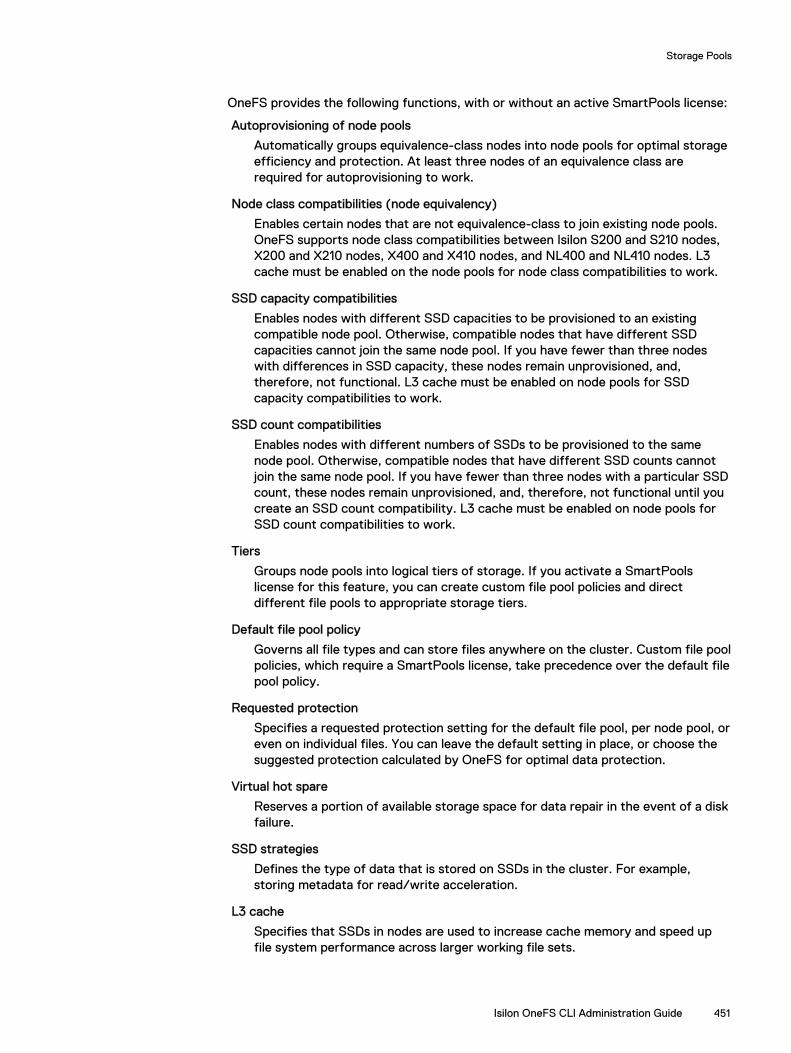
OneFS provides the following functions, with or without an active SmartPools license:
Autoprovisioning of node pools
Automatically groups equivalence-class nodes into node pools for optimal storageefficiency and protection. At least three nodes of an equivalence class arerequired for autoprovisioning to work.
Node class compatibilities (node equivalency)
Enables certain nodes that are not equivalence-class to join existing node pools.OneFS supports node class compatibilities between Isilon S200 and S210 nodes,X200 and X210 nodes, X400 and X410 nodes, and NL400 and NL410 nodes. L3cache must be enabled on the node pools for node class compatibilities to work.
SSD capacity compatibilities
Enables nodes with different SSD capacities to be provisioned to an existingcompatible node pool. Otherwise, compatible nodes that have different SSDcapacities cannot join the same node pool. If you have fewer than three nodeswith differences in SSD capacity, these nodes remain unprovisioned, and,therefore, not functional. L3 cache must be enabled on node pools for SSDcapacity compatibilities to work.
SSD count compatibilities
Enables nodes with different numbers of SSDs to be provisioned to the samenode pool. Otherwise, compatible nodes that have different SSD counts cannotjoin the same node pool. If you have fewer than three nodes with a particular SSDcount, these nodes remain unprovisioned, and, therefore, not functional until youcreate an SSD count compatibility. L3 cache must be enabled on node pools forSSD count compatibilities to work.
Tiers
Groups node pools into logical tiers of storage. If you activate a SmartPoolslicense for this feature, you can create custom file pool policies and directdifferent file pools to appropriate storage tiers.
Default file pool policy
Governs all file types and can store files anywhere on the cluster. Custom file poolpolicies, which require a SmartPools license, take precedence over the default filepool policy.
Requested protection
Specifies a requested protection setting for the default file pool, per node pool, oreven on individual files. You can leave the default setting in place, or choose thesuggested protection calculated by OneFS for optimal data protection.
Virtual hot spare
Reserves a portion of available storage space for data repair in the event of a diskfailure.
SSD strategies
Defines the type of data that is stored on SSDs in the cluster. For example,storing metadata for read/write acceleration.
L3 cache
Specifies that SSDs in nodes are used to increase cache memory and speed upfile system performance across larger working file sets.
Storage Pools
Isilon OneFS CLI Administration Guide 451

Global namespace acceleration
Activates global namespace acceleration (GNA), which enables data stored onnode pools without SSDs to access SSDs elsewhere in the cluster to store extrametadata mirrors. Extra metadata mirrors accelerate metadata read operations.
When you activate a SmartPools license, OneFS provides the following additionalfunctions:
Custom file pool policies
Creates custom file pool policies to identify different classes of files, and storesthese file pools in logical storage tiers. For example, you can define a high-performance tier of Isilon S-series node pools and an archival tier of high-capacityIsilon NL400 and HD400 node pools. Then, with custom file pool policies, you canidentify file pools based on matching criteria, and you can define actions toperform on these pools. For example, one file pool policy can identify all JPEGfiles older than a year and store them in an archival tier. Another policy can moveall files that were created or modified within the last three months to aperformance tier.
Storage pool spillover
Enables automated capacity overflow management for storage pools. Spilloverdefines how to handle write operations when a storage pool is not writable. Ifspillover is enabled, data is redirected to a specified storage pool. If spillover isdisabled, new data writes fail and an error message is sent to the client that isattempting the write operation.
AutoprovisioningWhen you add a node to an Isilon cluster, OneFS attempts to assign the node to anode pool. This process is known as autoprovisioning, which helps OneFS to provideoptimal performance, load balancing, and file system integrity across a cluster.
A node is not autoprovisioned to a node pool and made writable until at least threenodes of the same equivalence class are added to the cluster. If you add only twonodes of an equivalence class, no data is stored on these nodes until a third node ofthe same class is added.
Similarly, if a node goes down or is removed from the cluster so that fewer than threeequivalence-class nodes remain, the node pool becomes under-provisioned. In thiscase, the two remaining nodes are still writable. However, if only one node of anequivalence class remains, this node is not writable, but remains readable.
Over time, as you add new Isilon nodes to your cluster, the new nodes will likely bedifferent from the older nodes in certain ways. For example, the new nodes can be ofa different generation, or have different drive configurations. Unless you add threenew nodes of the same equivalence class each time you upgrade your cluster, the newnodes will not be autoprovisioned.
To work around those restrictions, OneFS enables you to create three types ofcompatibilities: node class, SSD capacity, and SSD count. With the appropriatecompatibilities in place, new node types can be provisioned to existing node pools. Youcan add nodes one at a time to your cluster, and the new nodes can become fullyfunctioning peers within existing node pools.
For example, suppose a cluster had a node pool made up of three S200 nodes, and youpurchase an S210 node. In addition to being a different node generation, the S210node could have a different number and capacity of SSDs. With the appropriatecompatibilities, the new S210 node can be provisioned to the S200 node pool.
Storage Pools
452 Isilon OneFS CLI Administration Guide

Node poolsA node pool is a group of three or more Isilon nodes that forms a single pool ofstorage. As you add nodes to your Isilon cluster, OneFS attempts to automaticallyprovision the new nodes into node pools.
To autoprovision a node, OneFS requires that the new node be of the sameequivalence class as the other nodes in the node pool. OneFS uses the followingcriteria to determine if the new node is of the same equivalence class:
l Family codel Chassis codel Generation codel Drive configurationl RAM capacity
If the new node matches all criteria, OneFS provisions the new node to the node pool.All nodes in a node pool are peers, and data is distributed across nodes in the pool.Each provisioned node increases the aggregate disk, cache, CPU, and networkcapacity of the cluster.
We strongly recommend that you let OneFS handle node provisioning. However, if youhave a special requirement or use case, you can move nodes from an autoprovisionednode pool into a node pool that you define manually. The capability to create manually-defined node pools is available only through the OneFS command-line interface, andshould be deployed only after consulting with Isilon Technical Support.
If you try to remove a node from a node pool for the purpose of adding it to a manualnode pool, and the result would leave fewer than three nodes in the original node pool,the removal fails. When you remove a node from a manually-defined node pool, OneFSattempts to autoprovision the node back into a node pool of the same equivalenceclass.
If you add fewer than three nodes of an equivalence class to your cluster, OneFScannot autoprovision these nodes. In these cases, you can often create one or morecompatibilities to enable OneFS to provision the newly added nodes to a compatiblenode pool.
Types of compatibilities include node class, SSD capacity, and SSD count.
Node class compatibilitiesTo be autoprovisioned, a node must be of the same equivalence class as the othernodes in the node pool. If a new node is not of the same equivalence class, you canenable the node to be provisioned to an existing node pool often by defining a nodeclass compatibility.
Note: Isilon Infinity models cannot be made class compatible with any other nodetype.
If you have existing S200, X200, X400, or NL400 node pools, and you add fewer thanthree Isilon S210, X210, X410, or NL410 nodes, you can create node classcompatibilities to provision the new nodes and make them functional within thecluster. Only S210, X210, X410, and NL410 nodes are currently eligible for node classcompatibility with older node generations.
To be provisioned, the new nodes should have the same drive configurations as theirolder-generation counterparts and must have compatible RAM amounts, as shown inthe following table:
Storage Pools
Isilon OneFS CLI Administration Guide 453

S200/S210Compatibility
X200/X210Compatibility
X400/X410Compatibility
NL400/NL410Compatibility
S200RAM
S210RAM
X200RAM
X210RAM
X400RAM
X410RAM
NL400RAM
NL410RAM
24 GB 32 GB 6 GB Notavailable
24 GB 32 GB 12 GB Notavailable
48 GB 64 GB 12 GB 48 GB 64 GB 24 GB 24 GB
96 GB 128 GB 24 GB 24 GB 96 GB 128 GB 48 GB 48 GB
256 GB 48 GB 48 GB 192 GB 256 GB – –
If the new nodes have different drive configurations by virtue of having SSDs ofvarying capacities or counts, you need to create SSD capacity or SSD countcompatibilities, in addition to node class compatibilities.
Note: After you have added three or more newer-generation nodes of a particularequivalence class to your cluster, you might want to remove the node classcompatibilities that you have created. This step enables OneFS to autoprovisionnew S210, X210, X410, or NL410 nodes to their own node pools and takeadvantage of the higher performance specifications of the new node types.However, because larger node pools store data more efficiently, removingcompatibilities can also reduce the amount of available storage on your cluster. Ifyou are unsure whether to remove compatibilities, we recommend that you firstconsult with Isilon Technical Support.
SSD compatibilitiesOneFS cannot autoprovision new nodes if they have different SSD capacities or SSDcounts from the other nodes in a node pool. To enable new nodes with different SSDcapacities or counts to join a compatible node pool, you can create SSDcompatibilities.
For example, if your cluster already has an S200 node pool, and you add a new S200node, OneFS would attempt to autoprovision the new node to the S200 node pool.However, if the new S200 node has higher-capacity SSDs than the older S200 nodes,or a different number of SSDs, then OneFS cannot autoprovision the new node. Toenable the new node to be autoprovisioned, you can create SSD compatibilities for theS200 node type.
As with node class compatibilities, SSD compatibilities require the nodes to becompatible, as shown in the following table:
Existing node pool SSD compatibilities that can be created
S200 S200, S210*
X200 X200, X210*
X400 X400, X410*
NL400 NL400, NL410*
S210 S210, S200*
X210 X210, X210*
X410 X410, X410*
Storage Pools
454 Isilon OneFS CLI Administration Guide

Existing node pool SSD compatibilities that can be created
NL410 NL410, NL400*
Generation 6-F800 All-flash system; SSD compatibilities not supported
Generation 6-H600 Gen 6-H600
Generation 6-H500 Gen 6-H500
Generation 6-H400 Gen 6-H400
Generation 6-A2000 Gen 6-A2000
Generation 6-A200 Gen 6-A200
* Also requires a node class compatibility with the existing node pool class.
Note: For SSD compatibilities to be created, all nodes must have L3 cacheenabled. If you attempt to create a node class compatibility and appropriate SSDcompatibilities, and the process fails with an error message, make sure that theexisting node pool has L3 cache enabled. Then try again to create thecompatibility. L3 cache can only be enabled on nodes that have fewer than 16SSDs and at least a 2:1 ratio of HDDs to SSDs. On Infinity models that supportSSD compatibilities, SSD count is ignored. If SSDs are used for storage, then SSDcounts must be identical on all nodes in a node pool. If SSD counts are leftunbalanced, node pool efficiency and performance will be less than optimal.
Manual node poolsIf the node pools automatically provisioned by OneFS do not meet your needs, you canconfigure node pools manually. You do this by moving nodes from an existing nodepool into the manual node pool.
This capability enables you to store data on specific nodes according to your purposes,and is available only through the OneFS command-line interface.
CAUTION It is recommended that you enable OneFS to provision nodesautomatically. Manually created node pools might not provide the sameperformance and efficiency as automatically managed node pools, particularly ifyour changes result in fewer than 20 nodes in the manual node pool.
Virtual hot spareVirtual hot spare (VHS) settings enable you to reserve disk space to rebuild the data inthe event that a drive fails.
You can specify both a number of virtual drives to reserve and a percentage of totalstorage space. For example, if you specify two virtual drives and 15 percent, eachnode pool reserves virtual drive space equivalent to two drives or 15 percent of theirtotal capacity (whichever is larger).
You can reserve space in node pools across the cluster for this purpose by specifyingthe following options:
l At least 1–4 virtual drives.l At least 0–20% of total storage.
OneFS calculates the larger number of the two factors to determine the space that isallocated. When configuring VHS settings, be sure to consider the followinginformation:
Storage Pools
Isilon OneFS CLI Administration Guide 455

l If you deselect the option to Ignore reserved space when calculating availablefree space (the default), free-space calculations include the space reserved forVHS.
l If you deselect the option to Deny data writes to reserved disk space (thedefault), OneFS can use VHS for normal data writes. We recommend that youleave this option selected, or data repair can be compromised.
l If Ignore reserved space when calculating available free space is enabled whileDeny data writes to reserved disk space is disabled, it is possible for the filesystem to report utilization as more than 100 percent.
Note: VHS settings affect spillover. If the VHS option Deny data writes toreserved disk space is enabled while Ignore reserved space when calculatingavailable free space is disabled, spillover occurs before the file system reports100% utilization.
SpilloverWhen you activate a SmartPools license, you can designate a node pool or tier toreceive spillover data when the hardware specified by a file pool policy is full orotherwise not writable.
If you do not want data to spill over to a different location because the specified nodepool or tier is full or not writable, you can disable this feature.
Note: Virtual hot spare reservations affect spillover. If the setting Deny datawrites to reserved disk space is enabled, while Ignore reserved space whencalculating available free space is disabled, spillover occurs before the filesystem reports 100% utilization.
Suggested protectionBased on the configuration of your Isilon cluster, OneFS automatically calculates theamount of protection that is recommended to maintain Dell EMC Isilon's stringentdata protection requirements.
OneFS includes a function to calculate the suggested protection for data to maintain atheoretical mean-time to data loss (MTTDL) of 5000 years. Suggested protectionprovides the optimal balance between data protection and storage efficiency on yourcluster.
By configuring file pool policies, you can specify one of multiple requested protectionsettings for a single file, for subsets of files called file pools, or for all files on thecluster.
It is recommended that you do not specify a setting below suggested protection.OneFS periodically checks the protection level on the cluster, and alerts you if datafalls below the recommended protection.
Protection policiesOneFS provides a number of protection policies to choose from when protecting a fileor specifying a file pool policy.
The more nodes you have in your cluster, up to 20 nodes, the more efficiently OneFScan store and protect data, and the higher levels of requested protection theoperating system can achieve. Depending on the configuration of your cluster and how
Storage Pools
456 Isilon OneFS CLI Administration Guide
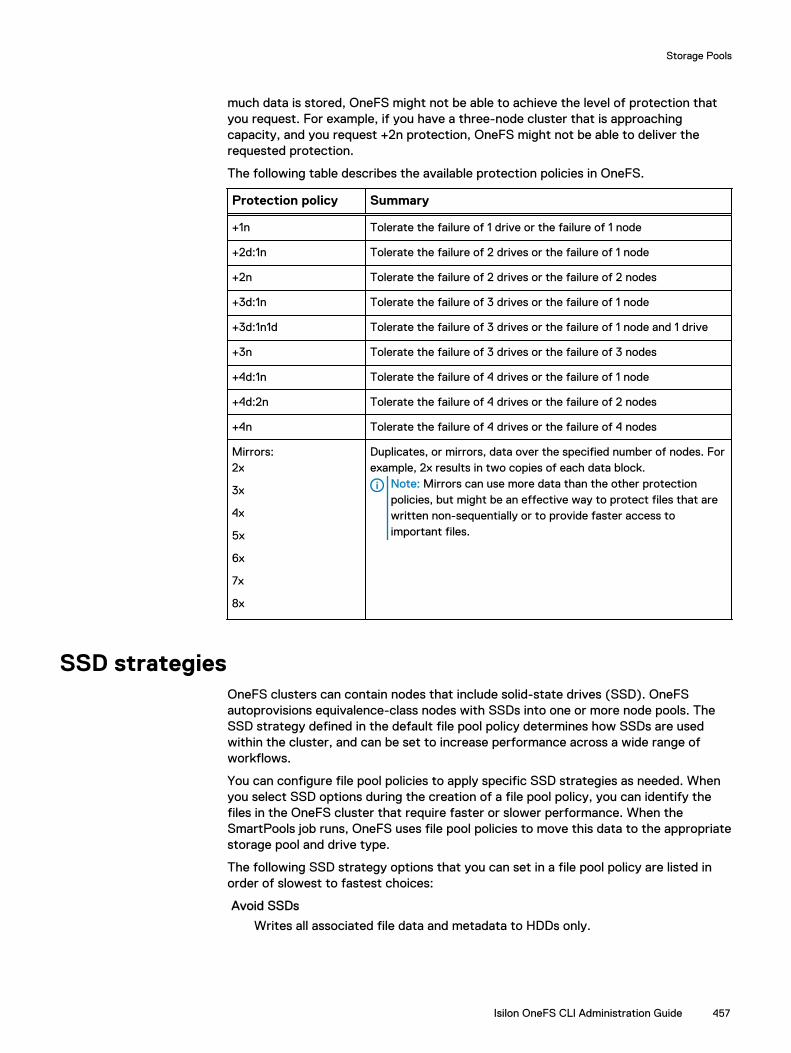
much data is stored, OneFS might not be able to achieve the level of protection thatyou request. For example, if you have a three-node cluster that is approachingcapacity, and you request +2n protection, OneFS might not be able to deliver therequested protection.
The following table describes the available protection policies in OneFS.
Protection policy Summary
+1n Tolerate the failure of 1 drive or the failure of 1 node
+2d:1n Tolerate the failure of 2 drives or the failure of 1 node
+2n Tolerate the failure of 2 drives or the failure of 2 nodes
+3d:1n Tolerate the failure of 3 drives or the failure of 1 node
+3d:1n1d Tolerate the failure of 3 drives or the failure of 1 node and 1 drive
+3n Tolerate the failure of 3 drives or the failure of 3 nodes
+4d:1n Tolerate the failure of 4 drives or the failure of 1 node
+4d:2n Tolerate the failure of 4 drives or the failure of 2 nodes
+4n Tolerate the failure of 4 drives or the failure of 4 nodes
Mirrors:2x
3x
4x
5x
6x
7x
8x
Duplicates, or mirrors, data over the specified number of nodes. Forexample, 2x results in two copies of each data block.
Note: Mirrors can use more data than the other protectionpolicies, but might be an effective way to protect files that arewritten non-sequentially or to provide faster access toimportant files.
SSD strategiesOneFS clusters can contain nodes that include solid-state drives (SSD). OneFSautoprovisions equivalence-class nodes with SSDs into one or more node pools. TheSSD strategy defined in the default file pool policy determines how SSDs are usedwithin the cluster, and can be set to increase performance across a wide range ofworkflows.
You can configure file pool policies to apply specific SSD strategies as needed. Whenyou select SSD options during the creation of a file pool policy, you can identify thefiles in the OneFS cluster that require faster or slower performance. When theSmartPools job runs, OneFS uses file pool policies to move this data to the appropriatestorage pool and drive type.
The following SSD strategy options that you can set in a file pool policy are listed inorder of slowest to fastest choices:
Avoid SSDs
Writes all associated file data and metadata to HDDs only.
Storage Pools
Isilon OneFS CLI Administration Guide 457
CAUTION Use this option to free SSD space only after consulting with IsilonTechnical Support personnel. Using this strategy can negatively affectperformance.
Metadata read acceleration
Writes both file data and metadata to HDDs. This is the default setting. An extramirror of the file metadata is written to SSDs, if available. The extra SSD mirror isincluded in the number of mirrors, if any, required to satisfy the requestedprotection.
Metadata read/write acceleration
Writes file data to HDDs and metadata to SSDs, when available. This strategyaccelerates metadata writes in addition to reads but requires about four to fivetimes more SSD storage than the Metadata read acceleration setting. EnablingGNA does not affect read/write acceleration.
Data on SSDs
Uses SSD node pools for both data and metadata, regardless of whether globalnamespace acceleration is enabled. This SSD strategy does not result in thecreation of additional mirrors beyond the normal requested protection butrequires significantly increased storage requirements compared with the otherSSD strategy options.
Other SSD mirror settingsOneFS creates multiple mirrors for file system structures and, by default, stores onemirror for each of these structures on SSD. You can specify that all mirrors for thesefile system structures be stored on SSD.
OneFS creates mirrors for the following file system structures:
l system B-tree
l system delta
l QAB (quota accounting block)
For each structure, OneFS creates multiple mirrors across the file system and storesat least one mirror on an SSD. Because SSDs provide faster I/O than HDDs, OneFScan more quickly locate and access a mirror for each structure when needed.
Alternatively, you can specify that all mirrors created for those file system structuresare stored on SSDs.
Note: The capability to change the default mirror setting for system B-tree,system delta, and QAB is available only in the OneFS CLI, specifically in the isistoragepool settings command.
Global namespace accelerationGlobal namespace acceleration (GNA) enables data on node pools without SSDs tohave additional metadata mirrors on SSDs elsewhere in the cluster. Metadata mirrorson SSDs can improve file system performance by accelerating metadata readoperations.
You can enable GNA only if 20 percent or more of the nodes in the cluster contain atleast one SSD and 1.5 percent or more of total cluster storage is SSD-based. For best
Storage Pools
458 Isilon OneFS CLI Administration Guide

results, before enabling GNA, make sure that at least 2.0 percent of total clusterstorage is SSD-based.
Even when enabled, GNA becomes inactive if the ratio of SSDs to HDDs falls belowthe 1.5 percent threshold, or if the percentage of nodes containing at least one SSDfalls below 20 percent. GNA is reactivated when those requirements are met again.While GNA is inactive in such cases, existing SSD mirrors are readable, but newlywritten metadata does not get the extra SSD mirror.
Note: Node pools with L3 cache enabled are effectively invisible for GNApurposes. All ratio calculations for GNA are done exclusively for node poolswithout L3 cache enabled. So, for example, if you have six node pools on yourcluster, and three of them have L3 cache enabled, GNA is applied only to the threeremaining node pools without L3 cache enabled. On node pools with L3 cacheenabled, metadata does not need an additional GNA mirror, because metadataaccess is already accelerated by L3 cache.
L3 cache overviewYou can configure nodes with solid-state drives (SSDs) to increase cache memory andspeed up file system performance across larger working file sets.
OneFS caches file data and metadata at multiple levels. The following table describesthe types of file system cache available on an Isilon cluster.
Name Type Profile Scope Description
L1 cache RAM Volatile Localnode
Also known as front-end cache, holds copiesof file system metadata and data requestedby the front-end network through NFS,SMB, HTTP, and so on.
L2 cache RAM Volatile Global Also known as back-end cache, holds copiesof file system metadata and data on thenode that owns the data.
SmartCache Variable Non-volatile
Localnode
Holds any pending changes to front-end fileswaiting to be written to storage. This type ofcache protects write-back data through acombination of RAM and stable storage.
L3 cache SSD Non-volatile
Global Holds file data and metadata released fromL2 cache, effectively increasing L2 cachecapacity.
OneFS caches frequently accessed file and metadata in available random accessmemory (RAM). Caching enables OneFS to optimize data protection and file systemperformance. When RAM cache reaches capacity, OneFS normally discards the oldestcached data and processes new data requests by accessing the storage drives. Thiscycle is repeated each time RAM cache fills up.
You can deploy SSDs as L3 cache to reduce the cache cycling issue and furtherimprove file system performance. L3 cache adds significantly to the available cachememory and provides faster access to data than hard disk drives (HDD).
As L2 cache reaches capacity, OneFS evaluates data to be released and, depending onyour workflow, moves the data to L3 cache. In this way, much more of the mostfrequently accessed data is held in cache, and overall file system performance isimproved.
Storage Pools
Isilon OneFS CLI Administration Guide 459

For example, consider a cluster with 128GB of RAM. Typically the amount of RAMavailable for cache fluctuates, depending on other active processes. If 50 percent ofRAM is available for cache, the cache size would be approximately 64GB. If this samecluster had three nodes, each with two 200GB SSDs, the amount of L3 cache wouldbe 1.2TB, approximately 18 times the amount of available L2 cache.
L3 cache is enabled by default for new node pools. A node pool is a collection of nodesthat are all of the same equivalence class, or for which compatibilities have beencreated. L3 cache applies only to the nodes where the SSDs reside. For the HD400node, which is primarily for archival purposes, L3 cache is on by default and cannot beturned off. On the HD400, L3 cache is used only for metadata.
If you enable L3 cache on a node pool, OneFS manages all cache levels to provideoptimal data protection, availability, and performance. In addition, in case of a powerfailure, the data on L3 cache is retained and still available after power is restored.
Note: Although some benefit from L3 cache is found in workflows with streamingand concurrent file access, L3 cache provides the most benefit in workflows thatinvolve random file access.
Migration to L3 cacheL3 cache is enabled by default on new nodes. If you are upgrading your cluster fromOneFS 7.1.0 or earlier, you must enable L3 cache manually on node pools that containSSDs. When you enable L3 cache, OneFS migrates data that is stored on the SSDs toHDD storage disks and then begins using the SSDs as cache.
You can enable L3 cache as the default for all new node pools or manually for aspecific node pool, either through the command line or from the web administrationinterface. L3 cache can be enabled only on node pools with nodes that contain SSDs.
When you enable L3 cache, OneFS displays the following message:
WARNING: Changes to L3 cache configuration can have a long completion time. If this is a concern, please contact Isilon Technical Support for more information.
You must confirm whether OneFS should proceed with the migration. After youconfirm the migration, OneFS handles the migration as a background process, and,depending on the amount of data stored on your SSDs, the process of migrating datafrom the SSDs to the HDDs might take a long time.
Note: You can continue to administer your cluster while the data is being migrated.
L3 cache on archive-class node poolsSome Isilon nodes are high-capacity units designed primarily for archival work flows,which involve a higher percentage of data writes compared to data reads. On nodepools made up of these archive-class nodes, SSDs are deployed for L3 cache, whichsignificantly improves the speed of file system traversal activities such as directorylookup.
L3 cache with metadata only stored in SSDs provides the best performance forarchiving data on these high-capacity nodes. L3 cache is on by default, as described inthe following table.
Nodes Comments
NL-series For node pools made up of NL-series nodes with hard-disk drives (HDD)smaller than 4 TB in capacity, L3 cache stores both data and metadata in
Storage Pools
460 Isilon OneFS CLI Administration Guide

Nodes Comments
SSDs by default. You can turn off L3 cache on NL-series nodes with 4 TBor smaller HDDs. However, we recommend that you leave L3 cacheenabled, as NL-series node pools typically do not have large numbers ofSSDs. From a performance perspective, the benefits of L3 cacheoutweigh the benefits of using SSDs as storage drives on these nodepools.For node pools made up of NL-series nodes with HDDs greater than 4 TBin capacity, L3 cache stores metadata only in SSDs and cannot bedisabled.
HD-series For all node pools made up of HD-series nodes, L3 cache stores metadataonly in SSDs and cannot be disabled.
Infinity A-series For all node pools made up of Infinity A-series nodes, L3 cache storesmetadata only in SSDs and cannot be disabled.
TiersA tier is a user-defined collection of node pools that you can specify as a storage poolfor files. A node pool can belong to only one tier.
You can create tiers to assign your data to any of the node pools in the tier. Forexample, you can assign a collection of node pools to a tier specifically created tostore data that requires high availability and fast access. In a three-tier system, thisclassification may be Tier 1. You can classify data that is used less frequently or that isaccessed by fewer users as Tier-2 data. Tier 3 usually comprises data that is seldomused and can be archived for historical or regulatory purposes.
File pool policiesFile pool policies define sets of files—file pools—and where and how they are storedon your cluster. You can configure multiple file pool policies with filtering rules thatidentify specific file pools and the requested protection and I/O optimization settingsfor these file pools. Creating custom file pool policies requires an active SmartPoolslicense.
The initial installation of OneFS places all files into a single file pool, which is subject tothe default file pool policy. Without an active SmartPools license, you can configureonly the default file pool policy, which controls all files and stores them anywhere onthe cluster.
With an active SmartPools license, OneFS augments basic storage functions byenabling you to create custom file pool policies that identify, protect, and controlmultiple file pools. With a custom file pool policy, for example, you can define andstore a file pool on a specific node pool or tier for fast access or archival purposes.
When you create a file pool policy, flexible filtering criteria enable you to specify time-based attributes for the dates that files were last accessed, modified, or created. Youcan also define relative time attributes, such as 30 days before the current date. Otherfiltering criteria include file type, name, size, and custom attributes. The followingexamples demonstrate a few ways you can configure file pool policies:
l A file pool policy to set stronger protection on a specific set of important files.
l A file pool policy to store frequently accessed files in a node pool that provides thefastest reads or read/writes.
Storage Pools
Isilon OneFS CLI Administration Guide 461

l A file pool policy to evaluate the last time files were accessed, so that older filesare stored in a node pool best suited for regulatory archival purposes.
When the SmartPools job runs, typically once a day, it processes file pool policies inpriority order. You can edit, reorder, or remove custom file pool policies at any time.The default file pool policy, however, is always last in priority order. Although you canedit the default file pool policy, you cannot reorder or remove it. When custom filepool policies are in place, the settings in the default file pool policy apply only to filesthat are not covered by another file pool policy.
When a new file is created, OneFS chooses a storage pool based on the default filepool policy, or, if it exists, a higher-priority custom file pool policy that matches thefile. If a new file was originally matched by the default file pool policy, and you latercreate a custom file pool policy that matches the file, the file will be controlled by thenew custom policy. As a result, the file could be placed in a different storage pool thenext time the SmartPools job runs.
FilePolicy jobYou can use the FilePolicy job to apply file pool policies.
The FilePolicy job supplements the SmartPools job by scanning the file system indexthat the File System Analytics (FSA) job uses. You can use this job if you are alreadyusing snapshots (or FSA) and file pool policies to manage data on the cluster. TheFilePolicy job is an efficient way to keep inactive data away from the fastest tiers. Thescan is done on the index, which does not require many locks. In this way, you canvastly reduce the number of times a file is visited before it is tiered down.
You need to keep down-tiering data in ways they already have, such as file poolpolicies that move data based on a fixed age. Adjust the data based on the fullness oftheir tiers.
To ensure that the cluster is correctly laid out and adequately protected, run theSmartPools job. You may use the SmartPools job after modifying the cluster, such asadding or removing nodes. You can also use the job for modifying the SmartPoolssettings (such as default protection settings), and if a node is down.
To use this feature, you must schedule the FilePolicy job daily and continue runningthe SmartPools job at a lower frequency. You can run the SmartPools job after eventsthat may affect node pool membership.
You can use the following options when running the FilePolicy job:
l --directory-only: This option helps you to process directories and is done toredirect new file ingest.
l --policy-only: This option helps you to set policies. Make sure not to restripe.
l --ingest: This option helps you to is a use -directory-only and -policy-only in combination.
l --nop: This option helps you to calculate and report the work that you have done.
Managing node pools through the command-line interfaceYou can manage node pools through the command-line interface. You can work withnode pools that are automatically provisioned, create and manage manual node pools,and create node class and SSD compatibilities for new nodes.
A node pool, whether automatically provisioned or manually created, must contain aminimum of three equivalent or compatible nodes. Nodes are provisioned when atleast three equivalent or compatible nodes are added to the cluster. If you add only
Storage Pools
462 Isilon OneFS CLI Administration Guide

two equivalent or compatible nodes to a cluster, you cannot store data on the nodesuntil you add a third node.
OneFS provides node class compatibilities and SSD compatibilities, which you cancreate to enable compatible nodes to become members of the an existing node pool.After you create a compatibility, any time a new compatible node is added to thecluster, OneFS provisions the new node to the appropriate node pool.
You can create a node pool manually only by selecting a subset of equivalence-class orcompatible nodes from a single autoprovisioned node pool. You cannot create amanual node pool that takes some nodes from one node pool and some nodes fromanother.
You must have the ISI_PRIV_SMARTPOOLS or greater administrative privilege tomanage node pools.
Create a node class compatibilityOneFS attempts to add new nodes to an existing node pool of the same equivalenceclass. For a new node that is not of the same equivalence class, you can create a nodeclass compatibility, which enables a new node to be provisioned to a compatible nodepool.
About this task
A new node must be provisioned to be functional within a cluster. The followingcompatibilities are currently supported: S200/S210, X200/X210, X400/X410, andNL400/NL410. For example, if you have a node pool made up of three or more S200nodes, you can create a compatibility so that new S210 nodes will be provisioned tothe S200 node pool.
Note: New nodes must have compatible RAM and the same drive configurationsas their older counterparts to be provisioned into those node pools. If driveconfigurations are not the same because of SSD capacity or SSD countdifferences, you can create SSD compatibilities, as well.
Procedure
1. Run the isi storagepool compatibilities class active createcommand.
The following command creates a compatibility between Isilon NL400 andNL410 nodes. Note that, in CLI commands, NL400 and NL410 nodes should bespecified as N400 and N410.
isi storagepool compatibilities class active create N400 N410
OneFS provides a summary of the results of executing the command, andrequires you to confirm the operation.
2. To proceed, type yes, and then press ENTER.
Results
OneFS attempts to add any unprovisioned NL410 nodes to the NL400 node pool. If thenew nodes remain unprovisioned, either L3 cache is turned off for the targeted nodepool, or you still need to create an SSD compatibility for the new nodes.
Storage Pools
Isilon OneFS CLI Administration Guide 463

Merge compatible node poolsYou can merge multiple compatible node pools to optimize storage efficiency on yourcluster.
About this task
For example, if you have six S200 nodes in one node pool and three S210 nodes in asecond node pool, you can create a compatibility to merge the two node pools intoone pool of nine nodes. Larger node pools, up to approximately 20 nodes, enableOneFS to protect data more efficiently, therefore providing more storage space fornew data.
Note: Newer node types typically have better performance specifications thanolder node types, so merging them with older node types can reduce performance.Also, when two node pools are merged, OneFS restripes the data, which can takeconsiderable time, depending on the size of your data set.
Procedure
1. Run the isi storagepool compatibilities class active createcommand.
The following command creates a compatibility between Isilon X400 and X410node pools:
isi storagepool compatibilities class active create X400 X410
OneFS provides a summary of the results of executing the command, includingthe node pools that will be merged, and requires you to confirm the operation.
2. To proceed, type yes, and then press ENTER.
Results
The compatible node pools are merged into one node pool. If the node pools were notmerged, either L3 cache is turned off for one of the node pools, or you still need tocreate an SSD compatibility between the two node pools.
Delete a node class compatibilityYou can delete a node class compatibility. As a result, any nodes that were provisionedto a node pool because of this compatibility are removed from the node pool.
About this task
CAUTION Deleting a node class compatibility could result in unintendedconsequences. For example, if you delete a compatibility, and fewer than threecompatible nodes are removed from the node pool, those nodes will be removedfrom your cluster's available pool of storage. The next time the SmartPools jobruns, data on those nodes would be restriped elsewhere on the cluster, whichcould be a time-consuming process. If three or more compatible nodes areremoved from the node pool, these nodes will form their own node pool, and datawill be restriped. Any file pool policy pointing to the original node pool will nowpoint to the node pool's tier, if one existed, or, otherwise, to a new tier created byOneFS.
Procedure
1. Determine the ID number of the active compatibility that you intend to delete.
Storage Pools
464 Isilon OneFS CLI Administration Guide
The following command lists active compatibilities and their ID numbers:
isi storagepool compatibilities class active list
2. Run the isi storagepool compatibilities class active deletecommand.
The following command deletes a node class compatibility with an ID number of1:
isi storagepool compatibilities class active delete 1
OneFS provides a summary of the results of executing the command, includingthe node pools that will be affected by the compatibility removal, and requiresyou to confirm the operation.
3. To proceed, type yes, and then press ENTER.
Results
OneFS splits any merged node pools, or unprovisions any previously compatible nodesthat are fewer than three in number.
Create an SSD compatibilityYou can create compatibilities both for SSD capacity and SSD count to enable newnodes to be provisioned to node pools with different SSD specifications. SSDcompatibilities can be created for the following node types: S200, S210, X200, X210,X400, X410, NL400, and NL410.
About this task
For example, if you have a node pool made up of three S200 nodes with 100GB SSDs,and you install an S200 node with an equal number of 200GB SSDs, the new S200node is not autoprovisioned to the S200 node pool until you create an SSD classcompatibility. If the nodes of the S200 node pool each have six SSDs, and the newS200 node has eight SSDs, you must also create an SSD count compatibility to enablethe new S200 node to be provisioned to the S200 node pool. Similarly, if you havedifferent generation nodes that are class-compatible, such as S200 and S210 nodes,you can create SSD compatibilities between those node types, as well.
Procedure
1. Run the isi storagepool compatibilities ssd active createcommand.
The following command creates an SSD class compatibility for Isilon S200nodes that have different capacity SSDs:
isi storagepool compatibilities ssd active create S200
The following command creates an SSD count compatibility for Isilon S200nodes that have a different number of SSDs:
isi storagepool compatibilities ssd active create S200 --count true
Storage Pools
Isilon OneFS CLI Administration Guide 465
The following command creates both an SSD class compatibility and an SSDcount compatibility between NL400 and NL410 nodes. Note that, in CLIcommands, NL400 and NL410 are expressed as N400 and N410.
isi storagepool compatibilities ssd active create N400 --class-2 N410 --count true
OneFS provides a summary of the results of executing the command, andrequires you to confirm the operation.
2. To proceed with the operation, type yes, and then press ENTER.
Results
The SSD compatibility is created.
Delete an SSD compatibilityYou can delete an SSD compatibility. If you do this, any nodes that are part of a nodepool because of this compatibility are removed from the node pool.
About this task
CAUTION Deleting an SSD compatibility could result in unintended consequences.For example, if you delete an SSD compatibility, and fewer than three compatiblenodes are removed from a node pool as a result, these nodes are removed fromyour cluster's available pool of storage. The next time the SmartPools job runs,data on those nodes is restriped elsewhere on the cluster, which could be a time-consuming process. If three or more compatible nodes are removed from the nodepool, these nodes form their own node pool, but data is restriped. Any file poolpolicy pointing to the original node pool points instead to the node pool's tier, ifone existed, or, otherwise, to a new tier created by OneFS.
Procedure
1. Run the isi storagepool compatibilities ssd active deletecommand.
You can run the isi storagepool compatibilities ssd activelist command to determine the ID number of active compatibilities.
The following command deletes an SSD compatibility with an ID number of 1:
isi storagepool compatibilities ssd active delete 1
The following command deletes an ssd compatibility between two differentIsilon models:
isi storagepool compatibilities ssd active delete 1 --id-2 2
Before executing your command, OneFS provides a summary of the results andrequires you to confirm the operation.
2. To proceed, type yes, and then press ENTER. To cancel, type no, and thenpress ENTER.
Storage Pools
466 Isilon OneFS CLI Administration Guide

Results
If you proceed with the operation, OneFS splits any merged node pools, orunprovisions any previously compatible nodes fewer than three in number.
Create a node pool manuallyYou can create node pools manually if autoprovisioning does not meet yourrequirements.
About this task
When you add new nodes to your cluster, OneFS places these nodes into node pools.This process is called autoprovisioning. For some workflows, you might prefer tocreate node pools manually. A manually created node pool must have at least threenodes, identified by the logical node numbers (LNNs).
CAUTION It is recommended that you enable OneFS to provision nodesautomatically. Manually created node pools might not provide the sameperformance and efficiency as automatically managed node pools, particularly ifyour changes result in fewer than 20 nodes in the manual node pool.
Procedure
1. Run the isi storagepool nodepools create command.
You can specify the nodes to be added to a nodepool by a comma-delimited listof LNNs (for example, --lnns 1,2,5) or by using ranges (for example, --lnns5-8).
The following command creates a node pool by specifying the LNNs of threenodes to be included.
isi storagepool nodepools create PROJECT-1 --lnns 1,2,5
Add a node to a manually managed node poolYou can add a node to a manually managed node pool.
About this task
If you specify a node that is already part of another node pool, OneFS removes thenode from the original node pool and adds it to the manually managed node pool.
Procedure
1. Run the isi storagepool nodepools modify command.
The following command adds nodes with the LNNs (logical node numbers) of 3,4, and 10 to an existing node pool:
isi storagepool nodepools modify PROJECT-1 --lnns 3-4, 10
Change the name or protection policy of a node poolYou can change the name or protection policy of a node pool.
Procedure
1. Run the isi storagepool nodepools modify command.
Storage Pools
Isilon OneFS CLI Administration Guide 467

The following command changes the name and protection policy of a node pool:
isi storagepool nodepools modify PROJECT-1 --set-name PROJECT-A \--protection-policy +2:1
Remove a node from a manually managed node poolYou can remove a node from a manually managed node pool.
About this task
If you attempt to remove nodes from either a manually managed or automaticallymanaged node pool so that the removal leaves only one or two nodes in the pool, theremoval fails. You can, however, move all nodes from an autoprovisioned node poolinto one that is manually managed.
When you remove a node from the manually managed node pool, OneFSautoprovisions the node into another node pool of the same equivalence class.
Procedure
1. Run the isi storagepool nodepools modify command.
The following command removes two nodes, identified by its LNNs (logical nodenumbers) from a node pool.
isi storagepool nodepools modify ARCHIVE_1 --remove-lnns 3,6
LNN values can be specified as a range, for example, --lnns=1-3, or in acomma-separated list, for example, --lnns=1,2,5,9.
Modify default storage pool settingsYou can modify default storage pool settings for requested protection, I/Ooptimization, global namespace acceleration, virtual hot spare, and spillover.
Procedure
1. Run the isi storagepool settings modify command.
The following command specifies automatic file protection and I/Ooptimization, disables global namespace acceleration, specifies a percentage ofstorage for a virtual hot spare, enables L3 cache for node pools with SSDs, andchanges the mirror settings for the QAB, system B-tree, and system delta filesystem structures:
isi storagepool settings modify --automatically-manage-protection files_at_default --automatically-manage-io-optimization files_at_default --global-namespace-acceleration-enabled no --virtual-hot-spare-limit-percent 5 --ssd-l3-cache-default-enabled yes --ssd-qab-mirrors all --ssd-system-btree-mirrors all --ssd-system-delta-mirrors all
Results
OneFS applies your changes to any files managed by the default file pool policy thenext time the SmartPools job runs.
Storage Pools
468 Isilon OneFS CLI Administration Guide

SmartPools settingsSmartPools settings include directory protection, global namespace acceleration, L3cache, virtual hot spare, spillover, requested protection management, and I/Ooptimization management.
Settings in WebAdmin
Settings in CLI Description Notes
Increase directoryprotection to a higherlevel than its contents
--protect-directories-one-level-higher
Increases the amount ofprotection for directories at ahigher level than the directoriesand files that they contain, sothat data that is not lost can stillbe accessed.When device failures result indata loss (for example, threedrives or two nodes in a +2:1policy), enabling this settingensures that intact data is stillaccessible.
This setting should be enabled(the default).When this setting is disabled, thedirectory that contains a file poolis protected according to yourprotection-level settings, but thedevices used to store thedirectory and the file may not bethe same. There is potential tolose nodes with file data intactbut not be able to access the databecause those nodes containedthe directory.
As an example, consider a clusterthat has a +2 default file poolprotection setting and noadditional file pool policies.OneFS directories are alwaysmirrored, so they are stored at3x, which is the mirroredequivalent of the +2 default.
This configuration can sustain afailure of two nodes before dataloss or inaccessibility. If thissetting is enabled, all directoriesare protected at 4x. If the clusterexperiences three node failures,although individual files may beinaccessible, the directory tree isavailable and provides access tofiles that are still accessible.
In addition, if another file poolpolicy protects some files at ahigher level, these too areaccessible in the event of athree-node failure.
Enable global namespaceacceleration
--global-namespace-acceleration-enabled
Specifies whether to allow per-file metadata to use SSDs in thenode pool.
l When disabled, restricts per-file metadata to the storagepool policy of the file, except
This setting is available only if 20percent or more of the nodes inthe cluster contain SSDs and atleast 1.5 percent of the totalcluster storage is SSD-based.If nodes are added to or removedfrom a cluster, and the SSDthresholds are no longer satisfied,
Storage Pools
Isilon OneFS CLI Administration Guide 469

Settings in WebAdmin
Settings in CLI Description Notes
in the case of spillover. Thisis the default setting.
l When enabled, allows per-filemetadata to use the SSDs inany node pool.
GNA becomes inactive. GNAremains enabled, so that whenthe SSD thresholds are metagain, GNA is reactivated.
Note: Node pools with L3cache enabled are effectivelyinvisible for GNA purposes.All ratio calculations for GNAare done exclusively for nodepools without L3 cacheenabled.
Use SSDs as L3 Cache bydefault for new nodepools
--ssd-l3-cache-default-enabled
For node pools that include solid-state drives, deploy the SSDs asL3 cache. L3 cache extends L2cache and speeds up file systemperformance across largerworking file sets.
L3 cache is enabled by default onnew node pools. When you enableL3 cache on an existing nodepool, OneFS performs amigration, moving any existingdata on the SSDs to otherlocations on the cluster.OneFS manages all cache levelsto provide optimal dataprotection, availability, andperformance. In case of a powerfailure, the data on L3 cache isretained and still available afterpower is restored.
Virtual Hot Spare --virtual-hot-spare-deny-writes--virtual-hot-spare-hide-spare
--virtual-hot-spare-limit-drives
--virtual-hot-spare-limit-percent
Reserves a minimum amount ofspace in the node pool that canbe used for data repair in theevent of a drive failure.
To reserve disk space for use asa virtual hot spare, select fromthe following options:
l Ignore reserved disk spacewhen calculating availablefree space. Subtracts thespace reserved for the virtualhot spare when calculatingavailable free space.
l Deny data writes toreserved disk space.Prevents write operationsfrom using reserved diskspace.
l VHS Space Reserved. Youcan reserve a minimumnumber of virtual drives(1-4), as well as a minimumpercentage of total diskspace (0-20%).
If you configure both theminimum number of virtual drivesand a minimum percentage oftotal disk space when youconfigure reserved VHS space,the enforced minimum valuesatisfies both requirements.
If this setting is enabled and Denynew data writes is disabled, it ispossible for the file systemutilization to be reported at morethan 100%.
Storage Pools
470 Isilon OneFS CLI Administration Guide

Settings in WebAdmin
Settings in CLI Description Notes
Enable global spillover --spillover-enabled Specifies how to handle writeoperations to a node pool that isnot writable.
l When enabled, redirectswrite operations from a nodepool that is not writableeither to another node poolor anywhere on the cluster(the default).
l When disabled, returns a diskspace error for writeoperations to a node poolthat is not writable.
Spillover Data Target --spillover-target--spillover-anywhere
Specifies another storage pool totarget when a storage pool is notwritable.
When spillover is enabled, but it isimportant that data writes do notfail, select anywhere for theSpillover Data Target setting,even if file pool policies send datato specific pools.
Manage protectionsettings
--automatically-manage-protection
When this setting is enabled,SmartPools manages requestedprotection levels automatically.
When Apply to files withmanually-managed protection isenabled, overwrites anyprotection settings that wereconfigured through File SystemExplorer or the command-lineinterface.
Manage I/O optimizationsettings
--automatically-manage-io-optimization
When enabled, uses SmartPoolstechnology to manage I/Ooptimization.
When Apply to files withmanually-managed I/Ooptimization settings is enabled,overwrites any I/O optimizationsettings that were configuredthrough File System Explorer orthe command-line interface
None --ssd-qab-mirrors Either one mirror or all mirrorsfor the quota account block(QAB) are stored on SSDs
Improve quota accountingperformance by placing all QABmirrors on SSDs for faster I/O.By default, only one QAB mirror isstored on SSD.
None --ssd-system-btree-mirrors
Either one mirror or all mirrorsfor the system B-tree are storedon SSDs
Increase file system performanceby placing all system B-treemirrors on SSDs for fasteraccess. Otherwise only onesystem B-tree mirror is stored onSSD.
None --ssd-system-delta-mirrors
Either one mirror or all mirrorsfor the system delta are storedon SSDs
Increase file system performanceby placing all system delta mirrorson SSDs for faster access.Otherwise only one system deltamirror is stored on SSD.
Storage Pools
Isilon OneFS CLI Administration Guide 471

Managing L3 cache from the command-line interfaceL3 cache can be administered globally or on specific node pools. If you choose to, youcan also revert SSDs back to storage drives. In Isilon HD400 node pools, SSDs areexclusively for L3 cache purposes. On these nodes, L3 cache is turned on by defaultand cannot be turned off.
Set L3 cache as the default for new node poolsYou can set L3 cache as the default, so that when new node pools are created, L3cache is enabled automatically.
Before you begin
L3 cache is effective only on nodes that include SSDs. If none of your nodes has SSDstorage, there is no need to enable L3 cache as the default.
Procedure
1. Run the isi storagepool settings modify command.
The following command sets L3 cache enabled as the default for new nodepools that are added.
isi storagepool settings modify --ssd-l3-cache-default-enabled yes
2. Run the isi storagepool settings view command to confirm that theSSD L3 Cache Default Enabled attribute is set to Yes.
Enable L3 cache on a specific node poolYou can enable L3 cache for a specific node pool. This is useful when only some ofyour node pools are equipped with SSDs.
Procedure
1. Run the isi storagepool nodepools modify command on a specificnode pool.
The following command enables L3 cache on a node pool named hq_datastore:
isi storagepool nodepools modify hq_datastore --l3 true
If the SSDs on the specified node pool previously were used as storage drives, amessage appears asking you to confirm the change.
2. If prompted, type yes, and then press ENTER.
Storage Pools
472 Isilon OneFS CLI Administration Guide

Restore SSDs to storage drives for a node poolYou can disable L3 cache for SSDs on a specific node pool and restore those SSDs tostorage drives.
About this task
Note: On HD400 node pools, SSDs are used only for L3 cache, which is turned onby default and cannot be turned off. If you attempt to turn off L3 cache on anHD400 node pool through the command-line interface, OneFS generates this errormessage: Disabling L3 not supported for the given node type.
Procedure
1. Run the isi storagepool nodepools modify command on a specificnode pool.
The following command disables L3 cache on a node pool named hq_datastore:
isi storagepool nodepools modify hq_datastore --l3 false
2. At the confirmation prompt, type yes, and then press ENTER.
Managing tiersYou can move node pools into tiers to optimize file and storage management.
Managing tiers requires ISI_PRIV_SMARTPOOLS or higher administrative privileges.
Create a tierYou can create a tier to group together one or more node pools for specific storagepurposes.
About this task
Depending on the types of nodes in your cluster, you can create tiers for differentcategories of storage, for example, an archive tier, performance tier, or general-usetier. After creating a tier, you need to add the appropriate node pools to the tier.
Procedure
1. Run the isi storagepool tiers create command.
The following command creates a tier named ARCHIVE_1, and adds node poolsnamed hq_datastore1 and hq_datastore2 to the tier.
isi storagepool tiers create ARCHIVE_1 --children hq_datastore1 --children hq_datastore2
Add or move node pools in a tierYou can group node pools into tiers and move node pools from one tier to another.
Procedure
1. Run the isi storagepool nodepools modify command.
Storage Pools
Isilon OneFS CLI Administration Guide 473

The following example adds a node pool named PROJECT-A to a tier namedARCHIVE_1.
isi storagepool nodepools modify PROJECT-A --tier ARCHIVE_1
If the node pool, PROJECT-A, happened to be in another tier, the node poolwould be moved to the ARCHIVE_1 tier.
Rename a tierA tier name can contain alphanumeric characters and underscores but cannot beginwith a number.
Procedure
1. Run the isi storagepool tiers modify command.
The following command renames a tier from ARCHIVE_1 to ARCHIVE_A:
isi storagepool tiers modify ARCHIVE_1 --set-name ARCHIVE_A
Delete a tierWhen you delete a tier, its node pools remain available and can be added to other tiers.
Procedure
1. Run the isi storagepool tiers delete command.
The following command deletes a tier named ARCHIVE_A:
isi storagepool tiers delete ARCHIVE_A
Creating file pool policiesYou can configure file pool policies to identify logical groups of files called file pools,and you can specify storage operations for these files.
Before you can create file pool policies, you must activate a SmartPools license, andyou must have the SmartPools or higher administrative privilege.
File pool policies have two parts: file-matching criteria that define a file pool, and theactions to be applied to the file pool. You can define file pools based oncharacteristics, such as file type, size, path, birth, change, and access timestamps,and combine these criteria with Boolean operators (AND, OR).
In addition to file-matching criteria, you can identify a variety of actions to apply tothe file pool. These actions include:
l Setting requested protection and data-access optimization parameters
l Identifying data and snapshot storage targets
l Defining data and snapshot SSD strategies
l Enabling or disabling SmartCache
For example, to free up disk space on your performance tier (S-series node pools),you could create a file pool policy to match all files greater than 25 MB in size, whichhave not been accessed or modified for more than a month, and move them to yourarchive tier (NL-series node pools).
Storage Pools
474 Isilon OneFS CLI Administration Guide
You can configure and prioritize multiple file pool policies to optimize file storage foryour particular work flows and cluster configuration. When the SmartPools job runs,by default once a day, it applies file pool policies in priority order. When a file poolmatches the criteria defined in a policy, the actions in that policy are applied, andlower-priority custom policies are ignored for the file pool.
After the list of custom file pool policies is traversed, if any of the actions are notapplied to a file, the actions in the default file pool policy are applied. In this way, thedefault file pool policy ensures that all actions apply to every file.
Note: You can reorder the file pool policy list at any time, but the default file poolpolicy is always last in the list of file pool policies.
OneFS also provides customizable template policies that you can copy to make yourown policies. These templates, however, are only available from the OneFS webadministration interface.
Create a file pool policyYou can create a file pool policy to match specific files and apply SmartPools actionsto the matched file pool. SmartPools actions include moving files to certain storagetiers, changing the requested protection levels, and optimizing write performance anddata access.
About this task
CAUTION If existing file pool policies direct data to a specific storage pool, do notconfigure other file pool policies that match this data with anywhere for the --data-storage-target setting. Because the specified storage pool is includedwhen you use anywhere, you should target specific storage pools to avoidunintentional file storage locations.
Procedure
1. Run the isi filepool policies create command.
The following command creates a file pool policy that archives older files to aspecific storage tier:
isi filepool policies create ARCHIVE_OLD --description "Move older files to archive storage" --data-storage-target ARCHIVE_TIER --data-ssd-strategy metadata --begin-filter --file-type=file --and --birth-time=2013-09-01 --operator=lt --and --accessed-time=2013-12-01 --operator=lt --end-filter
Results
The file pool policy is applied when the next scheduled SmartPools job runs. Bydefault, the SmartPools job runs once a day; however, you can also start theSmartPools job manually.
Valid wildcard charactersYou can combine wildcard characters with file-matching options to define a file poolpolicy.
OneFS supports UNIX shell-style (glob) pattern matching for file name attributes andpaths.
Storage Pools
Isilon OneFS CLI Administration Guide 475

The following table lists the valid wildcard characters that you can combine with file-matching options to define a file pool policy.
Wildcard Description
* Matches any string in place of the asterisk.For example, m* matches movies and m123.
[a-z] Matches any characters contained in the brackets, or a range ofcharacters separated by a hyphen. For example, b[aei]t matches
bat, bet, and bit, and 1[4-7]2 matches 142, 152, 162, and
172.
You can exclude characters within brackets by following the firstbracket with an exclamation mark. For example, b[!ie] matches
bat but not bit or bet.
You can match a bracket within a bracket if it is either the first or lastcharacter. For example, [[c]at matches cat and [at.
You can match a hyphen within a bracket if it is either the first or lastcharacter. For example, car[-s] matches cars and car-.
? Matches any character in place of the question mark. For example,t?p matches tap, tip, and top.
Default file pool requested protection settingsDefault protection settings include specifying the data storage target, snapshotstorage target, requested protection, and SSD strategy for files that are filtered bythe default file pool policy.
Settings (WebAdmin)
Settings (CLI) Description Notes
Storage Target --data-storage-target--data-ssd-strategy
Specifies the storage pool (node pool or tier) thatyou want to target with this file pool policy.
CAUTIONIf existing file pool policies direct data to aspecific storage pool, do not configure otherfile pool policies with anywhere for the Data
storage target option. Because the specifiedstorage pool is included when you useanywhere, target specific storage pools to
avoid unintentional file storage locations.
Select one of the following options to define yourSSD strategy:
Use SSDs for metadata read acceleration
Default. Write both file data and metadata toHDDs and metadata to SSDs. Acceleratesmetadata reads only. Uses less SSD spacethan the Metadata read/write accelerationsetting.
Note: If GNA is notenabled and the storagepool that you choose totarget does not containSSDs, you cannotdefine an SSD strategy.
Use SSDs for metadataread acceleration writesboth file data and metadatato HDD storage pools butadds an additional SSDmirror if possible toaccelerate readperformance. Uses HDDs toprovide reliability and anextra metadata mirror toSSDs, if available, toimprove read performance.Recommended for mostuses.
When you select Use SSDsfor metadata read/write
Storage Pools
476 Isilon OneFS CLI Administration Guide

Settings (WebAdmin)
Settings (CLI) Description Notes
Use SSDs for metadata read/writeacceleration
Write metadata to SSD pools. Usessignificantly more SSD space than Metadataread acceleration, but accelerates metadatareads and writes.
Use SSDs for data & metadata
Use SSDs for both data and metadata.Regardless of whether global namespaceacceleration is enabled, any SSD blocks resideon the storage target if there is room.
Avoid SSDs
Write all associated file data and metadata toHDDs only.
CAUTIONUse this to free SSD space only afterconsulting with Isilon Technical Supportpersonnel; the setting can negativelyaffect performance.
acceleration , the strategyuses SSDs, if available inthe storage target, forperformance and reliability.The extra mirror can befrom a different storagepool using GNA enabled orfrom the same node pool.
Neither the Use SSDs fordata & metadata strategynor the Use SSDs for data& metadata strategy resultin the creation of additionalmirrors beyond the normalrequested protection. Bothfile data and metadata arestored on SSDs if availablewithin the file pool policy.This option requires asignificant amount of SSDstorage.
Snapshot storagetarget
--snapshot-storage-target--snapshot-ssd-strategy
Specifies the storage pool that you want to targetfor snapshot storage with this file pool policy. Thesettings are the same as those for data storagetarget, but apply to snapshot data.
Notes for data storagetarget apply to snapshotstorage target
Requestedprotection
--set-requested-protection
Default of storage pool. Assign the defaultrequested protection of the storage pool to thefiltered files.
Specific level. Assign a specified requestedprotection to the filtered files.
To change the requestedprotection , select a newvalue from the list.
Default file pool I/O optimization settingsYou can manage the I/O optimization settings that are used in the default file poolpolicy, which can include files with manually managed attributes.
To allow SmartPools to overwrite optimization settings that were configured using FileSystem Explorer or the isi set command, select the Including files with manually-managed I/O optimization settings option in the Default Protection Settingsgroup. In the CLI, use the --automatically-manage-io-optimization optionwith the isi storagepool settings modify command.
Setting (WebAdmin)
Setting (CLI) Description Notes
Write Performance --enable-coalescer Enables or disablesSmartCache (also
Enable SmartCache is the recommended setting foroptimal write performance. With asynchronous writes,the Isilon server buffers writes in memory. However, if
Storage Pools
Isilon OneFS CLI Administration Guide 477

Setting (WebAdmin)
Setting (CLI) Description Notes
referred to as thecoalescer).
you want to disable this buffering, we recommend thatyou configure your applications to use synchronouswrites. If that is not possible, disable SmartCache.
Data AccessPattern
--data-access-pattern
Defines the optimizationsettings for accessingconcurrent, streaming, orrandom data types.
Files and directories use a concurrent access patternby default. To optimize performance, select thepattern dictated by your workflow. For example, aworkflow heavy in video editing should be set toOptimize for streaming access. That workflow wouldsuffer if the data access pattern was set to Optimizefor random access.
Managing file pool policiesYou can perform a number of file pool policy management tasks.
File pool policy management tasks include:
l Modifying file pool policies
l Modifying the default file pool policy
l Creating a file pool policy from a template
l Reordering file pool policies
l Deleting file pool policies
Note: You can create a file pool policy from a template only in the OneFS webadministration interface.
Modify a file pool policyYou can modify the name, description, filter criteria, and the protection and I/Ooptimization settings applied by a file pool policy.
About this task
CAUTIONIf existing file pool policies direct data to a specific storage pool, do not configureother file pool policies with anywhere for the Data storage target option.Because the specified storage pool is included when you use anywhere, targetspecific storage pools to avoid unintentional file storage locations.
Procedure
1. Run the isi filepool policies list command to view a list of availablefile pool policies.
A tabular list of policies and their descriptions appears.
2. Run the isi filepool policies view command to view the currentsettings of a file pool policy.
The following example displays the settings of a file pool policy namedARCHIVE_OLD.
isi filepool policies view ARCHIVE_OLD
Storage Pools
478 Isilon OneFS CLI Administration Guide

3. Run the isi filepool policies modify command to change a file poolpolicy.
The following example modifies the settings of a file pool policy namedARCHIVE_OLD.
isi filepool policies modify ARCHIVE_OLD --description "Move older files to archive storage" --data-storage-target TIER_A --data-ssd-strategy metadata-write --begin-filter --file-type=file --and --birth-time=2013-01-01 --operator=lt --and --accessed-time=2013-09-01 --operator=lt --end-filter
Results
Changes to the file pool policy are applied when the next SmartPools job runs.However, you can also manually run the SmartPools job immediately.
Configure default file pool policy settingsFiles that are not managed by custom file pool policies are managed by the default filepool policy. You can configure the default file pool policy settings.
Procedure
1. Run the isi filepool default-policy view command to display thecurrent default file pool policy settings.
Output similar to the following example appears:
Set Requested Protection: default Data Access Pattern: random Enable Coalescer: True Data Storage Target: anywhere Data SSD Strategy: metadata Snapshot Storage Target: anywhere Snapshot SSD Strategy: metadata
2. Run the isi filepool default-policy modify command to changedefault settings.
The following command modifies all default settings:
isi filepool default-policy modify --set-requested-protection +2 \ --data-access-pattern concurrency --enable-coalescer false \ --data-storage-target ARCHIVE_A --data-ssd-strategy avoid \ --snapshot-storage-target ARCHIVE_A --snapshot-ssd-strategy avoid
3. Run the isi filepool default-policy view command again to ensurethat default file pool policy settings reflect your intentions.
Results
OneFS implements the new default file pool policy settings when the next scheduledSmartPools job runs and applies these settings to any files that are not managed by acustom file pool policy.
Storage Pools
Isilon OneFS CLI Administration Guide 479

Prioritize a file pool policyYou can change the priority order of a file pool policy.
About this task
File pool policies are evaluated in descending order according to their position in thefile pool policies list. By default, when you create a new policy, it is insertedimmediately above the default file pool policy. You can assign a policy a differentpriority by moving it up or down in the list. The default policy is always the last inpriority, and applies to all files that are not matched by any other file pool policy.
Procedure
1. Run the isi filepool policies list command to view the list ofavailable file pool policies and their priority order.
Output similar to the following appears:
Name Description -----------------------------------------------ARCHIVE_1 Move older files to archive tier MOVE-LARGE Move large files to archive tier PERFORM_1 Move recent files to perf. tier -----------------------------------------------Total: 3
2. Run the isi filepool policies modify command to change the priorityof a file pool policy.
The following example changes the priority of a file pool policy namedPERFORM_1.
isi filepool policies modify PERFORM_1 --apply-order 1
3. Run the isi filepool policies list command again to ensure that thepolicy list displays the correct priority order.
Delete a file pool policyYou can delete a file pool policy.
About this task
Delete a file pool policy only if you are aware of, or unconcerned with, theconsequences.
Procedure
1. Run the isi filepool policies delete command.
The following example deletes a file pool policy named ARCHIVE_1.
isi filepool policies delete ARCHIVE_1
The system asks you to confirm the deletion.
2. Type yes, then press ENTER.
Storage Pools
480 Isilon OneFS CLI Administration Guide

Results
The file pool policy is removed. When you delete a policy, its file pool will be controlledeither by another policy or by the default file pool policy the next time the SmartPoolsjob runs.
Monitoring storage poolsYou can access information on storage pool health and usage.
The following information is available:
l File pool policy health
l SmartPools health, including tiers, node pools, and subpools
l For each storage pool, percentage of HDD and SSD disk space usage
l SmartPools job status
Monitor storage poolsYou can view storage pool status and details.
About this task
Details include the names of tiers and associated node pools, requested protection,HDD and SSD capacities and usage.
Procedure
1. Run the isi storagepool list command.
Output similar to the following example appears:
Name Nodes Protect HDD Total % SSD Total %------------------------------------------------------------------PERF_TIER 1-3 - 12.94T 17.019T 26.99% 0.4T 1.2T 33.00%- s-series 1-3 +2:1 12.94T 17.019T 26.99% 0.4T 1.2T 33.00%HOME_TIER 4-6 - 16.59T 19.940T 77.73% 0b 0b 0.00%- x-series 4-6 +2:1 16.59T 19.940T 77.73% 0b 0b 0.00%ARCHIVE_1 7-9 - 100.8T 200.60T 49.88% 0b 0b 0.00%- nl-serie 7-9 +2:1 100.8T 200.60T 49.88% 0b 0b 0.00%------------------------------------------------------------------Total: 6 200.5G 17.019G 26.99% 0b 0b 0.00%
View the health of storage poolsYou can view the health of storage pools.
Procedure
1. Run the isi storagepool health command.
Storage Pools
Isilon OneFS CLI Administration Guide 481

The following command, using the verbose option, displays a tabular descriptionof storage pool health:
isi storagepool health --verbose
View results of a SmartPools jobYou can review detailed results from the last time the SmartPools job ran.
About this task
The SmartPools job, by default, runs once a day. It processes the file pool policies thatyou have created to manage storage on your cluster.
Procedure
1. Run the isi job events list command.
A tabular listing of the most recent system jobs appears. The listing for theSmartPools job is similar to the following example:
2014-04-28T02:00:29 SmartPools [105] Succeeded2. Locate the SmartPools job in the listing, and make note of the number in square
brackets.
This is the job ID number.
3. Run the isi job reports view command, using the job ID number.
The following example displays the report for a SmartPools job with the job IDof 105.
isi job reports view 105
Results
The SmartPools report shows the outcome of all of the file pool policies that were run,including summaries for each policy, and overall job information such as elapsed time,LINs traversed, files and directories processed, and memory and I/O statistics.
Storage Pools
482 Isilon OneFS CLI Administration Guide
CHAPTER 25
System jobs
This section contains the following topics:
l System jobs overview...................................................................................... 484l System jobs library...........................................................................................484l Job operation................................................................................................... 487l Job performance impact.................................................................................. 488l Job priorities.................................................................................................... 489l Managing system jobs......................................................................................489l Managing impact policies................................................................................. 493l Viewing job reports and statistics.....................................................................496
Isilon OneFS CLI Administration Guide 483

System jobs overviewThe most critical function of OneFS is maintaining the integrity of data on your Isiloncluster. Other important system maintenance functions include monitoring andoptimizing performance, detecting and mitigating drive and node failures, and freeingup available space.
Because maintenance functions use system resources and can take hours to run,OneFS performs them as jobs that run in the background through a service called JobEngine. The time it takes for a job to run can vary significantly depending on a numberof factors. These include other system jobs that are running at the same time; otherprocesses that are taking up CPU and I/O cycles while the job is running; theconfiguration of your cluster; the size of your data set; and how long since the lastiteration of the job was run.
Up to three jobs can run simultaneously. To ensure that maintenance jobs do nothinder your productivity or conflict with each other, Job Engine categorizes them,runs them at different priority and impact levels, and can temporarily suspend them(with no loss of progress) to enable higher priority jobs and administrator tasks toproceed.
In the case of a power failure, Job Engine uses a checkpoint system to resume jobs asclose as possible to the point at which they were interrupted. The checkpoint systemhelps Job Engine keep track of job phases and tasks that have already beencompleted. When the cluster is back up and running, Job Engine restarts the job at thebeginning of the phase or task that was in process when the power failure occurred.
As system administrator, through the Job Engine service, you can monitor, schedule,run, terminate, and apply other controls to system maintenance jobs. The Job Engineprovides statistics and reporting tools that you can use to determine how longdifferent system jobs take to run in your OneFS environment.
Note: To initiate any Job Engine tasks, you must have the role of SystemAdmin inthe OneFS system.
System jobs libraryOneFS contains a library of system jobs that run in the background to help maintainyour Isilon cluster. By default, system jobs are categorized as either manual orscheduled. However, you can run any job manually or schedule any job to runperiodically according to your workflow. In addition, OneFS starts some jobsautomatically when particular system conditions arise—for example, FlexProtect andFlexProtectLin, which start when a drive is smartfailed.
Job name Description ExclusionSet
ImpactPolicy
Priority Operation
AutoBalance Balances free space in a cluster, and is mostefficient in clusters that contain only harddisk drives (HDDs). Run as part ofMultiScan, or automatically by the systemwhen a device joins (or rejoins) the cluster.
Restripe Low 4 Manual
AutoBalanceLin Balances free space in a cluster, and is mostefficient in clusters when file systemmetadata is stored on solid state drives(SSDs). Run as part of MultiScan, or
Restripe Low 4 Manual
System jobs
484 Isilon OneFS CLI Administration Guide

Job name Description ExclusionSet
ImpactPolicy
Priority Operation
automatically by the system when a devicejoins (or rejoins) the cluster.
AVScan Performs an antivirus scan on all files. None Low 6 Manual
ChangelistCreate Creates a list of changes between twosnapshots with matching root paths. Youcan specify these snapshots from the CLI.
None Low 5 Manual
Collect Reclaims free space that previously couldnot be freed because the node or drive wasunavailable. Run as part of MultiScan, orautomatically by the system when a devicejoins (or rejoins) the cluster.
Mark Low 4 Manual
Dedupe* Scans a directory for redundant data blocksand deduplicates all redundant data storedin the directory. Available only if youactivate a SmartDedupe license.
None Low 4 Manual
DedupeAssessment Scans a directory for redundant data blocksand reports an estimate of the amount ofspace that could be saved by deduplicatingthe directory.
None Low 6 Manual
DomainMark Associates a path, and the contents of thatpath, with a domain.
None Low 5 Manual
FlexProtect Scans the file system after a device failureto ensure that all files remain protected.FlexProtect is most efficient on clustersthat contain only HDDs. While there is adevice failure on a cluster, only theFlexProtect (or FlexProtectLin) job isallowed to run. Depending on the size ofyour data set, this process can last for anextended period. The cluster is said to be ina degraded state until FlexProtect (orFlexProtectLin) finishes its work. If younotice that other system jobs cannot bestarted or have been paused, you can usethe isi job status --verbosecommand to see if a "Cluster Is Degraded"message appears.
Note: Unlike HDDs and SSDs that areused for storage, when an SSD used forL3 cache fails, the drive state shouldimmediately change to REPLACEwithout a FlexProtect job running. AnSSD drive used for L3 cache containsonly cache data that does not have to beprotected by FlexProtect. After thedrive state changes to REPLACE, youcan pull and replace the failed SSD.
Restripe Medium 1 Manual
System jobs
Isilon OneFS CLI Administration Guide 485
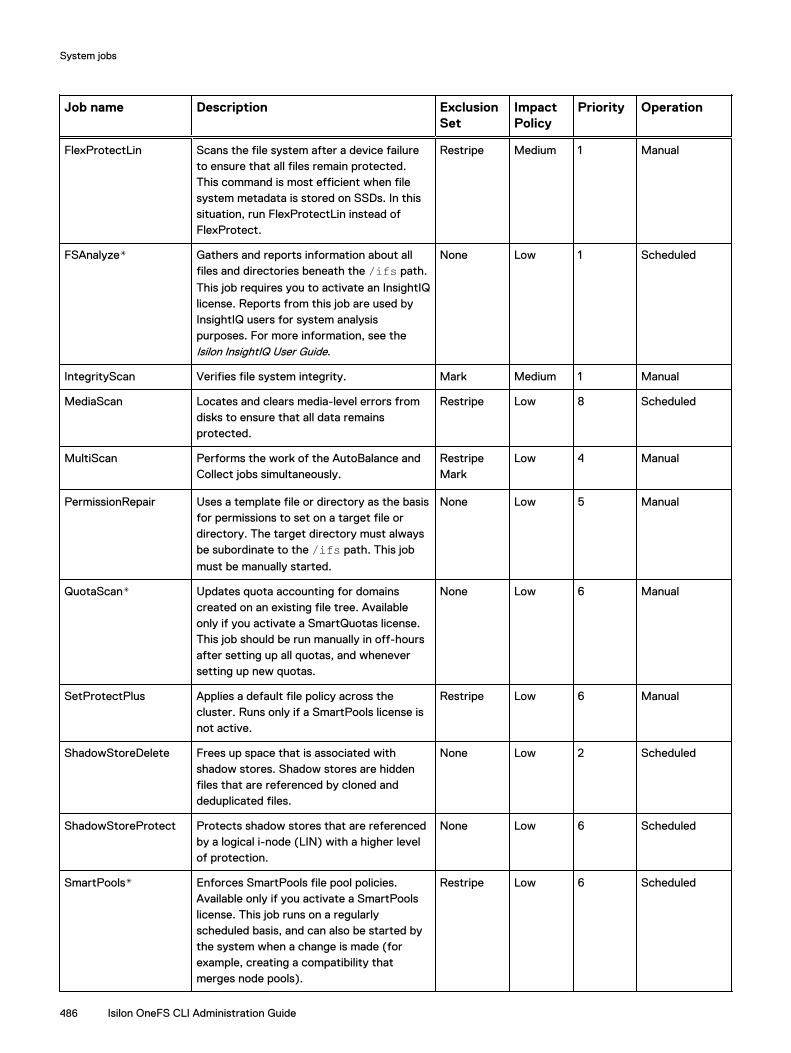
Job name Description ExclusionSet
ImpactPolicy
Priority Operation
FlexProtectLin Scans the file system after a device failureto ensure that all files remain protected.This command is most efficient when filesystem metadata is stored on SSDs. In thissituation, run FlexProtectLin instead ofFlexProtect.
Restripe Medium 1 Manual
FSAnalyze* Gathers and reports information about allfiles and directories beneath the /ifs path.
This job requires you to activate an InsightIQlicense. Reports from this job are used byInsightIQ users for system analysispurposes. For more information, see theIsilon InsightIQ User Guide.
None Low 1 Scheduled
IntegrityScan Verifies file system integrity. Mark Medium 1 Manual
MediaScan Locates and clears media-level errors fromdisks to ensure that all data remainsprotected.
Restripe Low 8 Scheduled
MultiScan Performs the work of the AutoBalance andCollect jobs simultaneously.
RestripeMark
Low 4 Manual
PermissionRepair Uses a template file or directory as the basisfor permissions to set on a target file ordirectory. The target directory must alwaysbe subordinate to the /ifs path. This job
must be manually started.
None Low 5 Manual
QuotaScan* Updates quota accounting for domainscreated on an existing file tree. Availableonly if you activate a SmartQuotas license.This job should be run manually in off-hoursafter setting up all quotas, and wheneversetting up new quotas.
None Low 6 Manual
SetProtectPlus Applies a default file policy across thecluster. Runs only if a SmartPools license isnot active.
Restripe Low 6 Manual
ShadowStoreDelete Frees up space that is associated withshadow stores. Shadow stores are hiddenfiles that are referenced by cloned anddeduplicated files.
None Low 2 Scheduled
ShadowStoreProtect Protects shadow stores that are referencedby a logical i-node (LIN) with a higher levelof protection.
None Low 6 Scheduled
SmartPools* Enforces SmartPools file pool policies.Available only if you activate a SmartPoolslicense. This job runs on a regularlyscheduled basis, and can also be started bythe system when a change is made (forexample, creating a compatibility thatmerges node pools).
Restripe Low 6 Scheduled
System jobs
486 Isilon OneFS CLI Administration Guide
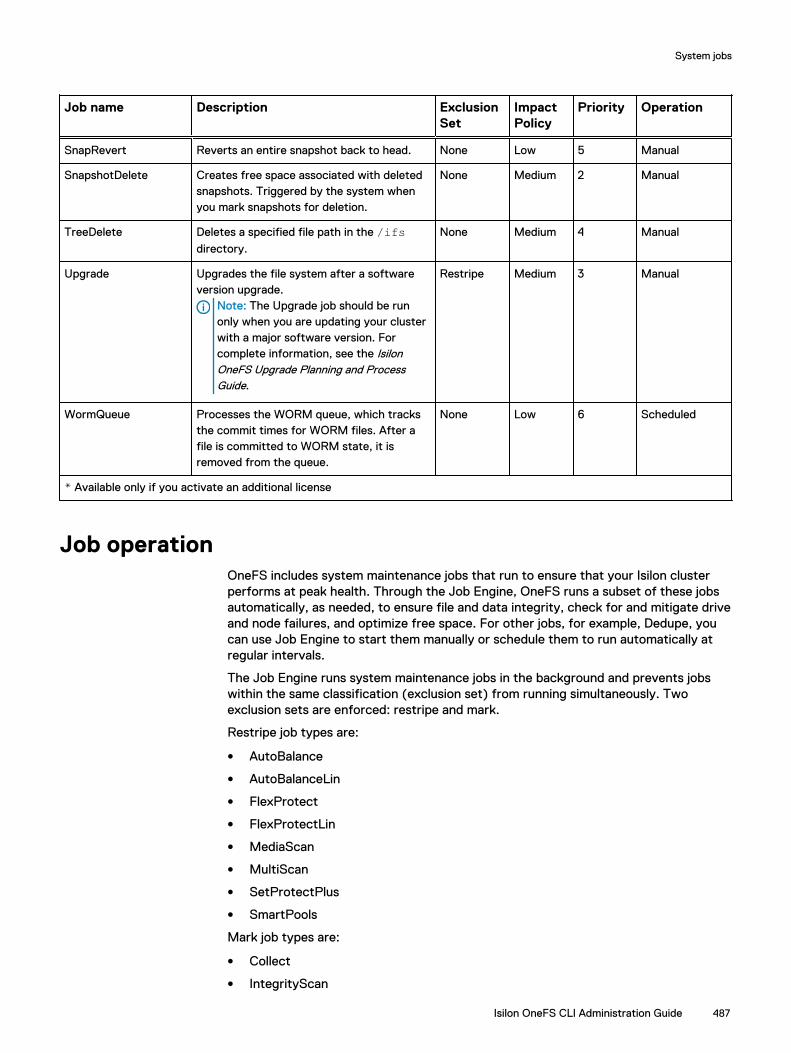
Job name Description ExclusionSet
ImpactPolicy
Priority Operation
SnapRevert Reverts an entire snapshot back to head. None Low 5 Manual
SnapshotDelete Creates free space associated with deletedsnapshots. Triggered by the system whenyou mark snapshots for deletion.
None Medium 2 Manual
TreeDelete Deletes a specified file path in the /ifsdirectory.
None Medium 4 Manual
Upgrade Upgrades the file system after a softwareversion upgrade.
Note: The Upgrade job should be runonly when you are updating your clusterwith a major software version. Forcomplete information, see the IsilonOneFS Upgrade Planning and ProcessGuide.
Restripe Medium 3 Manual
WormQueue Processes the WORM queue, which tracksthe commit times for WORM files. After afile is committed to WORM state, it isremoved from the queue.
None Low 6 Scheduled
* Available only if you activate an additional license
Job operationOneFS includes system maintenance jobs that run to ensure that your Isilon clusterperforms at peak health. Through the Job Engine, OneFS runs a subset of these jobsautomatically, as needed, to ensure file and data integrity, check for and mitigate driveand node failures, and optimize free space. For other jobs, for example, Dedupe, youcan use Job Engine to start them manually or schedule them to run automatically atregular intervals.
The Job Engine runs system maintenance jobs in the background and prevents jobswithin the same classification (exclusion set) from running simultaneously. Twoexclusion sets are enforced: restripe and mark.
Restripe job types are:
l AutoBalance
l AutoBalanceLin
l FlexProtect
l FlexProtectLin
l MediaScan
l MultiScan
l SetProtectPlus
l SmartPools
Mark job types are:
l Collect
l IntegrityScan
System jobs
Isilon OneFS CLI Administration Guide 487
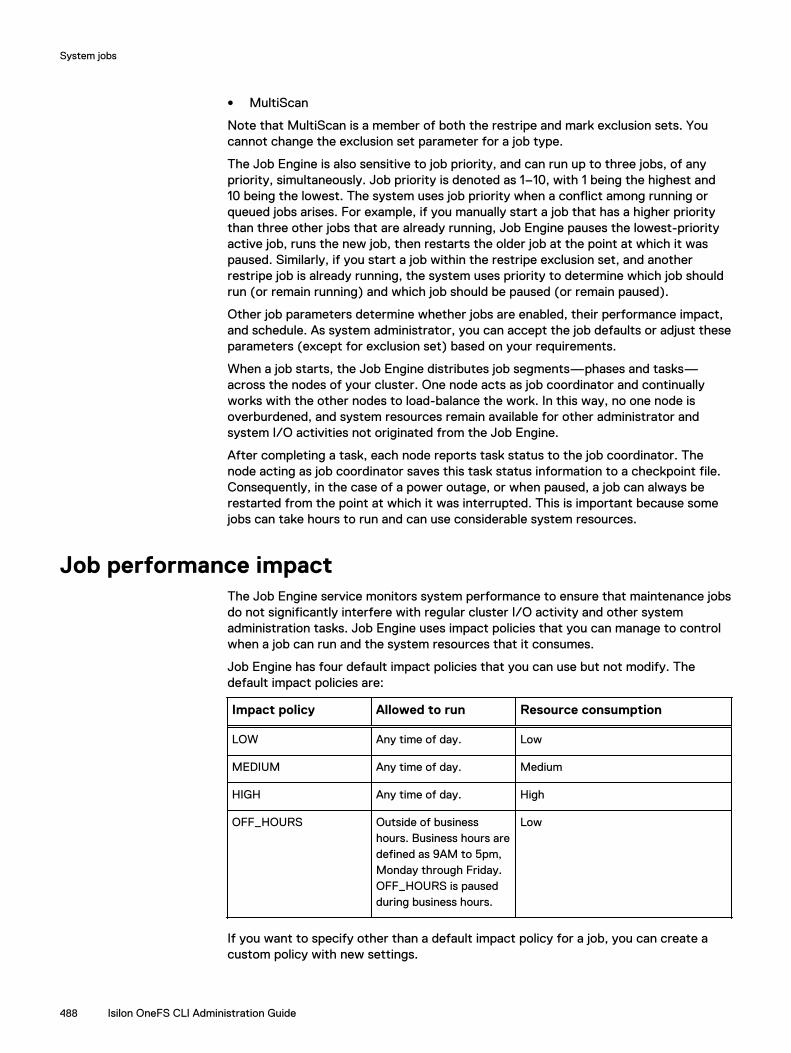
l MultiScan
Note that MultiScan is a member of both the restripe and mark exclusion sets. Youcannot change the exclusion set parameter for a job type.
The Job Engine is also sensitive to job priority, and can run up to three jobs, of anypriority, simultaneously. Job priority is denoted as 1–10, with 1 being the highest and10 being the lowest. The system uses job priority when a conflict among running orqueued jobs arises. For example, if you manually start a job that has a higher prioritythan three other jobs that are already running, Job Engine pauses the lowest-priorityactive job, runs the new job, then restarts the older job at the point at which it waspaused. Similarly, if you start a job within the restripe exclusion set, and anotherrestripe job is already running, the system uses priority to determine which job shouldrun (or remain running) and which job should be paused (or remain paused).
Other job parameters determine whether jobs are enabled, their performance impact,and schedule. As system administrator, you can accept the job defaults or adjust theseparameters (except for exclusion set) based on your requirements.
When a job starts, the Job Engine distributes job segments—phases and tasks—across the nodes of your cluster. One node acts as job coordinator and continuallyworks with the other nodes to load-balance the work. In this way, no one node isoverburdened, and system resources remain available for other administrator andsystem I/O activities not originated from the Job Engine.
After completing a task, each node reports task status to the job coordinator. Thenode acting as job coordinator saves this task status information to a checkpoint file.Consequently, in the case of a power outage, or when paused, a job can always berestarted from the point at which it was interrupted. This is important because somejobs can take hours to run and can use considerable system resources.
Job performance impactThe Job Engine service monitors system performance to ensure that maintenance jobsdo not significantly interfere with regular cluster I/O activity and other systemadministration tasks. Job Engine uses impact policies that you can manage to controlwhen a job can run and the system resources that it consumes.
Job Engine has four default impact policies that you can use but not modify. Thedefault impact policies are:
Impact policy Allowed to run Resource consumption
LOW Any time of day. Low
MEDIUM Any time of day. Medium
HIGH Any time of day. High
OFF_HOURS Outside of businesshours. Business hours aredefined as 9AM to 5pm,Monday through Friday.OFF_HOURS is pausedduring business hours.
Low
If you want to specify other than a default impact policy for a job, you can create acustom policy with new settings.
System jobs
488 Isilon OneFS CLI Administration Guide
Jobs with a low impact policy have the least impact on available CPU and disk I/Oresources. Jobs with a high impact policy have a significantly higher impact. In allcases, however, the Job Engine uses CPU and disk throttling algorithms to ensure thattasks that you initiate manually, and other I/O tasks not related to the Job Engine,receive a higher priority.
Job prioritiesJob priorities determine which job takes precedence when more than three jobs ofdifferent exclusion sets attempt to run simultaneously. The Job Engine assigns apriority value between 1 and 10 to every job, with 1 being the most important and 10being the least important.
The maximum number of jobs that can run simultaneously is three. If a fourth job witha higher priority is started, either manually or through a system event, the Job Enginepauses one of the lower-priority jobs that is currently running. The Job Engine placesthe paused job into a priority queue, and automatically resumes the paused job whenone of the other jobs is completed.
If two jobs of the same priority level are scheduled to run simultaneously, and twoother higher priority jobs are already running, the job that is placed into the queue firstis run first.
Managing system jobsThe Job Engine enables you to control periodic system maintenance tasks that ensureOneFS file system stability and integrity. As maintenance jobs run, the Job Engineconstantly monitors and mitigates their impact on the overall performance of thecluster.
As system administrator, you can tailor these jobs to the specific workflow of yourIsilon cluster. You can view active jobs and job history, modify job settings, and start,pause, resume, cancel, and update job instances.
Start a jobAlthough OneFS runs several critical system maintenance jobs automatically whennecessary, you can also manually start any job at any time.
About this task
The Collect job, used here as an example, reclaims free space that previously could notbe freed because the node or drive was unavailable.
Procedure
1. Run the isi job jobs start command.
The following command runs the Collect job with a stronger impact policyand a higher priority.
isi job jobs start Collect --policy MEDIUM --priority 2
Results
When the job starts, a message such as Started job [7] appears. In this example,7 is the job ID number, which you can use to run other commands on the job.
System jobs
Isilon OneFS CLI Administration Guide 489

Pause a jobTo free up system resources, you can pause a job temporarily.
Before you begin
To pause a job, you need to know the job ID number. If you are unsure of the job IDnumber, you can use the isi job jobs list command to see a list of runningjobs.
Procedure
1. Run the isi job jobs pause command.
The following command pauses a job with an ID of 7.
isi job jobs pause 7
If there is only one instance of a job type currently active, you can specify thejob type instead of the job ID.
isi job jobs pause Collect
In all instructions that include the isi job jobs command, you can omit thejobs entry.
isi job pause Collect
Modify a jobYou can change the priority and impact policy of an active, waiting, or paused job.
Before you begin
To modify a job, you need to know the job ID number. If you are unsure of the job IDnumber, you can use the isi job jobs list command to see a list of runningjobs.
About this task
When you modify a job, only the current instance of the job runs with the updatedsettings. The next instance of the job returns to the default settings for that job type.
Procedure
1. Run the isi job jobs modify command.
The following command updates the priority and impact policy of an active job(job ID number 7).
isi job jobs modify 7 --priority 3 --policy medium
System jobs
490 Isilon OneFS CLI Administration Guide

If there is only one instance of a job type currently active, you can specify thejob type instead of the job ID.
isi job jobs modify Collect --priority 3 --policy medium
Resume a jobYou can resume a paused job.
Before you begin
To resume a job, you need to know the job ID number. If you are unsure of the job IDnumber, you can use the isi job jobs list command.
Procedure
1. Run the isi job jobs resume command.
The following command resumes a job with the ID number 7.
isi job jobs resume 7
If there is only one instance of a job type currently active, you can specify thejob type instead of the job ID.
isi job jobs resume Collect
Cancel a jobIf you want to free up system resources, or for any reason, you can cancel a running,paused, or waiting job.
Before you begin
To cancel a job, you need to know the job ID number. If you are unsure of the job IDnumber, you can use the isi job jobs list command.
Procedure
1. Run the isi job jobs cancel command.
The following command cancels a job with the ID number 7.
isi job jobs cancel 7
If there is only one instance of a job type currently active, you can specify thejob type instead of the job ID.
isi job jobs cancel Collect
System jobs
Isilon OneFS CLI Administration Guide 491

Modify job type settingsYou can customize system maintenance jobs for your administrative workflow bymodifying the default priority level, impact level, and schedule for a job type.
About this task
The job type ID is the job name, for example, MediaScan.
Procedure
1. Run the isi job types modify command.
The following command modifies the default priority level and impact level forthe MediaScan job type.
isi job types modify mediascan --priority 2 --policy medium
When you run this command, the system prompts you to confirm the change.Type yes or no, and then press ENTER.
2. Establish a regular schedule for a job type.
The following command schedules the MediaScan job to run every Saturdaymorning at 9 AM. The --force option overrides the confirmation step.
isi job types modify mediascan --schedule 'every Saturday at 09:00' --force
3. Remove a regular schedule for a job type.
The following command removes the schedule for a job type that is scheduled.
isi job types modify mediascan --clear-schedule --force
Results
All subsequent iterations of the MediaScan job type run with the new settings. If aMediaScan job is in progress, it continues to use the old settings.
View active jobsYou can view information about jobs that are currently running on your Isilon cluster.
About this task
You might want to check active jobs if you are noticing slower system response or tosee what jobs are active before starting a new job.
Procedure
1. Run the isi job jobs list command.
System jobs
492 Isilon OneFS CLI Administration Guide

View job historyYou can view recent activity for system maintenance jobs.
About this task
You might want to check the last time a critical job ran, view all job history within arecent time period, or output job history for a certain time period into a comma-delimited format file.
Procedure
1. Run the isi job events list command for a specific job type.
The following command displays the activity of the MultiScan job type.
isi job events list --job-type multiscan
2. View all jobs within a specific time frame.
The following command displays all jobs that ran since September 16, 2013.
isi job events list --begin 2013-09-16
3. For reporting purposes, redirect output to a comma-delimited file.
The following command outputs job history for a specific two-week period to aspecified path name.
isi job events list --begin 2013-09-15 --end 2013-09-16 > /ifs/data/report1.txt
Time Message---------------------------------------------------------------2013-09-15T12:55:55 MultiScan[4] Phase 1: end lin scan and mark2013-09-15T12:55:57 MultiScan[4] Phase 2: begin lin repair scan2013-09-15T12:56:10 MultiScan[4] Phase 2: end lin repair scan2013-09-16T01:47:12 SetProtectPlus[3] System Cancelled2013-09-16T07:00:00 SmartPools[5] Waiting
Managing impact policiesFor system maintenance jobs that run through the Job Engine service, you can createand assign policies that help control how jobs affect system performance.
As system administrator, you can create, copy, modify, and delete impact policies, andview their settings.
System jobs
Isilon OneFS CLI Administration Guide 493

Create an impact policyThe Job Engine includes four default impact policies, which you cannot modify ordelete. However, you can create new impact policies.
About this task
You can create custom impact policies to define the best times for systemmaintenance jobs to run and mitigate their impact on system resources.
Procedure
1. Run the isi job policies create command.
The following command creates a custom policy defining a specific time frameand impact level. You can apply the custom policy to any job instance to enablethe job to run at a higher impact over the weekend.
isi job policies create MY_POLICY --impact medium --begin 'Saturday 00:00' --end 'Sunday 23:59'
2. View a list of available impact policies to see if your custom policy was createdsuccessfully.
The following command displays a list of impact policies.
isi job policies list
The displayed list appears as follows.
ID Description---------------------------------------------------------------HIGH Isilon template: high impact at all timesLOW Isilon template: high impact at all timesMEDIUM Isilon template: high impact at all timesOFF-HOURS Isilon template: Paused M-F 9-5, low impact otherwiseMY_POLICY ---------------------------------------------------------------
3. Add a description to the custom policy.
The following command adds a description to the custom policy.
isi job policies modify MY_POLICY --description 'Custompolicy: medium impact when run on weekends'
View impact policy settingsYou can view the settings of any impact policy.
About this task
If you intend to modify an impact policy, you can view the current policy settings. Inaddition, after you have modified an impact policy, you can view the policy settings toensure that they are correct.
System jobs
494 Isilon OneFS CLI Administration Guide
Procedure
1. Run the isi job policies view command.
The following command displays the impact policy settings of the customimpact policy MY_POLICY.
isi job policies view MY_POLICY
Modify an impact policyYou can change the description and policy intervals of a custom impact policy.
Before you begin
You cannot modify the default impact policies, HIGH, MEDIUM, LOW, andOFF_HOURS. You can only modify policies that you create.
Procedure
1. Run the isi job policies modify command to reset current settings tobase defaults.
Policy settings are cumulative, so defining a new impact level and time intervaladds to any existing impact level and interval already set on the custom policy.The following command resets the policy interval settings to the base defaults:low impact and anytime operation.
isi job policies modify MY_POLICY --reset-intervals
2. Run the isi job policies modify command to establish new impact leveland interval settings for the custom policy.
The following command defines the new impact level and interval of a custompolicy named MY_POLICY.
isi job policies modify MY_POLICY --impact high --begin 'Saturday 09:00' --end 'Sunday 11:59'
3. Verify that the custom policy has the settings that you intended.
The following command displays the current settings for the custom policy.
isi job policies view MY_POLICY
Delete an impact policyYou can delete impact policies that you have created.
Before you begin
You cannot delete default impact policies, HIGH, MEDIUM, LOW, and OFF_HOURS.
Procedure
1. Run the isi job policies delete command.
System jobs
Isilon OneFS CLI Administration Guide 495

The following command deletes a custom impact policy named MY_POLICY.
isi job policies delete MY_POLICY
OneFS displays a message asking you to confirm the deletion of your custompolicy.
2. Type yes and press ENTER.
Viewing job reports and statisticsYou can generate reports for system jobs and view statistics to better determine theamounts of system resources being used.
Most system jobs controlled by the Job Engine run at a low priority and with a lowimpact policy, and generally do not have a noticeable impact on cluster performance.
A few jobs, because of the critical functions they perform, run at a higher priority andwith a medium impact policy. These jobs include FlexProtect and FlexProtect Lin,FSAnalyze, SnapshotDelete, and TreeDelete.
As a system administrator, if you are concerned about the impact a system job mighthave on cluster performance, you can view job statistics and reports. These toolsenable you to view detailed information about job load, including CPU and memoryusage and I/O operations.
View statistics for a job in progressYou can view statistics for a job in progress.
Before you begin
You need to specify the job ID to view statistics for a job in progress. The isi jobjobs list command displays a list of active jobs, including job IDs.
Procedure
1. Run the isi job statistics view command with a specific job ID.
The following command displays statistics for a Collect job with the ID of 857:
isi job statistics view --job-id 857
The system displays output similar to the following example:
Job ID: 857 Phase: 1 Nodes Node: 1 PID: 26224 CPU: 7.96% (0.00% min, 28.96% max, 4.60% avg)
Virtual: 187.23M (187.23M min, 187.23M max, 187.23M avg) Physical: 19.01M (18.52M min, 19.33M max, 18.96M avg)
Read: 931043 ops, 7.099G Write: 1610213 ops, 12.269G Workers: 1 (0.00 STW avg.)
System jobs
496 Isilon OneFS CLI Administration Guide
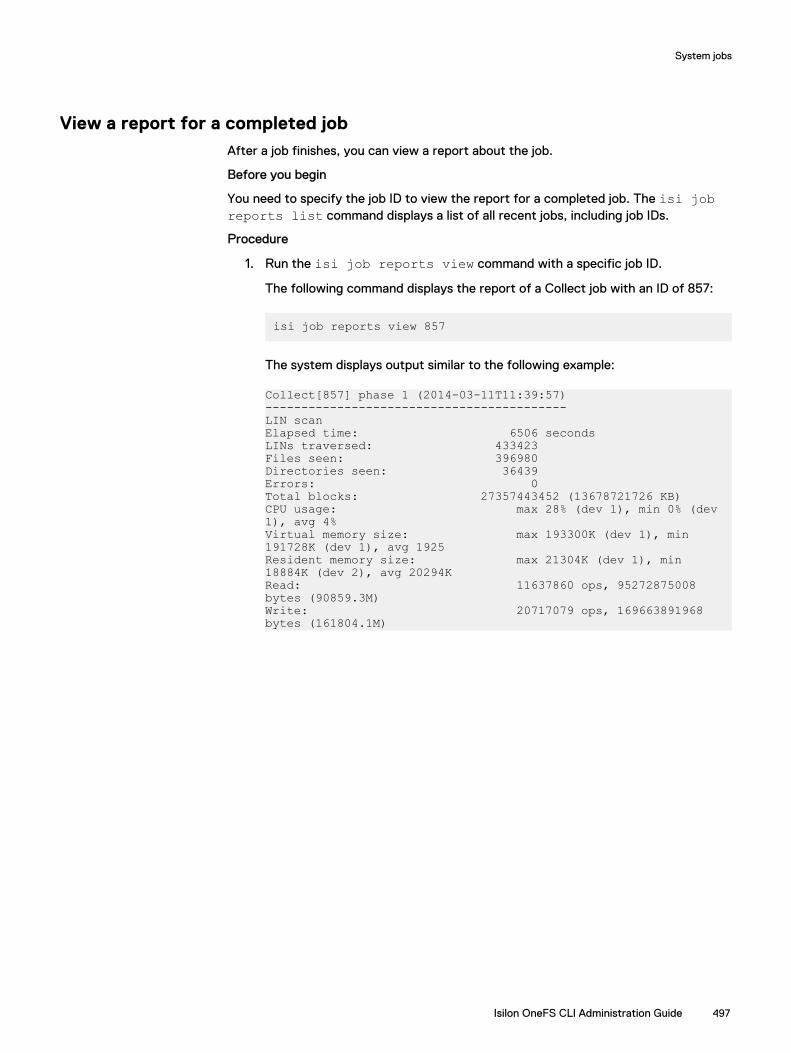
View a report for a completed jobAfter a job finishes, you can view a report about the job.
Before you begin
You need to specify the job ID to view the report for a completed job. The isi jobreports list command displays a list of all recent jobs, including job IDs.
Procedure
1. Run the isi job reports view command with a specific job ID.
The following command displays the report of a Collect job with an ID of 857:
isi job reports view 857
The system displays output similar to the following example:
Collect[857] phase 1 (2014-03-11T11:39:57)------------------------------------------LIN scanElapsed time: 6506 secondsLINs traversed: 433423Files seen: 396980Directories seen: 36439Errors: 0Total blocks: 27357443452 (13678721726 KB)CPU usage: max 28% (dev 1), min 0% (dev 1), avg 4%Virtual memory size: max 193300K (dev 1), min 191728K (dev 1), avg 1925Resident memory size: max 21304K (dev 1), min 18884K (dev 2), avg 20294KRead: 11637860 ops, 95272875008 bytes (90859.3M)Write: 20717079 ops, 169663891968 bytes (161804.1M)
System jobs
Isilon OneFS CLI Administration Guide 497

System jobs
498 Isilon OneFS CLI Administration Guide

CHAPTER 26
Small Files Storage Efficiency for archiveworkloads
Small Files Storage Efficiency for archive workloads improves the overall storageefficiency of clusters in which small files consume most of the logical space.
l Overview .........................................................................................................500l Requirements...................................................................................................500l Upgrades and rollbacks.....................................................................................501l Interoperability................................................................................................. 501l Managing Small Files Storage Efficiency..........................................................502l Reporting features ..........................................................................................506l File system structure.........................................................................................511l Defragmenter overview.................................................................................... 513l Managing the defragmenter............................................................................. 513l CLI commands for Small Files Storage Efficiency.............................................518l Troubleshooting Small Files Storage Efficiency ...............................................536
Isilon OneFS CLI Administration Guide 499
OverviewThe Small Files Storage Efficiency feature improves storage efficiency for small filearchive workloads.
Archive workloads are large numbers of small files that are rarely modified but must bestored long term and available for retrieval. Small files are defined as 1 MB or less insize.
Storage efficiency of these data sets is improved by consolidating file data andreducing overall protection overhead. Files that meet specified criteria are packed(containerized) in a special container called a ShadowStore. FilePools policies providethe selection criteria.
Note: There is a trade-off between storage efficiency and performance. The goalof Small Files Storage Efficiency is to improve storage efficiency, which can affectperformance.
Small Files Storage Efficiency is enabled using the isi_packing utility. Afterenabling the feature, you configure FilePools policies to specify the selection criteriafor files that should be packed. The SmartPools job packs and containerizes theselected files in the background. The job handles packing and unpacking according toa FilePools policy packing flag.
The SmartPools job can take significant time to complete its initial run on the dataset. Subsequent runs are faster because only new and modified files are packed.
Defragmenter tool
After files are packed, overwrites and file deletions can cause fragmentation of theShadowStore. Fragmentation affects storage efficiency. To accommodate archiveworkloads with moderate levels of overwrites and deletions, Small Files StorageEfficiency provides a ShadowStore defragmenter. See Defragmenter overview onpage 513 for more information.
The ShadowStoreDelete job runs periodically to reclaim unused blocks fromShadowStores. This job also runs the defragmenter.
Assessment tool
An assessment tool is available to estimate the raw space that could be reclaimed byenabling Small Files Storage Efficiency. You can use the assessment tool withoutenabling Small Files Storage Efficiency.
RequirementsSmall Files Storage Efficiency is designed for the following conditions.
l A significant portion of the space used in a defined data set is for small files. Smallfile is defined as less than 1 MB.
l The files are used in an archive workflow, meaning that the files are not modifiedoften. Moderate levels of modifications are accommodated by running thedefragmentation tool.
l There must be an active SmartPools license and a SmartPools policy enabled onthe cluster.
Small Files Storage Efficiency for archive workloads
500 Isilon OneFS CLI Administration Guide

A File System Analytics (FSA) license is highly recommended. That license permitsyou to use the FSAnalyze job and isi_packing utility to monitor storageefficiency.
Upgrades and rollbacksThere is a minor difference in upgrade procedures related to Small Files StorageEfficiency depending on whether you are upgrading from OneFS versions earlier than8.0.1 or 8.0.1 and later.
Upgrading from OneFS versions earlier than 8.0.1
If you are upgrading from OneFS versions earlier than 8.0.1, Small Files StorageEfficiency is available only after the upgrade is committed. The feature cannot berolled back, although you may disable it if needed.
Small Files Storage Efficiency implements new on-disk structures and fields. Becauserollback of the feature is not possible, you are not permitted to enable the feature untilthe installation or upgrade is committed.
The sequence of steps for obtaining and enabling Small Files Storage Efficiency is:
1. Perform the upgrade.
2. Test the upgrade. At this point, you cannot enable or test Small Files StorageEfficiency.
3. Commit the upgrade.
4. Enable Small Files Storage Efficiency.
5. Test Small Files Storage Efficiency.
6. You may disable Small Files Storage Efficiency if needed.
Upgrading from OneFS 8.0.1 and later
If all nodes are running OneFS 8.0.1 or later, and all are committed, then you mayfollow the normal upgrade, test, and commit procedures. You may enable Small FilesStorage Efficiency before committing the upgrade, and the upgrade can be rolled backif needed.
InteroperabilityThis section describes how Small Files Storage Efficiency interoperates with OneFScomponents.
OneFScomponent
Description
SyncIQ l Packed files are treated as normal files during failover and failbackoperations. Packed files are packed on the target cluster if SmallFiles Storage Efficiency is enabled on the target cluster and thecorrect file pools policy can be applied.
l SyncIQ does not synchronize the file pools policies. You mustmanually create the correct file pools policies on the targetcluster.
l Best practice is to enable Small Files Storage Efficiency on thesource cluster and on the target cluster so that you retain thebenefits of storage efficiency on both clusters.
Small Files Storage Efficiency for archive workloads
Isilon OneFS CLI Administration Guide 501

OneFScomponent
Description
l If Small Files Storage Efficiency is enabled on only the sourcecluster, there is risk that the target cluster may run out of space.Running out of space blocks data replication.
Note: The benefits of Small Files Storage Efficiency are notrealized on the target cluster until a SmartPools job runs on
the replicated data.
File clones anddeduplication
Interoperability is limited.
l Cloned files are not optimized.
l Deduplication skips packed files.
l Packing skips deduplicated files.
InsightIQ l Adding shadow references to files does not change the logical filesize. It does change the physical block usage of files.
l InsightIQ cluster summary figures accurately display the used andfree space.
l The figures for per-directory and per-file usage may not beaccurate.
CloudPools Interoperability is limited.
l The CloudPools SmartLink files are not packed.
l Packed files can be unpacked first and included in SmartLink files.
l Recalled files are not packed immediately.
SmartLock The packing process handles write-once/read-many (WORM) files asregular files. WORM files are good candidates for packing. WORM filesare unlikely to cause fragmentation due to writing changed files backto disk, so will not degrade storage efficiency.
Managing Small Files Storage EfficiencyYou enable and configure Small Files Storage Efficiency using the OneFS command-line interface (CLI). You can also run reports and disable the feature using the CLI.
You must have an active SmartPools license and a SmartPools policy enabled beforeyou configure Small Files Storage Efficiency. We also recommend that you have a FileSystem Analytics (FSA) license.
Implementation overviewUse the following steps to implement Small Files Storage Efficiency.
Task Instructions
1 Optionally generate the Storage Efficiencyreport to get a baseline of your cluster'sstorage efficiency.
See Monitor storage efficiency withFSAnalyze on page 509.
Small Files Storage Efficiency for archive workloads
502 Isilon OneFS CLI Administration Guide

Task Instructions
Save the job number so you can compare thebefore-packing and after-packing storageefficiency results.
2 Enable Small Files Storage Efficiency. See Enable Small Files StorageEfficiency on page 503.
3 Configure the global options that control filepacking behavior.
See View and configure global settingson page 503.
4 Create FilePools policies that define selectioncriteria for the files to pack.
See Specify selection criteria for files topack on page 504.
When all of the above tasks are completed, the SmartPools job runs in thebackground, selecting files based on FilePools policies and packing them.
Enable Small Files Storage EfficiencySmall Files Storage Efficiency is disabled by default. Use this procedure to enable it.
Before you begin
You must have an active SmartPools license and at least one SmartPools policyenabled.
Procedure
1. Run the isi_packing --enabled=true command.
2. Type yes to display the license agreement.
The license agreement displays.
3. Enter q, and then accept the license agreement.
Results
Small Files Storage Efficiency is enabled.
View and configure global settingsUse the isi_packing command to configure the behavior of Small Files StorageEfficiency.
Procedure
1. To view the current configuration of Small Files Storage Efficiency, enter thefollowing command:
# isi_packing --ls
For example:
# isi_packing --lsEnabled: NoEnable ADS: NoEnable snapshots: NoEnable mirror containers: NoEnable mirror translation: NoUnpack recently modified: NoUnpack snapshots: No
Small Files Storage Efficiency for archive workloads
Isilon OneFS CLI Administration Guide 503

Avoid deduped files: YesMaximum file size: 1016.00kSIN cache cutoff size: 8.00MMinimum age before packing: 1DDirectory hint maximum entries: 16Container minimum size: 1016.00kContainer maximum size: 1.00G
2. To view configuration options and syntax, enter:
# isi_packing -I --help
The following usage displays.
usage: isi_packing [--ls] [--fsa] [--enabled true|false] [--enable-ads true|false] [--enable-snaps true|false] [--enable-mirror-containers true|false] [--enable-mirror-translation true|false] [--unpack-recent true|false] [--unpack-snaps true|false] [--avoid-dedupe true|false] [--max-size bytes] [--sin-cache-cutoff-size bytes] [--min-age seconds] [--dir-hint-entries entries] [--container-min-size bytes] [--container-max-size bytes] [-v]
Additional help information also appears below the syntax.
3. To change any configuration setting, use the following command:
# isi_packing <option>=<value>
For example:
isi_packing --enabled=false
For guidance, use the additional help that appears after the usage display or seethe reference page for isi_packing on page 525 .
Specify selection criteria for files to packTo define which files to select for packing, create FilePools policies. The policies youcreate are applied when the SmartPools background job runs.
Before you begin
To create FilePools policies, you must activate a SmartPools license and have theSmartPools or higher administrative privilege.You should be familiar with the isi filepool policies create command.
About this task
See the Isilon OneFS CLI Administration Guide for information about SmartPools andFilePools policies.
Procedure
1. Create FilePools policies that define the data sets to pack.
Small Files Storage Efficiency for archive workloads
504 Isilon OneFS CLI Administration Guide

The syntax is:
isi filepool policies create <policy_name> --enable_packing=true /--begin_filter --path=<path_name> --changed-time=<time> --operator=<operator> --end-filter
where:
<policy_name>
Identifies this FilePool policy.
--enable_packing=true
Enables packing on the data sets in this policy. See Disable packing on page506 for disable options.
--path=<path_name>
Identifies a data set.
--changed-time=<time>
--operator=<operator>
These two parameters set the amount of time that must pass since a filewas modified before that file is selected for packing. The default amount oftime is the global value set by isi packing --min-age. Use this policy-specific --changed-time parameter to increase the amount of time towait since changes were made to a value greater than the global setting.
Note: The policy-specific --changed-time parameter can notdecrease the amount of time to wait before selecting the file forpacking to less than the global setting. Any value less than the global--min-age setting is ignored. If you want a setting that is less thanthe current global default, you must first change the global --min-age parameter in the isi packing command.
The following example enables packing on the /ifs/data/pacs data set.
isi filepool policies create pacs --enable_packing=true /--begin_filter --path=/ifs/data/pacs --end-filter
The following example specifies that a file in /ifs/data/pacs is selected forpacking only if 1 week has passed since the file was last modified.
isi filepool policies create pacs --enable_packing=true /--begin_filter --path=/ifs/data/pacs --changed-time=1W /--operator=gt --end-filter
2. Wait for the SmartPools job to run.
The data sets identified in the FilePools policies are packed by the SmartPoolsjob.
Small Files Storage Efficiency for archive workloads
Isilon OneFS CLI Administration Guide 505

Disable packingYou can disable packing either globally or by editing the individual FilePools policies.
Procedure
1. To globally disable packing, run the following command:
# isi_packing --enable=false
Packed files remain packed, but no additional files will be packed.
2. To disable packing by policy, use the following steps:
a. Check the available space on the cluster to ensure that there is sufficientfree space to handle unpacked files.
b. Run the command isi filepool policies modify policy-name.There are two choices.
l Include the --enable-packing=false parameter. With --enable-packing= set to false, the packed files that match the policy areunpacked. For example, the following command disables packing on themyfiles policy and unpacks all existing packed files that match thepolicy criteria:
# isi filepool policies modify myfiles --enable-packing=false
l Exclude the --enable-packing parameter. If the parameter does notexist in the policy, then no packing or unpacking activity occurs. Filesremain packed or unpacked depending on their state. For example, thefollowing command disables packing on the myfiles policy but does notchange the state of existing packed files:
# isi filepool policies modify myfiles
Reporting featuresSmall Files Storage Efficiency includes the following reporting features.
Activity Description More information
Estimate possiblestorage savings with theisi_sfse_assesscommand.
The isi_sfse_assess command
scans a set of files and simulatesthe work that Small Files StorageEfficiency would do. The resultsare an estimate of the savings thatcould be achieved by packing files.
See Estimate possible storagesavings on page 507.
View packing andunpacking results from
The SmartPools job report shows
the number of files that were
See View packing andunpacking activity by
Small Files Storage Efficiency for archive workloads
506 Isilon OneFS CLI Administration Guide

Activity Description More information
the SmartPools job
report.
packed, re-packed, or unpackedduring the run.
SmartPools jobs on page508.
Monitor storageefficiency with theFSAnalyze job.
The FSAnalyze job generates
detailed statistics which can befurther analyzed. Theisi_packing --fsa command
uses data from an FSAnalyze job
to generate overall storageefficiency numbers.
See Monitor storageefficiency with FSAnalyze onpage 509.
View ShadowStoredetails with theisi_sstore command.
The isi_sstore command shows
statistics for each ShadowStore.
See View ShadowStoreinformation on page 510.
Monitor storageefficiency on a smalldata set.
The isi_storage_efficiencycommand is a debugging scriptthat calculates storage efficiencyon small, sample data sets.
See Monitor storageefficiency on a small data seton page 511.
Estimate possible storage savingsUse the isi_sfse_assess command to generate an estimate of possible storagesavings that could be achieved by packing files.
About this task
This command scans a set of files and simulates the work that Small Files StorageEfficiency would do. It generates an estimation of the savings that could be achievedwith packing, without moving any data.
You can run this command against the entire file system or against a specificdirectory. If you have an idea of a directory that might benefit from file packing, youcan confirm the potential savings with this command, and then create an appropriateFilePool policy.
For information about the options and example output, see the reference page for isi_sfse_assess on page 518.
Procedure
1. To start the assessment, use the isi_sfse_assess command, as follows:
Usage: isi_sfse_assess <assess mode> [process options] [sysctl options]
Assess Modes: -a | --all : assess all files on OneFS -p <path> | --path=<path> : assess <path> and sub-dirs -r | --resume : resume previous assessment
Process Options: -q | --quick : slow mode (better accuracy) -f <fails> | --max-fails=<fails> : max failures before aborting (default: 1000) -v | --verbose : verbose mode
Sysctl Options: --max-size=<bytes> : max file size to pack --avoid-bsin[=on|off] : avoid cloned/dudped files
Small Files Storage Efficiency for archive workloads
Isilon OneFS CLI Administration Guide 507
--mirror-translation-enabled[=on|off] : convert mirrored to FEC --mirror-containers-enabled[=on|off] : process mirrored files --snaps-enabled[=on|off] : process snapshots --ads-enabled[=on|off] : process ADS files
For example:
root# isi_sfse_assess -a -q -v --mirror-translation-enabled --mirror-containers-enabled
2. To interrupt processing, use the Ctrl-C keys.
A summary of the estimation progress displays. In the background, the contextof the current run-time status is saved.
3. To resume processing, use the following command:
# isi_sfse_assess -r [-v]
The assessment processing continues where it left off, using the same optionsthat were provided in the original command. The -v option, for more verboseoutput, is the only additional option permitted with the resume option. If otheroptions are included with the resume option, they are ignored.
View packing and unpacking activity by SmartPools jobsThe SmartPools job report shows the number of files that were packed, re-packed, orunpacked during the job run.
Procedure
1. View the job report from a SmartPool job.
# isi job reports view -v 12
Alternatively, to view a job report using the Web UI:
a. Select Cluster management > Job operations > Job reports >Type=SmartPools, Phase=1.
b. Click View details.
2. Review the job output.
For each policy, output similar to the following displays:
'pol1': {'Policy Number': 0, 'Files matched': {'head':500, 'snapshot': 0}, 'Directories matched': {'head':1, 'snapshot': 0}, 'ADS containers matched': {'head':0, 'snapshot': 0}, 'ADS streams matched': {'head':0, 'snapshot': 0}, 'Access changes skipped': 0, 'Protection changes skipped': 0, 'Packing changes skipped': 0, 'File creation templates matched': 1, 'Skipped packing non-regular files': 1, 'Skipped packing regular files': 0,
Small Files Storage Efficiency for archive workloads
508 Isilon OneFS CLI Administration Guide

'Skipped files already in containers': 0, 'Files packed': 500, 'Files repacked': 0, 'Files unpacked': 0, },
Monitor storage efficiency with FSAnalyzeTo monitor storage efficiency, run an FSAnalyze job and then the isi_packing--fsa command.
Before you begin
An active File System Analytics (FSA) license is required.
About this task
This is a two-step procedure. First, the FSAnalyze job scans the file system andrecords the total of logical and physical blocks used. A CLI command uses that data tocalculate a global storage efficiency. The storage efficiency should improve whenpacking is enabled.
We recommend using this procedure before and after you enable packing, to observethe storage efficiency improvements. Thereafter, use this procedure periodically tomonitor the current global state of the file system's storage efficiency.
If storage efficiency degrades, you might want to use FilePool policies that matchmore data. You can also use the isi_sfse_assess command to help identifyadditional directory trees that could benefit from packing.
Procedure
1. Run the FSAnalyze job or obtain the jobid of a previously run FSAnalyze job.
You can run the FSAnalyze job manually or on a schedule, or both. To run itmanually, enter the following:
# isi job start FSAnalyze
2. Generate the storage efficiency report using the following command:
# isi_packing --fsa [--fsa-jobid $jobid]
Where:
--fsa-jobid $jobid
Specifies an FSAnalyze job run to use for generating the report. If thisoption is not included, isi_packing --fsa defaults to using the mostrecently run FSAnalyze job.
For example:
# isi_packing --fsa --fsa-jobid 100
Small Files Storage Efficiency for archive workloads
Isilon OneFS CLI Administration Guide 509

Results
The isi_packing --fsa command produces the FSA storage efficiency report.The report is similar to the following.
# isi_packing --fsaFSAnalyze job: 83 (Wed Jul 27 01:57:41 2016) Logical size: 1.8357T Physical size: 3.7843TEfficiency: 48.51%
Where:
FSAnalyze job
Shows the FSA job ID. In the example, this is 83.
Logical size
Shows the logical size of all files scanned during the FSA job run.
Physical size
Shows the physical size of all files scanned during the FSA job run.
Efficiency
Shows the file storage efficiency, calculated as logical size / physical size.
The isi_packing --fsa command does not count the files in the /ifs/.ifsvar directory as logical data. Because of that, if you run the FSA jobon an empty cluster, the space used by /ifs/.ifsvar can cause FSA to reporta low storage efficiency. As you store more data, the effect of /ifs/.ifsvardissipates.
View ShadowStore informationThe isi_sstore command displays information about ShadowStores.
About this task
For example command output and explanations of each field, see the reference pagefor isi_sstore on page 528.
Procedure
1. To list ShadowStores, use the following command:
# isi_sstore list -l
2. For more information about each ShadowStore, including fragmentation andefficiency scores, use the verbose option.
# isi_sstore list -v
Small Files Storage Efficiency for archive workloads
510 Isilon OneFS CLI Administration Guide

3. To view statistics about ShadowStores, use the following command:
# isi_sstore stats
Monitor storage efficiency on a small data setThe isi_storage_efficiency debugging script calculates storage efficiency onsmall, sample data sets. The script runs out of memory if you run it on large data sets.
About this task
This script recursively scans through a directory of files and calculates the storageefficiency of files in the sample data set, taking into account the use of shadow stores.The Unix du command does not show accurate usage for files with shadowreferences, including packed files.
Procedure
1. To obtain storage efficiency for a small data set, enter the following command:
isi_storage_efficiency <filepath>
For example:
isi_storage_efficiency /ifs/data/my_small_files
For sample output, see the reference page for isi_storage_efficiency on page 535.
File system structureSmall Files Storage Efficiency uses a specific class of container ShadowStore tocontain packed data. File attributes indicate the pack state and pack policy type.
You can determine the types of data that reside in a ShadowStore (SIN) by checkingthe SIN prefix.
l Base shadow stores (BSINs) with the prefix 0x40 contain clone or deduplicateddata.
l Container shadow stores (CSINs) with the prefix 0x41 contain packed data.
The following file attributes indicate a file's pack state.
File attribute Description Original defaultbefore any packingor unpacking
packing_policy Indicates whether the file meets the criteriaset by your file pool policies and is eligible forpacking. The value is updated by theSmartPools job. Values are:
native
Small Files Storage Efficiency for archive workloads
Isilon OneFS CLI Administration Guide 511

File attribute Description Original defaultbefore any packingor unpacking
l container—The file is eligible to be
packed.
l native—The file is not eligible to be
packed.
packing_target Describes the file's current state. Values are:
l container—The file is packed.
l native—The file is explicitly unpacked,
or never packed.
native
packing_complete Indicates whether the target is satisfied.Values are:
l complete—The target is satisfied,
meaning that packing or unpacking iscomplete.
l incomplete—The packing state of the
file is not specifically known.
complete, indicating
that the packingtarget state is intact.
Note: To ensure that there is sufficient space to handle unpacking or expandingpacked or deduplicated files, monitor physical space on a regular basis. Inparticular, SyncIQ operations unpack and expand deduplicated files on the targetcluster. Those files are then repacked on the target cluster.
Viewing file attributesUse the isi get command to view file attributes.
Procedure
1. Enter the following command:
# isi get -D <file name>
2. Scan the output for packing attributes.
For example:
# isi get -D /ifs/data/pol1/file.001POLICY W LEVEL PERFORMANCE COAL ENCODING FILE IADDRS+2d:1n 18 4+2/2 concurrency on UTF-8 file.001<1,1,2411008:512>, <2,4,1406976:512>, <3,5,1359360:512> ct: 1554959873 rt: 0************************************************** IFS inode: [ 1,1,2411008:512, 2,4,1406976:512, 3,5,1359360:512 ]*************************************************** Inode Version: 6 . . <output intentionally deleted> .
Small Files Storage Efficiency for archive workloads
512 Isilon OneFS CLI Administration Guide

* Packing policy: container* Packing target: container* Packing status: complete . . <output intentionally deleted> .
Defragmenter overviewThe Small Files Storage Efficiency defragmenter reclaims space in the ShadowStorecontainers by moving data into a more optimal layout.
The defragmenter divides each SIN into logical chunks and assesses each chunk forfragmentation. If the current storage efficiency of each chunk is below a targetefficiency then the chunk is processed by moving all of the data out of it and toanother location where it is stored more efficiently.
The default target efficiency is 90% of the maximum storage efficiency available withthe protection level used by the shadow store. Larger protection group sizes cantolerate a higher level of fragmentation before the storage efficiency drops below thisthreshold.
Attributes such as the chunk size, target efficiency, and the types of SINs to examineare configurable. In addition, you can configure the defragmenter to reduce thenumber of protection groups, when possible.
The defragmenter is implemented in the ShadowStoreDelete job. This job runsperiodically to reclaim unused blocks from shadow stores. There is also a CLIcommand that runs the defragmenter.
The feature includes the following methods for obtaining statistics aboutfragmentation and storage efficiency. These aids can help you decide when and howoften to run the defragmenter.
l Running the defragmenter in assessment mode generates estimates of the amountof space that could be saved by defragmentation.
l The isi_sstore list -v commmand generates fragmentation and storageefficiency scores.
Managing the defragmenterThe defragmenter is disabled by default. You use command line commands to enableand configure it. When it is enabled, the defragmenter runs as part of theShadowStoreDelete job. You can also run it on the command line. An assessmentmode lets you preview space savings before running the defragmenter.
Enable the defragmenterThe defragmenter is an optional feature of the Small Files Storage Efficiency and doesnot require a separate license. It must be explicitly enabled.
Procedure
1. Log in to any node
You do not need to be root but you need PRIV_ROOT privilege. Using sudo istypically enough.
Small Files Storage Efficiency for archive workloads
Isilon OneFS CLI Administration Guide 513

2. Ensure that Small Files Storage Efficiency is enabled using the followingcommand:
# isi_packing --ls
3. Enable the defragmenter using the following command:
# isi_gconfig -t defrag-config defrag_enabled=true
Configure the defragmenterUse the isi_gconfig -t defrag-config command to configure global valuesfor the defragmenter options.
About this task
The defragmenter runs as part of the ShadowStoreDelete job. It uses globalconfiguration values that are set in a global configuration. The following list describesthe global options.
defrag_enabled={true | false}
Controls whether the shadow store defragmenter is enabled.The installed value is false.
access_mode={true | false}
Controls whether the defragmenter runs in assessment mode.Assessment mode generates an estimate of the disk space savings that couldoccur with defragmentation without actually performing the defragmentation.This mode does not move any data or make any other on-disk changes. This is aquick operation that can be used to determine if the defragmentation featureshould be fully enabled. The assessment mode must be turned off for thedefragmentation process to do any actual work.The installed value is false.
bsins_enabled={true | false}
Controls whether the defragmenter examines BSINs.BSINs are block-based shadow stores, which are stores used by clone and dedupeoperations. The defragmentation process on BSINs can be intensive and may takesome time.The installed value is false.
csins_enabled={true | false}
Controls whether the defragmenter examines CSINs.CSINs are small file storage efficiency containers.The installed value is true.
pg_efficiency={true | false}
Enables or disables protection group efficiency.This is a compaction feature. When enabled, this option attempts to reduce thenumber of protection groups needed by the shadow stores, which in turn reducesrestripe time.The installed value is true.
snapshots_enabled={true | false}
Small Files Storage Efficiency for archive workloads
514 Isilon OneFS CLI Administration Guide

Determines whether the defragmenter examines snapshot files for references tothe shadow store being defragged. Consider the following:
l When this option is disabled, if snapshot files contain references to shadowstore blocks that need to be defragmented, the defragmenter can not movethose blocks and the shadow store may remain fragmented.
l When this option is enabled, it can add significant processing overhead forclusters with many snapshots.
Depending on your workflow, it may be preferable to run the defragmenter mostfrequently without examining files from snapshots, with occasional runs thatinclude the snapshot files.
The installed value is false.
target_efficiency=<efficiency-percent>
Sets the target efficiency percentage.The target_efficiency determines the minimum acceptable storageefficiency relative to the maximum storage efficiency achievable by the shadowstore based on its current protection level.A target of 90% is relatively easy to achieve with a large cluster. The value can beset even higher. Smaller clusters, such as a 3-node cluster, may perform betterwith a lower target, such as 80%.
The percent is a whole number. If a fraction is specified, the digits after thedecimal point are ignored.
The installed global configuration value is 90.
chunk_size=<bytes>
Sets the defragmentation chunk size, in bytes. The chunk size is the size of eachregion in the shadow store that is independently evaluated for defragmentation.The optimal size depends on your workflow.
l Setting a value greater than the size of the shadow store (for example, 2GB),forces the entire shadow store to be defragmented only when the efficiencyof the entire store is degraded.
l Setting a small value (for example, 1MB) achieves more aggressive gains.
The installed global configuration value is 33554432 which is 32MB. This settingworks well in most scenarios.
log_level=<defrag_log_level>
This parameter is currently not used.
The following procedure describes how to view the current settings and how tochange them.
Procedure
1. To view the current global settings, enter this command:
# isi_gconfig -t defrag-config
The output looks similar to the following:
# isi_gconfig -t defrag-config [root] {version:1}
Small Files Storage Efficiency for archive workloads
Isilon OneFS CLI Administration Guide 515
defrag_enabled (bool) = trueassess_mode (bool) = falsebsins_enabled (bool) = truecsins_enabled (bool) = truepg_efficiency (bool) = truesnapshots_enabled (bool) = truetarget_efficiency (uint8) = 90chunk_size (uint64) = 33554432log_level (enum defrag_log_level) = notice
2. Run the following command to change the value of a global setting.
# isi_gconfig -t defrag-config <option>=<value>
For example:
# isi_gconfig -t defrag-config target_efficiency=95
Run the defragmenterThe ShadowStoreDelete job runs the defragmenter. There is also a CLI commandthat runs the defragmenter.
About this task
The following table describes the two methods for running defragmentation.
Method Explanation
Automatically in theShadowStoreDelete job.
When the defragmentation feature is enabled in the globalconfiguration, defragmentation runs automatically as partof the ShadowStoreDelete job. In this case, the optionsettings in the global configuration control the behavior ofthe defragmenter.
On the command line. You can run the defragmenter on the command line usingthe isi_sstore defrag command. In this case, the
options are set on the command line. See isi_sstore defragon page 532 for more information.
The following procedure describes how to prepare for running the defragmenterautomatically as part of the ShadowStoreDelete job..
Procedure
1. Make sure that defragmentation is enabled and review current globalconfiguration settings as described in previous procedures.
2. Optionally, run the isi_sstore list -v command to check thefragmentation and storage efficiency scores before defragmentation.
The output is similar to the following:
# isi_sstore list -v SIN lsize psize refs filesize date sin type underfull frag score efficiency4100:0001:0001:0000 66584576 129504K 16256 128128K Sep 20 22:55
Small Files Storage Efficiency for archive workloads
516 Isilon OneFS CLI Administration Guide
container no 0.49 0.50...
3. Run the ShadowStoreDelete job.
# isi job jobs start ShadowStoreDelete [-o HIGH]
This job reclaims unused blocks from shadow stores and runs the defragmenterif it is enabled.
4. Optionally rerun the isi_sstore list -v command to check thefragmentation and storage efficiency scores after defragmentation.
The following results are expected:
l The fragmentation score should be lower after defragmentation.If the fragmentation score is not reduced, check if the shadow storeunderfull flag is true. When the shadow store contains only a small amountof data, the defragmenter may not move the data, and the fragmentationscore remains unchanged.
l The efficiency score should be higher after defragmentation.The storage efficiency may be reported as low if the shadow store isunderfull due to an insufficient sample of containerized data.
View estimated storage savings before defragmentingRun the defragmenter in assessment mode to generate statistics about the amount ofdisk space that could be reclaimed by the defragmentation process.
About this task
Assessment mode does not move any data or make any other on-disk changes. It is aquick operation, useful to help determine if the defragmenter should be run. It requiresexisting ShadowStores with previously containerized data.
To run the assessment and view results, use the isi_sstore defrag commandwith appropriate options on the command line .
Note: Although you may set up the global configuration so that theShadowStoreDelete job runs the defragmenter in assessment mode, the joboutput does not display the statistics.
Procedure
1. Log onto any node in the cluster.
You do not need to be root but you need PRIV_ROOT privilege. Using sudo istypically enough.
2. Run the isi_sstore defrag command using at least the -d and -a options.
The -d option enables the defragmenter for this command run. Thedefragmenter does not need to be globally enabled.
The -a option runs the defragmenter in assessment mode.
For descriptions of all available options, see isi_sstore defrag on page 532.
Small Files Storage Efficiency for archive workloads
Isilon OneFS CLI Administration Guide 517

As an example, the following command displays potential storage savings if thesmall files storage efficiency containers are defragmented and protectiongroups are reduced.
# isi_sstore defrag -d -a -c -p -v
Results
The example above displays statistics similar to the following:
# isi_sstore defrag -d -a -c -p -v…Processed 1 of 1 (100.00%) shadow stores, space reclaimed 31MSummary:Shadows stores total: 1Shadows stores processed: 1Shadows stores skipped: 0Shadows stores with error: 0Chunks needing defrag: 4Estimated space savings: 31M
CLI commands for Small Files Storage EfficiencyThe CLI commands in this section configure, monitor, and manage Small Files StorageEfficiency and the related defragmenter.
isi_sfse_assessGenerates an estimate of possible storage savings that could be achieved by packingfiles with Small Files Storage Efficiency.
Usage
The isi_sfse_assess command scans a set of files and simulates the work thatSmall Files Storage Efficiency would do. This command generates an estimate of diskspace savings without moving any data. It does not require a license and does notrequire that Small Files Storage Efficiency be enabled.Use this tool before enabling Small Files Storage Efficiency to see possible storagesavings. Use the tool after some file packing has occurred to identify additionalpossible savings given the current state of the file system.
The assessment is based on calculating the blocks saved when small files are packedinto containers at the same protection level. A file is categorized as small if its size isless than the value of the max_size option. The default is about 1MB.
Many of the options in the isi_sfse_assess command mirror options available duringactual packing. These are system level control options (sysctl options) with presetdefault values. For packing to achieve the results predicted during assessment, youmust use the same settings for packing and assessment.
l You can change the default settings for sysctl options used during packing withthe isi_packing command.
l You can change the default settings for sysctl options used during assessmentwith this isi_sfse_assess command.
The assessment skips the following types of files.
l Non-regular files (not recorded).
Small Files Storage Efficiency for archive workloads
518 Isilon OneFS CLI Administration Guide

l Unlinked files (not recorded).
l ADS files, if ads_enabled is false.
l Stubbed (CloudPools) files.
l Empty files (not recorded).
l Zero-sized files, where all blocks have no physical content, such as shadowreferences, ditto, etc.
l Oversized files, where the file size is greater than the max_size value.
l Mirror protected files, if mirror_containers_enabled is false.
l Clone/deduped files, if avoid_bsin is true.
The command reports progress as it runs by displaying the following information:
l % complete.
l Estimated possible space savings on the files scanned so far. This number shouldcontinually increases as the program progresses.
l Estimated time remaining.
You can temporarily interrupt processing at any time using CTRL-C. The commandsaves its progress, allowing you to restart processing at a later time. Use the --resume (or -r) option to restart the processing. For details, see Example: Stop andrestart processing on page 521 below.
Syntax
Usage: isi_sfse_assess <assess-mode> [process options] [sysctl options]
Assess Modes: -a | --all : assess all files on OneFS -p <path> | --path=<path> : assess <path> and sub-dirs -r | --resume : resume previous assessment
Process Options: -q | --quick : slow mode (better accuracy) -f <fails> | --max-fails=<fails> : max failures before aborting (default: 1000) -v | --verbose : verbose mode
Sysctl Options: --max-size=<bytes> : max file size to pack --avoid-bsin[=on|off] : avoid cloned/deduped files --mirror-translation-enabled[=on|off] : convert mirrored to FEC --mirror-containers-enabled[=on|off] : process mirrored files --snaps-enabled[=on|off] : process snapshots --ads-enabled[=on|off] : process ADS files
Options
-a | --all
Scans all files across the cluster for possible storage savings. The scan includessnapshots if both of the following are true:
l The --snaps-enabled option is set to on.
l The default (slow) process option is selected. If slow is not the processoption, the scan is adjusted for faster processing, and snapshots are notincluded.
-p <path> | --path=<path>
Scans files in the named path for possible storage savings across the nameddirectory path. This option performs a tree walk across all files and subdirectories
Small Files Storage Efficiency for archive workloads
Isilon OneFS CLI Administration Guide 519
within the named path. Because snapshots are invisible to the directory treestructure, the tree walk does not process any snapshots. Both absolute andrelative path names are acceptable.
-r | --resume
Users can interrupt a running assessment using theCTRL-C keys simultaneously.This option resumes the assessment processing at the point where it wasinterrupted. The resumed process uses all of the same options that were specifiedon the original command.
-q | --quick
Slow mode is the default. Use this option to override the default and run in quickmode. The differences are:
l Quick mode makes some assumptions during processing based on file andblock size, as opposed to gathering actual data block information. If yourOneFS system stores only regular files (no snapshots, cloned or deduped files,etc.), the results of quick mode can be very close to the accuracy achieved inslow mode.
l Slow mode is more accurate but is very time-consuming. This mode collectsactual data block information, including overhead blocks, and the results areprecise.
-f <fails> | --max-fails=<fails>
The maximum number of failures allowed before aborting the assessmentprocess. The default is 1000.The command first collects a list of files to process and then proceeds with actualprocessing. A failure occurs when it attempts to process a file that was modifiedor deleted after being added to the list.These failures are more likely to occur on abusy cluster with a very large number of files.
-v | --verbose
Turns on verbose output.
--max-size=<bytes>
Sets the maximum size of files to select for processing. The default is 1040384bytes, which is 8192 bytes less than 1MB, or 127 fs blocks. This value makes filesless than 1MB available for packing.
--avoid-bsin[=on | off]
Controls whether to avoid cloned and deduped files.The default is on, or true, meaning that deduped files are not processed. Werecommend not to pack deduped files. Packing them has the effect of undoingthe benefits of dedupe. Also, packing deduped files may affect performance whenreading the packed file.
Note: The dedupe functionality does not dedupe packed files.
--mirror-translation-enabled[=on | off]
Controls whether to pack mirrored files into FEC containers with equivalentprotection. The default is off, or false.
l The off setting ensures that a mirrored file remains a true mirror. This is animportant quality for some users.
Small Files Storage Efficiency for archive workloads
520 Isilon OneFS CLI Administration Guide

l The on setting allows packing of files with mirror protection polices intocontainers with equivalent FEC protection policies. The on setting canincrease space savings.
--mirror-containers-enabled[=on | off]
Controls whether to process mirrored files. The default is off, or false.
l The off setting does not process mirrored files.
l The on setting allows creation of containers with mirrored protection policies.Mirrored files remain mirrored, so there is no space saving. However, thissetting can reduce the total protection group count and potentially reducerebuild times.
--snaps-enabled[=on | off]
Controls whether to process snapshots. The default is off, or false.
l The off setting does not process snapshot files. Use this setting ifprocessing time is an issue.
l The on setting processes snapshot files. This processing can significantlyincrease the time it takes to pack a data set if there are many snapshots withdata. The advantage to using the on setting is the storage savings that maybe gained. Snapshot files are often sporadically allocated, which typicallyresults in poor storage efficiency. Packing can improve the storage efficiency.
--ads-enabled[=on | off]
Controls whether to process ADS files. The default is off, or false.
l The off setting does not process ADS files. Typically, these stream files aretoo large to be considered for packing. In addition, it is more efficient toprocess directories of streams files, but not efficient to process them singlyfrom various locations.
l The on setting processes ADS files. Use this setting if you have small ADSfiles located together in a directory.
Example: Start assessment in slow mode on all files
The following command scans all files in slow mode.
# isi_sfse_assess -a
Example: Start assessment in quick mode on a directory
The following command uses quick mode to generate precise space saving estimateson the /ifs/my-data directory.
# isi_sfse_assess -q -p /ifs/my-data
Example: Stop and restart processing
# isi_sfse_assess -a --snaps-enabled --mirror-containers-enabled# <CTRL-C> # isi_sfse_assess -r
The process resumes using all of the same options that were originally entered.
Small Files Storage Efficiency for archive workloads
Isilon OneFS CLI Administration Guide 521

Example: Verbose output
root# isi_sfse_assess -a -s -v --mirror-translation-enabled --mirror-containers-enabled------------------------------------------------SFSE simulation options: Slow mode: on Max fails: 1000 Verbose output: on Sysctls: efs.sfm.pack.max_size: 1040384 efs.sfm.pack.avoid_bsin: 1 efs.sfm.pack.mirror_translation_enabled: 1 (5 nodes involved in mirror translation) efs.sfm.pack.mirror_containers_enabled: 1 efs.sfm.pack.snaps_enabled: 0 efs.sfm.pack.ads_enabled: 0------------------------------------------------>> Starting LIN scan assessment...>> 1632 files (13.27%) scanned...[ETC: 1 minute, 5 seconds]>> 3014 files (19.51%) scanned...[ETC: 1 minute, 22 seconds]>> 4423 files (22.95%) scanned...[ETC: 1 minute, 40 seconds]>> 5685 files (25.75%) scanned...[ETC: 1 minute, 55 seconds]>> 6960 files (28.87%) scanned...[ETC: 2 minutes, 3 seconds]>> 8367 files (35.34%) scanned...[ETC: 1 minute, 49 seconds]>> 9708 files (38.96%) scanned...[ETC: 1 minute, 49 seconds]>> 11019 files (46.11%) scanned...[ETC: 1 minute, 33 seconds]>> 12307 files (49.25%) scanned...[ETC: 1 minute, 32 seconds]>> 13565 files (52.68%) scanned...[ETC: 1 minute, 29 seconds]>> 14892 files (56.11%) scanned...[ETC: 1 minute, 26 seconds]>> 16289 files (63.05%) scanned...[ETC: 1 minute, 10 seconds]>> 17738 files (66.40%) scanned...[ETC: 1 minute, 5 seconds]>> 19135 files (73.03%) scanned...[ETC: 51 seconds]>> 20455 files (76.86%) scanned...[ETC: 45 seconds]>> 21779 files (80.93%) scanned...[ETC: 37 seconds]>> 22989 files (82.21%) scanned...[ETC: 36 seconds]>> 24309 files (88.52%) scanned...[ETC: 23 seconds]>> 25635 files (100.00%) scanned...[ETC: 0 seconds]>> 25938 files (100.00%) scanned...[ETC: 0 seconds]------------------------------------------------25938 files scanned: * Packable: 23978 * Non-packable: 14 - Oversized: 14 - Cloned/deduled: 0 - Snapshots: 0 - ADS: 0 - Stubbed: 0 - Zero-sized: 0 * Failed: 0 * Skipped: 1946
SFSE estimation summary: * Raw space saving: 1.5 GB * PG reduction: 22298
SFSE estimation details: * prot level: 3x, files: 3995, size: 314857823, data blks: 41090 - effective prot level: 3+2 - prot overhead: 82180 -> 27396 - prot groups: 5666 -> 857 * prot level: 4x, files: 3996, size: 315210935, data blks: 41134 - effective prot level: 4x - prot overhead: 123402 -> 123402 - prot groups: 5669 -> 2571 * prot level: 5x, files: 3995, size: 314857823, data blks: 41090 - effective prot level: 5x - prot overhead: 164360 -> 164360 - prot groups: 5666 -> 2569
Small Files Storage Efficiency for archive workloads
522 Isilon OneFS CLI Administration Guide
* prot level: 8+2/2, files: 4002, size: 314867566, data blks: 41097 - prot overhead: 38374 -> 10290 - prot groups: 4002 -> 322 * prot level: 12+3/3, files: 3995, size: 314857823, data blks: 41090 - prot overhead: 57540 -> 10278 - prot groups: 3995 -> 215 * prot level: 16+4/4, files: 3995, size: 314857823, data blks: 41090 - prot overhead: 76720 -> 10304 - prot groups: 3995 -> 161------------------------------------------------
isi_gconfig -t defrag-configEnables or disables ShadowStore defragmentation and changes the globalconfiguration settings for the defragmenter.
Usage
When the defragmenter runs in the ShadowStoreDelete job, it is controlled by settingsin the global configuration.
When the defragmenter is initiated on the command line using the isi_sstoredefrag command, that command uses the global settings for target_efficiency,chunk_size, and log_level unless you override the values with command line options.The isi_sstore defrag command resets all of the boolean values in the globalconfiguration to false, allowing you to set them using command options specific toeach command line execution.
Syntax
isi_gconfig -t defrag-config[defrag_enabled={true | false}][access_mode={true | false}][bsins_enabled={true | false}][csins_enabled={true | false}][pg_efficiency={true | false}][snapshots_enabled={true | false}][target_efficiency=<efficiency-percent>][chunk_size=<bytes>][log_level=<defrag_log_level>]
Options
defrag_enabled={true | false}
Controls whether the shadow store defragmenter is enabled.The installed value is false.
access_mode={true | false}
Controls whether the defragmenter runs in assessment mode.Assessment mode generates an estimate of the disk space savings that couldoccur with defragmentation without actually performing the defragmentation.This mode does not move any data or make any other on-disk changes. This is aquick operation that can be used to determine if the defragmentation featureshould be fully enabled. The assessment mode must be turned off for thedefragmentation process to do any actual work.The installed value is false.
bsins_enabled={true | false}
Controls whether the defragmenter examines BSINs.
Small Files Storage Efficiency for archive workloads
Isilon OneFS CLI Administration Guide 523

BSINs are block-based shadow stores, which are stores used by clone and dedupeoperations. The defragmentation process on BSINs can be intensive and may takesome time.The installed value is false.
csins_enabled={true | false}
Controls whether the defragmenter examines CSINs.CSINs are small file storage efficiency containers.The installed value is true.
pg_efficiency={true | false}
Enables or disables protection group efficiency.This is a compaction feature. When enabled, this option attempts to reduce thenumber of protection groups needed by the shadow stores, which in turn reducesrestripe time.The installed value is true.
snapshots_enabled={true | false}
Determines whether the defragmenter examines snapshot files for references tothe shadow store being defragged. Consider the following:
l When this option is disabled, if snapshot files contain references to shadowstore blocks that need to be defragmented, the defragmenter can not movethose blocks and the shadow store may remain fragmented.
l When this option is enabled, it can add significant processing overhead forclusters with many snapshots.
Depending on your workflow, it may be preferable to run the defragmenter mostfrequently without examining files from snapshots, with occasional runs thatinclude the snapshot files.
The installed value is false.
target_efficiency=<efficiency-percent>
Sets the target efficiency percentage.The target_efficiency determines the minimum acceptable storageefficiency relative to the maximum storage efficiency achievable by the shadowstore based on its current protection level.A target of 90% is relatively easy to achieve with a large cluster. The value can beset even higher. Smaller clusters, such as a 3-node cluster, may perform betterwith a lower target, such as 80%.
The percent is a whole number. If a fraction is specified, the digits after thedecimal point are ignored.
The installed global configuration value is 90.
chunk_size=<bytes>
Sets the defragmentation chunk size, in bytes. The chunk size is the size of eachregion in the shadow store that is independently evaluated for defragmentation.The optimal size depends on your workflow.
l Setting a value greater than the size of the shadow store (for example, 2GB),forces the entire shadow store to be defragmented only when the efficiencyof the entire store is degraded.
l Setting a small value (for example, 1MB) achieves more aggressive gains.
Small Files Storage Efficiency for archive workloads
524 Isilon OneFS CLI Administration Guide

The installed global configuration value is 33554432 which is 32MB. This settingworks well in most scenarios.
log_level=<defrag_log_level>
This parameter is currently not used.
Examples
Enable and disable the defragmentation tool
The defragmenter is disabled by default after installation. The following exampleenables the defragmentation tool in the global configuration.
# isi_gconfig -t defrag-config defrag_enabled=true
Display the global configuration for the defragmentation tool
The isi_gconfig -t defrag-config command displays the current settings forthe defragmentation tool in the global configuration. The following example shows thecommand and typical settings.
# isi_gconfig -t defrag-config [root] {version:1}defrag_enabled (bool) = trueassess_mode (bool) = falsebsins_enabled (bool) = truecsins_enabled (bool) = truepg_efficiency (bool) = truesnapshots_enabled (bool) = truetarget_efficiency (uint8) = 90chunk_size (uint64) = 33554432log_level (enum defrag_log_level) = notice
Change a default value in the global configuration for the defragmentation tool
The following example changes the default value for the target_efficiency setting to95%.
# isi_gconfig -t defrag-config target_efficiency=95
isi_packingEnables or disables file packing and controls the behavior of pack operations. Thiscommand sets global options that apply to the packing operation regardless ofFilePool policy.
Usage
FilePool policies control files that are selected for packing. In addition, many of theoptions in the isi_packing command set system level control options (sysctl options)that are also applied to file selection. The system level control options are preset withdefault values. You may change the default settings with this command.
The packing operation skips the following types of files.
l Non-regular files (not recorded).
l Unlinked files (not recorded).
l ADS files, if ads_enabled is false.
Small Files Storage Efficiency for archive workloads
Isilon OneFS CLI Administration Guide 525

l Stubbed (CloudPools) files.
l Empty files (not recorded).
l Zero-sized files, where all blocks have no physical content, such as shadowreferences, ditto, etc.
l Oversized files, where the file size is greater than the max_size value.
l Mirror protected files, if mirror_containers_enabled is false.
l Clone/deduped files, if avoid_dedupe is true.
Syntax
isi_packing[--ls] [--fsa] [--enabled true|false][--enable-ads true|false] [--enable-snaps true|false][--enable-mirror-containers true|false][--enable-mirror-translation true|false][--unpack-recent true|false] [--unpack-snaps true|false][--avoid-dedupe true|false] [--max-size bytes][--sin-cache-cutoff-size bytes] [--min-age seconds][--dir-hint-entries entries] [--container-min-size bytes][--container-max-size bytes] [-v]
Options
--ls
List current settings.
--fsa [ --fsa-jobid <job id>]
Reports FSAnalyze job results. If you do not specify an FSAnalyze job ID, therequest uses the results from the last FSAnalyze job run.
--enabled {true | false}
Enable or disable packing. Set to true to enable packing. Set to false to disablepacking.
--enable-ads {true | false}
Controls whether to process ADS files. The default is false.
l The false setting does not process ADS files. Typically, these stream filesare too large to be considered for packing. In addition, it is more efficient toprocess directories of streams files, but not efficient to process them singlyfrom various locations.
l The true setting processes ADS files. Use this setting if you have small ADSfiles located together in a directory.
--enable-snaps {true | false}
Controls whether to process snapshots. The default is false.
l The false setting does not process snapshot files. Use this setting ifprocessing time is an issue.
l The true setting processes snapshot files. This processing can significantlyincrease the time it takes to pack a data set if there are many snapshots with
Small Files Storage Efficiency for archive workloads
526 Isilon OneFS CLI Administration Guide

data. The advantage to using the true setting is the storage savings that maybe gained. Snapshot files are often sporadically allocated, which typicallyresults in poor storage efficiency. Packing can improve the storage efficiency.
--enable-mirror-containers {true | false}
Controls whether to process mirrored files. The default is false.
l The false setting does not process mirrored files.
l The true setting allows creation of containers with mirrored protectionpolicies. Mirrored files remain mirrored, so there is no space saving. However,this setting can reduce the total protection group count and potentiallyreduce rebuild times.
--enable-mirror-translation {true | false}
Controls whether to pack mirrored files into FEC containers with equivalentprotection. The default is false.
l The false setting ensures that a mirrored file remains a true mirror. This isan important quality for some users.
l The true setting allows packing of files with mirror protection polices intocontainers with equivalent FEC protection policies. This setting can increasespace savings.
--unpack-recent {true | false}
Unpack recently modified files.
--unpack-snaps {true | false}
Unpack packed snapshot version files.
--avoid-dedupe {true | false}
Controls whether to avoid cloned and deduped files.The default is true, meaning that deduped files are not processed. Werecommend not to pack deduped files. Packing them has the effect of undoingthe benefits of dedupe. Also, packing deduped files may affect performance whenreading the packed file.
Note: The dedupe functionality does not dedupe packed files.
--max-size <bytes>
Maximum size of files to select for processing. The default is 1040384 bytes,which is 8192 bytes less than 1MB, or 127 fs blocks. This value makes files lessthan 1MB available for packing.
--sin-cache-cutoff-size <bytes>
Maximum size of a container ShadowStore in cache.
--min-age <seconds>
A global setting for the minimum amount of time that must pass since a file wasmodified before the file is selected for packing, in seconds. The installed defaultminimum age is one day.A FilePool policy may set a higher minimum age using its --changed-timeparameter.
--dir-hint-entries <entries>
Number of entries in the directory container hint.
Small Files Storage Efficiency for archive workloads
Isilon OneFS CLI Administration Guide 527

--container-min-size <bytes>
Minimum size of a container shadow file. The default is 1040384 bytes. Anycontainers whose size is less than this are considered to be underfull and not ableto provide decent savings. A container shadow file is a ShadowStore usedexclusively by packing.
--container-max-size <bytes>
Maximum size of a container shadow file.
Examples
FSAnalyze job results
To look at the FSAnalyze results for job 2069:
# isi_packing --fsa --fsa-jobid 2069
Show current configuration settings
# isi_packing --ls
List help
# isi_packing -I --help
isi_sstoreDisplays information about ShadowStores.
This section describes the isi_sstore parameters related to Small Files StorageEfficiency: list and stats.Syntax
isi_sstore[list { -l| -v}][stats]
Options
list { -l | -v }
Lists all shadow stores. The -l option displays a summary. The -v option displaysmore details and can take some time to run depending on the number of shadowstores.
stats
Displays statistics for each shadow store.
Small Files Storage Efficiency for archive workloads
528 Isilon OneFS CLI Administration Guide
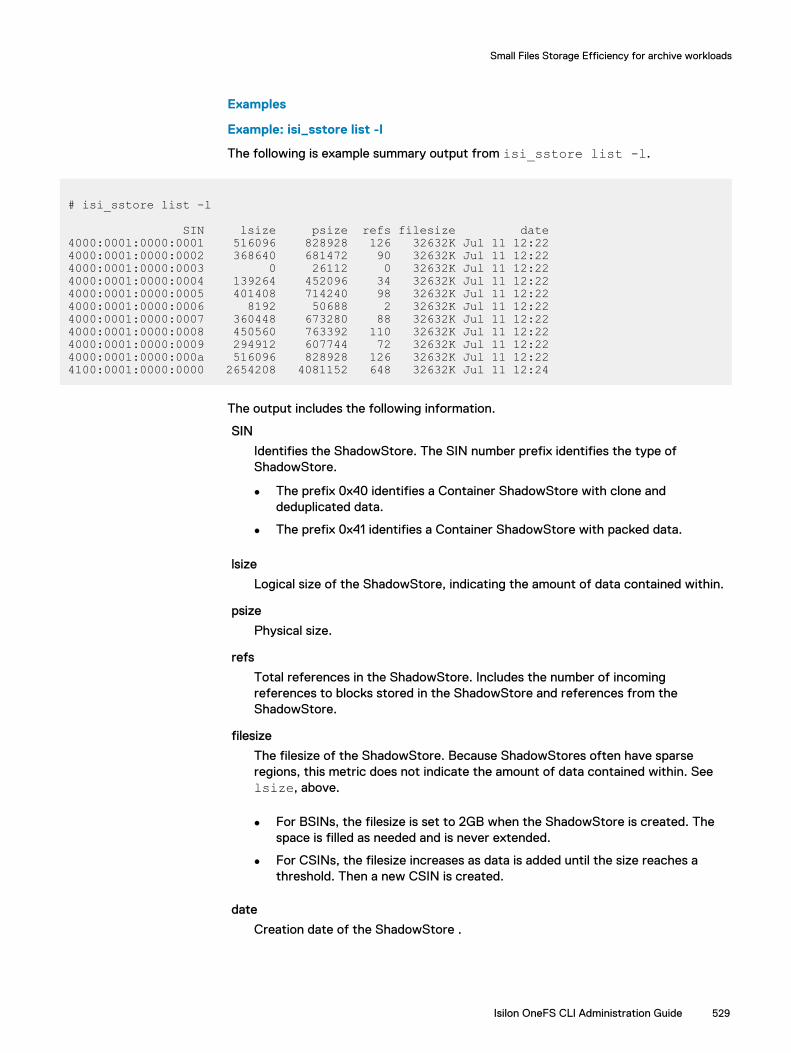
Examples
Example: isi_sstore list -l
The following is example summary output from isi_sstore list -l.
# isi_sstore list -l SIN lsize psize refs filesize date4000:0001:0000:0001 516096 828928 126 32632K Jul 11 12:224000:0001:0000:0002 368640 681472 90 32632K Jul 11 12:224000:0001:0000:0003 0 26112 0 32632K Jul 11 12:224000:0001:0000:0004 139264 452096 34 32632K Jul 11 12:224000:0001:0000:0005 401408 714240 98 32632K Jul 11 12:224000:0001:0000:0006 8192 50688 2 32632K Jul 11 12:224000:0001:0000:0007 360448 673280 88 32632K Jul 11 12:224000:0001:0000:0008 450560 763392 110 32632K Jul 11 12:224000:0001:0000:0009 294912 607744 72 32632K Jul 11 12:224000:0001:0000:000a 516096 828928 126 32632K Jul 11 12:224100:0001:0000:0000 2654208 4081152 648 32632K Jul 11 12:24
The output includes the following information.
SIN
Identifies the ShadowStore. The SIN number prefix identifies the type ofShadowStore.
l The prefix 0x40 identifies a Container ShadowStore with clone anddeduplicated data.
l The prefix 0x41 identifies a Container ShadowStore with packed data.
lsize
Logical size of the ShadowStore, indicating the amount of data contained within.
psize
Physical size.
refs
Total references in the ShadowStore. Includes the number of incomingreferences to blocks stored in the ShadowStore and references from theShadowStore.
filesize
The filesize of the ShadowStore. Because ShadowStores often have sparseregions, this metric does not indicate the amount of data contained within. Seelsize, above.
l For BSINs, the filesize is set to 2GB when the ShadowStore is created. Thespace is filled as needed and is never extended.
l For CSINs, the filesize increases as data is added until the size reaches athreshold. Then a new CSIN is created.
date
Creation date of the ShadowStore .
Small Files Storage Efficiency for archive workloads
Isilon OneFS CLI Administration Guide 529

Example: isi_sstore list -v
The following is example verbose output from the isi_sstore list -v command:
# isi_sstore list -v SIN lsize psize refs filesize date sin type underfull frag score efficiency4000:0001:0000:0001 1163264 5136384 157 2097152K Apr 11 03:22 block no 0.00 0.234000:0001:0001:0000 2777088 6012928 372 2097152K Apr 11 03:23 block no 0.75 0.464000:0001:0002:0000 1433600 5947392 1055 2097152K Apr 11 03:24 block no 0.00 0.244000:0001:0003:0000 163840 2138112 20 2097152K Apr 11 03:24 block yes 0.00 0.084100:0001:0000:0001 0 24576 0 131072 Apr 11 05:18 container yes 0.00 0.004100:0001:0000:0002 0 32768 0 131072 Apr 11 05:18 container yes 0.00 0.004100:0001:0000:0003 0 40960 0 131072 Apr 11 05:18 container yes 0.00 0.004100:0001:0000:0004 0 32768 0 131072 Apr 11 05:18 container yes 0.00 0.004100:0001:0001:0000 0 24576 0 131072 Apr 11 05:18 container yes 0.00 0.004100:0001:0001:0001 0 32768 0 131072 Apr 11 05:18 container yes 0.00 0.004100:0001:0001:0002 0 40960 0 131072 Apr 11 05:18 container yes 0.00 0.004100:0001:0001:0003 0 40960 0 131072 Apr 11 05:18 container yes 0.00 0.004100:0001:0001:0004 0 24576 0 131072 Apr 11 05:18 container yes 0.00 0.004100:0001:0002:0000 0 24576 0 131072 Apr 11 05:18 container yes 0.00 0.004100:0001:0002:0001 0 32768 0 131072 Apr 11 05:18 container yes 0.00 0.004100:0001:0002:0002 0 40960 0 131072 Apr 11 05:18 container yes 0.00 0.004100:0001:0002:0003 0 32768 0 131072 Apr 11 05:18 container yes 0.00 0.004100:0001:0002:0004 0 24576 0 131072 Apr 11 05:18 container yes 0.00 0.004100:0001:0003:0000 0 32768 0 131072 Apr 11 05:18 container yes 0.00 0.004100:0001:0004:0000 0 40960 0 131072 Apr 11 05:18 container yes 0.00 0.004100:0001:0005:0000 0 24576 0 131072 Apr 11 05:18 container yes 0.00 0.004100:0001:0005:0001 0 40960 0 131072 Apr 11 05:18 container yes 0.00 0.00
All shadow store summary:Block SINs: 4 shadow stores 5537792 (5408 KB) logical bytes 19234816 (18 MB) physical bytes (including metadata) 928 (928) incoming refsContainer SINs: 18 shadow stores 0 (0 B) logical bytes 589824 (576 KB) physical bytes (including metadata) 0 (0) incoming refs
SStores in CStat summary:Block SINs:
Small Files Storage Efficiency for archive workloads
530 Isilon OneFS CLI Administration Guide

4 shadow stores 5537792 (5408 KB) logical bytes
The output includes the following information.
SIN type
One of the following:
l block—the shadow store is used for dedupe or clone operations.
l container—the shadow store is used for packing operations.
underfull flag
If yes, the container is too small to provide storage savings benefits.
frag score
A measure of the level of fragmentation in the shadow store. Higher numbersmean more fragmentation.The value is the ratio of the sparse blocks in partially allocated stripes to the totalsize of all stripes containing data.
efficiency score
A ratio of the logical size of the shadow store versus the physical size required tostore it (including protection overhead). Higher numbers are better but there willbe a limit based on the protection level in use by the shadow stores.
Example: isi_sstore stats
The following is example output from the isi_sstore stats command.
# isi_sstore stats Block SIN stats:6 MB user data takes 3 MB in shadow stores, using 6 MB physical space.280K physical average per shadow store.
2 refs per block.Reference efficiency 50%.Storage efficiency 200%
Container SIN stats:3 MB user data takes 3 MB in shadow stores, using 4 MB physical space.3984K physical average per shadow store.
1 refs per block.Reference efficiency 0%.Storage efficiency 100%Raw counts={ type 0 num_ss=20 lsize=3055616 pblk=715 refs=1119 }{ type 1 num_ss=1 lsize=2654208 pblk=498 refs=648 }
The first set of statistics is for a shadow store that contains cloned data. TheStorage efficiency of 200% means that every two files consume one file spaceafter cloning.
The second set of statistics is for a shadow store that contains packed data. Becausepacked data is single-referenced, its Storage efficiency is 100% and itsReference efficiency is 0% (that is, no block sharing).
The Raw counts field at the end of the output contains the following statistics:
Small Files Storage Efficiency for archive workloads
Isilon OneFS CLI Administration Guide 531

num_ss
The number of ShadowStores.
lsize
Logical size of data contained in the ShadowStores.
pblk
Number of physical blocks.
refs
Number of incoming block references for the shadow store.
isi_sstore defragRuns ShadowStore defragmentation on a node.
Usage
This command runs on a single node and iterates through all shadow stores serially.The command starts by retrieving the defragmentation global configuration fromgconfig and then resets all of the boolean options to false. Use command lineoptions to enable (re-enable) each of the options as needed.
Syntax
isi_sstore defrag [-a] [-b] [-c] [-d] [-e percent][-h] [-l level] [-p] [-s] [-v] [-z size][sins]
Options
-a
Runs the shadow store defragmenter in assessment mode.Assessment mode generates an estimate of the disk space savings that couldoccur with defragmentation without actually performing the defragmentation.This mode does not move any data or make any other on-disk changes. This is aquick operation that can be used to determine if the defragmentation featureshould be fully enabled. The assessment mode must be turned off for thedefragmentation process to do any actual work.
-b
Runs the defragmenter against block-based stores.BSINs are block-based shadow stores, which are stores used by clone and dedupeoperations. The defragmentation process on BSINs can be intensive and may takesome time.
-c
Runs the defragmenter against containers.CSINs are small file storage efficiency containers.
-d
Enables defragmentation. This option is always required, even when running thedefragmenter in assessment mode.
-e percent
Sets the target efficiency percentage.
Small Files Storage Efficiency for archive workloads
532 Isilon OneFS CLI Administration Guide
The target_efficiency determines the minimum acceptable storageefficiency relative to the maximum storage efficiency achievable by the shadowstore based on its current protection level.A target of 90% is relatively easy to achieve with a large cluster. The value can beset even higher. Smaller clusters, such as a 3-node cluster, may perform betterwith a lower target, such as 80%.
The percent is a whole number. If a fraction is specified, the digits after thedecimal point are ignored.
The installed global configuration value is 90.
For example: -e 95-h
Displays the command help.
-l level
This parameter is currently not used.
-p
Enables protection group efficiency.This is a compaction feature. When enabled, this option attempts to reduce thenumber of protection groups needed by the shadow stores, which in turn reducesrestripe time.
-s
Determines whether the defragmenter examines snapshot files for references tothe shadow store being defragged. Consider the following:
l When this option is disabled, if snapshot files contain references to shadowstore blocks that need to be defragmented, the defragmenter can not movethose blocks and the shadow store may remain fragmented.
l When this option is enabled, it can add significant processing overhead forclusters with many snapshots.
Depending on your workflow, it may be preferable to run the defragmenter mostfrequently without examining files from snapshots, with occasional runs thatinclude the snapshot files.
-v
Sets the output to verbose.
-z size
Sets the defragmentation chunk size, in bytes. The chunk size is the size of eachregion in the shadow store that is independently evaluated for defragmentation.The optimal size depends on your workflow.
l Setting a value greater than the size of the shadow store (for example, 2GB),forces the entire shadow store to be defragmented only when the efficiencyof the entire store is degraded.
l Setting a small value (for example, 1MB) achieves more aggressive gains.
The installed global configuration value is 33554432 which is 32MB. This settingworks well in most scenarios.
sins
Provide an optional list of SINs, separated with spaces, on which to apply thiscommand. The default is to include all SINs.
Small Files Storage Efficiency for archive workloads
Isilon OneFS CLI Administration Guide 533

Examples
Example of isi_sstore defrag -d -b
The following is sample output for isi_sstore defrag -d -b . The commandruns the defragmenter on all BSINs without moving files in snapshots.
# isi_sstore defrag -d -b Summary: Shadows stores total: 1 Shadows stores processed: 1 Shadows stores with error: 0 Chunks needing defrag: 1 Estimated space savings: 8192K Files moved: 2 Files repacked: 0 Files missing: 0 Files skipped: 0 Blocks needed: 3072 Blocks rehydrated: 4096 Blocks deduped: 2048 Blocks freed: 4096 Shadows stores removed: 1
Example of isi_sstore defrag -d -a -b -v
The following is sample output for isi_sstore defrag -d -a -b -v . Thecommand runs the shadow store defragmenter in assessment mode. The outputshows the disk space that would be reclaimed by defragmenting all block-basedshadow stores.
# isi_sstore defrag -d -a -b -vConfiguration: Defrag enabled: 1 BSINs enabled: 1 CSINs enabled: 0 Chunk size: 33554432 Target efficiency: 90 PG efficiency: 0 Snapshots enabled: 0 Log level: 5Summary: Shadows stores total: 1 Shadows stores processed: 1 Shadows stores skipped: 0 Shadows stores with error: 0 Chunks needing defrag: 1 Estimated space savings: 8192K
Example with a SIN list
The following command requests defragmentation on a list of SINs.
# isi_sstore defrag -v -d -a -c -p 4000:0001:0000:0001 4000:0001:0000:0002 4000:0001:0000:0003 4000:0001:0000:0004 4000:0001:0000:0005
Small Files Storage Efficiency for archive workloads
534 Isilon OneFS CLI Administration Guide

isi_storage_efficiencyCalculates storage efficiency on small, sample data sets.
Usage
The isi_storage_efficiency debugging script recursively scans through adirectory and calculates the storage efficiency of files in the sample data set, takinginto account the use of ShadowStores. This script runs out of memory if you run it onlarge data sets.
Note: The Unix du command does not show accurate usage for files with shadowreferences, including packed files.
Syntax
isi_storage_efficiency <path>
Options
path
Path name of directory to scan.
Storage efficiency example
The following example shows the storage efficiency of a small file data set, /ifs/data/my_small_files, before and after packing. Before packing, the storageefficiency is 33%. After packing, storage efficiency is 65.5%.
# isi_storage_efficiency /ifs/data/my_small_files Mode Count Logical data size Size Blocks DIR 1 0 48045 964 REG 2048 134217728 134217728 792576
Storage efficiencyFile data 0.330749354005File logical data 0.330749354005 Overall 0.330465808769Overall logical 0.330347556519
Now, assume that the following activities have occurred:
l A FilePools policy that selects /ifs/data/my_small_files is enabled
l A SmartPools job has run.
Rerunning the report shows improved storage efficiency.
# isi_storage_efficiency /ifs/data/my_small_files Mode Count Logical data size Size Blocks DIR 1 0 48045 964 REG 2048 134217728 134217728 6144 SIN 1 134217728 167075840 394227Shadow store usage may be affected by the ShadowStoreDelete job.
Small Files Storage Efficiency for archive workloads
Isilon OneFS CLI Administration Guide 535

Storage efficiencyFile data 0.654752716855File logical data 0.654752716855 Overall 0.653413826082Overall logical 0.653180011711
Troubleshooting Small Files Storage EfficiencyPossible issues generally fall into the following categories.
Performance
I/O efficiency, fragmentation, and packing can affect performance.
Space
Unpacking or expanding clones, packed files, and deduplicated files requiresufficient available space.
Following are suggestions for investigating these issues.
Log filesTo locate container ShadowStores that might be affected by storage efficiencyproblems, look for the following types of information in the logs.
Module name
Look for the value SFM.
SIN ID prefix
Container shadow stores (CSINs) that contain packed data have the prefix 0x41.
File pack state
Values are complete or incomplete.
Packing policy and packing target
Values are native or container.
For information about file attributes, see File system structure on page 511.
Fragmentation issuesFragmentation affects space usage and is the most common storage efficiency issue.
If files are overwritten or deleted repeatedly, there can be fragmentation in thecontainer ShadowStores.
The following commands provide information about fragmentation:
l isi_sstore defrag -v -d -a -c -p shows the fragmentation space thatdefragmentation can reclaim.
l isi_packing --ls shows the current packing configuration.
l SmartPools job reports in verbose mode shows statistics about files that werepacked.
l isi_sstore list and isi_sstore stats show the degree of fragmentation.Use isi_sstore list -v to see the fragmentation score and other verboseattributes for each SIN entry.
Small Files Storage Efficiency for archive workloads
536 Isilon OneFS CLI Administration Guide
l isi_storage_efficiency scans through a directory or files and calculates thestorage efficiency of files in the sample data set.
l isi get shows file attributes, including packing attributes.
l isi_cprSee the Isilon OneFS CLI Command Reference for information about isi get. Thereference pages for the commands related to Small Files Storage Efficiency are here.
The ShadowStoreDelete job frees up blocks for the shadow store and runs thedefragmenter if it is enabled.
Be aware of how much space you have packed. Clones, packed files, and deduplicatedfiles are unpacked or expanded on the target cluster during SyncIQ operations andhave to be re-packed or re-deduplicated on the target cluster.
Small Files Storage Efficiency for archive workloads
Isilon OneFS CLI Administration Guide 537

Small Files Storage Efficiency for archive workloads
538 Isilon OneFS CLI Administration Guide

CHAPTER 27
Networking
This section contains the following topics:
l Networking overview....................................................................................... 540l About the internal network.............................................................................. 540l About the external network.............................................................................. 541l Managing internal network settings................................................................. 549l Managing groupnets.........................................................................................551l Managing external network subnets................................................................ 553l Managing IP address pools...............................................................................558l Managing SmartConnect Settings................................................................... 562l Managing connection rebalancing....................................................................566l Managing network interface members............................................................. 567l Managing node provisioning rules.................................................................... 570l Managing routing options.................................................................................572l Managing DNS cache settings......................................................................... 574
Isilon OneFS CLI Administration Guide 539

Networking overviewAfter you determine the topology of your network, you can set up and manage yourinternal and external networks.
There are two types of networks on a cluster:
Internal
Nodes communicate with each other using a high speed low latency InfiniBandnetwork. You can optionally configure a second InfiniBand network to enablefailover for redundancy.
External
Clients connect to the cluster through the external network with Ethernet. TheIsilon cluster supports standard network communication protocols, including NFS,SMB, HDFS, HTTP, and FTP. The cluster includes various external Ethernetconnections, providing flexibility for a wide variety of network configurations.
About the internal networkA cluster must connect to at least one high-speed, low-latency InfiniBand switch forinternal communications and data transfer. The connection to the InfiniBand switch isalso referred to as an internal network. The internal network is separate from theexternal network (Ethernet) by which users access the cluster.
Upon initial configuration of your cluster, OneFS creates an initial internal network forthe InfiniBand switch. The interface to the default internal network is int-a. An internalnetwork for a second InfiniBand switch can be added for redundancy and failover.Failover allows continuous connectivity during path failures. The interface to thesecondary internal network is int-b, which is referred to as int-b/failover in the webadministration interface.
CAUTION Only Isilon nodes should be connected to your InfiniBand switch.Information exchanged on the back-end network is not encrypted. Connectinganything other than Isilon nodes to the InfiniBand switch creates a security risk.
Internal IP address rangesThe number of IP addresses assigned to the internal network determines how manynodes can be joined to the cluster.
When you initially configure the cluster, you specify one or more IP address ranges forthe primary InfiniBand switch. This range of addresses is used by the nodes tocommunicate with each other. It is recommended that you create a range ofaddresses large enough to accommodate adding additional nodes to your cluster.
While all clusters will have, at minimum, one internal InfiniBand network (int-a), youcan enable a second internal network to support another Infiniband switch withnetwork failover (int-b/failover). You must assign at least one IP address range for thesecondary network and one range for failover.
If any IP address ranges defined during the initial configuration are too restrictive forthe size of the internal network, you can add ranges to the int-a network or int-b/failover networks, which might require a cluster restart. Other configuration changes,such as deleting an IP address assigned to a node, might also required the cluster tobe restarted.
Networking
540 Isilon OneFS CLI Administration Guide

Internal network failoverYou can configure an internal switch as a failover network to provide redundancy forintra-cluster communications.
In order to support an internal failover network, the int-a port on each node in thecluster must be physically connected to one of the Infiniband switches, and the int-bport on each node must be connected to the other Infiniband switch.
After the ports are connected, you must configure two IP address ranges; an addressrange to support the int-b internal interfaces, and an address range to supportfailover. The failover addresses enable seamless failover in the event that either theint-a or int-b switches fail.
About the external networkYou connect a client computer to the cluster through the external network. Externalnetwork configuration is composed of groupnets, subnets, IP address pools, andfeatures node provisioning rules.
Groupnets are the configuration level for managing multiple tenants on your externalnetwork. DNS client settings, such as nameservers and a DNS search list, areproperties of the groupnet. Groupnets reside at the top tier of the networkinghierarchy. You can create one or more subnets within a groupnet.
Subnets simplify external (front-end) network management and provide flexibility inimplementing and maintaining the cluster network. You can create IP address poolswithin subnets to partition your network interfaces according to workflow or nodetype.
The IP address pool of a subnet consists of one or more IP address ranges. IP addresspools can be associated with network interfaces on cluster nodes. Client connectionsettings are configured at the IP address pool level.
An initial external network subnet is created during the setup of your cluster with thefollowing configuration:
l An initial groupnet called groupnet0 with the specified global, outbound DNSsettings to the domain name server list and DNS search list, if provided.
l An initial subnet called subnet0 with the specified netmask, gateway, andSmartConnect service address.
l An initial IP address pool called pool0 with the specified IP address range, theSmartConnect zone name, and the network interface of the first node in thecluster as the only pool member.
l An initial node provisioning rule called rule0 that automatically assigns the firstnetwork interface for all newly added nodes to pool0.
l Adds subnet0 to groupnet0.
l Adds pool0 to subnet0 and configures pool0 to use the virtual IP of subnet0 as itsSmartConnect service address.
GroupnetsGroupnets reside at the top tier of the networking hierarchy and are the configurationlevel for managing multiple tenants on your external network. DNS client settings,such as nameservers and a DNS search list, are properties of the groupnet. You cancreate a separate groupnet for each DNS namespace that you want to use to enable
Networking
Isilon OneFS CLI Administration Guide 541

portions of the Isilon cluster to have different networking properties for nameresolution. Each groupnet maintains its own DNS cache, which is enabled by default.
A groupnet is a container that includes subnets, IP address pools, and provisioningrules. Groupnets can contain one or more subnets, and every subnet is assigned to asingle groupnet. Each cluster contains a default groupnet named groupnet0 thatcontains an initial subnet named subnet0, an initial IP address pool named pool0, andan initial provisioning rule named rule0.
Each groupnet is referenced by one or more access zones. When you create an accesszone, you can specify a groupnet. If a groupnet is not specified, the access zone willreference the default groupnet. The default System access zone is automaticallyassociated with the default groupnet. Authentication providers that communicate withan external server, such as Active Directory and LDAP, must also reference agroupnet. You can specify the authentication provider with a specific groupnet;otherwise, the provider will reference the default groupnet. You can only add anauthentication provider to an access zone if they are associated with the samegroupnet. Client protocols such as SMB, NFS, HDFS, and Swift, are supported bygroupnets through their associated access zones.
DNS name resolutionYou can designate up to three DNS servers per groupnet to handle DNS nameresolution.
DNS servers must be configured as an IPv4 or IPv6 address. You can specify up to sixDNS search suffixes per groupnet; the suffixes settings are appended to domainnames that are not fully qualified.
Additional DNS server settings at the groupnet level include enabling a DNS cache,enabling server-side search, and enabling DNS resolution on a rotating basis.
SubnetsSubnets are networking containers that enable you to sub-divide your network intosmaller, logical IP networks.
On a cluster, subnets are created under a groupnet and each subnet contains one ormore IP address pools. Both IPv4 and IPv6 addresses are supported on OneFS;however, a subnet cannot contain a combination of both. When you create a subnet,you specify whether it supports IPv4 or IPv6 addresses.
You can configure the following options when you create a subnet:
l Gateway servers that route outgoing packets and gateway priority.
l Maximum transmission unit (MTU) that network interfaces in the subnet will usefor network communications.
l SmartConnect service address, which is the IP address on which theSmartConnect module listens for DNS requests on this subnet.
l VLAN tagging to allow the cluster to participate in multiple virtual networks.
l Direct Server Return (DSR) address, if your cluster contains an external hardwareload balancing switch that uses DSR.
How you set up your external network subnets depends on your network topology. Forexample, in a basic network topology where all client-node communication occursthrough direct connections, only a single external subnet is required. In anotherexample, if you want clients to connect through both IPv4 and IPv6 addresses, youmust configure multiple subnets.
Networking
542 Isilon OneFS CLI Administration Guide

IPv6 supportOneFS supports both IPv4 and IPv6 address formats on a cluster.
IPv6 is the next generation of internet protocol addresses and was designed with thegrowing demand for IP addresses in mind. The following table describes distinctionsbetween IPv4 and IPv6.
IPv4 IPv6
32-bit addresses 128-bit addresses
Address Resolution Protocol (ARP) Neighbor Discovery Protocol (NDP)
You can configure the Isilon cluster for IPv4, IPv6, or both (dual-stack) in OneFS. Youset the IP family when creating a subnet, and all IP address pools assigned to thesubnet must use the selected format.
VLANsVirtual LAN (VLAN) tagging is an optional setting that enables a cluster to participatein multiple virtual networks.
You can partition a physical network into multiple broadcast domains, or virtual localarea networks (VLANs). You can enable a cluster to participate in a VLAN whichallows multiple cluster subnet support without multiple network switches; one physicalswitch enables multiple virtual subnets.
VLAN tagging inserts an ID into packet headers. The switch refers to the ID to identifyfrom which VLAN the packet originated and to which network interface a packetshould be sent.
IP address poolsIP address pools are assigned to a subnet and consist of one or more IP addressranges. You can partition nodes and network interfaces into logical IP address pools.IP address pools are also utilized when configuring SmartConnect DNS zones andclient connection management.
Each IP address pool belongs to a single subnet. Multiple pools for a single subnet areavailable only if you activate a SmartConnect Advanced license.
The IP address ranges assigned to a pool must be unique and belong to the IP addressfamily (IPv4 or IPv6) specified by the subnet that contains the pool.
You can add network interfaces to IP address pools to associate address ranges with anode or a group of nodes. For example, based on the network traffic that you expect,you might decide to establish one IP address pool for storage nodes and another foraccelerator nodes.
SmartConnect settings that manage DNS query responses and client connections areconfigured at the IP address pool level.
Link aggregationLink aggregation, also known as network interface card (NIC) aggregation, combinesthe network interfaces on a physical node into a single, logical connection to provideimproved network throughput.
You can add network interfaces to an IP address pool singly or as an aggregate. A linkaggregation mode is selected on a per-pool basis and applies to all aggregated networkinterfaces in the IP address pool. The link aggregation mode determines how traffic isbalanced and routed among aggregated network interfaces.
Networking
Isilon OneFS CLI Administration Guide 543
SmartConnect moduleSmartConnect is a module that specifies how the DNS server on the cluster handlesconnection requests from clients and the policies that are used to assign IP addressesto network interfaces, including failover and rebalancing.
Settings and policies that are configured for SmartConnect are applied per IP addresspool. You can configure basic and advanced SmartConnect settings.
SmartConnect Basic
SmartConnect Basic is included with OneFS as a standard feature and does notrequire a license. SmartConnect Basic supports the following settings:
l Specification of the DNS zone
l Round-robin connection balancing method only
l Service subnet to answer DNS requests
SmartConnect Basic enables you to add two SmartConnect Service IP addresses to asubnet.
SmartConnect Basic has the following limitations to IP address pool configuration:
l You may only specify a static IP address allocation policy.
l You cannot specify an IP address failover policy.
l You cannot specify an IP address rebalance policy.
l You may assign two IP address pools per external network subnet.
SmartConnect Advanced
SmartConnect Advanced extends the settings available from SmartConnect Basic. Itrequires an active license. SmartConnect Advanced supports the following settings:
l Round-robin, CPU utilization, connection counting, and throughput balancingmethods
l Static and dynamic IP address allocation
SmartConnect Advance enables you to add a maximum of six SmartConnect ServiceIP addresses per subnet.
SmartConnect Advanced enables you to specify the following IP address poolconfiguration options:
l You can define an IP address failover policy for the IP address pool.
l You can define an IP address rebalance policy for the IP address pool.
l SmartConnect Advanced supports multiple IP address pools per external subnet toenable multiple DNS zones within a single subnet.
SmartConnect zones and aliasesClients can connect to the cluster through a specific IP address or though a domainthat represents an IP address pool.
You can configure a SmartConnect DNS zone name for each IP address pool. Thezone name must be a fully qualified domain name. SmartConnect requires that you adda new name server (NS) record that references the SmartConnect service IP addressin the existing authoritative DNS zone that contains the cluster. You must also providea zone delegation to the fully qualified domain name (FQDN) of the SmartConnectzone in your DNS infrastructure.
Networking
544 Isilon OneFS CLI Administration Guide
If you have a SmartConnect Advanced license, you can also specify a list of alternateSmartConnect DNS zone names for the IP address pool.
When a client connects to the cluster through a SmartConnect DNS zone,SmartConnect handles the incoming DNS requests on behalf of the IP address pool,and the service subnet distributes incoming DNS requests according to the pool'sconnection balancing policy.
DNS request handlingSmartConnect handles all incoming DNS requests on behalf of an IP address pool if aSmartConnect service subnet has been associated with the pool.
The SmartConnect service subnet is an IP address pool setting. You can specify anysubnet that has been configured with a SmartConnect service IP address andreferences the same groupnet as the pool. You must have at least one subnetconfigured with a SmartConnect service IP address in order to handle client DNSrequests. You can configure only one service IP address per subnet.
A SmartConnect service IP address should be used exclusively for answering DNSrequests and cannot be an IP address that is in any pool's IP address range. Clientconnections through the SmartConnect service IP address result in unexpectedbehavior or disconnection.
Once a SmartConnect service subnet has been associated with an IP address pool, theservice subnet distributes incoming DNS requests according to the pool's connectionbalancing policy. If a pool does not have a designated service subnet, incoming DNSrequests are answered by the subnet that contains the pool, provided that the subnetis configured with a SmartConnect service IP address. Otherwise, the DNS requestsare excluded.
Note: SmartConnect requires that you add a new name server (NS) record thatreferences the SmartConnect service IP address in the existing authoritative DNSzone that contains the cluster. You must also provide a zone delegation to the fullyqualified domain name (FQDN) of the SmartConnect zone.
IP address allocationThe IP address allocation policy specifies how IP addresses in the pool are assigned toan available network interface.
You can specify whether to use static or dynamic allocation.
Static
Assigns one IP address to each network interface added to the IP address pool,but does not guarantee that all IP addresses are assigned.
Once assigned, the network interface keeps the IP address indefinitely, even ifthe network interface becomes unavailable. To release the IP address, remove thenetwork interface from the pool or remove it from the node.
Without a license for SmartConnect Advanced, static is the only method availablefor IP address allocation.
Dynamic
Assigns IP addresses to each network interface added to the IP address pool untilall IP addresses are assigned. This guarantees a response when clients connect toany IP address in the pool.
Networking
Isilon OneFS CLI Administration Guide 545

If a network interface becomes unavailable, its IP addresses are automaticallymoved to other available network interfaces in the pool as determined by the IPaddress failover policy.
This method is only available with a license for SmartConnect Advanced.
IP address failoverWhen a network interface becomes unavailable, the IP address failover policy specifieshow to handle the IP addresses that were assigned to the network interface.
To define an IP address failover policy, you must have a license for SmartConnectAdvanced, and the IP address allocation policy must be set to dynamic. Dynamic IPallocation ensures that all of the IP addresses in the pool are assigned to availablenetwork interfaces.
When a network interface becomes unavailable, the IP addresses that were assignedto it are redistributed to available network interfaces according to the IP addressfailover policy. Subsequent client connections are directed to the new networkinterfaces.
You can select one of the following connection balancing methods to determine howthe IP address failover policy selects which network interface receives a redistributedIP address:
l Round-robin
l Connection count
l Network throughput
l CPU usage
Connection balancingThe connection balancing policy determines how the DNS server handles clientconnections to the cluster.
You can specify one of the following balancing methods:
Round-robin
Selects the next available network interface on a rotating basis. This is the defaultmethod. Without a SmartConnect license for advanced settings, this is the onlymethod available for load balancing.
Connection count
Determines the number of open TCP connections on each available networkinterface and selects the network interface with the fewest client connections.
Network throughput
Determines the average throughput on each available network interface andselects the network interface with the lowest network interface load.
CPU usage
Determines the average CPU utilization on each available network interface andselects the network interface with lightest processor usage.
Networking
546 Isilon OneFS CLI Administration Guide

IP address rebalancingThe IP address rebalance policy specifies when to redistribute IP addresses if one ormore previously unavailable network interfaces becomes available again.
To define an IP address rebalance policy, you must have a license for SmartConnectAdvanced, and the IP address allocation policy must be set to dynamic. Dynamic IPaddresses allocation ensures that all of the IP addresses in the pool are assigned toavailable network interfaces.
You can set rebalancing to occur manually or automatically:
Manual
Does not redistribute IP addresses until you manually start the rebalancingprocess.
Upon rebalancing, IP addresses will be redistributed according to the connectionbalancing method specified by the IP address failover policy defined for the IPaddress pool.
Automatic
Automatically redistributes IP addresses according to the connection balancingmethod specified by the IP address failover policy defined for the IP address pool.
Automatic rebalancing may also be triggered by changes to cluster nodes,network interfaces, or the configuration of the external network.
Note: Rebalancing can disrupt client connections. Ensure the client workflowon the IP address pool is appropriate for automatic rebalancing.
Node provisioning rulesNode provisioning rules specify how new nodes are configured when they are added toa cluster.
If the new node type matches the type defined in a rule, the network interfaces on thenode are added to the subnet and the IP address pool specified in the rule.
For example, you can create a node provisioning rule that configures new Isilonstorage nodes, and another rule that configures new accelerator nodes.
OneFS automatically checks for multiple provisioning rules when new rules are addedto ensure there are no conflicts.
Routing optionsOneFS supports source-based routing and static routes which allow for more granularcontrol of the direction of outgoing client traffic on the cluster.
If no routing options are defined, by default, outgoing client traffic on the cluster isrouted through the default gateway, which is the gateway with the lowest prioritysetting on the node. If traffic is being routed to a local subnet and does not need toroute through a gateway, the traffic will go directly out through an interface on thatsubnet.
Networking
Isilon OneFS CLI Administration Guide 547

Source-based routingSource-based routing selects which gateway to direct outgoing client traffic throughbased on the source IP address in each packet header.
When enabled, source-based routing automatically scans your network configurationto create client traffic rules. If you make modifications to your network configuration,such as changing the IP address of a gateway server, source-based routing adjusts therules. Source-based routing is applied across the entire cluster and does not supportthe IPv6 protocol.
In the following example, you enable source-based routing on an Isilon cluster that isconnected to SubnetA and SubnetB. Each subnet is configured with a SmartConnectzone and a gateway, also labeled A and B. When a client on SubnetA makes a requestto SmartConnect ZoneB, the response originates from ZoneB. This results in a ZoneBaddress as the source IP in the packet header, and the response is routed throughGatewayB. Without source-based routing, the default route is destination-based, sothe response is routed through GatewayA.
In another example, a client on SubnetC, which is not connected to the Isilon cluster,makes a request to SmartConnect ZoneA and ZoneB. The response from ZoneA isrouted through GatewayA, and the response from ZoneB is routed through GatewayB.In other words, the traffic is split between gateways. Without source-based routing,both responses are routed through the same gateway.
Source-based routing is disabled by default. Enabling or disabling source-basedrouting goes into effect immediately. Packets in transit continue on their originalcourses, and subsequent traffic is routed based on the status change. Transactionscomposed of multiple packets might be disrupted or delayed if the status of source-based routing changes during transmission.
Source-based routing can conflict with static routes. If a routing conflict occurs,source-based routing rules are prioritized over the static route.
You might enable source-based routing if you have a large network with a complextopology. For example, if your network is a multi-tenant environment with severalgateways, traffic is more efficiently distributed with source-based routing.
Static routingA static route directs outgoing client traffic to a specified gateway based on the IPaddress of the client connection.
You configure static routes by IP address pool, and each route applies to all nodes thathave network interfaces as IP address pool members.
You might configure static routing in order to connect to networks that are unavailablethrough the default routes or if you have a small network that only requires one or tworoutes.
Note: If you have upgraded from a version earlier than OneFS 7.0.0, existing staticroutes that were added through rc scripts will no longer work and must be re-created.
Networking
548 Isilon OneFS CLI Administration Guide

Managing internal network settingsYou can modify internal IP address ranges and configure an Infiniband switch forfailover.
Add or remove an internal IP address rangeYou can configure IP address ranges for the int-a, int-b, and failover networks.
About this task
Each internal Infiniband switch requires an IP address range. The ranges should have asufficient number of IP addresses for present operating conditions as well as futureexpansion and addition of nodes.
Procedure
1. Run the isi config command.
The command-line prompt changes to indicate that you are in the isi configsubsystem.
2. Modify the internal IP address ranges by running the iprange command.
The following command adds an IP range to the int-a internal network:
iprange int-a 192.168.206.10-192.168.206.20
The following command deletes an existing IP address range from the int-ainternal network:
deliprange int-a 192.168.206.15-192.168.206.20
3. Run the commit command to complete the configuration changes and exit isiconfig.
Modify an internal network netmaskYou can modify the subnet mask, or netmask, value for the int-a and int-b internalnetwork interfaces.
About this task
If the netmask is too restrictive for the size of the internal network, you must modifythe netmask settings. It is recommended that you specify a class C netmask, such as255.255.255.0, for the internal netmask, that is large enough to accommodate futuregrowth of your Isilon clusters.It is recommended that the netmask values you specify for int-a and int-b/failover arethe same. If you modify the netmask value of one, modify the other.
Note: You must reboot the cluster to apply modifications to the netmask.
Procedure
1. Run the isi config command.
The command-line prompt changes to indicate that you are in the isi configsubsystem.
Networking
Isilon OneFS CLI Administration Guide 549

2. Modify the internal network netmask by running the netmask command.
The following command changes the int-a internal network netmask:
netmask int-a 255.255.255.0
The system displays output similar to the following example:
!! WARNING: The new netmask will not take effect until the nodes are rebooted.
3. Run the commit command to complete the configuration changes and exit isiconfig.
Configure and enable internal network failoverYou can configure the int-b internal interfaces to provide backup in the event of anint-a network failure.
About this task
Failover configuration involves enabling the int-b interface, specifying a valid netmask,and adding IP address ranges for the int-b interface and the failover network. Bydefault, the int-b interface and failover network are disabled.
Note: You must reboot the cluster to apply modifications to internal networkfailover.
Procedure
1. Run the isi config command.
The command-line prompt changes to indicate that you are in the isi configsubsystem.
2. Set a netmask for the second interface by running the netmask command.
The following command changes the int-b internal network netmask:
netmask int-b 255.255.255.0
The system displays output similar to the following example:
!! WARNING: The new netmask will not take effect until the nodes are rebooted.
3. Set an IP address range for the second interface by running the iprangecommand.
The following command adds an IP range to the int-b internal network:
iprange int-b 192.168.206.21-192.168.206.30
4. Set an IP address range for the failover interface by running the iprangecommand.
The following command adds an IP range to the internal failover network:
iprange failover 192.168.206.31-192.168.206.40
5. Enable a second interface by running the interface command.
Networking
550 Isilon OneFS CLI Administration Guide

The following command specifies the interface name as int-b and enables it:
interface int-b enable
6. Run the commit command to complete the configuration changes and exit isiconfig.
7. Restart the cluster to apply netmask modifications.
Disable internal network failoverYou can disable internal network failover by disabling the int-b interface.
About this task
You must reboot the cluster to apply modifications to internal network failover.
Procedure
1. Run the isi config command.
The command-line prompt changes to indicate that you are in the isi configsubsystem.
2. Disable the int-b interface by running the interface command.
The following command specifies the int-b interface and disables it:
interface int-b disable
3. Run the commit command to complete the configuration changes and exit isiconfig.
4. Restart the cluster to apply failover modifications.
Managing groupnetsYou can create and manage groupnets on a cluster.
Create a groupnetYou can create a groupnet and configure DNS client settings.
Procedure
1. Run the isi network groupnet create command.
The following command creates a groupnet named groupnet1 that supports twoDNS servers, which are specified by IPv6 addresses:
isi network groupnet create groupnet1 \--dns-servers=2001:DB8:170:9904::be06,2001:DB8:170:9904::be07
The following command creates a groupnet named groupnet1 that supports oneDNS server, which is specified by an IPv4 address, and enables DNS caching:
isi network groupnet create groupnet1 \--dns-servers=192.0.2.0 --dns-cache-enabled=true
Networking
Isilon OneFS CLI Administration Guide 551

Modify a groupnetYou can modify groupnet attributes including the name, supported DNS servers, andDNS configuration settings.
Procedure
1. Run the isi network groupnet modify command.
The following command modifies groupnet1 to enable DNS search on threesuffixes:
isi network groupnet modify groupnet1 \--dns-search=data.company.com,storage.company.com
The following command modifies groupnet1 to support a second DNS serverand to enable rotation through the configured DNS resolvers:
isi network groupnet modify groupnet1 \--add-dns-servers=192.0.2.1 --dns-options=rotate
Delete a groupnetYou can delete a groupnet from the system, unless it is the default groupnet. If thegroupnet is associated with an access zone, an authentication provider, removal fromthe system might affect several other areas of OneFS and should be performed withcaution.
Before you begin
In several cases, the association between a groupnet and another OneFS component,such as access zones or authentication providers, is absolute. You cannot modifythese components to associate them with another groupnet.
In the event that you need to delete a groupnet, we recommend that you complete thethese tasks in the following order:
1. Delete IP address pools in subnets associated with the groupnet.
2. Delete subnets associated with the groupnet.
3. Delete authentication providers associated with the groupnet.
4. Delete access zones associated with the groupnet.
Procedure
1. Run the isi network groupnet delete command..
2. At the prompt to confirm deletion, type yes.
The following command deletes a groupnet named groupnet1:
isi network groupnet delete groupnet1
The following command attempts to delete groupnet1, which is still associatedwith an access zone:
isi network modify groupnet groupnet1
Networking
552 Isilon OneFS CLI Administration Guide

The system displays output similar to the following example:
Groupnet groupnet1 is not deleted; groupnet can't be deleted while pointed at by zone(s) zoneB
View groupnetsYou can retrieve and sort a list of all groupnets on the system and view the details of aspecific groupnet.
Procedure
1. To retrieve a list of groupnets in the system, run the isi networkgroupnets list command.
The following command sorts the list of groupnets by ID in descending order:
isi network groupnets list --sort=id --descending
The system displays output similar to the following example:
ID DNS Cache DNS Search DNS Servers Subnets------------------------------------------------------------groupnet2 True data.company.com 192.0.2.75 subnet2 192.0.2.67 subnet4groupnet1 True 192.0.2.92 subnet1 192.0.2.83 subnet3groupnet0 False 192.0.2.11 subnet0 192.0.2.20--------Total: 3
2. To view the details of a specific groupnet, run the isi network groupnetsview command.
The following command displays the details of a groupnet named groupnet1:
isi network groupnets view groupnet1
The system displays output similar to the following example:
ID: groupnet1 Name: groupnet1 Description: Data storage groupnet DNS Cache Enabled: True DNS Options: - DNS Search: data.company.com DNS Servers: 192.0.1.75, 10.7.2.67Server Side DNS Search: True Subnets: subnet1, subnet3
Managing external network subnetsYou can create and manage subnets on a cluster.
Networking
Isilon OneFS CLI Administration Guide 553
Create a subnetYou can add a subnet to the external network of a cluster.
Before you begin
Subnets must be associated with a groupnet. Ensure that the groupnet you want toassociate with this subnet exists in the system.
About this task
An IP address family designation and prefix length are required when creating asubnet.
Procedure
1. Run the isi network subnets create command and specify a subnet ID,IP address family, and prefix length.
Specify the subnet ID you want to create in the following format:
<groupnet_name>.<subnet_name>
The subnet name must be unique in the system.
The following command creates a subnet associated with groupnet1, designatesthe IP address family as IPv4 and specifies an IPv4 prefix length:
isi network subnets create \ groupnet1.subnet3 ipv4 255.255.255.0
The following command creates a subnet with an associated IPv6 prefix length:
isi network subnets create \ groupnet1.subnet3 ipv6 64
Modify a subnetYou can modify a subnet on the external network.
About this task
Note: Modifying an external network subnet that is in use can disable access tothe cluster.
Procedure
1. (Optional) To identify the ID of the external subnet you want to modify, run thefollowing command:
isi network subnets list
2. Run the isi networks modify subnet command
Specify the subnet ID you want to modify in the following format:
<groupnet_name>.<subnet_name>
Networking
554 Isilon OneFS CLI Administration Guide
The following command changes the name of subnet3 under groupnet1 tosubnet5:
isi network subnets modify groupnet1.subnet3 \ --name=subnet5
The following command sets the MTU to 1500, specifies the gateway addressas 198.162.205.10, and sets the gateway priority to 1:
isi network subnets modify groupnet1.subnet3 --mtu=1500 --gateway=198.162.205.10 --gateway-priority=1
Delete a subnetYou can delete an external network subnet that you no longer need.
About this task
Note: Deleting an external network subnet also deletes any associated IP addresspools. Deleting a subnet that is in use can prevent access to the cluster.
Procedure
1. (Optional) To identify the name of the subnet you want to delete, run thefollowing command:
isi network subnets list
2. Run the isi networks delete subnet command.
Specify the subnet ID you want to delete in the following format:
<groupnet_name>.<subnet_name>
The following command deletes subnet3 under groupnet1:
isi network subnets delete groupnet1.subnet3
3. At the prompt, type yes.
View subnetsYou can view all subnets on the external network, sort subnets by specified criteria, orview details for a specific subnet.
Procedure
1. To view all subnets, run the isi network subnets list command.
The system displays output similar to the following example:
ID Subnet Gateway|Priority Pools SC Service----------------------------------------------------------------------groupnet1.subnet0 203.0.113.10/24 203.0.113.12|1 pool0
Networking
Isilon OneFS CLI Administration Guide 555

198.51.100.10groupnet1.subnet3 192.0.2.20/24 192.0.2.22|2 pool3 198.51.100.15----------------------------------------------------------------------
2. To view the details of a specific subnet, run the isi network subnetsview command and specify the subnet ID.
Specify the subnet ID you want to view in the following format:
<groupnet_name>.<subnet_name>
The following command displays details for subnet3 under groupnet1:
isi network subnets view groupnet1.subnet3
The system displays output similar to the following example:
ID: groupnet1.subnet3 Name: subnet3 Groupnet: groupnet1 Pools: pool3 Addr Family: ipv4 Base Addr: 192.0.2.20 CIDR: 192.0.2.20/24 Description: Sales subnet Dsr Addrs: - Gateway: 192.0.2.22Gateway Priority: 2 MTU: 1500 Prefixlen: 24 Netmask: 255.255.255.0 Sc Service Addr: 198.51.100.15 VLAN Enabled: False VLAN ID: -
Configure a SmartConnect service IP addressYou can specify a SmartConnect service IP address on a subnet.
Procedure
1. (Optional) To identify the name of the external subnet you want to modify, runthe following command:
isi network subnets list
2. Run the isi networks modify subnet command
Specify the subnet ID you want to modify in the following format:
<groupnet_name>.<subnet_name>
Networking
556 Isilon OneFS CLI Administration Guide

The following command specifies the SmartConnect service IP address onsubnet3 under groupnet1:
isi network subnets modify groupnet1.subnet3 \ --sc-service-addr=198.51.100.15
After you finish
Assign this subnet to one or more IP address pools in order to handle DNS requests forthose pools.
Enable or disable VLAN taggingYou can partition the external network into Virtual Local Area Networks or VLANs.
About this task
VLAN tagging requires a VLAN ID that corresponds to the ID number for the VLAN seton the switch. Valid VLAN IDs are 2 to 4094.
Procedure
1. (Optional) To identify the name of the external subnet you want to modify forVLAN tagging, run the following command:
isi network subnets list
2. Enable or disable VLAN tagging on the external subnet by running the isinetworks modify subnet command.
Specify the subnet ID you want to modify in the following format:
<groupnet_name>.<subnet_name>
The following command enables VLAN tagging on subnet3 under groupnet1 andsets the required VLAN ID to 256:
isi network subnets modify groupnet1.subnet3 \ --vlan-enabled=true --vlan-id=256
The following command disables VLAN tagging on subnet3 under groupnet1:
isi network subnets modify groupnet1.subnet3 \ --vlan-enabled=false
3. At the prompt, type yes.
Networking
Isilon OneFS CLI Administration Guide 557

Add or remove a DSR addressYou can specify a Direct Server Return (DSR) address for a subnet if your clustercontains an external hardware load balancing switch that uses DSR.
Procedure
1. (Optional) To identify the name of the external subnet you want to modify forDRS addresses, run the following command:
isi network subnets list
2. Run the isi network subnets modify command.
Specify the subnet ID you want to modify in the following format:
<groupnet_name>.<subnet_name>
The following command adds a DSR address to subnet3 under groupnet1:
isi network subnets modify groupnet1.subnet3 \ --add-dsr-addrs=198.51.100.20
The following command removes a DSR address from subnet3 under groupnet1:
isi network subnets modify groupnet1.subnet3 \ --remove-dsr-addrs=198.51.100.20
Managing IP address poolsYou can create and manage IP address pools on the cluster.
Create an IP address poolYou can partition the external network interface into groups, or pools, of unique IPaddress ranges.
About this task
Note: If you have not activated a SmartConnect Advanced license, the cluster isallowed one IP address pool per subnet. If you activate a SmartConnect Advancedlicense, the cluster is allowed unlimited IP address pools per subnet.
When you create an address pool, you must assign it to a subnet. If the subnet is notunder the default groupnet, groupnet0, then you must also assign an access zone tothe pool.
Procedure
1. Run the isi network pools create command.
Specify the ID of the pool you want to create in the following format:
<groupnet_name>.<subnet_name>.<pool_name>
Networking
558 Isilon OneFS CLI Administration Guide
The following command creates a pool named pool5 and assigns it to subnet3under groupnet1:
isi network pools create groupnet1.subnet3.pool5
The following command creates a pool named pool5, assigns it togroupnet1.subnet3, and specifies zoneB as the access zone:
isi network pools create groupnet1.subnet3.pool5 \ --access-zone=zoneB
Modify an IP address poolYou can modify IP address pools to update pool settings.
Procedure
1. (Optional) To identify the name of the IP address pool you want to modify, runthe following command:
isi network pools list
2. Run the isi networks modify pool command.
Specify the pool ID you want to modify in the following format:
<groupnet_name>.<subnet_name>.<pool_name>
The following command changes the name of the pool from pool3 to pool5:
isi network pools modify groupnet1.subnet3.pool3 --name=pool5
Delete an IP address poolYou can delete an IP address pool that you no longer need.
About this task
When a pool is deleted, the pool and pool settings are removed from the assignedsubnet.
Procedure
1. (Optional) To identify the name of the IP address pool you want to delete, runthe following command:
isi network pools list
2. Run the isi networks delete pool command.
Specify the pool ID you want to delete in the following format:
<groupnet_name>.<subnet_name>.<pool_name>
Networking
Isilon OneFS CLI Administration Guide 559
The following command deletes the pool name pool5 from groupnet1.subnet3:
isi network pools delete groupnet1.subnet3.pool5
3. At the prompt, type yes.
View IP address poolsYou can view all IP address pools within a groupnet or subnet, sort pools by specifiedcriteria, or view details for a specific pool.
Procedure
1. To view all IP address pools within a groupnet or subnet, run the isi networkpools list command.
The following command displays all IP address pools under groupnet1.subnet3:
isi network pools list groupnet1.subnet3
The system displays output similar to the following example:
ID SC Zone Allocation Method----------------------------------------------------------groupnet1.subnet3.pool5 data.company.com staticgroupnet1.subnet3.pool7 data.company.com dynamic----------------------------------------------------------
2. To view the details of a specific IP address pool, run the isi network poolsview command and specify the pool ID.
Specify the pool ID you want to view in the following format:
<groupnet_name>.<subnet_name>.<pool_name>
The following command displays the setting details of pool5 undergroupnet1.subnet3:
isi network pools view groupnet1.subnet3.pool5
The system displays output similar to the following example:
ID: groupnet0.subnet3.pool5 Groupnet: groupnet1 Subnet: subnet3 Name: pool5 Rules: - Access Zone: zone3 Allocation Method: static Aggregation Mode: lacp SC Suspended Nodes: - Description: - Ifaces: 1:ext-2, 2:ext-2, 3:ext-2 IP Ranges: 203.0.223.12-203.0.223.22 Rebalance Policy: autoSC Auto Unsuspend Delay: 0 SC Connect Policy: round_robin SC Zone: data.company.com
Networking
560 Isilon OneFS CLI Administration Guide

SC DNS Zone Aliases: - SC Failover Policy: round_robin SC Subnet: groupnet0.subnet3 SC Ttl: 0 Static Routes: -
Add or remove an IP address rangeYou can configure a range of IP addresses for a pool.
About this task
All IP address ranges in a pool must be unique.
Procedure
1. (Optional) To identify the name of the IP address pool you want to modify for IPaddress ranges, run the following command:
isi network pools list
2. Run the isi network pools modify command.
Specify the pool ID you want to modify in the following format:
<groupnet_name>.<subnet_name>.<pool_name>
The following command adds an address range to pool5 undergroupnet1.subnet3:
isi network pools modify groupnet1.subnet3.pool5 \ --add-ranges=203.0.223.12-203.0.223.22
The following command deletes an address range from pool5:
isi network pools modify groupnet1.subnet3.pool5 \ --remove-ranges=203.0.223.12-203.0.223.14
Configure IP address allocationYou can specify whether the IP addresses in an IP address pool are allocated tonetwork interfaces statically or dynamically.
Before you begin
To configure dynamic IP address allocation, you must activate a SmartConnectAdvanced license.Procedure
1. (Optional) To identify the name of the IP address pool you want to modify, runthe following command:
isi network pools list
Networking
Isilon OneFS CLI Administration Guide 561
2. Run the isi network pools modify command.
Specify the pool ID you want to modify in the following format:
<groupnet_name>.<subnet_name>.<pool_name>
The following command specifies dynamic distribution of IP addresses in pool5under groupnet1.subnet 3:
isi network pools modify groupnet1.subnet3.pool5 \ --alloc-method=dynamic
Managing SmartConnect SettingsYou can configure SmartConnect settings within each IP address pool on the cluster.
Configure a SmartConnect DNS zoneYou can specify a SmartConnect DNS zone and alternate DNS zone aliases for an IPaddress pool.
Procedure
1. (Optional) To identify the name of the IP address pool you want to modify, runthe following command:
isi network pools list
2. To configure a SmartConnect DNS zone, run the isi networks modifypool command:
Specify the pool ID you want to modify in the following format:
<groupnet_name>.<subnet_name>.<pool_name>
The following command specifies a SmartConnect DNS zone in pool5 undersubnet3 and groupnet1:
isi network pools modify groupnet1.subnet3.pool5 \ --sc-dns-zone=www.company.com
It is recommended that the SmartConnect DNS zone be a fully-qualified domainname (FQDN).
3. To configure a SmartConnect DNS zone alias, run the isi networksmodify pool command:
Networking
562 Isilon OneFS CLI Administration Guide

The following command specifies SmartConnect DNS aliases in pool5 undersubnet3 and groupnet1:
isi network pools modify groupnet1.subnet3.pool5 \ --add-sc-dns-zone-aliases=data.company.com,storage.company.com
You cannot specify more than three SmartConnect DNS zone aliases.
4. To remove a SmartConnect DNS zone alias, run the isi networks modifypool command:
The following command removes a SmartConnect DNS aliases from pool5 undersubnet3 and groupnet1:
isi network pools modify groupnet1.subnet3.pool5 \ --remove-dns-zone-aliases=data.company.com
After you finish
SmartConnect requires that you add a new name server (NS) record to the existingauthoritative DNS zone that contains the cluster and that you delegate the FQDN ofthe SmartConnect DNS zone.
Specify a SmartConnect service subnetYou can designate a subnet as the SmartConnect service subnet for an IP addresspool.
Before you begin
The subnet that you designate as the SmartConnect service subnet must have aSmartConnect service IP address configured, and the subnet must be in the samegroupnet as the IP address pool. For example, although a pool might belong tosubnet3, you can designate subnet5 as the SmartConnect service subnet as long asboth subnets are under the same groupnet.Procedure
1. (Optional) To identify the name of the IP address pool you want to modify, runthe following command:
isi network pools list
2. Run the isi networks modify pool command:
Specify the pool ID you want to modify in the following format:
<groupnet_name>.<subnet_name>.<pool_name>
The following command specifies subnet0 as the a SmartConnect servicesubnet of pool5 under subnet3 and groupnet1:
isi network pools modify groupnet1.subnet3.pool5 \ --sc-subnet=subnet0
Networking
Isilon OneFS CLI Administration Guide 563

Suspend or resume a nodeYou can suspend and resume SmartConnect DNS query responses on a node.
Procedure
1. To suspend DNS query responses for an node:
a. (Optional) To identify a list of nodes and IP address pools, run the followingcommand:
isi network interfaces list
b. Run the isi network pools sc-suspend-nodes command andspecify the pool ID and logical node number (LNN).
Specify the pool ID you want in the following format:
<groupnet_name>.<subnet_name>.<pool_name>
The following command suspends DNS query responses on node 3 whenqueries come through IP addresses in pool5 under groupnet1.subnet 3:
isi network pools sc-suspend-nodes groupnet1.subnet3.pool5 3
2. To resume DNS query responses for an IP address pool, run the isi networkpools sc-resume-nodes command and specify the pool ID and logical nodenumber (LNN).
The following command resumes DNS query responses on node 3 when queriescome through IP addresses in pool5 under groupnet1.subnet 3:
isi network pools sc-resume-nodes groupnet1.subnet3.pool5 3
Configure a connection balancing policyYou can set a connection balancing policy for an IP address pool.
About this task
SmartConnect supports the following balancing methods:
l Round robinNote: Round robin is the only method available without activating aSmartConnect Advanced license.
l Connection count
l Network throughput
l CPU usage
Procedure
1. (Optional) To identify the name of the IP address pool you want to modify, runthe following command:
isi network pools list
Networking
564 Isilon OneFS CLI Administration Guide
2. Run the isi network pools modify command.
Specify the pool ID you want to modify in the following format:
<groupnet_name>.<subnet_name>.<pool_name>
The following command specifies a connection balancing policy based onconnection count in pool5 under subnet 3 and groupnet1:
isi network pools modify groupnet1.subnet3.pool5 \ --sc-connect-policy=conn_count
Configure an IP failover policyYou can set an IP failover policy for an IP address pool.
Before you begin
To configure an IP failover policy, you must activate a SmartConnect Advancedlicense.
About this task
SmartConnect supports the following distribution methods:
l Round robin
l Connection count
l Network throughput
l CPU usage
Procedure
1. (Optional) To identify the name of the IP address pool you want to modify, runthe following command:
isi network pools list
2. Run the isi network pools modify command.
Specify the pool ID you want to modify in the following format:
<groupnet_name>.<subnet_name>.<pool_name>
The following command specifies a IP failover policy based on CPU usage inpool5 under subnet 3 and groupnet0:
isi network pools modify groupnet0.subnet3.pool5 \ --sc-failover-policy=cpu_usage
Networking
Isilon OneFS CLI Administration Guide 565

Managing connection rebalancingYou can configure and manage a connection rebalancing policy that specifies when torebalance IP addresses after a previously unavailable node becomes available again.
Configure an IP rebalance policyYou can configure a manual or automatic rebalance policy for an IP address pool.
Before you beginTo configure a rebalance policy for an IP address pool, you must activate aSmartConnect Advanced license and set the allocation method to dynamic.Procedure
1. (Optional) To identify the name of the IP address pool you want to modify, runthe following command:
isi network pools list
2. Run the isi network pools modify command.Specify the pool ID you want to modify in the following format:
<groupnet_id>.<subnet_name>.<pool_name>
The following command specifies manual rebalancing of IP addresses in pool5under groupnet1.subnet 3:
isi network pools modify groupnet1.subnet3.pool5 \ --rebalance-policy=manual
After you finishIf you configure an automatic rebalance policy, you can specify a rebalance delaywhich is a period of time (in seconds) that should pass after a qualifying event beforean automatic rebalance is performed. The default value is 0 seconds. You can specifythe delay by running the isi network external modify command with the --sc-balance-delay option.
Manually rebalance IP addressesYou can manually rebalance a specific IP address pool or all of the pools on theexternal network.
Before you beginYou must activate a SmartConnect Advanced license.Procedure
1. To manually rebalance IP addresses in a pool:
a. (Optional) To identify the name of the IP address pool you want torebalance, run the following command:
isi network pools list
Networking
566 Isilon OneFS CLI Administration Guide
b. Run the isi network pools rebalance-ips command.
Specify the pool ID you want to modify in the following format:
<groupnet_id>.<subnet_name>.<pool_name>
The following command rebalances the IP addresses in pool5 undergroupnet1.subnet 3:
isi network pools rebalance-ips groupnet1.subnet3.pool5
c. Type yes at the confirmation prompt.
2. To manually rebalance all IP address pools:
a. Run the isi network sc-rebalance-all command.
b. Type yes at the confirmation prompt.
Managing network interface membersYou can add and remove network interfaces to IP address pools.
Add or remove a network interfaceYou can configure which network interfaces are assigned to an IP address pool.
Before you begin
Network interfaces must be specified in the following format <lnn>:<interface_name>.Run the isi network interfaces list command to identify the node numbersand interface names that you need.
About this task
If you add an aggregated interface to the pool, you cannot individually add anyinterfaces that are part of the aggregated interface.
Procedure
1. (Optional) To identify the name of the IP address pool you want to modify, runthe following command:
isi network pools list
2. Run the isi networks modify pool command.
Specify the pool ID you want to modify in the following format:
<groupnet_name>.<subnet_name>.<pool_name>
Networking
Isilon OneFS CLI Administration Guide 567

The following command modifies pool5 under groupnet1.subnet3 to add the firstexternal network interfaces on nodes 1 through 3:
isi network pools modify groupnet1.subnet3.pool5 --add-ifaces=1-3:ext-1
The following command removes the first network interface on node 3 frompool5:
isi network pools modify groupnet1.subnet3.pool5 --remove-ifaces=3:ext-1
Specify a link aggregation modeYou can combine multiple, physical external network interfaces on a node into a singlelogical interface through link aggregation.
About this task
You can add an aggregated interface to a pool and specify one of the followingaggregation modes:
l LACP
l Round robin
l Failover
l FEC
Procedure
1. (Optional) To identify the name of the IP address pool you want to modify, runthe following command:
isi network pools list
2. Run the isi networks modify pool command.
Specify the pool ID you want to modify in the following format:
<groupnet_name>.<subnet_name>.<pool_name>
The following command modifies pool5 under groupnet1.subnet3 to specify FECas the aggregation mode for all aggregated interfaces in the pool:
isi network pools modify groupnet1.subnet3.pool5 --aggregation-mode=fec
The following command modifies pool5 under groupnet1.subnet3 to add ext-aggon node 1 and specify LACP as the aggregation mode:
isi network pools modify groupnet1.subnet3.pool5 --add-ifaces=1:ext-agg --aggregation-mode=lacp
Networking
568 Isilon OneFS CLI Administration Guide
Link aggregation modesThe link aggregation mode determines how traffic is balanced and routed amongaggregated network interfaces. The aggregation mode is selected on a per-pool basisand applies to all aggregated network interfaces in the IP address pool.
OneFS supports dynamic and static aggregation modes. A dynamic aggregation modeenables nodes with aggregated interfaces to communicate with the switch so that theswitch can use an analogous aggregation mode. Static modes do not facilitatecommunication between nodes and the switch.
OneFS provides support for the following link aggregation modes:
Link Aggregation Control Protocol (LACP)
Dynamic aggregation mode that supports the IEEE 802.3ad Link AggregationControl Protocol (LACP). You can configure LACP at the switch level, whichallows the node to negotiate interface aggregation with the switch. LACPbalances outgoing traffic across the interfaces based on hashed protocol headerinformation that includes the source and destination address and the VLAN tag, ifavailable. This option is the default aggregation mode.
Loadbalance (FEC)
Static aggregation method that accepts all incoming traffic and balances outgoingtraffic over aggregated interfaces based on hashed protocol header informationthat includes source and destination addresses.
Active/Passive Failover
Static aggregation mode that switches to the next active interface when theprimary interface becomes unavailable. The primary interface handles traffic untilthere is an interruption in communication. At that point, one of the secondaryinterfaces will take over the work of the primary.
Round-robin
Static aggregation mode that rotates connections through the nodes in a first-in,first-out sequence, handling all processes without priority. Balances outboundtraffic across all active ports in the aggregated link and accepts inbound traffic onany port.
Note: This method is not recommended if your cluster is handling TCP/IPworkloads.
View network interfacesYou can retrieve and sort a list of all external network interfaces on the cluster.
Procedure
1. Run the isi network interfaces list command.
The system displays output similar to the following example:
LNN Name Status Owners IP Addresses--------------------------------------------------------------1 ext-1 Up groupnet0.subnet0.pool0 10.7.144.0 groupnet1.subnet3.pool5 203.0.223.121 ext-2 Not Available2 ext-1 Up groupnet0.subnet0.pool0 10.7.144.0 groupnet1.subnet3.pool5 203.0.223.12
Networking
Isilon OneFS CLI Administration Guide 569

2 ext-2 Not Available3 ext-1 Up groupnet0.subnet0.pool0 10.7.144.0 groupnet1.subnet3.pool5 203.0.223.123 ext-2 Not Available
The following command displays interfaces only on nodes 1 and 3:
isi network interfaces list --nodes=1,3
The system displays output similar to the following example:
LNN Name Status Owners IP Addresses--------------------------------------------------------------1 ext-1 Up groupnet0.subnet0.pool0 10.7.144.0 groupnet1.subnet3.pool5 203.0.223.121 ext-2 Not Available3 ext-1 Up groupnet0.subnet0.pool0 10.7.144.0 groupnet1.subnet3.pool5 203.0.223.123 ext-2 Not Available
Managing node provisioning rulesYou can create and manage node provisioning rules that automate the configuration ofnew network interfaces.
Create a node provisioning ruleYou can create a node provisioning rule to specify how network interfaces on newnodes are configured when the nodes are added to the cluster.
Procedure
1. Run the isi network rules create command.Specify the ID of the rule you want to create in the following format:
<groupnet_name>.<subnet_name>.<pool_name>.<rule_name>
The following command creates a rule named rule7 that assigns the firstexternal network interface on each new accelerator node togroupnet1.subnet3.pool5:
isi network rules create groupnet1.subnet3.pool5.rule7 \ --iface=ext-1 --node-type=accelerator
Modify a node provisioning ruleYou can modify node provisioning rules settings.
Procedure
1. (Optional) To identify the name of the provisioning rule you want to modify, runthe following command:
isi network rules list
Networking
570 Isilon OneFS CLI Administration Guide

2. Run the isi network rules modify command.
Specify the ID of the rule you want to modify in the following format:
<groupnet_name>.<subnet_name>.<pool_name>.<rule_name>
The following command changes the name of rule7 to rule7accelerator:
isi network rules modify groupnet1.subnet3.pool5.rule7 \ --name=rule7accelerator
The following command changes rule7 so that it applies only to backupaccelerator nodes:
isi network rules modify groupnet1.subnet3.pool5.rule7 \ --node-type=backup-accelerator
Delete a node provisioning ruleYou can delete an node provisioning rule that you no longer need.
Procedure
1. (Optional) To identify the name of the provisioning rule you want to delete, runthe following command:
isi network rules list
2. Run the isi networks delete rule command.
Specify the ID of the rule you want to delete in the following format:
<groupnet_name>.<subnet_name>.<pool_name>.<rule_name>
The following command deletes rule7 from pool5:
isi network rules delete groupnet1.subnet3.pool5.rule7
3. At the prompt, type yes.
View node provisioning rulesYou can retrieve and sort a list of all node provisioning rules on the external network orview details of a specific rule.
Procedure
1. To list all of the provisioning rules in the system, run the isi network ruleslist command:
The system displays output similar to the following example:
ID Node Type Interface---------------------------------------------------
Networking
Isilon OneFS CLI Administration Guide 571

groupnet0.subnet0.pool0.rule0 any ext-1groupnet0.subnet1.pool1.rule1 accelerator ext-3groupnet1.subnet3.pool3.rule2 storage ext-3 groupnet1.subnet3.pool5.rule7 storage ext-2---------------------------------------------------
The following command only lists rules in groupnet1:
isi network rules list --groupnet=groupnet1
The system displays output similar to the following example:
ID Node Type Interface---------------------------------------------------groupnet1.subnet1.pool1.rule1 accelerator ext-3groupnet1.subnet3.pool3.rule2 storage ext-3 ---------------------------------------------------
2. To view the details of a specific provisioning rule, run the isi networkrules view command and specify the rule ID.
Specify the rule ID you want to view in the following format:
<groupnet_name>.<subnet_name>.<pool_name>.<rule_name>
The following command displays the setting details of rule7 undergroupnet1.subnet3.pool5:
isi network rules view groupnet1.subnet3.pool5.rule7
The system displays output similar to the following example:
ID: groupnet1.subnet3.pool5.rule7 Node Type: storage Interface: ext-2Description: - Name: rule7 Groupnet: groupnet1 Subnet: subnet3 Pool: pool5
Managing routing optionsYou can provide additional control of the direction of outgoing client traffic throughsource-based routing or static route configuration.
If both source-based routing and static routes are configured, the static routes willtake priority for traffic that matches the static routes.
Enable or disable source-based routingYou can enable source-based routing to ensure that outgoing client traffic is routed tothe gateway of the source IP address in the packet header. If you disable source-
Networking
572 Isilon OneFS CLI Administration Guide

based routing, outgoing traffic is destination-based or it follows static routes. Source-based routing is enabled or disabled globally on the cluster.
Before you begin
Static routes are prioritized over source-based routing rules. You can check if thereare static routes configured in any IP address pools by running the followingcommand:
isi networks list pools -v
Procedure
1. Enable source-based routing on the cluster by running the following command:
isi network external modify --sbr=true
2. Disable source-based routing on the clusetr by running the following command:
isi network external modify --sbr=false
Add or remove a static routeYou can configure static routes to direct outgoing traffic to specific destinationsthrough a specific gateway.
Procedure
1. (Optional) Identify the name of the IP address pool that you want to modify forstatic routes by running the following command:
isi network pools list
2. Run the isi networks modify pool command.
Specify the route in classless inter-domain routing (CIDR) notation format.Specify the pool ID you want to modify in the following format:
<groupnet_name>.<subnet_name>.<pool_name>
The following command adds an IPv4 static route to pool5 and assigns the routeto all network interfaces that are members of the pool:
isi network pools modify groupnet1.subnet3.pool5 --add-static-routes=192.168.100.0/24-192.168.205.2
The following command removes an IPv6 static route from pool4:
isi network pools modify groupnet2.subnet2.pool4 --remove-static-routes=2001:DB8:170:7c00::/64-2001:DB8:170:7cff::c008
Networking
Isilon OneFS CLI Administration Guide 573

Managing DNS cache settingsYou can set DNS cache settings for the external network.
DNS cache settingsYou can configure settings for the DNS cache.
Setting Description
TTL No Error Minimum Specifies the lower boundary on time-to-livefor cache hits.The default value is 30 seconds.
TTL No Error Maximum Specifies the upper boundary on time-to-livefor cache hits.The default value is 3600 seconds.
TTL Non-existent Domain Minimum Specifies the lower boundary on time-to-livefor nxdomain.The default value is 15 seconds.
TTL Non-existent Domain Maximum Specifies the upper boundary on time-to-livefor nxdomain.The default value is 3600 seconds.
TTL Other Failures Minimum Specifies the lower boundary on time-to-livefor non-nxdomain failures.The default value is 0 seconds.
TTL Other Failures Maximum Specifies the upper boundary on time-to-livefor non-nxdomain failures.The default value is 60 seconds.
TTL Lower Limit For Server Failures Specifies the lower boundary on time-to-livefor DNS server failures.The default value is 300 seconds.
TTL Upper Limit For Server Failures Specifies the upper boundary on time-to-livefor DNS server failures.The default value is 3600 seconds.
Eager Refresh Specifies the lead time to refresh cacheentries that are nearing expiration.The default value is 0 seconds.
Cache Entry Limit Specifies the maximum number of entries thatthe DNS cache can contain.The default value is 65536 entries.
Test Ping Delta Specifies the delta for checking the cbindcluster health.The default value is 30 seconds.
Networking
574 Isilon OneFS CLI Administration Guide

CHAPTER 28
Antivirus
This section contains the following topics:
l Antivirus overview............................................................................................576l On-access scanning......................................................................................... 576l Antivirus policy scanning.................................................................................. 577l Individual file scanning......................................................................................577l WORM files and antivirus................................................................................. 577l Antivirus scan reports.......................................................................................577l ICAP servers.................................................................................................... 578l Antivirus threat responses................................................................................578l Configuring global antivirus settings................................................................ 579l Managing ICAP servers.................................................................................... 581l Create an antivirus policy ................................................................................582l Managing antivirus policies.............................................................................. 582l Managing antivirus scans................................................................................. 583l Managing antivirus threats...............................................................................584l Managing antivirus reports.............................................................................. 586
Isilon OneFS CLI Administration Guide 575

Antivirus overviewYou can scan the files you store on an Isilon cluster for computer viruses, malware,and other security threats by integrating with third-party scanning services throughthe Internet Content Adaptation Protocol (ICAP).
OneFS sends files through ICAP to a server running third-party antivirus scanningsoftware. These servers are referred to as ICAP servers. ICAP servers scan files forviruses.
After an ICAP server scans a file, it informs OneFS of whether the file is a threat. If athreat is detected, OneFS informs system administrators by creating an event,displaying near real-time summary information, and documenting the threat in anantivirus scan report. You can configure OneFS to request that ICAP servers attemptto repair infected files. You can also configure OneFS to protect users againstpotentially dangerous files by truncating or quarantining infected files.
Before OneFS sends a file to be scanned, it ensures that the scan is not redundant. Ifa file has already been scanned and has not been modified, OneFS will not send the fileto be scanned unless the virus database on the ICAP server has been updated sincethe last scan.
Note: Antivirus scanning is available only on nodes in the cluster that areconnected to the external network.
On-access scanningYou can configure OneFS to send files to be scanned before they are opened, afterthey are closed, or both. This can be done through file access protocols such as SMB,NFS, and SSH. Sending files to be scanned after they are closed is faster but lesssecure. Sending files to be scanned before they are opened is slower but more secure.
If OneFS is configured to ensure that files are scanned after they are closed, when auser creates or modifies a file on the cluster, OneFS queues the file to be scanned.OneFS then sends the file to an ICAP server to be scanned when convenient. In thisconfiguration, users can always access files without any delay. However, it is possiblethat after a user modifies or creates a file, a second user might access the file beforethe file is scanned. If a virus was introduced to the file from the first user, the seconduser will be able to access the infected file. Also, if an ICAP server is unable to scan afile, the file will still be accessible to users.
If OneFS ensures that files are scanned before they are opened, when a user attemptsto download a file from the cluster, OneFS first sends the file to an ICAP server to bescanned. The file is not sent to the user until the scan is complete. Scanning filesbefore they are opened is more secure than scanning files after they are closed,because users can access only scanned files. However, scanning files before they areopened requires users to wait for files to be scanned. You can also configure OneFS todeny access to files that cannot be scanned by an ICAP server, which can increase thedelay. For example, if no ICAP servers are available, users will not be able to accessany files until the ICAP servers become available again.
If you configure OneFS to ensure that files are scanned before they are opened, it isrecommended that you also configure OneFS to ensure that files are scanned afterthey are closed. Scanning files as they are both opened and closed will not necessarilyimprove security, but it will usually improve data availability when compared toscanning files only when they are opened. If a user wants to access a file, the file may
Antivirus
576 Isilon OneFS CLI Administration Guide

have already been scanned after the file was last modified, and will not need to bescanned again if the ICAP server database has not been updated since the last scan.
Antivirus policy scanningUsing the OneFS Job Engine, you can create antivirus scanning policies that send filesfrom a specified directory to be scanned. Antivirus policies can be run manually at anytime, or configured to run according to a schedule.
Antivirus policies target a specific directory on the cluster. You can prevent anantivirus policy from sending certain files within the specified root directory based onthe size, name, or extension of the file. On-access scans also support filtering by size,name, and extensions, using the isi antivirus settings command. Antiviruspolicies do not target snapshots. Only on-access scans include snapshots.
Individual file scanningYou can send a specific file to an ICAP server to be scanned at any time.
If a virus is detected in a file but the ICAP server is unable to repair it, you can sendthe file to the ICAP server after the virus database had been updated, and the ICAPserver might be able to repair the file. You can also scan individual files to test theconnection between the cluster and ICAP servers.
WORM files and antivirusWORM (write-once, read-many) files can be scanned and quarantined by antivirussoftware, but cannot be repaired or deleted until their retention period expires.
The SmartLock software module enables you to identify a directory in OneFS as aWORM domain. All files within the WORM domain will be committed to a WORMstate, meaning that those files cannot be overwritten, modified, or deleted.
As with other files in OneFS, WORM files can be scanned for viruses and othersecurity threats. However, because of their protected read-only nature, WORM filescannot be repaired or deleted during an antivirus scan. If a WORM file is found to be athreat, the file is quarantined.
When practical, you can initiate an antivirus scan on files before they are committed toa WORM state.
Antivirus scan reportsOneFS generates reports about antivirus scans. Each time that an antivirus policy isrun, OneFS generates a report for that policy. OneFS also generates a report every 24hours that includes all on-access scans that occurred during the day.
Antivirus scan reports contain the following information:
l The time that the scan started.
l The time that the scan ended.
l The total number of files scanned.
l The total size of the files scanned.
Antivirus
Isilon OneFS CLI Administration Guide 577

l The total network traffic sent.
l The network throughput that was consumed by virus scanning.
l Whether the scan succeeded.
l The total number of infected files detected.
l The names of infected files.
l The threats associated with infected files.
l How OneFS responded to detected threats.
ICAP serversThe number of ICAP servers that are required to support an Isilon cluster depends onhow virus scanning is configured, the amount of data a cluster processes, and theprocessing power of the ICAP servers.
If you intend to scan files exclusively through antivirus scan policies, it isrecommended that you have a minimum of two ICAP servers per cluster. If you intendto scan files on access, it is recommended that you have at least one ICAP server foreach node in the cluster.
If you configure more than one ICAP server for a cluster, it is important to ensure thatthe processing power of each ICAP server is relatively equal. OneFS distributes files tothe ICAP servers on a rotating basis, regardless of the processing power of the ICAPservers. If one server is significantly more powerful than another, OneFS does notsend more files to the more powerful server.
CAUTION When files are sent from the cluster to an ICAP server, they are sentacross the network in cleartext. Make sure that the path from the cluster to theICAP server is on a trusted network. In addition, authentication is not supported. Ifauthentication is required between an ICAP client and ICAP server, hop-by-hopProxy Authentication must be used.
Antivirus threat responsesYou can configure the system to repair, quarantine, or truncate any files that the ICAPserver detects viruses in.
OneFS and ICAP servers react in one or more of the following ways when threats aredetected:
Alert
All threats that are detected cause an event to be generated in OneFS at thewarning level, regardless of the threat response configuration.
Repair
The ICAP server attempts to repair the infected file before returning the file toOneFS.
Quarantine
OneFS quarantines the infected file. A quarantined file cannot be accessed by anyuser. However, a quarantined file can be removed from quarantine by the rootuser if the root user is connected to the cluster through secure shell (SSH). If youback up your cluster through NDMP backup, quarantined files will remainquarantined when the files are restored. If you replicate quarantined files toanother Isilon cluster, the quarantined files will continue to be quarantined on thetarget cluster. Quarantines operate independently of access control lists (ACLs).
Antivirus
578 Isilon OneFS CLI Administration Guide

Truncate
OneFS truncates the infected file. When a file is truncated, OneFS reduces thesize of the file to zero bytes to render the file harmless.
You can configure OneFS and ICAP servers to react in one of the following ways whenthreats are detected:
Repair or quarantine
Attempts to repair infected files. If an ICAP server fails to repair a file, OneFSquarantines the file. If the ICAP server repairs the file successfully, OneFS sendsthe file to the user. Repair or quarantine can be useful if you want to protectusers from accessing infected files while retaining all data on a cluster.
Repair or truncate
Attempts to repair infected files. If an ICAP server fails to repair a file, OneFStruncates the file. If the ICAP server repairs the file successfully, OneFS sendsthe file to the user. Repair or truncate can be useful if you do not care aboutretaining all data on your cluster, and you want to free storage space. However,data in infected files will be lost.
Alert only
Only generates an event for each infected file. It is recommended that you do notapply this setting.
Repair only
Attempts to repair infected files. Afterwards, OneFS sends the files to the user,whether or not the ICAP server repaired the files successfully. It is recommendedthat you do not apply this setting. If you only attempt to repair files, users will stillbe able to access infected files that cannot be repaired.
Quarantine
Quarantines all infected files. It is recommended that you do not apply thissetting. If you quarantine files without attempting to repair them, you might denyaccess to infected files that could have been repaired.
Truncate
Truncates all infected files. It is recommended that you do not apply this setting.If you truncate files without attempting to repair them, you might delete dataunnecessarily.
Configuring global antivirus settingsYou can configure global antivirus settings that are applied to all antivirus scans bydefault.
Include specific files in antivirus scansYou can target specific files for scans by antivirus policies.
Procedure
1. Run the isi antivirus settings modify command.
Antivirus
Isilon OneFS CLI Administration Guide 579

The following command configures OneFS to scan only files with the .txtextension:
isi antivirus settings modify --glob-filters-enabled true \--glob-filters .txt
Configure on-access scanning settingsYou can configure OneFS to automatically scan files as they are accessed by users.On-access scans operate independently of antivirus policies.
Procedure
1. Run the isi antivirus settings modify command.
The following command configures OneFS to scan files and directoriesunder /ifs/data/media when they are closed:
isi antivirus settings modify --scan-on-close true \--path-prefixes /ifs/data/media
Configure antivirus threat response settingsYou can configure how OneFS responds to detected threats.
Procedure
1. Run the isi antivirus settings modify command.
The following command configures OneFS and ICAP servers to attempt torepair infected files and quarantine files that cannot be repaired:
isi antivirus settings modify --repair true --quarantine true
Configure antivirus report retention settingsYou can configure how long OneFS retains antivirus reports before automaticallydeleting them.
Procedure
1. Run the isi antivirus settings modify command.
The following command configures OneFS to delete antivirus reports older than12 weeks.
isi antivirus settings modify --report-expiry 12w
Enable or disable antivirus scanningYou can enable or disable all antivirus scanning. This procedure is available onlythrough the web administration interface.
Procedure
1. Run the isi antivirus settings modify command.
The following command enables antivirus scanning
isi antivirus settings modify --service enable
Antivirus
580 Isilon OneFS CLI Administration Guide

The following command disables antivirus scanning
isi antivirus settings modify --service disable
Managing ICAP serversBefore you can send files to be scanned on an ICAP server, you must configure OneFSto connect to the server. You can test, modify, and remove an ICAP serverconnection. You can also temporarily disconnect and reconnect to an ICAP server.
Add and connect to an ICAP serverYou can add and connect to an ICAP server. After a server is added, OneFS can sendfiles to the server to be scanned for viruses.
Procedure
1. Run the isi antivirus servers create command.
The following command adds and connects to an ICAP server at 10.7.180.108:
isi antivirus servers create icap://10.7.180.108 --enabled yes
Temporarily disconnect from an ICAP serverIf you want to prevent OneFS from sending files to an ICAP server, but want to retainthe ICAP server connection settings, you can temporarily disconnect from the ICAPserver.
Procedure
1. Run the isi antivirus servers modify command.
The following command temporarily disconnects from an ICAP server with aURL of icap://10.7.180.108:
isi antivirus servers modify icap://10.7.180.108 --enabled yes
Reconnect to an ICAP serverYou can reconnect to an ICAP server that you have temporarily disconnected from.
Procedure
1. Run the isi antivirus servers modify command.
The following command reconnects to an ICAP server with a URL of icap://10.7.180.108:
isi antivirus servers modify icap://10.7.180.108 --enabled no
Antivirus
Isilon OneFS CLI Administration Guide 581

Remove an ICAP serverYou can permanently disconnect from the ICAP server.
Procedure
1. Run the isi antivirus servers delete command.
The following command removes an ICAP server with an ID of icap://10.7.180.108:
isi antivirus servers delete icap://10.7.180.108
2. Type yes and then press ENTER.
Create an antivirus policyYou can create an antivirus policy that causes specific files to be scanned for viruseseach time the policy is run.
Procedure
1. Run the isi antivirus policies create command.
The following command creates an antivirus policy that scans /ifs/dataevery Friday at 12:00 PM:
isi antivirus policies create WeekendVirusScan --paths /ifs/data \--schedule "Every Friday at 12:00 PM"
Managing antivirus policiesYou can modify and delete antivirus policies. You can also temporarily disable antiviruspolicies if you want to retain the policy but do not want to scan files.
Modify an antivirus policyYou can modify an antivirus policy.
Procedure
1. Run the isi antivirus policies modify command.
The following command modifies a policy called WeekendVirusScan to be run onSaturday at 12:00 PM:
isi antivirus policies modify WeekendVirusScan \--schedule "Every Friday at 12:00 PM"
Delete an antivirus policyYou can delete an antivirus policy.
Procedure
1. Run the isi antivirus policies delete command.
Antivirus
582 Isilon OneFS CLI Administration Guide

The following command deletes a policy called WeekendVirusScan:
isi antivirus policies delete WeekendVirusScan
Enable or disable an antivirus policyYou can temporarily disable antivirus policies if you want to retain the policy but do notwant to scan files.
Procedure
1. Run the isi antivirus policies modify command.
The following command enables a policy called WeekendVirusScan:
isi antivirus policies modify WeekendVirusScan --enabled yes
The following command disables a policy called WeekendVirusScan:
isi antivirus policies modify WeekendVirusScan --enabled no
View antivirus policiesYou can view antivirus policies.
Procedure
1. Run the following command:
isi antivirus policies list
Managing antivirus scansYou can scan multiple files for viruses by manually running an antivirus policy, or scanan individual file without an antivirus policy. You can also stop antivirus scans.
Scan a fileYou can manually scan an individual file for viruses.
Procedure
1. Run the isi antivirus scan command.
The following command scans the /ifs/data/virus_file file for viruses:
isi antivirus scan /ifs/data/virus_file
Manually run an antivirus policyYou can manually run an antivirus policy at any time.
About this task
This procedure is available only through the web administration interface.
Antivirus
Isilon OneFS CLI Administration Guide 583

Procedure
1. Click Data Protection > Antivirus > Policies.
2. In the Antivirus Policies table, in the row for a policy, click More > Run Policy.
Stop a running antivirus scanYou can stop a running antivirus scan. This procedure is available only through the webadministration interface.
Procedure
1. Click Cluster Management > Job Operations > Job Summary.
2. In the Active Jobs table, in the row with type AVScan, click More > CancelRunning Job.
Managing antivirus threatsYou can repair, quarantine, or truncate files in which threats are detected. If you thinkthat a quarantined file is no longer a threat, you can rescan the file or remove the filefrom quarantine.
Manually quarantine a fileYou can quarantine a file to prevent the file from being accessed by users.
Procedure
1. Run the isi antivirus quarantine command.
The following command quarantines /ifs/data/badFile.txt:
isi antivirus quarantine /ifs/data/badFile.txt
Rescan a fileYou can rescan a file for viruses if, for example, you believe that a file is no longer athreat.
Procedure
1. Run the isi antivirus scan command.
For example, the following command scans /ifs/data/virus_file:
isi antivirus scan /ifs/data/virus_file
Remove a file from quarantineYou can remove a file from quarantine if, for example, you believe that the file is nolonger a threat.
Procedure
1. Run the isi antivirus release command.
Antivirus
584 Isilon OneFS CLI Administration Guide

The following command removes /ifs/data/badFile.txt from quarantine:
isi antivirus release /ifs/data/newFile
Manually truncate a fileIf a threat is detected in a file, and the file is irreparable and no longer needed, you canmanually truncate the file.
Procedure
1. Run the truncate command on a file.
The following command truncates the /ifs/data/virus_file file:
truncate -s 0 /ifs/data/virus_file
View threatsYou can view files that have been identified as threats by an ICAP server.
Procedure
1. Run the following command:
isi antivirus reports threats list
Antivirus threat informationYou can view information about the antivirus threats that are reported by an ICAPserver.
The following information is displayed in the output of the isi antivirusreports threats list command.
Scan
The ID of the antivirus report.
ID:
The ID of the antivirus policy that detected the threat. If the threat was detectedas a result of a manual antivirus scan of an individual file, MANUAL is displayed.
Remediation
How OneFS responded to the file when the threat was detected. If OneFS did notquarantine or truncate the file, Infected is displayed.
Threat
The name of the detected threat as it is recognized by the ICAP server.
Time
The time that the threat was detected.
Antivirus
Isilon OneFS CLI Administration Guide 585

Managing antivirus reportsYou can view antivirus reports through the web administration interface. You can alsoview events that are related to antivirus activity.
View antivirus reportsYou can view antivirus reports.
Procedure
1. Run the following command:
isi antivirus reports scans list
View antivirus eventsYou can view events that relate to antivirus activity.
Procedure
1. Run the following command:
isi event events list
All events related to antivirus scans are classified as warnings. The followingevents are related to antivirus activities:
AVScan Infected File Found
A threat was detected by an antivirus scan. These events refer to specificreports on the Antivirus Reports page but do not provide threat details.
No ICAP Servers available
OneFS is unable to communicate with any ICAP servers.
ICAP Server Misconfigured, Unreachable or Unresponsive
OneFS is unable to communicate with an ICAP server.
Antivirus
586 Isilon OneFS CLI Administration Guide
CHAPTER 29
VMware integration
This section contains the following topics:
l VMware integration overview.......................................................................... 588l VAAI.................................................................................................................588l VASA............................................................................................................... 588l Configuring VASA support............................................................................... 589l Disable or re-enable VASA............................................................................... 592l Troubleshooting VASA storage display failures................................................ 593
Isilon OneFS CLI Administration Guide 587

VMware integration overviewOneFS integrates with VMware infrastructures, including vSphere, vCenter, and ESXi.VMware integration enables you to view information about and interact with Isilonclusters through VMware applications.
OneFS interacts with VMware infrastructures through VMware vSphere API forStorage Awareness (VASA) and VMware vSphere API for Array Integration (VAAI).For more information about VAAI, see the Isilon VAAI NAS Plug-In for Isilon ReleaseNotes.
OneFS integrates with VMware vCenter Site Recovery Manager (SRM) through theIsilon Storage Replication Adapter (SRA). VMware SRM facilitates the migration anddisaster recovery of virtual machines stored on Isilon clusters. Isilon SRA enablesVMware vCenter SRM to automatically manage the setup, testing, and failovercomponents of the disaster recovery processes for Isilon clusters. For informationabout Isilon SRA for VMware SRM, see the Isilon SRA for VMware SRM ReleaseNotes.
VAAIOneFS uses VMware vSphere API for Array Integration (VAAI) to support offloadingspecific virtual machine storage and management operations from VMware ESXihypervisors to an Isilon cluster.
VAAI support enables you to accelerate the process of creating virtual machines andvirtual disks. For OneFS to interact with your vSphere environment through VAAI,your VMware environment must include ESXi 5.0 or later hypervisors.
If you enable VAAI capabilities for an Isilon cluster, when you clone a virtual machineresiding on the cluster through VMware, OneFS clones the files related to that virtualmachine.
To enable OneFS to use VMware vSphere API for Array Integration (VAAI), you mustinstall the VAAI NAS plug-in for Isilon on the ESXi server. For more information on theVAAI NAS plug-in for Isilon, see the VAAI NAS plug-in for Isilon Release Notes.
VASAOneFS communicates with VMware vSphere through VMware vSphere API forStorage Awareness (VASA).
VASA support enables you to view information about Isilon clusters through vSphere,including Isilon-specific alarms in vCenter. VASA support also enables you to integratewith VMware profile driven storage by providing storage capabilities for Isilon clustersin vCenter. For OneFS to communicate with vSphere through VASA, your VMwareenvironment must include ESXi 5.0 or later hypervisors.
Isilon VASA alarmsIf the VASA service is enabled on an Isilon cluster and the cluster is added as aVMware vSphere API for Storage Awareness (VASA) vendor provider in vCenter,OneFS generates alarms in vSphere.
The following table describes the alarm that OneFS generates:
VMware integration
588 Isilon OneFS CLI Administration Guide
Alarm name Description
Thin-provisioned LUN capacity exceeded There is not enough available space on thecluster to allocate space for writing data tothinly provisioned LUNs. If this conditionpersists, you will not be able to write to thevirtual machine on this cluster. To resolve thisissue, you must free storage space on thecluster.
VASA storage capabilitiesOneFS integrates with VMware vCenter through VMware vSphere API for StorageAwareness (VASA) to display storage capabilities of Isilon clusters in vCenter.
The following storage capabilities are displayed through vCenter:
Archive
The Isilon cluster is composed of Isilon NL-Series nodes. The cluster is configuredfor maximum capacity.
Performance
The Isilon cluster is composed of Isilon i-Series, Isilon X-Series, or Isilon S-Seriesnodes. The cluster is configured for maximum performance.
Note: If a node type supports SSDs but none are installed, the cluster isrecognized as a capacity cluster.
Capacity
The Isilon cluster is composed of Isilon X-Series nodes that do not contain SSDs.The cluster is configured for a balance between performance and capacity.
Hybrid
The Isilon cluster is composed of nodes associated with two or more storagecapabilities. For example, if the cluster contained both Isilon S-Series and NL-Series nodes, the storage capability of the cluster is displayed as Hybrid.
Configuring VASA supportTo enable VMware vSphere API for Storage Awareness (VASA) support for a cluster,you must enable the VASA daemon on the cluster and add the Isilon vendor providercertificate in vCenter.
Note: If you are running vCenter version 6.0, you must create a self-signedcertificate as described in the Create a self-signed certificate section before addingthe Isilon vendor provider certificate and registering the VASA provider throughvCenter.
VMware integration
Isilon OneFS CLI Administration Guide 589

Enable VASAYou must enable an Isilon cluster to communicate with VMware vSphere API forStorage Awareness (VASA) by enabling the VASA daemon.
Procedure
1. Open a secure shell (SSH) connection to any node in the cluster and log in.
2. Enable VASA by running the following command:
isi services isi_vasa_d enable
Download the Isilon vendor provider certificateTo add an Isilon cluster VASA vendor provider in VMware vCenter, you must use avendor provider certificate.
Procedure
1. In a supported web browser, connect to an Isilon cluster at https://<IPAddress>, where <IPAddress> is the IP address of the Isilon cluster.
2. Add a security exception and view the security certificate to make sure that it iscurrent.
3. Download the security certificate and save it to a location on your machine.
For more information about exporting a security certificate, see thedocumentation of your browser.
Note: Record the location of where you saved the certificate. You will needthis file path when adding the vendor provider in vCenter.
After you finish
If you are running vCenter version 6.0, follow the instructions in the Create a self-signed certificate section. If you are running the previous versions of vCenter, skip thenext section and follow the instructions in the Add the Isilon vendor provider section.
Create a self-signed certificateIf you are running VMware vCenter version 6.0, you must create a new self-signedcertificate before adding and registering a VASA provider through vCenter.
About this task
You can create a self-signed certificate by opening a secure shell (SSH) connection toa node in the Isilon cluster that will be used as the VASA provider. Alternatively, aftercreating a self-signed certificate on a node, you can copy the certificate to any othernode in the cluster and register that node as a VASA provider in vCenter.
Procedure
1. Create an RSA key by running the following command:
openssl genrsa -aes128 -out vp.key 1024
VMware integration
590 Isilon OneFS CLI Administration Guide

2. Remove the passphrase from the key by running the following commandssequentially:
cp vp.key vp.key.withpassphraseopenssl rsa -in vp.key.withpassphrase -out vp.key
3. Create a certificate signing request by running the following command:
openssl req -new -key vp.key -out vp.csr
4. Generate a self-signed certificate that does not have CA signing ability byrunning the following commands sequentially:
echo "basicConstraints=CA:FALSE" > vp.extopenssl x509 -req -days 365 -in vp.csr -sha256 -signkey vp.key -extfile vp.ext -out vp.crt:
Note: With a validity period of 365 days, you can change the self-signedcertificate, if necessary.
5. Display the new certificate with the extensions information for verification byrunning the following command:
openssl x509 -text -noout -purpose -in vp.crt
6. Create a backup of original server.key by running the following command:
cp /usr/local/apache2/conf/ssl.key/server.key /usr/local/apache2/conf/ssl.key/server.key.bkp
7. Replace the previous server key with the new server key by running thefollowing command:
cp vp.key /usr/local/apache2/conf/ssl.key/server.key
Where vp.key is the new server key.
8. Create a backup of the original certificate by running the following command:
cp /usr/local/apache2/conf/ssl.crt/server.crt /usr/local/apache2/conf/ssl.crt/server.crt.bkp
Where, server.crt is the original certificate.
9. Replace the original certificate on the server with the new certificate by runningthe following command:
cp vp.crt /usr/local/apache2/conf/ssl.crt/server.crt
VMware integration
Isilon OneFS CLI Administration Guide 591
Where vp.crt is the new certificate.
10. Stop and restart the apache service httpd at /usr/local/apache2/bin/after the certificate is replaced by running the following commands sequentially:
killall httpd/usr/local/apache2/bin/httpd -k start
Add the Isilon vendor providerYou must add an Isilon cluster as a vendor provider in VMware vCenter before you canview information about the storage capabilities of the cluster through vCenter.
Before you begin
Download a vendor provider certificate. Create a self-signed certificate if you arerunning vCenter version 6.0.
Procedure
1. In vCenter, navigate to the Add Vendor Provider window.
2. Fill out the following fields in the Add Vendor Provider window:
Name
Type a name for this VASA provider. Specify as any string. For example,type Isilon System.
URL
Type https://<IPAddress>:8081/vasaprovider, where <IPAddress> isthe IP address of a node in the Isilon cluster.
Login
Type root.
Password
Type the password of the root user.
Certificate location
Type the file path of the vendor provider certificate for this cluster.
3. Select the Use Vendor Provider Certificate box.
4. Click OK.
Disable or re-enable VASAYou can disable or re-enable an Isilon cluster to communicate with VMware vSpherethrough VMware vSphere API for Storage Awareness (VASA).
About this task
To disable support for VASA, you must disable both the VASA daemon and the Isilonweb administration interface. You will not be able to administer the cluster through aninternet browser while the web interface is disabled. To re-enable support for VASA,you must enable both the VASA daemon and the web interface.
VMware integration
592 Isilon OneFS CLI Administration Guide

Procedure
1. Open a secure shell (SSH) connection to any node in the cluster and log in.
2. Disable or enable the web interface by running one of the following commands:
l isi services apache2 disablel isi services apache2 enable
3. Disable or enable the VASA daemon by running one of the following commands:
l isi services isi_vasa_d disablel isi services isi_vasa_d enable
Troubleshooting VASA storage display failuresIf you are unable to view information about Isilon clusters through vSphere, follow thetroubleshooting tips given below to fix the issue.
l Verify that the vendor provider certificate is current and has not expired.
l Verify that the Isilon cluster is able to communicate with VASA through the VASAdaemon. If the VASA daemon is disabled, run the following command to enable it:
isi services isi_vasa_d enable
l Verify that the date and time on the cluster is set correctly.
l Verify that data has been synchronized properly from vCenter.
VMware integration
Isilon OneFS CLI Administration Guide 593

VMware integration
594 Isilon OneFS CLI Administration Guide