ioc level 5 - institute of chess 2: pirc and modern defences the pirc and modern defences are as...
TRANSCRIPT

Institute of
Chess
Revision Guide to
LEVEL 5
The contents were written and arranged by
Andrew Bigg with advice from
GM Chris Ward.
This revision guide is dedicated to the memory of
IM Bob Wade OBE (1921 ~ 2008),
who devoted his life to chess.
Last Updated September 2010

1
Institute of Chess Level 5 Coaching Course
by Andrew Bigg
Index of Contents
Page
1. Bishop’s Opening and the Portuguese Opening 2
2. Pirc and Modern Defences 6
3. Queen’s Gambit Accepted and Anti-Marshall Lines of Lopez 11
4. Anti-Sicilians 16
5. Planning – the Basics 22
6. Middlegame Strategy: Open Centre 26
7. Middlegame Strategy: Closed Centre 32
8. Middlegame Strategy: Centre under Tension 38
9. Analysis of Games: Planning 42
10. Analysis of Games: Combinations 48
11. Putting it all together: Learn from the Champions 56
12. Unusual Openings: an Introduction 61
13. Unusual Openings in Practice: Playing against them 67
14. Exploiting an Advantage 74

2
PART 1: Bishop’s Opening and Portuguese Opening The Bishop’s Opening is rarely seen at the highest level since it presents Black with no real
difficulties. It does, however, along with its brother the Portuguese, have one crucial difference to
an Italian game, which is what this section concentrates on.
The Italian game, or Giuoco Piano, starts as you know with the moves 1.e4 e5 2.Nf3 Nc6 3.Bc4 and
the Spanish, or Ruy Lopez, begins with 1.e4 e5 2.Nf3 Nc6 3.Bb5. The two openings in this section
omit the moves 2.Nf3 Nc6, leaving us with the Bishop’s Opening:
1.e4 e5 2.Bc4
and the Portuguese Opening 1.e4 e5 2.Bb5
Now what you may ask does White think he is gaining by breaking the usual opening rule of
‘knights before bishops’? Well, by not putting a knight on f3 White has left open one option which
he does not usually have in either the Lopez or Giuoco Piano. You may have guessed it by now,
White intends to advance his f-pawn to f4 in order to initiate a kingside attack. Generally attacking
is helped by having one’s pawns in front of one’s pieces since maximum mobility can then be
enjoyed. These openings have a strong link with both the Vienna Opening (1.e4 e5 2.Nc3 intending
a future f2-f4) and the King’s Gambit (1.e4 e5 2.f4 getting on with it immediately). I think the best
way to tackle this idea is to show some sample variations, some of which will turn out well for
White and some which won’t.
Let’s start with the Bishop’s Opening and play may continue from the diagram 2…Nc6 3.d3 –
White covers the f4-square with his c1-bishop and simultaneously supports both his e4-pawn and
his c4-bishop, looking good so far – 3…Nf6 4.f4 Bc5 5.Nf3 and we reach a critical position:-
[SEE DIAGRAM OVERLEAF]

3
However, a closer look shows a weakness in White’s pawn formation – the dark squares are left
very weak. Full marks if you have already seen 5…Ng4 6.Rf1 (to cover the weakness on f2)
6…Nxh2! And if 7.Nxh2 then 7…Qh4+ gets the knight back and deprives White of the right to
castle. For those of you who like complications, however, you might like to look at 6.Bxf7+!
instead: 6…Kxf7 7.Ng5+ and now 7…Kg8 may objectively be best so Black may just have gone
wrong with 5…Ng4. Perhaps therefore 5…d6 is better, keeping …Ng4 ideas in reserve. It is often
said in chess that ‘a threat is more dangerous than its execution’.
If White plays 5.Nc3 instead of 5.Nf3 then the queen covers g4 anyway so White doesn’t have to
worry. If Black plays 5…d6 then White can cut the bishop off from the g4-square with 6.f5!? The
other advantage of moving the queen’s knight first is that by far the most irritating Black piece is
the c5-bishop as it prevents kingside castling by White. Therefore the plan of Na4xc5 is likely to be
quite high on White’s agenda.
Black has fairly few deviations from 2…Nc6, 3…Nf6 and then …Bc5, …d6 etc. To give a couple
of examples let’s say 1.e4 e5 2.Bc4 Nc6 3.d3 Na5 (trying to get the bishop pair) 4.Bxf7+! Kxf7
5.Qh5+ and now if 5…Ke8 or 5…Ke7 then 6.Qxe5+ wins the knight back on a5; 5…Kf6 allows
6.Bg5+ and the black queen leaves the board; finally 5…g6 6.Qxe5 forking knight on a5 and rook
on h8, Black now reduced to trying 6…Nc6 7.Qxh8 Nf6 threatening 8…Bb4+ winning the white
queen by discovered attack, but the calm 8.Nc3 leaves Black struggling.
Another try by Black is to play 2…f5. Usually this move would be very risky after 2.Nf3 by White
in the opening. It is called the Latvian, and we will meet it in a later section on ‘unusual openings’
but I’ll let you into a secret now: it is not very good! White plays 3.Nxe5 when the best line is
3…Qf6 to avoid Qh5+ by White. Need I say more when the queen moves in a defensive manner on
move 3? After 2.Bc4, however, this resource is unavailable for White, and if 3.exf5 then 3…Nf6
covers the h5-square against the white queen and prepares 4…d5 taking a big centre with tempo on
the c4-bishop, followed by perhaps regaining the pawn with …Bxf5. The weakness of the light
squares is still a problem after 2…f5, but ironically can only be exploited by surrendering the key
light-squared bishop with 3.Bxg8! Rxg8 4.Qh5+ g6 5.Qxh7 Rg7 with a tense position for a pawn
sacrifice. White must probably play 6.Qh3 when 6…d5!? 7.ed c6 8.dc Nxc6 springs to mind, with a
lot of development for two pawns. The onus in on you to prove you know what you are doing with
2…f5 but I can say one thing for it – your opponent is unlikely to be familiar with the resulting
positions!
2…Bc5 is one last move that I’ll mention as now 3.Nc3 is the best move, with 4.d3 and perhaps
5.Be3 in mind. The point is that 3.Nf3 Nc6 is a Giuoco Piano and 3.f4? falls foul of 3…Bxg1!
4.Qh5! (not 4.Rxg1 allowing 4…Qh4+ 5.g3 Qxh2 when there is no longer a ‘Rg2’ option because
the extra tempo White has he has spent moving his f1-bishop! 6.Kf1 is forced and then 6…d5! With
the double threat of 7…dxc4 and 7…Bh3+ wins:-
[SEE DIAGRAM OVERLEAF]

4
The insertion of 4.Qh5! covers h4 against checks and threatens mate should Black try to save the
g1-bishop. Black has 4…Qe7 5.Rxg1 d6 intending 6…Nf6 gaining time on the white queen. Play
may continue 6.Nc3 Nf6 7.Qh4 Nc6 8.d3 Nd4?! (8…Be6 is safer) 9.dxe5! dxe5 10.Bg5! Nxc2+
11.Kd2 Nxa1 12.Nd5 (maybe 12.Rf1 threatening Rxf6 is even better) 12…Nxd5(!) 13.Bxe7 Nxe7
14.Rxa1 Ng6 15.Qf2 0-0 16.Rf1 Be6 17.Bxe6 fxe6 18.Qe1 with an ending that is tricky but should
objectively favour White. I have shown this variation because it contains quite a few tactical
concepts common to chess at a higher level, even if the variation itself has never been played
before!
So let us now consider the Portuguese with 2.Bb5 instead of 2.Bc4.
The main independent significance is that after 2…Nc6 White may try 3.Bxc6!? (in fairness Black
is hinting at 3…Nd4 if White doesn’t do this) 3…dxc6 4.d3 and a subsequent f2-f4 advance. Black
must be a little careful he doesn’t just end up with a bad structure but his pieces will be very active
after 4…Ne7 5.f4 exf4 6.Bxf4 Ng6 7.Be3 (else 7…Bc5 and Black may even be better) 7…Bd6
8.Nf3 0-0 9.0-0 f5 10.N(b)d2 Qe8
Ok, I admit this is all a bit far off the opening track but it gives a feel for where the play for both
sides comes from. Even 7…Qh4+ 8.Bf2 Qg5 attacking g2 or 8.g3 Qf6 intending h7-h5-h4 is worth
a look.
If 3.f4 instead of 3.Bxc6 then 3…Nd4 4.Bc4 exf4 5.Nf3 Bc5 6.c3 looks better for White to me, and
4…Bc5 5.c3 Nc6 (5…Ne6 hitting f4 is probably best) 6.Nf3 likewise seems good for White after a
subsequent d2-d4. Perhaps therefore 3…Nd4 is not so much of a problem and 3…exf4 should be
preferred when 4.Nf3 g5!? Is a violent way to try to seize the initiative typical of Black in the
King’s Gambit.
Finally, let us look at 2…a6 when thematic is 3.Ba4 b5 4.Bb3
[SEE DIAGRAM OVERLEAF]

5
On the face of it this just seems to help White. He has his bishop back on the safe b3 square and can
lash out at Blacks weakened queenside with a timely a2-a4, as well as still intending d2-d3 and f2-
f4 on the kingside. The question is whether, after 4…Nf6 5.d3 (5.f4 exf4 6.e5 Ne4 7.Bd5 does not
work due to 7…Qh4+ 8.g3 fxg3 9.Nf3+ g2+! Winning) 5…Bc5, does White have anything better
than 6.Nf3 Nc6 going back into a Lopez? The only move of independent value is f2-f4, but let’s
throw in 6.a4 first. Play may continue 6…Bb7 7.Na3 b4 8.Nc4 d6 9.c3 Nc6 10.f4 0-0 11.Nf3
This is certainly a more dynamic Lopez than with the pawn still back on f2. Black’s best may be
11…bxc3 12.bxc3 Re8 intending perhaps …exf4 and either…d5 or a sacrifice with …Nxe4 while
the white king stays in the centre. White may try 13.f5 Rb8 14.Rb1 but where does he go from
here? He cannot castle at the moment, so Be3 is the intention, but 14…Ng4 seems to put a stop to
that. However, we do not give up this easily: 15.Ng5! Nf2 16.Qh5 is horrible for Black. Thus
14…h6 springs to mind: 15.Be3 Bxe3 16.Nxe3 Na5 when 17.Ba2 d5! Is at least equal for Black and
17.c4 c5 or 17…c6 with …d5 in mind is also nothing for White.
I hope that one thing you have realized about these less popular lines is that in order to play for a
win in a style unique to that opening (in other words not transposing back into main lines of more
common openings) then one needs to be prepared to handle some intense complications. This
naturally involves a risk, but at the end of the day it is your choice!

6
PART 2: Pirc and Modern Defences The Pirc and Modern Defences are as closely related to each other as the Bishop’s Opening and the
Portuguese. The biggest difference is that you are far more likely to come across these at some
stage, and indeed may even give them a try as Black.
The basic idea is not to rush to take the centre but to allow White to develop good control of the
centre and then to try and knock it down from the flank. It is referred to as Modern because this
strategy of flank attack was only popularised some time after ‘Classical chess’ (where both sides
fight to occupy the centre from the start) had been going on for pretty much right up until the early
twentieth century. Like most new ideas, ‘hypermodernism’ as it is known, enjoyed a spurt of
popularity and then theory was worked out on the openings that fell under this classification of
style. I intend to demonstrate the main lines of the Pirc and Modern Defences and show the pros
and cons of the play for each side.
First of all we need to understand the key difference between the two and how a Modern may later
transpose to a Pirc. The Pirc starts (via its most common move order) as follows: 1.e4 d6 2.d4 Nf6
3.Nc3 g6
By contrast, the Modern starts 1.e4 d6 2.d4 g6 3.Nc3 Bg7
Note that Black is deliberately delaying the development of his g8-knight and the reason for this
will be made clear later. First let’s tie up some loose ends. In the Pirc move order the move 3.e5? is
seriously flawed due to 3…dxe5 4.dxe5 Qxd1+ 5.Kxd1 Ng4 forking f2 and e5, thus winning a pawn
for nothing as well as having deprived White of castling rights. The only other deviation is to avoid
3…g6 by playing 3…c6, with the intention to move the queen out and exert pressure on White’s
dark squares.
Against this I recommend 4.f4! and now: (i) 4…Qa5 5.e5 Ne4 6.Qf3 d5 7.Bd3 Bf5 (7…f5 8.Ne2
may be best) 8.Ne2 intending bxc3, 0-0, a4, Rfb1 etc, with an initiative on the queenside:
[SEE DIAGRAM OVERLEAF]
7
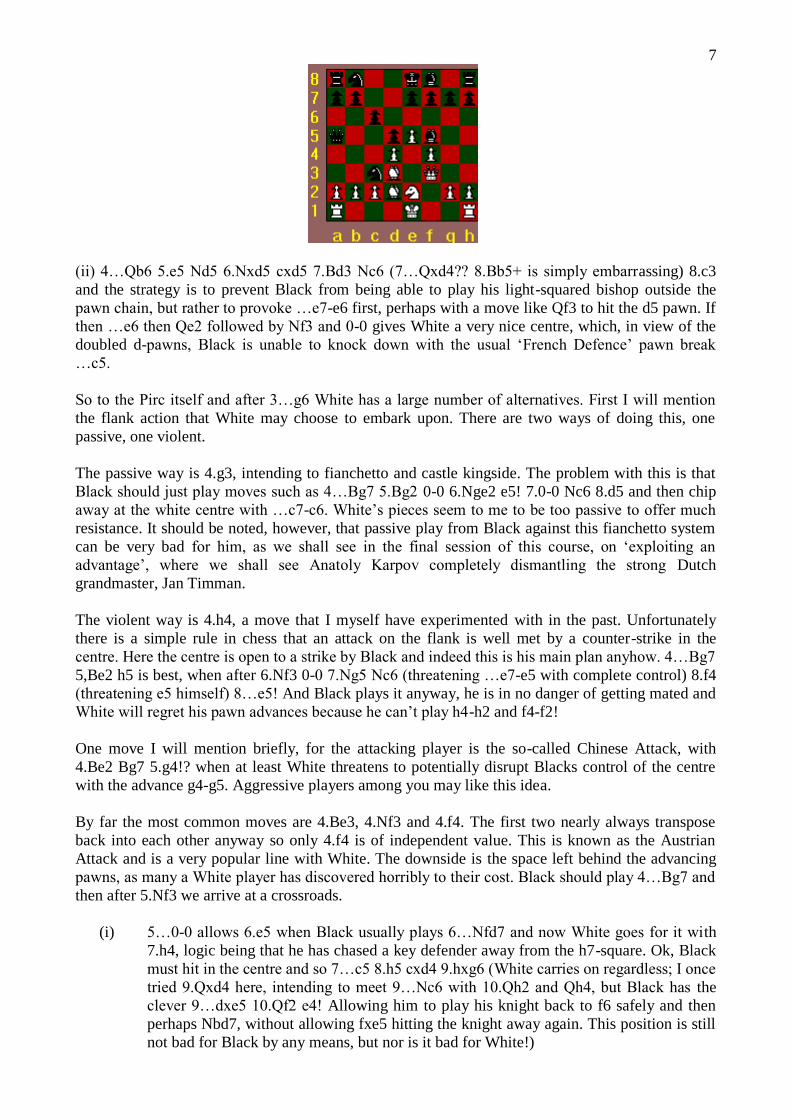
(ii) 4…Qb6 5.e5 Nd5 6.Nxd5 cxd5 7.Bd3 Nc6 (7…Qxd4?? 8.Bb5+ is simply embarrassing) 8.c3
and the strategy is to prevent Black from being able to play his light-squared bishop outside the
pawn chain, but rather to provoke …e7-e6 first, perhaps with a move like Qf3 to hit the d5 pawn. If
then …e6 then Qe2 followed by Nf3 and 0-0 gives White a very nice centre, which, in view of the
doubled d-pawns, Black is unable to knock down with the usual ‘French Defence’ pawn break
…c5.
So to the Pirc itself and after 3…g6 White has a large number of alternatives. First I will mention
the flank action that White may choose to embark upon. There are two ways of doing this, one
passive, one violent.
The passive way is 4.g3, intending to fianchetto and castle kingside. The problem with this is that
Black should just play moves such as 4…Bg7 5.Bg2 0-0 6.Nge2 e5! 7.0-0 Nc6 8.d5 and then chip
away at the white centre with …c7-c6. White’s pieces seem to me to be too passive to offer much
resistance. It should be noted, however, that passive play from Black against this fianchetto system
can be very bad for him, as we shall see in the final session of this course, on ‘exploiting an
advantage’, where we shall see Anatoly Karpov completely dismantling the strong Dutch
grandmaster, Jan Timman.
The violent way is 4.h4, a move that I myself have experimented with in the past. Unfortunately
there is a simple rule in chess that an attack on the flank is well met by a counter-strike in the
centre. Here the centre is open to a strike by Black and indeed this is his main plan anyhow. 4…Bg7
5,Be2 h5 is best, when after 6.Nf3 0-0 7.Ng5 Nc6 (threatening …e7-e5 with complete control) 8.f4
(threatening e5 himself) 8…e5! And Black plays it anyway, he is in no danger of getting mated and
White will regret his pawn advances because he can’t play h4-h2 and f4-f2!
One move I will mention briefly, for the attacking player is the so-called Chinese Attack, with
4.Be2 Bg7 5.g4!? when at least White threatens to potentially disrupt Blacks control of the centre
with the advance g4-g5. Aggressive players among you may like this idea.
By far the most common moves are 4.Be3, 4.Nf3 and 4.f4. The first two nearly always transpose
back into each other anyway so only 4.f4 is of independent value. This is known as the Austrian
Attack and is a very popular line with White. The downside is the space left behind the advancing
pawns, as many a White player has discovered horribly to their cost. Black should play 4…Bg7 and
then after 5.Nf3 we arrive at a crossroads.
(i) 5…0-0 allows 6.e5 when Black usually plays 6…Nfd7 and now White goes for it with
7.h4, logic being that he has chased a key defender away from the h7-square. Ok, Black
must hit in the centre and so 7…c5 8.h5 cxd4 9.hxg6 (White carries on regardless; I once
tried 9.Qxd4 here, intending to meet 9…Nc6 with 10.Qh2 and Qh4, but Black has the
clever 9…dxe5 10.Qf2 e4! Allowing him to play his knight back to f6 safely and then
perhaps Nbd7, without allowing fxe5 hitting the knight away again. This position is still
not bad for Black by any means, but nor is it bad for White!)

8
So after 9.hxg6 comes 9…dxc3, grabbing the piece and accepting the challenge. There follows
10.gxf7+ Rxf7 (not 10…Kh8 in view of 11.Rxh7+! Kxh7 12.Ng5+ Kh6 13.Bd3 intending Qg4 and
mating) 11.Bc4
Black must now play accurately. The threat is 12,Ng5 when the white queen is also liberated to
swing to h5. Black’s best is 11…e6 12.Ng5 (12.Qxd6!?; 12.Bxe6 Nxe5!) 12…Nf8 13.Nxf7 Kxf7
14.Qh5+ Kg8 15.Bd3 h6 which is in fact reckoned to be a bit better for Black. Obviously if you
intend to play this line with either side you need to study it, but the more of these sorts of variations
you play through, the more you get a feel for what works and what doesn’t.
(ii) 5…c5 has an independent significance as it allows White a further choice: 6.dxc5 is
harmless for Black after 6…Qa5 (the dark squares are a key theme as we shall see)
7.Bd3 (7…Nxe4 was the threat) 7…Qxc5 8.Qe2 Bg4 9.Be3 Qa5 10.0-0 0-0 11.h3 Bxf3
12.Qxf3 Nc6 13.a3 Nd7 and Black’s dark square grip gives him a fully equal game.
The second sixth move choice is 6.Bb5+ and in my view the more dangerous. The major problem
with this is that there are too many variations to cover in this session, so I shall just show you a
couple of ideas. If you are interested, you can find the theory in an appropriate opening book.

9 6…Nc6 is not good as White has either 7.d5 a6 8.Ba4 b5 9.dxc6 bxa4 (notice this device to draw
the opponents pawns out onto the a-file, it is often useful for ruining the opponent’s structure)
10.e5!?, or simply 7.dxc5 to release the tension.
6…Bd7 is the main line, when one thematic idea is 7.e5 Ng4 8.Bxd7+ Qxd7 9.d5 gaining space,
and after 9…dxe5 10.h3 e4! (a device we have seen already) 11.Nxe4 Nf6 12.Nxf6 Bxf6 13.0-0 0-0
with an unclear middle game in prospect.
As I have already said, the two most common fourth move choices are 4.Nf3 and 4.Be3. The only
big difference between them is that after 4.Be3 White retains the option of playing 5.f3 to secure the
e4 and g4 squares against the f6-knight. An example is 4…Bg7 5.f3 0-0 6.Qd2 (Lining up along the
c1-h6 diagonal with a view to a later Bh6xg7 to weaken the black king. Now we see why the
Modern Opening delays the development of the g8-knight in order to keep the h6-square covered
for as long as possible.) 6…c6 7.Bd3 b5 (Black’s standard plan in this line to attack on the flank)
8.Nge2 Nbd7 9.a4 (also typical of this line – White lashes out at the weakened queenside) 9…b4
10.Nd1 a5 11.Nf2 e5 12.c3 when White has a solid centre and will slowly build up to a kingside
attack.
So finally to 4.Nf3 Bg7 5.Be3 – probably the most played response to the Pirc among club players
and hence called the ‘150’ attack – and now:-
Trying to grab the dark-squared bishop with 5…Ng4 is risky. For starters White may try 6.Bc4
Nxe3 7.fe intending 0-0 and double heavy pieces on the f-file. The attack on f7 should fully
compensate for the loss of the dark-squared bishop. If this is not to taste then White may try 6.Bg5
h6 7.Bh4 g5 (remember, pawns can’t move backwards!) 8.Bg3 and it is not clear to me what Black
thinks he has gained from this other than a weakened kingside.
5…0-0 is more sensible and then 6.Qd2 c6 7.Bd3 b5 and now 8.Bh6 would be my recommendation,
with the idea that White will follow up with 9.a4 if allowed. For example 8…Nbd7 9.a4 b4 10.Ne2
a5 11.Ng3 intending h2-h4-h5 and an attempt at a direct mating attack. Of course, Black has moves
like 11…e5 with a counterstrike in the centre and an interesting fight in prospect.

10 So onto the Modern, and we will look at a couple of example where Black stubbornly refuses to
move his g8-knight.
One of the most desperate attempts to try and refute the Modern is 1.e4 d6 2.d4 g6 3.Nc3 Bg7
4.Bc4 – the idea being that if Black intends to keep his king’s knight at home then this delays
castling and f7 becomes a juicy target. The ‘Modern Defence’ move here is 4…c6, planning the
usual …b5, this time gaining time on the c4-bishop. White answers this with 5.Qf3 when Black
must cover f7 with 5…e6. Play continues 6.Nge2 b5 7.Bb3 a5 (I feel that Black should get punished
for making one bishop move and six pawn moves on his first seven turns, but he has no
weaknesses) 8.a3 with the idea to try and hit Black on the kingside with h2-h4(-h5 if allowed).
The main move after 3…Bg7 is still 4.Be3 and then 4…a6 (the key difference – Black intends to
play for c7-c5; if instead 4…c5 then play gets very awkward after 5.dxc5 Bxc3+ 6.bxc3 Nf6) 5.Nf3
(there is no rush for Qd2 since Bh6 is not possible anyhow) 5…b5 6.Bd3 Nd7 7.0-0 Bb7 8.a4 b4
9.Ne2 c5 10.c3 a5 11.Ng3 h5!? 12.h4 and a very tense situation arises.
Black will finally develop his knight with 12…Ngf6 and White can occupy a nice square with one
of his own knights with 13.Ng5. If Black castles then 14.f4 springs to mind, until we notice that
14…Ng4 is awkward due to the fork on e3 and d4. Therefore 14.f3 is indicated and then if Black
plays 14…bxc3 15.bxc3 cxd4 16.cxd4 then it is a race between the two sides to get their rooks to
the b and c files. Black must also be wary of the move Qb3, probing b7 and f7 simultaneously.
The Pirc and Modern Defences are usually played by solid players who do not want to have to learn
much theory, but just a few simple plans and concepts. The difficulty is, as we have seen, that there
are quite a few concepts to bear in mind. Good luck!

11
PART 3: Queen’s Gambit Accepted and Anti-Marshall Lines
The main part of these notes is dedicated to an opening that you may not have seen in detail before,
but which is very popular at the higher levels of the game so it is well worth knowing. This is the
Queen’s Gambit Accepted (or QGA for short), and begins with the moves 1.d4 d5 2.c4 dxc4
White now has three main options, which I shall step through in order: 3.e3, 3.e4 and 3.Nf3 with a
quick 4.Nc3 in mind. I start with 3.e3 – the attraction being its simplicity.
Two instant advantages of 3.e3 are that it (a) supports the d4-pawn, which is often a target for
counterattack by Black, and (b) it sets a lethal trap. The trap is, that if Black gets greedy, and tries to
cling onto his extra pawn (obviously the idea is to play Bxc4 if possible, whereupon White would
have successfully exchanged a Black d-pawn for his own c-pawn, and as you know by now, centre
pawns are generally more valuable in the opening) with 3…b5 then White calmly plays 4.a4, the
standard recipe to smash down a b5-pawn, and in fact Black is now in almost terminal difficulties
already. 4…a6 is clearly impossible due to 5.axb5 and the pin on the a8-rook is decisive. However,
4…c6 does not help either due to 5.axb5 cxb5 6.Qf3 and once again the rook on a8 is Black’s
undoing. It is trapped in broad daylight! Believe me, some players fall for this trap, so keep it in
mind. Of course, it does not work after 3.e4, blocking the f3-a8 diagonal. Finally, if Black plays
4…bxa4 then I leave it to you to count the number of isolated pawns Black has given himself!
So after 3.e3 the most normal plan is 3…Nf6, but 3…e5 is worth a quick look. Obviously to capture
would be to deny White castling rights after the exchange of queens, but is this such a problem?
Let’s check! After 4.dxe5 Qxd1+ 5.Kxd1 Nc6 6.Nf3 (6.f4 f6! 7.exf6 Nxf6 intending …Bg4 and
…0-0-0 is risky for White, and 6.Bxc4 Nxe5 7.Bb3, trying to play Ke2, is flawed by 7…Bf5 8.Ke2
0-0-0 with a huge grip on the d3-square) 6…Bg4 7.Be2 0-0-0+ 8. Nbd2 Bb4 looks unpleasant to
me.

12
Instead, I recommend 4.Nf3 with the idea of 4…exd4 5.Bxc4! and then capture back on d4 with
whichever piece seems most appropriate depending on what Black does now. Note that 5…dxe3
allows 6.Bxf7+ and also 5…Bg4 6.Bxf7+ and Ne5+. The Black bishop never really develops to the
kingside in this line because if nothing else, having taken back on c4 with his bishop, White will
play Qb3, forking f7 and b7, as soon as he sees the bishop on c8 move. Make sure you see how this
works, because people at a lower level fall for things like this regularly. Finally, if after 5.Bxc4
above Black tries 5…Bb4+ then 6.Bd2 Bxd2+ 7.Qxd2 dxe3 8.Bxf7+ Ke7 9.Qxd8+ Kxd8 and White
could play 10.fxe3 but then his pawn is weak for the rest of the game. Instead, 10.Nc3! is a good
gambit idea: 10…exf2+ 11.Kxf2 and the white rooks will flood in very quickly.
So to the main line 1.d4 d5 2.c4 dxc4 3.e3 Nf6 4.Bxc4 and now, seeing as moves with the c8-
bishop fall foul of 5.Qb3, Black plays 4…e6. Play now always seems to continue 5.Nf3 c5 – Black
now hits back at the White centre in true Queen’s Gambit fashion.
White should now play 6.0-0 and now it is Black who has the three major alternatives.
(iii) 6…cxd4 7.exd4, gives White an isolated d-pawn, but this often works to White’s
advantage because his pieces are more active. We will meet IQP (Isolated Queen’s
Pawn) positions in the section on planning, but it is obvious that White has now a mobile
bishop on c1 and the g5-square suggests itself. The knight will come to c3 and the f1-
rook to the open e-file. As I say, more on this position in section 5 of the course, but for
now just trust me: White stands better here. 6…cxd4 releases the central tension too
early.
(iv) 6…Nc6 7.Nc3 threatens to advance in the centre. For example 7…Be7 8.d5 exd5
9.Nxd5 Nxd5 10.Bxd5 and e3-e4, with a good grip on central light squares. Having said
that, it is debatable how bad this is for Black, since he has the dark squares in return!
Note also 7…Bd6 8.dxc5 Bxc5 9.Qxd8+ Kxd8 10.Rd1+ Ke7 and now not 11.e4? Ng4!
(I once fell for this in a very important round of a junior masters tournament. I was on
3/3 playing the top seed in the fourth round with White. A win would have put me clear
favourite for the tournament, and I come up with Rf1-d1…and back to f1!) Instead,
11.h3! is therefore correct, and Black cannot prevent the e3-e4 advance. White has a tiny
edge here, but no more.

13
(v) 6…a6 is by far the most common move, play continuing 7.Qe2 (7.a4 is playable but
gives Black an outpost on b4, which, as we shall see later (section 5), would not help at
all after a subsequent …cxd4 exd4 with an IQP. Here the b4-square is actually crucial.)
7…b5 8.Bb3
This is the main position for this line and has been seen almost too many times to count. White’s
ideas include playing for e3-e4 by the preparatory Rf1-d1 – annoying the black queen into the
bargain – as well as keeping an eye out for the aggressive plan of Nc3 and the advance d4-d5.
Sometimes he will capture on c5 to release the tension on the centre at an appropriate moment.
Black’s plan is to develop with moves like …Bb7, …Nbd7, …Bd6, …Qc7 and …0-0. Sometimes
he will even try …0-0-0 if he is feeling aggressive, and in any case will be on the lookout for a
chance to play …Nf6-g4 and attack the white king. White usually plays h2-h3 as a precaution
against this. Black will also look for appropriate moments to play either …c5xd4 and leave White
an IQP, or …c5-c4 intending to keep his majority of pawns on the queenside. Of course this gains
time on the bishop on c4 and if White plays Nc3 then Black may gain a further tempo to push his
queenside pawn majority by …b5-b4.
All in all the diagram position is to be played on and understood thematically rather than to be
assessed as better for one side at the moment.
White’s second major third move option is 3.e4, which takes the centre ambitiously and 3…b5 4.a4
c6 5.b3 still looks bad for Black if he tries to cling onto the c4-pawn. The downside is that the d4-
pawn lacks pawn support, and Black will get counterplay by attacking it with either 3…e5 or
3…Nc6 (3…c5 allows White to push forward in the centre with d4-d5 and get an advantage in
space; 3…Nf6 4.e5 Nd5 5.Bxc4 allows White to regain the pawn with no worries).
3…e5 4.Nf3 is main line – development is top priority. 4…exd4 5.Bxc4 Nc6 can follow, where
White has surrendered a pawn but will play 6.0-0 and either Nb1-d2-b3 to regain the pawn, or play
around it with Qb3(or a4), Bg5, Nbd2, Re1 and e5 etc. I think that White’s development lead and

14 active pieces compensate for the pawn, but probably no more. If you are an attacking player,
however, you will like playing White here.
3…Nc6 4.d5 is a critical line: 4…Ne5 and now:-
(i) 5.f4 Bg4 (5…Nd3+ 6.Bxd3 cxd3 7.Nc3 and White is in no rush to round up the d3-pawn,
reserving options of Qb3 or Qa4 instead) and White needs to find a clever move. Perhaps 6.Be2
Nd3+ 7.Kf1 Bxe2 8.Nxe2 Nf6 9.Nc3 intending Qa4+ might appeal, but this is hardly forced for
either side.
(ii) 5.Bxc4 Nxc4 6.Qa4+ is nothing for White after 6…Bd7 7.Qxc4 c6 or 7…e6 to destroy White’s
now overextended centre.
(iii) 5.Qd4 Ng6 and Black will equalize with 6…e5
(iv) 5.Nf3 is most common when there can follow 5…Bg4 6.Be2 (6.Qa4+ Bd7 gets White nowhere)
6…Bxf3 7.gxf3 leads to dynamic play where White intends f3-f4, or 6…Nd3+ 7.Bxd3 cxd3 8.Qxd3
with the threat of Ne5.
3.e4 tends to lead therefore to more tense situations than 3.e3 and it is purely a question of style as
to who chooses which. However, I will now finish on the QGA with a look at my own personal
preference with White: 3.Nf3 Nf6 4.Nc3!?
White does not commit his e-pawn, and instead develops and waits to see how Black will proceed.
If Black now plays 4…c6 we transpose into a variation of the Slav Defence, which is not the topic
of this section. White can play 5.a4 to halt …b5 or 5.e3 b5 6.a4 and try to destroy Black’s
temporary queenside grip.
The main moves here are 4…c5 and 4…a6. After 4…c5 5.d5 is by far the best move in my view but
5.e4 cxd4 6.Qxd4 is also playable for people who like more endgame-style situations. After 5.d5
one fun line to whet your appetite is 5…b5 6.e4 b4 7.e5 bxc3 8.exf6 – it is anyone’s guess what is

15 going on here, but I prefer White’s activity. If instead 5…e6 then 6.e4 and if allowed 7.Bg5 with
an attack.
4…a6 is my recommendation – 5.e4 b5 6.e5 Nd5 7.a4 is main line. Here 7…e6 is best, because if
7…Bb7 (hoping for 8.axb5 Nxc3 9.bxc3 axb5 when Black seems OK) 8.e6! f6 (8…fxe6 is hideous)
9.Nd2!? Qd6 10.Nce4 Qxe6 11.Be2, looking for setups like Nc5, 0-0, Re1, Bf3 and Nde4 etc. If
11…Nf4 12.0-0! Bxe4 13.Nxe4 Qxe4 14.Bf3 wins, or 12…Nxg2 13.Kxg2 Bxe4+ 14.Nxe4 Qxe4+
15.Bf3 Qg6+ 16.Kh1 Ra7 17.axb5 and Black is in trouble.
After 7…e6 White should play 8.axb5 when 8…Nb6 is the idea: 9.Be3 defends d4 here in order to
play Nf3-d2 next, hitting c4 and allowing the queen access to f3 and g4 as required. Black will
commonly need to sacrifice a pawn in this line. It produces interesting and active play. I hope that
these lines give you some tactical insight and concept of how to manoeuvre your pieces effectively.
You will need such ideas when we come to the sections of this course on planning and
combinations, and you have a go at working plans out and analysing on your own.
OK, finally a very brief word on avoiding the Marshall Gambit as White in the Ruy Lopez.
(Actually it is probably not that dangerous since most of the main lines of the Marshall seem to end
in perpetual check as far as I can see, but anyway!)
After 1.e4 e5 2.Nf3 Nc6 3.Bb5 a6 4.Ba4 Nf6 5.0-0 Be7 6.Re1 b5 7.Bb3 0-0 White can try 8.h3
The idea is to prevent h2 being a target of attack (8…d5 9.exd5 Nxd5 10.Nxe5 Nxe5 11.Rxe5 c6
12.d4 Bd6 13.Re1 and now 13…Qh4 doesn’t threaten h2. Having said that, …Bxh3 is a threat in
some cases, but 14.Bxd5 cxd5 15.Qf3! Qxd4 16.Nc3 Bb7 17.Be3 Qb4 18.Nxd5 seems one good
option for White).
8…d6 is best, when we avoid the Marshall, and 9.c3 returns to the main line when Black increases
the grip on the centre with either 9…Na5 10.Bc2 c5 or 9…Nd7 10.d4 Bf6. Both are found
extensively in the theory books.
8.a4 is a more interesting alternative, when 8…Bb7 9.Na3 is the idea: 9…b4 (practically forced)
10.Nc4 d6 11.d3 – Black has difficulty here in finding a plan. White on the other hand may play
moves like a4-a5, keeping the pawns on a6 and b5 unconnected and thus weak. If Black plays
11…a5 first then either 12.h3, intending 13.Be3 or even 12.Ne3 both offer White good chances for
a lasting advantage. Perhaps …h6, …Re8 and …Bf8 is best for Black, but it is hardly ambitious. As
it happens I do not play the Lopez with either colour, but if I did, then I would choose 8.a4 with
White!

16
PART 4: Anti-Sicilians
There are many White players who do not like the main lines of the Open Sicilian, if for no other
reason than that they simply do not like walking into pet Dragons or Pelicans! If you play the
Sicilian as Black then the line you know best is almost certainly the Open lines with Nf3, d2-d4 and
Nxd4. I intend now to take you through a variety of anti-Sicilian ideas, giving my own
recommendation for Black at each stage.
I begin with a line where White looks as if he is going to cooperate 1.e4 c5 2.Nf3 d6 3.d4 cxd4
(looking forward to a Dragon or Najdorf) and then 4.Qxd4 comes out. Clearly, White intends to
answer 4…Nc6 with 5.Bb5 and a subsequent capture on c6. The queen on d4 can be annoying in
this case. I recommend 4…Bd7, preventing the Bb5 idea.
White cannot avoid losing time with his queen now and will usually try for a bind on the d5-square
instead by 5.c4 Nc6 6.Qd1 (simplest, but 6.Qd2 intending Nc3, b3 and Bb2 is worth investigating)
6…Nf6 7.Nc3 g6 intending …Bg7, …0-0 and …Qa5, …Rfc8 etc, with classical Dragon-style
pressure. Blunders permitting, Black should have no problems here at all, and Qxd4 lines are very
rare as a result.
Another line in which White looks at first to be cooperating is 1.e4 c5 2.Nf3 d6 and then 3.c3 is
quite common. The best idea for Black is to see that the b1-knight now cannot get to c3 to defend
e4 and so 3…Nf6 suggests itself. 4.d3 would then be very non-ambitious and 4.Qc2 Qc7! will make
the push d2-d4 much harder owing to the pin down the c-file after …cxd4. 4.Bd3 has been viewed
very suspiciously in the past as it just looks so unnatural. One good line for Black is then 4…Bg4
5.h3 Bxf3 6.Qxf3 Nc6 7.0-0 g6 8.Bb5 (8.Bc2 Bg7 9.d3 0-0 intending …Nd7, …Rb8 and b7-b5-b4
risks being better for Black if anything) 8…Qb6 looks good enough if nothing else. Let us hold our
horses a bit though, because 3…Nf6 does not actually threaten the e4-pawn yet. Can you see why?
The answer is that the pawn is tactically defended since …Nxe4 meets with Qa4+ forking king and
knight! Hence White may try 4.h3 to stop …Bg4 and then go for Bf1-d3-c2, and d2-d4. Black plays
4…Nc6 and then 5.Bd3 d5! Hits White where it hurts. GM Chris Ward points out the line 6.e5 Nd7
7.e6 fxe6 8.Ng5 Nf6 9.Bxh7 Nxh7 10.Qh5+ Kd7 11.Nxh7 b6! 12.Nf6+ exf6 13.Qxh8 Ba6 with
almost a winning position for Black due to the strength of the light-squared bishop. Consider for
instance what happens if the bishop reaches d3!
[SEE DIAGRAM OVERLEAF]

17
White’s main try is 4.Be2 but he doesn’t threaten d2-d4, since then the line from a4-e4 is blocked,
making …Nxe4 perfectly safe. The trap is, that if Black plays 4…Nc6, which looks sensible, then
5.d4! cxd4 6.cxd4 Nxe4 7.d5 (the black knight cannot move on account of Qa4+(xe4) again)
7…Qa5+ (forced to cover a4) 8.Nc3 and practice has shown that White has too much development
to compensate for the pawn. You can find the analysis in a book, but I would not recommend this
for Black. Instead, I prefer 4…Bd7, once again just covering tricks along the a4-e8 diagonal before
they occur. Now …Nxe4 is a definite threat, so 5.d3 look forced. This looks unbearably passive but
the hope is that the bishop is misplaced on d7. Black may try a setup with …g6, …Bg7 and …0-0
with …Bc6 and …Nbd7 to develop the queenside. Of course, White has moves in between and
Black will need to think carefully about the order in which he plays this sequence, but he should
not experience too many difficulties as White is likely to be engaged in his own quiet manoeuvring
while this is going on, such as 0-0, Re1, Bf1, Nbd2 etc.
The other third move option for White is 3.Bb5+, known by its dullness! 3…Bd7 is simplest against
this, when 4.Bxd7+ Qxd7 (4…Nxd7 is more complicated and I would prefer c6 for this knight) 5.0-
0 Nc6 6.c3 Nf6 7.Re1 – the idea of White’s play, to go for d2-d4 – 7…e6 8.d4 cxd4 9.cxd4 d5!
10.e5 Ng8!? Intending to reroute to e7, a very important manoeuvre to remember. Note that White
must be careful not to get saddled with a bad dark-squared bishop since all his fixed pawns are on
the same colour square. Black has traded off his ‘bad’ bishop already on move 3 and should now
have no problems.
As far as White is concerned the two main anti-Sicilian lines are 2.c3 and 2.Nc3 which are the main
focus of this section. I start with 2.c3, against which Black has two choices:-
(i) 2…d5 takes advantage of the b1-knight’s immobility once more. This is the key concept for
getting counterplay in this line. White cannot play 3.e5 since 3…Bf5 and 4…e6 gives Black a very
good French/Caro-Kann setup. Hence 3.ed is forced and then 3…Qxd5 (3…Nf6 is also interesting
since if 4.c4 e6 5.dxe6 Bxe6 – the only way to test Black – there appears to be good compensation
for a pawn, and moves like …Nc6, …Bd6, …Qe7 and perhaps …0-0-0. If White plays 4.Bb5+ Bd7
5.Bxd7+ Qxd7 6. c4 e6 7.dxe6 fxe6! intending …Nc6 and …0-0-0 might be even more dynamic
because of the weakness of the d3-square. 3…Qxd5 is still safer, however.)

18 4.d4 Nf6 5.Nf3 Bg4 6.h3 Bh5 7.Be2 e6 8.0-0 cxd4 9.cxd4 Nc6 10.Nc3 is the main line here.
In spite of the rather dull reputation that the 2.c3 Sicilian has we now have an interesting IQP
position. Black has a target on d4 and active pieces, but where does he put his queen? I have tried
10…Qa5 here and I think all retreat squares along the d-file have been tried in their time. White
usually puts a bishop on e3 and will look for opportunities to play either Ne5 or d5 to get some
central play going. The fairest assessment here is that the position is unclear.
(ii) 2…Nf6 is the other way to hit the e4-pawn, and probably my preferred choice for Black here.
3.e5 is the only sensible reply and then 3…Nd5 4.d4 cxd4 5.cxd4 is standard. Please note that if
your opponent tries the Morra Gambit with 1.e4 c5 2.d4 cxd4 3.c3 then 3…Nf6 4.e5 Nd5 5.cxd4
transposes to the above line. Therefore you do not need to worry about the complications after
accepting the gambit with 3…dxc3 4.Nxc3, although White players be warned: this gambit is not so
dangerous for Black in any case if he knows his theory book. Black should now play 5…d6 to chip
away at White’s space advantage and play might continue 6.Nf3 Nc6 7.Nc3 Nxc3 8.bxc3 Qa5!?
forking c3 and e5:-
White now has to play 9.exd6 and now 9…e6! (9…e5 10.d5! is awkward) 10.Bd2 Bxd6 11.Bd3 0-0
12.0-0 (the Greek Gift with 12.Bxh7+ doesn’t work due to 12…Kxh7 13.Ng5+ Kg8 14.Qh5 Qf5!)
and now 12…e5 seems to equalize at least, and the sacrifice at h7 still fails since now the bishop
comes to f5 to cover h7 after Qh5.
The other second move alternative is 2.Nc3 but I would just like to ‘clear up the rubbish’ as it were
by looking at 2.f4 and 2.d3 – neither of which I much like. After 2.f4 Black plays 2…d5 3.exd5 Nf6
4.c4 (what else challenges?) 4…e6 5.dxe6 Bxe6 or 4.Bb5+ Bd7 (4…Nbd7 5.c4 a6 6.Ba4 b5!? is
also a spirited way to try and seize the initiative) 5.Bxd7+ Qxd7 6.c4 e6 7.dxe6 fxe6 or Qxe6+ seem
to create a good impression, since they are the same as that which we could have had in the 2.c3
line, but the difference being the outrageous insertion of f2-f4, weakening the dark squares. Black
should be doing well here.
2.d3 is passive and not worrying, but Black must be a bit careful that he doesn’t slowly get ground
down by White gaining a progressive space advantage. For instance, if White plays Nd2, g3, Bg2,

19 Ngf3, 0-0, Re1 and e5 Black can find himself under an ever strengthening kingside attack and
White has no weaknesses. I recommend 2…Nc6 3.Nd2 e6 4.g3 Nf6 5.Bg2 d5 6.Ngf3 Be7 7.0-0 0-0
8.Re1 b5! 9.e5 Nfd7 when Black’s plan is to play …a7-a5-a4, …b5-b4 and …Bc8-a6 with a big
space advantage on the queenside. We have actually transposed from a Sicilian to a French Defence
in this position, so it is always useful knowing more than one opening!
So finally to 2.Nc3, the Closed Sicilian. The inevitable sequence is then 2…Nc6 3.g3 g6 4.Bg2 Bg7
5.d3 d6 and we reach the main starting position, upon which there are almost too many choices for
White to cover properly.
I will focus on three main choices, the first of which is a move that White often flicks in at some
stage, the timid 6.Rb1. Black should happily follow this example and play 6…Rb8, a move which
probably helps him more, because while both sides have got their rooks off the vulnerable long
diagonal Black is the one with the more mobile b-pawn and will play …b7-b5-b4 quite quickly, and
maybe …Qa5 to attack the vulnerable a2-pawn. I do not like 6.Rb1, and consider that Black should
have no problems.
6.f4 is an aggressive-minded move that intends Nf3, 0-0, and an advance of the kingside pawns.
This would be especially effective if Black were to place a knight at f6. For instance: 6…Nf6 7.Nf3
0-0 8.0-0 Rb8 9.h3! b5 10.g4 b4 11.Ne2 with the plan of Ng3 and g5 when White will get a strong
attack. Note that if Black ever tries to hit the centre with …d6-d5 then White replies e4-e5, opening
up his light-squared bishop and locking out Black’s dark-squared bishop, plus it gains time on the
f6-knight.
The correct square for the g8-knight is thus e7 and so 6…e6! is best: 7.Nf3 Nge7 8.0-0 0-0 9.Be3
Rb8! – Black notices that 10.d4? fails to 10…cxd4 11.Nxd4 Qb6, winning the b2-pawn and a lot of
dark squares at the very least – 10.Rb1 Nd4!
This is the key move, to blockade White on the dark squares. Play might continue 11.Ne2 Nxf3+
12.Bxf3 b6! – a clever move, securing c5 in preparation for a future …d6-d5 advance – and if
White tries 13.g4?! then Black blockades with 13…f5! when 14.h3 Bb7 is better for Black.

20 6.Be3 is the most dangerous in my opinion, hoping for 6…e6 7.Qd2 Nge7 8.Bh6 0-0 9.Bxg7
(9.h4 allows the cunning 9…Bxh6 10.Qxh6 f6! to answer 11.h5 with 11…g5 trapping the White
Queen with …Kh8 and …Ng8 to follow!) Kxg7 10.h4 h5 11.Nh3 or 11.Nge2 and I prefer White
since the exchange of dark-squared bishops has taken a lot of the punch out of the Black position.
Instead, I recommend 6…Rb8! 7.Qd2 b5 in order to play some useful moves on the queenside while
keeping the knight back on g8 to cover f6 just as we saw previously in the Modern Defence in
section 2. Castling queenside is risky in the extreme after moves like …Qa5 and …b4, while
castling kingside takes the punch out of an h-file attack. For instance 8.Nge2 Nd4! 9.h4 h5 10.0-0
Nh6! and it is White who has to be careful.
The final option for White is the Grand Prix Attack with 1.e4 c5 2.Nc3 Nc6 3.f4.
The general idea is to play Nf3, then develop the f1-bishop to c4 or b5 and finally play 0-0 and d3,
with a view to an eventual f4-f5 advance and a kingside attack. Black has one strategy to prevent
this working, and working well at that, but fortunately this strategy is easily adequate for equality.
The idea will be to give the light-squared bishop as much hassle as possible.
So 3…g6 is almost invariably played (although French Defence players might like 3…e6 and
4…d5, but if they are French Defence players then why did they play 1…c5?) 4.Nf3 Bg7 and now
the parting of the ways:
(i) 5.Bb5 Nd4! (Obligatory in my view, since 5…d6 6.0-0 Bd7 7.Bxc6 Bxc6 8.Qe1 and d2-d3 will
actually give White quite an easy way to build up a kingside attack. Have a look at this yourself and
see why the knight is such an important defensive piece on d4.) 6.a4 a6! (The idea is to harass the
bishop, not to capture it.) 7.Bc4 e6 8.0-0 Ne7 9. Qe1 0-0 10.d3 d5!
11.Ba2 (11.exd5 may be even worse as it liberates the c8-bishop into the bargain for Black)
11…b5! Is relentless, threatening moves like …Bb7 and b5-b4(-b3). Black is better in the diagram
position.
Instead of 6.a4, 6.Bd3 is also common to try and keep the bishop out of harm’s way. There follows
6…d6 7.Nxd4 cxd4 8.Ne2 Nf6! (with the tactic 9.Nxd4 Nxe4 with discovered attack) 9.0-0 0-0
10.c3 bxc3 11.bxc3 b6! 12.Bc2 Bb7 – now the idea is clear, White cannot play d2-d4 due to the e-
pawn being attacked – 13.d3 Qc7 14.Qe1 and a critical position arises.
[SEE DIAGRAM OVERLEAF]

21
Here, White threatens the rook swing Rf1-f3-h3, Qe1-h4 and f4-f5, with an attack that could be
mating if Black is not very careful. For his part, Black can play 14…Rac8 with a view to …Rfd8
and meeting f4-f5 with …d6-d5 to blast open the centre. A very tactical struggle is inevitable here
and a good position to test one’s combinational vision.
(ii) 5.Bc4 is very dangerous if Black is slow. For instance 5…d6 6.0-0 e6 7.f5!? exf5 8.d3 is a nasty
long-term pawn sacrifice to try to break open lines on the light squares. Best is 5…e6 at once 6.0-0
Nge7 7.Qe1 0-0 and now 8.d3 d5! Is once again fine for Black with 9.Bb3 b5! because 10.Nxb5
fails to 10…Qb6, hitting the knight and simultaneously threatening …c4 discovered check, winning
the bishop on b3. This is the kind of tactical trick that you will be becoming more familiar with, so
keep an eye out. Thus the only dangerous line is 8.f5!? d5 9.Qh4!? with the idea of 9…dxc4 10.f6
but 10…Nf5! 11.exf5 Bxf6 12.Qxc4 exf5 13.Qxc5 Nd4 seems very nice for Black (14.Nb5 b6!). I
would not worry about the Grand Prix too much.
There is one final thing to say before this section is over, and that is that Black may not be a 2…d6
player after 2.Nf3. This has the advantage that you won’t ever have to worry about 3.Bb5+ or Qxd4
systems, but after 2…e6 3.c3 presents new problems since after 3…Nf6 4.e5 Nd5 5.d4 cxd4 6.cxd4
we do not transpose back into the line we had earlier after 2.c3, but this is still OK for Black. I
recommend 6…b6 to bring the bishop out onto the powerful long diagonal and then perhaps …d6
and …Nd7.
If you are a 2…Nc6 player then 3.Bb5 may prove irritating. The best way against this is to stay
calm and play 3…g6, with …Bg7 and …e5 to follow. White usually captures on c6 and Black
should recapture with his d-pawn if possible. He may defend his e5-pawn with …f6 before playing
…Nh6 and …0-0. He has a good grip of central squares and White is usually calmly rearranging his
pieces while Black does all this. The battle may only start on about move 15, but if one side has
failed to place their pieces sensibly the game can all too often be quite short and painful once things
liven up.
This is not a complete set of anti-Sicilian systems because there are too many to cover in the time. I
have omitted the systems where White goes b3 and Bb2 and also failed to cover early c2-c4
systems. Both of these tend to be quite quiet in nature, but watch out for tactics of course. Finally
the Wing Gambit 2.b4 is just nonsense: take it and play …d7-d5 and …e7-e6!

22
PART 5: Planning – the Basics
No matter how well you can picture the board in your head and move pieces in your mind’s eye,
and no matter how much opening theory you can remember, you will get almost nowhere unless
you can plan. It is vital in chess to be able to know what you think you should be aiming for in the
longer term apart from checkmate itself! Obviously when a position gets really tense and tactical,
then analysis is what matters and planning then becomes a simple matter of “in that line I come out
a piece down, but in that one I come out two pawns up” and picking the line of analysis which is
best for you in the final position. We will look at three games of this type in section 10 of the
course, but for now we will look at how to form a plan in quieter positions.
Middlegame theory will be discussed in more detail in sections 6-8, so the idea of this section is to
get you thinking on your own. The notes for this section are short and the idea is simple: I write
less, you think more. You will find below four positions on emerging from the opening. The
opening may or may not be familiar to you, but don’t worry, all I want is for you to think about
what you think the side whose move it is ought to be doing. I will discuss my thoughts on each
position at the end. If you are doing this at home then try to do it as if you were in an hour-long
coaching session and spend 15 minutes on each position.
Try to write down your thoughts and plans, giving variations where necessary to explain your
decisions.
Position 1: White to play
Position 2: White to play
Position 3: Black to play [SEE DIAGRAM OVERLEAF]

23
Position 4: Black to play
Good luck!
Ok, so here are my thoughts on these positions
25. Position 1: Well this should already be familiar to you in the opening because it is a QGA
from section 3. Like I said, I think that Black has loosened the tension too early, but does
nonetheless have a weak pawn on d4 to aim at. In order to aim at it, however, Black must
first blockade it, thus preventing White from playing the advance d4-d5, which he will
always have his eye out for, liquidating his only weakness. For his part, White wants to
exploit his slightly greater share of space by developing his pieces to active squares such as
Re1, Bg5 and Nc3. Black will presumably be castling kingside in the meantime, and trying
to get a knight to d5 and keep it there. If Black is allowed …Be7, …0-0, …Nd5, …Bf6 etc,
he seems to have everything under control. Then you might also notice that …Nc6-b4-d5 is
even stronger, when both knights can control the blockading procedure. Also if the f6-
knight has to move to d5 then h7 will be a target if Black castles kingside (which he will!).
It would be nice to arrange a line up of bishop and queen along the b1-h7 diagonal. The
queen needs to be in front of the bishop for this to be dangerous. Aha, now we see the idea:
play a2-a3, preventing …Nb4 and then Qd3 and Bb3-c2. The other pieces can then go to the
squares that we mentioned earlier. Once the key move a2-a3 is seen, it is simply a question
of a little bit of analysis to work out move order. I like 1.Re1 because d4-d5 is now a threat.
Black cannot play …Nb4 with his king still in the middle because 1…Nb4 2.Nc3 again
threatens d4-d5 and 2…Nbd5 3.Bg5 and Black is in too many pins; 3…Nxc3 4.bxc3 and
White no longer as an IQP and 3…Be7 4.Bxf6 forces 4…gxf6 because 4…Bxf6 loses a
piece to Nxd5 as the king is still in the centre and the pin down the e-file is now fatal. So
1…Be7 2.a3! 0-0 3.Nc3 Qc7 4.Bb3 (avoiding discovered attack along the c-file) 4…Rd8
5.Bg5 b6 6.Qd3 Bb7 7.Bc2 g6 8.Rad1 and White completes development and maintains a
small advantage.
Position 2: This position arises from the Trompowski Attack, which you will meet, if you haven’t
already, in section 13. The key question for White is how to develop and we need to ask what our
opponent wants to do in order to decide upon the best plan of action. Black’s doubled pawns give
him one worry and one bonus, the worry is the inability to hit at the centre with …e5 and the bonus

24 is that the e-file is open for a rook. Black’s plan is …Bg7, …d6, …f5, …0-0 and …Re8. He will
probably play his knight via d7 to f6 and then into e4. White must also not allow the f-pawn to
reach f4 safely because if Black can liquidate his doubled pawns he will just have an unopposed
dark-squared bishop for nothing. This is White’s main worry ever since he gave his bishop up for a
knight on move 3. The fact that d4-d5 is horrible for White also makes …b6 and …Bb7 a
possibility for Black. So what are White’s assets? Well he has the chance to play on the queenside
with his pawn majority and he can freely expand over there while Black gets his forces out.
However, we need to stop this f-pawn advance by Black which means controlling f4 as much as
possible. Clearly White does not want his knight on f3 as Black will have excellent control over e5
and the knight hits nothing. A far better square is e2. Also, White’s bishop clearly belongs on the
long diagonal if White intends to attack on the queenside. So we have a plan: pawns to e3 and g3,
bishop to g2, knight to e2, castle kingside and advance the queenside pawns. Move order? Well if
1…b6 might be annoying were it Black’s move, we start 1.g3! and stop this before we are stopped
from fianchettoing! Play may go 1.g3 Bg7 2.e3 d6 3.Ne2 0-0 4.Bg2 f5 5.0-0 Re8 6.c4 Nd7 7.Nbc3
c6 8.b4! Nf6 9.Qd3 (covering e4 and connecting rooks) 9…Qe7 10.a4! Ne4 11.b5 Bd7 12.a5!
threatening a5-a6 and if Black moves the b-pawn then bxc6 and Black must recapture with the
bishop, leaving a huge outpost on d5 and the move Nf4 now looks very nice for White, with a
choice of knights to deposit on d5. White is better.
Just before we move on to the next position, I should point out that if anyone wanted to play 1.h4
then do not feel silly, because Britain’s top player GM Michael Adams once did the same! Black
plays 1…h5 and the plan is then to play e3 and Ne2-f4, with c4 and Nc3 to follow. This is
obviously very effective if Black goes …b6, …Bb7 and …d5 in some order, since White’s control
of d5 will be better, with backup moves like Qb3! Finally, no credit for anyone wanting to play for
e2-e4 as White, since Black has the bishop pair and an open centre is exactly what he wants.
Position 3: This is from the French Defence and White has just played Ne2-g3. I had this position
recently and played 1…Bd7, which is bad and illustrates the dangers of playing a move ‘for the
sake of it’ rather than have a plan. The analysis of this position is simple, I have only one plan: play
…e6-e5. In this light …Bd7 is a waste of time, since after a subsequent …e6-e5, which is what I
ended up playing for anyway, the bishop will have to move again. The game that I played went
1…Bd7? 2.Bd2 Qc7 3.Rc1 Rae8 (intending to hide the queen on b8) 4.b4! Qb6 5.Bc3 Bxb4??
6.Rb1 Qa5 7.Rxb4! (I missed this) Nxb4 and White should play 8.Qb3 and get two minor pieces for
a rook, whereupon because of my weak dark squares I am already lost! This helps us to think to
ourselves: “Well, the knight on g3 is now away from the control of d4 but it does block any attack
on h2, both directly along the b8-h2 diagonal and also in the fact that Black cannot play either
…Qe8-h5 or …Bd7-e8-h5. Therefore there is but one idea left: 1…e5! And simple analysis gives
2.dxe5 Nxe5 3.Nd4 (one knight must get to d4!) 3…Bc5! With moves like …Qb6 and …Nfg4 to
follow: new target on f2. Black’s active play more than compensates for the weak d-pawn. By the
way anyone who wanted to play 1…Qb6 may take credit for it as long as they remembered that
Black must play …Kh8 before he can threaten to capture on d4, otherwise an exchange of knights
to drag the Black queen to d4 will lose very embarrassingly for Black after Bxh7+ with a winning
discovered attack on d4.
Position 4: This is from a top grandmaster encounter between Salov and Yusupov. White has just
played Ra1-b1 to prevent Black’s first plan of advancing his a-pawn further. If 1…a4 then either
2.b4 or 2.bxa4 with Bxf6 and Rxb7 to follow is possible. The correct plan is to deploy Black’s
pieces more usefully for a push in the centre with …e6-e5. The main problem with that push at the
moment is that White will play Ne3 to hit the g4-bishop and put pressure on f5 and d5. Yusupov
played therefore the cool 1…Bh5! To step out of the way and met 2.Ne3 with 2…Bc5 (note the
switch to this diagonal familiar from the last position) 3.Qd2 Qb6 4.a3 Qa7 (step off b-file) 5.Nc2
(change of plan by White: play for b3-b4) 5…Bf8! (get out of the way of this advance) 6.Bd4 Qb8
7.Ba1 (losing the thread of the game somewhat) 7…e5 and Black is better and went on to win.

25 Do not worry if you found these difficult, the idea is to make you look for your opponents moves
as well as your own, a key factor in planning successfully. Also as you have seen strong players are
quite capable of coming up with creative plans but also getting it horribly wrong!

26
PART 6: Middlegame Strategy – Open Centre
Parts 6-8 of this course cover three important aspects of middlegame strategy in turn. Firstly in this
section, the open centre, and then in the next two, the closed centre and centre under tension
respectively. Clearly, no matter what your style, nothing detracts from the fact that the centre is a
very important feature in any game of chess and as a result planning the strategy for the
middlegame is dependent upon knowing about the different types of central structure that can occur.
In each of parts 6-8 there will be two complete games shown to you, with my commentary, from
GM-level encounters. It is best to deal with complete games, since it gives you a feel for where a
middlegame position has come from and how it all gets finished off. It is no good knowing just one
part of the game well, if you are going to win games you need to win most of them as complete
games with opening, middlegame and closing it off in an ending. Only if your opponent blunders
can you get away with faulty knowledge, and we can’t rely on that!
The first game I will show you is a French Defence and is the game Nijboer – Uhlmann,
Amsterdam 1990. This is a real classic for open centre play. One feature of an open centre is of
course open lines for pieces and therefore the strategy should already be clear. The one who can put
his or her pieces on more active squares than the opponent and use them to fullest effect will stand
the better chances of winning. This game has been chosen because that battle for active squares is
very noticeable, in a position which is otherwise of a very equal nature: starts with rough material
equality (although Black’s best plan correctly involves trying to hold onto an extra pawn), no
glaringly weak squares and castling on the same side. I hope you enjoy this game as much as I did
when I first played through it. Oh, and one more thing, I would encourage you to follow this on
your own board, including the analysis. Moves that were actually played in the game are in bold
print and analysis in normal print. Here we go….
1. e4 e6
2. d4 d5
3. Nd2 c5
Another common line is 3…Nf6, to attack the e4-pawn again, when play usually continues 4.e5
Nfd7 and Black strikes at the centre with …c7-c5 and …f7-f6. This gives the game a closed nature,
or a ‘centre-under-tension’ nature, which is the topic of the coming sections. 3…c5 blasts open lines
and usually leaves Black with a weak d-pawn (an IQP) but active pieces to compensate.
4. exd5 exd5
5. Ngf3 Nc6
6. Be2 ….
This move is rare, and probably not best. Most challenging is undoubtedly 6.Bb5 Bd6 7.dxc5
(notice White waits until Black has moved his bishop and then forces it to move again, whilst securing the IQP position at the same time) 7…Bxc5 8.Nb3 (another tempo gain) 8…Bd6 9.0-0
Ne7 10.c3 0-0 and now 11.Bd3! to prevent the natural 11…Bg4 on account of the tactic 12.Bxh7+
and Ng5+ which should be a very familiar concept to you by now. Black can just about equalize
here, but it is tricky.
6. …. Cxd4
7. 0-0 Be7!
Black correctly realizes that since the white bishop on e2 blocks the e-file, thus preventing Re1+, he
has time for the manoeuvre …Be7-f6 and then …Nge7, in fact keeping an eye on the extra, albeit
doubled pawn on d4. Black now has slightly the superior control of the centre, which will help him
to get the more active pieces later on. White’s play is now forced if he is to regain his pawn.

27
8. Nb3 Bf6
9. Nbxd4 Nge7
10. c3 0-0
While White has been getting his pawn back, Black has been catching up with development and
now needs to think about where best to put his light-squared bishop and queen. Well, the choice for
the queen is easy: b6 is glaring, because Black wants to put maximum pressure on d4, the square in
front of his IQP, with a hope to one day advancing it. The bishop has only one available square at
g4. So all is quite simple at the moment, with both sides playing good and logical moves. The real
battle has yet to begin.
11. Bf4 ….
There is a nice trick here after 11.Bg5 when Black plays 11…Nxd4! And White has to recapture
with the c-pawn, whereupon there is no weak d-pawn to aim at anymore, because White has
blocked the d-file. The knight couldn’t recapture because of the need to protect the bishop on g5
and it is no use playing 12.Bxf6 first because Black wins a piece by 12…Nxf3+ and then 13…gxf6.
11. …. Bg4
12. h3 Bh5
13. Nb5!? ….
This move marks the start of the real fight. It is very aggressive, eyeing the c7 and d6 squares, but
be careful! Do not get so distracted by this that you miss the threat of 14.g4 Bg6 15.g5 winning a
piece because there is no longer a knight to capture on d4 with the f6-bishop. This is of course a
nasty trick even at GM level and many masters could even miss it because it doesn’t look like a
candidate move to hurl a pawn up in front of the king. Open centre play, however, opens up many
active possibilities, and as such demands accuracy and calculation.
13. …. Bg6!
Uhlmann, a great tactician, sees the problem and finds a solution. He withdraws the bishop in good
time and stays one move ahead of the game. If now 14.g4 then 14…Be4! 15.g5 Bxf3 16.gxf6 Bxe2
and Black even emerges a bit better. The position would have been blown wide open and
complicated considerably, but White would have lost a lot of control in doing so. White avoids
14.g4 in the game because he is still fighting for a small but steady advantage, but Black is fighting
back. Note how actively he was able to make use of just one bishop in that last variation.
14. Nd6 Qb6
15. Qb3 d4!
An excellent move, requiring very good judgement indeed. With all the piece out and aiming at
nearly every available square, Uhlmann judges that his are the slightly better posted pieces and that
the knight on d6 could be a weakness if it were surrounded. He therefore liquidates the centre
completely.
16. cxd4 ….
Exchanging queens does not help: 16.Qxb6 axb6 17.Nxb7 dxc3 18.bxc3 Nd5! – a real ‘power-play’
move securing a large advantage. Also after 17.cxd4 Nxd4 18.Nxd4 Bxd4 Black is still better
because of his more active pieces. Note that it is precisely the pieces, and not the pawns, which are
most relevant in deciding who is better. One inaccuracy in piece positioning could change the
assessment very quickly.
28
16. …. Nxd4
17. Nxd4 Qxd4!
The black queen is very powerful on this central square, and gains time on the bishop. Generally
speaking, you should try to avoid having undefended pieces (or ‘hanging’ pieces as we call them in
chess) in any position if possible, but especially in open positions, since the chances of that piece
being hit is that much more likely. Black has everything defended here, whereas White has a bishop
on f4 undefended and tied down to a knight on d6. Added to this, the b-pawn is attacked.
18. Qc4 Nd5!
Relentlessly attacking f4 again to improve his knight position.
19. Bg3 Qxb2!
Black uses all his developed forces to effect here as he grabs a pawn, eyeing two more targets on a1
and e2, as well as defending b7. White now shifts another piece to a securely defended square, but
he has lost a pawn for it.
20. Bf3 Nc3!
Preventing Rb1 by White and making sure the knight is securely defended. In fact 21…Nb1! Is a
winning threat, so White creates some breathing space for his a1-rook.
21. a4 Rad8
22. Rfe1 ….
Correctly avoiding 22.Nxb7 Bd3! Winning. It is nearly always the simple moves that end up
catching people out, so be careful.
22 …. h5
I like the subtlety of this, since White has just moved a defender away from f2 and so Uhlmann
prepares to kick another one away with …h4.
23. h4 b6
24. Rac1 Qa3
With this elegant double attack on a4 and d6, Black is effectively just a clear pawn up with the
initiative and the win is almost in sight.
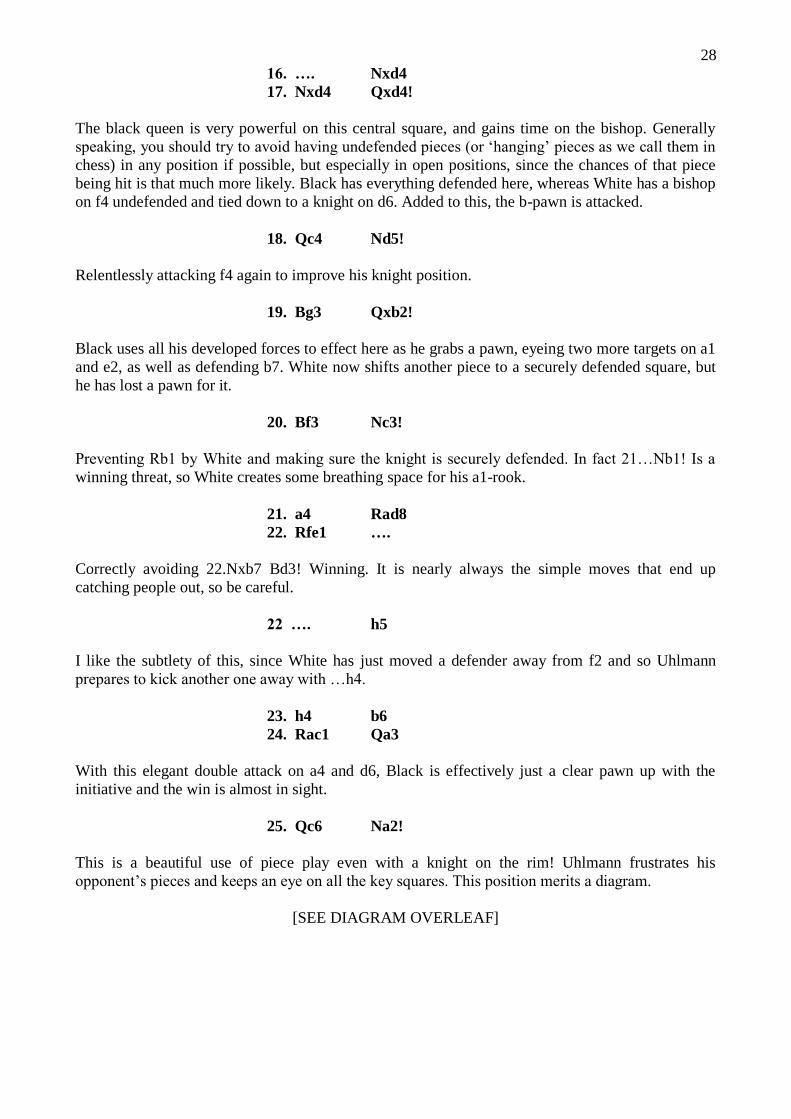
25. Qc6 Na2!
This is a beautiful use of piece play even with a knight on the rim! Uhlmann frustrates his
opponent’s pieces and keeps an eye on all the key squares. This position merits a diagram.
[SEE DIAGRAM OVERLEAF]

29
26. Rcd1 Nb4
27. Qb5 Nc2!
Relentless again, but you have to admire the agility of that knight.
28. Re4! ….
Let’s not forget that White is a grandmaster too. This is a nice sacrificial concept, giving an
exchange to improve White’s coordination and deprive Black of his two bishops. If 28…Bxe4
29.Bxe4 and Qxh5 to follow is very dangerous. It is not over until your opponent has signed the
score sheet.
28. …. Qc5!
Nice change of tack, exchanging the queen’s instead.
29. Qxc5 bxc5
30. Rc4 Nd4
31. Rxc5 Nxf3+
Now things clam down and White has lost one of his bishops and had his structure ruined in return
for getting the pawn back. He now has little resistance to offer and the rest of the game needs no
special comments other than to mention that when people go on about the advantage of the two
bishops, this is the kind of position they have in mind!
The game concluded 32.gxf3 Rd7 33.Re1 Rfd8 34.Ne4 Be7 35.Rc4 f6 36.Nc3 Bf7 37.Rc6 Bb4!
38.Rb1 a5 39.Bf4 Rd3 40.Bc7 Rc8 41.Nb5 Rxf3 42.Nd4 Bd5! 43.Rcc1 Rh3 44.Bh2 Re8! 45.Nf5
Be4 46.Rxb4 axb4 47.Nd6 b3 48.Rc5 b2 49.Rb5 Bc6! and White resigned (0-1).
The second game shows a very different flavour to open positions, because in this one we see
castling on opposite sides. The race is now to give checkmate but it is still true that piece activity is
more important than where the pawns are. This game is a Sicilian Defence and is from
Nezhmetdinov – Taimanov, USSR Championship Semi-Final, 1951. The flow of this game will
become apparent in due course, so let’s get straight into the action.
1. e4 c5
2. Nf3 Nc6
3. d4 cxd4
4. Nxd4 Nf6
5. Nc3 d6
6. Bg5 ….

30 This is a particularly sharp variation of the Sicilian called the Rauzer Attack. There is more
theory on this than most people would care to learn, but one thing is common to nearly all
variations: White is castling long, and Black short.
6. …. e6
7. Qd2 Be7
8. 0-0-0 0-0
The deed is done. Another possibility is 8…Nxd4, a simplifying exchange that White now avoids,
at the same time as depriving the black queen of the possibility of using the a5-square.
9. Nb3 Qb6
Eyeing the f2-pawn.
10. f3 a6
11. Be3 Qc7
The last few moves are not just for decoration. White plays 11.Be3 in order to have no obstacle to
advancing his kingside pawns, while Black plays 10…a6 so that, when the queen is kicked back to
c7, the b5-square is covered in preparation for …b7-b5. Note one key difference in the attacks
though: Black already has an open file to fire down.
White must get on with it therefore.
12. g4 b5
13. g5 Nd7
This kicks a knight away from defending the kingside but towards attacking the queenside. It is
already a case of all or nothing for both sides.
14. f4 Nb6
White takes the e5-square away from Black so he covers the a4-square instead. On 14…b4?!
15.Na4 would have held Black up. He must not block the position in any way.
15. Qf2 Rb8
16. h4 Na4!
This is better than the obvious 16…b4, which allows unwanted piece exchanges after 17.Bxb6,
reducing Black’s threats considerably. Note that 17.Nxa4? is suicide as it allows Black two open
files on the queenside after 17…bxa4 before White has done anything on the kingside.
17. Bd2 Nxc3
18. Bxc3 b4
19. Bd2 a5
20. Kb1 a4
21. Nc1 Bd7
Notice how Black has arranged to push his pawns to maximum effect, exploiting the unfortunate
placement of the White minor pieces. They are not attacking the black king and are losing White
many tempi on the queenside as they step out of the way of the advancing pawns. White must go all
out now or he will get crushed.
22. Bd3 Rfc8

31
23. h5 Na5
24. f5 Nc4
Beautiful and important strategy from Black. While White attacks with only his pawns Black
calmly ignores him and attacks with his pieces on the queenside.
25. f6 Bf8
26. g6! ….
This is my favourite position of the whole game and deserves a diagram.
It looks at first as if White is getting away with it, and indeed he has played the best try, but where
are his pieces? Answer, they are huddled for dear life around his king. Black realises that the queen
is the only dangerous piece and so plays the excellent move….
26 …. Qc5!!
The double exclamation mark is no exaggeration. White cannot avoid the trade of queens because if
say 27.Qg2 then 27…Qd4! And Black crashes through on the queenside because he threatens mate
at b2 and 28.Bxc4 Qxc4 and moves like …b3 or …Bc6xe4. Black can also consider 27…a3! Or
even perhaps 27…Na3+!? If he wants to smash open lines with check. White now crumbles under
the pressure.
27. gxh7+ Kh8!
This is the final subtlety, where Black uses the White pawn as shelter, since of all the things chess
players can try tactically, taking your own pawns is just not allowed!
28. Qxc5 Rxc5
29. Bf4 gxf6
30. Ne2 Ne5
Having lost the thread of the game, White is now making one inaccuracy after another. He is now
almost certainly lost and the game concluded 31.Be3 R5c8 32.Rhg1 Kxh7 33.h6 b3! 34.cxb3 axb3
35.a3 Nxd3 36.Rxd3 Bb5 37.Rd2 Rc2!
38.Nf4 Rxd2 39.Bxd2 Bxh6 40.Rh1 Kg7 41.Nxe6+ fxe6 42.Bxh6+ Kg6 43.Bf4 e5 44.Rg1+ Kf7
45.Bd2 Bd3+ and White resigned (0-1)
I hope these games have given some helpful insight into the complexities of the open centre and the
race to give checkmate. The next section will be a bit quieter, since the centre will be blocked.

32
PART 7: Middlegame Strategy – Closed Centre
There is no special introduction to this section, so we will get straight on with the games. The major
characteristic of the closed centre, is, as you will see, the pawn breaks, and who can arrange them
first in order to create entry points into the opponent’s position. The first game is Kramnik –
Topalov, Dortmund 1999. This is of course some of the highest quality chess you will ever see,
between two of the greatest players ever, and also relatively up-to-date! In this game we will see
Kramnik closing the centre and then making an impressive breakthrough on the flank.
1. d4 Nf6
2. Nf3 d5
3. c4 c6
4. Nc3 a6
5. c5 ….
I am glad that Kramnik is the one who made this decision to close the centre. I would have played
5.Bg5 allowing a pawn-grab with 5…Ne4 6.Bf4 Nxc3 7.bxc3 dxc4 8.e4 b5 9.Qb1!? preventing
9…Bb7 due to 10.Bxc4 and on 9…Bg4 10.Ne5 is now possible. The plan otherwise is 10.a4 to
exert maximum pressure on the rather brittle queenside and then play simply with Be2 and 0-0. I
trust Kramnik knows what he is doing closing the centre here, because I probably wouldn’t
understand this position for White at all if I had to play it for the first time. However, that is why
Kramnik made it to World Champion!
5. …. Bf5
6. Bf4 Nbd7
If the players want a draw here then 6…Nh5 7.Bd2 Nf6 8.Bf4 Nh5 and a repetition is one way to
make peace quickly. Black is weak on the dark squares on the queenside so White has to be careful
before he gives up his dark-squared bishop for a knight with 7.Bg3 Nxg3 8.hxg3, although this is
the most obvious way to avoid repetition and play for a win. Actually the best move may well be
7.e3!? Nxf4 8.exf4 when White keeps plenty of control over the e5-square. This is important since
Black has one plan in this blocked up position: play for an …e5 break.
7. e3 e6
8. Be2 Be7
9. Nd2!? ….
Two of the key characteristics of closed positions are (i) simple development, often unhurried, and
(ii) manoeuvring pieces to key squares. Kramnik sends his knight over to the side of the board
where he has the space advantage and prevents …Nh5 ideas in doing so. White also sets a trap by
delaying castling, namely 9…0-0?! 10.g4! Bg6 11.h4 now with an initiative on both flanks. Topalov plays a retreating move in good time with his bishop instead, a technique we have seen in a
few GM games already in this course.
9. …. Bg6
10. b4 Qc8
11. 0-0 Bd8
An instructive manoeuvre by Black, although trading dark-squared bishops is not ideal in principle,
nonetheless the advance …e6-e5 must be played for and this is the only way. Topalov intends 12.a4
Bc7 13.Bxc7 Qxc7 14.f4 (looks good at the moment) 14…b6! and perhaps …a6-a5 with good
counterplay on the dark squares. If you wanted to play 12.a4 do not be upset – I would probably

33 have played it too! Kramnik, ever alert, plays a very perceptive move, emphasizing that in closed
positions you do not have to rush.
12. Rc1 ….
Directed against any hint of …b6 on account of a capture and the rook already pressing against the
weak backward c-pawn, not to mention the queen on c8 or c7.
12. …. Bc7
13. Bxc7 Qxc7
14. f4 ….
Forced, but now Black has no constructive pawn breaks and stands worse as a result. Phase 1 is
complete, opponent’s counterplay dead. Now Kramnik can improve his pieces. Castling is still risky
for Black due to g2-g4 and h2-h4 advances.
14. …. Ng8
An intriguing manoeuvre by Black, intending the knight for the f5-square, where, in fairness to him,
it at least hits something. That same something is not staying there long though.
15. e4! ….
I like this move, playing an alternative pawn break to one on the queenside and thus frustrating
Black’s plan. He also eyes up f4-f5 ideas that Black must be on his guard against. A good principle
in chess is called the ‘principle of two weaknesses. If you can attack two areas in your opponent’s
position and force a weakness in both then he is tied down to defending both which is going to be a
lot harder in the long run than if he only had one weak pawn, say.
15. …. Ne7
16. f5!? ….
Kramnik plays it anyway! This is risky, but at least it forces a new weakness after…
16. …. exf5
17. exd5 cxd5
Not 17…Nxd5, which would allow the d2-knight access to c4 and d6. Now Black has a weak d-
pawn and White has a mobile pawn majority on the queenside.
18. b5 0-0
19. b6 ….
To some people’s eyes this might look unnatural as it closes things off somewhat, but Kramnik has
a cunning intention as we shall see. He keeps as all the pawns on the board and gains more space
with tempo. He also prevents Black opening the a-file for good.
19. …. Qd8
20. Nb3 Nf6
21. Na5 ….
That’s the point, the knight has a superb outpost and attacks b7, all from the rim.
21. …. Rb8
34
22. a4! Ne4
23. Na2 ….
Now we see the idea of 22.a4!, well in fact there are two ideas. First, Black must always be on the
lookout for the sacrifice 23.Nxb7 followed by a4-a5 and capturing on a6. Second, it allows Kramnik
to avoid exchanges and keep his knights with 23.Na2. The knights are important of course, because
the position is still of a blocked nature.
23. …. f6?
Kramnik criticizes this move and recommends 23…f4! Instead, sacrificing a pawn in order to play
…Ne7-f5 and …Qd8-g5. This is instructive as it shows that clinging into material is not always
good even in blocked positions. Black is dead on the queenside and must mow seize the moment
and go all out on the kingside. After the game move, Black is perhaps already lost.
24. Nb4 Be8
Having done A, Black must do B.
25. Qc2! g6
26. Rb1 Rf7
27. Nxb7! ….
Having lined up his pieces appropriately (don’t forget – do not rush!) White now crashes through.
27. …. Rxb7
28. a5 Nc6
Black desperately tries to blockade, but all is in vain.
29. Nxc6 Bxc6
30. Bxa6 Rb8
31. Bb5! ….
An important move, simultaneously stepping off the a-file and trading off an important Black
blockader.
31. …. Qc8
32. Bxc6 Qxc6
33. a6 Kg7
34. Rb4 Nd6
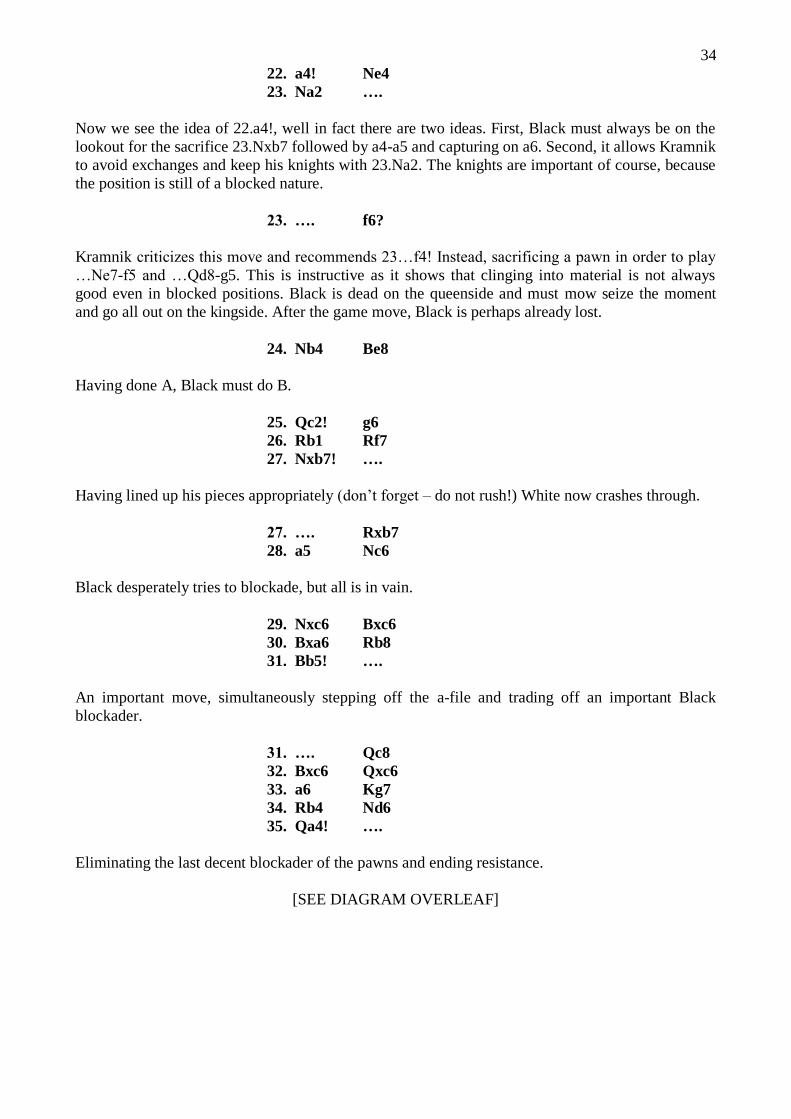
35. Qa4! ….
Eliminating the last decent blockader of the pawns and ending resistance.
[SEE DIAGRAM OVERLEAF]

35
The game finished 35…Qxa4 36.Rxa4 Nc8 37.Rb4 Na7 38.bxa7 Ra8 39.c6 Raxa7 40.Rc1 and
Black resigned since the passed pawns will cost him a rook after Rb7.
(1-0)
Notice that there were only a relatively few variations to go through in that game and it was mainly
based on positional concepts of space and available squares. The only specific calculation was the
breakthrough on b7.
Next up is a game of my own (not quite GM standard perhaps but both my opponent and I were
about BCF 200 when this was played and my opponent is now significantly stronger still). The
game is Woodward – Bigg from a weekend congress back in 2001. In this game, a King’s Indian
Defence, each side has total domination of one particular flank. White has the queenside and I have
the kingside. It is a race against time. White wants to shatter and capture Black’s queenside and
Black wants to give checkmate on the kingside.
1. Nf3 d6
2. d4 Nf6
3. c4 g6
4. Nc3 Bg7
5. e4 0-0
6. Be2 e5
It is important to strike at the centre as soon as possible. If White now plays 7.dxe5 dxe5 8.Qxd8
Rxd8 9.Nxe5 then Black regains his pawn with 9…Nxe4! 10.Nxe4 Bxe5 and a slight edge to Black.
Also the zwischenzug 10.Nxf7 fails to 10…Bxc3+ and then 11…Kxf7 and an extra piece for Black.
7. 0-0 Nc6
8. d5 Ne7
Ok, so we have the blocked centre. White’s space is on the queenside and so he needs to advance
his pawns with and pieces manoeuvring in behind them. He particularly wants to play the pawn
break c4-c5. Black, by contrast, wants to play the pawn break …f7-f5 and then advance his pawns
on the kingside with his pieces coming in behind them. Who will win?
9. Ne1 Ne8
10. Be3 f5
11. f3 f4
12. Bf2 g5
13. c5 ….
A key moment: both sides have redeployed their pieces for a future assault and pawns have been
hurled forward. Now is when each side has to think how best to place their pieces. I like my knight
on e8 for the moment, since it covers d6 and c7 in anticipation of Nb5 and Rc1 by White.

36 Obviously I will play …h7-h5 at some point and also will need my queen in the attack. At the
moment though, my e7-knight gets in the way and so…
13. …. Ng6
14. a4! Rf7!
While White correctly probes the queenside with yet another pawn, Black arranges some defence
along the seventh rank and prepares moves like …Bf8 in some lines, to pressurize c5 and defend
d6.
15. a5 h5
16. cxd6 ….
Possibly an inaccuracy: 16.Nd3 is solid enough to keep the tension and 16.c6!? b6 17.axb6 cxb6
18.Ba6 and if 18…Nc7 then 19.Bb7 looks good. Maybe White is a little better in this variation. If
White can exchange the light-squared bishops then Black’s attack will be held up on the light
squares more effectively. Often in this line, White is even willing to sacrifice an exchange along the
c-file for the light-squared bishop. 16…bxc6 may be best when 17.dxc6 Be6 is unclear, or 17.Bc4
c5 and White plays for b2-b4.
16. …. cxd6
17. Nb5 ….
The intention of this move is to provoke …a7-a6 and then use the outpost resulting at b6. However,
this plan may be a little slow in view of the game continuation.
17. …. a6
18. Bb6?! Qd7
18.Na3 and Nc4 was perhaps preferable, because ironically d7 is a great square for the queen at this
particular moment because it controls g4 one more time.
19. Na3 g4!
Black is now taking over the initiative and getting nearer the White king. Psychologically too, this
position is now very difficult for White. For instance the key question: defend or carry on regardless
on the queenside?
20. Nc4 g3!
The key position. White cannot play the natural 21.h3 due to 21…Nh4 (Black could easily have
ruined this possibility if he had pushed his h-pawn any further). Note the similarity with Kramnik’s
knight on a5 and the sacrifice on b7 in the last game. The idea is the same: …Nxg2 followed by

37 …Qxh3 and White will get mated very quickly. Notice the ineffectiveness of the White pieces to
defend this type of dark square assault. The pawn on f3 in particular gets in the way. White now
reluctantly decides to switch to defence and it is hard to suggest any major improvement.
21. Kh1 Bf6!
Perhaps my favourite move of the game, allowing the f7-rook to swing over and planning …Bd8 to
cover the key b6-square.
22. Bg1 Bd8
23. Nb6 ….
Too cooperative, but after the alternative 23.Nd3 it is hard to see how White goes about doing
anything quickly, or is he just fiddling while Rome burns? The knight may be needed on e1 to cover
g2 anyway.
23. …. Bxb6
24. Bxb6 gxh2
Black is clearly better now, because he has a nice square for a knight on g3.
25. b4 h4
26. b5 h3
27. bxa6 bxa6
28. Qc2 Bb7!
Now with the move …Rc8 Black even gets active on the queenside. There is no rush: the g3 square
isn’t going away.
29. Rc1 Rc8
30. Qb2 Nf6
Time to move into g3, and I think White is now lost. The game concluded 31.Rxc8 Bxc8 32.Qa3
Nh5 33.Bf2 Ng3+ 34.Bxg3 fxg3 35.gxh3 Nf4 36.Qb2 Qxh3 37.Bc4 Rc7! and White resigned
because he will lose the c4-bishop and the f1-rook in turn.
(0-1)

38
PART 8: Middlegame Strategy – Centre under Tension
The characteristic feature of a centre under tension is that it is not known whether either side may
suddenly choose to open it or to close it off. Flexible piece play thus becomes very important and
the key to tense central positions is probably best summed up by the question: who has the
initiative? Forcing moves can extremely important in these situations.
First up is the game Marin – Knaak, Stara Zagora Zonal 1990. It is a Semi-Slav Defence and a very
high quality game from two imaginative grandmasters. At each stage in the early middlegame one
needs to ask oneself, ‘have I got enough initiative to force the issue in the centre?’
1. Nf3 d5
2. c4 e6
3. d4 c6
4. e3 Nf6
5. Nc3 Nbd7
6. Bd3 dxc4
Notice once again the idea of waiting for the bishop to move before capturing. The strategy is like
this: Black wants to break out with either …c6-c5 or …e6-e5, and he doesn’t want to allow cxd5 in
response, because that would give him an IQP in all probability. He therefore gets rid of his d-pawn
while it gains a tempo to do so.
7. Bxc4 b5
8. Bd3 a6
Ok, so the idea is now clear – Black intends …c6-c5. If White now castles, 9.0-0, then 9…c5 10.a4
(to hit out on the weakened light squares) then 10…b4 11.Ne4 Bb7 is fine for Black. Instead, White
takes up the gauntlet thrown down by Black with…
9. e4 c5
10. d5 c4
So there we have it, a centre under tension. White has squares like c6 and Black has d3. White may
chip away at Black’s pawns with moves like a2-a4 or may capture on e6. Black may choose to
block with …e6-e5 or to give White an IQP with …exd5. Who can take the initiative and resolve
the central tension to their advantage?
11. dxe6 ….
Perhaps Marin did not like the fact that after 11.Bc2 Black can choose between blocking with
11…e5 and pressurizing with 11…Bb7. Both these moves have been seen in practice and now is not the place to quote theory, but here White prefers to carry the action himself. This move allows
the option, rejected by Black in this game of playing 11…cxd3. In fact this might be best, since
12.exd7+ Qxd7! 13.0-0 Bb7 would not worry me as Black at all.
11. …. fxe6
12. Bc2 Qc7
Black covers e5 and f4. If you think that the tension is now over then just wait till you see what’s in
store!
13. 0-0 Bc5

39
14. Qe2 Ne5
Another option was to swing the other knight round with 14…Ng4 15.h3 Nge5 16.Nxe5 Nxe5 when
White will play either Kh1 or Be3 and then advance f2-f4. Then we would have a new situation of
central tension, namely: will White continue e4-e5 or f4-f4, or indeed, neither.
15. Nxe5 Qxe5
16. Be3 ….
Again, 16.Kh1 was worth a look, though presumably Marin was anxious to exchange the dark-
squared bishops.
16. …. Bxe3
17. Qxe3 0-0
18. Rad1 Ng4
The game remains tense as Black has a queenside majority, but a weak e6-pawn. White’s bishop
and knight are slightly immobile at present, but how long will that last I wonder? This last move
forces the transition into a very tense endgame indeed.
19. Qg3 Qxg3
20. hxg3 Ra7
A good move, since getting this rook in the game is Black’s top priority if he wants any form of
initiative. White must try to combat this initiative as best he can, and hopefully wrestle it back.
21. Rd2 g5
22. f3 Ne5
23. Kf2 Bd7
24. Rc1! ….
An excellent move, anticipating the advance …b5-b4 by aiming at the c-pawn, which would be
weakened by such an advance.
24. …. b4
25. Nd1 Bb5
26. Ne3 Raf7
This is the culmination of all the tension and both sides are fighting for it. It looks though, as if
White has gone wrong on account of the threat of 27…Nxf3+ 28.gxf3 Rxf3+ and the knight is lost
because 29.Ke2 loses to 29…c3+. In this key position, however, White now comes up with the best
move in the game, which he would have had to have seen well in advance of this position.

40
27. Bd1!! ….
At first sight, what could be more natural. We defend f3 and prepare Be2 to terrorize the c-pawn.
But hang on! What about…..
27. …. Nd3+
?? Answer….
28. Rxd3 cxd3
29. Bb3 ….
And White is in possession of the initiative, but is it enough for an exchange?
29. …. Re8
30. Rc5 h6
31. Ke1! ….
Yes! If you look carefully at this position, you will find that it is not easy to spot any constructive
move for Black here. White just has all the squares covered.
31. …. Kg7
32. Kd2 Kg6
33. Re5 Rfe7
34. f4 ….
In a sense the game is now resolved because the tension has gone in White’s favour. I will include
the remaining moves for the sake of completeness but the key point is the hard work – the fight for
the initiative – is over.
The game concluded 34…Bd7 35.Bc4 a5 36.Rxa5 gxf4 37.gxf4 e5 38.Ra6+ Kh5 39.f5 Rg7 40.f6
Rh7 41.f7 Rf8 42.Ra5 Rhxf7 43.Rxe5+ Kh4 44.Bxf7 Rxf7 45.Nf5+ Bxf5 46.exf5 Kg3 47.Kxd3
Kxg2 48.Ke4 h5 49.f6! (An advantage of two pawns on one side is what we want in a rook and
pawn endgame. Black must therefore go for the a-pawn and White has seen that his better king
position will win the day even then.) 49…Rxf6 50.Rxh5 Rf2 51.Rg5+ Kh3 52.b3 Rxa2 53.Kd3
Kh4 54.Rb5 Kg4 55.Kc4 Kf4 56.Kxb4 Ke4 57.Rh5 Ra8 58.Kc4 Rc8+ 59.Rc5 and Black
resigned (1-0)
Next up is an old classic: Boleslavsky – Keres, Candidates Tournament 1953. The opening was a
Ruy Lopez, renowned for tense central situations. This game is a masterpiece when it comes to
using the initiative and I’d wager no-one worth a title of IM or GM has gone down this particular
line for White since.
1. e4 e5
2. Nf3 Nc6
3. Bb5 a6
4. Ba4 Nf6
5. 0-0 Be7
6. Re1 b5
7. Bb3 d6
8. c3 0-0
9. h3 Na5
10. Bc2 c5

41
11. d4 Qc7
12. Nbd2 Rd8
I think that nowadays 12…Re8 is more common, with …Bf8 to follow. If White had seen what was
about to happen he would likely have played 13.d5! in this position and taken the game back into a
closed structure. After he continues with the robotic Lopez manoeuvre Nf1, the tension reaches its
peak….
13. Nf1 d5!
Black blasts the centre right open. Here judgement was needed in order to make sure Black’s pieces
are better placed for an open situation. This looks unlikely if we just view the position statically,
because the e7-bishop and a5-knight seem to be passive. However the pawn will not be on c5 for
long and the knight is going to c4. White should keep a pawn on c5 here with 14.dxe5, which also
covers the f6-square against the black bishop. There follows 14…dxe4 15.N3d2 Qxe5 16.Qe2 Bb7
when Black is fine.
14. exd5? exd4
15. cxd4 Nxd5
16. Qe2 Bb7
17. Ng3 cxd4!
Now that the pieces have developed and the centre has been cleared we have a full horror of the
situation for White. His bishop is loose on c2 and Black’s pieces are more aggressively poised for
an open game. White’s one chance is to mate Black on the kingside, but Black’s very next move
puts paid to that idea!
18. Nxd4 g6!
19. Bh6 Bf6
Simple stuff, but it works and White is now struggling on the long diagonal.
20. Nb3 Nc4
21. Ne4 Bxb2
22. Nbc5 ….
Desperation, and it doesn’t even work! The game ended 22…Bxa1 23.Rxa1 f5! 24.Nxb7 Qxb7
25.Nc5 Qc6 26.Nd3 Nc3 27.Qe1 Qf6 28.f4 Ne4! 29.Kh2 Qc3 30.Qb1 Ncd2 31.Qc1 Rxd3
32.Bxd3 Qxd3 33.Qc7 Nf3+! and White resigned (0-1).
I hope you have seen that it is important to think about the central structure to decide the best way
to proceed in a game. As we have just seen, if you get it slightly wrong at first, that could be the end
of that fifteen moves later.

42
PART 9: Analysis and Planning
This is a more advanced section on planning than Part 5, and in the same format as the last three
chapters, except that there are three illustrative games rather than two. In each one the winning side
has to construct an effective long-term plan in order to win, but having done so it looks like he is
just playing one good-looking move after another. Good chess often looks like effortless chess!
First up is the game Williams – Karpov, Nice Olympiad, 1974. This is an unusual variation of the
Nimzo-Indian Defence, known for its mad tactical nature. There have been some very exciting wins
for both sides in this opening, but in this game Karpov makes his superiority known.
1. d4 Nf6
2. c4 e6
3. Nc3 Bb4
4. Bg5 ….
The dreaded (by some) Leningrad variation. It must be admitted that I would quite enjoy playing
this for either side. White aggressively tries to force through e2-e4 and practically forces Black to
play some weakening moves to break the pin.
4. …. h6
5. Bh4 c5
This move facilitates possibilities of …Qa5 at some stage. It should be mentioned that this opening
is almost refuted by this move, because after 6.d5 it looks at first as if the incredible 6…Nxd5 is
possible: 7.Bxd8 Nxc3 and I leave you to work out what happens if White puts his queen on any
square except the correct 8.Qb3! Ne4+ 9.Kd1 Nxf2+ 10.Kc2 Kxd8 11.Qg3! Nxh1 12.Qxg7 Re8
13.Qxf7 covers f2 and the h1-knight is trapped.
6. d5 d6
6…b5 is an interesting attempt to get some play after 7.dxe6 fxe6 8.cxb5 d5
7. e3 Bxc3+
8. bxc3 e5
9. Bd3 e4
This is an important move. At first it looks like e3-e4 is no big deal, after all Black has his pawns on
the opposite colour square from his remaining bishop and doesn’t appear to be in any huge danger.
But then we see Ne2, 0-0 and f4! as a plan, and we get a tad nervous. This is why the pin will have
to be broken sooner rather than later. White’s play is easier to arrange if the position gets
completely blocked and so Karpov keeps it under tension. What he needs now is a plan giving him the initiative.
By the way, the e4-pawn is taboo since 10.Bxe4 loses to 10…g5 and 10.Bxf6 Qxf6 hits the c3-
pawn.
10. Bc2 g5
11. Bg3 Qe7
As we shall see in a moment, this is not just a quiet supporting move, but a vital part of the overall
plan.

43
12. Ne2 Nbd7
13. h4 Rg8
14. hxg5 hxg5
15. Qb1 ….
This is the critical position, on emerging from the opening. White has a strong dark-squared bishop
and chances to attack down at b-file and with an a-pawn advance. His king is a potential weakness
and Karpov will seek counterplay on the kingside and use the central tension. First, however, he
needs to attend to his own king safety and then look for a break on the kingside. Ideally the pawn
break …f7-f5-f4 looks ideal, but very difficult to arrange. Well, difficult for you or I perhaps, but
not for Karpov!
15. …. Kd8!
Actually the standard plan in this line and another reason for the queen move earlier. Black will put
the king on c7 and hope it is safe. In fact, although it looks safe, I have seen the king get into
serious trouble in some games as well, based on the fact that the bishop on g3 stares straight at it.
White is on the lookout for tricks on d6 and c5.
16. a4! a5!
Both players know what White wants. If 16…Kc7 17.a5! then one plan might be Ra1-a2-b2-b5.
This looks like three moves with the same piece in a row, but if Black if forced to play …b6 then
the pawn on a5 means that the black knight is tied down to d7, and this seriously limits Black’s play
on the kingside. Furthermore there is the amazing idea of Nd4! as a follow up, when …cxd4 allows
cxd4 and c4-c5 with what might be a crushing attack. With the move 16…a5! Karpov makes sure
that he will be able to defend with either …b7-b6 or even …Ra8-a6.
17. Ra2 Kc7
18. Rh6 Ra6!
White now hurls the kitchen sink in for good measure, but Karpov’s defence is immaculate as he
looks for an opportunity to take the initiative and resolve the tension in his favour.
19. Qb5 Kb8
20. Rb2 Ka7
Stage 1 complete: the king is out of danger. In hindsight perhaps 19.Rb2 would have been better for
White, since then the rook is in front of the queen and he only has to retreat the queen now anyway.
Karpov now seizes the initiative.
21. Qb3? Ng4!

44 One move is all it takes and now it is all but over.
22. Rh1 f5!
23. Kd1 Rb6
And White is lost. The queen had to remain on b5 to hit a5 and stop …Rb6. The game ended
abruptly with 24.Qa2 Rxb2 25.Qxb2 b6! 26.Bb3 Ba6 27.Nc1 Nde5 28.Qe2 Ng6 29.Kd2 Nf6
30.Qd1 f4! and White resigned (0-1)
Next up is an old classic, revolving around a very simple strategy. Having got a big space
advantage, White just opens an important file and penetrates into his opponent’s position along it. I
feel a bit guilty showing this game, because Black doesn’t seem to make nay contribution to chess
during it, but I blame it on misplaying the French Defence!
The game is Forgacs – Tartakower, St. Petersburg 1909.
1. e4 e6
2. d4 d5
3. Nc3 Nf6
4. Bg5 Be7
5. e5 Ne4?!
In my view it all goes downhill from here. 5…Nfd7 is by far the best move, when White can choose
between 6.h4 and 6.Bxe7.
6. Nxe4 Bxg5
This is the most sensible in appearance, but given what is going to happen perhaps 6…dxe4 and
take the chances with the weak pawn was preferable.
7. Nxg5 Qxg5
8. g3! c5
9. c3 Nc6
10. f4 ….
Now we see the problem for Black. The dark squared bishops are off and White has an ideally
supported pawn wedge and a long-term space advantage.
10. …. Qe7
11. Nf3 Bd7
12. Qd2 0-0
13. Bd3 c4?!
I do not like this anti-positional move. Black’s best try was 13…f6! and to take his chances after
14.exf6. The e5-square is a problem but at least he is active. Now White has an easier time of it.
14. Bc2 b5
15. 0-0 a5
16. Rae1 b4
17. f5! ….
[SEE DIAGRAM OVERLEAF]

45
This is pretty much end of game for Black now. White wrenches the f-file open (the threats are g4,
Ng5 or f6) and Black has made no impact on the queenside at all. One word of advice: these plans
of throwing a b-pawn down the board to weaken the c3-pawn or c6-pawn, depending on whether
you are Black or White respectively, then laboriously trying to win it, only work if (a) you play
exactly the right moves in exactly the right order and waste no time, and (b) if your opponent has no
play at all. Ideally therefore you would need a fighting initiative on the other side of the board as
well. We saw a good example in Kramnik – Topalov in section 7, but it takes a player of Kramnik’s
understanding to get that sort of thing right.
The above game concluded 17…exf5 18.g4! fxg4 19.Ng5 g6 (19…h6 20.Nh7 Rfe8 21.Nf6+! gxf6
22.Qxh6 looks good) 20.Rf6 Kg7 21.Rfe1 Be8 22.Qf4 Nd8 23.e6! Ra6 24.Qe5! Kh6 25.R1f5!
fxe6 26.Nf7+!! Qxf7 27.Rh5+ Kg7 28.Rxg6 mate!
Beautiful, and a nice warm up for the next section, on combinations.
First, however, the final game of this section. This game is another classic, but from a bit later than
1909, and a little less one-sided! It is Kasparov – Tal, Brussels 1987. These two are both very
attacking, and of course very strong. I like this game, because Kasparov shows that in some
positions a plan need often be no more than playing pieces to the strongest squares, pushing the
right pawns and looking out for tactics. In fact this kind of ‘series of little short term plans’ is by far
the most common in most tournament situations. Do not always stare at the board until you see a
long-term plan therefore, because there might not be one!
1. d4 Nf6
2. c4 e6
3. Nc3 Bb4
4. e3 0-0
5. Bd3 d5
6. cxd5 exd5
7. Ne2 c5
8. 0-0 Nc6
9. a3 cxd4
10. exd4 bxc3
11. bxc3 ….
A common Nimzo-Indian structure has arisen and share of central space is equal. The first micro-
plan if you like is to strengthen White's centre, which allows him to keep the important light-
squared bishop. If 11.Nxc3 Nxd4 12.Bxh7+ Kxh7 13.Qxd4 still leaves White better but the opposite
colour bishops give the game drawish tendencies. In fact there is perhaps even the amazing move
13…Kg6!!? to prevent 14.Bg5 and …Bf5 and possibly …Rh8 to follow. In any case, the White
knight is needed on the kingside and this is another reason for 11.bxc3.
11. …. Ne7
12. Qc2 ….

46 White covers the e4 and f5 squares a second time to keep the Black knights out. We have seen by
now that a plan can be as simple as saying: ‘What does my opponent want to do? How can I stop
him?’
12. …. Bd7
13. Bg5 ….
Of course, everything is line up along the h4-d8 diagonal and Black has no dark-squared bishop so
White makes full use of his. Garry must keep the initiative, as potentially his c-pawn is weak down
the semi-open file.
13. …. Ng6
14. f4! ….
Absolutely! Garry combines piece play and pawn play to gradually improve his position.
14. …. h6
This looks like a risky weakening, but it sets a little trap. If now 15.f5? hxg5 16.fxg6 we find the
remaining black knight on f6 very strong indeed and White has conceded his dark-squared bishop
for nothing.
15. Bxf6 Qxf6
16. f5 ….
Garry kicks the remaining knight back but closes the diagonal for his queen and bishop. He needs
to find a clever way of opening it again.
16. …. Ne7
17. Ng3 Nc8
This manoeuvre of …Ne7-c8-d6 is tedious, but the only way to untangle. I’d wager Tal was not
enjoying this position. Garry now finds a beautiful build-up move to increase his attacking forces. If
you have more space it is generally a good idea to make full use of it for bringing pieces in to play.
18. Rf4!
Some players might think that if Tal now played 18…Qd6, Garry would play 19.Raf1. However,
that would allow 19…f6! and the f5-pawn blocks everything. Instead think tactically: 19.f6!! allows
White in first because the rook is taboo due to 19…Qxf4 20.Bh7+ Kh8 21.fxg7+ Kxg7 22.Nh5+
and the greedy black queen pays the price for gluttony. Generally speaking tactics are there in chess
to allow one to carry out positional ideas with more force. That is certainly the case here.
18. …. Nd6
19. Qf2 ….
This move prepares 20.Nh5 when 20…Qg5 is met by 21.g4 and the queen on f2 covers h4 in
readiness for the tempo-gaining thrust h2-h4 when White’s attack develops alarming proportions.
19. …. Rfe8
20. Nh5 Qd8
21. Nxg7! ….
[SEE DIAGRAM OVERLEAF]

47
The key breakthrough, Garry rips through his opponent’s defences in the most simple and direct
way. The knight is immune from capture because 21…Kxg7 22.f6+ followed by Qh4xh6 just wins.
21. …. Ne4
22. Bxe4 Rxe4
Black is doing his level best to complicate matters, but Garry has won a pawn and his next move
seals his opponent’s fate.
23. f6! Kh7
24. Rxe4 dxe4
25. Qf4 ….
Black’s next move is forced, in order to defend the e-pawn and then White will have the f5-square
under complete control.
25. …. Bc6
26. Re1! ….
Typical Garry, the cleanest win is found and there is no defence to Re1-e3-h3. The game ended
with 26…Qf8 27.c4 (27.Re3 Qxa3 threatens the annoying …Qa1+) 27…Qxa3 28.Nf5 Qf8 29.Re3
Bd7 30.Rg3 Bxf5 31.Qxf5+ and Black resigned (1-0).

48
PART 10: Analysis – Combinations
Well I hope you’re ready for this section because we have two very exciting games coming up,
followed by a challenge to see if you can work out the winning combination in the position I shall
give at the very end of these notes. The answer will be at the beginning of the notes for the next
section.
Where combinations are concerned all we really need is (a) an ability to spot weak points in the
opponent’s position and the lines leading to them, and (b) an ability to hold more than one variation
in our head at a time. Ideally you are able to analyse further down a line now than you were a year
ago, but analysis requires constant practice, because discipline of concentration is one of the easiest
things to lose in chess.
The first game sees our old friend Mr Uhlmann showing us how to play the French Defence. It is
Bogdanovic – Uhlmann, Sarajevo 1965. Try to follow the game pausing to have a think for yourself
every so often. I wonder how much of Uhlmann’s analysis you can find.
1. e4 e6
2. d4 d5
3. Nc3 Bb4
4. e5 Ne7
5. a3 Bxc3+
6. bxc3 c5
7. a4 ….
This is no longer thought to be the most challenging move, which is almost certainly 7.Qg4. 7.a4
has its points though, hinting at Ba3 and also preventing sequences like …Qa5 8.Bd2 Qa4!? which
can often be a nuisance.
7. …. Nbc6
8. Nf3 Qa5
9. Qd2 Bd7
All sensible development so far, and a semi-blocked but tense centre. The initiative will only come
out of a tense struggle here. If White plays 10.Bd3 then 10…c4 is a useful tempo gain for Black as
long as he realises that, as in the game, his plan is to blast the centre open with …f7-f6.
10. Be2 f6!
11. exf6 gxf6
12. dxc5! ….
White rises to the challenge, accepting tripled pawns for a chance to play aggressively. His ideas include Nf3-d4-b5 and c3-c4 as well as activity down the b-file. Black meanwhile, has to castle
queenside and go for …e6-e5 and a g-file attack. Tactical awareness will clearly be very important
here.
12. …. 0-0-0
13. 0-0 e5
14. c4 ….
White goes for it to try to open lines on the queenside. It also asks Black the question, do you fear
an exchange of queens?

49
14. …. d4!
No, we do not! 15.Qxa5 Nxa5 is just a bad ending for White because his appalling pawn structure
severely hampers the activity of his bishop pair. White now avoids the queen swap. Note that
14…Qxd2 15.Nxd2! d4 16.Ne4! gives White some unwelcome play.
15. Qh6 Ng6
16. Nd2 ….
Both sides manoeuvre purposefully to make inroads into their opponent’s position. The need for
combinational awareness cannot be far off.
16. …. f5!
A good move to frustrate White by preventing Nd2-e4.
17. Nb3 Qc7
18. f4!? ….
White sees that his structure leaves him in danger of being worse if he is not imaginative. This
move is either reckless or good and only tactical developments will prove which one. Black cannot
play the logical 18…e4 since 19.Bb2 Be8 20.Rad1 is awkward for the d4-pawn. The downside of
this move is that it weakens the e3-square and opens the white king up. It also strands the queen
temporarily on h6. It is factors like this that the tactician must always bear in mind.
18. …. Nb4!!
Brilliant! Uhlmann correctly sees that the c2-pawn is deprived of a defender with Qh6-d2 and
angles his knight towards c2 and then perhaps e3, as well as vacating c6 for his bishop to point at
the kingside. If 19.Bd3 then 19…e4 comes with tempo, but what about 19.fxe5? Let’s analyse
19…Nxc2 20.Rb1 (if 20.Ra2 the problem is that the knight returns to b4 with gain of time)
20…Bc6! Intending to meet 21.Rxf5 with 21…Be4 when Black has by far the better-coordinated
pieces. So White has to play….
19. Bd1 d3!
The best way to secure entry squares for the black pieces is to exchange the pawns.
20. cxd3 Nxd3
21. fxe5 ….
Finally White commits to clearing the centre and the tactics are now set to come thick and fast. We
have already seen in section 6 how good Uhlmann is in open positions!

50
21. …. Qxe5
Typical Uhlmann, the queen is the most powerful piece in the centre, so use her.
22. Bf3 ….
Looks good, but what about the tempo-gaining 22.Bg5 to activate the other bishop? This is where
we hunt for tactical resources and in his notes Uhlmann gives 22…Bc6! 23.Bxd8 Ngf4!
(threatening …Qe3+ and …Bxg2 mate!) 24.Bf3 Qe3+ 25.Kh1 Bxf3 and now:-
(a) 26.Rxf3 Nf2+ (the only move to consider that could possibly do anything, which makes playing
through in your head easier: if it works then play it and if not the whole line is refuted and you can
look for something else) 27.Rxf2 (27.Kg1 N4h3+ and …Qxh6! Remember the bishop on d8 will
drop at the end of Black’s onslaught too) 27…Qxf2 28.Qg5 Rxd8 29.Qxf5+ Kb8 and Black has by
far the better placed pieces and threats in return for the two pawn deficit and let us not forget that
White can hardly boast that the extra pawns are well placed!
(b) 26.gxf3 and now 26…Rg8!! With the very nice threat of …Rg1+ and either …Qxf3 or …Nf2
are both mating. 27.Bg5 aims to block the g-file, but then 27…Qe2 and there is no 28.Bxf4 because
of 28…Qg2 mate. But what about 27.Ra2! Rg1+ 28.Rxg1 Qxf3+ 29.R1g2 (29.Rag2 Nf2 mate)
29…Qf1+ 30.Rg1 Qf3+ and we have a perpetual, after all that!
22. …. f4
The chance to play Bg5 is now gone.
23. Bd2 Bc6
24. Bxc6 bxc6
It looks as if things are quietening done, but don’t relax just yet because the position is gaining new
possibilities in place of the old ones.
25. Rab1 Rd7!
26. Qh3 Re8
The pieces have now rearranged themselves and 27.Na5 looks like the natural move, but what about
27…Qxc5+ 28.Kh1 Nf2+ 29.Rxf2 Qxf2? Is this enough play for an exchange? No! The rook is tied
down to the back rank and 30.Nxc6 Qxd2 31.Rb8+ Kc7 gives White nothing because he doesn’t
have enough pieces aiming at the right squares. This is a key for a combination to work. Having
pieces near the opponent’s king is no guarantee of success.
27. Qf3 Qe4!

51 Black’s pieces are better, so he offers a simplifying queen swap. He has not given up on
combinations, however, since (from Uhlmann’s notes again) 28.Rfe1 Nxe1 29.Rxe1 Qxe1+!
30.Bxe1 Rxe1+ 31.Kf2 Ne5! Wins immediately as there is no defence to the dual threats of …Nd3+
and …Nxf3.
28. Nxa5 Qxf3
Now that the queens are off Black is in full control and the game ended 29.Rxf3 Re2! 30.Bc1 Nh4!
31.Rxf4 Rxg2+ 32.Kf1 Nxf4 33.Bxf4 Rd3! and White resigned (0-1).
If someone were to ask me what was the best game I had ever played then I would need to put all
my wins on Fritz and see how many mistakes were made and the one with the fewest would get the
vote, but that is a very difficult thing to judge. If, however, someone asked me what the most
entertaining game I have ever played was then it would certainly be the one I am about to show you.
Basically the opening position was crazy and all I could think to do was to create complications. I
am White and my opponent is G. Buckley (IM) from yet another weekend congress. This game is
by no means free of mistakes, but pleases the crowds.
1. d4 Nf6
2. Bg5 Ne4
3. h4!? ….
For those of you who don’t know, this is the Trompowski Attack and 3.h4!? was my pet line at the
time. This game was played back in 2001 and since then I have mainly graduated towards the more
sensible 3.Bf4. Having said that this is a dangerous opening against anyone not on their guard and I
have clocked up a lot of points against lower-rated players in this line. In this game, Black plays a
response that I had never seen before.
3. …. c5
4. d5 Qc7!?
I now played the only logical move, fully aware what the planned response was.
5. Nd2 Ng3
6. Rh3 ….
Clearly forced, since 6.fxg3 Qxg3 would have the only advantage that I’d be the first to finish!
6. …. Nxf1
You don’t see this too often in chess – a knight moves four times in the opening and all to capture a
bishop that (a) hasn’t moved and (b) can’t move! I debated a friend of mine after the game as to
whether I should recapture with the king or the knight. My friend prefers 7.Kxf1 and maybe he is
right.. My plan was to reroute the knight to the kingside. It is hard to know how big a plus the two
bishops are for Black in this position.
7. Nxf1 d6
8. Rh1 e5
9. e4 Nd7
10. Ne2 b5
This is an interesting decision, since my plan is to play on the kingside and Black is safer with his
king on the queenside. I can hardly criticize this move, however, because I will confess that I just
didn’t understand this position at all.
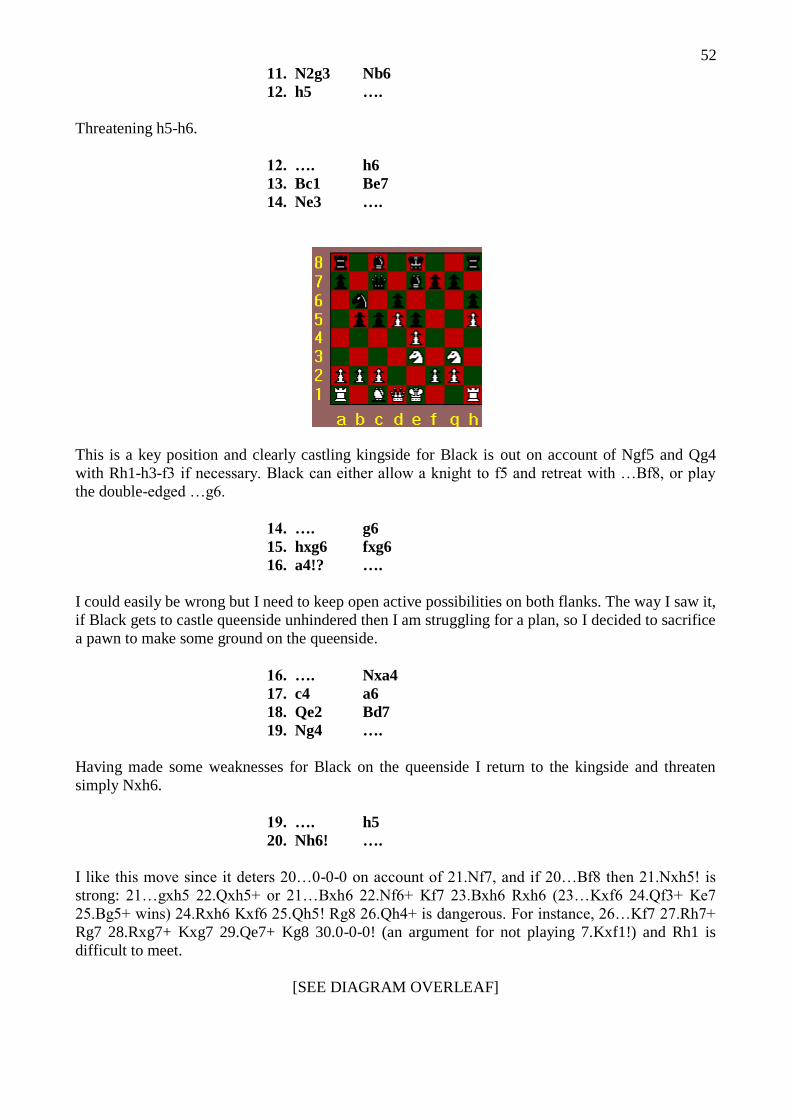
52
11. N2g3 Nb6
12. h5 ….
Threatening h5-h6.
12. …. h6
13. Bc1 Be7
14. Ne3 ….
This is a key position and clearly castling kingside for Black is out on account of Ngf5 and Qg4
with Rh1-h3-f3 if necessary. Black can either allow a knight to f5 and retreat with …Bf8, or play
the double-edged …g6.
14. …. g6
15. hxg6 fxg6
16. a4!? ….
I could easily be wrong but I need to keep open active possibilities on both flanks. The way I saw it,
if Black gets to castle queenside unhindered then I am struggling for a plan, so I decided to sacrifice
a pawn to make some ground on the queenside.
16. …. Nxa4
17. c4 a6
18. Qe2 Bd7
19. Ng4 ….
Having made some weaknesses for Black on the queenside I return to the kingside and threaten
simply Nxh6.
19. …. h5
20. Nh6! ….
I like this move since it deters 20…0-0-0 on account of 21.Nf7, and if 20…Bf8 then 21.Nxh5! is
strong: 21…gxh5 22.Qxh5+ or 21…Bxh6 22.Nf6+ Kf7 23.Bxh6 Rxh6 (23…Kxf6 24.Qf3+ Ke7
25.Bg5+ wins) 24.Rxh6 Kxf6 25.Qh5! Rg8 26.Qh4+ is dangerous. For instance, 26…Kf7 27.Rh7+
Rg7 28.Rxg7+ Kxg7 29.Qe7+ Kg8 30.0-0-0! (an argument for not playing 7.Kxf1!) and Rh1 is
difficult to meet.
[SEE DIAGRAM OVERLEAF]

53
20. …. bxc4
An imaginative move, intending to bring the bishop out to b5.
21. Nxh5 0-0-0
Both sides are hurling everything they have into outplaying one another. Sadly I must now retreat!
22. Ng3 Bb5
23. Qc2 Qd7
24. Rh3 Rdf8
At first I thought I was stuck here, but then I saw an imaginative way to get more pieces to the
kingside.
25. Ne2 Kb7
26. R1a3! Bd8
27. Rag3 ….
Usually rooks coordinate along the first rank at this stage in a game, but not in the 3.h4
Trompowski!
27. …. Ba5+
28. Nc3 Rf6
29. Bg5 Rf8
30. Bd2 ….
In addition to the silly rook moves my bishop has now gone from c1-g5-c1-g5-d2!
30. …. Nxc3
31. bxc3 Qe8
32. Rh4! ….
The rooks have a bit more shuffling to do yet.
32. …. Rh7
33. Rhg4 Rg7
34. Nf5! Rd7
35. Rxg6 Bc7
Well I have my pawn back and am now clearly better, but how do I get to his king?
36. Bh6 Rh8

54
37. Qd1 Rdh7?
Perhaps Black had had enough of the silly rook and bishop moves and wanted to put the boot in
down the h-file, but this move gives me the opportunity of an exchange sacrifice, and more silly
rook moves along the sixth rank into the bargain!
38. Rxd6! Bd7
Clearly the rook is immune due to the fork on d6 but now all my pieces seem to be attacked and
…Bxf5 is a big threat.
39. Qb1+ Ka7
40. R3g6! ….
A picturesque setup, and temporarily material ahead.
40. …. Bxd6
41. Rxd6 Bb5
41….Bxf5 42.Qb6+ Ka8 43.exf5 is good for White because if the pieces come off, the pawns are
good for him in the ending. Black simply has too many potential weaknesses.
42. Kd2! ….
Perhaps my favourite move of the game, quiet but deadly. I want to play Be3 without allowing
check on h1.
42. …. Rb7
43. Be3 Qc8
44. Qb4! Rc7
45. Qa5 Ka8
46. Re6! …..
There is no need to hunt for tricks. If I can take the e-pawn then I have four connected passed
pawns. I will now give the remaining moves of the game with no comment other than that this was
the first time, and the last, that I have ever won a game with a king-storm in the middlegame! The
game finished 46…Ra7 47.Rxe5 Qb8 48.Re6 Bd7 49.Bxc5! Qb2+ 50.Ke3 Qc1+ 51.Kd4 Bxe6
52.dxe6 Qb2 53.Bxa7 Qxf2+ 54.Ke5 Qxa7 55.Qd5+ Qb7 56.e7 Re8? 57.Qxb7+ Kxb7 58.Nd6+
and Black resigned (1-0).
Finally, the challenge: Black to play and win.
[SEE DIAGRAM OVERLEAF]

55

56
PART 11: Putting it all together – Learn from the Champions
Ok, first here is the solution to the puzzle at the end of the last section. The game is Ortueta – Sanz
from Madrid in 1934. Black played the logical 1…Rd2 2.Na4 (I hope you all got this far!)
2…Rxb2!! 3.Nxb2 c3 4.Rxb6 (4.Nd3 c4+ 5.Rxb6 cxd3 and one pawn will queen) 4…c4!
(threatening …c2 and if 5.Nxc4 c2 wins!) 5.Rb4 a5!! 6.Na4 (6.Rxc4 cxb2 wins) 6…axb4 (0-1).
Congratulations to anyone who got this.
This section is simple: having worked through a lot of strategy and tactics we take a look at two
absolute top-level classics to see all the elements in action together. The first is from a long time
ago and the second another game from Vladimir Kramnik.
The first game is Rubinstein – Teichmann, Vienna, 1908.
1. d4 d5
2. c4 e6
3. Nc3 Nf6
4. Bg5 Nbd7
5. e3 Be7
6. Nf3 0-0
7. Qc2 b6
8. cxd5 ….
The best move, in order to fix a pawn on d5 now that Black has signalled his intention to play a
fianchetto. If 8…Nxd5 9.Nxd5 Bxg5 10.Nxc7 or 9…exd5 10.Bxe7 Qxe7 11.Qxc7 Qb4+ 12.Qc3.
8. …. exd5
9. Bd3 Bb7
10. 0-0-0! ….
By far the best way to fight for an initiative. Black can achieve counterplay on the queenside with
…c7-c5 while White tries to checkmate him on the kingside.
10. …. c5
Another way to go for counterplay is 10…Ne4 when 11.h4! is an important move, so that after a
capture on g5 White will have the h-file to launch a crushing attack down. Play might continue
11…f5 12.Kb1 Rc8 13.Qb3 Nxc3 14.bxc3 is very unclear. Do notice, however that if 12…c5 then it
is combination time with 13.dxc5 bxc5 (else Black gets an IQP and a weak d4-square, with
manoeuvres like Nc3-b5-d4 in the offing) 14.Nxe4 fxe4 15.Bxe4! dxe4 16.Qb3+ Kh8 17.Qxb7 wins a piece as d7 is twice attacked.
11. h4 c4
Both sides are going for it full out.
12. Bf5 Re8
It is often useful to vacate the f8-square for a knight in these positions, from where it will defend
h7. The rook also eyes the e4-square to aim to disrupt the coordination of White’s pieces.

57
13. Bxf6!
A very perceptive move, clearing the way for the advance of the g-pawn.
13. …. Nxf6
14. g4 Bd6?!
It seems harsh to criticize but every move must count and as such 14…Bb4 was better, to have
options of capturing c3 and dominating the e4-square. Having said that, it might make no difference
after 15.g5 anyway.
15. g5 Ne4
16. h5 Qe7?!
This has got to be too slow. 16…Nxg5 17.Nxg5 Qxg5 18.Bxh7+ Kh8 19.Rdg1 Qh6 20.Bg6! is
winning for White because, even if Black defends f7, White will take it and play Rg6 forking the
queen and the unfortunately placed bishop on d6. Maybe the desperate 16…b5 is indicated.
17. Rdg1 a6
Black just doesn’t seem to sense the danger, and carries on preparing for …b6-b5 regardless. Now
is combination time, surely?
18. Bxh7+!! ….
Yes! It is indeed crunch time. This is crushing and there is not much to say other than, can you work
out the finish from here, in your head!
18. …. Kxh7
19. g6+ Kg8
19…fxg6 20.Nxe4! dxe4 (20…Qxe4 21.Ng5+) 21.Ng5+ Kg8 22.Qxc4+ Kf8 23.Nh7 mate would
have been a nice finish.
20. Nxe4 dxe4
20…Qxe4 loses to 21.gxf7+ Kxf7 22.Ng5+ again.
21. h6! ….
Very nice indeed: 21…exf3 22.gxf7+ Qxf7 23.hxg7! with dual threats of Rh8 mate and Qh7 mate,
and if 23…Qxg7 then 24.Qh7+ anyway due to the pin; if 21…fxg6 22.Nh4! g5 (22…Kf7 23.Rxg6!
Rg8 24.Qxc4+ Kf8 25.h7! Rh8 26.Re6 with Ng6+ to follow wins) 23.Ng6 hits the queen and

58 threatens h7+, whereupon the best is 23…Qf6 24.h7+ Kf7 25.h8=Q Rxh8 26.Nxh8+ Ke7 with
some compensation for the exchange, but probably not enough. If this worries White then maybe
23.h7+!? Kf7 24.Nf5 is worth a look. For instance 24…Qf6 to defend g5 loses to 25.Qxc4+ Kg6
(blocking on e6 hangs the d6-bishop with check due to the pin along the a2-g8 diagonal) 26.Nh4+
Kxh7 27.Nf3+ Kg6 28.Nxg5 Rac8 29.Nh7+ Kf5 30.Rh5+ g5 31.Rhxg5+ Qxg5 32.Rxg5 mate, or
28…Qxg5 29.Rxg5+ Kxg5 30.Qf7! wins. Finally if 21….gxh6 then 22.exf7+ Kxf7 23.Rxh6 with
dual threats of Rh7+ and Qxc4+.
21. …. f6
22. hxg7 exf3!
Although this lets the white queen into the attack it is still the only way to test White to see whether
he can see the finish.
23. Rh8+ Kxg7
24. Rh7+ Kg8
25. Qf5! ….
This threatens the finishing move Qh5.
25. …. c3!
26. Rxe7 ….
White avoids the last trap: 26.Qh5?? cxb2+ 27.Kb1 Be4+ 28.Kxb2 Ba3+ 29.Ka1 Bb2+! 30.Kxb2
Qb4+ mating.
Black now resigned due to 26…Bxe7 losing to 27.Qe6+ and into f7 with Rh1 to follow if
necessary, and 26…Rxe7 27.Qxf6 Bb4 28.Rh1 Rg7 29.Qe6+ mating.
I can’t help feeling a bit sorry for Black because everything seemed to work for White, but
deservedly so because he showed superb judgement in all aspects of the game.
The last game sees Vladimir Kramnik punishing a dodgy opening move. The game is Gelfand –
Kramnik from the European Club Cup in Berlin in 1996.
1. d4 d5
2. c4 c6
3. Nc3 Nf6
4. Nf3 e6
5. e3 Nbd7
6. Qc2 Bd6
7. g4?! ….
This move is wild, and obviously hopes for 7…Nxg4 8.Rg1 with play. Perhaps my assessment of
dubious is only based on what happens to you if you play this against Kramnik. The idea is g4-g5
and a quick e3-e4 to follow. The main reply was 7…dxc4 but Kramnik comes up with something
else.
7. …. Bb4!
The character of the position has changed, and e4 is now a very important square. Black wants to
play full out in the centre and try to make the g-pawn look silly.
8. Bd2 Qe7
59
9. a3 ….
Kramnik mentions 9.g5!? Bxc3 10.Bxc3 Ne4 11.Bd3 Nxc3 12.Qxc3 as ‘a Queen’s Gambit with a
pawn on g5 instead of g2!’ He admits that it is hard to see who this favours and suggests 12…dxc4
intending …b7-b5 and …Bc8-b7.
9. …. Bxc3
10. Bxc3 b6!
A double-purpose move, allowing …c7-c5 in response to Bb4 ideas and looking to develop the
bishop on the flank.
11. Bd3 Ba6!
12. Qa4 dxc4!
Now if 13. Qxc6 Rc8 14. Qa4 Bb7 15. Bb4 Qd8 16. Be2 a5 and this is when the pawn really wants
to be back on g2, since the long diagonal weakness is telling.
13. Qxa6 cxd3
14. Qxd3 0-0
15. g5 Nd5
16. Bd2 f5!
That is the positional phase out of the way and Gelfand has been outplayed. He cannot capture on
f6 en passant because of the f-file weakness after 17…Qxf6. Thus Black is better and has only now
to find a way to smash through. White has another awkward question to answer, namely: where is
he going to put his king?
17. 0-0-0 c5
18. Kb1 b5!
It is no use White hiding, Black is persistent. Now …c5-c4 is a threat, and horrible moves like
…a7-a5, …/Rac8 and pushing the b-pawn through. Therefore White must accept the offer.
19. Qxb5 Rab8
20. Qa5 ….
White tries to stay out of the range of the black knights but lets a rook in instead.
20. …. Rb3
21. Ka2? ….
The final error in a bad position. Gelfand doesn’t see the coming combination, as if he had he would
almost certainly have chosen 21.Ka1
21. …. Rfb8
22. Rb1 e5!
A beautiful move, intending to move the queen onto the g8-a2 diagonal to attack the white king.
Gelfand tries bringing his last piece into the defence, but to no avail.
23. Rfc1 Qe6!
Can you see the threat? (Answer on next line)

60
24. Ka1 ….
An admission or previous error, but he couldn’t allow 24…Nc3+ as then whichever way White
captures Black plays …Rb2 with double check, and then Ka1 Qa2 mate!
24. …. exd4
25. Rxc5 ….
Desperation as Black’s last move threatened the simple …Qe4, as well as just being a good
positional move.
25. …. Nxc5
26. Qxc5 Nc3!!
The finishing combination, mate is unavoidable! See if you can see why.
The game finished 27.Nxd4 (27.Bxc3 dxc3 28.Nd4 cxb2+ 29.Ka2 {29.Rxb2 Rxb2 30.Nxe6 Rb1+
31.Ka2 R8b2 mate} 29…Rxa3+! 30.Kxa3 Qa6 mating) 27…Rxb2! 28.Rxb2 Qa2+! and White
resigned. I leave you to find the finish!!

61
PART 12: Unusual Openings
This section is intended to familiarize you with some of the less common openings that occur. In
fact, some of these are now quite common in modern chess, just emphasizing the fact that chess is
just as influenced by trends as everything else. The Trompowski Attack in particular, one of my
own favourites, is now very common in tournament practice. Historically, the openings in this
section are rare because they deviate slightly from the opening ‘rules’ that you are used to. This
does not mean that breaking the rules is clever (a lot of the openings in this section I shall be
showing you how to refute – not recommending them!), but it does mean that there is no such thing
in chess as an ‘unbreakable’ opening rule. The rules are general guidelines such as:-
(1) Pawns in the centre (2) Knights before Bishops (3) Castle early (4) Don’t move the queen too
early….etc, etc.
These only apply in the context of a broader strategy and it is this strategy that has to come first.
The above list cannot take account of the specifics of the position by move 7, for instance, nor can it
account for the strategic style of the player involved. The first opening we will look at is the
Trompowski itself, and the first moves are 1.d4 Nf6 2.Bg5 moving a bishop before the knight.
Usually this is not recommended because it was thought generally that it would be easier to know
where you wanted your knights (f3/c3 etc) than where you wanted your bishop. However, 1.e4 e5
2.Nf3 Nc6 3.Nc3 (following the opening ‘rule’) is far less common at the higher level than 3.Bb5.
This is because the strategy that the White player chooses to adopt is defined by this pressurizing
bishop move. Similarly, the mindset of the Trompowski player has a clear intention in mind for
how he or she wishes to apply pressure to the opponent’s position. Thus it is clearly known that we
want the bishop on g5 because our strategy depends upon it. It is not yet known, however, whether
the knight’s want to go to c3 and f3, or f3 and d2, or d2 and e2. This will depend on how Black
answers our initial strategy of applying pressure down the h4-d8 diagonal and threatening perhaps
to take on f6.
So without further ado let’s get down to the nitty-gritty of the openings themselves.
(a) The Trompowski Attack
1.d4 Nf6 2.Bg5 and Black has the choice of whether to allow a capture at f6 or not. Clearly this
capture would weaken his control of the centre, but it would give him the two bishops. I will
consider briefly the five main responses.
(i) 2…g6 is not a move I feel I can recommend since the whole point of the Trompowski is
to avoid lines like the King’s Indian, so the opening would seem pretty pointless if 2…g6 was good. White should play 3.Bxf6 exf6 and Black has a difficult choice. The
main idea of most King’s Indians is to hit out at the centre with …e7-e5 but Black no
longer has an e-pawn. We saw the best setup for White in this position in section 5 of
this course when we discussed the plans for both sides. One of my favourite wins in this
line went as follow: 4.c4 (4.g3 may be even more accurate as discussed in section 5)
4…Bg7 5.Nc3 d6 6.g3 0-0 7.Bg2 f5 8.e3 Nd7 9.Nge2 Nf6 10.0-0 c6 11.Qd3 Qe7 12.b4
Bd7 13.a4 Rfe8 14.b5 Ne4 15.a5 a6 (else a5-a6 by White) 16.bxc6 Bxc6?! 17.Nf4
Nxc3?! 18.Qxc3 Bxg2 19.Kxg2 Rac8 20.Qd3 Qe4+ 21.Qxe4 fxe4 22.Rfc1 Bf8 23.Rab1
[SEE DIAGRAM OVERLEAF]

62
The culminating point of White’s strategy, he has better rooks, better pawns and good knight
against bad bishop. Black is lost, and although he struggled on until move 41 he could possibly
have resigned here with a clear conscience.
(ii) 2…e6 is a far more sensible move, aiming for 3…h6 to secure the bishop pair. There is quite a
lot that White can do here so I shall just mention a couple of possibilities. 3.e4 is most common,
when after 3…h6 4.Bxf6 Qxf6 5.c3 is an interesting plan. I feature another game of my own in the
next section in this line, in which Black played 5…d5. If he plays 5…d6 then the idea is 6.Bd3 and
then Ng1-e2, 0-0 and f2-f4 with a very active centre and a potentially exposed black queen. 6…Qg5
is an interested attempt to frustrate this, when White probably has to play 7.g3, which does at least
have the virtue of adding further support to f4. For instance 7…e5 8.Ne2 Bg4 9.Nd2 Nc6 10.Qa4
with the intention to castle queenside, looks interesting.
In addition to this, White can play 3.Nf3 taking play into a Torre Attack. Black may answer with
3…h6 and then White must choose between 4.Bxf6 Qxf6 5.e4 and follow with c2-c3 and Nb1-d2
before choosing which side to castle, or 4.Bh4 g5 5.Bg3 d6 6.e4 Nh5 7.c3 Bg7 8.Nfd2! Nxg3
9.hxg3 with Nb1-a3, Qd1-a4 and 0-0-0 to follow.
(iii) 2…d5 is super-solid, when White plays 3.Bxf6 and after 3…exf6 4.e3 Be6 (otherwise c2-c4
comes with a nice structural advantage to White) 5.g3!? intending a solid setup with Bf1-g2, Ng1-
e2, 0-0, Nb1-d2 and then perhaps b2-b3 and c2-c4. In fact, I can recommend 2…d5 and 3…exf6 for
Black, with the idea of playing a subsequent …h7-h5 at some stage after 5.g3!? If 3…gxf6 then the
position gets sharp after 4.c4! dxc4 (if 4…c6 5.e3 Bf5 6.Nc3 e6 then either 7.Nge2 with the idea of
Ng3 and f2-f4 or simply 7.Nf3 with Bf1-d3, 0-0 and e3-e4 to follow are both good for White) 5.e3
c5 6.Bxc4 cxd4 7.exd4 Bg7 8.Ne2 0-0 9.Nbc3 f5 10.Qd2 Nc6 11.Rd1 e6 12.0-0 is the usual
continuation, when I slightly prefer White. I should make it clear that you are not expected to
commit these lines to memory, all I wish to do is to give you a flavour of the variety of structures
that can arise in chess, and the Trompowski is one of the best openings to do this with.
(iv) 2…c5 3.Bxf6 gxf6 leads to very interesting positions. I recommend 4.d5 Qb6 5.Qc1 f5 6.c4!? –
left to his own devices White intends Nb1-c3, e2-e3, f2-f4, Bf1-d3, Ng1-e2, Qc1-c2 and then either
g2-g3 and 0-0, or Rh1-g1, h2-h3 and g2-g4 with intent to 0-0-0 at some stage. The thing I like about

63 White’s position here is that it is so easy to be flexible. For instance instead of Bf1-d3 there is
also g2-g3 and Bf1-h3 and Ng1-f3-h4 in mind. Flexibility due to better coordination between the
pawns and the pieces is what makes up for the lack of the bishop pair in most Trompowski
positions.
(v) 2…Ne4 is by far the most common move, keeping the pawns intact. 3.Bf4 is the main response
and then after 3…d5 White chooses between 4.f3 Nf6 5.e4!? dxe4 6.f3 – an imaginative gambit line
for rapid piece development after 6…exf3 7.Nxf3 or the solid 3.e3 with the intention to shift the e4-
knight with Bf1-d3xe4. Black’s most common try is 3…c5 when 4.f3 Qa5+ 5.c3 Nf6 leaves a
further choice between 6.d5!? (the aggressive move) and 6.Nd2 cxd4 7.Nb3 Qb6 8.Qxd4 Nc6!
9.Qxb6 axb6 10.Nd4! e5 11.Nxc6 dxc6 12.Bxe5 Be6 with a very interesting position and
compensation for the pawn.
In summary, the Trompowski allows the White player to experience a huge variety of positions
against the different Black responses and much more so than in other openings. Even if you only
play it occasionally, the experience is worth having.
(b) A mad gambit line!
The next opening I want you to see is a very off-beat one. I am showing it to you, so that you get a
flavour for the sort of tricks that are at least possible in the opening. The gambit in question is called
the Frankenstein – Dracula Gambit and arises out of a possible variation of the Bishop’s Opening
that I declined to mention back in section 1. The moves are as follows: 1.e4 e5 2.Bc4 Nf6 3.Nc3
(instead of 3.d3) giving Black the opportunity of the tactic 3…Nxe4!?
The idea is, of course, that if White plays 4.Nxe4 then 4…d5 regains the piece by a fork, whereupon
Black will have no problems at all from the opening. White, however, sees that things are not so
simple due to the possible threat of mate on f7. He sees that 5.Qf3 Nd6 6.Bb3 Be7!, with …0-0 and
…Nb8-c6 to follow gets nowhere, but what about 5.Qh5! which hits e5 into the bargain. I leave you
to work out for yourself why 5…Nd6 is absolutely forced. 6.Qxe5+ is now perfectly possible and

64 6…Qe7 is enough to equalize for Black, but White wants more with 6.Bb3 and now after 6…Nc6
to defend e5 there comes 7.Nb5! exploiting the fact that Black is still one move off castling. The d6-
knight is the only thing preventing mate and can’t move, but is now attacked. 7…Qe7 fails to
8.Nxc7+ and it all looks rather bad. So 7…g6 is the only move and then 8.Qf3 hits f7 from another
angle. Now Black must play 8…f5 but then 9.Qd5! and finally there is no way to cover f7 other
than by 9…Qe7. Then White triumphantly plays 10.Nxc7+ expecting resignation of at least serious
disappointment, but Black calmly plays 10…Kd8 11.Nxa8 b6! and we arrive at the starting position
of the Frankenstein – Dracula Gambit!
So what is going on? Well Black’s next move is bound to be …Bc8-b7, attacking a8 and
threatening nasty things against the white queen. Play usually continues 12.Nxb6 axb6 13.Qf3 Bb7
14.Qh3 when I think 14…h5 intending …g6-g5-g4 is worth a punt. Clearly this is a drastic try by
Black, but if his pieces coordinate properly then it is not out of the question that he might pull off a
win, and probably one that will please any spectators!
(c) The Latvian Gambit
Still in the 1.e4 e5 mode, one other gambit that is played occasionally at lower level is the Latvian,
but I cannot recommend this. The moves are 1.e4 e5 2.Nf3 f5?! when White should play 3.Nxe5
and the threat of Qh5+ almost forces 3…Qf6 and then 4.Nc4! fxe4 5.Nc3 Qg6 6.d3 is a simple way
to a good position for White.
(d) The Alekhine Defence and Nimzowitsch Defence
These two openings are the two where Black is determined to move a knight before any pawns. The
Alekhine Defence is 1.e4 Nf6 when White can either keep it quiet with 2.Nc3 or try for more with
2.e5 whereupon the main line runs 2…Nd5 3.d4 d6 4.Nf3 (4.c4 Nb6 5.f4 is the most aggressive, but
after 5…dxe5 6.fxe5 Nc6 Black appears to have what he wants, a vulnerable White centre to
attack.) and Black has a choice between a kingside fianchetto with 4…g6, or trying to clarify
matters in the centre with 4…dxe5 5.Nxe5 c6 intending 6…Nb8-d7xe5. Note, however, that Black
should be careful of 5…Nd7 on account of 6.Nxf7! Kxf7 7.Qh5+ when if Black is not just going to
lose a pawn and castling rights for nothing then he must play 7…Ke6!? to hold onto his extra piece
and take his chances.
[SEE DIAGRAM OVERLEAF]

65
The Nimzowitsch, after the great man himself, begins 1.e4 Nc6 and after 2.d4 then 2…e5. Of
course, if White so desires then he can play 3.Nf3 and go back into a Scotch Game, but there are
also 3.d5 and 3.dxe5 to consider. After 3.d5 Nce7 4.c4 Ng6 Black intends …Bb4+ with …Ng8-f6,
…d7-d6 and …0-0 to follow and then he will play for …f7-f5 with a kingside attack. White may
counter this with 5.a3 a5 (trying for …Bf8-c5 instead) 6.Be3 when Black must play 6…b6 and try
for …Bf8-c5 anyway. White may also play 4.Nf3(!) when 4…Ng6 not only walks into 5.h4 but also
5.Be3 Bb4+? (again, 5…b6 is best) 6.c3 Ba5 7.Qa4! Bb6 8.Bxb6 cxb6 9.d6! and Black is in big
trouble, as I once discovered to my cost!
3.dxe5 is a curious way of playing and leads to such positions as 3…Nxe5 4.Nf3 Qf6 5.Nc3 Bb4
6.Bd2 Nxf3 7.gxf3 Ne7 when clearly an assessment is not easy. Black may have to play …c7-c6 to
keep the white knight out of d5 and b5. Meanwhile White is developing and using the g-file.
Again I hope this has increased your awareness of the variety of positions that can arise in chess, as
that is the main point of this section.
Finally, we go back to 1.d4 and look at a move which is tricky, but nowadays very common.
(e) The Dutch Defence
This opening has too much theory on it to even contemplate giving you anything more than a brief
introduction to the possibilities. The opening begins 1.d4 f5 whereupon White has a few tricky
second moves:-
(i) 2.Nc3 tries for an immediate 3.e4 which Black wishes to avoid as his king is slightly open.
2…Nf6 meets 3.Bg5 when 3…d5 is the main way to stop the e-pawn advance. White plays 3.Bxf6
exf6 4.e3 and if Black plays 4…c6 (4…Nc6 and re-route to e7 may be best here) then 5.Bd3 and
Qd1-f3 is often a good plan, with ideas like Ng1-e2, h2-h3 and g2-g4. This is a pawn break that all
1…f5 players need to be aware of, because played at the right time it can be deadly.
(ii) 2.Bg5 hopes for 2…Nf6 3.Bxf6 or 2…h6 3.Bh4 g5 4.e4 with the threat of Qh5 mate. I
recommend 2…g6! 3.Nc3 Nh6!? 4.e4 fxe4 5.Nxe4 Nf7 with moves like …Bf8-g7, …d7-d5 and
…Nb8-c6 to follow.
(iii) 2.e4 is a desperate attempt to take the Dutch Defence to pieces quickly, but I do not recommend
this: 2…fxe4 3.Nc3 Nf6 4.Bg5 Nc6!? 5.d5 Ne5 6.Qd4 Nf7 7.Bxf6 exf6 8.Nxe4 f5 9.Ng3 g6! 10.0-
0-0 Bh6+ 11.f4 0-0 is main line. One interesting plan here is to play …Bh6-g7, …Nf7-d6, …b7-b5,
…Ra8-b8 and ….Qd8-f6 with some pressure against the white queenside.
[SEE DIAGRAM OVERLEAF]

66
The main line is 2.Nf3 Nf6 3.g3 when Black must choose between 3…g6 and 3…e6. In the former
case he has a King’s Indian set-up with a pawn already on f5. Given that one of the aims of the
King’s Indian is to break with …f7-f5 one might think that this just very good for Black. The harder
part is getting in the move …e7-e5 successfully. For instance, 3…g6 4.Bg2 Bg7 5.0-0 0-0 6.c4 d6
7.Nc3 Nc6 8.d5 Ne5 9.Nxe5 dxe5 and Black has a pawn at e5, but it is doubled and the game can
burst into action after 10.e4 f4 11.exf4 Nh5!? If Black feels up to taking this on then good luck, but
you will need to study this in the theory books first.
3…e6 is more common and after 4.Bg2 the strategy revolves around whether Black wants to fight
for …e6-e5 by playing 4…Be7 5.0-0 0-0 6.c4 d6 – the Classical Variation, or whether he wants to
solidify his grip over e4 once and for all by playing 4…d5 when play might continue 5.0-0 Bd6
6.c4 c6 7.b3 Qe7 to prevent Bc1-a3 and moves like …b7-b6, …Bc8-b7, …0-0, …a7-a5 and …Nf6-
e4 to follow, choosing d7 or a6 for the knight on b8 as appropriate. White may also try 7.Bf4 Bxf4
8.gxf4 0-0 and 9…Nbd7 with a very tense situation of Black having the more solid structure but
White having the better dark-square control, in particular the outpost created by Black at e5.

67
PART 13: Unusual Openings in Practice
In this section there are two games of my own, with me being White in both. They show less usual
openings getting into tense positions with lots of things to analyse. Both games are eventually
drawn, but White has the upper hand in both, in the first case playing with the ‘rare opening’ and in
the second case playing against it.
The first game is Bigg – Tsesarsky (IM), Coulsdon 2002. The opening is another Trompowski, and
as you will see, complications start quite early!
1. d4 Nf6
2. Bg5 e6
3. e4 h6
4. Bxf6 Qxf6
5. c3 d5
6. Nd2 c5!
Much more accurate than 6…dxe4 7.Nxe4 Qd8 8.f4!? intending 9.Nf3 with more space and a huge
grip on e5, or just 8.Nf3 at once.
7. Ngf3 Nc6
Here 7…cxd4 is perhaps more accurate at once, to force me to make a decision as to how to
recapture. 8.cxd4? is ugly due to 8…dxe4 and I have an IQP and my opponent has the two bishops
into the bargain, one trump too many. 8.exd5 is correct, with the idea of 8…exd5 9.Nxd4 when
Black has the IQP but two bishops to compensate, or if he plays 8…dxc3!? then 9.Ne4 Qg6
10.Nxc3 with Bb5+ and 0-0 to follow is good for White.
8. Bb5 cxd4
Here I thought about 9.Nxd4 exploiting the pin. If 9…e5 then 10.exd5! exd4 11.0-0!? is very
interesting, since 11…dxc3 is met by 12.Ne4 with Rf1-e1 to follow and an attack, while 11…a6
12.Ba4 b5 13.dxc6! bxa4 (13…Qxc6 14.Re1+ Be6 15.Bc2 threatens Be4 skewering the queen and
rook and gaining time for 16.cxd4 as a result, and 15…0-0-0?! Is risky to say the least after 16.Be4
Qb6 17.a4!) 14.Qxa4 and we reach the critical position:-
By this stage I had used quite a lot of time checking all the side variations and convincing myself
that this was the best line. I was unsure how to assess my chances here and decided not to risk it.
Was my decision correct? Well I had noticed that all of Rfe1+, Ne4 and c7+ are potential threats,
but what if Black just plays …Be7, …Bd7 and …0-0 in response? This is what put me off, but now
we have the position in front of us, let us see if we can make something work. One threat that I failed to notice is the simple 15.cxd4 with three nice pawns that can be pushed for the piece. One
plan that looks good then is rooks to e1 and d1, d4-d5 and Ne4. Thus it seems Black should either

68 take on c3 or defend d4. If 14…dxc3 then do we go 15.Ne4 or 15.Rae1+? (I pick the a-rook so
that a future …cxb2 will not gain a tempo). If 15.Rae1+ Be7 (not 15…Be6 16.c7+) 16.Ne4 Qg6
17.Nc5 with a threat of c7+ looks good and I assume that 15.Ne4 and 16.Rae1 may well transpose.
But wait! Black has 17…0-0 18.Rxe7 Qd6! And I see no way to save the piece. What about
17.Nxc3 instead, threatening Nc3-d5? Maybe 17…Qd6 again, but wait, in that case I will play my f-
rook to e1 on move 15 and then I would have 18.Rad1 winning after 17…Qd6. Let us check that
there is no opportunity for …cxb2: no, there is not! Move 15 is with check, move 16 threatens to
capture the queen on f6 with check and the knight captures the problem pawn on the next turn.
Therefore we play 15.Rfe1+ Be7 16.Ne4 Qg6 17.Nxc3 and has Black got a defence (this is how we
need to analyse chess: be prepared to go back and look at improvements in a line, because you
might not find the correct rook to move or the most forcing move order first time round)? 17…Kf8
looks hideous so 17…Be6 is the last try. White must try 18.c7+ and then 18…Bd7 (18…Kf8
19.Rad1! threatens ideas of both Qxa6 and Rd8+, as well as Qc6 and Nd5: this looks risky for
Black to me) and now perhaps we can sacrifice with 19.Rxe7+ Kxe7 20.Qb4+! to take the f8-square
away from Black as an escape route. 20…Qd6 allows 21.Nd5+ Ke6 22.Re1+ Kxd5 23.Rd1+
winning the queen and mating shortly after, while 20…Ke8 21.Nd5! Qg5 22.Qb8+! wins. Thus the
king would have to come forward with 20…Kf6 21.Nd5+ Ke5 (note that if 20…Ke6? then White
wins a tempo with Re1+ which makes things even worse) 22.Qc5! wins. White threatens the
unstoppable 23.Re1+ and if 22…Qe4 then 23.Nc3+
That is what I call a king hunt and it seems that 14…dxc3 is losing, so 14…Bc5 is indicated, to
defend d4. However, White has 15.Ne4 but then 15…Qe5 is surprisingly annoying, so 15.Rae1+!
Be6 16.c7+ Ke7 (16…Kf8 17.Qc6 regains the piece) 17.Nb3! when 17…Qf5 loses to 18.Qa5! and
17…Bb6 to 18.Qb4+ so 17…Ba7 is forced and then just 18.cxd4 and White has material equality
and a huge attack. So perhaps 9.Nxd4! is best, but there was no way I would have seen all the above
at the board, and White had to be very accurate too. This type of analysis is good fun and excellent
practice. Perhaps 9.Nxd4! Bd7 is more solid but then 10.Qa4 e5 11.exd5 exd4 12.0-0-0!? is worth a
look. 12…Ne5 13.Rhe1 might be awkward and 12…Nb8 13.Rhe1+ Be7 14.Ne4 Qf4+ 15.Kb1 also
looks good, but perhaps the calm 13…Kd8! 14.Ne4 Qf4+ 15.Kb1 f5!? holds on. Maybe then
10.exd5 exd5 11.0-0 is safest. Grabbing a pawn with 11….Nxd4 12.Bxd7+ Kxd7 13.cxd4 Qxd4 is
surely suicide after 14.Qb3! Bb4 15.Nf3 or 14…b6 15.Rad1
So after all that, back to the game!
9. cxd4 Bd7
Evidently Tsesarsky is worried about 9…dxe4 10.Ne5! catching his king in the centre after
10…Bd7 11.Nxd7 or 11.Qa4 Rc8 12.Nxe4 Qd8 13.Nxd7 Qxd7 14.Rc1 with a likely transition into
a superior ending for White.
10. 0-0 Be7
11. Ne5!? ….

69 This exploits the fact that the black queen cannot retreat to d8 after 11…Nxe5 12.dxe5 and so
White will get to keep the black king in the centre with Bxd7+ on the next move. 11.Ne5 also
prevents 11…0-0, and 11…0-0-0 is clearly asking for 12.Rc1 and Qa4 to follow. Note that 11.e5 is
still bad, even though the black queen can’t retreat, because it just blocks up all White’s play and in
the long run Black has the two bishops.
11. …. Rd8
12. Nxd7 ….
The problem for White is that there are too many candidate moves and time is running out. 12.exd5
was also to be considered: 12…exd5 13.Bxc6 Bxc6 14.Rc1 with the aim of taking on c6 and
saddling Black with a backward c-pawn, following up with Nd2-b3 and perhaps an edge in an
ending. Black can try 12…Nxe5 instead, however. After 13.dxe5 Qxe5 14.Bxd7+ Rxd7 15.dxe6
Qxe6 16.Re1 Qd6 it will be difficult to stop Black castling when he might have a better ending
because of bishop against knight. 17.Nc4 Qxd1 18.Raxd1 Rxd1 19.Rxd1 might be best, with a dead
draw.
19…0-0 20.Rd7 Rc8! 21.Rxe7 Rxc4 22.Re8+! Kh7 23.Kf1!(=)
The move in the game may be the best way to fight for more.
12. …. Rxd7
13. Qa4 dxe4!
Forced but good.
14. Bxc6 bxc6
15. Nxe4 Qxd4
16. Qxc6 0-0!
16…Qxb2 17.Rab1 Qe5 18.Rfd1 Qc7 19.Qxc7 Rxc7 20.Rb8+ wins.
17. Nc3! Qd6
17…Rfd8 loses to 18.Rad1! Qxd1 19.Nxd1 Rxd1 20.Qc2 and White is in control.
18. Qxd6 Rxd6
[SEE DIAGRAM OVERLEAF]

70
A very interesting endgame has arisen in which I have a queenside majority and Black has a weak
a-pawn but Black has the bishop on an open board. Black’s rooks are too active for my liking so the
first plan is to exchange them off.
19. Rfd1 Rfd8
Moving the rook allows 7th rank infiltration with 20.Rd7!
20. Rxd6 Rxd6
21. Rd1 Rxd1+
22. Nxd1 Kf8
23. Kf1 Ke8
24. Ke2 Kd7
25. Kd3 f5
I must now think about how to get my pawns in motion while holding Black’s pawns up on the
kingside by blockading on the light squares.
26. f3 Kd6
27. Nc3 Kc5
28. a3 Bd6
29. h3 Bb8
30. b4+ Kd6
31. Kc4 Kc6
32. a4 Bg3
White is now better but can he win. I could not see how and may have been running out of time by
now. The game eventually fizzled out to a draw by 33.Nb5 Bf2 34.Nd4+ Kd6 35.b5 Ke5! 36. Nc6+
Kd6 37.a5 Be1 38.Nd8 Kd7 39.b6! a6! 40.Nb7 Kc6 41.Nd8+ and a draw was agreed.
The next game is taken from the last round of one of the worst tournaments of my entire life. It was
another weekend congress and I had started on the depressing score of half a point out of three. I
managed to win the fourth round with Black and needed to win this game with White just to finish
on half-score! The determination was almost too much to bear. My opponent is David Tucker, who
has been on the regular tournament circuit in Kent for a long time.
1. d4 Nf6
2. Nf3 ….
I had lost with the Trompowski in both of my previous White games in this tournament and was in
no good humour about it!
2. …. b5?!

71 It must be said I do not like this move, but my first reaction, given my performance in the rest of
the tournament was ‘O great! I’m going to lose to this as well now am I?’
Black tries to take hold of the c4-square but White changes plan and plays of the kingside instead.
3. Bg5! Ne4
4. Bf4 ….
My excuse is that Black does not generally-speaking play an early …b7-b5 against the
Trompowski.
4. …. Bb7
5. e3 a6
6. a4 b4
7. Nbd2 e6
8. Nxe4 Bxe4
9. Bd3! Bb7
Perhaps best, since 9…Bxd3 10.Qxd3 leaves the light squares looking very shaky for Black when
he plays …a6-a5 and if he doesn’t play this then I play a4-a5 and the b-pawn will be a permanent
worry for Black.
10. 0-0 d5
Black is worried, probably quite rightly, about 11.e4 and 12.Qe2 when there is little point in Black’s
position and I threaten building moves like a4-a5, c2-c3 and if the b-pawns are exchanged then Rf1-
b1 and the b7-bishop gives Black more trouble. The problem with 10…d5 is emphasized by my
next move.
11. Ne5! Nd7
12. Qh5! Nxe5
13. Bxe5 ….
Black is hopelessly tied down on the kingside. He move the f8-bishop or g7 falls, the f-pawn is
pinned and 13…g6? 14.Qh3 wins a couple of pawns after 14…f6 (14…Rg8 15.Qxh7 is even worse)
15.Qxe6+ and Qxf6. There is only one plan remaining: castle queenside.
13. …. Qd7
14. f4! 0-0-0
15. f5 ….
The threat is 16.fxe6 and the rook gets into f7. Again, Black finds an only move.
15. …. f6
16. fxe6 Qe8
17. Qh3! Kb8
Obviously not 17…fxe5 18.e7+ Rd7 19.exf8=Q Rxf8 19.Rxf8 Qxf8 20.Bf5 winning.
18. Bf4 Bd6
Black covers the diagonal and prepares …Bb7-c8. I cannot save my extra pawn so I must further
get to grips with his weakened queenside and try to expose the black king while he retrieves his
pawn.

72
19. a5! Bc8
20. c3! ….
My 19th move fixed a6 and b4 as weaknesses and my 20th move attacks b4. Swapping b-pawns on
c3 is very dangerous as Black would then come under heavy attack down the b-file. 20…Bxe6
21.Qg3! Ka7 22.cxb4 and attacking down the c-file leaves Black in serious trouble.
20. …. b3
The only other option but even this allows me to keep a clear advantage.
21. Bxd6 Rxd6
22. Ra3! Rxe6
23. Rxb3+ Bb7
23…Rb6 24.Rxb6+ cxb6 25.Qg3+ and 26.axb6 leaves Black a pawn down and now vulnerable
down the a-file. If the king moves then 24.Qg3 gains a vital tempo on the c7-pawn.
24. Re1 Qc6?!
25. Qg3! g6
26. Rb6 ….
The point of my 25th move, the c-pawn is pinned.
26. …. Qd7
27. e4! Rhe8
28. Rxe6 Rxe6
29. e5 fxe5
30. Rxe5 Rf6
31. Qe1 Qa4
32. b4 Qc6
33. h3 Be8
34. Re8 Kb7
White is winning; he has total control of the e-file, an extra pawn and perhaps a safer king. The
pawns on the dark squares complement the bishop superbly. It is around this stage that the quality
of moves goes downhill. I was eager to get home with half-score and forget all about the
tournament and I imagine Black was just hacked off at his position.
35. Qe5 Re6?!
36. Rxe6 Bxe6
37. Qe3 Bf5?

73
Far too impatient and makes my life a lot easier. Obviously not 37…Qxc3?? 38.Bxa6+
38. Bxf5 gxf5
39. Qf3! Qe6
40. c4! c6?!
Not 40…Qe4? 41.Qxe4! fxe4 (41…dxe4 42.g4! f4 43.g5 Kc7 44.h4 Kd7 45.h5 Ke6 46.d5+ cxd5
47.cxd5+ and Black cannot stop all the pawns, especially with b4-b5 and queening the a-pawn in
reserve) 42.cxd5 and the king will round up the e4-pawn. 40…Kc6 deserves attention though.
41. cxd5 cxd5
41…Qxd5 42.Qe3! and black’s isolated pawns and now exposed king begin to tell.
42. Kf2 Kc6?
43. Qc3+?? Kb5!
And the game is drawn.
I cannot believe my hasty 43rd move, allowing the king to roam freely around my weak pawns.
42…Kc6? is a mistake too, after 43.Qd3! Kb7 44.b5! axb5 45.Qxb5+ Ka7 46.a6! Qxa6 47.Qxd5
and the passed d-pawn gives me an easy win with the black king all the way over on a6 and the
remaining black pawns isolated. After playing so many good moves one blunder can still throw it
all away. This is a tournament that I wish to forget as soon as possible!

74
PART 14: Exploiting an Advantage
One of the most common things that you will hear chess player say to you is the immortal phrase “I
was winning, but…..!” Exploiting an advantage is sadly not always as easy as the opponent’s play
might mean it deserves to be.
One player who probably would not be heard saying the above phrase is Anatoly Karpov and if we
want lessons in converting an edge then he is the person to follow. If he does ever lose a game it is
because he started with a bad position, not because he blundered a winning one. The first game is
Karpov – Timman, Montreal 1979. Timman gets a bad position from the opening and that’s about
that. This game might be described as a lesson in grinding.
1. e4 d6
2. d4 Nf6
3. Nc3 g6
4. g3 Bg7
5. Bg2 0-0
6. Nge2 e5
7. 0-0 Na6
I wonder whether 7…Nc6 or 7…Nbd7 is better.
8. Re1 c6
9. h3 ….
An important move, eliminating counterplay by Black on g4, and preparing to put his bishop to e3.
9. …. Re8
10. Bg5 ….
An important provoking move, to get Black to weaken his kingside before retreating the bishop to
e3.
10. …. h6
11. Be3 Qc7
I do not like this set-up by Black, it seems very artificial and where is the a6-knight going?
12. Qd2 Kh7
That’s another advantage of provoking …h7-h6 of course, Karpov gains a tempo while connecting
his rooks.
13. Rad1 Bd7
[SEE DIAGRAM OVERLEAF]

75
Black has a horrible position, with almost no play at all, but it White goes forward recklessly then
Black may get all the chances he needs. Karpov is calm and patient, waiting to see whether his
opponent will make mistakes here. Most of us would probably play 14.f4 here, or perhaps wait with
14.Kh2. Karpov prefers to gain a bit more space first.
14. g4 Rad8
15. Ng3 ….
Karpov carefully overprotects his centre and move slowly further forward.
15. …. Bc8
16. f4 ….
Karpov now thinks the time is right and gains more space creating tension. Interestingly enough, I
would be concerned about 16…Bxg4 17.hxg4 Nxg4 here, but Karpov never seems worried about
his opponents sacrificing. Perhaps 18.d5 is just good for White though.
16. …. b5
17. a3! ….
Typical Karpov, just stop the counterplay before it starts.
17. …. b4
Clearly risky, since it will give Karpov the weak a-pawn as a target, but with the pawn on b5 the
move d4-d5 is always in the air for White, intending to undermine the pawn’s support.
18. axb4 Nxb4
19. Nce2! ….
I like the philosophy, there is a piece in my half of the board therefore I will shift it!
19. …. exd4
20. Nxd4 ….
Even here Karpov is sure to avoid 20.Bxd4 c5! and …Bc8-a6 to follow with some play.
20. …. a5
21. c3 ….
Actually now or never since after …Bc8-a6 this move could be met by …Nb4-d3!
21. …. Na6

76
22. Qc2! ….
Simple control, defending e4 so that he can answer 22…Nc5 with 23.b4
22. …. Bd7
23. Nf3 Re7
24. Bf2 ….
Coordinating his defences to the utmost before making any attempt to move forward.
24. …. Be8
25. Qd3! ….
A nice moment to play this, as 25…Nc5 loses simply to 26.Bxc5 due to the pin along the d-file.
25. …. Qb7
26. Ra1 ….
Karpov could have gone for it with 26.e5, but why break the habit of a lifetime. Black cannot
defend a5 and 26…Qxb2?? 27.Rfb1 is just embarrassing.
26. …. Nc7
27. Rxa5 R8d7
28. b4 ….
Just compare this with the position on the last diagram. Karpov has a winning position against a
strong GM by just calmly grinding out a better position by keeping a good defensive set-up on the
key squares and gaining space where possible.
28. …. Ne6
29. Be3! ….
Even now he does not relax. 29.Qd2 allows 29…d5! 30.e5 Ne4 31.Nxe4 dxe4 32.Nd4 c5! and
Black has counterplay. It seems unfair that Black still has chances after White has played so well,
but such is chess.
29. …. c5
30. f5 Nd8
31. b5! Kh8
I leave it to you to work out why capturing on e4 would have lost for Black.
32. Bf2 Qc7

77
33. Re4 ….
e4 will be overprotected whether it likes it or not.
33. …. Qb8
34. c4 ….
It just gets better with every move.
34. …. Ra7
35. Rxa7 ….
Karpov is a clear pawn up so he trades pieces at every opportunity. Note that it was still possible to
go wrong: 35.Rfa1 Nxe4! and the bishop on g7 hits a1 and if 36.Rxa7 then 36…Nxf2! wins.
35. …. Rxa7
36. e5 ….
At last the breakthrough, and the end is in sight.
36. …. dxe5
37. Nxe5 Ra2
38. Bxc5
and Black resigned (1-0)
I end the notes on this course with one of my all-time favourite games, in which rather than use a
grinding technique to convert an advantage, here we see White use the initiative, and once he’s got
it he doesn’t let it go. The game is Tal – Ivkov, Uppsala 1956. I just give the moves here, without
any commentary, because my input would spoil the flow of a masterpiece. By the way, in case you
think Black is a weak player, then I would point out that Borislav Ivkov is a top class grandmaster
who recently played in the Senior European Championship in a field of strong veteran GMs and
IMs, including Victor Korchnoi, and won the tournament outright with an amazing score of 8/9!
Mikhail Tal, however, can beat anyone on his day.
1. e4 e5
2. Nf3 Nc6
3. Bb5 a6
4. Ba4 Nf6
5. 0-0 Be7
6. Re1 b5
7. Bb3 0-0
8. c3 d6
9. h3 Na5
10. Bc2 c5
11. d4 Qc7
12. Nbd2 Bd7
13. Nf1 Re8
14. Ne3 g6
15. b4 cxb4
16. cxb4 Nc4
17. Nxc4 bxc4
18. Re3 Bf8
19. Bb2 Bh6
20. Ra3 Qb7

78
21. dxe5 Qxb4
22. Qd4 Nh5
23. exd6 Bg7
24. e5 Bc6
25. Re3 Bxf3
26. Bc3 Qb5
27. gxf3 Rad8
28. f4 Re6
29. Rb1 Qc6
30. Rb6 Qc8
31. Bd1 Bh6
32. Bxh5 gxh5
33. f5
and Black resigned (1-0)
The final position speaks for itself.
I hope you find these notes useful and that this course will have shown you a lot about how chess is
played at some of the highest levels. I hope also that your grade will show a big leap as a result.
Best of luck.
Andrew Bigg.