inviso sa step-by...lansweeper –sql queries to extract relevant hardware/software data from...
TRANSCRIPT

Inviso SAStep-by-Step Guide
DATE: NOVEMBER 21, 2017
1

Section 1: Introduction
2
Inviso Software Analyzer
The Inviso Software Analyzer (InvisoSA.com) is an IT inventory processing service that transforms and enriches hardware and software data into consolidated and highly accurate reporting and analysis.
This reporting details the Microsoft software present and in use within an environment. This information is useful for: ✓ Optimization and harvesting analysis✓ License compliance and Software Asset Management
InvisoSADiscovery Toolkit
InvisoSA Discovery Toolkit (ISADT) is the lightweight client application that allows IT professionals to run a variety of scripts to collect hardware, software, and usage data from multiple database and directory sources for analysis via InvisoSA.

Section 2: Administration
3
✓ Subscriptions
✓ Organizations
✓ Engagements

Registering and Creating a Subscription
4
1. Click ‘Sign in’ and enter your Microsoft Account to activate a Subscription.
2. As prompted, associate an email address to the Account and click the Register button. This automatically creates your Subscription and a sample Organization and Engagement.
3. Once the Subscription is activated, the ‘Manage’, ‘See/Add Artifacts’ and ‘See/Add Jobs’ tiles will activate and change from gray to colors.

Inviting Users to a Subscription
5
1. Click the ‘Manage’ tile on the home page, then click the ‘Create New Organization’ tile and click the Subscription Name.
2. Click on the ‘Invite a New User +’ button.
3. A one-time link will be created that you can send to other individuals. When they click it they be granted access to your Subscription.
Note: A user invited to the Subscription will have access to view all information under that Subscription, associated Organizations, and associated Engagements.
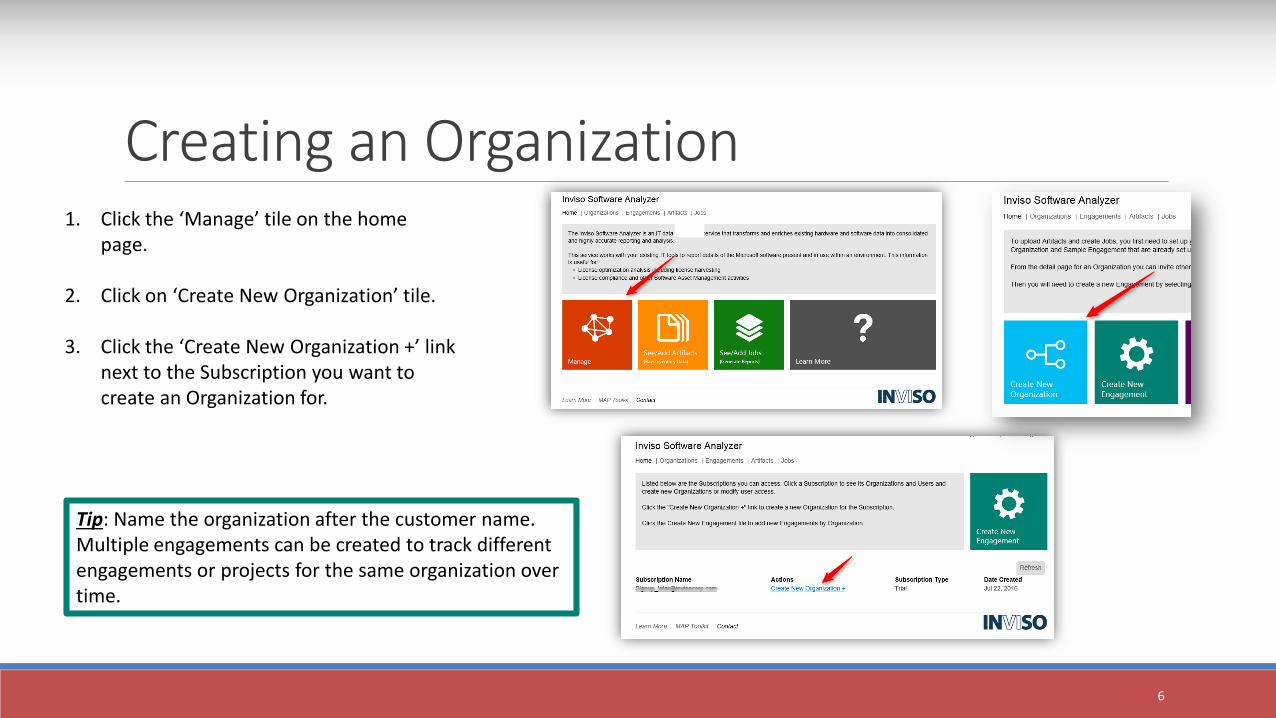
Creating an Organization
6
1. Click the ‘Manage’ tile on the home page.
2. Click on ‘Create New Organization’ tile.
3. Click the ‘Create New Organization +’ link next to the Subscription you want to create an Organization for.
Tip: Name the organization after the customer name. Multiple engagements can be created to track different engagements or projects for the same organization over time.

Inviting Users to an Organization
7
1. Click the ‘Manage’ tile on the home page, then click the ‘Create New Engagement’ tile and click the Organization Name.
2. Click on the ‘Invite a New User’ button.
3. A one-time link will be created that you can send to other individuals. When they click it they be granted access to your Organization.
Note: If a user is invited to the Organization, the individual will have access to view all information under that Organization and associated Engagements.

Creating Engagements
8
1. Click the ‘Manage’ tile on the home page then click the ‘Create New Engagement’ tile.
2. Click the ‘Create New Engagement +’ link next to the Organization for which you want to create an Engagement.
3. Enter an Engagement name.
Tip: Be descriptive in the Engagement name, noting the Date, Scope, etc., so that when multiple Engagements are associated to an Organization, it will be easy to differentiate them.

Section 3: Data Collection & Analysis
9
✓ Exploring the InvisoSA Discovery Toolkit & Extracting Data
✓ Uploading Data to InvisoSA
✓ Inventory Summary: Generation & Retrieval
✓ Report Analysis and Utilization
✓ Multiple Job Iterations

Exploring the InvisoSA Discovery Toolkit
10
ISADT does not perform any network or endpoint scans itself, instead leveraging existing database and directory repositories to collect relevant hardware, software and user data points. The outputs are saved locally and are uploaded to InvisoSA by the user of the tool. All of the scripts can be viewed within the tool or copied to a text file or SQL Management Studio, for example, in order to appropriately review and test them.
ISADT supports inventory data collection using three methods. You can mix and match data collected using any or all of these methods:
1. ISADT Connectors: Install ISADT in the environment data is to be collected from. Queries will be run directly against the data source. 2. PowerShell Collectors: PowerShell scripts have been developed so that inventory data can be efficiently collected from environments
where it may not be possible to install ISADT. 3. Use Excel: The Simple Generic Template is available to enable manual entry (via Excel) into the InvisoSA website.

Data Sources - ISADT Connectors
11
ISADT Connector - Data Sources Currently Supported:
✓ Active Directory – PowerShell scripts to collect Computer and User details to help define the scope of active computers/users✓ Altiris – SQL queries to extract relevant hardware/software data from Altiris databases✓ Dell KACE – SQL queries to extract relevant hardware/software data✓ Intune – Converts CSV files to XML files✓ LANDESK – SQL queries to extract relevant hardware/software data ✓ Lansweeper – SQL queries to extract relevant hardware/software data from Lansweeper databases✓ MAP ToolKit – SQL queries to extract relevant hardware, software, user, and usage data from MAP databases✓ SCCM – SQL queries to extract relevant hardware/software data from SCCM databases✓ SCOM – SQL queries to extract relevant hardware/software data from SCOM databases✓ SCVMM – SQL queries to extract relevant hardware/software data from SCVMM databases✓ VMware vCenter – Queries to extract relevant ESX Host, Host/VM mapping, and VM movement data from vCenter databases

Setting Up ISADT
12
1. From the InvisoSA homepage, click, ‘Download Toolkit’ to download ISADT.
2. Install ISADT locally on the machine(s) from which target sources will be connected to and queried.
3. Click ‘Set Preferences.’ It is here you can change the default Output Folders if needed. The default used by the app will normally be fine.
Note: If you change folders to file shares on other servers, your performance will be affected by your network’s performance.

Extracting Data - ISADT Connectors
13
1. Run the relevant ‘Collect Data’ item(s) to extract the desired datasets (moredetails on the following pages).
2. The tool outputs .XML and .GZ files to the folder specified in ‘Set Preferences.’ The default folder is here:
C:\Program Files (x86)\Inviso Corporation\Inviso Software Analyzer Discovery Toolkit\Output
3. This folder can be accessed by the Open Output Folder button and houses the files which will be uploaded to InvisoSA as Artifacts for processing.
Note: For assistance with MAP scans, SCCM configurations, and other tooling challenges, contact [email protected]. Click the MAP Toolkit tile on the Learn page for more information.

Extracting Data from Inventory Tools
14
1. Popular inventory tools such as MAP and System Center collect inventory data and store it locally in a dedicated SQL database.
2. To extract that data, choose the appropriate Inventory Tool Connector, enter the Server and Database Names, use Alternate Native Credentials if using SQL Authentication, and connect to that SQL database.
3. Use the Test Connection button to verify connectivity and select the Run Query button to extract the inventory data.
4. The tool outputs .XML and .GZ files to the folder specified in ‘Set Preferences.’ It can be accessed by the Open Output Folder button. The default folder is here:
C:\Program Files (x86)\Inviso Corporation\Inviso Software Analyzer Discovery Toolkit\Output
Note: To allow full transparency of operation, the scripts can be viewed in the Script folder here:C:\Program Files (x86)\Inviso Corporation\Inviso Software Analyzer Discovery Toolkit\Output

Custom Inventory: Active Directory
15
1. ISADT runs LDAP queries against domain controllers to determine the last activity dates of computers and users in the domain.
2. Select “Query for Computers” and run the query. Then change the selection to “Query for Users” and run that query, as well.
3. For recent network activity, the activity dates for a given computer or user may vary across the different domain controllers (but it may take a prolonged period of time to collect data from every domain controller).
4. To resolve this, the default setting is to run the query against just one domain controller, but the option to query all of them is also available.

Focusing on Altiris, LANDESK and Lansweeper
16
1. Enter the server name and database used by Altiris, LANDESK or Lansweeper.
2. If the ‘Use Alternate Native Credentials’ option is not selected, the queries will run under your credentials.
3. Select on ‘Test Connection’ before selecting on ‘Run Query.’
4. Output is saved in XML format that can be opened in Excel.
Note: No credentials are stored by the application.

Focusing on Dell KACE
17
1. Enter the server name, database and port. If no port is specified, then default of 3306 will be used.
2. The MySQL Dell KACE query requires you to specify Alternate Native Credentials as integrated authentication is not yet supported.
3. Select on ‘Test Connection’ before selecting on ‘Run Query.’
4. Output is saved in XML format that can be opened in Excel.
Note: No credentials are stored by the application.

Focusing on Intune
18
This utility converts Intune Computer and Software CSV files into XML files.
Select on the CSV file and process the file to get the converted XML file.

Focusing on the MAP Tool
19
1. By default, when a user installs the MAP Tool, a light-weight installation of SQL Server (LocalDB) is installed in the user’s profile. The user then specifies a database name to store scan data.
2. To extract this data, the same user must install ISADT on the same machine (since the database is not accessible from other machines).
3. If the database is local, the Server Name value must be entered as “(LocalDB)\MAPToolKit” and then the appropriate Database Name.
4. Alternatively, if the MAP Tool has been set up to use a full installation of SQL Server (see MAP documentation), ISADT can remotely access the database.
5. In this case, the Server Name value must specify the correct SQL instance on the server (“MAPS”) and the appropriate Database Name.

Focusing on System Center
20
1. Enter the name (or name\instance) of the database server used by System Center (This may be a different Windows Server from the computer where System Center is installed).
2. Use the System Center console or SQL Server Management Studio to find the name of the System Center database.
3. By default, when an administrator installs System Center, the setup program creates a database with a name that follows the 3-letter site naming convention (e.g. “SMS_XYZ” or “CM_XYZ”).
4. Use Alternate Native Credentials if using SQL Authentication.

Focusing on VMware vCenter
21
VMware vCenter contains information about physical hosts and virtual machines
1. Enter the vCenter server name.
2. Use VMware Credentials if your credentials do not have permissions to the vCenter appliance.

Extracting Data - PowerShell Collectors
22
PowerShell scripts are available for data sources.
• If you don’t see the data source you are looking for, review the list of sources available using ISADT native data collectors.
• If a data source is not supported for automatic collection, the Generic Template can be used to import data from Excel.
Under Download Link, select on the designated ‘PowerShell Script’ and it will prompt you to a site to download the PowerShell script.

Extracting Data - Generic Excel Import
23
Two Excel Generic Templates are available for collecting inventory data:
1. Simple Generic Template is better suited where only device and software data are collected.
2. Advanced Generic Template is better suited when only types of inventory data (e.g. Usage data) need to be collected.
It is strongly recommended to use ISADT Connectors or PowerShell Collectors as primary and secondary collection options. The Simple or Advanced Generic template should only be used for data sources not supported by either of the options above. This is because population of the Generic Template is prone to human data input error where the other options are not.
Templates are available from https://www.invisosa.com/learn.

Locating Files for Uploading to InvisoSA
24
1. All data files are written to the folder specified ‘Set Preferences.’ It can be accessed by the Open Output Folder button.
2. XML files are saved as uncompressed and compressed (.gz) versions. Either one can be uploaded. Uploading zipped files will significantly decrease the time it takes.
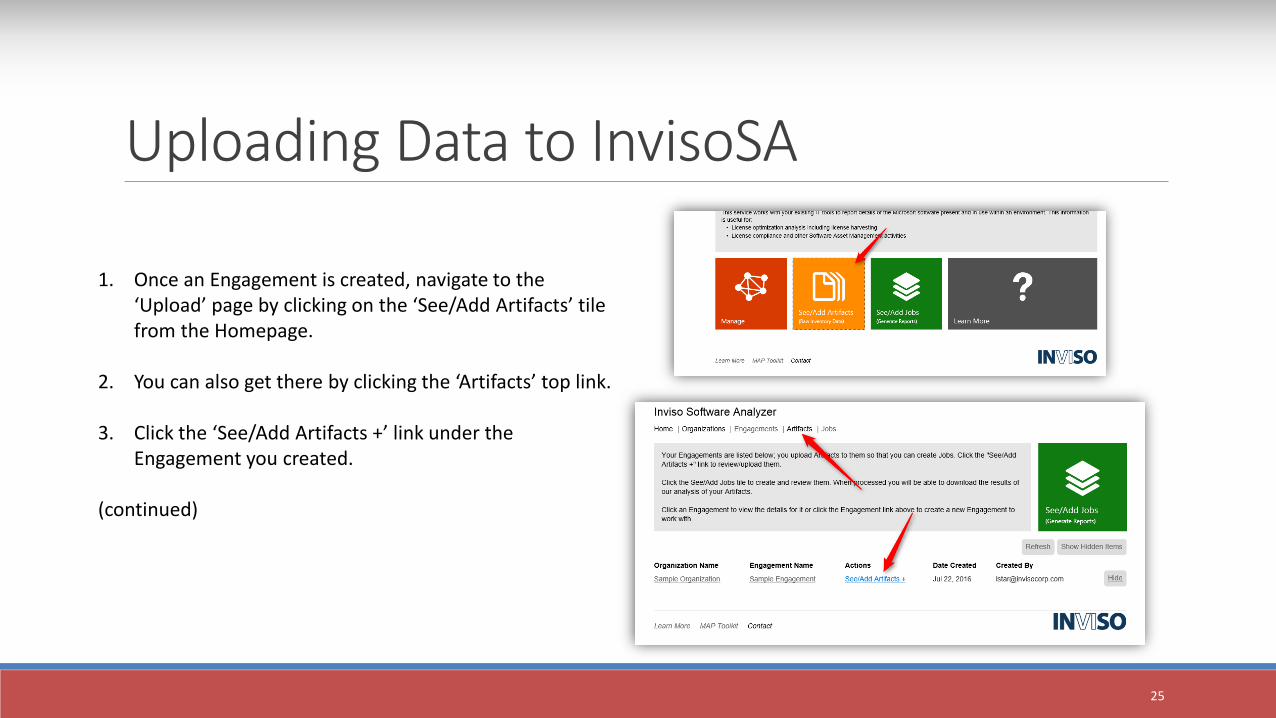
Uploading Data to InvisoSA
25
1. Once an Engagement is created, navigate to the ‘Upload’ page by clicking on the ‘See/Add Artifacts’ tile from the Homepage.
2. You can also get there by clicking the ‘Artifacts’ top link.
3. Click the ‘See/Add Artifacts +’ link under the Engagement you created.
(continued)

Uploading Data (continued)
26
4. Browse to the data file location, create a name for the Artifact, and select ‘Upload.’
5. The file will appear under ‘Artifacts’ under ‘Artifact Name.’
6. The status under ‘Most Recent Status (refresh browser page)’ will show ‘Uploaded (ready to be included in a job).’
Note: The Artifact status will be shown after the Job processes.

Generating Reports
27
1. Once all relevant Artifacts have been uploaded, select the ‘See/Add Jobs’ tile to process the Artifact data.
2. Select ‘Create A New Job’.
(continued)

Generating Reports (continued)
28
3. Select the Artifact(s) from the dropdown, create a ‘Job Name,’ set the ‘In-Scope Reference Date’ and ‘In-Scope Period.’
4. Click the ‘Create Job’ button to start the processing.
Note: InvisoSA has the ability to take multiple Artifacts and merge them into a single, cleansed, de-duplicated report.

Retrieving Reports
29
1. You will see your Job under ‘Job Name’ and the status under ‘Status (refresh browser page).’
2. The ‘Status (refresh browser page)’ will initially report ‘Waiting to be processed (1 of 6).’
3. Refresh the browser page until the Status changes to ‘Succeeded (6 of 6).’ Four reports will then be available for download.
Note: On average, once you’ve created a Job you will be able to access the reports in 10-20 minutes. If your Artifact(s) included software items not in our catalog (“uncategorized software”) these reports will not be final. You will see the Job Status as "Succeeded - has uncategorized software (5 of 6)." Final reports will automatically be generated once all the software has been categorized. Catalog updates take place daily, Monday-Friday, at approximately 12:00PM PST.

Support Resources
30
Online Documentation:✓ InvisoSA & ISADT: https://www.invisosa.com/learn ✓ MAP: https://www.invisosa.com/learn/MAP
Reach out to [email protected] for any questions regarding:✓ InvisoSA & ISADT✓ MAP Deployment, Configuration &Troubleshooting✓ SCCM Deployment, Configuration &Troubleshooting
For any general Software Asset Management questions, please email [email protected]

Appendix 1-5REFER TO APPENDIX 1-5 FOR MORE INFORMATION ON HOW INVISOSA AND INVISOSA DISCOVERY TOOLKIT WORK
31

Appendix 1: Overview
Overview
The inventory processing service transforms hardware and software data points that have been collected from a variety of sources, into a consolidated report that details the Microsoft software present in the environment and the computer systems where it is installed. The data points are supplied as a set of one or more XML files known as Artifacts that are combined together in a Job that produces the inventory report.
32

Appendix 2: Artifacts and JobsArtifacts
Artifacts are data files that are produced by the ISADT Connectors, PowerShell Collectors, or the Simple and Advanced Generic Templates. ISADT contains ISADT Connectors, PowerShell Collectors and Generic Templates for users to use to collect data from various data source. ISADT Connectors and PowerShell Collectors allow an IT professional to run a variety of scripts to collect data from multiple database and directory sources, while the Generic Templates allow users to manually input data. Each script produces a data file, formatted as XML that can be inspected locally if desired before being uploaded as an Artifact to the InvisoSA web site.
Jobs
One or more Artifacts are submitted as a Job, which generates an inventory report. A Partner or Microsoft field representative does not need to combine all the uploaded Artifacts into a single report, but has the option to select a subset of available Artifacts and submit a Job that produces a report for that subset. The Job runs through the following phases:
◦ Establish the set of unique computers
◦ Establish Virtual Machine to Host relationships
◦ Establish which computers are in/out of scope
◦ Establish the target software inventory data
◦ Establish licensing information for installed software
◦ Generate the report
33

Appendix 3 : Reference Catalog and Unique Set of ComputersReference Catalog
The Job has access to a Reference Catalog that correlates software inventory with Microsoft license requirements. In the event that a Job encounters a piece of software inventory that cannot be correlated with the Reference Catalog, the Job continues and a preliminary report is generated that can be downloaded for review. A team of researchers maintains the Reference Catalog, and routinely updates it to accommodate newly discovered software. Once updated, the Job generates a final report and replaces the preliminary report on the InvisoSA web site.
Establish the unique set of computers
There are many scenarios where a specific computer system is referenced by multiple Artifacts, and in certain cases multiple times by the same Artifact. Additionally, different Artifacts can specify the same data points with different values (e.g. virtual host) and data points that tend to be specific to a certain type of Artifact (e.g. last logon time). To provide the optimal result, the Job synthesizes an inventory record for each computer system that factors in all the available information. Many factors are taken into consideration in establishing the unique set of machines and their properties, but in general the most recently discovered data points are the values reflected in the report.
34

Appendix 4: Virtual Machine to Host and In/Out of scope ComputersEstablish Virtual Machine to Host relationship
There are many ways to identify a virtual machine, either explicitly through querying a virtual machine management system or indirectly by inspecting the chassis, model or manufacturer of the machine. The corresponding hosts may have been identified as hosts or may have simply been identified as Windows Servers, or in some cases they may not have been discovered at all. Once the unique set of computers has been identified, it is necessary to rationalize the references between hosts and guests described above to ensure consistent reporting.
Establish which computers are in/out of scope
The Job examines the data points in each Artifact, and will only mark a computer as Out of Scope if both the following are true:
◦ The computer has been active in the past
◦ The computer has not been active in the 30 days prior to ISADT creating the Artifact data file
This approach effectively excludes computers specified by old Active Directory records, but does not exclude computers where no activity information is known.
35

Appendix 5: Software Inventory Data and Installed Software Licensing Information
Establish the target software inventory data
Once the set of computers that are considered In Scope has been determined, the Job identifies all the Microsoft software associated with each computer. This is primarily achieved by filtering on the publisher/vendor name of the software. Additionally, software associated with the computer operating system will be identified regardless of manufacturer
Establish licensing information for installed software
The Job correlates all the software inventory data supplied by the Artifacts for each computer with the Reference Catalog. The Reference Catalog supplies a standardized name for display in reports and also allows software from the same license family to be ranked, and a winner determined, when installed on the same computer.
36