introduction - u.s. department of veterans affairs · web viewfigure 170 – selecting a...
TRANSCRIPT

Voluntary Service System (VSS) Enhancements
VSS*5*3User Guide
Department of Veterans AffairsOffice of Information and Technology (OI&T)
Product Development
Version 3.4October 2017

October 2017 VSS 5*3User Guidei
Revision HistoryDate Revision Description Author
10/06/2017 3.4 Minor update. VSS Technical Team
08/23/2017 3.3 Updates for 5.3 Release VSS Technical Team
08/09/2017 3.2 Updates for 5.3 Release VSS Technical Team
07/31/2017 3.1 Updates for 5.3 Release VSS Technical Team
06/15/2017 3.0 Updates for 5.3 Release VSS Technical Team
05/02/2017 2.9 Updates for 5.3 Release VSS Technical Team
04/17/2017 2.8 Updates for 5.2 Release VSS Technical Team
03/03/17 2.7 Updates for 5.2 Release VSS Technical Team
02/13/17 2.6 Updates for 5.2 Release VSS Technical Team
01/13/17 2.5 Document Review VSS Technical Team
01/03/17 2.4 Document Review VSS Technical Team
12/12/16 2.3 Document Review VSS Technical Team
11/03/16 2.2 VSS 5*1 Additions VSS Technical Team
09/22/16 2.1 Document Revised VSS Technical Team
09/13/16 2.0 Document Returned VA OIT Product Development
08/31/16 1.9 Document Submitted VSS Technical Team
07/06/16 1.8 Document Revisions VSS Technical Team
06/02/16 1.7 Document Revisions VSS Technical Team
05/18/16 1.6 Document Revisions VSS Technical Team
03/09/16 1.5 Document Review VSS Technical Team
02/03/16 1.4 Approved Draft document VA OIT Product Development
01/26/16 1.3 Updated document VSS Technical Team
01/21/16 1.2 Reviewed by VA VA OIT Product Development
12/08/15 1.1 Review and Update. VSS Technical Team
11/24/15 1.0 Initial Document VSS Technical Team

October 2017 VSS 5*3User Guideii
Table of Contents
1. Introduction...............................................................................................................11.1 Purpose.............................................................................................................11.1.1 Document Orientation........................................................................................11.1.2 Organization of the Manual................................................................................21.1.3 Assumptions......................................................................................................2
1.2 Disclaimers........................................................................................................31.2.1 Software Disclaimer...........................................................................................31.2.2 Documentation Disclaimer.................................................................................3
1.3 References and Resources...............................................................................3
1.4 National Service Desk and Organizational Contacts.........................................4
1.5 Documentation Conventions..............................................................................4
2. System Summary......................................................................................................52.1 System Configuration........................................................................................5
3. Getting Started..........................................................................................................63.1 Screen Elements...............................................................................................6
3.2 Performing Tasks...............................................................................................73.2.1 Button/Link Definitions.......................................................................................73.2.2 Screen Messages..............................................................................................9
3.3 Logging On......................................................................................................103.3.1 SSOi with PIV..................................................................................................103.3.2 Using VA Network ID and Password...............................................................133.3.3 Windows Authentication..................................................................................143.3.4 Select/Change Facility.....................................................................................15
3.4 Exit System......................................................................................................16
3.5 Automatic Timeout...........................................................................................16
3.6 VSS Web Home Page.....................................................................................173.6.1 Announcements...............................................................................................173.6.2 Notifications.....................................................................................................173.6.3 VSS Menu Bar.................................................................................................18
3.7 Permission Levels............................................................................................19
3.8 User Access Levels.........................................................................................20
4. Volunteers................................................................................................................214.1 Add New Volunteer..........................................................................................22

October 2017 VSS 5*3User Guideiii
4.1.1 Search for an Existing Volunteer.....................................................................234.1.2 Create Volunteer..............................................................................................25
4.2 Edit Volunteer..................................................................................................284.2.1 Assignments....................................................................................................294.2.2 Select Assignments.........................................................................................294.2.3 View Requirements..........................................................................................314.2.4 Master Record.................................................................................................324.2.5 Contact Information..........................................................................................324.2.6 Organizations...................................................................................................334.2.7 Assign an Organization....................................................................................334.2.8 Emergency Contact.........................................................................................344.2.9 Facility Management........................................................................................354.2.10 Hours & Awards...............................................................................................354.2.11 Add an Award..................................................................................................364.2.12 Parking Stickers...............................................................................................364.2.13 Add Parking Sticker.........................................................................................364.2.14 Uniforms..........................................................................................................374.2.15 Add Uniform.....................................................................................................37
4.3 Existing Volunteer Records..............................................................................38
4.4 Volunteer Demographics.................................................................................40
4.5 Post Regular Time...........................................................................................424.5.1 View or Edit Adjusted Hours............................................................................45
4.6 Post Occasional Time......................................................................................464.6.1 Edit Occasional Time Entry..............................................................................48
4.7 Daily Meal Tickets............................................................................................494.7.1 Add a Meal Ticket............................................................................................504.7.2 Print Meal Ticket..............................................................................................51
4.8 Awards.............................................................................................................53
4.9 Requirement Notifications................................................................................55
5. Donations.................................................................................................................585.1 Add New Donation...........................................................................................595.1.1 Search for Existing Donor - Individual..............................................................595.1.2 Create Donor- Individual..................................................................................605.1.3 Link Volunteer..................................................................................................615.1.4 Create Donor – Organization...........................................................................635.1.5 Add Donation...................................................................................................66

October 2017 VSS 5*3User Guideiv
5.2 Add Anonymous Donation...............................................................................70
5.3 Existing Donor Records...................................................................................745.3.1 Read Only Donations.......................................................................................775.3.2 Change Donor – Donation Details Screen.......................................................785.3.3 Merge Donor or Make Anonymous..................................................................78
5.4 Existing Donation Records Screen..................................................................80
5.5 E-Donations Received.....................................................................................83
Print Thank You Letters................................................................................................84
6. Expenditures...........................................................................................................856.1 General Ledger................................................................................................856.1.1 Add an Expenditure.........................................................................................866.1.2 Add an Adjustment..........................................................................................88
6.2 Existing Expenditure Records..........................................................................88
6.3 Existing Adjustment Records...........................................................................89
7. Reports.....................................................................................................................907.1 Volunteers Reports..........................................................................................917.1.1 Daily Volunteer List..........................................................................................927.1.2 Volunteer Daily Review....................................................................................937.1.3 Meal Ticket......................................................................................................947.1.4 New Volunteer.................................................................................................957.1.5 View Excluded Entities....................................................................................977.1.6 Volunteers By Service (Summary/Detail/Daily)................................................987.1.7 Volunteers By Service and Facility................................................................1027.1.8 Volunteers By Organization (Summary/Detail/Daily).....................................1047.1.9 National Organization Affiliated Volunteers...................................................1077.1.10 Regular Scheduled and Occasional Hours....................................................109
7.2 Donations Reports.........................................................................................1117.2.1 Manage Letter Templates..............................................................................1117.2.2 Grand Total of Donations...............................................................................112
7.3 Administration Reports..................................................................................1167.3.1 Address Labels Report..................................................................................1167.3.2 NAC Organization Reports............................................................................1217.3.3 Voluntary Service Directory (Summary/Detail)...............................................1297.3.4 Organization Listing.......................................................................................1317.3.5 Benefiting Service Listing...............................................................................1327.3.6 User Access Listing.......................................................................................133

October 2017 VSS 5*3User Guidev
8. Maintenance..........................................................................................................1348.1 Manage Facilities...........................................................................................134
8.2 Manage Organizations...................................................................................1428.2.1 Organization List............................................................................................1428.2.2 Create an Organization..................................................................................1448.2.3 National Officials Section...............................................................................1468.2.4 Local Branch Section.....................................................................................1488.2.5 Merge Organizations.....................................................................................1508.2.6 Merge Branches............................................................................................152
8.3 Search Existing Organizations.......................................................................154
8.4 Manage Voluntary Service.............................................................................1558.4.1 Create and Manage Voluntary Service Staff..................................................157
8.5 Manage Benefiting Service............................................................................159
8.6 Manage Service Templates...........................................................................160
8.7 Manage Volunteer Requirements..................................................................1628.7.1 Both Administrative Roles..............................................................................162
8.8 Manage Staff Titles........................................................................................165
8.9 Manage Award Codes...................................................................................167
9. Reference...............................................................................................................1689.1 Policies..........................................................................................................169
9.2 VAVS SharePoint...........................................................................................169
9.3 VAVS Website................................................................................................169
10. Manage User Access............................................................................................16910.1 Manage User Access.....................................................................................17010.1.1 Select User....................................................................................................17110.1.2 Assign Roles and Facilities............................................................................17110.1.3 Unlock User...................................................................................................17110.1.4 Time Zone......................................................................................................172
11. Help........................................................................................................................ 17212. Troubleshooting....................................................................................................172
12.1 Special Instructions for Error Correction........................................................173
13. Acronyms and Abbreviations..............................................................................17314. CRUD Matrix..........................................................................................................174

October 2017 VSS 5*3User Guidevi
Table of Contents –Figures
Figure 1 - VSS Home Page and Menu Descriptions...........................................................................2Figure 2 - Describing How to Use the Search Options.......................................................................6Figure 3 - Searching for Options.........................................................................................................7Figure 4 - Dropdown Menu.................................................................................................................7Figure 5 – Add Donation Button.........................................................................................................7Figure 6 - Single Sign-On with PIV Card.........................................................................................11Figure 7 - Selecting a PIV Certificate...............................................................................................11Figure 8 - Certificate Details.............................................................................................................12Figure 9 - Entering PIV Pin in ActivClient Box...............................................................................12Figure 10 – Signing In Using VA Network ID and Password..........................................................13Figure 11 – Signing In with VA Network ID....................................................................................13Figure 12 - Enter VA Network ID and Password.............................................................................14Figure 13 - Signing In with Windows Authentication......................................................................14Figure 14 – Selecting the Signing In with Windows Authentication Option....................................15Figure 15 - Select/Change Facility Screen........................................................................................16Figure 16 - Confirmation Message to Exit VSS................................................................................16Figure 17 - Session About to Expire Message..................................................................................17Figure 18 – Requirement Notifications Screen.................................................................................18Figure 19 - VSS Menu Screen...........................................................................................................19Figure 20 - Permission Hierarchy.....................................................................................................20Figure 21 - Volunteers Menu Options...............................................................................................22Figure 22 - New Volunteer Menu Option.........................................................................................22Figure 23 - Adding a New Volunteer................................................................................................24Figure 24 - Please Enter at Least One Piece of Search Criteria Box................................................24Figure 25 - Add New Volunteer Box with Search Criteria Defined.................................................25Figure 26 - Duplicate Volunteers Found...........................................................................................25Figure 27 - Volunteer Name Section.................................................................................................26Figure 28 - Master Record Section....................................................................................................26Figure 29 - Contact Information Section...........................................................................................27Figure 30 - Emergency Contact Section............................................................................................27Figure 31 - Facility Management Section.........................................................................................27Figure 32 - Create Volunteer Screen.................................................................................................28Figure 33 - Edit Volunteer Screen.....................................................................................................29Figure 34 - Assignments Section.......................................................................................................29Figure 35 - Selecting an Assignment................................................................................................30Figure 36 - Assignments Section.......................................................................................................30Figure 37 - Requirements Section.....................................................................................................31Figure 38 - Volunteer Requirement Details Screen..........................................................................32Figure 39 - Master Record Section....................................................................................................32Figure 40 - Contact Information Section...........................................................................................33Figure 41 - Organizations Section.....................................................................................................33Figure 42 - Assigning Organization with the Search Organization Box...........................................33Figure 43 - Organizations Listed in the Search for Organization Box..............................................34Figure 44 - Emergency Contact Screen.............................................................................................34

October 2017 VSS 5*3User Guidevii
Figure 45 - Facility Management Section.........................................................................................35Figure 46 - Hours & Awards.............................................................................................................36Figure 47 - Hours & Awards Section with the Last Award and Date Defined.................................36Figure 48 - Parking Stickers Section.................................................................................................36Figure 49 - Parking Sticker Details...................................................................................................37Figure 50 - Uniforms Section............................................................................................................37Figure 51 - Uniform Details Screen..................................................................................................38Figure 52 - Search for Volunteer Screen Menu Option....................................................................38Figure 53 - Searching for an Existing Volunteer..............................................................................39Figure 54 - Existing Volunteers Available from Search Results......................................................39Figure 55 - Volunteer Demographics Menu Option.........................................................................40Figure 56 - Volunteer Demographics Screen....................................................................................42Figure 57 - Post Regular Time Menu Option....................................................................................42Figure 58 - Time Entry Screen..........................................................................................................43Figure 59 – Time Entry – By Volunteer Screen................................................................................44Figure 60 - By Date - Time Report...................................................................................................44Figure 61 - By Volunteer - Time Report...........................................................................................45Figure 62 - View/Edit Adjusted Hours Section.................................................................................46Figure 63 - Add Time Adjustment Box.............................................................................................46Figure 64 - Adjusted Hours Posted Screen.......................................................................................46Figure 65 – Post Occasional Time Menu Option..............................................................................47Figure 66 - Enter Time Section.........................................................................................................48Figure 67 - Occasional Time Entry Screen.......................................................................................48Figure 68 - Edit Occasional Time Entry Box....................................................................................49Figure 69 – Daily Meal Ticket Menu Option....................................................................................49Figure 70 - Daily Meal Tickets Screen with No Meal Tickets Found..............................................50Figure 71 - Searching for a Volunteer to Add Meal Ticket..............................................................50Figure 72 - Daily Meal Ticket Screen...............................................................................................51Figure 73 - Format Select Box to Print Meal Tickets.......................................................................52Figure 74 - Meal Ticket Example......................................................................................................53Figure 75 - Awards Menu Option.....................................................................................................54Figure 76 - Awards List Screen.........................................................................................................55Figure 77 - Requirement Notifications Menu Option.......................................................................56Figure 78 - Requirement Notifications Screen..................................................................................57Figure 79 - The Confirmation Box Displays to Clear Notification...................................................57Figure 80 - Click on View E-Donations Received to view the E-Donation List..............................57Figure 81 - Click on Edit Volunteer Requirement to display the Volunteer Requirements Detail box.....................................................................................................................................................58Figure 82 - Click View Volunteer to display the Edit Volunteer Screen..........................................58Figure 83 - Donations Menu Options................................................................................................59Figure 84 - Search for Existing Donor - Individual..........................................................................60Figure 85 - Create a Donor Screen....................................................................................................61Figure 86 - Searching for a Volunteer to Link to a Donation...........................................................61Figure 87 - Volunteer is Linked to Another Donor Error Message..................................................62Figure 88 - Edit Donor Screen to Link a Donor Record...................................................................62Figure 89 - Searching for a Donor Type as an Organization............................................................63

October 2017 VSS 5*3User Guidevii
i
Figure 90 - Searching for an Organization before Creating a New Donor.......................................64Figure 91 - Organization is Linked to Another Donor Error Message.............................................65Figure 92 - Searching for an Organization to Link to a Donor Record.............................................65Figure 93 - Donor Established on the Edit Donor Screen.................................................................66Figure 94 - Add a Donation from the Create Donation Screen.........................................................66Figure 95 - Overriding the Address information for the ACK..........................................................67Figure 96 - Donations Screen............................................................................................................68Figure 97 - In Memory Of Section....................................................................................................69Figure 98 - CC Fields Section...........................................................................................................69Figure 99 - Adding a Donation from the Create Donation Screen....................................................70Figure 100 - Add Anonymous Donation Menu Option....................................................................70Figure 101 - Add Anonymous Donation from the Create Donation Screen.....................................72Figure 102 - In Memory Of Section..................................................................................................72Figure 103 - CC Fields Section for an Anonymous Donation..........................................................73Figure 104 - Add Anonymous Donation Screen from the Create Donation Screen.........................73Figure 105 - Existing Donor Records Screen....................................................................................74Figure 106 - Search for Donor Records - Individual Results............................................................75Figure 107 - Search for Donor Records Results - Organization.......................................................76Figure 108 - Modifying or Viewing Information on the Edit Donor Screen....................................76Figure 109 - Donations List Displays Donations for the Working Facility......................................77Figure 110 - Changing Donor on the Donation Detail Screen..........................................................78Figure 111 - Merge Donor Button on the Edit Donor Screen...........................................................79Figure 112 - Merging Donor.............................................................................................................79Figure 113 - Target Donor Cannot be the Same as the Source Donor Message...............................80Figure 114 - Make Anonymous Donation.........................................................................................80Figure 115 - Existing Donation Records Menu Option....................................................................81Figure 116 - Donor Types and Acknowledgment Options Selected on the Donations List.............81Figure 117 - Donor List Screen.........................................................................................................82Figure 118 - E-Donations Received Menu Option............................................................................83Figure 119 - E-Donation List Screen................................................................................................83Figure 120 - Print Thank You Letters Menu Option.........................................................................84Figure 121 - Print Thank You Letters from the Donation List Screen..............................................84Figure 122 - Print Donation Documents Box....................................................................................85Figure 123 - Expenditures Menu Options.........................................................................................85Figure 124 - General Ledger Screen.................................................................................................86Figure 125 - Expenditure Details Box...............................................................................................87Figure 126 - Adjustment Details Box................................................................................................88Figure 127 – Expenditure List...........................................................................................................89Figure 128 - Adjustment List Screen................................................................................................90Figure 129 - Reports Menu Options..................................................................................................91Figure 130 - Volunteer Reports Menu Option..................................................................................91Figure 131 - Specify Parameters for the Daily Volunteer List Report Box......................................92Figure 132 – Select a Volunteer for the Volunteer Daily Review report..........................................93Figure 133 - Specify Parameters for the Volunteer Daily Review Report........................................94Figure 134 - Specify Parameters for the Meal Ticket Report Box....................................................95Figure 135 - Specify Parameters for the New Volunteer Report Box...............................................96

October 2017 VSS 5*3User Guideix
Figure 136 - Excluded Entity Matches Screen..................................................................................97Figure 137 - Specify Parameters for the Volunteers by Service Report Box....................................99Figure 138 - Specify Parameters for the Volunteers by Service and Facility Report......................103Figure 139 - Specify Parameters for the Volunteers by Organization Report Box.........................104Figure 140 - Specify Parameters for the National Organization Affiliated Volunteers Report Box.........................................................................................................................................................108Figure 141 - Specify Parameters for the National Organization Affiliated Volunteers Report Box.........................................................................................................................................................110Figure 142 - Donations Menu Options............................................................................................111Figure 143 - Manage Letter Templates Screen...............................................................................112Figure 144 - Grand Totals of Donations Report - Summary...........................................................114Figure 145 - Administration Reports Menu Options.......................................................................116Figure 146 - Specify Parameters for the Volunteer Address Labels Report Box...........................118Figure 147 – Volunteer Address Labels Report..............................................................................119Figure 148 -Specify Parameters for the Voluntary Service Directory Report Box.........................129Figure 149 - Maintenance Menu Options........................................................................................134Figure 150 - Manage Facilities Menu Option.................................................................................135Figure 151 - Manage Facilities Screen............................................................................................135Figure 152 - Facility Details Screen................................................................................................136Figure 153 - Confirmation Message to Inactivate Location and Volunteer Assignments..............137Figure 154 – Location Details Box.................................................................................................137Figure 155 - Adding a New Kiosk in the Kiosk Details Box..........................................................138Figure 156 - Kiosks Data Fields......................................................................................................139Figure 157 - Meal Ticket Settings Screen.......................................................................................140Figure 158 – Adding a New General Post Fund.............................................................................141Figure 159 - Adding a New Reference............................................................................................141Figure 160 - General Post Fund and Reference Sections................................................................142Figure 161 - Manage Organizations Menu Option.........................................................................142Figure 162 - Organization List Screen............................................................................................143Figure 163 - Organization Details Screen.......................................................................................145Figure 164 - Adding a National Official.........................................................................................148Figure 165 - Editing a National Official.........................................................................................148Figure 166 - Local Branches Section..............................................................................................149Figure 167 - Local Branch Detail Screen........................................................................................150Figure 168 - Organization List with Organization Merge Button Below.......................................151Figure 169 - Merging Organizations...............................................................................................151Figure 170 – Selecting a Branch from Local Branches List...........................................................152Figure 171 - Merging Sibling Option..............................................................................................153Figure 172 - Merge Branch Siblings Box.......................................................................................153Figure 173 - Search Existing Organizations Menu Options............................................................154Figure 174 - Searching for an Organization to View the Organization Detail Screen....................155Figure 175 - Manage Voluntary Service Menu Option...................................................................155Figure 176 - Service and Contact Information Section...................................................................156Figure 177 - Program Manager’s Immediate Supervisor Section...................................................156Figure 178 - VAVS Information.....................................................................................................156Figure 179 - VAVS Staff Members................................................................................................157
October 2017 VSS 5*3User Guidex
Figure 180 - Search for a Staff User................................................................................................157Figure 181 - Staff Details Screen....................................................................................................158Figure 182 - Manage Benefiting Service Menu Option..................................................................159Figure 183 - Manage Benefiting Service & Roles Screen..............................................................159Figure 184 - New Benefiting Service Box......................................................................................160Figure 185 - Manage Service Templates Menu Options.................................................................160Figure 186 - Manage Templates for Benefiting Service & Roles Screen.......................................161Figure 187 - New Benefiting Service Template Box......................................................................161Figure 188 - Manage Requirements Screen....................................................................................162Figure 189 - Create Requirements Screen.......................................................................................165Figure 190 – Manage Staff Title.....................................................................................................165Figure 191 - Manage Staff Title Screen..........................................................................................166Figure 192 - New Staff Title Box....................................................................................................166Figure 193 - Manage Award Codes Menu Options........................................................................167Figure 194 - Manage Award Codes Screen.....................................................................................168Figure 195 - Add New Award Code Box........................................................................................168Figure 196 - Reference Menu Options............................................................................................169Figure 197 – Manage User Access to VSS Screen.........................................................................170Figure 198 - User Management Screen...........................................................................................172Figure 199 - An Example of an Error Message on a VSS Screen...................................................173
Table of Contents - Tables
Table 1 - Service Desk and Organizational Contacts Table................................................................4Table 2 - Documentation Icon Tables.................................................................................................4Table 3 - VSS System Information.....................................................................................................5Table 4 - Screen Messages Table........................................................................................................9Table 5 - User Access Levels Table..................................................................................................20Table 6- Acronyms & Abbreviation Table......................................................................................173

October 2017 VSS 5*3User Guide1
1. IntroductionThe Department of Veterans Affairs (VA) Voluntary Service (VAVS) operates one of the largest volunteer programs in the Federal Government, supplementing staff and resources in all areas of patient care and support. VAVS’ mission is to provide a structured volunteer program under the management of VA compensated employees in cooperation with community resources to serve Veterans and their families with dignity and compassion.
The Voluntary Service System (VSS) is an Enterprise web application that allows staff to track volunteers, assignments, schedules, hours, and the affiliated organizations. The VSS Enhancement project tracks donations and provides information on volunteer data for a variety of purposes. As mandatory requirements for on-boarding volunteers (including security) increase, significant improvements are needed to meet these demands.
The term “user” throughout this document refers to Voluntary Service staff members, not actual volunteers.
This User Guide was drafted in a test environment and therefore the data is not active.
1.1PurposeThe purpose of this VSS Enhancements User Guide is to provide summaries and step-by-step instructions for all VSS user screens. The intent of this document is to familiarize users with the functionality released with VSS*5*3.
The VSS User Guide is a reference manual used in conjunction with the online help in the VSS application. The User Guide provides an overview similar to the online help with the steps and procedures in a print form.
In addition, VAVS staff uses VSS to track the thousands of volunteers used for the national rehabilitation events. The VSS User Guide may be accessed on-line through the Vista Documentation Library (VDL) at the following address: http://www.va.gov/vdl/application.asp?appid=135
This guide only includes what is completed through the most current Software build in Production. Future functionality is captured and provided at a later date.
1.1.1Document OrientationThe VSS User Guide and Artifact Repository for VSS can be accessed through the following link: http://www.va.gov/vdl/application.asp?appid=135
October 2017 VSS 5*3User Guide2
1.1.2Organization of the ManualFuture updates to this document include sections corresponding to the different organizations that use the VSS application; Central Office (CO), the Enterprise Management Center (EMC), and the Voluntary Service Timekeeping stations.
The full VSS Menu includes the following areas of functionality:
1. Volunteer Records - for viewing and editing volunteer master records.
2. Time Posting - for recording hours of regular and occasional volunteers.
3. Awards - for issuing awards to volunteers.
4. Donations - for tracking donations to a Veterans Health Administration (VHA) facility.
5. Reports - for generating reports on various aspects of a facility’s activities and personnel.
6. Maintenance - for tailoring the VSS application to a site's needs (e.g., entering local services, organizations, and programs).
7. Reference – for accessing important links, policies, procedures and other publications directly from VSS Web.
8. User Administration - for viewing and assigning security roles to system users.
Figure 1 - VSS Home Page and Menu Descriptions
1.1.3AssumptionsThis Guide includes the following assumptions:
VSS*5*3 incorporates Standard Data Services lookup tables so that all current sites such as the Veterans Integrated Service Networks, Veterans Affairs Medical Centers, and Community Based Outpatient Clinics (CBOCs) are available for users and updated periodically.
Military time is the standard for user interface (UI) input. The user may have the ability to set preferences which customizes the output display.
All times entered and displayed are in the user’s local time zone, which is synchronized when the user logs into the application.

October 2017 VSS 5*3User Guide3
The VA standard inactive period of 15 minutes applies to this system. The user is automatically logged out unless they choose to remain active. The VSS application (and its interfaces) is running on the most current platform supported by OI&T.
The Structured Query Language (SQL) Extensible Mark-up Language 3.0 functionality is replaced. According to Enterprise Operations (EO), when users are moved off the SQL Server 2008 to SQL Server 2012, the functionality is not supported.
1.2Disclaimers1.2.1Software Disclaimer
This software was developed at the Department of Veterans Affairs (VA) by employees of the Federal Government in the course of their official duties.
Pursuant to title 17 Section 105 of the United States Code this software is not subject to copyright protection and is in the public domain.
VA assumes no responsibility whatsoever for its use by other parties, and makes no guarantees, expressed or implied, about its quality, reliability, or any other characteristic. We would appreciate acknowledgement if the software is used.
This software can be redistributed and/or modified freely provided that any derivative works bear some notice that they are derived from it, and any modified versions bear some notice that they have been modified.
1.2.2Documentation Disclaimer The appearance of external hyperlink references in this manual does not constitute
endorsement by the Department of Veterans Affairs (VA) of this website or the information, products, or services contained therein.
The VA does not exercise any editorial control over the information you may find at these locations. Such links are provided and are consistent with the stated purpose of the VA.
1.3References and Resources VHA Forms and Publication Search page
http://vaww.va.gov/vapubs/search_action.cfm?dType=2
Handbook 1620.01 Voluntary Service Procedures
http://vaww.va.gov/vhapublications/ViewPublication.asp?pub_ID=2165
Handbook 1620.02 Volunteer Transportation Network
http://www.va.gov/vhapublications/ViewPublication.asp?pub_ID=3042
VA Handbook 6500 – Information Security Program
http://vaww.va.gov/vapubs/viewPublication.asp?Pub_ID=793&FType=2
Handbook 4721 VHA General Post Fund Procedures http://vaww.va.gov/vhapublications/ViewPublication.asp?pub_ID=1571

October 2017 VSS 5*3User Guide4
1.4National Service Desk and Organizational ContactsTable 1 - Service Desk and Organizational Contacts Table
Name Role Organization Contact Info
OI&T National Service Desk Tier 1 Support OI&T 1-855-673-4357
Financial Systems Team Tier 2 Support OI&T 1-855-673-4357
Health Product Support Tier 2 Support VHA 1-855-673-4357
Vista Patch Maintenance Tier 3 Application Support OI&T 1-855-673-4357
1.5Documentation ConventionsThe VSS Development Team adheres to the documentation requirements as required by VIP in compliance with VA and Product Development documentation standards.
Table 2 - Documentation Icon Tables
Symbol Description
Active or Inactive – Displays the status of a function. Clicking on this icon displays a message, indicating whether a user could proceed to inactivate the function.CAUTION or DISCLAIMER - Used to inform the reader to take special notice of critical information.Default Station Icon - Clicking on this icon displays a dialog box that allows you to specify which station's data is the default station data when you start or restart the application.Delete – Delete icon is used to delate information in an existing record.Edit - Edit icon is used to view or change information in an existing recordEmail – Clicking on this icon enables the user to send an email.
HELP Icon - Clicking on this icon displays the Help page explaining how to use the screen you are on.
NOTE or Reference - Used to inform the reader of general information and reference material.Print Icon – Click to print a copy of the report.

October 2017 VSS 5*3User Guide5
Symbol Description
Refresh Report Icon - Used to refresh the report.
Next Page Buttons – Click the buttons to view a specific page, or Navigates to a specific page. Enter the page number into the text field and press Enter.
2. System SummaryVSS is an Enterprise web application that tracks volunteers, their assignments, schedules, hours, and their affiliated organizations. The new VSS enhancements track donations and provide information regarding volunteer data for a variety of purposes. For additional VSS information, refer to the Table below.
Table 3 - VSS System Information
VSS System Information
System Name: Voluntary Service System v5*1
System Type: Enterprise Web Application
Hosting Type Enterprise Operations Managed
Information Security Officer: Robert Caldwell, [email protected]
2.1System ConfigurationNew system features proposed for the VSS Enhancements project are categorized as functional or non-functional.
Functional requirements represent new features or functions requested by the business. Non- functional requirements represent documentation, disaster recovery, 508 compliance, security, and system performance requirements.

October 2017 VSS 5*3User Guide6
3. Getting StartedOver 80,000 volunteers contribute more than 11 million hours of service to Veterans annually. Currently, VSS does not support the ability to categorize this volume of volunteers. Due to increased demands for on-boarding security checks, health screenings, and training, VSS enhancements reduce administrative overhead by automating tracking, and notifying VAVS Program Managers when mandatory requirements have been met.
3.1Screen ElementsVSS uses a graphical User Interface. Screen access is limited by the system role assigned (user, manager, or administrator) and by the type of site you belong to: the CO, EMC, Game station, or Timekeeping station. Common screen elements include the following:
Data Grids used throughout this document include:
Filter Functionality: Allows you to enter a value or partial value, such as a Name or Abbreviation, to filter through or the ability to display values in ascending and descending order.
Search Button: Searches for the criteria entered in the text fields (i.e., Name or Abbreviation in the example below) and displays a list of results that match the criteria.
Figure 2 - Describing How to Use the Search Options
The Search text field enables you to search for any value in the results, narrowing down a match quicker on the Search box. This search is executed against all information currently being displayed in the list.

October 2017 VSS 5*3User Guide7
Figure 3 - Searching for Options
Field: Used for entering text or numbers.
Dropdown or Pulldown List: Some options are available in a dropdown list. When you click on the option, the list expands and then select the option you want. If the list is long, click on the up or down arrows on the bar to scroll through the list.
Figure 4 - Dropdown Menu
Radio Button: Radio buttons are options, one of which can be selected.
3.2Performing TasksMost of the work performed in VSS is done with buttons and links. The function of a button is indicated in its name. Links are actions that navigate you to screens. For example, a click on this button to add a new donation.
Figure 5 – Add Donation Button
3.2.1Button/Link DefinitionsActivate - The Activate link is used in specific screens and initiates an action. This volunteer has at least one active assignment at any facility.

October 2017 VSS 5*3User Guide8
Add - The Add link is used to add a new item to a list or to the database.
Advance Page - The Advance Page is an option to direct users to a specific page(s) (i.e., First, Next, and Last).
Assign/Assignment - Used for posting or assigning.
Cancel - The Cancel link exits the screen and returns you to the previous screen without saving the information.
Clear - The Clear button is used to erase entries or reset fields on a screen. It is not used to remove data from the database.
Close - The Close link closes a screen or popup window.
Delete - The Delete link is used to remove a record from the database.
Display - After specifying what to include in a report, the Display button enables you to see the report on the screen.
Edit - The Edit button is used to view or change information in an existing record.
Excel, PDF, and Print - The options are for creating documents or printing.
When using Internet Explorer to print, the user must manually set the print option to landscape for reports or data grids to include all content. Export options for Word/PDF to landscape can be controlled by the system.
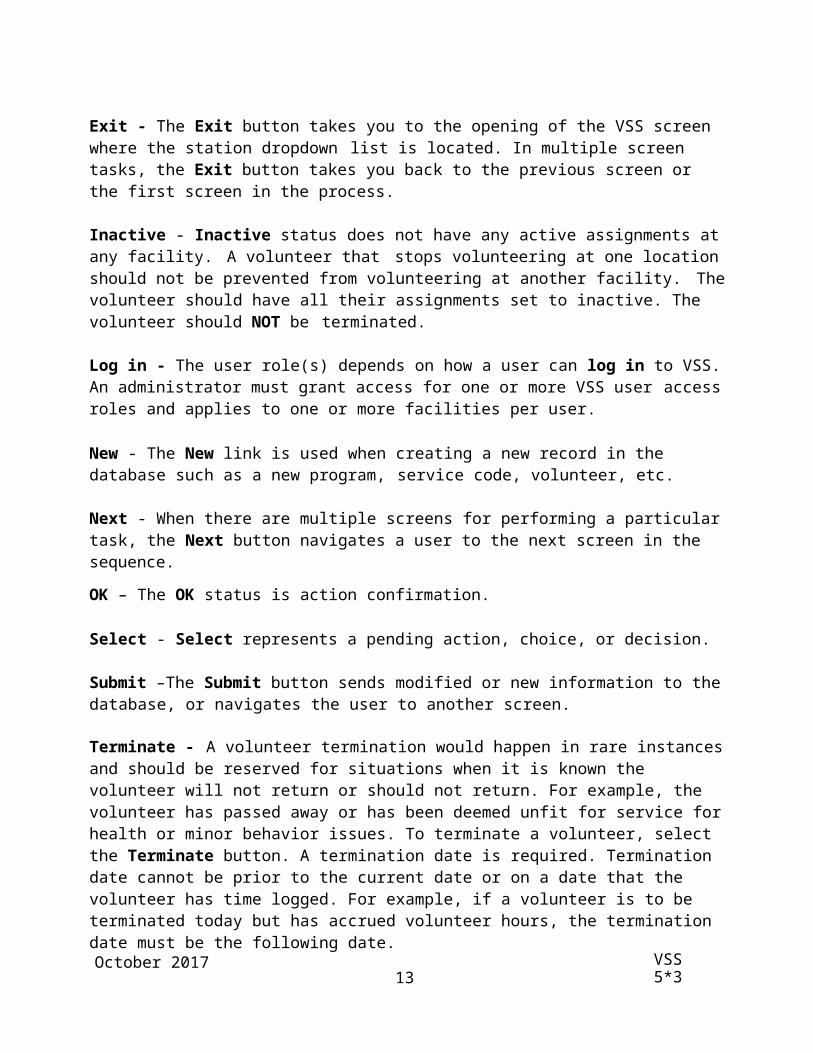
Exit - The Exit button takes you to the opening of the VSS screen where the station dropdown list is located. In multiple screen tasks, the Exit button takes you back to the previous screen or the first screen in the process.
Inactive - Inactive status does not have any active assignments at any facility. A volunteer that stops volunteering at one location should not be prevented from volunteering at another facility. The volunteer should have all their assignments set to inactive. The volunteer should NOT be terminated.
Log in - The user role(s) depends on how a user can log in to VSS. An administrator must grant access for one or more VSS user access roles and applies to one or more facilities per user.
New - The New link is used when creating a new record in the database such as a new program, service code, volunteer, etc.
Next - When there are multiple screens for performing a particular task, the Next button navigates a user to the next screen in the sequence.

October 2017 VSS 5*3User Guide9
OK – The OK status is action confirmation.
Select - Select represents a pending action, choice, or decision.
Submit –The Submit button sends modified or new information to the database, or navigates the user to another screen.
Terminate - A volunteer termination would happen in rare instances and should be reserved for situations when it is known the volunteer will not return or should not return. For example, the volunteer has passed away or has been deemed unfit for service for health or minor behavior issues. To terminate a volunteer, select the Terminate button. A termination date is required. Termination date cannot be prior to the current date or on a date that the volunteer has time logged. For example, if a volunteer is to be terminated today but has accrued volunteer hours, the termination date must be the following date.
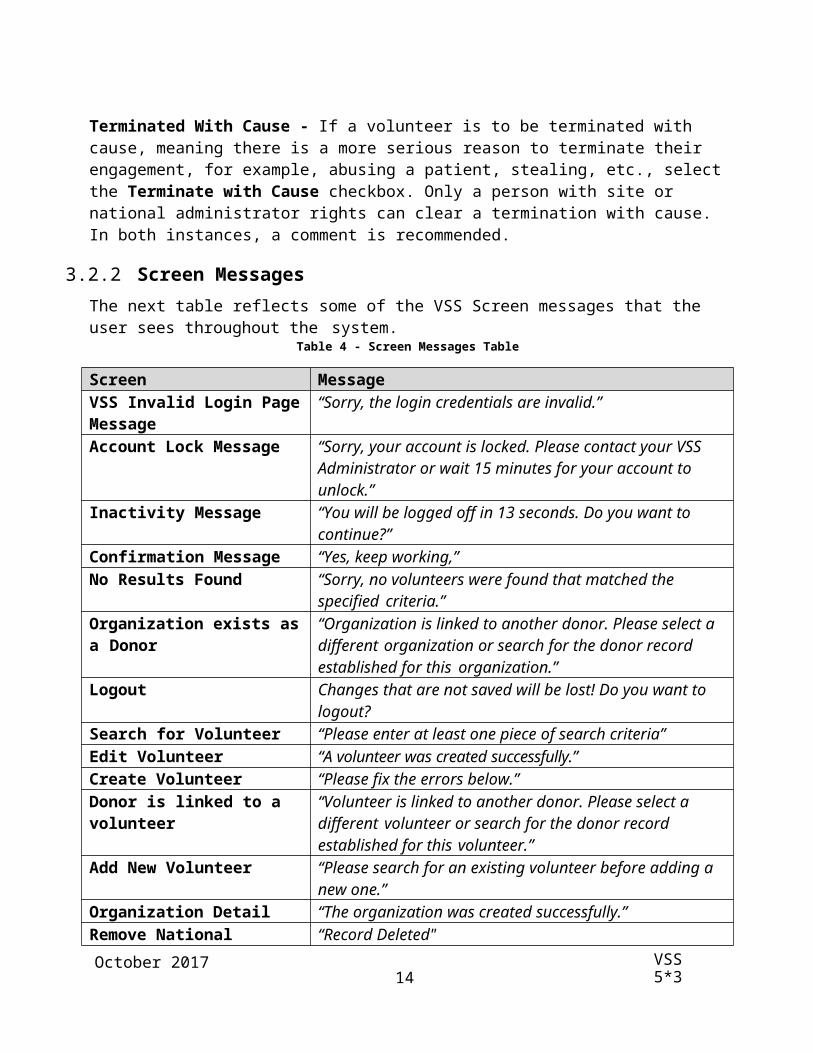
Terminated With Cause - If a volunteer is to be terminated with cause, meaning there is a more serious reason to terminate their engagement, for example, abusing a patient, stealing, etc., select the Terminate with Cause checkbox. Only a person with site or national administrator rights can clear a termination with cause. In both instances, a comment is recommended.
3.2.2Screen MessagesThe next table reflects some of the VSS Screen messages that the user sees throughout the system.
Table 4 - Screen Messages Table
Screen MessageVSS Invalid Login Page Message
“Sorry, the login credentials are invalid.”
Account Lock Message “Sorry, your account is locked. Please contact your VSS Administrator or wait 15 minutes for your account to unlock.”
Inactivity Message “You will be logged off in 13 seconds. Do you want to continue?”
Confirmation Message “Yes, keep working,”No Results Found “Sorry, no volunteers were found that matched the specified
criteria.”Organization exists as a Donor “Organization is linked to another donor. Please select a
different organization or search for the donor record established for this organization.”
Logout Changes that are not saved will be lost! Do you want to logout?
Search for Volunteer “Please enter at least one piece of search criteria”Edit Volunteer “A volunteer was created successfully.”Create Volunteer “Please fix the errors below.”Donor is linked to a volunteer “Volunteer is linked to another donor. Please select a different
volunteer or search for the donor record established for this volunteer.”

October 2017 VSS 5*3User Guide10
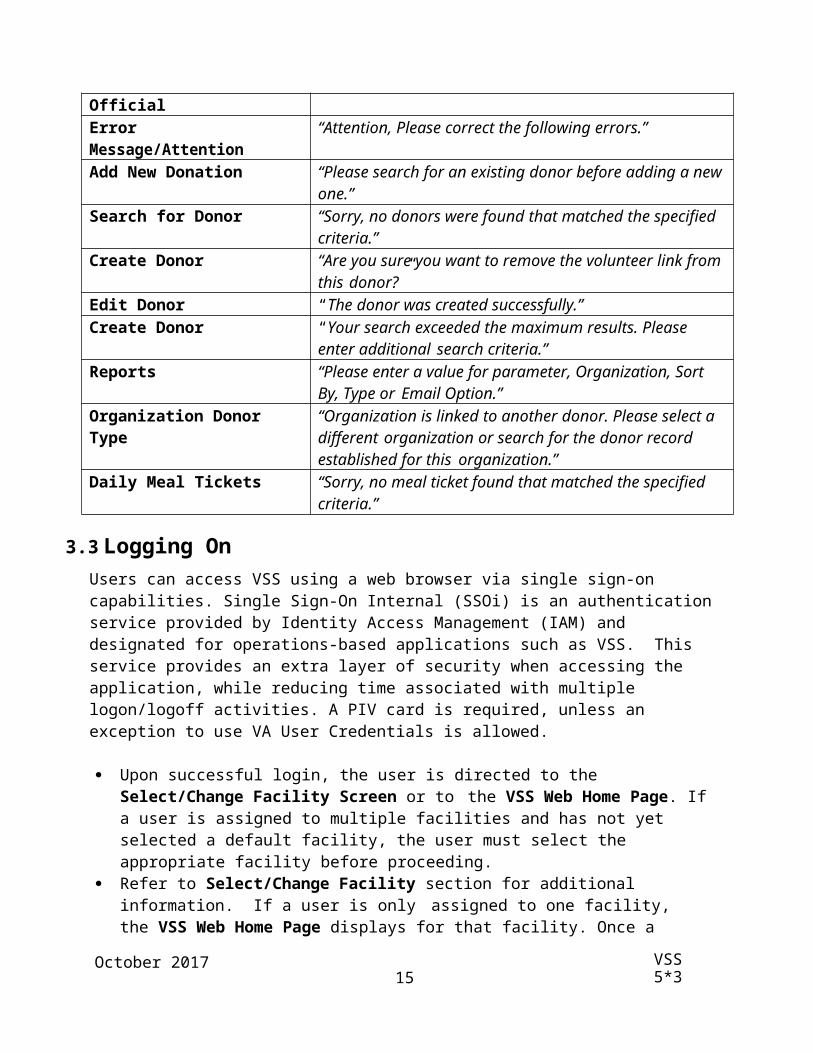
Add New Volunteer “Please search for an existing volunteer before adding a new one.”
Organization Detail “The organization was created successfully.”Remove National Official “Record Deleted"Error Message/Attention “Attention, Please correct the following errors.”Add New Donation “Please search for an existing donor before adding a new
one.”Search for Donor “Sorry, no donors were found that matched the specified
criteria.”Create Donor “Are you sure you want to remove the volunteer link from this
donor?”Edit Donor “The donor was created successfully.”Create Donor “Your search exceeded the maximum results. Please enter
additional search criteria.”Reports “Please enter a value for parameter, Organization, Sort By,
Type or Email Option.”Organization Donor Type “Organization is linked to another donor. Please select a
different organization or search for the donor record established for this organization.”
Daily Meal Tickets “Sorry, no meal ticket found that matched the specified criteria.”
3.3Logging OnUsers can access VSS using a web browser via single sign-on capabilities. Single Sign-On Internal (SSOi) is an authentication service provided by Identity Access Management (IAM) and designated for operations-based applications such as VSS. This service provides an extra layer of security when accessing the application, while reducing time associated with multiple logon/logoff activities. A PIV card is required, unless an exception to use VA User Credentials is allowed.
Upon successful login, the user is directed to the Select/Change Facility Screen or to the VSS Web Home Page. If a user is assigned to multiple facilities and has not yet selected a default facility, the user must select the appropriate facility before proceeding.
Refer to Select/Change Facility section for additional information. If a user is only assigned to one facility, the VSS Web Home Page displays for that facility. Once a user has selected the default facility, the VSS Web Home Page displays it. The system then uses this facility in all subsequent functions.
3.3.1SSOi with PIV1. Ensure your PIV card is inserted in the card reader.2. Using the web browser, access VSS through URL: https://vaww.vss.med.va.gov/ 3. The VA Single Sign-On Screen displays. Click Sign In with VA PIV Card.
If the VA Single Sign-On Screen is not displaying using Internet Explorer, ensure SSL 2.0 and SSL 3.0 are both unselected in the browser security settings. In your browser's top right corner, click the Tools icon and select Internet Options. Click the Advance tab and ensure the options are unselected.

October 2017 VSS 5*3User Guide11
Figure 6 - Single Sign-On with PIV Card
4. The system will verify and read the PIV card. If found, the Windows Security box displays with the list of certificates associated with the PIV card.
5. Select the certificate and click OK to display the ActivClient Login window.
Figure 7 - Selecting a PIV Certificate
If more than one certificate displays, select Click here to view certificate properties link to display the Certificate Details box. Select the Certificate Path tab and scroll to ensure the certificate ends internal PIV Authentication.

October 2017 VSS 5*3User Guide12
Figure 8 - Certificate Details
6. Enter your Personal Identification Number (PIN) and click OK.If the incorrect PIN is entered, an error message displays and the user has six more
attempts before being locked out and will need to be unlocked by calling the VA National Service Desk at 1-855-673-4357.
Figure 9 - Entering PIV Pin in ActivClient Box
7. Once the system verifies the PIV card and PIN match, the Select/Change Facility Screen displays or the VSS Home Page.
If the user is only authorized to a single facility, the system defaults to the authorized facility. The user does not have to select it upon login. The System recognizes this access and uses the selected facility in all subsequent functions
If the user is authorized to access multiple facilities:o If the user has previously selected a default facility, the user does not have to
select a facility upon login. The system defaults to the specified default facility and uses this facility in all subsequent functions. To change the facility, click the Facility Name Link in the header bar to display the Select/Change Facility page

October 2017 VSS 5*3User Guide13
3.3.2Using VA Network ID and PasswordIn some cases, a user may sign-in with their VA Network Username and Password. This is only to be utilized when a PIV exemption is required. User must call VA Help Desk and request this exemption for this option to be utilized8. On the VA Single Sign-On Screen, click the View Other Sign-On Options link to
display the VA Single Sign-On box.
Figure 10 – Signing In Using VA Network ID and Password
9. Click Sign in with VA Network ID.
Figure 11 – Signing In with VA Network ID
10. The VA Single Sign-On box displays text fields to enter your VA Network ID and Password. Click Sign-In.

October 2017 VSS 5*3User Guide14
Figure 12 - Enter VA Network ID and Password
11. The system will verify the user and be redirected to the Select/Change Facility Screen or the VSS Home Page.
3.3.3Windows Authentication12. On the VA Single Sign-On Screen, click the View Other Sign-On Options link to
display the VA Single Sign-On box.
Figure 13 - Signing In with Windows Authentication
13. Click Sign in with Windows Authentication.
October 2017 VSS 5*3User Guide15
Figure 14 – Selecting the Signing In with Windows Authentication Option
14. The system will verify the user and be redirected to the Select/Change Facility Screen or the VSS Home Page.
3.3.4Select/Change FacilityIf a user is authorized to work at multiple facilities and the user has not yet selected a default facility, the Select/Change Facility Screen displays after login. This screen displays a list of authorized facilities and can be accessed at any time by authorized users. If the user does not have a default facility on file, the system recalls the last facility visited and highlights that facility the next time the user logs in.
VSS utilizes user access roles to control access to application functionality (facility).
1. From the Select/Change Facility Screen, select the appropriate facility from the list to access VSS Web (Example: Cheyenne VAMC (#442) in the screenshot below is selected).
2. Click on the up or down arrows on the scroll bar to scroll through the list. To filter through the list, enter the three digit facility code or any part of the facility name in the Select Facility text box.
3. For an easier selection, the last facility accessed is highlighted in the Select Facilitylist.
4. Click Submit.
Additional information that displays on the screen includes:
Last Facility Visited:
o Name: In this example, Cheyenne VA Medical
o Parent: Veterans Integrated Service Networks (VISN)
o VISN: 19VA VHA is divided into 21 geographical regions or areas called VISNs. In this example VISN 19 represents the VA Rocky Mountain Network.
October 2017 VSS 5*3User Guide16
Figure 15 - Select/Change Facility Screen
3.4 Exit SystemThe user must click the Log Out link located above the VSS Menu Bar. A confirmation message is displayed, click OK to confirm.
Figure 16 - Confirmation Message to Exit VSS
Once confirmed, the user is logged out of VSS and returns to the Login page. User may exit their web browser once logged off. If not confirmed, the system returns to screen displayed, when logout was requested.
3.5Automatic TimeoutThe user is automatically logged out of the system after 60 minutes of inactivity. A warning message displays, counting down from 30 seconds until a user is logged off the application. A user may click the Yes. Keep Working button, to stop the countdown and continue working. If the system automatically logs off, any work in progress is not retained. User will have to login again using SSOi with their PIV card and PIN or other options.
October 2017 VSS 5*3User Guide17
Figure 17 - Session About to Expire Message
3.6VSS Web Home PageThe VSS Web Home Page displays once the user is successfully logged in. From the home page, the user can access VSS functionality using the menu options, based upon the access role assigned.
The example displayed in the next Figure is a Test Environment Banner and will not be seen in Production.
The Facility Name and Facility Number that the current user is working in are displayed in the header.
The User Name is displayed in the top right corner of the application header.
The Log Out link is available to exit VSS.
The Footer section is the area at the bottom of VSS application screen. The section contains an audit message, contact information for questions or problems, application version, and copyright date.
3.6.1AnnouncementsAny important program announcements will display in the Announcements box.
3.6.2NotificationsUsers can view and manage notifications on volunteer and system activities, such when an e-donation from Pay.gov is received, from the VSS Homepage. In the Notifications List, messages display by severity and include a brief description and the user who issued the activity. Volunteer notifications allow the user to directly navigate to the Volunteer Profile and view activity or clear the notification from the list in the Actions column.
Only e-donations, LEIE Matches, and Kiosk change are available on the Notifications List on the VSS Home Page. All other notifications are located on the Requirement Notifications Screen.
Some notifications (i.e., LEIE Notifications) can be cleared manually on the VSS Home Page. These notifications have a default timeout to keep the list update-to-date, avoiding a long backlog.
In some instances, notifications calculated by the system will no longer be listed when resolved through VSS.

October 2017 VSS 5*3User Guide18
Click the Requirement Notifications link to view additional notifications on the Requirement Notifications Screen.o Note: The Requirement Notification Screen can also be accessed under the
Volunteers Menu by clicking on the menu option.
The following displays in the Notification List:
Each notification in the Severity column displays a status of High, Medium or Low and a color coded icon.o High = Redo Medium = Yellowo Low = Not color coded.
Name – Brief description of the notification. The bullet point below displays an additional explanation.
Details – Includes which Volunteer initiated the activity. Click the name link to view the Volunteer Profile.
Originating Facility Created Date Removal Date Actions – Click the arrow button to view the activity (i.e., View Volunteer or View
E-Donations Received displays in the dropdown) or clear the notification. Filters are available for all columns. Edit volunteer requirements, view data changes, or clear notifications. Excel, PDF, and Print enables a user to export and print notifications.
Figure 18 – Requirement Notifications Screen
3.6.3VSS Menu BarThe VSS Menu Bar at the top of the screen allows access to functions that a user can perform, according to role assigned to the user. Example 1 in the Figure refers to the VSS Menu Bar.
Breadcrumb Link - As a user navigates back and forth through the application, the names of screens display at the top left of the screen. A user can click the Breadcrumb link and go to that

October 2017 VSS 5*3User Guide19
location. Example 2 in the Figure refers to the Breadcrumb link.
Help – Clicking the Help icon on each screen displays the online help page that is specific to that screen. A user can access the online help for step-by-step procedures on how to utilize the functionality of VSS. Example 3 in the Figure 3 refers to the Help icon.
Figure 19 - VSS Menu Screen
3.7Permission LevelsVSS application utilized by the Voluntary Service Office staff utilizes an access role granted to the user for each facility to control access to application functionality. Each user access role has a set of predefined permissions associated with it and the user must be assigned a user access role before using the VSS application.
The next Figure represents the Permission Hierarchy for VSS. The National Administrator is the highest level and is responsible for nationwide VSS administration. This includes granting all levels of user access and maintaining all national lists and reports.
For more information on the access roles, refer to the CRUD Matrix in section 13 within this document.

October 2017 VSS 5*3User Guide20
Figure 20 - Permission Hierarchy
3.8User Access LevelsVSS is designed for primary and secondary users to easily track volunteers, assignments, schedules, hours, and their affiliated organizations as described in the next table.
Table 5 - User Access Levels Table
Type of User Description Responsibilities
Primary Users Voluntary Service Staff
Volunteer Management, Timekeeping, and Donation Tracking.

October 2017 VSS 5*3User Guide21
Primary Users National Administrator
Voluntary supervised programs; tracks Voluntary Services at all VHA facilities.
Creates basic information for new VHA sites or edits information for existing sites. The station information resides in the institution file.
VSS National Administrator shall have the ability to update/edit National Advisory Committee (NAC) information.
Secondary Users Volunteers (contractor or employee)
Take mandatory training, transport patients, work with Veterans at the National Games, and other volunteer duties, including entering their time and printing meal tickets, when applicable.
4. VolunteersUsers with the following roles are permitted to use the VSS Volunteers Menu option.
National Administrator (Only if logged into a local facility) National Specialist (Only if logged into a local facility with Read Only access) Site Administrator Site Specialist Site User (Read Only access)
From the VSS Menu Bar, select Volunteers. The following dropdown options are listed: Add New Volunteer Existing Volunteer Records Post Regular Time Post Occasional Time Daily Meal Tickets Awards Requirement Notifications

October 2017 VSS 5*3User Guide22
Names used throughout this document in the screenshots are examples only and are not valid names.
Figure 21 - Volunteers Menu Options
4.1Add New VolunteerWith the appropriate permissions assigned, you can add a new volunteer to the VSS application. But first, you must perform a search to verify if the user exists in the database.
The high-level process for creating a new volunteer is: From the Volunteers Menu, select Add New Volunteer to display the Add New
Volunteer Screen.
Figure 22 - New Volunteer Menu Option
Search for existing volunteers thoroughly to ensure a duplicated Volunteer Profile is not created.
Note: The system will always perform a duplicated volunteer search based on the “Lastname + DOB” and “Firstname + DOB” matching criteria when creating or modifying a Volunteer Profile.
If a volunteer is not found, the Add New Volunteer button is available to create the new volunteer profile.
Use the Edit Volunteer Screen to Add Assignments and Organizations. A volunteer cannot log in or get meals without at least one active Assignment and one active Organization.

October 2017 VSS 5*3User Guide23
4.1.1Search for an Existing VolunteerSearchable Fields for Add New Volunteer Last Name - Enter the Last Name. First Name - Enter the Frist Name. Scope - Search within a Facility or Nationally.
o When adding a new volunteer, the National option is auto selected, locked, and cannot be changed.
o When searching for an existing volunteer to edit, the Within Facility and National options are available to use.
Identifying Code (IC) - The user’s sign-in code and is based on when the volunteer was added. The IC is alphanumeric. In the example below, L represents letter. N represents number.o Existing users ICs remain (i.e., LNNNN).o For users that previously had duplicate ICs, the user with the oldest entry will keep the
original IC. The other users will have an extra number at the end of their original IC (i.e., LNNNNN).
o New user ICs are randomly assigned a six digit code that is three letters and three numbers (i.e., LLLNNN).
Date of Birth (DOB) - Calendar displayed:o If the user clicks on the calendar, the current month displays with the current year.
You can change the information by entering a two digit month, two digit days, and four digit years.
o Another option is to use the forward and backward arrows to select the month and date, and enter the four digit year.
o When using accessibility tools, the user can directly type in the date. Email - Optional; Search existing volunteers by matching the email address. Include Inactive Volunteers - This option is selected and locked. When adding a new
volunteer a user must view all “Inactive Volunteer” matches in the Search to help avoid duplicating an existing volunteer.

October 2017 VSS 5*3User Guide24
Figure 23 - Adding a New Volunteer
Conduct a thorough Search to prevent the creation of duplicate volunteers.
4. Enter at least one piece of search criteria. If the user clicks Search without making a selection, a pop-up message displays, “Please enter at least one piece of search criteria”. After viewing the message, close the screen.
Figure 24 - Please Enter at Least One Piece of Search Criteria Box
5. If no information displays from the name search a message displays, “Sorry, no volunteers were found that matched the specified criteria.” The user then has the option to click the Add New Volunteer button.

October 2017 VSS 5*3User Guide25
Figure 25 - Add New Volunteer Box with Search Criteria Defined
4.1.1.1 Duplicate Volunteer4. In some instances, duplicate volunteers may be found. The system performs a
duplicated volunteer search based on the “Lastname + DOB” and “Firstname + DOB” matching criteria when creating or modifying a Volunteer Profile.
Figure 26 - Duplicate Volunteers Found
-
4.1.2Create VolunteerWithin the Create Volunteer Screen are multiple sections representing different functional aspects of the volunteer. The sections shown may vary depending on your screen’s zoom range, and may show more than one column.

October 2017 VSS 5*3User Guide26
Volunteer Name
Last Name (required) First Name (required) Middle Name Suffix
Figure 27 - Volunteer Name Section
Master Record Nickname Gender (required) Date of Birth (required) Preferred Language Code VA employee checkbox Remarks box
Figure 28 - Master Record Section
Contact Information
The Contact Information is the volunteer’s demographic data updated by the user. Address Line 1 (required) Address Line 2 City (required) State (required) ZIP Code (required) Email Phone Alternate Phone 1 and 2

October 2017 VSS 5*3User Guide27
Figure 29 - Contact Information Section
Emergency ContactThe Emergency Contact is the volunteer’s family contact information used in case of an emergency.
Name Relationship Phone Alternate Phone
Figure 30 - Emergency Contact Section
Facility Management Meals Eligible dropdown - Establishes the number of meals allowed (required if meals=0). Open box for remarks
Figure 31 - Facility Management Section
The next Figure is an example of the all the sections on the Create Volunteer Screen.

October 2017 VSS 5*3User Guide28
Figure 32 - Create Volunteer Screen
1. Once all volunteer information is defined, click Submit. The Edit Volunteer Screen displays and is considered the Volunteer Profile.
4.2Edit VolunteerThe Volunteer Profile displays the following information specific to the volunteer:
Name - The Volunteer Name. Click to edit the name.
Entry Date – This is a Read Only field calculated by the system.The system date is used when a new volunteer was created. Migrated data has static entry dates that were previously entered potentially before VSS existed.
Years Volunteering – This is a Read Only field calculated by the system as every fiscal year the volunteer has logged time at least once, in addition to every year prior to FY2002.
Primary Facility – If the volunteer has Assignments at more than one facility, then all the facilities with active assignments are available in the dropdown. If a volunteer has no assignments, the default value is the facility the user is currently working in.
Primary Organization – If the volunteer has more than one organization then all the active organizations display. If a volunteer has no organization assigned, the system displays this message, “Please add at least one organization.” A Primary Organization is established in the Organization section of the Volunteer Profile.
The Print button displays at the top of the profile and prints all details on the Volunteer Profile in order for staff members to have a printable reference sheet.
Within the Edit Volunteer Screen are multiple sections representing different functional aspects of the volunteer. The sections shown may vary depending on your screen zoom range, and may show more than one column. In this example, two columns appear at 75% screen zoom range. Enter all required fields on the Edit Volunteer Screen.” On this screen a message displays, “The volunteer was created successfully.”

October 2017 VSS 5*3User Guide29
Figure 33 - Edit Volunteer Screen
4.2.1AssignmentsThis is a list of a volunteer’s assignments across all facilities. Only active volunteer assignments are displayed in the section by default. An empty list is indicated by the phrase, "No entries yet."
Name (Filterable) Facility (Filterable) Physical Location (Filterable) Status (Filterable) Assign button
Figure 34 - Assignments Section
4.2.2Select Assignments1. Click Assign from the Assignments section of the Edit Volunteer Screen. The Select
Assignment box displays with all the active service-role combinations configured for the currently selected facility.
2. Click the Facility dropdown to add an Assignment from another facility to the volunteer.

October 2017 VSS 5*3User Guide30
3. Enter the Service Name in the Search field to narrow down the list.4. Once the service is found, click the Service Name Link to complete the assignment.
Figure 35 - Selecting an Assignment
5. The new Assignment automatically displays in the Assignments section.6. Users may delete an Assignment only if the volunteer has not logged time; otherwise it is set
to inactive. Setting the filter to “Inactive” or “All” displays any existing inactive Organizations that the volunteer has currently.
Figure 36 - Assignments Section
1. Filters default to “All” until a selection is made. Service Name Service Role Physical Location Status
2. Assignments can be reactivated by clicking the icon as long as the associated parent assignment at the facility is still active.
3. Assignments shown as “Active” are assignments volunteers can have new time posted against.
4. Assignments shown as “Inactive” cannot be assigned new time and is not shown on time posting pages (Kiosk, Regular and Occasional).

October 2017 VSS 5*3User Guide31
4.2.3View RequirementsUsers with the Create Volunteer or Edit Volunteer access may define the fields in this section.
Name - The Organization Name displays above all requirements. Click the Requirement Name Link to view the requirement details.
Application Type - Options are: All Volunteers, All Volunteers at (Facility Name), or Specific Roles.
Date - Indicates the Start Date, Completion Date, and Expiration Date when a requirement is due or expired.
Status – New and Met are the two required values for every requirement. If a requirement was Met but past the Expiration Date, the status Expired displays.
The Red Icon indicates the volunteer does not meet the requirement. The Yellow Icon indicates the requirement is within the expiration period. Once the requirement is completed and the status is changed to Met, the icon no longer
displays.
Figure 37 - Requirements Section
4.2.3.1 View Volunteer Requirement DetailsClick on the Requirement Name Link to view the Volunteer Requirement Details Screen.Click on the Calendar icon to adjust the date.Select the Status dropdown to update the requirement.Add any comments and click Submit.

October 2017 VSS 5*3User Guide32
Figure 38 - Volunteer Requirement Details Screen
4.2.4Master RecordIncludes detailed information about the user defined when creating the new user profile. Nickname Gender (required) Date of Birth (required) Preferred Language Code VA employee checkbox Remarks box
Figure 39 - Master Record Section
4.2.5Contact InformationThe Contact Information is the volunteer’s demographic data updated by the user. Address Line 1 (required) Address Line 2 City (required) State (required) ZIP Code (required) Email Phone Alternate Phone 1 Alternate Phone 2

October 2017 VSS 5*3User Guide33
Figure 40 - Contact Information Section
4.2.6OrganizationsThis is a list of a volunteer’s Organizations across all facilities. Only active volunteer assignments are displayed in the section by default.
Name Facility Status (Filterable) Action Assign button
Figure 41 - Organizations Section
4.2.7Assign an Organization1. Click Assign. The Search for Organization box displays.2. Enter the Organization Name.3. Click Search or Cancel.
Figure 42 - Assigning Organization with the Search Organization Box

October 2017 VSS 5*3User Guide34
4. After clicking Search, the results display in the Search for Organization box.
Figure 43 - Organizations Listed in the Search for Organization Box
5. The Facility and Type filter defaults to All until a selection is made.6. Once the organization is found, select the Name Link to assign the organization to the
volunteer. 7. The organization information automatically populates on the Volunteer’s Profile Screen.8. The filter can also be set to Inactive or All if the volunteer has been identified with those
types.9. Users may delete an Organization only if the volunteer has not logged time. Otherwise it
is set to inactive. Setting the filter to Inactive or All displays any existing inactive organizations that the volunteer has currently.
4.2.8Emergency ContactThe Emergency Contact is the volunteer’s family contact information used in case of emergency.
Name – includes First, Middle, Last Name and Name Suffix. Relationship Phone Alternate Phone
Figure 44 - Emergency Contact Screen
4.2.9Facility ManagementAdministrative functions such as establishing the number of meals allowed and terminating a user.

October 2017 VSS 5*3User Guide35
Meal Eligible - Indicates the number of meals allowed and additional remarks. LEIE Exclusion Date - LEIE False Positive - Terminate button – Click to expand the Termination fields.
o Terminate Date – Select the Calendar icon or enter the date to determine the termination date and enter a Termination remark (required).
o Terminate with Cause – Select the checkbox and enter a Termination remark (required).
o Clear the Termination date if Terminate with Cause checkbox is selected. The volunteer must be reactivated by a Facility Administrator or National Administrator role. Facility users and Specialists cannot reactivate Volunteers “Terminated with Cause.”
Figure 45 - Facility Management Section
4.2.10 Hours & Awards Prior Year Hours – All logged time prior to current Fiscal Year (FY). Current Year Hours – All logged time in the current FY. The user can click the
hyperlink to view if the volunteer has active time entries on the Time Entry Screen. Total Hours – Total hours the volunteer is credited. Includes adjusted hours. Adjusted Hours - Net of adjusted hours for this volunteer. Field is hidden if value is
zero. Last Award – The dropdown lists all eligible awards and hours the volunteer can receive. Last Award Date – Date of the last award hour the volunteer received. Last Date Volunteered – The date the user volunteered last.

October 2017 VSS 5*3User Guide36
Figure 46 - Hours & Awards
4.2.11 Add an AwardVolunteers can be awarded based on the numbers of volunteer hours they achieved. Awards are given to adults and youth.1. Select an award from the Last Award dropdown. If an award is not listed, navigate to the
Maintenance Menu and select Manage Award Codes to add a new one.2. Click the Calendar icon and select the date or enter the date in the Last Award Date
field.
Figure 47 - Hours & Awards Section with the Last Award and Date Defined.
4.2.12 Parking StickersThe volunteers may have stickers in multiple facilities, but the user can only manage the stickers for the currently logged in facility.
Facility – Facility name and number. Sticker – The associated parking sticker number assigned to the volunteer. License – License plate number of the volunteer’s vehicle. Action - Edit or Delete icon. Add Button – Enables the user to add a parking sticker.
Figure 48 - Parking Stickers Section
4.2.13 Add Parking Sticker1. Select Add to display the Parking Sticker Details box.2. Define the following:
Select the facility from the dropdown list (required). Sticker Number (required)

October 2017 VSS 5*3User Guide37
Select the State License Plate number Click Submit or Cancel.
Figure 49 - Parking Sticker Details
3. The Parking Sticker information automatically populates on the Volunteers Profile Screen.
4.2.14 Uniforms The user only manages Uniforms that are associated to their assigned facilities. Facility - Facility name and number Size – Indicates the size of the uniform. Sizes range from S to XXX Large. Number – The number of uniforms assigned to the volunteer. Action – Edit or Delete icon. Add button – Enables user to add a uniform.
Figure 50 - Uniforms Section
4.2.15 Add Uniform1. Select Add to display the Uniform Details Screen.2. Define the following:
Select the facility from the dropdown list (required). Select the size of the uniform. Options are: Small, Medium, Large, X Large, XX Large,
and XXX Large. Select number of uniforms needed. Click Submit or Cancel.

October 2017 VSS 5*3User Guide38
Figure 51 - Uniform Details Screen
3. The Uniform information automatically populates on the Volunteer Profile Screen.
4.3 Existing Volunteer RecordsExisting Volunteer Profiles are available from the VSS Menu dropdown menu that enables a user to modify or view detailed information.
1. From the Volunteers Menu, select Existing Volunteer Records to display the Search for Volunteer Screen.
Figure 52 - Search for Volunteer Screen Menu Option
2. The user can perform a search for Existing Volunteer Records in the VSS database, view the Search results, and select the volunteer from the results to view or edit Volunteer Profile Screen.
Searchable Fields

October 2017 VSS 5*3User Guide39
Name - Enter Last Name, First Name, Middle Name or Suffix Scope - Defaults to Within Facility. A user can select the dropdown list to view and
select stations and enter keywords to find a facility using the Filter option. The National option is available to select.
Identifying Code (IC) DOB Email Address: Optional Include Inactive Volunteers Click Search One piece of search criteria must be entered for the search.
Figure 53 - Searching for an Existing Volunteer
2. The search results displays on the screen, including options to filter and search through the results.
3. Click the Volunteer Name Link to display the Volunteer’s Profile Screen.
Figure 54 - Existing Volunteers Available from Search Results
4. If the Search returns no results, a display message displays, “Sorry, no volunteers were

October 2017 VSS 5*3User Guide40
found that matched the specific criteria” on the screen.
4.4Volunteer DemographicsThe Volunteer Demographic Screen provides users with a collective list of volunteers demographic and profile information. The list is customizable, allowing a user to define which information they want to see for an active or inactive volunteer, which facility, and add any restrictions. Customizations are based on roles, as National roles can choose which facility, nationally or assigned, to view in the list. Users with facility only roles are limited to the current logged in facility. Facility users do not have access to view the menu option.
In the Volunteer Demographic Screen, National roles can choose either the logged in facility or all volunteers nationally. Users with Facility Only roles are limited to the current logged in facility. Facility users will not see the option to toggle nationally/facility only.
This report combines the current VSS reports: New Volunteers, Sign-In Code List, Telephone List, Terminated Volunteers, and Alphabetical Volunteers, as well as provide additional columns and reporting formats in an adhoc manner.
1. From the Volunteer Menu, select Volunteer Demographics to display the Volunteer Demographics Screen.
Figure 55 - Volunteer Demographics Menu Option
2. The Volunteer Demographics List is customizable and displays the following columns by default.
Name – The Last Name, First Name, Middle Name or Suffix. Click the name link to view the Edit Volunteer Profile.
Date of Birth AgeGenderIdentifying CodeEntry Date - Filterable by Month and/or Year.Full Address – Includes the Street Address, City, State, and ZIP Code.Full Contact – Includes the Email and Phone Numbers. Active Assignments – Lists which facilities the user has access to.

October 2017 VSS 5*3User Guide41
Last Volunteer Date3. To customize and add more columns in the list, click the Customize link.
Current Status - Select which set of volunteers to view by the following statuses:o Activeo Inactiveo Terminatedo Terminated With Cause
National Roles Only. Volunteers from the current logged in facility will display, or select the Nationally radio button to include all facilities.
The Add/Remove Columns includes all the options that can display in the Volunteer Demographics List. Several options are available to select.
Show Custom Restrictions – Expand this link to customize dates. The options are:o Last Volunteered Date – Select whether all, those who have volunteered, or
those who haven’t volunteered dates display.o Status Date – Select whether status dates from this fiscal year, the last two
fiscal years, before, after, or between displays.o Entry Date – Select whether entry dates when volunteers started from this
fiscal year, the last two fiscal years, before, after, or between displays. Click the Search button to include customized changes.
2. The Presets dropdown are common report formats to view volunteer demographics. Options are: Alphabetically Potentially Inactive Volunteers Separated from Service New Volunteers Custom
3. Excel, PDF, and Print enables a user to export and print the report.4. Print Labels – To print a mailing label for a volunteer, select a check box next to the
volunteer’s name and click Print Labels.5. Email Volunteers – To email a volunteer, select a check box next to the volunteer’s name and
click Email Volunteers.6. Search text field available.7. Click the name link to view a volunteer’s profile on the Edit Volunteer Screen.

October 2017 VSS 5*3User Guide42
Figure 56 - Volunteer Demographics Screen
4.5Post Regular TimeThe primary use of the Time Entry Screen is for facility staff to enter and manage volunteer time manually. This includes reviewing time entry and editing previously posted volunteer time. The screen displays in two sections, Enter Time and Time Report.
1. From the Volunteer Menu, select Post Regular Time to display the Time Entry Screen.
Figure 57 - Post Regular Time Menu Option
The high-level process for Posting Regular Time is:
View a volunteer time post for a given day (default to current). Post logged time for a volunteer. Post adjusted hours for a volunteer.

October 2017 VSS 5*3User Guide43
Search in current FY specific postings to edit or delete.
The Enter Time section contains two radio button options- By Date and By Volunteer:
Enter Time - By Date Option Volunteer – Start entering the volunteer’s name (i.e., Last Name, First Name, Middle
Name or Suffix) and a dropdown list displays with potential matches. Select the volunteer’s name.
Hours (Decimal value that rounds to nearest .25 with a max value of 24.0) Assignment (Active assignments) Organization (Active organizations) Action - Delete icon + to add rows Press Alt + “1” anywhere to go directly to the Post All button. Post All button
Figure 58 - Time Entry Screen
Time Entry – By Volunteer Option Date – Click the Calendar icon or enter the date. Hours (Decimal value that rounds to nearest .25 with a max value of 24.0) Assignment (Active assignments) Organization (Active assignments) Action - Delete icon + to add time entry rows Press Alt + “1” to go directly to the Post All button. Post All button

October 2017 VSS 5*3User Guide44
Figure 59 – Time Entry – By Volunteer Screen
The second section is Time Report. This displays time entries determined from the Enter Time By Date or By Volunteer radio buttons. By Date - Time Report Search field Excel, PDF, and Print enables a user to export and print a time report. Volunteer Hours Service Role (Filterable) Location (Filterable) Organization (Filterable) Action – Edit or Delete icon. The section refreshes when a New Volunteer is selected, or when time is posted through the
Post Time link
Figure 60 - By Date - Time Report

October 2017 VSS 5*3User Guide45
By Volunteer - Time Report Time Report for (Volunteer’s Name Link) – Click the name link to view the volunteer’s
profile. Search field Excel, PDF, and Print - enables a user to export and print a time report. Date Hours Service Role (Filterable) Location (Filterable) Organization (Filterable) Action – Edit or Delete icon.
Figure 61 - By Volunteer - Time Report
4.5.1View or Edit Adjusted HoursThe View/Edit Adjusted Hours section displays the adjusted hour’s lifetime history for a volunteer, with the most recent first and enables the hours to modify. The option is only available when viewing By Volunteer.
1. Click or expand the View/Edit Adjusted Hours link to display the Adjusted Hours section for the volunteer. The following displays:
Date Hours Comments Created By Add Entry button

October 2017 VSS 5*3User Guide46
Figure 62 - View/Edit Adjusted Hours Section
2. To adjust the hours for a volunteer, click the Add Entry button to display the Add Time Adjustment box.
Date – Click the Calendar icon or enter the date to adjust the hours. Must be with in the current Fiscal Year and grace period.
Hours – Enter the hours. Positive and negative hours are accepted. Comments – Justification for adding the adjustment. Click Submit.
Figure 63 - Add Time Adjustment Box
3. The adjusted hours are posted. Click on the Close Adjusted Hours link to minimize the section.
Figure 64 - Adjusted Hours Posted Screen
4.6Post Occasional TimeThe Post Occasional Time Screen is for facility staff to enter and manage Volunteer time manually. This includes reviewing who has logged time for the current day, and additional time interactions.

October 2017 VSS 5*3User Guide47
Users with the following access roles are permitted to use the VSS Volunteers Menu option. National Administrator Site Administrator Site Specialist
1. From the Volunteers Menu, select Post Occasional Time to display the Occasional Time Entry Screen.
Figure 65 – Post Occasional Time Menu Option
2. This screen provides the user the ability to: Post Occasional Hours, View the most recent Occasional Hours’ time postings. Edit existing Occasional Hours’ time postings.
The initial view of the Occasional Hours Screen is a two part display. The first section contains the fields for submitting a new Occasional Hours posting, and the second section contains a data of all current FY Occasional Hours postings by most recent date, as well as Edit and Delete icons.
VA fiscal year begins October 1 of the prior calendar year, such that FY2016 extends from 10/1/2015 to 9/30/2016.
Enter Time Date – Select the Calendar icon or enter the date to adjust the hours. Values must be within the
current fiscal year. The system may auto resolve the year portion to make time entry quicker (There is only one valid year for any given month-day combination within a FY).
Number in Group – Enter the number of volunteers for a posting. Total Group Hours – Enter the total number of hours the group of volunteers worked.
Decimal point value but must be rounded to nearest .25 of an hour. Organization – Start entering the organization’s name and a dropdown list displays with
potentials matches. Only active organizations and branches are available. Assignment – Start entering the assignment and a dropdown list displays with potentials
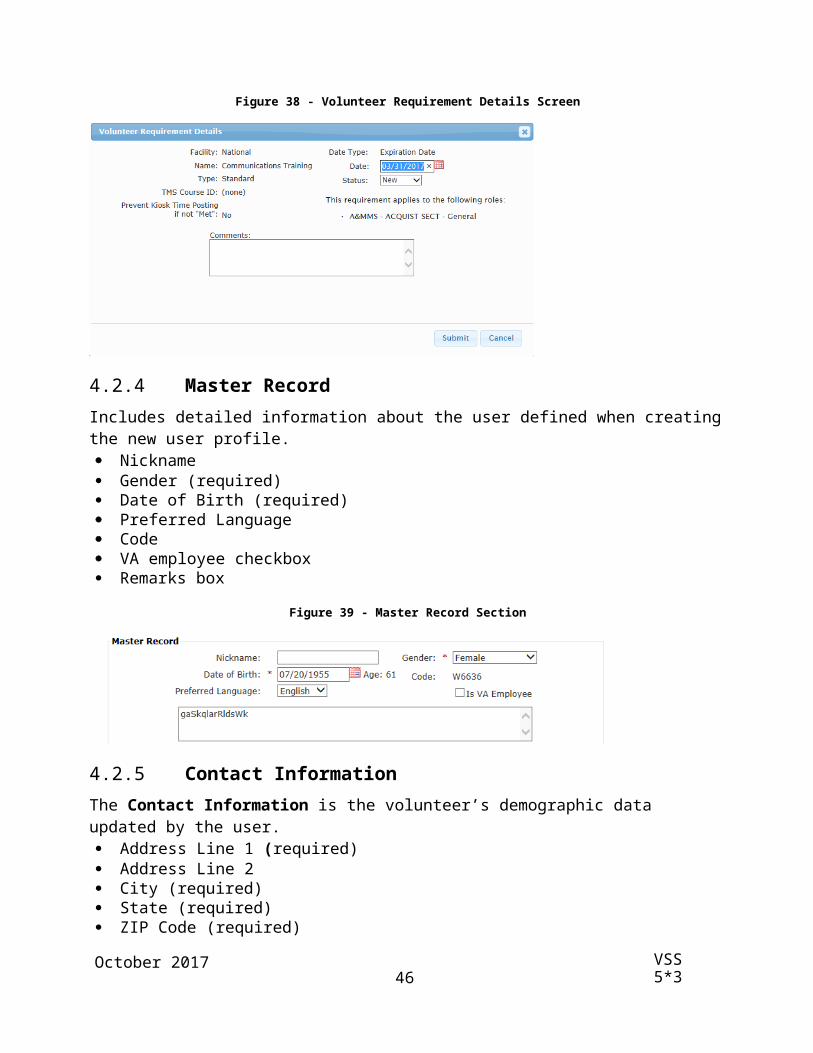
October 2017 VSS 5*3User Guide48
matches. Only active services for the facility are available. Comments – This field is used to describe the time entry with 40 characters. Action - User can add or delete rows. Press Alt + “1” anywhere to go directly to the Post All button. Post All button
The system does not allow duplicate entries with the same Day, Assignment, and Organization.
Figure 66 - Enter Time Section
Occasional Time Report Search field Excel, PDF, and Print enables a user to export and print a time report. Date (Filterable) Number In Group Total Group Hours Organization (Filterable) Service (Filterable) Role (Filterable) Location (Filterable) Comments Action Items: Edit or Delete
Figure 67 - Occasional Time Entry Screen
4.6.1Edit Occasional Time Entry2. Locate the Time Entry and click the Edit icon in the same row to display the Edit Occasional
Time Entry box. A user can modify the information and click Submit.

October 2017 VSS 5*3User Guide49
Figure 68 - Edit Occasional Time Entry Box
4.7Daily Meal TicketsThe Daily Meal Ticket List displays information for each volunteer who has requested a meal or who has had a meal manually added by VAVS Staff. If the site allows multiple meals, each meal requested is listed.
Users with the following access roles are permitted to use the VSS Volunteers Menu Bar option. National Administrator Site Administrator Site Specialist
1. From the Volunteers Menu, select Daily Meal Tickets to display the Daily Meal Tickets Screen.
Figure 69 – Daily Meal Ticket Menu Option
2. If the facility has indicated one or more meals are allowed, the Daily Meal Tickets List for the current date displays the volunteers who have requested a meal TODAY from the PC Kiosk, or have been manually added to this Daily Meal Tickets List by authorized staff.
Data Fields and Performing Tasks of the Daily Meal Ticket Volunteer Last and First Name (i.e., Last Name, First Name, Middle Name or Suffix). Occasional Volunteer Name - Name of the Occasional Volunteer added through the
Add button

October 2017 VSS 5*3User Guide50
Search button
3. If no entries are made for that day. “Sorry, no meal tickets were found that matched the specified criteria.” message displays.
Figure 70 - Daily Meal Tickets Screen with No Meal Tickets Found
4. If the volunteer is not listed, you can search or add a meal ticket to the volunteer.
4.7.1Add a Meal Ticket5. On the Daily Meal Tickets Screen, enter the Volunteer or Occasional Volunteer Last or
First Name and click Search to display the Search for the Volunteer box.6. If the volunteer is found, click the volunteer name link. If not, reenter the search criteria.
Figure 71 - Searching for a Volunteer to Add Meal Ticket
7. The volunteer now has a meal ticket and the information is displayed on the Daily Meal Tickets List.
Data Fields and Performing Tasks Print Selected button enables a user to print meal tickets.

October 2017 VSS 5*3User Guide51
Excel, PDF, and Print enables a user to export and print the meal ticket list. Select All/None - Select the checkbox next to the volunteer’s name or click Select All
to select all volunteers’ names. This enables a user to print meal tickets for all volunteers and select individuals or print or create a spreadsheet of the Meal Ticket List. Click None to uncheck.
Volunteer Name (i.e., Last Name, First Name, Middle Name or Suffix). Occasional Volunteer Name - Name of the Occasional Volunteer added through the
Add button. Meal Ticket ID - Unique ID for the meal ticket. Printed - Date and Time the meal ticket was originally requested for print (Filterable). Reprinted:
Yes, the meal ticket was re-requested for print. No, the meal ticket was not requested for reprint (Filterable).
Action – Click the Delete icon to remove the meal ticket selection.
Figure 72 - Daily Meal Ticket Screen
4.7.2Print Meal TicketThe printing of the daily Meal Ticket is available from Voluntary Service and can be used as payment for each volunteer’s meal.
1. Click the volunteer name checkbox in the Meal Ticket List. Or, click the Select All link to select all volunteers in the list.
2. Click the Print Selected button to display the Format Select Box.3. The options enable a user to print a meal ticket from a normal printer or format a meal
ticket to a kiosk printer. Click on a print icon to display the Print box. Normal Printer - Sends the meal ticket to a normal printer. Receipt Printer - Used for printing from a Kiosk.

October 2017 VSS 5*3User Guide52
Figure 73 - Format Select Box to Print Meal Tickets
4. The meal ticket and the Print box displays. Click Print.
Each Meal Ticket is for the current date only. Each Meal Ticket displays the following information:o VAVS Logo
o Volunteer Meal Ticketo Facility Nameo Volunteer Name o Valid Only On This Date: [Today’s Date] in mm/dd/yyyy format o Maximum Value of Meal Ticketo Signature of Volunteero VA Form 10-3558o For use by Voluntary Service Onlyo Meal Ticket IDo REPRINTED displays if a ticket has been printed more than once.
Each Meal Ticket is for one meal. If the volunteer is eligible for more than one meal ticket, print separately.

October 2017 VSS 5*3User Guide53
Figure 74 - Meal Ticket Example
4.8AwardsThe Awards Lists Screen displays a list of volunteers who have served enough hours to be eligible for an award and enables users to manage and view processed awards. The Primary Facility associated with the volunteer is responsible for managing awards.
1. From the Volunteers Menu, select Awards to display the Awards List Screen.

October 2017 VSS 5*3User Guide54
Figure 75 - Awards Menu Option
2. The user can perform a search for a volunteer eligible or received an award, view the search results, and select the volunteer from the results to view or edit Volunteer Profile Screen.
Searchable Fields Disposition
o Eligible – Volunteer available to receive award (Default).o Processed – Volunteer processed for award.
Typeo Adult – Adult award (Default)o Youth – Youth award.
Statuso Active – Default.o Separated - Inactive or Terminated or Terminated with Cause
3. Click the Search button to display results. The Awards List displays the following information for each volunteer:
Excel, PDF, and Print - Enables a user to export and print awards report. Search – Enables a user to search for specific information in the Awards List. Give Award – Select the checkbox to grant the award to the volunteer. Award Name - Name of Award Code the volunteer is eligible for (Filterable). Group Type - Award type of the award the volunteer is eligible for (Filterable). Volunteer Name – Last Name, First Name, Middle Name and Suffix. Click the
name link to navigate to the Volunteer Profile Screen. Status – Volunteer’s status (Filterable). Last Award Date - Date volunteer received last award. Last Award Hours - Award hours associated with last award. Service Years - Volunteer’s years of service. Average Hours/Month – The number of total hours of volunteer service
divided by number of months of service. Date Last Volunteered – Date the volunteer last posted time. Labels All/None – Select the checkbox to print a mailing label for the volunteer. Award Date – Select the Calendar icon or enter the date for the volunteer to

October 2017 VSS 5*3User Guide55
receive the award. The award date cannot be in the future. Post Awards – Click the button to process the award. Cancel – Click the button to cancel the award. Print Labels – Click to print address labels for selected volunteer.
Figure 76 - Awards List Screen
4. When the Post Awards button is selected, a warning message displays, “WARNING: This process will code the awards for the selected volunteers. The process may take some time to post the awards and is an irreversible process. Do you want to continue?”.
5. Click OK to process the award. The Last Award Date for the volunteer on the Awards Lists Screen will display the date the award is processed.
Once an award is processed, a user cannot recall the award. However, a user can post again to process volunteers previously excluded from an award or navigate to Volunteer Profile Screen and update each volunteer’s award manually.
4.9Requirement NotificationsThe Requirement Notifications Screen displays unmet and expired requirements related to the facility, other than the high priority notifications listed on the VSS Homepage. A user can quickly clear or adjust requirements and navigate directly a volunteer’s profile, without navigating through the application to view a specific screen or function.
1. From the Volunteers Menu, select Requirement Notifications to display the Requirement Notifications Screen.
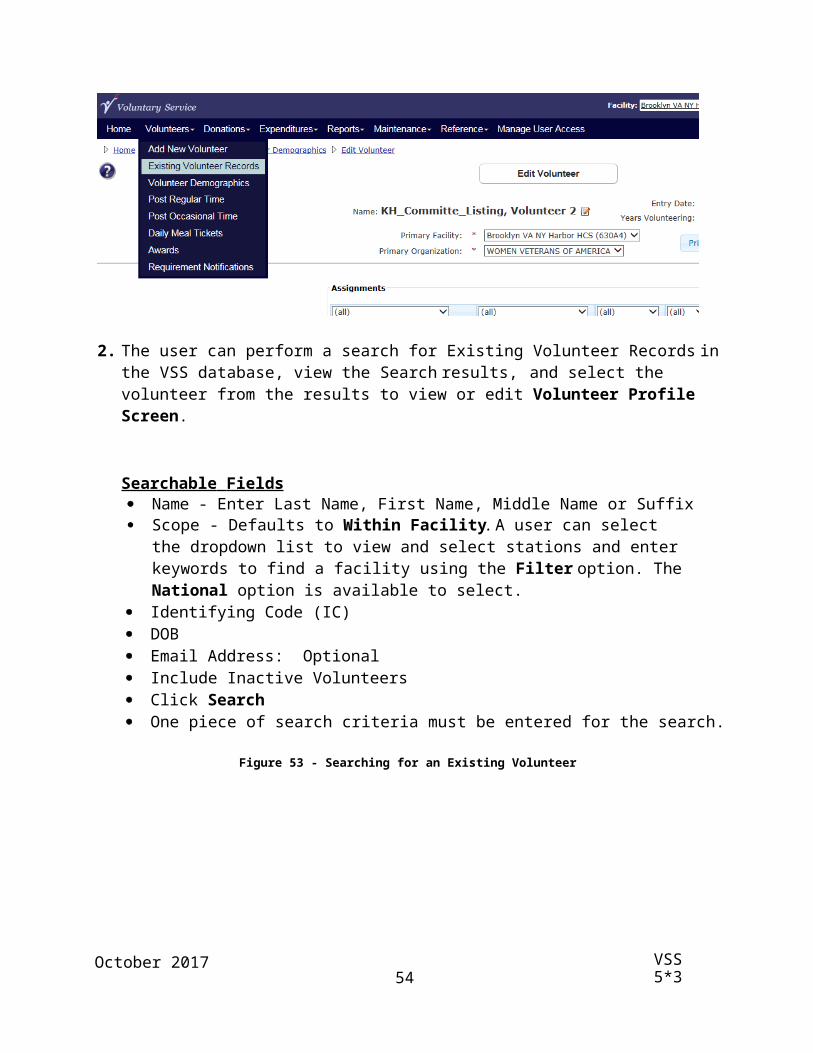
October 2017 VSS 5*3User Guide56
Figure 77 - Requirement Notifications Menu Option
2. The following displays Requirement Notifications Screen: Severity - Displays a status of High, Medium or Low and a color coded icon.
o High = Redo Medium = Yellowo Low = Not color coded.
Name – Brief description of the notification. The bullet point below displays an additional explanation.
Details – Includes which Volunteer initiated the activity. Click the name link to view the Volunteer Profile.
Originating Facility Created Date Removal Date Actions – Click the arrow button to view the activity (i.e., View Volunteer,
Volunteer Requirement or View E-Donations Received displays in the dropdown) or clear the notification.
Filters are available for all columns. Edit volunteer requirements, view data changes, or clear notifications. Excel, PDF, and Print enables a user to export and print notifications.

October 2017 VSS 5*3User Guide57
Figure 78 - Requirement Notifications Screen
3. To clear a notification, click the Actions dropdown and click Clear Notifications.4. A Confirmation box displays, click OK to clear the notification.
Figure 79 - The Confirmation Box Displays to Clear Notification.
5. To view an e-donation, click the Actions dropdown and click View E-Donations Received. The user is directed to the E-Donation List.
Figure 80 - Click on View E-Donations Received to view the E-Donation List
6. When a requirement is unmet or expired, click the Actions dropdown and click Edit Volunteer Requirement to display the Volunteer Requirement Details box.
7. Modify the Due Date by entering the date or clicking on the Calendar icon to select a new date. Change the status to New or Met, add any comments, and click Submit.

October 2017 VSS 5*3User Guide58
Figure 81 - Click on Edit Volunteer Requirement to display the Volunteer Requirements Detail box.
8. Also, for a requirement that is unmet or expired, click the Actions dropdown and click View Volunteer to display the Edit Volunteer Screen.
Figure 82 - Click View Volunteer to display the Edit Volunteer Screen.
5. DonationsThis menu is only available to local facilities. Central Office users will not see this menu. Only users with Create Donation permission may add, edit, or update donors and donations within a local facility. Users with Read Donation permission only have the ability to view donors or donations.
The following roles have Create Donation permission and are permitted to use the Donations Menu list:
National Administrator (Only available if logged into a local facility) Site Administrator Site Specialist Site User

October 2017 VSS 5*3User Guide59
The following roles have Read Donation permission and can access the Donations menu with Read Only access to donor and donation information.
National Specialist and National User (Read Only access within a local facility)
1. Select Donations from the VSS Volunteer Menu Bar. The following dropdown options are listed:
Add New Donation Add Anonymous Donation Existing Donor Records Existing Donation Records E-Donations Received Print Thank You Letters
Figure 83 - Donations Menu Options
5.1Add New Donation1. From the Donations Menu, select Add New Donation to display the Search for Donor
Screen.2. The high-level process for Add New Donation is the following:
Search existing Donor Records thoroughly in the VSS database to ensure a duplicate Donor (Individual, Individual (Volunteer), or Organization), record is not created.
Add New Donor Record (Individual or Organization) on the Create Donor Screen. Edit donations or donor records on the Edit Donor Screen.
5.1.1Search for Existing Donor - Individual1. If searching for Donor Type as an Individual on the Search for Donor Screen, the
user can populate any or all of the following fields to search for an Existing Donor Record. Last and First Name - Last Name or First Name. State Donated at - Current working Facility or Any Facility (Default)
2. If the Donor is found from the search, select the Donor Name Link from the results

October 2017 VSS 5*3User Guide60
list to display the Edit Donor Screen to edit the Donor and add a donation.
Figure 84 - Search for Existing Donor - Individual
3. If no Donors are found from the search the, “Sorry, no donors were found that matched the specified criteria.” displays and the Add New Donor button is available to create a new donor profile.
4. Click Add New Donor to display the Create Donor Screen.
5.1.2Create Donor- IndividualDefine the following fields on the Create Donor Screen:
Donor Type Individual – The radio button is automatically selected. To change the donor type,
select the Organization button and click Cancel to cancel creating an Individual Donor.
Link Volunteer Button – Links a Volunteer to a Donor.Donor
Last Name (required) Prefix Suffix First Name (required) Middle Name/Initial
Mailing Address Street Address 1 Street Address 2 City State ZIP Code Email Address Phone Number

October 2017 VSS 5*3User Guide61
Figure 85 - Create a Donor Screen
5.1.3Link Volunteer1. If the individual donor is a volunteer, click Link Volunteer to display the Search
for Volunteer Screen. This allows the user to search for existing volunteers.
Figure 86 - Searching for a Volunteer to Link to a Donation
2. If the volunteer exists as a donor and missed in the initial Search, an error message displays, “Volunteer is linked to another donor. Please select a different volunteer or search for the donor record established for this volunteer.”

October 2017 VSS 5*3User Guide62
Figure 87 - Volunteer is Linked to Another Donor Error Message
3. If the volunteer is found, the user can select it and establish it as a donor record. Once the volunteer is located, the system automatically populates the volunteer’s information in the Edit Donor Screen.
Figure 88 - Edit Donor Screen to Link a Donor Record
4. Once a donor is linked to a volunteer, the user can: Link Volunteer - Allows the user to search for existing volunteers. Once a donor is
linked to a volunteer, the other options can be performed. Unlink Volunteer – The Unlink Volunteer button removes the link between the
Volunteer Profile to the Donor Profile. When the Unlink Volunteer is entered the user receives a message, “Are you sure you want to remove the volunteer link from this donor?”.
o Click OK and the volunteer and donor are no longer linked. The user can enter or update the donor information or link to another volunteer.
o If Cancel is selected, the volunteer remains linked to the donor. Edit Volunteer – Provides the ability to modify volunteer information on the Edit

October 2017 VSS 5*3User Guide63
Volunteer Screen. Merge Donor - Provides the ability to merge two existing donors into one from
the Edit Donor Screen. Make Anonymous - Provides the ability to merge two existing donors as
“anonymous” into one from the Edit Donor Screen. Add Donation – This button is available for users to add a donation.
5.1.4Create Donor – Organization1. If searching for Donor Type as an Organization on the Search for Donor Screen, the
user can enter the Organization Name and then click Search. The system searches using the criteria to verify if the Organization has been established as a Donor.
Figure 89 - Searching for a Donor Type as an Organization
2. If no donors are found from the search, the “Sorry, no donors were found that matched the specified criteria.” displays and the Add New Donor button is available to create a new donor.
3. The Search for Organization Screen will display with the Organization Name pre-populated in the Name Field to allow the user to Search for the organization to link to the donor record. The user can then execute the Search for any organization/local branch matching the criteria entered.

October 2017 VSS 5*3User Guide64
Figure 90 - Searching for an Organization before Creating a New Donor
2. If the Organization is not found, the “Sorry, no organizations were found that matched the specified criteria.” displays and the Create Organization button is available to create a Local Organization. Once the Local Organization is created it is established as a donor and the Edit Donor Screen is displayed with message of “The donor was created successfully.”
3. If the Organization exists as a donor and was missed in the initial search, an error message displays, “Organization is linked to another donor. Please select a different organization or search for the donor record established for this organization.”

October 2017 VSS 5*3User Guide65
Figure 91 - Organization is Linked to Another Donor Error Message
4. If the Organization is found in the Search of Donor Screen, the user can select the Organization and establish it as a Donor Record.
Figure 92 - Searching for an Organization to Link to a Donor Record
5. Once selected, the Edit Donor Screen displays with the updated organization information.6. Once the Organization is chosen as a donor the user can establish the following on the Edit
Donor Screen: Edit Organization - This selection provides the ability to modify the organization
information on the Organization Detail Screen.Only Local Organizations and Local Branches within your working facility can be updated.
Merge Donor - Provides the ability to merge two existing donors into one from the Edit Donor Screen.
Make Anonymous Add Donation – This button is available for users to add a donation from the Edit
Donor Screen.

October 2017 VSS 5*3User Guide66
Figure 93 - Donor Established on the Edit Donor Screen
5.1.5Add Donation1. After adding or selecting an existing Donor record, click the Add Donation button on the
Edit Donor Screen to display the Create Donation Screen.
2. The Donor section displays in a Read Only format regardless of Donor Type.
Figure 94 - Add a Donation from the Create Donation Screen
The user has the ability to override the address information for the Acknowledgement by clicking on the Edit icon next to Acknowledgement Override. This override is only applicable to the selected Donation and does not update the Donor Profile address. The user has the option to show or hide the Acknowledge Address.
Note: Acknowledge Address override is only available for Volunteer Donor is Volunteer or Donor is an Organization.

October 2017 VSS 5*3User Guide67
Figure 95 - Overriding the Address information for the ACK
3. The Donation section contains the following: Facility - Current working facility is displayed in Read Only format. Donation ID - Auto-generated by the system Donation Date – Click the Calendar icon or enter the date. Must be within current
fiscal year (required). Donation Type – Select the donation type from the dropdown (required). Options
are: Activity, Cash, Check, Credit Card, E-Donation, and Item.o Check Number displays when Check is selected (required).o Check Date displays when Check is selected (required).o Card Type displays when Credit Card is selected. Options are: American
Express, Master Card, Visa, and Discover (required).o Confirmation Number displays when Credit Card is selected.o E-Pay Training Number displays when E-Donation is selected (required).
General Post Fund – Select the account number defined for the working facility to apply the donation against. Defaults to none if Donation Type is Activity or Item.
Donation Amount (Required) Field Service Receipt - Receipt number from Fiscal Service once a donation has
been submitted and recorded. Only displays when Donation Type is Cash, Check, or Credit Card.
ACK Date - Automatically populated when donation document is printed, can manually be entered.
Reference - Used for categorizing donations, such as division ID or sub-accounts. Dropdown list of References defined are for the working facility.
Letter Salutation - The greeting used in the Thank You Letter (required). Defaults to Individual Donor name or Contact Name if the donor is an organization.
Designation - Purpose or intended recipient of the donation. Affiliation - Organization to receive credit for the donation. Only available for
Individual Donors. Add Affiliation - Searches for Organizations. If found, click on the Organization
Name Link to add to the Donation section. Only available for Individual - Donor = Individual.

October 2017 VSS 5*3User Guide68
Delete Affiliation - Removes the Affiliation. Donation Description - This description is used when formulating the receipt and
Acknowledgement. Note: Used in an Acknowledgement Letter. Additional Information - Area to add information related to the donation.
Figure 96 - Donations Screen
4. The fields in the In Memory Of section are available for all monetary donation types, except for Activity or Item. Define the following:
In Memory Of - The field recognizes who the donation was made in honor of. Family Contact - Family member of the individual in whose memory the donation
was made.o This field is not required however, can only be entered if In Memory Of is
populated. If not, user receives error message, “In Memory Of is required when Family Contact is entered.”
Name - Last Name, First Name and Middle Name. Street City State (dropdown list) Zip – ZIP code.

October 2017 VSS 5*3User Guide69
Figure 97 - In Memory Of Section
5. Define the name(s) to display in the Carbon Copy (CC) section.
Figure 98 - CC Fields Section
6. The Post and Print button allows the user to save the information on the screen and displays the Post and Print dialogue.
The user can choose to print the donation receipt, memo, or Thank You Letter in PDF or Word format.
If the Donation ACK date has not been previously populated, the date of the Thank You Letter requested is printed and displayed.
7. The Post button saves the information to the database. The user’s ID, time, and date of update is recorded. This information is retained in the database for auditing purposes, and is not displayed.
The user receives a confirmation message of the saved Donation information. If edits fail, error message(s) display indicating the corrections and the action
requested from the user. The data is not saved until all edits are passed.8. If user clicks Cancel, updates are not saved to the database.

October 2017 VSS 5*3User Guide70
Figure 99 - Adding a Donation from the Create Donation Screen
5.2Add Anonymous Donation 1. From the Donations Menu, select Add Anonymous Donation to display the Create
Donation Screen.
Figure 100 - Add Anonymous Donation Menu Option
2. The Donor Type displays as Anonymous on the Create Donation Screen. In the Donation section, establishing the following:
Facility - current working facility is displayed in Read Only format. Donation ID - Auto-generated by the system Donation Date – Click the Calendar icon or enter the date. Must be within current
fiscal year (required).

October 2017 VSS 5*3User Guide71
Donation Type – Select the donation type from the dropdown (required). Options are: Activity, Cash, Check, Credit Card, E-Donation, and Item.o Check Number displays when Check is selected (required).o Check Date displays when Check is selected (required).o Card Type displays when Credit Card is selected. Options are: American
Express, Master Card, Visa, and Discover (required).o Confirmation Number displays when Credit Card is selected.o E-Pay Training Number displays when E-Donation is selected (required).
General Post Fund – Select the account number defined for the working facility to apply the donation against. Defaults to none if Donation Type is Activity or Item.
Donation Amount (Required) Field Service Receipt - Receipt number from Fiscal Service once a donation has
been submitted and recorded. Only displays when Donation Type is Cash, Check, or Credit Card.
ACK Date - Automatically populated when donation document is printed, can manually be entered.
Reference - Used for categorizing donations, such as division ID or sub-accounts. Dropdown list of References defined are for the working facility.
Letter Salutation - The greeting used in the Thank You Letter and not displayed for Anonymous donations.
Designation - Purpose or intended recipient of the donation. Affiliation - Organization to receive credit for the donation. Only available for
Donor = Individual. Add Affiliation - Searches for Organizations. If found, click on the Organization
Name Link to add to the Donation section. Delete Affiliation - Removes the Affiliation. Donation Description - This description is used when formulating the receipt and
ACK. Additional Information - Area to add information related to the donation.

October 2017 VSS 5*3User Guide72
Figure 101 - Add Anonymous Donation from the Create Donation Screen
3. The fields in the In Memory Of section are available for all monetary donation types, expect for Activity or Item. Define the following:
In Memory Of - The field recognizes who the donation was made in honor of. Family Contact - Family member of the individual in whose memory the donation
was made.o This field is not required however, can only be entered if In Memory Of is
populated. If not, user receives error message, “In Memory Of is required when Family Contact is entered.”
Name - Last Name, First Name, Middle Name or Suffix. Street City State (dropdown list) Zip – ZIP Code
Figure 102 - In Memory Of Section
4. Define the name(s) to display in the Carbon Copy (CC) section.

October 2017 VSS 5*3User Guide73
Figure 103 - CC Fields Section for an Anonymous Donation
5. The Post and Print button allows the user to save the information on the screen and display the Post and Print dialogue.
The user can choose to print the donation receipt, memo, or Thank You Letter in PDF or Word format.
If the Donation ACK date has not been previously populated, the date of the Thank You Letter was requested is printed and displayed.
The Post and Print button allows the user to save the information on the screen and display the Post and Print dialogue.
6. The Post button saves the information to the database. The user’s ID, time, date of update is recorded. This information is retained in the database for auditing purposes, and is not displayed.
The user receives a confirmation message of the saved Donation information. If edits fail, error message(s) display indicating the corrections and the action
requested from the user. The data is not saved until all edits are passed.7. If user clicks Cancel, updates are not saved to the database.
Figure 104 - Add Anonymous Donation Screen from the Create Donation Screen

October 2017 VSS 5*3User Guide74
5.3Existing Donor RecordsThe Edit Donor Screen, regardless of Donor Type, displays the donations in the Donations List that allows the user to add and view existing donations.
1. From the Donations Menu, select Existing Donor Records to display the Search for Donor Screen.
Figure 105 - Existing Donor Records Screen
2. From the Search for Donor Screen, the user searches for an existing donor through the Search options.
3. If the system identifies a match, the user is presented with the results list containing the following information:
Search for Donor Records - Individual Results
Search - The user can conduct a Search within the list of results from this screen. Name - Last Name, First Name, Middle Name or Suffix. Donor Is Volunteer (Filterable). The default is All. Contact Information - Address, City, State, and ZIP Code Last Donation Facility [Name (#)] (Filterable) Last Donation Date (Filterable) Last Donation Type Last Donation Amount

October 2017 VSS 5*3User Guide75
Figure 106 - Search for Donor Records - Individual Results
Once the donor is matched, the user clicks on the name link and will be taken to the Edit Donor Screen and the information is prepopulated.
Search for Donor Records Results - Organization
Search - The user can conduct a Search within the list of results from this screen. Name – Organization name. Organization’s Facility - National or Local (Filterable) Contact Name - Last Name, First Name, Middle Name or Suffix. Contact Information - Address, City, State, and ZIP Code. Last Donation Facility [Name (#)] (Filterable) Last Donation Date (Filterable) Last Donation Type Last Donation Amount

October 2017 VSS 5*3User Guide76
Figure 107 - Search for Donor Records Results - Organization
4. Once the donor is matched, click the Organization Name Link to display the Edit Donor Screen with the information prepopulated.
5. A user can modify or view information on the Edit Donor Screen. The Donor, Mailing Address, and Donations sections contain information on the donor.
Figure 108 - Modifying or Viewing Information on the Edit Donor Screen

October 2017 VSS 5*3User Guide77
6. The Donations List displays donations for the working facility. The user can request to see all donations for all facilities by choosing the Facility filter.
The Donations List displays the last 10 donations in donation date order from newest to oldest. The user can view additional donations by selecting the Show entries dropdown.
Add Donation button - Donations can only be created for individuals or Active Organizations. If the Organization has a status of Inactive; the user cannot add a new donation and the Add Donation button is disabled.
Excel, PDF, and Print – The ability to export all the donations in the list or Print the list.
Date - The user edits or views the details for a donation by clicking on the Date hyperlink.
Facility – The facility the donation originated from. Type – Donation type. Included are: Activity, Cash, Check, Credit Card, E-
Donation, and Item. Amount – Donation amount. ACK Date - Indicates the date donation was acknowledged. Description – Donation description entered for the donation. Affiliation - Affiliation is an individual donation given on behalf of an organization.Action - The user can print/reprint a Thank You Letter, Memo, or Receipt for a
donation by clicking the Printer icon. If the Printer icon is not displayed, the donation does not qualify to print/reprint a donation document.
If the donation is for the working facility, an authorized user is able to delete a donation by clicking the Trash Can icon in the Action Column. A confirmation message is displayed “Are you sure you want to delete this donation?”
o If OK is selected, the donation is deleted.o If Cancel the donation remains.o If the Trash Can icon is not displayed, the donation does not qualify or
the user may not have the authority to delete the donation.
Figure 109 - Donations List Displays Donations for the Working Facility
5.3.1Read Only DonationsDonations that meet the following criteria cannot be edited or updated. Donations are displayed in Read Only format:
All donations must be entered for the current fiscal year (Oct 1 – Sept 30) by the end of the

October 2017 VSS 5*3User Guide78
fiscal year (Sept 30). Users are allocated two weeks (+ 14 days grace period) after the fiscal year end to make any needed corrections for the previous fiscal year.
o If Donation Date is in previous fiscal year (Example: date < 10/1/14) - Read Only.o If Donation Date is in this fiscal year (Example: date >= 10/1/14 and <= 09/30/15)
If Current date > 10/14/15 – Read Only. If the donation is for a facility other than the current working facility, the donation is
available for display only. The user cannot update it without changing their working facility.
o If Inactive Organization/Local Branch is Donor, the donations are Read Only.o If Inactive Organization/Local Branch is affiliated with a Donation, the donation is
Read Only.
5.3.2Change Donor – Donation Details ScreenThe Change Donor buttons is only available when editing and updating a donation on the Donation Details Screen. If the user has not updated any of the Donation Detail information currently captured, the button is enabled and can be selected. This allows the user to change the Donor associated with this donation, to another Donor regardless of Donor Type by navigating to the Donor Search Screen.
Once a new Donor has been selected, the updated Donor information is displayed with a confirmation message, “Are you sure you want to move this donation to the new Donor?”
If confirmed, this Donation is associated with the new Donor. If not confirmed, this donation remains with the previous Donor information.
If changes have been made to the Donation Detail Screen the Change Donor feature is not available and is disabled. The user has to post the changes first before the button is enabled.
Figure 110 - Changing Donor on the Donation Detail Screen
5.3.3Merge Donor or Make AnonymousMerge Donor or Make Anonymous Buttons provide the ability to merge two existing donors into one from the Edit Donor Screen. Within this screen, all donations are moved from the source donor the user is currently viewing, into the target donor and deletes the source donor.

October 2017 VSS 5*3User Guide79
All donations for the source donor are moved to the target donor regardless of the facility where it was recorded, the fiscal year of the donation and the facility the user is working in at the time the merge is executed.
Any donor can be merged with any other donor. The source and target donor does not have to have the same Donor Type.
If the Donor Type for the source Donor = Organization, it must have a status of Active to be eligible for the merge. If the Organization is Inactive; the merge feature is not available.
If the Donor Type for the target Donor = Organization, it must have a status of Active to be eligible for the merge. If the organization is Inactive; the user receives the message “Target Donor Organization is inactive, please choose a different target Donor.”
Only National or Site Administrators in the local facilities has access to the Merge Donor button.
Figure 111 - Merge Donor Button on the Edit Donor Screen
5.3.3.1 Merge Donor ButtonIf the Merge Donor button is selected, the Search Donor Screen displays. This allows the user to search and then select the target donor for merging. The target donor is the option remaining on file after the merge. Click OK to merge.
Figure 112 - Merging Donor
The source and target donors cannot be the same. If they are the same donor, the user receives a message “The target Donor cannot be the same as the source Donor.”

October 2017 VSS 5*3User Guide80
Figure 113 - Target Donor Cannot be the Same as the Source Donor Message
5.3.3.2 Make Anonymous ButtonIf the Make Anonymous button is selected, the Confirmation box displays. The target Donor Type is Anonymous.
Figure 114 - Make Anonymous Donation
5.4Existing Donation Records ScreenThe Existing Donation Records provides the ability to view a list of donations by date range. An advanced search is provided and the user can narrow the list by Donor Name, Donor Type, and ACK Date.
1. From the Donations Menu, select Existing Donation Records to display the Donation List Screen.

October 2017 VSS 5*3User Guide81
Figure 115 - Existing Donation Records Menu Option
2. The following search parameters are available to allow the user to narrow the list of donations displayed:
Begin Date - The Begin Date is defaulted to the current date – 30 days. The user may modify this date if desired.
End Date – Select or enter the End Date to search for donations within a date range.
Donor Name - Any characters to be used to narrow the list. These characters could appear in the Donor Name or the Organization or Other Organization name fields associated with the Donation.
Donor Type - Lists are narrowed by Donor Types: Individual (default), Organization (default), and Anonymous. Also, the list can be expanded to include Organization and Individual, Other Groups and Individual or Other Groups by clicking Show Legacy.
Acknowledgement - Lists are narrowed to include donations with an Acknowledged Date or without an Acknowledged Date. Acknowledged and Unacknowledged are selected by default.
Donation ID – Lists are narrowed by Donation ID. Click Submit to display donation results.
Figure 116 - Donor Types and Acknowledgment Options Selected on the Donations List
3. The following columns are available in Donation List search results: Select All/None – Select the link to print one or all donations. Date – Date of Donation. The hyperlink navigates user to Donation Detail Screen. Type – Donation Type listed. Included are: Activity, Cash, Check, Credit Card, E-
Donation, and Item. Donor Type – Donation Type listed. Included are: Individual, Organization,

October 2017 VSS 5*3User Guide82
Anonymous, Organization & Individual, Other Groups and Individual, or Other Groups (Filterable).
Donor Name - Hyperlink navigates user to Edit Donor Screen. Affiliation - Affiliation is an individual donation given on behalf of an organization. Organization or Other Groups – Results displayed only when Show Legacy
Donor Types were searched (Filterable). Description – Donation Description entered for the donation. Value – Dollar amount of donation. ACK Date – Indicates the date donation was acknowledged. Letter - The Thank You Letter template used.
o Monetary Donation In Memory Ofo Monetary Donation Family Contact (letter to Donor, letter to Family
Contact)o Monetary Donation Not in Memory Ofo Activity Donationo Item Donation
ID – Donation ID Each column can be sorted in ascending or descending order. A Search box is available on screen to search for any value within the list. In order to print Thank You Letters, the user selects one or more checkboxes in the
Select All/None column, then clicks Print Selected. This button prompts the user to select which items to print (Memo, Receipt, or Thank You Letter) and offers the option of PDF or Word Document formats. After making a selection of Thank You Letter and output format, click Submit, and the Thank You Letter(s) opens in a separate window.
A request to print the Thank You Letter updates the Donation ACK Date with the current date for each donation selected.
If the ACK Date was previously populated, the date is not updated. The user is able to export all donations displayed in the Donation List by choosing Excel or PDF format or may choose to Print the list. Print Thank You Letters Screen.
Figure 117 - Donor List Screen

October 2017 VSS 5*3User Guide83
5.5E-Donations ReceivedVSS can receive any donations posted to Pay.gov, nightly for the VSS staff to incorporate into VSS. These donations are displayed when E-Donations Received is selected from the Donations menu.
1. From the Donations Menu, select E-Donations Received to display the E-Donation List Screen.
Figure 118 - E-Donations Received Menu Option
2. The following columns are available in E-Donation List search results: Donor Name – Name of the donor associated with donation. Address – Address of the donor associated with donation. Phone Email – Phone number and email addressed of the donor associated with
donation. Date – Date of donation. Amount – Amount of the e-donation. Program GPF - The General Post Fund on the donation. Additional Information – Any information associated with the donation. Epay Tracking ID – The identification number assigned to the e-donation. Action – Click the Add new Donation link to add a donation. The Search for
Donor Screen displays and user proceeds to the process. Each column can be sorted in ascending or descending order. Excel, PDF, and Print enables a user to export and print a report of e-donations. A Search box is available on screen to search for any value within the list.
Figure 119 - E-Donation List Screen

October 2017 VSS 5*3User Guide84
Print Thank You Letters1. From the Donations Menu, select Print Thank You Letters to display the Donation List
Screen.
Figure 120 - Print Thank You Letters Menu Option
2. The Donation List Screen allows a user to print one or more Thank You Letters for the existing donations within the working facility and view donor and donation details.
3. From the search results, click the Donor Name Link to view donor details.4. Click Excel, PDF, or Print to view the Donation List details.5. Enter Begin Date and End Date to search existing donations. Click Submit.6. Once the results display, select the checkbox next to the donation(s) and then click Print
Selected button.
Figure 121 - Print Thank You Letters from the Donation List Screen
7. The Print Donation Documents box displays and select to print the Receipt Thank You Letter, Memo, and/or Receipt in either PDF or Word format. Click Submit.

October 2017 VSS 5*3User Guide85
Figure 122 - Print Donation Documents Box
6. ExpendituresThis menu enables users to view of list of all expenditures along with a daily balance by General Post Funds (GPF) and make any adjustments in balances.
Users with the following access roles are permitted to use the Expenditures Menu. National Administrator (Create and Delete) Site Administrator (Create and Delete) Site Specialist (Create Only)
From the VSS Menu Bar, select Expenditures. The following dropdown options are listed: General Ledger Existing Expenditure Records Existing Adjusted Records
Figure 123 - Expenditures Menu Options
6.1General LedgerThe General Ledge Lists displays the total balance, donations, expenditures, and adjustments for General Post Funds (GPF). The list displays the Fiscal Year balances (default), but a user can change the display balances for the Current Fiscal Year, Previous Fiscal Year, Current Month, Previous Month, Other Fiscal Year, and specific month.
1. From the Expenditures Menu, select General Ledger to display the General Ledger List.

October 2017 VSS 5*3User Guide86
2. The General Ledger List displays the following: Date Range – Select which previous balances or monthly balances to view. Select
an option and click Submit to view balances. Options are:o Current Fiscal Year – Default.o Previous Fiscal Year o Other Fiscal Year - When selected, the Fiscal Year dropdown displays and
you can select which year to view.o Current Montho Previous Montho Specific Month(s) – When selected, the Start Month/Year and End
Month/Year dropdowns display. Define both to view the balances. Excel, PDF, and Print enables a user to export and print report balances. Search text field available. Total – The grand total of GPF balances, donations, total expenditures, and
adjustments display at the top of the General Ledger List in each respective column. General Post Fund – Click the link to view the daily balance of the GPF. Current Balance – The balance for each General Post Fund. Total Donations – The total donation amount for each General Post Fund.
o Click the add icon to add or edit a donation. The user will search for a donor and organization first, then be directed the Edit Donor Screen.
o Click the Donation Amount link to view the Donations List. Total Expenditures - The total expenditure amount for each General Post Fund.
o Click the add icon to add or edit an expenditure.o Click the link to view the Expenditure List.
Total Adjustments – The total adjustment amount for each General Post Fund.o Click the add icon to add or edit an adjustment.o Click the link to view the Adjustment List.
Figure 124 - General Ledger Screen
6.1.1Add an Expenditure1. After selecting add icon, the Expenditures Details Screen displays.2. Define the following:

October 2017 VSS 5*3User Guide87
Purchase Order – The number from IFCAP once the Purchase Order is issued. Transaction Number – Temporary Transaction Number before the Purchase Order
is issued. Expenditure Date – Click the Calendar icon or enter the date. Amount – Amount of expenditure. GPF - A user can select another GPF to update other than the one initially selected. Search button – Select the button to search for a user to add as the Purchase
Requester. Description – Required description of the expenditure. Vendor – Vendor used for expenditure. Quantity Purchased – The quantity number purchased of the expenditure. Unit - Options include: Assortment, Bag, Box, Case, Carton, Dozen, Each, Job,
Lot, Mean, Month, Package, Unit, and Year. Unit Price – Unit price of expenditure. Comments Link to Donation – Click the button to link a donation to the expenditure. The Donations List table displays all donations already linked to the expenditure.
Click the Delete icon in the Action column to remove the donation. Submit or Cancel button.
Figure 125 - Expenditure Details Box

October 2017 VSS 5*3User Guide88
6.1.2Add an AdjustmentA user can update a ledger adjustment to bring the VSS balance in alignment with the Integrated Funds Distribution, Control Point Activity, Accounting and Procurement (IFCAP) program.
1. After selecting add icon, the Adjustments Details Screen displays.2. Define the following:
Adjustment Date - Click the Calendar icon or enter the date. Amount - Balance of the existing GPF account before this expense was applied. GPF - The user can select another GPF to update other than the one initially
selected. Justification Submit or Cancel button.
Figure 126 - Adjustment Details Box
6.2Existing Expenditure RecordsThe Expenditure List enables users to view all expenditures that have been posted.
1. From the Expenditures Menu, select Existing Expenditure Records to display the Expenditure List.
2. The Expenditure List displays the following: Start Date and End Date - Click the Calendar icons or enter the Start and End
Dates.o Start Date defaults to the previous 3 months.
General Post Fund Submit and Cancel
Excel, PDF, and Print - enables a user to export and print the expenditure list.
Search text field available General Post Fund Date – Click the date link to view the expenditure details. Amount

October 2017 VSS 5*3User Guide89
Vendor Quantity Purchase Requester - Click the name link to send the purchaser an email. Transaction # Purchase order Donations Action – Click the delete icon to delete the General Post Fund.
Figure 127 – Expenditure List
6.3Existing Adjustment RecordsThe Adjustment List enables users to view all adjustments that have been posted.
1. From the Expenditures Menu, select Existing Adjustment Records to display the Adjustment List.
2. The Adjustment List displays the following: Start Date and End Date - Click the Calendar icons or enter the Start and End
Dates.o Start Date defaults to the previous 3 months.
General Post Fund – All General Post Funds display in the list (Default is any). Select any GPF to view individually.
Submit and Cancel Excel, PDF, and Print - Enables a user to export and print the ledger
adjustment list. Search text field available General Post Fund Date – Click the date link to view the General Post Fund details. Amount Justification

October 2017 VSS 5*3User Guide90
Requester – Click the name link to send an email to the requester. Actions – Click the Delete icon to delete the General Post Fund.
Figure 128 - Adjustment List Screen
7. ReportsUsers with the following access roles are permitted to use the Reports Menu.
National Administrator National Specialist National User Site Administrator Site Specialist Site User
From the VSS Menu Bar, select Reports. The following dropdown options are listed: Volunteers Donations Administration

October 2017 VSS 5*3User Guide91
Figure 129 - Reports Menu Options
7.1 Volunteers Reports1. From the Reports Menu, select Volunteers. The following dropdown options are listed:
Daily Volunteer List Volunteer Daily Review Meal Ticket New Volunteer View Excluded Entities Volunteers By Service Volunteers By Service and Facility Volunteers By Organization National Organization Affiliated Volunteers Regular Scheduled and Occasional Hours
Within each screen users can export results to print, PDF, Excel and MS Word.
Figure 130 - Volunteer Reports Menu Option

October 2017 VSS 5*3User Guide92
7.1.1Daily Volunteer ListThe Daily Volunteer List Report displays a detailed history of volunteers’ hours within a date range and the date and time of the entry, as well as the user that made the last change.
1. From the Reports Menu, select Volunteers>Daily Volunteer List to display the Specify Parameters for the Daily Volunteer List Report box.
2. Select the Calendar icon or enter date for the Begin field to search within the date range specified. Report includes volunteers entered on or after this date.
3. Select the Calendar icon or enter date for the End field to search within the date range specified. Report includes volunteers entered on or before this date.
Figure 131 - Specify Parameters for the Daily Volunteer List Report Box
4. Click Submit or Cancel. The next screen displays is Daily Volunteer List Report.
Daily Volunteer List Report Facility - Facility Name and Number. Begin Date and End Date – Displays the date range specified from the parameters screen. Volunteer’s Name - Last Name, First Name, Middle Name or Suffix. Assignments Physical Location Organization Posted Date - Modified Date and Time Stamp. Posted By – The user who posted the time. Hours – Totals hours worked. Day and Date Count - Number of Volunteers posted for a given day. Total Hours Worked for Date - Total hours worked for the date. Total Report Volunteer Count - The number of volunteers for a given day. Report Total for Date Range - Total hours for the specified date range. Click Edit Parameters to run another Daily Volunteer List for a specific date. Click Print to print the report. The report run date and time is printed at the bottom of each page.

October 2017 VSS 5*3User Guide93
The page number series X of Y is printed at the bottom of each page.
7.1.2Volunteer Daily ReviewThe Volunteer Daily Review Report enables users to run a report on a single volunteer and view a detailed history of the volunteer’s hours. When the parameters screen displays, a user searches for the specific volunteer and defines a date range. The report displays hours the volunteer worked, which facility, the user who entered the time, a date and time stamp, and more.
1. From the Reports Menu, select Volunteers>Volunteer Daily Review to display the Specify Parameters for the Volunteer Daily Review Report box.
2. Click Search to display the Search for Volunteer box. This allows the user to search for an existing volunteer within the facility or nationally. Select the volunteer name link to define the date range on the Specify Parameters for the Volunteer Daily Review Report box.
Figure 132 – Select a Volunteer for the Volunteer Daily Review report.
3. Select the Calendar icon or enter date for the Begin field to search within the date range specified. Report includes the volunteer entered on or after this date.
4. Select the Calendar icon or enter date for the End field to search within the date range specified. Report includes the volunteer entered on or before this date.

October 2017 VSS 5*3User Guide94
Figure 133 - Specify Parameters for the Volunteer Daily Review Report
5. Click Submit or Cancel. The next screen displays is Volunteer Daily Review Report.
Volunteer Daily Review Report Volunteer’s Name – Last Name, First Name. Facility - Facility Name and Number. Begin Date and End Date – Displays the date range specified from the parameters screen. Date – The day and date when the volunteer worked. Assignments Physical Location Organization Posted Date - Modified Date and Time Stamp. Posted By – The user who posted the time. Hours – Hours volunteered for that date. Count - Number of volunteers posted for a given day. Total Hours Worked for the Facility. Total Hours worked for All Facilities. Click Edit Parameters to run another Volunteer Daily Review for a specific date. Click Print to print the report. The report run date and time is printed at the bottom of each page. The page number series X of Y is printed at the bottom of each page.
7.1.3Meal TicketThe Canteen fills in the dollar amount for each meal the Volunteer has paid for using their printed Meal Ticket(s) or requests the user to sign the form instead of a meal ticket. The Canteen returns this list to the VAVS office to track the dollar amount spent on Volunteer meals.
1. From the Reports Menu, select Volunteers>Meal Ticket to display the Specify Parameters for the Meal Ticket Report box.

October 2017 VSS 5*3User Guide95
Figure 134 - Specify Parameters for the Meal Ticket Report Box
2. Select or enter the date to print the list. The date is defaulted to the current day.3. Click Submit or Cancel. The next screen displays is Meal Ticket Report.
Meal Ticket Report Facility - Facility Name and Number. For Date - Selected Date. Volunteer Name - Last Name, First Name, Middle Name or Suffix. The report detail is sorted alphabetically by Volunteer Last Name, First Name. Meal ID Amount Signature of Volunteer Click Edit Parameters to run another Meal Ticket Report for a specific date. Click Print to print the report. The report run date and time is printed at the bottom of each page. The page number series X of Y is printed at the bottom of each page.
7.1.4New VolunteerThis report retrieves all volunteers who are new at the facility within the date range entered. For each facility selected, this report groups the volunteers by each organization associated with their time entry. There is a count of volunteers for each organization and then a total for each facility.
This report excludes new volunteers who have not yet logged time. The same volunteer may show up for multiple organizations and independently counted in organization subtotals; however the grand total counts unique volunteers only.
1. From the Reports Menu dropdown list, select Volunteers>New Volunteer to display the Specify Parameters for the New Volunteer Report box.
2. Select one or more Facilities checkbox from the Select Facilities dropdown. Includes all donations recorded for the selected facility(s).
Click Check all to select all facilities. Uncheck all removes the selections.
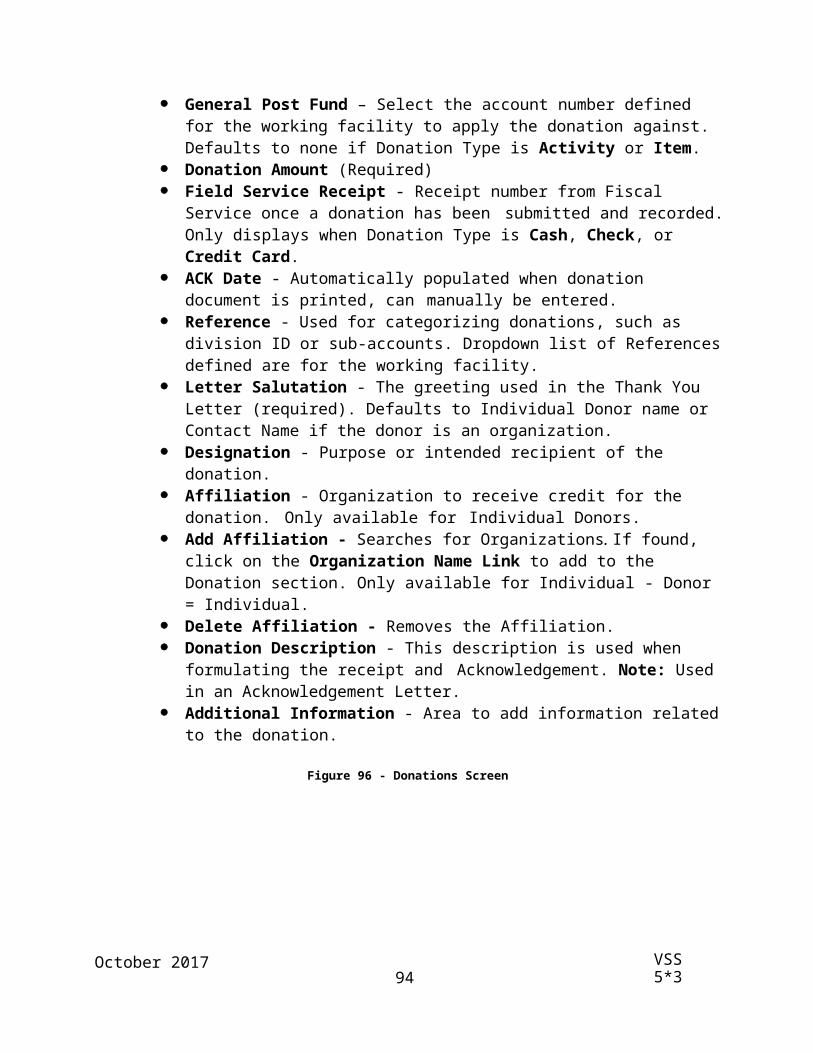
October 2017 VSS 5*3User Guide96
3. Select the Calendar icon or enter date for the Begin Date field to search within the date range specified. Report includes volunteers entered on or after this date.
4. Select the Calendar icon or enter date for the End Date field to search within the date range specified. Report includes volunteers entered on or before this date.
5. Click Submit or Cancel.
Figure 135 - Specify Parameters for the New Volunteer Report Box
6. The next screen displays is New Volunteers. On this screen the users can “Run Report of New Volunteers” for the specified dates.
New Volunteers Report Facility - Facility Name and Number. Begin Date End Date Organization Name - Displays the Primary Organization for the Volunteer. Volunteer Name - Last Name, First Name, Middle Name or Suffix Age - Volunteer’s age. Entry Date – Volunteer entered into VSS. Assignment - Volunteer Assignment at the facility. Physical Location - Physical location for the assignment. Email - Email address. Phone - Contact phone.
The report is sorted alphabetically and includes: The Organization Total follows the Detail Report for each primary organization associated
to volunteers within the facility. The Report Total follows the Organization Total for each facility. Click Edit Parameters to run another New Volunteer for a specific date. Click Print to print the report.

October 2017 VSS 5*3User Guide97
7.1.5View Excluded EntitiesThe Office of the Inspector General publishes a List of Excluded Individuals/Entities (LEIE) of individuals and entities currently excluded from participation in Medicare, Medicaid, and all other Federal health care programs. Any individuals/entities who have been reinstated are removed from the LEIE list.
1. From the Reports Menu dropdown list, select Volunteers>View Excluded Entities to display the Excluded Entity Matches Screen.
Figure 136 - Excluded Entity Matches Screen
The Excluded Entity Matches Screen provide a list of existing Active volunteers (Active = volunteers who have their Primary Facility = to the facility the user is working in OR who have an active assignment at the facility the user is working in AND are not TERMINATED) that have an entry on the LEIE file that matches the volunteer’s first name, last name, suffix, and date of birth.The All Excluded Entities Screen provides a list of all excluded entities received in the input file (regardless of whether or not there was a match to an existing volunteer).
Screen InformationLEIE Source Data Last Updated: This date is when the table was last updated with new values and not when the file was last retrieved (daily). The file is updated once a month therefore VSS pulls the file daily and updates the VSS table with values.
The following fields are displayed for each match:
View Excluded Entities Report Volunteer Name Facility LEIE Name SSA 42 USC Code Exclusion Date – Date this person was added to the LEIE file.

October 2017 VSS 5*3User Guide98
Exclusion Description VSS Address composite LEIE Address composite VSS DOB LEIE DOB
If there are no Volunteers that match the LEIE file the user receives a message “No Excluded Entities were found for facility (Facility name (#))”. The link to “View all LEIE data” takes the user to “All Excluded Entities.” Click Edit Parameters to run another report for a specific date. Click Print to print the report.
7.1.6Volunteers By Service (Summary/Detail/Daily)The Volunteers By Service Report displays the number of volunteer hours logged for the selected service(s) during the specified date range. The Summary and Detail report information is listed by month and includes the hours worked for each selected service and selected facility. The Daily report information is listed by day and includes the hours for each selected service and selected facility.
For each service, the Volunteers By Service Summary Report lists the total of all regular scheduled (RS) hours, the total of all occasional hours, and the grand total of all hours worked. On the Volunteers By Service Detail Report, listed is each volunteer who has logged hours towards the selected service(s) along with how many hours logged per month and if requested, the number of visits it took to log those hours. Additionally, the Volunteers By Service Detail Report displays a summary for each month selected, a summary for each service selected, and a grand total for all months/services included in the report. The Volunteers By Service Daily Report lists each volunteer who has logged hours towards the selected service(s), how many hours were logged per day of each month, a count of the number of visits, and an average of how many hours were logged per visit. The Volunteers By Service Daily also includes monthly totals, service totals, and an overall grand total.
Note: Volunteers By Service Report cannot exceed 12 months.
1. From the Reports Menu dropdown list, select Volunteers>Volunteers by Service to display the Specify Parameters for the Volunteers by Service Report box displays.
2. Select Summary, Detailed, or Daily from the Type dropdown.3. Enter the month and year as options as the Begin Date and End Date.
Note: Begin and End dates cannot exceed 12 months.4. Show Visits (Detail Report Only) – Select the Yes or No radio button.5. Select one Facility from the Select Facility dropdown.6. Select one or more Services checkboxes from the Services dropdown.
Click Check all to select all Services. Uncheck all removes the selections7. Click Submit or Cancel. The next screen displays the Volunteers By Service Report.

October 2017 VSS 5*3User Guide99
Figure 137 - Specify Parameters for the Volunteers by Service Report Box
Report Header:The Report Header displays the following information:
VAVS Logo Report Name: Volunteers By Service (Summary/Detail/Daily) The report header will appear at the top of each page.
Facility Header:The Facility Header displays the following information:
Facility: [Facility name (#)] Begin Date: [Month Year] End Date: [Month Year]
Volunteers By Service Report (Summary)Detail Header:
Service Name Months – Indicates the months in the Begin Date and End Date search criteria.
Report Detail: Grand Total RS Hours – Total Regular Scheduled (RS) hours logged for the
selected service. Grand Total Transitional RS Hours – Total transitional RS hours logged for the
selected service. Grand Total Youth RS Hours – Total of all youth hours logged for the selected
service. Grand Total All RS Hours – Grand total of RS hours logged for all selected
services. Grand Total Occasional Hours – Grand total of occasional hours logged for all
selected services. Grand Total All Hours Work (RS and Occasional) – Grand total of all volunteer
hours logged for all selected services. Grand Total Adult RS Visits

October 2017 VSS 5*3User Guide100
Grand Total Transitional RS Visits Grand Total Youth RS Visits Grand Total of all Visits Grand Total Adult RS Volunteers Grand Total Transitional RS Volunteers Grand Total Youth RS Volunteers Grand Total of all Volunteers
Volunteers By Service Report (Detail)
Detail Header: The Detail Header displays the column headings. Service Name Months – Indicates the months in the Begin Date and End Date search criteria.
Report Detail: Role + Physical Location – the volunteer assignment is composed of the Service +
Role + Physical Location Volunteer Name - Last name, First Name, Suffix, and Middle name. Youth/Adult
o Y – Youth, under 18 years of age.o A – Adult, 18 or older.o *A - Transitional Age volunteer, 17 at the start of the report period and
turned 18 by the end of the report period. Status Date - The date the current assignment status was applied. Assignment Status - The current status of the assignment. Hours - The hours posted for the role and physical location within that service for
each volunteer for each month within the report period. Visits - The number of times the volunteer posted hours for the role and physical
location within that service for each volunteer for each month within the report period. This is only displayed if Yes is selected for Show Visits.
Total - Total Hours and Number of Visits for each volunteer. Month/Year - The Month and Year for each month within the report period is
displayed. The Service Summary displays the following information for each Service:
Count Adult RS Volunteers – All RS volunteers 18 years old or higher. Count Transitional RS Volunteers - All RS volunteers who turned 18 within the
report period. Count Youth RS Volunteers - All RS volunteers less than 18 years old. Count All RS Volunteers - All RS volunteers. Total Adult RS Hours - Sum all hours for RS volunteers 18 years old or higher.

October 2017 VSS 5*3User Guide101
Total Transitional RS Hours - Sum all hours for RS volunteers who turned 18 within the report period.
Total Youth RS Hours - Sum all hours for RS volunteers less than 18 years old. Total All RS Hours - Sum all hours for RS volunteers. Total Adult RS Visits - Number of visits for RS volunteers 18 years old or higher. Total Transitional RS Visits - Number of visits for RS volunteers who turned 18
within the report period. Total Youth RS Visits - Number of visits for RS volunteers less than 18 years old. Total All RS Visits - All RS visits. Total Adult RS Assignments Worked - All RS assignments for volunteers 18
years old or higher. Total Transitional RS Assignments Worked - All RS assignments for volunteers
who turned 18 within the report period. Total Youth RS Assignments Worked – All RS assignments for volunteers less
than 18 years old. Total All RS Assignments Worked - All RS assignments. Total Occasional Hours - Sum of all occasional hours during the report period. Total Occasional Assignments - Count of all occasional assignments during the
report period. Total Occasional Volunteers - Count of all occasional volunteers during the
report period. Total All Assignments Worked - All RS and Occasional assignments worked
during the report period. Total All Hours Worked - Sum of all RS and Occasional hours worked during the
report period. Total By Location – displays one line for each physical location associated with
the service. o Each row includes the total hours by month for a specific physical locationo A Total row will follow the listed physical locations, containing a total for
all physical locations associated with the service.
Volunteers By Service Report (Daily)Detail Header:
Days – Indicates the days of the month (1-31).
Report Detail: Service - The service the hours were logged against. Month/Year - The Month and Year for each month within the report period is
displayed. Volunteer Name - Last name, First Name, Middle Name and Suffix. Hours - The number of hours volunteered for each day of the month.

October 2017 VSS 5*3User Guide102
Count - The number of visits for each day of the month. Average - Hours divided by Count. Monthly Totals – Total by month for the service. Service Totals - Total by service. Grand Total – Total for all days, months, and services.
7.1.7Volunteers By Service and FacilityThe Volunteers By Service and Facility Report displays services in alphabetical order for the selected facility(s) within number of months specified. The information is categorized by regular scheduled volunteers, occasional volunteers, and total volunteers to show the total number of hours by service and role.
Note: Volunteers By Service and Facility Report cannot exceed 12 months.
1. From the Reports Menu dropdown list, select Volunteers>Volunteers by Service and Facility to display the Specify Parameters for the Volunteers by Service and Facility Report box displays.
2. Enter the month and year as options as the Begin Date and End Date. Note: Begin and End dates cannot exceed 12 months.
3. Select one Facility from the Select Facility dropdown.4. Select the All Services checkbox to include all services or uncheck add specific Benefiting
Service Names in the report.5. Select National, Local, or All Services from the Service Scope dropdown.6. If the Include Inactive Benefiting Services checkbox is selected, the report includes
Active and Inactive selected Benefiting Services. Note: This is Service status, not Role status. All roles for the selected Benefiting
Service are always included regardless of status.7. Game
If No is selected, Benefiting Services that are not Games related are included. If Yes is selected, Benefiting Services that are Game related are included.
8. If the options selected, the report will narrow down Benefiting Services. Starts With – If selected, the system should filter and display a list of Benefiting
Service names that start with the characters entered in the Filter String on the Benefiting Services dropdown list box.
Contains – If selected, then the system should filter and display a list of Benefiting Service names that contain the characters entered in the filter string on the Benefiting Service dropdown list box.
9. Enables the user to search and select Benefiting Services established for the selected facilities by entering at least 2 characters of the full or partial service name in the Filter String box.
10. Click Submit or Cancel. The next screen displays the Volunteers By Service and Facility Report.
Figure 138 - Specify Parameters for the Volunteers by Service and Facility Report

October 2017 VSS 5*3User Guide103
Report Header:The Report Header displays the following information:
VAVS Logo Report Name: Volunteers By Service (Summary/Detail/Daily) The report header will appear at the top of each page.
Facility Header:The Facility Header displays the following information:
Facility: [Facility name (#)] Begin Date: [Month Year] End Date: [Month Year]
Volunteers By Service and Facility Report Service Name - Lists the services for selected facility(s) in alphabetical order Role – Lists all the roles for the selected facility(s) and service(s). Role Status – Includes Active and Inactive statues. Months – Indicates the months in the Begin Date and End Date search criteria. Regular Scheduled Volunteers
o Number of Volunteers - The number of RS volunteers for the selected date.o Visits - The number of visits by RS volunteers.o Hours – The hours logged for the OS volunteers.
Total Volunteerso Number of Volunteers- The number of RS volunteers for the selected date.o Visits – The number of visits for the RS Volunteers and OS Volunteers.o Hours – The hours logged for the RS and OS volunteers.
Click Edit Parameters to run another report for a specific date. Click Print to print the report.

October 2017 VSS 5*3User Guide104
7.1.8Volunteers By Organization (Summary/Detail/Daily)The Volunteers By Organization Report displays the number of volunteer hours logged for the selected organization(s) during the specified date range. The Summary and Detail report information is listed by month and includes the hours worked for each selected organization and selected facility. The Daily report information is listed by day and includes the hours for each selected organization and selected facility.
1. From the Reports Menu dropdown list, select Volunteers>Volunteers by Organization to display the Specify Parameters for the Volunteers by Organization Report box displays.
2. Select Summary, Detailed, or Daily from the Type dropdown.3. Enter the month and year as options as the Begin Date and End Date.
Note: Begin and End dates cannot exceed 12 months.4. Show Visits (Detail Report Only) – Select the Yes or No radio button.5. Select one Facility from the Select Facility dropdown.6. Select one or more Organizations checkboxes from the Organizations dropdown.
Click Check all to select all Organizations. Uncheck all removes the selections7. Click Submit or Cancel. The next screen displays the Volunteers By Organization
Report.
Figure 139 - Specify Parameters for the Volunteers by Organization Report Box
Report Header:The Report Header displays the following information:
VAVS Logo Report Name: Volunteers By Organization (Summary/Detail/Daily) The report header will appear at the top of each page.
Facility Header:The Facility Header displays the following information:

October 2017 VSS 5*3User Guide105
Facility: [Facility name (#)] Begin Date: [Month Year] End Date: [Month Year]
Volunteers By Organization Report (Summary)Detail Header:
The Detail Header displays the column headings. Organization Name Months – Indicates the months in the Begin Date and End Date search criteria.
Report Detail: Total All RS Hours – Total Regular Scheduled (RS) hours logged for the selected
organization. Total Occasional Hours – Total occasional hours logged for the selected
organization. Total All Hours Worked – Total of all volunteer hours logged for the selected
organization. Grand Total All RS Hours – Grand total of RS hours logged for all selected
organizations. Grand Total Occasional Hours – Grand total of occasional hours logged for all
selected organizations. Grand Total All Hours Work – Grand total of all volunteer hours logged for all
selected organizations.
Volunteers By Organization Report (Detail)Detail Header:
The Detail Header displays the column headings. Organization Name Months – Indicates the months in the Begin Date and End Date search criteria.
Report Detail: Branch Name – includes the parent organization and all branches under the parent
organization. Volunteer Name - Last name, First Name, Suffix, and Middle name. Youth/Adult
o Y – Youth, under 18 years of age.o A – Adult, 18 or older.o *A - Transitional Age volunteer, 17 at the start of the report period and
turned 18 by the end of the report period. Status Date - The date the current assignment status was applied. Assignment Status - The current status of the assignment. Service – the volunteer assignment is composed of the service + role + physical
location. Role - the volunteer assignment is composed of the service + role + physical
location

October 2017 VSS 5*3User Guide106
Physical Location - the volunteer assignment is composed of the service + role + physical location
Hours -The hours posted for the role and physical location within that organization for each volunteer for each month within the report period.
Visits - The number of times the volunteer posted hours for the role and physical location within that organization for each volunteer for each month within the report period. This is only displayed if Yes is selected for Show Visits.
Total - Total Hours and Number of Visits for each volunteer. Month/Year - The Month and Year for each month within the report period is
displayed. The Organization Summary displays the following information for each Organization:
Count Adult RS Volunteers – All RS volunteers 18 years old or higher. Count Transitional RS Volunteers - All RS volunteers who turned 18 within the
rep-ort period. Count Youth RS Volunteers - All RS volunteers less than 18 years old. Count All RS Volunteers - All RS volunteers. Total Adult RS Hours - Sum all hours for RS volunteers 18 years old or higher. Total Transitional RS Hours - Sum all hours for RS volunteers who turned 18
within the report period. Total Youth RS Hours - Sum all hours for RS volunteers less than 18 years old. Total All RS Hours - Sum all hours for RS volunteers. Total Adult RS Visits - Number of visits for RS volunteers 18 years old or higher. Total Transitional RS Visits - Number of visits for RS volunteers who turned 18
within the report period. Total Youth RS Visits - Number of visits for RS volunteers less than 18 years old. Total All RS Visits - All RS visits. Total Adult RS Assignments Worked - All RS assignments for volunteers 18
years old or higher. Total Transitional RS Assignments Worked - All RS assignments for volunteers
who turned 18 within the report period. Total Youth RS Assignments Worked – All RS assignments for volunteers less
than 18 years old. Total All RS Assignments Worked - All RS assignments. Total Occasional Hours - Sum of all occasional hours during the report period. Total Occasional Assignments - Count of all occasional assignments during the
report period. Total Occasional Volunteers - Count of all occasional volunteers during the
report period. Total All Assignments Worked - All RS and Occasional assignments worked
during the report period.

October 2017 VSS 5*3User Guide107
Total All Hours Worked - Sum of all RS and Occasional hours worked during the report period.
Volunteers By Organization Report (Daily)Detail Header:
Days – Indicates the days of the month (1-31)
Report Detail: Organization - The organization the hours were logged against. Month/Year - The Month and Year for each month within the report period is
displayed. Volunteer Name - Last name, First name, Middle Name and Suffix. Hours - The number of hours volunteered for each day of the month. Count - The number of visits for each day of the month. Average - Hours divided by Count. Monthly Totals – total by month for the organization Org Totals – total by organization Grand Total – total for all days, months, and organizations Click Edit Parameters to run another report for a specific date. Click Print to print the report.
7.1.9National Organization Affiliated VolunteersEnables users to run a report on the total number of volunteers with the total number of active Volunteers that have logged time and the total number Volunteers that have not logged any time from each National Organization or Facility.
Displays number of volunteers in each National Organization with active hours. Displays numbers of volunteers in each National Organization that are active but dormant
(i.e., ho hours logged). Displays total number of active hours by National Organization.
1. From the Reports Menu dropdown list, select Volunteers>National Organization Affiliated Volunteers to display the Specify Parameters for the National Organization Affiliation Volunteers Report box displays.
2. Select to sort the report by Facility or Organization.3. Select one Facility from the Select Facility dropdown.4. Select one or more Organizations checkboxes from the Organizations dropdown.
Click Check all to select all Organizations. Uncheck all removes the selections.5. Select Fiscal Year - Select the fiscal year to view results from that year on the report. 6. Click Submit or Cancel. The next screen displays the Specify Parameters for the
National Organization Affiliated Volunteers Report box.
Figure 140 - Specify Parameters for the National Organization Affiliated Volunteers Report Box

October 2017 VSS 5*3User Guide108
Report Header:The Report Header displays the following information:
VAVS Logo Report Name: National Organization Affiliated Volunteers The report header will appear at the top of each page.
Facility Header:The Facility Header displays the following information:
Facility: [Facility name (#)] Begin Date and End Date
National Organization Affiliated Volunteers Report Organization Name Fiscal Year – The year selected from the parameters screen. Facility Name Last Name First Name Begin Date End Date Hours - The hours accumulated by Q1, Q2, Q3, and Q4. Total Hours – The total of hours the volunteer worked all year. Volunteer Total Volunteers with Hours Participation Rate Total Hours for Facility Organization Totals Total Hours - The total hours the volunteer worked. Grand Total – The total hours for Q1, Q2, Q3, and Q4. Volunteer Grand Total – The grand total of all volunteers for a facility Volunteers with Hours Grand Total

October 2017 VSS 5*3User Guide109
Participation Rate Click Edit Parameters to run another report for a specific date. Click Print to print the report.
7.1.10 Regular Scheduled and Occasional HoursThe Regular Scheduled and Occasional Report compares the increase, decrease, and overall change in the number of regularly scheduled and occasional volunteers at the facility within the specified date range.
1. From the Reports Menu dropdown list, select Volunteers>Regular Scheduled and Occasional Hours to display the Specify Parameters for the Regular Scheduled and Occasional Hours Report box displays.
2. Select Summary or Detail from the Type dropdown.3. Filter Report By:
Facility: The report displays only the selected Facilities. State: The report displays only the Stations within the selected States. VISN: The report displays only the Stations within the selected VISNs.
4. Select information is displayed by 3, 6, or 9 months.5. Select Fiscal Year - Select the fiscal year to view results from that year on the report.6. Select one or more Facilities checkbox from the Select Facilities dropdown. Includes all
donations recorded for the selected facility(s). Click Check all to select all facilities. Uncheck all removes the selections.
7. Click Submit or Cancel. The next screen displays the Specify Parameters for the National Organization Affiliated Volunteers Report box.

October 2017 VSS 5*3User Guide110
Figure 141 - Specify Parameters for the National Organization Affiliated Volunteers Report Box
Report Header:The Report Header displays the following information:
VAVS Logo Report Name: Volunteers By Service (Summary/Detail/Daily) The report header will appear at the top of each page.
Facility Header:The Facility Header displays the following information:
Facility: [Facility name (#)] Fiscal Year
Regular Scheduled and Occasional Hours Details Count Current – includes the totals from the date range specified. Count Prior - includes the totals prior before the date range specified. Increase/Decrease - increase or decrease for each category. Percentage Change – includes an increase or decrease for each category. Current Percent of Total RS on rolls logging hours end of period Number recruited in period – new to VA Number recruited in period – not new to VA Number separated in period Net gain or loss in period
o This includes the totals of Recruited (new to VA), Recruited(not new to VA), inactivated, and separated volunteers.
Regular Scheduled Hours Number of occasional volunteer visits Occasional Hours Adjustment Hours Total Hours

October 2017 VSS 5*3User Guide111
The report also displays the following: Count of volunteers by age range (standard demographic age ranges) Count of transitional age volunteers
o A transitional age volunteer is defined as those who were 17 (youth) at the start of the report period and turned 18 by the end of the report period.
Click Edit Parameters to run another report for a specific date. Click Print to print the report.
7.2Donations ReportsThis report retrieves donations made by individual and customizable Thank You Letter templates. Select Donations Screen from the Reports dropdown list. There are two options, Manage Letter Templates and Grand Total of Donations.
Figure 142 - Donations Menu Options
7.2.1Manage Letter TemplatesAll Thank You Letter templates initially include default text in the letter. Facilities may choose to use the default text or modify the template(s).
1. From the Reports Menu dropdown list, select Donations > Manage Letter Templates to display the Manage Letter Template Screen.
2. The user is shown a list of the template types and has an option of templates. Each facility currently has the ability to generate 5 types of Thank You Letters.This is based on the Donation Type. Letter Type 2 (Family Contact) is composed of two different letters. Therefore, there are 6 different letter templates that a user may modify:
Type 1 - Cash/Check/Credit Card/E-Donate In Memory Of Type 2 (a) - Family Contact (To Donor) Type 2 (b) - Family Contact (To Family) Type 3 - Cash/Check/Credit Card/E-Donate Not in Memory Of Type 4 - Activity Donation Type 5 - Item Donation
3. All default text for templates is based on the templates saved for CO (#101). Changes can be made to the CO template to update the default text (appropriate permissions

October 2017 VSS 5*3User Guide112
are*required). Any changes made to the CO templates changes the default text for all sites without customized templates.
4. Upon making a selection, the user is presented with a screen to edit the selected template and click Submit to save changes.
Figure 143 - Manage Letter Templates Screen
7.2.2Grand Total of DonationsThis report retrieves all the donations recorded for a facility based on a date range and any additional parameters entered. There is an option to print the report in Summary form or Detail form.
1. From the Reports Menu dropdown list, select Donations > Grand Total of Donations to display the Specify Parameters for the Grand Total of Donations Report box displays
2. Define the following: Type: Report format (required)
o Summary – Allows user to generate a Summary Report.o Detailed – Allows user to generate a Detail report followed by a Summary
Page. Filter Report By:
o Facility – Allows user to select one or more facilities. Includes all donations recorded for the selected facility(s).
o State – Allows user to select one or more states. Includes all donations recorded for all facilities whose addresses are in the selected state(s).
o VISN – Allows user to select one or more VISNs. Includes all donations recorded for all stations that are in the selected VISN(s) (required).
Date Range:o Begin Date - Report includes Donations with donation date greater than or

October 2017 VSS 5*3User Guide113
equal to this date (required).o End Date - Report includes Donations with donation date less than or equal to
this date (required). Show Params - Select the Yes or No Radio Button to show parameters. Select Facilities:
o Select one or more Facilities checkbox from the Select Facilities dropdown Donor Type
o Individual o Organization & Individualo Other Groups & Individualo Organizationo Other Groupso Anonymous
Donor Type - *Required: Yes if Legacy Donor Type not selectedo Activityo Casho Checko Credit Card o E-Donationo Itemo GPF (Only available if a single facility is selected)o Reference (Only available if a single facility is selected)
3. Click Submit to display the Grand Total of Donations report. Depending on the report type, the report name displays as either Grand Total of
Donation – Detail or Grand Total of Donations – Summary. The report header displays at the top of each page; however, the VAVS logo only
displays on the first page.4. The following displays for either a Detail or Summary report:
Facility Header
For Facility: [Facility name (#)]
For Facilities within State: [State Name]
For Facilities within VISN: [VISN: Name (#)]
For Date: [Begin Date] through [End Date]
For Donor Type: [selected Donor Types]
For Donation Type: [selected Donation Types]
For Donor Name: [Donor name]
For GPF: [selected GPF]
For Reference: [selected Reference]
Report Type = Summary

October 2017 VSS 5*3User Guide114
Purpose: Report totals for each facility based on parameters entered.
o The Summary report contains one page for each selected facility.o The Report appears in Facility Name order.o The Report Header displays at the top of each pageo The Facility Header follows the Report Header.
The Summary report displays the following information for each facility:
o Cash: [total of all donations for Donation Type = Cash]o Check: [total of all donations with Donation Type = Check]o Credit Card: [total of all donations with Donation Type = Credit Card]o E-Donation: [total of all donations with Donation Type = E-Donation]
Total Monetary Donations: [total of all monetary donations]o Activity: [total of all donations for Donation Type = Activity]o Item: [total of all donations with Donation Type = Item]
Total Non-Monetary Donations: [total of all non-monetary donations]o Total All Donations: [total of all donations]
Figure 144 - Grand Totals of Donations Report - Summary
Report Type = Detail
Purpose: Report 1 detail line for each donation recorded at each facility based on parameters entered. Followed by a Summary Page per Facility. Details are grouped by each Facility.
The Detail report contains one or more pages varying by the number of donations recorded for each selected facility.
The Report displays in Facility Name order. The Report Header displays at the top of each page.
The Facility Header follows the Report Header.
The Detail Header follows the Facility Header.
o Each detail row in the Detail report displays the following information.
Donor Type: [type of donor associated with donation]

October 2017 VSS 5*3User Guide115
o To save space on the report; Use the Donor Type keys of : A– Anonymous I – Individual O – Organization G – Other Groups OI- Organization and Individual GO – Other Groups and Individual
Donor Name: [name of donor associated with donation]
o [If Donor Type = Individual/ Organization and Individual/ Other Group and Individual; this is the individual on the donation.]
o [If Donor Type = Organization; this is the organization/local branch on the donation.]
o [If Donor Type =Anonymous; it reads “Anonymous”]
Affiliation/Organization/Other Group:
o [If Donor Type = Individual; this is the organization affiliated with the organization if one is present.]
o [If Donor Type = Organization and Individual; this is the organization on the donation]
o [If Donor Type = Other Group and Individual; this is the other group on the donation]
o Otherwise - blank GPF: [the GPF on the donation]
Donation Date: [the Date on the donation]
Donation Type: [the Type on the donation]
o To save space on the report; use the Donation Type keys of: C- Cash CC – Credit Card CH – Check E – E-Donations A – Activity I - Item
Donation Value: [the Amount on the donation]
Reference: [the Reference on the donation] Description: [the Description on the donation]
o The report is sorted alphabetically by Donor Name.o The Summary report follows the Detail Report for each facility.
Report Footer
o The report run date and time is printed at the bottom of each page.o The page X of X is printed at the bottom of each page.
Report – No Data

October 2017 VSS 5*3User Guide116
o If there is no data for the parameters entered, the report header displays, followed by a “No Records Returned for this Date Range.”
Click Edit Parameters to run another report for a specific date.
Click Print to print the report
7.3Administration ReportsFrom the Reports Menu dropdown list, select Administration. The following options are three options, Address Label Reports, Voluntary Service Directory and National Officials Listings.
Figure 145 - Administration Reports Menu Options
7.3.1Address Labels ReportFrom the Reports Menu dropdown list, select Administration> Address Labels Reports.A secondary menu has the following options:
Volunteer Address Labels Voluntary Service Directory Label National Official Labels
Address Label Reports are designed to support Avery 5160 compatible label sheets.
7.3.1.1 Volunteer Address LabelsThe Volunteer Address Label Screen displays address labels for volunteers with specific parameters. The report is restricted to the user’s assigned Facility (s) and allows the user to print reports. Also, Volunteer Address Labels Screen allows the user to print address labels for mailings to volunteers associated with a selected station.
1. From the Reports Menu dropdown list, select Administration >Address Label

October 2017 VSS 5*3User Guide117
Reports>Volunteer Address Labels. The Specify Parameters for the Volunteer Address Labels Report box displays. Define the following:
Filter by: Age Birth Month Organizations Services Selected Volunteers All Volunteers All VAVS Representatives ZIP Code
Facility - The user is able to filter the report based on a list of Facilities.
Filter – Enter keywords to further a search.
Age Range (Filter selected)
Range - From a specific age to a specific age
Birth Month (Filter selected)
Select a month from the dropdown list.
Organizations (Filter selected)
Click the checkbox beside the organization name.
o Click Check all to select all organizations. Uncheck all removes the selections.
o Filter – Enter keywords to further a search.
Services (Filter selected)
Click the checkbox beside the service name.
o Click Check all to select all services. Uncheck all removes the selections.
o Filter – Enter keywords to further a search.
Selected Volunteers (Filter selected)
Click the checkbox beside the Volunteer’s name.
o Click Check all to select all volunteers. Uncheck all removes the selections.
o Filter – Enter keywords to further a search.
ZIP Code (Filter selected)
Click the checkbox beside the ZIP Code name.

October 2017 VSS 5*3User Guide118
o Click Check all to select all ZIP Codes. Uncheck all removes the selections.
o Filter – Enter keywords to further a search.Sort By
Volunteer Name
ZIP CodeEmail Option
Volunteer with No Email Address
All VolunteersNumber of Labels to Skip
A number 0 to 27 may be selected to skip printing in those label spaces. The default choice is zero. Skipped label spaces are horizontal across rows.
Figure 146 - Specify Parameters for the Volunteer Address Labels Report Box
5. Click Submit or Cancel. The next screen displays is Volunteer Address Labels Report.
Volunteer Address Labels Report6. The report runs as of the Current Date/Time. Any data on file as of the current Date/Time
is included on the report.7. The report is formatted to Avery 5160 address labels (3 columns by 10 rows).8. The report includes a note on the screen stating “*Exported labels may require additional
formatting.”9. The system displays the following detail lines on each address label.
Name
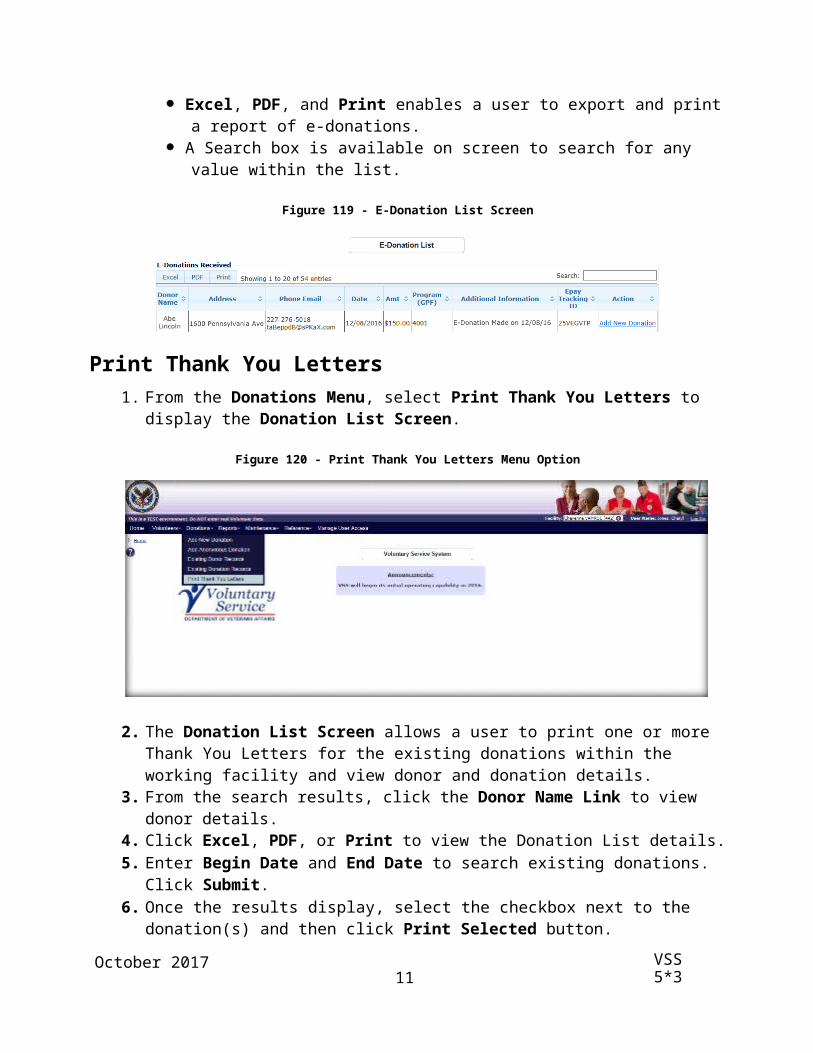
October 2017 VSS 5*3User Guide119
Address Line 1 Address Line 2 City State ZIP Code Click Edit Parameters to run another report for a specific date. Click Print to print the report.
Figure 147 – Volunteer Address Labels Report
7.3.1.2 Voluntary Service Directory LabelsThis report displays the Voluntary Services Directory Labels by Facility, VISN, and State or by All Facilities. The reporting tool allows the user to print the report and the GUI includes helpful breadcrumbs at the top of each report screen.
The Voluntary Service Directory Labels Screen allows users to print address labels for VHA stations. You can print labels for an individual station, for all stations in the country, or for all stations in a selected VISN or state.
1. From the Reports Menu dropdown list, select Administration >Address Label Reports> Voluntary Service Directory Labels. The Specify Parameters for the Voluntary Service Directory Labels Report box displays. Define the following:
Filter Report By:
All – report if filtered by facilities, state, and VISN.
Facility - The user is able to filter the report based on a list of Facilities.
o Filter – Enter keywords to further a search.
o Click Check all to select all facilities. Uncheck all removes the selections.
State – The report displays only the Stations within the selected States.
o Filter – Enter keywords to further a search.
o Click Check all to select all States. Uncheck all removes the selections.

October 2017 VSS 5*3User Guide120
VISN - The report displays only the Stations within the selected VISNs.
o Filter – Enter keywords to further a search.
o Click Check all to select all VISNs. Uncheck all removes the selections.Sort By
Facility
StateNumber of Labels to Skip
A number 0 to 27 may be selected to skip printing in those label spaces. The default choice is zero. Skipped label spaces are horizontal across rows.
2. After entering the values, click Submit. The next screen to display is the Voluntary Services Directory Label Report.
Voluntary Services Directory Labels Report
3. The report runs as of the Current Date/Time. Any data on file as of the current Date/Time is included on the report.
4. The report is formatted to Avery 5160 address labels (3 columns by 10 rows).5. The report includes a note on the screen stating “*Exported labels may require
additional formatting.”6. The system displays the following detail lines on each address label.
Name of Facility Service Title (Mail Stop) Address Line 1 Address Line 2 City State ZIP Code
Click Edit Parameters to run another report for a specific date. Click Print to print the report.
7.3.1.3 National Officials LabelsThis report displays the National Officials Labels addresses by National Officials by Representatives (Reps), Deputies (Deps), National Certifying Officials (NCOs), Only Reps in Organizations defined as the National Acquisition Center (NAC) Executive Committee Members, and All National Officials not Reps/Deps/NCOs.

October 2017 VSS 5*3User Guide121
1. From the Reports Menu dropdown list, select Administration >Address Label Reports> National Official Labels. The Specify Parameters for National Officials Labels Report box displays. Define the following:
National Official Labels Report
Filters Report By:o Representatives: The report displays only Representatives. o Deputies: The report displays only Deputies.o National Certifying Officials: The report displays only National Certifying Officials.o Only Reps in Organizations defined as NAC Executive Committee Members:
This report displays Representatives defined as NAC Executive Committee Members.
o All National Officials not Reps/Deps/NCOs: The report displays all National Officials that are not Reps, Deps, or NCOs.
Organizationso The user is able to filter the report based on a list of Organizations to limit the
report output to only the selected Organizations.
o Click Check all to select all facilities. Uncheck all removes the selections. Sort By:
o The report output may be sorted by the Contact Name.
o The report output may be sorted by the Organization Name. Email Option – The user can choose to filter the report:
o All National Officials
o Only National Officials who do not have an email address. Number of Labels to Skip
o A number 0 to 27 may be selected to skip printing in those label spaces. The default choice is zero. Skipped label spaces are horizontal across rows.
After entering the values, click Submit. Another screen opens to run the report and print.
7.3.2NAC Organization ReportsFrom the Reports Menu dropdown list, select Administration> NAC Organization Reports.A secondary menu has the following options:
Annual Joint Review Committee Attendance Listing National Official Listing NAC Organization Yearly Comparison Voluntary Organizations RS Occasional Hours

October 2017 VSS 5*3User Guide122
7.3.2.1 Annual Joint ReviewUsers have the ability to create customized Annual Joint Review (AJR) Reports. It is mandatory by Department of Veterans Affairs Voluntary Service (VAVS) for all VA Voluntary Service (VAVS) Organizations (National and Facility) to conduct an Annual Joint Reviews (AJR) with the Voluntary Service Program Manager. The objective is to assess organizations’ participation in the VAVS Program during the preceding year and develop plans and goals for the next year.
1. From the Reports Menu dropdown list, select Administration>NAC Organization Reports>Annual Joint Review to display the Specify Parameters for the Annual Joint Review Report box displays. Define the following:
Select Facility – Select the facility from the dropdown. To narrow down the facility list, search for the local facility name in the Filter box.
Select Organization – This option is only visible to VSS users who are assigned the National Administrator role. If this option is visible, the user can select one or more national organizations. All other users will default to see all facilities.
Due Date – Enter the month and year (MM/YYYY) as the AJR Due Date. Click Submit or Cancel. The next screen displays is Annual Joint Review Report.
Annual Join Review Report Name of Facility/Station Number/Address Name of Organization Date of Review This Year Last Year Growth Rate Number of RS Volunteers Number of RS Volunteer Hours Number of Occasional Volunteer Hours Number of All Volunteer Hours Number of Youth Volunteers Number of Transitional Volunteers Number of Adult Volunteers Number of New RS Volunteer Assignments Total Monetary Donations Total Estimated Value of Non-Monetary Donations Number of Units Volunteering Estimated Number of Local Organizational Units Within VAMC Area Estimated Total Membership Number of Units Contacted Annual Review (From Representative)
o Score: Excellent, Good, Fair, and Poor Quality of VA Staff Supervision (Not VAVS) Quality of Voluntary Service Support Quality of Organization Support

October 2017 VSS 5*3User Guide123
Goals and Objectives – The free-form area to evaluate last year’s progress, defined by the Representative and Chief.
New Goals – The free-form area to evaluate next year’s goals, defined by the Representative and Chief.
Comments – The free-form area to note any fundraising activities, special events, volunteer and assignments and more, defined by the Representative and Chief.
VAVS Representative Signature Chief, Voluntary Service Signature Medical Facility – Name of the facility being analyzed in the Annual Joint Review Report Acknowledgement – Space for required signatures.
o VAVS Medical Center Representatives – Three spaces are available for signatures.o I Received the Summary of your Annual Joint Review on- Include date when AJR
occurred.o Your participations in this review is important and greatly appreciated. My
Comments appear below – Space for additional comments.o Signature of National VAVS Representative
Click Edit Parameters to run another report for a specific date. Click Print to print the report.
7.3.2.2 Committee Attendance ListingThe Committee Attendance Listing Report displays one line of detail per volunteer who logs hours towards VAVS committee attendance. The volunteer hours and visits are listed by quarter for the selected fiscal year. The results are grouped by facility then organization, or by organization then facility, depending on the Sort By option selected, and include overall totals. In addition, the Committee Attendance Listing Report includes the committee attendance members that have no hours logged or visits for the fiscal year selected. Volunteers with no hours are listed on the report with the hours of 0.00 in Quarterly Hours Columns and Visits Columns.
1. From the Reports Menu dropdown list, select Administration>NAC Organization Reports>Committee Attendance Listing. The Specify Parameters for the Committee Attendance Listing Report box displays. Define the following:
Sort By - This option is only visible to VSS users who are assigned the National Administrator role. All other roles will default to a Sort By selection of “Facility”.
Facility - The report output may be sorted by the Facility or Facilities. Organization – The report output may be sorted by the Organization(s).
Select Organization – This option is only visible to VSS users who are assigned the National Administrator role. If this option is visible, the user can select one or more national organizations. All other users will default to see all facilities.
Select Facility – Select one or more Facilities from the dropdown. Select Fiscal Year - Select the fiscal year to view results from that year on the report. After entering the values, click Submit. Next, another screen opens to run the report and
print.
Committee Attendance Listing Report
October 2017 VSS 5*3User Guide124
Report Header:The Report Header displays the following information:
VA Logo Report Name: Committee Attendance Listing The report header will appear at the top of each page.
Facility/Organization Header:The Facility/Organization Header displays the following information:
When Sort By Facility is selected, the header shows Facility: [Facility name (#)] When Sort By Organization is selected, the header shows Organization: [Organization
Name] Fiscal Year The facility header will appear at the top of each page.
Detail Header:The Detail Header displays the following information:
The individual column headings The detail header will appear at the top of each page
Report Detail: Volunteer Name: [Last Name] [First Name] Title: R (for Representative), D (for Deputy), A (for Associate), H (for Honorary) Begin Date: The volunteers start date as a volunteer End Date: The date the volunteer became inactive or terminated – this value may be blank. Hours (sums)
o Q1 – hours logged in Quarter 1 of the selected fiscal yearo Q2 – hours logged in Quarter 2 of the selected fiscal yearo Q3 – hours logged in Quarter 3 of the selected fiscal yearo Q4 – hours logged in Quarter 4 of the selected fiscal yearo Total Hours
Visits (count of individual days worked)o Q1 – number of visits in Quarter 1 of the selected fiscal yearo Q2 – number of visits in Quarter 1 of the selected fiscal yearo Q3 – number of visits in Quarter 1 of the selected fiscal yearo Q4 – number of visits in Quarter 1 of the selected fiscal yearo Total Visits
Organization/Facility Total Grand Total
7.3.2.3 National Officials ListingThe National Officials Listing Report lists all National Officials assigned to a National Organization(s).
1. From the Reports Menu dropdown list, select Administration>NAC Organization

October 2017 VSS 5*3User Guide125
Reports>National Officials Listing. The Specify Parameters for the National Officials Listing Report box displays. Define the following:
NAC Title - The report can be run for all NAC titles or for a specific NAC title(s). Default selection is (all).
o VACANT/Missing NAC Title - Include organization(s) that currently do not have representatives and national assigned without a NAC title on file. Unselect this option to not include or display the organization(s) that currently without NAC officials assigned.
o National Representative – Includes officials who are National Representatives.o National Deputy Representative – Includes officials who are Deputy
Representatives. o National Certifying Official – Includes officials who are National Certifying
Officials. o Honorary Representative – Includes officials who are Honorary
Representatives.o National Chairperson - Includes officials who are National Chairpersons.o National President - Includes officials who are National Presidents.o National Commander - Includes officials who are National Commanders.o National Adjutant - Includes officials who are National Adjutants.o Not Applicable
NAC Executive Committee Members - If selected, display the National Officials that have the selected NAC Titles and also are NAC Executive Committee Member. If unselected, the report displays the National Officials that have the NAC Titles, but are not NAC Executive Committee Members.
National Certifying Officials - If selected, displays the National Officials that have the selected NAC Titles, and are also designated as National Certifying Officials. If unselected, the report displays the National Officials that have the selected NAC Titles, but are not designated as National Certifying Officials.
NAC Organizations - Select the NAC Organization(s) to be displayed on the report. Default selection is all options selected.
Click Check all to select all NAC organizations. Uncheck all removes the selections.
Filter – Enter keywords of NAC organization name to further a search to narrow the displayed list.
2. After entering the values, click Submit. Next, another screen opens to run the report and print.National Officials Listing Report
Organization Name Membership Status AJR Month NCO Executive Committee Branch Name NAC Member

October 2017 VSS 5*3User Guide126
7.3.2.4 NAC Organization Yearly ComparisonThe NAC Organization Yearly Comparison Report compares the total number of volunteers from each NAC organization by Facility, State, or VISN five years back from the defined date. The report includes totals for Regular Scheduled (RS) and Occasional Volunteers who have logged time or no logged time and any visits.
1. From the Reports Menu dropdown list, select Volunteer >NAC Organization Reports>National Officials Listing to display the Specify Parameters for the NAC Organization Yearly Comparison Report box displays. Define the following:
Fiscal Year End – Includes data from the year selected and rolls back five years from the selected year.
Filter Report By: Facility: The report displays only the selected Facilities. State: The report displays only the Stations within the selected States. VISN: The report displays only the Stations within the selected VISNs
NAC Organizations - The user can select one or more NAC organizations. After entering the values, click Submit. Next, another screen opens to run the report and
print.
NAC Organization Yearly Comparison Report If Facility, State, or VISN is selected in the parameter screen then the following will be
displayed:o Selected Station Inputo Facility Nameo Facility Addresso Fiscal Year
Organization Name Fiscal Year - Data displayed for the Fiscal Year selected and five years prior to that date. Total Volunteers – Total number of volunteers for a year. RS Count (No Time Logged) – Lists the count of regular scheduled volunteers with no

October 2017 VSS 5*3User Guide127
logged time for a year. RS Count (With Time Logged) – Lists the count of regular scheduled volunteers with
logged time for a year. RS Hours – Lists the hours of regular scheduled volunteers for a year. Occasional Visits – Lists the number of visits an occasional volunteer has for a year. Occasional Hours – Lists the hours of occasional volunteers for a year. Total Hours – The total of RS and occasional hours for a year. Exec. Member – Indicates if an organization is an Executive Member or not. NAC Membership Status – Displays the NAC membership status of an organization. At the end of the report, the following grand total summaries within five years are
displayed:o NAC Organizationso Non-NAC Organizationso Local Organizationso All Organizations Totalso Executive Memberso Total Number of Members (Current Fiscal Year) o Membership Status o Number of Organization (Current Fiscal Year)
Click Edit Parameters to run another report for a specific date. Click Print to print the report.
7.3.2.5 Voluntary Organizations RS Occasional HoursThe Voluntary Organizations Regular Scheduled (RS) and Occasional Hours Report is a multiple functional report (Part 1, Part, 2, and Part 3) that states the total of volunteers hours and visits for each Facility and Organization.
Part 1 reports hours logged for National Organizations on the National Advisory Committee as Part 2 reports National Organizations not on the National Advisory Committee. Part 3 is reports hours for Local Organizations. The maximum date set to report is only a year and will not exceed over a year.
2. From the Reports Menu dropdown list, select Volunteer >Administration Voluntary Organizations RS Occasional Hours to display the Specify Parameters for the Voluntary Organizations RS Occasional Hours Report box displays. Define the following:
The Type dropdown contains: Part 1, Part 2, and Part 3.1. Part 1 - Lists all active national organizations that are on the National Advisory
Committee.2. Part 2 - Lists all active national organizations that are not on the National Advisory
Committee.3. Part 3 - Lists all active local organizations that are associated with the selected
facility.4. Date Range - Select the Calendar icon or enter date for the Begin Date field to search
within the date range specified. Report includes volunteers entered on or after this date.

October 2017 VSS 5*3User Guide128
Select the Calendar icon or enter date for the End Date field to search within the date range specified. Report includes volunteers entered on or before this date.
Note: Date range cannot exceed more than 12 months.5. Select one or more Facilities from the dropdown.
Click Check all to select all Facilities. Uncheck all removes the selections.6. Select one more Organizations from the dropdown.
Click Check all to select all Organizations. Uncheck all removes the selections. Click the Show Inactive checkbox to display any inactive facilities. Click Submit or Cancel. The next screen displays is Regular Scheduled and Occasional
Hours Report.
Regular Scheduled and Occasional Hours Report (Part 1, Part 2, and Part 3) Organization Name Organization Type Begin Date and End Date Facility Name and Number Regular Scheduled Count - Number of volunteers who logged hours at the facility and
organization within the date range. Regular Scheduled Hours - Sum of volunteer hours that were logged at the facility and
organization within the date range. Occasional Visits - Sum of occasional volunteer visits logged hours at the facility and
organization within the date range. Occasional Hours - Sum of occasional hours logged hours at the facility and organization
within the date range. Total Hours - Includes Regular Scheduled and Occasional hours. Rep/Dep Count - Number of unique volunteers who logged hours for a Rep or Dep
assignment at the facility and Organization within the date range. Rep/Dep Hours - Sum of hours that were logged for a Rep or Dep assignment at the
facility and Organization within the date range. Total By Organization Total Regular Scheduled Count and Hours Total Occasional Visits and Hours Total Rep/Dep Count and Hours Count of Facilities with on Rep/Dep by Organization. Count of all facilities that have a Rep/Dep of 1 or more. Click Edit Parameters to run another report for a specific date. Click Print to print the report.

October 2017 VSS 5*3User Guide129
7.3.3Voluntary Service Directory (Summary/Detail)This report displays the Voluntary Service Directory Labels with detail and contact information related to the Voluntary Service office at each facility. The user is able to select the facilities to include on the report.
This report combines the current VSS reports: Service Chiefs, Service Directory, Station Information Detail, and Station Information Contact List.
1. From the Reports Menu dropdown list, select Administration >Address Label Reports> Voluntary Service Directory. The Specify Parameters for the Voluntary Service Directory Report box displays. Define the following:
Filter Report By:
o Facility: The report displays only the selected Facilities.o State: The report displays only the Stations within the selected States.o VISN: The report displays only the Stations within the selected VISNs.
Typeo Summary: The Summary Report displays the main point of contact at the station
(Program Manager or Acting Program Manager), along with the phone number and email address for each person
o Detail: The Detail Report displays a Station Information Detail report. This report contains detailed information such as the following: Station Name, Station Number, VISN, Address, Phone Number, Voluntary Staff, and Operating Costs.
Sort By:
o Alphabeticalo State
Figure 148 -Specify Parameters for the Voluntary Service Directory Report Box
2. After entering the values, click Submit. Another screen opens to run the report and print.
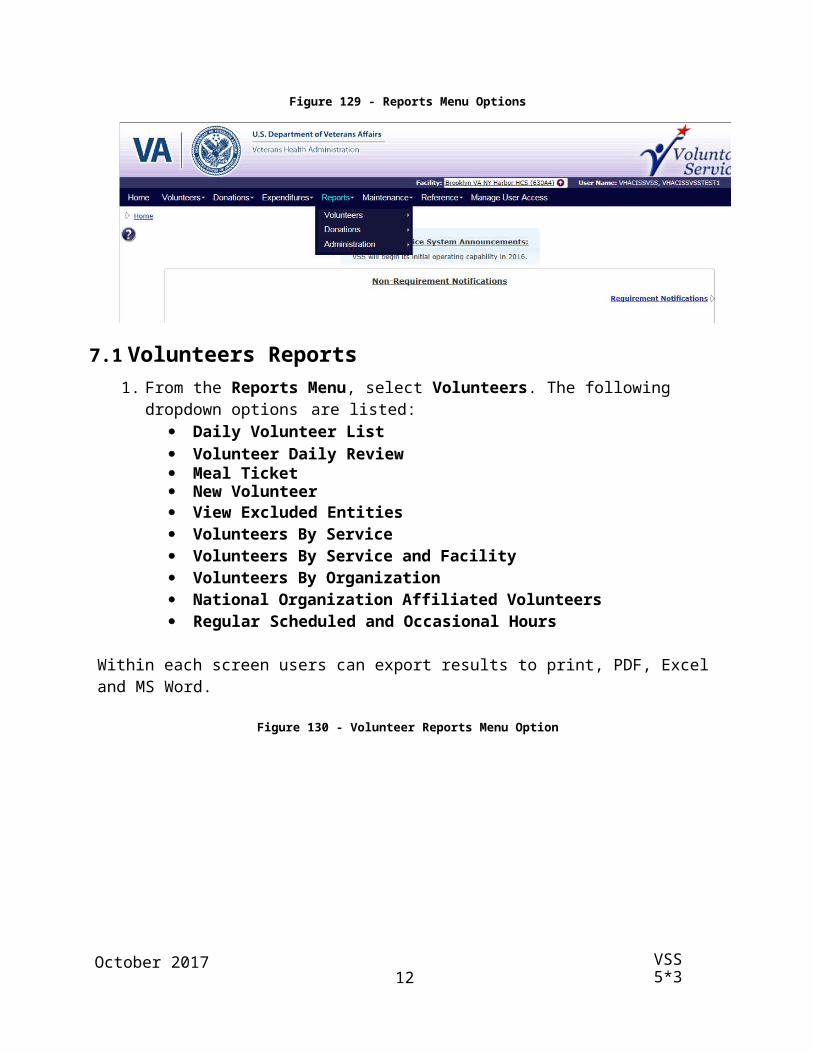
October 2017 VSS 5*3User Guide130
Voluntary Service Directory Report
1. The report runs as of the Current Date/Time. Any data on file as of the current Date/Time is included on the report.
2. Both reports display a footer that contains the Report Execution Time and “Page X of Y” page numbering.
3. The Detail Report displays the following Voluntary Service Information on each selected Facility:
Voluntary Service Information
o Facility Nameo Facility Numbero VISNo Street Address 1 o Street Address 2o Cityo Stateo ZIP Codeo Primary Phoneo Secondary Phoneo Fax Numbero Primary Site o Service Titleo Mail Stopo Typeo Descriptiono Has Own VAVS Committeeo Operating Costso Staff Costso Last Updatedo Program Manager’s Supervisoro Supervisor’s Title
Employee Information
o Prefixo Nameo Nicknameo VAVS Leadership Board?o Gradeo VAVS Roleo Position Start Dateo Email
4. The Summary Report displays the following contact Information for each Station selected: VISN Facility Name Name

October 2017 VSS 5*3User Guide131
Address City State ZIP Code Telephone Email Address Click Edit Parameters to run another report for a specific date. Click Print to print the report.
7.3.4Organization ListingThe Organization Listing Report lists all national and local organizations and any subsidiary organizations related to or under the same tier.
1. From the Reports Menu dropdown list, select Administration >Organization Listing. The Specify Parameters for the Organization Listing Report box displays. Define the following:
Facility - The report can be run for National Organization(s) or for a specific Facility Local Organization(s).
National - The report displays only National Organizations. Local - The report displays only Local Organizations (Default).
o Select Facility – Select the facility from the dropdown. To narrow down the facility list, search for the local facility name in the Filter box.
Include Branches - If selected, includes all Branches for the selected organizations. If unselected, do not include branches
Include Inactive Orgs/Branches - If checked, include inactive organizations and inactive branches for the selected organizations. If unchecked, does not include inactive organizations and inactive branches on the report.
Organization - Click the checkbox beside the organization name. Click Check all to select all organizations. Uncheck all removes the selections. Filter – Enter keywords to further a search.
Organization Type - Organization list is narrowed by type. Click Check all to select all organizations. Uncheck all removes the selections. Organization Types include: Missing Organization Type, Academic, Civic,
Community, Corporate, Faith Based, Veterans Service, Youth, and Other.2. After entering the values, click Submit. Next, another screen opens to run the report and
print.
Organization Listing Report Organization Name Facility Branch Name NAC Member Exec Comm Member Organization Type

October 2017 VSS 5*3User Guide132
Contact Info Contact Phone/Email Status Click Edit Parameters to run another report for a specific date. Click Print to print the report.
7.3.5Benefiting Service ListingThe Benefiting Service Listing Report displays all Benefiting Services established at every facility and Benefiting Service Templates available at the National level.
1. From the Reports Menu dropdown list, select Administration >Benefiting Service Listing. The Specify Parameters for the Benefiting Service Listing Report box displays. Define the following:
Facility - The report can be run for All Facilities (National) or for a specific Facility. All Facilities - All facilities at the national level. Local (Default) - All local facilities the user is authorized are listed.
Select Facility – Select a Facility from the dropdown. To narrow down the facility list, search for the local facility name in the Filter box.
Service Templates Only – Option enabled if Facility option is All Facilities. If selected, all Benefiting Service Templates established at the National level will be
listed. If unselected, the Benefiting Services established at the National level will be
available to select and listed on the report. Include Inactive Benefiting Services - If selected, the report includes Active and Inactive
selected Benefiting Services. 1. Note: This is Service status, not Role status. All roles for the selected Benefiting
Service are always included regardless of status. Games
1. If No is selected, Benefiting Services that are not Games related are included.2. If Yes is selected, Benefiting Services that are Game related are included.
Benefiting Service - Select one or all Benefiting Services to be included in the report. To narrow down the Benefiting Service list, search for the name in the Filter box.
After entering the values, click Submit. Next, another screen opens to run the report and print.
Benefiting Service Templates Report Service Name Role Name Role Type Role Status Subdivision Abbreviation Games Service Status
Benefiting Service List Report

October 2017 VSS 5*3User Guide133
Service Name Role Name Physical Location Role Type Role Status Service Scope Role Scope Facility Subdivision Abbreviation Games Service Status Click Edit Parameters to run another report for a specific date. Click Print to print the report.
7.3.6User Access ListingThe User Access Listing Report is a detailed report on users and their roles and status (i.e., inactive, active, disabled, or locked) for the specified facility.
1. From the Reports Menu dropdown list, select Administration >User Access Listing. The Specify Parameters for the User Access Listing Report box displays. Define the following:
Select Facility – Select one or more Facilities from the dropdown. 1. Click Check all to select all facilities. Uncheck all removes the selections.
Type - Select the status. Active – All active users. Disabled - Any users who have been disabled in VSS. Inactivated– Any users with an inactive status. Locked - Any users who have been temporary locked out of VSS.
After entering the values, click Submit. Next, another screen opens to run the report and print.
User Access Listing Report Name - Last Name, First Name, Middle Initial. User ID Title Phone Email Last Successful Login Account Lock Date (when Active/Disabled/Locked are selected) or Account
Inactivated Date (when Inactivated is selected) Facility Role Click Edit Parameters to run another report for a specific date. Click Print to print the report.
8. Maintenance

October 2017 VSS 5*3User Guide134
Users with the following access roles are permitted to use the Maintenance Menu. National Administrator National Specialist National User Site Administrator Site Specialist Site User
Select Maintenance from the VSS Menu Bar. The following dropdown options are listed: Manage Facilities Manage Organizations Search Existing Organizations Manage Voluntary Service Manage Benefiting Service Manage Service Template Manage Volunteer Requirements Manage Staff Title Manage Award Codes
Figure 149 - Maintenance Menu Options
8.1Manage Facilities1. From the Maintenance Menu, select Manage Facilities to display the Manage Facilities
Screen.
October 2017 VSS 5*3User Guide135
Figure 150 - Manage Facilities Menu Option
Users with Site Administrator access roles are permitted to use this menu option.
2. The Manage Facilities Screen permits the user to complete the following:
Click the Facility name link to can view or edit specific details.
Click the Show Inactive checkbox to display any inactive facilities.
Click Add Facility to add a new facility to the list.
Excel, PDF, and Print enables a user to export and print a report of facilities and active nodes.
Enter the facility name or station number in the text box to quickly find the facility in the list.
Figure 151 - Manage Facilities Screen
3. Click the Facility name link to display the Manage Facilities Screen. This screen

October 2017 VSS 5*3User Guide136
permits the user to complete the following:
Manage physical locations at facilities.
Manage facility donation parameters (e.g. GPF & donation references).
Manage facility meal ticket parameters.
Manage facility Kiosk parameters.
Facility Details Data Fields
Facility Name: (required)
Official VA Facility: Read Only
Parent Facility: Read Only
VISN: Read Only
Address: City, State, ZIP (required)
Time Zone: (required) dropdown list option
Is Active checkbox
Figure 152 - Facility Details Screen
Physical locations are used within Voluntary Service as part of the assignment. These assignments represent different physical mailing addresses and are managed as part of the facility. Examples are: Cemeteries, CBOCs, or warehouses. The Main Facility is the default option at every facility.
Physical locations cannot be deleted if volunteers have logged time against an assignment. The locations must be inactivated instead. Inactivating a physical location also activates all of the associated assignments and associated volunteer assignments. If a user wants to reactivate an assignment or volunteer assignment after reactivating a physical location, it must be done manually.
Physical Location Data Fields

October 2017 VSS 5*3User Guide137
Location Name
Address
Contact Information
Volunteers: Contains the volunteers count:
o Active - All volunteers with an active assignment for the location.o Total - All volunteers with an assignment of any active/inactive status.
Status – Indicates and an Active or Inactive facility, plus a user can inactive the location and all volunteer assignments. Click the Active icon to inactivate location and volunteer assignments.
Figure 153 - Confirmation Message to Inactivate Location and Volunteer Assignments
Click the Actions icon to view or modify the location in the Location Details Box. Click Add Location to add new a facility location. The Location Details box display with
the Name, Address, City, State, ZIP Code, Contact Name, Contact Role, Contact Phone, and Contact Emails text boxes to define. Click Submit when finished.
Figure 154 – Location Details Box

October 2017 VSS 5*3User Guide138
Kiosks Data Fields
Default Language (English) – This is the facility specific welcome text that displays to volunteers on the Kiosk login screen.
Alternate Language (Spanish) – This is the Spanish language equivalent welcome text that displays on PC Kiosk login screen.
Kiosk Location – For each Kiosk at a facility an entry must be made to this table. The location is where the Kiosk is physically located at the facility. The system automatically names the default entry as is Main but should change to accurately represent where the Kiosk is located. Additional Kiosk information must be entered here before local information technology can set them up for use at the facility floor. Expected values are descriptive locations where you place the Kiosks (e.g. Recreation Room, VSS Office, and Main Entry).
Registered – If the Kiosk is not registered, it displays on the Station Selection Screen on the Kiosk and can be selected. Once the Kiosk setup is complete, the registered value is set to Yes and will no longer be listed on the Station Selection Screen on the Kiosk. If the Kiosk is offline, the user can click the Registered box to remove the registration on the Kiosk Details window.
Printer Status – Displays if Kiosk printer is currently functioning properly. Clearly marked Kiosks are important for identifying purposes should a problem arise.
Queued Print Jobs – Number of queued print jobs. Normally this value is 0 or 1.
Last Error – This is a system error message from the Kiosk designed to assist Tier 2 and Tier 3 Support in trouble shooting, also printer errors (e.g., out of ink or paper, other issues). If there are Kiosk issues and this field contains a value, include it with your Helpdesk ticket.
Click Add Kiosk to add a new Kiosk entry on the Kiosk Details box. Enter the new Kiosk Location name (required) to identify the Kiosk and then click Submit. The new Kiosk displays in the Kiosk List.
o This must be established in order to setup the kiosk at the facility.o The same kiosk name cannot be entered twice and the following message “Another
kiosk exists with this location name. Please choose unique kiosk location names.” will display.
Figure 155 - Adding a New Kiosk in the Kiosk Details Box

October 2017 VSS 5*3User Guide139
Action – Edit Kiosk or Delete icon. If deleted, the Kiosk needs to be reset with a new ID, recreating it with the same name will not work.
o Edit – Edit Kiosk name or register/unregister an existing one in the Kiosk Details box.
o Delete – Delete an existing Kiosk. If the user attempts to delete the Kiosk, the following message displays, “Are you sure you want to delete this kiosk? Deleting this entry will disable the kiosk currently configured for it. If the kiosk is being moved, please name it instead. The kiosk will need to be reconfigured by IT staff before it will work with a new entry.” If the user chooses OK, the Kiosk will be deleted.
Figure 156 - Kiosks Data Fields
Meal Ticket Settings Data Fields
Number of Meals - The number of meals offered varies between canteens. For example, the canteen opens for breakfast and lunch, but the program may only provide 1 meal a day, so the volunteer has to choose which meal. This setting should not exceed the number of meals the canteen provides daily (if your canteen only provides breakfast and lunch, it should not be set to 3).
Meals Allowed on Days - Select the Saturday, Sunday, or Holidays checkboxes.
Meal Authorization Type - If your facility does not have active Kiosks you can set the Meal Authorization Type to List. This indicates that the Meal Ticket Form is delivered to the canteen manually each day. Select Ticket to indicate Meal Tickets are provided.
Meal Price - This is the maximum value of the meal tickets. The price is the same for all meals served.
(Required) Hours - Each subsequent meal must require more hours than the previous one.
(Required) Cutoff times for meals - Cutoff times are set in military time and descend chronologically for each subsequent meal.

October 2017 VSS 5*3User Guide140
o Example - Volunteer with 3 meals for canteen that serves Breakfast 7am-10am, Lunch 11am-2pm and Dinner 4pm-7pm.
The cutoff time for 1 meal would be 1900 because the last meal is dinner, but the cutoff time for 2 meals would be 1400 because they could only eat lunch and dinner. The cutoff time for the third meal would be 1000 because the only way to eat all three meals is to arrive at the canteen for breakfast before 10:00 a.m.
Figure 157 - Meal Ticket Settings Screen
Donation Settings and General Post Fund Data Fields
Voluntary Service Signature: The name of the program manager at the facility who signs the letters.
Director’s Signature: The name of the (usually non-VAVS staff) senior level staff member who signs high value donation thank you letters. This person does not have to be a director, but the term for that role in VSS is Director.
Set Value Amount: The donation value threshold that determines whether the thank you letter prints out with the Program Manager or Director’s signature line. Values above the threshold are printed with the Director’s name for signing.
General Posting Fund (GPF): Donations may be directed to these accounts. Items added to this list display for selection on donations. A GPF can only be deleted if there are no associated donations; otherwise it may only be inactivated. Inactive GPFs do not show up for selection on new donations.
o Click Add GPF to add a general posting fund in the General Post Fund Details box.

October 2017 VSS 5*3User Guide141
Figure 158 – Adding a New General Post Fund
Reference: References mark donations with a specific note that allow ad-hoc national reporting (Example: Hurricane Katrina, VA2K). References may be deleted if they are not used on any donations; otherwise the references may be inactivated instead. Inactive references do not show up for selection on new donations.
o Click Add Reference to add more references in the Reference Details box. (optional)
Figure 159 - Adding a New Reference

October 2017 VSS 5*3User Guide142
Figure 160 - General Post Fund and Reference Sections
8.2Manage Organizations1. From the Maintenance Menu, select Manage Organizations to display the Organization
List Screen. This screen displays and provides the ability to view a list or Search for existing organizations that are established at either the National or Local level.
Figure 161 - Manage Organizations Menu Option
8.2.1Organization ListFrom the Organization List Screen the user is able to view a list of all existing organizations or navigate to view the detail for an existing organization or create a new organization. The user also has the capability of exporting the list.
The Organization List Screen displays the Facility, Code, Name, Abbreviation, Type, NAC Committee Member flag, Annual Joint Review (AJR) Month, NAC Executive Committee Flag,

October 2017 VSS 5*3User Guide143
NAC Membership Status, and Status for each existing organization.
1. The Organization List Screen contents depend on the facility the user is currently working in. For example:
If user is working in the National facility (i.e. CO (#101):
o The list includes organizations with a National scope.o The list displays in ascending order of Organization (Display) Name.
If user is working in another facility:
o The list includes both the National and the Local Organizations.o The National Organizations are displayed first in ascending order by
Organization (Display) Name followed by Local Organizations within the Facility in ascending order by Organization (Display) name.
o The user can filter to include the organizations within the working facility or the national organizations.
2. The Organization List Screen only includes organizations with a status of Active initially. The user can filter to include Inactive organizations and sort the columns: The list can be narrowed by applying filter values for Facility, Organization Type, NAC
Member, NAC Executive Member, NAC Membership Status, AJR Month, and Organization Status columns.
If filter values have been applied, reset to All to reinitialize the list. The list can be exported with any filters applied and as is when exported. The export into
PDF defaults to Landscape mode. The user can execute a Search (i.e. find any characters anywhere in any column of the
list) to narrow the list to only organizations that match the Search criteria. This Search is executed against all data currently being displayed.
Figure 162 - Organization List Screen

October 2017 VSS 5*3User Guide144
8.2.2Create an Organization After selecting Create Organization, the Organization Detail Screen displays the following
information:
Organization Section
Facility - Facility reflects the option to choose the organization’s establishment at the National or local facility. This indication is defaulted based on the user’s working facility and cannot be changed
Display Name - The organization name and the maximum length is 35 characters (required).
Full Name - The organization’s name and is defaulted to the Display Name that can be overridden. The maximum length is 255 characters. This field may be utilized in reports generated for Mailing or when the full name is required.
Abbreviation - The shorten form of a word or name for the organization. The Organization Abbreviation is an optional field. The maximum length is 6 characters.
Type - The type of organization is provided (Required). Below is a list of the valid values:
o Academico Civico Community o Corporate o Faith Basedo Veterans Serviceo Youtho Other
Status - The status for the organization (required). Status values are:
o Status value = Active: Default when creating a new organization.o Status value = Inactive: All fields on this screen except Status are Read Only.
A user is not able to update any field for the Inactive status.o If user reactivates the organization by changing the Status to Active and clicks
Submit, the user is presented with a message stating the organization was updated successfully. Once the status is set back to Active, fields are available for update.
Contact Information SectionThe Contact Information includes the Organization Name, Title, Phone, Emails, Address, City, State, and ZIP Code can be defined in the Contact Information section.
National Advisory Committee Section If Facility = National and user is National Administrator or National Specialist logged into
Central Office:
October 2017 VSS 5*3User Guide145
Central Office (CO) can designate a national organization as a member of the NAC. The status of a NAC organization can be one of the following, as determined by CO in accordance with the national organization.
Service Member Associate Service Member Donor Member Associate Donor Member Honorary Member
NAC organizations can also be members of the NAC Executive Committee:
The following fields can be updated by the user:o NAC is required. Default is No.o If NAC member = Yes:
NAC Executive member is required. The default is No. Membership Status. It is required. AJR month is optional.
o On Update, if NAC member was changed from Yes to No: NAC Executive member is set to No and is Read Only. Membership Status is set to Inactive and is Read Only.
AJR month remains and is Read Only.
When the user clicks Submit, edits are performed and errors are displayed. If no errors, the data is saved to the database and the user receives a message indicating “The organization was created successfully.”
Figure 163 - Organization Details Screen
3. This information is for auditing purposes only and is not displayed. Enter all required fields, and then click Submit. A message displays at the top of the screen, “The organization was created successfully.”
4. Local branches can also be added by clicking the Add button in the Local Branch section.

October 2017 VSS 5*3User Guide146
5. When user clicks Cancel, updates are not saved to the database. If the organization is associated with the Current Facility the user is working in, the user is able to update the organization. If not, the user only views the information.
8.2.3National Officials SectionIf Facility = National and user is National Administrator or National Specialist logged into Central Office the ability to Add/Edit National Officials is available; otherwise, this information is read only.
The National Officials section is available on the Organization Detail Screen and provides the ability to:
View any National Officials currently assigned to any National Organization and navigate to the detail information related to the assignment.
Add or Edit a National Official and assign to a National Organization. There can be more than one National Official associated with each National
Organization. Remove a National Official from a National Organization.
The National Official List displays the following information for each of the National Officials currently assigned to the National Organization:
VAVS Title Prefix Last Name First Name Middle Name/Middle Initial National Certifying Official
The National Official is on the National Organization Detail Screen. There can be more than one National Official associated with each National Organization, and no new permissions are added.
Add National OfficialsTo add a National Official, click the Add button.
The National Officials Detail Screen captures the following information:
Name Section Prefix First Name Middle Name/Middle Initial Last Name Organization Title National Certifying Official (required)
o Yeso No – Default

October 2017 VSS 5*3User Guide147
Contact Information Street Address (required) City (required) State ZIP Code Email Address Telephone Number
VAVS Committee Information VAVS Title (required). Options are:
o National Representativeo National Deputy Representativeo National Certifying Officialo Honorary Representativeo National Chairpersono National Presidento National Commandero National Adjutanto Not Applicable
Appointment Date Expiration Date
NAC Committee Information National Executive Committee Member (required). Options are:
o Yeso No – Default
Appointment Date Expiration Date
Click Submit and the following occurs: Data is saved to the database. If any errors, the data is not saved to the database. The user receives a message to identify
what changes are needed. If user clicks Cancel, updates are not saved to the database.

October 2017 VSS 5*3User Guide148
Figure 164 - Adding a National Official
Edit National Official
From the National Officials list, click the VAVS title hyperlink of the National Official you would like to edit. Perform edits and click Submit on the National Official Detail Screen.
Figure 165 - Editing a National Official
8.2.4Local Branch SectionThe Local Branch List option on the Organization Detail Screen provides the ability to:
View any Local Branch (s) currently assigned to any organization and navigates to the detail information for the Local Branch.
Add a new Local Branch to the Organization. Edit or Inactivate a Local Branch for the Organization.
The Local Branch List displays the following information for each of the Local Branches established for the Organization:
Facility Name (#) – Select All to view all facilities or select an individual facilities. Local Branch – Select the name link to view or edit a specific Local Branch.

October 2017 VSS 5*3User Guide149
Contact Name Title Address - City, State, and ZIP Code Email Status - Active or Inactive. Defaults to Active. User can change to see Inactive and/or All. If the Organization is Active, the user can create a new or edit an existing Local Branch for
the organization. If the user is assigned Read Organization the user can view the details for a Local Branch. Each column in the list can be sorted in ascending or descending order. Facility, Branch and Status columns can be filtered. The user can execute search (i.e. find any characters anywhere in any column of the list) to
narrow the list to only Local Branches that match the search criteria entered. This search is executed against all data currently being displayed.
Figure 166 - Local Branches Section
Add Local BranchTo add a Local Branch, click the Add button.
The Local Branch Detail Screen displays the following information:
Organization Section (Read Only)
Scope - National or Local.Name - Name of Organization.
Local Branch Section Local Branch Name – Enter name of local branch (required). Status - Active (default) or Inactive
Contact Information Section Name Title Phone Email Address Line 1 Address Line 2 City State

October 2017 VSS 5*3User Guide150
ZIP Code
Click Submit and the following occurs: Data is saved to the database. If any errors, the data is not saved to the database. The user receives a message to identify
what changes are needed. If user clicks Cancel, updates are not saved to the database.
Figure 167 - Local Branch Detail Screen
8.2.5Merge OrganizationsThe VSS National Administrator can merge Local Organizations, such that, all the affiliated local entities (branches), Occasional hours, Regular hours, all volunteers organizations associations, all volunteer “Primary Organization” data, and all the branches now have the National Organization as the parent. Any donor or donations with the local organization will now have the National Organization as the donor or affiliation on the donation.
1. Select the Merge Local Organizations button at the bottom of the Organization Detail Screen under the Local Branches list to display the Organization Merge box.

October 2017 VSS 5*3User Guide151
Figure 168 - Organization List with Organization Merge Button Below
2. Enter the name of the organization in the Local Organizations Search field to merge with the Target Organization.
3. When the organization list populates, select the check box(s) to merge with the Target Organization.
4. The following buttons enables the following: Click the All-> button to move the entire selection of organizations to the
Selected Local Organization section. Click the [->] button to moves all organizations that are selected to the Selected
Local Organization section. Click the All<- button to move the entire selection of organizations back to the
organization list. Click the [<-] button to move all organizations selected back to the organization
list. 5. The “Warning!! Are you sure you want to merge this Organization(s)? The Source
Organization(s) will be removed once all information is transferred to the Target Organization.” warning message displays below.
6. Click Submit to merge the selected organizations into one Target Organization.
Figure 169 - Merging Organizations

October 2017 VSS 5*3User Guide152
7. The following occurs during the merge of the Target Organization: Occasional hours that were linked to the Local Organization are now linked to the
National Organization. Regular hours that were linked to the Local Organization are now linked to the
National Organization. All volunteer assigned organization(s) that were linked to the Local Organization
are now linked to the National Organization. All volunteers’ primary organizations are linked to new Target Organization. All branches now have the National Organization assigned. Updated donation detail to the new Organization. Updated donors to the new Organization. Former organization(s) is deleted from VSS.
8.2.6Merge BranchesThe VSS Site or National Administrators can merge Siblings (Branches) under National or Local Organizations, such that, all the affiliated local entities (branches), Occasional hours, Regular hours, all volunteers organizations associations, all volunteer “Primary Organization” data, are merged under one branch. Any donor or donations with the branch that was merged will now have the target branch as the donor or affiliation on the donation.
1. Select the Local Branch name link to display the Local Branch Details box.
Figure 170 – Selecting a Branch from Local Branches List
2. Click the Advanced Options link and click the Merge Siblings option to display the Merge Branch Siblings box.

October 2017 VSS 5*3User Guide153
Figure 171 - Merging Sibling Option
3. Select all the Branches checkboxes that will be merged with the Target Branch.4. The “Warning!! Are you sure you want to merge this Branch(s)? The selected Branch(s)
will be removed once all information is transferred to the Target Branch.” warning message displays.
5. Click Submit. Figure 172 - Merge Branch Siblings Box
6. The following occurs during the merge of the Branches: Occasional hours are linked from the Source Branch to the Target Branch. Regular hours are linked to the Source Branch to the Target Branch. All volunteer organization linked to the Source Branch are linked to the Target
Branch.

October 2017 VSS 5*3User Guide154
All volunteers’ primary organizations are linked to new Source Branch. All branches now have the National Organization assigned. Updated donation summary for the new Branch. Updated donors for the new Branch. Former Branch(s) is deleted from VSS.
8.3Search Existing Organizations1. From the Maintenance Menu, select Search Existing Organizations to display the Search
for Organization box.
Figure 173 - Search Existing Organizations Menu Options
2. Enter Search criteria: Name Abbreviation Information on the National or Local Organization displays depending on your
facility. Optional to Include Inactive Organizations.
3. The next screen to display is the Search for Organization.4. If an Organization is located, the user can select the name link and the Organization
Detail Screen displays.

October 2017 VSS 5*3User Guide155
Figure 174 - Searching for an Organization to View the Organization Detail Screen
8.4Manage Voluntary Service1. From the Maintenance Menu, select Manage Voluntary Service to display the Voluntary
Service Detail Screen.
Users with National or Site Administrator access roles are permitted to add, edit, and delete Voluntary Service Staff. All other roles have read only access.
Figure 175 - Manage Voluntary Service Menu Option
2. The Voluntary Service Screen displays the following:
Service and Contact Information section Service Title (required) Primary Phone (required) Fax Number Service Type (required) - Includes Service (default), Section, and Program.

October 2017 VSS 5*3User Guide156
Alternate Phone Mail Stop (required)
Figure 176 - Service and Contact Information Section
Program Manager’s Immediate Supervisor Name Title Click Search to display the Search for User box. Then enter search criteria to locate a
Program Manager.
Figure 177 - Program Manager’s Immediate Supervisor Section
VAVS Information VAVS Committee Established VAVS Information Last Reviewed (read only) Update VAVS Last Reviewed Date Costs – Operating Costs and Staff Costs Click Submit or Cancel to update section.
Figure 178 - VAVS Information

October 2017 VSS 5*3User Guide157
8.4.1Create and Manage Voluntary Service StaffThe Voluntary Service Detail Screen provides the ability to assign a staff member to a Voluntary Service (VAVS) Program Manager or support for the VAVS office, view applicable details for the Voluntary Service Staff, or navigate to the Staff Member record. Also, the user can view or edit the full details related to the staff currently associated with the Voluntary Service office at the facility.
1. From the Maintenance Menu, select Manage Voluntary Service to display the Voluntary Service Screen.
2. In the VAVS Staff Members section, click Add Staff to display the Search for User Screen.
Figure 179 - VAVS Staff Members
3. Enter the search criteria and select the name link to display Staff Details Screen.
Figure 180 - Search for a Staff User
4. The Staff Details Screen displays the following:
Staff Information Section Last Name First Name Middle Name/Initial Job Title

October 2017 VSS 5*3User Guide158
Department Nickname Prefix Office Business Phone Email Email notifications – If selected, the volunteer will receive emails on all high
priority notifications that display in the Notifications List on VSS Homepage and the Requirement Notifications Screen.
Voluntary Service Section VAVS Role - Select one of the roles available in the dropdown. Click the Calendar icon or enter the date. – Enter the Staff Members Grade. VAVS Start Date - Click the Calendar icon or enter the Start date. VAVS End Date - Click the Calendar icon or enter the End date. Date Eligible for Retirement - Enter staff member’s eligible retirement date, when
applicable. Estimated Date of Retirement - Enter staff members estimated retirement date,
when applicable.
Comments SectionComments - Enter any comments, not required
Figure 181 - Staff Details Screen
8.5Manage Benefiting Service

October 2017 VSS 5*3User Guide159
Users with National or Site Administrator access roles are permitted to use this menu option.
1. From the Maintenance Menu, select Manage Benefiting Service to display the Manage Benefiting Service & Roles Screen.
Figure 182 - Manage Benefiting Service Menu Option
2. The Manage Benefiting Service & Roles Screen displays the following: Click Add Service to add another service. Select the Facility dropdown to view service information at another facility. Search text field available. Filter by Local or National Scope, Game Service, and Status. In the Action column, perform the following:
o Select the Edit icon to modify the Benefiting Service. o Select the Add icon to create an additional National Benefiting Services
and Roles.o Select the Delete icon to delete the Benefiting Service.
Figure 183 - Manage Benefiting Service & Roles Screen
3. If the user selects Add Service, the Add National Benefiting Services and Roles Screen displays. The following functions and fields are available:
Physical Locations (Filterable) Search capabilities Select a Service & Role Games (Filterable) Abbreviation

October 2017 VSS 5*3User Guide160
Add Local Service Submit or Cancel
4. When the user selects Add Local Service, the New Benefiting Service box displays.
5. Define the following: Name Abbreviation Is Active checkbox (default) Game Services Physical Location – Select the facility from the dropdown. Submit button
Figure 184 - New Benefiting Service Box
8.6Manage Service Templates1. From the Maintenance Menu, select Manage Service Templates to display the Manage
Service Templates Screen.
Figure 185 - Manage Service Templates Menu Options
2. The Manage Templates for Benefiting Service & Roles Screen displays the following: Click New Service Template to add another template.

October 2017 VSS 5*3User Guide161
Search text field available. Filter by, Game Service, and Status. In the Action column, perform the following:
o Select the Edit icon to modify the Benefiting Service Template. o Select the Add icon to create an additional Benefiting Service Role
Template.o Select the Delete icon to delete the Benefiting Service Template.
Figure 186 - Manage Templates for Benefiting Service & Roles Screen
3. If the user selects New Service Template, the New Benefiting Service Template box displays. The following functions and fields are available:
Name (required) Abbreviation Game Service Submit or Cancel
Figure 187 - New Benefiting Service Template Box

October 2017 VSS 5*3User Guide162
8.7Manage Volunteer RequirementsThe National Administrator has the ability to define National requirements for volunteers in VSS. These requirements may apply to all volunteers, all volunteers with a specific role type, or all volunteers with a specific role.
Users with National Administrator access roles are permitted to use this menu option.
1. From the Maintenance Menu, select Manage Volunteer Requirements to display the Manage Requirements Screen.
2. The default view of the Manage Requirements Screen is a data grid that displays all requirements depending on your role:
8.7.1Both Administrative Roles Active requirements are shown by default (status filter = active) Name, Description, Application Type, Date Type, Status and Action (Active/Inactive)
o Select the Edit icon to modify the Requirement. o Select the Add icon to create an additional Requirement.o Select the Delete icon to delete the Requirement.
Facility Administrator vs National Administrator The radio button is only visible to National Administrators and is set to National
by default. National Administrators do not see the logged in facility requirements without
changing the radio button to Facility. If the radio button is set to facility requirements, the user has access for all functionality (except they see the option to go back to National requirements sections).
Figure 188 - Manage Requirements Screen
3. The Add Requirement button is located on the top right of the data grid. When clicked, Add New Requirement box displays.
Requirement Basic Fields Name - 50 characters (required) Description - 250 characters (required)

October 2017 VSS 5*3User Guide163
TMS Course ID Active – Select the Yes or No radio button. Date Type –Initial values are:
o Completion Dateo Due Dateo End Dateo Expiration Dateo Not Applicableo Start Date
Notification Periodo Not Applicableo 30 Dayso 60 Dayso 90 Days
Valid Statuses – Select the following checkboxes:o New (automatically selected)o Not Applicableo Blocked o Not Meto In Progresso Met (automatically selected)
Prevent Kiosk Time Posting if Not Met: Select the Yes or No radio button.
Requirement Application Fields Apply this requirement to - Select one of the requirements:
All Volunteers Role Type
o Administrative/Clericalo Advisory Committeeo Clinical/Patient Careo Communicationso Drivero Escorto Faith-Based/Religiouso Food & Nutritiono Generalo Information Technologyo Special Events
Specific Role Template – When selected, the Template List is displayed and a user can select the service name.
Click Submit or Cancel.

October 2017 VSS 5*3User Guide164
Figure 189 - Create Requirements Screen
8.8Manage Staff Titles1. From the Maintenance Menu, select Manage Staff Titles to display the Manage Titles
Screen.
Figure 190 – Manage Staff Title
2. The Manage Staff Title Screen displays the following: Click Add Staff Title to add a new staff title. Excel, PDF, and Print enables a user to export and print report staff titles and
statuses.

October 2017 VSS 5*3User Guide165
Search text field available. Name – Click the name link to edit the staff title options. Description – Description of the staff title. Is Chief - Indicates if the staff title represents a chief role (Filterable). Is Chief Supervisor – Indicates if the staff title represents a chief supervisor role
(Filterable). Status – Active initially displays. The user can filter to include Inactive staff titles
(Filterable). In the Action column, select the Delete icon to delete the staff.
Figure 191 - Manage Staff Title Screen
3. If the user selects Add Staff Title, the New Staff Title box displays. The following functions and fields are available:
Name (required) Description Is Chief Is Chief Supervisor Is Active Click Submit or Cancel.
Figure 192 - New Staff Title Box

October 2017 VSS 5*3User Guide166
8.9Manage Award CodesUsers can create and manage volunteer service awards in VSS as a way to reward volunteers for their time. From the Manage Reward Codes Screen, the user can view a list of all existing award codes or navigate to view details for an existing award code or create a new award code. They also have the capability to export the list.
1. From the Maintenance Menu, select Manage Award Codes to display the Manage Award Codes Screen.
Figure 193 - Manage Award Codes Menu Options
2. The Manage Award Codes Screen displays the following: Add Award Code button Excel, PDF, and Print enables a user to export and print award codes and statuses. Search text field available. Name – Click the name link to edit the award code options. Code – Code for the award. Required Hours – The hours required to be eligible for the award. Award Hours - The completed hours of service to be eligible for the award. Award Group Type – Volunteer age group eligible for the award (Filterable). Status – Only Award Codes with the status of Active are initially available. The
user can filter to include Inactive award codes. In the Action column, select the Delete icon to delete the Staff.

October 2017 VSS 5*3User Guide167
Figure 194 - Manage Award Codes Screen
3. Click Add Award Code to display the Add New Award Code box. Define the following: Code Name Required Hours Award Hours Award Group Type – Adult, Youth, and Other. Is Active checkbox Click Submit or Cancel.
Figure 195 - Add New Award Code Box
9. ReferenceThe Reference Menu provides an easy access to important links, policies, procedures and other publications directly from VSS Web.
From the Reference Menu, the following options are available:
A. PoliciesB. VAVS SharePoint

October 2017 VSS 5*3User Guide168
C. VAVS Website
Figure 196 - Reference Menu Options
9.1PoliciesFor additional information on policies, refer to the links below:
VHA Directive 1620 VHA Handbook 1620.01 VHA Handbook 1620.02 VHA Handbook 1620.03 VHA Directive 2008-020 VHA Directive 4721 VHA Handbook 4721
9.2VAVS SharePointFor information on the VAVS SharePoint, refer to the link below: http://vaww.teamshare.va.gov/vavs/default.aspx
9.3VAVS WebsiteFor information on the VAVS Website, refer to the link below: http://www.volunteer.va.gov/
10. Manage User AccessUsers with the following access roles are permitted to use this menu option.
National Administrator
National Specialist
National User
Site Administrator
Site Specialist
October 2017 VSS 5*3User Guide169
Site User
From the VSS Menu, select Manage User Access to display the Manage User Access to VSS Screen.
Figure 197 – Manage User Access to VSS Screen
10.1 Manage User AccessThe Manage User Access to VSS Screen can only be accessed by the National Administrator, National Specialist, Site Administrator, or Site Specialist. This screen is used to assign roles to site users. The role determines what data the user can access. The term User refers to Voluntary Service staff members, not volunteers. Volunteers are administered through the Add Volunteers and Edit Volunteers screens.
Note: User can only grant roles and assign facility(s) when they are assigned a Global Role under the Facilities and Global Roles section. If user only has Customized roles, they cannot grant access, but they have access to VSS.
National Administrator can grant the following roles and any facility: National Administrator National Specialist National User Site Administrator Site Specialist Site User Volunteer
National Specialist can grant the following roles and facility(s) to which they are assigned: National User Site Administrator Site Specialist Site User

October 2017 VSS 5*3User Guide170
VolunteerSite Administrator can grant the following roles and facility(s) to which they are assigned:
Site Specialist Site User Volunteer
Site Specialist can grant the following roles and facility(s) to which they are assigned: Site User Volunteer
10.1.1 Select User1. In the Select User text field, search by name or VA username. When the name displays,
click the name link to view facility access and roles.
To add a new user, click the Add button. The Search for User box displays first, to enable a user to perform a search before a duplicate user is added. If duplicate name is not displayed, the new user can be added.
2. Once a user has been selected, the following sections are listed:
User Details
Facilities and Global Roles (Roles Available & Roles Assigned)
Facilities Available & Facilities Assigned
Effective Roles
3. Ensure the Enabled checkbox in the User Details section is selected.
10.1.2 Assign Roles and Facilities4. In the Facilities & Global Roles section, select a role from Roles Available and click the
arrow button to move it to Roles Assigned. Click the All button to assign ALL roles. Each user MUST have at least one Role assigned.
5. Select a facility from Facilities Available or search for a facility in the text box and click the arrow button to move it to Facilities Assigned.
Click the All button to assign ALL facilities. Each user MUST have at least one facility assigned.
2. The Effective Role section provides a grid of which roles and facilities are assigned to the users.
10.1.3 Unlock User6. If the Locked checkbox is selected, the user has three unsuccessful login attempts and is
unable to log into the VSS for one hour. The “Lock” will clear automatically after the user has been locked out for one hour or an authorized user can unselect the Locked checkbox to unlock the user.
7. Users, who have not logged in within the past six months, either at their current station or any other station are automatically inactivated and no longer have access to the system at any station. User activation/inactivation is national in scope and is by user, not by station.

October 2017 VSS 5*3User Guide171
8. If a user is activated or inactivated at one station, their access at every station where roles are assigned is affected.
10.1.4 Time Zone9. Time zone is set on the User Management screen. Times shown throughout the system
are based on this setting and do not automatically update to reflect time zone changes of users on travel.
Figure 198 - User Management Screen
11. HelpClick the Help icon in the VSS application to view additional information about the screen.
12. TroubleshootingIf screen display issues occur when working in VSS Web, enable Compatibility Mode in the browser. This issue may occur when using Internet Explorer browsers.
To manually enable the setting:
1. Open VSS in Internet Explorer.2. Click the Tools option.3. Click Compatibility View Settings under Add this Website.4. Add the VSS Web URL site to the list.5. Click Add.
12.1 Special Instructions for Error CorrectionIf the application displays an error at the time of log on or if there are error messages that are NOT part of data entry (e.g., a system error message), contact the VA Service Desk to log a

October 2017 VSS 5*3User Guide172
Remedy ticket. Technical Personnel provides content for error messages with the system.
o Call 1-855-673-4357
o Email [email protected]
Refer to the next Figure for an example of an error message. “Attention” displays on the screen.
Figure 199 - An Example of an Error Message on a VSS Screen
13. Acronyms and AbbreviationsTable 6- Acronyms & Abbreviation Table
Acronyms & Abbreviations
Translation
ACK Acknowledgement
BRD Business Requirements Document
CBOCs Community Based Outpatient Clinic
CO Central OfficeCOOP Continuity of Operation
EO Enterprise Operations
IC Identifying Code

October 2017 VSS 5*3User Guide173
LDAP Lightweight Directory Access Protocol
NAC National Advisory Committee
OI&T Office of Information and Technology
PMAS Project Management Accountability System
SME Subject Matter Expert
SQL Structured Query Language
TBD To Be Delivered
TSPR Technical Service Project Repository
UI User Interface
VA Department of Veterans Affairs
VAVS Department of Veterans Affairs (VA) Voluntary Service
VHA Veterans Health Administration
VISN Veterans Integrated Service Network
Vista Veterans Health Information Systems and Technology Architecture
VSS Voluntary Service System
14. CRUD MatrixThe CRUD Matrix only applies to the VAVS Staff application and not to actual volunteers.