introduction to oracle bi publisher... · web vieworacle bi publisher desktop can build the table...
TRANSCRIPT

03 Introduction to Oracle BI Publisher Desktop
Table of Contents11i Oracle XML Publisher Fundamentals: Introduction to Oracle BI Publisher Desktop.............................2Installing and Opening Word.......................................................................................................................3Basic Template............................................................................................................................................4Loading the Sample XML Data.....................................................................................................................5Loading Complete........................................................................................................................................7Setting the Address......................................................................................................................................7Choosing the Address Fields........................................................................................................................9Setting the Other Simple Fields...................................................................................................................9Previewing Your Progress..........................................................................................................................10Inserting a Table........................................................................................................................................11Setting Instruction Preferences.................................................................................................................11Setting Instruction Preferences.................................................................................................................12Creating the Table.....................................................................................................................................13End Result..................................................................................................................................................17Changing Field Properties..........................................................................................................................18Preview Your Progress...............................................................................................................................19Creating a Chart.........................................................................................................................................20Placeholder................................................................................................................................................23Previewing Your Progress..........................................................................................................................24Student Lab...............................................................................................................................................25
1

11i Oracle XML Publisher Fundamentals: Introduction to Oracle BI Publisher Desktop
Oracle BI Publisher Desktop is an extension to Microsoft Word (2000 or later) that simplifies rich text format (RTF) creation. Oracle BI Publisher Desktop allows the following functions:
• Insert data fields.• Insert data-driven tables.• Insert data-driven forms.• Insert data-driven charts.• Preview your template with sample XML data.• Browse and update the content of form fields.• Extract boilerplate text into an XLIFF translation file and test translations.
What Is Oracle BI Publisher Desktop?All of these steps, and many others, can be performed manually. Oracle BI Publisher Desktop simplifies the common tasks associated with creating an Oracle BI Publisher RTF template.
2

Installing and Opening Word
• Open Microsoft Word.• If Oracle BI Publisher Desktop was properly installed, you should see the following on
your menu bar.
Often, you have a starting template from which to begin. For the sake of an example, look at the following template:Balance Letter Start.rtf
Starting the Walk-ThroughThe default location for student sample files is:D:\Program Files\Oracle\XML Publisher Desktop\samplesFrom that directory, there are three subdirectories:
eText templatesPDF templatesRTF templates
The files used in this demonstration and its associated lab are kept in the RTF templates subdirectory. Specifically, the files are located as follows:D:\Program Files\Oracle\XML Publisher Desktop\samples\RTF templates\Balance Letter
3

Basic Template
Basic TemplateNothing about this template is unique to Oracle BI Publisher. You could just have easily started from a blank document. You just saved some typing.
4

Loading the Sample XML Data
• From the Data menu, select Load XML Data.• You are going to load Balance.xml.
Note: You must leave the template open as you load the XML data.
5
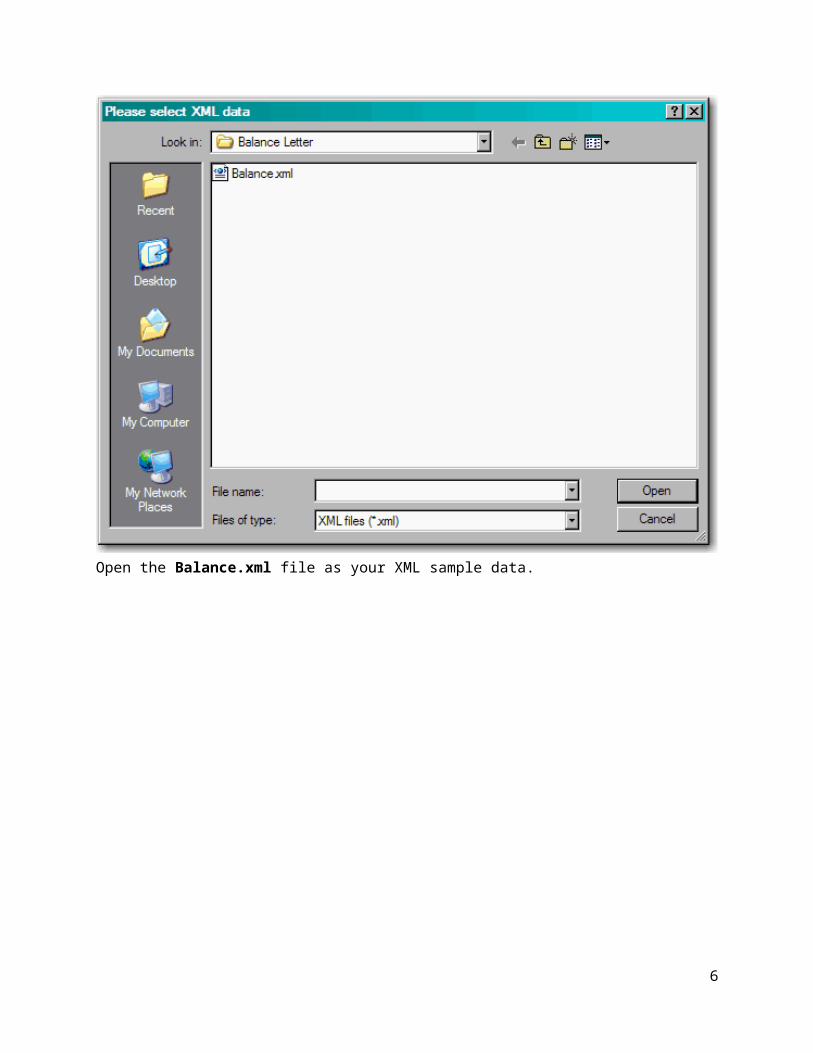
Open the Balance.xml file as your XML sample data.
6

Loading CompleteIf you successfully loaded the sample XML Data, you see the following:
Setting the Address
• Position the cursor in the Word document where you want to insert the address.• From the Insert menu, select Field.
Setting the Address
7

Note: Throughout the starting document, you will see several placeholders such as the following:<INSERT ADDRESS HERE>You must remove these placeholders, and replace them with the appropriate fields.Note: You will also have to adjust the position of the cursor, typically by pressing the Enter key, when inserting fields. If you do not, all the fields will appear on the same line.
8

Choosing the Address Fields
• Select <CUSTOMER_NAME> and then click Insert.• In the same way, click Insert after selecting the following:
– <ADDRESS_LINE_1>– <ADDRESS_LINE_2>– <ADDRESS_LINE_3>– <ADDRESS_LINE_4>– <CITY>– <STATE>– <ZIP>
Setting the Other Simple Fields
9

Set the other simple fields on the RTF template as follows:• <AS_OF_DATE> for <INSERT AS OF DATE HERE>• <TRX_CURRENCY_CODE> for <INSERT CURRENCY HERE>• <C_INV_OPEN_BALANCE> for <INSERT CURRENCY BALANCE HERE>
Note: At this point, you should insert fields only for unique data fields. You will handle the data table in the next section.
Previewing Your Progress
• Save your work as Balance Letter End.rtf.• From the Preview menu, select your format:
– PDF to see the document in Acrobat Reader– HTML to see the document in your browser– RTF to see the document in Microsoft Word– EXCEL to see the document in Microsoft Excel
Note: The preview should show Vision Operations with a CAD (Canadian dollar) balance of 31,500.
When you save your work, be certain to do a Save As instead of just Save.CAD will show up in these reports. CAD is the currency code for Canadian dollars.
10

Inserting a Table
Oracle BI Publisher Desktop offers a function that generates a table for you.Oracle BI Publisher Desktop can build the table using Abbreviated or Descriptive instructions. Abbreviated instructions make the template easier to read. Descriptive ones make the template easier to understand. The following demo uses Descriptive instructions.
Setting Instruction Preferences
• From the Tools menu, choose Options.
11

• Select the Build tab.• Select Descriptive as shown.
• Click OK to finish.
12

Creating the Table
The document should include a table of all invoices, at the place in the file labeled <INSERT TABLE OF INVOICES HERE> that are not or only partially paid. From the Insert menu, select Table/Form to open the Table/Form dialog box.
Note: When you create the table using Insert > Table > Advanced, you will not be able to properly create the table using the Table Wizard.
• In the Data Source (left) panel, choose the <G_INVOICES> element by dragging it to the Template (center) panel.
• When the dialog box appears, choose Drop All Nodes.
13

• Delete all the items in the Template (center) panel, except:– <TRX_NUMBER>– <TRANSACTION_DATE>– <TRANS_AMOUNT>– <TRANS_AMOUNT_REMAINING>
14

Creating the TableYou should click again on the G Invoices element in the center view. The Properties region on the right shows how the data fields will be formatted. You should see the information displayed in the slide.For each group you can set the following properties that describe how a group (such as G Invoices) should be rendered by the Oracle BI Publisher Desktop:
• Style: Select Table to create a table around the data fields.• Grouping: Grouping is an advanced operation that allows you to re-group the
data – for example by transaction date instead of currency. You can select the element that the data should be grouped by for this property. Refer to the Oracle BI Publisher User’s Guide for additional information on grouping.
• Show Grouping Value: This property will only be shown if you have selected a node created by the Grouping functionality. You can choose for a group if the Data Field node used as a grouping criterion is shown in the table or form.
• Sort By: You can select an element by which the data groups are sorted.• Sort Order: If you have selected an element for Sort By you can select, if the
data should be sorted either ascending or descending.• Sort Data Type: If you have selected an element for Sort By the data is by
default sorted as Text. That means that 12 will be shown after 111. If you need to sort numbers you should select Number as the sort data type.
• Break: This property allows you to insert a page break or a section break between every data group. If nothing is select, then the data groups will be
15

shown continuously with no break. If you select New Page per Element, then a page break will be inserted between each element. If you select New Section per Element, a section break will be created for each data group. A section break allows changing the header/footer and resets the page number. You will typically use this option, if you want to print multiple documents (for example invoices or purchase orders) to a single PDF file.
• The order in which the data elements are shown reflects the order of the columns in the table. If you want to reorder the columns you need to change the Insert Position box from Child to Same Level. Then drag the elements into the correct order.
Click the OK button to create the table. See the next slide for an example of the inserted table.
16
End Result
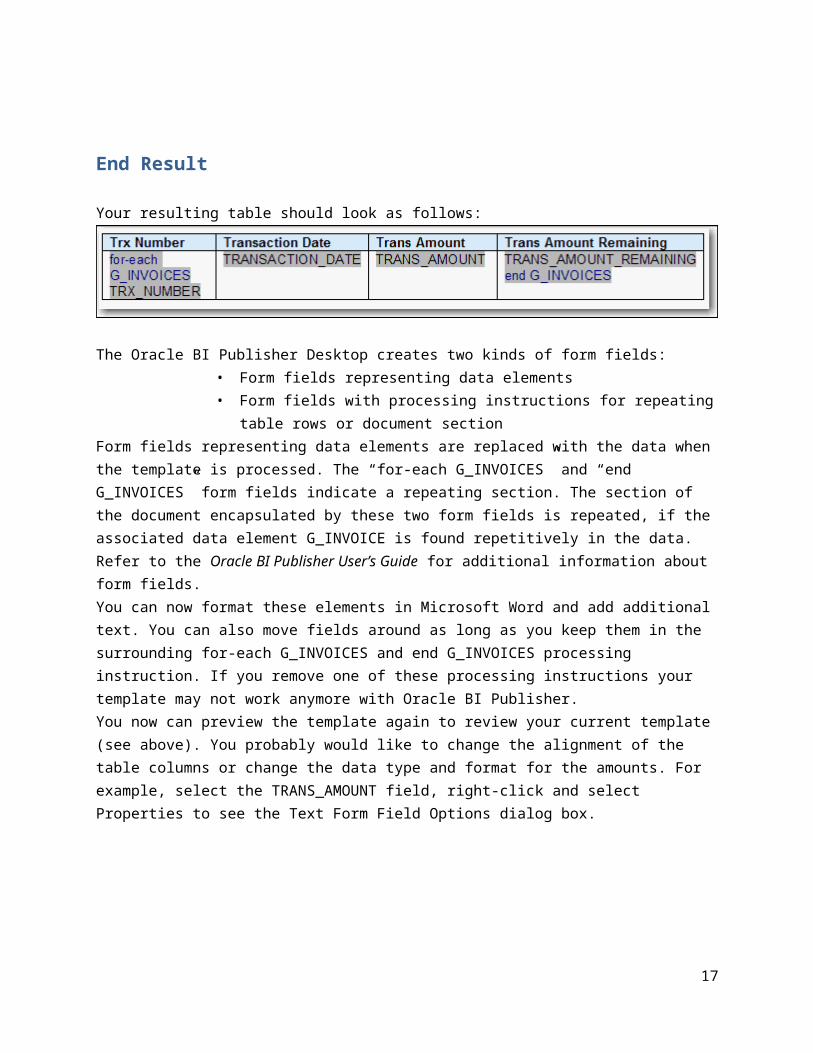
Your resulting table should look as follows:
The Oracle BI Publisher Desktop creates two kinds of form fields: • Form fields representing data elements• Form fields with processing instructions for repeating table rows or document
section Form fields representing data elements are replaced with the data when the template is processed. The “for-each G_INVOICES” and “end G_INVOICES” form fields indicate a repeating section. The section of the document encapsulated by these two form fields is repeated, if the associated data element G_INVOICE is found repetitively in the data. Refer to the Oracle BI Publisher User’s Guide for additional information about form fields.You can now format these elements in Microsoft Word and add additional text. You can also move fields around as long as you keep them in the surrounding for-each G_INVOICES and end G_INVOICES processing instruction. If you remove one of these processing instructions your template may not work anymore with Oracle BI Publisher.You now can preview the template again to review your current template (see above). You probably would like to change the alignment of the table columns or change the data type and format for the amounts. For example, select the TRANS_AMOUNT field, right-click and select Properties to see the Text Form Field Options dialog box.
17

Changing Field Properties
• Select the TRANS_AMOUNT field, right-click and select Properties to see the Text Form Field Options dialog box.
Changing Field PropertiesYou may select Number in the Type field, #,##0.00 for Number format and enter 1,000.00 as the Default Number to achieve a more desirable format for currencies in US Dollar. It is recommended not to use currency signs such as $ in the format string, because it may lead to difficulties in supporting multiple languages with a single template.Formatting options defined in this dialog box are understood by Oracle BI Publisher and used to format your fields. Try to modify the template to get an idea which Word functions are supported by Oracle BI Publisher 5.5.
18

Preview Your Progress
Before you preview you work, be certain to save it as Balance Letter End.rtf.
19

Creating a Chart
• Open Retails Sales Start.rtf.• From the Insert menu, select Chart.• On the left tree panel, select the Row element.• Select Industry for Grouping.• Select Sum of Sales for Measure.• Select Pie Chart as the Type.• Click OK.• Look at the placeholder.• Save the report as Retail Sales End.rtf.• Preview your report.
Creating a ChartThe data used for creating the open balance letter is not well suited to create a chart. Therefore, close the Balance Letter file. Open the following file:D:\Program Files\Oracle\XML Publisher Desktop\samples\RTF templates\Sales Report\Retail Sales Start.rtfLoad the RetailSales.xml file in the D:\Program Files\Oracle\XML Publisher Desktop\samples\RTF templates\Sales Report folder by selecting Load XML Data from the Data menu. This data contains retail sales data for different industries. You will create a chart that shows the sales per industry. Oracle BI Publisher does not support native Microsoft Word Charts. You need to create charts using the Oracle BI Publisher Desktop.
20

21

Select Type = Pie ChartSelect Group = ROW/INDUSTRYSelect Measure = sum of ROW/SALES
22

Placeholder
23

Previewing Your Progress
24

Student Lab
• Re-create both the report and the chart for yourself.• Follow the same steps on your PC.
Student Lab:1. Open Microsoft Word2. Open the file D:\Program Files\Oracle\XML Publisher Desktop\samples\RTF
templates\Balance Letter\Balance Letter Start.rtf.3. Load the XML sample data (D:\Program Files\Oracle\XML Publisher Desktop\samples\
RTF templates\Balance Letter\Balance.xml) 4. Replace the <INSERT ADDRES HERE> marker with the fields <CUSTOMER_NAME>,
<ADDRESS_LINE_1>, <ADDRESS_LINE_2>, <ADDRESS_LINE_3>, <ADDRESS_LINE_4>, <CITY>, <STATE>, and <ZIP>. Format into an appropriate address block.
5. Replace the <INSERT AS OF DATE HERE> marker with the <AS_OF_DATE> field.6. Replace the <INSERT_CURRENCY_HERE> marker with the <TRX_CURRENCY_CODE> field.7. Replace the <INSERT CURRENCY BALANCE HERE> marker with the
<C_INV_OPEN_BALANCE> field.8. Save your progress as Balance Letter End.rtf.9. Preview your progress in the format (PDF, HTML, RTF, EXCEL) of your choice.10. Set the Tools > Options > Build setting to Descriptive in the For-each Form Field section.11. Replace the <INSERT TABLE OF INVOICES HERE> marker with a table created via Table >
Advanced. The table should have the <G_INVOICES> group, and the <TRX_NUMBER>, <TRANSACTION_DATE>, <TRANS_AMOUNT>, and <TRANS_AMOUNT_REMAINING> fields.
12. Change the properties of the TRANS_AMOUNT field to the Default Text of 1,000.00 and a Text Format of #,##0.00.
13. Save your progress as Balance Letter End.rtf.14. Preview your progress in the format (PDF, HTML, RTF, EXCEL) of your choice.15. Close the file.16. Open the file D:\Program Files\Oracle\XML Publisher Desktop\samples\RTF
templates\Sales Report\Retail Sales Start.rtf.17. Load the XML sample data (D:\Program Files\Oracle\XML Publisher Desktop\samples\
RTF templates\Sales Reports\RetailSales.xml)18. Insert a chart (INSERT > CHART) below the header.19. Select the ROW element from the Tree pane.20. Select the INDUSTRY for grouping.21. Select SUM of SALES for measure.22. Select the Chart Type a PIE CHART.
25

23. Click the OK button when complete.24. Save your progress as Retail Sales End.rtf.25. Preview your progress in the format (PDF, HTML, RTF, EXCEL) of your choice.
26