introduction to labview 8.5 elec 163 electronic design i freshman design course at wentworth...
TRANSCRIPT

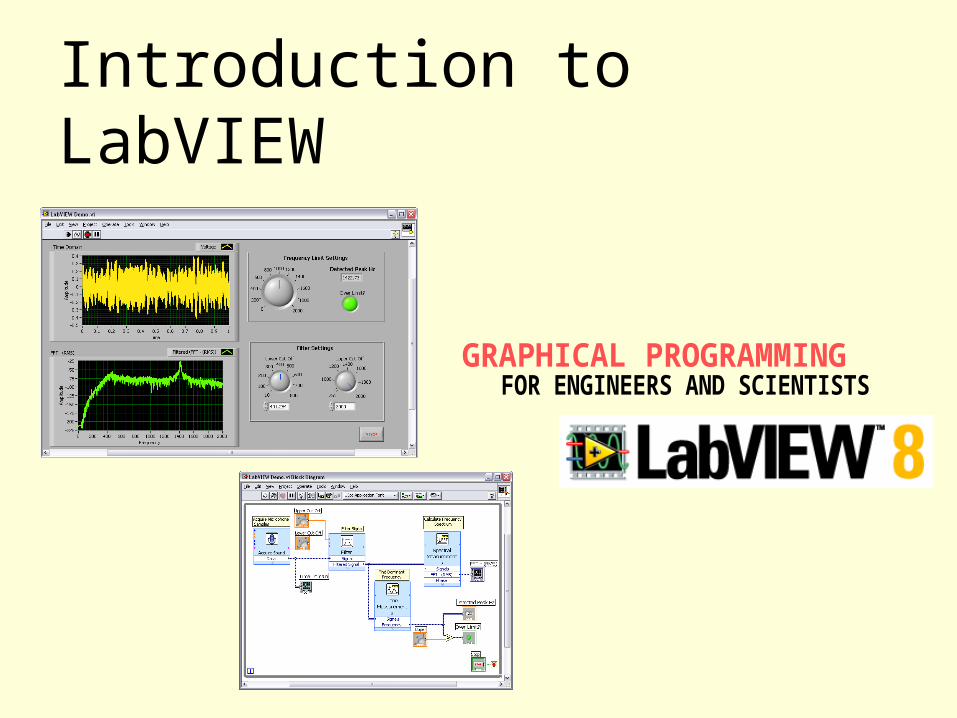
Introduction to LabVIEW 8.5
• Elec 163 Electronic Design I
• Freshman design course at Wentworth Institute of Technology
• Original slides prepared by Professor Xiaobin Le of Mechanical program
• Adapted for Electrical program by Cap’n Tim Johnson, PE
Introduction to LabVIEW

Introduction to LabVIEW (1)
• What is LabVIEW?– LabVIEW– The Virtual Instrumentation (VI) Approach for
measurement systems
• LabVIEW environment – Three parts of a VI– Three palettes – Show context help– Status bar

What is LabVIEW?• LabVIEW - Laboratory Virtual Instrument
Engineering Workbench
• LabVIEW is a software, which uses graphical programming language for data acquisition, data analysis, presentation of result and instrument control.
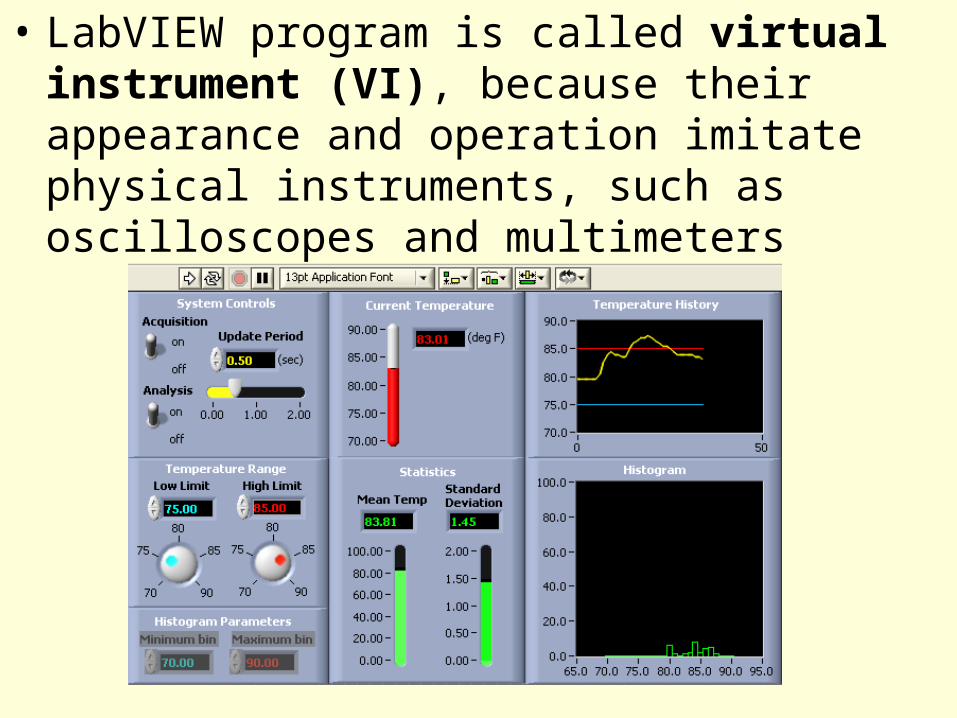
• LabVIEW program is called virtual instrument (VI), because their appearance and operation imitate physical instruments, such as oscilloscopes and multimeters

The VI approach for measurement systems
High-SpeedDigitizers
High-ResolutionDigitizers and DMMs
Multifunction Data Acquisition
DynamicSignal Acquisition
Digital I/OInstrumentControl
Counter/Timers
MachineVision
Motion Control
Distributed I/O andEmbedded Control
Laptop PC PDADesktop PCPXI Modular Instrumentation
Signal Conditioningand Switching
Unit Under Test
LabVIEW +Computer
Hardware + sensor
Object being tested

LabVIEW environment
• Three parts of a VI– Front panel – Block diagram– Icon and connector
pane• Three palettes
– Tools palette– The Controls palette– The Functions palette
• Show context Help• Status bar
• LabVIEW provides an easy-to-use graphical programming environment, including all of the tools necessary for data acquisition (DAQ), data analysis and presentation of results.
• LabVIEW tries to make your life as hassle-free as possible. It has extensive libraries of functions and subroutines to help you with most programming tasks.
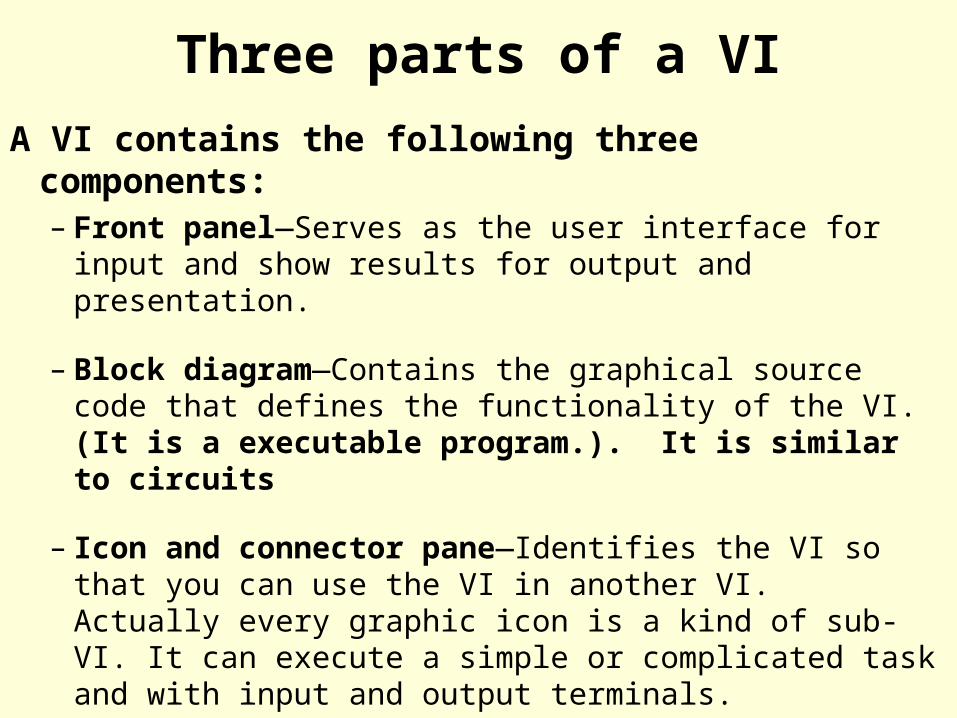
Three parts of a VI
A VI contains the following three components:– Front panel—Serves as the user interface for input
and show results for output and presentation.
– Block diagram—Contains the graphical source code that defines the functionality of the VI. (It is a executable program.). It is similar to circuits
– Icon and connector pane—Identifies the VI so that you can use the VI in another VI. Actually every graphic icon is a kind of sub-VI. It can execute a simple or complicated task and with input and output terminals.

• The front panel is the user interface of the VI. – A front panel contains controls for input and
indicators for output or data presentation• Controls are knobs, pushbuttons, dials, and
other input devices. – Controls simulate instrument input devices and
supply data to the block diagram of the VI.• Indicators are graphs, LEDs, and other displays.
– Indicators simulate instrument output devices and display data the block diagram acquires or generates.
Front Panel
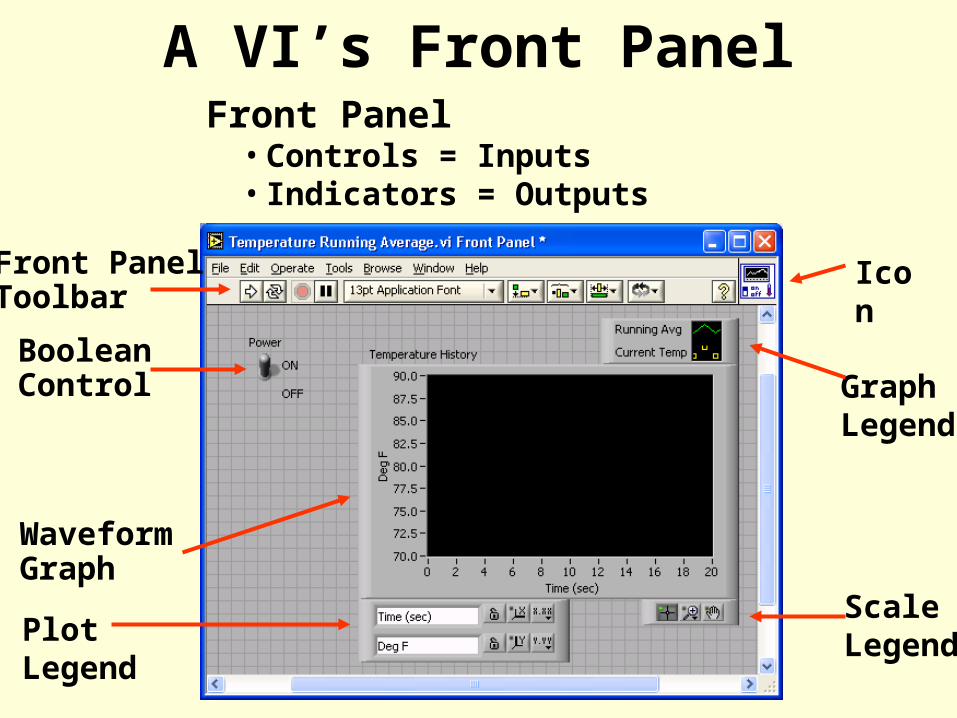
A VI’s Front Panel
Front Panel Toolbar
GraphLegend
BooleanControl
WaveformGraph
Icon
PlotLegend
ScaleLegend
Front Panel• Controls = Inputs• Indicators = Outputs
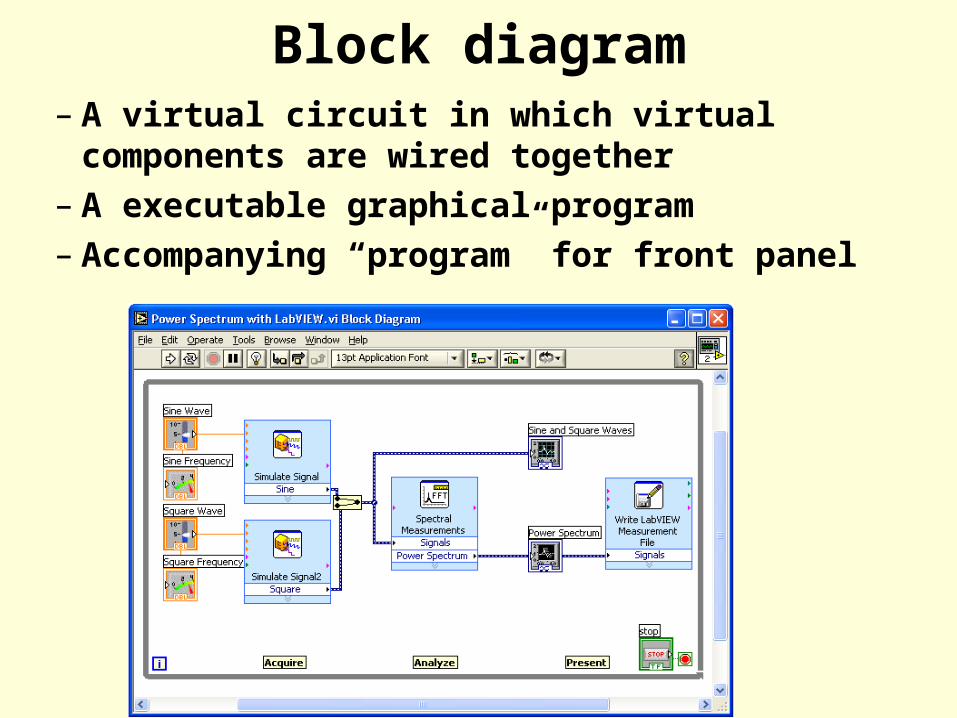
Block diagram– A virtual circuit in which virtual components
are wired together– A executable graphical program– Accompanying “program” for front panel

A VI’s Block Diagram
Wire Data
GraphTerminal
SubVI
While LoopStructure
Block Diagram Toolbar Divide
Function
Numeric Constant
Timing Function
Boolean Control Terminal
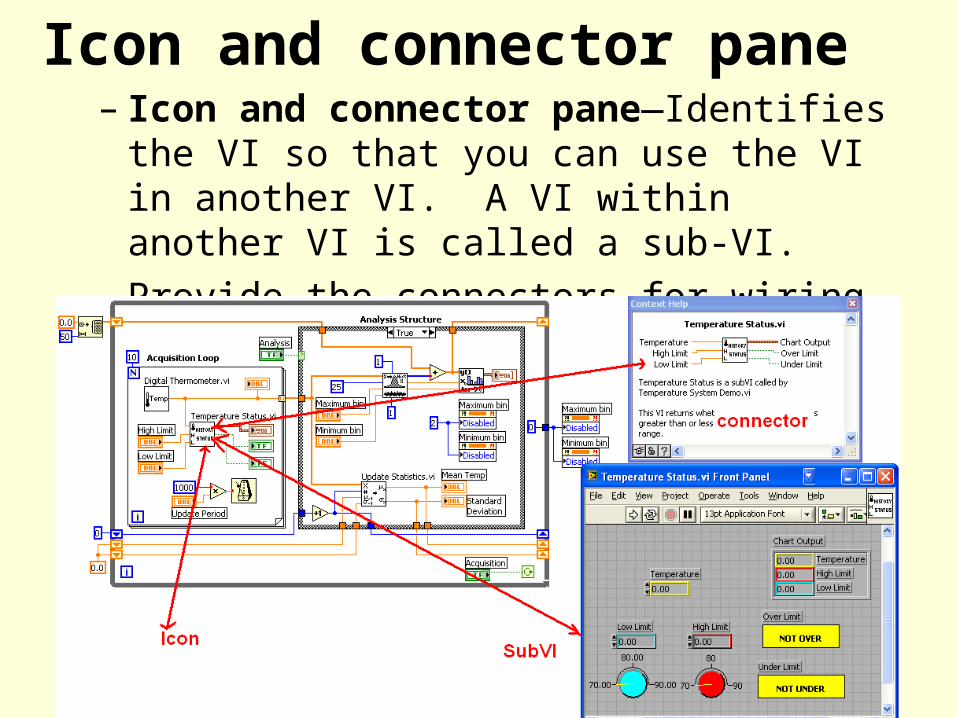
Icon and connector pane – Icon and connector pane—Identifies the VI
so that you can use the VI in another VI. A VI within another VI is called a sub-VI.
– Provide the connectors for wiring

Three LabVIEW Palettes• The Tools palette is available on the front
panel and the block diagram.– A tool is a special operating mode of the
mouse cursor.• The Controls palette is available only on the
front panel. – The Controls palette contains the controls
and indicators you use to create the front panel.
• The Functions palette is available only on the block diagram. – The Functions palette contains the VIs and
functions you use to build the block diagram.
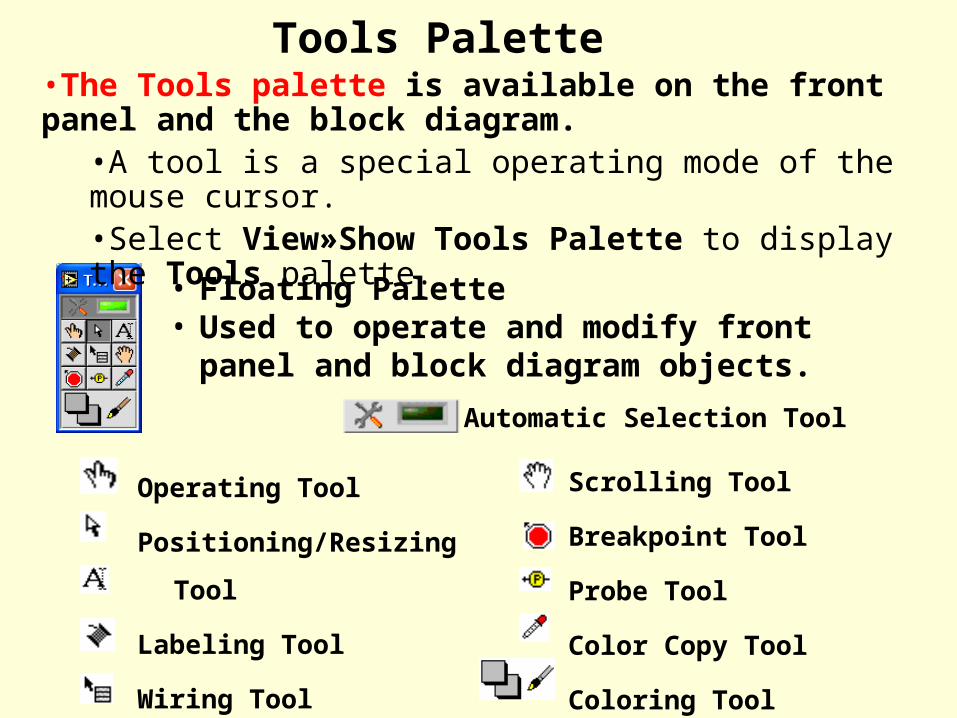
Tools Palette
Operating Tool
Positioning/Resizing Tool
Labeling Tool
Wiring Tool
Shortcut Menu Tool
• Floating Palette• Used to operate and modify front panel and
block diagram objects.
Scrolling Tool
Breakpoint Tool
Probe Tool
Color Copy Tool
Coloring Tool
Automatic Selection Tool
•The Tools palette is available on the front panel and the block diagram.
•A tool is a special operating mode of the mouse cursor.•Select View»Show Tools Palette to display the Tools palette.

The Controls palette• Select View»Show Controls Palette or right-click the
front panel workspace to display the Controls palette
• In the front panel mode, right click any empty place, the “control palette” will be shown. After you choose proper screen, you can pin that screen.

Functions Palette•Select View»Show Functions Palette or right-click the block diagram workspace to display the Functions palette.
•In the Block diagram mode, right click any empty place, the “function palette” will be shown. After you choose proper screen, you can pin that screen.

Show context Help When you point at any icon (graphical code), the description of the icon will be shown if the “show context help” is checked.

Run Button
Continuous Run Button
Abort Execution
Execution Highlighting Button
Additional Buttons on the Diagram Toolbar
Status Toolbar
Retain Wire Values Button
Step Function Buttons

End of Overview
• The next few slides will help you get started making your own virtual instrument.
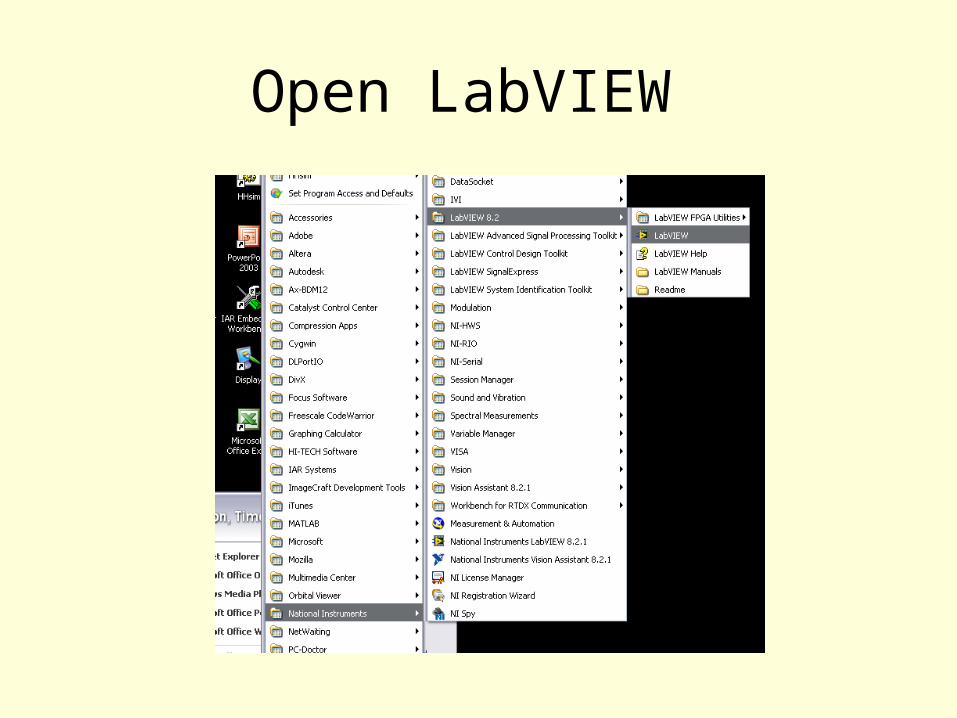
Open LabVIEW

Lab instructions
• Read Ch1 in “Getting Started with LabVIEW. • If your instructor hands out the pages for this chapter you won’t
need to open up the manual (instructions follow)• This manual is found (on my machine) at C:\Program Files\National
Instruments\LabVIEW 8.2\manuals or 2 selections down from where you clicked to start LabView.
• Click on LV_Getting_Started.pdf to open the manual.• Do NOT print out the manual!!!!• If you are working as a team have one of your team mates open up
the PDF and use that as your copy.
Tutorial
• As you read through the chapter make the VI and modifications suggested.
• Turn in a screen print of the design, and
• Answer the questions on the following page.

Begin designing
• You are on your way.
• This lab is part of the design process steps Gathering Information and Conceptualizing Alternate Solutions.
• The question you are considering is:
Will this software help me with the soldering iron project?
If so, how?