introduction to jquery - intertech · • jquery was created by john resig who currently leads the...
TRANSCRIPT

An Intertech Course
Understanding jQuery

OxygenBlast - Understanding jQuery
Copyright © Intertech, Inc. 2009 • www.Intertech.com • 800-866-9884 • Slide 2
What is jQuery?
• jQuery, released in 2006, is an open-source JavaScript framework with a
large number of widgets and 3rd party plug-ins.
• Its primary focus is to ease the complexity of coding JavaScript and Ajax
applications.
• Their motto is “write less, do more.”
• This framework is free and licensed under the MIT and GNU General Public
License, Version 2.
• Browser support includes Firefox 2.0+, IE 6+, Safari 3+, Opera 9+, and Chrome
1+.
OxygenBlast - Understanding jQuery
Copyright © Intertech, Inc. 2009 • www.Intertech.com • 800-866-9884 • Slide 3
What is jQuery? Cont.
• jQuery is arguably the most popular JavaScript framework available.
• One stats Web site listed jQuery as “the most detected JavaScript library in use
on the web” by a wide-margin.
(July 2010 - http://trends.builtwith.com/javascript)
• jQuery is used by Google, Microsoft, Dell, IBM, Amazon, NBC, among others.
• jQuery was created by John Resig who currently leads the project’s
development team.
• Resig is also a JavaScript Tool Developer for the Mozilla Corporation
• You can find out more about the development team, along with links to their
blogs and Twitter accounts at: http://jquery.org/team
OxygenBlast - Understanding jQuery
Copyright © Intertech, Inc. 2009 • www.Intertech.com • 800-866-9884 • Slide 4
jQuery Setup
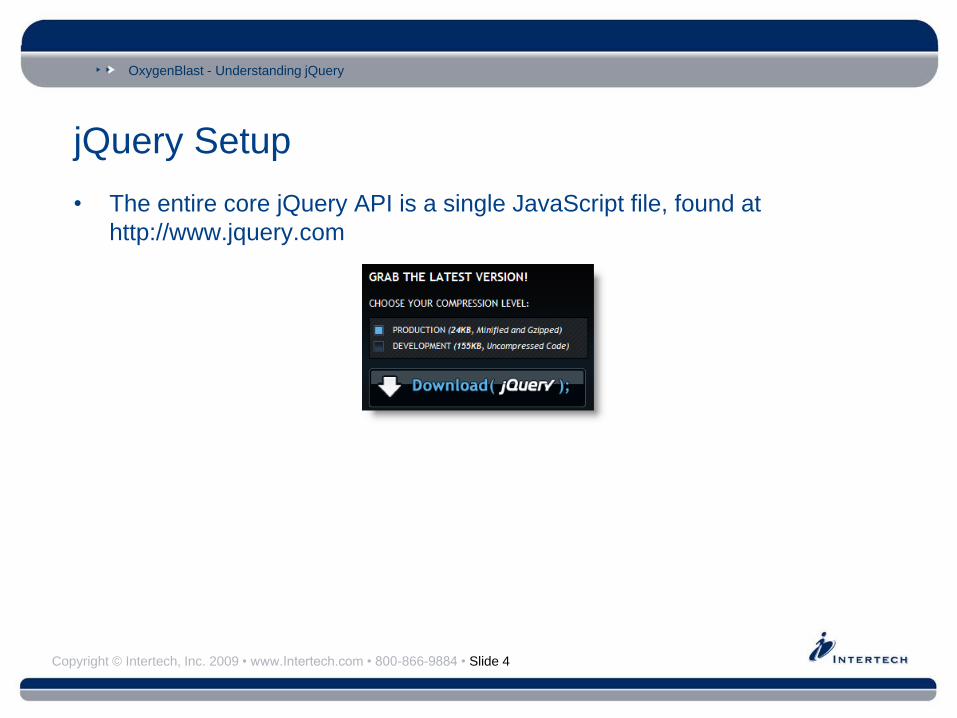
• The entire core jQuery API is a single JavaScript file, found at
http://www.jquery.com

OxygenBlast - Understanding jQuery
Copyright © Intertech, Inc. 2009 • www.Intertech.com • 800-866-9884 • Slide 5
jQuery Setup Cont.
• As noted in the previous image, there are two primary versions of the
jQuery API.
• Both contain the exact same API; the only difference is in size & formatting.
• 1 - Production Version - To produce the smallest file possible, most white space
and comments have been removed, and the content has been compressed.
OxygenBlast - Understanding jQuery
Copyright © Intertech, Inc. 2009 • www.Intertech.com • 800-866-9884 • Slide 6
jQuery Setup Cont.
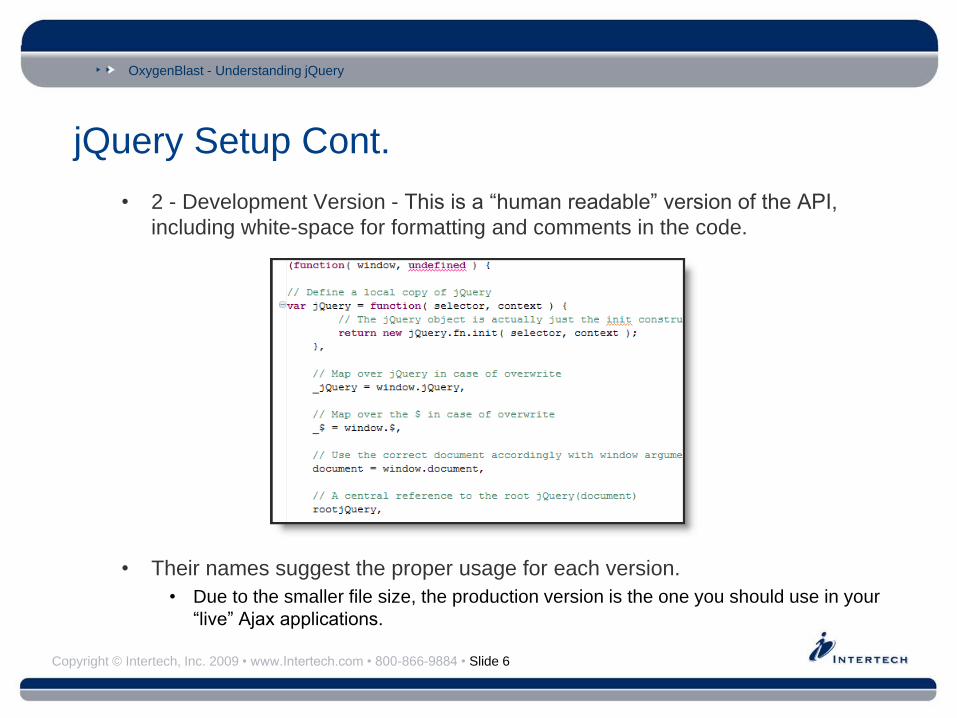
• 2 - Development Version - This is a “human readable” version of the API,
including white-space for formatting and comments in the code.
• Their names suggest the proper usage for each version.
• Due to the smaller file size, the production version is the one you should use in your
“live” Ajax applications.

OxygenBlast - Understanding jQuery
Copyright © Intertech, Inc. 2009 • www.Intertech.com • 800-866-9884 • Slide 7
jQuery Setup Cont.
• After downloading the jQuery API JavaScript file of your choice, add it to
your web content folder, and use the <script> tag to link to it in your Web
pages.
• That’s it! You are now ready to use jQuery!
<!DOCTYPE html PUBLIC "-//W3C//DTD XHTML 1.0 Transitional//EN"
"http://www.w3.org/TR/2002/REC-xhtml1-20020801/DTD/xhtml1-transitional.dtd">
<html xmlns='http://www.w3.org/1999/xhtml' xml:lang='en'>
<head>
<title>Intertech jQuery Demo</title>
<script type='text/javascript' src='jquery-1.4.2.min.js'>
</script>
</head>
...

OxygenBlast - Understanding jQuery
Copyright © Intertech, Inc. 2009 • www.Intertech.com • 800-866-9884 • Slide 8
jQuery Setup Cont.
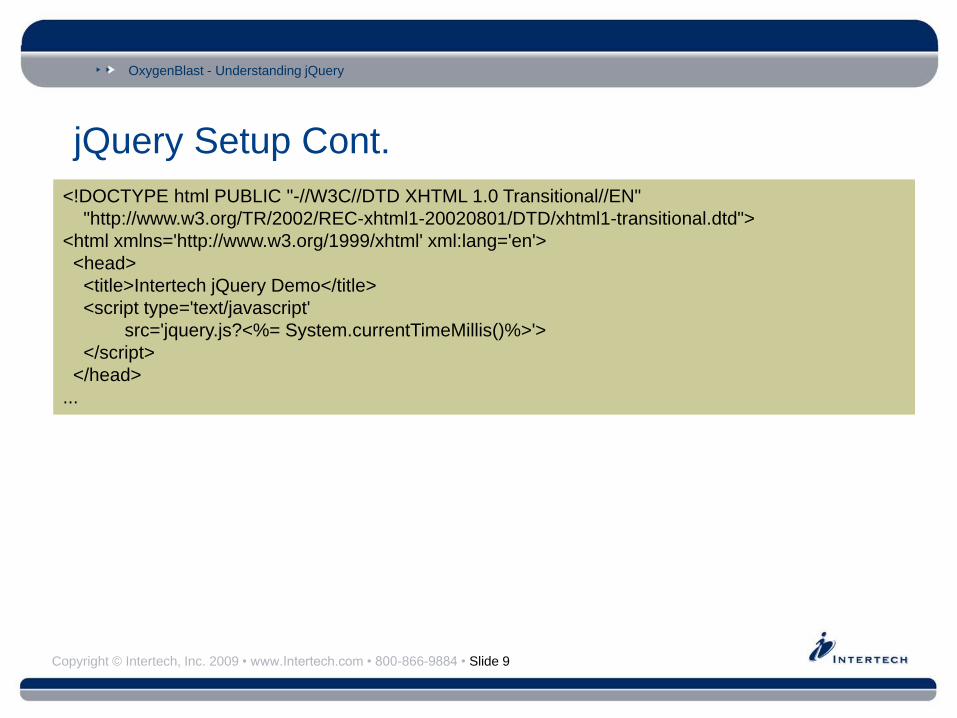
• You may want to consider changing the name of the versioned jQuery file
(such as “jquery-1.4.2.min.js”) to the more generic “jquery.js.”
• Pros - You won’t have to go into every Web page and update each jQuery link
when you upgrade your version of the API. Simply download the latest version
and change the file name to “jquery.js.”
• Cons - A client browser may have cached the included jQuery JavaScript file,
thereby ignoring any updates you install.
• A quick and common solution for solving the “cached resources” issue is to add a
query string to the URL with a unique ID (most often a date/time stamp).
• This produces a unique URL as far as the browser is concerned, so it does not cache
the resource.
• There is no negative affect on the Web server; the unique ID is ignored.
• Here’s an example of adding a unique ID in a JSP, by using the
System.currentTimeMillis() method.
OxygenBlast - Understanding jQuery
Copyright © Intertech, Inc. 2009 • www.Intertech.com • 800-866-9884 • Slide 9
jQuery Setup Cont.
<!DOCTYPE html PUBLIC "-//W3C//DTD XHTML 1.0 Transitional//EN"
"http://www.w3.org/TR/2002/REC-xhtml1-20020801/DTD/xhtml1-transitional.dtd">
<html xmlns='http://www.w3.org/1999/xhtml' xml:lang='en'>
<head>
<title>Intertech jQuery Demo</title>
<script type='text/javascript'
src='jquery.js?<%= System.currentTimeMillis()%>'>
</script>
</head>
...

OxygenBlast - Understanding jQuery
Copyright © Intertech, Inc. 2009 • www.Intertech.com • 800-866-9884 • Slide 10
jQuery’s Identifiers
• jQuery provides its functionality through a single object.
• There are two identifiers used to access this object: “$” and “jQuery”
• Either can be used, but choosing “$” results in more compact code.
• Resolving identifier conflicts:
• If you have a situation where another variable, function, or object also uses “$”
as an identifier, you can release jQuery’s hold on it by calling the “noConflict()”
method:
// Both of these statement are equivalent to one another.
$.someMethod();
jQuery.someMethod();
// Release the “$” identifier from jQuery
$.noConflict();
// Now the “jQuery” identifier is used instead of “$”
jQuery.someMethod();

OxygenBlast - Understanding jQuery
Copyright © Intertech, Inc. 2009 • www.Intertech.com • 800-866-9884 • Slide 11
jQuery’s Identifiers Cont.
• Creating your own identifier:
• The noConflict() method returns a handle to the jQuery object, so you can also
use this to create your own custom identifier.
• Regardless of which strategy you choose, it’s best to pick a single identifier
and use it consistently.
• This improves readability and maintenance.
// Release the “$” identifier from jQuery and create one called “jq”
var jq = $.noConflict();
// Now the “jq” identifier is used instead of “$”
jq.someMethod();

OxygenBlast - Understanding jQuery
Copyright © Intertech, Inc. 2009 • www.Intertech.com • 800-866-9884 • Slide 12
Method Chaining
• Since many jQuery actions are handled through the jQuery object, your
source code may contain repetitive use of the “$” identifier.
• To minimize this redundancy, most jQuery methods return a reference to
itself.
• This allows method calls to be chained together without requiring the repetitive
use of the jQuery identifier.
• As a best practice, favor clarity over minimizing redundancy
• When combined, method chaining and nesting may produce code that is difficult
to read.
$.aMethod();
$.anotherMethod();
$.yetAnotherMethod();
$.aMethod().anotherMethod().yetAnotherMethod();
$.aMethod(42,$.aMethod2().aMethod3($.aMethod4())).aMethod5();

OxygenBlast - Understanding jQuery
Copyright © Intertech, Inc. 2009 • www.Intertech.com • 800-866-9884 • Slide 13
Selecting Elements
• You must first select an element on a Web page before reading or
modifying it with your JavaScript code.
• In traditional JavaScript, element selection is executed through the DOM API:
• The most common method is to use document.getElementById(<ID>).
• Another common method is to locate the target node by using the DOM API to
traverse the tree.
<head>
<script>
var customerElement = document.getElementById(“FirstName”);
// ...
</script>
</head>
<body>
<input type=”text” id=”FirstName” name=”FirstName” />
</body>

OxygenBlast - Understanding jQuery
Copyright © Intertech, Inc. 2009 • www.Intertech.com • 800-866-9884 • Slide 14
Selecting Elements Cont.
• jQuery simplifies this by implementing its selection API with a syntax based on
Cascading Style Sheets (CSS).
• Recall that CSS primarily uses three types of selectors: Element, ID, and Class.
function displayCustomerInfo( req )
{
var customerElement = document.getElementById( “customer” );
if( req.readyState == 4 && req.status == 200 )
{
var xmlDOM = req.responseXML;
alert( xmlDOM.firstChild.firstChild.nodeType );
}
}

OxygenBlast - Understanding jQuery
Copyright © Intertech, Inc. 2009 • www.Intertech.com • 800-866-9884 • Slide 15
Selecting Elements Cont.
• Consider the following example:
• CSS selectors to match elements on this page might look like this:
<div id="employeeSearch">
Employee ID: <input class="employee" id="employeeID"
name="employeeID" type="text" /><br />
Division ID: <input class="division" id="divisionID"
name="divisionID" type="text" /><br />
</div>
<style>
div#employeeSearch input {color: blue} /* Selects Both Input Tags */
#employeeID {background-color: white} /* Selects a Single Input Tag */
</style>

OxygenBlast - Understanding jQuery
Copyright © Intertech, Inc. 2009 • www.Intertech.com • 800-866-9884 • Slide 16
Selecting Elements Cont.
• jQuery matches elements in exactly the same way.
• NOTE: Don’t forget to surround your selector with quotes (single or double);
otherwise it will not match any elements on the page.
$("div#employeeSearch input") // Selects Both Input Tags
$("#employeeID") // Selects a Single Input Tag

OxygenBlast - Understanding jQuery
Copyright © Intertech, Inc. 2009 • www.Intertech.com • 800-866-9884 • Slide 17
Selecting Elements Cont.
• Recent versions of popular browsers (such as IE 8, Firefox 3.1, and so on)
have implemented two methods to use this same CSS styled selection.
• document.querySelector( “selector” ) for a single element, and
document.querySelectorAll( “selector” ) for multiple elements.
• jQuery, however, provides this functionality with older browser versions as well.
• In addition to being bundled with the core jQuery API, the “jQuery Project” offers
this selector API as a stand-alone library, called “Sizzle” - http://sizzlejs.com/

OxygenBlast - Understanding jQuery
Copyright © Intertech, Inc. 2009 • www.Intertech.com • 800-866-9884 • Slide 18
Selecting Elements Cont.
• As shown in the preceding example, a selector may match a set of
elements.
• Each element is given an index, starting with the number 0.
• A subset of the total elements matched can be accessed through a special
selector. This process is known as “filtering.”
Selector (Filtering) Definition
:eq( index ) Select the nth element in the set.
:first Select the first element in the set.
:last Select the last element in the set.
:lt( index ) Select all of the elements in the set that are before the index specified.
:gt( index ) Select all of the elements in the set that are after the index specified.
:even Select all of the elements in the set with even indices (0, 2, 4, 6...).
:odd Select all of the elements in the set with odd indices (1, 3, 5, 7...).
:not( selector ) Select all of the elements in the set that do not match the selector specified here.
:contains( text ) Select all of the elements in the set that contains the case sensitive text specified here.

OxygenBlast - Understanding jQuery
Copyright © Intertech, Inc. 2009 • www.Intertech.com • 800-866-9884 • Slide 19
Selecting Elements Cont.
• The css() method used in the examples below, applies style definitions to
each selected elements in the set.
• This and other rendering methods are examined in detail in a later section of
this seminar.
<body>
<div id="Number0">Number 0</div>
<div id="Number1Section">Number 1</div>
<div id="SectionNumber2">Number 2</div>
<div>This is Number 3</div>
<div>Number 4</div>
<div>Number 5</div>
<div>This is Number 6</div>
<div>Number 7</div>
</body>

OxygenBlast - Understanding jQuery
Copyright © Intertech, Inc. 2009 • www.Intertech.com • 800-866-9884 • Slide 20
Selecting Elements Cont.
• Equals:
<body>
<div id="Number0">Number 0</div>
<div id="Number1Section">Number 1</div>
<div id="SectionNumber2">Number 2</div>
<div>This is Number 3</div>
<div>Number 4</div>
<div>Number 5</div>
<div>This is Number 6</div>
<div>Number 7</div>
</body>
$("div:eq(2)").css("background-color", "red");

OxygenBlast - Understanding jQuery
Copyright © Intertech, Inc. 2009 • www.Intertech.com • 800-866-9884 • Slide 21
Selecting Elements Cont.
• Greater Than:
<body>
<div id="Number0">Number 0</div>
<div id="Number1Section">Number 1</div>
<div id="SectionNumber2">Number 2</div>
<div>This is Number 3</div>
<div>Number 4</div>
<div>Number 5</div>
<div>This is Number 6</div>
<div>Number 7</div>
</body>
$("div:gt(3)").css("background-color", "red");

OxygenBlast - Understanding jQuery
Copyright © Intertech, Inc. 2009 • www.Intertech.com • 800-866-9884 • Slide 22
Selecting Elements Cont.
• Odd:
<body>
<div id="Number0">Number 0</div>
<div id="Number1Section">Number 1</div>
<div id="SectionNumber2">Number 2</div>
<div>This is Number 3</div>
<div>Number 4</div>
<div>Number 5</div>
<div>This is Number 6</div>
<div>Number 7</div>
</body>
$("div:odd").css("background-color", "red");

OxygenBlast - Understanding jQuery
Copyright © Intertech, Inc. 2009 • www.Intertech.com • 800-866-9884 • Slide 23
Selecting Elements Cont.
• Contains:
<body>
<div id="Number0">Number 0</div>
<div id="Number1Section">Number 1</div>
<div id="SectionNumber2">Number 2</div>
<div>This is Number 3</div>
<div>Number 4</div>
<div>Number 5</div>
<div>This is Number 6</div>
<div>Number 7</div>
</body>
$("div:contains(This is)").css("background-color",
"red");

OxygenBlast - Understanding jQuery
Copyright © Intertech, Inc. 2009 • www.Intertech.com • 800-866-9884 • Slide 24
Selecting Elements Cont.
• Element selection can be further refined by using an Attribute Selector
Attribute Selector Definition
element[att-name] Select all elements that match the element name and contain the attribute specified.
element[att-name = text] Select all elements that match the element name and contain the attribute specified, as long as the value of this attribute
contains the text specified.
element[att-name ^= text] Select all elements that match the element name and contain the attribute specified, as long as the value of this attribute
starts with the text specified.
element[att-name $= text] Select all elements that match the element name and contain the attribute specified, as long as the value of this attribute
ends with the text specified.
element[att-name *= text] Select all elements that match the element name and contain the attribute specified, as long as the value of this attribute
contains the text specified anywhere in the String.
element[att-name != text] Select all elements that match the element name and contain the attribute specified, as long as the value of this attribute
does not have the text specified.

OxygenBlast - Understanding jQuery
Copyright © Intertech, Inc. 2009 • www.Intertech.com • 800-866-9884 • Slide 25
Selecting Elements Cont.
• Contains a named Attribute:
<body>
<div id="Number0">Number 0</div>
<div id="Number1Section">Number 1</div>
<div id="SectionNumber2">Number 2</div>
<div>This is Number 3</div>
<div>Number 4</div>
<div>Number 5</div>
<div>This is Number 6</div>
<div>Number 7</div>
</body>
$("div[id]").css("background-color", "red");
OxygenBlast - Understanding jQuery
Copyright © Intertech, Inc. 2009 • www.Intertech.com • 800-866-9884 • Slide 26
Selecting Elements Cont.
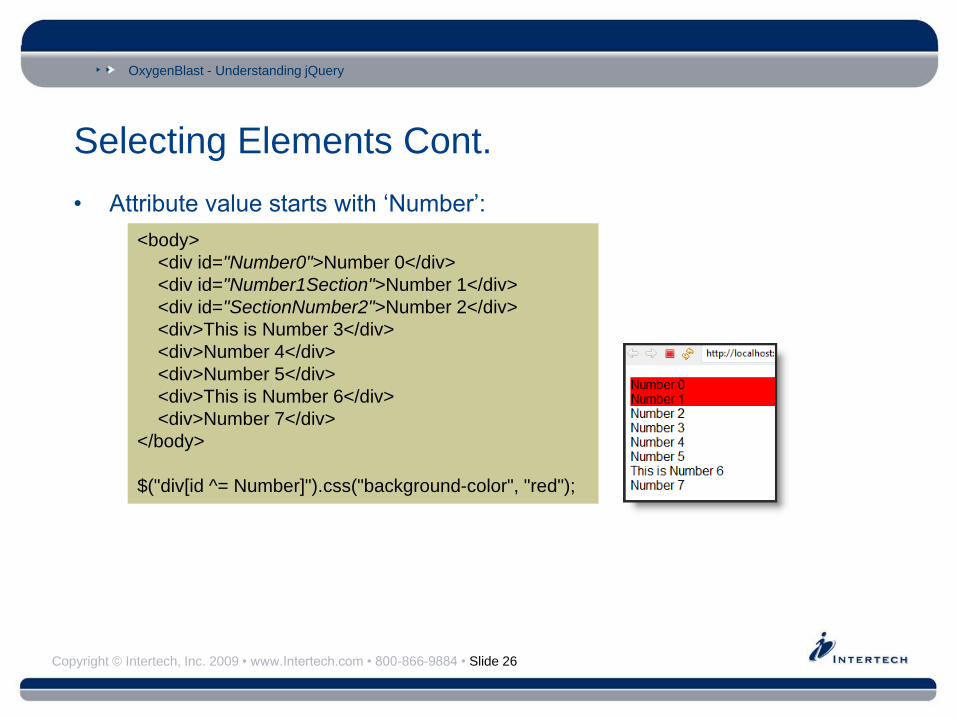
• Attribute value starts with ‘Number’:
<body>
<div id="Number0">Number 0</div>
<div id="Number1Section">Number 1</div>
<div id="SectionNumber2">Number 2</div>
<div>This is Number 3</div>
<div>Number 4</div>
<div>Number 5</div>
<div>This is Number 6</div>
<div>Number 7</div>
</body>
$("div[id ^= Number]").css("background-color", "red");

OxygenBlast - Understanding jQuery
Copyright © Intertech, Inc. 2009 • www.Intertech.com • 800-866-9884 • Slide 27
Selecting Elements Cont.
• Attribute value contains ‘Section’:
<body>
<div id="Number0">Number 0</div>
<div id="Number1Section">Number 1</div>
<div id="SectionNumber2">Number 2</div>
<div>This is Number 3</div>
<div>Number 4</div>
<div>Number 5</div>
<div>This is Number 6</div>
<div>Number 7</div>
</body>
$("div[id *= Section]").css("background-color", "red");
OxygenBlast - Understanding jQuery
Copyright © Intertech, Inc. 2009 • www.Intertech.com • 800-866-9884 • Slide 28
Selecting Elements Cont.
• Besides offering a rich and compact selector API, jQuery reduces the
amount of code necessary by providing “Implicit Iteration.”
• Any method that is called upon a selection with multiple elements has that
method called upon all of the elements in the set.
• Therefore, there is no need to write code for looping; the framework executes
the iteration for you.
• A traditional JavaScript example:

OxygenBlast - Understanding jQuery
Copyright © Intertech, Inc. 2009 • www.Intertech.com • 800-866-9884 • Slide 29
Selecting Elements Cont.
• jQuery reduces the previous block of code to one short line:
var employeeArray =
document.getElementById("employeeSearch").childNodes;
for( i = 0; i < employeeArray.length; i++ )
{
if( employeeArray.item(i).nodeName == “div” &&
employeeArray.item(i).hasAttribute("id") )
{
if( employeeArray.item(i).getAttribute("id") != "number3" )
{
employeeArray.item( i ).style.color = "blue";
}
}
}
$( "div#employeeSearch div:not(#number3)" ).css( "color", "blue" );

OxygenBlast - Understanding jQuery
Copyright © Intertech, Inc. 2009 • www.Intertech.com • 800-866-9884 • Slide 30
Ajax Utilities
• jQuery’s Ajax utilities greatly reduce the amount of code that needs to be
written.
• jQuery’s methods for retrieving data and handing events facilitate organization
as well as reduce the amount of code that needs to be written.
OxygenBlast - Understanding jQuery
Copyright © Intertech, Inc. 2009 • www.Intertech.com • 800-866-9884 • Slide 31
Ajax Utilities Cont.
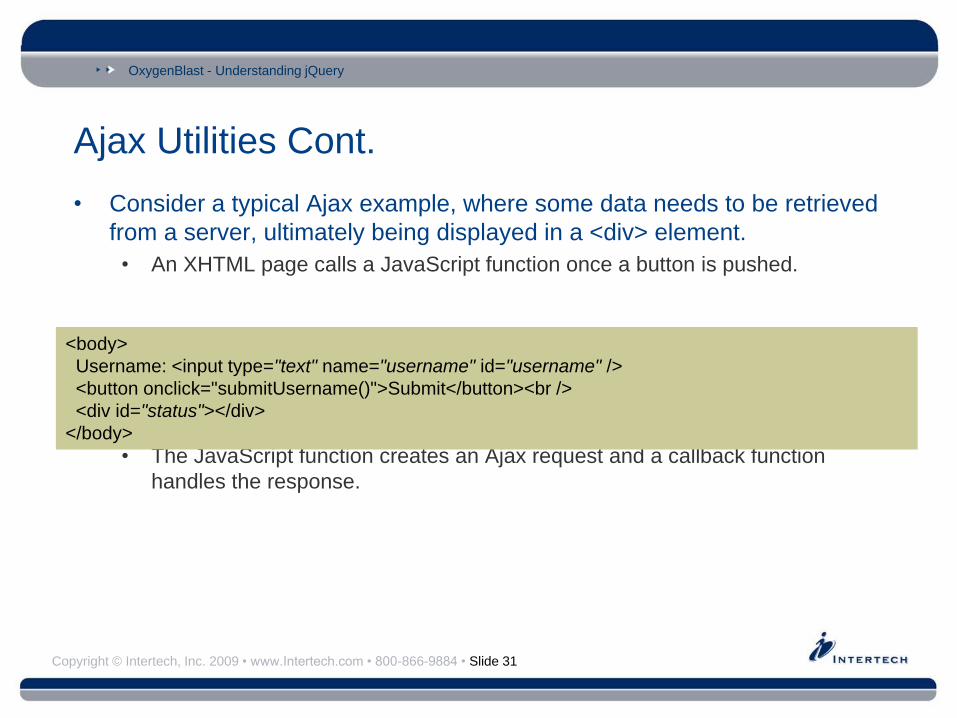
• Consider a typical Ajax example, where some data needs to be retrieved
from a server, ultimately being displayed in a <div> element.
• An XHTML page calls a JavaScript function once a button is pushed.
• The JavaScript function creates an Ajax request and a callback function
handles the response.
<body>
Username: <input type="text" name="username" id="username" />
<button onclick="submitUsername()">Submit</button><br />
<div id="status"></div>
</body>

OxygenBlast - Understanding jQuery
Copyright © Intertech, Inc. 2009 • www.Intertech.com • 800-866-9884 • Slide 32
Ajax Utilities Cont.
function submitUsername()
{
var username = document.getElementById( "username" ).value;
var url = "StatusVerifier?username=" + escape( username );
var httpMethod = "GET";
var isAsynchronousRequest = true;
var req = getXMLHttpRequest();
req.open( httpMethod, url, isAsynchronousRequest );
req.onreadystatechange = function() { displayStatus( req ) };
req.send( null );
}
function displayStatus(req)
{
if( req.readyState == 4 && req.status == 200 )
{
var statusElement = document.getElementById( "status" );
statusElement.innerHTML = req.responseText;
}
}
function getXMLHttpRequest() { // Custom method to create a browser specific request. }
OxygenBlast - Understanding jQuery
Copyright © Intertech, Inc. 2009 • www.Intertech.com • 800-866-9884 • Slide 33
Ajax Utilities Cont.
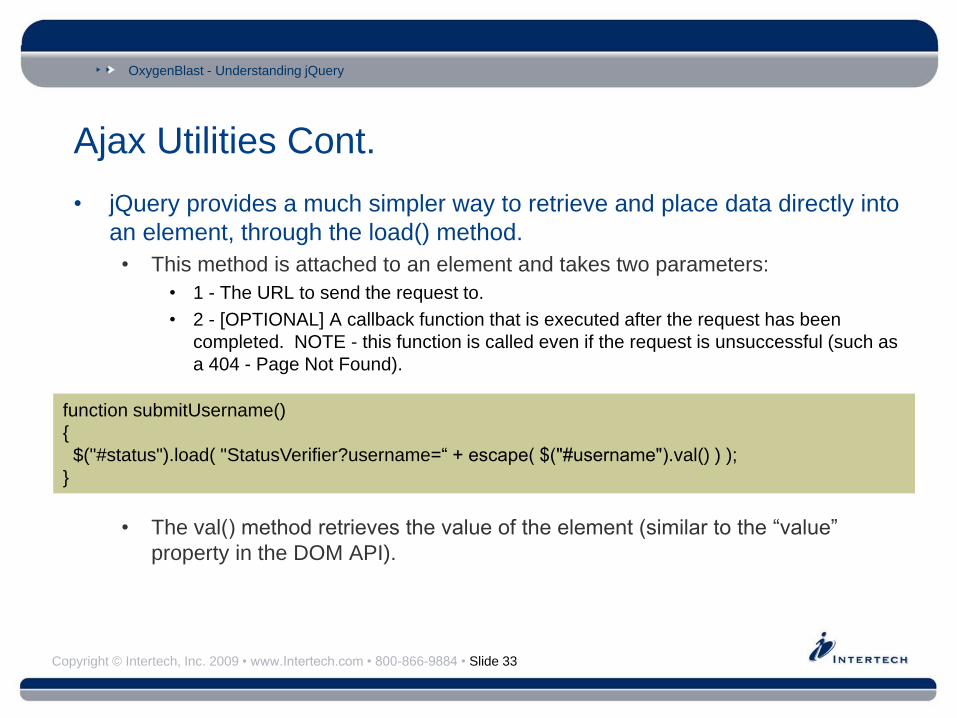
• jQuery provides a much simpler way to retrieve and place data directly into
an element, through the load() method.
• This method is attached to an element and takes two parameters:
• 1 - The URL to send the request to.
• 2 - [OPTIONAL] A callback function that is executed after the request has been
completed. NOTE - this function is called even if the request is unsuccessful (such as
a 404 - Page Not Found).
• The val() method retrieves the value of the element (similar to the “value”
property in the DOM API).
function submitUsername()
{
$("#status").load( "StatusVerifier?username=“ + escape( $("#username").val() ) );
}
OxygenBlast - Understanding jQuery
Copyright © Intertech, Inc. 2009 • www.Intertech.com • 800-866-9884 • Slide 34
Ajax Utilities Cont.
• When using load(), there is no need to create a browser specific
XMLHttpRequest, check the readyState, the HTTP status, nor provide a
callback function.
• This is another example of jQuery staying true to its motto: “Write Less, Do
More.”
• In the “event handler” section of this seminar, a better way to attach handlers to
elements is explored.
• For more complex scenarios, where a callback function needs to process
the response, there are two additional jQuery methods:
• $.get() - executes an HTTP GET request.
• $.post() - executes an HTTP POST request.
• Unlike load(), these methods are not attached to an element; a callback function
must handle any response processing and page rendering.
• Another difference between these two and load() is the callback function is NOT
executed if the request is unsuccessful (such as a 404 error).

OxygenBlast - Understanding jQuery
Copyright © Intertech, Inc. 2009 • www.Intertech.com • 800-866-9884 • Slide 35
DOM Creation and Manipulation
• A typical DOM API scenario for adding a set of new elements to a Web
page, required several steps:
• 1 - Create each node needed (elements, text, attributes, and so on).
• 2 - Assemble the nodes into a tree structure
• 3 - Add the parent node to an existing element on the Web page
// Steps 1 & 2
<script>
var greetingDiv = document.createElement("div");
var strongElm = document.createElement("strong");
var greetingText = document.createTextNode("Hellooooooo!");
strongElm.appendChild( greetingText );
greetingDiv.appendChild( strongElm );
</script>

OxygenBlast - Understanding jQuery
Copyright © Intertech, Inc. 2009 • www.Intertech.com • 800-866-9884 • Slide 36
DOM Creation and Manipulation
• jQuery simplifies by this by providing a syntax to create all of the nodes in
the tree at the same time:
$('<div><strong>Hellooooooo!</strong></div>');
OxygenBlast - Understanding jQuery
Copyright © Intertech, Inc. 2009 • www.Intertech.com • 800-866-9884 • Slide 37
DOM Creation and Manipulation Cont.
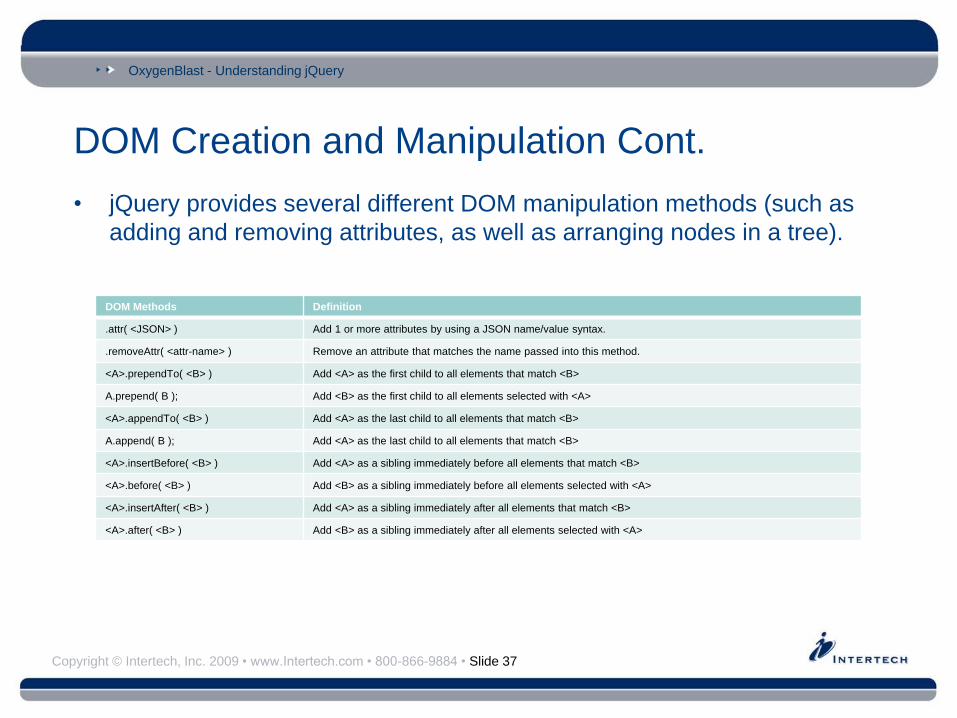
• jQuery provides several different DOM manipulation methods (such as
adding and removing attributes, as well as arranging nodes in a tree).
DOM Methods Definition
.attr( <JSON> ) Add 1 or more attributes by using a JSON name/value syntax.
.removeAttr( <attr-name> ) Remove an attribute that matches the name passed into this method.
<A>.prependTo( <B> ) Add <A> as the first child to all elements that match <B>
A.prepend( B ); Add <B> as the first child to all elements selected with <A>
<A>.appendTo( <B> ) Add <A> as the last child to all elements that match <B>
A.append( B ); Add <A> as the last child to all elements that match <B>
<A>.insertBefore( <B> ) Add <A> as a sibling immediately before all elements that match <B>
<A>.before( <B> ) Add <B> as a sibling immediately before all elements selected with <A>
<A>.insertAfter( <B> ) Add <A> as a sibling immediately after all elements that match <B>
<A>.after( <B> ) Add <B> as a sibling immediately after all elements selected with <A>
OxygenBlast - Understanding jQuery
Copyright © Intertech, Inc. 2009 • www.Intertech.com • 800-866-9884 • Slide 38
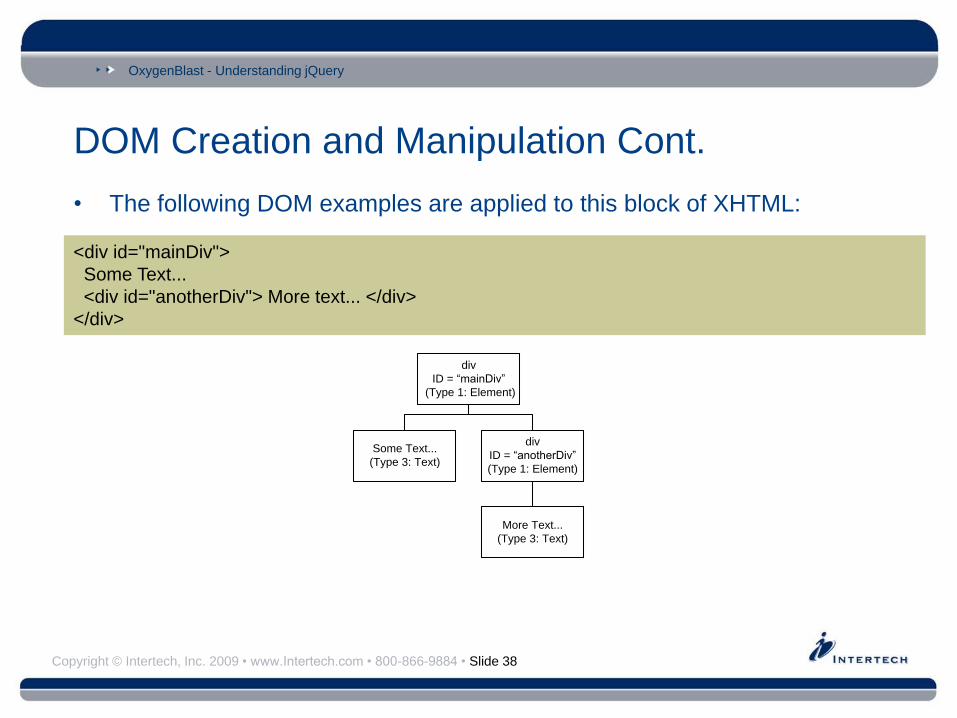
DOM Creation and Manipulation Cont.
• The following DOM examples are applied to this block of XHTML:
<div id="mainDiv">
Some Text...
<div id="anotherDiv"> More text... </div>
</div>
div
ID = “mainDiv”
(Type 1: Element)
div
ID = “anotherDiv”
(Type 1: Element)
More Text...
(Type 3: Text)
Some Text...
(Type 3: Text)
OxygenBlast - Understanding jQuery
Copyright © Intertech, Inc. 2009 • www.Intertech.com • 800-866-9884 • Slide 39
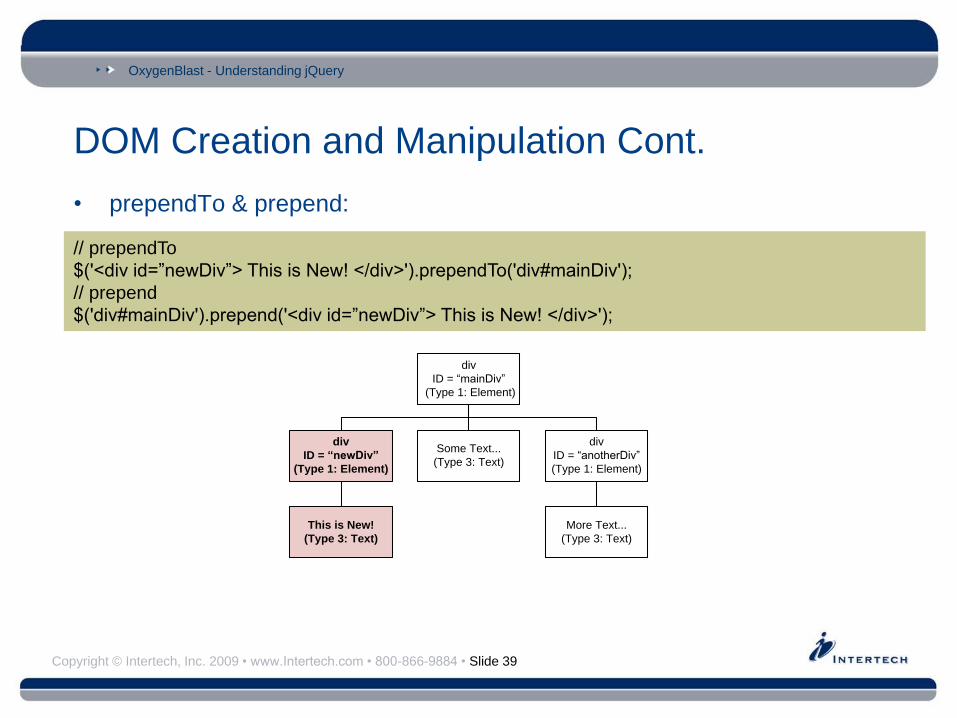
DOM Creation and Manipulation Cont.
• prependTo & prepend:
// prependTo
$('<div id=”newDiv”> This is New! </div>').prependTo('div#mainDiv');
// prepend
$('div#mainDiv').prepend('<div id=”newDiv”> This is New! </div>');
div
ID = “mainDiv”
(Type 1: Element)
div
ID = “anotherDiv”
(Type 1: Element)
More Text...
(Type 3: Text)
Some Text...
(Type 3: Text)
This is New!
(Type 3: Text)
div
ID = “newDiv”
(Type 1: Element)

OxygenBlast - Understanding jQuery
Copyright © Intertech, Inc. 2009 • www.Intertech.com • 800-866-9884 • Slide 40
DOM Creation and Manipulation Cont.
• appendTo & append:
// appendTo
$('<div id=”newDiv”> This is New! </div>').appendTo('div#mainDiv');
// append
$('div#mainDiv').append('<div id=”newDiv”> This is New! </div>');
div
ID = “mainDiv”
(Type 1: Element)
div
ID = “anotherDiv”
(Type 1: Element)
More Text...
(Type 3: Text)
Some Text...
(Type 3: Text)
This is New!
(Type 3: Text)
div
ID = “newDiv”
(Type 1: Element)
OxygenBlast - Understanding jQuery
Copyright © Intertech, Inc. 2009 • www.Intertech.com • 800-866-9884 • Slide 41
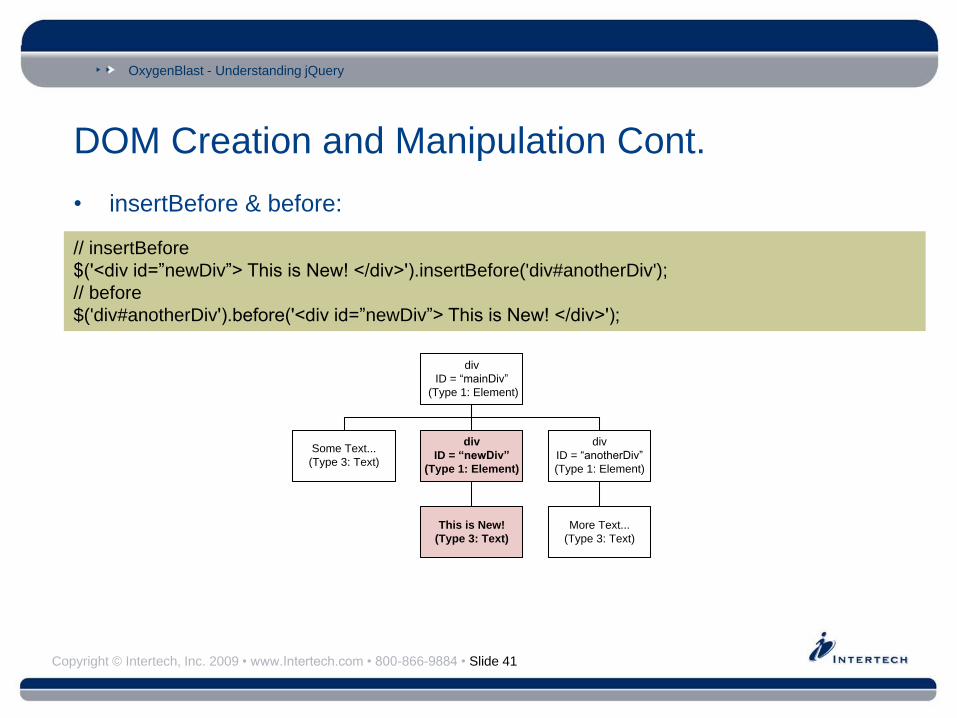
DOM Creation and Manipulation Cont.
• insertBefore & before:
// insertBefore
$('<div id=”newDiv”> This is New! </div>').insertBefore('div#anotherDiv');
// before
$('div#anotherDiv').before('<div id=”newDiv”> This is New! </div>');
div
ID = “mainDiv”
(Type 1: Element)
div
ID = “anotherDiv”
(Type 1: Element)
More Text...
(Type 3: Text)
Some Text...
(Type 3: Text)
This is New!
(Type 3: Text)
div
ID = “newDiv”
(Type 1: Element)

OxygenBlast - Understanding jQuery
Copyright © Intertech, Inc. 2009 • www.Intertech.com • 800-866-9884 • Slide 42
Event Handling
• Event handlers are programmatically added to elements in two different
ways.
• 1 - Set an event handler property on an HTMLElement object.
• While this is cross-browser compliant, it only allows a single event handler per event
type.
• 2 - Use browser specific methods to attach an event handler to an
HTMLElement object.
• This allows multiple handlers to be attached to a single event type, but your code must
branch for each supported browser.
document.getElementById(“StockButton”).onclick = loadNewStockQuote;

OxygenBlast - Understanding jQuery
Copyright © Intertech, Inc. 2009 • www.Intertech.com • 800-866-9884 • Slide 43
Event Handling Cont.
// In IE: attachEvent( eventType, eventHandler );
document.getElementById(“StockButton”).attachEvent(“onclick”,
loadNewStockQuote);
document.getElementById(“StockButton”).attachEvent(“onmouseover”,
changeStockImage);
// In Mozilla: addEventListener( eventType, eventHandler,
// stopPropagation);
document.getElementById(“StockButton”).addEventListener(“click”,
loadNewStockQuote, false);
document.getElementById(“StockButton”).addEventListener(“mouseover”,
changeStockImage, false);

OxygenBlast - Understanding jQuery
Copyright © Intertech, Inc. 2009 • www.Intertech.com • 800-866-9884 • Slide 44
Event Handling Cont.
• The most basic event that concerns JavaScript developers is
“window.onload”
• Developers attach handlers to this event, for code which should only be
executed once the page has been completed loaded.
• Otherwise, if a function is called before the page is loaded, it is possible that the
elements and resources they are attempting to read or manipulate may not be
available.
// This syntax only allows one handler for the onload event.
window.onload = init;
// Multiple onload handlers for IE
window.attachEvent( "onload", init );
window.attachEvent( "onload", init2 );
// Multiple onload handlers for Mozilla
window.addEventListener( "load", init, false );
window.addEventListener( "load", init2, false );
function init() { //... }
function init2() { // ...}

OxygenBlast - Understanding jQuery
Copyright © Intertech, Inc. 2009 • www.Intertech.com • 800-866-9884 • Slide 45
Event Handling Cont.
• jQuery uses a different syntax to attach handlers to the onload event:
$("document").ready( function() { init(); anotherInit(); } );
// or
$("document").ready( function() { init(); } );
$("document").ready( function() { anotherInit(); } );

OxygenBlast - Understanding jQuery
Copyright © Intertech, Inc. 2009 • www.Intertech.com • 800-866-9884 • Slide 46
Event Handling Cont.
• jQuery provides several other methods to configure event handlers.
• Some use an identifier that match an event type (such as .click(), .focus(), and
so on).
• Like the event handler property of the HTMLElement object, these methods only allow
a single handler per event type.

OxygenBlast - Understanding jQuery
Copyright © Intertech, Inc. 2009 • www.Intertech.com • 800-866-9884 • Slide 47
Event Handling Cont.
• This syntax provides three advantages:
• 1 - The same ready() method is called for all supported browsers.
• 2 - It can be called multiple times to add as many handlers as needed.
• 3 - It is faster than window.onload.
• window.onload waits for all resources (such as external images) to be loaded, before
firing the event.
• ready() only waits for the markup and scripts to be loaded before firing the event.

OxygenBlast - Understanding jQuery
Copyright © Intertech, Inc. 2009 • www.Intertech.com • 800-866-9884 • Slide 48
Event Handling Cont.
Common Event
Handlers
Definition
.click( handler ) Configures a handler for when a mouse button is clicked.
.change( handler ) Configures a handler for when a value changes for an input element.
.submit( handler ) Configures a handler for when a form is submitted.
.focus( handler ) Configures a handler for when an element becomes “in focus.”
.blur( handler ) Configures a handler for when an element loses its focus.
.mouseover( handler ) Configures a handler for when a mouse cursor is placed over an
element.
.mouseout( handler ) Configures a handler for when a mouse cursor, which was previously
placed over an element, has now moved outside of it.
$(“#StockButton”).click( loadNewStockQuote );

OxygenBlast - Understanding jQuery
Copyright © Intertech, Inc. 2009 • www.Intertech.com • 800-866-9884 • Slide 49
Event Handling Cont.
• For adding multiple event handlers to a single event type, jQuery provides a bind()
method.
Common Event
Handlers
Definition
.bind( “type[.name]”,
handler )
Configures a handler for the event type passed in as
the first parameter. This method can be called
repeatedly on an element (or set) to add multiple
handlers.
$("#StockButton").bind( "click", loadNewStockQuote );
$("#StockButton").bind( "click", changeStockImage );

OxygenBlast - Understanding jQuery
Copyright © Intertech, Inc. 2009 • www.Intertech.com • 800-866-9884 • Slide 50
Event Handling Cont.
• In addition to permitting multiple handlers per event type, the bind() method
takes an optional identifier parameter.
• This identifier can be any name that you choose to use.
• It is attached to the event type parameter following a period (“.”), and can be
used to remove specific handlers (via the unbind() method).
• If an identifier is not used, unbind() removes all attached handlers.
• Example #1 - Without an identifier:
$("#StockButton").bind( "click", loadNewStockQuote );
$("#StockButton").bind( "click", changeStockImage );
// Removes both events
$("#StockButton").unbind( "click" );

OxygenBlast - Understanding jQuery
Copyright © Intertech, Inc. 2009 • www.Intertech.com • 800-866-9884 • Slide 51
Event Handling Cont.
• Example #2 - With an identifier:
$("#StockButton").bind( "click.load", loadNewStockQuote );
$("#StockButton").bind( "click.change", changeStockImage );
// Removes the loadNewStockQuote, but leaves
// the changeStockImage handler.
$("#StockButton").unbind( "click.load" );

OxygenBlast - Understanding jQuery
Copyright © Intertech, Inc. 2009 • www.Intertech.com • 800-866-9884 • Slide 52
Adding Styles & Effects
• Earlier examples in this seminar introduced the css() method.
• This method allows a specific style property, or a JSON map of properties, to be
set for the element(s) it is called upon.
$("#greeting").css("background-color", "red");
$("#greeting").css("color", "white");
// or
var myStyles = { "background-color" : "red", "color" : "white" }
$("#greeting").css( myStyles );
OxygenBlast - Understanding jQuery
Copyright © Intertech, Inc. 2009 • www.Intertech.com • 800-866-9884 • Slide 53
Adding Styles & Effects Cont.
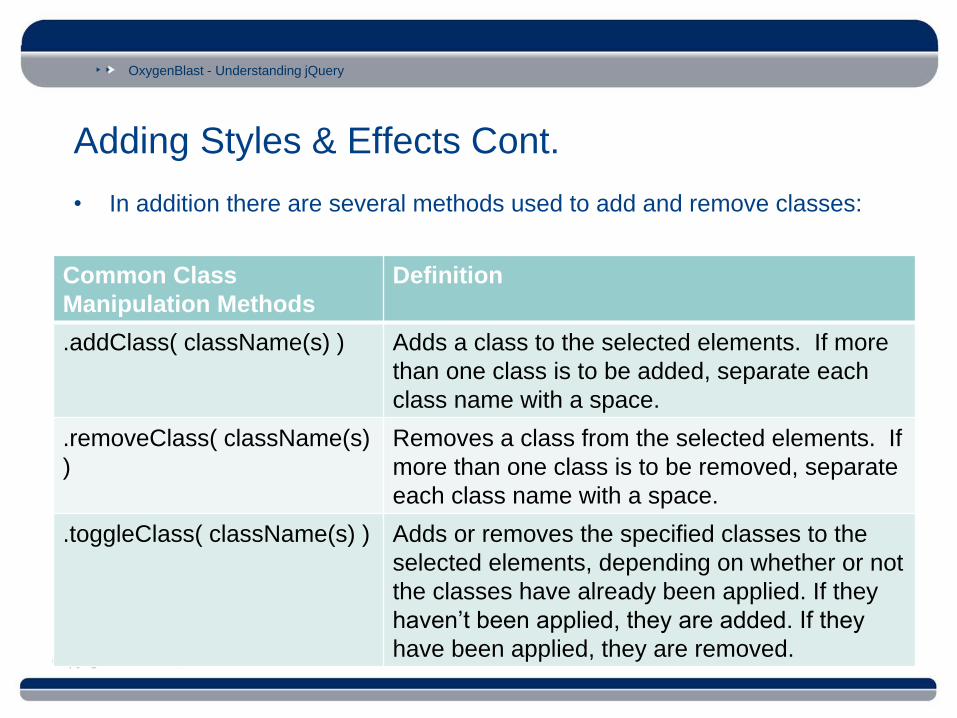
• In addition there are several methods used to add and remove classes:
Common Class
Manipulation Methods
Definition
.addClass( className(s) ) Adds a class to the selected elements. If more
than one class is to be added, separate each
class name with a space.
.removeClass( className(s)
)
Removes a class from the selected elements. If
more than one class is to be removed, separate
each class name with a space.
.toggleClass( className(s) ) Adds or removes the specified classes to the
selected elements, depending on whether or not
the classes have already been applied. If they
haven’t been applied, they are added. If they
have been applied, they are removed.

OxygenBlast - Understanding jQuery
Copyright © Intertech, Inc. 2009 • www.Intertech.com • 800-866-9884 • Slide 54
Adding Styles & Effects Cont.
• Here’s an example of using toggleClass()

OxygenBlast - Understanding jQuery
Copyright © Intertech, Inc. 2009 • www.Intertech.com • 800-866-9884 • Slide 55
Adding Styles & Effects Cont. <style>
.makeItRed { background-color: red; color: white }
.invertStyle { background-color: white; color: red }
</style>
<script language="JavaScript">
$( "document " ).ready( function() { init(); } );
function init() { $("#toggle").bind( "click.toggle", toggleStyle ); }
function toggleStyle() { $("#mainDiv").toggleClass("invertStyle"); }
</script>
...
<body>
<div id="mainDiv" class="makeItRed">Some Text</div><br />
<input id="toggle" type="button" value="ToggleStyle" / >
</body>
OxygenBlast - Understanding jQuery
Copyright © Intertech, Inc. 2009 • www.Intertech.com • 800-866-9884 • Slide 56
Adding Styles & Effects Cont.
• CSS and JavaScript are used in combination to provide different types of
effects on text, images, etc.
• For example, a Web page might feature an image sliding down or slowly
appearing into view.

OxygenBlast - Understanding jQuery
Copyright © Intertech, Inc. 2009 • www.Intertech.com • 800-866-9884 • Slide 57
Adding Styles & Effects Cont.
• jQuery provides simple utility methods for producing these common
effects.
• All of the methods below taken an optional ‘duration’ parameter, which can be
set to ‘fast’ or ‘slow.’
• There is also an optional callback parameter, which will be called once the
effect has completed.
Common Effect Methods Definition
.fadeIn( [duration], [callback] ) Fades the selected elements into view.
.fadeOut( [duration], [callback] ) Fades the selected elements out of view.
.fadeTo( duration, opacity [callback] ) Fades the selected elements to a specific opacity level (a number between 0 and 1).
.slideUp( [duration], [callback] ) Slides the selected elements up until they are no longer in view.
.slideDown( [duration], [callback] ) Slides the selected elements down until they are in complete view. This is typically used with the hide()
method.
.hide( [duration], [callback] ) Hides the selected elements. If the duration parameter is included, the elements will have their width,
height, and opacity reduced until they are no longer visible.
.show( [duration], [callback] ) Displays the selected elements. If the duration parameter is included, the elements will have their
width, height, and opacity increased until they are completely visible.
OxygenBlast - Understanding jQuery
Copyright © Intertech, Inc. 2009 • www.Intertech.com • 800-866-9884 • Slide 58
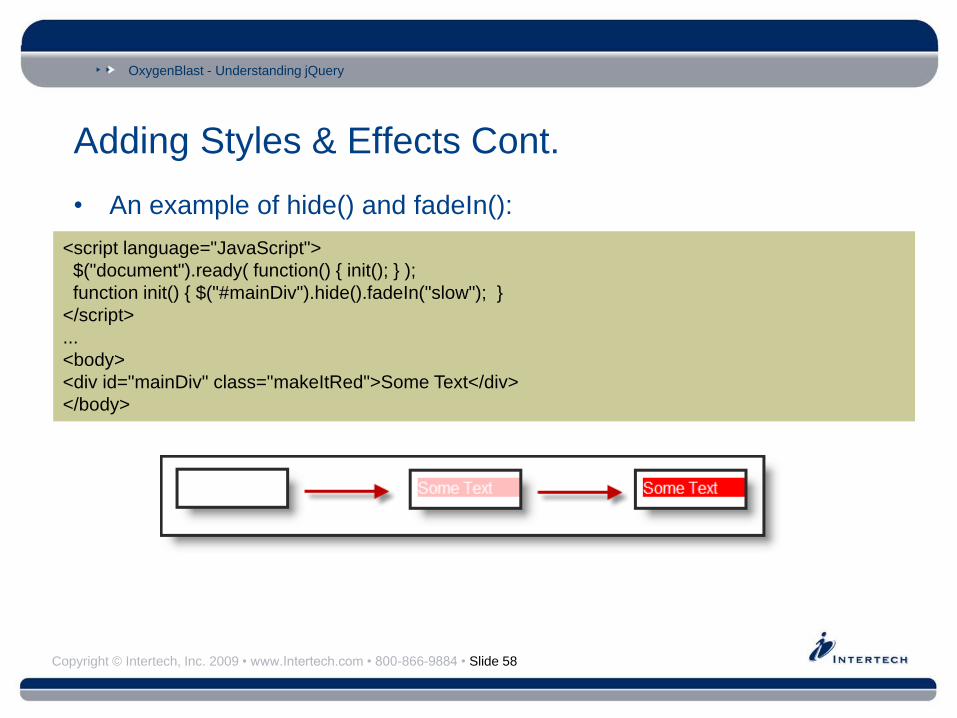
Adding Styles & Effects Cont.
• An example of hide() and fadeIn():
<script language="JavaScript">
$("document").ready( function() { init(); } );
function init() { $("#mainDiv").hide().fadeIn("slow"); }
</script>
...
<body>
<div id="mainDiv" class="makeItRed">Some Text</div>
</body>

OxygenBlast - Understanding jQuery
Copyright © Intertech, Inc. 2009 • www.Intertech.com • 800-866-9884 • Slide 59
Adding Styles & Effects Cont.
• An example of slideUp():
<script language="JavaScript">
$("document").ready( function() { init(); } );
function init() { $("#toggle").bind( "click.slide", slideUp ); }
function slideUp() { $("#mainDiv").slideUp("slow"); }
</script>
...
<body>
<div id="mainDiv" class="makeItRed">Some Text</div><br />
<input id="toggle" type="button" value="Slide Up" />
</body>
OxygenBlast - Understanding jQuery
Copyright © Intertech, Inc. 2009 • www.Intertech.com • 800-866-9884 • Slide 60
UI Library Overview
• jQuery is an extensible framework allowing third parties to create utilities
and widgets.
• One of the most popular collection of plug-ins is the jQuery UI Library
• Like the jQuery core, this is maintained by the “jQuery Project”

OxygenBlast - Understanding jQuery
Copyright © Intertech, Inc. 2009 • www.Intertech.com • 800-866-9884 • Slide 61
UI Library Overview Cont.
• The jQuery UI Library provides widgets, themes, animations, and other
effects.
• This library is not offered as part of the jQuery core and must be downloaded
separately.
• The download is found at http://jqueryui.com/
• The UI Library Web site lets you choose which resources (components, theme,
and version) you need prior to downloading.
• This creates the smallest and most efficient package while meeting the requirements
for your project.

OxygenBlast - Understanding jQuery
Copyright © Intertech, Inc. 2009 • www.Intertech.com • 800-866-9884 • Slide 62
UI Library Overview Cont.
• To find out which resources you need to include in the download, navigate
to the online documentation found at the jQuery UI Web site.
• Each widget contains an “Overview” tab, where includes a list of dependencies.

OxygenBlast - Understanding jQuery
Copyright © Intertech, Inc. 2009 • www.Intertech.com • 800-866-9884 • Slide 63
UI Library Overview Cont.
• There are four types of components available:
• UI Core - The base classes for all other UI plug-ins
• Interactions - Behaviors such as “Draggable,” Droppable,” and “Sortable.”
• Widgets - Controls such as “Tabs,” “Progressbar,” and “Datepicker”
• Effects - Animations such as “explode,” “shake,” and “highlight.”
• In addition to choosing your components, you can also select pre-defined
“themes”
• This provides a uniform look and feel to all of your components.
• There are dozens of themes to choose from, or you have the option to create
your own.
OxygenBlast - Understanding jQuery
Copyright © Intertech, Inc. 2009 • www.Intertech.com • 800-866-9884 • Slide 64
UI Library Overview Cont.
• Once your components have been selected, the jQuery UI Web site
generates a zip file.
• This contains several folders that include JavaScript Files, CSS Files, Images,
and so on.
• Unzip this file and add the contents to your Web project directory.
• Include links to the main jquery-ui CSS and JavaScript file
• If in doubt regarding which files to link to, check out the sample index.html file included
in the root directory of the zip file.
<link type="text/css“ href="css/pepper-grinder/jquery-ui-1.8.1.custom.css“ rel="stylesheet" />
<script type='text/javascript' src='jquery-1.4.2.min.js'></script>
<script type='text/javascript‘ src='js/jquery-ui-1.8.1.custom.min.js'></script>

OxygenBlast - Understanding jQuery
Copyright © Intertech, Inc. 2009 • www.Intertech.com • 800-866-9884 • Slide 65
UI Library Overview Cont.
• The code for adding UI Library components is typically very simple.
• 1 - Create an element on the page for the widget.
• 2 - Configure the element through JavaScript.
• For example, the following code adds a date picker to a web page:
<script language=“JavaScript”>
$("document").ready( function() { $("#datepicker").datepicker(); } );
</script>
...
<body>
<div id="reservationDate">
Select Reservation Date: <input id="datepicker" type="text" />
</div>
</body>

OxygenBlast - Understanding jQuery
Copyright © Intertech, Inc. 2009 • www.Intertech.com • 800-866-9884 • Slide 66
UI Library Overview Cont.
• Complete documentation and demos for the UI Library can be found at
http://jqueryui.com/demos/
OxygenBlast - Understanding jQuery
Copyright © Intertech, Inc. 2009 • www.Intertech.com • 800-866-9884 • Slide 67
jQuery Resources
• Bibeault, Bear, and Yehuda Katz. jQuery in Action, Second Edition.
Greenwich: Manning, 2010.
• "jQuery: The Write Less, Do More, JavaScript Library". jQuery. 3/12/2010
<http://www.jquery.com>.
• “jQuery User Interface”. jQuery. 3/12/2010 <http://www.jqueryui.com>.
• Keith, Jeremy. DOM Scripting: Web Design with JavaScript and the
Document Object Model. Berkeley: Apress, 2005.
• "Learning jQuery". 4/08/2010 <http://www.learningjquery.com>.
• Lindley, Cody. jQuery Cookbook: Solutions & Examples for jQuery
Developers. Sebastopol: O'Reilly, 2009.
• York, Richard. Beginning JavaScript and CSS Development with jQuery.
Wrox, 2009.

OxygenBlast - Understanding jQuery
Copyright © Intertech, Inc. 2009 • www.Intertech.com • 800-866-9884 • Slide 68
Free Learning from Intertech
• Blogs - http://www.intertech.com/Blog/
• Twitter - http://twitter.intertech.com
• Facebook – http://facebook.intertech.com
• LinkedIn – http://linkedin.intertech.com
• Twin Cities Java User Group -
http://www.intertech.com/UserGroups/JavaUserGroup.aspx
• Oxygen Blast Events - http://www.intertech.com/resource/briefings.aspx
• .NET, Java, and XML Resources -
http://www.intertech.com/resource/default.aspx