introduction - sbl interactive · introduction tutorial overview tutorial 1 outcomes: ... computer...
TRANSCRIPT

1.
Tutorial
The purpose of this tutorial is to provide you with hands-on experience in using the SBL-Interactive (SBLi®) Builder to produce a multimedia scenario.
Since the emphasis is on acquiring skills in using the software, rather than scenario creation as such, we will work with a simple problem scenario – finding out why a boy’s goldfish keep dying.
This scenario has been developed by Terry Stewart, Massey University, Palmerston North, New Zealand.
The images required to complete this SBLi® tutorial can be found in the images or icons folder on the Resource CD supplied.
This SBLi® tutorial consists of four sub-tutorials. Each sub-tutorial will demonstrate specific features of SBLi®. By the conclusion of the whole tutorial you will be able to meet the following outcomes:
Introduction
Tutorial Overview
Tutorial 1 Outcomes:
Understand the difference between the SBLi � ® Builder and SBLi® PlayerUse the properties panel �Add a new location �Edit a new location �Save the scenario �Add text to the content window �Add media (image, audio or video clip) to the content window �Add a background image �Add an item to the environment window �Edit an item in the environment window �Collect an item from the environment window �Switch between Builder and Player mode (Ctrl Tab) �
Tutorial 2 Outcomes:Load a scenario �Add new locations �Add, edit and delete actions �Add a linked page �Restate the scenario �
Tutorial 3 Outcomes:Understand the application �of prerequisitesAdd a location prerequisite �Add more content to �your scenarioAdd an action prerequisite �Review all basic features of �scenario development
Tutorial 4 Outcomes:Insert a report item �Insert a report submit button �Create a final task �Revision of all basic �SBLi® features

2.
Tutorial Session 1
At the conclusion of Tutorial Session 1 you will be able to:
Understand the difference between the SBLi® Builder and SBLi® Player �Use the properties panel �Add a new location �Edit a new location �Save the scenario �Add text to the content window �Add an image to the content window �Add a background image �Add an item to the environment window �Edit an item in the environment window �Collect an item from the environment window �Switch between Builder and Player mode (Ctrl Tab) �
Open a. SBLi® Builder. The Builder screen is divided into 4 main areas, the Location Window (top left), the Environment Window (top right), the Actions & Collections Window (bottom left) and the Content Window (bottom right). There is also a free floating window, the Properties Panel.
Click onb. File on the top menu bar and select New Scenario.
Make sure that you are in c. Builder mode by clicking on Settings and select Mode. If Builder Mode is greyed out, you are already in Builder mode; otherwise, click on Builder Mode (Ctrl Tab will toggle between modes).
If the d. Properties Panel is not visible, click on the View button on the top tool bar and click Show Properties Panel. Select the tab Scenario and in the box “Name:” in Scenario Properties, type “Goldfish” and press Enter.
Hint: The screen shot on the left displays the four windows that appear in the
SBLi® Builder. These same four windows also appear when you run the program in Player mode (the view used to “play” the scenario).
Ctril Tab will toggle between Builder and Player mode.
The Properties Panel: An important tool for scenario development is the Properties Panel which is a free floating window that should be to the right of the main
SBLi® window. Otherwise, click on “view” in the top tool bar.
Tutorial Session 1
1.1 Understanding the SBLi® interface
Location Window
Actions & Collections
Window
Environment Window
Content Window
Above: SBLi® Builder Mode with Properties Panel displayed
3.
Tutorial Session 1
Select the a. Location Tab in the Properties Panel.
As the developer of a scenario it is very important to plan out your scenario. Write down the learning objectives for your topic and plan a scenario that achieves the objectives. Sample templates can be found on your Resource CD in the folder called Helpful Documents. Now we can begin creating a scenario. The first page should list the learning objectives and acknowledge those involved.
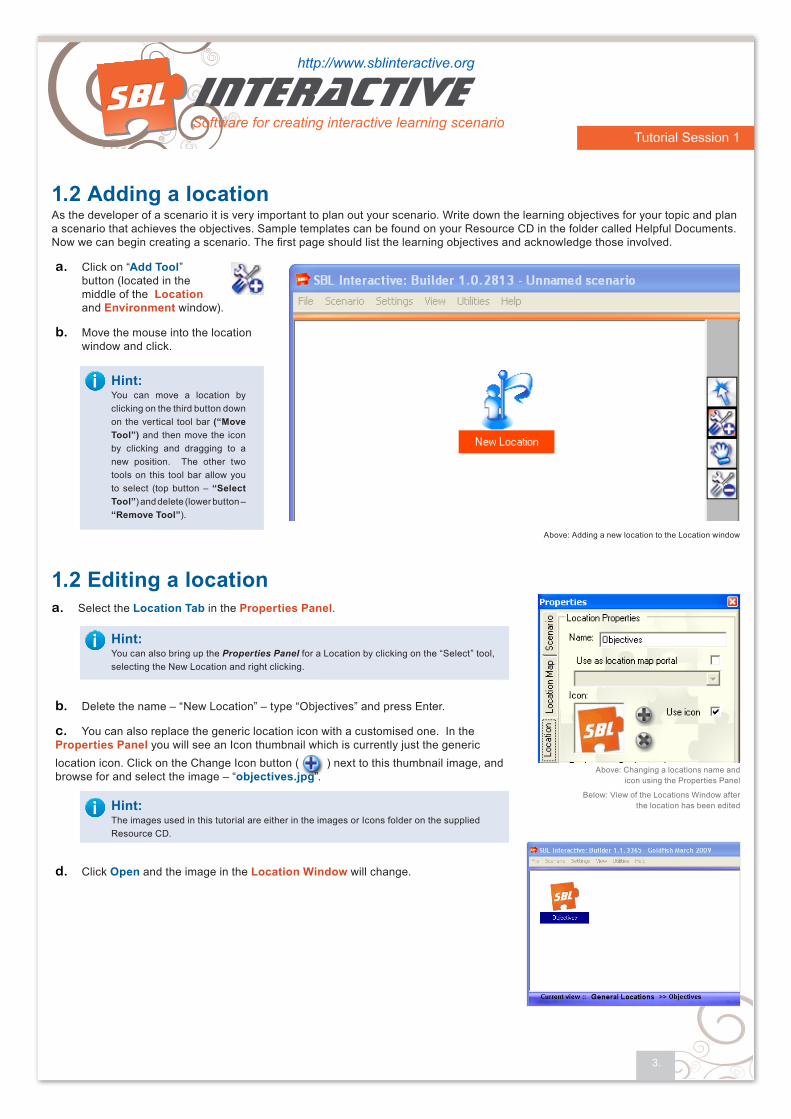
Click on “a. Add Tool” button (located in the middle of the Location and Environment window).
Move the mouse into the location b. window and click.
1.2 Adding a location
1.2 Editing a location
Hint: You can move a location by clicking on the third button down on the vertical tool bar (“Move Tool”) and then move the icon by clicking and dragging to a new position. The other two tools on this tool bar allow you to select (top button – “Select Tool”) and delete (lower button – “Remove Tool”).
Delete the name – “New Location” – type “Objectives” and press Enter. b.
You can also replace the generic location icon with a customised one. In the c. Properties Panel you will see an Icon thumbnail which is currently just the generic location icon. Click on the Change Icon button ( ) next to this thumbnail image, and browse for and select the image – “objectives.jpg”.
Hint: You can also bring up the Properties Panel for a Location by clicking on the “Select” tool, selecting the New Location and right clicking.
Click d. Open and the image in the Location Window will change.
Hint: The images used in this tutorial are either in the images or Icons folder on the supplied Resource CD.
Above: Adding a new location to the Location window
Above: Changing a locations name and icon using the Properties Panel
Below: View of the Locations Window after the location has been edited

4.
Tutorial Session 1
You can now enter textual information outling the ojectives etc.
If you look in the Content Window (bottom right) you will notice that it contains some default text. Replace this text with text in the box below.
Click on File on the top tool bar and then Save Scenario As – choose where you want to save the file, enter the name “Goldfish” and Save.
Scenario Learning Objectives: On the completion of this course you will: • understand the basics of SBLi software • be able to create and modify your own scenarios • be able to create internal scenario report modules that allow students to submit answers
Acknowledgements: Scenario developer: [your name] Subject matter adviser: [your name et al] Graphic designer: Jessica Tsai Date of completion: [Date] (this would be filled out on completion) Target audience: Teaching academics Discipline: Higher Education Learning
1.4 Saving the scenario
1.5 Adding text to the Content Window
Hint: Once you have selected where you want your scenario to be saved you can just select Save or Ctrl S and it will be saved to the same folder.
When users first encounter a scenario, they need to be provided with a brief description of the problem. In this case, the goldfish that have died belong to a boy called Alex. So we can start the scenario by going to Alex’s bedroom to see the “scene of the crime” and provide the user with a description of the problem. Therefore, we need to add a location (Alex’s bedroom) in the top left hand window.
Add another location using the add location icon . In the Properties Panel you will see an Icon thumbnail which is currently
just the generic location icon. Click on the Change Icon button ( ) next to this thumbnail image, now browse for and select the
image – “room_icon.jpg”. Don’t forget to name the location - Alex’s Bedroom.
Now once again replace the default text with the following:
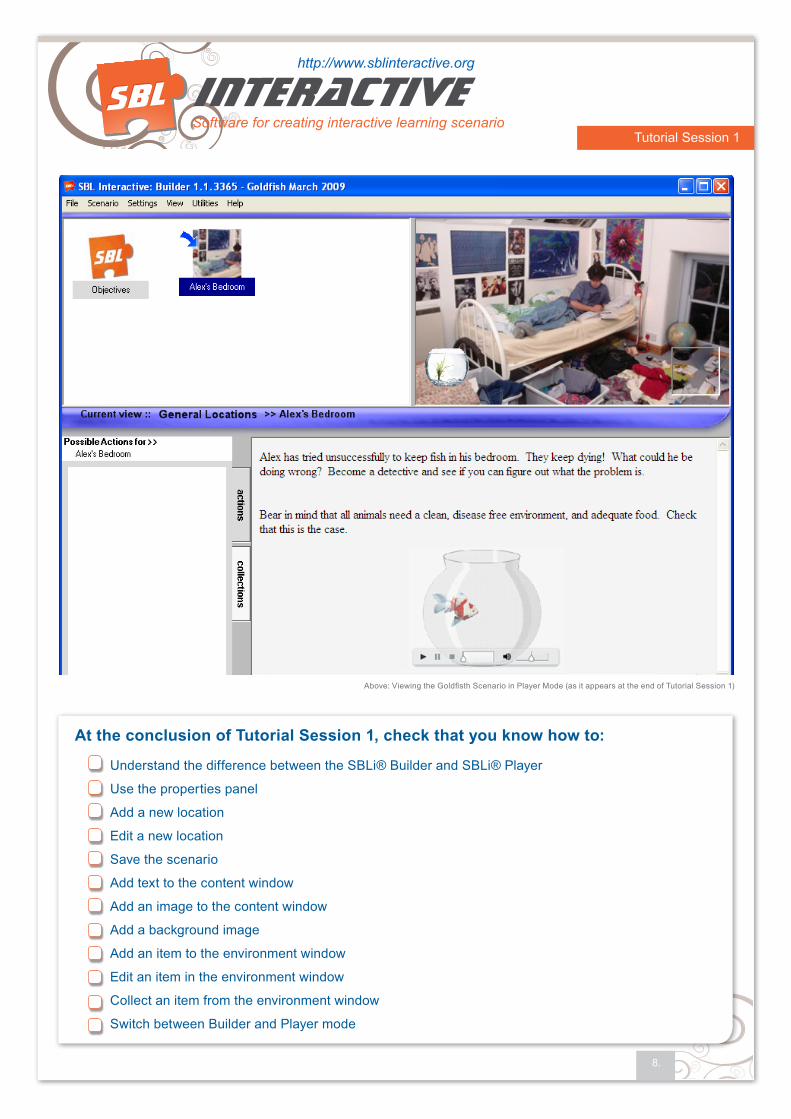
Alex has tried unsuccessfully to keep fish in his bedroom. They keep dying! What could he be doing wrong? Become a detective and see if you can figure out what the problem is.
Bear in mind that all animals need a clean, disease free environment, and adequate food. Check that this is the case.
Move your cursor around the bedroom environment to see where you can gather information. (this text will be relevant later when we add items)

5.
Tutorial Session 1
Click on the a. Insert Media button on the tool bar at the top of the Content Window.
Open from the CD video folder - b. “fish.avi” .
Use Ctrl Tab to toggle between c. builder and player mode to see how the video will appear.
Click on the d. Center Align button on the Content toolbar to centre the media in the content window.
1.6 Adding Media to the Content Window
Above: Inserting an image and text into the Content Window
Note the insert media button is used for Images, Video and Audio files. SBLi will perform the necessary encoding as long as your computer has FFmpeg. You will find this encoder along with instructions on where to save on your Resource CD in the folder FFmpeg.
Hint: If you are inserting an image you can also reduce the size of this image by clicking on it and dragging the size handles; you can also move it around by dragging the image. Insert an image from you images folder to have a try.
6.
Tutorial Session 1
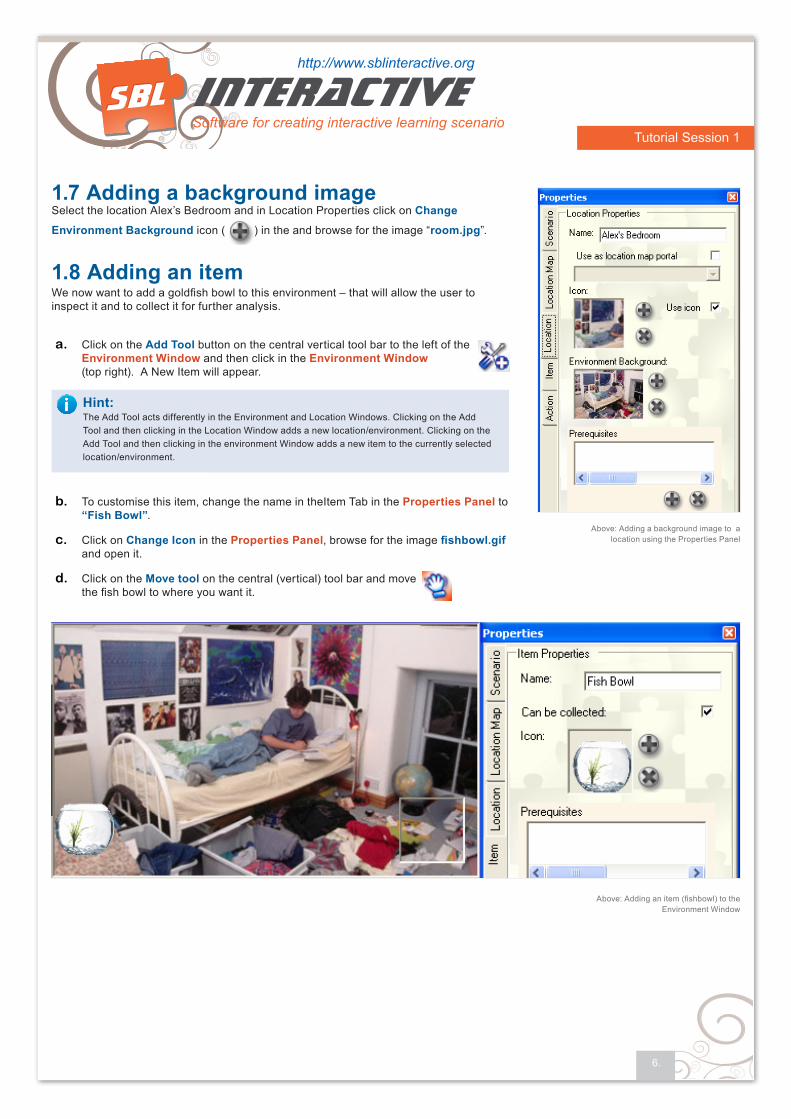
We now want to add a goldfish bowl to this environment – that will allow the user to inspect it and to collect it for further analysis.
Click on the a. Add Tool button on the central vertical tool bar to the left of the Environment Window and then click in the Environment Window (top right). A New Item will appear.
Select the location Alex’s Bedroom and in Location Properties click on Change
Environment Background icon ( ) in the and browse for the image “room.jpg”.
1.7 Adding a background image
1.8 Adding an item
Above: Adding a background image to a location using the Properties Panel
Above: Adding an item (fishbowl) to the Environment Window
To customise this item, change the name in theItem Tab in the b. Properties Panel to “Fish Bowl”.
Click on c. Change Icon in the Properties Panel, browse for the image fishbowl.gif and open it.
Click on the d. Move tool on the central (vertical) tool bar and move the fish bowl to where you want it.
Hint: The Add Tool acts differently in the Environment and Location Windows. Clicking on the Add Tool and then clicking in the Location Window adds a new location/environment. Clicking on the Add Tool and then clicking in the environment Window adds a new item to the currently selected location/environment.
7.
Tutorial Session 1
When a user inspects the fish bowl, by clicking on it, we want to provide information about the fish bowl in the Content Window.
Click on the a. Select Tool on the central tool bar, and click on the fish bowl to select it.
Notice that the b. Content Window has now reverted to the default text. The information we want to provide regarding the fish bowl is contained in the box below. Copy and paste this information into the Content Window, replacing the default text.
1.9 Editing an item
Since we want the user to be able to test the water, we want the user to be able to collect the fish bowl and take it to another location.
Use the select tool to select the fishbowl a.
Right click on the fish bowl to bring up the Item properties panel, notice there is a b. tick box “Can be collected”, under the Name box. There should be a tick in this box
since “Can be collected” is the default for all items.
1.10 Collecting an item
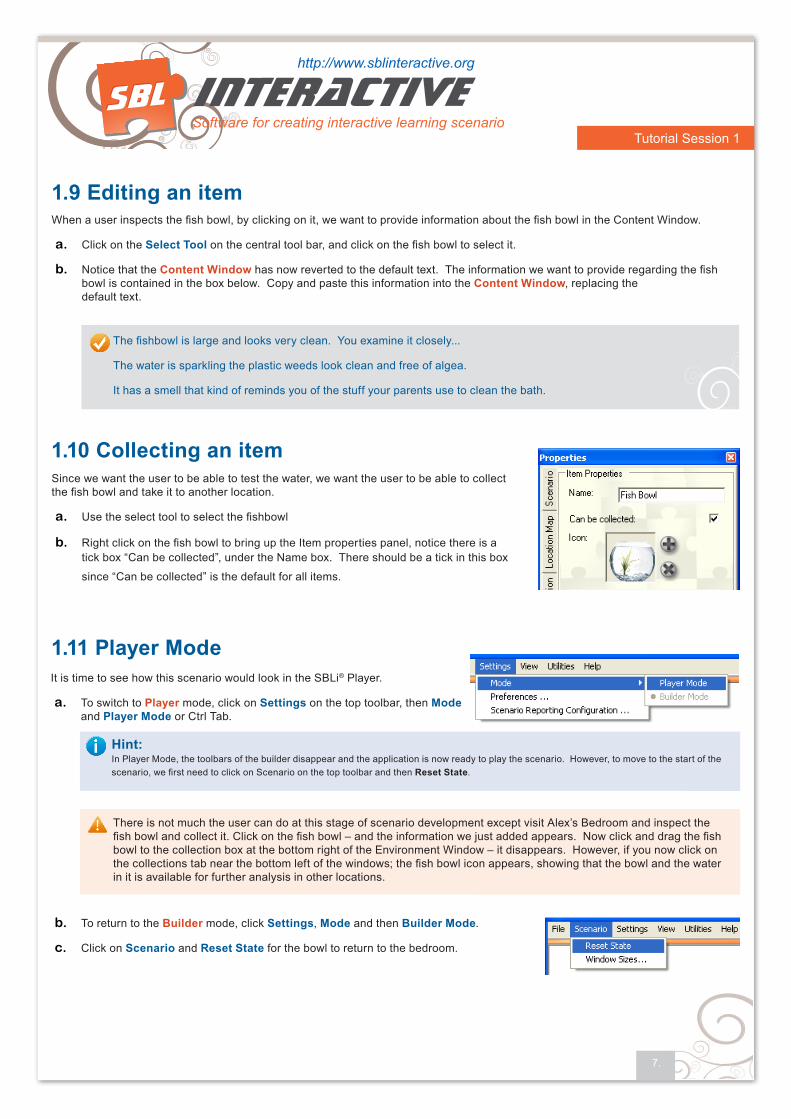
It is time to see how this scenario would look in the SBLi® Player.
To switch to a. Player mode, click on Settings on the top toolbar, then Mode and Player Mode or Ctrl Tab.
1.11 Player Mode
T o return to the b. Builder mode, click Settings, Mode and then Builder Mode.
Click on c. Scenario and Reset State for the bowl to return to the bedroom.
The fishbowl is large and looks very clean. You examine it closely...
The water is sparkling the plastic weeds look clean and free of algea.
It has a smell that kind of reminds you of the stuff your parents use to clean the bath.
Hint: In Player Mode, the toolbars of the builder disappear and the application is now ready to play the scenario. However, to move to the start of the scenario, we first need to click on Scenario on the top toolbar and then Reset State.
There is not much the user can do at this stage of scenario development except visit Alex’s Bedroom and inspect the fish bowl and collect it. Click on the fish bowl – and the information we just added appears. Now click and drag the fish bowl to the collection box at the bottom right of the Environment Window – it disappears. However, if you now click on the collections tab near the bottom left of the windows; the fish bowl icon appears, showing that the bowl and the water in it is available for further analysis in other locations.
8.
Tutorial Session 1
At the conclusion of Tutorial Session 1, check that you know how to:
Understand the difference between the SBLi® Builder and SBLi® Player
Use the properties panel
Add a new location
Edit a new location
Save the scenario
Add text to the content window
Add an image to the content window
Add a background image
Add an item to the environment window
Edit an item in the environment window
Collect an item from the environment window
Switch between Builder and Player mode
Above: Viewing the Goldfisth Scenario in Player Mode (as it appears at the end of Tutorial Session 1)

9.
Tutorial Session 2
By the conclusion of Tutorial Session 2 you will be able to:
Load a scenario �Add new locations �Add actions �Edit actions �Delete actions �Add a linked page �Restate the scenario �
Add these three locations in the a. Location Window (refer back to Tutorial 1 if you have forgotten how to add locations) i. Alex’s kitchen (kitchen_icon.jpg; kitchen.jpg), ii. Alex’s pool (swimpool_icon.jpg; pool.jpg ) iii. Dad’s Laboratory (laboratory_icon.jpg; laboratory.jpg).
Type in the names and change the icons and background images (to those indicated above), using the b. Properties Panel.
Tutorial Session 2
2.1 Loading a ScenarioIn Builder Mode , click on File, Load Scenario. Browse to find and open the file “Goldfish.sblib”.
2.2 Adding more locationsYou can now add some more locations and their respective icons and background images to the scenario, as we did for Alex’s bedroom.
There are three other locations that can be visited – each having an icon and a background image associated with it (shown in brackets, the icon first) - Alex’s kitchen (kitchen_icon.jpg; kitchen.jpg), Alex’s pool (pool_icon.jpg; pool.jpg ) and Alex’s Dad’s Laboratory (laboratory_icon.gif; laboratory.jpg).
Above: Adding more locations to the Goldfish Scenario

10.
Tutorial Session 2
The next step is to add an item. Even though Alex is in the original picture, for information to be attached to him about him, you need to add a separate icon.
Click on the select tool and use it to select c. Alex’s Bedroom in the Locations Window. Alex’s Bedroom should now be displayed in the Environment Window.
Click on the d. Add Tool button and click in Environment Window. A generic item icon will be added top the screen.
Using the e. Properties Panel, rename the new item “Alex” and change the icon – browse for and select “Alex_item.jpg”.
You can move this icon to superimpose the original image by clicking on the f. Move button and then moving the icon.
Since we do not want Alex to be collectable, deselect the tick next to “g. Can be collected” in the Item properties panel.
Select h. Alex using the Select Tool by clicking on the Alex icon. The default text again appears in the Content Window. Replace this default text by copying and pasting the text below.
2.3 Adding an item
2.3 Adding Actions Click on a. Add a new action in the Actions and Collections Window (bottom left). Type – “Ask about fish deaths” - and press Enter to replace the text “New Action”. If you make a mistake or want to rename an action, click on the “R” to the left of the Action. If you want to delete an action, click on the “X”
Note that when you click on the Action – Ask about fish deaths – that the b. Content Window again reverts to the default text. Copy and paste the following text into the Content Window, associated with “Ask about fish deaths”, and also add an image of a dead goldfish (dead fish.jpg), using the Insert Picture button on the Content toolbar.
Alex waits impatiently to tell you all he knows.
To ask Alex a question, click on a question in the Actions box to the left of this window
Alex says his fish just seem to slow down and then turn belly up. He washes the bowl often, but it doesn’t seem to help. He tells you he has been through six sets of fish in the last three months.
His last fish died yesterday he says unhappily.
Above: Adding the item ‘Alex’ to the environment ‘Alex’s bedroom’
Above: Adding actions to the Actions Window

11.
Tutorial Session 2
2. Ask about fly spray – Add the image – “Fly_spray.jpg”
1. Ask about cleaning the bowl - Add the image – “water.jpg”
Alex says he cleans the bowl once every two weeks.
He takes the fish out and keeps it in the hand basin filled with water. He then takes the bowl to the swimming pool and fills it up there. It’s a large bowl and hard to get under the tap you see, so it’s easier to fill in up from the pool. He cleaned the bowl three days ago.
“The water in the pool looks cleaner than water from the tap!” says Alex
You know sometime fly sprays can affect fish so you ask Alex if he ever sprays in his room.
I do sometimes, says Alex, looking embarrassed.
“Do you cover the bowl?” you ask.
Errr... no, says Alex.
Left: Adding content and images to the Content Window for the action “Ask about fish deaths’
There are two other questions that Alex can be asked – he can be asked about cleaning the bowl and asked about fly spray. Using the same procedure as above, add the questions, copy and paste the text answer in the Content window and add the respective images.
12.
Tutorial Session 2
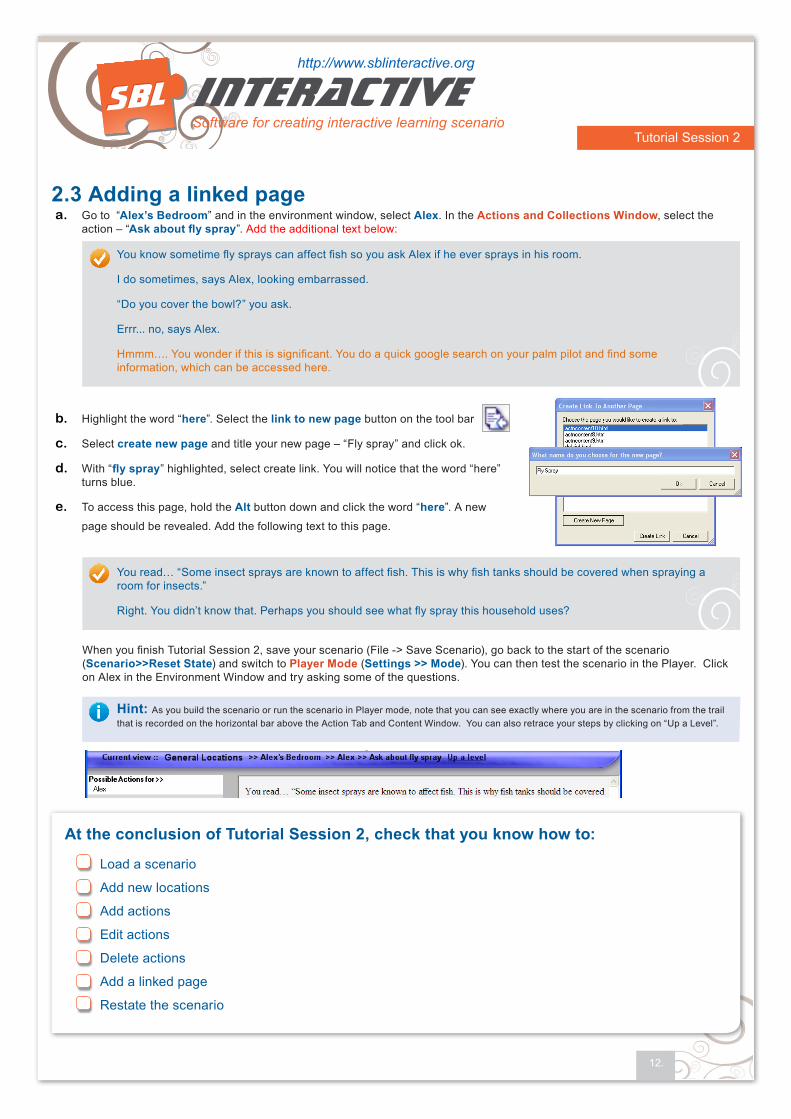
2.3 Adding a linked page Go to “a. Alex’s Bedroom” and in the environment window, select Alex. In the Actions and Collections Window, select the action – “Ask about fly spray”. Add the additional text below:
Highlight the word “b. here”. Select the link to new page button on the tool bar
Select c. create new page and title your new page – “Fly spray” and click ok.
With “d. fly spray” highlighted, select create link. You will notice that the word “here” turns blue.
To access this page, hold the e. Alt button down and click the word “here”. A new
page should be revealed. Add the following text to this page.
Hint: As you build the scenario or run the scenario in Player mode, note that you can see exactly where you are in the scenario from the trail that is recorded on the horizontal bar above the Action Tab and Content Window. You can also retrace your steps by clicking on “Up a Level”.
When you finish Tutorial Session 2, save your scenario (File -> Save Scenario), go back to the start of the scenario (Scenario>>Reset State) and switch to Player Mode (Settings >> Mode). You can then test the scenario in the Player. Click on Alex in the Environment Window and try asking some of the questions.
At the conclusion of Tutorial Session 2, check that you know how to:
Load a scenario
Add new locations
Add actions
Edit actions
Delete actions
Add a linked page
Restate the scenario
You know sometime fly sprays can affect fish so you ask Alex if he ever sprays in his room.
I do sometimes, says Alex, looking embarrassed.
“Do you cover the bowl?” you ask.
Errr... no, says Alex.
Hmmm…. You wonder if this is significant. You do a quick google search on your palm pilot and find some information, which can be accessed here.
You read… “Some insect sprays are known to affect fish. This is why fish tanks should be covered when spraying a room for insects.”
Right. You didn’t know that. Perhaps you should see what fly spray this household uses?

13.
Tutorial Session 3
By the conclusion of Tutorial Session 3 you will be able to:
Understand the application of prerequisites �Add a location prerequisite �Add more content to your scenario �Add an action prerequisite �Review all basic features of scenario development �
Tutorial Session 3
3.1 Adding a Location PrerequisiteIn the previous session you have seen how easy it is to setup locations, insert objects and add actions. However, in a scenario we may not want everything available everywhere, all of the time. Prerequisites involve making certain locations, actions or items available only when certain locations have been visited, actions taken, etc.
In this goldfish example, one of the clues in the scenario – that Alex fills his goldfish bowl with water from the swimming pool - is found by asking Alex about cleaning the bowl. To have the pool showing in the Location Window before asking about cleaning the bowl might give too obvious a clue. Therefore, we only want the pool to appear in the Location Window once the action – Ask about cleaning the bowl – has been taken.
Load your Goldfish scenario in a. SBLi® Builder Mode.
Click on the Alex’s pool icon in the b. Location Window. Note that the details concerning the location - pool - are now shown in the Properties Panel.
To apply the pre-requisite, click on the c. Add button below the Prerequisites box.
The d. Prerequisite Builder Panel which appears invites you to edit this sentence: “I want this location: “Alex’s pool” to be available if …”.
i. To complete the sentence, click on the down arrow button to the right of the first empty box and select “the action:”. The rest of the sentence is then completed for you. However, this is not the prerequisite we want.
ii. To edit the rest of the sentence, click on the down arrow button next to the second box and select “Ask about cleaning the bowl”. The rest of the sentence – “has been …performed” - is correct, so we can click on the Add this prerequisite button.
Hint: To test that this prerequisite works, reset the scenario (Scenario >> Reset State) and switch into Player Mode (Ctrl Tab). Note that the pool icon has disappeared from the Location Window. To test that the prerequisite works, click on the Alex icon in the Environment Window and click on Ask about cleaning the bowl in the Actions Window. The pool icon then appears in the Location window and can be visited.
Above: Adding a location prerequisite
Below: the Prerequisite Builder Panel
14.
Tutorial Session 3
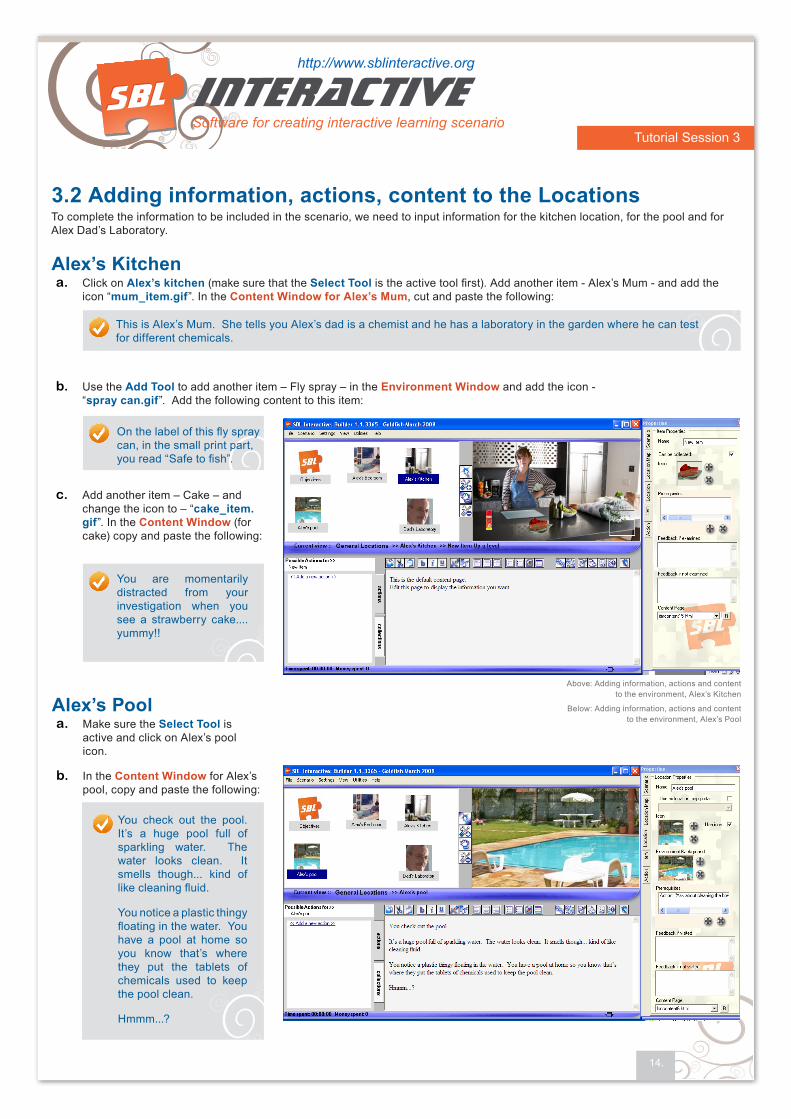
3.2 Adding information, actions, content to the LocationsTo complete the information to be included in the scenario, we need to input information for the kitchen location, for the pool and for Alex Dad’s Laboratory.
Click on a. Alex’s kitchen (make sure that the Select Tool is the active tool first). Add another item - Alex’s Mum - and add the icon “mum_item.gif”. In the Content Window for Alex’s Mum, cut and paste the following:
Alex’s Kitchen
Use the b. Add Tool to add another item – Fly spray – in the Environment Window and add the icon - “spray can.gif”. Add the following content to this item:
Add another item – Cake – and c. change the icon to – “cake_item.gif”. In the Content Window (for cake) copy and paste the following:
Make sure the a. Select Tool is active and click on Alex’s pool icon.
In the b. Content Window for Alex’s pool, copy and paste the following:
Alex’s Pool
This is Alex’s Mum. She tells you Alex’s dad is a chemist and he has a laboratory in the garden where he can test for different chemicals.
On the label of this fly spray can, in the small print part, you read “Safe to fish”.
You are momentarily distracted from your investigation when you see a strawberry cake....yummy!!
You check out the pool.It’s a huge pool full of sparkling water. The water looks clean. It smells though... kind of like cleaning fluid.
You notice a plastic thingy floating in the water. You have a pool at home so you know that’s where they put the tablets of chemicals used to keep the pool clean.
Hmmm...?
Above: Adding information, actions and content to the environment, Alex’s Kitchen
Below: Adding information, actions and content to the environment, Alex’s Pool

15.
Tutorial Session 3
Alex Dad’s Laboratory - setting more location prerequisites Make sure the a. Select tool is active. Click on the icon for Alex Dad’s laboratory
Add a prerequisite to this location by clicking on the Add button ( ) below the Prerequisites box in the Properties Panel b.
The Prerequisite should read ‘I want this location: ‘Dad’s Laboratory’ to be available if the item Alex’s Mum has been c. examined’.
Hint: To check that this works, Select Player Mode and Reset the scenario – and the icon for Alex Dad’s laboratory should disappear. Now click on Alex’s kitchen and on Alex’s Mum – and Alex Dad’s laboratory icon should appear in the Location Window.
Go back to d. Builder Mode and with Alex Dad’s laboratory selected, in the Content Window – copy and paste the following text:
You wander into Alex Dad’s lab. He is mixing all kinds of weird chemicals.
Alex’s Dad certainly seems to have a good time. You wish you could do this for a job!
3.3 Building on the scenario Select the location Alex’s Dad’s Laboratory. In the Action Window click on Add a new action, type in “Ask about testing water” in a. place of New Action and press Enter.
Now click on “Ask about testing water” and the default message will appear in the Content Window. Copy and paste the b. following text in the Content Window:
You ask Alex’s Dad if he could test the water in the goldfish bowl for toxic chemicals.
“No problem” - he says - “Did you collect the bowl and bring it with you” (Remember it’s in Alex’s bedroom)
Above: Adding content to the new action ‘Ask about testing water’

16.
Tutorial Session 3
At the conclusion of Tutorial Session 3, check that you know how to:
Understand the application of prerequisites
Add a location prerequisite
Add more content to your scenario
Add an action prerequisite
Review all basic features of scenario development
You can then change to Player mode if you wish to test that this works.
3.4 Adding action prerequisitesWe now want to add another action in the laboratory about testing the water. However, we only want this action to be available if the goldfish bowl with the water in it has been collected.
Add the action – “a. Test water”.
Then click on “b. Test water” and click on the Add button under the prerequisites window.
Select the appropriate settings so that the prerequisite reads ‘I want this action c. ‘Test Water’ to be available if the item Fish Bowl as been collected’.
Top: View of the Properties Panel once a ActionPrerequisite has been added
Above: Using the Prerequisite Builder to set the action ‘Test Water’ to only be available if the fish bowl has
been collected
17.
Tutorial Session 4
By the conclusion of Tutorial Session 4 you will be able to:
Insert a report item �Insert a report submit button �Create a final task �Revision of all basic SBLi � ® features
Tutorial Session 4
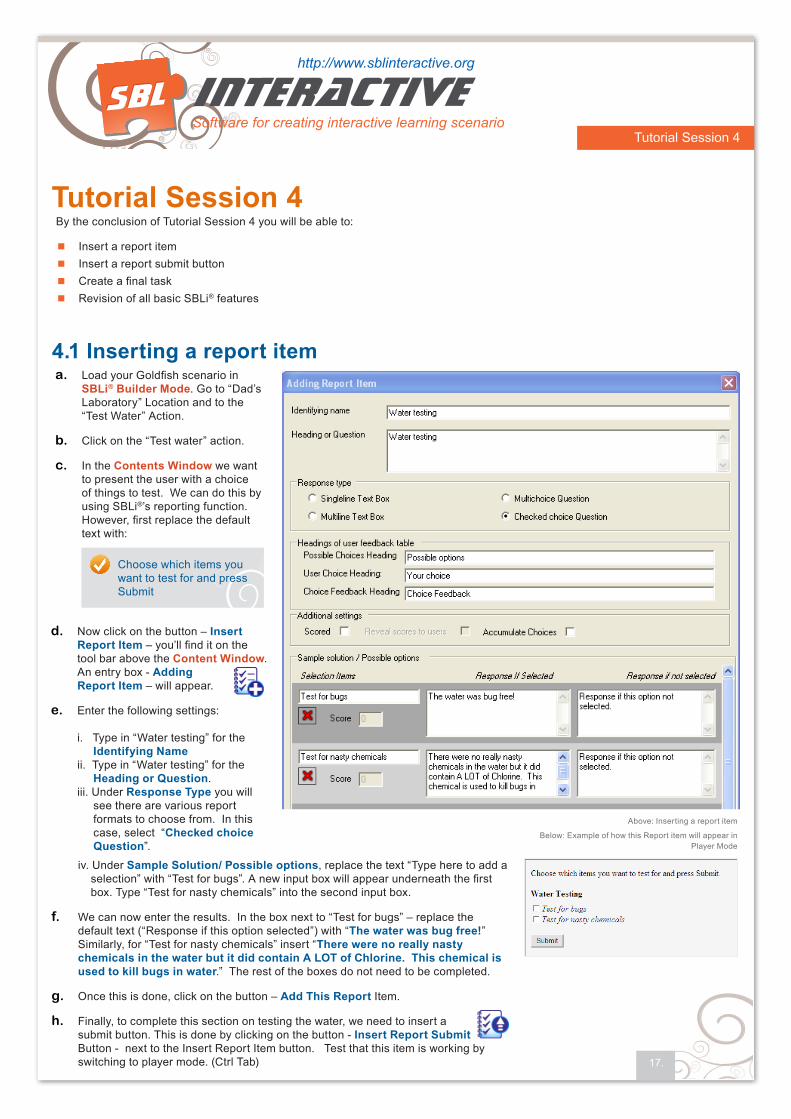
4.1 Inserting a report item Load your Goldfish scenario in a. SBLi® Builder Mode. Go to “Dad’s Laboratory” Location and to the “Test Water” Action.
Click on the “Test water” action. b.
In the c. Contents Window we want to present the user with a choice of things to test. We can do this by using SBLi®’s reporting function. However, first replace the default text with:
Now click on the button – d. Insert Report Item – you’ll find it on the tool bar above the Content Window. An entry box - Adding Report Item – will appear.
Enter the following settings: e. i. Type in “Water testing” for the Identifying Name ii. Type in “Water testing” for the Heading or Question. iii. Under Response Type you will see there are various report formats to choose from. In this case, select “Checked choice Question”.
Choose which items you want to test for and press Submit
Above: Inserting a report item
Below: Example of how this Report item will appear in Player Mode
iv. Under Sample Solution/ Possible options, replace the text “Type here to add a selection” with “Test for bugs”. A new input box will appear underneath the first box. Type “Test for nasty chemicals” into the second input box.
We can now enter the results. In the box next to “Test for bugs” – replace the f. default text (“Response if this option selected”) with “The water was bug free!” Similarly, for “Test for nasty chemicals” insert “There were no really nasty chemicals in the water but it did contain A LOT of Chlorine. This chemical is used to kill bugs in water.” The rest of the boxes do not need to be completed.
Once this is done, click on the button – g. Add This Report Item.
Finally, to complete this section on testing the water, we need to insert a h. submit button. This is done by clicking on the button - Insert Report Submit Button - next to the Insert Report Item button. Test that this item is working by switching to player mode. (Ctrl Tab)
18.
Tutorial Session 4
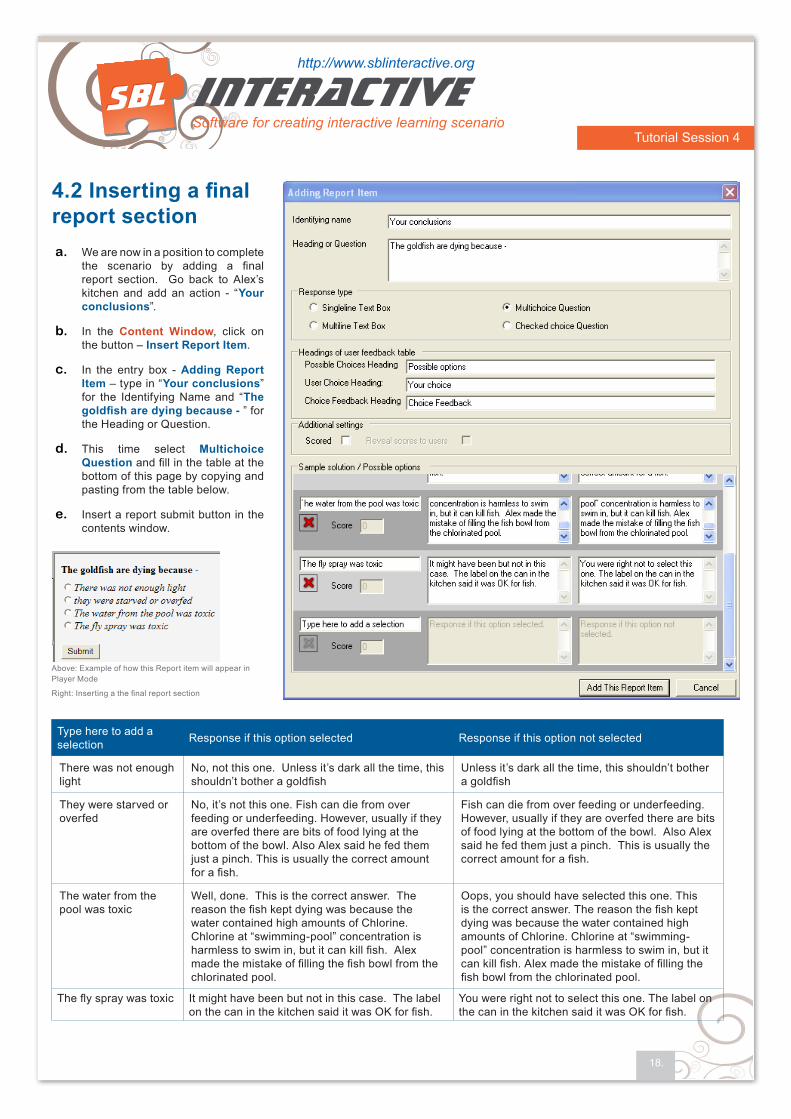
4.2 Inserting a final report section
We are now in a position to complete a. the scenario by adding a final report section. Go back to Alex’s kitchen and add an action - “Your conclusions”.
In the b. Content Window, click on the button – Insert Report Item.
In the entry box - c. Adding Report Item – type in “Your conclusions” for the Identifying Name and “The goldfish are dying because - ” for the Heading or Question.
This time select d. Multichoice Question and fill in the table at the bottom of this page by copying and pasting from the table below.
Insert a report submit button in the e. contents window.
Type here to add a selection Response if this option selected Response if this option not selected
There was not enough light
No, not this one. Unless it’s dark all the time, this shouldn’t bother a goldfish
Unless it’s dark all the time, this shouldn’t bother a goldfish
They were starved or overfed
No, it’s not this one. Fish can die from over feeding or underfeeding. However, usually if they are overfed there are bits of food lying at the bottom of the bowl. Also Alex said he fed them just a pinch. This is usually the correct amount for a fish.
Fish can die from over feeding or underfeeding. However, usually if they are overfed there are bits of food lying at the bottom of the bowl. Also Alex said he fed them just a pinch. This is usually the correct amount for a fish.
The water from the pool was toxic
Well, done. This is the correct answer. The reason the fish kept dying was because the water contained high amounts of Chlorine. Chlorine at “swimming-pool” concentration is harmless to swim in, but it can kill fish. Alex made the mistake of filling the fish bowl from the chlorinated pool.
Oops, you should have selected this one. This is the correct answer. The reason the fish kept dying was because the water contained high amounts of Chlorine. Chlorine at “swimming-pool” concentration is harmless to swim in, but it can kill fish. Alex made the mistake of filling the fish bowl from the chlorinated pool.
The fly spray was toxic It might have been but not in this case. The label on the can in the kitchen said it was OK for fish.
You were right not to select this one. The label on the can in the kitchen said it was OK for fish.
Above: Example of how this Report item will appear in Player Mode
Right: Inserting a the final report section

19.
Tutorial Session 4
4.3 Adding a final taskIn many cases you may wish the scenario to be disabled once this conclusions section has been reached.
This can be done by going to the Properties window while you are still within the action – “Your conclusions”, and ticking the box next to - “Is a final task”
Once you have done this, switch to Player Mode and try it out. Note that once you have completed the “Your Conclusions” action, a message appears in the centre bar – “The scenario has ended, because you completed the final task”.
At the conclusion of Tutorial Session 4, check that you know how to:
Insert a report item
Insert a report submit button
Create a final task
Revision of all basic SBLi® features