introduction - itp.ieitp.ie/img/cms/decking-brochure-2015.pdf · larch decking from itp is machine...
TRANSCRIPT


Introduction
ITPs larch decking can do wonders for your backyard.
It’s a very attractive way to extend our outdoor living and entertaining areas, as a flooring for your
pergola, patio, gazebo or veranda.
You can also use ITPs larch decking as a landscape feature in your garden by creating a sun deck or
walkways.
ITPs larch decking solves the problem of landscaping a steep or undulating block because you can
extend level terraces and sun decks out over the uneven ground.
Indoors, ITPs larch decking is a practical floor around spa pools, atrium garden or indoor swimming
pools.
Larch decking is two sided with one plain and one reeded surface.
Reeded larch decking is ideal for wet areas such as pool and spa surroundings. The tiny corrugations
in the timber make the surface non-slip.
Comfortable
ITPs larch decking is comfortable to walk on.
Larch decking from ITP is machine finished and virtually splinter free.
Low maintenance
Another practical advantage is that sand, dirt and crumbs can fall between the boards for easier
cleaning.
Larch is one of the best timbers for outdoor use without the need for chemical treatment. It resists
fungus attack and will keep its good looks for years.
Doing it yourself
This brochure shows you how to design and build your own larch decking
We have used a low level deck house extension as our prime example.
Getting Started
Ask your local Council if they have any special requirements for the erection of a deck.
Appraise the site. Decide on the location and function of the deck. Keep the position of the sun in
mind and be aware of any underground cables, tanks, and drains.
Decide on the location and style of steps or handrails if these are required. Will you use the reeded
or unreeded surface?
Using your graph sheet inside the back cover of this brochure, draw a plan, elevation and section of
your deck. See the elevation example we have used on page 8.
If you have any problem with deciding on components, or simply want some advice, please call
David 087 2250151 for any advice we can offer.
What you will need While you read this section, use your Checklist at the back to mark off what you will need for your
deck.
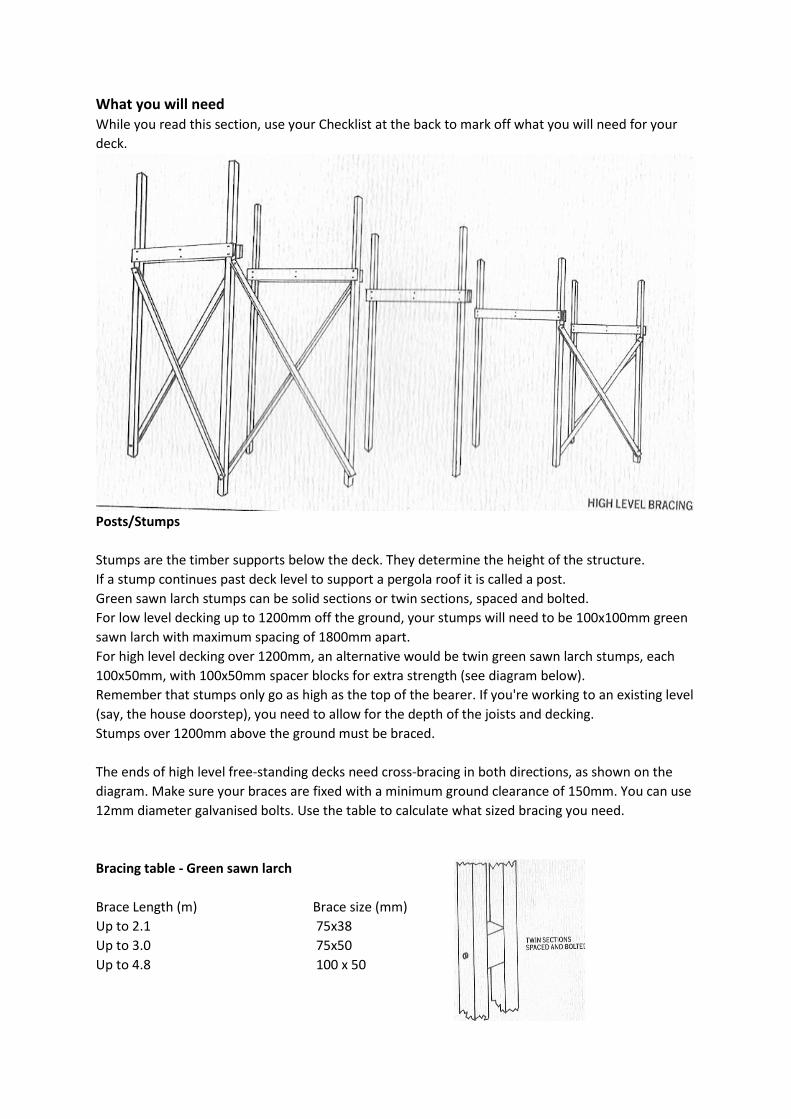
Posts/Stumps
Stumps are the timber supports below the deck. They determine the height of the structure.
If a stump continues past deck level to support a pergola roof it is called a post.
Green sawn larch stumps can be solid sections or twin sections, spaced and bolted.
For low level decking up to 1200mm off the ground, your stumps will need to be 100x100mm green
sawn larch with maximum spacing of 1800mm apart.
For high level decking over 1200mm, an alternative would be twin green sawn larch stumps, each
100x50mm, with 100x50mm spacer blocks for extra strength (see diagram below).
Remember that stumps only go as high as the top of the bearer. If you're working to an existing level
(say, the house doorstep), you need to allow for the depth of the joists and decking.
Stumps over 1200mm above the ground must be braced.
The ends of high level free-standing decks need cross-bracing in both directions, as shown on the
diagram. Make sure your braces are fixed with a minimum ground clearance of 150mm. You can use
12mm diameter galvanised bolts. Use the table to calculate what sized bracing you need.
Bracing table - Green sawn larch
Brace Length (m) Brace size (mm)
Up to 2.1 75x38
Up to 3.0 75x50
Up to 4.8 100 x 50

BEARERS
Tying the stumps together, bearers provide first level support for the joists and later the deck.
For lower level decking you can use solid bearers, fixed on top of the stumps.
In some instances, doubles bearers fixed to both sides of the post are better. This also allows the
stumps to extend further up to support guard rail, or pergola roof. (See diagram Page 7)
Spacer blocks the same width as the posts should be fixed between doubled bearers to further
strengthen them.
The table will tell you what timber sizes and maximum block spacing you should use.
Bearer Table - Green sawn larch
Bearer Spacing Span Blocking
Size (m) (m) Centres
(mm) doubled
bearers
Solid
100x75 1.2 1.8-2.2 0.75
or 1.5 1.7-2.0 0.70
Doubled
2/100x38 1.8 1.6-1.8 0.65
Doubled

2/125x38 1.2 2.3-2.8 1.0
1.5 2.1-2.5 0.95
. 1.8 2.0-2.3 0.85
2.4 1.9 0.75
Doubled
2/150x38 1.2 2.7-3.4 0.80
( 1.8 2.4-2.7 0.67
2.4 2.2-2.3 0.85
3.0 2.0-2.1 0.75
Doubled
2/200x38 1.2 3.6-4.2 1.07
1.8 3.2-3.6 0.90
2.4 2.9-3.1 0.77
3.0 2.7-2.8 1.0
3.6 2.5 0.90
Doubled
2/250x38 1.2 4.3-5.0 0.98
1.8 3.9-4.5 0.85
2.4 3.6-3.9 0.97
3.0 3.4-3.5 0.87
3.6 3.1 0.77
Joists
The joists provide close spans and directly Support
the decking.
The joist table shows timber sizes for joists used on
edge and with a single span or continuous over two
or more spans.
If you are extending the decking out beyond the
outer bearers, the cantilever should not be more
than 30% of the single span limit.

Joist table - Green sawn larch
Size Spacing Maximum span (m) Continuous span (m)
over 2 or more
100x50 450 1.8 2.1
600 1.7 2.0
125x 38 450 2.2 2.5
600 2.1 2.4
150x38 450 2.8 3.3
600 2.7 3.2
150x50 450 3.2 3.9
600 3.0 3.6
Decking
The table is a guide to maximum spans for flat decking
spaced up to 10mm apart and supported at each end and
each intermediate joist.
Decking table – Larch
Sizes Surface
Maximum
Span (mm)
I40 x 30 reeded one side
450 mm
140x45
600mm
Guardrails/Balustrade
High level decks above 915mm may require a guardrail to meet standard building regulations,
A guardrail consists of a hand rail supported by posts with horizontal rails, balusters or wire mesh
between.
Usually the maximum width of openings is 120mm and the minimum height of handrails to 865mm.
Balusters should be
175mm apart
The table shows suitable sizes for larch handrails. Other components should not be less
Than 42mm in width and 35mm in thickness,
Handrail table – Machined larch
Post spacing (m) Handrail sizes (mm)
1.8 80x40 or 125x30
3.0 175x40

Steps
You will need a larch ledger, strings, cleats, treads and extra handrail materials if handrails are
necessary. (See page 12)
Fasteners and Fixing
To avoid rust, all bolts, nails, strapping and other fasteners for decking should be hot dipped
galvanised steel.
The minimum requirements are:-
Joist Span x spacing ( maximum m2)
bolts required number and diameter
Single side Double side
2.00 2/16mm 2/10mm
2.40 2/20mm 2/10mm
2.50 2/24mm 2/10mm
2.90 2/24mm 2/12mm
3.00 3/16mm 2/12mm
3.60 2/30mm 2/16mm
4.00 3/20mm 2/16mm
4.80 3/20mm 2/20mm

Decking to joist
Decking thickness
30mm planed or sawn (mm)
Nail size 60X2.8dia
Screw size 60 x 4 dia
Joists to Bearers
Skew nailing with two 75x3.75mm each side, each joint (if there is sufficient nailing area) is required.
These joints can alternatively be made using galvanised metal brackets.
Bearers to Posts
Bolting to the face of posts in single side Joints is recommended. Through bolting to the opposite
faces of posts (i.e. with double side Joints) is the only acceptable fixing method for Spaced bearers.
Minimum bolt numbers and Diameters for these Joints are shown in table.
Building your decking Step 1.
Compacted soil provides ideal site conditions on
which to build a deck.
Deck sites need good drainage to avoid the problems
of soil erosion and footing settlement caused by
excess water in the soil. Grading the surface may
solve this for some sites, but on poorer sites rock-
filled trenches for drainage could be needed
Prepare the site by marking the position of the deck
on the ground with stakes. Check the layout is square
by making sure the diagonal dimensions are equal.
Mark the position of each post.
Check the soil level around each post and fill any
depressions to prevent water accumulation
If weeds are likely to be a problem, treat the soil with
a weedicide. (An alternative is to lay
Plastic sheeting after the posts have been set in place)
Step 2
Oak sole plates 150mm x 150mm x40mm under the
stumps provide suitable footings for decks.
Stumps must be embedded to a depth of at least
450mm or one quarter of their height, whichever is the
greater.
Another way of fixing stumps to the ground is to bolt
them to galvanized steel brackets set in concrete (see
diagram).
You need to allow 2 to 3 days for the concrete to dry
NOTE: PLUMB ALL POST CAREFULLY USING A SPIRIT
LEVEL
5.80 3/20mm 2/24mm

Steel post shoes, bolt down or drive in
Step 3.
Attach ledgers to the wall of the house at a height which
allows for the widths of beams joists and decking (or just
joists and decking). See diagram
To avoid decay, the ledger should be set out slightly from the
wall. To make a firm deck-to-house attachment, use
expansion anchors to connect the ledger to the masonry
foundation wall.
Measure stump height. For house-attached decks, start with
the stumps farthest from the house. For freestanding decks,
begin working on the stumps that support opposite edges
and corners, then do any intermediate stumps,
To check levels use string or a straight piece of lumber and a
spirit level. Use the top of the wall ledger as your reference,
If you think the deck should slope slightly for Drainage of the
surface, tilt your level marks
Downward away from the house about 2cm for
Every 3 meters.
Cut the top of the stumps in place.
Step 4.
Bearers are always placed on edge
Cut sections the width and height of your bearers out of the post
tops. If any bearers do not span the full length of the decking,
shorter Pieces can be joined on the posts. (See diagram above)
Bolt bearers in place
Joists are also placed on edge, Place joists in Position on top of
the bearers
Skew-nail joists to ledger and bearers

Step 5.
If you are adding steps, it is easier to do it before laying the decking - see section on steps.
Lay the decking square and fasten the two outside pieces of decking at opposite edges of the deck,
If the decking does not reach the full length of the deck, be sure to butt join the pieces directly over
a joist. Stagger joints so that no two line up consecutively over one joist.
Accurate spacing can be achieved by using spacers. You can use a thick nail, or cut a wooden spacer
to the right width.
The best spacing is no more than 6mm. This Aids drainage and ventilation, but doesn't allow
Small objects to slip through. Also, high-heeled shoes won’t be gripped by the cracks.
Make any spacing adjustments by slightly increasing or decreasing the distance between several
pieces to avoid having to make a large adjustment to the last one.
Nail or screw decking with two nails or screws at every joist support to prevent cupping of the deck
boards
Galvanised nails and coated screws are suitable

How to construct steps Steps can set traffic patterns, dramatize a deck
area, eliminate the need for extensive site grading
and provide additional seating.
The basic open stairway consists of two stair strings
and the treads. The supporting members are the
strings. These should be at another .5 of a meter to
allow two abreast.
Treads should be a clear width of 300mm. All risers
should be of equal height, and for comfort should
be between 150mm and 180mm. for example, if
you’re total rise height is 640mm for elderly people,
a preferred riser would be about 145mm. (See
diagram)
In correctly designed steps the clear tread width
plus twice the riser height should be not less than
585mm or more than 630mm.
Step l.
Measure overall rise, or the height of the steps.
This is the vertical distance between the decking
and the other walking surface you wish to reach.
Calculate riser height by dividing the total height by a number to give a riser height between 15O
and 180mm. For example, if you’re total rise height is 640mm:
If you divide by 3 =2J3mm each riser would be too large
If you divide by 4 =160mm each riser would be
satisfactory
Calculate clear tread width. If you use the design
equation above, then out example tread should be
585-(2x160mm) =265mm
If the maximum recommended overlap of 25mm is
added, then we would have a total width of tread
timber of 290mm
Make a template to actual size as shown and
measure the pitch length
Multiply the pitch length by the number of risers to
give the overall length of pitch line. This is the
length of the string you’ll need. Our example
required 1238mm.
You need twice the number of cleats as steps (in
our example, 6).
Fill in your requirements on the checklist at the
back of the brochure.
Our example requires:
STRINGS 2 required, about 1300mm long (pitch length x 4 steps) order 300x50mm x 1.300
TREADS 3 required, each 900mm long, order 150x50mm x 6@ 900 long
CLEATS 6 required, each 300mm approx. order 75x 50 mm x .300mm long
LEDGER order 75x5Omm x 1.5m.

Step 2
Mark out the strings. Use the template you
made to calculate the string length. Mark in
the ‘margin' line 5Omm in from the edge of
both strings.
Now mark the two strings out along the
pitch line using the template. Also mark the
upper line which indicates top vertical line of
the string, allowing for full tread width,
including overlap for the top tread. (See
diagram Page 12)
With outline of the string marked, also
locate and mark portion of the cut-out for
the ledger, as well as the cutaway to fit the
angle bracket at the foot of the steps. (See
diagram above)
Cut out strings as marked on top and
bottom.
Step 3
Cut cleats to pattern shown and fasten in position using galvanised bolts, nuts and washers
Step 4.
Fix the angle bracket at foot position of steps. With strings held in final position as a guide, the
galvanised angle bracket can be fixed to the existing patio floor or path.
If a concrete slab is required, this should be level and sufficiently wide to form another standard size
ground level tread for our example, where the
tread length is 900mm, the minimum concrete
slab would be 1200x300x100mm.
Step 5.
Cut a ledger of a length sufficient to project
about l50mm each side of the strings.
Fix ledger in place on fascia or trimmer board or
on edge of deck using three galvanised bolts,
nuts and washers or coach screws as
appropriate.
Step 6.
Fix strings to angle brackets at foot and skew
nail to ledger checking they are parallel, vertical
and at required spacing,
NOTE: Strings do not contact concrete slab.
Damp course can fixed if desired between the
concrete and the strings
Cut treads to required length

Fix treads in place, nailing through string into end of thread
and through pre-drilled holes into the cleat. Use three
galvanised nails or screws into each end of the tread and
through Tread into the cleats.
Sand or plane off all sharp corners.
How to construct balustrades
Step 1.
The components you'll need are newel posts, or corner
supports, balusters, rails and handrail
Depending on the rise height and passage width of our
steps you may need guard railing there as well.
The sturdiest post arrangement is to extend the main posts
of the decks structure right through the deck surface and
to the proper balustrade height. This is very important for
high level decks.
For lower level decks, balustrade posts can be fastened to
deck bearers or joists
All balustrading has the same basic structure – vertical posts
capped and joined by a cross member on edge.
Decide on height of your balustrade, how far away the
balusters will be, how many you'll need and whether you want any other railing,
Calculate the quantities of timber you will need and add to your shopping list on the back page.
Step 2.
Cut newel posts to the required height and fix in position on the deck, Cut
and fit rails including hand rail.
Step 3.
If using a string cap, cut cap to the length you require and fix in position
through the floor of the decking to support member with nails.
Step 4.
Measure from handrail to string cap, this is the length for
your balusters,
Trim balusters to the length required, or cut to angle if
they are part of the steps' balustrade,
Position balusters to your spacing’s in the string cap and
skew nail from either side into the string cap.
Step 5.
Make sure each baluster is vertical by using a square or
spirit level. Skew nail balusters to handrail.

Finishing touches
Decide what sort of finish you would like your deck to have. A rich colour with the grain showing
through, the natural larch colour enhanced and protected, or a solid colour to complement other
garden fittings.
COLOURED WOOD PUTTY - fills nail holes, cracks and other imperfections before staining or clear
finishing.
ACRYLIC TIMBER COLOUR - covers the grain but allows the texture to show through.
NATURAL FINISH OIL STAIN - colours the timber but allows the grain to show through.
ACRYLIC DECK FINISH - hides the grain but highlights the texture.
EXTERIOR CLEARWOOD FINISH - the grain and natural colour of the timber can show through. This is
perfect for exterior doors, handrails and panelling.
HEAVY DUTY CLEAR FLOOR FINISH - hard wearing clear finish that allows the grain and natural colour
to show through. For interior timber floors, cork tiles, cupboards, bench tops and doors.
CLEAR FLOOR FINISH – clear, hard wearing finished which allows the natural colour and grain to
show through
With and staining or painting of timber, make up a swatch with scrap pieces of timber showing the
various stages your treatment of the job has gone through. This will allow you to go back at any time
to assist in the repainting or repair of and surface.
Decking Timber Item No or Size
Length Number Of
Unit Price
Cost
Larch Sawn Posts
Larch Sawn Beams
Spacers for twin beams
Larch Sawn Joists
Larch machined decking
Nuts,Bolts,Washers for beams thru post
Nuts,Bolts,Washers for post thru footings
Nails Galvanised for Joists

Nails Galvanised or Screws for Decking
Concrete Anchor Bolts for Ledger to wall
STEPS
Larch Sawn Ledger Beam
Larch machined Strings
larch sawn Cleats
Larch machined Treads
Scrap Plywood for template
2 angle brackets to secure strings to ground
Coach screws for bracket to strings
Anchor bolt for bracket to ground
Screws to fix string , treads and cleats
Nuts ,bolts and washers for ledger thru fascia
Nuts,bolts and washers for cleats thru strings
Balustrade
Larch machined Newel Posts
Larch machined Balusters
Larch machined string capping
Larch machined Fillet
Larch machined hand rail
Screws to fix string cap to deck
Screws to fix balusters to string and hand rail
Dowels
General Hardware
Hammer
Drill and Bits
Spirit Level
Measuring tape and pencil
Builders line and cement
Mitre Square
Spanner
Chisel
Saw, shovel or spade
