intesisbox modbus tcp server...number of rtu slaves 321 intesisbox can handle up to 32 modbus slave...
TRANSCRIPT

IntesisBox® Modbus TCP Server Modbus RTU Master
User Manual
r1 eng

IntesisBox® Modbus Server – Modbus RTU Master User’s Manual r1 eng
© Intesis Software S.L. - All rights reserved This information is subject to change without notice
IntesisBox® is a registered trademark of Intesis Software SL
URL Email tel
http://www.intesis.com [email protected] +34 938047134
2 / 15
© Intesis Software S.L. 2013 All Rights Reserved.
Information in this document is subject to change without notice. The software described in
this document is furnished under a license agreement or nondisclosure agreement. The
software may be used only in accordance with the terms of those agreements. No part of
this publication may be reproduced, stored in a retrieval system or transmitted in any form
or any means electronic or mechanical, including photocopying and recording for any
purpose other than the purchaser’s personal use without the written permission of Intesis
Software S.L.
Intesis Software S.L. Milà i Fontanals, 1 bis 08700 Igualada Spain TRADEMARKS
All trademarks and trade names used in this document are acknowledged to be the
copyright of their respective holders.

IntesisBox® Modbus Server – Modbus RTU Master User’s Manual r1 eng
© Intesis Software S.L. - All rights reserved This information is subject to change without notice
IntesisBox® is a registered trademark of Intesis Software SL
URL Email tel
http://www.intesis.com [email protected] +34 938047134
3 / 15
Gateway to communicate with Modbus RTU slaves remotely using several Modbus TCP masters.
Order code:
IBOX-MBS-TCP2RTU

IntesisBox® Modbus Server – Modbus RTU Master User’s Manual r1 eng
© Intesis Software S.L. - All rights reserved This information is subject to change without notice
IntesisBox® is a registered trademark of Intesis Software SL
URL Email tel
http://www.intesis.com [email protected] +34 938047134
4 / 15
INDEX
1. Description ...................................................................................................... 5
1.1 Introduction ................................................................................................. 5
1.2 Functionality ................................................................................................. 6
1.3 Capacity of IntesisBox ................................................................................... 6
2. Modbus interfaces of IntesisBox ......................................................................... 6
2.1 Modbus TCP .................................................................................................. 6
2.2 Modbus RTU ................................................................................................. 6
3. Quick Setup ..................................................................................................... 7
4. Connection ...................................................................................................... 8
4.1 Power device ................................................................................................ 9
4.2 Connect to Modbus RTU ................................................................................. 9
4.3 Connect to Connect to Modbus TCP ................................................................. 9
4.4 Connect to PC (LinkBoxMB) .......................................................................... 10
5. LinkBoxMB. Configuration & monitoring of IntesisBox Modbus Server series .......... 11
5.1 Project configuration .................................................................................... 11
5.1.1 Connection configuration ........................................................................ 11
5.1.2 Saving the configuration ........................................................................ 13
6. Mechanical & electrical characteristics ............................................................... 14
7. Dimensions.................................................................................................... 15

IntesisBox® Modbus Server – Modbus RTU Master User’s Manual r1 eng
© Intesis Software S.L. - All rights reserved This information is subject to change without notice
IntesisBox® is a registered trademark of Intesis Software SL
URL Email tel
http://www.intesis.com [email protected] +34 938047134
5 / 15
1. Description
1.1 Introduction
Communicate with Modbus RTU slaves remotely using Modbus TCP, with the advantage of
having various Modbus TCP masters accessing the same RTU slaves simultaneously.
Transparent operation: the Modbus TCP telegrams are converted to Modbus RTU and vice-
versa transparently.
When more than one Modbus TCP master is connected, the queries of each master are
appropriately alternated, handling the waiting queues and RTU bus access.
Simple configuration: only the IP address, Net Mask, EIA232 or EIA485, baud rate, parity
and stop bits are needed. All is done using LinkBoxMB software for windows, provided with
the gateway without additional cost, quickly and easily.
The Modbus TCP port acts as a slave, the Modbus RTU port acts as a master.
Figure 1.1 Modbus Server – Up to four Master system overview
Slave
ModBus RTU EIA232/EIA485
Ethernet
Configuration Software
LinkBoxMB Only for configuration
Master
ModBus TCP
EIA232 or
Ethernet
Modbus TCP
Modbus RTU
LAN
WAN
INTERNET
Slave
ModBus RTU
Master
ModBus TCP
Master
ModBus TCP
Modbus TCP
IntesisBox

IntesisBox® Modbus Server – Modbus RTU Master User’s Manual r1 eng
© Intesis Software S.L. - All rights reserved This information is subject to change without notice
IntesisBox® is a registered trademark of Intesis Software SL
URL Email tel
http://www.intesis.com [email protected] +34 938047134
6 / 15
1.2 Functionality
This gateway allows communicating with Modbus RTU slave devices from any Modbus TCP
master. The gateway behaves as a Modbus TCP slave device.
The procedure of configuration of IntesisBox is as simple as following these steps:
- Introduction of the communication parameters for Modbus ports
- Once this configuration has been done with the configuration software tool
LinkBoxMB, you have to download this configuration to IntesisBox via a serial or
Ethernet connection and IntesisBox will reboot with the new configuration working.
1.3 Capacity of IntesisBox
Element
Max. Notes
Number of TCP masters 32 IntesisBox can handle up to 32 TCP Masters, all of
them connected to the same Ethernet port.
Number of RTU slaves 321 IntesisBox can handle up to 32 Modbus slave
devices
Ref.: IBOX-MBS-TCP2RTU
2. Modbus interfaces of IntesisBox
2.1 Modbus TCP
IntesisBox Modbus TCP communication uses the Ethernet port of the gateway with standard
Ethernet configuration.
2.2 Modbus RTU
IntesisBox Modbus RTU communication can work with both EIA232 and EIA485. The baud
rate, parity and polling time can be configured.
1 IntesisBox could handle up to 255, but it is strongly recommended not use more than 32 RTU slave devices to avoid communication problems and to ensure integration stability.

IntesisBox® Modbus Server – Modbus RTU Master User’s Manual r1 eng
© Intesis Software S.L. - All rights reserved This information is subject to change without notice
IntesisBox® is a registered trademark of Intesis Software SL
URL Email tel
http://www.intesis.com [email protected] +34 938047134
7 / 15
3. Quick Setup
1. Install LinkBoxMB Details in section 5
2. Install IntesisBox in the desired installation site (DIN rail mounting inside a metallic
industrial cabinet connected to ground is recommended).
3. Power up and connect the communication cables. Details in section 4
4. Open LinkBoxMB, open a project or create a new one. Details in section 5.
5. Connect to the IntesisBox (details in section 5)
6. (optional) Configure the IntesisBox. Details in section 5.1
7. Check if there is communication in both Modbus TCP and Modbus buses (section 5).
8. The IntesisBox is ready to be used in your system.

IntesisBox® Modbus Server – Modbus RTU Master User’s Manual r1 eng
© Intesis Software S.L. - All rights reserved This information is subject to change without notice
IntesisBox® is a registered trademark of Intesis Software SL
URL Email tel
http://www.intesis.com [email protected] +34 938047134
8 / 15
4. Connection
The device uses a standard enclosure allowing DIN EN60715 TH35 rail mounting. Its plastic
meets standard PC UL 94 V0.
Figure 4.1 Device connection diagram
Ensure proper space for all connectors when mounted.
The items supplied by Intesis Software for this integration are:
IntesisBox Modbus Server – Modbus RTU hardware
Console cable. Standard DB9F-DB9M cable 1.8 meter long.
Installation sheet, containing a link to the LinkBoxMB software and this manual.
Console wire 1.8 m long. DB9 Female - DB9 Male standard. It is supplied.
LinkBoxMB Only needed for configuration
Power See Note 1
Modbus TCP
PC Console
- + Ethernet Modbus TCP
IntesisBox®
www.intesis.com
Ethernet RJ45
EIA232
EIA485
- +
Modbus RTU
Modbus RTU EIA232
Modbus RTU EIA485
CMN 24Vac
9 - 30Vdc
Max.125 mA 24Vac
Max.127mA 50-60Hz

IntesisBox® Modbus Server – Modbus RTU Master User’s Manual r1 eng
© Intesis Software S.L. - All rights reserved This information is subject to change without notice
IntesisBox® is a registered trademark of Intesis Software SL
URL Email tel
http://www.intesis.com [email protected] +34 938047134
9 / 15
4.1 Power device
The first step to perform is to power up the device. To do so a power supply working with
any of the voltage range allowed is needed (check section 6). Once connected the ON led
will turn on.
WARNING! In order to avoid earth loops that can damage the gateway and/or any other
equipment connected to it, we strongly recommend:
The use of DC power supplies, floating or with the negative terminal connected to
earth. Never use a DC power supply with the positive terminal connected
to earth.
The use of AC power supplies only if they are floating and not powering any other
device.
4.2 Connect to Modbus RTU
Connect the communication cable coming from the Modbus RTU network to the port marked
as Modbus RTU of IntesisBox (Figure 4.1). Two methods to connect to the Modbus network
can be used:
The EIA485 port if the network is EIA485 2-wire. Connect the + and the – to the
respective ports in the slave devices (polarity matters)
The EIA232 port if the connection is point to point to one single slave.
IntesisBox
Modbus RTU
slave2
DB9 M EIA232 DB9 F
TX 3 RX
RX 2 TX
GND 5 GND
Table 4.1 Modbus EIA232 cable pin out
How to check if there is communication with the Modbus bus is explained in the LinkBoxMB
Manual (section 5).
4.3 Connect to Modbus TCP
Connect the communication cable coming from the network hub or switch to the ETH port
(Figure 4.1) of IntesisBox. The cable to be used depends on where the IntesisBox is being
connected:
Connecting directly to a Modbus TCP master device: crossover Ethernet UTP/FTP
CAT5 cable
Connecting to a hub or switch of the LAN of the building: a straight Ethernet UTP/FTP
CAT5 cable
2 Check your Modbus device’s user’s manual provided by its respective manufacturer to know more details about pin out.

IntesisBox® Modbus Server – Modbus RTU Master User’s Manual r1 eng
© Intesis Software S.L. - All rights reserved This information is subject to change without notice
IntesisBox® is a registered trademark of Intesis Software SL
URL Email tel
http://www.intesis.com [email protected] +34 938047134
10 / 15
In case there is no communication with the IntesisBox IntesisBox, check that the Modbus
TCP devices they are operative and reachable from the network connection used by
IntesisBox. Check the IntesisBox Ethernet interface sending Pings to its IP address using a
PC connected to the same Ethernet network.
4.4 Connect to PC (LinkBoxMB)
This action allows the user to have access to configuration and monitoring of the device
(more information can be found in the LinkBoxMB User Manual [section 5]).Two methods to
connect to the PC can be used:
Ethernet: Using the ETH port (Figure 4.1) of IntesisBox. How to check connectivity is
explained in section 4.3.
Serial cable: To connect the device to the PC the serial cable supplied should be
plugged to the PC console port (Figure 4.1).
The cable is an EIA232 straight cable and its pin out is at explained in Table 4.2.
IntesisBox PC
DB9 M EIA232 (Straight) DB9 F
TX 2 2 RX
RX 3 3 TX
GND 5 5 GND
Table 4.2 Configuration serial cable pin out
IntesisBox® Modbus Server – Modbus RTU Master User’s Manual r1 eng
© Intesis Software S.L. - All rights reserved This information is subject to change without notice
IntesisBox® is a registered trademark of Intesis Software SL
URL Email tel
http://www.intesis.com [email protected] +34 938047134
11 / 15
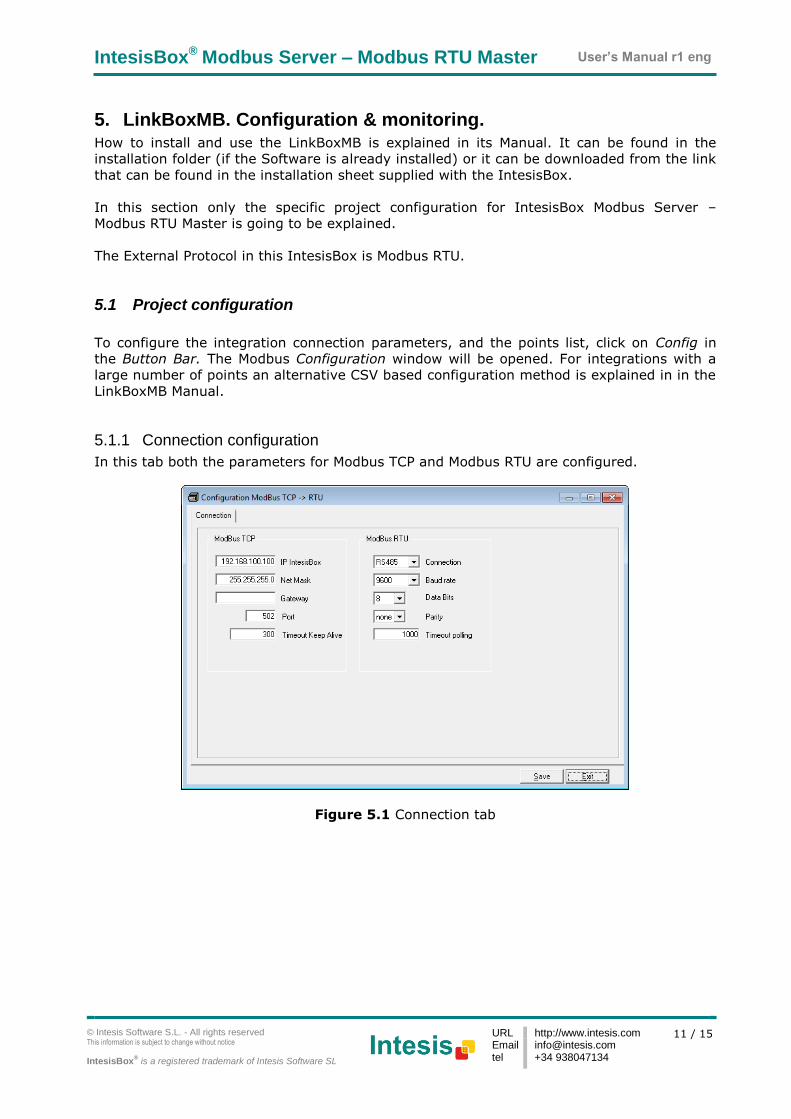
5. LinkBoxMB. Configuration & monitoring. How to install and use the LinkBoxMB is explained in its Manual. It can be found in the
installation folder (if the Software is already installed) or it can be downloaded from the link
that can be found in the installation sheet supplied with the IntesisBox.
In this section only the specific project configuration for IntesisBox Modbus Server –
Modbus RTU Master is going to be explained.
The External Protocol in this IntesisBox is Modbus RTU.
5.1 Project configuration
To configure the integration connection parameters, and the points list, click on Config in
the Button Bar. The Modbus Configuration window will be opened. For integrations with a
large number of points an alternative CSV based configuration method is explained in in the
LinkBoxMB Manual.
5.1.1 Connection configuration
In this tab both the parameters for Modbus TCP and Modbus RTU are configured.
Figure 5.1 Connection tab

IntesisBox® Modbus Server – Modbus RTU Master User’s Manual r1 eng
© Intesis Software S.L. - All rights reserved This information is subject to change without notice
IntesisBox® is a registered trademark of Intesis Software SL
URL Email tel
http://www.intesis.com [email protected] +34 938047134
12 / 15
Modbus TCP configuration:
Figure 5.2 Modbus TCP interface configuration.
IP IntesisBox: Enter the IP address for IntesisBox.
Net Mask: Enter the IP net mask for IntesisBox.
Gateway: Enter the default router address to use by IntesisBox, leave blank if there is
no need of router address.
Port: Enter the TCP port to use, by default 502.
Timeout Keep Alive: Enter the Keep Alive Timeout (in seconds). This is the time
without Modbus TCP traffic after which IntesisBox will send a Keep Alive packet to the
master(s) connected to it; this is to maintain alive the TCP connection.
Modbus RTU configuration:
Figure 5.3 Modbus RTU interface configuration
Connection: Select the port to use (EIA232 or EIA485).
Data Bits: Data bits
Baud rate: Select the baud rate to use
Parity: Select the parity.
Slave: Enter the Modbus slave number for IntesisBox.

IntesisBox® Modbus Server – Modbus RTU Master User’s Manual r1 eng
© Intesis Software S.L. - All rights reserved This information is subject to change without notice
IntesisBox® is a registered trademark of Intesis Software SL
URL Email tel
http://www.intesis.com [email protected] +34 938047134
13 / 15
5.1.2 Saving the configuration
When the configuration of the project is finished follow the next steps:
1. Click the button Save. Once accepted the pop-up message, that will save the project
in the folder on hard disk (more information in LinkBoxMB Manual).
2. You will be prompted to generate the configuration file to be sent to the gateway,
a. If YES is selected, the binary file (Modbus.LBOX) containing the configuration
for the gateway will be generated and saved also into the project folder.
b. If NO is selected the binary file needs to be created before following the next
steps. To do so open the Configuration window (section 5.1) and restart from
step 1
3. Once in the configuration window again, click on exit. The configuration is ready to
be sent to the IntesisBox (check LinkBoxMB Manual)
The configuration cannot be received from the gateway to LinkBoxMB, it can only
be sent.

IntesisBox® Modbus Server – Modbus RTU Master User’s Manual r1 eng
© Intesis Software S.L. - All rights reserved This information is subject to change without notice
IntesisBox® is a registered trademark of Intesis Software SL
URL Email tel
http://www.intesis.com [email protected] +34 938047134
14 / 15
6. Mechanical & electrical characteristics
Enclosure Plastic, type PC (UL 94 V-0).
Dimensions: 107mm x 105mm x 58mm.
Color Light Grey. RAL 7035.
Power
9 to 30Vdc +/-10%, Max.: 125mA.
24Vac +/-10% 50-60Hz, Max.: 127mA
Must use a NEC Class 2 or Limited Power Source (LPS) and SELV
rated power supply.
Plug-in terminal block for power connection (2 poles).
Terminal wiring
(for power supply
and low-voltage
signals)
Per terminal: solid wires or stranded wires (twisted or with ferrule)
1 core: 0.5mm2… 2.5mm2
2 cores: 0.5mm2… 1.5mm2
3 cores: not permitted
Mounting Wall.
DIN rail EN60715 TH35.
Modbus RTU ports 1 x Serial EIA232 (DB9 male DTE). SELV
1 x Serial EIA485 (Plug-in screw terminal block 2 poles). SELV
Modbus TCP port 1 x Ethernet 10Base-T RJ45.
LED indicators
1 x Power.
2 x Serial port (Modbus RTU) activity (Tx, Rx).
2 x Ethernet port (Modbus TCP) link and activity (LNK, ACT).
Console port EIA232. DB9 female connector (DCE). SELV
Configuration Via console port.1
Firmware Allows upgrades via console port.
Operational
temperature 0°C to +70°C
Operational
humidity 5% to 95%, non-condensing
Protection IP20 (IEC60529).
RoHS conformity Compliant with RoHS directive (2002/95/CE).
Norms and
standards
CE conformity to EMC directive (2004/108/EC) and Low-voltage
directive (2006/95/EC)
EN 61000-6-2, EN 61000-6-3, EN 60950-1, EN 50491-3 1 Standard cable DB9male-DB9female 1,8 meters long is supplied with the device for connection to a PC COM port for
configuring and monitoring the device. The configuration software, compatible with Windows® operating systems, is also
supplied.

IntesisBox® Modbus Server – Modbus RTU Master User’s Manual r1 eng
© Intesis Software S.L. - All rights reserved This information is subject to change without notice
IntesisBox® is a registered trademark of Intesis Software SL
URL Email tel
http://www.intesis.com [email protected] +34 938047134
15 / 15
7. Dimensions
Recommended available space for its installation into a cabinet (wall or DIN rail mounting), with space enough for external connections
115 mm
130 mm
100 mm
Power
+
Ethernet
107 mm 105 mm
58 mm
Modbus RTU
EIA232/485
Console
port