interrelation between perimeter and area - fisme.uu.nl filelearning the concepts of area and...
TRANSCRIPT

LEARNING THE CONCEPTS OF AREA AND
PERIMETER BY EXPLORING THEIR RELATION
MASTER THESIS
Destina Wahyu Winarti
NIM 09715005
SURABAYA STATE UNIVERSITY
POSTGRADUATE PROGRAM
MATHEMATICS EDUCATION STUDY PROGRAM
2011

LEARNING THE CONCEPTS OF AREA AND
PERIMETER BY EXPLORING THEIR RELATION
MASTER THESIS
A Thesis Submitted to Surabaya State University Postgraduate Program
as a Partial fulfillment of the requirements for the Degree of Master of Science
in Mathematics education Program
Destina Wahyu Winarti
NIM 09715005
SURABAYA STATE UNIVERSITY
POSTGRADUATE PROGRAM
MATHEMATICS EDUCATION STUDY PROGRAM
2011

ii
APPROVAL
iii
Thanks to:
Allah SWT for the Blessings and Mercies in
every single path of mine. My dearest Mom
and Dad for your love and support, my sisters
Nunuk and Desi and my brother Tiyok for
always there for me anytime.
I dedicate this master thesis for those who
inspiring me the most….my parents, sisters
and brother.

iv
ABSTRACT
Winarti, Destina Wahyu. 2011. Learning the concepts of area and perimeter by
exploring their relation. Master Thesis, Mathematics Education Study Program,
Postgraduate Program of Surabaya State University. Supervisor: (I) Prof. Dr. Siti
Maghfirotun Amin, M.Pd, and (II) Dr. Agung Lukito, MS.
Keywords: Perimeter, Area, Relation between perimeter and area, Understanding
Learning the concept of perimeter and area is not easy for students in
grade 3 of primary school. A common mistake is that students think that if the
area is the same, the perimeter also has to be the same. It is difficult for them to
understand that for a given area, there are many possibilities of perimeter and vice
versa. When student are not aware of this relation they might confuse about the
concept in their continuation of learning process. This research was conducted to
study if it would support students‟ understanding of the concept of perimeter and
area if we let them explore the relation between perimeter and area in the very
first phase of the learning process.
Design research was chosen as the method to study this issue and the three
basic principles in The Realistic Mathematics approach were applied in this study
to support the learning process of perimeter and area. Real life context such as
picture frames was choosen in developing a sequence of learning line to reach the
learning goal of perimeter and area. The partipants of this research were students
and mathematics teacher of grade 3 in one of the elementary school in Surabaya.
Two classes were taken to involve in the first cycle and second cycle respectively.
The teaching experiment shows that the class activities such as making
photo frame, measuring photo paper with sticky paper and arranging shapes with
wooden matches are activities which can be used to reveal the relation of
perimeter and area. From those activities students build their own understanding
that in fact area and perimeter are not in one to one correspondence, they found
that for the given area they might find different perimeter or vice versa. They also
found the reason why they multiply length and width to count the area of
rectangular or square shape from sticky paper activity. Somehow some students
were found still struggle with their understanding of area and perimeter. They
often simply count the area and perimeter but when it comes into comparing the
area or perimeter they still struggle to differentiate between area and perimeter.
v
ABSTRAK
Winarti, Destina Wahyu. 2011. Learning the concepts of area and perimeter by
exploring their relation. Tesis, Program Studi Pendidikan Matematika, Program
Pascasarjana Universitas Negeri Surabaya. Pembimbing: (I) Prof. Dr. Siti
Maghfirotun Amin, M.Pd, and (II) Dr. Agung Lukito, M.S.
Kata Kunci: keliling, luas, hubungan antara keliling dan luas, pemahaman
Mempelajari konsep keliling dan luas bagi siswa kelas 3 SD bukanlah hal
yang mudah. Kesalahan umum yang mungkin dilakukan siswa adalah anggapan
bahwa dengan luas yang sama maka keliling juga akan sama. Sulit bagi mereka
untuk memahami bahwa untuk suatu luas tertentu mereka mungkin memperoleh
keliling yang berbeda-beda atau sebaliknya. Jika siswa tidak menyadari hubungan
antara keliling dan luas, mereka mungkin akan bingung dengan konsep tersebut
dalam kelanjutan proses belajarnya. Penelitian ini dilakukan untuk mengetahui
apakah dengan mengeksplorasi hubungan antara keliling dan luas dalam tahap
awal pembelajaran siswa kelas 3 SD akan mendukung pemahaman mereka
terhadap konsep keliling dan luas.
Design research dipilih sebagai metode untuk mempelajarai permasalahan
tersebut, dan tiga prinsip dasar RME (Realistic Mathematics Education)
diimplementasikan dalam penelitian ini untuk mendukung proses belajar
pembelajaran keliling dan luas. Konteks dari dunia nyata seperti mengukur
bingkai foto telah dipilih dalam mengembangkan urutan pembelajaran untuk
mencapai tujuan pembelajaran luas dan keliling. Peserta dalam penelitian ini
adalah siswa dan guru matematika kelas 3 SD di salah satu sekolah swasta di
Surabaya. Dua kelas diambil untuk terlibat dalam siklus pertama dan kedua.
Hasil penelitian menunjukkan bahwa aktifitas kelas seperti membuat
bingkai foto, mengukur kertas foto dengan mengunakan kertas tempel atau
membentuk bangun datar dari korek api adalah aktifitas-aktifitas yang dapat
digunakan sebagai alat untuk memunculkan hubungan antara keliling dan luas.
Melalui aktifitas-aktifitas tersebut siswa membangun pemahaman mereka sendiri
bahwa pada kenyataannya keliling dan luas itu tidak berkorespondensi satu-satu.
Mereka menemukan bahwa untuk suatu luas tertentu, mereka mungkin mendapati
keliling yang berbeda-beda dan atau sebaliknya. Mereka juga menemukan alasan
mengapa mereka mengalikan panjang dan lebar untuk menghitung luas persegi
atau persegi panjang melalui aktifitas dengan kertas tempel. Namun demikian,
masih didapati siswa yang masih mengalami kesulitan untuk memahami konep
keliling dan luas. Mereka hanya menghitung luas dan keliling tapi ketika merak
harus membadingkan suatu luas atau keliling maka mereka mulai mengalami
kesulitan untuk membedakan luas dan keliling
vi
ACKNOWLEDGEMENTS
Praise and gratitude are always be given to Allah SWT for His blessing
and mercies so that the writer could accomplished her master thesis under the
Title:
LEARNING THE CONCEPTS OF AREA AND PERIMETER BY
EXPLORING THEIR RELATION
This master thesis would not be accomplished without the hand from all
parties. Along with this master thesis, the greatest thanks are delivered to:
1. My beloved Mother and Father, Mbak Nunuk and family, Mbak Desi and
my brother Destiyo for all the supports, prayers, patience and tender cares.
2. Dr. Siti Maghfirotun Amin, M.Pd, Dr. Agung Lukito, M.S, and Frans Van
Gallen as supervisors who have given their supports, inputs and also
advices along the making of this Master Thesis.
3. Dr. Agung Lukito, M.S as the head of Mathematics Education,
Postgraduate Program-UNESA.
4. Jaap Den Hertog as the Coordinator of IMPoME Program in Netherland.
5. Dr. Tatag YES, M.Pd as the head of Mathematics Department, UNESA.
6. All the lecturers in Mathematics Department, UNESA and Freudenthal
Institute, Utrecht University for all the supports.
7. All the staff of Postgraduate Program, UNESA, Mathematics Department,
UNESA and Freudenthal Institute, Utrecht University for all the supports.
8. Karel J. Mulderik, Lenny and Roos for being my family along my stay in
Netherland.
9. Students and Teachers at SD. At.Taqwa who have given a huge
contribution on this thesis.
10. My collegueages of IMPoME Program‟09, S2- Mathematics Reguler‟09
for the friendship, cooperation, and supports.
11. All the parties who have given their hand and supports so this Master
Thesis could be accomplished.
The writer does realize that the making of this master thesis is still away
from perfect. For still having much lackness, the writer welcomes any suggestion
and criticism from the readers. The writers expect that this master thesis can be
beneficial for all the parties who concerned with this work.
Surabaya, September 2011
Writer
vii
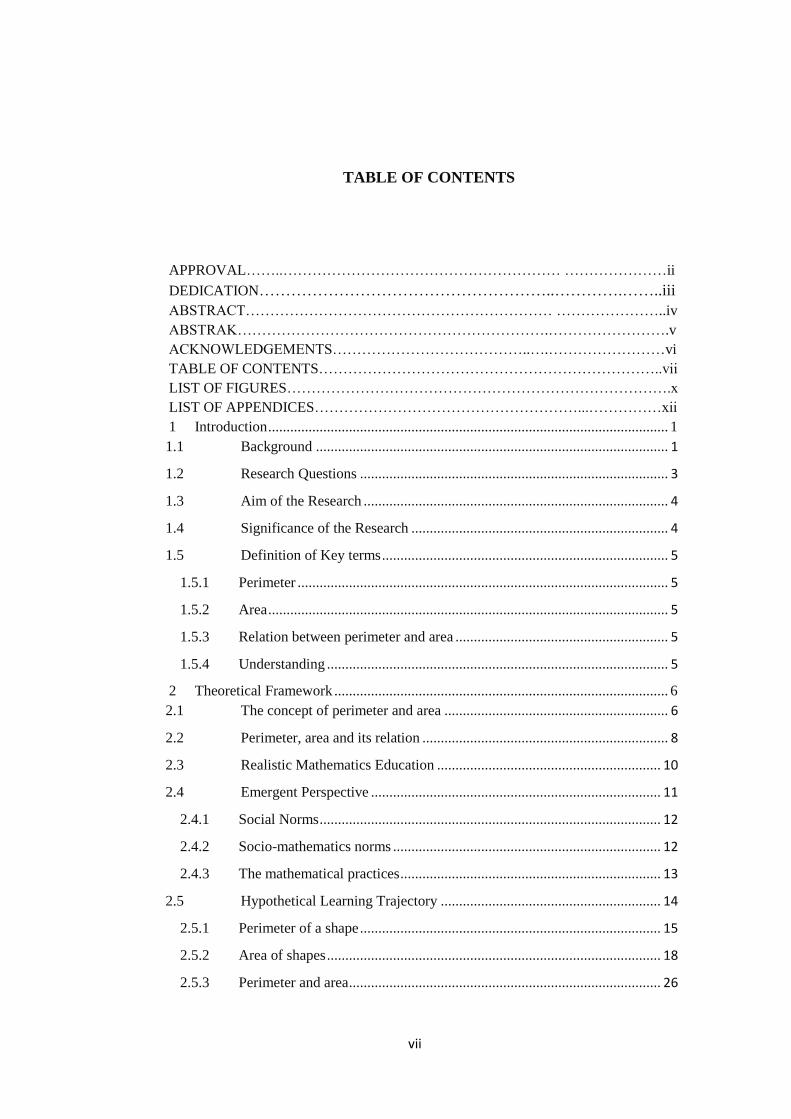
TABLE OF CONTENTS
APPROVAL……..………………………………………………… …………………ii
DEDICATION………………………………………………..………….……..iii
ABSTRACT……………………………………………………… …………………..iv
ABSTRAK……………………………………………………….…………………….v
ACKNOWLEDGEMENTS…………………………………..….……………………vi
TABLE OF CONTENTS……………………………………………………………..vii
LIST OF FIGURES…………………………………………………………………….x
LIST OF APPENDICES………………………………………………...……………xii
1 Introduction ............................................................................................................. 1
1.1 Background ................................................................................................ 1
1.2 Research Questions .................................................................................... 3
1.3 Aim of the Research ................................................................................... 4
1.4 Significance of the Research ...................................................................... 4
1.5 Definition of Key terms .............................................................................. 5
1.5.1 Perimeter ..................................................................................................... 5
1.5.2 Area ............................................................................................................. 5
1.5.3 Relation between perimeter and area .......................................................... 5
1.5.4 Understanding ............................................................................................. 5
2 Theoretical Framework ........................................................................................... 6
2.1 The concept of perimeter and area ............................................................. 6
2.2 Perimeter, area and its relation ................................................................... 8
2.3 Realistic Mathematics Education ............................................................. 10
2.4 Emergent Perspective ............................................................................... 11
2.4.1 Social Norms ............................................................................................. 12
2.4.2 Socio-mathematics norms ......................................................................... 12
2.4.3 The mathematical practices ....................................................................... 13
2.5 Hypothetical Learning Trajectory ............................................................ 14
2.5.1 Perimeter of a shape .................................................................................. 15
2.5.2 Area of shapes ........................................................................................... 18
2.5.3 Perimeter and area ..................................................................................... 26

viii
2.5.4 Exploring the shape other than rectangle and square ................................ 29
3 Methodology ......................................................................................................... 31
3.1 Research Design ....................................................................................... 31
3.1.1 Preparation and design .............................................................................. 31
3.1.2 Teaching Experiment ................................................................................ 32
3.1.3 Retrospective analysis ............................................................................... 32
3.2 Data Collection ......................................................................................... 33
3.2.1 Video Recording ....................................................................................... 33
3.2.2 Interview ................................................................................................... 33
3.2.3 Students‟ work .......................................................................................... 33
3.2.4 Field Note .................................................................................................. 34
3.3 Validity and Reliability ............................................................................ 34
3.3.1 Validity ..................................................................................................... 34
3.3.2 Reliability .................................................................................................. 35
4 Retrospective Analysis .......................................................................................... 37
4.1 The Timeline of the Research ................................................................... 37
4.2 Analysis on First cycle of HLT implementation ...................................... 39
4.2.1 Pre-test ...................................................................................................... 39
4.2.2 Frame fencing activity .............................................................................. 42
4.2.3 Making Photo Frame ................................................................................. 47
4.2.4 Comparing the photo paper ....................................................................... 49
4.2.5 Measuring photo paper with sticky paper ................................................. 52
4.2.6 Arranging shapes with wooden matches ................................................... 57
4.2.7 Working with odd number of wooden matches ........................................ 62
4.2.8 Playing with rope ...................................................................................... 64
4.2.9 Post-test ..................................................................................................... 66
4.2.10 Conclusion from first cycle implementation of HLT ................................ 68
4.2.11 HLT-revised .............................................................................................. 71
4.3 Analysis on second cycle of HLT implementation .................................. 72
4.3.1 Pre-test ...................................................................................................... 74
4.3.2 Introducing the term Perimeter ................................................................. 75

ix
4.3.3 Counting perimeter with non-standard unit and introducing the term „area‟
.................................................................................................................. 79
4.3.4 Comparing the area ................................................................................... 82
4.3.5 Two plane figures with the same area can have different perimeter or vice
versa. ......................................................................................................... 88
4.3.6 Form the shape with odd number of wooden matches .............................. 93
4.3.7 Exploring the perimeter and area of the shapes other than rectangle and
square ........................................................................................................ 95
4.3.8 Post-test ................................................................................................... 100
4.3.9 General Discussion ................................................................................. 103
5 Conclusion .......................................................................................................... 110
5.1 Answer to the research questions ........................................................... 110
5.1.1 Answer to the first sub question .............................................................. 110
5.1.2 Answer to the second sub question ......................................................... 113
5.1.3 Local Instruction Theory of learning perimeter and area in grade 3 of
elementary school ................................................................................... 117
5.2 Weakness of the research ....................................................................... 118
5.3 Recommendation .................................................................................... 119
5.4 Reflection ............................................................................................... 121
6 References ........................................................................................................... 123

x
List of Figures
Figure 2.1 Area and Perimeter measurement 3rd
grade elementary School in .................... 7
Figure 4.1 Timeline of the research .................................................................................. 38
Figure 4.2 An example of the ropes .................................................................................. 39
Figure 4.3 Examples of tables with the same number of square grids but different form.
.......................................................................................................................................... 41
Figure 4.4 Measuring the frames‟ fence by using ropes ................................................... 44
Figure 4.5 Comparing the ropes ........................................................................................ 44
Figure 4.6 Example of students‟ work on comparing and ordering the frame fence. ...... 45
Figure 4.7 Arrange the plane figures side by side to compare them ................................ 50
Figure 4.8 Put the plane figures as a stack to compare them ........................................... 50
Figure 4.9 Put two different shapes in stack .................................................................... 52
Figure 4.10 Farel‟s work in comparing the shapes .......................................................... 53
Figure 4.11 Counting the area with sticky paper .............................................................. 54
Figure 4.12 Counting the perimeter of the rectangle ....................................................... 55
Figure 4.13 Students work on the worksheet ................................................................... 56
Figure 4.14 Students‟ answer ........................................................................................... 56
Figure 4.15 Working with wooden matches .................................................................... 58
Figure 4.16 Example of shape formed from wooden matches ......................................... 59
Figure 4.17 Examples of two shapes with the same number of square grids but different
number of wooden matches .............................................................................................. 60
Figure 4.18 Examples of students‟ work ......................................................................... 61
Figure 4.19 Example of the shape formed with odd number of wooden matches ........... 63
Figure 4.20 Students work with the ropes to form any plane figure ................................ 64
Figure 4.21 Students‟ description about perimeter and area ............................................ 67
Figure 4.22 Plane Figures ................................................................................................ 74
Figure 4.23 Measuring the perimeter with the ropes ........................................................ 77
Figure 4.24 Comparing the length of the ropes ................................................................ 77
Figure 4.25 Discussion about perimeter and area ............................................................ 80
Figure 4.26 Comparing two different shapes ................................................................... 84
Figure 4.27 Class discussion on perimeter and area by using the lockers at the context . 85
Figure 4.28 Grid paper ..................................................................................................... 86
Figure 4.29 Examples of different plane figures with the same number of wooden
matches ............................................................................................................................. 90
Figure 4.30 Examples of different plane with the same number of square grids but
different wooden matches ................................................................................................. 90
Figure 4.31 Forming the shape with ice cream sticks ...................................................... 96
Figure 4.32 Forming the shape with the ropes ................................................................. 98
Figure 4.33 The shape formed from the ropes, arrange on the grid paper ....................... 99

xi
Figure 4.34 Ilustration of photopaper covered with sticky papers ................................. 106
Figure 5.1 Local Instruction Theory ............................................................................... 117
xii
LIST OF APPENDICES
Appendix A HLT visualization ...................................................................................... 125
Appendix B Lesson Plan ................................................................................................ 126
Appendix C Students‟ work (LKS) ................................................................................ 138
Appendix D Result of Student‟s work ............................................................................. 154
1
CHAPTER I
INTRODUCTION
1 Introduction
1.1 Background
Perimeter and area become one of the interesting topics to be discussed
since those two are very relevant to the real world. Almost in every part of our
surrounding we find perimeter and area. With or without realizing, pupils use that
terms in their daily conversation such as “my plate is larger than yours” or “I
guess I used shorter rope to fence this photo frame than what you spent”. Even
though they do not literary use the words area or perimeter but the issue that they
bring actually about perimeter and area. Somehow we cannot conclude yet that
those who made the conversation have the same understanding about the concept
of perimeter and area.
The concept of perimeter and area is not an easy thing to learn. Romberg
(1997) states that a common difficulty regarding perimeter and area is to
understand that for a given area, many perimeters are possible, and vice versa. In
addition, it is frequently found that pupils mix the concepts of area and perimeter.
They often tend to think that two figures with the same area also have the same
perimeter (TAL Team, 2004). From an observation in a primary school in
Indonesia, it was found that some pupils had counted the perimeters to answer the
questions about areas (Fauzan, 2002).
Pupils are familiar with the concept of length since they were in grade 2 of
primary school. For pupils who have a good understanding of perimeter as a

2
special application of length that measures the distance around a figure, they will
be accustomed to finding perimeters where the length of every part of a figure is
given and they just had to add all the given numbers but for those who do not
have an adequate understanding of perimeter will find it difficult to deduce the
length of the side when it was not stated explicitly (Kai Kow, 2006). Therefore it
is important to embed a good understanding of perimeter for students on their
early years of introduction in perimeter.
Different from perimeter, in fact, area is a more difficult concept for the
students on their first year of introduction to area. Perimeter is in line with the
concept of length which is known as linier measurement but area is not about
length, it is about the whole surface that covers a shape. Understanding the
attribute of area involves giving a quantitative meaning to the amount of bounded
two-dimensional surface (Cross et all, 2009). Understanding of area measurement
involves learning and coordinating many ideas (Clement & Stephan, 2004), such
as transitivity, the relation between number and measurement, and unit iteration
operating in area measurement.
Narrowing the coverage of perimeter and area for rectangles and square
only then we focused on the 3rd
grade students (9-10 years) that based on previous
research still found some difficulties to distinguish between perimeter and area.
Students in 3rd
grade also show little skill or knowledge about area and perimeter
(NAEP). In line with the above description, a research in implementing IRME
curriculum for teaching area and perimeter for 4th
grader in Indonesia was
conducted by Fauzan in 2002.

3
One interesting finding from Fauzan‟s research is about the relation of area
and perimeter that was thought consecutively starting with the concept of area. He
described in his research that students could understand the relationship between
area and perimeter after they had worked on some contextual problems in which
they create geometry objects that had the same area but were different in
perimeter and vice versa. Somehow the reasoning behind students thinking was
just discussed briefly. Strong argumentations that underpin this is still lacking as
Fauzan stated that needs further research to see the process from the development
of student‟s mathematical thinking through their reasoning.
From one of the criticism of Fauzan to Indonesian curriculum, “Not clear
why the topic „perimeter and area‟ has to be separated, while they are
interconnected with each other” and also the discussion of Fauzan and his
colleague (see http://mathforum.org/t2t/) that it doesn‟t matter whether perimeter
or area comes first. Based on those reasoning then this research will work on
perimeter and area side by side. This research will argue that it is possible to teach
the concept of perimeter and area side by side to reveal the relation of them to
help the students gain understanding towards the concept of perimeter and area.
1.2 Research Questions
The research question was formulated to achieve the research aim as
follows:
How can exploring the relation of perimeter and area support the student’s
understanding about the concepts of perimeter and area?
4
We formulated two sub-questions that relevant with the issue in the main
research question in order to gather enough information for answering the main
research question. The sub-questions are:
1. What activities can be used to explore the relation of area and perimeter?
2. What kinds of understandings that students could reach from the learning
process?
1.3 Aim of the Research
In line with the background of this research and research questions, the
first aim of this research is to support students‟ learning process in understanding
the concept of perimeter and area by exploring the relation between perimeter and
area through class activities. The second aim is to develop a local instruction
theory on supporting students understanding in perimeter and area through the
relation of perimeter and area. To achieve those aims, a hypothetical learning
trajectory will be designed, tested in the teaching experiment and analyzed,
redesigned to fulfill the needs of achieveing the aims.
1.4 Significance of the Research
In line with the purpose of this study there are two significances regarding
this study. The first significance is to contribute in giving grounded instruction
theory on the concept of perimeter and area. The second significance is to give an
insight to mathematics teacher on how to develop teaching and learning process
that support students‟ understanding about the concept of perimeter and area. This
study also offeres an overview to researchers on how to design instructional
activities and what considerations that should be taken into such a design.

5
1.5 Definition of Key terms
We will describe several key terms related to the research questions
mention above.
1.5.1 Perimeter
In this research we define perimeter as the curve enclosing a region of a
surface or the length of such a curve (Borowski & Borwein, 2002)
1.5.2 Area
In this research we define area as part of a two-dimensional surface
enclosed within a specified boundary / geometry figure or the measure or extent of
such a or part of a surface (Borowski & Borwein, 2002)
1.5.3 Relation between perimeter and area
The relation between perimeter and area in this research is about the ways
in which perimeter and area are connected and how perimeter gives impact to area
and vice versa.
1.5.4 Understanding
In this research we describe understanding as the ability to deduce specific
rules or procedures from more general mathematics relationship, in short one
knows „how‟ and „why‟(Skemp, 1979 in Idris, 2006).

6
CHAPTER II
THEORETICAL FRAMEWORK
2 Theoretical Framework
In designing a research in mathematics education, we do need a theoretical
framework both mathematical and didactical to provide a foundation in order to
design an instructional theory. To Design an instructional theory for the learning
series of perimeter and area then we studied the literatures related to those
subjects. The coverage of theoretical framework for this research is as follows
2.1 The concept of perimeter and area
Kai Kow on his article “Teaching area and perimeter: Mathematics-
Pedagogical-Content Knowledge-in-Action” stated that most primary school
pupils have good understanding of perimeter as a special application of length that
measures the distance around a figure. Somehow for primary students in their
early learning of perimeter and area, they might start to understand the concept of
perimeter by relating it with their daily life. For instance, Ria goes around the
football field from certain point and come back to her initial point then she said it
as perimeter or she simply said perimeter as the boundary of the polygonal region.
Early primary students understand perimeter starting from their spatial and visual
idea and develop into logical measuring operation when they already have
adequate conservation of length, then finally they have the concept of perimeter as
the distance or length of the figure.
Douglas H. Clement (2004) in his book “Engaging Young Children in
mathematics” described area as an amount of two-dimensional surface that is

7
contained within a boundary and that can be quantified in some manner. Same as
the concept of perimeter for early primary students, they might start to understand
the concept of area from their spatial and visual idea. They see area as the region
within a boundary then along their learning process they will develop their logical
measuring ability to make a sense that area is the amount of material needed to
cover the whole surface that is contained within a boundary.
In this research, the concept of perimeter and area will be delivered to
pupils in grade 3 of primary level in Indonesia where it is their first introduction
to perimeter and area. For Indonesian curriculum, the concept of area and
perimeter in grade 3 was given in the coverage of rectangular and square plane
figure. It was described in the following table,
Figure 2.1 Area and Perimeter measurement 3rd
grade elementary School in
Indonesia curriculum
This research will work in the same coverage of Indonesian curriculum;
somehow we convince ourselves to put some addition of the generalization for the
concept of perimeter and area not only for square and rectangular plane figures
only but also for any plane figures.
To be considered to have the understanding about the concept of perimeter
and area, the students in grade 3 do not necessarily have to be able to state
Standard Competence Basic Competence
Counting the perimeter and area of square
and rectangular plane figures and its
application in problem solving.
Counting the perimeter of square
and rectangular plane figure
Counting the area of square and
rectangular plane figure
Solving the problems related to
perimeter and area of square and
rectangular plane shape.

8
formally the definition of perimeter and area as mentioned above. We will
describe briefly about our background theory on understanding from Skemp (in
Olsen, 1981 and Idris, 2006). He described the understanding as recognizing a
task as one of a particular class for which one already knows a rule (Skemp, 1979
in Olsen, 1981) or the ability to deduce specific rules or procedures from more
general mathematics relationship (Skemp, 1979 in Idris, 2006)
Regarding how to attempt those understanding, Skemp (in Idris, 2006)
highlight the importance of getting the right direction and the connection to be
made to schemata (knowledge structures) to bring about mathematics
understanding. According to him teacher cannot help students to construct
schemata, but can only provide good learning situation so that students can build
their own schemata.
2.2 Perimeter, area and its relation
Most primary school pupils have a good understanding of perimeter as a
special application of length that measures the distance around a figure (Kai Kow,
2003). Measures of length are generally regarded as the simplest measures to
understand and appy because they involve only one dimension; and because of
their comparative simplicity, they provide good illustration of the fundamental
points of the teaching of measure generally (A.R. Bunker, 1967).
Different from perimeter, area is not an easy subject to be learned by
young children. Although the steps in learning to use measures of area are very
much the same as those followed in learning about length, the concept associated
with area are much more difficult to grasp. In developing the concept of area, all
9
work should be directed towards an answer to the question, “How much surface is
covered?”(A.R. Bunker, 1967). In comparing area of rectangles for instance,
pupils in early elementary years tend to focus on one-dimensional length of
rectangle, rather than the two-dimensional space enclosed (Jensen J.Robert, 1993).
Some students develop strategies for finding area that did involve both width and
height. When asked to compare the areas of two rectangles, some students
compared the sums of the height and width and others compared the length of the
diagonal of the rectangles. Here we can see that students seem to lack an
understanding of the property of area.
It is important that students have time to explore the relationship between
area and perimeter. They need to know that not all shapes with the same area have
the same perimeters and vice versa (Bahr. Kathleen, et all). Relating to the
concepts of area and perimeter, students try to use what they already know to
make sense of new mathematical concepts (Helbert&Carpenter). When student
realize that two shapes with the same perimeter might not have the same area then
they will no longer believe that the same perimeter always result in the same area.
Teachers should aware and make these connections explicit, determining what
their students already know and helping students see how the new concept is
related to that knowledge. For example students know the concept of perimeter as
the length of string required surrounding the region then teacher can approach the
concept of area starting from student‟s understanding of the concept of perimeter.
Teacher can direct student, for instance, to realize that every time they create a
fence then eventually they will create a region within it.
10
The teacher can make this connection even stronger by using objects that
students are familiar with (such as a photo frame) and by introducing the concepts
as part of a problem ("Which photo frame needs the longest rope?” or “Which
photo frame is the largest?”). Because it is difficult to transfer knowledge from
one discipline to another, students should have experience applying mathematical
knowledge to other disciplines. This will also motivate the need for learning
mathematics.
2.3 Realistic Mathematics Education
Perimeter and Area are two terms that are very relevant to the real world.
Everything that available in our surrounding are always consist of perimeter and
area. In education curriculum in Indonesia the concept of perimeter was
introduces since grade 2 in the form of introduction to length as a basic concept of
perimeter then in grade 3 they start to learn the term perimeter and area.
Regarding the introduction of the concept of perimeter and area, students are
likely to understand concepts, such as mathematical definitions if the teacher
provides them examples of those concepts (Selden. Annie et all, 1998) and indeed
students try to use what they already know to make sense of new mathematical
concepts ( Hiebert&Carpenter). When a new concept is introduced, students need
tactile and visual experiences to assist them in understanding the concept
(Grouws, 1992).
Bringing the concept of perimeter and area from a real life situation to the
learning activities in class somehow becomes the main consideration in this
research and Realistic Mathematics Education (RME) becomes a choice to guide

11
the students in learning the concept of Perimeter and Area. Based on Gravemeijer
(1994), there are three basic principles in the Realistic Mathematics Approach
namely Guided reinvention, didactical phenomenology and self-developed
models. Those three basic principles in RME are used as the underlying theory for
developing the learning sequence.
In realistic mathematics Education, mathematics is primarily seen as a
process, a human activity. According to the principle of guided reinvention,
teacher should give opportunity for students by guiding/ supervising them to re-
invent the mathematics by themselves. One way that teacher might do is finding
the contextual problem that allow for a wide variety of solution procedures
(Gravemeijer, 1994). Following the reinvention principle then we relate to the
idea of didactical phenomenology. Based on the idea of didactical
phenomenology, the teacher may find the situations that can evoke paradigmatic
solution procedures that can be taken for vertical mathematization
(gravemaijer,1994). The third principle is found in the role which self-develop
models play in bridging the gap between informal knowledge and formal
mathematics. Self develop model may become the model of informal
mathematical activity and over time may develop into a model for more formal
mathematical reasoning (Gravemeijer, 2004)
2.4 Emergent Perspective
Emergent Perspective was introduced by Cobb and Yackel (1996) as their
framework for interpreting classroom discourse and communication. In this
research we will also put the emergent perspective for the framework of
12
classroom discourse and communication to conduct the class experiment. The
Framework of learning perimeter and area can be viewed as a response to the
issue of attempting to understand the concept of perimeter and area as it occurs in
the social context of the classroom. The social context itself was divided into
Social Perspective to focus on classroom community and Psychological
Perspective to focus on student‟s reasoning. The Social Perspective will be
elaborated further as follow:
2.4.1 Social Norms
Social Norms is defined as the ways of acting and explaining as the
process of mutual negotiation between teacher and students. Learning the concept
of perimeter and area in reform mathematics then we expected that the classroom
will have different approach than the traditional ways of learning. It is important
to put the norms of reform math class in to account such as students explain and
justify solution, indicate agreement and disagreement, try to make a sense the
explanation given by other and question some possible alternative in such
situation where a conflict in interpretation is apparent.
2.4.2 Socio-mathematics norms
Different from Socio norms, Socio-mathematics norm is the ways of
explicating and acting in whole class discussions that are specific to mathematics,
in this research will be particularly about the concept of perimeter and area. This
norm is important to create the opportunity for the students to take over the
teacher‟s duty as validator. Socio-mathematics norm enable students to make
independent judgments. For instance, each student might have their own ways of

13
explaining what they understand about perimeter and area. Here the teacher and
students can participate in a discussion to negotiate and redefine about, for
instance, the concept of perimeter and area. Having socio-mathematic norms in
the classroom will help the teacher to foster the development of the students‟
thinking process.
2.4.3 The mathematical practices
The description of mathematical practices in Gravemeijer and Cobb (2006)
was that it can be described as the normative ways of acting, communicating and
symbolizing mathematically at a given moment in time. In this learning series,
there will be many mathematical practices that are more specific to particular
mathematical ideas or concepts. Starting with comparing perimeter works with
ropes and picture frame to evoke the ideas of perimeter and recall the knowledge
of measuring length. Then making frame from ice cream sticks that will bring the
students to the idea of counting perimeter with non-standard unit and also
awareness that when they create any fence than there will be a region within it.
Region within the fence or boundaries can be the ground idea of the concept of
area. Comparing directly and indirectly with the help of tool (sticky paper) will
help the students to directly experience the mathematical practices of comparing
the area and perimeter then among the group they will communicate their finding.
Students will also experience to use wooden matches that in fact area able to
reveal many mathematical ideas such as with the same number of wooden
matches students can create different shape with different area as well. At the end
students will work with ropes to generalize the idea of perimeter and area not for

14
rectangle and square only. In the students‟ learning processes about the concept of
perimeter and area, their interpretation and their mathematical practices are related
so that their mathematical development occurs as they contribute to the
constitution of mathematical practices.
2.5 Hypothetical Learning Trajectory
Simon (1995) in Gravemeijer (2006, page 133) described Hypothetical
Learning Trajectory as the consideration of the learning goals, the learning
activities and the thinking and learning that students might engage. This chapter
will elaborate those considerations that will be presented as a learning line or
learning trajectory of perimeter and area subjects.
The learning line will be designed for 3 weeks teaching experiment and
divided into 6 activities. In line with the purpose of this research described in
chapters 1 and 2 the design of learning will put perimeter and area as the subject
to be learned side by side. The scheme of HLT refinement can be seen in the
following diagram.
Figure 2.2 Scheme of HLT changing
Initial HLT
HLT 1 (first cycle)
Analyzed and drevised
Next cycles
Analyzed and drevised

15
Below we will describe the detail of the learning lines that consist of goals,
description of activities and conjectures of students‟ thinking.
2.5.1 Perimeter of a shape
The meaning of perimeter as we described in chapter 1 is curve enclosing
a region of a surface or the length of such a curve. Based on Indonesian
curriculum, pupils are introduced with the concept of length in grade 1 and started
learning to use of measurement unit for length in grade 2. Since pupils in grade 3
are already familiar with the concept of length and how to measure it from their
previous years then the concept of perimeter itself will not be a very complicated
matter for them. The purpose of this learning is to understand the literary concept
of perimeter as the whole outer edge or boundary of a shape and the concept of
perimeter as the length of the whole outer edge or boundary. In this learning step
of perimeter there will be an activity which directs the students to the introduction
to what is meant by perimeter and how to measure it. The researcher chooses the
activity of fencing a photo frame as a class activity.
2.5.1.1 Frame fencing activity
-Goals:-Students are able to compare the length of the fence they have created
-Students are able to define with their own words the meaning of perimeter.
-Description of activity
Teacher brings the context of purchasing the fencing for photo frame to
the photo frame makers. Teacher will share her or his problem that the price of
fencing a photo frame depends on the size of fence. The shortest the size of the
fence it means the cheaper the price of the frame fencing. Teacher will bring the

16
different shapes and size of photo frame and asks the student to help her or him to
decide which photo frame will cost the least amount of money.
Students start the activity with group work of measuring the fence of the
photo frame. For instance 30 students in class then there will be 6 groups of 5.
Teacher will provides each group with different shapes of photo frames such as
rectangles, squares, triangles, quadrilateral and circle with the bunch of rope as
their tools to measure the length of the fence. Scissors also provided to cut the
rope as much as students need. At the end of the class activity, teacher will
conduct a discussion. Teacher will post some questions such as: “What shape will
cost the most for fencing? Why do you think so?” and “What shapes will cost the
least for fencing? Why do you think so”, “Describe how you compare the fence”.
At the end of class discussion, teacher will direct the students to the exploration of
the definition of perimeter based on student‟s thinking after doing the activity.
-Conjectures on students’ thinking
-When students start comparing the fence of the photo frame, they might start
estimating the frame among them such as „I think my frame is bigger than
yours” or “I think my frame will need longer fence than yours”.
-Some student might span the rope around the edges of the frame to see the
total length they need then they just simply span the rope along the ruler to
see the length of it or they might not use ruler, instead they just compare
among the rope to see which one is the shortest or longest.
-There might be some students who will not use rope but directly measure
each edge with rulers than adding it up altogether to get the total length.

17
-Discussion
It was expected that students will use the rope as their tools to measure the
length of the outer edges of the frame. By using rope, students will just simply
span it and compare it to see which one is the longest or the shortest. Introducing
the use of rope in the first activity also intended that students will be familiar with
it because they will use it again for the following activities at the end of the lesson
series.
Since students in grade 3 already know ruler as the tools to measure length
starting from grade 2 so there might be some possibilities that students will come
with the idea of using it instead of rope or measure the rope with ruler. React to
this possibilities teacher can just let student work with ruler. For those who work
with ruler, it might take more time than direct comparison of ropes. Students
might argue among themselves that using ropes will be more efficient than ruler
since they just need to compare without having known the measurement. Then
teacher can emphasis that they need to figure out which frame that needs more or
less fence and they are not coming into measurement of perimeter. Teacher can
also post questions to those who measure the circle frame whether they get
difficulties when they use ruler to compare its length.
Students might come with vary ideas about the way they compare the
fence of the frame. Through these differences then teacher can bring it into class
discussion. On the class discussion, besides the vary ideas in comparing the fence,
students might come up with different ideas about perimeter as well, some might
say perimeter is the length of the rope, others might say the total length of the
18
outer part of the photo frame or the total addition of each edge of the frame.
Teacher is the main actor to direct the class to the final conclusion about what is
the meaning of perimeter and also encourage students to be able to reasoning
when the frame will cost the most or the least.
2.5.2 Area of shapes
Stepping from the concept of perimeter to the concept of area was not an
easy step to take moreover for young children in 3rd
grade who just in their
beginning of knowing the term perimeter and area. Even though perimeter and
area are interconnected but perimeter has a different concept from area, perimeter
is merely as linier measurement which connects to length but area concern with
the whole surface that cover the shape. So the concept of area seems more
complicated than perimeter.
Compare to perimeter, the concepts associated with area are much more
difficult to grasp. Part of this difficulty is due to the fact that the child‟s every day
experience which involve area can be described quite satisfactory in general
terms, with the result that it is harder to establish the need for specific measures.
In developing the concept of area, all work should be directed towards an answer
to the question, “How much surface is covered?”(A.R. Bunker, 1967). The
purpose of this learning is to understand the literary concept of area as the whole
surface that cover a shape and the concept of area as the total amount of material
needed to cover a surface.
19
2.5.2.1 Making photo frame
-Goals: -Students will aware that every time they create any fence then there will
be a region within it.
- Students are able to describe with their own words, the meaning of area.
- Students will aware that the same perimeter can have different area and
vice versa.
-Description of activity:
To start with, teacher will use the activity in learning perimeter to
introduce the concept of area. The photo frame context in learning perimeter will
be modified by using ice cream stick. If previous activity was comparing the fence
of the photo frame but now students create the photo frame by themselves as a
present for their Mother. Student will form a frame from the ice cream stick. Each
group will consist of 4 or 5 students; each student will get 20 ice cream sticks.
Teacher will ask the students to make a different shape for each student in the
group. They can use less than 20 sticks for the frame or spend it all. Students will
arrange the stick with any shapes they want then stick it together on a paper to
form a photo frame. Teacher will give examples to avoid misconception about the
task given. After each group completing their work then the teacher can bring
them into class discussion and post a question such as “ can anyone of you explain
what do you found different from this activity compare to fencing frame
activity?”, or “did you find any interesting fact about the frame when you create
it? Explain it”.
20
-Conjectures on students thinking:
-The rectangular and squares are the most common shape for the frame so it
might happen that the whole class will only make the frame with the shape
of rectangles and squares
-With the same number of sticks and freedom to choose the shape, student
might come to the possibilities that they can form the different shapes and
different area with the same number of stick which means the same
perimeter.
-Some students might use less than 20 sticks, in this case they might come to
the possibilities that they can form the same area with the different number
of sticks.
-Answering the question post by the teacher they might only think about the
different procedures between the first activity previously in comparing the
fence of the frame and the present activity in creating the fence by
themselves. But some other might realize that in this present activity they
create a fence which eventually creates a space within it.
-Discussion
By using the activities that quite similar context with frame fencing
activities, it was expected that pupils will be able to relate the perimeter with the
concept of area. They will realize that every time they create a fence then
eventually they will have a region within it. Here teacher can encourage the
student to use that fact to reasoning themselves about the meaning of area.

21
Rectangles and squares are the most common shapes for frame so that
most of students might choose these shapes. React to these choices, teacher can
use students choices in rectangles and squares to post a question such as “Can you
form a shape like this with 19 sticks?17?15?”. Student will think or even try to
make it, then eventually they will able to explain that it is impossible to make it,
we have to take one more or add more in the opposite side. Even though in this
discussion teacher will not go into the concept of length x width but it will
worthwhile for students to have knowledge that in rectangle and square the
opposite side have the same length.
It was expected also by giving the same number of sticks and freedom to
choose any shape, students will start to realize that with the same perimeter they
can have different area or vice versa. As each student will have their own design
of the frame so it might be possible that some of them unintentionally have
different shape but they spent the same amount of sticks or they spent the different
amount of sticks but seems to have the same area. Indeed in this activity students
are not yet in the steps of measuring area but it was expected that at least they can
estimate it and make a presumption that with different number of sticks they can
have the same area or vice versa.
2.5.2.2 Comparing the photo papers
-Goal: - Students are able to compare the area directly and order it
-Description of activity:
In this activity teacher will bring the context of printing photos. Students
are asked to help the teacher to find the cheapest price of the photos. Teacher will
22
share her or his problem that the price of the photo printing depends on the area of
the photo paper, the bigger the photo paper the more expensive the price and vice
versa. Teacher will bring the different shapes and size of photo paper and asks the
student to help her or him to decide which photo paper will cost the least amount
of money to print the photos.
Students started the activity with group work of comparing the area of the
photo paper. For instance 30 students in class then there will be 6 groups of 5. For
the class activity, teacher will only use paper so that it easy for student if they
might need to folded or cut the paper. Teacher will provide each group with
different size of rectangular and squares paper with the same size as the real photo
paper that the teachers has. The paper were arrange as such so that there are some
paper that can be compared directly with the other paper such as the bigger paper
can cover the whole part of smaller paper. At the end of the class activity, teacher
will conduct a discussion. Teacher will post some questions such as: “Which
photo paper will cost the most for photo printing? Why do you think so?” and
“Which photo paper will cost the least for photo printing? Why do you think so”,
“Describe how you compare the area of the frame”. From students‟ answer that
might be vary then teacher can lead it to discussion about measuring area.
- Conjectures on student thinking:
-Comparing the paper then some students might only use their sight to
compare the area of the paper. They will use their visual sense to make an
approximation of ordering the paper from the smallest to the biggest or vice
versa.

23
-Some others might use the length of the side to decide the area. As we know
that students in grade 3 have learned about the concept of length and how to
measure it in grade 2. There is possibility that students were still influenced
with what they‟ve learned previously. They might think that the longer side
will remain bigger perimeter.
-Some student might arrange the paper as a stack or put it side by side to see
any leftover part of the paper that covers the other paper. They might
conclude that the shape which has the most left over part then it will be the
biggest area.
- Discussion
Comparing photo paper is the activity that intended to develop students‟
knowledge about area through comparing and ordering. With the material that was
arranged as such then it is possible for them to compare the paper directly. Direct
comparison is an important early stage in measuring. In this level students still do
not have to relate their work with numbers or unit. They can simply use their
sense to make the comparison. Such as using their visual sense to decide that one
is bigger than the other or arrange it in a row or put it as stack to see which shape
has the most leftover part. Somehow their initial knowledge can also influence the
way they work in this activity. For those who understand about measuring length,
for instance, they might relate it with the way they compare the area. We, as the
educator, must be aware that the students‟ initial knowledge might lead them to
the wrong understanding. Comparing the area, for instance, they will say the
24
longest the side the largest the area. They still consider that measuring length and
area are two things that similar.
2.5.2.3 Measuring photo paper with sticky paper
-Goal: - Students are able to measure the area by using another object as unit
measurement
- Students are aware that different area will create different perimeter and
vice versa.
-Description of activity:
This activity is the continuation of the previous activity. When pupils find
that there are some photo paper that are difficult to be compared directly since it
just slightly different size to each other then they are urged to find other ways to
compare it. In this activity teacher will again bring the context of printing photos.
Students are asked to help the teacher to find the cheapest price of the photos.
Teacher will bring up the previous discussion about comparing the area of photo
paper. Teacher will post a question “How if you find that two photo papers have
almost the same size?” how you compare it? Students might come up with the
idea of using other material as a tools to measure the area of the photo paper but if
no one has the idea of using others tools then teacher can direct the students to do
so. The teacher will bring the issue of n using sticky paper, “In other class they
use the help of sticky paper to measure the photo paper, what do you think if we
try to practice it in class now?”. Teacher will bring the different shapes and size of
photo paper and asks the student to help her or him to decide which photo paper

25
will cost the least amount of money to print the photos with the help of sticky
paper.
Students start the activity with group work of measuring the area of the
photo paper. For instance 30 students in class then there will be 6 groups of 5.
Teacher will provides each group with different size of rectangular and squares
photo paper and a box of square color sticky papers as a tool to measure the area
of the photo paper. The frames were arrange as such so that when the sticky paper
was attached then there will be no space left and it will be arranged so that
different size of frames might have the same number of sticky paper on it. At the
end of the class activity, teacher will conduct a discussion. Teacher will post some
questions such as: “Which photo paper will cost the most for photo printing? Why
do you think so?” and “Which photo paper will cost the least for photo printing?
Why do you think so”, “Describe how you compare the area of the frame”. Is
there any group which has the same perimeter but different area?” can you share
to the class, how is it possible?”From students‟ answer that might be vary then
teacher can lead it to discussion about measuring area.
-Conjectures on students thinking
-To measure the area of photo paper, students might count the number of
sticky papers one by one. For others who aware about the number of column
and rows of the sticky paper that they arrange, they will just count the paper
in one column then times with how many rows or vice versa.
-Student might only see the photo paper and make estimation about the
number of the sticky paper.
26
-React to the question about different area but the same perimeter then
students will realize that they have different number of sides of sticky paper
but in fact they spent the same numbers of sticky paper or oppositely they
spent different numbers of sticky paper even though they have the same
number of sides of sticky paper.
-Discussion
The use of sticky paper as the tool of unit measurement is under the
consideration that square is the simplest shape to adjust with. Sticky paper which
has colorful paper is expected to help students to make arrangement in counting or
in coloring the photo paper is even easier. By doing this activity, students were
expected to be able to reasoning about the different ways of arranging the sticky
paper to measure the area of the frame. The question about the perimeter direct to
the idea that students will see the number of sides of the sticky paper in the outer
parts as the perimeter of the photo paper. From two different fact about the
number of sides of sticky paper and the numbers of sticky papers that represent
perimeter and area respectively then students can bring it into conclusion that with
the same number of sides of sticky paper they might need different number of
sticky paper or vice versa. This fact will lead to the understanding that indeed
perimeter and area related but those two has its own concept that different to each
other, perimeter does not depend on area and vice versa.
2.5.3 Perimeter and area
From the previous activity we can see that even though the main activity
has direct students to the meaning of area and perimeter but students also start to
27
do the activity that bring them briefly to the relation of perimeter and area. For the
following teacher can use the relation of perimeter and area to deepen students
understanding about the concept of perimeter and area itself.
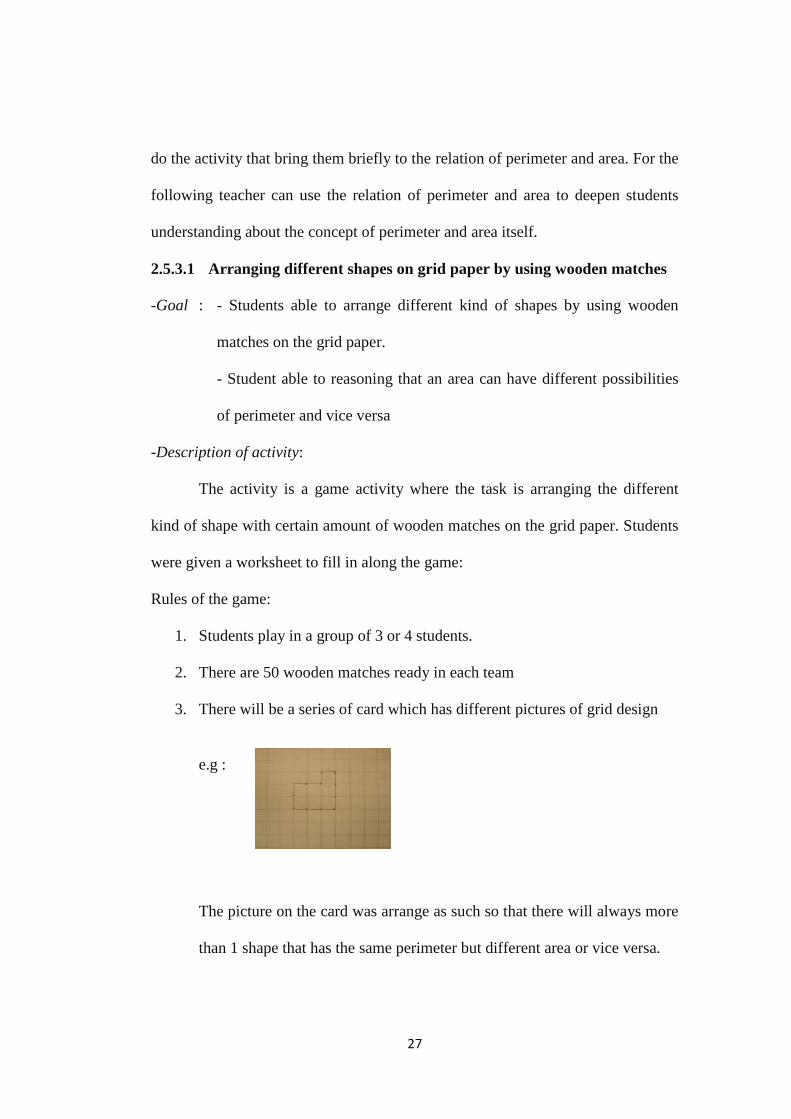
2.5.3.1 Arranging different shapes on grid paper by using wooden matches
-Goal : - Students able to arrange different kind of shapes by using wooden
matches on the grid paper.
- Student able to reasoning that an area can have different possibilities
of perimeter and vice versa
-Description of activity:
The activity is a game activity where the task is arranging the different
kind of shape with certain amount of wooden matches on the grid paper. Students
were given a worksheet to fill in along the game:
Rules of the game:
1. Students play in a group of 3 or 4 students.
2. There are 50 wooden matches ready in each team
3. There will be a series of card which has different pictures of grid design
e.g :
The picture on the card was arrange as such so that there will always more
than 1 shape that has the same perimeter but different area or vice versa.

28
4. Each person will get 5 cards in random and they will play in turn. They
have to form the shape based on the card form the matches provided.
5. The matches have to follow the grid in grid paper.
6. Students are requested to take a note in every shape they form for:
-the number of matches they use (in matches unit)
-the area of the shape (in square grid unit)
At the end of the game, Teacher will conduct a class discussion about what
students learn from the game. Student must be able bring their reasoning to the
discussion about their finding during the game such as how come different area
might have the same perimeter or vice versa.
-Conjectures on student’s thinking
-Students which have many activities in perimeter and area previously
might find this game is really interesting and do not find any difficulties
to play it.
-During the play students might notice already that they form the different
shapes but it might have the same area or perimeter, different area with
the same perimeter or vice versa.
-Discussion
This game is rich with the concept about the relation of perimeter and area.
Through this game, students are familiar with arranging different kind of shape
with the same amount of matches or vice versa. With playing this game where
different arrangement of matches will create different area or perimeter then

29
students will able to reasoning that with the same perimeter they can create
different shapes with different area or vice versa.
2.5.4 Exploring the shape other than rectangle and square
In our daily life, in fact we are not just dealing with rectangular and square
shapes only. By exploring the shape other than rectangle and square it was
expected that students will able to generalize the concept of perimeter and area for
the shape other than rectangle and square.
2.5.4.1 Playing with rope
-Goal : - Students are able to generalize that an area of any shapes can have
different possibilities of perimeter and vice versa.
-Description of activity:
As the final activity, teacher will bring the activity that was expected to be
able to generalize student‟s insight that an area of any shapes can have different
possibilities of perimeter and vice versa. The rope will be given to the students as
the main tools in this activity. Students will sit in a group of 4 or 5 then each
group will be given 2 ropes with the same length. Teacher will ask students to
make any shapes from those ropes, in different shapes respectively. Then teacher
will post questions: “Do you think both ropes form different area?, can you
explain?” or “Do you think both rope form the same area?”can you explain. After
posting a question to the groups then teacher can bring it into class discussion.
Teacher will choose the answers from those that able to direct the class into the
final conclusion.
-Conjectures on students thinking
30
-While forming the shape from the rope most of students might tend to make
the form of rectangles and squares only since most of the previous activities
were dealing with rectangle and square but some of them might be so
creative to make any irregular shapes.
-Answering the questions from the teacher, some student might answer that
both rope forms the same area since they have the same perimeter but some
other might say it will be different by reasoning that area does not depend on
its perimeter or vice versa.
-Discussion
Through this activity it was expected that students will be able to make
generalization about the relation of perimeter and area. In the previous activities
students works mostly in the shape of rectangle and square then in this activity
students will use rope as the media to form any shapes. It was expected that by
giving freedom for students to form any shapes then they will have idea to form
irregular shape or any shapes other than rectangles and squares. Giving a tricky
question such as” Do you think both ropes have the same area? Was expected to
evaluate students understanding about the relation of area and perimeter in terms
of irregular shapes, it was presumed that when students already understand the
relation of area and perimeter in activity 6 then obviously they will able to answer
correctly the question given in this activity

31
CHAPTER III
RESEARCH METHODS
3 Methodology
There are some elements will be discussed in this chapter regarding the
methodology used in this research. We will describe about design research
methodology and the content within it such as the preparation and design of this
research, the teaching experiment and the retrospective analysis. We will also talk
about how we collect our data and how to work on it, also about Validity and
Reliability of this research.
3.1 Research Design
Theoretically, the aim of this research is to develop the instructional theory
to support students understanding in perimeter and area by exploring the relation
of perimeter and area. Practically, the aim of this research is to see how children
relate perimeter and area, also to figure out whether they aware with the different
of those and use it to support their understanding about the concept of perimeter
and area. In designing the research methodology, the researcher use the three
phases of conducting a design experiment from Gravemeijer & Cobb (2006),
namely:
3.1.1 Preparation and design
Preparation and design is the preliminary work to be conducted in this
research. It was started from collecting the sources such as articles, journals and
books which are related to perimeter, area and its relation. While working with the
sources, researcher also starts designing the learning process. Interviews were also

32
conducted with some mathematicians and educators to gain more insight in the
related matter.
3.1.2 Teaching Experiment
The teaching experiment will be run to implement the result of the
learning process design. First cycle will be conducted as the pilot experiment,
taking 6 students to participate in the teaching experiment. The aim of the pilot
experiment is mainly to adjust with the initial learning process design. We expect
to develop the design better to implement it in the next cycle of the teaching
experiment. The content of the teaching experiment of first cycle and next cycles
will be the same under the consideration that next cycle is the revision of the
previous cycle. There will be preliminary discussion among researcher and
teacher before conducting the class with the design proposed to adjust and make
agreement about how the class will run based on teacher and researcher point of
view. This is to avoid or minimize any error that possible happen on the field.
3.1.3 Retrospective analysis
The goal of retrospective analyses will, of course depend on the theoretical
intent of the design experiment. However, one of the primary aims is typically to
contribute to the development of a local instruction theory (Akker et al, 2006). In
this retrospective analysis, researcher will make an analysis from the result of the
teaching experiments. All the data from video, interview and field notes will be
collected for being analyzed.
33
3.2 Data Collection
For collecting the data of the research experiment, researcher will use
video recording, interview, students‟ work and also field note.
3.2.1 Video Recording
At most two videos will be placed in class during the teaching experiment
to avoid too many data to be observed deeply. Those two videos will have its own
part, one for static video that will capture all happening during the class
experiment and the other one is the dynamic video that will be operated around
the class to capture certain moments that was considered important.
3.2.2 Interview
There will be several interviews before and after the teaching experiment.
Before the teaching experiment, researcher will conduct the interview with the
class teacher to gain information about the class situation including students, class
environment and norm and also subject material. Researcher will also make an
interview to some student in order to gain the data about students‟ ability or
condition before the teaching experiment. After the teaching experiment then
researcher will also conduct another interview to do further observation and gain
more detail information about students‟ achievement after the class experiment.
3.2.3 Students’ work
Students‟ work were designed as one of the instruments in the teaching
experiment to assess how far students‟ understanding toward a certain lesson
given. The students‟ work will also include pre-test and post test which aimed to

34
assess students‟ pre-knowledge and students‟ development in understanding the
intended concept respectively.
3.2.4 Field Note
Field note is one of the important data collections. Field note is still
needed even though we have recorder the whole class session since there might be
a certain moment that we consider important but it might not be catch properly by
the camera.
3.3 Validity and Reliability
The nature of this research can be characterized as design research which
also known as developmental research. It consists of designing instructional
activity which results in a Hypothetical Learning Trajectory to understand the
students‟ learning process. The validity and the reliability from the result of the
research to strengthen the quality of the research are described as follows,
3.3.1 Validity
Validity is seen as the strength of the research, which are used to suggest
determining whether the findings are accurate from the standpoint of the
researcher, the participant, or the reader of an account (Creswell&Miller, 2000).
In this research the validity will be seen from internal and external sides. Internal
sides including the ways of collecting the data collection, the method of analysis
and triangulation. External side will consist of the generalization from the result of
the research and the theory whether it useful in other contexts.
This research has purpose to see how the relation of perimeter and area
will help students to deepen their insight towards the concept of perimeter and

35
area itself. In order to validate the research internally then it was expected that
during this research, the sufficient data to see how students reasoning about their
understanding of the concept of area and perimeter will be gain. It will include
video recording of the whole lesson series, students‟ works, record of the
interview and also field note. Externally, the validation will be seen from the
generalization of the research whether it will appropriate to implement research
for the population where the samples were taken.
3.3.2 Reliability
Reliability in this research will be seen from three ways, namely:
3.3.2.1 Data registration
To convince ourselves that we work in a reliable way, trustworthy and also
not misleading then we try to make the detail of data collection. We collect the
data from different resources. Those data are described and categorized to get the
conclusion. The method triangulation will be done by checking the data from
different methods such as the data from video recording, audio, students‟ work
field note.
3.3.2.2 Track ability
We do realize that we need to give a clear description on how we work on
this research so that people will easily see how it run. We will describe how the
teaching experiment was happening, how we interpret it and give conclusion. We
name it as Retrospective analysis.

36
3.3.2.3 Inter subjectivity
Every researcher definitely has their own point of view or subjectivity
toward the research that they conduct. Somehow sharing the ideas might bring
into a better understanding. For that reason, we will cross-interpret the data that
we have in this research with colleagues and supervisors. We can come into
common discussion on the data collection and make a better understanding.
.

37
CHAPTER IV
RETROSPECTIVE ANALYSIS
4 Retrospective Analysis
From the whole data of the teaching experiment that we have collected, we
will analyze both the pilot experiment and the teaching experiment. We will relate
the analysis with the initial HLT in chapter 2 whether it was supported or not
supported that lead into the explanation how and why this design support the
students‟ understanding of perimeter and area. We will describe both the analysis
in on the first and second cycle of HLT implementation.
4.1 The Timeline of the Research
Date Description
Preparing for the Experiment
Preparation October –December 2010 Studying literatures and
designing HLT 1
Preliminary research to
school (communicating
with school and teacher)
3 of February 2011 Communicating the plan
of the research including
HLT and research
method
Teaching Experiment for the First Cycle
1st meeting 18
th of February 2011 Pre-test, activity.1: Frame
fencing
2nd
meeting 21st of February 2011 Acitivity.2: Making
photo frame
Activity.3: Comparing
the photo paper
3rd
meeting 22nd
of February 2011 Activity.4: Measuring
photo paper with sticky

38
Date Description
paper
4th
meeting 23rd
of February 2011 Activity.5: Arranging
shapes with wooden
matches
5th
meeting 24th
of February 2011 Revising activity.5
6th
meeting 28th
of February 2011 Working with odd
number of wooden
matches.
7th
meeting 4th
of March 2011 Post-test
Teaching Experiment for the Second Cycle
1st meeting 24
th of february 2011 Pre-test
2nd
meeting 16th
of March 2011 Activity.1: frame fencing
3rd
meeting 17th
of March 2011 Activity.2: making photo
frame
4th
meeting 21st of March 2011 Activity.3: comparing the
photo paper
5th
meeting 22nd
of february 2011 Acitvity.4: Measuring
photo paper with sticky
paper
6th
meeting 23rd
of March 2011 Activity.5: Arranging
shapes with wooden
matches
7th
meeting 25th
of March 2011 Activity6: revision
activity.5
8th
meeting 28th
of March 2011 Activity.6: Arranging the
shapes from ropes
Figure 4.1 Timeline of the research

39
4.2 Analysis on First cycle of HLT implementation
The research was conducted in 3rd
grade of At -Taqwa elementary school
Surabaya. It was planned to have at least 2 cycles of HLT implementation. The
first cycle will consist of 6 random students from grade 3 of two different classes.
Those 6 students are Andre, Dilla, Dio, Farel, Ryan, and Salma. Those students
are the representation of different types of students starting from Andre who has
good realistic interpretation, Dilla as a quite student but very diligent, Dio who
has a very good logical reasoning but still has problem in his counting ability,
Farel who has a good arithmetical ability but quite weak on his reasoning, Ryan
who always does a very good practical work and last Salma who has a very fast
response but sometimes also very careless. The HLT was divided into 6 different
activities that the first activity was aimed to support the second activity and so on.
4.2.1 Pre-test
Pre-test was conducted to know the students understanding towards the
subject that will be given. It was started by giving the worksheet that consist of
five pages that quite surprising for the students. They said it was quite a lot of
works to do. The Pre-test has essay types of questions. The question set mainly
divide into 2 activities, each of which was used to answer the questions given. In
the first activity, students were given two ropes to be compared,
Figure 4.2 An example of the ropes
40
Here the aim of using ropes was to recall students‟ knowledge in
measuring length as basic knowledge to go further into perimeter later on. Besides
on the learning series they will also use ropes so we thought it good to make them
familiar with it. Most of the students found no problem to compare those two
ropes including finding the differences and similarities. At first we predict that
some of them will use ruler to compare but in fact none of them come up with the
idea of using ruler to compare. Somehow when the teacher asked the tools to
measure the length they can mention ruler as the tools.
For the 2nd
questions students were asked to create any shape from the
ropes given. Students were able to form the shapes from the ropes even though the
ropes were not quite handy to be formed as shapes. For describing the differences
of the shapes they have created, students tend to compare the visual appearances
only such as they made different shapes of circle or oval, one shape is bigger or
smaller than the other. We thought some students might come with the idea of
perimeter and area when they were asked about the difference of the shapes but
for the beginning of learning perimeter and area, it makes sense that at the first
time they still did not have the idea about it yet.
On the 2nd
activity they worked with grid paper. In this activity 2 tables
were given in different form but with the same number of grids.

41
Figure 4.3 Examples of tables with the same number of square grids but different
form.
Students were asked to find the similarities and differences from both
tables. They noticed that the number of grids from both tables is same but the
shapes are different. Somehow it‟s interesting that they count the number of grids
but to decide the type of shapes they ignore the number of grids in each side but
just see the pictures
For the next questions, students were asked how they compare the
perimeter and the area of the shape. Some of them said “by seeing the grids” with
no further elaboration about the meaning of seeing the grids but some of them
even have no idea how to do it.
The last question was about rearranging the tables in the different forms of
squares or rectangles but with the same number of grids. Most of the students just
change the shapes from vertical to horizontal. They can notice that the similarities
of the previous tables and the new tables they arrange that the number of the grids
were still the same. For the differences some of them could explain that the
number of rows and columns were changed.
`
A
B

42
-Discussion
The questions given in pre-test are quite open actually; somehow since the
number of students is quite small then each student has more opportunities to ask
question to the teacher concerning the pre-test. The use of ribbon for pre-test did
not give much help, at the contrary students thought that it was hard to form any
shape by using that ribbon. The questions that mostly exploring student‟s
reasoning was making them confused. Students in grade 3 seem not yet familiar of
giving argument or reasoning. They mostly know how or what to do but to
describe it in the sentences are not easy, as on the worksheet paper they tend to
write very short sentences.
On this test most of the students are familiar with the term length and how
to deal with it, somehow the term perimeter sounds quite new even though they
know it was related to length but area for most of them are totally new.
4.2.2 Frame fencing activity
Frame fencing activity was the first activity to engage the students with the
knowledge of perimeter. Teacher used the context of purchasing the fencing for
photo frame. Teacher brought the different shapes and sizes of photo frame and
asked the students to help her to decide which photo frame will cost the least
amount of money. Teacher posed some questions such as: “What shape will cost
the most for fencing? Why do you think so?” and “What shapes will cost the least
for fencing? Why do you think so”, “Describe how you compare the fences”

43
Before starting the activity teacher brought some real examples of picture
frames (3 different sizes of picture frame) to the class and made small discussion
with students,
Teacher : does anyone has it at home?
Students : yeeesssssss
Teacher : does anyone know what these are?
Students : place for picture
Teacher : Do you know any other shape of frame other than what I have now? (teacher
only has rectangular and square shapes)
Salma : yeah..love...:)
Andre : i know circle
Teacher : So for this frame, if all of them made from the same material, do you think
which one is the most expensive?
Students : that one (all pointing to the biggest frame)
Teacher : Why this one?
Dio : because that one is the biggest
Teacher : heemm..so the biggest is the most expensive??
Students : yeeess
Teacher : Why biggest is the most expensive?
Dio : because for the biggest we put the most difficult effort
Salma : Because for the biggest you spent the most material on it.
Teacher : Ok then how if i want to decorate the edges of the frame by giving a fence
from ribbon? Do you think which one that needs the most material?
Andre : the one that bigger
Teacher : so now let‟s try to work on this frame. Pretend that you have picture frame
factory. For fencing the frame which frame will cost the most expensive?
Work in group of three.
(Teacher gave them four different shapes and sizes of carton paper made as if
they are picture frame).
Students started the activity with group work of measuring the fence of the
photo frame (carton paper). Teacher provided each group with different shapes of
photo frames (rectangles, squares, triangles, and circle) with the bunch of ribbons
as their tools to measure the length of the fence. Scissors also provided to cut the
ribbon as much as students need. Students span the ribbon around the edges of the
shapes respectively and cut the ribbon when it arrived in the end of the side.

44
Figure 4.4 Measuring the frames‟ fence by using ropes
In fact the idea of measuring the frame by using ribbon is not always start
from one of the end of the ribbon, some students just take any part of the ribbon
then attached it to the frame, and apparently they realize themselves that it takes
more work than start it from one of the end. One person in group A noticed this
situation:
Ryan : (Ryan tried to measure the edge by taking the middle part of the ribbon…but he
got mix up)
Andre : you have to start from one of the end
Ryan : (repeat his work again and he made it)
After cutting the ribbon as long as the total edges of the shape then student
compare the length of those ribbons to find the shortest and the longest one. They
span the ropes together. Some of them do it altogether at one and compare it but
some of them do it two by two.
Figure 4.5 Comparing the ropes
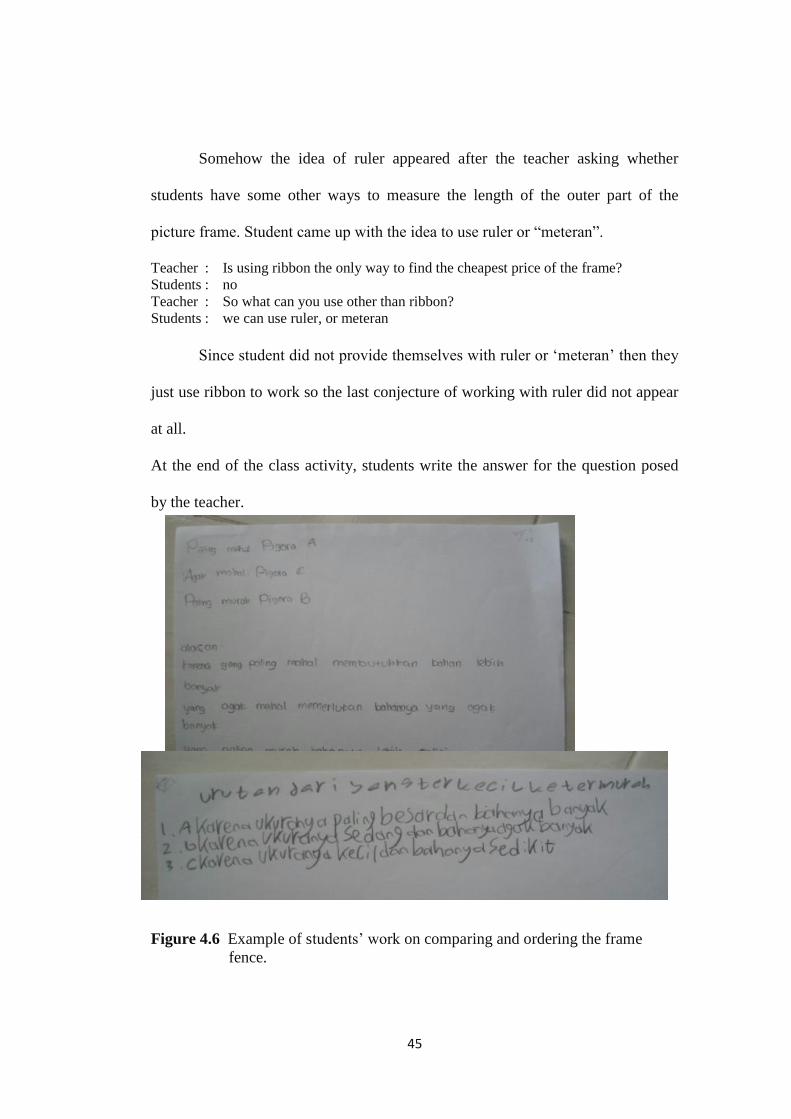
45
Somehow the idea of ruler appeared after the teacher asking whether
students have some other ways to measure the length of the outer part of the
picture frame. Student came up with the idea to use ruler or “meteran”.
Teacher : Is using ribbon the only way to find the cheapest price of the frame?
Students : no
Teacher : So what can you use other than ribbon?
Students : we can use ruler, or meteran
Since student did not provide themselves with ruler or „meteran‟ then they
just use ribbon to work so the last conjecture of working with ruler did not appear
at all.
At the end of the class activity, students write the answer for the question posed
by the teacher.
Figure 4.6 Example of students‟ work on comparing and ordering the frame
fence.
46
At the end of the session indeed teacher can direct the student that the
perimeter is the outer part of the shape. Somehow it‟s still difficult for children to
describe it in their own words; they like to show what is called perimeter instead.
-Discussion
Frame fencing activity is a good start of the learning series of perimeter
and area because it relates with the idea of measuring length and the concept of
perimeter. Indeed we will work on both perimeter and area but since the students
of grade 3 have learned about measuring length which also the basic knowledge of
perimeter then it seems students will be easier to accept the idea when it start with
something that they already knew or experience.
Even though 3rd
grader already familiar with ruler to measure the length
somehow in this activity we hardly find the students who came up with the idea of
using ruler. It might happen because the teacher already started with ribbon to
deal with. Children in this level tend to follow what is told as it shows to them at
the first place. Somehow we can see that they have the knowledge about standard
measurement when they can mention ruler as another tools that they can use to
measure the perimeter.
From this activity students start to experience themselves how to compare
the fence of the frame. They might not yet really know how to describe what
perimeter is but we can see from their work that they have the idea of perimeter
when they surround the outer part of the shapes with ribbon. For comparing the
ropes indeed students found no problem at all. They put all the ropes together to
see and then order it from the longest to the shortest or vice versa. They can
47
intuitively notice which one is longer without using any standard measurement
tools.
4.2.3 Making Photo Frame
Making photo frame is the continuation of the frame fencing activity. If
previous activity was comparing the fence of the photo frame but now students
create the photo frame by themselves. The objective of this activity is mainly as
the bridge from perimeter as the outer part of the shape in the first activity to the
introduction of area in the next activity. Making photo frame activity is intended
to build students‟ awareness that during the making of photo frame, while making
a fence then eventually they also create a region within it.
Student formed a frame from the ice cream sticks. Each group consist of
two students, each students will get 20 ice cream sticks. They can use less than 20
sticks for the frame or use it all. Students arranged the stick with any shapes they
want then stick it together on a paper to form a photo frame. Teacher gave
examples in advance to avoid misconception about the task given.
During the group work, teacher posed several questions to the students:
Teacher : compare to our 1st activity yesterday, what is the difference you found from
today‟s activity?
Andre : yesterday was hard and today is easy
Teacher : so you choose this form (he made square frame), if i use these sticks to
measure the perimeter, what is the perimeter of your frame?
Andre : 4 ice cream sticks
Teacher : if i use scissors instead of ice cream sticks with the same length, what is the
perimeter?
Andre : 4 scissors
Teacher : wait..you made another shape? What shape is it?
Farel : this is triangle
Teacher : so what is the perimeter of this frame?
Farel : 3 sticks
(After each group completing their work then the teacher asked all students to gather for
class)
48
Teacher : Everyone let see the frame of Dio and Ryan. For this frame if I use ice cream
sticks to measure the perimeter of this frame. What is the perimeter of this
frame?
Dio : (counting each stick one by one) 14 (fourteen)
Teacher : what 14?
Dio : 14 ice cream sticks.
Teacher : so the perimeter is 14 sticks then (pointing to the inner part of the frame)
what about this part? What do you call this part?, well you know already that
this part (pointing around the outer part of the frame) is?
Students : perimeter
Teacher : so how about this one? (Pointing to the inner part of the frame), what do you
call this?
Salma : that is field
Teacher : field? Ya..it‟s possible..when you make a fence then you have your field
inside it. For this photo frame, what do you call this part?
Students : (no answer)
Teacher : well actually what is the use of this part? (still pointing for the inner part of
the frame)
Student : to put the picture
Teacher : ok..for picture, so how do you measure this part?
Andre : we can multiply it
Teacher : multiply? Which one that you should multiply?
Andre : this (pointing on length) times this (pointing on width)
Teacher : why multiplication, can you explain?
Andre : just silent
Teacher : ok then it‟s as homework for tomorrow, how you measure the inner part of
the fence
-Discussion
The activity of making photo frame stimulates the student to have more
interest in learning perimeter and area. First of all, students really enjoy making
the frame. It‟s a good starting point for them to be engaged more in the learning
series. From making the frame student in fact also practices to form 2 dimensional
shapes. They made the shapes of rectangle, square and triangle since those shapes
are quite familiar for them since they learned it already in grade.2. Most of
students just used some of the sticks so researcher didn‟t find any student who
uses the same number of sticks. So apparently the conjecture that students will be

49
aware that with the same number of sticks they can have different shapes was not
coming.
As we can see on the conversation, the teacher started to introduce the
measurement unit of ice cream stick to count the perimeter of the frame. Then the
teacher tried to provoke the students to think when they made the frame from ice
cream sticks, there was an area in it. Students start to think when they know how
to measure the outer part which they know as perimeter from the previous
learning then how about the area inside of the fence? How to measure it? One of
the students answers with multiplication but he failed to explain. For this moment
teacher stops the activity and leaves the question for students about how to
measure the area.
4.2.4 Comparing the photo paper
Comparing the photo paper is the activity that supports the students to
learn about area. In this activity teacher will share her or his problem that the
price of the photo printing depends on the area of the photo paper, the bigger the
photo paper the more expensive the price and vice versa. Teacher asked the
students to help her or him to decide which photo paper will cost the least
amount of money to print the photos.
In the activity, teacher used carton paper as the representation of photo
paper with the different sizes of rectangular and square papers. The paper were
arranged as such so that they can compare directly with the other papers such as
the bigger paper can cover the whole part of a smaller paper. The class discussion
was run as follows.
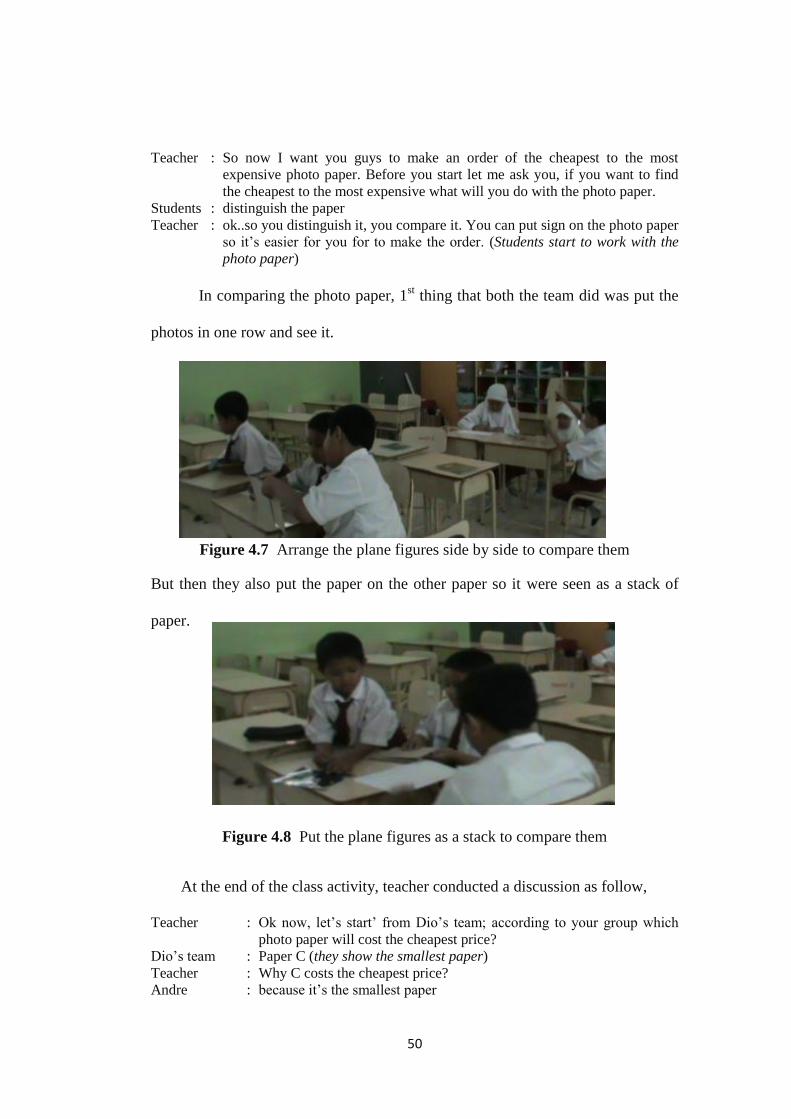
50
Teacher : So now I want you guys to make an order of the cheapest to the most
expensive photo paper. Before you start let me ask you, if you want to find
the cheapest to the most expensive what will you do with the photo paper.
Students : distinguish the paper
Teacher : ok..so you distinguish it, you compare it. You can put sign on the photo paper
so it‟s easier for you for to make the order. (Students start to work with the
photo paper)
In comparing the photo paper, 1st thing that both the team did was put the
photos in one row and see it.
Figure 4.7 Arrange the plane figures side by side to compare them
But then they also put the paper on the other paper so it were seen as a stack of
paper.
Figure 4.8 Put the plane figures as a stack to compare them
At the end of the class activity, teacher conducted a discussion as follow,
Teacher : Ok now, let‟s start‟ from Dio‟s team; according to your group which
photo paper will cost the cheapest price?
Dio‟s team : Paper C (they show the smallest paper)
Teacher : Why C costs the cheapest price?
Andre : because it‟s the smallest paper

51
Teacher : which part of the paper do you mean with small? the outer part?
Ryan : all part, perimeter and area
Teacher : perimeter and area? What do you mean with area?
Andre : (show the outer edges of the paper)
Teacher : (pointing to the outer edges of the paper) so this is area??
Students : no
Teacher : so what is it then?
Student : perimeter
Student : so if this part (pointing to the outer edges of the paper) is perimeter,
then which one is area?
Ryan : pointing to the outer edges of the paper
Farel : No, that one is perimeter
Teacher : so then perimeter and area are the same?
Student : no, different
Teacher : what is the different?
Student : perimeter is taking around the city
Farel : area is big
Teacher : so still the question, what is area is, let it keep first. Now continue to
the discussion. Now the next group, which paper is the cheapest?
Salma : paper C (choose the smallest paper)
Teacher : why paper C is the cheapest?
Dilla and Salma : because it needs less material
Teacher : how did you figure out which one is the cheapest and most expensive
Andre : made the stack of it (he put the biggest at the bottom then the smallest
at the top)
Teacher : how about the other team
Dilla : we also made a stack
Teacher : so, which one from the stack that is the cheapest?
Andre : the smallest one
Teacher : so it means the paper at the top? The one where we can see the whole
part?
Student : yes
-Discussion
In this activity children did not found any difficulty to decide which photo
paper will cost the most or the least. It happens because 3 of the photo paper have
different sizes and similar in shapes so that student can directly compare the sizes
of the photo paper. First they arrange the photo in a row and then they put those
photo papers in a stack then compare it.
Somehow when the teacher tried to connect the perimeter and area
apparently students were still confused to differ both of them. They clearly know
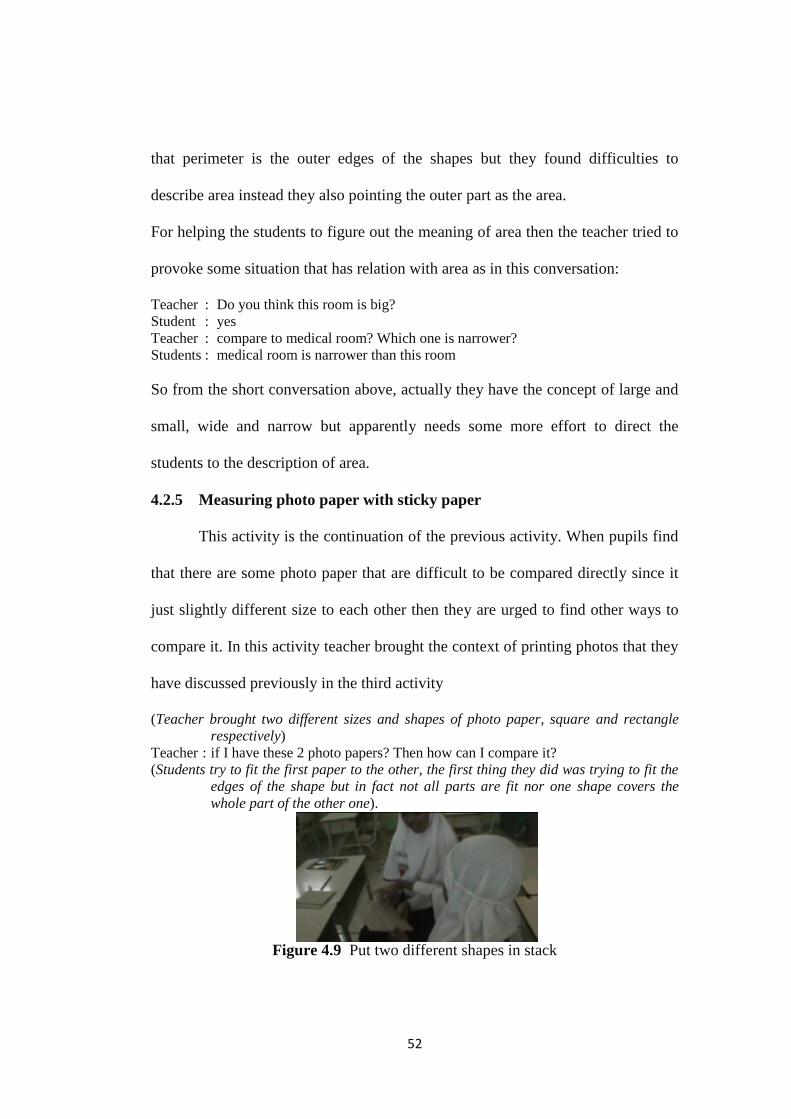
52
that perimeter is the outer edges of the shapes but they found difficulties to
describe area instead they also pointing the outer part as the area.
For helping the students to figure out the meaning of area then the teacher tried to
provoke some situation that has relation with area as in this conversation:
Teacher : Do you think this room is big?
Student : yes
Teacher : compare to medical room? Which one is narrower?
Students : medical room is narrower than this room
So from the short conversation above, actually they have the concept of large and
small, wide and narrow but apparently needs some more effort to direct the
students to the description of area.
4.2.5 Measuring photo paper with sticky paper
This activity is the continuation of the previous activity. When pupils find
that there are some photo paper that are difficult to be compared directly since it
just slightly different size to each other then they are urged to find other ways to
compare it. In this activity teacher brought the context of printing photos that they
have discussed previously in the third activity
(Teacher brought two different sizes and shapes of photo paper, square and rectangle
respectively)
Teacher : if I have these 2 photo papers? Then how can I compare it?
(Students try to fit the first paper to the other, the first thing they did was trying to fit the
edges of the shape but in fact not all parts are fit nor one shape covers the
whole part of the other one).
Figure 4.9 Put two different shapes in stack

53
Teacher : then after that, how do you know one is bigger or smaller than the other?
Farel : we cut it
Teacher : How? Can you explain (ask Farel to show and explain it)
Figure 4.10 Farel‟s work in comparing the shapes
(Farel is one of the students that is quite difficult to give explanation so he just show that
he cut the part that left over than paste it to the other part left)
Teacher : do you have any other ways to compare other than cut the paper?
Dio : we can put cover on it
Teacher : put cover? Listen everyone…it is interesting, Dio said to cover the shape
So how do you cover it, with what?
Dio : black paper?
Teacher : why black paper ?
Dio : so it won‟t be seen
Since one of the students already has idea about covering the whole part of
the surface then the teacher brings to the example from another school about the
use of sticky paper to cover the surface. (Teacher ask the students to try it for next
meeting because the time was over)
Before starting the activity with sticky papers, teacher tried to recall about
perimeter and area. Teacher asked the students to point the part of the book that
called as perimeter of the book then students said that the outer edges were the
perimeter. Step to the area, teacher also ask the students to show her part of the
book called as area.
Teacher : so which part that called as area?

54
Salma : all
Dio : inside (pointing to the book)
Teacher : so can I say that this whole part is the area? (Covering her hand to the whole
part of the book)
Students : yeesss
After recalling about perimeter and area and the teacher at least convinced
from students‟ answer that they can distinguish area and perimeter then she started
with measuring with sticky papers. The instruction and examples were given to
avoid students‟ misconception.
After arranging the papers then students count the number of sticky papers
they used for each photo paper. In fact students came up with many different ways
of counting. Salma counted all the sticky papers one by one and Farel saw every
Figure 4.11 Counting the area with sticky paper
row of 3, he repeated every 3 for 6 times because he has 6 columns then Andre
simply said that he just do 4 times 5 to get 20. The variety of the ways to count the
squares did not really matter so teacher did not discuss any further about it.
Teacher : Now let us compare these two photo papers, which one is bigger?
Students : Photo paper A
Teacher : why A?
Dio : Photo paper A needs more sticky papers than photo paper B
Teacher : others? Do you agree?
Students : yes
Teacher : so now after we know the area of the photo paper, let us check the perimeter
of the paper. If I used the side of sticky paper to measure then how many
sides of sticky paper is the perimeter of this photo paper?
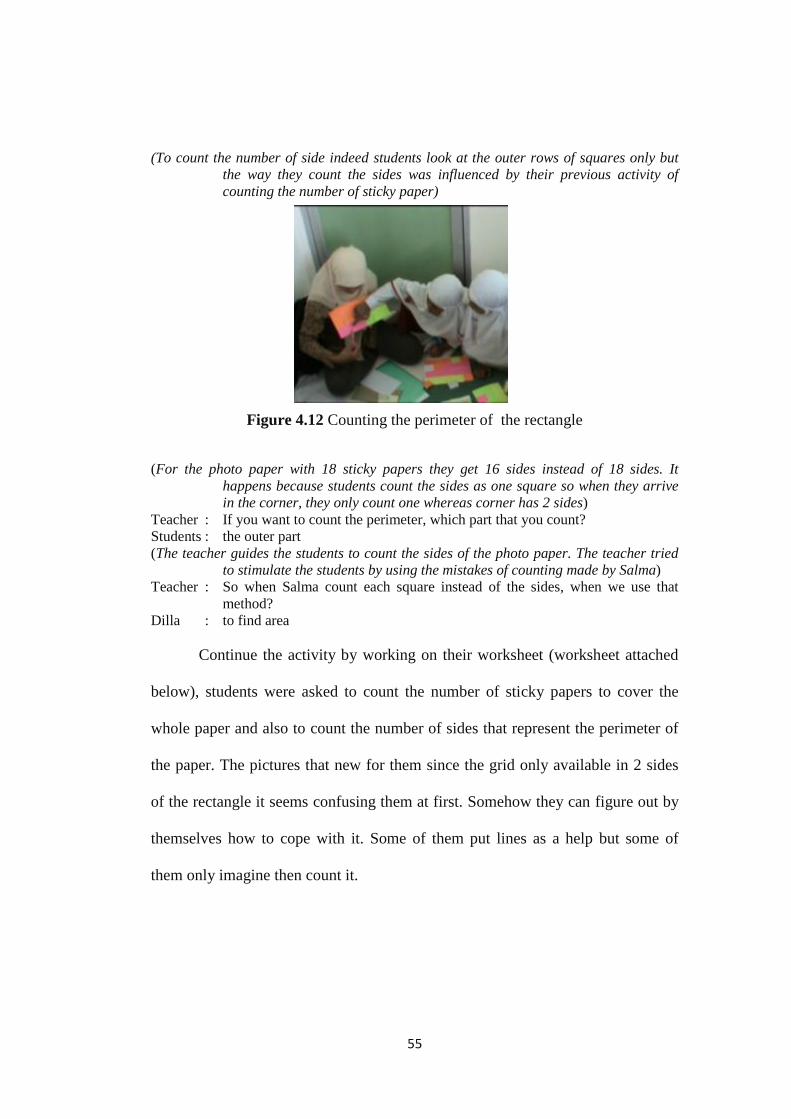
55
(To count the number of side indeed students look at the outer rows of squares only but
the way they count the sides was influenced by their previous activity of
counting the number of sticky paper)
Figure 4.12 Counting the perimeter of the rectangle
(For the photo paper with 18 sticky papers they get 16 sides instead of 18 sides. It
happens because students count the sides as one square so when they arrive
in the corner, they only count one whereas corner has 2 sides)
Teacher : If you want to count the perimeter, which part that you count?
Students : the outer part
(The teacher guides the students to count the sides of the photo paper. The teacher tried
to stimulate the students by using the mistakes of counting made by Salma)
Teacher : So when Salma count each square instead of the sides, when we use that
method?
Dilla : to find area
Continue the activity by working on their worksheet (worksheet attached
below), students were asked to count the number of sticky papers to cover the
whole paper and also to count the number of sides that represent the perimeter of
the paper. The pictures that new for them since the grid only available in 2 sides
of the rectangle it seems confusing them at first. Somehow they can figure out by
themselves how to cope with it. Some of them put lines as a help but some of
them only imagine then count it.
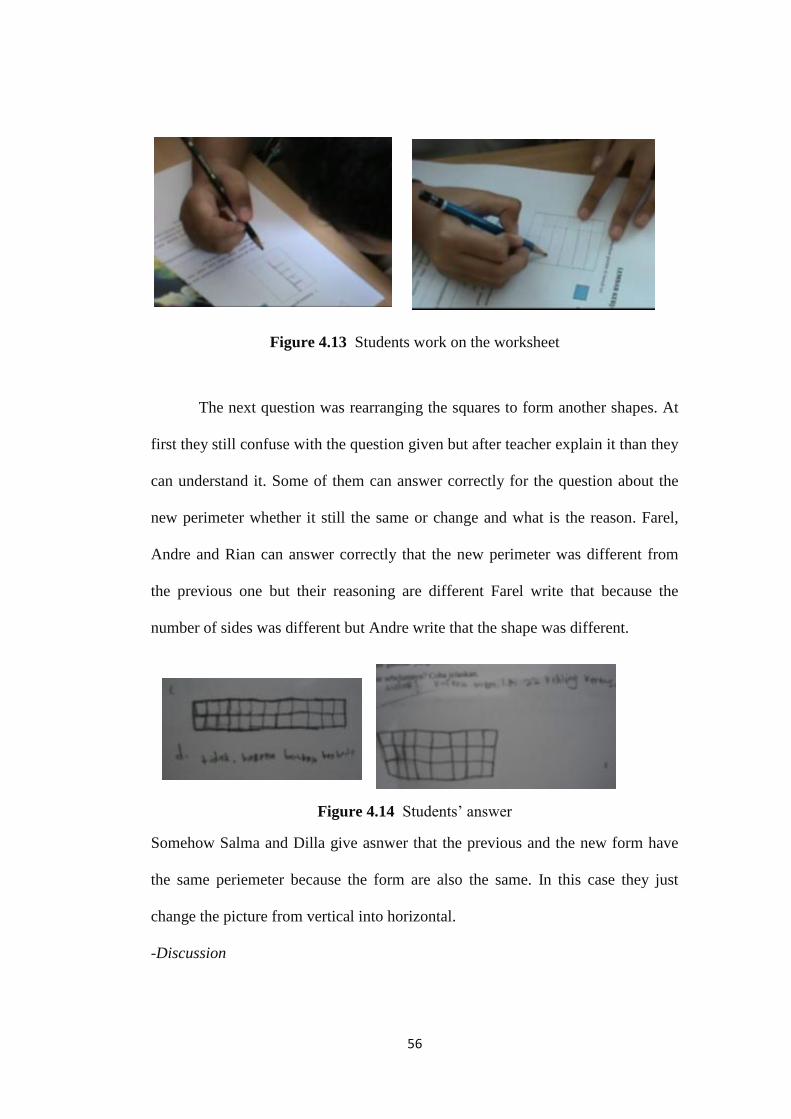
56
Figure 4.13 Students work on the worksheet
The next question was rearranging the squares to form another shapes. At
first they still confuse with the question given but after teacher explain it than they
can understand it. Some of them can answer correctly for the question about the
new perimeter whether it still the same or change and what is the reason. Farel,
Andre and Rian can answer correctly that the new perimeter was different from
the previous one but their reasoning are different Farel write that because the
number of sides was different but Andre write that the shape was different.
Figure 4.14 Students‟ answer
Somehow Salma and Dilla give asnwer that the previous and the new form have
the same periemeter because the form are also the same. In this case they just
change the picture from vertical into horizontal.
-Discussion
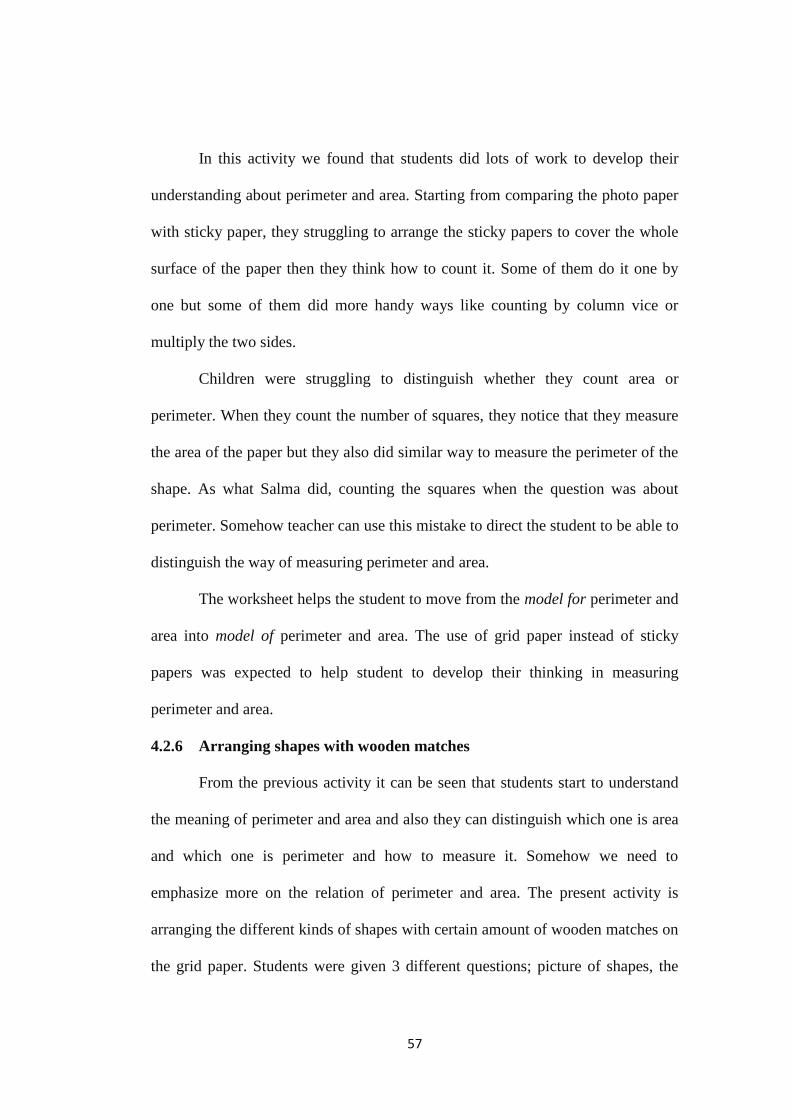
57
In this activity we found that students did lots of work to develop their
understanding about perimeter and area. Starting from comparing the photo paper
with sticky paper, they struggling to arrange the sticky papers to cover the whole
surface of the paper then they think how to count it. Some of them do it one by
one but some of them did more handy ways like counting by column vice or
multiply the two sides.
Children were struggling to distinguish whether they count area or
perimeter. When they count the number of squares, they notice that they measure
the area of the paper but they also did similar way to measure the perimeter of the
shape. As what Salma did, counting the squares when the question was about
perimeter. Somehow teacher can use this mistake to direct the student to be able to
distinguish the way of measuring perimeter and area.
The worksheet helps the student to move from the model for perimeter and
area into model of perimeter and area. The use of grid paper instead of sticky
papers was expected to help student to develop their thinking in measuring
perimeter and area.
4.2.6 Arranging shapes with wooden matches
From the previous activity it can be seen that students start to understand
the meaning of perimeter and area and also they can distinguish which one is area
and which one is perimeter and how to measure it. Somehow we need to
emphasize more on the relation of perimeter and area. The present activity is
arranging the different kinds of shapes with certain amount of wooden matches on
the grid paper. Students were given 3 different questions; picture of shapes, the
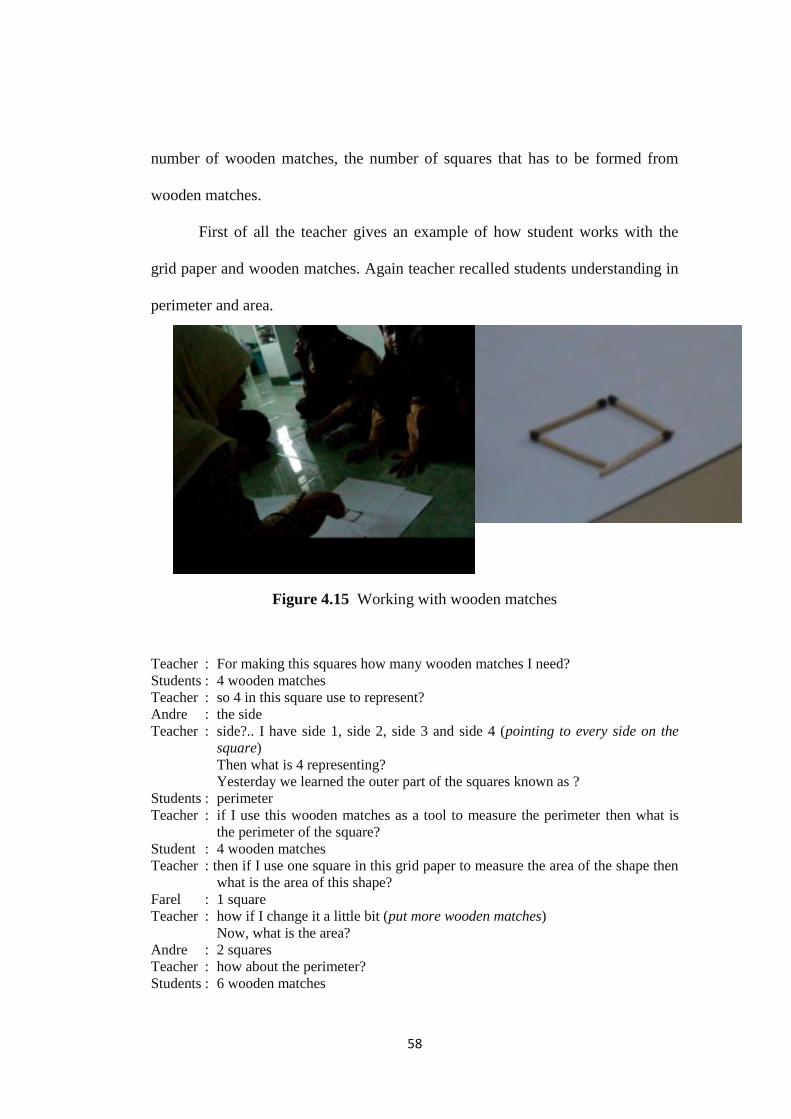
58
number of wooden matches, the number of squares that has to be formed from
wooden matches.
First of all the teacher gives an example of how student works with the
grid paper and wooden matches. Again teacher recalled students understanding in
perimeter and area.
Figure 4.15 Working with wooden matches
Teacher : For making this squares how many wooden matches I need?
Students : 4 wooden matches
Teacher : so 4 in this square use to represent?
Andre : the side
Teacher : side?.. I have side 1, side 2, side 3 and side 4 (pointing to every side on the
square)
Then what is 4 representing?
Yesterday we learned the outer part of the squares known as ?
Students : perimeter
Teacher : if I use this wooden matches as a tool to measure the perimeter then what is
the perimeter of the square?
Student : 4 wooden matches
Teacher : then if I use one square in this grid paper to measure the area of the shape then
what is the area of this shape?
Farel : 1 square
Teacher : how if I change it a little bit (put more wooden matches)
Now, what is the area?
Andre : 2 squares
Teacher : how about the perimeter?
Students : 6 wooden matches

59
After made small discussion while demonstrating how to arrange the
matches then teacher asked the student to start working in a group. Students works
two by two and with the different questions given. The teachers has arrange the
questions as such so that later on when the students work on the matches in a
certain result it will come up that with the same number of wooden matches they
will create shapes with different number of squares or vice versa.
As we predicted that students enjoy doing this activity and they did not
find any hard time to make the shapes at all. They completed the work in a quite
short time including filling the table about the perimeter and area for each shape.
Teacher started the class discussion after all students completed their works;
teacher asked all the class to help recheck each other works. One student made
wrong interpretation about the question. He was asked to make any shape with
area of 6 squares but in fact he made the shapes with perimeter of 6 wooden
matches.
There are two possibilities, Firstly he didn‟t not read the question
carefully, secondly indeed he still mix up with squares for area and wooden
matches for perimeter.
Figure 4.16 Example of shape formed from wooden matches

60
Teacher tried to find the answer as follow:
Teacher : can you repeat the question, Andre?
Andre : create a shape with the area of 6 squares
Teacher : So for this shape what is the area?
Andre : (reading the paper again) oh wait …aha squares
Teacher : So if the matches are 6 then we can count 1,2,3,4,5,6 (pointing on each side of
the shape).
Teacher : so for this shape what is the area?
Andre : 2 squares
Teacher : and the perimeter?
Andre : 6 wooden matches.
During the checking then it was found that Ryan can create two shapes with the
same area but different perimeters.
Figure 4.17 Examples of two shapes with the same number of square grids but
different number of wooden matches
After asking each student to make conclusion with their own words about
the picture above then the teacher tried to emphasize it:
Teacher : so from two shapes made by Ryan we can conclude that those shapes
have the same number of squares. Number of squares represents?
Students : the area
Teacher : and different number of wooden matches which represent the perimeter
Teacher : how if two shapes with the same area and same perimeter, is it possible?
Students : yes
Teacher : how about two shapes with the same perimeter but different areas, is it
possible?
Some Students : No
Some students : yes
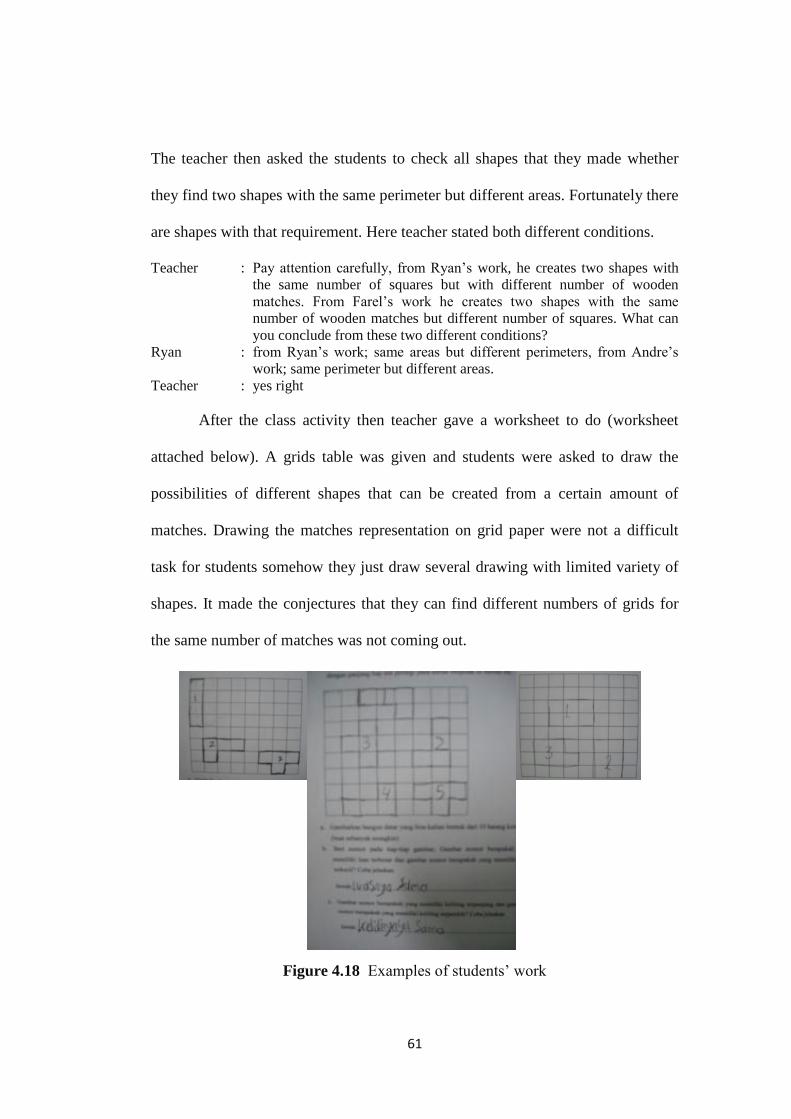
61
The teacher then asked the students to check all shapes that they made whether
they find two shapes with the same perimeter but different areas. Fortunately there
are shapes with that requirement. Here teacher stated both different conditions.
Teacher : Pay attention carefully, from Ryan‟s work, he creates two shapes with
the same number of squares but with different number of wooden
matches. From Farel‟s work he creates two shapes with the same
number of wooden matches but different number of squares. What can
you conclude from these two different conditions?
Ryan : from Ryan‟s work; same areas but different perimeters, from Andre‟s
work; same perimeter but different areas.
Teacher : yes right
After the class activity then teacher gave a worksheet to do (worksheet
attached below). A grids table was given and students were asked to draw the
possibilities of different shapes that can be created from a certain amount of
matches. Drawing the matches representation on grid paper were not a difficult
task for students somehow they just draw several drawing with limited variety of
shapes. It made the conjectures that they can find different numbers of grids for
the same number of matches was not coming out.
Figure 4.18 Examples of students‟ work

62
-Discussion
The result of the students‟ work on arranging wooden matches was really
help the teacher to direct the student to build their own understanding about the
relation between area and perimeter. Somehow the result on worksheet did not
come out as smooth as class activity. The conjecture of different area for the same
number of matches in fact did not come out. Actually even though each student
made similar shapes on their own worksheet but among them has difference in
design, teacher should bring this result into class discussion so that students can
make conclusion from it.
4.2.7 Working with odd number of wooden matches
From the previous work, students were working with all even numbers of
wooden matches. The teacher tried to give a problem to the students “how if the
numbers of wooden matches are odd and they have to create square or rectangular
shapes?”
All students were so eager to solve it, they do it very quick since they
already has lots of experiences of creating shapes from the previous activities. But
in the middle of their work they started to realize that it is impossible to create a
square or rectangle with odd numbers of wooden matches. Arranging with odd
numbers then they will end up with “need one more matches” or “one matches
was left over”
Salma : I need one more, it will work if I have 6 matches ( Salma has 5 matches)
Ryan : it is too many matches
(Then the teacher started interviewing the students about the problem they have with odd
number of wooden matches)
Teacher : Seems none of you can create the square or rectangle?
Students : yaaa….it doesn‟t work

63
Teacher : do you still remember the number of wooden matches I gave you the day
before?
Students : 8, 10, 12, and 14
Teacher : how about today? What number of matches you have?
Students : 5, 7, 9, 11, 13 and 15
Teacher : can you notice the differences?
Student : even and odd
Teacher : so to create any square or rectangle is it possible to use wooden matches with
odd numbers?
Students : no, we can‟t form it with odd numbers
Teacher : let see Dilla‟s work; how many matches you have Dilla?
Dilla : I have 7 matches
Teacher : in this design, how many matches you need?
Dilla : 8 matches
Teacher : but let see her design; here is one side that still uncompleted, it needs one
more matches. So when we create any square or rectangle, the sides opposite
to each other has to be…??
Teacher : this side has 2 and the opposite side also 2, so the opposite sides have to be
the same right?
Teacher : let see the uncompleted side, one side has two matches and the opposite side
has only one matches, is it possible?
Students : NO
Teacher : Let see Farel‟s work; this side has 4 matches and the opposite side also has 4
matches, so what is the condition for the opposite sides?
Students : The opposite sides should have the same number of matches.
Teacher : so if this side has 1 match, so the opposite side needs?
Students : 1 match as well
Figure 4.19 Example of the shape formed with odd number of wooden matches
-Discussion
The activity above is good starting to come into more formal level of
measuring the area of squares or rectangles as length x width and the perimeter of
it as (2 x length)+(2 x width). By bringing up the different condition of arranging
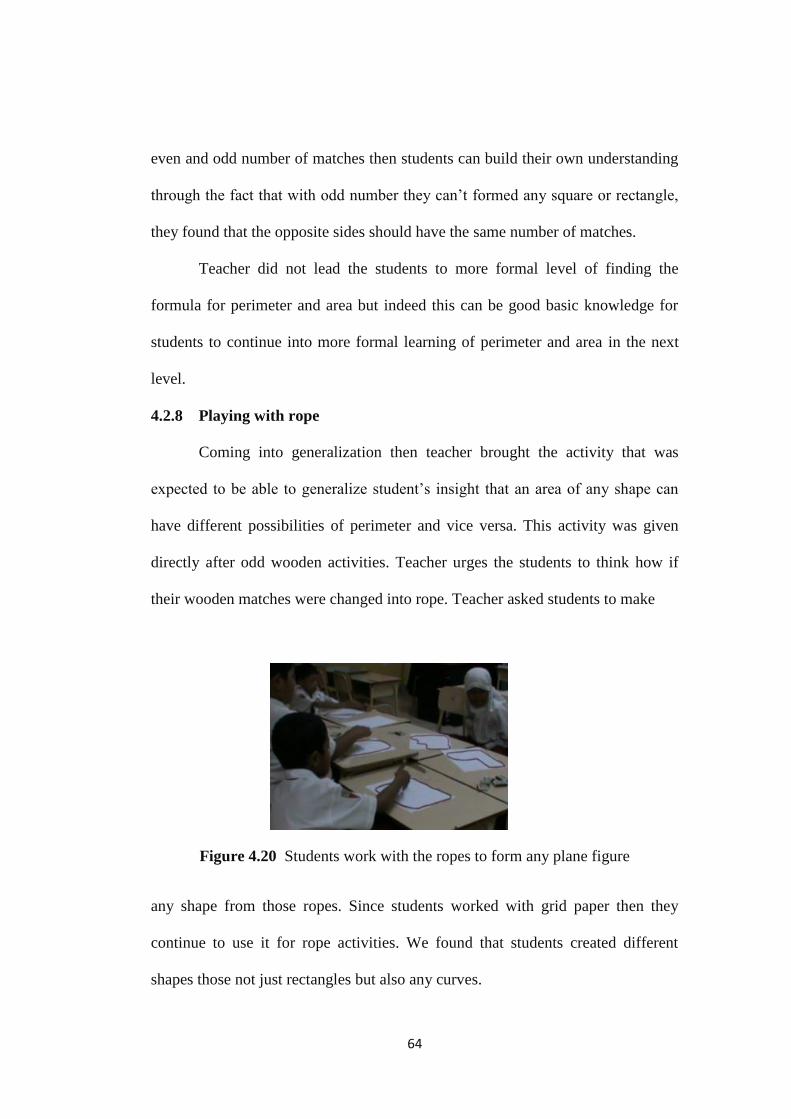
64
even and odd number of matches then students can build their own understanding
through the fact that with odd number they can‟t formed any square or rectangle,
they found that the opposite sides should have the same number of matches.
Teacher did not lead the students to more formal level of finding the
formula for perimeter and area but indeed this can be good basic knowledge for
students to continue into more formal learning of perimeter and area in the next
level.
4.2.8 Playing with rope
Coming into generalization then teacher brought the activity that was
expected to be able to generalize student‟s insight that an area of any shape can
have different possibilities of perimeter and vice versa. This activity was given
directly after odd wooden activities. Teacher urges the students to think how if
their wooden matches were changed into rope. Teacher asked students to make
Figure 4.20 Students work with the ropes to form any plane figure
any shape from those ropes. Since students worked with grid paper then they
continue to use it for rope activities. We found that students created different
shapes those not just rectangles but also any curves.

65
With the help of grid paper they count the area of the shapes they made
and in fact most of them have different results of area. Meanwhile they work with
ropes with the same length for all shapes. This situation was used by the teacher to
direct the students to make their conclusion that with the same length of ropes
they can create different forms of shape and also different areas.
Teacher : So let see how many grids that cover each shape; dilla 21, Salma 24, Rian 30,
Dio 30, Andre 27 and Farel 16. Meanwhile all of you have the same length of
ropes.
Teacher : So we here we can say that, even though the length of ropes area the same but
the area......???
Students : not always the same
The worksheet was given after the class activity. There are only 3
questions given. Most of the students give an answer that still not as what we
expected. When they were asked the possibilities of 2 ropes with the same length
to form different areas, they said “yes it‟s possible”, but their reasoning is more to
the shape only. “Because the shapes are different then they also have different
areas”. Also when they were asked whether they need to know the perimeter
before they measure the area, they said yes. Some of them give reasoning that
they need to know the shape first, they need to form perimeter or they just simply
said that they need it.
-Discussion
Counting the number of grid that covers the shapes was not a big problem
for the students. When it comes into the relation of perimeter and area, somehow,
students get confused. Here we can see the dangerous of introducing the term with
double meaning. As we can track back from the very first activity, the teacher
introduce perimeter as the outer edges of the shapes and at same time also

66
introduce perimeter as the length of the outer edges of the shapes. The same
happening for area, first the teacher brought the discussion about area into the
inner part of the shape but then also introduce the area as the number of material
needed to cover the whole surface.
Children seems to take both meaning at a time where on their beginning of
learning perimeter and area it will be a very hard work for them to understand
both at a time. It should be clear from the very first time that they learn perimeter
and area in the field of measurement of perimeter and area only in the matter of
their visualization.
4.2.9 Post-test
Post test were given after the students completing their lesson series. This
test was aimed to see the students understanding and reasoning about the whole
series of the learning (relation between area and perimeter).
First activity was given similar with the activity in pre-test but the ropes
given have different length. In this activity students did it very well, they can
describe how they compare the ropes and they notice that the ropes have different
lengths. In the next activity students were requested to create any shape from the
ropes and measure their areas. In this activity, on purpose teacher did not provide
any tool to measure the areas. Teacher expected the students to come with the idea
of grid paper then as what we predicted, they asked about grid paper during the
test.
Salma : Area? ehm..so?
Teacher : for example you have created the shape then you can measure the area, you can
make estimation perhaps.
Salma : Oh ya..so I make some kind of grid to estimate how many squares needed for
the shape?

67
The students can make their own grid paper, even though they could not
make the very neat one but it is clearly seen that they have the knowledge about
measuring area with the help of grid paper from the previous lesson. So when
there‟s a question about area then their thought directly went to grid paper.
For describing the meaning of area, the expectation from the researcher
was that students are able to explain that area is the total materials needed to cover
the whole surface. In fact most of the students described area as the inner part
since from the starting point they learned the outer part of the shape as perimeter
and the inner part is area.
perimeter
Area
Figure 4.21 Students‟ description about perimeter and area
The second activity was working with grid paper. In this activity 2 grid
tables were given in different form but with the same number of grids. Students
were asked to find the similarities and differences from both tables. Some students
noticed both table as rectangular shape with the same area but different perimeter
but there is student that mix up perimeter as area and area as perimeter. For the
next questions, students were asked how they compare the perimeter and the area
of the shapes. Here they can clearly state that they measured the area by counting
the grid and measured the perimeter by counting the total outer side of the grids.

68
The last question was about rearranging the tables in the different forms of
squares or rectangles but with the same number of grids. Most of the students still
do as the pre-test; just change the shapes from vertical to horizontal. They can
notice that the similarities of the previous tables and the new tables they arrange
that the number of the grids were still the same.
4.2.10 Conclusion from first cycle implementation of HLT
From the whole learning series we can conclude that introducing perimeter
and area at the same time for grade 3 was actually not a problem. They might find
some confusion at the beginning and made certain mistakes about those two terms
but through the mistakes, we can direct them to the difference between perimeter
and area and how they are related.
Starting from Activity 1-frame fencing where children were directed to
recall their knowledge about length to connect it with the term of perimeter. When
they span the ropes along the edges of the frame then they build their own
understanding that perimeter is the length of the outer parts of the shapes.
Continuing to the next activities of making photo frame then student experienced
themselves to create many kinds of shapes. The use of ice cream sticks also helps
them to start using the tools to find the perimeter of the shapes. As the teacher
asked them about the perimeter of the frame then they can simply answer that the
perimeter is the total ice cream sticks that they use to make the frame. The
teachers‟ questions during the class discussion about the inner part of the frame
actually made them think about that region. Even though they have a hard time to
describe what the region within the frame is but they have the idea that when they

69
create a fence on the paper with ice cream sticks, indeed there was a region within
it.
Starting with the idea of region within the frame then the activity was
continued to comparing the size of the photo paper. From the class discussion it
was seen that Dio has the idea of covering the whole part of the surface to figure
out the size of photo paper, and from the question about which room is bigger or
smaller where they can describe very well certain room is bigger or smaller than
the other. It means that even though students cannot describe yet the meaning of
area but naturally they already have the sense of area.
Direct comparison was aimed as the scaffolding to go to the situation
when students cannot compare things directly then what can they do. In direct
comparison, when the shape of the paper are similar, students can compare it
easily just by seeing or put all the paper together in stack somehow students has
problem when the shapes are not similar and they cannot just simply look at it or
put it on stack. The idea of cutting the left over part was a good idea that arose
from Farel. Somehow teacher needed to direct the students into the idea of
covering the whole surface with sticky papers to finally come into the
measurement of region.
Covering the whole surface with sticky papers was very stimulating,
colorful papers also help students to enjoy this activity more. In this activity Dio
was quite struggling to arrange the sticky papers and counting the number of
sticky papers, somehow with the help from his friend and the teacher then he can
support himself and be confident to speak up his works. Some students were still

70
using counting one by one to get the total number of sticky paper that covered the
surface of photo paper, somehow Farel counts it by row wise and Andre simply
use row times column. Indeed Andre is the only one that is quite moving fast to
the formal level compared with his other friends.
An interesting finding was when teacher asked the number of sticky papers
they use to cover the whole surface. All students gave the right answer for the
number of sticky papers but when they come into counting the perimeter by using
the side of the sticky papers as the unit, and then they got mix up. They count the
sides as they count the squares, somehow teacher can use these mistakes to direct
the students to realize themselves that at the same time with the same shapes they
can distinguish between perimeter and area. And through sticky paper it‟s clearly
seen that area is the total sticky papers used to cover the whole surface. Perimeter
is the total outer sides of sticky papers that cover the edges and they count it by
adding up all the outer sides of sticky papers that cover the edge.
Moving into more formal level, the teacher used wooden matches and grid
paper to come into more detailed relation between perimeter and area. During this
activity students finally figure out by themselves that with the same number of
wooden matches they can create different shapes with different numbers of
squares and vice versa. Somehow the students still find difficulties to find the
greatest area that they can create from the same number of wooden matches. They
tend to make one model and just change it vertically or horizontally.
The additional activity of creating squares or rectangular shapes with odd
number of wooden matches was also interesting. At the first place students were

71
so eager to work on it, somehow they were struggling to figure out why they
cannot form any square or rectangle with odd number of wooden matches. Last
activity was the generalization of the relation between perimeter and area where in
this activity students will figure out that for any shapes with the same perimeter it
can have different area and vice versa.
4.2.11 HLT-revised
There are some revisions that will be taken into account for preparing the
2nd
cycles. As we can see from the whole series that teacher has double meaning
for perimeter and area. First the teacher introduce perimeter as the outer edges of
the shapes but then also introduce it as the length of the outer part of the shapes.
Same happening for area, the teacher introduce area as the inner part of the shape
but then also introduce area as the total material spent to cover the whole surface
of the shape. Whereas the goal of this lesson series is the understanding of
perimeter and area in the field of measurement. So for the 2nd
cycle we will direct
the students to have the understanding or perimeter and area in the field of
measurement.
For the pre test and post test, we will change the material for the ropes
since previous one was not quite handy according to students. We will reformulate
the questions in pre and post-test as well. The result of Post-test in cycle 1 showed
that the questions given did not assess the whole learning series. We can say
briefly that the question given was still quite general, need to be more specific and
more elaboration for every lesson given.
72
In the wooden matches activity, after the activity of creating shapes with
wooden matches we plan to bring it into semi-formal activities where the students
no longer needs wooden matches to create the shape but they can directly draw it
in grid paper instead. Indeed they work with drawing on grid paper while they do
their worksheet but we consider that worksheet is not sufficient enough it has t0
be conducted in class activity so it can come into class discussion as well.
We consider adding one more activity after the wooden matches‟ activity.
The activity is finding the possibilities of creating the squares or rectangle shapes
with odd number of wooden matches. The idea is that measuring perimeter and
area in the formal level will be in the form of 2 × 𝑙𝑒𝑛𝑔𝑡ℎ + 2 × 𝑤𝑖𝑑𝑡ℎ and
𝑙𝑒𝑛𝑔𝑡ℎ × 𝑤𝑖𝑑𝑡ℎ respectively. Even though the final goal of this learning series
was not yet reaching the formal level mention above but since students already
work with wooden matches and arranging it so giving this additional activity will
be worthwhile for as their knowledge to go to the formal level.
Considering the different number of student from 1st cycle compare to 2
nd
cycle, where the 2nd
cycle will consist of 28 students then we consider re-
arranging the group activity as such so that at least all the group member will
involve. We also consider not conducting class presentation for every session but
class discussion instead.
4.3 Analysis on second cycle of HLT implementation
The second cycle of HLT implementation was the revision of first cycle of
HLT implementation. The retrospective analysis was conducted based on the data
collection namely, students‟ work, video of class experiment, and also interview.

73
We have chosen to make further elaboration of the data that were in line with the
HLT whether in giving support or even not supporting the HLT. The aim of this
analysis is to figure out how was the implementation of HLT compared to the
design of the HLT itself and then to propose the better approach for the
implementation of HLT in the future.
The participants for this second cycle consist of the whole class of 3B, At-
Taqwa elementary school Surabaya. The class consists of 28 students, 10 girls and
18 boys. The class that was dominated by boys more or less affects the class
environment that seems quite crowded and noisy. Somehow the students in this
class, mainly boys, are very active. They were very fond of doing class activities,
give good response on class discussion, and answer the questions given. The class
itself has two class teachers. Both of them are in charge for the class management
but they teach certain subject respectively. We work with one of the teacher who
in charge in mathematics subject. The teacher is a new comer in the school; she
has been working as a teacher for one year. Indeed she is quite new as a teacher
somehow we can see that she is willing to learn and cooperate very well along this
research.
During the teaching experiment, we thoroughly observed the learning
process of students in learning perimeter and area and its relation. Somehow we
also paid attention on teacher‟s role during the class experiment. Some finding
related to the elements in perimeter and area and its relation need to be analyzed
further and clarified so it can come into the generalization of the learning process
of perimeter and area. In this analysis we will briefly review each of the cycle and

74
the teaching experiment in particular based on the findings and mathematical
ideas.
4.3.1 Pre-test
Pre-test was conducted to know the students understanding towards the
subject that will be given. From the whole series of questions given in pre-test,
most of students have no problem in comparing the lengths of the ropes. It means
that students already have the pre-knowledge about measuring lengths and how to
compare them. In this test, most of the students are familiar with the term „length‟
and how to deal with it, somehow the term perimeter sounds quite new even
though they know it was related to length. They also still have misconception
about counting perimeter. When they were asked about the perimeter of the
shapes most of them will pay attention on the physical appearance of the shapes
and ignoring the unit measurement. Seeing two shapes below, for instance,
Figure 4.22 Plane Figures
they will say that picture B has longer perimeter compared to A because picture B
as a whole seems longer than A.
And for area, it indeed is totally new for them. When they have to compare
two shapes with grid paper in it, the first thing they check is the number of square
grids in each shape somehow they do not have in their mind yet that area is the
A
B
75
total material needed to cover the whole surface (see appendix C). Many students
leave their page blank for the question about describing the word „area‟.
When it comes into comparing two shapes with the same number of square
grids but different shape, only some students notice that the number of square
grids is same. They did not yet come into their sense of the relation of perimeter
and area on those both shapes. None of them put their reasoning on perimeter. To
compare those shapes they also use their intuitive that one is big or small, long or
short.
-Discussion
From the result of pre-test we can see how far the knowledge of students
about perimeter and area. It is very acceptable that students in grade 3 do not have
the understanding about the term „perimeter‟ and „area‟ yet because indeed it is
new for them. The result of this pre-test also help us to redesign our HLT so it will
as much as possible be in line with the needs to support the students in their
learning process of understanding perimeter, area and its relation.
4.3.2 Introducing the term Perimeter
Perimeter in Indonesian word, „keliling‟, is not a new term for students in
grade.3. They use it in their daily base such as „berkeliling kota‟, „mengelilingi
lapangan‟. Somehow as a single word „keliling‟ which we describe in chapter 1 as
the curve inclosing a region of a surface or the length of such a curve, it is a new
term for the students. As we can see in this following conversation:
Teacher : today we will learn about perimeter (keliling)
Rizky : Berkeliling ke mana? (where to go around?)
Haikal : to Singapore

76
It showed that the first impression that students might get when the teacher said
about perimeter is about goes to taking around on a certain place.
When it comes into measuring the perimeter then it will be easier for them
to understand what the length of the path is than to understand what the perimeter
of the path is. It happens because they have learned the concept of measuring
length in grade 2 but not the length of the whole outer sides of certain shape
known as perimeter of the shape.
Fencing activity was the first activity to engage the students with the
knowledge of perimeter. Since students in grade 3 have learned about measuring
length then it was expected that through fencing activity students will be able to
recall their knowledge in measuring length as basic knowledge of perimeter. The
teacher used the context of purchasing the fencing for photo frame. Teacher
brought the different shapes and sizes of photo frame and asked the students to
help her to decide which photo frame will cost the least amount of money.
In the first session, teacher brought three different sizes of photo frame;
she asked the students how to count the perimeter of the frame. Surprisingly
students came with lots of ideas of counting the perimeter starting from the
standard tools and non standard. They mention ruler, path, pencil, rope, meteran
(some kind of ruler but very long), and pencil box. From the students‟ respond we
can see that they already understand about the concept of measuring length, they
know that they can measure the length with different kind of units. During the
class activity, we did not sure whether students familiar or understand about the
word perimeter but since the teacher shows by surround her finger along the outer

77
side of the frame then it help to form the students idea about what they will
measure.
Figure 4.23 Measuring the perimeter with the ropes
In the second session, a group work, each group were given four different
shapes namely rectangle, square, triangle and circle. Those shapes were chosen
because students already familiar with them. Circle was chosen as the reasoning
that using ropes as the tools to measure the perimeter is quite making sense
because ruler or other straight tools are not always worked. Students span the rope
and surround it along the edge of the shapes. They cut the ropes then compare it.
Figure 4.24 Comparing the length of the ropes

78
During this activity of measuring the perimeter of the shape, students start
to build their understanding that for counting the perimeter they need to surround
the outer part of the shapes. Most of the students can show which part of the shape
known as perimeter; somehow it is still difficult for them to put it in words, as the
class discussion below:
Teacher : So from the activity we‟ve already done, what is perimeter according to you?
Mizar : the sides of the shape
Hani : the area of the shape (but her hand seems to surround the shapes)
Haiqal : the angles of the shapes
From the students‟ answer above we can see that each student has their
own interpretation about perimeter even though they did the same activity of
surrounding the outer part of the shapes by using the ropes to find the shortest
ropes. As we make an interview with one of the students, Diva, she can explain to
us that she studied about perimeter, she can explain how to measure the perimeter,
somehow, when it comes into the description of perimeter in her own words she
said about area but she can show that perimeter is the length of the outer part of
the shape. It seems that Diva still struggle to find her own words about perimeter,
but she can describe what perimeter is actually.
-Discussion
The idea of choosing the fencing frame activity as the first activity along
the series was under the consideration that grade 3 students have learned the
length measurement in grade 2. It was expected that by starting the learning series
with something that already accustom for the student then it will give good
stimulation to go further on the learning series. Fencing activity indeed helps
students to come into the terms perimeter as the outer part of the shape and how to

79
count it. We found that it was not an easy task for students in grade 3 to describe
perimeter in the words. Somehow from the class activity and class discussion we
can see that students are able to build their own understanding about perimeter.
They can show how they compare the perimeters of the frames. They can show
which part of the shape known as perimeter. We can conclude here that students
in grade 3 do not have to be really able to describe the meaning of perimeter in
certain words. Their understanding can be seen from how they work on counting
and comparing perimeter and their reasoning.
4.3.3 Counting perimeter with non-standard unit and introducing the term
‘area’
From the fencing frame activity, students have their understanding about
perimeter as the outer part of the shape. They use the ropes to surround the outer
part of the shapes then compare the ropes and stated that one rope is longer or
shorter than the other without considering the length of each rope. In this present
activity students start using nonstandard measurement unit to count the perimeter
of the shape. It was expected that student will have deeper understanding about
perimeter when they work with discrete tools which are more real for them
comparing to the ropes.
Making photo frame is the context used to learn about counting perimeter
with non standard measurement unit. If previous activity was comparing the fence
of the photo frame but now students create the photo frame by themselves by
using ice cream sticks. The objective of this activity is mainly as the bridge from
perimeter as the outer part of the shape in the first activity to the introduction of
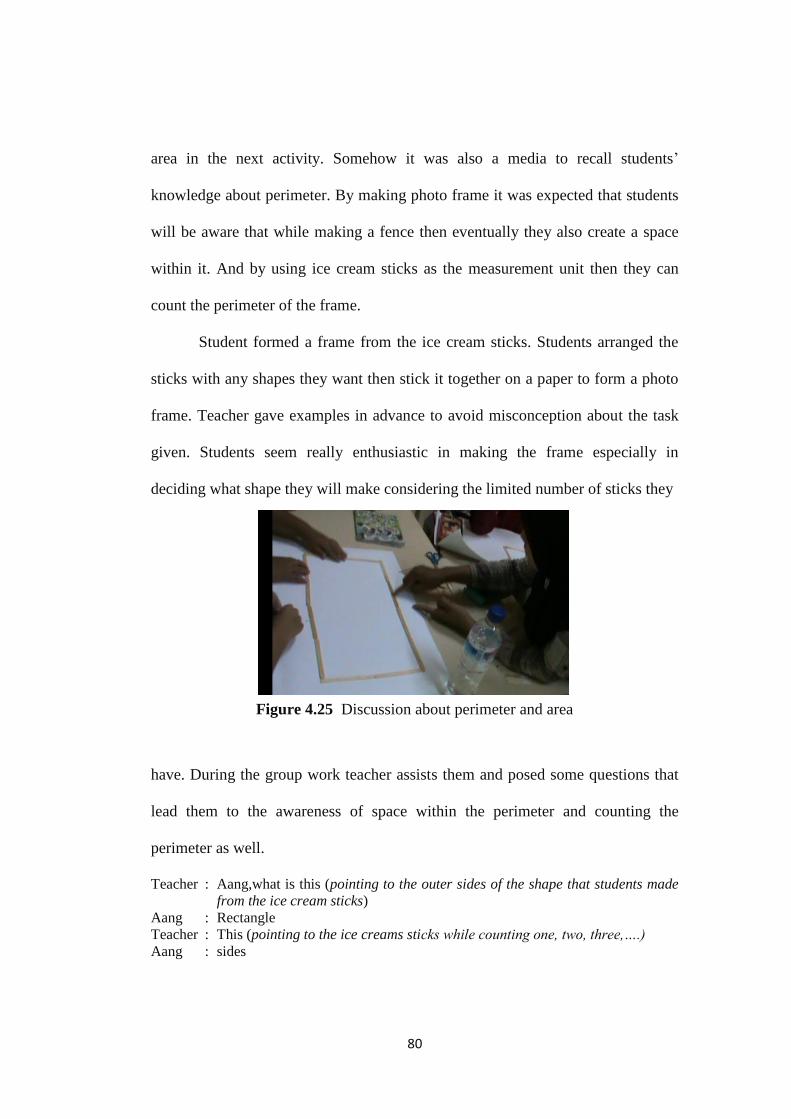
80
area in the next activity. Somehow it was also a media to recall students‟
knowledge about perimeter. By making photo frame it was expected that students
will be aware that while making a fence then eventually they also create a space
within it. And by using ice cream sticks as the measurement unit then they can
count the perimeter of the frame.
Student formed a frame from the ice cream sticks. Students arranged the
sticks with any shapes they want then stick it together on a paper to form a photo
frame. Teacher gave examples in advance to avoid misconception about the task
given. Students seem really enthusiastic in making the frame especially in
deciding what shape they will make considering the limited number of sticks they
Figure 4.25 Discussion about perimeter and area
have. During the group work teacher assists them and posed some questions that
lead them to the awareness of space within the perimeter and counting the
perimeter as well.
Teacher : Aang,what is this (pointing to the outer sides of the shape that students made
from the ice cream sticks)
Aang : Rectangle
Teacher : This (pointing to the ice creams sticks while counting one, two, three,….)
Aang : sides

81
Teacher : if this (pointing to one side of the rectangle)…this (pointing to another side),
these area sides. If all from here (surround the outer sides of the ice cream
frame) to here..?
Students : perimeter
Teacher : Then what is inside perimeter?
Students : area
Teacher : can you count the perimeter of this shape?
Students : (count the sticks)
From the discussion above we can see that the teacher try to recall the
understanding about perimeter and then also try to build students‟ awareness that
when they create a fence then there is an area within it. From the activity teacher
also bring students into counting perimeter with nonstandard unit, namely, ice
cream sticks. Counting with sticks seems easier for students than using ropes
because sticks are discrete quantity so it will be easier for students to count when
the unit is the sticks. It will be helpful for students when they just need to consider
that perimeter is the outer part of the shape and how to count it is just simply
count the number of ice cream sticks surrounding the shape.
-Discussion
In this activity we start seeing that perimeter was learned together with
area. When the students arranged the ice cream sticks to form a certain shape then
teacher directs them to be aware that there is a region within the shape that
they‟ve created. Somehow the sense of perimeter seems to be stronger than area in
this activity. Students seem busy in arranging the sticks and come into how many
sticks they‟ve spent for each shape somehow they do not really pay attention on
the region within the shape unless the teacher asked them about. Teacher‟s
question related with counting perimeter become a good support for students
understanding especially for them who still have less understanding of perimeter

82
from the previous activity which using ropes as the context. To build students
awareness on area then teacher also post question about the region within the
shape. Indeed some students seem struggled in this activity because they pay more
attention on working with sticks and put aside on the counting perimeter and
awareness on region within the shape. This students need to be supported so that
they will have the same understanding as their other friends.
4.3.4 Comparing the area
The study of area involves two steps based on Simon and Blume (1994) in
Zacharoz (2006); namely, considering the area as a quantity and evaluating that
quantity. Physical quantity can be seen while the experiences offer the students to
compare area of objects (Heuvel-Panhuizen, 2005). In this way, intuitive
awareness of measuring emerges in many students. Comparing the area of photo
paper is the activity that supports the students to learn about area. The context
given was that the price of the photo printing depends on the area of the photo
paper. The bigger the photo papers it means the more expensive the price and vice
versa. Teacher asked the students to help her or him to decide which photo paper
will cost the least amount of money to print the photos. By comparing the photo
paper it was expected that students will start using their intuition to compare the
papers by using, for instance, the term „bigger‟ or „smaller‟. The papers were
arranged as such so that students will be able to compare it by using their
intuition, they can compare directly with the other papers such as the bigger paper
can cover the whole part of a smaller paper. At this stage students might not be
able to describe the quantity of the area in numbers yet but they have made the

83
first steps of learning area already by describing the comparison of certain areas
with the terms „bigger‟ and „smaller‟.
Before starting the class activity with comparing the photo papers, teacher
again tries to recall students‟ knowledge about what perimeter and area are.
Teacher : Do you still remember what we‟ve learned yesterday?
Students : Keliling (perimeter)
Teacher : So what is perimeter?
Aang : perimeter is side to side
Meizar : Perimeter is the length of the outer boundaries (panjang batas terluar)
Teacher : (repeating Meizar’s answer) the length of the outer boundaries.
So what is area?
Students : region inside the sides
Students : inner part
Then teacher come to the white board, draw a rectangle and re-explain
about area and perimeter. Teacher repeated Meizar‟s answer about perimeter as
the length of the outer boundaries by surrounding the outer sides of the rectangles
then she shaded the inner part and poses a question for students:
Teacher : so what is this shaded part?
Student : area
Student : region
Teacher : the region inside the boundaries
So do you think the region inside the perimeter can be measured? it has
quantity?
Students : yes
Teacher : so area has a quantity
On the discussion above, the teacher tried to direct the students into the
early idea of what they are going to do on the activity. Teacher expected the
students to understand that area is not just the region inside the boundaries but it
also can be quantified and they will learn how to count it.
It‟s shown during the class experiments that from the very first place
students actually have the sense of area already. By seeing three different shapes,
for instance, they can directly differentiate them by saying one is smaller or bigger

84
than the other. Somehow it does still not yet come into their mind about how to
count the area. Indeed one or two students already know about counting the area
in the formal level of 𝑙𝑒𝑛𝑔𝑡ℎ × 𝑤𝑖𝑑𝑡ℎ but he failed to explain why it comes into
length times width; they just simply use it.
The conflict then arises when the teacher gave two different photo papers
which are slightly different for students to compare.
Figure 4.26 Comparing two different shapes
With these two shapes they cannot directly conclude which shape is smaller or
bigger than the other just by seeing it or put it in stack. They need to quantify the
areas to make sure which one is bigger or smaller than the other shape. And they
will ask and try to find the answer how to count the area of those shapes. To raise
the conflict in area then the teacher brought the context of printing photos that
they have discussed previously in the third activity. Teacher brought two different
sizes and shapes of photo paper, square and rectangle respectively.
In this activity, the teacher urged the students to think and figure out the
idea that they need a tool to quantify the area of the photo paper. From the HLT, it

85
was planned that teacher explores the possibilities to count the area from the
students‟ idea. Somehow during the class experiment teacher directly offered the
students to cut the paper. Teacher also questions how if comparing two shapes
which cannot be cut, for instance, comparing the area of one board to the other
board. Unfortunately teacher did not explore further and directly propose to use
paper to cover the surface. What teacher did might not give enough support on
students‟ development process. Somehow we will not discuss further in this
analysis. We will more focus on students‟ development process.
Coming into comparing the areas of two shapes by using square paper to
cover the whole surface, it was expected that from this activity students will build
their understanding for area as the total number of materials (square papers) that
cover the whole surface. The teacher started with class discussion on counting the
perimeter and area of class locker, as follow:
Teacher : Do this locker has perimeter?
Students : yes
Teacher : so count the perimeter
Figure 4.27 Class discussion on perimeter and area by using the lockers
at the context

86
From the previous activities of making photo frame where they used each
of ice cream sticks as the measurement unit of perimeter, teacher expected when
they count the perimeter of the locker, students will use each outer side of the
square box as the unit measurement. Somehow when the teacher asked them to
count its perimeter they answer it as 8 x 4 = 32 which as its area with the square
box as its measurement unit. It seems that students cannot relate ice cream sticks
with the sides of the square to be something similar to count the perimeter. Also
when the teacher comes with rectangular paper with square grid on it, some
students said that its perimeter is 4.
Figure 4.28 Grid paper
Those students do not have the idea of using each side of square grid as
the measurement unit as when they used ice cream sticks previously. They just
think that rectangle has 4 sides so for the perimeter as the length of all outer part
then it must be 4. Indeed some students count the perimeter as 12 square sides.
Teacher uses this answer as the class conclusion on how they count the perimeter.
Having the discussion above, student seems struggled at the first place to
differentiate which one for counting area and which one for counting perimeter.
We can see here that students‟ understanding about counting area and perimeter is
still not deep enough. Indeed, they already have the idea that perimeter as the

87
outer part and for them area is the inner part of the perimeter. Somehow the
context of locker seems quite abstract for them to represent area and perimeter.
Coming into the main activity of comparing two photo papers, teacher
asked the students to find which photo paper is smaller than the other. The goal of
this activity is to develop students‟ understanding of area as the number of
materials used to cover the surface. Somehow the idea of perimeter will also be
recalled by counting its perimeter by using the sides of square paper as the
measurement unit.
Using sticky papers to cover the whole surface of the photo paper seems
not a problem at all for all students. It might be supported from the previous
discussion of locker and rectangular paper with square grid in it. Somehow, again,
some of them still get mixed up between counting perimeter and area. Ardan, for
example, when the teacher asked him to count the perimeter of the photo paper he
counted the number of square paper. Even after the teacher explained to him that
perimeter is the outer part and area the inner part, still he counts the squares for
perimeter. It seems that counting the sides of squares doesn‟t make a sense for
him to count the perimeter. It seems that square is the one that real for him, the
sides of the squares seem to be one unit of the square so when it comes into
counting perimeter he also counted the squares.
Even though we found many students still mix up between area and
perimeter but some other students in fact do not have any problem with this
activity. They can differentiate very well which one for counting area and which
88
one for perimeter. This student seems to have good spatial ability as well. Taking
the side of square paper to count the perimeter seems reliable for them.
-Discussion
Area comparison of some shapes which can be compared directly seems to
be good starting point. This type of comparison is the simplest one for students.
Pupils have no problems in comparing these kinds of shapes only by seeing them
or put them as stacks. The idea of area was in fact already embedded in students
mind as well. They can compare the areas by saying one is bigger or smaller than
the other even though they do not have the idea of counting the area yet. Stepping
into indirect comparison where the students use sticky paper as measurement unit
then students starts to learn how to count the area. They start to have the sense of
area as the number of sticky papers they use to cover the whole surface of photo
paper. Somehow when it comes into counting perimeter by using the sides of
sticky paper as measurement unit then some confusion were there. For some
students, the side of sticky paper used as measurement unit of perimeter is still
quite abstract. First they use sticky papers to count the area but then they use its
side to count the perimeter. These students still need further support on their
understanding about perimeter and area.
4.3.5 Two plane figures with the same area can have different perimeter or
vice versa.
The common difficulty about perimeter and area is to understand that for a
given area, there are many possibilities of perimeter and vice versa. Pupils often
think that for the same area they will get the same perimeter as well. When

89
students lack awareness to this relation of perimeter and area then on their
continuation of learning process they might get confused about this concept. It is
important that students have time to explore the relationship between area and
perimeter. They need to know that not all shapes with the same area have the
same perimeter and vice versa (Bahr. Kathleen, et all).
Teacher has started to bring up the idea that for a given area, there are
many possibilities of perimeter and vice versa when they use sticky papers on the
previous activity. Students count the area by counting the number of sticky papers
and count the perimeter by counting the outer side of sticky papers. Somehow we
figured out that not all students can accept the idea of counting area and perimeter
by using sticky papers. Some of them can distinguish very well between area and
perimeter but some of them get mixed-up between counting area and perimeter.
For them using the side of sticky papers to count the perimeter seems quite
abstract.
Indeed the understanding that for a given area there are many possibilities
of perimeter and vice versa is still new for the students. Even though in the
previous activities it was already introduced, somehow the use of sticky paper as
the context for both counting area and perimeter seems still made some students
confused. At the contrary with sticky papers, the use of wooden matches and grid
paper as the context to learn the relation of perimeter and area seems to be a rich
material to use. Starting with forming as many shapes as possible from the same
number of wooden matches on the grid paper, teacher encouraged the students to
develop their own understanding about the relation of perimeter and area. For

90
instance, with 10 wooden matches in fact different students have different ideas of
arranging the shapes that result in different areas as well.
Figure 4.29 Examples of different plane figures with the same number of
wooden matches
From the pictures above we can see that, with the same number of wooden
matches, 10, the shapes have different number of square grids. It leads to the
understanding that for the given perimeter the areas can be different.
Figure 4.30 Examples of different plane with the same number of square grids
but different wooden matches
Conversely, for making any shapes with 4 squares grid area, each students may
need different number of wooden matches. It leads to the understanding that for
the given area, the perimeters can be different.
The use of wooden matches and square grids as a context was in fact very
reliable for students. They used to count the area with square grid as its
measurement unit and wooden matches as the boundary of the shapes seem real
for them. The fragment below shows how the use of wooden matches and grid
paper help students in counting the perimeter and area.

91
Teacher : what is the perimeter? let‟s count
Doni : (tagging each wooden matches and whispering 1,2,3,…12) twelve
Teacher : ok..12, now what is the area?
Doni : (tagging on each square grid inside the wooden matches and whispering
1,2,…6) six
We can see that it seems Doni doesn‟t have any problem to differentiate which
one is perimeter and which one is area. The perimeter represented by wooden
matches and area represented by square grids seem to be to different things that
are real different for students.
For some students who already have a good understanding, with some
support, they even can figure out how to count the perimeter in a handy way
instead of counting it one by one. Mizar, for instance, he can notice that the
opposite sides have the same length so he came into the idea of 2 × 𝑝 + 2𝑥𝑙
for counting perimeter.
Moving from the context of wooden matches which is very real to students
then teacher comes into worksheet where students try to draw a shape on the grid
paper. It was expected that students no longer need wooden matches to form a
certain shape; instead they will draw on a grid paper. Same as forming wooden
matches, students have no problem in interpreting wooden matches on grid paper.
Even though most of them just play in the rectangular form vertically or
horizontally but they can stick with 10 wooden matches.
Coming into finding the biggest area that possible to be formed from 10
wooden matches then there are different levels of understanding towards this
problem. Some students can directly describe their reasoning very clear that the
biggest area is the one that has the most number of square grids. Somehow there

92
are some students who can write the area and perimeter correctly but did not
explain which one is the smallest or biggest. There are some possibilities, they
might understand already but are not able to describe their reasoning, and other
possibility they do not really understand the question given. Students with lower
ability somehow still struggle in understanding about counting area, for
comparing the area they just see the physical appearance and ignoring the number
of square grids.
Finding the longest perimeter has the similarities with area. Even though
they know from the first place that as if they only have 10 wooden matches to be
drawn on the grid paper, somehow they still answer that one of the drawing has
the longest or the shortest perimeter. They mostly pay attention on the physical
appearance of the shape and ignore the number of wooden matches on the
drawing. Indeed there are one or two students who can answer correctly that all
perimeters remain the same because all those shapes spent the same number of
wooden matches; namely, 10. Still it becomes a great concern of the teacher that
some students still struggle with perimeter and area.
Repeating the discussion on perimeter and area seems to be one of the
supports from the teacher to help the students to build their understanding about
perimeter and area. Teacher decides to repeat the discussion on area and perimeter
especially emphasizing on counting perimeter. Class discussion seems to be the
right choices, first because students have learned in the previous day, second
because all the class will be involved in the discussion. Teacher puts big grid
paper on the white board and represents wooden matches with ice cream steaks.
93
Posing several questions about perimeter and area, teacher expected the students
to recall their previous knowledge about how to count perimeter and area
-Discussion
The use of wooden matches and grid paper was really good support for
students learning after some confusion in the previous learning with sticky paper.
First of all wooden matches are something separated from the grid paper. Students
will notice it as 2 separate things. Grid paper to represent the area counting and
wooden matches along the side of the grid paper to represent the perimeter
counting.
By using wooden matches and grid paper teacher tries to build awareness
that for the given area it might have different perimeters and vice versa. As the
example mentioned above that for 10 wooden matches, for instance, students can
create different shapes with different areas as well.
The wooden matches and grid paper are real and make sense for students,
so they do not find it difficult to come into more formal level where they no
longer use wooden matches but draw it on grid paper. Drawing the shape on a grid
paper was quite similar with arranging wooden matches so students are still able
to recognize this pattern of work.
4.3.6 Form the shape with odd number of wooden matches
From the previous activity, students were working with all even numbers
of wooden matches. The teacher tried to give a problem to the students “how if
the numbers of wooden matches are odd and they have to create square or
rectangular shapes?” Through this activity, it was expected that student realize,
94
they need even number of wooden matches to form rectangle and square. It was
also expected that they will realize that the opposite side of rectangle have the
same length. Indeed we will not go further into formal form of counting perimeter
and area but in the long run, based on their knowledge, they will be able to come
into more formal level of counting perimeter in the form 2 × 𝑙 + 2 × 𝑝 or
2 × 𝑙 + 𝑝 .
Teacher let some representation to come forward and demonstrate how to
make square or rectangle with odd number of sticks. They were so eager to solve
it, they do it very quick since they already has lots of experiences of creating
shapes from the previous activities. But in the middle of their work they started to
realize that it is impossible to create a square or rectangle with odd numbers of
wooden matches. Arranging with odd numbers then they will end up with “need
one more matches” or “one matches was left over”.
Teacher also posed the next problem, is that enough with even number of
matches to create a square? Teacher made some kind of class discussion and
chooses some representative to come forward and demonstrate how to make the
square. Arranging square with even number of sticks then they realize that they
need more than just even number but also divisible by four.
-Discussion
Exploring the ideas of arranging the shapes from wooden matches in fact
can be very broadening. After working with the same number of matches or the
same number of square grids but different number of matches then the teacher try
to explore to the possibilities of forming rectangles or square from odd number of

95
wooden matches. In this activity all students involve with their design respectively
and indeed they have the idea that it was impossible to form the rectangles and
square with odd number of matches in the contrary it have to be even number.
Somehow the students did not come into the awareness yet that the opposite side
has the same number of matches. They have those ideas after the teacher direct the
students to see the sides of the shapes. To come into the idea of formal calculation
also still a long run. It seems that students need more time to explore the idea of
odd wooden matches.
4.3.7 Exploring the perimeter and area of the shapes other than rectangle
and square
The concept of perimeter and area actually is not limited in the form of
rectangle and square only. Every plane shape has the concept of perimeter and
area including irregular shapes. In our everyday life we figure out irregular
shapes also, other than regular shape. Realizing that students needs to be able to
generalize the concept of perimeter and area not for rectangle and square only
then it‟s important to give sometime for student to explore the shapes other than
rectangle and square.
The aim of this activity is to develop students‟ awareness that 2 shapes
with the same perimeter can have different area and vice versa. Another reason is
that we avoid students to come directly into rope activity that seems quite abstract
compare to recall wooden matches‟ activity. Before directly step into irregular
shapes then we bring the students to parallelogram and rhombus. Parallelogram
and rhombus was chosen because we want to stick into the concept of the relation

96
between area and perimeter. By using 4 ice cream sticks for each shape for
instance, then we can get different area when one shape is square and the other
one is rhombus.
Arranging plane figures with ice cream sticks again can be used to explore
the perimeter and area of parallelogram and rhombus. Looking back to the
previous activities of arranging wooden matches for rectangle and square, teacher
tried to bring the conflict among the students. How if her rectangle was moved a
little bit to the right or to the left, will it still have the same area with the previous
one (i.e rectangle)?. It was interesting because the class was divided in two
groups, half believed that the area will remain the same but some said it will
change. By questioning about the area of the shape then students will start to
explore it by measuring it.
Teacher started the discussion about perimeter and area of parallelogram
and rhombus by asking the students to form any rhombus with four ice cream
sticks.
Figure 4.31 Forming the shape with ice cream sticks
97
The form of rhombus made by the students seems did not help much to
reveal the fact that the rhombus and square which formed from the same number
of ice cream sticks have different area. It happen because students formed the ice
cream sticks just slightly different from the squares. Most of the students see it as
one square area, same as the square shape previously. Teacher then asked other
students to form another parallelogram, this time with six ice cream sticks.
Counting the area of the parallelogram and rhombus is something new for
students. First, the shape is slightly different with squares and rectangle. Here two
opposite side are a little bit slant compare to rectangle or square. Since the
students have experienced to use square shapes to count the area then it might
make them confuse a little bit about how to count the area of rhombus or
parallelogram. There are some left over parts which are not covering the whole
one square grid.
Teacher introduced the concept of counting area with approximation.
Teacher introduce the term, for instance, greater than 2, smaller than 1. Somehow,
introducing approximation was not an easy approach for the teacher. It might
happen because students start to learn counting perimeter and area by using the fix
whole number of measurement unit and using certain shape like rectangle and
square.
Moving from parallelogram and rhombus into irregular shapes then
teacher use the ropes and grid paper as the tools to reveal the idea of irregular
shapes. Teacher asked the students to form any shapes from the rope on the grid
paper.

98
Figure 4.32 Forming the shape with the ropes
The idea of giving the task to form any shape is that, ropes are flexible to
be formed in any way; it‟s quite different with ice cream sticks or wooden
matches which have straight shape. By using ropes we expected that students will
come with non rectangular or square form but more to irregular shapes. We expect
that students will aware that with the same length of ropes they can make different
shapes and remains in different area as well. And they won‟t restrict their idea
with rectangle and square only but to any shapes.
Somehow what happen during the class experiment did not really as the
conjecture given. Most of the students tend to form rectangle and squares form.
Even though the teacher asked them to form any shapes but still from the first idea
that come into their mind was making rectangle and square form. Indeed they can
form square or rectangle in a perfect shape because it‟s quite difficult to make a
right angle; somehow their basic idea was rectangle and squares. The benefit of
using ropes is that students can‟t force themselves to make the ropes in line with
the grid paper, sometimes the lines lays between the squares grid. This condition
will urge the students to make an estimation to count the area of the shapes.

99
Since forming the shape from the ropes was not really handy so it take
quite some times for students to make the shape itself. They really focus on how
to form the shapes from the ropes given. When it comes into counting the area
then students seems still struggle to make estimation. It‟s shown from their
worksheet that they did after this activity. For counting the area of the plane figure
given below
Figure 4.33 The shape formed from the ropes, arrange on the grid paper
then they still write it in the whole number of squares unit. It seems students still
confuse to decide, for instance when the shape only cover some part of the square
grid, then it still difficult for them to decide what value they can give, such as a
half of the square, more than a half or even less than a half. It seems the whole
number is the only real number for them so most of them still answer with the
whole number.
-Discussion
The perimeter and area exploration of the shape other than rectangle and
square was important for grade 3 students. In their daily life they do not just face
rectangular shape only but also other shapes including irregular one. By giving a
chance for the students to explore the shape other than rectangle and square than
100
we help the student to build their awareness about the concept of perimeter and
area for any shapes.
Indeed the student‟s understanding about the concept of perimeter and area
might be more in rectangle and square form somehow we already gave a
preliminary knowledge about different shapes that available and need to be
consider by them as well.
Starting with parallelogram with ice cream sticks and grid paper seems to
be good choices before come into irregular shape with grid paper. In fact ice
cream sticks were less abstract compare to ropes to be form as the shapes. With
the parallelogram and rhombus we can lead the students to the shape other than
rectangle and squares but also still in the coverage of the relation between area
and perimeter where in the same area it might be some possibilities of perimeter.
The use of ropes as the tools to form any irregular shapes seemed does not
really help to come into the idea of the relation between perimeter and area. It
happen because the ropes it selves were not quite handy tools to be formed as the
shape. Students more focus in deciding what shape to be formed and how to form
it rather than realize that each of them use the same length of ropes to form
different shapes and different area. Indeed teacher also bring the discussion about
it to the class, somehow we figure out that the students still struggle with it.
4.3.8 Post-test
The post test was conducted after we complete the whole series of
teaching experiment. This test was aimed to assess students‟ understanding about
the lesson given along the whole lesson series. Based on the result along the

101
process of teaching experiments then we decided to make several revisions on the
post test of cycle one. Some addition activities and students‟ works were given
during this cycle which is not given in the first cycle, so we consider to also
assessing the addition material given.
All the questions given in post test were about what student have learned
during the teaching experiment. Starting from comparing two different shapes
then we see that most of the students came into the idea of perimeter and area,
they differentiate the shape based on their perimeter and area. They are also able
to describe how they count the perimeter and area.
Working with incomplete grid paper, they are able to use their spatial
ability to see the grids as a whole coverage of the surface. And for those who did
work well with their spatial sense then put the line to continue the pattern of the
grid. It seems that the students understand very well about the concept of area as
the total square grids to cover the surface. Somehow we also found some student
who still struggle with incomplete grid. They cannot imagine the grid as the whole
surface, they area only pay attention on the grids that was drawn on the paper.
Working with the wooden matches, in this test, student no longer working
with wooden matches in real but they only imagine as if they have certain number
of wooden matches to be drawn on the grid paper. Most of the students find no
problem in drawing the matches. Most of them work in the shape of rectangle and
square. It is quite understandable since they work most of the time with these two
shapes. We also still found some students who struggle to draw the matches, they
might find problem to imagine the matches and put it in the drawing.
102
Counting the area seems does not become a problem for most of the
students. They understand very well that area is the inner part of the shape then
they count the number of square grids to get the area. Somehow for perimeter in
fact did not result the same way. Many students still struggle with the idea of
perimeter. Indeed they understand that they need to count the outer side to get the
perimeter but when it comes into comparison then they get mix up. They still
consider that the shape which looks longer than the other shape no matter the
calculation is, it will be consider having longer perimeter as well.
From the result of post test we divide the students into three different
group, first those who made some improvement from their previous knowledge,
second those who still struggle with the concept of perimeter and area and third
those who did not join pre-test. From 28 students, 14 of them make a very well
improvement, 11 of them still struggle with perimeter and area and 3 of them did
not join pre-test. For those who did not join pre-test, we hardly find prove about
their initial knowledge about perimeter and area but Diva made a good work on
her post test, even though her other 2 friends seem still struggle as their other 11
friends.
-Discussion
The result of this post-test more or less can give description about
students‟ progress from their initial knowledge. Statistically comparing the result
of pre-test and post-test indeed we see some improvement for some students but
some other also still struggle with the concept of perimeter and area.
103
For instance the different acceptance about the concept of area and
perimeter, most of the student can count and compare the area of two different
shapes; somehow many students still struggle to compare the perimeter of two
different shapes. It might be happen because the idea of area in this learning series
seems more real for students to be put in their logic. Even though perimeter seems
to be a very simple measurement but when we put together with area, student
might get it more abstract compare to area.
Even thought the main consideration in this paper is about the process of
students learning but at least from this post-test we also can briefly conclude that
indeed those representations of numbers (see appendix) can support the
argumentation previously about the development of students‟ learning process.
4.3.9 General Discussion
The relation of perimeter and area become the means in this research to
support students‟ understanding about the concept of perimeter and area. Based on
the aim of this research, the learning series was arranged as such so that perimeter
and area were studied side by side along the learning series. The key principles of
RME serve as a basis for the whole learning series in this research. We will
elaborate how that key principles underlay the activities in this research.
4.3.9.1 Guided Reinvention or Mathematizing
The first key principle of RME is guided reinvention or mathematizing.
Based on this principle, teacher should give opportunity for students by guiding/
supervising them to re-invent the concept of perimeter and area by themselves.
Teacher‟s role is very important to help the students to re-invent their own
104
mathematics. The following are the elaboration of teacher‟s role in guided
reinvention or mathematizing.
1. Providing students an opportunity to present their idea
During the group or class discussion teacher should stimulate student
to present their ideas to start the class discussion. Teacher can start it by
posing question to the students. During the teaching experiment we figure out
that teacher posed the questions below in order to provoke students to present
their idea.
- “What is perimeter according to you?”
- “What did you use to measure perimeter?”
2. Stimulating social Interaction
Teacher should be able to stimulate social interaction among students.
Teacher can provoke this interaction through pair work, group work or class
discussion. It was proven in the observation that those students who rare to
share their ideas in the class discussion were able to share it in the pair or
group work. Another strategy to stimulate social interaction was posing
appropriate question, as one of the question posed by the teacher during the
teaching experiment below,
“Kiki said we can use hand span to count the perimeter, how about the others?”
Along the lesson series teacher also arranged group activities where
students work in their group to cooperate in solving the problem and sharing
ideas. It is important for the students to interact among their friends and also
with the teacher because their learning process was not only when they study
themselves but more when they share it with people and get justification from

105
them. As the discussion in one of the group during the teaching experiment
below when one student try to respond to their friends answer.
Teacher : (talking to the group) So how you count this perimeter?
Rizky : (tagging each side of sticky paper) one, two,…seventeen
Aang : (knowing that Rizky’s tagging was not synchronic with his counting)
you wrong!
Teacher : this is how you suppose to count (tagging each side of sticky paper)
one, two, so now you try
Arya : (tagging each side of sticky paper) one, two,… (he did skip counting)
Aang : you wrong, you missed one line. (he showed to the group how to
count the perimeter correctly)
3. Connecting activities
To support student‟s learning, teacher needs to help the students in
communicating and developing their ideas by elaborating upon what they
already know. During the teaching experiment we figured out a discussion
where teacher try to relate the previous activities with the next activities, as
the conversation below.
Teacher : ”what tools can you use to measure perimeter?”(students mention
ruler, hand span, ropes, pencil case etc)
Teacher : (show a circular shape) “what tools can be used to measure this
shape?”
Meizar : ribbon
Teacher : how about this (show rectangular shape)
Rizky : ruler
Teacher : (repeated again for circular shape) so can we use ruler to
measure the perimeter of this shape?
Students : no..
From the conversation we can see that teacher try to relate the
knowledge of students about length measuring tools with counting perimeter.
Teacher tried to bring the students to their awareness that not every shape can
be counted with the same tools. Teacher also wanted to make ropes as a tool
that make a sense for students in the next activities that will be conducted.

106
4. Eliciting the mathematical concept
Cooke & Buchholz (2005) and Kolb in de Freites & oliver (2006), in
Ariyadi (2009) mention that the most important objective of a class discussion
is transforming students‟ concrete experiences into mathematical concepts.
One of the examples of transforming a concrete experience into mathematical
concept during the class experiment was when the teacher tried to bring the
idea of region within the boundaries into measuring area.
“ Do you think the region within the boundary has quantity?”
By posing a question about quantity, teacher try to direct the students
to the idea that if the region has quantity then it can be measured, the next
question for students will be “How can I measure the quantity of this region?”
Other finding during the teaching experiment that shows how teacher tried to
elicit the mathematical concept was when students use sticky paper to count
the area of the photo paper below
Figure 4.34 Ilustration of photopaper covered with sticky papers
Teacher : what is the area of the shape?
Aang : (counting the square one by one) twelve
Teacher : do you have any other way than count it one by one
Aang : this is 4 right (pointing to the first row), then this three (pointing to
the last coloumn) so four × three equal to twelve.
107
5. Asking for clarification
In the learning process we need to figure out the student‟s thinking
through their reasoning. From students‟ reasoning we can see their idea or
strategies that can picture either their achievement or the difficulties that they
face during the learning process.
During the observation of teaching experiment we found several
discussions when teacher tried to clarify students‟ answer.
Teacher : which one has the cheapest price s? (show 3 different rectangular shapes
and stated that the smallest its area the cheapest its price will be )
Students : B (the biggest one)
Teacher : how can you decide B?
Students : It‟s the smallest
Teacher : How can you know B is the smallest? Aang, come here, show how you get
B.
In the discussion above teacher try to get the clarification from students about
their answer. This becomes one of the ways for the teacher to see students‟
ability in expressing their idea as the benchmark of their understanding. As
have been stated by Romberg, et all (2005) that expressing ideas involves
communication of knowledge, either verbally, in writing or through such
means as pictures, diagrams, or models.
4.3.9.2 Didactical Phenomenology
Based on the idea of didactical phenomenology, the teacher may find the
situations that can evoke paradigmatic solution procedures that can be taken for
vertical mathematization (Gravemaijer, 1994). One of the ways that teacher can
do is by finding the contextual problem that allows for a wide variety of solution
procedures (Gravemeijer, 1994). In this research we helped the teacher to design
108
the series of activities that reveal a contextual problem in which students might
come with a wide variety of solutions.
A situation that is experientially real for students is used as the base for
mathematical activity along the learning series. Some activities were chosen to fit
the concepts of perimeter and area and are also experientially real for students; for
instance, arranging shapes with wooden matches. From 10 wooden matches
students can come with different shapes but often with rectangular and square
form. For rectangular and square forms, to count the perimeter of the shapes,
students might also come with different strategies. From the observation during
the teaching experiment some students choose to count the number of wooden
matches one by one, others choose to see only two sides, they add it up then
multiply it by two since they know that the opposite sides has the same number of
wooden mathches.
4.3.9.3 Self-developed model
A self-developed model was the last principle of RME that serves as the
basic idea in this research. The whole series of activities were intended to be able
to support students in making their self-developed model to understand the
concept of area and perimeter. Creating picture frame from ice cream sticks, in
fact, help students make a very simple preliminary description about perimeter
and area. The inner part is area and the outer part (i.e ice cream sticks) is the
perimeter. With their own simple description they use to memorize in their mind
what area and perimeter are.
109
Starting to count the number of square grids to count the area and also
arranging wooden matches in square grid paper then students accustom with the
square grid unit in counting area. As they have to count the area of shape made
from ropes, the first idea they have is to put it on the grid paper so that they can
count its area. Students are also familiar with counting perimeter with wooden
sticks unit or use one side of the square grid. They accustom with certain model
that they use in counting perimeter and area and use it in solving problem.
Learning perimeter and area side by side along the lesson series makes
them accustomed to see both aspects of perimeter and area in any shapes. When
they were asked about the different between two shapes, their answers mostly go
into the similarities or the difference of its perimeter and area even though some
of them also pay attention to the different form of the shapes. The fact that two
shapes with the same area might have different perimeters and vice versa seems
help the students to be aware that area is not depending on its perimeter and vice
versa.

110
CHAPTER VI
CONCLUSION
5 Conclusion
5.1 Answer to the research questions
This chapter will consist of the conclusion that was drawn from the whole
learning series to answer the main research questions. The main research question
was formulated as ”How can exploring the relation of perimeter and area support
the students’ understanding about the concepts of perimeter and area”. For
answering the main research question, we have two relevant questions that make
the main research question more practical and concrete. Those are:
1. What activities can be used to explore the relation of area and perimeter?
2. What kinds of understanding that students could reach from the learning
process?
5.1.1 Answer to the first sub question
There are two main ideas relating to the relation of perimeter and area.
Those are the idea that every time we create a fence then eventually there is a
region within it, and the idea that for two different shapes with the same area then
there are many possibilities of perimeter or vice versa. In this research, we
designed the learning trajectory that consists of the series of activities that was
expected to explore the relation of perimeter and area. We will describe briefly
how an activity can be used as the tool to explore the relation of perimeter from
each activity.

111
- Making Photo Frame
The objective of this activity is mainly as the bridge from perimeter as the
outer part of the shape in the first activity to the introduction of area in the next
activity. In this activity students arrange the ice cream sticks on the paper to create
a photo paper. From this activity indeed we can‟t see much what is reveal from
students mind. The only obvious happening is that there were busy to decide what
shape they will create.
Somehow during the group work teacher support the students by posing
some questions that lead them to their awareness of space within the perimeter
and counting the perimeter as well. From the discussion in the class (see 4.2.3) we
can see that Aang, for example, with the support from the teacher can answer
which part of the shape that was called as perimeter and area. He notices the outer
part of the shape (i.e. ice cream sticks) is perimeter and he also knows the word
area already and describes it as the inner part of the perimeter. He with his
understanding that define perimeter and area physically without relate it with the
quantity yet.
- Measuring photo paper with sticky paper
The goal of this activity is to develop students‟ understanding of area as
the number of materials used to cover the surface. Somehow the idea of perimeter
will also be recalled by counting its perimeter by using the sides of square paper
as the measurement unit.
From this activity student will both working with sticky paper for counting
perimeter and area. For perimeter, they will count the number of the sides of
112
sticky paper and for counting the area, they will count the number of sticky paper.
It was arranged as such so that with the same number of sticky paper it will result
different number of the sides and vice versa. Here students figure out themselves
that from 2 different shapes with the same number of sticky paper they can get
different number of sides (see 4.2.4).
- Arranging shapes with wooden matches
The use of wooden matches and grid paper as the context to learn the
relation of perimeter and area seems to be a rich material to use. Starting with
forming as many shapes as possible from the same number of wooden matches on
the grid paper then teacher encouraged the students to develop their own
understanding about the relation of perimeter and area. For instance with 10
wooden matches, in fact different students have different ideas of arranging the
shapes that result in different area as well.
Conversely for making any shapes with 4 squares grid area, each students
may need different number of wooden matches. It leads to the understanding that
for the given area, the perimeter can be different. By using wooden matches and
grid paper teacher try to build awareness that for the given area it might have
different perimeter and vice versa. As the example mention above that for 10
wooden matches, for instance, students can create different shapes with different
area as well (see 4.2.5).
Conclusion for the first sub question
Making photo frame, measuring photo paper with sticky paper and
arranging shapes with wooden matches are activities which can be used to reveal

113
the relation of perimeter and area. From doing those activities, students experience
themselves how perimeter and area are related. By making photo frame from ice
cream sticks they realize that counting the perimeter means counting the number
of ice cream sticks, somehow they also wondering that there is a region within the
ice cream frame. It comes into their awareness that every time they create a fence
then there will be a region within it. This is the preliminary step of knowing the
term „area‟.
Comparing the area of photo paper with sticky papers then students figure
out that two photo papers with the same number of sticky papers to cover its
surface do not always remains with the same perimeter which in this case they use
the side of sticky paper as measurement unit of perimeter. In addition wooden
matches‟ activity also gives rich possibilities of revealing the relation of perimeter
and area. Student can arrange different shapes with the same number of matches.
With 10 wooden matches for instance, each students might form different shapes
which also result in different area. They realize themselves that forming two
shapes with the same number of wooden matches, they might found those shapes
have different area. Reversely, forming 2 shapes with four squares unit area then
they might use different number of wooden matches to form it.
5.1.2 Answer to the second sub question
The goal of this design of learning series is that by exploring the relation
of perimeter and area, student will gain an understanding about the concept of
area and perimeter along their learning process. During the class experiment
students experienced a learning series that was designed as such so that it was

114
expected to occupy the need of students to support their understanding about the
concept of perimeter and area. As we described in chapter 2, Skemp described the
understanding as recognizing a task as one of a particular class for which one
already knows a rule (Skemp, 1979 in Olsen, 1981) or the ability to deduce
specific rules or procedures from more general mathematics relationship, in short
one knows „how‟ and „why‟.
Grade 3 students have learned how to measure the length with standard
and non-standard tools. Here we conclude that they already have understanding
about length measurement. It was shown also when the students were able to
mention the tools that can be used to measure the length of the fence for the photo
frame (see 4.2.2). Perimeter itself also related to the concept of measuring length.
This becomes one of the considerations that even though the learning of perimeter
and area will come side by side but the introduction to the term of perimeter come
in the first learning series.
From the frame fencing activity students start to experience themselves
how to compare the fence of the frame by using ropes. They might not yet really
know how to describe what perimeter is but we can see from their work that they
have the idea of perimeter when they surround the outer part of the shapes with
ribbon. They aware that to know the total ropes needed to fence the frame, they
need to surround the frame with the ropes.
We found that it was not an easy task for students in grade 3 to describe
perimeter in words. Somehow from the class activity and class discussion we can
see that students were able to build their own understanding about perimeter. They

115
can show how they compare the perimeters of the frames. They can show which
part of the shape known as perimeter (see 4.2.2). We can conclude here that
students in grade 3 do not have to be really able to describe the meaning of
perimeter in certain words. Their understanding can be seen from how they work
on counting and comparing perimeter and their reasoning.
Exploring the relation of perimeter and area become the means in this
research to support students‟ understanding in the concept of perimeter and area.
Making the frame from ice cream stick was aimed to lead the students into
counting perimeter with non-standard form. After making the frame from ice
cream sticks then they count the perimeter with each stick as its unit
measurement. The stimulation from the teacher (see 4.2.3) helps the students to be
aware that when they create the frame then there is a region within it. Even though
they have different word to describe it such as space, or area but we can see that
students start having the idea of area.
Having the idea of area as the region within the frame then it was
continued into the quantity of the region itself. When the students compare 2
different shapes which they can not just use their intuition to decide which one is
bigger or smaller then they need another tools to quantify it. The use of square
paper as the tools to quantify the area of shape seems really help to make the
students understand about the concept of area as the total material needed to cover
the whole surface. Through this activity student are able to demonstrate how to
count the area with square paper unit. They can compare two different shape by

116
differentiate the number of square papers that cover the surface of the shapes (see
4.2.4).
In the relation of area and perimeter the fact is that two shapes with the
same area might have different perimeter and vice versa. Students need to explore
those relation so that they have good understanding and able to differentiate very
well between area and perimeter. Working with sticky paper and wooden matches,
students start to explore that relation. With sticky paper they experienced
themselves that with the same number of sticky paper, two shapes can have
different perimeter with the sides of the sticky paper as the measurement unit (see
4.2.4). Also when students work with wooden matches, they experience
themselves that with certain number of wooden matches they were able to form
several different shapes with different area. Conversely to result the shapes with
certain number of square grids they can spend different number of wooden
matches (see 4.2.5). From this activity, students will aware that not every shape
with the same perimeter will result the same area and vice versa.
Conclusion of second sub-question
We grouped the kinds of understanding that students gained along the
learning process into two different kinds. First is when students can recognize a
task as one of a particular class for which they already know a rule. Second is
when students can deduce specific rules or procedure from more general
mathematics relationship, simply we can say they can explain how and why.

117
5.1.3 Local Instruction Theory of learning perimeter and area in grade 3 of
elementary school
We have described in chapter 1 that the aim of this research was to
develop a local instructional theory on supporting students understanding in
perimeter and area through the relation of perimeter and area. Below we formulate
a table to summary the local instruction theory that consist the sequence of
activities and the concept for the teaching and learning perimeter and area.
Activity Tools Practice Concept
Measuring the
fence of the
photo frame by
using ribbon
Ribbon Measuring the fence
and comparing the
length of the fence
Perimeter is the curve
enclosing a region of a
surface or the length
of such a curve..
Making photo
frame from ice
cream sticks
Ice cream
sticks
Creating frame from
ice cream sticks (any
shapes)
Area is a part of a two-
dimensional surface
enclosed within a
specified boundary or
geometry figure
Comparing the
area of photo
paper
Photo paper Direct comparison Area is the measure or
extent of such a or part
of a surface
Comparing the
area of photo
paper by using
sticky paper
-Photo paper
-Sticky paper
Indirect comparison Area is the number of
material needed to
cover the whole
surface
Arranging the
shapes from
wooden
matches
Wooden
matches
Arranging different
shapes by using
wooden matches on
a grid paper
Two shapes with the
same area can have
different perimeter and
vice versa
Arranging the
shapes from
ropes
Ropes Arranging different
shapes by using ropes
on a grid paper
Two shapes with the
same perimeter can
have different area and
vice versa.
Figure 5.1 Local Instruction Theory

118
5.2 Weakness of the research
We designed the Local Instruction Theory with the key principles of
Realistic Mathematics Education as the underlying theory (see 5.2). The cyclic
character in design research allowed us to adapt the experimental settings and the
learning trajectory, and instructional activities are used to elicit our purpose in this
study.
Somehow, the high expectation from the researcher made the design of
instructional activities become very compact within a certain period of time. Each
phase of instructional activity was designed in one day meeting. Most of the
phases consist of group work activity, class discussion and individual work on
worksheet related to the respective activity. For grade 3 students, indeed those
series of activities seems too much to be achieved at once. The concepts of
perimeter and area are new for students in grade 3. They need more time to
perceive their own learning process. From the interview with the teacher, we got a
very valuable input that the students in grade 3 feel a burden to have the learning
series that consist of group work, class discussion and individual work all at once.
During the teaching experiment we also figure out that students‟ respond was
decreasing when it passed a half period of the learning duration.
Another consideration is about students‟ learning styles. In this study,
researcher did not make any further elaboration on how students‟ learning styles
in fact gave contribution to the process of their learning. As an example, some
students found that the use of tools such as wooden matches or sticky paper really
helpful for them to understand how to find area or perimeter. At the contrary some

119
others do not need any practical experience, they simply reading about and
studying them.
It will give beneficial when we study further on students learning style so
we can put appropriate approach for a particular conditions for the students which
can give a better result of the study it self.
As we describe in chapter one that one of the aim of this research was
supporting student‟s learning process to understand the concept of perimeter and
area. Somehow the description and boundaries on what is so called „support‟ was
not being elaborated. It needs some more detail description to clarify how far we
can say that some action called as support for students on their learning process.
5.3 Recommendation
Through the whole process of implementing the HLT on the teaching
experiment, we have several considerations that can be recommended for further
research or for educator who is interested in this particular course. We will start
with the classroom organization. The class size in fact also affected the
implementation of this leaning series. Students in grade 3 are children who love to
play and very active. The more space for students to explore themselves will be
beneficial for the learning process. We recommend putting two class teachers who
in charge for the implementation of this learning series so that they can well
manage the class.
The duration of the teaching experiment should become the main
consideration from the very first time of designing the experiment. We
recommend for the future researcher to pay attention to the duration of teaching

120
experiment. The time which is too short or too long will give huge effect to the
result of the research itself. We also recommend a preliminary research to the
intended school, first because we need to know earlier about the place where we
will conduct the experiment; second we can interact and make discussion with the
teacher so we can share more and get more information to eliminate any possible
error/obstacles.
Concerning with the learning process itself, the choices of square sticky
paper to count the area of the photo paper and also the perimeter of the photo
paper seems confusing for students. Square papers to cover the whole surface of
photo paper seem to make a sense for students but using the edge of the square
paper to count the perimeter of the photo paper seems confusing for them. We
recommend to the teacher to be critical in choosing the context as the means to
help students re-invent the mathematics. Instead of using square papers we can
use wooden matches and grid papers or keep the square paper context but leave it
for the concept of area only.
The use of ropes to explore the perimeter and area for the shape other than
square and rectangle seems to be a good idea. Somehow we have to be aware with
the previous learning series we already have. If along the series students used to
work with rectangle and square only and not familiar with estimation then when it
comes with any shape (irregular shape) formed from ropes they will struggle a lot
in making the estimation of its area and neglect the fact about the relation of
perimeter and area itself.

121
5.4 Reflection
Looking back into this study, we can see that the domain instruction
theory of Realistic Mathematics Education helped understand the significance of
realistic problem situation for students. Learning the concept of perimeter and
area of plane figures for Indonesian students is more to learning to memorize the
formula without knowing why it works that way. They start to learn from
something which is quite abstract for them because it was introduced through the
means which are not connected to their real world.
In this research, we tried to bring the realistic problem situation as the
starting point to learn the concept of perimeter and area. As what we have
designed in the learning experiment, for instance, perimeter and area will be more
real when students surrounded the edge of grid paper with wooden matches and
covered a rectangular photo paper with squares respectively.
We designed the Local Instruction Theory with the key principles of
Realistic Mathematics Education as the underlying theory (see 5.2). The design
research paradigm used in this research is also appropriate for the purpose of this
study. The cyclic character in design research allowed us to adapt the
experimental settings and the learning trajectory, and instructional activities are
used to elicit our purpose in this study.
Somehow, the high expectation from the researcher made the design of
instructional activities become very compact within a certain period of time. Each
phase of instructional activity was designed in one day meeting. Most of the
phases consist of group work activity, class discussion and individual work on
122
worksheet related to the respective activity. For grade 3 students, indeed those
series of activities seems too much to be achieved at once. The concepts of
perimeter and area are new for students in grade 3. They need more time to
perceive their own learning process. From the interview with the teacher, we got a
very valuable input that the students in grade 3 feel a burden to have the learning
series that consist of group work, class discussion and individual work all at once.
During the teaching experiment we also figure out that students‟ respond was
decreasing when it passed a half period of the learning duration.
123
CHAPTER VII
REFERENCES
6 References
Annie Shelden & John Shelden (1998), The role of examples in Learning
Mathematics, The mathematics association of America Research Sampler
A.R.Bunker (1967), Understanding and teaching mathematics in the primary
school. Halstead Press, Sydney
Cross. Christopher T, Woods. Taniesha A, and Schweingruber Heidi (2009),
Mathematics Learning in early childhood, The national Academies Press-
Washington DC
Daintith. John, Rennie. Richard (2005), The facts on File Dictionary of
Mathematics, Market House Book Ltd
Depdiknas. (2006). Kurikulum Tingkat Satuan Pendidikan Sekolah Dasar.
Jakarta: Depdiknas
Douglas H. Clements, Julie Sarama (2004), Engaging young children in
mathematics, Lawrence Erlbaum Associates, Inc, Publisher
Fauzan, A. (2002). Applying Realistic Mathematics Education (RME) in
Teaching Geometry in Indonesian Primary Schools. Enschede:
PrintPartners Ipskamp.
Gravemeijer, K.P.E. et al (2007). Meten en meetkunde in de bovenbouw.
Tussendoelen Annex Leerlijnen Bovenbouw Basisschool,
Utrecht/Groningen: Freudenthal instituut; Wolters-Noordhoff.
Hiebert & Carpenter, “Learning and Teaching with understanding, pg.80
Jan Van den Akker et all (2006), Educational Design research, Routledge-
Taylor and Francis Group
Jensen. J. Robert (1993). Research Ideas for the classroom: Early childhood
mathematics. Maxwell, Maxmillan International.
Kai Kow Joseph Yeo (2006), Teaching Area and Perimeter: Mathematics-
Pedagogical-Content Knowledge-in-Action. Proceedings of the 31st
Annual Conference of the Mathematics Education Research Group of
Australasia
124
Olsen. Stieg Mellin (1981). Instrumentalism as an educational concept-
Educational Studies in Mathematics, vol. 12. No. 3, Aug. 1981
Romberg et all (2005) Understanding Mathematics and Science Matters,
Lawrence Erlbaum Associates, Publisher, London
S. Margaret Schwan, Silver. Edward A.,Stein. Mary Kay, Improving
instruction in geometry and measurement

125
Appendix A HLT visualization

126
Appendix B Lesson Plan
Rencana Pelaksanaan Pembelajaran
Satuan Pendidikan: SDIT AT TAQWA Surabaya
Mata Pelajaran : Matematika
Kelas/ Semester : III / 2
Pertemuan Ke- : 1
Alokasi Waktu : 2 x 30 menit
Standar Kompetensi : Menghitung keliling, luas persegi dan persegi panjang, serta
penggunaannya dalam pemecahan masalah.
Kompetensi Dasar : Menghitung keliling persegi dan persegi panjang.
Indikator :
Menghitung keliling bingkai foto (persegi, persegi panjang, segitiga,
lingkaran)
Menjelaskan keliling sebagai panjang batas terluar dari bangun datar.
Membandingkan keliling bingkai foto (persegi, persegi panjang, segitiga,
lingkaran)
I. Tujuan Pembelajaran
a. Siswa mampu menghitung dan membandingkan ukuran keliling bangundatar.
b. Siswa dapat mendefinisikan dengan kalimat mereka sendiri tentang arti
keliling.
II. Materi Pembelajaran
Keliling bangun datar adalah panjang garis yang menglilingi atau
membatasi suatu bangun datar.
Keliling ditentukan dengan total panjang bahan yang diperlukan untuk
mengelilingi batas terluar bangun datar.
III. Metode Pembelajaran
Tanya jawab, diskusi, tugas kelompok
IV. Langkah-langkah Kegiatan
Pendahuluan :
Apersepsi :
• Mengingat kembali materi sebelumnya tentang pengukuran panjang,
pengenalan bangun datar.

127
Kegiatan Inti :
1. Guru akan membawa konteks memesan bingkai foto. Guru akan
menceritakan permasalahan beliau bahwa harga bingkai foto
bergantung pada ukuran keliling bingkai foto tersebut. Semakin
panjang ukuran keliling bingkai foto maka harganya semakin mahal
dan sebaliknya. Guru akan membawa beberapa bingkai foto dengan
ukuran dan bentuk yang berbeda-beda dan meminta siswa untuk
membantu beliau memutuskan bingkai foto yang mana yang harus
dipesan agar beliau membayar dengan harga termurah.
2. Siswa akan bekerja secara berkelompok (4-5 orang). Guru akan
membagikan beberapa bingkai foto dengan bentuk dan ukuran yang
berbeda pada tiap kelompok. Mereka akan menghitung keliling bingkai
foto dan membandingkannya, guru memantau siswa dan mengarahkan
siswa yang mengalami kesulitan.
3. Guru memandu diskusi dan mengarahkan siswa agar mampu
merumuskan arti keliling dengan kalimat mereka sendiri.
Penutup :
Membimbing siswa untuk merangkum materi yang telah disajikan
V. Alat/ Bahan/ Sumber
Bingkai foto ( kertas karton)
Pita/tali, gunting
VI. Penilaian :
Proses dalam kerja kelompok mencakup keaktifan siswa berpartisipasi.
Presentasi hasil kerja kelompok
Surabaya, 14
Februari 2011
Kepala Sekolah Guru
Kelas

128
Rencana Pelaksanaan Pembelajaran
Satuan Pendidikan: SDIT AT TAQWA Surabaya
Mata Pelajaran : Matematika
Kelas/ Semester : III / 2
Pertemuan Ke- : 2
Alokasi Waktu : 2 x 30 menit
Standar Kompetensi : Menghitung keliling, luas persegi dan persegi panjang,
serta penggunaannya dalam pemecahan masalah
Kompetensi Dasar : Menghitung keliling persegi dan persegi panjang
Indikator :
Membuat bingkai foto
I. Tujuan Pembelajaran
a. Siswa tahu bahwa setiap kali mereka membentuk suatu pagar maka
mereka juga membentuk suatu daerah di dalamnya.
b. Siswa dapat menjelaskan dengan bahasa mereka sendiri arti luas.
c. Siswa tahu bahwa dua bangun datar dengan keliling yang sama dapat
memiliki luas yang berbeda-beda.
II. Materi Pembelajaran
Setiap pagar yang dibentuk juga akan membentuk daerah di dalamnya
Luas bangun datar adalah suatu ukuran daerah yang dibatasi oleh garis
yang mengelilingi atau membatasinya.
Dua bangun datar yang memiliki keliling yang sama dapat memiliki luas
yang berbeda-beda dan juga sebaliknya.
Keliling berhubungan dengan luas namun tidak bergantung satu sama
lain.
III. Metode Pembelajaran
Tanya jawab, diskusi, tugas kelompok
IV. Langkah-langkah Kegiatan
Pendahuluan :
Apersepsi :
• Mengingat kembali materi sebelumnya tentang menghitung dan
membandingkan keliling bingkai foto.

129
Kegiatan Inti :
1. Guru akan membawa konteks membuat bingkai foto dari stick ice
cream. Setiap kelompok siswa akan mendapat 50 stick ice cream. Guru
akan meminta siswa untuk membuat 2-3 bingkai foto yang berbeda
ukuran dan / atau bentuknya. Guru akan memberi contoh untuk
menghindari kesalahan pemahaman tugas.
2. Siswa akan bekerja secara berkelompok (4-5 orang). Mereka bisa
menggunakan semua stick atau kurang. Stick disusun sedemikian rupa
dengan bentuk bebas, dilekatkan pada kertas sehingga membentuk
bingkai foto.
3. Guru memandu diskusi dan mengarahkan siswa dengan memberikan
pertanyaan:
“ siapa yang bisa menjelaskan apa yang berbeda dari kegiatan kita hari ini
dibandingkan dengan kegiatan kemarin (pertemuan-1)?”
“Apakah kalian menemukan sesuatu yang menarik dari bingkai foto yang
kalian buat? Jelaskan”.
Penutup
Membimbing siswa untuk merangkum materi yang baru saja disajikan
V. Alat/ Bahan/ Sumber
Stick Ice cream, kertas linen, gunting
Kertas Poster, Spidol
VI. Penilaian :
Proses dalam kerja kelompok mencakup keaktifan siswa berpartisipasi.
Diskusi kelas
Surabaya, 14
Februari 2011
Kepala Sekolah Guru
Kelas
130
Rencana Pelaksanaan Pembelajaran
Satuan Pendidikan: SDIT AT TAQWA Surabaya
Mata Pelajaran : Matematika
Kelas/ Semester : III / 2
Pertemuan Ke- : 3
Alokasi Waktu : 2 x 30 menit
Standar Kompetensi : Menghitung keliling, luas persegi dan persegi panjang, serta
penggunaannya dalam pemecahan masalah
Kompetensi Dasar : Menghitung luas persegi dan persegi panjang
Indikator :
Menghitung, membandingkan dan mengurutkan luas kertas foto
I. Tujuan Pembelajaran
Siswa mampu membandingkan langsung dan mengurutkan luas kertas foto
II. Materi Pembelajaran
Luas bangun datar adalah ukuran daerah yang dibatasi oleh garis yang
mengelilingi atau membatasinya.
Membandingkan luas antar bangun datar secara langsung tanpa
menggunakan alat bantu lain.
III. Metode Pembelajaran
Tanya jawab, diskusi, tugas kelompok
IV. Langkah-langkah Kegiatan
Pendahuluan :
Apersepsi :
• Mengingat kembali materi sebelumnya tentang pengenalan luas
Kegiatan Inti :
1. Guru akan membawa konteks tentang cetak foto. Siswa diminta
membantu guru untuk mencari harga cetak foto termurah. Guru akan
menceritakan permasalahan beliau bahwa harga cetak foto bergantung
pada luas kertas foto tersebut. Semakin luas kertas foto maka harganya
semakin mahal dan sebaliknya. Guru akan membawa beberapa kertas
foto dengan ukuran yang berbeda-beda dan meminta siswa untuk

131
membantu beliau memutuskan kertas foto yang mana yang harus
dipesan agar beliau membayar dengan harga termurah.
2. Siswa akan bekerja secara berkelompok (4-5 orang). Guru akan
membagikan beberapa kertas foto dengan bentuk dan ukuran yang
berbeda pada tiap kelompok. Kertas disusun sedemikian rupa sehingga
kertas-kertas foto tersebut dapat dibandingkan secara langsung. Namun
ada juga kertas foto yang berbeda tipis antara satu dan lainnya
sehingga akan memerlukan lebih banyak usaha bagi siswa untuk
membandingkan. Untuk kondisi kertas foto yang sulit untuk
dibandingkan secara langsung, guru tidak akan mengarahkan siswa
untuk menyelesaikan pada saat itu juga, namun menggunakannya
untuk bahan materi perteuan selanjutnya.
3. Guru memandu diskusi dan mengarahkan siswa agar mampu untuk
membandingkan luas
Penutup :
Membimbing siswa untuk merangkum materi yang baru saja disajikan.
V. Alat/ Bahan/ Sumber
Kertas foto (kertas linen)
Kertas Poster, Spidol
VI. Penilaian :
Proses dalam kerja kelompok mencakup keaktifan siswa berpartisipasi
Presentasi hasil kerja kelompok
Surabaya, 14
Februari 2011
Kepala Sekolah Guru
Kelas
132
Rencana Pelaksanaan Pembelajaran
Satuan Pendidikan: SDIT AT TAQWA Surabaya
Mata Pelajaran : Matematika
Kelas/ Semester : III / 2
Pertemuan Ke- : 4
Alokasi Waktu : 2x 30 menit
Standar Kompetensi : Menghitung keliling, luas persegi dan persegi panjang, serta
penggunaannya dalam pemecahan masalah
Kompetensi Dasar : Menghitung luas persegi dan persegi panjang
Indikator :
Menghitung luas bangun yang berbentuk persegi dan persegi panjang
dengan bantuan objek lain sebagai unit pengukuran.
I. Tujuan Pembelajaran
a. Siswa dapat menghitung luas dengan objek lain sebagai satuan pengukuran.
II. Materi Pembelajaran
Ukuran luas ditentukan dengan jumlah bahan yang diperlukan untuk
menutup seluruh permukaan bangun datar.
Menghitung dan membandingkan luas antar bangun datar dengan
menggunakan alat bantu obyek lain sebagai satuan pengukuran.
III. Metode Pembelajaran
Tanya jawab, diskusi, tugas kelompok
IV. Langkah-langkah Kegiatan
Pendahuluan :
Apersepsi :
• Mengingat kembali materi sebelumnya bahwa ada beberapa kertas
foto yang tidak dapat dibandingkan secara langsung.
Kegiatan Inti :
1. Guru mereview pertemuan sebelumnya bahwa ada beberapa kertas foto
yang tidak dapat dibandingkan secara langsung. Kemudian guru
memberikan pertanyaan:”bagaimana kalau kalian mendapati dua kertas
foto yang memiliki ukuran hampir sama? Bagaimana kalian
membandingkannya? Jika tidak ada siswa yang merespon, guru dapat
mengarahkan dengan “ Di kelas lain, mereka menggunakan bantuan

133
kertas tempel untuk menghitung luas kertas foto, bagaimana kalau kita
coba?”
2. Secara berkelompok (4-5 orang) siswa menghitung luas kertas foto
dengan bantuan kertas tempel, guru memantau siswa dan mengarahkan
siswa yang mengalami kesulitan.
3. guru memandu diskusi dan mengarahkan siswa untuk mendapatkan
kesimpulan.
Penutup :
Membimbing siswa untuk merangkum materi yang baru saja disajikan
V. Alat/ Bahan/ Sumber
Kertas foto (i.e kertas linen)
Kertas temple (post it)
Kertas Poster, Spidol
VI. Penilaian :
Proses dalam kerja kelompok mencakup keaktifan siswa berpartisipasi
Presentasi hasil kerja kelompok
Surabaya, 14
Februari 2011
Kepala Sekolah Guru
Kelas

134
Rencana Pelaksanaan Pembelajaran
Satuan Pendidikan: SDIT AT TAQWA Surabaya
Mata Pelajaran : Matematika
Kelas/ Semester : III / 2
Pertemuan Ke- : 5
Alokasi Waktu : 2x 30 menit
Standar Kompetensi : Menghitung keliling, luas persegi dan persegi panjang, serta
penggunaannya dalam pemecahan masalah
Kompetensi Dasar : Menyelesaikan masalah yang berkaitan dengan keliling, luas
persegi dan persegi panjang
Indikator :
Menyusun berbagai bentuk bangun datar
I. Tujuan Pembelajaran
-Siswa dapat menyusun berbagai bentuk bangun datar dengan menggunakan
korek api pada kertas berpetak.
-Siswa dapat memberikan alasan bahwa dua bangun datar dengan luas yang
sama bisa memiliki keliling yang berbeda dan / atau sebaliknya.
II. Materi Pembelajaran
Dengan bantuan kertas berpetak dapat disusun berbagai bentuk bangun
datar dengan luas yang berbeda-beda untuk keliling sama dan juga
sebaliknya.
III. Metode Pembelajaran
Permainan, tugas kelompok, diskusi
IV. Langkah-langkah Kegiatan
Pendahuluan :
Apersepsi :
• Mengingat kembali materi sebelumnya bahwa keliling tidak
bergantung pada luas dan sebaliknya.
Kegiatan Inti :
1. Dalam aktivitas ini, siswa melakukan permainan berkelompok
menyusun berbagai bentuk bangun datar dengan sejumlah korek api
yang telah ditentukan pada kertas berpetak.

135
2. Lembar kerja akan dibagikan kepada siswa untuk diisi sesuai dengan
hasil permainan yang mereka jalankan.
3. Guru memandu diskusi dan mengarahkan siswa untuk mendapatkan
kesimpulan.
Penutup :
Membimbing siswa untuk merangkum materi yang disajikan.
V. Alat/ Bahan/ Sumber
Kertas perpetak
Korek api
VI. Penilaian :
Lembar Kerja Siswa
Keaktifan siswa dalam diskusi kelas
Surabaya, 14
Februari 2011
Kepala Sekolah Guru
Kelas
136
Rencana Pelaksanaan Pembelajaran
Satuan Pendidikan: SDIT AT TAQWA Surabaya
Mata Pelajaran : Matematika
Kelas/ Semester : III / 2
Pertemuan Ke- : 6
Alokasi Waktu : 2x 30 menit
Standar Kompetensi : Menghitung keliling, luas persegi dan persegi panjang, serta
penggunaannya dalam pemecahan masalah
Kompetensi Dasar : Keliling dan Luas bangun datar
Indikator :
Menghitung keliling dan luas bangun datar.
I. Tujuan Pembelajaran
Siswa dapat mengeneralisasi bahwa dua bangun dengan luas yang sama dapat
memiliki keliling yang berbeda-beda dan juga sebaliknya.
II. Materi Pembelajaran
Mengeneralisasi pemahaman tentang keliling dan luas bangun datar bahwa
untuk semua bangun datar berlaku hubungan antar luas dan keliling yang
tidak saling bergantung satu sama lain.
III. Metode Pembelajaran
Tanya jawab, diskusi, tugas kelompok
IV. Langkah-langkah Kegiatan
Pendahuluan :
Apersepsi :
• Mengingat kembali materi sebelumnya bahwa persegi atau persegi
panjang yang memiliki luas yang sama dapat memiliki keliling
yang berbeda.
Kegiatan Inti :
1. Guru akan memberi tiap siswa 2 tali yang sama panjang dan siswa
diminta untuk membuat bentuk bangundatar apapun dari kedua tali
tersebut dengan bentuk yang berbeda. Kemudia guru memberikan
pertanyaan kepada siswa” Menurut kalian, kedua tali yang kalian
bentuk itu memiliki luas yang sama atau berbeda? Coba jelaskan”.
2. Guru memandu diskusi dan mengarahkan siswa untuk mendapatkan
kesimpulan bahwa luas yang sama dapat menghasilkan keliling yang
berbeda dan sebaliknya.
137
Penutup :
Membimbing siswa untuk merangkum materi yang baru saja disajikan
V. Alat/ Bahan/ Sumber
Tali sama panjang ( sepasang)
Kertas Poster, Spidol
VI. Penilaian :
Proses dalam kerja kelompok mencakup keaktifan siswa berpartisipasi
Diskusi kelas
Surabaya, 14
Februari 2011
Kepala Sekolah Guru
Kelas

138
Appendix C Students’ work (LKS)
LKS I
1. Perhatikan gambar di bawah ini:
a. Jika tiap satu kertas tempel persegi berukuran sama degan tiap persegi dalam
gambar, berapa jumlah kertas tempel yang diperlukan untuk menutup semua
permukaan kertas di atas?
b. Berapa jumlah sisi terluar kertas tempel yang menunjukkan keliling gambar di
atas?
Kertas tempel persegi
139
c. Dengan jumlah persegi yang sama, susunlah gambar di atas secara berbeda.
Gambarkan di bawah ini (satu susunan baru saja)
d. Apakah gambar yang kalian susun memiliki keliling yang sama dengan
gambar sebelumnya?

140
LKS II
1. Bayangkan kalian mempunyai 10 batang korek api yang panjangnya sama
dengan panjang tiap sisi persegi pada kertas berpetak di bawah ini.
a. Gambarkan bangun datar yang bisa kalian bentuk dari 10 batang korek api.
(buat sebanyak mungkin)
b. Beri nomor pada tiap-tiap gambar, Gambar nomor berapakah yang memiliki
luas terbesar dan gambar nomor berapakah yang memiliki luas terkecil? Coba
jelaskan
_____________________________________________________________________
c. Gambar nomor berapakah yang memiliki keliling terpanjang dan gambar
nomor berapakah yang memiliki keliling terpendek? Coba jelaskan
Jawab ____________________________________________________

141
LKS III
1. Perhatikan gambar bangun datar pada kertas berpetak di bawah ini.
a. Hitung keliling dan luas bangun datar di atas, dan jelaskan
bagaimana cara kalian menghitungnya.
Keliling bangun datar A = _____ Luas bangun datar A = ______
Keliling bangun datar B = _____ Luas bangun datar B = ______
Cara menghitung:
Keliling bangun datar A: ________________________________
Luas bangun datar A: ___________________________________
Keliling bangun datar B: ________________________________
Luas bangun datar B: ___________________________________

142
b. Dari gambar bangun datar A dan B di atas, bangun yang manakah
yang memiliki luas terbesar? Coba jelaskan .
c. Dari gambar bangun datar A dan B di atas. Gambar manakah yang
memiliki keliling terpanjang? Coba jelaskan
Bangun datar yang memiliki luas terbesar adalah
bangun ______________
Karena______________________________________________
____________________________________________________
Bangung datar yang memiliki keliling terpanjang adalah bangun
_________________
Karena____________________________________________
__________________________________________________

143
LKS IV
1. Perhatikan gambar bangun datar pada kertas berpetak di bawah
ini.
a. Isilah tabel di bawah ini berdasarkan gambar di atas.
No Keliling Luas
b. Bagaimana cara kalian menghitung keliling dan luas bangun B dan D?
Cara menghitung keliling adalah
Cara menghitung luas adalah
______________________________________________________________________

144
c. Jika kalian mempunyai 2 tali sama panjang, digunakan untuk
menyusun bangun datar seperti di bawah ini.
d. Hitung luas bangun datar di atas. Bagaimana cara kalian
menghitung luas tersebut?
Luas bangun A = ______________________________ persegi
Luas bangun B = _______________________________ persegi
Cara menghitung luasnya adalah
_____________________________________________________________________
A B

145
PRE-TEST
Aktivitas.1
1. Dari kedua tali (merah dan kuning) yang diberikan, bandingkan
panjang kedua tali tersebut.
a. Bagaimana cara kalian membandingkan panjang tali tersebut?
Coba jelaskan.
b. Adakah persamaan atau perbedaan kedua tali tersebut? Coba
sebutkan setiap persamaan dan perbedaannya.
2. Bentuklah bangun datar yang berbeda dari tiap-tiap tali merah dan
kuning tersebut.
a. Perbedaan apa saja yang kalian temukan dari kedua bangun
datar yang kalian bentuk? Sebutkan.
Persamaan:
Perbedaan:
146
b. Menurut pendapatmu, bangun datar yang kalian bentuk itu
memiliki luas yang sama atau berbeda? Coba jelaskan
alasanmu.
c. Bagaiamanakah cara kalian membandingkan luas kedua
bangun datar tersebut?
d. Menurut pendapat kalian, apakah luas itu? Coba jelaskan

147
Aktivitas.2
Perhatikan gambar di bawah ini :
A B
a. Sebutkan persamaan dan perbedaan kedua gambar di atas.
b. Bagaimana kalian membandingkan keliling gambar A dan B? Coba
jelaskan.
c. Bagaimana kalian membandingkan luas gambar A dan B? Coba
jelaskan.

148
d. Susun ulang persegi-persegi kecil pada gambar A di atas menjadi
bentuk persegi atau persegi panjang baru yang berbeda. (Buat
paling sedikit 2 bentuk.)
e. Dapatkah kalian menemukan persamaan dan perbedaan persegi
dan persegi panjang yang baru ini dari gambar A? Coba sebutkan.
Persamaan:
Perbedaan:
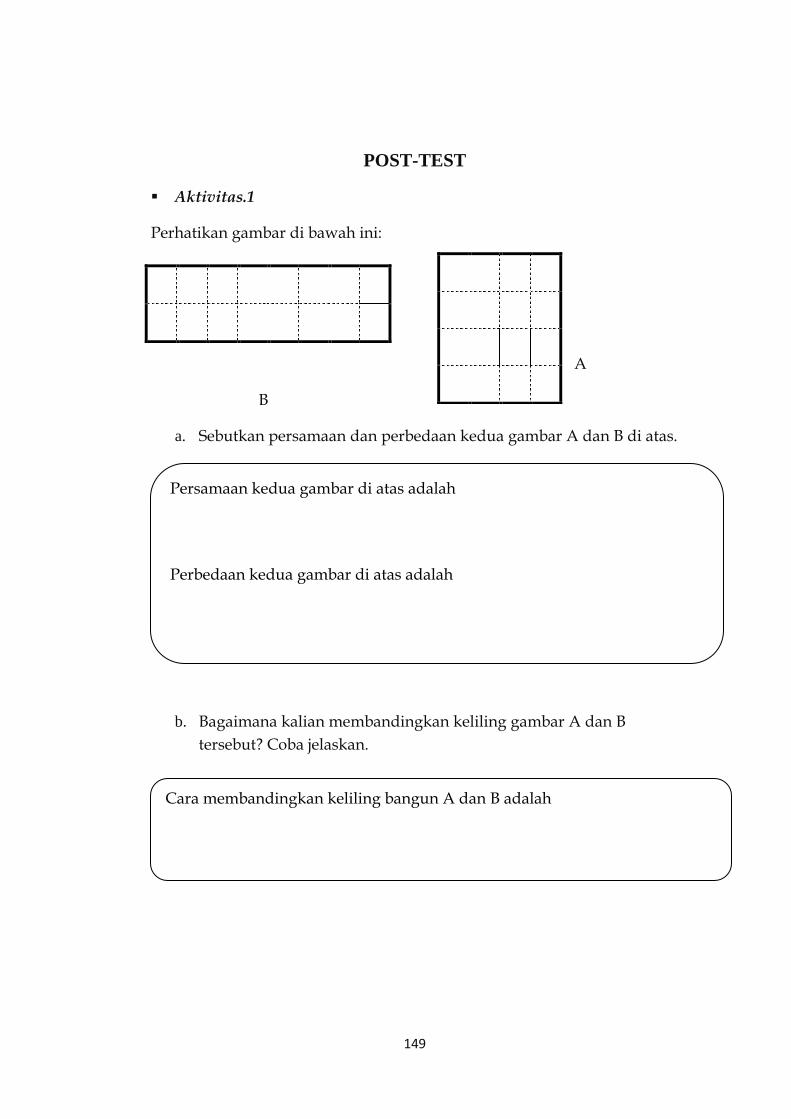
149
POST-TEST
Aktivitas.1
Perhatikan gambar di bawah ini:
A
B
a. Sebutkan persamaan dan perbedaan kedua gambar A dan B di atas.
b. Bagaimana kalian membandingkan keliling gambar A dan B
tersebut? Coba jelaskan.
Persamaan kedua gambar di atas adalah
Perbedaan kedua gambar di atas adalah
Cara membandingkan keliling bangun A dan B adalah

150
c. Bagaimana kalian membandingkan luas bangun A dan B di atas ?
Coba jelaskan
Aktivitas 2
Perhatikan gambar berikut ini.
a. Berapakah keliling dan luas persegi panjang di atas? Coba jelaskan
bagaimana cara kalian menghitungnya.
Cara membandingkan luas bangun A dan B adalah dengan
Keliling = __________
Cara menghitung keliling adalah
Luas = ____________
Cara menghitung luas adalah

151
b. Coba jelaskan dengan kata-kata kalian sendiri yang disebut dengan
Keliling dan Luas.
Aktivitas 3
Bayangkan kalian mempunyai 8 batang korek api yang panjangnya
sama dengan panjang tiap sisi persegi pada kertas berpetak di bawah
ini.
a. Gambarkan bangun datar yang bisa kalian bentuk dari 8 batang
korek api tersebut (buat sebanyak mungkin). Beri nomor pada tiap-
tiap gambar.
Keliling adalah
Luas adalah
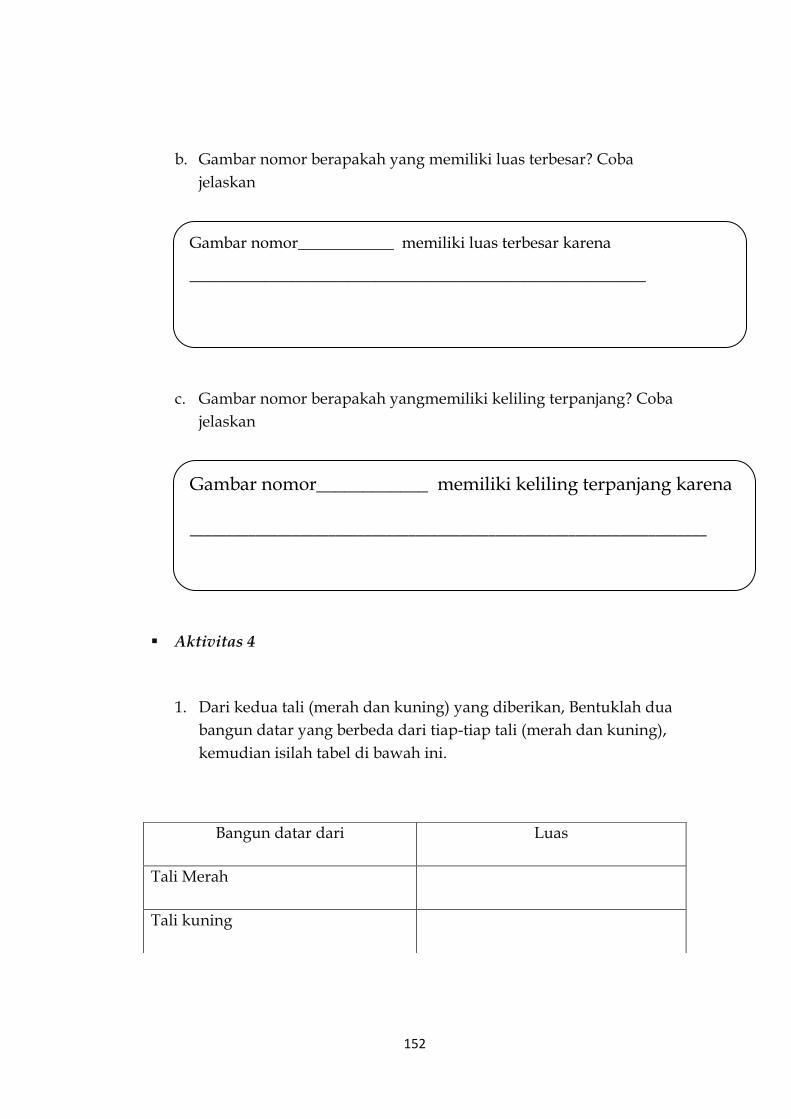
152
b. Gambar nomor berapakah yang memiliki luas terbesar? Coba
jelaskan
c. Gambar nomor berapakah yangmemiliki keliling terpanjang? Coba
jelaskan
Aktivitas 4
1. Dari kedua tali (merah dan kuning) yang diberikan, Bentuklah dua
bangun datar yang berbeda dari tiap-tiap tali (merah dan kuning),
kemudian isilah tabel di bawah ini.
Bangun datar dari Luas
Tali Merah
Tali kuning
Gambar nomor____________ memiliki luas terbesar karena
_________________________________________________
Gambar nomor____________ memiliki keliling terpanjang karena
_______________________________________________________________________
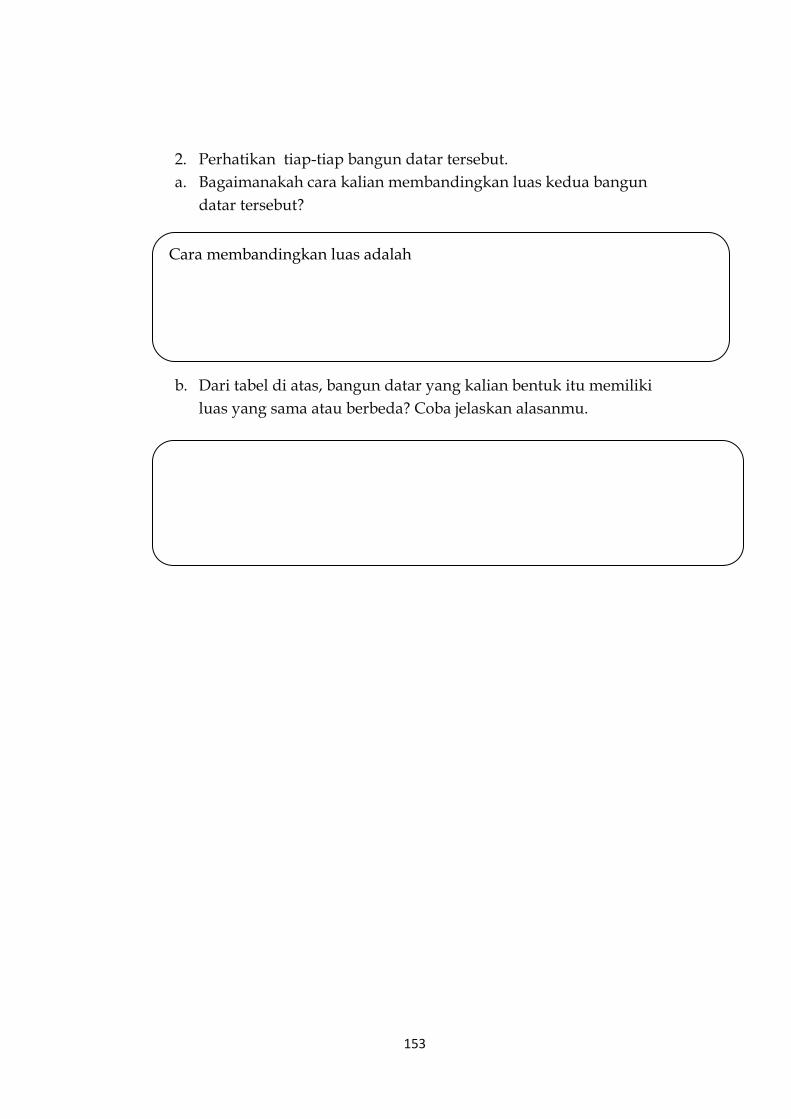
153
2. Perhatikan tiap-tiap bangun datar tersebut.
a. Bagaimanakah cara kalian membandingkan luas kedua bangun
datar tersebut?
b. Dari tabel di atas, bangun datar yang kalian bentuk itu memiliki
luas yang sama atau berbeda? Coba jelaskan alasanmu.
Cara membandingkan luas adalah

154
Pre-test
Question Answer How students work on question Discussion on students work
Comparing two ropes
1.a How do you compare the length
of those two ropes? Can you explain?
Same We see it 6 students said that they just see the
ropes to compare it. Actually most of
them did more than just see, but since
they did not use any measurement
tools so they conclude that their
activity was just see the ropes.
Span the rope 6 students said that they need to span
the ropes to see the length of it and
compare it. These students actually
did the same activity as the previous
group. It just, this group able to
describe their activity compare to the
previous one.
Measure it with measurement tools 3 students mention about
measurement tools or ruler in
comparing the ropes. Somehow they
did not elaborate any further how
they work on the measurement tools.
Actually we thought that more
students will come with measurement
tools since they‟ve learned about
using ruler to measure length but
maybe because we didn‟t state any
measurement tool from the very first
Appendix D Result of Student‟s work

155
Question Answer How students work on question Discussion on students work
place then not many of them recall
their knowledge about ruler.
Not same With explanation:
Span the ropes, then compare it
whether it same or one longer/shorter
than the other
10 students give further elaboration
on how they work with the ropes,
starting from span the ropes, compare
it by using measurement tools or just
see it.
1.b What do you get from comparing
those two ropes
The color and the length are the same. 20 students conclude their answer
from their activity of comparing the
ropes.
They are different Johan span the rope to compare the
length somehow he found that the
ropes have different length. It might
be happen that he made mistake in
measuring.
Circle, rectangle, square,
parallelogram. 2 students mention several shapes.
They might have in their mind that
the ropes can be formed as those
shapes they‟ve mention
The ropes are different or same Bryan explain that by comparing both
rope he can figure out whether the
ropes same or different.
Cut the ropes Bryan answer that he need to cut the
ropes, we don‟t have sufficient data
to figure out why he need to cut the
ropes somehow.
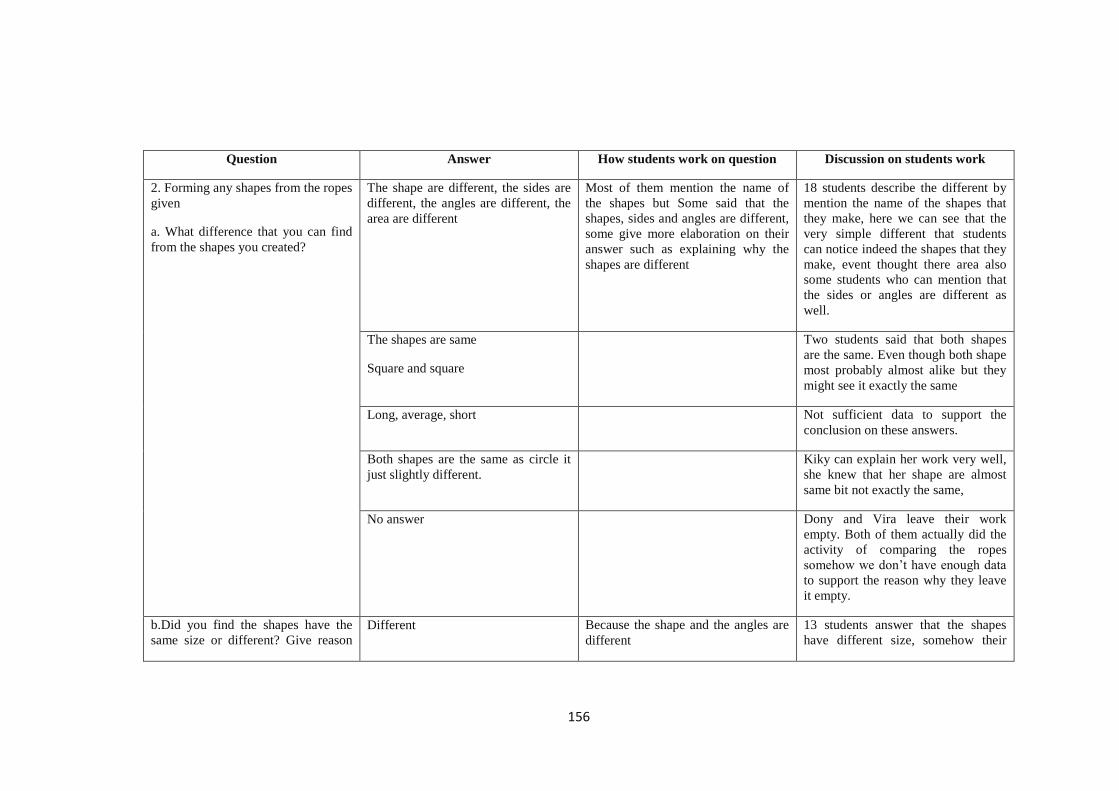
156
Question Answer How students work on question Discussion on students work
2. Forming any shapes from the ropes
given
a. What difference that you can find
from the shapes you created?
The shape are different, the sides are
different, the angles are different, the
area are different
Most of them mention the name of
the shapes but Some said that the
shapes, sides and angles are different,
some give more elaboration on their
answer such as explaining why the
shapes are different
18 students describe the different by
mention the name of the shapes that
they make, here we can see that the
very simple different that students
can notice indeed the shapes that they
make, event thought there area also
some students who can mention that
the sides or angles are different as
well.
The shapes are same
Square and square
Two students said that both shapes
are the same. Even though both shape
most probably almost alike but they
might see it exactly the same
Long, average, short Not sufficient data to support the
conclusion on these answers.
Both shapes are the same as circle it
just slightly different.
Kiky can explain her work very well,
she knew that her shape are almost
same bit not exactly the same,
No answer Dony and Vira leave their work
empty. Both of them actually did the
activity of comparing the ropes
somehow we don‟t have enough data
to support the reason why they leave
it empty.
b.Did you find the shapes have the
same size or different? Give reason
Different Because the shape and the angles are
different
13 students answer that the shapes
have different size, somehow their

157
Question Answer How students work on question Discussion on students work
why those shapes have the same size
or different?
Because the ropes have different
length
reasoning in fact quite vary. One in
common is that none of them put
reasoning by measuring the area or
perimeter of the shapes. They pay
attention to the shapes and angles.
Because oval is different from circle,
oval is longer than circle
Because it‟s difficult to form the same
shapes
Same
Because the length of the ropes are
same
8 students answer that the shapes
have the same size. The same as the
answer for “different size”, they put
reasoning on the length of the ropes,
angles and sides which are same, or
they simply said it have been
measured and it same
Because the sides/angles are same
Because it have been measured and
it‟s same
Because if it is different than we can‟t
form it
some are same but some are not This student did not elaborate more
his answer. He might see in general
that a lot of shapes around him, some
are same and some are different
No answer This student leaves his page blank.
He might do not understand the
question or he confuse about his own
answer.
c. How did you compare the size of See it, measure it, from big and small 12 students say they see or measure

158
Question Answer How students work on question Discussion on students work
those shapes?
Using ruler, ropes, ribbons the shapes to compare it, and 2
students say they see it from big and
small. 7 other said they use ruler,
ropes or ribbon to measure. This
group of students basically has the
same idea that they see it, measure it
using a certain tools.
Plane figure, form it differently These 2 students have answer that is
not in line with the question. They
might not understand the question
given.
No answer 2 students leave their page blank.
They might run out of time or they
don‟t understand the question given.
d. How did you describe the word
„area‟? explain in your own words
Area is area Many students seemed still struggle
with the concept of area. So many
different variation of answers, but we
also found that some students already
consider the small boxes/square
inside the shape as the description of
area. Others even go a little bit more
formal by considering area as the left,
right, up and down sides. We also
found some students who still
confuse or might be don‟t know at
all, they leave the answer empty.
Area is wide/a wide space
Area is large/a large space
If area then the area is the same
Left, right, up and down
By seeing the small boxes inside the
shape
Because wide and area

159
Question Answer How students work on question Discussion on students work
No answer
Activity.2 given two different shape
with grid in it
a. Explain the similarities and
difference from those two
shapes.
Similarities: same number of boxes,
number of space,
Differences: the shapes are different
Many students in fact paid attetention
to the boxes/squares. We can make a
preliminary conclution that the use of
square grid was quite logic for
students. They can represent what
they thought by using the square grid.
They count the number of square grid
to see see whether the shapes area
same or not. Somehow, we also
found some students who did not
considetr about the square grid but
more to shapes whether it looks
longer or shorter.
The shapes are same and the total are
same
The equation are different
The total is 12 and the long one also
12,
the differences is that box 1 has 3
rows and box 2 has 2 rows
A has many boxes
(redraw the boxes)
Similarities: the boxes are same
Difference: the size of the boxes are
different
A: wide, high but short
B: long but short
b. How do you compare the A: tall-short.2 Most of the students in grade 3 still

160
Question Answer How students work on question Discussion on students work
perimeter of picture A and B? B: long-low struggle in handling the question
“how” describing the process was not
an easy work for them. We found
some students give short explanation
like: measure it, see it, or count it but
many students give direct answer
instead of the explanation of the
process.
(re-draw the shapes)2
From the shapes.10
By seeing it/measure it/count it.5
By seeing the sides.2
A: square
B: rectangle.1
No answer.3
c. How do you compare the area of
picture A and B?
Measure it, see it, count it.14
Same as the previous question,
describing an explanation was not
easy for grade 3 students. Some area
able to describe very short
explanation like: see it, count it and
measure it but some others give direct
answer without any explanation.
From the area of A and B.3
A is shorter than B.1
No answer.4
The area is same
Because I know the meaning of area
d. Rearrange the small squares in the
picture above into a different new
square or rectangle (make at least 2
Rearrange the shape.14 Most of the students can understanf
the question very well, tey also able
to re-arrange the shapes correctly. No answer.6
161
Question Answer How students work on question Discussion on students work
shapes) Re-arrange but wrong.4 Just minor students who made
mistake in re-arrange the shapes and
it might also miss counting the
number of grid. Somehow we still
found six students who leave their
work empty for this particular
question.
On its side
e. What are the similarities and
differences from the new shapes?
Explain it
Same shape and same number of
boxes Since every student has their own
model to re-arrange the shape so we
found different answer as well. Some
get the shapes with the same form but
with different number of square
grids/boxes. Some other have the
same shapes and the same number of
square grid as well. Some students,
somehow, leave their answer empty
for maybe they still confuse with the
question given.
Different shape but same number of
boxes
By seeing it
Long, short, low
If it‟s big then it‟s a lot
No answer
162
LKS-I
Questions Students answer How student works on the question Discussion on students answer
See the picture below
24 Keep the picture blank.
5 students keep the picture blank
while they try to answer the
number of “kertas tempel persegi”.
There are some possibilities, first
they can imagine the grid without
drawing it so by head they can
calculate the number of grid,
second they aware that there are 4
square grids at the bottom rows and
there are 6 stacks so it means they
need 6 stacks of 4 square grids
rows which is 24, last they might
come to the formal one when they
notice the row has 4 square grids
and the column has 6 square grids
so 4x6=2
Make lines to continue the pattern of the
grid
12 students make the lines to help
them counting the number of
“kertas tempel persegi”. Then they
count the grid one by one to get the
total number of 24
163
Questions Students answer How student works on the question Discussion on students answer
Kertas temple persegi
a. If every “kertas temple
persegi” has the same size as
every square grid on the
picture, how many “kertas
temple persegi” needed to
cover all the surface of the
picture above.
Make the lines to continue the pattern of
the grid then number all the grids.
8 students make the lines to help
them counting the number of
“kertas tempel persegi” and put
number in each square
consecutively. Some of them did
this because indeed they get mix up
in counting if they did not put
numbering but some of them just to
asure them selve that they count
correctly.
25 Make the lines to continue the grid pattern.
Jofan and Naufal made the lines to
follow the grid pattern correctly
and it suppose to be 24 grid
squares. Somehow he might made
skip counting or jumping in his
counting that‟s why he got the
final answer 25.
164
Questions Students answer How student works on the question Discussion on students answer
b. How many outer sides of
“kertas tempel that described
the number of
20
17 students answer 20 for the outer
sides of “kertas temple” they use
their previous work to decide the
number of outer side. They seems
already understand that they need
to count each outer side of every
outer squares.
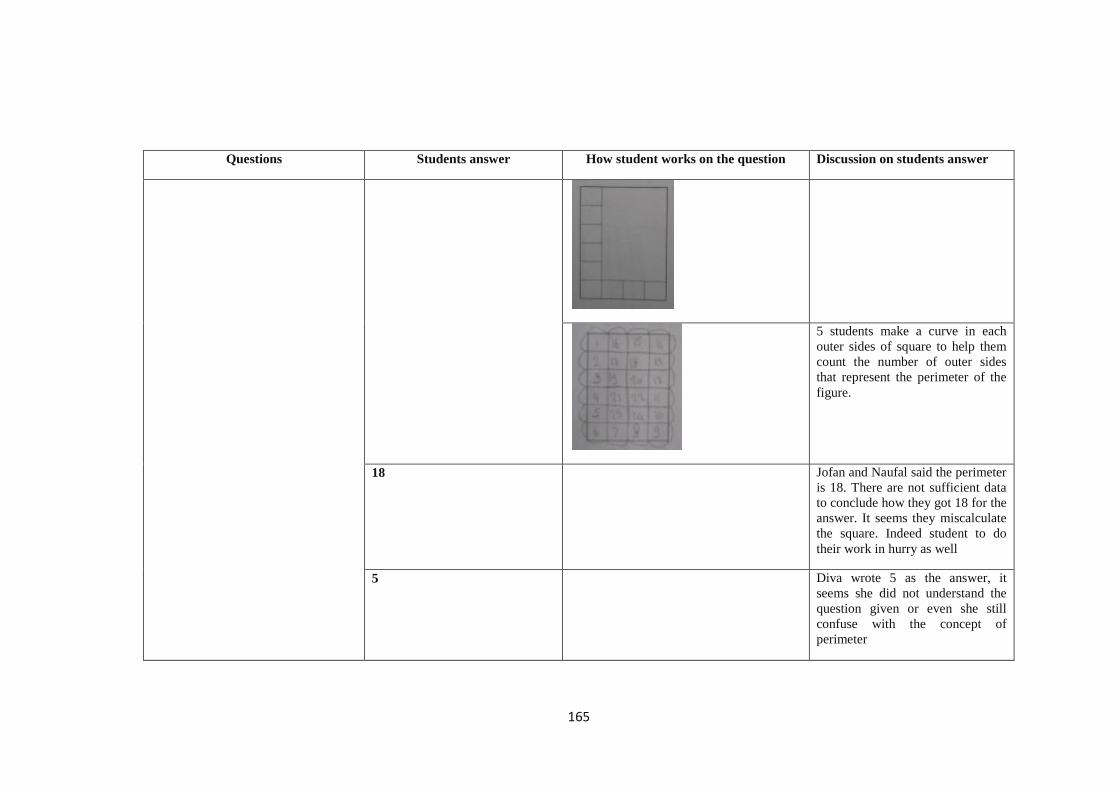
165
Questions Students answer How student works on the question Discussion on students answer
5 students make a curve in each
outer sides of square to help them
count the number of outer sides
that represent the perimeter of the
figure.
18 Jofan and Naufal said the perimeter
is 18. There are not sufficient data
to conclude how they got 18 for the
answer. It seems they miscalculate
the square. Indeed student to do
their work in hurry as well
5 Diva wrote 5 as the answer, it
seems she did not understand the
question given or even she still
confuse with the concept of
perimeter
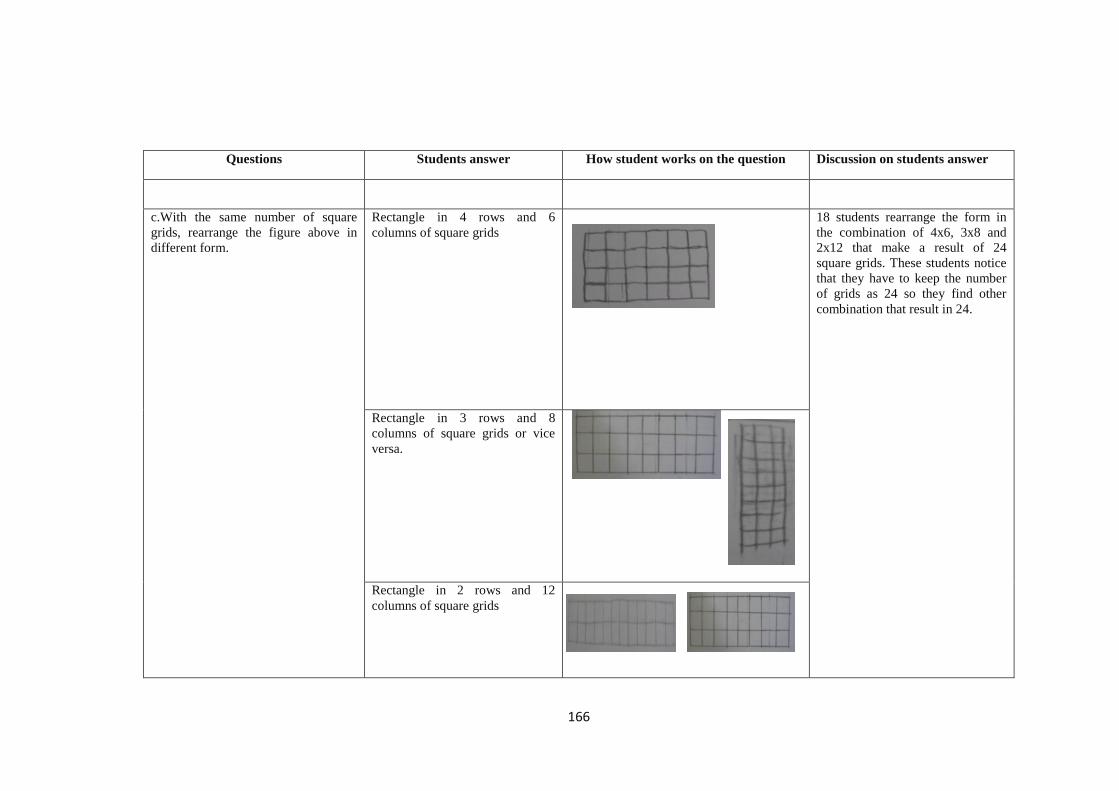
166
Questions Students answer How student works on the question Discussion on students answer
c.With the same number of square
grids, rearrange the figure above in
different form.
Rectangle in 4 rows and 6
columns of square grids
18 students rearrange the form in
the combination of 4x6, 3x8 and
2x12 that make a result of 24
square grids. These students notice
that they have to keep the number
of grids as 24 so they find other
combination that result in 24.
Rectangle in 3 rows and 8
columns of square grids or vice
versa.
Rectangle in 2 rows and 12
columns of square grids

167
Questions Students answer How student works on the question Discussion on students answer
Random form
4 student make random
arrangement because indeed no
instruction to make it in the certain
form of shape. They seems just
keep arranging the square until 24
and ignoring the shape.
3 students make random
arrangement but with the total
square more than 24. It seems they
just miscalculate the number of
grid. But one student made 80
square grids. For him the question
might still unclear.
d. does the new shape that you
arrange has the same
perimeter with the previous
one? How about the area?
They have different perimeter but
have the same area
11 students rearrange the figure in
composition of 3x8, 2x12 or
random. For this reason then they
could say that the figures have the
same area but different perimeter.

168
Questions Students answer How student works on the question Discussion on students answer
They have the same perimeter and
area
9 students rearrange the figure in
composition of 6x4 which actually
the same with the first figure but
horizontal. That‟s why they still
conclude that the perimeter and
area of both figure are the same.
Somehow one student which
rearrange the squares in random
also conclude the same. This
student seems to have an
understanding that the same
number of squares grid or area then
the perimeter will turn the same as
well.
Area= 8, 20 These two students have different
answer than the other. One said the
area is 8 and the other one write 20.
They seems still confuse where this
question heading to.
No answer 2 students leave the space blank.
They seems run out of time or they
don‟t understand the question.
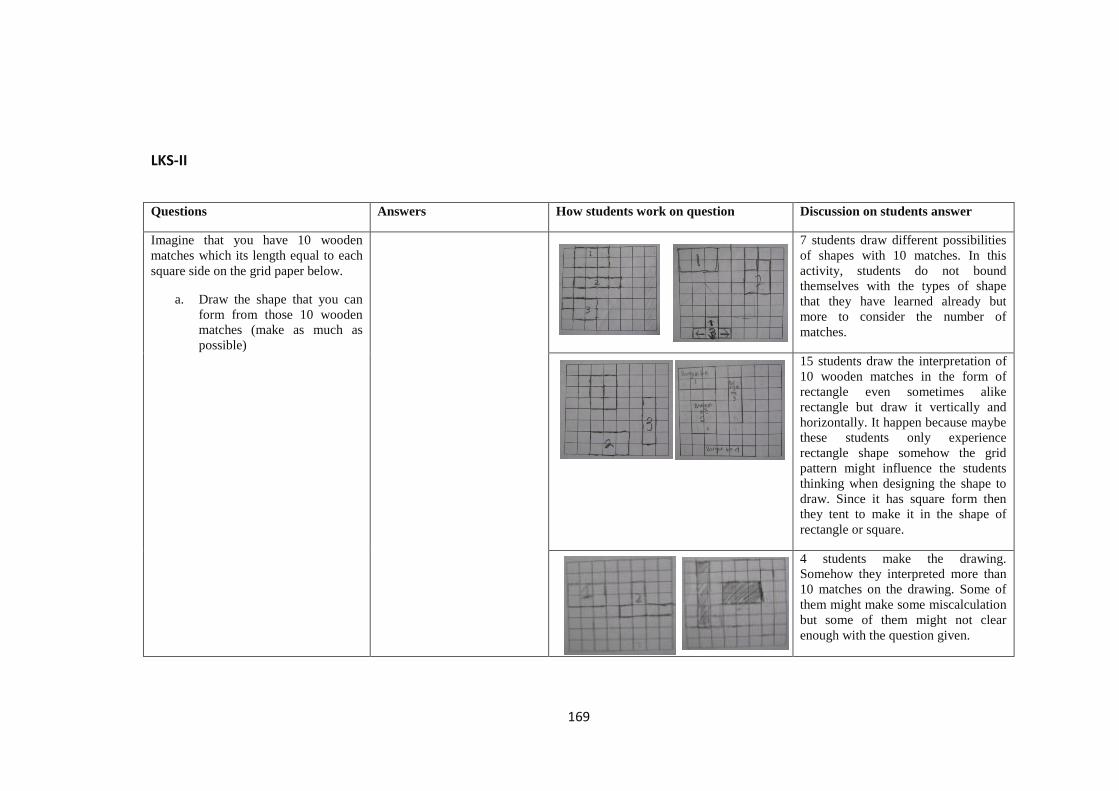
169
LKS-II
Questions Answers How students work on question Discussion on students answer
Imagine that you have 10 wooden
matches which its length equal to each
square side on the grid paper below.
a. Draw the shape that you can
form from those 10 wooden
matches (make as much as
possible)
7 students draw different possibilities
of shapes with 10 matches. In this
activity, students do not bound
themselves with the types of shape
that they have learned already but
more to consider the number of
matches.
15 students draw the interpretation of
10 wooden matches in the form of
rectangle even sometimes alike
rectangle but draw it vertically and
horizontally. It happen because maybe
these students only experience
rectangle shape somehow the grid
pattern might influence the students
thinking when designing the shape to
draw. Since it has square form then
they tent to make it in the shape of
rectangle or square.
4 students make the drawing.
Somehow they interpreted more than
10 matches on the drawing. Some of
them might make some miscalculation
but some of them might not clear
enough with the question given.

170
Questions Answers How students work on question Discussion on students answer
b. Put number on each figure.
Which number that has the
biggest area and which
number has the smalles one?
Explain
The biggest area is number.1,
it has 6 squares. The smallest
area is number.2, it has 4
squares.(Mizar)
This student has a clear description on
his work. He seems understand
already about the concept of
measuring area by using square units.
He describes the number of square
that represent the area. The more
number of squares the bigger area.
Figure.1: area=6,
perimeter=10
Figure.2: area=4,
perimeter=10
This student has good understanding
about measuring area by using square
grid unit and also interprets wooden
matches as the unit for measuring
perimeter. He counts the number of
square grid to figure out the area and
he counts the number of sides to
figure out the perimeter of the shapes.
Somehow he didn‟t describe the
biggest or smallest area. We can‟t
conclude that he can‟t make
comparison yet, he might miss out the
explanation.
The biggest area is 2 and 1
because large, long
The smallest area is 3 because
small, narrow
This student made good interpretation
of 10 wooden matches in 3 different
shapes. Somehow in describing the
area of the shape, he just pays
attention on how the shape looks like.
He did not pay attention on the
number of squares. This student seems
still struggle to understand the concept
of measuring area with square grid
unit.

171
Questions Answers How students work on question Discussion on students answer
This student seems did not understand
well about the question given. He can
represent 10 wooden matches but for
area problem he gave example of his
own. But actually he has the concept
of measuring area with square grid
unit. We can see it from his answer
that he describes very well the area
based on the number of squares and
the perimeter based on the sides.
Number.2 is the smallest and
number.1 is the biggest
because the perimeter of
number.1 is 6 and the
perimeter of number.2 is 8, if
we combine then it becomes
13
This student seems still struggle a lot
with the concept of area and
perimeter. He mixed up the area and
perimeter. When he answers number 2
as the smallest and 1 as the biggest,
his reasoning is mixing up between
area and perimeter. If we pay attention
on her drawing, picture 1 has area 6
but she said 6 as perimeter and for
picture 2 he did correctly that the
perimeter is 8 somehow we didn‟t
have enough data to figure out why he
decide to add up those 6 and 8.
c. Which number that has the
longest perimeter and which
number has the shortest one?
Explain
All shapes have the same
perimeter which is 10
8 students said that the perimeter for
all shapes is the same which is 10.
They aware that they only use 10
wooden watches for every shape that
they draw.

172
Questions Answers How students work on question Discussion on students answer
The shortest perimeter is
number.2 and the longest
perimeter is no.1
6 students said that the perimeters are
different. Even though they made a
correct interpretation in their drawing
somehow they did not aware that for
each of shape they use the same
number of matches which is 10. They
decide the perimeter by seeing the
pictures. As the picture beside, indeed
number 1 looks longer than number 2
but the number of squares sides still
10. The students here still did not
understand very well about the
squares side as the unit measurement
of perimeter.
Number.2 is the smallest and
number 1 is the biggest,
because number.1 the
perimeter is 10 and number.2
the area is 4 so if we put
together there are 14
This student has different answer from
the other. She mixes up area and
perimeter as one. When he answers
for number.2 he gave perimeter
reasoning but for number.1 he gave
area reasoning and both for the same
question about perimeter. It seems he
did not understand well the different
between area and perimeter

173
LKS-III
Questions answers How students work on
question/reasoning
Discussion on students’
answer
See the picture below
a. Count the perimeter and area and explain how
you counted it.
Shape A: perimeter=12,
area=8
Shape B: perimeter=12,
area=9
Perimeter A= (2x2)+(4x2)=12
Area A= count the squares
Perimeter B= 3x4 = 12
Area B=count the squares
Mizar is the only one who used
quite formal way to count the
perimeter. He notice that
opposite sides in rectangles
have the same length that‟s why
he times it by 2 then for 4
square he also notice that all
sides are the same that‟s why he
times it by 4. Somehow he just
counted the number of square to
find the area instead of using
multiplication.
Perimeter A and B = count the
outer sides of a shape/count the
sticks
Area A and B = count the
number of squares
25 students have the same
answers. These students
understand very well the
instruction given and also the
information given in the
question. They count the square
grids to figure out the area of
the shapes and they count the
sides of the squares to figure
out the perimeter of the shapes.
Shape A: perimeter=12, area=8
Shape B: perimeter=12, area=9
Instead of showing how to
count the perimeter and area,
they just rewrite the value of

174
Questions answers How students work on
question/reasoning
Discussion on students’
answer
perimeter and area.
Perimeter=from the outer line
Area= from the inner line
They give reasoning which in
fact did not support their
answer.
Shape A: perimeter=12,
area=8
Shape B: perimeter=11,
area=9
Shape A: perimeter=12, area=8
Shape B: perimeter=11, area=9
Bryan is the only student who
made minor mistakes in
answering the area of shape B.
he wrote 11 for the perimeter. It
seems this student have good
understanding already same as
his other 25 friends, it just in a
matter that he might be careless
or skip counting the number of
squares
b. From the picture of shape A and B, which
shape has the biggest area? explain it.
Shape B/squares
-Shape B has the total squares
more than shape A
-Shape B has 9 squares but
shape A has 8 squares
19 students describe that B
bigger than A. They have the
concept of measuring area and
perimeter already. In this case
they count the number of
squares to count the area and
count the number of sides for
counting perimeter.
-The perimeter is a lot.
-long
4 students describe their
reasoning that not supports their
answer. They reason about
perimeter when the question
was about area. These students

175
Questions answers How students work on
question/reasoning
Discussion on students’
answer
-big might still mix up
c. From the picture of shape A and B, which
shape has the longest perimeter? explain it
Same/A and B
-They have the same perimeter
-The number of stick are same
15 students realize that both
shapes have the same perimeter.
They count the number of sides
but some of them also still have
model of sticks instead of sides
of squares. It‟s not a problem
because indeed students have
their own level of
understanding.
-The sticks have the same length
-The shapes area squares so
that‟s why they‟re same
-they have the same lines
-it‟s smaller
-long
7 students describe their
reasoning that not supports their
answer. For instance “the sticks
have the same length/ have the
same line” in this answer they
might understand that it is about
the same number of sides but
they might get difficulties to
write in on their own. Somehow
for not having enough data for
some answer then we have no
idea why they answer that way.
“it‟s smaller‟, for instance, it‟s
not supporting the answer that
both perimeter are the same.

176
Questions answers How students work on
question/reasoning
Discussion on students’
answer
Shape A has the longest
perimeter
-The perimeter is a little
-Short
-The area is a little
-the perimeter is long
Here the student really struggle
with the idea of longest
perimeter. Even their reasoning
didn‟t support their own
answer. They seems still
confuse about the different of
area and perimeter still.
-The perimeter area same = 12
-same
2 student said that the longest
perimeter is A, somehow their
reasoning support the answer
that both shape have the same
perimeter. After farther
elaboration then it seems
students understand that both
shape have the same perimeter
but again they saw the physical
of the shape where shape A
horizontally longer than shape
B. For the question is about the
longest perimeter then they said
that A is the longest by seeing
the picture and ignoring their
finding on the number of sides
which area same.
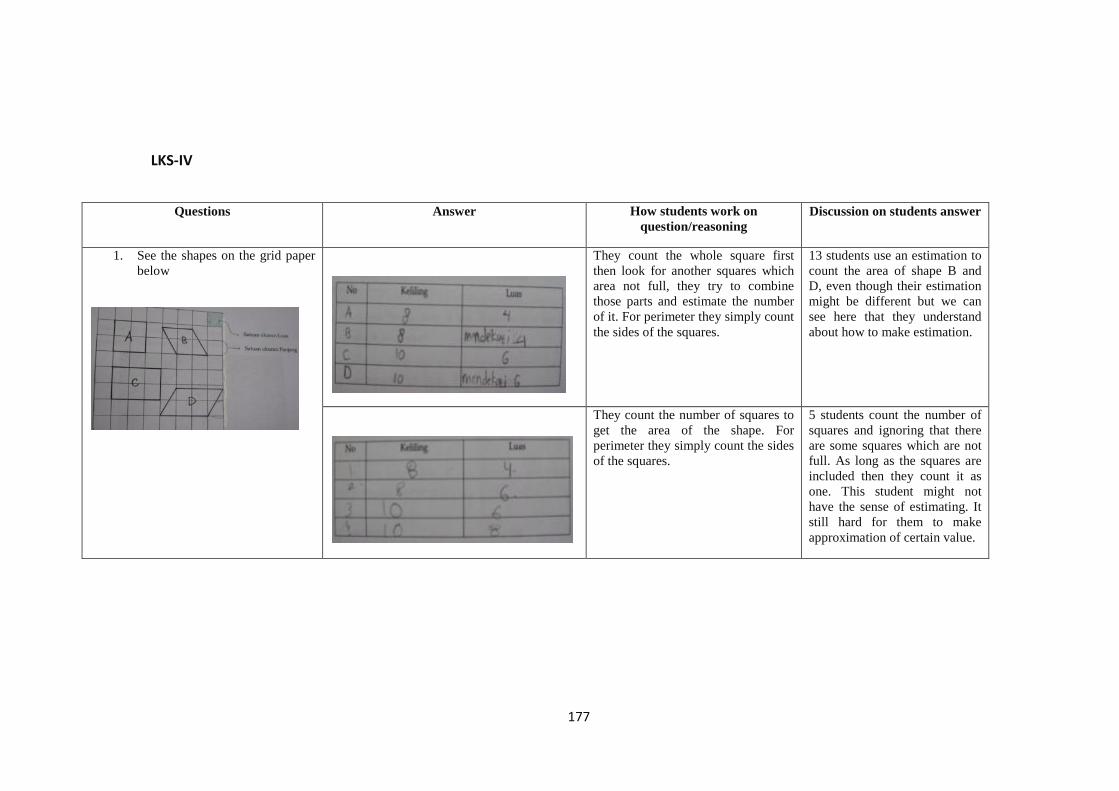
177
LKS-IV
Questions Answer How students work on
question/reasoning
Discussion on students answer
1. See the shapes on the grid paper
below
They count the whole square first
then look for another squares which
area not full, they try to combine
those parts and estimate the number
of it. For perimeter they simply count
the sides of the squares.
13 students use an estimation to
count the area of shape B and
D, even though their estimation
might be different but we can
see here that they understand
about how to make estimation.
They count the number of squares to
get the area of the shape. For
perimeter they simply count the sides
of the squares.
5 students count the number of
squares and ignoring that there
are some squares which are not
full. As long as the squares are
included then they count it as
one. This student might not
have the sense of estimating. It
still hard for them to make
approximation of certain value.
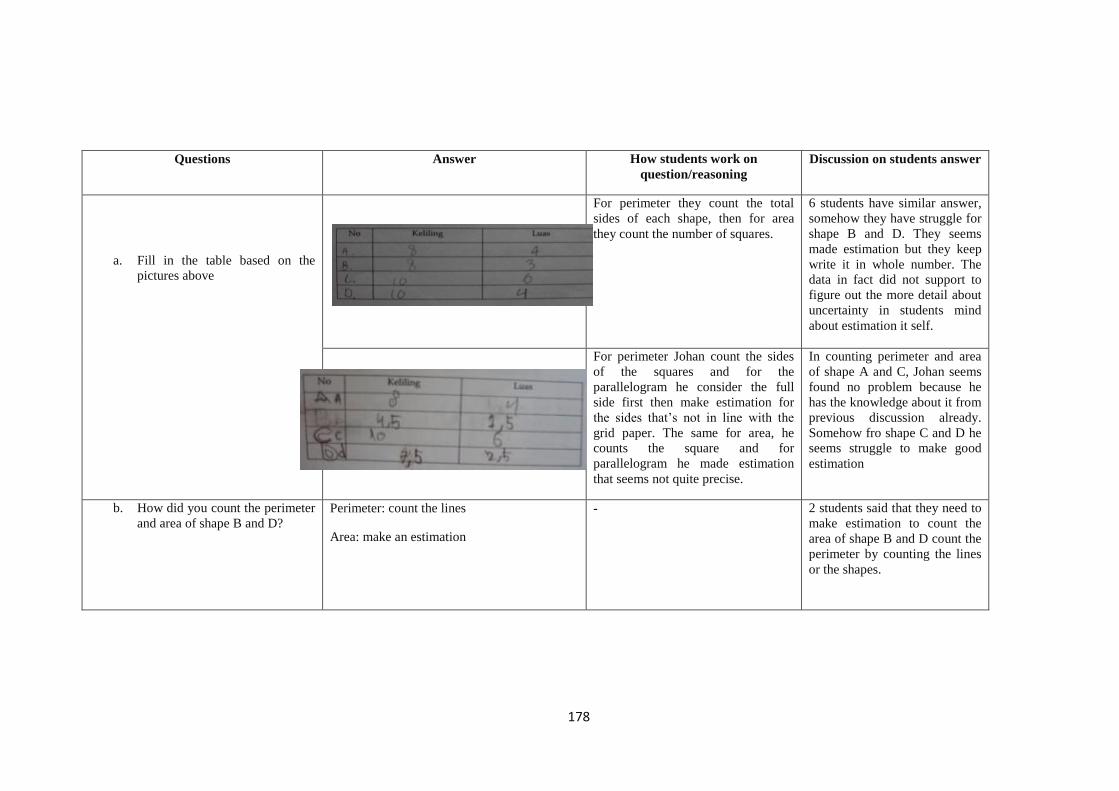
178
Questions Answer How students work on
question/reasoning
Discussion on students answer
a. Fill in the table based on the
pictures above
For perimeter they count the total
sides of each shape, then for area
they count the number of squares.
6 students have similar answer,
somehow they have struggle for
shape B and D. They seems
made estimation but they keep
write it in whole number. The
data in fact did not support to
figure out the more detail about
uncertainty in students mind
about estimation it self.
For perimeter Johan count the sides
of the squares and for the
parallelogram he consider the full
side first then make estimation for
the sides that‟s not in line with the
grid paper. The same for area, he
counts the square and for
parallelogram he made estimation
that seems not quite precise.
In counting perimeter and area
of shape A and C, Johan seems
found no problem because he
has the knowledge about it from
previous discussion already.
Somehow fro shape C and D he
seems struggle to make good
estimation
b. How did you count the perimeter
and area of shape B and D?
Perimeter: count the lines
Area: make an estimation
- 2 students said that they need to
make estimation to count the
area of shape B and D count the
perimeter by counting the lines
or the shapes.

179
Questions Answer How students work on
question/reasoning
Discussion on students answer
Perimeter: count the outer lines, count the
number sticks, count one by one, add it up
Area: count the squares, count one by one
- Even though we found that
most of students give answer in
approximation for area but they
said that they need to count
lines for perimeter and count
the squares for area.
2. If you have 2 ropes with equal
length, used to form these shapes
below
Area of shape A=23
Area of shape B = 18
Count the squares They count the number of
squares to get the area. Here the
students ignore whether the
square is full square or just a
part. As long as it‟s including in
the shape then they count it as
one.
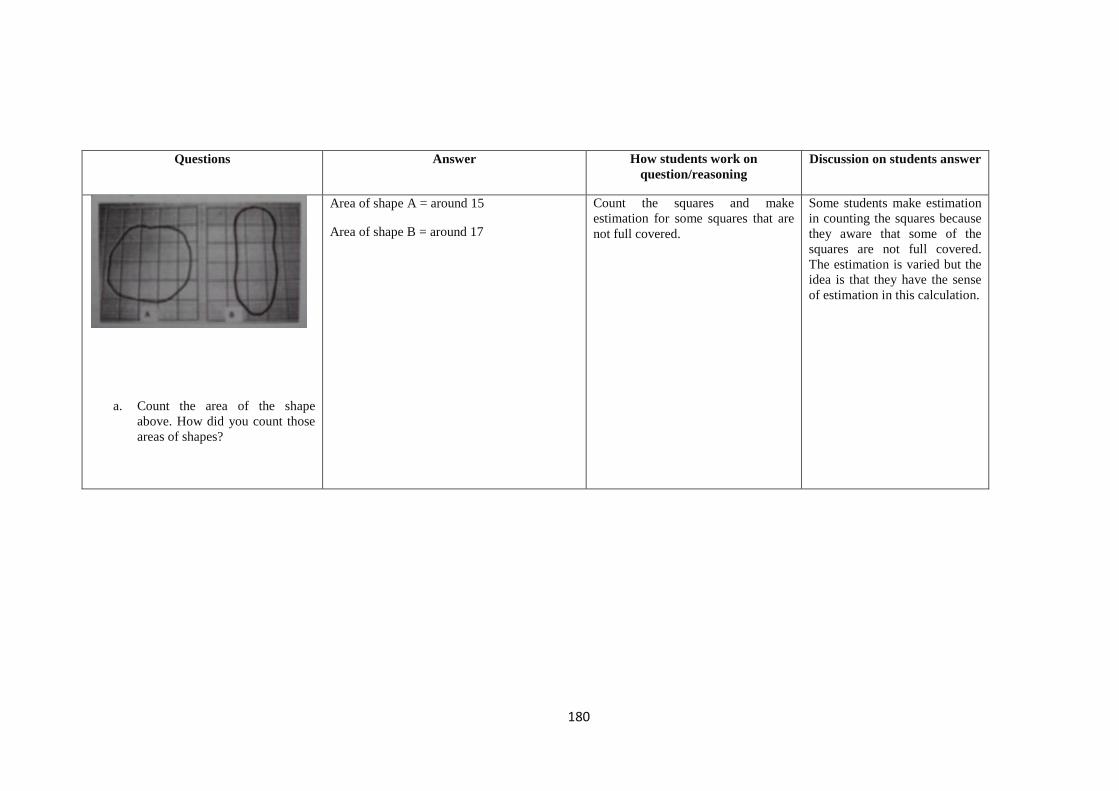
180
Questions Answer How students work on
question/reasoning
Discussion on students answer
a. Count the area of the shape
above. How did you count those
areas of shapes?
Area of shape A = around 15
Area of shape B = around 17
Count the squares and make
estimation for some squares that are
not full covered.
Some students make estimation
in counting the squares because
they aware that some of the
squares are not full covered.
The estimation is varied but the
idea is that they have the sense
of estimation in this calculation.

181
Post-test
Question Answer How students work on question/reasoning
Discussion
Activity.1
See the picture below
a. Explain the similarities and
difference from those two shapes.
No answer .1 We divided the answers in 8
different groups. The group that has
most members is the one who
answer that the area/the number of
squares from both shapes are same
but the perimeters area different.
There are 18 students from the total
of 28 students. These students seem
understand well which one is area
and which one is perimeter and how
to count it. Somehow, we still found
other group who still struggle, like
they describe that both area and
perimeter of the shapes area same.
Overall for those who still struggle
in answering this question is about
the perimeter, they often mix up
with the idea that longer perimeter
is when the appearance of the shape
looks longer.
S: P shape A = P shape B.1
D:A shape A = A shape B
S: area/number of squares.18
D: perimeter
S: the number of squares=16.1
D: the number of squares=16
S: -
D: A has rectangular shape B has
square shape
S: area
D: shape A=rectangle, shape B: square
S: 16 boxes
D: pic A is longer than pic B/ shape
are different

182
Question Answer How students work on question/reasoning
Discussion
S: inside the box there are two small
boxes and they are very long namely
rectangle
D: inside the box there 4 small boxes
namely square
b. How did you compare the
perimeter of shape A and B.
Explain it
By counting the lines/the outer
line/the sticks/.12
There are 7 different groups of
answer. 12 students explain very
well that they use the outer line to
count the perimeter but there are
some students also who explain that
they use ropes, ruler or just by
seeing it to count the perimeter. We
also see some students also struggle
to answer this question, they even
count the number of square grids to
answer it or just by seeing it and
decide that A is longer than B.
Student who still struggle to count
perimeter even until their last lesson
seems still need more guidance to
understand the concept. For them, it
might be confusing to have the area
and perimeter at the same time, or
maybe for them perimeter is less
abstract then area when they come
together.
By using ropes/ruler/ count one by
one/measure both shape.5
Count the boxes/area and the
perimeter/the sides.4
Times it:4x4=16 .1
P.A=20
P.B=16, not the same.1
By seeing it.3
A: 16 squares.1
B:16 squares
Pic.A the perimeter is longer compare
to B.1
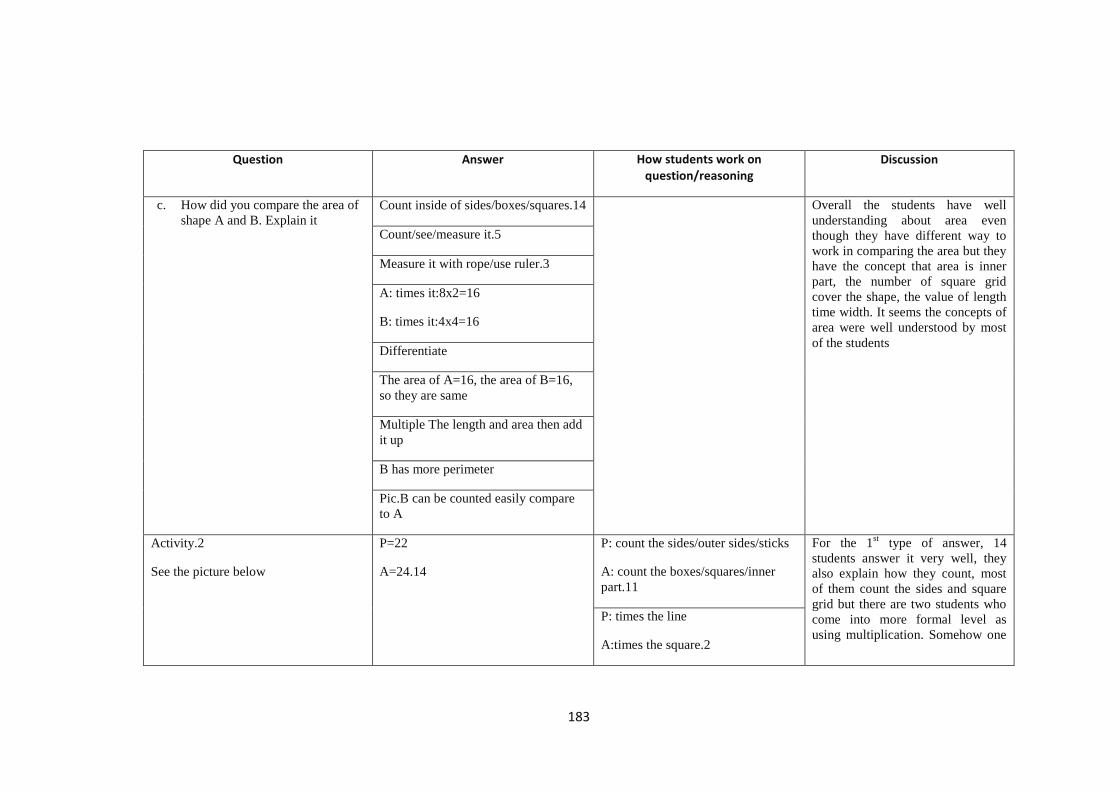
183
Question Answer How students work on question/reasoning
Discussion
c. How did you compare the area of
shape A and B. Explain it
Count inside of sides/boxes/squares.14
Overall the students have well
understanding about area even
though they have different way to
work in comparing the area but they
have the concept that area is inner
part, the number of square grid
cover the shape, the value of length
time width. It seems the concepts of
area were well understood by most
of the students
Count/see/measure it.5
Measure it with rope/use ruler.3
A: times it:8x2=16
B: times it:4x4=16
Differentiate
The area of A=16, the area of B=16,
so they are same
Multiple The length and area then add
it up
B has more perimeter
Pic.B can be counted easily compare
to A
Activity.2
See the picture below
P=22
A=24.14
P: count the sides/outer sides/sticks
A: count the boxes/squares/inner
part.11
For the 1st type of answer, 14
students answer it very well, they
also explain how they count, most
of them count the sides and square
grid but there are two students who
come into more formal level as
using multiplication. Somehow one
P: times the line
A:times the square.2

184
Question Answer How students work on question/reasoning
Discussion
a. What is the perimeter and area of
the shape above. Explain how you
count it.
No reason.1 student left without explanation.
Somehow there are some students
who still struggle with the question
given, those who still have problem
in their spatial ability found it
difficult to imagine the whole
square grids from the picture given.
They might know the concept of
area as the number of square grids
covers the whole surface but they
struggle to form the next grids. But
it also possible that they confuse
still with the concept of area itself.
P=22
A=16.3
P:count one by one
A: count the squares
P: count the sticks
A: in its lines
P: measure it
A: measure it
P=24
A=22.1
P: count the boxes
A: count the black lines
P=9
A=4.1
P=9
A=10.1
A:count the
boxes
B: count the
boxes carefully
A: count the
boxes
B: count the
boxes
P=21
A=24.2
P: count the black lines
A: complete the boxes
P=4
A=24.1
P=4 lines
A=4 sides.1
P: count the
perimeter
A: add the
-

185
Question Answer How students work on question/reasoning
Discussion
squares
P=10
A=8x3=24.1
P:count the partition
A: multiple it
- - P=add 1+1 and
on
A=count the
boxes.1
P=count the lines
A=count the
boxes.1

186
Question Answer How students work on question/reasoning
Discussion
b. Try to explain in your words,
what is perimeter and area.
P=the outer side/outer part/outside
A=the boxes inside perimeter/inner
part/inside.20
Most of the students have the same
idea about their interpretation of the
words area and perimeter. They
describe those words in a matter of
physical appearance of perimeter
and area. Somehow one or two
student also consider about area and
perimeter in the matter of
measuring. At the contrary one
students still understand perimeter
which in bahasa known as keliling
into the meaning of taking around.
From this answer only we can‟t
claim that students are understand
or not understand but we also need
how they demonstrate the
measuring activity, how they
compare and how they structure
their reasoning about area and
perimeter.
P= unit perimeter
A= unit area
P= part inside the squares
A= part inside the squares
P= count perimeter inside the lines
A= count area on the lines
P= count the number of partition
A= Area of rectangle
P= we count the boxes
A= we count the box which contains
boxes
P= people selling food
No answer

187
Question Answer How students work on question/reasoning
Discussion
Aktivity.3
Imagine you have 8 wooden matches
which its each side has the same length
with the side of square grid below
Students draw the form of rectangle
and square.17
In fact almost 100% of students
have no problem in arranging the
picture but we can see the pattern
here that most of the students tend
to make the shapes of rectangle and
square. It might be because from the
very first introduction of this lesson
they meet with rectangle and square
more often than other shapes. There
are some students also who make
the shape in L form or even in
random.
Students draw the form of rectangle
and L but some also with square.6
4 students draw in random, ignoring
the number of sticks
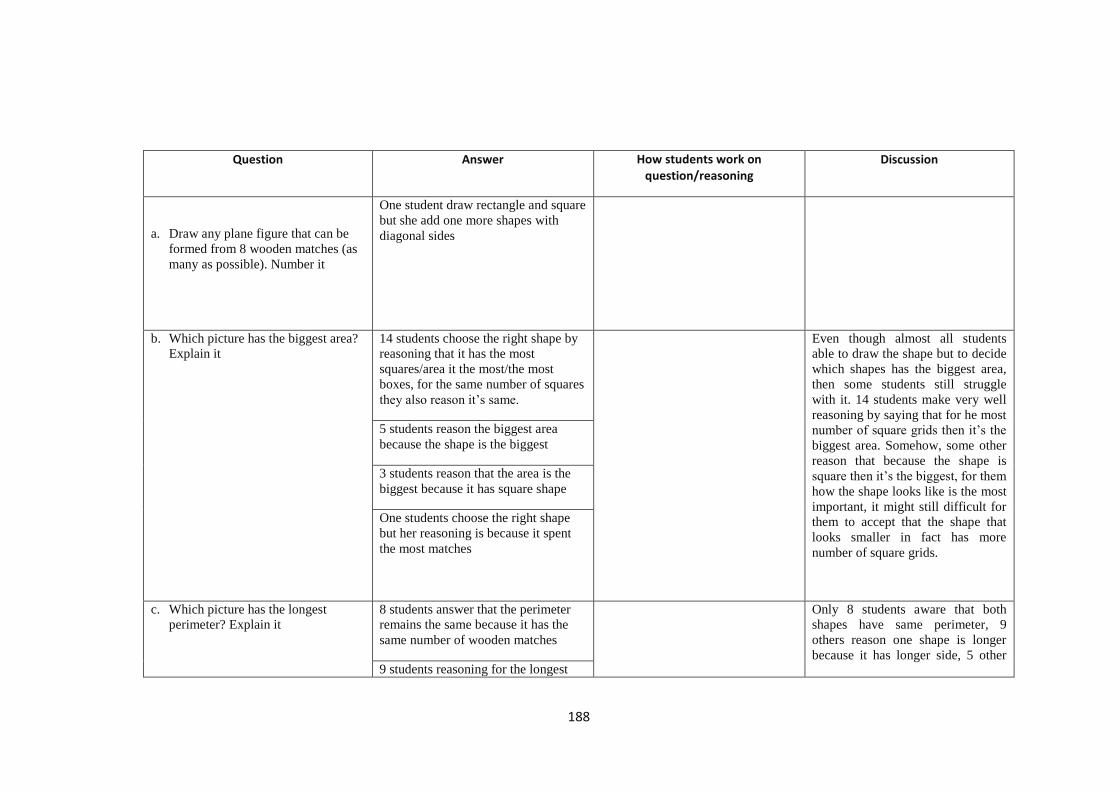
188
Question Answer How students work on question/reasoning
Discussion
a. Draw any plane figure that can be
formed from 8 wooden matches (as
many as possible). Number it
One student draw rectangle and square
but she add one more shapes with
diagonal sides
b. Which picture has the biggest area?
Explain it
14 students choose the right shape by
reasoning that it has the most
squares/area it the most/the most
boxes, for the same number of squares
they also reason it‟s same.
Even though almost all students
able to draw the shape but to decide
which shapes has the biggest area,
then some students still struggle
with it. 14 students make very well
reasoning by saying that for he most
number of square grids then it‟s the
biggest area. Somehow, some other
reason that because the shape is
square then it‟s the biggest, for them
how the shape looks like is the most
important, it might still difficult for
them to accept that the shape that
looks smaller in fact has more
number of square grids.
5 students reason the biggest area
because the shape is the biggest
3 students reason that the area is the
biggest because it has square shape
One students choose the right shape
but her reasoning is because it spent
the most matches
c. Which picture has the longest
perimeter? Explain it
8 students answer that the perimeter
remains the same because it has the
same number of wooden matches
Only 8 students aware that both
shapes have same perimeter, 9
others reason one shape is longer
because it has longer side, 5 other 9 students reasoning for the longest
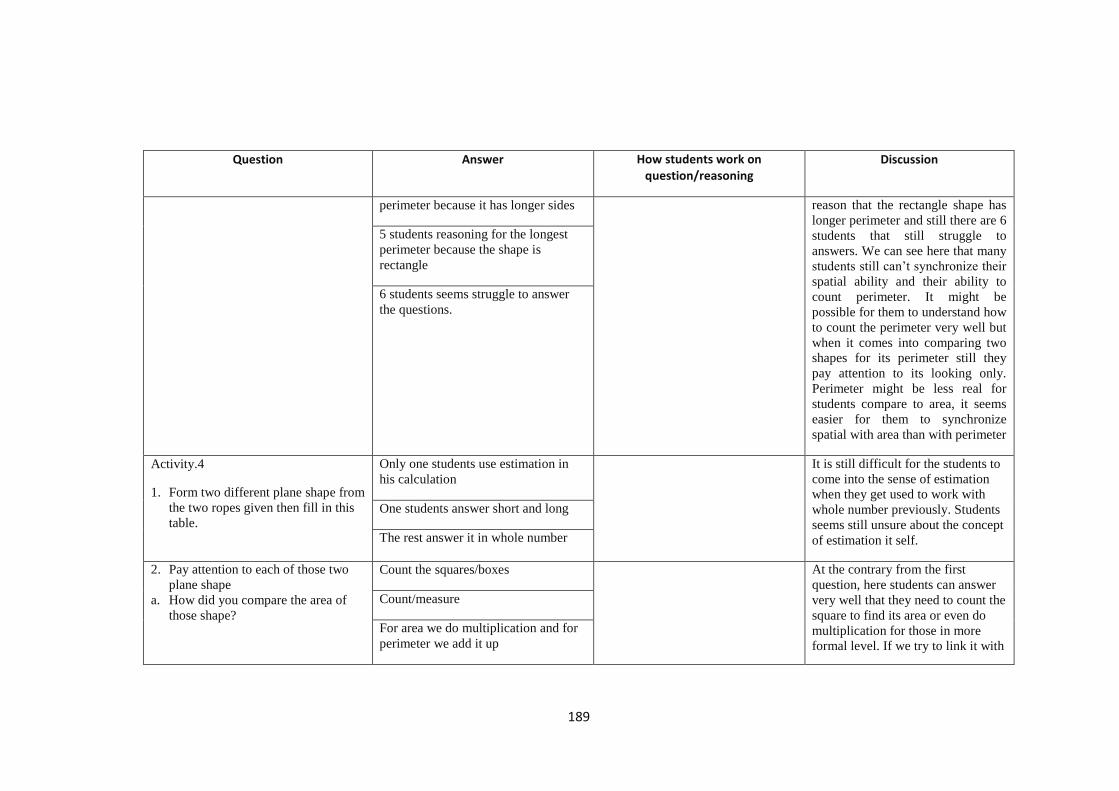
189
Question Answer How students work on question/reasoning
Discussion
perimeter because it has longer sides
reason that the rectangle shape has
longer perimeter and still there are 6
students that still struggle to
answers. We can see here that many
students still can‟t synchronize their
spatial ability and their ability to
count perimeter. It might be
possible for them to understand how
to count the perimeter very well but
when it comes into comparing two
shapes for its perimeter still they
pay attention to its looking only.
Perimeter might be less real for
students compare to area, it seems
easier for them to synchronize
spatial with area than with perimeter
5 students reasoning for the longest
perimeter because the shape is
rectangle
6 students seems struggle to answer
the questions.
Activity.4
1. Form two different plane shape from
the two ropes given then fill in this
table.
Only one students use estimation in
his calculation
It is still difficult for the students to
come into the sense of estimation
when they get used to work with
whole number previously. Students
seems still unsure about the concept
of estimation it self.
One students answer short and long
The rest answer it in whole number
2. Pay attention to each of those two
plane shape
a. How did you compare the area of
those shape?
Count the squares/boxes At the contrary from the first
question, here students can answer
very well that they need to count the
square to find its area or even do
multiplication for those in more
formal level. If we try to link it with
Count/measure
For area we do multiplication and for
perimeter we add it up

190
Question Answer How students work on question/reasoning
Discussion
Form it in different shape the previous question, students
already know about the concept of
area somehow it still difficult for
them to work in estimation
See the outer side
b. From the data you‟ve fill in the
table. Do the shapes have the same
area or different?
Different
Because it has different number of
squares/boxes
Some students said that the shapes
have different area but in fact they
have different reasoning about it.
First group said that since the
number of squares is different so the
area of the shapes remains different.
Other group said that since the
shapes are different so as the area,
they ignore the number of square
grids. Last group even pay attention
on the ropes/perimeter of the
shapes. To them, the longer the
ropes, the greater the area.
Because the shapes are different
Because one shape has longer ropes
than the other one
No reason
Same Because it has the same area This group considers the shapes
have the same area but they did not
show how their work was. It might
be possible that they miss calculate
the number of the square grids or
they might create two shapes that
identically same.
No reason For this student, they might still
struggle in reasoning. They just
simply answer the question.

191
Question Answer How students work on question/reasoning
Discussion
No answer - This students seems do not
understand the questions given, or it
might be because still confused with
the concept of perimeter and area.