international maternal & child health carebooks.mcai.org.uk/international maternal and child...
TRANSCRIPT

43
Section 1.12
that are known to cause shock. These include sepsis (for which antibiotics are needed), and antepartum or postpartum haemorrhage (for which specifi c treat-ment including medication and urgent surgery is needed together with replacement of lost blood (see Sections 2.5.D.i, iii and iv).
O Surgical advice and interventions for certain gastroin-testinal emergencies such as volvulus would constitute emergency treatment. The following symptoms and signs may suggest intra- abdominal emergencies: vom-iting, abdominal pain, abdominal tenderness and/or rigidity, lack of bowel sounds, rectal bleeding, abdominal mass (see Section 5.19).
Secondary assessment of neurological failure (disability)
TABLE 1.11.6 Neurological failure: signs and symptoms
Common symptoms
Signs Emergency investigations
HeadacheDrowsinessVomitingBehavioural changesVisual disturbance
Altered conscious levelConvulsionsBradycardiaAltered pupil size and reactivityAbnormal posturesMeningismFever Papilloedema or retinal haemorrhageAltered deep tendon refl exesHypertension
Blood glucoseOxygen saturationBlood culture (if infection is suspected)HaemoglobinUrea and electrolytes (if available)Malarial parasites
Examples of emergency treatment for neurological failure
O If hypoglycaemia with a blood glucose level of less than 2.5 mmol/L (45 mg/dL) is a possible diagnosis, it will have been treated as part of resuscitation, but the prevention of further hypoglycaemia by IV glucose infu-sion represents emergency treatment. Remember that there will be a reason for the hypoglycaemia, so further monitoring and treatment are needed until the child is drinking appropriate fl uids or has an IV infusion in place through which dextrose can be given.
O If convulsions persist after initial anticonvulsant drugs, treatment with further doses of anticonvulsants (see Sections 2.5.E, 2.7.E and 5.16.E) represents emergency treatment.
O If there is evidence of raised intracranial pressure (i.e. decreased conscious level, abnormal posturing and/or abnormal ocular motor refl exes), the patient should receive oxygen and bag-valve-mask ventilation as resus-citation, if they have apnoea or slow or poor breathing. Emergency treatment could include:
— nursing with head in- line and 20–30 degrees head- up position (to aid cerebral venous drainage)
— repeat IV infusion with mannitol 250–500 mg/kg over 15 minutes; however, the treatment becomes less effective with each dose (see Section 7.3.C)
— in more long- standing raised ICP, caused by tumours in the brain, dexamethasone will help to reduce raised ICP for a few days while specialist neurosurgical inter-vention is sought, or as palliation (see Section 5.14). The initial dose is 25 mg for patients over 35 kg and 20 mg for patients less than 35 kg, followed by a sliding scale of 4 mg every 3 hours for 3 days, then every 6 hours for 1 day, and continuing to decrease by 1–2 mg per day.
O In patients with a depressed conscious level or convul-sions, antibiotics are urgently required, but then consider encephalitis and give acyclovir as appropriate, as emer-gency treatment (see Sections 2.7.E and 5.16.C).
O In unconscious patients with pinpoint pupils, consider the possibility of opiate poisoning. After supporting breathing if necessary, a trial of naloxone should be given as emergency treatment (see Section 1.15).
Developmental and family historyParticularly in a small child or infant, knowledge of the child’s developmental progress and immunisation status may be useful. The family circumstances may also be helpful, and asking about these may sometimes prompt parents to remember other details of the family’s medical history.
Drugs and allergiesAny medication that the patient is currently taking, or has taken, should be recorded. In addition, if poisoning is a possibility, ask about any medication in the home that a child might have had access to. A history of allergies should be sought.
1.12 Basic life support for children and pregnant mothers
IntroductionBasic life support (BLS) is a technique that can be employed by one or more rescuers to support the respiratory and circulatory functions of a collapsed patient using no or minimum equipment.
Resuscitation from cardiac arrest in pregnant women and in childrenThe international guidelines for resuscitation from cardiac arrest (European Resuscitation Council, 2010) detail two approaches to basic life support. One is for adults and the other for children.
44
International Maternal & Child Health Care
The ‘adult’ programme is predicated on resuscitation from a sudden cardiac event (e.g. ventricular fi brillation from a coronary occlusion) in a patient who was ventilating before the event and therefore has oxygen in their blood. In this group, chest compressions to move the oxygen-ated blood into the coronary and cerebral arteries are of prime importance, and therefore the rescuer’s sequence of actions after assessment starts with chest compressions, not rescue breaths.
The sequence of actions in the ‘child’ programme is predicated on a hypoxic event (including any respiratory failure or obstruction, or hypoxia at a cellular level as seen in shock). In this type, re- establishing oxygenation is of prime importance, and moving the oxygenated blood to the coro-nary and cerebral arteries is the second step. Therefore the rescuer’s sequence of actions after assessment starts with rescue breaths and then moves on to chest compressions.
The ‘child’- type cardiac arrest is seen in almost all chil-dren (excluding those rare arrhythmic events in children with congenital or acquired heart disease and those in whom sudden, unexpected collapse is preceded by apparent normal respiratory and circulatory function), and in adults who have a terminal acute illness involving respiratory or circulatory pathology. This includes patients who have had convulsions, trauma (including drowning), poisoning, bleeding, sepsis, etc.
In addition, international guidelines on resuscitation from cardiac arrest agree that, where possible, guidelines should be simplifi ed as there is evidence that complex guidelines cause ‘provider paralysis’, resulting in no or poor life- saving effort being made.
In view of the above, the Advanced Life Support Group
(ALSG)/Maternal Childhealth Advocacy International (MCAI) programme for resource- limited countries teaches a pro-gramme of basic life support for infants, children and pregnant mothers which refl ects the known pathologies in these groups (i.e. respiratory and circulatory causes of cardiac arrest) and recognises that the clinicians who provide resuscitation attend patients of all ages.
The sequence taught therefore includes fi ve preliminary rescue breaths and a subsequent ratio of 15:2.
Because of minor differences in technique based on anatomical differences between the groups, children are classifi ed into two groups:
O infants (< 1 year of age) O children between 1 year of age and puberty.
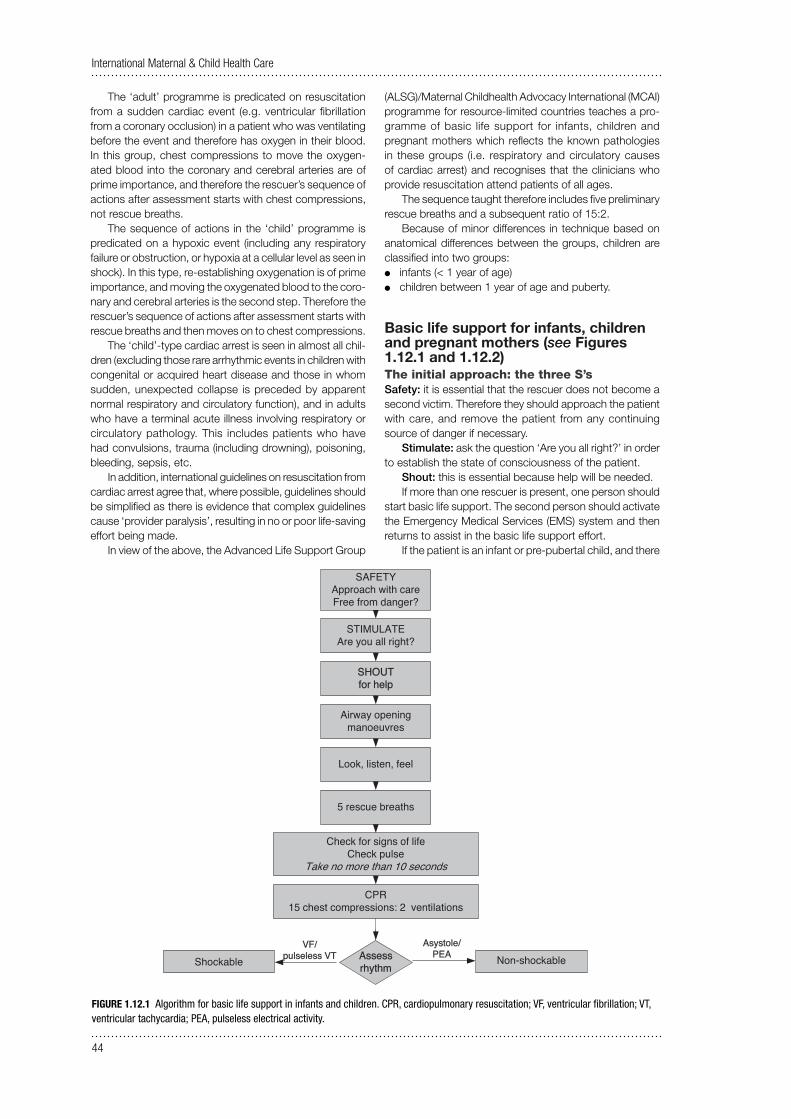
Basic life support for infants, children and pregnant mothers (see Figures 1.12.1 and 1.12.2)The initial approach: the three S’sSafety: it is essential that the rescuer does not become a second victim. Therefore they should approach the patient with care, and remove the patient from any continuing source of danger if necessary.
Stimulate: ask the question ‘Are you all right?’ in order to establish the state of consciousness of the patient.
Shout: this is essential because help will be needed.If more than one rescuer is present, one person should
start basic life support. The second person should activate the Emergency Medical Services (EMS) system and then returns to assist in the basic life support effort.
If the patient is an infant or pre- pubertal child, and there
ShockableVF/
pulseless VTAsystole/
PEA
SAFETYApproach with careFree from danger?
SHOUTfor help
Airway opening manoeuvres
Look, listen, feel
5 rescue breaths
Check for signs of lifeCheck pulse
Take no more than 10 seconds
CPR15 chest compressions: 2 ventilations
STIMULATEAre you all right?
Non-shockableAssess rhythm
FIGURE 1.12.1 Algorithm for basic life support in infants and children. CPR, cardiopulmonary resuscitation; VF, ventricular fi brillation; VT, ventricular tachycardia; PEA, pulseless electrical activity.
45
Section 1.12
is only one rescuer and no help has arrived, the rescuer should open the airway, deliver the fi ve rescue breaths and give 1 minute of cardiopulmonary resuscitation (CPR), and then activate the EMS system (if one is available) using a mobile phone if available so as to continue CPR. If a mobile is not available and the patient is a baby, the rescuer will probably be able to carry them to a telephone while continuing CPR.
Similarly, if the patient is a pregnant mother, and there is only one rescuer, they should activate the EMS system, where one is available, if no help has arrived in response to the initial shout for help after opening the airway, delivering the fi ve rescue breaths and giving 1 minute of CPR.
‘Are you all right?’An initial simple assessment of responsiveness consists of asking the patient ‘Are you all right?’ and gently shaking them by the shoulder. Infants may make some noise or open their eyes.
In cases associated with trauma, or possible trauma, the cervical spine should be immobilised during this procedure by placing one hand fi rmly on the forehead while one of the patient’s shoulders is shaken.
Airway- opening actionsAn obstructed airway may be the primary problem, and cor-rection of the obstruction can result in recovery without the need for further intervention. If the patient is unconscious but breathing, the recovery position should be used. For pregnant mothers the left lateral position must be adopted (see Section 2.5).
SAFETYApproach with careFree from danger?
STIMULATEAre you all right?
Airway opening manoeuvresHead tilt/chin lift sniffingJaw thrust only if trained and competent
LOOK for adequate chest movementsLISTEN for breath sounds
FEEL for breaths For 10 seconds
IS BREATHING ADEQUATE?
NO
RECOVERY POSITIONGET HELP
REASSESS REGULARLY
15 chest compressions
5 rescue breaths
Remove outer clothingCentre of chest
2 hands
OPEN AIRWAY2 BREATHS TO 15 COMPRESSIONS
Caesarean section should be viewed as part of the resuscitation of the mother, and the baby should be delivered within 5 minutes of cardiac arrest regardless of the state of the
fetus
Agonal gasps = not adequateIf doubt = not adequate
YES
Check for signs of life orFIND pulse
Take no more than 10 seconds Hard surface Manually displace uterus or
15 30 degree lateral tilt using pillow
Compress chest by one-third A-P diameter (4–
–
5 cm)
SHOUT FOR HELP
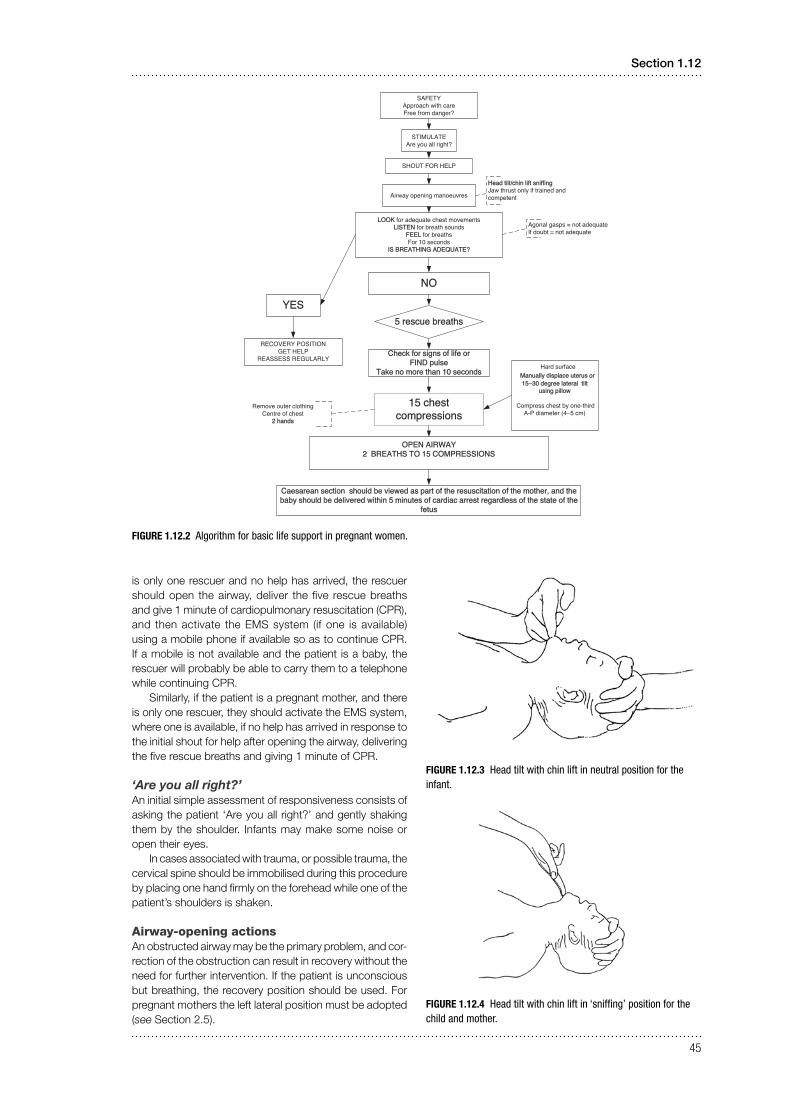
FIGURE 1.12.2 Algorithm for basic life support in pregnant women.
FIGURE 1.12.4 Head tilt with chin lift in ‘sniffi ng’ position for the child and mother.
FIGURE 1.12.3 Head tilt with chin lift in neutral position for the infant.

46
International Maternal & Child Health Care
If the patient is not breathing, this may be because the airway is blocked by the tongue falling back and obstructing the pharynx. Attempt to open the airway using the head tilt/chin lift manoeuvre. The rescuer places their nearest hand on the patient’s forehead, and applies pressure to tilt the head back gently. The correct positions are ‘neutral’ in the infant (0–1 year of age) (see Figure 1.12.3) or ‘sniff-ing’ (nose up in the air) in the child or pregnant mother (see Figure 1.12.4).
The fi ngers of the other hand should then be placed under the chin, and the chin of the supine patient should be lifted upwards. As this action may close the patient’s mouth, it may be necessary to use the thumb of the same hand to part the lips slightly.
As an alternative to the head tilt/chin lift, the jaw thrust manoeuvre can be very effective, but requires more training and experience.
FIGURE 1.12.5 Jaw thrust to open airway.
Jaw thrust is achieved by placing two or three fi ngers under the angle of the mandible bilaterally, and lifting the jaw upward (see Figure 1.12.5). This is potentially safer than the head tilt/chin lift if there is a history of major trauma, as the latter manoeuvre may exacerbate a cervical spine injury.
BUT airway opening is always the most important action which must be achieved, and should always take precedence over concerns about a possible cervical spine injury.
Patency of the airway should then be assessed by: O looking for adequate chest movements O listening for breath sounds O feeling for breaths.
This is best achieved by the rescuer placing their face above that of the patient, with the ear over the nose, the cheek over the mouth, and the eyes looking along the line of the chest. They should take no longer than 10 seconds to assess breathing.
If there is anything obvious in the mouth and it is easy to reach, remove it.
Do not perform a blind fi nger sweep in the mouth. A blind fi nger sweep can damage the soft palate, and foreign bodies may be forced further down the airway and become lodged below the vocal cords.
Breathing actionsIf airway- opening techniques do not result in the resumption of adequate breathing within 10 seconds, and a self- infl ating bag–mask system is not available, then the rescuer should commence mouth- to- mouth or mouth- to- mouth- and- nose exhaled air resuscitation.
Defi nition of adequate breathingA patient may have very slow or shallow breathing, or take infrequent, noisy, agonal gasps. Do not confuse this with normal breathing.
Rescue breathsIf in doubt about the adequacy of breathing, fi ve initial res-cue breaths should be given. While the airway is held open, the rescuer breathes in and seals their mouth around the patient’s mouth or mouth and nose (in the case of infants) (see Figures 1.12.6 and 1.12.7). If the mouth alone is used, the nose should be pinched using the thumb and index fi nger of the hand maintaining head tilt. Slow exhalation, 1–2 seconds, by the rescuer should result in the patient’s chest rising. The rescuer should take a further breath him- or herself before the next rescue breath.
FIGURE 1.12.6 Mouth-to-mouth and nose breaths in neutral position for an infant.
FIGURE 1.12.7 Mouth-to-mouth breaths with pinched nose in sniffi ng position for a child or mother.
As children and mothers vary in size, only general guid-ance can be given regarding the volume and pressure of inflation (see Box 1.12.1).

47
Section 1.12
BOX 1.12.1 General guidance for exhaled air resuscitation
Q The chest should be seen to rise. Q Slow breaths at the lowest pressure reduce gastric
distension. Q Firm gentle pressure on the cricoid cartilage may reduce
gastric distension with air.
If the chest does not rise, the airway is not clear. The usual cause is failure to correctly apply the airway- opening techniques discussed earlier. The fi rst step is to readjust the head tilt/chin lift position and try again. If this is not successful, jaw thrust should be tried. If two rescuers are present, one should maintain the airway while the other breathes for the patient.
Failure of both head tilt/chin lift and jaw thrust should lead to suspicion that a foreign body is causing the obstruc-tion (see below).
While performing rescue breaths, the presence of a gag refl ex or coughing is a positive sign of life (see below).
Circulation actionsOnce the initial fi ve breaths have been given successfully, circulation should be assessed and managed.
Check signs of life and/or pulse (take no more than 10 seconds)Even experienced health professionals can fi nd it diffi cult to be certain that the pulse is absent within 10 seconds, so the absence of ‘signs of life’ is the best indication for starting chest compressions. ‘Signs of life’ include move-ment, coughing, gagging or normal breathing (but not agonal gasps, which are irregular, infrequent breaths). Thus the absence of evidence of normal breathing, coughing or gagging (which may be noticed during rescue breaths) or any spontaneous movement is an indication for chest compressions.
Inadequacy of circulation is also indicated by the absence of a central pulse for up to 10 seconds, but it can be diffi cult and therefore time wasting to be certain about this – hence the current emphasis on assessing the presence of ‘signs of life’.
In babies and young children, if a slow pulse (less than 60 beats/minute) is felt, this is still an indication for chest compressions. In children and pregnant mothers, the carotid pulse in the neck can be palpated. However, infants generally have a short fat neck, so the carotid pulse may be diffi cult to identify. The brachial artery in the medial aspect of the antecubital fossa or the femoral artery in the groin should be felt in infants. If there are no signs of life and/or a pulse is absent for up to 10 seconds, start chest com-pressions. Compressions should also be started if in an infant or young child there is an inadequate heart rate (less than 60 beats/minute), but only if this is accompanied by signs of poor perfusion, which include pallor, lack of responsiveness and poor muscle tone.
Start chest compressions if: O there are no signs of life or O there is no pulse or O there is a slow pulse (less than 60 beats/minute in an
unconscious infant or young child with poor perfusion).
‘Unnecessary’ chest compressions are almost never dam-aging. It is important not to waste vital seconds before starting chest compressions after oxygenating the patient with the rescue breaths. If there are signs of life and the pulse is present (and has an adequate rate, with good perfusion), but apnoea persists, exhaled air resuscitation must be continued until spontaneous breathing resumes.
Chest compressionsFor the best output, the patient must be placed on their back, on a hard surface. The chest should be compressed by a third of its depth. Children vary in size, and the exact nature of the compressions given should reflect this. In general, infants (less than 1 year of age) require a different technique from pre- pubertal children, in whom the method used in adults can be applied with appropriate modifications for their size.
FIGURE 1.12.8 Two-thumb method for chest compressions in an infant (two rescuers).
FIGURE 1.12.9 Two-fi nger method for chest compressions in an infant (one rescuer).
Position for chest compressionsChest compressions should compress the lower half of the sternum.
Infants: Infant chest compression can be more effec-tively achieved using the hand- encircling technique: the infant is held with both the rescuer’s hands encircling or
48
International Maternal & Child Health Care
partially encircling the chest. The thumbs are placed over the lower half of the sternum and compression is carried out as shown in Figure 1.12.8. This method is only pos-sible when there are two rescuers, as the time needed to reposition the airway precludes the use of the technique by a single rescuer if the recommended rates of compression and ventilation are to be achieved. The single rescuer should use the two- finger method as shown in Figure 1.12.9, employing the other hand to maintain the airway position.
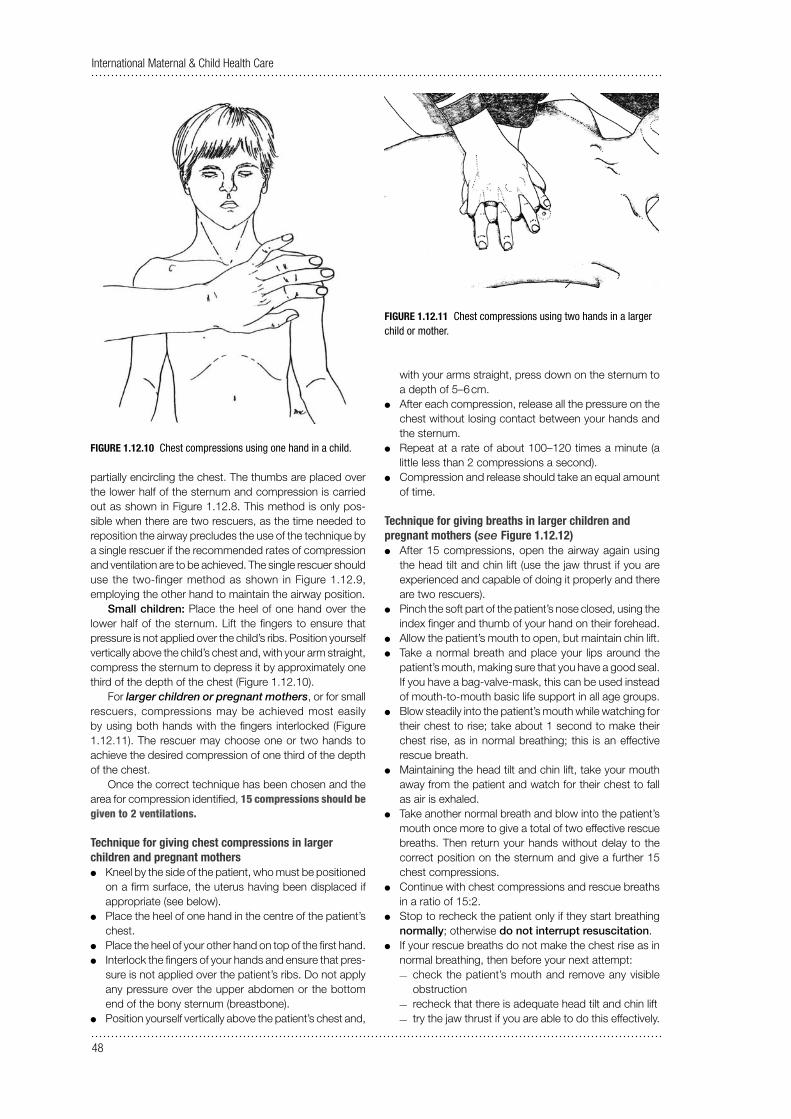
Small children: Place the heel of one hand over the lower half of the sternum. Lift the fi ngers to ensure that pressure is not applied over the child’s ribs. Position yourself vertically above the child’s chest and, with your arm straight, compress the sternum to depress it by approximately one third of the depth of the chest (Figure 1.12.10).
For larger children or pregnant mothers, or for small rescuers, compressions may be achieved most easily by using both hands with the fi ngers interlocked (Figure 1.12.11). The rescuer may choose one or two hands to achieve the desired compression of one third of the depth of the chest.
Once the correct technique has been chosen and the area for compression identified, 15 compressions should be given to 2 ventilations.
Technique for giving chest compressions in larger children and pregnant mothers
O Kneel by the side of the patient, who must be positioned on a fi rm surface, the uterus having been displaced if appropriate (see below).
O Place the heel of one hand in the centre of the patient’s chest.
O Place the heel of your other hand on top of the fi rst hand. O Interlock the fi ngers of your hands and ensure that pres-
sure is not applied over the patient’s ribs. Do not apply any pressure over the upper abdomen or the bottom end of the bony sternum (breastbone).
O Position yourself vertically above the patient’s chest and,
with your arms straight, press down on the sternum to a depth of 5–6 cm.
O After each compression, release all the pressure on the chest without losing contact between your hands and the sternum.
O Repeat at a rate of about 100–120 times a minute (a little less than 2 compressions a second).
O Compression and release should take an equal amount of time.
Technique for giving breaths in larger children and pregnant mothers (see Figure 1.12.12)
O After 15 compressions, open the airway again using the head tilt and chin lift (use the jaw thrust if you are experienced and capable of doing it properly and there are two rescuers).
O Pinch the soft part of the patient’s nose closed, using the index fi nger and thumb of your hand on their forehead.
O Allow the patient’s mouth to open, but maintain chin lift. O Take a normal breath and place your lips around the
patient’s mouth, making sure that you have a good seal. If you have a bag-valve-mask, this can be used instead of mouth- to- mouth basic life support in all age groups.
O Blow steadily into the patient’s mouth while watching for their chest to rise; take about 1 second to make their chest rise, as in normal breathing; this is an effective rescue breath.
O Maintaining the head tilt and chin lift, take your mouth away from the patient and watch for their chest to fall as air is exhaled.
O Take another normal breath and blow into the patient’s mouth once more to give a total of two effective rescue breaths. Then return your hands without delay to the correct position on the sternum and give a further 15 chest compressions.
O Continue with chest compressions and rescue breaths in a ratio of 15:2.
O Stop to recheck the patient only if they start breathing normally; otherwise do not interrupt resuscitation.
O If your rescue breaths do not make the chest rise as in normal breathing, then before your next attempt:
— check the patient’s mouth and remove any visible obstruction
— recheck that there is adequate head tilt and chin lift — try the jaw thrust if you are able to do this effectively.
FIGURE 1.12.10 Chest compressions using one hand in a child.
FIGURE 1.12.11 Chest compressions using two hands in a larger child or mother.

49
Section 1.12
O Do not attempt more than two breaths each time before returning to chest compressions.
O If there is more than one rescuer present, a different person should take over CPR about every 2 minutes to prevent fatigue. Ensure that there is minimal delay during the changeover between rescuers.
Continuing cardiopulmonary resuscitationThe compression rate for all age groups is 100–120 com-pressions per minute. A ratio of 15 compressions to 2 ventilations is maintained irrespective of the number of rescuers. With pauses for ventilation there will be less than 100–120 compressions per minute, although the rate is 100–120 per minute. Compressions can be recommenced at the end of inspiration and may augment exhalation.
If no help has arrived, the emergency services must be contacted after 1 minute of cardiopulmonary resuscitation. Apart from this interruption to summon help, basic life support must not be interrupted unless the patient moves or takes a breath.
Effective chest compressions are tiring for the rescuer. Continually check that the compressions and ventilations are satisfactory (they should be performed ‘hard and fast’) and, if possible, alternate the rescuers involved in this task.
Any time spent readjusting the airway or re- establishing the correct position for compressions will seriously decrease the number of cycles given per minute. This can be a real problem for the solo rescuer, and there is no easy solution. In infants and small children, the free hand can maintain the head position. The correct position for compressions does not need to be measured after each set of ventilations.
The cardiopulmonary resuscitation manoeuvres recom-mended for infants and children are summarised in Table 1.12.1.
TABLE 1.12.1 Summary of basic life support techniques in infants and children
Infants (< 1 year) Children (1 year to puberty) and pregnant mothers
Airway
Head- tilt position Neutral Sniffi ng
Breathing
Initial slow breaths Five Five
Circulation
Pulse check Brachial or femoral Carotid
Landmark Lower half of sternum Lower half of sternum
Technique Two fi ngers or two thumbs One or two hands
CPR ratio 15:2 15:2
Call emergency services (if available)If no help has arrived, the emergency services must be contacted after 1 minute of resuscitation has been deliv-ered. A mobile phone can be used or an infant or small child may be carried to a static telephone or to get help while attempts are continued. Apart from any necessary interruption to summon help, basic life support must not be interrupted unless the patient moves or takes a breath, or you are exhausted.
If recovery occurs and signs of life return, place the patient in the recovery position and continue to reassess them and ensure that specialist help arrives.
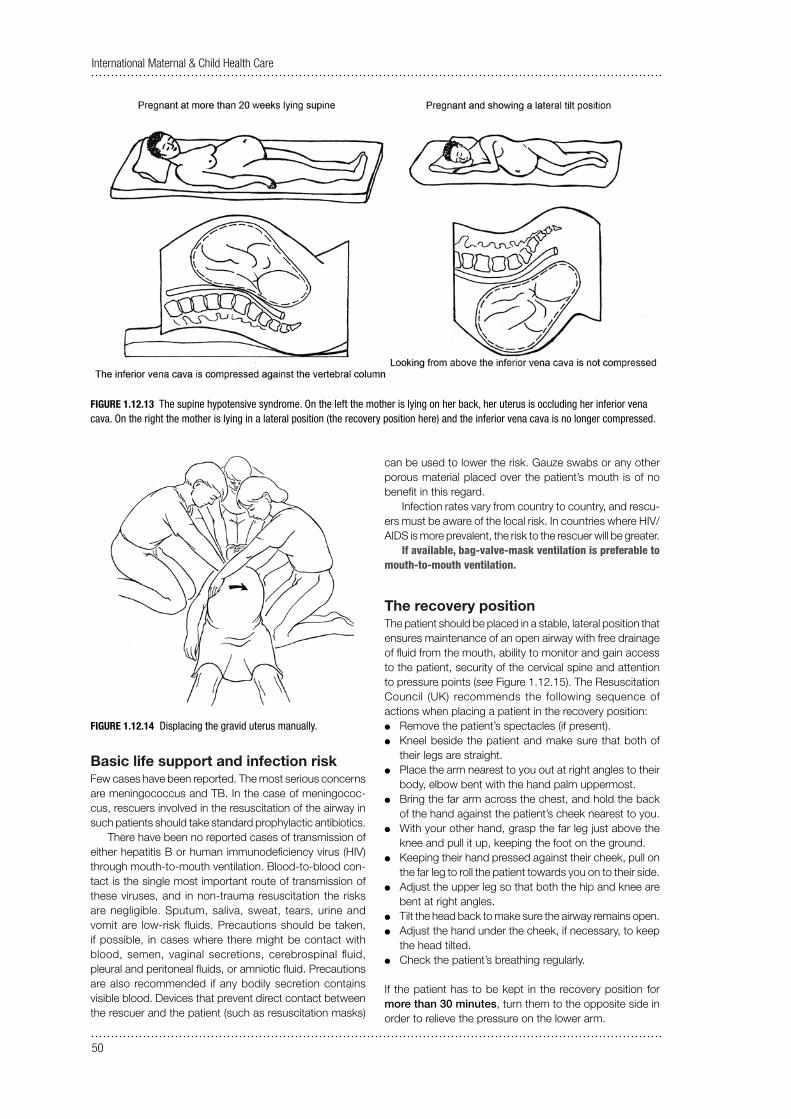
Special circulation actions in the pregnant mother (see Figures 1.12.13 and 1.12.14)Place the patient on a hard surface in the left lateral tilt position to overcome vena caval compression. This can be achieved with a wedge placed under the right hip to displace the gravid uterus to the left, or it is possible to
improvise with a pillow or coat. If an assistant is available, they can displace the uterus to the left side of the vena cava. Effective chest compressions can be accomplished at a 15–30-degree tilt to the left, but displacement of the uterus is the more effective method.
Chest- compression- only CPR. O If you either unable or unwilling to give rescue breaths,
give chest compressions only. This is particularly relevant in countries where there is a high prevalence of HIV, hepatitis or TB (see below).
O If chest compressions only are given, these should be continuous at a rate of 100 compressions per minute.
O Stop to recheck the patient only if they start to breathe normally; otherwise do not interrupt resuscitation.
Continue resuscitation until: O qualifi ed help arrives and takes over or O the patient starts breathing normally or O you become exhausted.
FIGURE 1.12.12 Giving breaths for a larger child or a mother.
50
International Maternal & Child Health Care
Basic life support and infection riskFew cases have been reported. The most serious concerns are meningococcus and TB. In the case of meningococ-cus, rescuers involved in the resuscitation of the airway in such patients should take standard prophylactic antibiotics.
There have been no reported cases of transmission of either hepatitis B or human immunodeficiency virus (HIV) through mouth- to- mouth ventilation. Blood- to- blood con-tact is the single most important route of transmission of these viruses, and in non- trauma resuscitation the risks are negligible. Sputum, saliva, sweat, tears, urine and vomit are low- risk fluids. Precautions should be taken, if possible, in cases where there might be contact with blood, semen, vaginal secretions, cerebrospinal fluid, pleural and peritoneal fluids, or amniotic fluid. Precautions are also recommended if any bodily secretion con tains visible blood. Devices that prevent direct contact between the rescuer and the patient (such as resuscitation masks)
can be used to lower the risk. Gauze swabs or any other porous material placed over the patient’s mouth is of no benefit in this regard.
Infection rates vary from country to country, and rescu-ers must be aware of the local risk. In countries where HIV/AIDS is more prevalent, the risk to the rescuer will be greater.
If available, bag-valve-mask ventilation is preferable to mouth- to- mouth ventilation.
The recovery positionThe patient should be placed in a stable, lateral position that ensures maintenance of an open airway with free drainage of fl uid from the mouth, ability to monitor and gain access to the patient, security of the cervical spine and attention to pressure points (see Figure 1.12.15). The Resuscitation Council (UK) recommends the following sequence of actions when placing a patient in the recovery position:
O Remove the patient’s spectacles (if present). O Kneel beside the patient and make sure that both of
their legs are straight. O Place the arm nearest to you out at right angles to their
body, elbow bent with the hand palm uppermost. O Bring the far arm across the chest, and hold the back
of the hand against the patient’s cheek nearest to you. O With your other hand, grasp the far leg just above the
knee and pull it up, keeping the foot on the ground. O Keeping their hand pressed against their cheek, pull on
the far leg to roll the patient towards you on to their side. O Adjust the upper leg so that both the hip and knee are
bent at right angles. O Tilt the head back to make sure the airway remains open. O Adjust the hand under the cheek, if necessary, to keep
the head tilted. O Check the patient’s breathing regularly.
If the patient has to be kept in the recovery position for more than 30 minutes, turn them to the opposite side in order to relieve the pressure on the lower arm.
FIGURE 1.12.13 The supine hypotensive syndrome. On the left the mother is lying on her back, her uterus is occluding her inferior vena cava. On the right the mother is lying in a lateral position (the recovery position here) and the inferior vena cava is no longer compressed.
FIGURE 1.12.14 Displacing the gravid uterus manually.

51
Section 1.12
Automatic external defibrillators (AEDs) The use of the AED is now included in basic life support teaching for adults because early defibrillation is the most effective intervention for the large majority of unpredicted cardiac arrests in adults. As has already been stated, in children and young people and in pregnant and puerperal women, circulatory or respiratory causes of cardiac arrest predominate. However, in certain circumstances, in children and pregnant mothers there may be a primary cardiac cause of cardiac arrest, and the use of an AED may be life- saving.
An algorithm for AED use is shown in Figure 1.12.16. The standard AED can be used in children over the age of 8 years and in adults. For children aged 1–8 years, an AED can be used, but paediatric paddles are essential. An AED cannot currently be used for infants under 1 year old, as the devices are not accurate enough in this age group.
These devices are becoming much more widely avail-able and are relatively inexpensive. They are life- saving in cases where there is a shockable rhythm, and are included in the training for basic rather than advanced life support, as they were designed for community use. If defi brillation is to be successful, it must be performed within 15 minutes of the onset of fi brillation (and the earlier it is performed, the greater the likelihood of success), so for cases of collapse that might produce fi brillation in the community, waiting until arrival at hospital would be too late.
However, AEDs are also now widely used in treatment of hospital cardiac arrests by fi rst responders, and are therefore included here.
Attach AED pads Expose the chest and place one adhesive defi brillator pad on the patient’s chest to the right of the sternum below the right clavicle, and one in the mid- axillary line, taking care to avoid breast tissue. Keep the axillary electrode vertical to maximise effi ciency.
FIGURE 1.12.15 The semi-prone or recovery position.
Stimulate and assess response
Call for help
Open airway
Not breathing normally
Start chest compressionsAdd 2 ventilation breaths
Continue 30:2 until AED is attached
AED assesses rhythm
Shock not advised
Shock advised
Immediately resume
CPR 30:2for 2 minutes
1 shock150—200 J biphasic
Call emergency services
Immediately resume
CPR 30:2for 2 minutes Continue until the patient
starts to breathe normally
Unresponsive
Continue chest compressions while AED
is charging
Ensure no one touches patient
Ask to bring AED
FIGURE 1.12.16 Algorithm for automatic external defi brillator (AED) use.

52
International Maternal & Child Health Care
If a shock is indicated, most AED devices will do this automatically, but some will ask the operator to deliver the shock by pressing a button. Immediately after the shock, resume compressions for 2 minutes, after which there will be a further prompt for a rhythm analysis.
If defi brillation is not indicated, CPR should be con-tinued for 2 minutes, at which stage the AED will prompt further analysis of the rhythm.
Perimortem Caesarean sectionThe UK Resuscitation Council considers that prompt Caesarean delivery should be seen as part of resuscitation in cardiac arrest in advanced pregnancy. Delivery of the fetus will obviate the effects of aortocaval compression and signifi cantly increase the likelihood of successful resuscita-tion. It will reduce maternal oxygen consumption, increase venous return, make ventilation easier and allow CPR in the supine position.
When to perform itAll the evidence suggests that a Caesarean delivery should begin within 4 minutes of cardiac arrest and be accomplished by 5 minutes. In practice this means that preparations for surgical evacuation of the uterus should begin almost at the same time as CPR following cardiac arrest. Pregnant women develop anoxia faster than non- pregnant women, and can suffer irreversible brain damage within 4–6 minutes of cardiac arrest. CPR should be con-tinued throughout the Caesarean section and afterwards, as this increases the likelihood of a successful neonatal and maternal outcome.
Where to perform it The woman should not be transferred to an operating thea-tre as this will merely waste time. She should be delivered at the site of collapse unless this is physically impossible. Diathermy will not be needed, as blood loss is minimal in patients with no cardiac output. If the mother is successfully resuscitated, she can be moved to theatre to be anaesthe-tised and to complete the operation.
How to perform itA minimal amount of equipment is required in this situa-tion. Sterile preparation and drapes are unlikely to improve survival. A surgical knife is suffi cient.
No one surgical approach in particular is recommended, and the choice of approach should be based on operator preference. The classical midline abdominal approach is aided by the natural diastasis of recti abdomini that occurs in late pregnancy and the relatively bloodless fi eld in this situation. However, many obstetricians are more familiar with a lower transverse abdominal incision and can deliver a baby in less than 1 minute.
Open cardiac massage during surgery is a possibility when the abdomen is already open and the heart can be reached relatively easily through the diaphragm (if a midline approach has been used).
An anaesthetist should attend at the earliest opportunity to provide a protected airway, ensure continuity of effective chest compressions and adequate ventilation breaths, and help to determine and treat any underlying cause (4 Hs and 4 Ts, see Section 1.13).
If resuscitation is successful and the mother regains a
cardiac output, appropriate anaesthesia and pain relief will be required and the woman should be moved to a theatre to complete the operation.
Fetal outcomeIt must be emphasised that Caesarean section is part of resuscitation and is performed to improve maternal survival, and it is worthwhile performing this procedure once the uterus has reached the level of the umbilicus (i.e. around 20 weeks’ gestation). If done promptly, it can also improve fetal survival, although gestational age at the time of delivery also clearly infl uences the fetal outcome. In the UK, the 2006–2008 National Audit Report on maternal mortality (‘Saving Mothers’ Lives’: The Eighth Report of the Confi dential Enquiries into Maternal Deaths in the United Kingdom) there were no neonatal survivors among those delivered at less than 28 weeks. However, 47% of those delivered at more than 36 weeks did survive; all but one of the cases in this group involved CPR commenced in hospital, demonstrating the advantage of early evacuation of the uterus for the neonate as well as the mother.
Although uterine evacuation is a well- validated step in maternal resuscitation, there is still reluctance among some obstetricians to perform peri- arrest Caesarean section, due to concerns about neonatal neurological damage. However, in a comprehensive review of postmortem Caesarean deliv-eries between 1900 and 1985 by Katz and colleagues, 70% (42/61) of infants delivered within 5 minutes survived, and all of them developed normally. Only 13% (8/61) of those delivered at 10 minutes and 12% (7/61) of those delivered at 15 minutes survived. One infant in each of the groups of later survivors had neurological damage. Later series confi rm the advantage of early delivery for intact fetal survival, although there are a few case reports of intact infant survival more than 20 minutes after maternal cardiac arrest.
The evidence suggests that if the fetus survives the neo-natal period, the probability of normal development is high.
The decision to abandon CPR if it is unsuccessfulCPR should be continued if the rhythm continues as ventricular fi brillation (VF)/ventricular tachycardia (VT). The decision to abandon CPR should only be made after dis-cussion with senior clinicians.
Medico- legal issuesNo doctor has been found liable for performing a postmor-tem Caesarean section in the UK jurisdiction.
ChokingIntroduction The vast majority of deaths from foreign body airway obstruction (FBAO) occur in preschool children. Virtually anything may be inhaled, but foodstuffs predominate. The diagnosis may not be clear- cut, but should be suspected if the onset of respiratory compromise is sudden and associ-ated with coughing, gagging and stridor.
Airway obstruction also occurs with infections such as acute epiglottitis and croup. In these cases, attempts to relieve the obstruction using the methods described below are dangerous. Children with known or suspected infectious causes of obstruction, and those who are still breathing and in whom the cause of obstruction is unclear, should be
53
Section 1.12
taken to hospital urgently. The treatment of these children is dealt with in Section 4.
If a foreign body is easily visible and accessible in the mouth, remove it, but while attempting this take great care not to push it further into the airway. Do not perform blind finger sweeps of the mouth or upper airway, as these may further impact a foreign body and damage tissues without removing the object.
The physical methods of clearing the airway, described below, should therefore only be performed if: 1 the diagnosis of FBAO is clear- cut (witnessed or strongly
suspected) and ineffective coughing and increasing dyspnoea, loss of consciousness or apnoea have occurred.
2 head tilt/chin lift and jaw thrust manoeuvres have failed to open the airway of an apnoeic child.
If the child is coughing, this should be encouraged. A spon-taneous cough is more effective in relieving an obstruction than any externally imposed manoeuvre. An effective cough is recognised by the patient’s ability to speak or cry and to take a breath between coughs. The child should be continu-ally assessed and not left alone at this stage. No intervention should be made unless the cough becomes ineffective (i.e. quieter or silent), and the patient cannot cry, speak or take a breath, or becomes cyanosed or starts to lose conscious-ness. Then call for help and start the intervention.
These manoeuvres are then alternated with each other, and with examination of the mouth and attempted breaths as shown in Figure 1.12.17.
FIGURE 1.12.17 Algorithm for the management of choking.
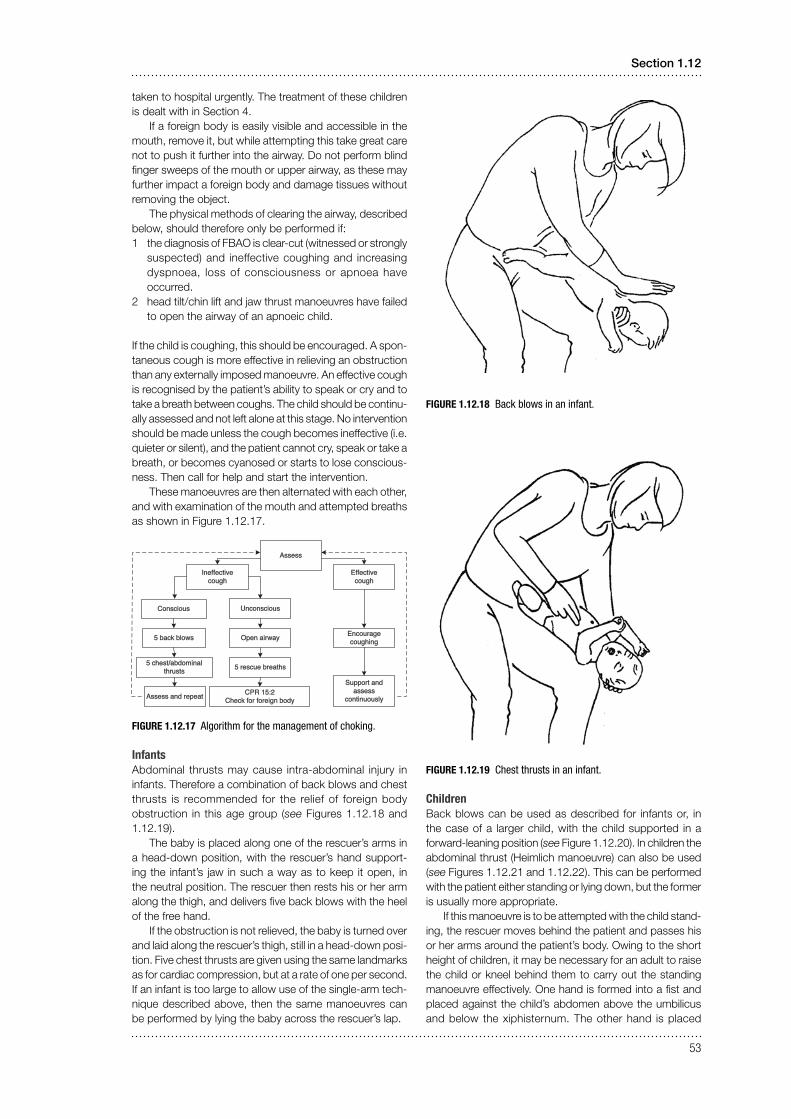
InfantsAbdominal thrusts may cause intra- abdominal injury in infants. Therefore a combination of back blows and chest thrusts is recommended for the relief of foreign body obstruction in this age group (see Figures 1.12.18 and 1.12.19).
The baby is placed along one of the rescuer’s arms in a head- down position, with the rescuer’s hand support-ing the infant’s jaw in such a way as to keep it open, in the neutral position. The rescuer then rests his or her arm along the thigh, and delivers fi ve back blows with the heel of the free hand.
If the obstruction is not relieved, the baby is turned over and laid along the rescuer’s thigh, still in a head- down posi-tion. Five chest thrusts are given using the same landmarks as for cardiac compression, but at a rate of one per second. If an infant is too large to allow use of the single- arm tech-nique described above, then the same manoeuvres can be performed by lying the baby across the rescuer’s lap.
FIGURE 1.12.18 Back blows in an infant.
FIGURE 1.12.19 Chest thrusts in an infant.
Children Back blows can be used as described for infants or, in the case of a larger child, with the child supported in a forward- leaning position (see Figure 1.12.20). In children the abdominal thrust (Heimlich manoeuvre) can also be used (see Figures 1.12.21 and 1.12.22). This can be performed with the patient either standing or lying down, but the former is usually more appropriate.
If this manoeuvre is to be attempted with the child stand-ing, the rescuer moves behind the patient and passes his or her arms around the patient’s body. Owing to the short height of children, it may be necessary for an adult to raise the child or kneel behind them to carry out the standing manoeuvre effectively. One hand is formed into a fist and placed against the child’s abdomen above the umbilicus and below the xiphisternum. The other hand is placed
Assess
Ineffective cough
Effective cough
Conscious Unconscious
5 back blows Open airway
5 chest/abdominal thrusts
Assess and repeat
5 rescue breaths
CPR 15:2Check for foreign body
Encourage coughing
Support and assess
continuously

54
International Maternal & Child Health Care
over the fist, and both hands are thrust sharply upwards into the abdomen. This procedure is repeated fi ve times unless the object that is causing the obstruction is expelled before then.
To perform the Heimlich manoeuvre in a supine child, the rescuer kneels at the child’s feet. If the child is large, it may be necessary to kneel astride him or her. The heel of one hand is placed against the child’s abdomen above the umbilicus and below the xiphisternum. The other hand is placed on top of the first, and both hands are thrust sharply upwards into the abdomen, with care being taken to direct the thrust in the midline. This procedure is repeated fi ve times unless the object that is causing the obstruction is expelled before then.
FIGURE 1.12.20 Back blows in a small child.
Following successful relief of the obstructed airway, the child should be assessed clinically. There may still be some foreign material present in the respiratory tract. If abdominal thrusts have been performed, the child should be assessed for possible abdominal injuries.
Each time breaths are attempted, look in the mouth for the foreign body and remove it if it is visible. Take care not to push the object further down, and avoid damaging the tissues. If the obstruction is relieved the patient may still require either continued ventilations if they are not breathing,
or chest compressions if there are no signs of a circulation. Advanced life support may also be needed.
FIGURE 1.12.22 Heimlich manoeuvre using a chair.
If the child is breathing effectively, place them in the recovery position and continue to monitor them.
Unconscious infant or child with foreign body airway obstruction
O Call for help. O Place the child in a supine position on a fl at surface. O Open the mouth and attempt to remove any visible
object. O Open the airway and attempt five rescue breaths,
repositioning the airway with each breath if the chest does not rise.
O Start chest compressions even if the rescue breaths were ineffective.
O Continue the sequence for single- rescuer CPR for about 1 minute, then summon help again if none is forthcoming.
O Each time breaths are attempted, look in the mouth for the foreign body and remove it if it is visible. Take care not to push the object further down, and avoid damag-ing the tissues.
O If the obstruction is relieved, the patient may still require either continued ventilations if they are not breathing but are moving or gagging, or both ventilations and chest compressions if there are no signs of a circulation. Advanced life support may also be needed.
O If the child is breathing effectively, place them in the recovery position and continue to reassess them.FIGURE 1.12.21 Heimlich manoeuvre in a standing child.