internal cedar hot tub - alpine spascdn.alpinespas.co.nz/manuals/hot_tubs/cedar-int_burner.pdf ·...
TRANSCRIPT

1 | P a g e
Internal Cedar Hot Tub
Please watch Assembly Video in conjunction with this Manual YouTube Link: www.alpinespas.co.nz/assembly

2 | P a g e
I. USER INSTRUCTIONS ....................................................................................3
II. PRECAUTIONS ...............................................................................................3
III. CLEANING AND MAINTENANCE ..............................................................4
IV. PREPARATION BEFORE INSTALLATION...................................................5
V. PREPARATION OF TOOLS............................................................................5
VI. DETAILED SKETCH OF COMPONENTS ...................................................6
VII. HOT TUB INSTALLATION..........................................................................6
1.HOT TUB BASE INSTALLATION ..........................................................7
2.STOVE FEET AND HOT TUB STAVE INSTALLATION .......................9
3.LADDER INSTALLATION .......................................................................14
4.WOOD FIRED STOVE AND LOWER FENCE INSTALLATION ..........16
5.BENCH INSTALLATION .........................................................................20
6.WOODEN COVER AND UPPER FENCE INSTALLATION .................22
7.INSULATION COVER AND CHIMNEY INSTALLATION ....................24
Contents
Congratulations on your purchase of the Alpine Internal Cedar Hot Tub! Please read the manual carefully and watch the assembly video before
assembling or using.

3 | P a g e
I. User Instructions I. After the product is installed and assembled, the Hot Tub will leak at first. Your Hot Tub will usually drip
for 1-2 weeks before the Cedar swells and seals. You can use it during this time as it helps with sealing the Tub.
II. Prepare paper and dry kindling wood on the grate then light the fire, slowly building it up with small split pieces of firewood. Keep the fire box lid on top with the air intake open and check fire every 15 minutes or so. Add wood as needed. There is a positioning plate on the stove cover. After covering and pushing it in opposite direction of air inlet, it will be struck when reaching the appropriate position (refer to Page 23).
III. Regularly check the water temperature and close the air vent when you reach your desired temperature. After a few attempts at heating up the water, you will get to know the best method and time for your Hot Tub to be at your desired temperature.
IV. If the fire is managed correctly and built up steadily, then a minimal amount of smoke will be produced. Smoke occurs when there is insufficient heat to burn off all the gases.
V. DO NOT USE COAL. As the stove is underwater, it’s surface temperature isn’t high enough to burn off excess tar in the burner.
VI. Before use, stir water thoroughly in the Hot Tub with wooden paddle, particularly stirring water upwards and measure water temperature. You can start to use it when water temperature is consistent.
II. Precautions I. Always make sure that the firebox is completely surrounded by water before lighting
the fire, otherwise it may buckle. II. Before using the Hot Tub, stir water evenly with the wooden paddle provided, and ensure water
temperature is suitable. III. Water temperature inside the hot tub should not exceed 41℃. Preffered temperature is between
38-40℃ for a healthy adult. A lower water temperature is more suitable for children if they are using the Hot Tub for more than 10 minutes.
IV. When you begin to use the Hot Tub, please let the fire inside the stove burn out, or put it out. This prevents water temperature from continuing to rise and will leave enough charcoal to keep it warm during use.
V. Ensure heat-intolerant people and children only use this product while accompanied by an adult. VI. After meals it is recommended to wait a minimum of 30 minutes before using the Hot Tub.
DO NOT drink alcohol, or use narcotics or drugs while using this product. VII. The following are required to use this product under the guidance of doctors:
a.Those with skin rupture, abscess, severe wounds. b.Those diagnosed with vascular diseases and heart function disorders (hypertension, diabetes, varicose veins, etc.); c.Those with heart problems or those with pacemakers; d.Women during menstruation or pregnancy.
VIII. The insulation cover has a built-in password lock which is “00”. When the Hot Tub is not in use, please use the lockable cover and combination locks to prevent accidental drownings and to stop debris falling into the water.

4 | P a g e
I. When using the wood fired stove, please do not directly touch it to prevent burns. Ensure the
stove is covered when the product is not in use. II. Please use a thermometer or other measuring tools when measuring water temperature to
ensure the water is not too hot.
III. Cleaning and Maintenance To protect and lengthen the lifespan of your new Cedar Hot Tub, please follow instructions below for cleaning and maintenance.
I. When filling the Hot Tub for the first time, please steep it in water over several days, allowing the wood to swell, and ensure you are frequently topping it up to enable saturation of wood as it will leak during this time.
II. It is recommended to use the Hot Tub at least once a week. After bathing, it is recommended you
empty out dirty water from the Tub and wash it down with clean water to prevent accelerated aging from absorption of dirty water. If you do not use it for a long time, please fill it up with water and keep moisture in to avoid thermal expansion, this will prevent the wood from cracking due to lack of water.
III. Slight leakage is a completely normal while the Hot Tub is sealing. If it still leaks after being submerged in water for fourteen days, the leak may be due to assembly and should be structurally inspected. If there are any quality problems, please contact us so we can assist you as soon as possible. If there are
any problems during the process of installation, feel free to call us so we can help. IV. Any woodern surface exposed to dirt needs to be wiped down promptly to remove dirt and prevent
stains. For surface dirt, wipe it first with clean water and cotton cloth. If it is difficult to remove, scrub with banister brush and neutral cleaning agents. Never use acid cleaning agents and hard brushes as this will cause irreversible damage to wood.
V. If the Hot Tub is leaking due to damage to the stave or base, wipe out water around leakage (both
inside and outside if possible). Paint neutralglass cement in the gap of leakage in both inside and outside if possible. Leave to set for 24hours and then refill and reassess.
VI. Over time, the steel bands around the Hot Tub will become loose due to aging and shrinkage of wood and may need to be tightened occasionally.
VII. You need to clean charcoal ash in the wood fired stove once it becomes too full. Use the hook ash shovel provided to empty the burner. When cleaning burner and removing ash, you need to
open the burning frame with the hook and shovel out the ashes. (The medium part is connected by hinges, which can be opened like a door).
VIII. Our Hot Tubs are painted with natural wax oil which helps maintain the wood and keep its colour. The oil will nt add any chemicals and should be reapplied either annually or biannually.
IX. Applying wax oil is a simple process and can be carried out at home as per following steps: a. Apply wax oil on sunny days. Drain water completely from the Hot Tub and let it dry 3-5 days.
b. ‘’Anti-UV Wax Oil’’ is preferable. c. Clean the Hot Tub with a dry cotton cloth. Painting can be done with brush or cotton cloth which is
recommended. Wipe out surplus paint on the surface with cotton cloth 20-30min after painting, while paint is still wet. You can continue using the Hot Tub after 24h or per wax oil instructions.

5 | P a g e
IV. Preparation before Installation Before installation, please read the following instructions to ensure the correct assembly of your Hot Tub.
• Assemble the Hot Tub on a solid surface flat and level surface with no less than 3,500kg load bearing; either concrete pad or pavers is recommended.
• Ensure you can both fill and drain the Hot Tub from the position you’ve decided to place the Tub. • Assembly require 2-3 people and usually takes between 2-3 hours. • Refer to the instructions below for information on parts required and parts included. • Please install this product per figures and text below.
V. Preparation of Tools INSTALLATION KIT TOOLS TO PREPARE
HARDWARE ACCESSORIES: List of Internal Wood Fired Stove hardware.
No: Component Specification Unit Amount
1 Hot Tub Base Installation
M8 x 100 Pcs 5 x 3.5 5 x 4 6 x 3.5 6 x 4 7 x 3.5 7 x 4
2 Steel Strip M12 x 180 Pcs 14 14 19 19 19 19
3 Bench Panel M6 x 75 Pcs 2 3 4 6 4 6
4 Bench Feet M5 x 60 Pcs 20 20 20 20 24 24
5 Wood Fired Stove ST6 x 35 Pcs 8 8 8 8 8 8
6 Fence Hinge M3 x 16 Pcs 8 8 8 8 8 8
7 Fence Connection M5 x 30 Pcs 24 24 24 24 24 24
8 Modular Fix of Upper Fence
M5 x 50 Pcs 5 5 5 5 5 5
9 Wooden Cover M5 x 50 Pcs 4 4 4 4 4 4
10 Ladder Pedal M5 x 60 Pcs 18 24 18 24 18 24
Hammer x1 Cement x1 Cement Gun x1
Power Drill x1 Adjustable Wrench x2 Hex/Allen Key x1 Pencil x1 Tape x1
Level Ruler x1
6 | P a g e
11 Ladder Corner Connector
M60 x 60 x 50
Pcs 2 2 2 2 2 2
12 Ladder Connector Fix
M5 x 30 Pcs 10 10 10 10 10 10
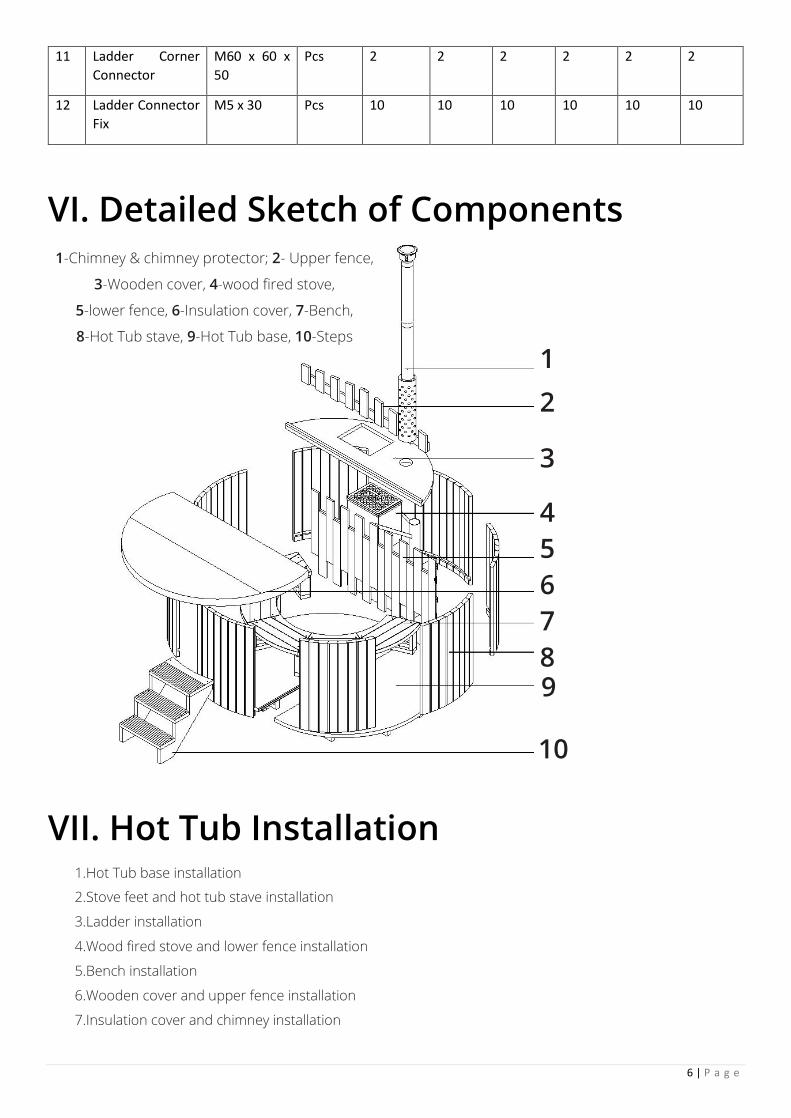
VI. Detailed Sketch of Components
VII. Hot Tub Installation
1-Chimney & chimney protector; 2- Upper fence,
3-Wooden cover, 4-wood fired stove,
5-lower fence, 6-Insulation cover, 7-Bench,
8-Hot Tub stave, 9-Hot Tub base, 10-Steps
1 2
3
4 5 6 7 8 9
10
1.Hot Tub base installation
2.Stove feet and hot tub stave installation
3.Ladder installation
4.Wood fired stove and lower fence installation
5.Bench installation
6.Wooden cover and upper fence installation
7.Insulation cover and chimney installation

7 | P a g e
1. Hot Tub Base Installation
1 Apply glass cement on the joint of 2 Hot Tub base boards.
Glass cement
Silicon
Join the 2 Hot Tub base boards. 2
3 Place connections beside hot tub base. Note: The hole should be aligned with Hot Tub base.
Hot Tub base connections

8 | P a g e
4 Tightly connect the two Hot Tub bases with M8X100 screws.
M8x100LM
5 Connect draining pipe to the drainer. Do not forget the seal apron,
or it will leak water.
Draining pipe

9 | P a g e
6
Turn over the assembled Hot Tub base and move into the position you want it located.
Note: The Hot Tub has to be placed where it is flat, level and capable of supporting the Tub.
2. Stove Feet and Hot Tub Stave Installation
1 Stove introduction
Wood inlet Stove cover
Air inlet Smoke outlet
Wood
Burning frame
10 | P a g e
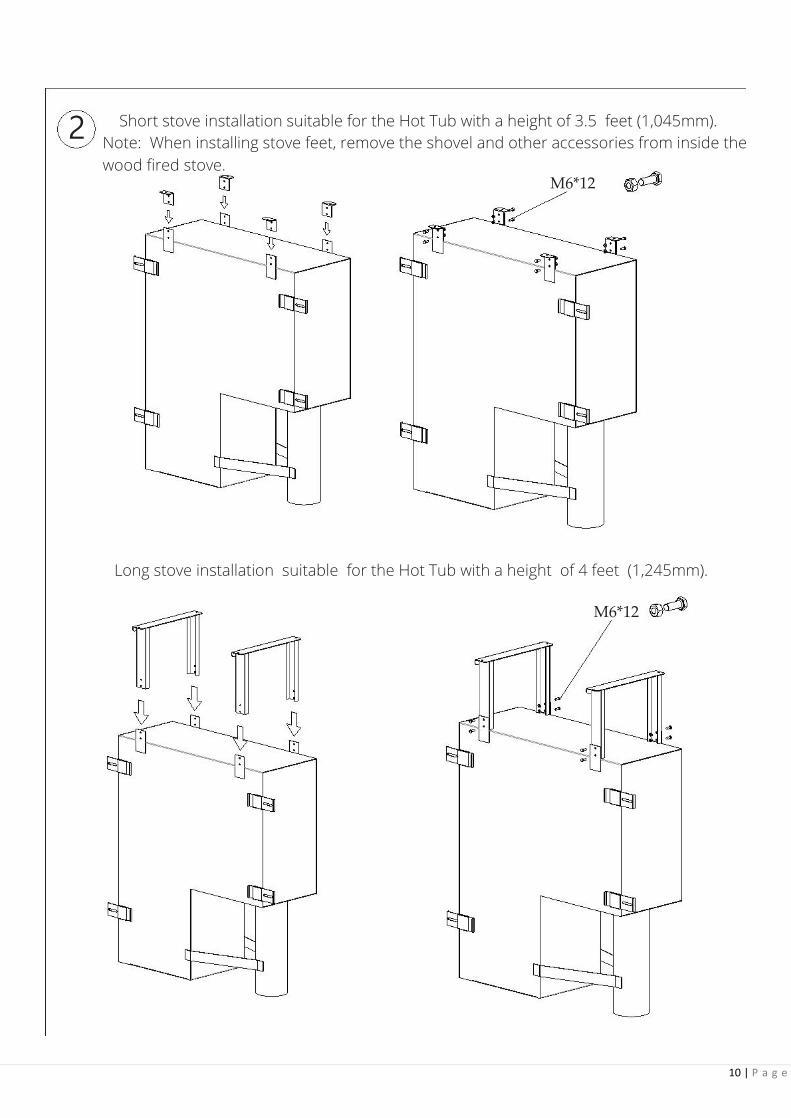
Short stove installation suitable for the Hot Tub with a height of 3.5 feet (1,045mm). Note: When installing stove feet, remove the shovel and other accessories from inside the wood fired stove.
2
M6*12
Long stove installation suitable for the Hot Tub with a height of 4 feet (1,245mm).
M6*12

11 | P a g e
3
Move the stove, assembled with stove feet to the middle top of Hot Tub base.
Stave
4 Apply the silicon here.
Silicon
Installation line
Align groove of the staves to the edge of base, and secure them to the base. Make sure all staves sit just before the installation line. Do not go beyond the installation line as staves need space to swell into.
The diameter of the silicon should
be 1cm

12 | P a g e
Choose appropriate width staves when installing the last pieces to complete the Tub. We have provided 3 extra stave pieces; 1pc standard width, 1pc 80mm width and 1pc 65mm width).
5
Tip: When installing the last stave, you should start from the top and work downwards, gently push staves either side of the gap apart and gently knock the new stave into the installation line.
Required amount of Hot Tub stave(pcs)
Specification
of Hot Tub
Total amount of
Hot Tub stave(pcs)
5 feet 6 feet 7 feet
53 64 75
56 67 78
6 Carefully open the steel strip, and connect two steel strips of different lengths with the
M12 screw.
M12*180

13 | P a g e
Once the Hot Tub staves are in place, the bands need to be added to keep them in position. 2 people are required to tighten the steel strips to the Hot Tub. When tightening the screws, try to knock each stave in tightly with a plastic hammer. When you can hear squeaking the bands are tight enough.
7
Tip: Ensure the steel strip is not too tight. When the Hot Tub is filled with water, the staves will swell. If the bands are too tight, it may cause damage of staves and steel strips.
For Hot Tubs with a height of 4 feet, the staves are locked by 3 circles of steel strip. The third steel strip is locked between the other two steel strips.
130
50 Specification
of Hot Tub
Specification of
each steel strip
5 feet One in 4,730 mm One in 2,050 mm One in 3,600 mm 6 feet
7 feet The hot tub with a height of 3.5 feet is locked by 2 circles of steel strip. One in 3,000 mm
One in 3,600 mm 130
50

14 | P a g e
3.Ladder installation
1 The Hot Tub with a height of 3.5 feet has 3 tier steps, and Hot Tub ladder with a height of 4 feet has 4 tier steps. Assemble the steps as shown below.
Note that the arc pedal cannot be assembled at this time.
M5*60
3-tier steps
M5*60
4-tier steps

15 | P a g e
2
Corner connector
M5*30
3
M5*60
16 | P a g e
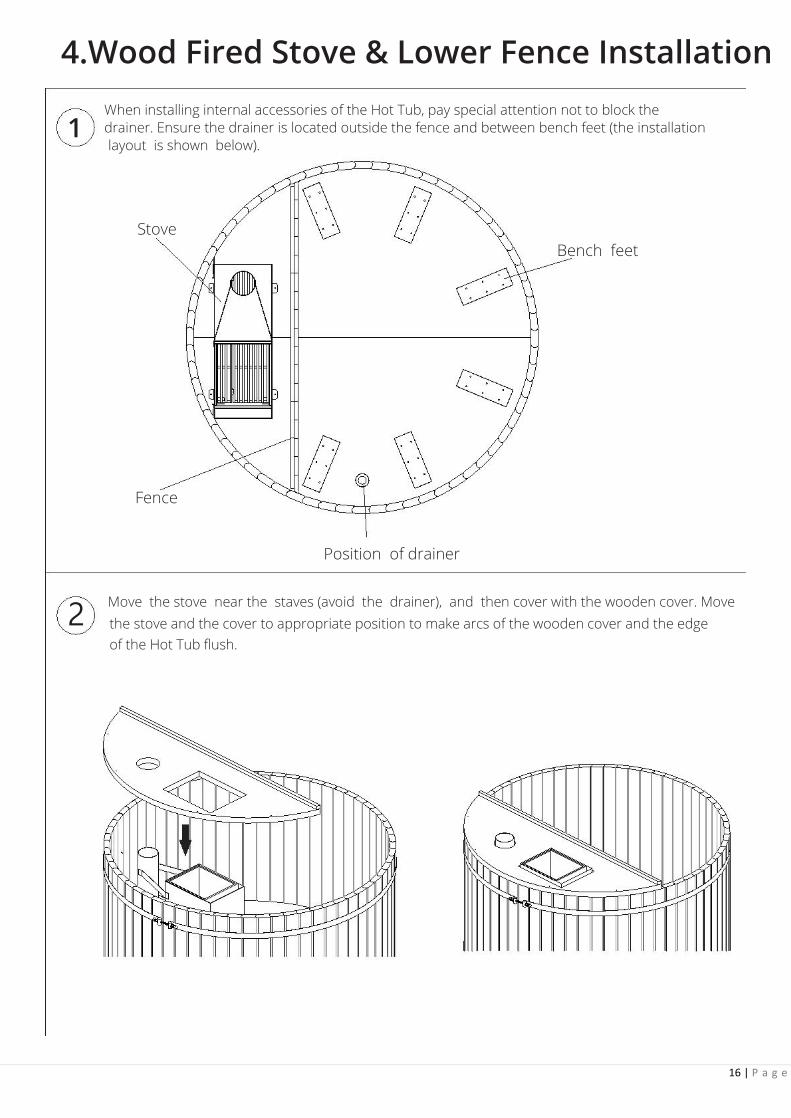
4.Wood Fired Stove & Lower Fence Installation When installing internal accessories of the Hot Tub, pay special attention not to block the
1 drainer. Ensure the drainer is located outside the fence and between bench feet (the installation layout is shown below).
Stove Bench feet
Fence
Position of drainer
Move the stove near the staves (avoid the drainer), and then cover with the wooden cover. Move 2 the stove and the cover to appropriate position to make arcs of the wooden cover and the edge
of the Hot Tub flush.
17 | P a g e
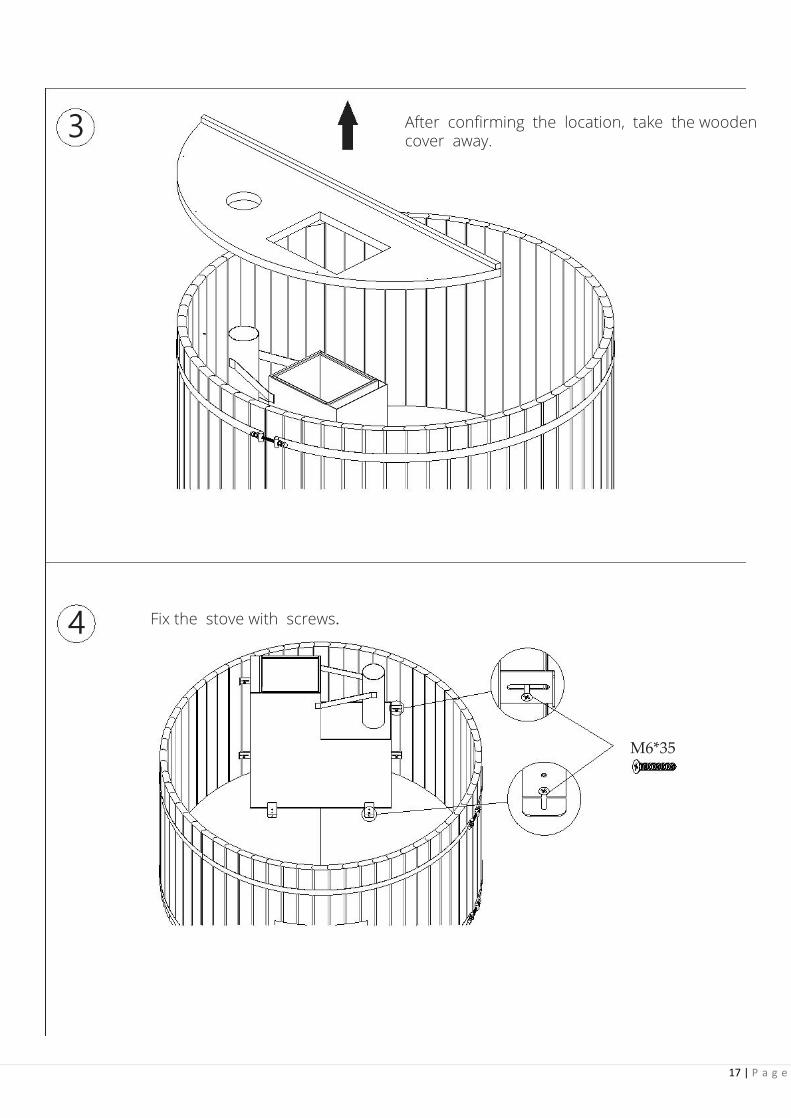
3 After confirming the location, take the wooden cover away.
4 Fix the stove with screws.
M6*35

18 | P a g e
5
6
M5*30

19 | P a g e
7 Lower fence and stove must be horizontal.
8 Fence hinge installation
M3*16
20 | P a g e
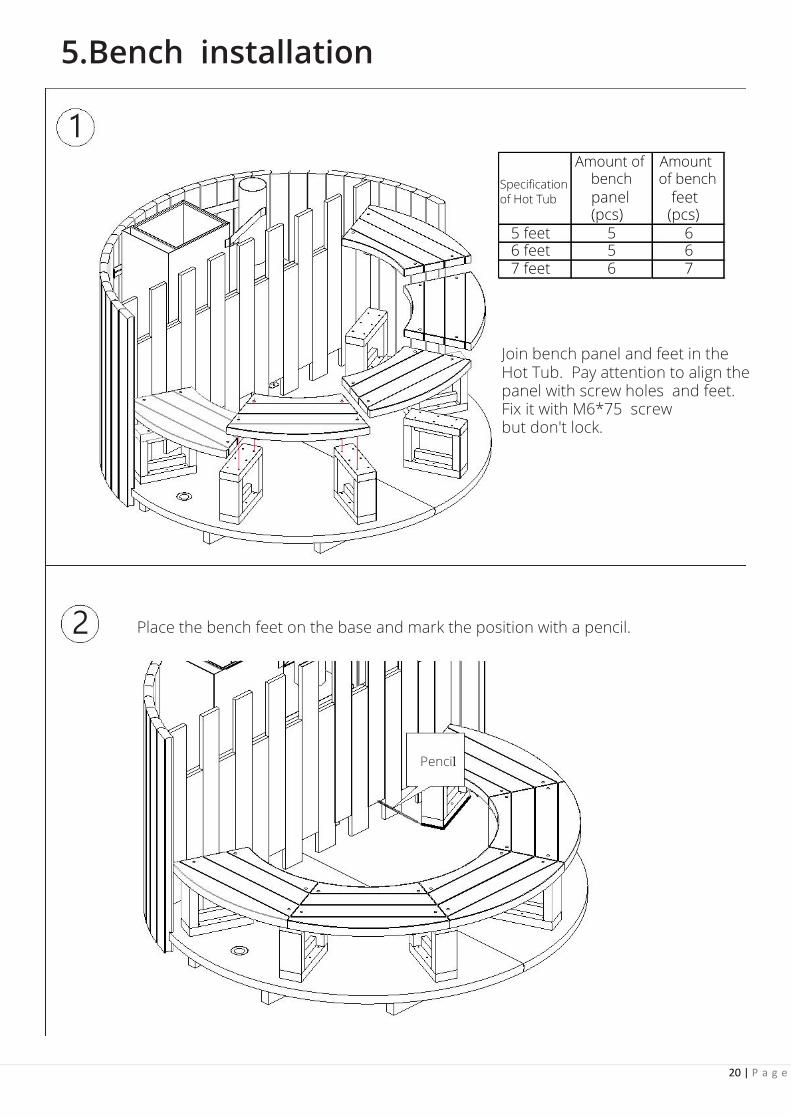
5.Bench installation
1 Amount of Amount
bench of bench Specification of Hot Tub panel
(pcs) feet
(pcs) 5 feet 6 feet 7 feet
5 5 6
6 6 7
Join bench panel and feet in the Hot Tub. Pay attention to align the panel with screw holes and feet. Fix it with M6*75 screw but don't lock.
2 Place the bench feet on the base and mark the position with a pencil.
Pencil

21 | P a g e
3 Move the bench panel away, and fix the feet in the base with M5*60 screw.
M5*60
4 Fix the panel to bench feet with M6*75 screw.
M6*75LN

22 | P a g e
6.Wooden Cover & Upper Fence Installation
1
Fix wooden cover to the staves with screws.
M5*50

23 | P a g e
Specification of the Hot Tub
5 feet 6 feet 7 feet
2 D
35mm 70mm 80mm
After confirming the position, fix upper fence to wooden cover with screws.
M5*50
24 | P a g e
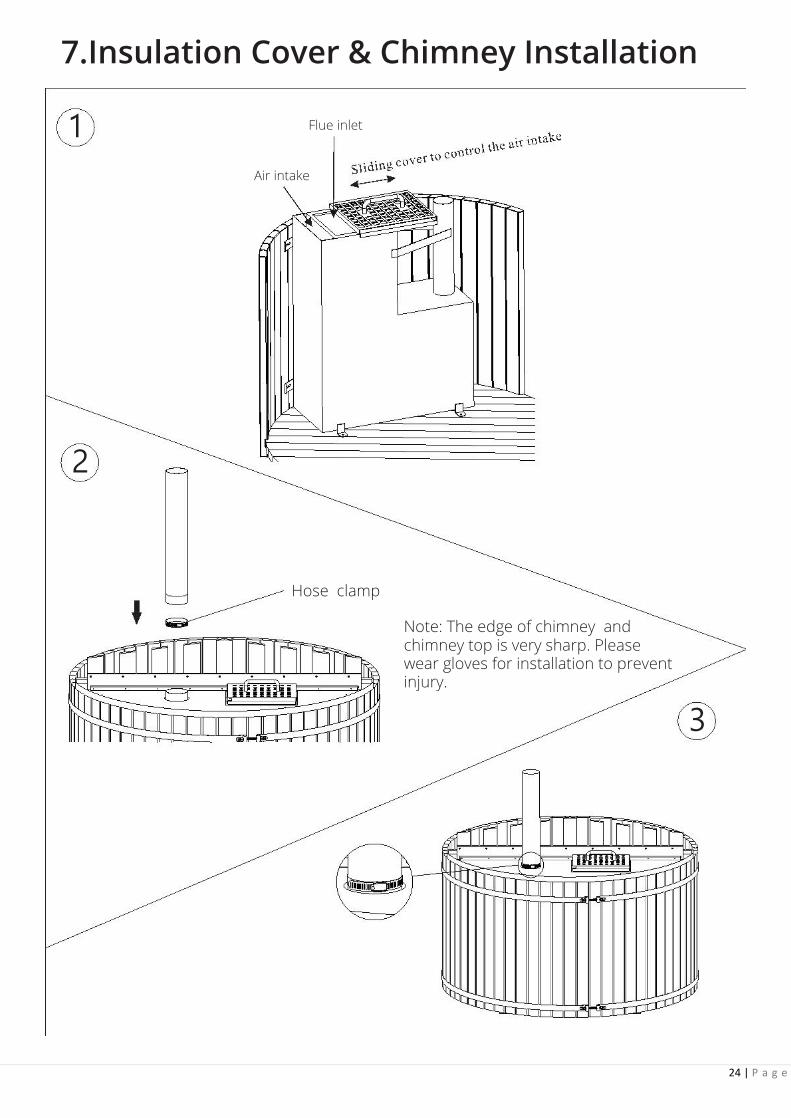
7.Insulation Cover & Chimney Installation
1 Flue inlet
Air intake
2
Hose clamp
Note: The edge of chimney and chimney top is very sharp. Please wear gloves for installation to prevent injury.
3

25 | P a g e
Tightly lock the screws.
4
4
5

26 | P a g e
6
Install insulation cover as shown below. 7 Insulation cover has a built-in password lock, which is “00”.
Note: Please lock clips when the Hot Tub is not in use to prevent drownings and debris from falling in the water.
M3*16

27 | P a g e
Installation Completion Congratulations – Your Hot Tub is now ready to use! If you have any questions through-out the process of assembly or once installation is complete don’t hesitate to contact us.