interactive notebook i will use my interactive notebook to help me better understand text
TRANSCRIPT
Interactive NotebookI will use my interactive notebook to help me better understand text.

Genres of Fiction
• Fantasy• Science Fiction• Historical Fiction• Realistic Fiction
1. Color the genre pockets. You won’t need to color the entire pocket for all 4 of them, only the one you’ll put at the bottom.2.Cut out each of the genre pockets around the perimeter. 3. Begin layering and gluing in the pockets from the TOP down. You’ll only need a few dots of glue around the perimeter of the pocket (on the back of the outlined narrow sides) but not at the top above the genre since this part will be open and for inserting cards.4. Continue to stagger the pockets down the page until all 4 are glued on 3 sides and left open at the top.5. Cut out the sort cards and place themin the proper pockets. Write at least one characteristic on the back that helps to identify the genre. For example, for card 1, a student might write “could really happen” or “set in the modern present.”

Elements of a Story• Plot• Setting• Complications• Protagonist• Antagonist
Let’s look at an example.

Story Vocabulary
• First, cut out each individual tab. Leave the thin rectangle at the top attached to the larger rectangle.
• Fold the tab at the top down like shown below.
• Glue on the back of the tab only so that each tab swings up and open. Spread them out on the notebook page so that all pieces fit.
• Allow the glue about 1-2 minutes to dry and write under the tab onto the notebook paper.

Interactive Activity
1. Color the scene.2. Start by cutting out along the top and bottom of the horizontal dotted
lines above and below the story scene. There is no need to trim the sides.
3. You will make each dotted box into a window that swings open from the top. To do this, you will need to cut 3 of the 4 sides (leave the solid line at the top in tact). Do a soft fold of the paper (do not crease) to begin a cut.
4. Once you have cut out 3 sides for each window, swing it open from the top and crease it.
5. Flip the scene over and place small dots of glue around the perimeter and throughout the back of the scene. Be sure the windows are open so that you do not glue the windows.
6. Allow the glue 2-3 minutes to dry.
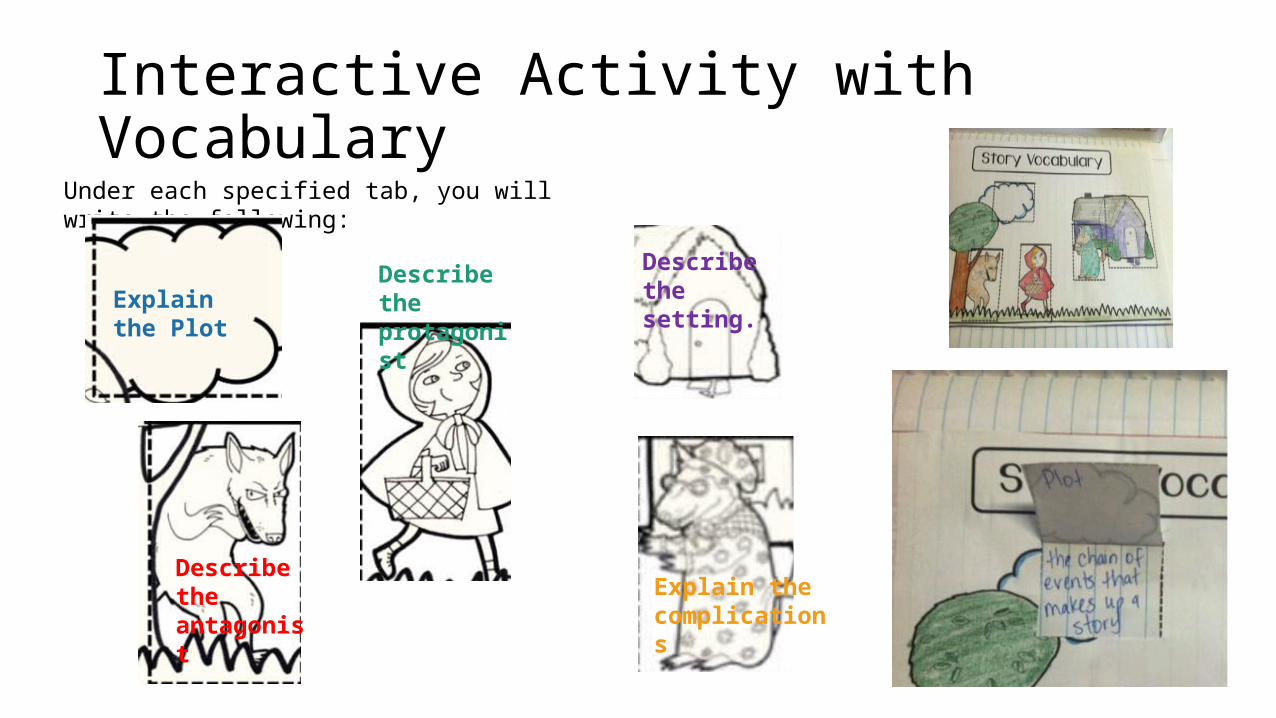
Interactive Activity with VocabularyUnder each specified tab, you will write the following:
Explain the Plot
Describe the antagonist Explain the
complications
Describe the protagonist
Describe the setting.

Little Red Riding Hood Plot Development• Plot – While visiting her sick Granny, Little Red Riding Hood finds the
big, Bad Wolf dressed as Granny and in her bed to trick Little Red so that he can eat her!
• Setting – In the woods, at Granny’s house, a long time ago• Complications – Big Bad Wolf eats Granny and pretends to be her• Protagonist – Little Red Riding Hood• Antagonist – The Big Bad Wolf

Creating a Plot Foldable
1. Cut out foldable along the perimeter on the outer black lines.
2. Fold along the dotted lines.
3. Cut along the black borders between elements, stopping at the dotted fold line.
4. Write in and color your foldable. Write the definitions and for each element.

• Exposition: the first part of the plot, characters, setting, and basic situation are revealed
• Inciting Incident: the event that sets the story in motion and makes the rest of the story possible
• Rising Action: main part of the story and moves the plot along; where complications arise
• Climax: the most exciting or intense part of the story for the protagonist (the OMG!)
• Falling Action: events that follow the climax and lead to the resolution where the conflicts begin moving towards resolution
• Resolution: the end of the story where loose ends of the plot are tied up and remaining questions are answered; conflicts are resolved

Elements of Plot Tab Foldable 1. Write on top of the foldable or color the foldable.2. Cut out foldable along the perimeter on the outer black lines.
3. Fold the left vertical tab inward as shown. On the back of this vertical tab is the only place you will put glue.
4. Glue the foldable into notebook by putting glue ONLY on the back of the long left vertical tab.
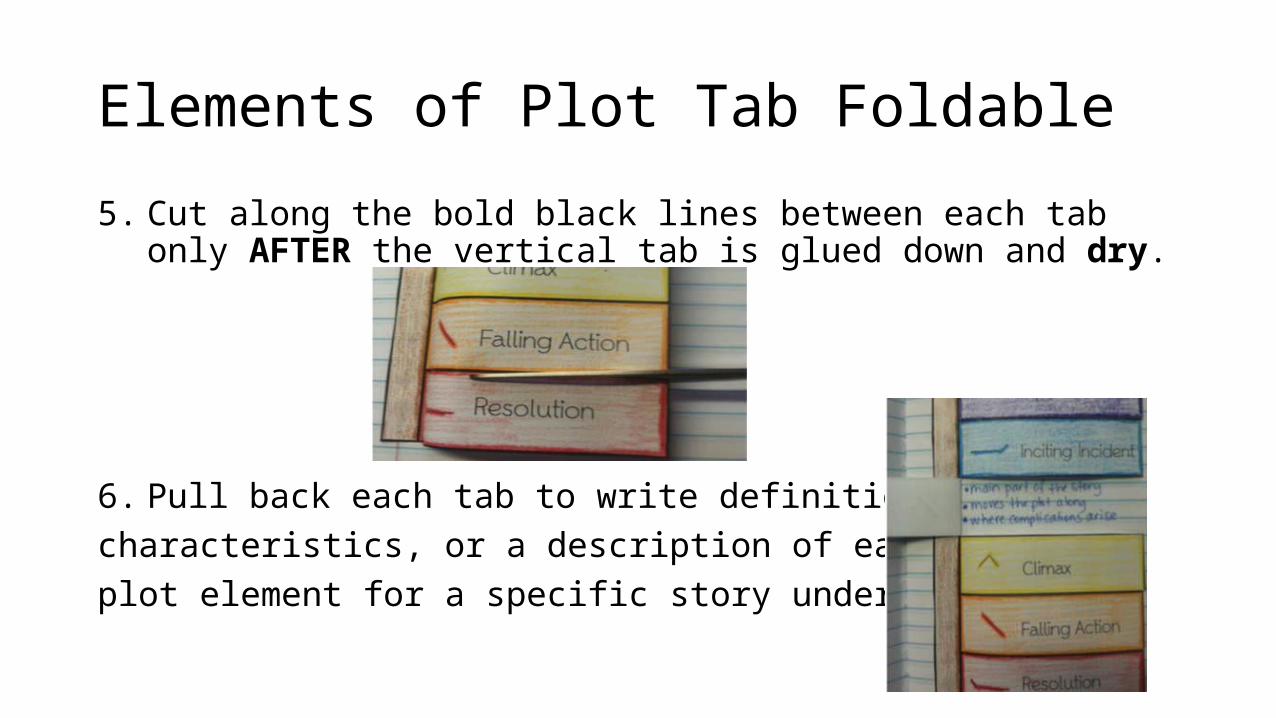
Elements of Plot Tab Foldable
5. Cut along the bold black lines between each tab only AFTER the vertical tab is glued down and dry.
6. Pull back each tab to write definitions, characteristics, or a description of each plot element for a specific story under each tab.

• Exposition: the first part of the plot, characters, setting, and basic situation are revealedWho are the main characters? Where is the story set? What event makes the rest of the story possible?• Inciting Incident: the event that sets the story in motion and makes the rest of the story
possibleWhat event set the story in motion?• Rising Action: main part of the story and moves the plot along; where complications ariseWhat are the most important complications and events in the story that move the plot along?• Climax: the most exciting or intense part of the story for the protagonist (the OMG!)How does the main problem reach its peak?• Falling Action: events that follow the climax and lead to the resolution where the conflicts
begin moving towards resolutionWhat events take place after the climax that prepare the story for its resolution?• Resolution: the end of the story where loose ends of the plot are tied up and remaining
questions are answered; conflicts are resolvedHow are the loose ends tied up? What questions are answered? How is the conflict resolved?