intelligent keyboard instruction ... - security solution … · intelligent keyboard drawing 3.1...
TRANSCRIPT
Intelligent Keyboard Instruction Manual
1
Notice: 1. Please read instructions completely before installing or operating the unit. 2. Operating Conditions:
(1) Please do not use this unit near water and damp environments. (2) Avoid using in direct sunlight and ensure good ventilation around unit. (3) Do not place this unit on an unstable surface. It may overturn causing serious
damage to people and the unit itself. (4) To avoid interference keep away from magnets, radio and cellular phones.
3. Please follow all electrical safety standards and only use the power supply designed for the device. Please do not power the until all connections are secure and installation is complete.
4. Use a piece of dry cloth to clean the unit. If it is dirty, use a soft non-ionic (non-electrostatic) cloth to clean it. Do not use chemicals like alcohol, benzene and thinner which may permanently damage the shell of the unit.
Intelligent Keyboard Instruction Manual
1
INDEX
I. KEYBOARD OVERVIEW ..............................................................................................................................................................1
II. INTELLIGENT KEYBOARD PARAMETERS ............................................................................................................................1
III. INTELLIGENT KEYBOARD DRAWING ...................................................................................................................................1
3.1 FRONT PANEL CHART AND FUNCTION KEY DESCRIPTION.........................................................................................................1 3.1.1 Number Area: Data Input, Clear And Confirmation ............................................................................................2 3.1.2 DVR Control Key Area........................................................................................................................................2 3.1.3 Matrix Assistant Control Area .............................................................................................................................2 3.1.4 Lens Control Key Area .......................................................................................................................................2 3.1.5 F1~F8 Function Keys........................................................................................................................................2
3.2 INTELLIGENT KEYBOARD CONNECTION.....................................................................................................................................3 3. 2. 1 The Connection Sketch Of Keyboard With Matrix............................................................................................3 3. 2. 2 The Connection Sketch Of Keyboard With DVR..............................................................................................3
IV. KEYBOARD OPERATION ..........................................................................................................................................................4
4.1 KEYBOARD OPERATION .............................................................................................................................................................4 4.2 SPEED DOME..............................................................................................................................................................................5
4.2.1 Speed Dome Control ..........................................................................................................................................5 4.2.2 Speed Dome Setting ..........................................................................................................................................6
4.3 KEYBOARD ................................................................................................................................................................................9 4.3.1 Set The ID No.....................................................................................................................................................9 4.3.2 Set The Baud Rate.............................................................................................................................................9 4.3.3 The Protocol Setting...........................................................................................................................................9 4.3.4 The Keyboard Sound Setting .............................................................................................................................9 4.3.5 Match Resister Setting .....................................................................................................................................10 4.3.6 The Keyboard Test ...........................................................................................................................................10 4.3.7 Joystick Setup ..................................................................................................................................................10 4.3.8 Max Sub Control No. set .................................................................................................................................. 11 4.3.9 Max. Alarm No. set ........................................................................................................................................... 11
4.4 MATRIX....................................................................................................................................................................................11 4.4.1 Matrix Basic Operation .....................................................................................................................................12 4.4.2 Matrix Menu Operation.....................................................................................................................................12
4.5 DVR........................................................................................................................................................................................13
V. TROUBLE SHOOTING ...............................................................................................................................................................13

Intelligent Keyboard Instruction Manual
1
I. Keyboard Overview
The keyboard is used for controlling the intelligent speed dome and is the main interface between operator and device in the monitoring system, Main Characteristics: (1) LCD: 5.8 inch with touch screen display, for showing all operation interface. Direct,
convenient, and easy to follow it conveys large amounts of information. (2) 3-Dimensional Joystick. Used for operating high-speed dome. It can be handled easily with
flexible maneuvering. (3)Provides RS-485 control output signal as well as offer the standard RS-232 control signal
thus convenient to operate the equipment for both short and long distance. II. Intelligent Keyboard Parameters
2.1 Technical Parameter (1) Power input:DC 12V
(2) Power consumption:6W (3) Working temperature: -10 ~50℃ (4) Protocols:XTS ,PELCO_D ,PELCO_P , SAMSUNG , KALATEL
(5) Communication baud rate:2400 bps~19200 bps (6) Data format:N,8,1
2.2 Function Parameter (1) Maximum control camera number. :1024 (2) Maximum control monitor number:64
III. Intelligent Keyboard Drawing
3.1 Front Panel Chart and Function Key Description
Intelligent Keyboard Instruction Manual
2
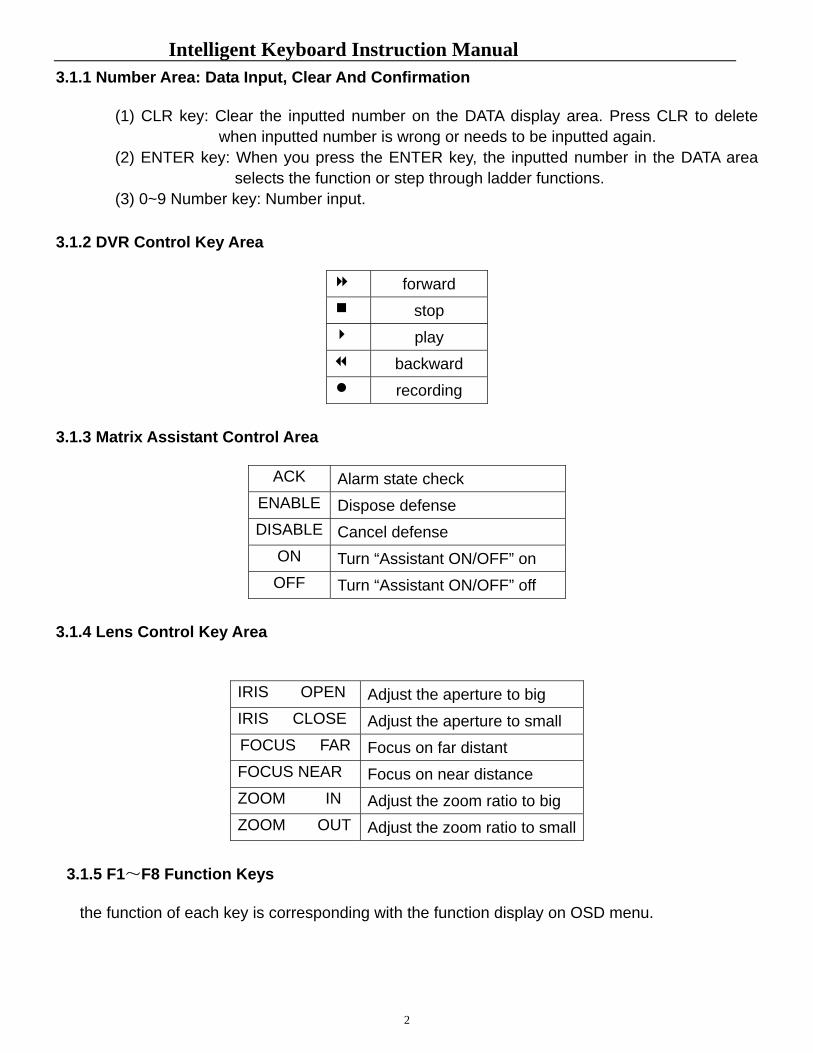
3.1.1 Number Area: Data Input, Clear And Confirmation
(1) CLR key: Clear the inputted number on the DATA display area. Press CLR to delete when inputted number is wrong or needs to be inputted again.
(2) ENTER key: When you press the ENTER key, the inputted number in the DATA area selects the function or step through ladder functions.
(3) 0~9 Number key: Number input.
3.1.2 DVR Control Key Area
forward stop play backward recording
3.1.3 Matrix Assistant Control Area
ACK Alarm state check ENABLE Dispose defense DISABLE Cancel defense
ON Turn “Assistant ON/OFF” on OFF Turn “Assistant ON/OFF” off
3.1.4 Lens Control Key Area
IRIS OPEN Adjust the aperture to big IRIS CLOSE Adjust the aperture to small FOCUS FAR Focus on far distant FOCUS NEAR Focus on near distance ZOOM IN Adjust the zoom ratio to big ZOOM OUT Adjust the zoom ratio to small
3.1.5 F1~F8 Function Keys
the function of each key is corresponding with the function display on OSD menu.
Intelligent Keyboard Instruction Manual
3
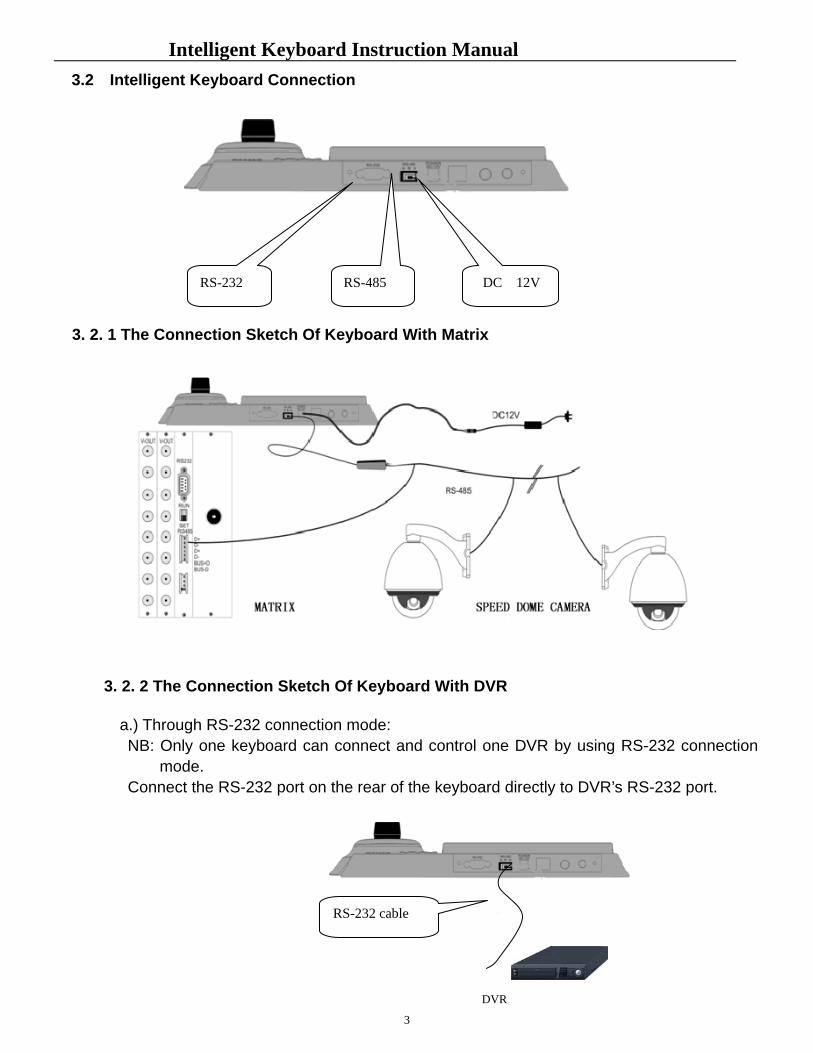
3.2 Intelligent Keyboard Connection
3. 2. 1 The Connection Sketch Of Keyboard With Matrix
3. 2. 2 The Connection Sketch Of Keyboard With DVR
a.) Through RS-232 connection mode: NB: Only one keyboard can connect and control one DVR by using RS-232 connection
mode. Connect the RS-232 port on the rear of the keyboard directly to DVR’s RS-232 port.
DVR
RS-232 cable
RS-232 RS-485 DC 12V
Intelligent Keyboard Instruction Manual
4
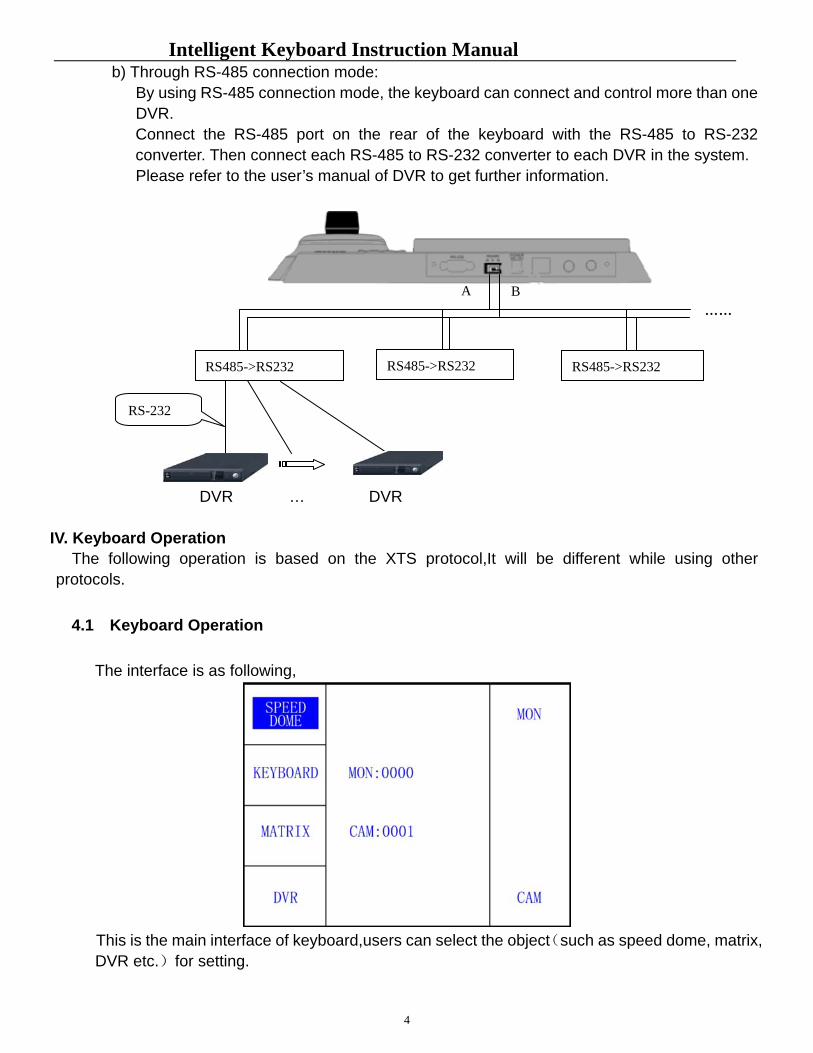
b) Through RS-485 connection mode: By using RS-485 connection mode, the keyboard can connect and control more than one
DVR. Connect the RS-485 port on the rear of the keyboard with the RS-485 to RS-232 converter. Then connect each RS-485 to RS-232 converter to each DVR in the system. Please refer to the user’s manual of DVR to get further information.
DVR … DVR
IV. Keyboard Operation The following operation is based on the XTS protocol,It will be different while using other protocols.
4.1 Keyboard Operation
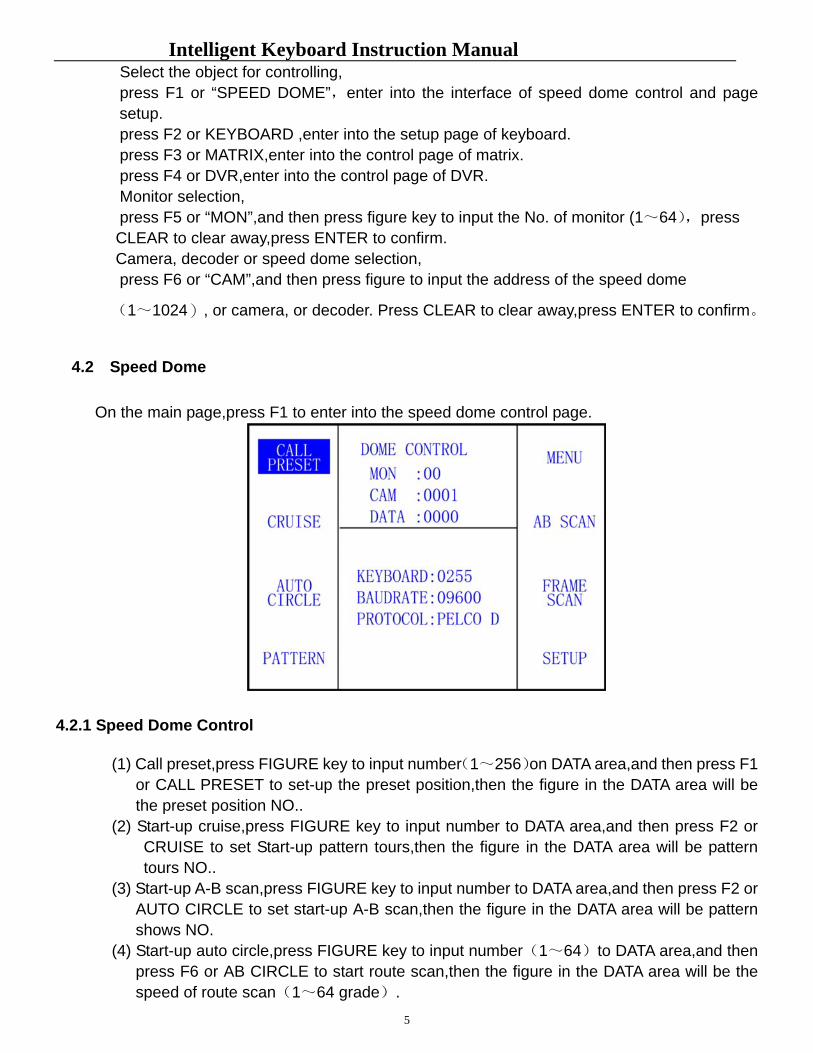
The interface is as following,
This is the main interface of keyboard,users can select the object(such as speed dome, matrix,
DVR etc.)for setting.
RS485->RS232 RS485->RS232
A B
RS485->RS232
……
RS-232
Intelligent Keyboard Instruction Manual
5
Select the object for controlling, press F1 or “SPEED DOME”,enter into the interface of speed dome control and page
setup. press F2 or KEYBOARD ,enter into the setup page of keyboard. press F3 or MATRIX,enter into the control page of matrix. press F4 or DVR,enter into the control page of DVR. Monitor selection, press F5 or “MON”,and then press figure key to input the No. of monitor (1~64),press
CLEAR to clear away,press ENTER to confirm. Camera, decoder or speed dome selection,
press F6 or “CAM”,and then press figure to input the address of the speed dome
(1~1024), or camera, or decoder. Press CLEAR to clear away,press ENTER to confirm。
4.2 Speed Dome
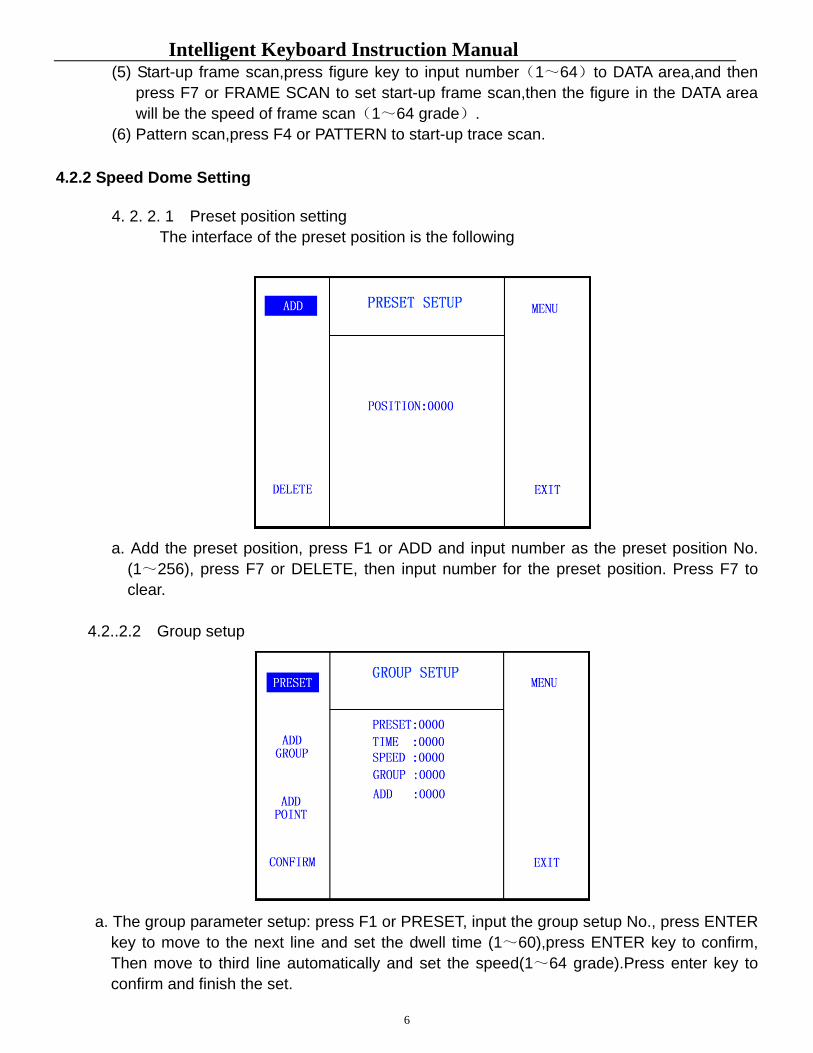
On the main page,press F1 to enter into the speed dome control page.
4.2.1 Speed Dome Control
(1) Call preset,press FIGURE key to input number(1~256)on DATA area,and then press F1 or CALL PRESET to set-up the preset position,then the figure in the DATA area will be the preset position NO..
(2) Start-up cruise,press FIGURE key to input number to DATA area,and then press F2 or CRUISE to set Start-up pattern tours,then the figure in the DATA area will be pattern tours NO..
(3) Start-up A-B scan,press FIGURE key to input number to DATA area,and then press F2 or AUTO CIRCLE to set start-up A-B scan,then the figure in the DATA area will be pattern shows NO.
(4) Start-up auto circle,press FIGURE key to input number(1~64)to DATA area,and then press F6 or AB CIRCLE to start route scan,then the figure in the DATA area will be the speed of route scan(1~64 grade).
Intelligent Keyboard Instruction Manual
6
(5) Start-up frame scan,press figure key to input number(1~64)to DATA area,and then press F7 or FRAME SCAN to set start-up frame scan,then the figure in the DATA area will be the speed of frame scan(1~64 grade).
(6) Pattern scan,press F4 or PATTERN to start-up trace scan.
4.2.2 Speed Dome Setting
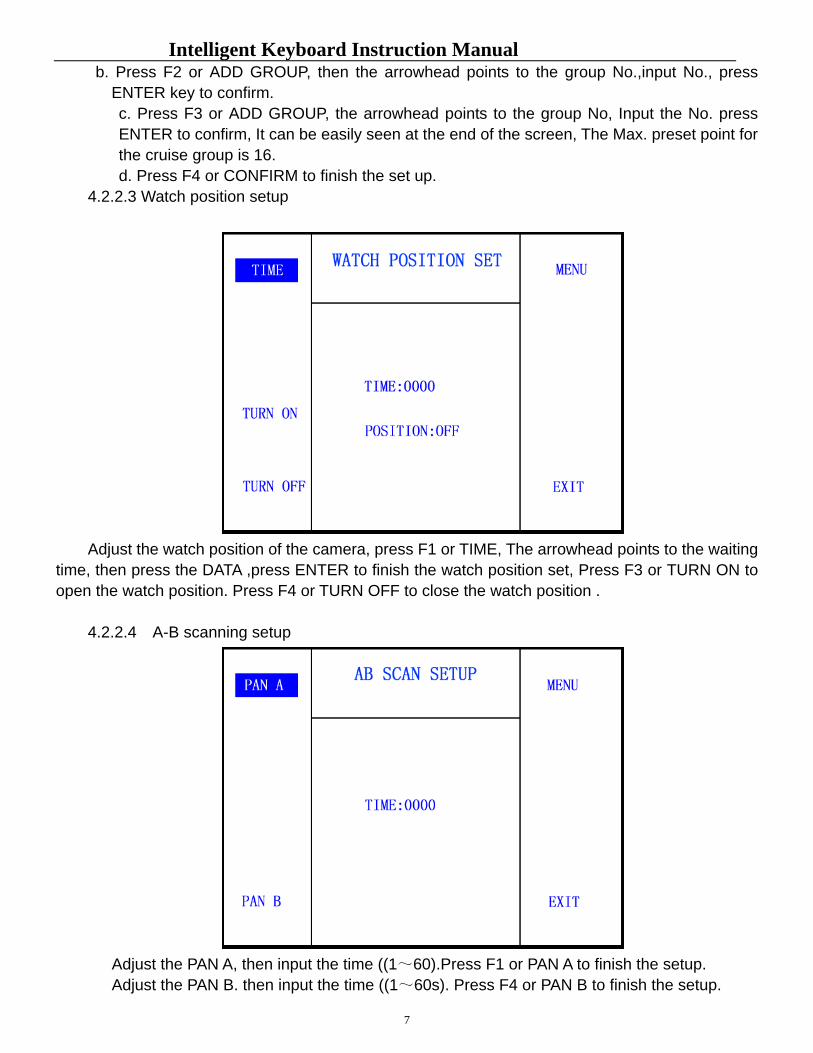
4. 2. 2. 1 Preset position setting The interface of the preset position is the following
a. Add the preset position, press F1 or ADD and input number as the preset position No.
(1~256), press F7 or DELETE, then input number for the preset position. Press F7 to clear.
4.2..2.2 Group setup
a. The group parameter setup: press F1 or PRESET, input the group setup No., press ENTER
key to move to the next line and set the dwell time (1~60),press ENTER key to confirm, Then move to third line automatically and set the speed(1~64 grade).Press enter key to confirm and finish the set.
Intelligent Keyboard Instruction Manual
7
b. Press F2 or ADD GROUP, then the arrowhead points to the group No.,input No., press ENTER key to confirm. c. Press F3 or ADD GROUP, the arrowhead points to the group No, Input the No. press ENTER to confirm, It can be easily seen at the end of the screen, The Max. preset point for the cruise group is 16. d. Press F4 or CONFIRM to finish the set up.
4.2.2.3 Watch position setup
Adjust the watch position of the camera, press F1 or TIME, The arrowhead points to the waiting
time, then press the DATA ,press ENTER to finish the watch position set, Press F3 or TURN ON to open the watch position. Press F4 or TURN OFF to close the watch position .
4.2.2.4 A-B scanning setup
Adjust the PAN A, then input the time ((1~60).Press F1 or PAN A to finish the setup. Adjust the PAN B. then input the time ((1~60s). Press F4 or PAN B to finish the setup.
Intelligent Keyboard Instruction Manual
8
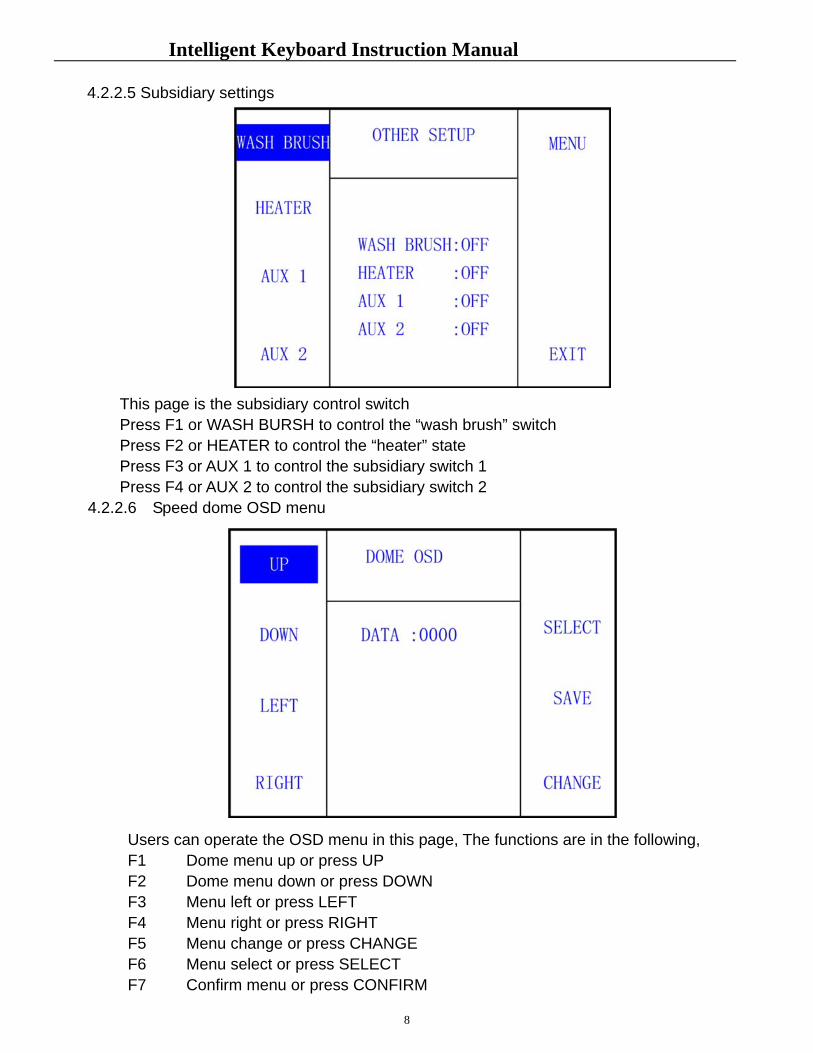
4.2.2.5 Subsidiary settings
This page is the subsidiary control switch Press F1 or WASH BURSH to control the “wash brush” switch Press F2 or HEATER to control the “heater” state Press F3 or AUX 1 to control the subsidiary switch 1 Press F4 or AUX 2 to control the subsidiary switch 2
4.2.2.6 Speed dome OSD menu
Users can operate the OSD menu in this page, The functions are in the following,
F1 Dome menu up or press UP F2 Dome menu down or press DOWN F3 Menu left or press LEFT F4 Menu right or press RIGHT F5 Menu change or press CHANGE F6 Menu select or press SELECT F7 Confirm menu or press CONFIRM
Intelligent Keyboard Instruction Manual
9
F8 Exit or press EXIT
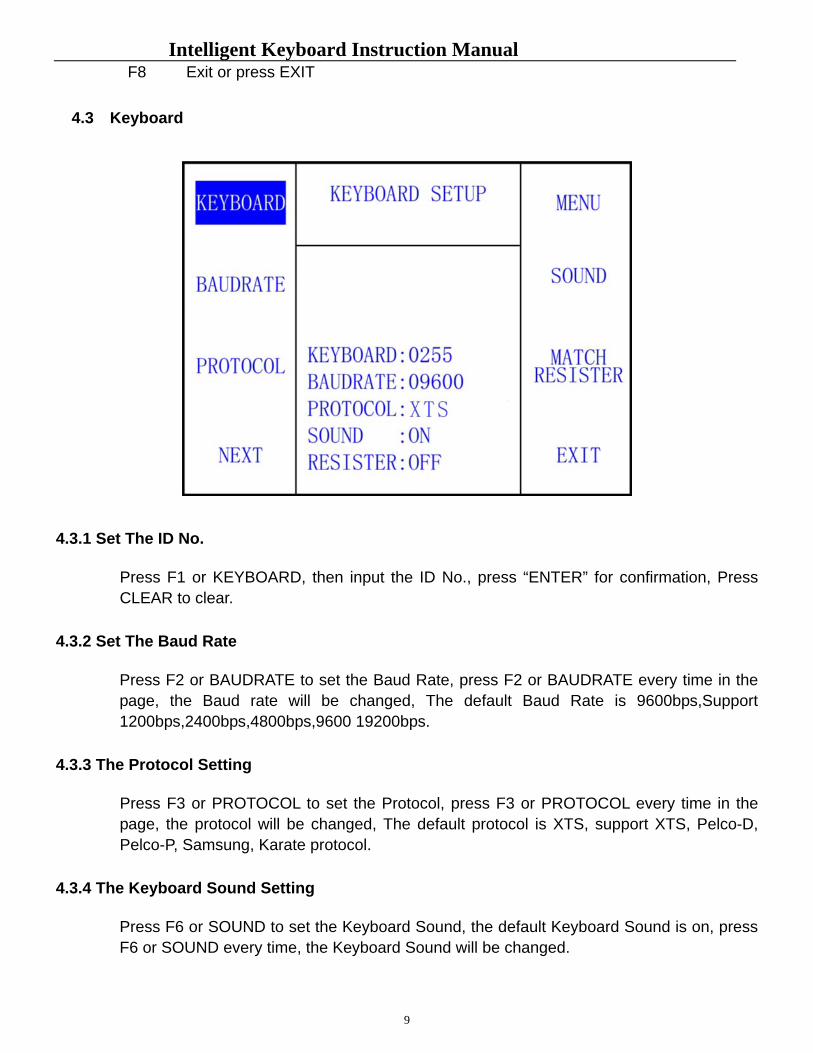
4.3 Keyboard
4.3.1 Set The ID No.
Press F1 or KEYBOARD, then input the ID No., press “ENTER” for confirmation, Press CLEAR to clear.
4.3.2 Set The Baud Rate
Press F2 or BAUDRATE to set the Baud Rate, press F2 or BAUDRATE every time in the page, the Baud rate will be changed, The default Baud Rate is 9600bps,Support 1200bps,2400bps,4800bps,9600 19200bps.
4.3.3 The Protocol Setting
Press F3 or PROTOCOL to set the Protocol, press F3 or PROTOCOL every time in the page, the protocol will be changed, The default protocol is XTS, support XTS, Pelco-D, Pelco-P, Samsung, Karate protocol.
4.3.4 The Keyboard Sound Setting
Press F6 or SOUND to set the Keyboard Sound, the default Keyboard Sound is on, press F6 or SOUND every time, the Keyboard Sound will be changed.
Intelligent Keyboard Instruction Manual
10
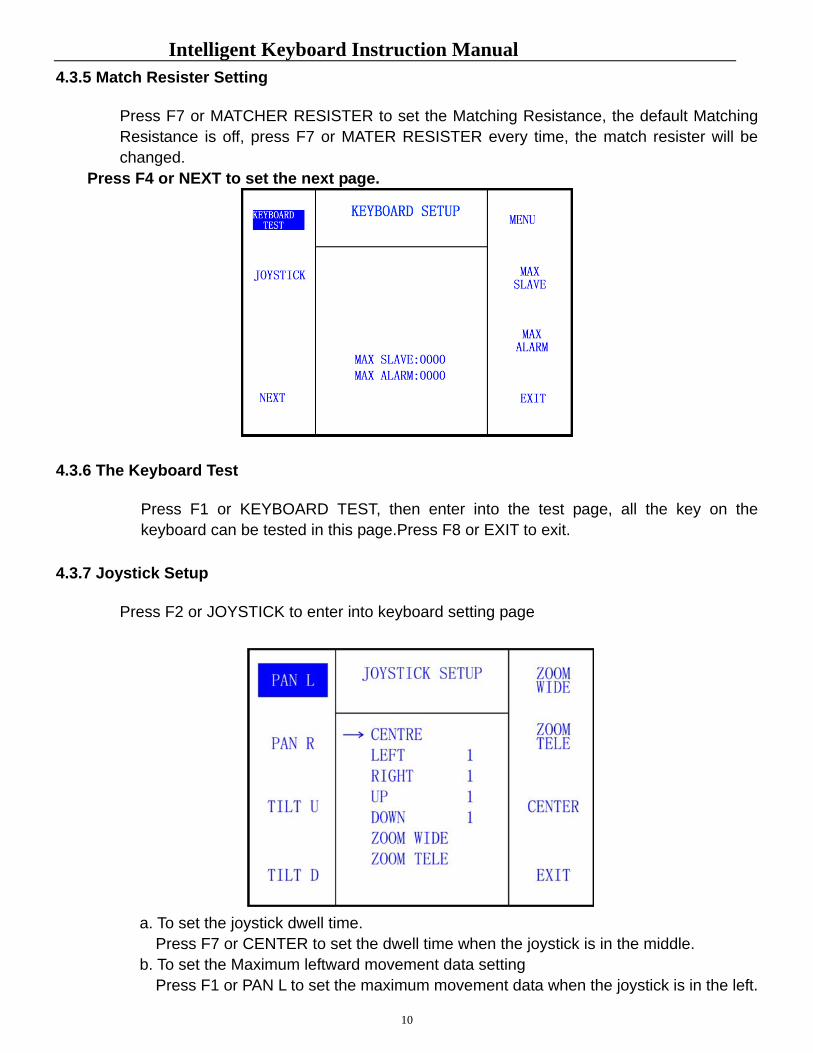
4.3.5 Match Resister Setting
Press F7 or MATCHER RESISTER to set the Matching Resistance, the default Matching Resistance is off, press F7 or MATER RESISTER every time, the match resister will be changed.
Press F4 or NEXT to set the next page.
4.3.6 The Keyboard Test
Press F1 or KEYBOARD TEST, then enter into the test page, all the key on the keyboard can be tested in this page.Press F8 or EXIT to exit.
4.3.7 Joystick Setup
Press F2 or JOYSTICK to enter into keyboard setting page
a. To set the joystick dwell time. Press F7 or CENTER to set the dwell time when the joystick is in the middle. b. To set the Maximum leftward movement data setting Press F1 or PAN L to set the maximum movement data when the joystick is in the left.
Intelligent Keyboard Instruction Manual
11
c. To set the Maximum rightward Movement data setting Press F2 or PAN R to set the Maximum movement data when the joystick is in the
right. d. To set the Maximum upward movement data setting Press F3 or TILT U to set the Maximum movement data when the joystick is up. e. To set the Maximum downward movement data setting Press F4 or TILT U to set the maximum movement data when the joystick is down. f. Maximum Counter-clockwise Data Setting
Turn joystick all the way Counter-clockwise and press F5 or ZOOM WIDE to enter the relevant maximum data setting.
g. Maximum Clockwise Data Setting Screw clockwise the middle pillar to its maximum and press F6 or ZOOM TELE to enter the relevant maximum data setting.
4.3.8 Max Sub Control No. set
Press F6 or MAX SLAVE, the arrowhead points to the Max. sub control. Then input number(the Max. sun control is 16),press ENTER to confirmation.
4.3.9 Max. Alarm No. set
Press F7 or MAX ALARM, the cursor points to the Max. alarm No. then input number(the largest alarm number is 239),press ENTER to confirmation.
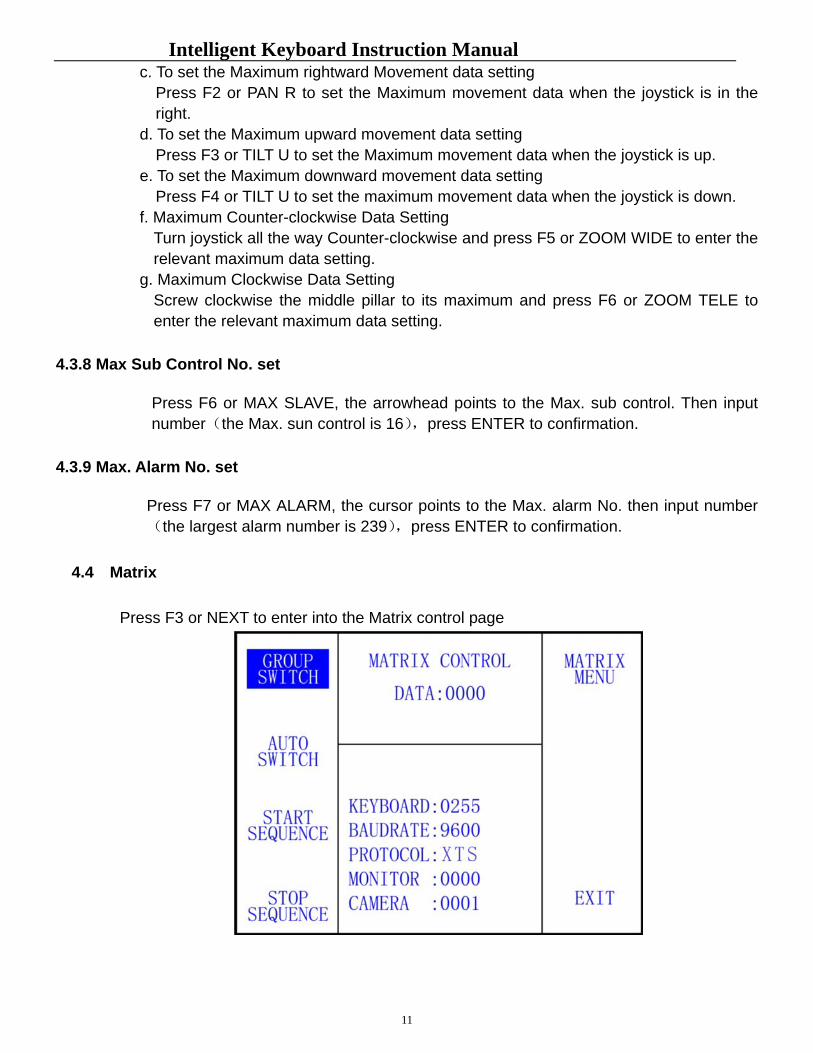
4.4 Matrix
Press F3 or NEXT to enter into the Matrix control page
Intelligent Keyboard Instruction Manual
12
4.4.1 Matrix Basic Operation
a. Monitor select,press No, to select the monitor No., then press F1 or MONITOR,the monitor will display the current picture.
b. Camera select,press No. to select the camera No., then press F2 or CAMERA,The monitor will display the current camera picture.
c. Group Switch Input number (1-99) in DATA area, press F2 or GROUP SWITCH to Auto-switch.
d. Start sequence Press F3 or START SEQUENCE, if showing 0 in DATA area, order-switch parameter (1-99) is in monitor area.Stop the sequence when in the monitor select or camera select.
e. Manual switch,press F5 or UP to up switch,press F6 to down switch. f. Press F5 or MATRIX MENU to enter into the menu Operation.
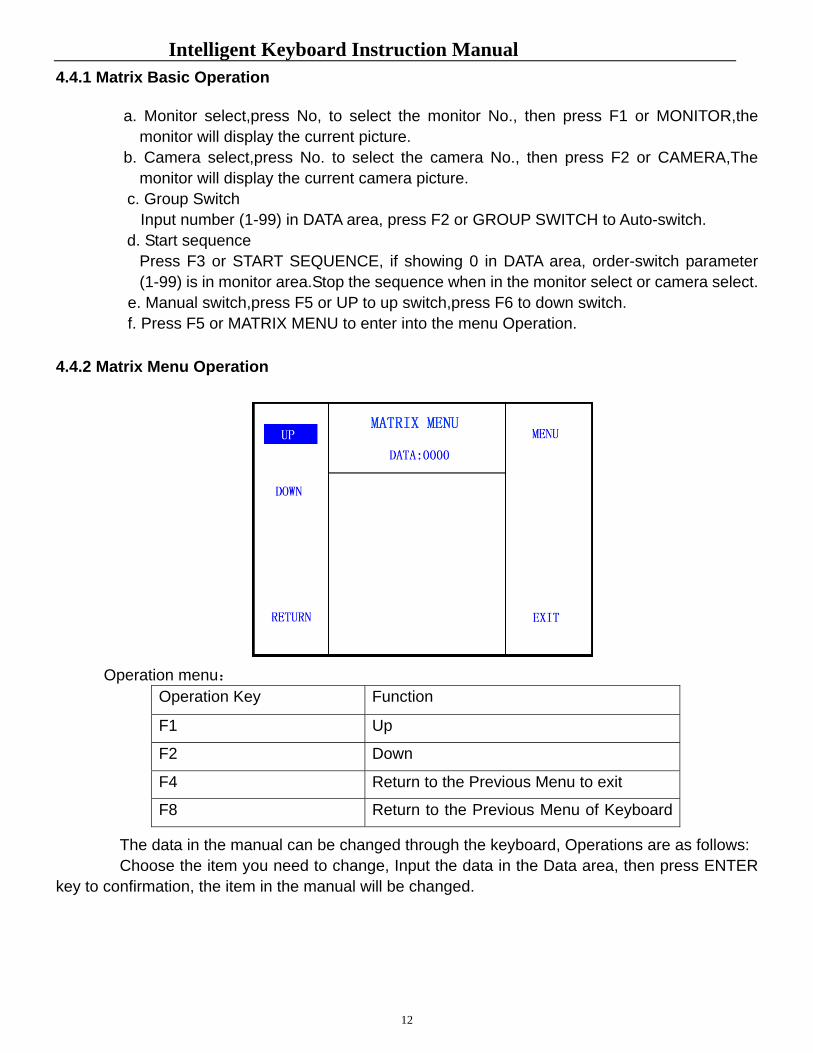
4.4.2 Matrix Menu Operation
Operation menu:
The data in the manual can be changed through the keyboard, Operations are as follows: Choose the item you need to change, Input the data in the Data area, then press ENTER
key to confirmation, the item in the manual will be changed.
Operation Key Function
F1 Up
F2 Down
F4 Return to the Previous Menu to exit
F8 Return to the Previous Menu of Keyboard
Intelligent Keyboard Instruction Manual
13
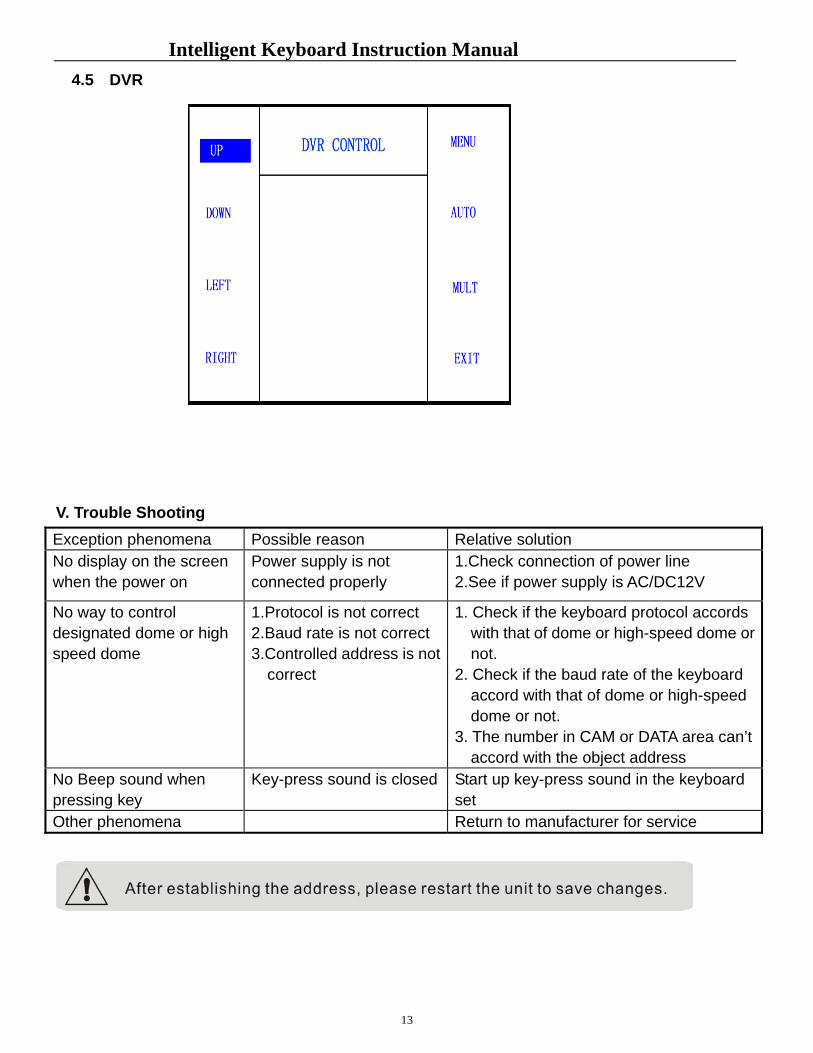
4.5 DVR
V. Trouble Shooting
Exception phenomena Possible reason Relative solution No display on the screen when the power on
Power supply is not connected properly
1.Check connection of power line 2.See if power supply is AC/DC12V
No way to control designated dome or high speed dome
1.Protocol is not correct 2.Baud rate is not correct 3.Controlled address is not
correct
1. Check if the keyboard protocol accords with that of dome or high-speed dome or not.
2. Check if the baud rate of the keyboard accord with that of dome or high-speed dome or not.
3. The number in CAM or DATA area can’t accord with the object address
No Beep sound when pressing key
Key-press sound is closed Start up key-press sound in the keyboard set
Other phenomena Return to manufacturer for service