intel® unite™ software - hp® official...
TRANSCRIPT

Intel® Unite™ Software
Standalone User Guide
Intel® Unite™ Software - Standalone User Guide 2 of 38
Legal Disclaimers & Copyrights
All information provided here is subject to change without notice. Contact your Intel
representative to obtain the latest Intel product specifications and roadmaps.
Intel technologies’ features and benefits depend on system configuration and may require
enabled hardware, software or service activation. Performance varies depending on system
configuration. No computer system can be absolutely secure. Check with your system
manufacturer or retailer or learn more at intel.com.
No license (express or implied, by estoppel or otherwise) to any intellectual property rights is
granted by this document.
The products described may contain design defects or errors known as errata which may cause
the product to deviate from published specifications. Current characterized errata are available
on request.
Intel disclaims all express and implied warranties, including without limitation, the implied
warranties of merchantability, fitness for a particular purpose, and non-infringement, as well as
any warranty arising from course of performance, course of dealing, or usage in trade.
Intel, the Intel logo, Intel Unite, Intel vPro, and Intel Core are trademarks of Intel Corporation in
the United States and/or other countries.
*Other names and brands may be claimed as the property of others
© 2015 Intel Corporation. All rights reserved.

Intel® Unite™ Software - Standalone User Guide 3 of 38
Table of Contents
Introduction ..................................................................................................................................... 5
Terminology .......................................................................................................... 5
Intel Unite Solution Installation ......................................................................................... 6
Overview ................................................................................................................. 6
Requirements....................................................................................................... 7
Hub Requirements ............................................................................. 7
Client Requirements ......................................................................... 7
Network Requirements ................................................................... 7
Intel Unite Hub Installation ........................................................................ 8
Closing the Intel Unite App on the Hub ........................... 15
Intel Unite Client Installation ................................................................. 15
Mac* Client Installation .............................................................. 16
Windows* Client Installation ................................................... 18
Uninstalling from Windows (Hub and Client) .............................. 22
Uninstalling from Mac ................................................................................. 22
Customizing the Hub .............................................................................................................. 23
Launching the Settings Application .................................................... 23
General Settings Tab .................................................................... 23
User Interface Tab.......................................................................... 25
Plugins Tab .......................................................................................... 26
Misc Tab ................................................................................................ 27
Intel Unite Solution Features ............................................................................................ 28
Getting Connected ......................................................................................... 28
Present Content .............................................................................................. 29
View Presentation .......................................................................................... 30
Take Over a Presentation ......................................................................... 30
Join a Presentation ........................................................................................ 31
Annotation .......................................................................................................... 32
Share a File ........................................................................................................ 33
Disconnect User .............................................................................................. 35
Intel Unite App Settings ............................................................................ 36

Intel® Unite™ Software - Standalone User Guide 4 of 38
Troubleshooting.......................................................................................................................... 36
Client PC not connecting to Hub .......................................................... 36
Invalid PIN .......................................................................................................... 37
Performance Issues ...................................................................................... 37
Changing Shared Key Value ................................................................... 37
Network Issues ................................................................................................ 37
Firewall Issues ................................................................................................. 38
Shortcut Does Not Open Application................................................. 38

Intel® Unite™ Software - Standalone User Guide 5 of 38
Introduction
Welcome to the Intel Unite solution, we are excited for you to experience the benefits of a smart
and connected meeting space. Intel Unite software was designed to connect everyone in a
meeting, quickly and easily. The Intel Unite solution is a simple and instant collaboration
solution today and a foundation for added capabilities and innovation in the future.
This document will explain the process to install the Intel Unite software in standalone mode,
learn more about features and assist with troubleshooting.
Terminology
Throughout this setup guide the following terms will be used:
Appliance – This term refers to the auto-configuration of the Hub that occurs during installation.
When a Hub is configured as an appliance, the Intel Unite application will automatically start
when the Hub PC is turned on and the Intel Unite application will operate in full screen mode.
Client – This term refers to a laptop (Windows or Mac) that will be used to connect to the Hub.
Hub – This term refers to an Intel® vPro™ processor family based PC that is connected to a
display in a conference room running the Intel Unite application.
Shared key – This term refers to a shared password (at least 8 characters in length) that you will
be prompted to enter on both the Hub and Client. Only systems that use the same shared key
will be able to connect to each other.
Simple Network – This term refers to a wired or wireless network where all devices on that
network are on the same subnet, similar to a home network.
Plugin – This term refers to a software component that is installed on the Hub which extends
the functionality of the Intel Unite solution.
Intel® Unite™ Software - Standalone User Guide 6 of 38
Intel Unite Solution Installation
Overview
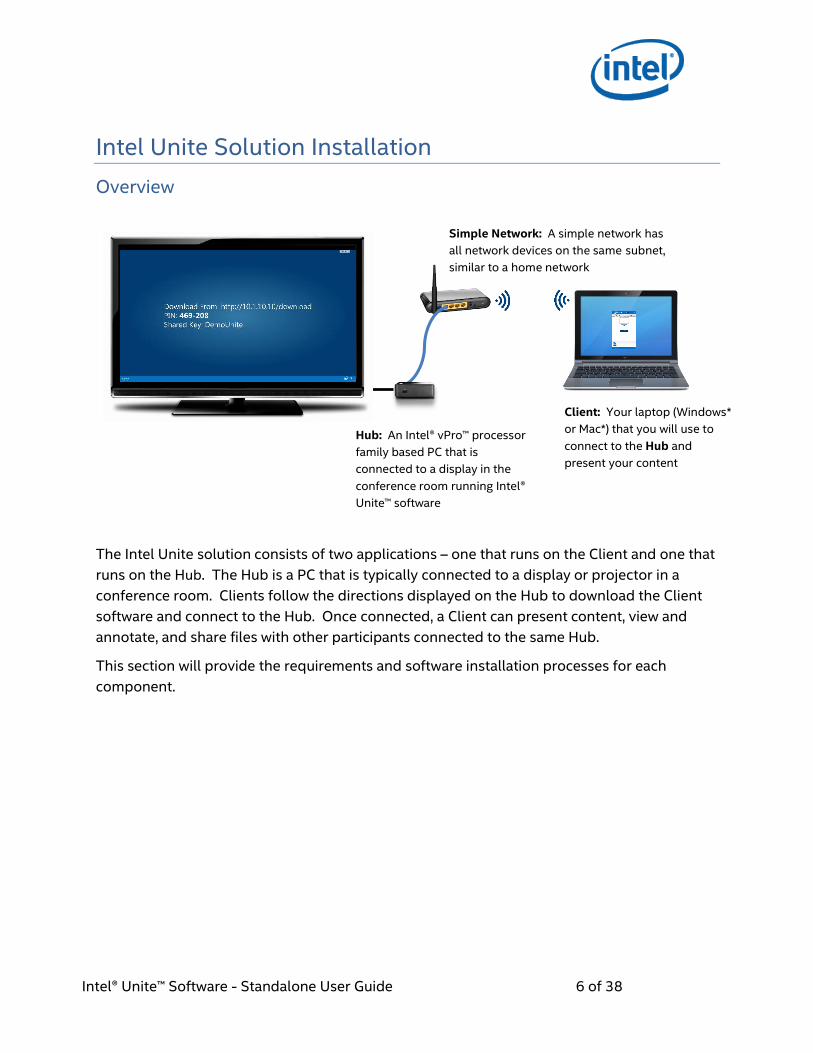
The Intel Unite solution consists of two applications – one that runs on the Client and one that
runs on the Hub. The Hub is a PC that is typically connected to a display or projector in a
conference room. Clients follow the directions displayed on the Hub to download the Client
software and connect to the Hub. Once connected, a Client can present content, view and
annotate, and share files with other participants connected to the same Hub.
This section will provide the requirements and software installation processes for each
component.
Client: Your laptop (Windows*
or Mac*) that you will use to
connect to the Hub and
present your content
Hub: An Intel® vPro™ processor
family based PC that is
connected to a display in the
conference room running Intel®
Unite™ software
Simple Network: A simple network has
all network devices on the same subnet,
similar to a home network
Intel® Unite™ Software - Standalone User Guide 7 of 38
Requirements
Hub Requirements:
A supported platform with an Intel® vPro™ processor family based PC
4 GB RAM
1 GB available storage
Microsoft Windows 7, 8, 8.1 or 10
Microsoft .NET 4 or greater
Wired or Wireless Network Connection
Client Requirements:
At least 1 GB RAM
At least 1 GB available storage
Microsoft Windows 7, 8, 8.1 or 10
Microsoft .NET 4 or greater
Apple Mac OSX 10.9 or greater
Network Requirements:
The standalone version of the Intel Unite solution requires that all devices are connected,
wired or wireless, to the same subnet on the same network, similar to a home network.

Intel® Unite™ Software - Standalone User Guide 8 of 38
Intel Unite Hub Installation
1. Copy and run HP Unite Hub Installer.msi on the system you intend to use as a Hub.
2. The HP Unite Hub Installer – InstallShield Wizard will pop up. Click on Next to continue
3. The Intel® Unite™ Solution installation Setup Wizard will open and the Welcome window
will be displayed. Click on Next to continue.

Intel® Unite™ Software - Standalone User Guide 9 of 38
4. The End User License Agreement window will be displayed. After reviewing the end user
license agreement, check the box I accept the terms in the License Agreement and click
Next to continue.
5. The Choose how to install the Intel® Unite™ Solution window will open, close Standalone
and click Next

Intel® Unite™ Software - Standalone User Guide 10 of 38
6. The Destination folder window will be displayed. Choose a destination or leave the default
and click on Next to continue.

Intel® Unite™ Software - Standalone User Guide 11 of 38
7. The Ready to install window will be displayed. Click on Install to continue.
8. Once the installation processes has completed, the Finish window will be displayed. Click
on Finish to continue.
IMPORTANT NOTE: If you unchecked Launch Intel® Unite™ application, then you will need to
launch the Intel Unite application using the desktop shortcut before continuing.

Intel® Unite™ Software - Standalone User Guide 12 of 38
9. The screen Setup your Intel® Unite™ solution will be displayed. After reviewing the Intel
Product Improvement Program agreement, select either the box I accept the terms of the
Intel Product Improvement Program and click Yes, or click No.
10. On the next screen, you are asked to create or enter a Shared Key consisting of at least 8
characters, you can use any combination of characters. All devices (Clients and Hubs) will
use the same Shared Key to communicate. Enter your key and click Next.
NOTE: If you have more than one Intel Unite Hub use the same key on each Hub.

Intel® Unite™ Software - Standalone User Guide 13 of 38
11. The Set up your Intel® Unite™ solution window will be displayed, select Yes or No:
Selecting Yes will configure your system as an Intel Unite appliance. When a Hub is
configured as an appliance, the Intel Unite application will automatically start when
the Hub PC is turned on and the Intel Unite application will operate in full screen
mode. Select this option if you want this PC dedicated to run as an Intel Unite Hub.
The following changes will be made to your system:
A new non-administrative user will be created:
User name: UniteUser
Password: P@ssw0rd
The computer will be set to automatically login as UniteUser and start the
Intel Unite application when the system boots up
A Windows firewall exception will be added to allow the Intel Unite
application
The power settings will be set to “Always On”
NOTE: This can be undone by using the Intel Unite Settings application or
uninstalling the Intel Unite software.
Selecting No will place a shortcut on your desktop and allow you to launch the Intel
Unite application manually. Select this option if your system has multiple purposes
and you want to be able to easily switch between the Intel Unite application and
other applications.
12. Click Finish to continue.

Intel® Unite™ Software - Standalone User Guide 14 of 38
Once the configuration is done, the Configuration is complete window will be displayed.
Click on Close.
NOTE: You can customize and access additional settings by clicking on the Customize button.
See the Customizing the Hub section for more details.
13. If you selected Yes in step 10, your system will reboot once setup is complete. If you
selected No, you will need to manually launch the Intel Unite application using the desktop
shortcut.
When the Intel Unite application starts it will display instructions for others to download the
Client software and connect to the Hub.
In this screen you can see the instructions that each system will follow in order to connect to
the Intel Unite Hub.
PIN
Shared Key
Client Download
Instructions

Intel® Unite™ Software - Standalone User Guide 15 of 38
The PIN is the number you will enter after launching the application on the Client to
connect to the Hub. For security reasons, the PIN displayed on the Hub will change
every 5 minutes. Please make sure the correct PIN is used every time a user connects
to a session.
Please note that everybody uses the same Shared Key to connect to the Intel Unite
Hub. In this example, DemoUnite is the Shared Key that must be entered on the
Client when prompted.
Closing the Intel Unite App on the Hub
If you configured the Intel Unite Hub as an appliance:
Press Alt+F4, which will close Intel Unite and give you the option to Start Intel Unite
or Sign Out.
If you run the Intel Unite application using the desktop shortcut:
To exit the Intel Unite application, press Alt+F4, which will close the full screen
window.
To fully exit you need to close Unite from the system tray:
In the system tray (next to the clock), right click on the icon for the Intel
Unite application and select Close.
Intel Unite Client Installation
Once the Intel Unite Hub has been installed, you need to install the application on each Client
device that will connect to the Intel Unite Hub.
Intel® Unite™ Software - Standalone User Guide 16 of 38
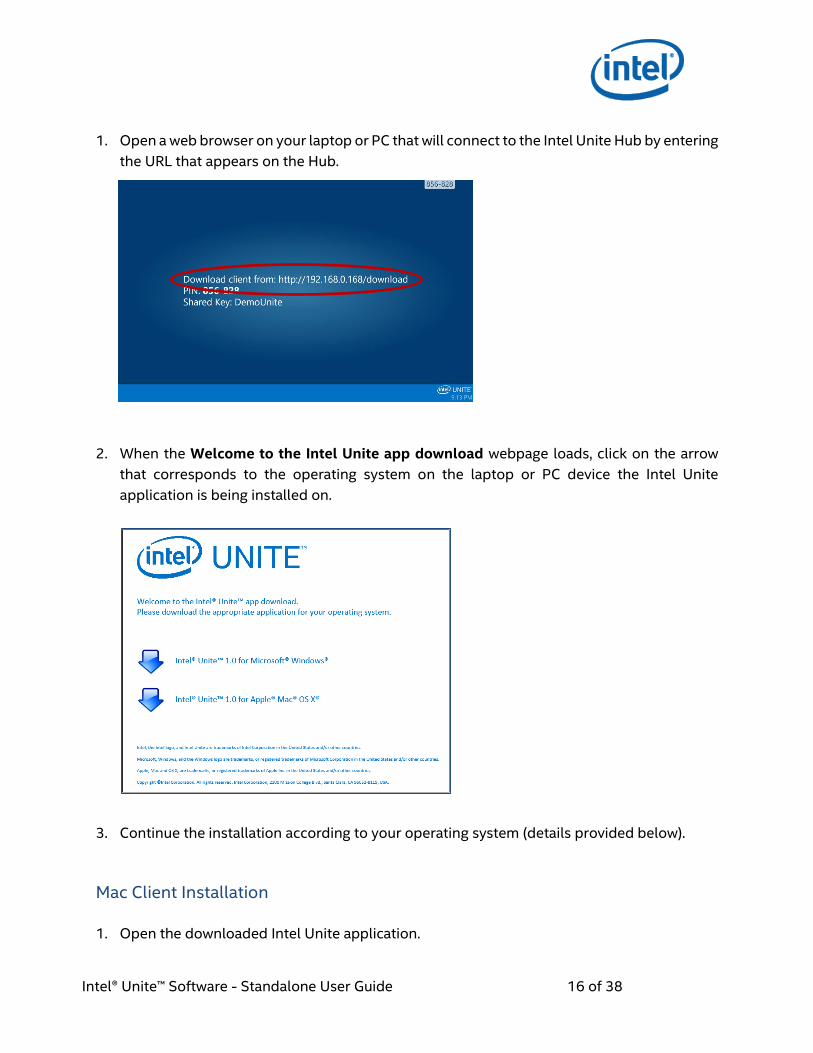
1. Open a web browser on your laptop or PC that will connect to the Intel Unite Hub by entering
the URL that appears on the Hub.
2. When the Welcome to the Intel Unite app download webpage loads, click on the arrow
that corresponds to the operating system on the laptop or PC device the Intel Unite
application is being installed on.
3. Continue the installation according to your operating system (details provided below).
Mac Client Installation
1. Open the downloaded Intel Unite application.

Intel® Unite™ Software - Standalone User Guide 17 of 38
2. When the license agreement displays, review it and click on Agree to continue.
3. Move the Intel Unite app to the Applications folder.
4. Launch the Intel Unite app from the Applications folder.
5. In the Stand Alone Mode window, enter the Shared Key displayed on the Hub and click
Save.
NOTE: This is a one-time step required for the standalone version.
6. The following Enter Pin & Connect to a Screen window will be displayed. To connect to the
Hub, enter the PIN displayed on the Hub

Intel® Unite™ Software - Standalone User Guide 18 of 38
7. Once the PIN is entered, you will join the session. You can click on Share if you wish to
present your content.
Windows Client Installation
1. Open the downloaded Intel Unite application.
2. The setup wizard will be displayed. Click on Next to continue.
3. After reviewing the end user license agreement, check the box I accept the terms in the
License Agreement and click Next.

Intel® Unite™ Software - Standalone User Guide 19 of 38
4. The Destination folder window will be displayed. Choose a destination or leave the
default and click on Next to continue. You can also check the box Create a desktop icon to
have quick access to the application.
5. The Ready to install window will be displayed, click on Install to continue.

Intel® Unite™ Software - Standalone User Guide 20 of 38
6. Once the installation wizard has ended, you will see the Finish window. Select the Launch
Intel Unite application box to open the application and click on Finish.
7. When the application launches, the Intel Unite application Privacy Statement window will
be displayed. After reviewing the statement, click on Yes and continue.

Intel® Unite™ Software - Standalone User Guide 21 of 38
8. The Shared Key window will be displayed. Enter the Shared Key displayed on the screen
of the Hub and click on Apply.
NOTE: This is a one-time step required for the standalone version.
9. The following Connect to a screen window will be displayed. To connect to the Hub, enter
the PIN displayed on the Hub.
10. Once the PIN is entered, you will join the session. You can click on Share if you wish to
present your content.
IMPOTANT NOTE: If you are having problems connecting the Client to the Hub, make sure the
firewalls are disabled or have exceptions in place for Intel Unite.exe; refer to the
Troubleshooting Section.

Intel® Unite™ Software - Standalone User Guide 22 of 38
Uninstalling from Windows (Hub and Client)
IMPORTANT NOTE: Before you uninstall the Intel Unite application from a Hub, you need to
make sure that the Intel Unite application is not running and that UniteUser is not signed in
(only applicable if the Hub was configured as an Appliance). Refer to the section Closing the
Intel Unite App on the Hub.
If you want to uninstall the Intel Unite software, follow the standard processes for removing
software from Windows:
1. Go to Control Panel then Programs then Uninstall a program.
2. Locate Intel® Unite™ in the list and double click on the icon.
3. Follow the prompts to uninstall the application.
Uninstalling from Mac
If you want to uninstall the Intel Unite app, drag the program from the Applications folder to the
Trash.

Intel® Unite™ Software - Standalone User Guide 23 of 38
Customizing the Hub
The Intel Unite Hub can be customized to fit the needs of your organization. Additional
options allows you to add a theme to the Hub or enable/disable features such as file share.
This section will guide you through customizing the Hub using the Intel Unite Settings
application.
Launching the Settings Application
To launch the settings application, you will need to close the Intel Unite application running
on the Hub and open Intel Unite Settings by clicking on the desktop launcher, or from the
start menu.
Settings are organized in to 4 tabs:
General: This tab contains the common settings
User Interface: This tab contains the settings which will allow you to customize the
background, look, and instructions when running in full screen mode
Plugins: This tab contains the security settings for plugins
Misc: This tab contains functionality and advanced settings
The buttons at the bottom will allow you to navigate, revert, and save changes. To close the
application, click Close.
General Settings Tab

Intel® Unite™ Software - Standalone User Guide 24 of 38
Shared Key: This setting will allow you to change the shared key for the Hub. If you have
multiple hubs, you should use the same shared key.
Reset Installation: This option will remove all system changes made during installation, and
will reset all settings back to default. The Intel Unite software will remain on the system, but
you will be guided through the Setup your Intel® Unite™ solution wizard the next time the
application is started. This option is useful if you want to change the appliance mode
selection you made during installation.
Reset Settings: This option will return all settings back to default. This will not remove any
system changes made during installation.
Pin Display Size: This option will allow you to customize the text size of the PIN that is
displayed in the upper-right corner of the screen. Note that as you change the value, the
example pin 000-000 will provide a preview.
Lock the Keyboard when in Full Screen: If set to Yes, the Intel Unite application will run in a
KIOSK mode, which will block key combinations that will allow a user to exit the application.
To exit, you must enter a Hub Unlock Password.
Hub Unlock Password: This text field is only present if Lock the Keyboard when in Full
Screen is set to Yes. The Hub Unlock Password is used while the Intel Unite application is
running KIOSK mode. When you enter it, the Intel Unite application will exit. Note that there
is not an indication that you are entering the password in KIOSK mode.

Intel® Unite™ Software - Standalone User Guide 25 of 38
User Interface Tab
Full Screen: If this option is set to Yes, the Intel Unite application will take over the entire
screen. If you select No, all other settings will be hidden.
Background Image: This will allow you to select a background image. You can type a
filename, or use the browse button to find a local image.
Full Screen Background Color: This will set the background color used in Full Screen mode.
To pick a color, click on the text box and a color-picker will appear; you can click on the color
you want or, if you want to specify your own hex value, you can click on Advanced within the
color selector.
Show a Clock: If set to Yes, the current system time will be displayed in the lower right corner
of the screen.
Show instructions: If set to Yes, text directions will be centered on the display. You can use
the default instructions, or specify your own.
Instruction Text Font: This will set the font that will be used for the instructions.
Instruction Text Color: This will set the color of the instructions. To pick a color, click on the
text box and a color-picker will appear; you can click on the color you want or, if you want to
specify your own hex value, you can click on Advanced within the color selector.

Intel® Unite™ Software - Standalone User Guide 26 of 38
Pin Color: Within the instructions, you can choose to have the PIN displayed. This option will
allow you to choose a different color for the PIN for emphasis. To pick a color, click on the
text box and a color-picker will appear; you can click on the color you want or, if you want to
specify your own hex value, you can click on Advanced within the color selector.
Full Screen Instructions: This textbox will allow you to customize the text instructions on the
Hub. If blank, the default instructions will appear. There are four special variables you can
use:
{host} This will display the hostname of the Hub
{ip} This will display the IP address of the Hub
{pin} This displays the current PIN
{psk} This will display the current shared key
Show Instructions: Click this button to preview the current settings. To exit the preview, click
Hide Instructions.
Plugins Tab
Verify Certificates on Plugins: This setting will ensure only trusted plugins are loaded. Set
this to Yes if only digitally signed plugins that you trust should be loaded. No will allow any
installed plugin to be loaded.
Intel® Unite™ Software - Standalone User Guide 27 of 38
Trusted Plugins: This option will only show up if Verify Certificates on Plugins is set to Yes.
This will allow you to select, by enabling the checkbox, which digitally signed plugins you want
to be loaded. If an installed plugin doesn’t show up in this list it is because the plugin is not
digitally signed; you should contact the plugin vendor. If this list is empty it is because there
are no digitally signed plugins installed. In the example above, “Traffic Plugin” is a digitally
signed plugin that is trusted and will be loaded. To deselect a plugin, remove the check from
the checkbox.
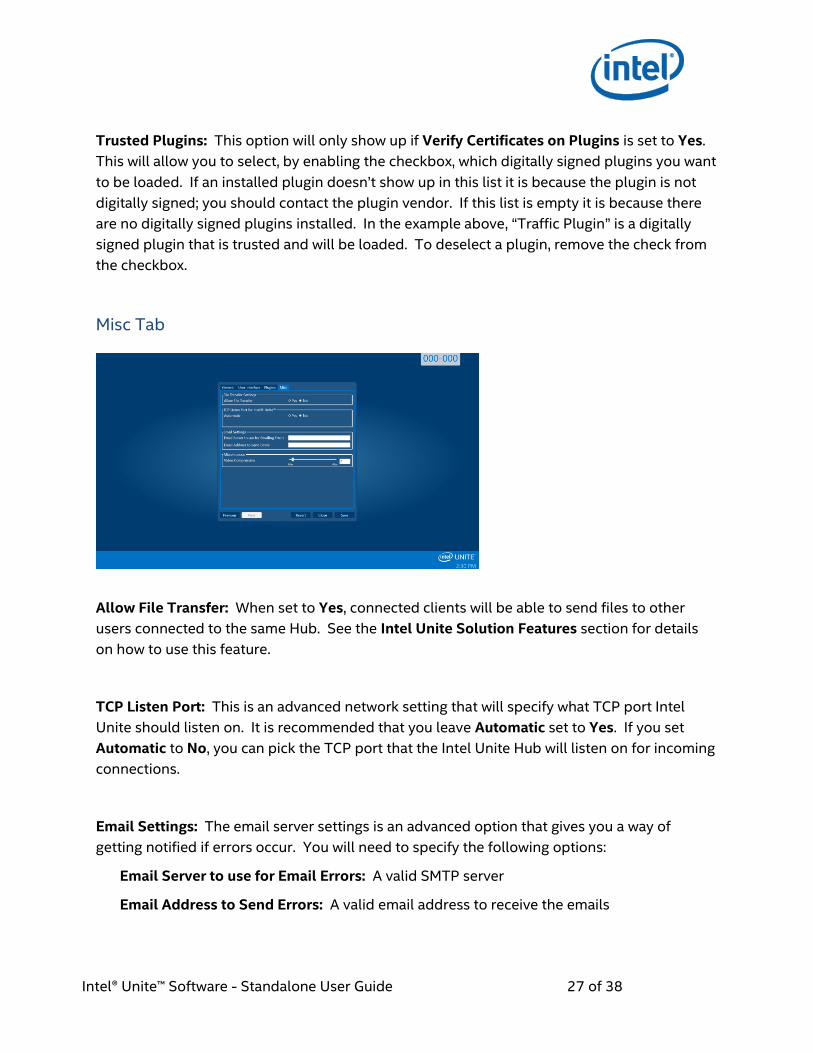
Misc Tab
Allow File Transfer: When set to Yes, connected clients will be able to send files to other
users connected to the same Hub. See the Intel Unite Solution Features section for details
on how to use this feature.
TCP Listen Port: This is an advanced network setting that will specify what TCP port Intel
Unite should listen on. It is recommended that you leave Automatic set to Yes. If you set
Automatic to No, you can pick the TCP port that the Intel Unite Hub will listen on for incoming
connections.
Email Settings: The email server settings is an advanced option that gives you a way of
getting notified if errors occur. You will need to specify the following options:
Email Server to use for Email Errors: A valid SMTP server
Email Address to Send Errors: A valid email address to receive the emails

Intel® Unite™ Software - Standalone User Guide 28 of 38
Video Compression: This advanced setting specifies how much compression should be
applied when screen sharing. Higher values will require less bandwidth, but can degrade the
image since more compression is being applied. Lower values gives you better quality, but
may require more bandwidth.
Intel Unite Solution Features
Once Clients connect to a Hub, the solution provides useful collaboration features that
includes the ability to present content side-by-side, share files, and annotate. This section will
provide instructions on how to use the features included with the Intel Unite solution.
Getting Connected To get a Client connected to a Hub, ensure that you have the Client application installed. If
you need to install the Client, you can follow the directions on the Hub screen to download
and install the Client or refer to the Intel Unite Client Installation section of this guide.
1. Launch the Intel Unite application on your Client by using the desktop shortcut.

Intel® Unite™ Software - Standalone User Guide 29 of 38
2. The Connect to a screen window will be displayed. Enter the PIN located on the Hub.
3. Once the PIN is entered, you will join the session. You can click on Share if you wish to
present your content.
Present Content The Intel Unite solution allows you to quickly present content to the display the Hub is
connected to. To start sharing your primary desktop:
1. Connect a Client to a Hub.
2. Click Share to present your content.

Intel® Unite™ Software - Standalone User Guide 30 of 38
3. To stop sharing, click Stop.
View Presentation When a connected user shares content, you can view and annotate the presentation locally.
To do this, while a connected user is presenting, click on the View Presentation link.
Take Over a Presentation When multiple users are presenting, a single user may want to take over the Hub screen. To
do this, the user who wants to take over the screen can use the Take Over option.

Intel® Unite™ Software - Standalone User Guide 31 of 38
To do this, when there are 2 or more users are connected and presenting to the same display,
the Take Over button will be available. If you click it, you will be the only person presenting to
the display.
NOTE: This action will not remove the other presenters from the collaboration session, it only
stops them from sharing their content. They can re-share at any time.
Join a Presentation Multiple users may want to connect and present content at the same time. To do this, when
the first user clicks Share to present their content, Join Screen will become available to other
users.
When users choose this option, the Hub will tile content together on the screen. Please note
that the max number of presenters per screen is four.

Intel® Unite™ Software - Standalone User Guide 32 of 38
Annotation Annotation is used to quickly highlight and point out a specific item or section on a displayed
screen. The ink shown will slowly fade after five seconds. To use annotation while presenting:
1. Connect a Client to a Hub.
2. Click Share to present your content.
3. A persistent tool menu will appear in the top, center of your display. Click on the down
arrow to expose a set of options
The annotation menu has three options:
Enable Remote Annotation
Make Annotation Persistent
Draw on my screen
You can also change the pen color using the pen dropdown menu
When you toggle Draw on my screen to the right, you can make annotations on your own
screen.
To exit annotation mode, toggle Draw on my screen to the left.
To annotate when someone else is presenting, choose the View Presentation link and begin
drawing.

Intel® Unite™ Software - Standalone User Guide 33 of 38
Share a File The Share Files feature provides an easy way for users to share presentations, meeting
minutes, picture, or other files with other users connected to the same Hub. To send a file
using the Intel Unite application:
1. Connect multiple Clients to a Hub
2. Click on Share Files.
3. Click on Select Files and navigate to the file to be sent, or drag and drop files to the select
files area. Please note that the maximum file size is 2GB.

Intel® Unite™ Software - Standalone User Guide 34 of 38
4. Once the files are ready to send, select the recipients and click on the Send button.
5. Recipients will receive an indicator on the Share Files button that files are waiting for
them. Click Share Files to retrieve files.

Intel® Unite™ Software - Standalone User Guide 35 of 38
6. In the file list, click on the download button next to the file you want to download. Files
will be placed in the folder Received Files on your desktop.
Disconnect User Any user connected to a Hub can view a list of participants and disconnect other participants
by clicking on the participant icon located on the upper navigation bar.

Intel® Unite™ Software - Standalone User Guide 36 of 38
Intel Unite App Settings Intel Unite app settings is located at the right lower corner of the window; click on the gear to
access your options:
Your Name – Your user name or chosen name.
Shared Key – This is the key that you entered during the installation processes. You
should use the value displayed on the Intel Unite Hub. Please note that this box will
appear empty even though it has a set value.
Avatar – Select a desired .png, .gif, or .jpg file.
Troubleshooting This section will walk you through common issues.
Client PC not connecting to Hub
Verify that the Client PC and the Hub are on the same subnet.
Verify that the firewall is allowing the Intel Unite app traffic to reach the network.
Verify that the shared key for the Client PC matches the Hub. You can update the shared
key on your Client by following the steps in Changing Shared Key value.

Intel® Unite™ Software - Standalone User Guide 37 of 38
Invalid PIN
If the message “The pin you entered could not be found. Please try again” appears when trying
to connect to the Intel Unite Hub:
Verify you have entered a valid and current PIN, the PIN changes every 5 minutes.
Verify that the shared key for the Client PC matches the PIN on the Hub. You can follow
the instructions found below to update the shared key.
Performance Issues
The Intel Unite Hub and each Client device needs to meet the requirements mentioned at the
start of this setup guide.
You may also see performance issues if you are operating on a congested network. It is
recommended that the PC acting as the Hub uses a wired Ethernet connection to minimize lag
caused by wireless congestion.
Changing Shared Key Value
Hub: Uninstall and reinstall the application.
Windows Client: Click on the gear on the bottom right corner of the Intel Unite application.
Mac Client: Open Keychain Access, (Applications then Utilities then Keychain Access) locate
the Intel Unite application, select the “Logins” keychain in the left panel and select “Intel Unite
Standalone Key” in the center panel to change the key.
Network Issues
Hub: You must log out, ensure that you are connected, then log back in:
NOTE: These directions assume that you selected “Yes” to the auto-configuration during the
Hub setup process.
Press <CTRL>+<ALT>+<DELETE>
Select Switch User
Log in as a different user
Use Windows to connect to a wired or wireless network
Press <CTRL>+<ALT>+<DELETE>
Select Switch User
Select UniteUser (password is: P@ssw0rd)

Intel® Unite™ Software - Standalone User Guide 38 of 38
Firewall Issues
If you experience firewall issues, please refer to the Firewall Help Guide to configure
Firewall Settings.
Shortcut Does Not Open Application Usually this is caused because the Intel Unite application is already running in the background.
Reboot your system and try again. You can also use Task Manager to force end the Intel Unite
application.
For more information about Unite: http://intel.com/unite