integrated package deployment - centers for disease ... · web viewdatabase server: windows server...
TRANSCRIPT

EPI INFO WEB SURVEYANALYTICS AND VISUALIZATION
DEPLOYMENT GUIDEVersion 1.005/28/2014
Revision Date: 7/23/2014 2:13:00 PM

Epi Info™ Web Analytics and Visualization – Deployment Guide
VERSION HISTORY
Version #
ImplementedBy
RevisionDate
Comments
1.0 Mohammad Usman, Daniel Shorter, Sachin Agnihotri
09/25/2012 Version 1.0 of the document
1.0 Mohammad Usman, Daniel Shorter, Sachin Agnihotri
01/17/2014 Review and updates to Version 1.0 of the document
1.0 Sachin Agnihotri 03/12/2014 Updates to Version 1.0 of the document
Revision Date: 7/23/2014 2:13:00 PM Page 2 of 53

Epi Info™ Web Analytics and Visualization – Deployment Guide
TABLE OF CONTENTS
1. INTRODUCTION...........................................................................................................................4
1.1 PURPOSE..........................................................................................................................4
1.2 AUDIENCE.........................................................................................................................4
2. SYSTEM DESCRIPTION.............................................................................................................4
2.1 KEY FEATURES...............................................................................................................4
2.2 INVENTORY......................................................................................................................5
2.3 ENVIRONMENT................................................................................................................5
2.4 SYSTEM OPERATIONS..................................................................................................6
2.5 SYSTEM ARCHITECTURE.............................................................................................6
3. APPLICATION INSTALLATION.................................................................................................10
3.1 PREREQUISITES...........................................................................................................10
3.2 ACCESS CONTROLS....................................................................................................10
3.3 INSTALLATION...............................................................................................................10
3.4 CONFIGURATION..........................................................................................................11
APPENDIX A: REFERENCES..................................................................................................................51
APPENDIX B: TABLE OF FIGURES........................................................................................................52
Revision Date: 7/23/2014 2:13:00 PM Page 3 of 53

Epi Info™ Web Analytics and Visualization – Deployment Guide
1. INTRODUCTION1.1 PURPOSE
Epi Info™ Web Analytics & Visualization is an open source project in the popular Epi Info™ suite of tools. The web product can be deployed as an internet or intranet application and will provide analytical and visualization capability for large public health datasets within an organization. The product will also provide a collection of relevant public health related tools that can be used by Epidemiologists or other public health professionals to analyze data.
1.2 AUDIENCEThe audience for this document includes system administrators, database administrators, and information technology personnel who will be configuring the system on web and database servers.
The person creating and configuring the database should have full administrative access to the database server and rights and privileges to create a database, create database users, and grant access to the database.
2. SYSTEM DESCRIPTION2.1 KEY FEATURES
The Epi Info™ Web Analytics & Visualization system enables the following functionalities on the web:
- Dashboard functionality on Web: Provides Epi Info™ 7 dashboard-like functionality, enabling users to use gadgets, charts and calculators via the Web.
- Configuration for Windows- and Form-based Authentication: System Administrators have a choice to choose the mode of the deployment.
- Admin tools: Provides the means for administrators to create groups within the system called “Organization”, create users within the group and control their access and also create connections to different data sources to be accessed by the users in the system.
o Role-based access to application features: Application features available to a user are determined by their role which is one of super administrator, administrator and user.
o Encapsulated working environment: Users from one organization can work on data sources in isolation from other groups.
o Creation of data sources: Admins have authority to create data sources for the users.
- Capability of Saving/Opening/Sharing Canvas: Users can save canvases with selected gadgets with all their filtering criteria, data sources used by them and layouts finalized by them. The saved dashboards can be opened any time and also shared with other users within their group. The save process only saves the
Revision Date: 7/23/2014 2:13:00 PM Page 4 of 53
Epi Info™ Web Analytics and Visualization – Deployment Guide
user’s settings and not the data. Whenever the canvas is opened in future by any user who has access to it, the gadgets in the dashboard queries and presents the latest copy of the data..
2.2 INVENTORYThe deployment package consists of a compressed folder structure having three sub folders, titled Database, Application, and Documents. The database scripts are present in the Database folder. All files needed for deployment of the web product are provided in Application folder. All the documentation for the web product is present in Documents folder.
2.3 ENVIRONMENTBelow is a list of hardware and software requirements, and operational activities needed for the deployment of the Epi Info™ Web Analytics & Visualization system:
Hardware:o Web server: Windows server 2008 or Windows Server 2008 R2
o Database server: Windows Server 2008 or Windows Server 2008 R2
Note: The system is designed to do all the processing and computations on the server. You will have to plan for server capacity depending on the size of data sources you plan to use and the number of users expected to use the system.
Software:o Web server:
Internet Information Services (IIS) 7.0 / 7.5
.NET 4.0
Microsoft Silverlight 5.0
o Database server
SQL Server 2008
PostgreSQL 9.1 and later
MySql
o Client
Microsoft Silverlight 5.0 runtime
o SMTP Server
Revision Date: 7/23/2014 2:13:00 PM Page 5 of 53

Epi Info™ Web Analytics and Visualization – Deployment Guide
The application would need to know the name of an SMTP server within the network that it can use.
Operational activities:o A system engineer, IT engineer with administrative access on the web
server configures the application.
o A database administrator with administrative access on the database server configures the database. This application can be configured for SQL Server 2008, MySql or PostgreSQL 9.1 or later.
2.4 SYSTEM OPERATIONSThe system will be used for:
Performing analysis using various Gadgets and Charts provided by the system.
Performing calculations using various StatCalc Calculators provided by the system.
Saving designed canvases with all the chosen Gadgets and Charts and their settings.
Opening the saved canvas and sharing with others
Defining groups called “Organization” that will be using the system
Defining data sources to be used by the users within a group/organization.
Defining users in the group/organization that will use the system and the data sources they have access to.
2.5 SYSTEM ARCHITECTUREThe system comprises a web application where the user will be able to choose the dataset they want to analyze. Once the dataset is chosen, the user can choose from any number of visualization gadgets and/or charts to start analyzing the data. Behind the scenes, the user interface interacts with a web service that does all the processing, and returns the computed data back to the user interface to be displayed. The web service interacts with a Meta database that has information on how to connect to various databases that a data mart, a data warehouse, or a database server may allow access to for analysis.
Figure 1 summarizes these components and their interactions.
Revision Date: 7/23/2014 2:13:00 PM Page 6 of 53

Epi Info™ Web Analytics and Visualization – Deployment Guide
Figure 1: Overview of Epi Info™ Web Analytics & Visualization
The product may be configured for usage as a public facing internet application, or as an intranet application within an organization’s network, behind the firewall.
Figure 2 shows the configuration for the product deployed as an intranet application where all the components of the system are hosted on infrastructure within an organization’s network behind the organization’s firewall. There is no firewall separating the web server from the database server. The system can only be accessed by users who are part of the network and from within the network. Anyone trying to access the server from public domain will be blocked by the organization’s firewall. Ideally, the intranet deployment should be configured using Windows Authentication if the organization uses Windows Active Directory.
Revision Date: 7/23/2014 2:13:00 PM Page 7 of 53

Epi Info™ Web Analytics and Visualization – Deployment Guide
Figure 2: Intranet Configuration
Figure 3 shows the configuration for the product deployed as an internet application where the components of the system are hosted on infrastructure in DMZ and within the organizations internal network. In this deployment the web server resides in DMZ. The database server is behind the firewall residing within the organizations internal network. The web server can communicate with database server only over the port that is opened for communication. The system can be accessed by both users within the organization and users in the public domain. The system deployed as internet application should be configured to use Forms Authentication.
Revision Date: 7/23/2014 2:13:00 PM Page 8 of 53

Epi Info™ Web Analytics and Visualization – Deployment Guide
Figure 3: Internet Configuration
Revision Date: 7/23/2014 2:13:00 PM Page 9 of 53

Epi Info™ Web Analytics and Visualization – Deployment Guide
3. APPLICATION INSTALLATION3.1 PREREQUISITES
In order to use the Epi Info™ Web Analytics & Visualization (EWAV) system, encryption keys must be created. These encryption keys are used to encrypt the meta database connection string, external database connection strings, and user passwords. For instructions on how to create these keys, refer to the “EWAV Encryption Utility Help” document included in the Documents folder of this package.
3.2 ACCESS CONTROLS3.2.1Database
The person creating and configuring the database should have full administrative access on the database server and rights and privileges to create a database, create database users, and grant access to the database.
3.2.2Application and ServicesThe person installing and configuring the application and services should have administrative access on the web server and should have full access and privileges to create a web application in Internet Information Services (IIS).
3.3 INSTALLATIONThe installation can be done using the EWAV package. The package for installation of the system consists of three items: 1) the database in the Database folder; 2) the application and services in the Application folder; and 3) the required documentation in the Documents folder. The Configuration section describes how these items are used.
Figure 4: File system showing components in the EWAV Package
Revision Date: 7/23/2014 2:13:00 PM Page 10 of 53
Epi Info™ Web Analytics and Visualization – Deployment Guide
3.4 CONFIGURATION3.4.1Database Configuration
The deployment package comes with “Databases” folder containing scripts to configure three types of databases namely SQL Server, MySQL and PostgreSQL. Choose the script for database type to configure per your organization’s need. Scripts provided in this package are for deploying the metadata database needed by the application. The instructions for configuring different database types are provided in three sub sections following this section:
o Setting up SQL Server metadata database – Section 3.4.1.1
o Setting up MySQL metadata database – Section 3.4.1.2
o Setting up PostgreSQL metadata database – Section 3.4.1.3
3.4.1.1 Set up EWAV for SQL Server
1. Log in to the database server using an account which has administrative privileges to create the database.
2. Open the provided script name “01CreateSchema.sql” in SQL Server Management Studio.
Figure 5: File menu to open the database script file for SQL Server
Revision Date: 7/23/2014 2:13:00 PM Page 11 of 53

Epi Info™ Web Analytics and Visualization – Deployment Guide
Figure 6: Open File dialog showing the available script for SQL Server.
3. Execute the script 01CreateSchema to create the database and the schema for the database.
Figure 7: Snapshot of a portion of 01CreateSchema script for SQL Server
Note: If you receive an error at this point upon execution, check to see if your hard-coded paths (tied directly to your machine) have the appropriate path pointing to the location where databases are created.
4. Open Script titled “02CreateUserAndRoles”. Replace the Password with a strong password that meets your organization’s password policy. Execute the script. This will create the Application User Account and will grant execute permissions on stored procedures.
Revision Date: 7/23/2014 2:13:00 PM Page 12 of 53

Epi Info™ Web Analytics and Visualization – Deployment Guide
Figure 8: Snapshot of a portion of 02CreateUserAndRoles script for SQL Server
Note: EWAV_APPUSER is the application account that is used by the application to connect to the database. Provide username and the password to the person configuring the application on the web server along with the Database server name and the Database name.
5. Open script “03InsertInitialRecord”. This script will add initial records for the system to work. It adds the roles used by the product; creates the Super Administrator user; and first organization. Before executing the script, you must update the sections marked in red, “Inserting Super Administrator user” and “Organization”. For Super Administrator, replace following placeholders with relevant values:
/*UserName*/o UserName has to be valid Email address. For Windows deployed mode, this
email has to be the part of Active Directory.
Revision Date: 7/23/2014 2:13:00 PM Page 13 of 53

Epi Info™ Web Analytics and Visualization – Deployment Guide
/*FirstName*/
/*LastName*/
/*EmailAddress*/
/*PhoneNumber*/
For Organization, replace following placeholders with relevant values:
/*OrganizationName*/
/*Description*/ - This is optional
Figure 9: Snapshot of a portion 03InsertInitialRecord script for SQL Server
Sample script is provided below:
Revision Date: 7/23/2014 2:13:00 PM Page 14 of 53

Epi Info™ Web Analytics and Visualization – Deployment GuideINSERT INTO [EWAV].[dbo].[User] ([UserName] ,[FirstName] ,[LastName] ,[PasswordHash] ,[ResetPassword] ,[EmailAddress] ,[PhoneNumber])VALUES ('[email protected]' ,'UserFirstName' ,'UserLastName' ,'' ,1 ,'[email protected]' ,'111-111-1111')GO
INSERT INTO [EWAV].[dbo].[Organization] ([OrganizationName] ,[Description] ,[Active])VALUES ('Organization Name' ,'Description'
,1)
GO
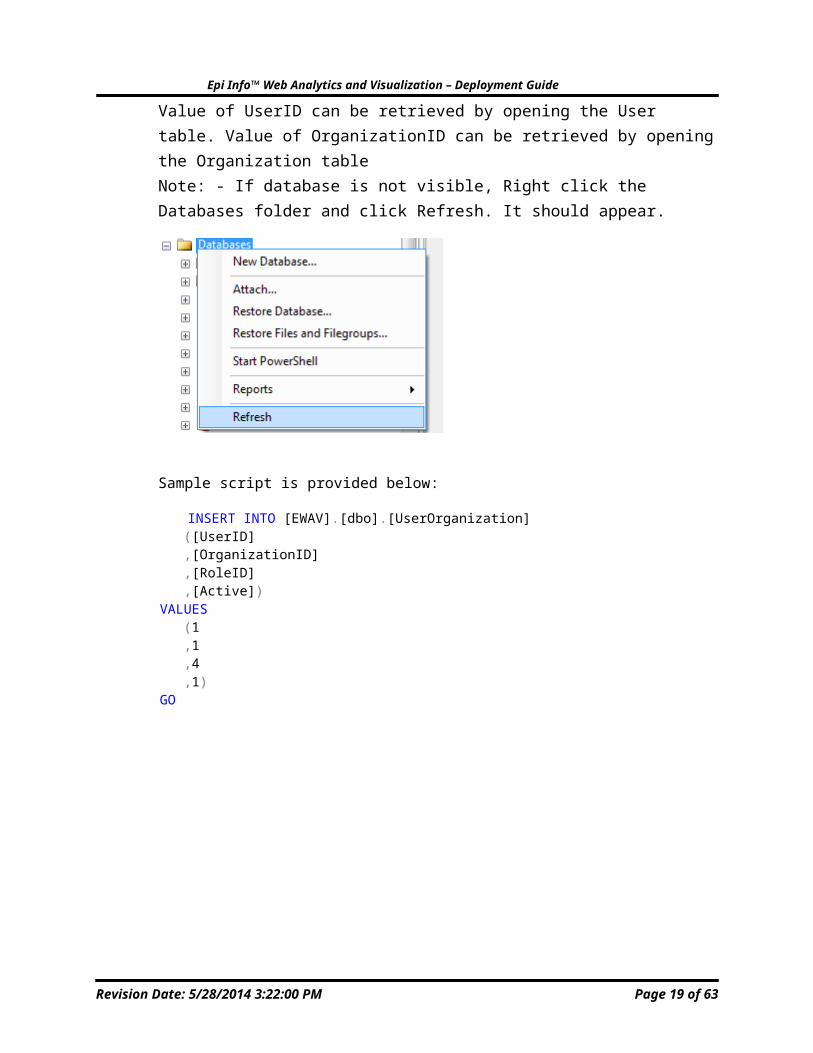
6. Open script “04InsertIntoUserOrganization”. This script creates the relationship between User and Organization for the recently added Super Administrator and Organization. The first user is being assigned the role of Super Administrator, which has a RoleID of 4. To execute the script replace following placeholders with relevant values:
/*UserID*/
/*OrganizationID*/
Figure 10: Snapshot of a portion 04InsertIntoUserOrganization script for SQL Server
Revision Date: 7/23/2014 2:13:00 PM Page 15 of 53

Epi Info™ Web Analytics and Visualization – Deployment Guide
Value of UserID can be retrieved by opening the User table. Value of OrganizationID can be retrieved by opening the Organization tableNote: - If database is not visible, Right click the Databases folder and click Refresh. It should appear.
Sample script is provided below:
INSERT INTO [EWAV].[dbo].[UserOrganization] ([UserID] ,[OrganizationID] ,[RoleID] ,[Active]) VALUES (1 ,1 ,4 ,1)
GO
Revision Date: 7/23/2014 2:13:00 PM Page 16 of 53

Epi Info™ Web Analytics and Visualization – Deployment Guide
Set up EWAV for MySQL
1. Log in to the database server using an account which has admin privileges to create the database.
2. Open the provided script namely “01CreateSchema.sql” in MySQL Workbench
Figure11: File menu to open the database script file for MySQL
Revision Date: 7/23/2014 2:13:00 PM Page 17 of 53

Epi Info™ Web Analytics and Visualization – Deployment Guide
Figure 12: Open File dialog showing the available script for MySQL
3. Execute the script “01CreateSchema” to create the database and the schema for the database
Revision Date: 7/23/2014 2:13:00 PM Page 18 of 53
Epi Info™ Web Analytics and Visualization – Deployment Guide
Figure 13: Snapshot showing portion of 01CreateSchema script for MySQL
4. Open Script titled “02CreateUserAndRoles”. Execute the script. This will create the Application User Account and will grant needed permissions.
Figure 14: Snapshot showing portion of 02CreateUserAndRoles script for MySQL
Revision Date: 7/23/2014 2:13:00 PM Page 19 of 53

Epi Info™ Web Analytics and Visualization – Deployment Guide
After executing the script, change the password for “ewav_appuser” account using Server Administration. Provide the “ewav_appuser” username, the password, server name and database name to the person configuring the web application.
Note: EWAV_APPUSER is the application account that is used by the application to connect to the database. Provide username and the password to the person configuring the application on the web server along with the Database server name and the Database name.
5. Open script “03InsertInitialRecord”. This script will add initial records for the system to work. It adds the roles used by the product; creates the Super Administrator user; and first organization. Before executing the script update sections marked in red for Inserting Super Administrator user and Organization. For Super Administrator replace following placeholders with relevant values:
/*UserName*/ o UserName has to be valid Email address. For Windows deployed mode, this
email has to be the part of Active Directory.
/*FirstName*/
/*LastName*/
/*EmailAddress*/
/*PhoneNumber*/
For Organization replace following placeholders with relevant values:
/*OrganizationName*/
/*Description*/ - This is optional
Revision Date: 7/23/2014 2:13:00 PM Page 20 of 53

Epi Info™ Web Analytics and Visualization – Deployment Guide
Figure 15: Snapshot showing portion of 03InsertInitialRecord script for MySQL
Sample script is provided below:
INSERT INTO `ewav`.`user`(`EmailAddress`,`FirstName`,`LastName`,`PasswordHash`,`PhoneNumber`,`ResetPassword`,`UserID`,`UserName`)VALUES('[email protected]', 'UserFirstName','UserLastName', '','111-111-1111', 1,
Revision Date: 7/23/2014 2:13:00 PM Page 21 of 53

Epi Info™ Web Analytics and Visualization – Deployment Guide'[email protected]','UserName'
);
INSERT INTO `ewav`.`organization`(`Active`,`Description`,`OrganizationID`,`OrganizationName`)VALUES(1, 'Description', 1,'Organization Name');
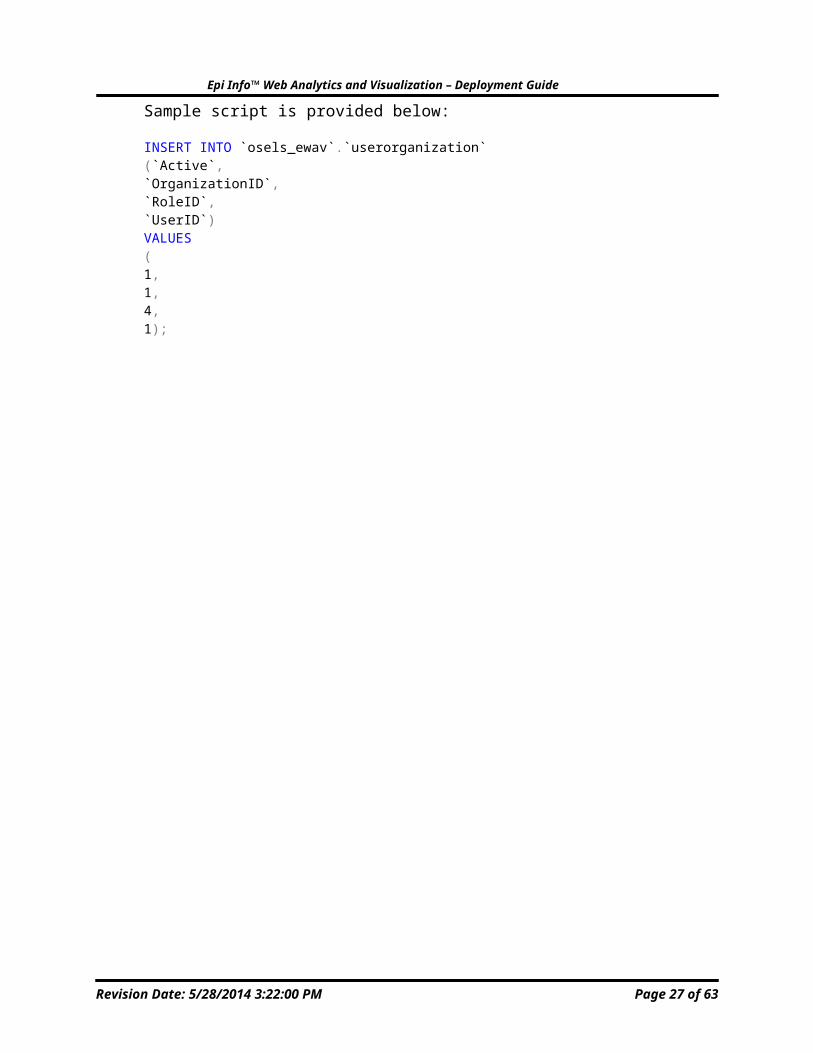
6. Open script “04InsertIntoUserOrganization”. This script creates the relationship between User and Organization for the recently added Super Administrator and your Organization. The first user is being assigned the role of Super Administrator that has a RoleID of 4. To execute the script replace following placeholders with relevant values:
/*UserID*/
/*OrganizationID*/
Figure 16: Snapshot showing portion of 04InsertInitialRecord script for MySQL
Revision Date: 7/23/2014 2:13:00 PM Page 22 of 53

Epi Info™ Web Analytics and Visualization – Deployment Guide
Value of UserID can be retrieved by opening the User table. Value of OrganizationID can be retrieved by opening the Organization table. Note: - If database is not visible, refresh the SCHEMAS folder. Database should appear as shown below:-
Sample script is provided below:
INSERT INTO `osels_ewav`.`userorganization`(`Active`,`OrganizationID`,`RoleID`,`UserID`)VALUES(1,1,4,1);
Revision Date: 7/23/2014 2:13:00 PM Page 23 of 53

Epi Info™ Web Analytics and Visualization – Deployment Guide
3.4.1.2 Set up EWAV for PostgreSQL
1. Log in to the database server using an account which has admin privileges to create the database.
2. Right click on Databases under the server and click on New Databases in context menu
Figure 17: Create new database context menu for PostgreSQL
3. Specify the name of the database as “EWAV” and owner as “postgres” and click Ok. This should create a new database.
Revision Date: 7/23/2014 2:13:00 PM Page 24 of 53

Epi Info™ Web Analytics and Visualization – Deployment Guide
Figure 18: Create new database dialog for PostgreSQL
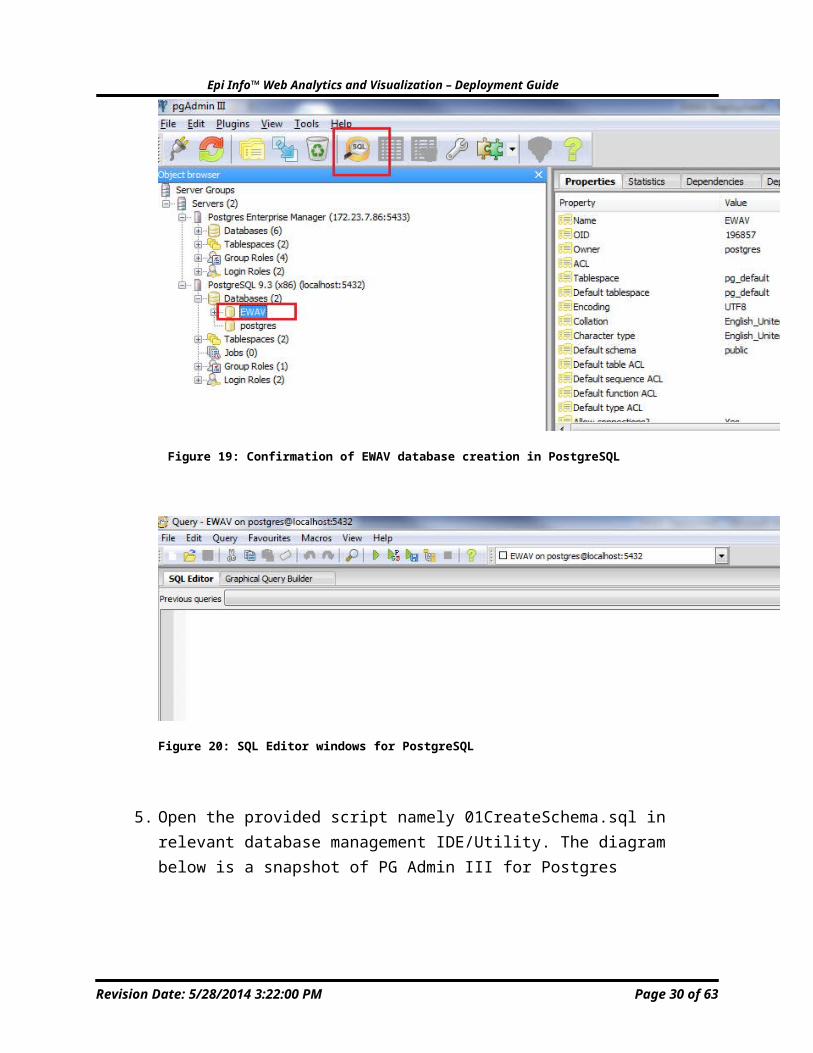
4. Highlight EWAV database under Databases tree and select SQL Editor. This shall open a new window as shown in the figure below to be used for other steps.
Revision Date: 7/23/2014 2:13:00 PM Page 25 of 53

Epi Info™ Web Analytics and Visualization – Deployment Guide
Figure 19: Confirmation of EWAV database creation in PostgreSQL
Figure 20: SQL Editor windows for PostgreSQL
5. Open the provided script namely 01CreateSchema.sql in relevant database management IDE/Utility. The diagram below is a snapshot of PG Admin III for Postgres
Revision Date: 7/23/2014 2:13:00 PM Page 26 of 53
Epi Info™ Web Analytics and Visualization – Deployment Guide
Figure 21: File menu to open the database script file for PostgreSQL
Figure 22: Open File dialog showing the available script for PostgreSQL
6. Click on the button shown below to execute the script to create the schema for the database
Revision Date: 7/23/2014 2:13:00 PM Page 27 of 53

Epi Info™ Web Analytics and Visualization – Deployment Guide
Figure 23: Snapshot showing portion of 01CreateScheam script for PostgreSQL
7. Open the script titled “02CreateUserAndRoles”. Replace the Password with a strong password that meets your organization’s password policy. Execute the script by clicking on the button shown below. This will create the Application User Account and will grant execute permissions on stored procedures.
Revision Date: 7/23/2014 2:13:00 PM Page 28 of 53

Epi Info™ Web Analytics and Visualization – Deployment Guide
Figure 24: Snapshot showing portion of 02CreateUserAndRoles script for PostgreSQL
Note: EWAV_APPUSER is the application account that is used by the application to connect to the database. Provide username and the password to the person configuring the application on the web server along with the Database server name and the Database name.
8. Open script “03InsertInitialRecord”. Execute this script by clicking on the button shown below. This script will add initial records for the system to work. It adds the roles used by the product; creates the Super Administrator user; and first organization. Before executing the script update sections marked in red for inserting Super Administrator user and Organization. For Super Administrator replace following placeholders with relevant values:
/*UserName*/ o UserName has to be valid Email address. For Windows deployed mode, this
email has to be the part of Active Directory.
/*FirstName*/
/*LastName*/
/*EmailAddress*/
/*PhoneNumber*/For Organization, replace following placeholders with relevant values:
Revision Date: 7/23/2014 2:13:00 PM Page 29 of 53
Epi Info™ Web Analytics and Visualization – Deployment Guide
/*OrganizationName*/
/*Description*/ - This is optional
Figure 25: Snapshot showing portion of 03InsertInitialRecord script for PostgreSQL
Sample script is provided below:
INSERT INTO "User" (username ,firstname ,lastname ,passwordhash ,resetpassword ,emailaddress ,phonenumber)VALUES ('[email protected]'
Revision Date: 7/23/2014 2:13:00 PM Page 30 of 53

Epi Info™ Web Analytics and Visualization – Deployment Guide ,'UserFirstName' ,'UserLastName' ,'' ,TRUE ,'[email protected]' ,'111-111-1111');
INSERT INTO organization (organizationname ,description ,active)VALUES ('Organization Name' ,'Description' ,TRUE);
9. Execute 04InsertIntoUserOrganization script; this script will create the relationship between User and Organization. By default the user created will be super administrator with RoleId ‘4’. This authority is needed for a user to add other organizations and users. Like other scripts, place holders need to be changed here as well. These place holders are UserID and OrganizationID Value of UserID can be retrieved from User table and value of OrganizationID can be retrieved from Organization table.
Figure 26: Snapshot showing portion of 04InsertIntoUserOrganization script for PostgreSQL
Note: if Database is not visible. Right click on Databases folder and click Refresh. It should appear as shown below:-
Revision Date: 7/23/2014 2:13:00 PM Page 31 of 53

Epi Info™ Web Analytics and Visualization – Deployment Guide
Sample script is provided below:
INSERT INTO userorganization( userid, organizationid, roleid, active) VALUES (1, 1, 4, TRUE);
3.4.2Application setup The deployment package comes with “Application” folder containing all the files needed for configuration of Epi Info Web Analytics and Visualization product on the web server. The product can be configured to work as an Intranet application that uses Windows Authentication for authenticating the user. In case you plan to deploy the product as an outward facing application on public facing server then the product can be configured as Forms authenticated application that prompts the user to provide username and password before using the application. Once you have made the decision about the type of configuration needed for your organization the instructions for configuration are provided in the sub sections provided below:
o Configure the application for Windows Authentication - Section 3.4.2.1
o Configure the application for Forms Authentication – Section 3.4.2.2
3.4.2.1 Configure the Application for Windows Authentication The person installing and configuring the application should have administrative access on the web server and should have full access and privileges to create a web application in Internet Information Services (IIS).
Revision Date: 7/23/2014 2:13:00 PM Page 32 of 53

Epi Info™ Web Analytics and Visualization – Deployment Guide
The application and services configuration results in Epi Info™ Web Analytics & Visualization Web product being configured as a web application on the Internet Information Services (IIS).
1. Create a folder called “EWAV” under “intepub\wwwroot.”
2. Copy the content of the folder “EWAV\Application” (and not the folder itself) to the “inetpub\wwwroot\Ewav” folder.
3. Create an application named “EWAV” in IIS by right clicking on “EWAV” folder under Sites and select Convert to Application
Revision Date: 7/23/2014 2:13:00 PM Page 33 of 53

Epi Info™ Web Analytics and Visualization – Deployment Guide
4. Make sure that the site is configured to run on an Application pool that is configured to use .NET 4.0. You can use one of the default application pools called Default Web Site or Default AppPool. This application pool uses a Managed Pipeline Mode of Integrated Authentication.
a. Figure 27: Application pool configured using .NET 4.0
5. Follow the steps provided below to configure application to run using Windows Authentication by configuring the settings of the application pool the application will use.
a. Highlight the application pool.b. Click on advanced settings on right hand side of the IIS Manager.
Figure 28: Application pool properties for windows authentication site
Revision Date: 7/23/2014 2:13:00 PM Page 34 of 53

Epi Info™ Web Analytics and Visualization – Deployment Guide
c. Under Process Model section click on Identity value. A popup will appear as shown below. Select Network Service and Click OK.
Figure 29: Setting Identity value for windows authentication application
Revision Date: 7/23/2014 2:13:00 PM Page 35 of 53

Epi Info™ Web Analytics and Visualization – Deployment Guide
6. Make sure the site uses Windows authentication only. For this select the site under Default Web Site and click on Authentication in the Features View.
Figure 30: Choosing authentication setting
7. In the Authentication View, click on Windows Authentication and then click on Enable in Actions on right hand side.
Figure 31: Enabling windows authentication setting
Revision Date: 7/23/2014 2:13:00 PM Page 36 of 53

Epi Info™ Web Analytics and Visualization – Deployment Guide
8. If Forms Authentication is "Enabled", make sure that it is set to "Disabled". Also disable Anonymous Authentication, Basic Authentication and Digest Authentication if present. Once the site has been configured to use Windows Authentication the Authentication View may look like the Figure shown below:
Figure 32: Confirming enabled and disabled authentication types
9. Open the web.config file in EWAV folder under “inetpub/wwwroot/EWAV” for editing in your preferred editor.
Figure 33: Web.config file for an integrated application under the file system of the web server
Revision Date: 7/23/2014 2:13:00 PM Page 37 of 53

Epi Info™ Web Analytics and Visualization – Deployment Guide
10.Validate that the authentication mode is set to “Windows” in the web.config file in the following section <!-- Only valid values for authentication are Windows, Forms--> <authentication mode="Windows">
11.Update Email notification section in the web.config file. <!--Email notification--><add key="EMAIL_USE_AUTHENTICATION" value="FALSE"/><add key="EMAIL_USE_SSL" value="FALSE"/> <add key="EMAIL_SUBJECT" value="XXXXXXXXXXXXX"/><add key="EMAIL_FROM" value="XXXXXXXXXXXXXXXXXX"/><add key="EMAIL_PASSWORD" value="XXXXXXXXXXXXXX"/><add key="EMAIL_TO" value="XXXXXXXXXXXXXX"/><add key="SMTP_PORT" value="XXXXXXXXXX"/><add key="SMTP_HOST" value="XXXXXXXXXXXXX"/>
EMAIL_USE_AUTHENTICATION: The default value is FALSE. Change this to TRUE if authentication is used.
EMAIL_USE_SSL: The default value is FALSE. Change this to TRUE if SSL is used.
EMAIL_FROM: Provide an email address that can be used for the FROM part of the email.
EMAIL_PASSWORD: A value needs to be provided here only if the EMAIL_USE_AUTHENTICATION is TRUE in step 6a above.
SMTP_PORT: The system uses the default value of 25. Only provide a port number if the port number is other than 25.
SMTP_HOST: This value has to be provided. This should be the name of the SMTP server used by the organization.
12.Update the password policy section to reflect the password policy for your organization. This policy will be used by users created in EWAV system. Following is the example of default password policy.
<add key="PasswordMinimumLength" value="6" /> <add key="PasswordMaximumLength" value="10" /> <add key="NumberOfTypesRequiredInPassword" value="3" /> <add key="TotalNumberOfTypesInPassword" value="4" /> <add key="UseNumbers" value="true" /> <add key="UseUpperCase" value="true" /> <add key="UseLowerCase" value="true" /> <add key="UseSymbols" value="true" /> <add key="Symbols" value="@#$|{}^" /> <add key="RepeatCharacters" value="true" /> <add key="ConsecutiveCharacters" value="false" /> <add key="UseUserIdInPassword" value="false" /> <add key="UseUserNameInPassword" value="false" />
Revision Date: 7/23/2014 2:13:00 PM Page 38 of 53

Epi Info™ Web Analytics and Visualization – Deployment Guide
PasswordMinimumLength: The default minimum length is 6. Change this to meet your organizations requirements.
PasswordMaximumLength: The default maximum length is 10. Change this to meet your organizations requirements.
NumberOfTypesRequiredInPassword: The default value is 3. Change this meet your organizations requirements.
TotalNumberOfTypesInPassword: The system supports alphanumeric characters and symbols making a total of 4 types, namely numbers, upper case, lower case and symbols.
UseNumbers: The default value for using numbers 0-9 is “TRUE”. Change this to meet your organizations requirements.
UseUpperCase: The default value for using characters A-Z is “TRUE”. Change this to meet your organizations requirements.
UseLowerCase: The default value for using character a-z is “TRUE”. Change this to meet your organizations requirements.
UseSymbols: The default value for using symbol is “TRUE”. Change this to meet your organizations requirements.
Symbols: The default list of symbols supported by the product is “@#$|{}^”. Change the symbol list to meet your organizations requirements.
RepeatCharacters: The default value for repeating characters in the password is “TRUE”. Change this to meet your organizations requirements.
ConsecutiveCharacters: The default value for consecutive characters in the password is “FALSE”. Change this to meet your organizations requirements.
UseUserIdInPassword: The default value for using User Id in password is “FALSE”. Change this to meet your organizations requirements.
UserUserNameInPassword: The default value for using user name in password is “FALSE”. Change this to meet your organizations requirements.
Revision Date: 7/23/2014 2:13:00 PM Page 39 of 53

Epi Info™ Web Analytics and Visualization – Deployment Guide
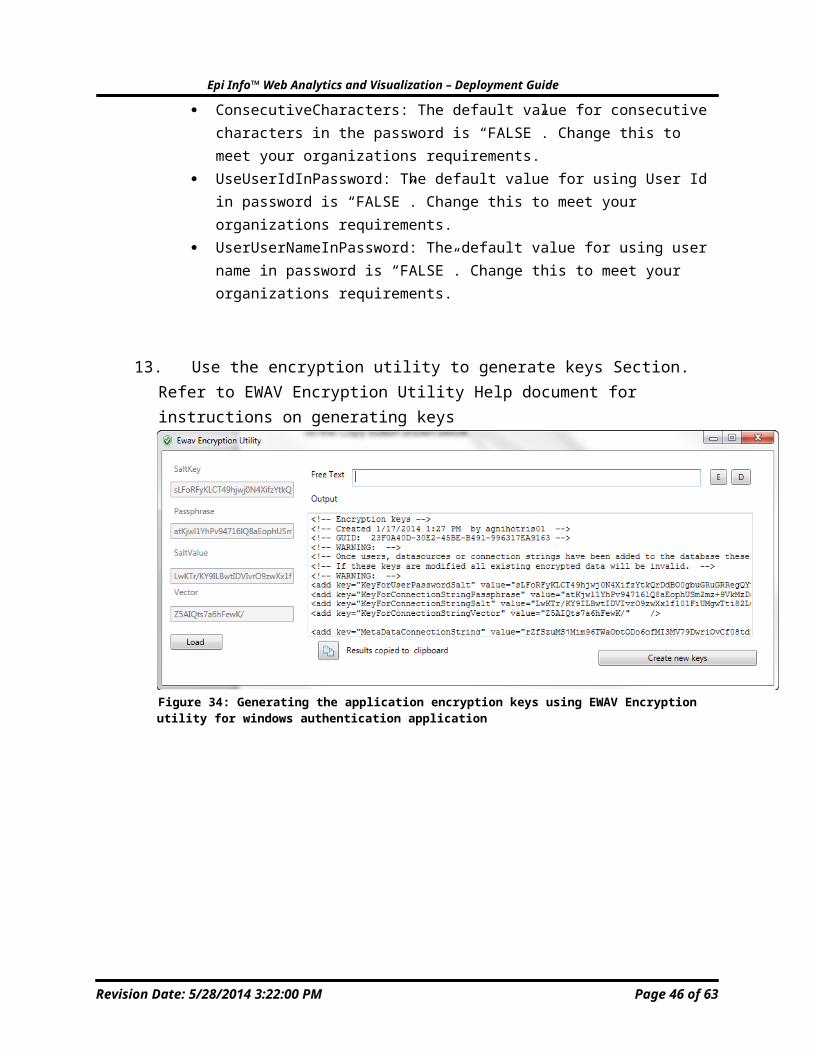
13.Use the encryption utility to generate keys Section. Refer to EWAV Encryption Utility Help document for instructions on generating keys
Figure 34: Generating the application encryption keys using EWAV Encryption utility for windows authentication application
14.Copy the section outputted in the Output text box by clicking the copy button shown with red rectangle. Replace the section shown below found under “Encryption Keys” in your web.config file with your copied text.
Figure 35: Copying the keys section to update the keys section in the provided web.config file for windows authentication application
<!-- Encryption keys --> <!-- Created 1/17/2014 1:27 PM by user01 --> <!-- GUID: 23F0A40D-30E2-45BE-B491-996317EA9163 --> <!-- WARNING: -->
Revision Date: 7/23/2014 2:13:00 PM Page 40 of 53

Epi Info™ Web Analytics and Visualization – Deployment Guide
<!-- Once users, datasources or connection strings have been added to the database these keys *cannot* be modified. --> <!-- If these keys are modified all existing encrypted data will be invalid. --> <!-- WARNING: --> <add key="KeyForUserPasswordSalt" value="sLFoRFyKLCT49hjwj0N4XifzYtkQrDdBO0gbuGRuGRRegQYv4EydWV5Q5yGV0ECoTYoq5a0UbbRIh81xQbDuQWjYf6Vk4gLg/1dQCuutN9iVtDZQbe8dlJL0aAhLbFantM013g==" /> <add key="KeyForConnectionStringPassphrase" value="atKjwl1YhPv94716lQ8aEophUSm2mz+9VkMzDgzRgscoPsRYJ2/vRs7eJTf43X6r/PiBQS2Pb99lzoA0DAVxfmwToq1QXDgovFCZP+axtINlw9vbidyz9cG0Ty3LNjxCYuMoIw==" /> <add key="KeyForConnectionStringSalt" value="LwKTr/KY9ILBwtIDVIvrO9zwXx1f101FiUMgwTti82LCY0Erdrrdu45vaVQntXe6kD0JjK1RXkLL8HdmuzPSEYsvtIKDJQ8SGdAtzHWpYrpkdXmcd5bi/pLO4UdL1H3f2ZfpZg==" /> <add key="KeyForConnectionStringVector" value="Z5AIQts7a6hFewK/" />
NOTE: The keys are the most critical piece of the system. Please make an archive of these keys and save it at a safe location in case they are lost/changed/updated in web.config file by mistake
15.Create MetaDataConnectionString for the type of database you are using and replace the relevant section marked in yellow as shown below
a. SQL Server
Data Source= DATABASE_SERVER_NAME;Initial Catalog= DATABASE_NAME;Persist Security Info=True;User ID= APPLICATION_ACCOUNT;Password= PASSWORD_FOR_ACCOUNT
b. MySQLServer= DATABASE_SERVER_NAME; Port=3306 ;Database= DATABASE_NAME;Uid= APPLICATION_ACCOUNT;Pwd= PASSWORD_FOR_ACCOUNT;
c. PostGreSql Server= DATABASE_SERVER_NAME;Port=5433;Database= DATABASE_NAME;User Id= APPLICATION_ACCOUNT;Password= PASSWORD_FOR_ACCOUNT;
Below is an example of connection string for SQL Server after removing the sections marked in yellow.
Data Source=SQLServer;Initial Catalog=EWAV;Persist Security Info=True;User ID=ewav_appuser;Password=P@ssW0rD
Revision Date: 7/23/2014 2:13:00 PM Page 41 of 53

Epi Info™ Web Analytics and Visualization – Deployment Guide
16.Use the encryption utility to encrypt the values of MetaDataConnectionString created in the step above using the encryption keys you had generated. The encryption keys should still be available in you’re the utility if you have not closed it. In case you have closed the utility refer to EWAV Encryption Utility document on how to get back the keys.
Figure 36: Encrypting connection string using EWAV Encryption utility for windows authentication application
17.Ewav uses the Microsoft Bing Maps API in its Case Cluster Map gadget. You must create a unique key for your web server on Microsoft’s Bing Maps portal page here: http://www.bingmapsportal.com/. A Microsoft account is required to use the portal page. If you do not have a Microsoft account you will be prompted to register for one.
Once you have created a key for the Bing Maps API the web.config must be updated with this entry: <add key="KeyForBingMaps" value="(Your key goes here)" />
3.4.2.2 Configure the Application for Forms-based Authentication The person installing and configuring the application should have administrative access on the web server and should have full access and privileges to create a web application in Internet Information Services (IIS).
The application and services configuration results the Epi Info Web Visualization Web application being configured as a single integrated application on the Internet Information Services (IIS).
Revision Date: 7/23/2014 2:13:00 PM Page 42 of 53

Epi Info™ Web Analytics and Visualization – Deployment Guide
1. Create a folder called “EWAV” under “intepub\wwwroot.”
2. Copy the content of the folder “EWAV\Application” (and not the folder itself) to the “inetpub\wwwroot\Ewav” folder.
3. Create an application named “EWAV” in IIS by right clicking on “EWAV” folder and select Convert to Application
4. Make sure that the site is configured to run on an Application pool that is configured to use .NET 4.0. You can use one of the default application pools called Default Web Site or Default AppPool. This application pool uses a Managed Pipeline Mode of Integrated Authentication.
Revision Date: 7/23/2014 2:13:00 PM Page 43 of 53

Epi Info™ Web Analytics and Visualization – Deployment GuideFigure 37: Application pool configured using .NET 4.0
5. Make sure the site uses Anonymous authentication only. This is the default setting when the site is configured in IIS.
Figure 38: Application configured with Anonymous Authentication Enabled
6. Open the web.config file in EWAV folder under “inetpub/wwwroot/EWAV” for editing in your preferred editor.
Figure 39: Web.config file for a forms authentication application
7. Validate that the authentication mode is set to “Forms” in the web.config file in the following section <!-- Only valid values for authentication are Windows, Forms--> <authentication mode="Forms">
Revision Date: 7/23/2014 2:13:00 PM Page 44 of 53

Epi Info™ Web Analytics and Visualization – Deployment Guide
8. Update Email notification section in the web.config file. <!--Email notification--><add key="EMAIL_USE_AUTHENTICATION" value="FALSE"/><add key="EMAIL_USE_SSL" value="FALSE"/> <add key="EMAIL_SUBJECT" value="XXXXXXXXXXXXX"/><add key="EMAIL_FROM" value="XXXXXXXXXXXXXXXXXX"/><add key="EMAIL_PASSWORD" value="XXXXXXXXXXXXXX"/><add key="EMAIL_TO" value="XXXXXXXXXXXXXX"/><add key="SMTP_PORT" value="XXXXXXXXXX"/><add key="SMTP_HOST" value="XXXXXXXXXXXXX"/>
EMAIL_USE_AUTHENTICATION: The default value is FALSE. Change this to TRUE if authentication is used.
EMAIL_USE_SSL: The default value is FALSE. Change this to TRUE if SSL is used.
EMAIL_FROM: Provide an email address that can be used for the FROM part of the email.
EMAIL_PASSWORD: A value needs to be provided here only if the EMAIL_USE_AUTHENTICATION is TRUE in step 6a above.
SMTP_PORT: The system uses the default value of 25. Only provide a port number if the port number is other than 25.
SMTP_HOST: This value has to be provided. This should be the name of the SMTP server used by the organization.
9. Update the password policy section to reflect the password policy for your organization. This policy will be used by users created in the EWAV system.
<add key="PasswordMinimumLength" value="6" /> <add key="PasswordMaximumLength" value="10" /> <add key="NumberOfTypesRequiredInPassword" value="3" /> <add key="TotalNumberOfTypesInPassword" value="4" /> <add key="UseNumbers" value="true" /> <add key="UseUpperCase" value="true" /> <add key="UseLowerCase" value="true" /> <add key="UseSymbols" value="true" /> <add key="Symbols" value="@#$|{}^" /> <add key="RepeatCharacters" value="true" /> <add key="ConsecutiveCharacters" value="false" /> <add key="UseUserIdInPassword" value="false" /> <add key="UseUserNameInPassword" value="false" />
PasswordMinimumLength: The default minimum length is 6. Change this to meet your organizations requirements.
PasswordMaximumLength: The default maximum length is 10. Change this to meet your organizations requirements.
NumberOfTypesRequiredInPassword: The default value is 3. Change this meet your organization’s requirements.
Revision Date: 7/23/2014 2:13:00 PM Page 45 of 53
Epi Info™ Web Analytics and Visualization – Deployment Guide
TotalNumberOfTypesInPassword: The system supports alphanumeric characters and symbols making a total of 4 types, numbers, upper case, lower case and symbols.
UseNumbers: The default value for using numbers 0-9 is “TRUE”. Change this to meet your organization’s requirements.
UseUpperCase: The default value for using characters A-Z is “TRUE”. Change this to meet your organization’s requirements.
UseLowerCase: The default value for using character a-z is “TRUE”. Change this to meet your organization’s requirements.
UseSymbols: The default value for using symbol is “TRUE”. Change this to meet your organization’s requirements.
Symbols: The default list of symbols supported by the product is “@#$|{}^”. Change the symbol list to meet your organization’s requirements.
RepeatCharacters: The default value for repeating characters in the password is “TRUE”. Change this to meet your organization’s requirements.
ConsecutiveCharacters: The default value for consecutive characters in the password is “FALSE”. Change this to meet your organization’s requirements.
UseUserIdInPassword: The default value for using User Id in password is “FALSE”. Change this to meet your organization’s requirements.
UserUserNameInPassword: The default value for using user name in password is “FALSE”. Change this to meet your organization’s requirements.
10.Use the encryption utility to generate keys Section. Refer to EWAV Encryption Utility Help document for instructions on generating keys.
Figure 40: Generating the application encryption keys using EWAV Encryption utility for forms authentication application
Revision Date: 7/23/2014 2:13:00 PM Page 46 of 53

Epi Info™ Web Analytics and Visualization – Deployment Guide
11.Copy the section generated in the Output text box by clicking the copy button highlighted in red below. Replace the section shown below found under “Encryption Keys” in your web.config file with your copied text.
Figure 41: Copying the keys section to update the keys section in the provided web.config file for forms authentication application
<!-- Encryption keys --> <!-- Created 1/17/2014 1:27 PM by user01 --> <!-- GUID: 23F0A40D-30E2-45BE-B491-996317EA9163 --> <!-- WARNING: --> <!-- Once users, datasources or connection strings have been added to the database these keys *cannot* be modified. --> <!-- If these keys are modified all existing encrypted data will be invalid. --> <!-- WARNING: --> <add key="KeyForUserPasswordSalt" value="sLFoRFyKLCT49hjwj0N4XifzYtkQrDdBO0gbuGRuGRRegQYv4EydWV5Q5yGV0ECoTYoq5a0UbbRIh81xQbDuQWjYf6Vk4gLg/1dQCuutN9iVtDZQbe8dlJL0aAhLbFantM013g==" /> <add key="KeyForConnectionStringPassphrase" value="atKjwl1YhPv94716lQ8aEophUSm2mz+9VkMzDgzRgscoPsRYJ2/vRs7eJTf43X6r/PiBQS2Pb99lzoA0DAVxfmwToq1QXDgovFCZP+axtINlw9vbidyz9cG0Ty3LNjxCYuMoIw==" /> <add key="KeyForConnectionStringSalt" value="LwKTr/KY9ILBwtIDVIvrO9zwXx1f101FiUMgwTti82LCY0Erdrrdu45vaVQntXe6kD0JjK1RXkLL8HdmuzPSEYsvtIKDJQ8SGdAtzHWpYrpkdXmcd5bi/pLO4UdL1H3f2ZfpZg==" /> <add key="KeyForConnectionStringVector" value="Z5AIQts7a6hFewK/" />
NOTE: The keys are the most critical piece of the system. Please make up an archive of these keys and save it in a safe location, in case they are lost/changed/updated in web.config file by mistake.
Revision Date: 7/23/2014 2:13:00 PM Page 47 of 53

Epi Info™ Web Analytics and Visualization – Deployment Guide
12.Create a MetaDataConnectionString for the type of database you are using by replacing the section highlighted in yellow, in the plain text connections string.
a. SQL Server
Data Source= DATABASE_SERVER_NAME;Initial Catalog= DATABASE_NAME;Persist Security Info=True;User ID= APPLICATION_ACCOUNT;Password= PASSWORD_FOR_ACCOUNT
b. MySQLServer= DATABASE_SERVER_NAME; Port=3306 ;Database= DATABASE_NAME;Uid= APPLICATION_ACCOUNT;Pwd= PASSWORD_FOR_ACCOUNT;
c. PostGreSql Server= DATABASE_SERVER_NAME;Port=5433;Database= DATABASE_NAME;User Id= APPLICATION_ACCOUNT;Password= PASSWORD_FOR_ACCOUNT;
Below is an example of connection string for SQL Server after removing the sections marked in yellow.
Revision Date: 7/23/2014 2:13:00 PM Page 48 of 53

Epi Info™ Web Analytics and Visualization – Deployment Guide
Data Source=SQLServer;Initial Catalog=EWAV;Persist Security Info=True;User ID=ewav_appuser;Password=P@ssW0rD
13.Use the encryption utility to encrypt the values of the MetaDataConnectionString created in the step above using the encryption keys generated above. The encryption keys should still be available in the utility if you have not closed it. In case you have closed the utility, refer to EWAV Encryption Utility document on how to retrieve the keys.
Figure 42: Encrypting connection string using EWAV Encryption utility for forms authentication application
14.EWAV uses the Microsoft Bing Maps API in its Case Cluster Map gadget. You must create a unique key for your web server on Microsoft’s Bing Maps portal page here: http://www.bingmapsportal.com/. A Microsoft account is required to use the portal page. If you do not have a Microsoft account you will be prompted to register for one.
Once you have created a key for the Bing Maps API the web.config must be updated with this entry: <add key="KeyForBingMaps" value="(Your key goes here)" />
Revision Date: 7/23/2014 2:13:00 PM Page 49 of 53

Epi Info™ Web Analytics and Visualization – Deployment Guide
3.4.2.3 Starting the System To start the system, perform following steps:
1. Navigate to system’s URL: http://<SERVER_NAME>/EWAV/Ewav.aspx
2. Click on Forgot password (only for Forms authentication application)
3. Enter the email address which was given during the time of running the initial scripts on the database (only for Forms authentication application)
4. An email will be sent out with temporary password (only for Forms authentication application)
5. Log in using the temporary password and reset your password (only for Forms authentication application)
6. Navigate to Admin tab.
7. Create organization if needed.
8. Create Users/Admins on the current organization.
9. Create at least one data source.
10.Navigate back to dashboard screen.
11.Set a data source.
12.Start adding gadgets.
Revision Date: 7/23/2014 2:13:00 PM Page 50 of 53

Epi Info™ Web Analytics and Visualization – Deployment Guide
APPENDIX A: REFERENCESThe following table summarizes the documents referenced in this document.
Document Name and Version
Description Location
EWAV Admin Help
This document describes the Epi Info™ Web Analytics & Visualization tool.
/Ewav/Documents
Revision Date: 7/23/2014 2:13:00 PM Page 51 of 53

Epi Info™ Web Analytics and Visualization – Deployment Guide
APPENDIX B: Table of Figures
Figure 1: Overview of Epi Info™ Web Analytics & Visualization..................................................................7Figure 2: Intranet Configuration..................................................................................................................8Figure 3: Internet Configuration..................................................................................................................9Figure 4: File system showing components in the EWAV Package............................................................10Figure 5: File menu to open the database script file for SQL Server..........................................................11Figure 6: Open File dialog showing the available script for SQL Server.....................................................12Figure 7: Snapshot of a portion of 01CreateSchema script for SQL Server................................................12Figure 8: Snapshot of a portion of 02CreateUserAndRoles script for SQL Server......................................13Figure 9: Snapshot of a portion 03InsertInitialRecord script for SQL Server..............................................14Figure 10: Snapshot of a portion 04InsertIntoUserOrganization script for SQL Server..............................15Figure11: File menu to open the database script file for MySQL...............................................................17Figure 12: Open File dialog showing the available script for MySQL.........................................................18Figure 13: Snapshot showing portion of 01CreateSchema script for MySQL.............................................19Figure 14: Snapshot showing portion of 02CreateUserAndRoles script for MySQL...................................19Figure 15: Snapshot showing portion of 03InsertInitialRecord script for MySQL......................................21Figure 16: Snapshot showing portion of 04InsertInitialRecord script for MySQL......................................22Figure 17: Create new database context menu for PostgreSQL................................................................24Figure 18: Create new database dialog for PostgreSQL.............................................................................25Figure 19: Confirmation of EWAV database creation in PostgreSQL.........................................................26Figure 20: SQL Editor windows for PostgreSQL.........................................................................................26Figure 21: File menu to open the database script file for PostgreSQL.......................................................27Figure 22: Open File dialog showing the available script for PostgreSQL..................................................27Figure 23: Snapshot showing portion of 01CreateScheam script for PostgreSQL......................................28Figure 24: Snapshot showing portion of 02CreateUserAndRoles script for PostgreSQL............................29Figure 25: Snapshot showing portion of 03InsertInitialRecord script for PostgreSQL...............................30Figure 26: Snapshot showing portion of 04InsertIntoUserOrganization script for PostgreSQL.................31a. Figure 27: Application pool configured using .NET 4.0......................................................................34Figure 28: Application pool properties for windows authentication site..................................................34Figure 29: Setting Identity value for windows authentication application................................................35Figure 30: Choosing authentication setting...............................................................................................36Figure 31: Enabling windows authentication setting.................................................................................36Figure 32: Confirming enabled and disabled authentication types...........................................................37Figure 33: Web.config file for an integrated application under the file system of the web server............37Figure 34: Generating the application encryption keys using EWAV Encryption utility for windows authentication application.........................................................................................................................40Figure 35: Copying the keys section to update the keys section in the provided web.config file for windows authentication application.........................................................................................................40
Revision Date: 7/23/2014 2:13:00 PM Page 52 of 53

Epi Info™ Web Analytics and Visualization – Deployment Guide
Figure 36: Encrypting connection string using EWAV Encryption utility for windows authentication application.................................................................................................................................................42Figure 37: Application pool configured using .NET 4.0..............................................................................44Figure 38: Application configured with Anonymous Authentication Enabled...........................................44Figure 39: Web.config file for a forms authentication application............................................................44Figure 40: Generating the application encryption keys using EWAV Encryption utility for forms authentication application.........................................................................................................................46Figure 41: Copying the keys section to update the keys section in the provided web.config file for forms authentication application.........................................................................................................................47Figure 42: Encrypting connection string using EWAV Encryption utility for forms authentication application.................................................................................................................................................49
Revision Date: 7/23/2014 2:13:00 PM Page 53 of 53