instructions for use read this booklet before use!
TRANSCRIPT

TX-4 / XD4 / VX-3 / VX-PRO3
INSTRUCTIONS FOR USE READ THIS BOOKLET BEFORE USE!

English
CONTENTS
To open/close shield ................................................................................4(TX-4/XD4)
To operate browvents ..............................................................................4(TX-4/XD4)
To adjust peak angle ................................................................................6To operate mouthvent ..............................................................................6(TX-4/XD4)
To operate top vents ................................................................................8
To operate airflow spoiler ......................................................................8(TX-4/XD4)
To remove/replace face shield/peak .........................................................10(TX-4/XD4)
To remove/replace diffusers ...................................................................12
To remove/replace cheekpads ...............................................................16To remove/replace comfort lining ...........................................................20To remove/replace chinstrap covers .......................................................22

English
TO OPEN/CLOSE SHIELDTX-4 / XD4Pull the shield latch tab on lower left side of the shield outward to release latch system and then raise the shield. To close the shield, push down the shield until the shield latch tab fully latches into place.
Apply one or two drops of supplied silicone lubricant around the edge trim and on other moving parts and wipe off with soft tissue paper to maintain proper operation.
WARNING: If your shield becomes too scratched or uncleanable, replace it with a new one. Impaired visibility causes accidents. Use a solution of mild soap or detergent and lukewarm water to clean your shield. Rinse well with clean water, and wipe off with a soft cloth. Never use petrol, thinner, benzene or any other solvents. There are many “aggressive” cleaners on the market, including some supposed to be specifically for use on shield. Arai strongly recommends that you do not use any such products to clean your shield as some of their ingredients may have damaging effects on the shield and other plastic parts installed on your helmet. Do not apply stickers or adhesive tape to the shield, as this will weaken the hard coating. If tinted, the shield is for daylight use only.
TO OPERATE BROWVENTSTX-4 / XD4The Browvents are operated from fully closed through intermediate, to fully open positions by simply pulling the vent control down to open, pushing up to close.
English
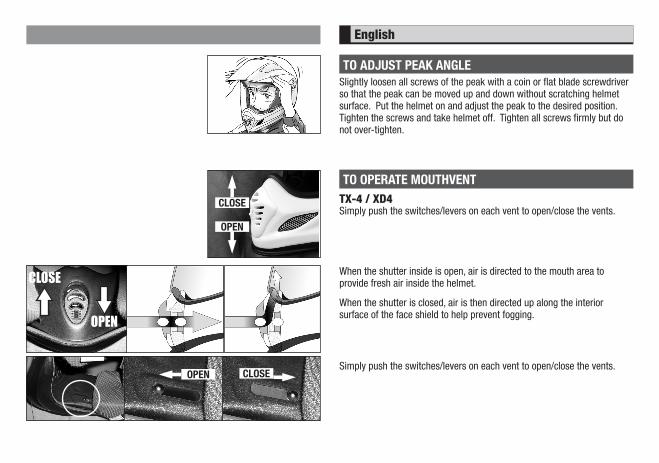
TO ADJUST PEAK ANGLESlightly loosen all screws of the peak with a coin or flat blade screwdriver so that the peak can be moved up and down without scratching helmet surface. Put the helmet on and adjust the peak to the desired position. Tighten the screws and take helmet off. Tighten all screws firmly but do not over-tighten.
TO OPERATE MOUTHVENTTX-4 / XD4Simply push the switches/levers on each vent to open/close the vents.
When the shutter inside is open, air is directed to the mouth area to provide fresh air inside the helmet.
When the shutter is closed, air is then directed up along the interior surface of the face shield to help prevent fogging.
Simply push the switches/levers on each vent to open/close the vents.
OPEN
CLOSE
OPEN CLOSE
OPEN
CLOSE

English
TO OPERATE TOP VENTSSimply push/slide the switch/lever on each duct to open/close the ducts as illustrated.
WARNING: Never attempt to adjust ventilation ducts when in motion riding your motorcycle.
TO OPERATE AIRFLOW SPOILERTX-4 / XD4To deploy the spoiler in the down position, simply pull it down by grasping the center of its chin curtain.
To retract, the spoiler, simply push it up with the heel of your hand.
LEFT (CLUTCH SIDE)
OPENCLOSE
RIGHT (THROTTLE SIDE)
INTERMEDIATE INTERMEDIATECLOSE OPEN
OPENCLOSE

English
TO REMOVE/REPLACE FACE SHIELD/PEAKTX-4 / XD4To remove shield/peak, remove the two screws from each side of the peak with flat blade screwdriver or coin. Remove the pressure plate from each side of the peak. The shield/peak can now be removed.
The black spring clip on each side may be removed for cleaning but please note that they can only be reinstalled properly in one direction. Do not remove the base plates from the helmet.
To replace shield/peak, place the black spring clip on the base plate on each side as illustrated (pay attention to the proper direction).
Place the shield on the helmet in the fully closed position, as illustrated, and place the peak so that the two screw holes line up ensuring the two pins of the base plate are in the lower screw hole of the peak, as illustrated.
Place the pressure plate on the peak (note that the L & R embossed on the plate indicate Left and Right on the helmet when the helmet is worn) and install the two screws through each pressure plate into the helmet and tighten with flat blade screwdriver or coin. Do not over-tighten. Work the shield up and down to check the operation.
LEFT RIGHT
English
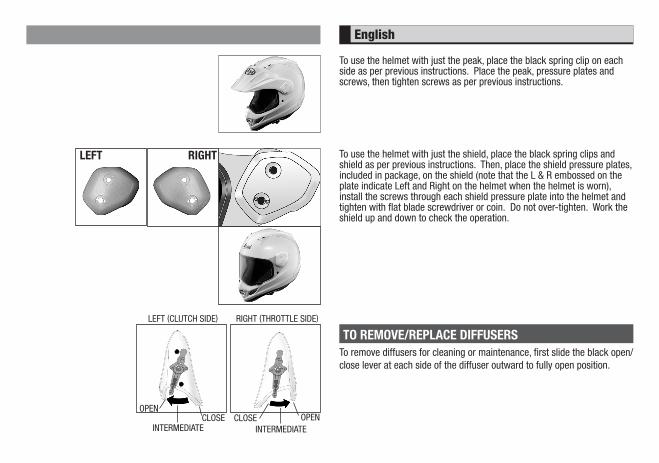
To use the helmet with just the peak, place the black spring clip on each side as per previous instructions. Place the peak, pressure plates and screws, then tighten screws as per previous instructions.
To use the helmet with just the shield, place the black spring clips and shield as per previous instructions. Then, place the shield pressure plates, included in package, on the shield (note that the L & R embossed on the plate indicate Left and Right on the helmet when the helmet is worn), install the screws through each shield pressure plate into the helmet and tighten with flat blade screwdriver or coin. Do not over-tighten. Work the shield up and down to check the operation.
TO REMOVE/REPLACE DIFFUSERSTo remove diffusers for cleaning or maintenance, first slide the black open/close lever at each side of the diffuser outward to fully open position.
LEFT RIGHT
LEFT (CLUTCH SIDE)
OPENCLOSE
RIGHT (THROTTLE SIDE)
INTERMEDIATE INTERMEDIATECLOSE OPEN

English
Then slide the red lock lever at each side of the diffuser inward to release lock system.
Finally slide back the black open/close lever inward to intermediate position, and pull the black lever down/backwards to remove the diffuser on each side.
To replace diffusers, place diffuser on helmet (contour of each diffuser will match the recess of the helmet shell) and push on the center of the diffuser until it snaps home. Repeat for the other side. Be sure the diffusers are fully secured to the helmet shell and the red lock levers are in the locked position.
NOTE: Do not use oils or waxes to lubricate vents or other moving parts. If you must lubricate such components, sparingly use the silicone lubricant supplied with your helmet for eyeport trim dressing.
LOCKED POSITION LOCKED POSITIONRELEASED POSITION RELEASED POSITION
LEFT(CLUTCH SIDE)
RIGHT(THROTTLE SIDE)

English
TO REMOVE/REPLACE CHEEKPADS
When first servicing the cheekpads, it is suggested that you do only one at a time so that the other can be used as reinstallation guide.
To remove cheekpads, first undo chinstrap. Pull pad toward the rear of the helmet, then inward to release and slide it off the strap.
To take off fabric covering for washing, peel the covering off until all the fabric is on the face side surface. Then draw the covering through the opening by grasping the rectangular collar and pulling.
TX-4 / XD4 cheekpad is equipped with a 5mm surface foam layer. The layer is removable to offer a bit more room if desired.
To wash fabric coverings, put them into lukewarm water with small amount of laundry soap or your own shampoo and wash gently by hand. Rinse well with fresh water and wipe off with a soft cloth. Dry them in the shade at ambient temperature.To replace fabric covering, ensure it is turned right side out, and stretch the covering over pad so that the label that says EMERGENCY TAB INSIDE sewn on the covering comes at the front bottom of the cheekpad assembly, and adjust the covering to lie smoothly. Be sure EMERGENCY TAB is covered by the fabric covering. Then push the rectangular collar through the pad assembly and adjust into final position.
WARNING: Do not leave the EMERGENCY TAB outside the fabric covering. The looped tab may be caught by projecting objects when riding.
English
ABOUT EMERGENCY TAB SYSTEM: The EMERGENCY TAB SYSTEM is to smoothly remove cheekpads that may be a hindrance when rescuers attempt to remove helmet from an inured helmet wearer. With the label that says EMERGENCY TAB INSIDE which is sewn on the fabric covering of the cheekpad at each side, rescuers can recognize that the helmet is equipped with the EMERGENCY TAB and can get access to the tab at each side by pulling up the label at the cheekpad covering and peeling the cover off to expose the EMERGENCY TAB which is then pulled downward to remove the cheekpad.
WARNING: Rescuers need to have sufficient knowledge and training about this system. The Emergency Tab may not always be an effective measure to securely remove cheekpads depending on circumstances of accident or condition of injured wearers.
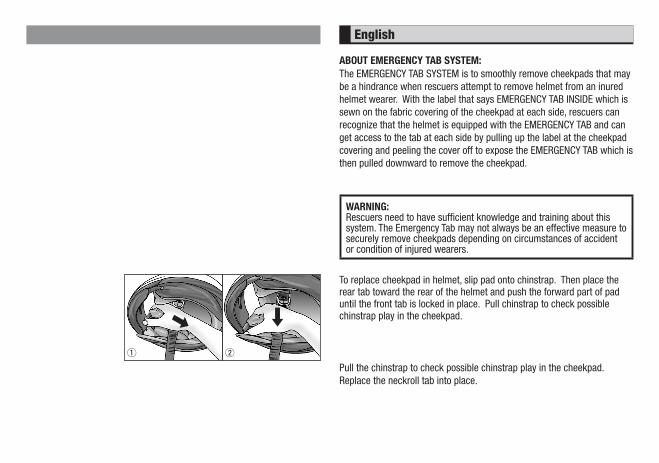
To replace cheekpad in helmet, slip pad onto chinstrap. Then place the rear tab toward the rear of the helmet and push the forward part of pad until the front tab is locked in place. Pull chinstrap to check possible chinstrap play in the cheekpad.
Pull the chinstrap to check possible chinstrap play in the cheekpad.Replace the neckroll tab into place.
q w

English
TO REMOVE/REPLACE COMFORT LININGThe comfort lining is secured to the helmet by plastic bosses.
To remove the lining, undo bosses by grasping the lining as close to each boss as possible and pulling straight up. Note the fore & back, top & bottom sides of the lining for replacement.
TX-4 / XD4 lining is equipped with removable temple pads to offer a bit more room if desired. To remove pads, open the pocket on each side of the lining and gently remove pad from the pocket. If you wish to replace them in the pockets, use double sided tape to fix them in place.
To wash the comfort lining, put it into lukewarm water with small amount of laundry soap or your own shampoo and wash gently by hand. Rinse well with fresh water and wipe off with a soft cloth. Dry it in the shade at ambient temperature.
WARNING: Never use petrol, thinner, benzene or any other solvents.
To replace the lining, place the bosses over their plastic receptacles and push them home.
WARNING: When reinstalling the comfort lining, be sure the lining is properly positioned along the inside shape of the EPS (a.k.a. Styrofoam) liner. If the comfort lining is not properly installed, the frame of the comfort lining may fold when you put on and take off the helmet, which may injure your skin, etc. Whenever you feel something is wrong with the comfort lining, check that the lining is properly installed.

English
TO REMOVE/REPLACE CHINSTRAP COVERSTo remove the chinstrap covers, first remove the cheekpads as per previous instructions.
Remove the plastic chinstrap anchor cover from the steel chinstrap anchor and slide the cover off the chinstrap.
Note the right and left, inside and outside of the chinstrap covers for replacement.
To wash the chinstrap covers, put them into lukewarm water with small amount of laundry soap or your own shampoo and wash gently by hand. Rinse well with fresh water and wipe off with a soft cloth. Dry them in the shade at ambient temperature.
WARNING: Never use petrol, thinner, benzene or any other solvents.
Left chinstrap cover (D-ring side) Couvercle gauche de la jugulaire (côté anneau en forme de D) Linke Kinnriemenabdeckung (D-Ring-Seite)
Right chinstrap cover (long side) Couvercle droit de la jugulaire (côté long)
Rechte Kinnriemenabdeckung (lange Seite)

English
To replace the left chinstrap cover (D-ring side), ensure the female chinstrap end snap side of the chinstrap and the leatherette side of the chinstrap cover both face outward, slip the chinstrap cover onto the chinstrap.
Position the plastic chinstrap anchor cover over the steel anchor and push the cover in the anchor until the tab on the back of the cover snaps fully home.
To replace the right chinstrap cover (long side), ensure the cap side of the chinstrap end snap (Arai logo impressed) on the chinstrap and the leatherette side of the chinstrap cover both face outward, slip the chinstrap cover onto the chinstrap.
Position the plastic chinstrap anchor cover over the steel anchor and push the cover in the anchor until the tab on the back of the cover snaps fully home

URL: http://www.arai.co.jpContact to
ARAI HELMET, LIMITED12 AZUMA-CHO, 2-CHOMEOMIYA, SAITAMA 330-0841
JAPAN
ARAI HELMET (AMERICAS), INC.P.O. BOX 787
ALLENTOWN, PA 18051-0787U.S.A.
ARAI HELMET (EUROPE), B.V.P.O. BOX 112
3870 CC HOEVELAKENTHE NETHERLANDS
Helmet Specifications subject to Change Without Notice.
Printed in Japan 2012_06 TX-4/XD4/VX-3/VX-PRO3 FUKUYAMA PRINTING CO.,LTD.