instructions for use aimovig (aim-oh-vig) (erenumab-aooe
TRANSCRIPT

1
Instructions for Use
AIMOVIG® (AIM-oh-vig) (erenumab-aooe)
Injection, For Subcutaneous Use
Single-Dose Prefilled SureClick® Autoinjector
140 mg/mL
Guide to parts
Before use
After use
Gray start
button
Expiration
Date
Expiration
Date
Window
Yellow
window
(injection
complete)
Medicine
Orange
cap on
Yellow
safety
guard
(needle
inside)
Yellow
safety
guard
(needle
inside)
Orange
cap off
Important: Needle is inside the yellow safety guard.

2
Important
Before you use AIMOVIG SureClick autoinjector, read this important
information:
Storing your AIMOVIG SureClick autoinjector
Keep the autoinjector out of the reach of children.
Keep the autoinjector in the original carton to protect from light.
The autoinjector should be kept in the refrigerator at 36°F to 46°F (2°C to 8°C).
After removing AIMOVIG from the refrigerator, it can be stored at room
temperature between 68°F to 77°F (20°C to 25°C) for up to 7 days.
Throw away AIMOVIG that has been left at room temperature for more than
7 days.
Do not freeze.
Using your AIMOVIG SureClick autoinjector
The needle shield within the orange cap of the AIMOVIG autoinjector contains dry
natural rubber, which is made from latex. Tell your healthcare provider if you are
allergic to latex.
It is important that you do not try to give the injection unless you or your
caregiver has received training from your healthcare provider.
Do not use the autoinjector after the expiration date on the label.
Do not shake the autoinjector.
Do not remove the orange cap from the autoinjector until you are ready to
inject.
Do not freeze or use the autoinjector if it has been frozen.
Do not use the autoinjector if it has been dropped on a hard surface. Part of the
autoinjector may be broken even if you cannot see the break. Use a new
autoinjector, and call 1-800-77-AMGEN (1-800-772-6436).
Step 1: Prepare
AIMOVIG comes as a single-dose (1 time) prefilled autoinjector. Your healthcare
provider will prescribe the dose that is best for you.
Before you inject, always check the label of your single-dose prefilled autoinjector to
make sure you have the correct medicine and the correct dose of AIMOVIG.
A Remove autoinjector from the carton.
Carefully lift the autoinjector straight up out of the carton.
Leave the autoinjector at room temperature for at least 30 minutes before injecting.
Do not put the autoinjector back in the refrigerator after it has reached room
temperature.
Do not try to warm the autoinjector by using a heat source such as hot water or
microwave.
Do not leave the autoinjector in direct sunlight.
Do not shake the autoinjector.
Do not remove the orange cap from the autoinjector yet.

3
B Inspect the autoinjector.
Yellow safety guard (needle inside)
Orange cap on Window Medicine
Make sure the medicine in the window is clear and colorless to slightly
yellow.
Do not use the autoinjector if the medicine is cloudy or discolored or contains
flakes or particles.
Do not use the autoinjector if any part appears cracked or broken.
Do not use the autoinjector if the autoinjector has been dropped.
Do not use the autoinjector if the orange cap is missing or not securely attached.
Do not use the autoinjector if the expiration date printed on the label has
passed.
In all cases, use a new autoinjector, and call 1-800-77-AMGEN (1-800-772-6436).
C Gather all materials needed for your injection.
Wash your hands thoroughly with soap and water.
On a clean, well-lit work surface, place the:
New autoinjector
Alcohol wipes
Cotton balls or gauze pads
Adhesive bandages
Sharps disposal container (See “Step 4: Finish”)

4
D Prepare and clean your injection site.
Only use these injection sites:
Your thigh
Stomach area (abdomen), except for a two inch area right around your navel
Outer area of upper arm (only if someone else is giving you the injection)
Clean your injection site with an alcohol wipe. Let your skin dry.
Do not touch this area again before injecting.
Do not inject into areas where the skin is tender, bruised, red, or hard.
Avoid injecting directly into raised, thick, red, or scaly skin patch or lesion, or
areas with scars or stretch marks.
Upper arm
Stomach area
(abdomen)
Thigh
Step 2: Get ready
E Pull the orange cap straight off, only when you are ready to inject. Do not leave
the orange cap off for more than five minutes. This can dry out the medicine.
5 minutes
Orange cap
It is normal to see a drop of liquid at the end of the needle or yellow safety guard.
Do not twist or bend the orange cap.
Do not put the orange cap back onto the autoinjector.
Do not put fingers into the yellow safety guard.
Do not remove the orange cap from the autoinjector until you are ready to
inject.
F Create a firm surface at the selected injection site (thigh, stomach, or outer areas
of the upper arm), by using either the Stretch method or the Pinch method.
5
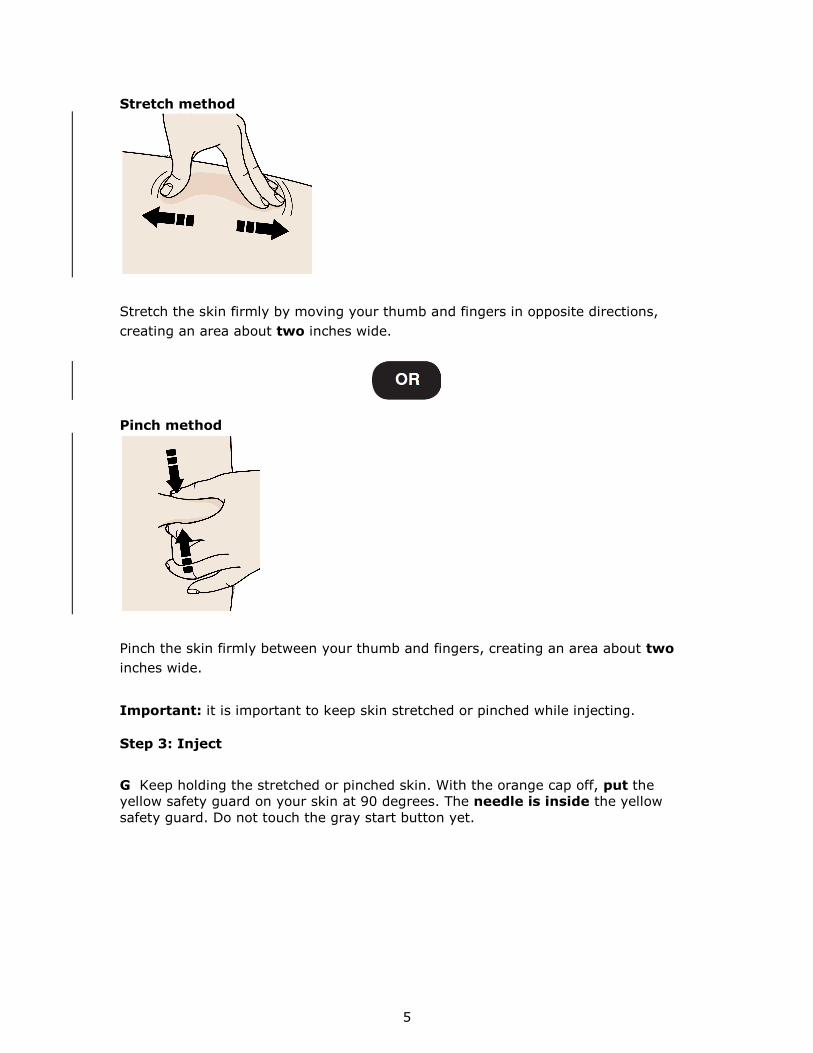
Stretch method
Stretch the skin firmly by moving your thumb and fingers in opposite directions,
creating an area about two inches wide.
Pinch method
Pinch the skin firmly between your thumb and fingers, creating an area about two
inches wide.
Important: it is important to keep skin stretched or pinched while injecting.
Step 3: Inject
G Keep holding the stretched or pinched skin. With the orange cap off, put the
yellow safety guard on your skin at 90 degrees. The needle is inside the yellow
safety guard. Do not touch the gray start button yet.

6
Yellow safety
guard (needle
inside)
H Firmly push the autoinjector down onto skin until the autoinjector stops moving.
Important: You must push all the way down but do not touch the gray start button
until you are ready to inject.
I When you are ready to inject, press the gray start button. You will hear a click.
“click”

7
J Keep pushing down on your skin. Then lift your thumb while still holding the
autoinjector on your skin. Your injection could take about 15 seconds.
“click”
15 seconds
Window turns from clear to
yellow
when injection is done. You
may hear a second click
Note: After you remove the autoinjector from your
skin, the needle will be automatically covered.
Important: When you remove the autoinjector, if the window has not turned yellow,
or if it looks like the medicine is still injecting, this means you have not received a
full dose. Call your healthcare provider immediately.
Step 4: Finish
K Discard the used autoinjector and the orange cap.
Put the used AIMOVIG autoinjector and orange cap in a FDA-cleared sharps disposal
container right away after use. Do not throw away (dispose of) the SureClick
autoinjector in your household trash.

8
If you do not have a FDA-cleared sharps disposal container, you may use a
household container that is:
Made of a heavy-duty plastic
Can be closed with a tight-fitting, puncture-resistant lid, without sharps being
able to come out
Upright and stable during use
Leak-resistant
Properly labeled to warn of hazardous waste inside the container
When your sharps disposal container is almost full, you will need to follow your
community guidelines for the right way to dispose of your sharps disposal container.
There may be state or local laws about how you should throw away used needles and
syringes. For more information about safe sharps disposal, and for specific
information about sharps disposal in the state that you live in, go to the FDA’s
website at: http://www.fda.gov/safesharpsdisposal
Do not reuse the autoinjector.
Do not recycle the autoinjector or sharps disposal container or throw them
into household trash.
Important: Always keep the sharps disposal container out of the reach of children.
L Examine the injection site.
If there is blood, press a cotton ball or gauze pad on your injection site. Do not rub
the injection site. Apply an adhesive bandage if needed.
Commonly asked questions
What will happen if I press the gray start button before I am ready to do the
injection on my skin?
Even when you press the gray start button, the injection will only happen when the
yellow safety guard is also pushed into the autoinjector.
Can I move the autoinjector around on my skin while I am choosing an
injection site?
It is okay to move the autoinjector around on the injection site as long as you do
not press the gray start button. However, if you press the gray start button and
the yellow safety guard is pushed into the autoinjector, the injection will begin.
Can I release the gray start button after I start my injection?
You can release the gray start button, but continue to hold the autoinjector firmly
against your skin during the injection.
Will the gray start button pop up after I release my thumb?
The gray start button may not pop up after you release your thumb if you held your
thumb down during the injection. This is okay.
What do I do if I did not hear a click after pushing the device down on my
skin for 15 seconds?
If you did not hear a click, you can confirm a complete injection by checking that the
window has turned yellow.

9
Whom do I contact if I need help with the autoinjector or my injection?
If you need more information or help, visit www.aimovig.com or call
1-800-77-AMGEN (1-800-772-6436).
This Instructions for Use has been approved by the U.S. Food and Drug
Administration.
AIMOVIG® (erenumab-aooe)
Manufactured by:
Amgen Inc.
One Amgen Center Drive
Thousand Oaks, CA 91320-1799 USA
U.S. License No. 1080
Marketed by:
Amgen Inc. (Thousand Oaks, CA 91320), and
Novartis Pharmaceuticals Corporation (East Hanover, NJ 07936)
© 2019-2021 Amgen Inc. All rights reserved.
<partnumber> Revised: 02/2021 v3
Symbol table
This
product contains
dry natural rubber
Do not
reuse
CAUTION, Prior to use,
read the enclosed
Instructions For Use for
administration information
and see package insert
for full Prescribing Information
Lot number