instructions for tying knots - bchi for tying knots.pdf · 4) then put a slipknot 8” from the...
TRANSCRIPT

Instructions for tying knots
Slip Knot (Fig. #2) – 1) Start with a loop (Fig. #1).
2) Reach thru the loop and pull the loose end of the rope back thru loop.
Square Knot (Fig. #4) – 1) Start with an overhand knot (Fig. #3).
2) Tie another overhand knot with the loose ends Be sure to cross the ropes over
the opposite direction to the first knot or you will have a Granny knot instead
of a Square Knot.
Clove Hitch (Fig. #7) – 1) Start with two loops (Fig. #5).
2) Move the top loop underneath the bottom loop (Fig. #6).
3) Put it over a post.
Tautline Hitch (Fig. #10) –
1) Begin with three loops (Fig. #8).
2) Move the top two loops underneath the bottom loop (Fig. #9).
3) Put it over a post.
Easy Bowline (Fig. #12) – 1) Start with a Slip Knot (Fig. #2).
2) Insert the free end thru the loop (Fig. #11).
3) Pull the Slip Knot tight (Fig. #12).
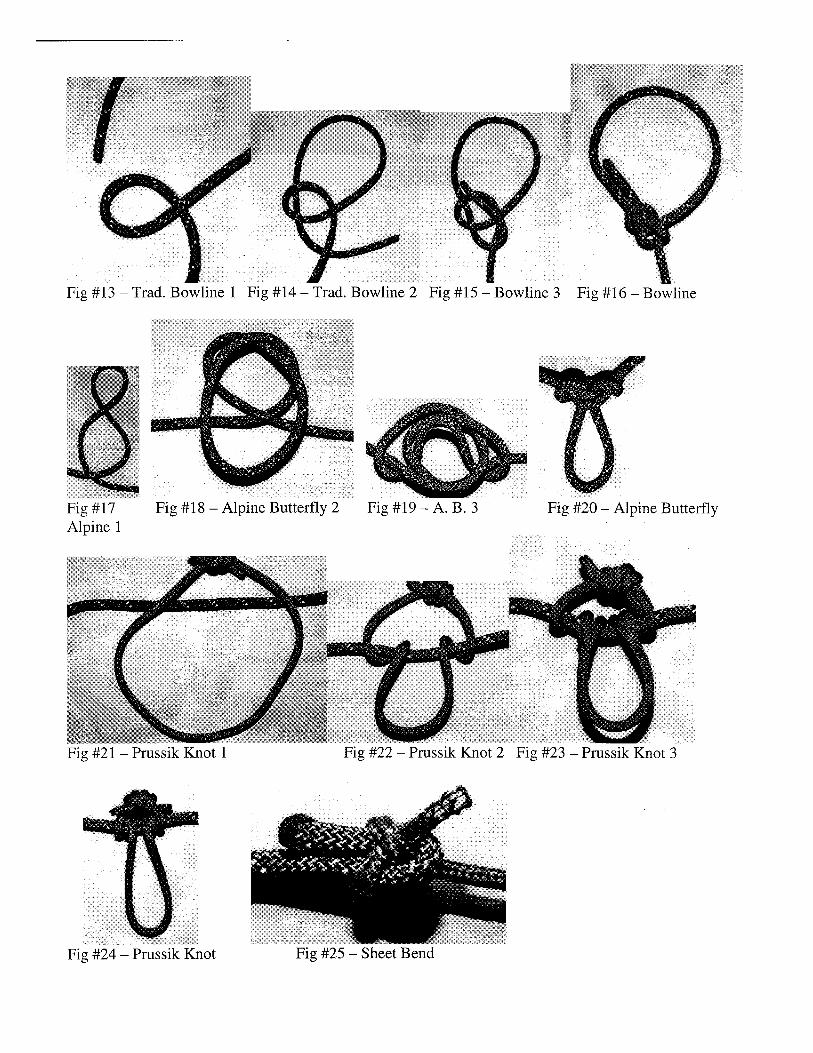
Traditional Bowline (Fig. #16) –
1) Start with a loop (Fig. #1)
2) Bring the loose end up thru the opening and under the long end of the rope
(Fig. #14).
3) Put the loose end back thru the opening (Fig. #15).
4) Tighten (Fig. #16).
Alpine Butterfly (Fig. #20) – 1) Twist the rope to form a “figure 8” (Fig. #17).
2) Next, grab the top of the “8” and fold it over the bottom of the “8” (Fig. #18).
3) Continue with the top of the “8” and put it thru the opening that was the lower
half of the “8” (Fig. #19).
4) Pull it tight (Fig. #20).
Prussik Knot (Fig. #24) –
1) Start with a circle of rope lying on top of your highline (Fig. #21).
2) Take the bottom of the circle and bring it under the highline and thru the
opening between the top of the circle and the highline (Fig. #22).
3) Repeat step 2 (Fig. #23).
4) Pull tight (Fig. #24).
Bank Robber’s Hitch (Fig. #28) – 1) Grab the end of the rope and loop it back about 8 inches, and put it over the tie
rail (Fig. #26).
2) Pull the doubled end up between the other two ropes and bring the loose end
under the doubled end and the standing end of the rope (Fig. #27).
3) Put a “quick release” loop thru the doubled end loop and tighten (Fig. #28).
Mooring Hitch (Fig. #30) –
1) Bring the loose end of the rope up over the tie rail and form a loop over the
standing end of the rope (Fig. #29).
2) Reach thru this loop and grab the standing end of the rope. Pull a loop up thru
the first loop (Fig. #29).
3) Put a “quick release” loop thru the second loop and tighten (Fig. #30).
Double Overhand (Fig. #34) – 1) Start with an Overhand Knot and bring the second rope in beside the rope on
the first knot (Fig. #31). Note: the second rope comes in and goes out of the
first knot right next to the rope of the first knot.
2) Next, take the loose end of the rope and go over the crossed ropes of the first
knot and down behind the other ropes (Fig. #32).
3) Then bring the loose end up and between the other two ropes, into the first knot
and out of the first knot next to the rope of the first knot (Fig. #33).
4) Arrange and tighten (Fig. #34).
Halter – 1) Start with a 23’ piece of rope.
2) Put an overhand knot at 42”. Then 8” farther and tie a loop 8” farther. Then
another overhand knot 6” farther. Another 10” farther.
3) Then tie this rope in with the earlier knot and come out and tie a double
overhand knot (Fig. #35).
4) Then put a slipknot 8” from the large loop and turn it into a double overhand
knot.
5) Run the end of the rope back to the noseband knots and make double overhand
knots out of them (Fig. #36).
6) Then take the end of the rope and run it back to the first overhand knot making
a double overhand knot out of it.