instructions for setting up the network connection with
TRANSCRIPT

Instructions for setting up the network connection with
DHCP in the studNET of Studentenwerk Leipzig
as of August 1st 2021
Content
1. Quick Start / General ............................................................ 4
2. Windows 10 .......................................................................... 4
3. Ubuntu Linux ........................................................................ 9
4. macOS ............................................................................... 11
5. Use of Routers / WLAN ...................................................... 14
6. Common mistakes .............................................................. 14
studNET website: https://www.studentenwerk-leipzig.de/wohnen/studnet
studNET helpdesk:
https://studnet.studentenwerk-leipzig.de

2
Dear Tenant,
This user manual will help you to configure your network access in your
room. Please read the instruction for your operating system carefully. If
problems occur during the configuration, please read first our
troubleshooting tips at the end of this booklet. Contact our system
administrator if the problem persists.
Please visit our website, where we publish current faults, planned
maintenance of our systems or changes in the office hours:
https://www.studentenwerk-leipzig.de/wohnen/studnet
For the connection between your PC or laptop and the data socket in your
room (in most cases this is the left connection), an Ethernet network cable
with RJ45 plug (see illustration) is needed. We recommend a cable of
category 5e or higher.
This cable may be purchased for a few euros
in any electronics or computer store. Once
you have the cable connected to your
computer, please follow the instructions for
setting up the network for your operating
system on the following pages.
To follow the instructions, you will also need
to have your personal access data. You have
received the data from your official in charge
for housing (Figure 1).
Ethernet network cable with RJ45 connector

3
Example network data:
Figure 1
4
1. Quick Start / General
Setting up the Internet connection, regardless of the operating system, consists of two steps:
1) Configuration of the network connection to automatically assign the
IP settings (DHCP).
2) Authentication at login server. For Windows operating systems, the
authentication will be achieved by using the studNET Login client,
which you can download from our website (only possible after you
have completed step 1). For Linux operating systems and macOS,
authentication will be established using the ssh command in a
terminal window. Use the connection data from your personal
data sheet (Figure 1).
In this booklet we have created exemplary instructions for three operating
systems. Please note that individual steps may vary for different versions of
operating systems.
2. Windows 10
Note: The figures and description refer to Windows 10. Windows 8 are very
similar and they differ only in details in our description. Please ensure that
your operating system has updated network drivers.
You will need administrator rights on your computer.
First, the network must be set up. Click with the right mouse button on the
network icon in the system tray (Figure 2).

5
Figure 2
Then select "Open Network and Internet settings" (Figure ).
Figure 3
Now select “Change adapter options” (Figure 4). In the list of network
connections, select the connection with which you have connected the cable
to the network socket in your room (Figure 5). The name of the connection
on your system may differ from the description in Figure 5. It is important that
you choose the connection, which is connected by cable to the data socket
in your room.
Figure 4

6
Figure 5
Click with the right mouse button on the connection and select "Properties"
(Figure 6).
Figure 6
7
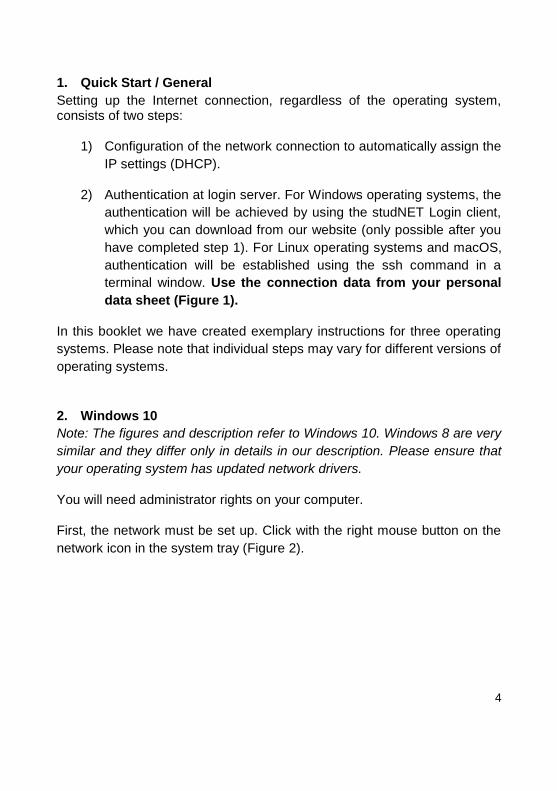
Then select "Internet Protocol Version 4" and "Properties" (Figure 7).
Figure 7

8
In the following window, select the points “Obtain an IP address
automatically” and “Obtain DNS server address automatically”. Confirm with
OK (Figure 8).
Figure 8
After the network is set up, you still need our studNET client to authenticate
to the login server. To do so, open a browser (e. g. Internet Explorer or
Firefox) and visit the following page:
https://www.studentenwerk-leipzig.de/studnet-client
Please note that only this page is unlocked for access without authentication!
Here you can download the studNET login client. Download and save this
file on your desktop. Execute the program and install it.
Now you can start the Login studNET client.

9
Enter your six digit tenant number (Mieternummer) and password in the
spaces provided and connect. You will find the data on your personal data
sheet (Figure 1).
The connection to the Internet is now set up and should work.
If you experience problems, please check again the details and read the
troubleshooting tips at the end of this booklet.
3. Ubuntu Linux
Please note: Depending on the version of the operating system, the
explained steps and figures might differ.
First, the network must be set up. Go to the System Settings and then
Network (Figure 9).
Figure 9
Then select the wired connection and click "Options" (Figure 10).

10
Figure 10
In this dialog (Figure 11), select "IPv4 settings". As "Method” select
"Automatic (DHCP)”. Confirm with "Save".
Figure 11
Now open a terminal window (Figure 12).

11
Figure 12
Type the following command in the terminal window:
(Instead of “tenant-number” write your personal six digit tenant number which
you find on your personal data sheet (Figure 1)).
During the first login the following message appears:
The authenticity of host '139.18.143.253' cannot be established.RSA (or ECDSA) key fingerprint is ……. Are you sure you want to continue connecting (yes / no)? Write ‘yes' and press "Enter."
You will next be prompted for your password. You find it on your personal
data sheet (Figure 1).
Here you need to enter your personal password. The password is case
sensitive and no signs will be displayed during typing on the terminal. If the
message below appears, the login was successful.
Hello <Mieternummer>. You are authenticated from host
"xxx.xxx..xxx.xxx" …
Now you are online.

12
Do not close the terminal. After a restart or the awakening of the computer,
you must log in again.
4. macOS
Please note: Depending on the version of the operating system, the
explained steps and figures might differ.
Click on the Apple menu. Then select "System Preferences" (Figure 13).
Figure 13
13
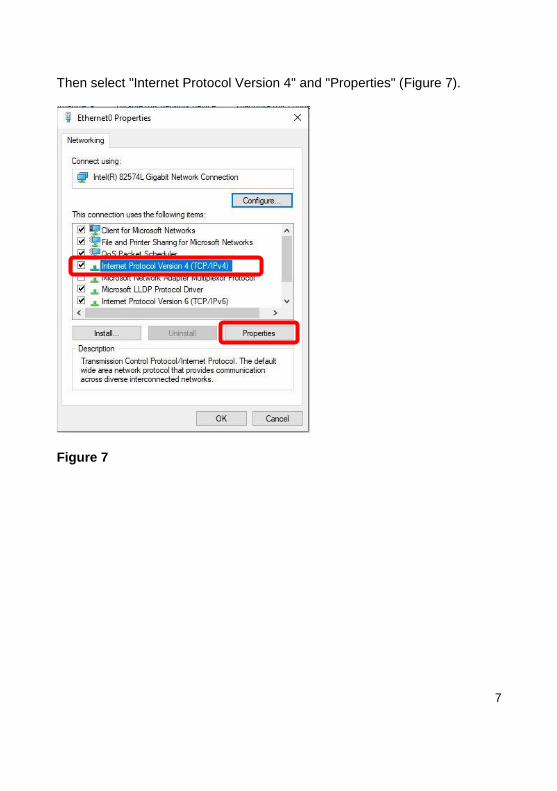
Figure 14
Then click the Network icon (Figure 14). Then, select the "Ethernet
connection" and in "Configure" please choose “Using DHCP” (Figure 15).
Confirm by clicking on “Apply”.

14
Figure 15
Now open a terminal window.
Type the following command in the terminal window:
(Instead of “tenant-number” write your personal six digit tenant number which
you find on your personal data sheet (Figure 1)).
During the first login the following message appears:
The authenticity of host '139.18.143.253' cannot be established. RSA (or ECDSA) key fingerprint is….. Are you sure you want to continue connecting (yes/no)? Write ‘yes' and press "Enter."
You will next be prompted for your password. You find it on your personal
data sheet (Figure 1).

15
Here you need to enter your personal password. The password is case
sensitive and no signs will be displayed during typing on the terminal. If the
message below appears, the login was successful.
Hello <tenant number>. You are authenticated from host
"xxx.xxx..xxx.xxx" …
Now you are online.
Do not close the terminal. After a restart or the awakening of the computer,
you must log in again.
5. Use of Routers / WLAN
We support exclusively setting up your studNET access based on a wired
direct connection to the network socket (LAN).
Yet you have the option of multiple devices (smartphone, tablet, laptop) to
connect via a wireless router with the studNET.
You can find an overview of the most important settings required on our
website at the following link:
https://www.studentenwerk-leipzig.de/wohnen/studnet
We provide for the configuration and use of your router no further advice or
technical support. The responsibility for all peripheral devices rests solely
with the user.
Please note also, that you are solely responsible for the security of your
router (insecure WLAN).
For any misuse of your connection, you can be held accountable.

16
6. Common mistakes
Before contacting our support team, please make sure that you have
checked the following steps:
1) You have your laptop / PC connected via cable directly to the data
jack in your room.
2) You have configured the network settings to DHCP functionality.
3) You have set the DHCP functionality on the correct network adapter
(not e. g. the wireless adapter).
4) You properly spelled the tenant number and password in the Login
studNET client.
5) You do not have defined a proxy server in your browser.

17

18

19

20
studNET helpdesk:
https://www.studnet.studentenwerk-leipzig.de As username type your six digit tenant number (Mieternummer) and your date of birth (ddmmyy), e.g.: date of birth: 02.11.1993 tenant number: 123456 username: 123456021193 The password is: studnet
Important: If possible, please add a screenshot (or text document) of your network settings (IP address / manual settings / Internet Protocol Version 4) of your LAN / ethernet adapter to your detailed problem description. Please provide us with specific information about your operating system and the type of network connection (cable / USB ethernet adapter / WLAN) as well as possible error messages.
studNET office: Hotline: 01761 / 96 59 818
Monday to Friday (except on public holidays): 8.30-9.30 a.m.
Office hours: at the student residence Straße des 18. Oktober 23, room 211 Tuesday 2.00-4.00 p.m.