instructions for making jewelry with
TRANSCRIPT

Instructions for Making Jewelry With
Bejeweled With Braille Bejeweled With Braille Bejeweled With Braille Bejeweled With Braille Bejeweled With Braille Bejeweled With Braille Bejeweled With Braille Bejeweled With Braille Bejeweled With Braille Bejeweled With Braille Bejeweled With Braille Bejeweled With Braille Bejeweled With Braille Bejeweled With Braille Bejeweled With Braille Bejeweled With Braille Bejeweled With Braille Bejeweled With Braille Bejeweled With Braille Bejeweled With Braille Bejeweled With Braille Bejeweled With Braille Bejeweled With Braille Bejeweled With Braille Bejeweled With Braille Bejeweled With Braille B R A I L L EB R A I L L E
B E A D SB E A D S


- I -
Bejeweled With Braille Instructions for Making Jewelry With Braille Beads
Copyright © 2014
All rights reserved. Except for use in a review, the reproduction or utilization of this work in any form or by any electronic, mechanical, or other means, now known or hereafter invented, including xerography, photocopying and recording, and in any information storage and retrieval system, is forbidden without the written permission of the publisher.
For information regarding permissions, write to:
American Printing House for the Blind, Inc. Resource Services
1839 Frankfort Avenue Louisville, KY 40206-0085
In keeping with our philosophy to provide access to information for people who are blind or visually impaired, the American Printing House for the Blind provides this book in large print and braille. The accompanying CD (attached to print book) contains HTML, BRF, DTB, and TXT files.
American Printing Housefor the Blind, Inc.
®

- II -
To order a set of replacement books (print and braille) through APH Customer Service, call 1-800-223-1839 and ask for Part Number 61-211-011.
This book is for use with Braille Beads: APH Starter Kit, Catalog 1-08879-00.
Printed in the United States of America
Project Leader: Tristan Pierce
Research Assistant: Monica Vaught-Compton
Art Director: Terri Gilmore
Design and Layout: Anthony Slowinski
Technical Research Division Manager: Frank Hayden
Manufacturing Specialist: Rod Dixon
Photography: InGrid Design

- III -
Bejeweled with Braille Table of Contents
Introduction......................................................................1
Message to the Reader.......................................................4
Chapter 1 Necklaces .................................................... 7
Chapter 2 Bracelets .................................................... 11
Chapter 3 Fobs .............................................................. 15
Chapter 4 Advanced Jewelry .................................... 17
References and Resources ........................................... 27

Men who have a pierced ear are better prepared for marriage; they’ve experienced pain and bought jewelry. ~ Rita Rudner, American
comedienne, writer, and actress

- 1 -
IntroductionThe history and culture of humankind are reflected in beads.
Beads are one of the oldest and most universal forms of art. Relics from ancient civilizations show that beads meant protection, were used as currency, reflected social status, and projected cultural trends.
Today, beads are still recognized as a symbol of social status and they reflect vast cultural connections. Not everyone can afford the cost of an emerald and sapphire beaded necklace. Beads—made from alabaster, amber, turquoise, and many other natural materials—are commonly used in Native American jewelry. Some of these beads are quite precious, such as those made with white turquoise (Sacred Buffalo Stone). White turquoise was discovered in 1993 on the Shoshone Indian Reservation, Nevada, at the Dry Creek turquoise mine. To date, this is the only place it is found.
It seems that it is our nature to adorn ourselves and our surroundings, to attach symbolization to that which we find, and to “celebrate the latest advance or discovery by drilling a hole in it and wearing it on a string” (Artbeads.com®, n.d., para 3).
White turquoise beaded necklace

- 2 -
The latest advance is Braille Beads, created by the American Printing House for the Blind (APH). APH’s Braille Beads are made from plastic. Each bead contains an incised print letter on
one side and the raised braille symbol on the other side. Each bead has two holes through which wire or cord is threaded. In March 2001, Tristan Pierce, APH Project Leader, attended the Overbrook School for the Blind Technology Conference.
While there, she visited the Overbrook art room and met with art teacher Lee Schultz. During this visit, the idea of braille beads emerged. For years, the cost of tooling and prototype production made Braille Beads unfathomable. In 2006, APH started looking into 3-D rapid prototyping technology. It was decided that Braille Beads would be a good product with which to test the technology.
In 2010, APH field tested the prototype Braille Beads. APH thanks the following agencies, staff, and students/clients who participated in the project.
• Columbia Lighthouse for the Blind & Visually Impaired, DC, MD, VA
• Georgetown Independent School District, TX
• Tennessee School for the Blind
• North Carolina Rehabilitation Center for the Blind
• Lighthouse for the Blind, Duluth, MN
• Jefferson County Public Schools, Louisville, KY
one side and the raised braille symbol on the other side. Each bead has two holes through which wire or cord is threaded. In March 2001, Tristan Pierce, APH Project Leader, attended the Overbrook School for the Blind Technology Conference.
While there, she visited the Overbrook art room
In 2010, APH field tested the prototype Braille Beads. APH

- 3 -
It can be argued that no one absolutely needs or must have braille beads with which to make jewelry. The same can be said about any beads—decorative or not. Making jewelry involves planning (a design), organizing the materials (wire, cord, needles, scissors), sorting (shape, size, color), and fine motor skills (stringing beads, tying knots, bending wire). It is an activity that children enjoy for arts and crafts, and an activity that adults enjoy for pleasure and employment. Several of these creative and artistic people handcraft braille beads. There are braille beads made from colorful glass and beads that are molded and/or stamped in metal. None of these are manufactured in a way that makes them affordable to a school, scout troop, or an arts and crafts club for youth. APH created Braille Beads so that children who have visual impairments or blindness can create personal objects of art, which they can wear. They can take pride in their creations; just by wearing their jewelry, they become community ambassadors, spreading the awareness and importance of braille.
and artistic people handcraft braille
are manufactured in a way that makes Two Sterling Silver
Braille Alphabet Bracelets created
by At First Sight

- 4 -
Message to the ReaderBraille Beads: APH Starter Kit includes the following items:
Instructions
• Bejeweled With Braille: Instructions for Making Braille Jewelry, Large Print
• Bejeweled With Braille: Instructions for Making Braille Jewelry, Braille
• Bejeweled With Braille: Instructions for Making Braille Jewelry, CD
Jewelry Findings
• Necklace, Bracelet, and Fob Assortment Pack
Beads
• Braille Beads Pack
• Pony Beads Pack
Clear adhesive braille labels
The Braille Beads Pack contains the following beads in each color:
A - 8B - 2C - 3D - 3 E - 8F - 2G - 2H - 6
I - 8J - 1K - 1L - 3M - 2N - 6O - 8P - 2
Q - 1R - 6S - 6T - 6U - 2V - 1W - 2 X - 1
Y - 2Z - 1Heart - 5Flower - 5Circle - 5Peace Symbol - 5Blanks - 10

- 5 -
Braille Beads are sorted by color and shipped in plastic bags. APH recommends that you only remove the amount of beads that you need for the piece of jewelry that you are making. This helps prevent beads from getting lost and colors mixed up. Each bead has an orientation mark on the bottom.
Your kit includes a sheet of adhesive braille labels. Place these labels on the Braille Bead and Pony bead bags to identify the various bead colors.
APH offers the Braille Beading Tray with Jars (Catalog #1-08877-00) as a separate product. The tray and jars keep the beads organized while beading and help prevent the misplacement of beads. The tray holds up to seven jars of Braille Beads. Each recessed circle that holds a jar of Braille Beads has a fluted space—directly in front of it—to hold the same color Pony beads. The tray has a workspace to lay the beads and to try different designs before stringing them onto a cord or wire. This workspace has a beading mat to minimize rolling of the Pony beads. A smaller space on the right holds jewelry findings or tools for cutting elastic or bending wires.

- 6 -
The Braille Beads for a necklace lie on the workspace of the APH Braille Beading Tray: They are ready to be strung onto the cord lying next to them. The tray holds seven full jars of Braille Beads, and the same colored Pony beads are displayed in the corresponding fluted spaces.
Safety Caution: Please note that Braille Beads and several of the findings included in the Braille Beads: APH Starter Kit carry a small parts warning and they may cause choking if swallowed. Braille Beads are not intended for children ages 5 and under without adult supervision.
Substitute items may be included in your kit due to the occasional unavailability of commercial items. Such items have been selected to serve a similar function.

- 7 -
Chapter 1Necklaces
Ball Chain NecklacePull the ball chain up and pop it out of the clasp. String the beads onto the chain. Place around neck and reattach clasp.
Tip: While beading, place a paper clip or binder clip on the other end to prevent
beads from sliding off.
Shown here is a silver ball chain necklace with a single black Braille Bead sandwiched between
two black Pony beads. It makes a simple, yet elegant statement.
Tip: While beading, place a paper clip or binder clip on the other end to prevent
beads from sliding off.
Shown here is a silver ball chain necklace with a single black Braille Bead sandwiched between

- 8 -
Pendant Cord NecklaceCut the cord to the desired length making sure it is long enough to place over the head once finished and tied off. String the desired beads and tie the two ends together with a knot.
Tip: Wrap a very small piece of masking tape around the end of the cord to create a stiff, needle-like end on the cord. Only wrap the tape around once or it will be too thick to slide through the Braille Bead holes.
A Halloween necklace has the word “boo” in black Braille Beads sandwiched between two sequences of orange, black, and white Pony beads followed by an orange circle shape Braille Bead (to represent a round pumpkin).
sandwiched between two sequences sandwiched between two sequences
Jewelry takes people’s minds off your wrinkles. ~ Sonja Henie, Norwegian
figure skater and film star

- 9 -
Adjustable Pendant Cord (Necklace to Choker)Use a slip knot to make an adjustable cord necklace. Follow the same instructions as described for the Pendant Cord Necklace, except cut the cord about 7 inches longer. Fold one of the cord ends 2 inches from the end. Place the other cord end inside the fold. Now tie a knot over the cord inside the fold. The cord on the inside of the fold will slide inside the knot. Now string a bead onto the sliding cord and then tie a knot at the end of the cord. You may need to tie a double knot to make sure the bead does not slip off. Grasp and pull the bead to shorten the necklace into a choker.
The alternating red and white bead choker shows school spirit. It reads “Go Cards.”

- 10 -
Twisted End Necklace Unscrew the end ball on the necklace wire and lay the ball where it will not roll away and can be found easily. String as many Pony beads and Braille Beads onto the necklace wire as desired. Tightly screw the end ball back on the necklace wire. Place the necklace around the neck and position the hook of the necklace wire over the necklace wire on the other side; then, pull back until the hook rests securely against the ball.
Alternating red and green Braille Beads spell “Merry Christmas.”
Unscrew the end ball on the necklace Unscrew the end ball on the necklace
and Braille Beads onto the necklace
Unscrew the end ball on the necklace
necklace wire over the necklace wire on the other side; then,
against the ball.
Braille Beads spell “Merry Christmas.”Braille Beads spell “Merry Christmas.”
Enlarged view of choker end ball and hook.

- 11 -
Chapter 2Bracelets
Gold Elastic Bracelet (two strands)Cut two strands of gold covered elastic long enough to go around the wrist with a minimum of 5 extra inches to tie off the bracelet. It is recommended to cut the cords longer than needed in case they need to be trimmed periodically due to fraying as you string the beads. (See tips below.) String the Braille Beads through the top hole of each bead. Place a paper clip at each end to prevent the beads from coming off the cord. String the second piece of cord through the bottom hole of each bead. Tie the ends of each cord together using a surgeon’s knot.
Tip 1: Smear a very thin coat of glue on the end of the freshly cut cord and let it dry before beading.
Tip 2: Wrap a very small piece of masking tape around the cord end to form a stiff probe to insert through the bead holes.
Tip 3: To tie a surgeon’s knot, bring the left elastic over and around the right elastic twice; pull to tighten. Bring the original right thread (now on the left) over and around the original left thread (now on the right) one time; pull hard to tighten. Many videos on the Internet
show how to tie a surgeon’s knot.
elastic over and around the right elastictwice; pull to tighten. Bring the original right thread (now on the left) over and around the original left thread (now on the right) one time; pull hard
Tip 3: To tie a surgeon’s knot, bring the leftelastic over and around the right elastic
Tip 3: To tie a surgeon’s knot, bring the leftelastic over and around the right elastic
right thread (now on the left) over and around the original left thread

- 12 -
This bracelet spells “Margaret” in pink Braille Beads and
alternates green and blue Pony beads between each Braille Bead. The gold elastic gives it a sparkle.
Twisted End Bracelets (Large and Small)Unscrew the end ball on the bracelet wire and lay the ball where it will not roll away and can be found easily. String a combination of Braille Beads and Pony beads onto the bracelet wire. When using a Braille Bead, only string the wire through the top hole of the Braille Bead. To secure the beads, screw the end ball back on the wire; twist tightly.
Enlarged view showing how to screw the end ball on the bracelet wire.
This bracelet spells “Margaret” in pink Braille Beads and
alternates green and blue Pony beads between each Braille
gives it a sparkle.
This bracelet spells “Margaret” in pink Braille Beads and
alternates green and blue Pony beads

- 13 -
This July 4th bracelet alternates red, white, and blue Pony beads on
the two sides. In the center of the bracelet, Braille Beads spell “I Love (heart symbol) USA.” The “I love” beads are red, and the “USA” beads are blue. Blank white Braille Beads
separate the words.
This Valentine bracelet alternates white Braille Beads with red Pony beads and reads, “I love (heart symbol) Harris.” The heart symbol is red with a white Pony bead on each side.
This July 4th bracelet alternates red, white, and blue Pony beads on
the two sides. In the center
white Braille Beads
This July 4th bracelet alternates red, white, and blue Pony beads on
the two sides. In the center

- 14 -
Not on one strand are all life’s jewels strung. ~ William Morris, English textile
designer, artist, and writer

- 15 -
Chapter 3Fobs
A fob is an ornament or seal attached to a chain, cord, or ribbon.
Cane FobCut a piece of black cord twice the length of the desired, finished fob. Fold it in half. Place the loop made at the halfway point behind one thickness of the cane’s elastic cord where it enters the cane handle. Hold it in place with your forefinger on the black cord and your thumb on the cane elastic cord. With your other hand, bring the two loose ends of the black cord forward, up and over your thumb, and through the loop. Pull until the cord is tight on your thumb. Remove your thumb and pull tightly again. You now have two cords hanging from your cane. Thread a selection of beads onto the cords. Both cords go through the single Pony bead hole. Thread one cord through the Braille Bead top hole and the other cord through the Braille Bead bottom hole. Tie off the end and trim the cord. For tassels, leave about 1 inch of cord and fray or unravel the ends.
This fob—attached to the cord of a cane—reads “Theo” in white Braille Beads. Before and after the name is a yellow and red Pony bead.

- 16 -
Key Chain FobYou can create a key chain fob the same way as a cane fob. Tie the black cord onto a round clip ring or split ring instead of the elastic cane holder. Follow the same directions detailed previously.
This key chain fob contains three Braille Beads: yellow peace symbol, blue initial “R,” and red heart symbol.
You can also create a simple key ring with just one or two Braille Beads. Pry apart one wire end on a split ring (key ring) and slide the single wire through the top Braille Bead hole. Continue to slide the bead along the ring until it is free of the double wire. This is a great way to put initials on your key ring. A key ring can also serve as a cane fob. To add more color, slide one Pony bead onto the ring, then the Braille Bead, and then one more Pony bead. Thicker split rings only have enough space to fit one Braille Bead within the single wire area. Thinner split rings can accommodate more Braille Beads.
This key ring has the yellow initial “H” sandwiched between two red Pony beads.
This key ring has the yellow initial “H” This key ring has the yellow initial “H” This key ring has the yellow initial “H”

- 17 -
Chapter 4Advanced Jewelry
The following jewelry is more challenging to make. The materials and tools required to make more advanced jewelry are not included in your APH Starter Kit. Much of it can be purchased at craft stores and bead stores. It takes more strength, patience, and practice to make the jewelry shown and described in this chapter than the jewelry in the previous chapters. Some pieces of jewelry require using a 3-in-1 combination tool for cutting wire and bending it into shapes. Other pieces require you to thread a needle with stretch floss and then tie a surgeon’s knot to secure the beads.
Memory Wire Bracelet (one strand double length with bent ends)Cut the memory wire long enough to wrap around the wrist twice, plus an additional 2 inches. Place the 3-in-1 combination tool in the middle of the wire and bend it 90 degrees to form a right angle. Place the 3-in-1 combination tool about 3/16 inch from the right angle and bend another right angle in the opposite direction. You now have one end of the wire pointing up and the other end pointing down. Hold one right angle in place with a pair of pliers. Take the 3-in-1 combination tool and twist the other angle 180 degrees so both wire ends face the same direction, like a three-sided rectangle. String the first bead on both wire ends at the same time, pushing the bead to the end

- 18 -
where the two 90-degree corners are located. Push the Braille Bead as tight as possible to the corners. Holding the two strands of wire with a pair of pliers may assist in the pull-push technique to make the bead fit more tightly without the wire slipping. Next, wrap the double strand of memory wire around a cardboard mailing tube to keep the two wires from twisting together while you bead. Continue to string the rest of the beads on the two wire strands. If you do not have a mailing tube, keep one finger between the two wire ends while you bead to keep the wires from crossing over each other. After all the beads are on, cut the two ends of the wire if they are too long. Bend each wire end into a tight loop with a wire cutter or 3-in-1 combination tool to prevent the beads from coming off. See tip below. The advantage
of using a single strand of wire over two strands of wire—as described next—is that you only have to bend or “finish off” two wire ends instead of four.
Tip: To bend the wire ends, place the 3-in-1 combination tool at the end of the wire. Hold tightly and twist your wrist forward to full flexion, as if using an ice cream scoop. Try to make a complete loop with the end of the wire.
of using a single strand of wire over two of using a single strand of wire over two

- 19 -
On this orange alphabet bracelet, see the wire bent like a bobby pin through the two holes of the Braille Bead “A” (enlarged view).
See the two wire ends turned to make tight loops at the two holes of the Braille Bead “Z” (enlarged view).
Memory Wire Bracelets (two strands with bent ends)Cut two pieces of Memory Wire to the desired length plus an additional half inch to bend the ends for finishing. Bend one end of each wire. (See tip on page 18.) Wrap the Memory Wire around a cardboard mailing tube with the two bent ends together. String on the desired combination of beads: all Braille Beads or a mixture of Braille and Pony beads. Bend the remaining wire ends.
This multi colored Peace and Love bracelet—using Pony beads and Braille Beads (letters and symbols)—has the two wire ends on both ends
of the bracelet bent into a tight loop.
On this orange alphabet On this orange alphabet
This multi colored Peace and LoveThis multi colored Peace and Love

- 20 -
White Stretch Floss (two strands with glue on knot)Cut two pieces of floss elastic to the desired length plus at least 4 inches to make it easier to tie the ends together. The larger the fingers, the more extra floss one will need to tie a knot. Thread one piece of floss into a beading needle. The Darice® Big Eye Curved Beading Needle is easy to thread, is stiff enough to maintain position when sliding a bead onto it, and it is not sharp enough to prick fingers. String the Braille Beads through the bead’s top hole using the curved end of the needle. Place a paper clip or binder clip at the end of the elastic floss to prevent the beads from coming off the floss. Repeat the process with the bottom hole of the Braille Beads. Tie all four floss ends together with a surgeon’s knot. (See Gold Elastic Bracelet for tip.) Apply a drop of glue on the knot and allow it to dry. Cut off excess elastic.
Tip: When you use elastic cord or stretch floss, it is recommended that you add a dab of glue* to the surgeon’s knot for extra security.
To use glue, wrap paper around a cardboard mailing tube and tape it down. This prevents glue from getting on the tube so it remains clean for future jewelry projects. Slide the bracelet around the paper covered mailing tube and apply a small amount of glue to the knot; let it dry for the amount of time recommended in the glue’s instructions.
*There are many types of glue sold on the Internet and in fabric and lapidary/beading shops that are designed for elastic. The most popular is E-6000®. Glues—including E-6000®—carry a consumer warning for vapors and other irritants. For this reason, APH does not include such glues in children’s products.

- 21 -
This alphabet bracelet designed with alternating white and yellow Braille Beads uses four lengths of elastic floss—two lengths through each hole.
The complete alphabet (26 Braille Beads) makes a large bracelet. The elastic allows the bracelet to stretch over the hand.
Triangle Earring (earring with memory wire) Cut a piece of memory wire about 1½ inch long. Use a 3-in-1 combination tool to bend the wire in half. This will be your vertex angle. Then bend the two sides again to form a triangle with an opening on the bottom. Slide the bent wire through a fishhook earring, stopping at the vertex angle. Place each of the cut ends—which form the base of the triangle—into opposite sides of a Braille Bead’s top hole. Squeeze the two sides together to form a tight fit so the bead does not fall off. Repeat the process to make another triangle the same size or smaller. Slide a Pony bead onto the second triangle and let it rest at the vertex angle. Place each cut end into opposite sides of the Braille Bead’s bottom hole. Squeeze the two sides together to form a tight fit so the bead does not fall off.

- 22 -
This earring shows a blue peace sign Braille Bead connecting the top and bottom triangles together, base-to-base. The bottom triangle has a yellow Pony bead at its downward pointing vertex angle.
Be creativeIt is exciting to make new jewelry and to create your own designs. There are many design ideas that are not described in this manual. If you know some simple macramé knots, you can create vertical pieces of jewelry or wall hangings. Use decorative elastic and knots to make necklaces and initial rings. Cuff links, brooches, and hair barrettes are all possible. You can sew Braille Beads onto fabric. Visit your local bead shop/lapidary to learn more about artistic ways to make jewelry. Browse the following Jewelry Gallery for more ideas.
Jewelry GalleryShow your school spirit with braille earrings. Alternate school colors—such as shown here with “KSB” in red and white Braille Beads connected vertically with floss elastic.
Use clip rings to create hoop earrings. For a monochromatic look, sandwich an orange Braille Bead between two orange Pony beads. For a more colorful look, slide three Pony beads (pink, yellow, and orange) on the clip ring. Slide on a
green Braille Bead. Now reverse the Pony bead sequence (orange, yellow, and pink).
Use clip rings to create hoop earrings.Use clip rings to create hoop earrings.For a monochromatic look, sandwich an
Pony beads. For a more colorful look,
For a monochromatic look, sandwich an orange Braille Bead between two orange
slide three Pony beads (pink, yellow, and orange) on the clip ring. Slide on a
- 23 -
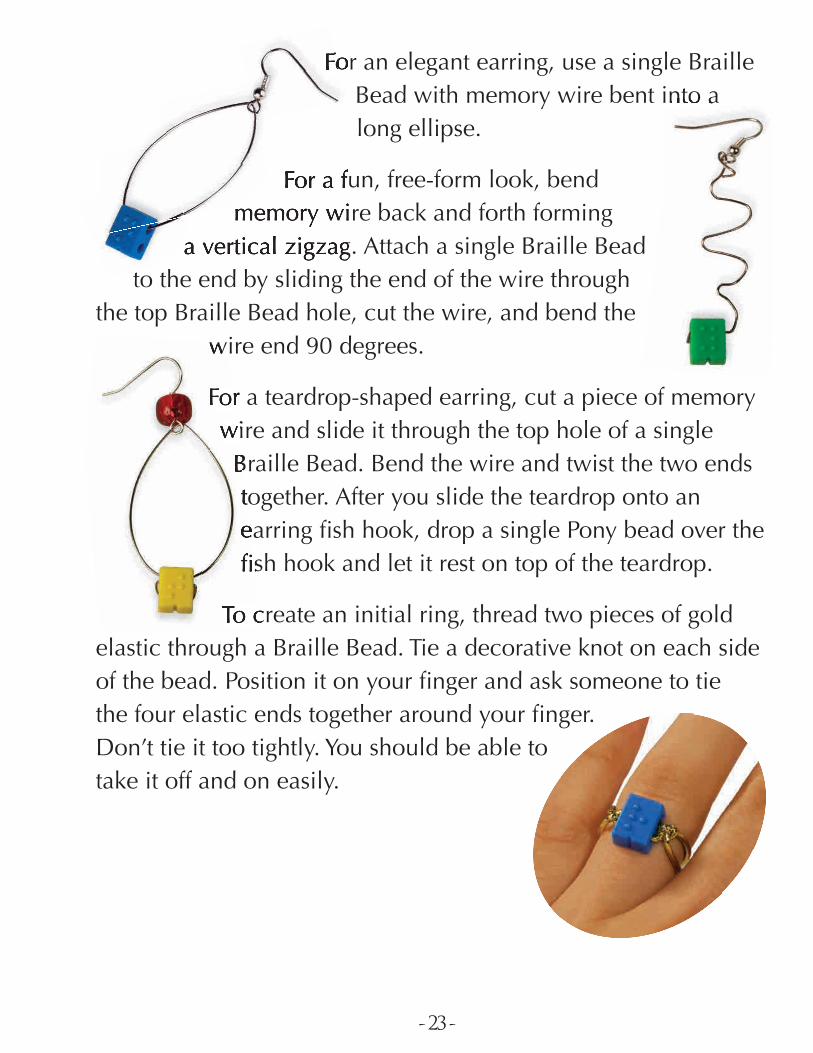
For an elegant earring, use a single Braille Bead with memory wire bent into a long ellipse.
For a fun, free-form look, bend memory wire back and forth forming
a vertical zigzag. Attach a single Braille Bead to the end by sliding the end of the wire through
the top Braille Bead hole, cut the wire, and bend the wire end 90 degrees.
For a teardrop-shaped earring, cut a piece of memory wire and slide it through the top hole of a single Braille Bead. Bend the wire and twist the two ends together. After you slide the teardrop onto an earring fish hook, drop a single Pony bead over the fish hook and let it rest on top of the teardrop.
To create an initial ring, thread two pieces of gold elastic through a Braille Bead. Tie a decorative knot on each side of the bead. Position it on your finger and ask someone to tie the four elastic ends together around your finger. Don’t tie it too tightly. You should be able to take it off and on easily.
For an elegant earring, use a single Braille
For a fun, free-form look, bendmemory wire back and forth forming
a vertical zigzag. Attach a single Braille Bead to the end by sliding the end of the wire through
For an elegant earring, use a single Braille
memory wire back and forth forminga vertical zigzag. Attach a single Braille Bead
Bead with memory wire bent into a Bead with memory wire bent into a Bead with memory wire bent into a Bead with memory wire bent into a
wire end 90 degrees.
For a teardrop-shaped earring, cut a piece of memory wire and slide it through the top hole of a single
wire end 90 degrees.
Braille Bead. Bend the wire and twist the two ends together. After you slide the teardrop onto an earring fish hook, drop a single Pony bead over the fish hook and let it rest on top of the teardrop.
To create an initial ring, thread two pieces of gold
wire end 90 degrees.
For a teardrop-shaped earring, cut a piece of memory wire and slide it through the top hole of a single
Braille Bead. Bend the wire and twist the two ends
To create an initial ring, thread two pieces of gold

- 24 -
Gold elastic makes great holiday jewelry. String a combination of Braille Beads and Pony beads for a necklace. This necklace spells, “Noel” in red. It uses repeating sequences of red, green, and blue Pony beads on each side of the Braille Beads. One Pony bead separates each Braille Bead.
This photo shows a red wire choker with five red Pony beads. The middle Pony bead has a red Braille Bead attached vertically with floss elastic through the top Braille Bead hole.
Make matching earrings and bracelet. This gold elastic bracelet alternates blue and green Pony beads with pink Braille Beads.
The earrings are a combination of a teardrop and a free-form design. The teardrops have a green
and a blue Pony bead, a pink Braille Bead (flower sign), and then a blue and green Pony bead. Hanging in the middle of the
teardrops are two free-form zigzags. One has a
blue Pony bead on the end, and the other
of Braille Beads and Pony beads for a necklace. This necklace
This photo shows a red wire choker with five red Pony beads.
Make matching earrings and bracelet. This gold elastic bracelet
form zigzags. One has a
The earrings are a combination of a teardrop and a free-form design. The teardrops have a green
and a blue Pony bead, a pink Braille Bead (flower sign), and then a blue and green Pony bead. Hanging in the middle of the
teardrops are two free-form zigzags. One has a
a free-form design. The teardrops have a green
form zigzags. One has a
a free-form design. The teardrops have a green and a blue Pony bead, a pink
blue and green Pony
teardrops are two free-
blue Pony bead on the end, and the other
and a blue Pony bead, a pink

- 25 -
has a green Pony bead on the end. The zigzags are attached at the top where the teardrop meets the fish hook. The zigzags can be made out of one piece of memory wire bent in the middle.
Make a hair barrette by attaching a thin ribbon through the end-hole on a blank barrette as described in the cane fob. Thread the two lengths of the ribbon through both Braille Bead holes. Tie off with a knot at the opposite end-hole. This barrette uses a burgundy ribbon with pink Braille Beads that spell “Mary (flower sign) Ann.”
two lengths of the ribbon through both Braille Bead holes. Tie off with a knot at the opposite end-hole. This barrette uses a burgundy ribbon with pink Braille Beads that
two lengths of the ribbon through both Braille Bead

- 26 -
The memory of a piece of jewelry brings back a stab of joy and love. ~ Elizabeth Taylor, British-born
American actress

- 27 -
References and ResourcesArtbeads.com®
(n.d.). History of beads. Retrieved from http://www.artbeads.com/history-of-beads.html
At First Sight...Braille Jewelry You’ll Fall in Love With www.braillejewelry.blogspot.com [email protected]
Braille Beading Tray with JarsAmerican Printing House for the BlindCatalog #1-08877-00 shop.aph.org
Bead Spinner by Darice® (battery powered)Automatic spinning eliminates hand fatigue and creates custom jewelry in a fraction of the time. It works with beading wire and memory wire. The bead spinner works with any size seed bead that will slip over the curved needle. It does not work with Pony beads or Braille Beads. www.youtube.com/watch?v=AwtTI1lpgYs
Beading to Beat Autismwww.beadingtobeatautism.org

- 28 -
Beading Suppliers• Fire Mountain Gems and Beads®
www.firemountaingems.com
• Consumer Crafts www.consumercrafts.com
Bead Societies & OrganizationsJustBeads.com lists beading groups by state. www.justbeads.com/user/societylist.cfm
Proper Trademark Notice and AttributionArtbeads.com® is a registered trademark of Artbeads.com.
Darice® is a registered trademark of Darice, Inc.
E-6000® is a registered trademark of Eclectic Products, Inc.
Fire Mountain Gems and Beads® is a registered trademark of Fire Mountain Gems and Beads, Inc.

®
Dear APH Customer:
The field test results of Braille Beads indicate that using jewelry tools and manipulating memory wire requires more dexterity and strength than possessed by most students. To prevent infrequently used items from increasing the cost of the kit, APH decided to include only the jewelry findings with which the students were successful and enjoyed using.
If your students enjoy making braille jewelry and have enough experience to make more advanced jewelry (see chapter 4), please complete, cut out, and mail this page to APH.
Would you like APH to produce and sell an advanced jewelry making set? Yes No
If yes, please check any items that the advanced kit should include.
Memory wire
Stretch floss
Needles
Combination tool (cuts, bends, and wraps wire)
Wire cutter
Bolster (holds wire during beading, holds elastic bracelets while glue dries on knots)
Earring fish hooks
Blank barrettes
Ribbons
Other

Comments
Mail to:
Braille Beads Research Department American Printing House for the Blind 1839 Frankfort Ave. Louisville, KY 40206-0085
Fold this line first. Secure with tape.
PLACESTAMPHERE


1839 Frankfort Avenue Louisville, KY 40206
Phone: 502-895-2405 Toll Free: 800-223-1839
Fax: 502-899-2274 E-mail: [email protected] Website: www.aph.org
For use with Braille Beads: APH Starter Kit,
Catalog 1-08879-00