instruction manual - mybinding.com · the aim of this instruction manual is safe and proper use....
TRANSCRIPT

Instruction Manual
Provided By
http://www.MyBinding.com http://www.MyBindingBlog.com

PAPER FOLDERDF-915
INSTRUCTION MANUAL
[120 V]

This equipment has been tested and found to comply with the limits for a Class B digital device, pursuant to Part 15 of the FCC
Rules. These limits are designed to provide reasonable protection against harmful interference in a residential installation. This
equipment generates, uses and can radiate radio frequency energy and, if not installed and used in accordance with theinstructions, may cause harmful interference to radio communications. However, there is no guarantee that interference will not
occur in a particular installation. If this equipment does cause harmful interference to radio or television reception, which can be
determined by turning the equipment off and on, the user is encouraged to try to correct the interference by one or more of thefollowing measures:
– Reorient or relocate the receiving antenna.
– Increase the separation between the equipment and receiver.
– Connect the equipment into an outlet on a circuit different from that to which the receiver is connected.
– Consult the dealer or an experienced radio/TV technician for help.

1
Thank you for purchasing this Duplo equipment.To ensure correct usage, please read this instruction manual thoroughly, especially the sectionSafety Precautions.
The aim of this instruction manual is safe and proper use. For this reason, users of this equipmentfor purposes or by methods other than those described in this manual and users who remodel thisequipment for their own reasons are asked to ensure safety in use at their own responsibility.
After reading, please keep this instruction manual handy for future reference.
INTRODUCTION
This instruction manual describes the functions of the equipment. It is composed of the followingchapters.It can be read from the required pages in use of this equipment.
ABOUT THIS INSTRUCTION MANUAL
◆ Safety (p.3 to 6)
This chapter describes user safety, such as precautions in use of this equipment, etc.
◆ Outline (p.7 to 18)
This chapter describes what users need to know about this equipment before using it.
◆ Basic Operations (p.19 to 27)
This chapter describes the most basic paper folding operation.
◆ Correcting Folding Misalignment (p.28 to 34)
This chapter describes how to correct folding misalignment of folded paper.
◆ Applied Use (p.35 to 47)
This chapter outlines applied paper folding operations such as standard folding of non-standardpaper, custom folding, and cross folding, etc.
◆ Others (p.48 to 59)
This chapter describes error messages, troubleshooting guide, etc.

2
◆ Safety
1. Safety Precautions ............................................. 3Caution Label Location ........................................ 5
2. Installation Precautions .................................... 52-1. Installation Location ................................... 5
2-2. Precautions in Moving the Unit .................. 5
3. Usage Precautions ............................................. 63-1. Power Supply ............................................. 6
3-2. Operating Environment .............................. 6
3-3. Storage Conditions .................................... 6
3-4. Maintenance .............................................. 6
◆ Outline
4. Installation .......................................................... 74-1. Standard Accessories ................................ 7
4-2. Installation Procedure ................................ 8
5. Names and Operation of Parts ......................... 115-1. External Parts ............................................ 11
5-2. Internal Parts ............................................. 12
6. Control Panel ...................................................... 146-1. Names and Operation of Control Panel ..... 14
6-2. Description of Windows ............................. 16
6-3. Types of Buzzer Sounds ............................ 18
◆ Basic Operations
7. Precautions Prior to Use ................................... 197-1. Paper Used ................................................ 19
7-2. Precautions on Stacking Paper ................. 20
7-3. Automatic Detection of Paper Size ............ 20
7-4. Checking the Front/Back, Top/End of
Paper ......................................................... 21
7-5. Using the “QUICK START” ........................ 21
8. Paper Folding Methods ..................................... 22
9. Standard Folding of Standard Paper ............... 239-1. Standard Paper .......................................... 23
9-2. Standard Folding Modes ............................ 23
9-3. Operation Procedure ................................. 23
◆ Correcting Folding Misalignment
10. Folding Misalignment ........................................ 2810-1. Correcting Folding Misalignment Along
Sides of Paper ........................................... 28
10-2. Correcting Folding Misalignment Along
Vertical Length of Paper ............................ 29
10-3. Correcting Deformed Folding ..................... 34
TABLE OF CONTENTS
◆ Applied Use
11. Standard Folding of Non-standard Paper ........ 3511-1. Paper Size Restrictions ............................. 35
11-2. Operation Procedure ................................. 35
12. Custom Folding .................................................. 3812-1. Paper Size Restrictions ............................. 38
12-2. Operation Procedure ................................. 38
13. Cross Folding ..................................................... 4113-1. Cross Folding Methods .............................. 41
13-2. Precautions on Cross Folding .................... 41
13-3. Cross Folding of Standard Paper .............. 42
13-4. Cross Folding of Non-standard Paper ....... 43
13-5. Cross Folding Paper at the Desired
Folding Position ......................................... 43
14. Using Art Paper and Coated Paper .................. 4414-1. Characteristics of Art Paper and Coated
Paper ......................................................... 44
14-2. Operation Procedure ................................. 44
15. Using Special Paper .......................................... 4515-1. Double Folding Thick Paper ...................... 45
15-2. Using Recycled Paper ............................... 45
15-3. Folding Small Size Paper .......................... 46
16. Stacker Roller ..................................................... 4716-1. Changing the Stacker Roller Position ........ 47
16-2. Changing the Stacker Roller Height .......... 47
◆ Others
17. When Paper Jamming Occurs .......................... 4817-1. When Paper Jams at Paper Feed Section ... 48
17-2. When Paper Jams Near Paper Feed Ring ... 48
17-3. When Paper Jams Inside Folding Plate ..... 49
17-4. When Paper Winds Around Folding Roller ... 49
17-5. When Paper Jams Near Folding Plate 1 ... 50
17-6. When Paper Jams Near Folding Plate 2 ... 51
17-7. When Paper Jams at Paper Ejection
Section ....................................................... 52
18. Error Messages .................................................. 53
19. Troubleshooting ................................................. 54
20. Cleaning the Unit ............................................... 5620-1. Cleaning the Folding Rollers ...................... 56
20-2. Cleaning the Paper Feed Rings ................. 57
20-3. Cleaning the Paper Separator ................... 57
20-4. Cleaning the Paper Feed Inlet Sensor ....... 57
20-5. Cleaning the Paper Ejection Outlet Sensor ... 58
21. Specifications ..................................................... 59

3
The following graphic symbols indicate the various types of action to be performed oravoided.
This graphic symbol indicates a forbidden action.means “Do not disassemble.”means “Do not touch.”
This graphic symbol indicates actions that must be performed.means “Disconnect the power plug.”
Always observe the cautions and warnings given below to prevent personal injury or propertydamage.
The degree of danger and damage that could occur is indicated on two levels by thefollowing marks.
WARNING : Ignoring this mark could result in the possibility of serious injury oreven death.
CAUTION : Ignoring this mark could result in the possibility of injury or physicaldamage.
1. SAFETY PRECAUTIONS
!
!
WARNING:!
Do not place metal objects or vessels containing liquids on top of the unit. The entry of anymetal object or liquid could result in a fire or an electrical shock.
Do not insert any metal or easily-combustible object inside this unit. This could result in a fireor an electrical shock.
Do not touch or insert foreign objects into any rotating part during operation. This couldresult in injury.
Do not remove the cover or back panel. This unit contains high-voltage components thatcould cause an electrical shock.
Do not disassemble, modify or repair this unit. There is a danger of fire, electrical shock orinjury. Contact your dealer when repairs are necessary.
Use only the power supply voltage specified on the main nameplate. Using other voltagescould result in a fire or an electrical shock.
Keep this unit and the power cord away from heaters and heater vents. Excessive heat couldmelt the cover or power cord covering, and result in a fire or an electrical shock.
Do not use solvent inside or near the unit (e.g. when cleaning the unit). Such solvents maydamage the rubber rollers and resin inside the unit, resulting in malfunctions.
(Continued on the next page)

4
Make sure that the combined power consumption of the appliances to be connected does notexceed the capacity rating of the power outlets or plug receptacles. Exceeding the capacityrating could cause the power outlets, plug receptacles, or power extension cords to overheatand catch a fire.
Remove any dust that accumulates on the power plug prongs and the surface of the plug fromwhich the prongs extend. Accumulated dust could result in a fire.
If any foreign object such as metal or liquid should enter this unit, immediately turn the unitoff at the power switch and disconnect the power plug from the power outlet. Failure to doso could result in a fire or an electrical shock. Contact your dealer immediately.
Do not damage the power cord or power plug. (Do not scratch, alter, bend, twist, pull or placeheavy objects on the power cord or power plug.)This could result in damage, a fire or an electrical shock.
Always grip the plug when disconnecting the power plug from the power outlet. Forciblypulling on the power cord could cause damage, resulting in a fire or an electrical shock.
Do not handle the power plug with wet hands. This could result in an electrical shock.
Before cleaning this unit, turn the unit off at the power switch and disconnect the power plugfrom the power outlet. Accidental operation of the unit during cleaning could result in injury.
CAUTION:!
Always disconnect the power plug from the power outlet when the unit is not to be used foran extended period. Failure to do so could result in a fire due to leakage current if theinsulation should deteriorate.
Install this unit on a level, stable stand or floor, with sufficient space around it. Failure to doso could result in the unit overturning and causing injury.
Do not install this unit in a location where there is excessive humidity or where contact withwater is possible. Poor choice of location could result in deterioration of the insulation, a fireor an electrical shock.
Disconnect the power plug from the power outlet before attempting to move this unit. Failureto do so could result in power cord damage, a fire or an electrical shock.
Do not touch the power switch with wet hands. Otherwise electric hazards may occur.
SAFETY PRECAUTIONS (continued)
Do not put fingers inside during operation. This could result in injury.
Keep away long hair, ties, jewelry and loose clothing. This could result in injury.
Do not use flammable sprays inside or near the unit (e.g. when cleaning the unit). Suchflammable gas may ignite and cause a fire or combustion.

5
Caution Label Location
2. INSTALLATION PRECAUTIONS
2-1. Installation LocationInstall the unit on a table which can tolerate its weight. The mass of the unit is as follows.
94 lb
Install the unit close to a power outlet.
The unit may make loud sounds while operating according to the processing speed and paperused due to its paper-folding mechanism. Therefore install it where it will not disturb the officeenvironment.
Refer to “1. SAFETY PRECAUTIONS” (☞ p.3, 4).
2-2. Precautions in Moving the UnitAs the unit weights 94 lb, when moving it, it should be held at the base by two persons.
When moving the unit with folding plates 1 and 2 removed, make sure the folding plates are notsubject to shock. Otherwise, the folding plates may damage, resulting in poor folding accuracy.
Arrange the power cord carefully so that it does not get stepped on, and damage as a result.
The caution label is pasted on the unit to ensure the safety of users. Do not remove nor change it.If the label becomes dirty, damaged, or lost, be sure to contact your nearest dealer for a new one.
NoteNote

6
3. USAGE PRECAUTIONS
3-1. Power SupplyThis equipment shall be installed near the socket-outlet where the plug on the power supplycord is easily accessible.
Make sure the power supply used is always within the following range.100 to 240 V AC, 50/60 Hz
When you power other appliances from the same AC outlet, make sure that the combinedpower consumption does not exceed the power supply capacity.
Rated power of this equipment: 1.4 to 0.7 A (95 W)
3-2. Operating EnvironmentOperate this unit in the following environment:
– where the temperature range is between 41 and95°F,
– where the humidity range is between 20 and80% RH (no dew condensation),
– which is not subject to direct sunlight,
3-3. Storage ConditionsStore this unit in the following environment:
– where the temperature range is between 14 and122°F,
– where the humidity range is between 10 and85% RH (no dew condensation),
– which is not subject to direct sunlight,
3-4. MaintenanceTo protect the special features of this unit, the customer should never apply oil or grease to theparts. Please contact your dealer in case of any problem.
– which is subject to little or no vibration,– where there are no harmful chemicals,– which is reasonably free from dust,– which is free from air-borne salt, and– where the equipment is not exposed to water.
– which is subject to little or no vibration,– where there are no harmful chemicals,– which is reasonably free from dust,– which is free from air-borne salt, and– where the equipment is not exposed to water.
Do not use flammable sprays or solvent inside or near the unit (e.g. when cleaning theunit). Such flammable gas may ignite and cause a fire or combustion. Such solvents maydamage the rubber rollers and resin inside the unit, resulting in malfunctions.
WARNING!

7
4. INSTALLATION
4-1. Standard AccessoriesConfirm that the following parts are provided.
PAPER FOLDERDF-915
INSTRUCTION MANUAL
[120 V]
q w e
t
No.
q
w
e
r
t
Name Qty. Remarks
Auxiliary part for cross folding
This manual
Folding plate 1 1
Folding plate 2 1
Cross folding guide 1
Power cord 1
Instruction manual 1
r

8
4. INSTALLATION
4-2. Installation Procedure
Open the auxiliary paper feed tray.1
Open the top cover, and place thecross folding guide as shown in thefigure.After setting, close the top coverproperly.
2
Auxiliary paperfeed tray
Top cover
Cross folding guide
If the top cover is open, the unit will notoperate.
NoteNote
Open the paper receiving tray.3
Paper receiving tray
Extend the paper receiving stopper.Adjust the stopper according to the paper size andfolded shape.
4
Paper receiving stopper
Attach folding plate 1.
q Push the lock lever on folding plate 1 towards“UNLOCK”.
5
UNLOCKLOCK
w Insert folding plate 1 into the unit.
When inserting the folding plate, be sure tohold it with both hands.
e Push the lock lever towards “LOCK”, andsecure folding plate 1.
NoteNote
Lock leverFolding plate 1

9
12
12
4. INSTALLATION
r Open the top cover, rotate the jam correctionknob to check that folding plate 1 is properlysecured. If the knob rotates smoothly, it meansthat folding plate 1 is secured.
Jam correction knob
Top cover
t Connect control cord 1 of folding plate 1 to theNo.1 connector.
Be sure to turn off the power beforeconnecting or disconnecting the controlcord. Otherwise the unit will malfunction.
NoteNote
No.1 connector
Control cord 1
Attach folding plate 2.
q Push the lock lever on folding plate 2 towards“UNLOCK”.
6
UNLOCK
LOCK
w Push in folding plate 2 along the set guide to the“2 ( )” mark. The safety stopper locks at thisposition.
Folding plate 2
Be sure to insert the folding plate holdingthe handle with both hands.
NoteNote
e While slightly lifting folding plate 2 with thehandle, push in it to the “1 ( )” mark.
Folding plate 2
Set guide
r Push the lock lever towards “LOCK”, andsecure folding plate 2.
t Move folding plate 2 up and down with thehandle to check that it is secured.
y Open the top cover, rotate the jam correctionknob to check that folding plate 2 is properlysecured again. If the knob rotates smoothly, itmeans that folding plate 2 is secured.
u Connect control cord 2 of folding plate 2 to theNo.2 connector.
Be sure to turn off the power beforeconnecting or disconnecting the controlcord. Otherwise the unit will malfunction.
NoteNote
Lock lever
No.2 connector
Control cord 2

10
4. INSTALLATION
Connect the power cord to the unit.7
Power cord
Insert the power plug into the outlet.8

11
5. NAMES AND OPERATION OF PARTS
5-1. External Parts
Guide plate for deciding the paper folding position
Safety cover to prevent the user from touching the moving parts
For operating the unit
For adjusting the paper feed pressure
For stacking the paper to be folded
For ensuring paper are stacked on the paper feed tray properly
For raising and lowering the paper feed tray when stacking paper
For turning on/off the power
For connecting external power
For securing folding plate 1
For controlling folding plate 1
For inserting control cord 1
Section which ejects folded paper from the unit
For aligning ejected paper
For receiving folded paper ejected out
Name Operation
q
w
e
r
t
y
u
i
o
!0
!1
!2
!3
!4
!5
Folding plate 1
Top cover
Control panel
Paper feed pressureadjusting lever
Paper feed tray
Auxiliary paper feedtray
Paper set lever
Power switch
Power inlet
Folding plate 1 locklever
Control cord 1
No.1 connector
Paper ejection section
Paper receiving stopper
Paper receiving tray
No.
<Paper feed side>
<Paper ejection side>
11
12
13
1514
1 2
3410
5
6
9
78
12
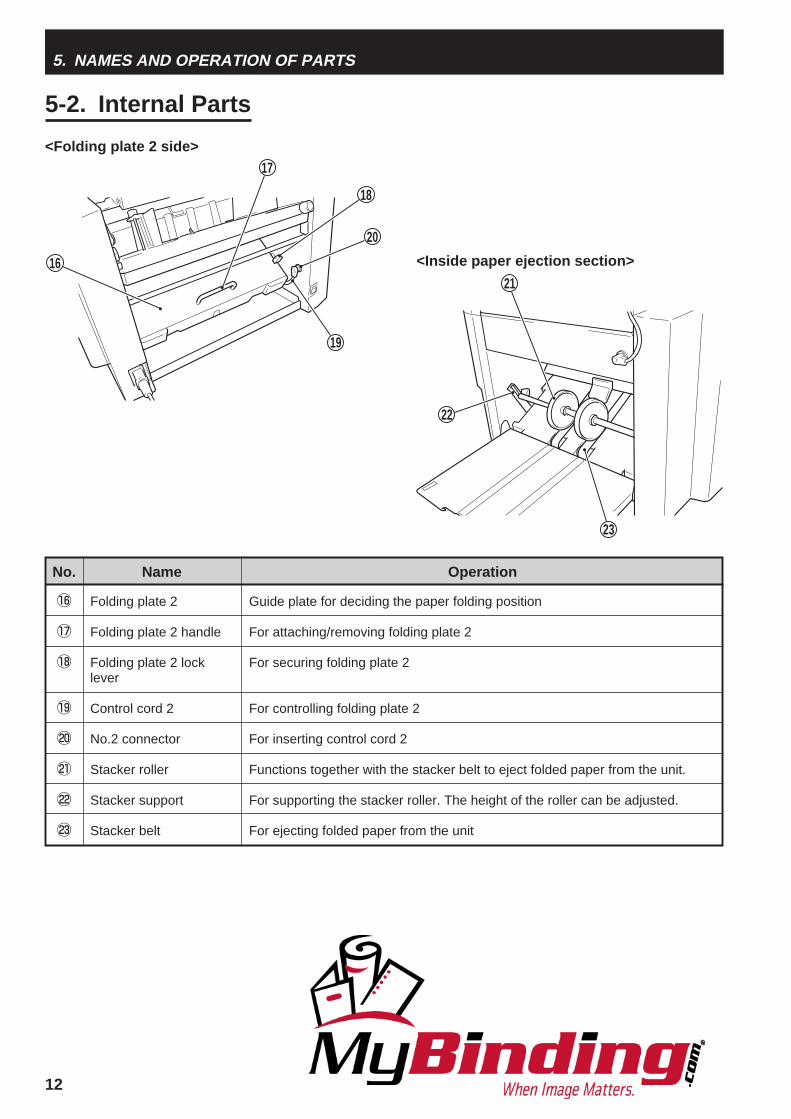
Guide plate for deciding the paper folding position
For attaching/removing folding plate 2
For securing folding plate 2
For controlling folding plate 2
For inserting control cord 2
Functions together with the stacker belt to eject folded paper from the unit.
For supporting the stacker roller. The height of the roller can be adjusted.
For ejecting folded paper from the unit
No. Name Operation
!6
!7
!8
!9
@0
@1
@2
@3
Folding plate 2
Folding plate 2 handle
Folding plate 2 locklever
Control cord 2
No.2 connector
Stacker roller
Stacker support
Stacker belt
5. NAMES AND OPERATION OF PARTS
5-2. Internal Parts
<Folding plate 2 side>
<Inside paper ejection section>16
17
18
20
19
22
21
23

13
5. NAMES AND OPERATION OF PARTS
<Inside top cover>
For rotating the folding rollers when paper has jammed inside the unit or whencleaning the unit
For holding down the folded paper when cross folding
Screw for securing the auxiliary paper feed ring (movable)
For folding paper
For holding down curled paper for reliable paper feed
For feeding paper
Movable according to the paper size in cross folding
For detecting the presence of paper
For detecting the presence of legal size paper
For securing the paper feed guide
For holding paper stacked on the paper feed tray firmly
For adjusting the paper separating pressure
For correcting skewed paper feed
For separating paper
Name Operation
@4
@5
@6
@7
@8
@9
#0
#1
#2
#3
#4
#5
#6
#7
Jam correction knob
Cross folding guide
Set knob
Folding roller
Auxiliary paper feedring
Paper feed ring
Auxiliary paper feedring (movable)
Paper switch 1
Paper switch 2
Guide fixing screw
Paper feed guide
Separating pressureadjusting dial
Skew correction knob
Paper separator
No.
2730
24
26
33
34
36
252829
35
31 3732

14
6. CONTROL PANEL
6-1. Names and Operation of Control Panel
Press to start paper folding.
Press to stop paper folding.
Press to test fold two sheets of paper.
Press to switch between the mode for entering the number of sheets to beprocessed and that for entering the paper length.When entering the paper length, use this key to register the value entered withthe y Paper length/Stacker roller position key.
Press to clear the counter to 0.
Press to enter the number of sheets to be processed or paper length.When setting the position of the stacker roller, press this key while pressing thew Stop key.
Press to select the processing speed from five levels.The processing speed needs to be changed according to the size and thicknessof the paper used.Pressing the “+” key increases the speed. Pressing the “–” key decreases thespeed.
Press to adjust the position (folding position) of the folding stopper of foldingplate 1.Every time the “+” key on the right is pressed, the folding stopper moves indirection A shown in the figure on the next page. Every time the “–” key on theleft is pressed, the folding stopper moves in direction B shown in the figure onthe next page.The folding stopper moves by 0.005" every time the key is pressed. Pressing thiskey continuously moves the folding stopper continuously within the range set.If the paper is more than ±0.2" of standard paper size, take it to be non-standardsize paper instead of adjusting the folding position with this key.
“ Correction range” (☞ p.30)
Press to adjust the position (folding position) of the folding stopper of foldingplate 2.Every time the “+” key on the left is pressed, the folding stopper moves indirection A shown in the figure on the next page. Every time the “–” key on theright is pressed, the folding stopper moves in direction B shown in the figure onthe next page.The other functions are the same as the i Folding plate 1 folding stopperadjusting key.
No. Name Operation
q
w
e
r
t
y
u
i
o
Start key
Stop key
Test key
No. of sheets/Paperlength key
Clear key
Paper length/Stackerroller position key
Speed key
Folding plate 1 foldingstopper adjusting key
Folding plate 2 foldingstopper adjusting key
eSee
13
9
10
7 6 5 4 3 2 1
14 15 16
8
1112

15
6. CONTROL PANEL
If the position of the folding stopper has been finely adjusted in standard foldingoperations, the adjustment value can be registered with this key.A total of 30 different adjustment values can be registered (6 standard foldingmodes × 5 standard paper sizes). The registered data is preserved even after thepower is turned off.To erase the registered data, select the paper size and folding mode to beerased. Next press this key until the buzzer sounds “pi.pi...” for about twoseconds, and then press it continuously for another two seconds until the buzzersounds “pi...”. (Four seconds in total)
Press to register the position of the folding stopper and stacker roller which havebeen moved when using custom folding modes.Up to two individual paper folding modes can be registered for custom folding.The registered data is preserved even after the power is turned off.To erase the registered data, continue pressing the custom folding registrationkey “1” or “2” registering the data to be erased until the buzzer sounds “pi...”.
When this lamp is lit, it means that the custom folding mode is registered.The custom folding mode cannot be selected if it has not been registered with the!1 Custom folding registration key.
Press to select the folding mode from six standard folding modes.When the power is turned on, the lamp of the single-folding mode lights up. Eachtime this key is pressed, the folding mode lamp lights up in order towards theright.If a custom folding mode is registered with the !1 Custom folding registrationkey, the custom folding mode can be selected.
Displays the folding mode selected from six standard folding modes.When a folding mode registered with the folding stopper position adjustmentvalue is selected, the corresponding lamp blinks.
Displays the size of standard paper stacked on the paper feed tray (LGR to INV),etc.
“6-2. Description of Windows” (☞ p.16)
Displays the paper length entered, correction value for the folding stopperposition, error messages, and the number of sheets already processed (addcounter) or yet to be processed (subtract counter).
“6-2. Description of Windows” (☞ p.16)
No. Name Operation
!0
!1
!2
!3
!4
!5
!6
Adjustment registrationkey
Custom foldingregistration key
Custom foldingregistration lamp
Folding mode key
Standard folding lamp
Left window
Right window(Counter)
<Outline of paper folder>
1
2 3
4
A
A
B
B
Folding stopper
Folding rollers 1 to 4
Paper feed ring
Paper feed tray
Folding plate 1
Stacker roller
Folding stopper
Folding plate 2
Flow of paper
eSee
eSee

16
6-2. Description of WindowsThis unit has two windows; the 2-digit left window and 4-digit right window.Their functions are described below.
6. CONTROL PANEL
Folding plate 1folding stopper adjusting key
Leftwindow
Rightwindow
No. of sheets/Paper length keyFolding plate 2folding stopper adjusting key
Custom foldingregistration key
(1) 2-digit left window
Five standard paper sizes which can be used in standard folding.These are displayed when the paper feed guides are set to the paper size used on the paper feed tray scale.
Indicates that the standard folding mode of non-standard paper (folding by entering paper length) isset.This is displayed when the length of non-standard paper is registered using the No. of sheets/Paperlength key.
Indicates that the custom folding mode is set.This is displayed when the custom folding registration key is pressed.
Indicates that folding plate 1 is selected in the adjustment and setting of the folding stopper position(folding position).This is displayed when the folding plate 1 folding stopper adjusting key is pressed.
Indicates that folding plate 2 is selected in the adjustment and setting of the folding stopper position(folding position).This is displayed when the folding plate 2 folding stopper adjusting key is pressed.
This is displayed when paper has run out on the paper feed tray.

17
6. CONTROL PANEL
(2) 4-digit right window
Display example of the add counter. Displayed value indicates the number of sheets alreadyprocessed. Maximum count displayed is “9999”.
Paper length entered in the standard folding of non-standard paper (unit: inch).
Corrected value of the folding stopper position (folding position) in standard folding (unit: inch).When “.030” is displayed, it means that the folding stopper of folding plate 1 or 2 is set 0.03"from the automatically set position in direction A shown in the figure on page 15.When “–.040” is displayed, it means that the folding stopper of folding plate 1 or 2 is set 0.04"from the automatically set position in direction B shown in the figure on page 15.
Value set for the folding stopper position (folding position) in custom folding (unit: inch).When “8.97” is displayed, it means that the length of the folded plane (see figure below) byfolding plate 1 or 2 will be about 8.97".
The value displayed is an approximate, and the actual folded size may differ accordingto the thickness and characteristics of the paper used.
NoteNote
Length offolded plane
Position of the stacker roller set. Can be set within the range of roL. 1 to 6.
The right window also shows error messages for paper jamming, etc. For details, refer to “18. ERRORMESSAGES” (☞ p.53).
NoteNote
Display example of the subtract counter. Displayed value indicates the number of sheets yetto be processed. Maximum count displayed is “999.”.

18
6. CONTROL PANEL
6-3. Types of Buzzer SoundsThis unit sounds the verification buzzer when keys on the control panel are pressed or when paperhas run out on the paper feed tray. The different types of buzzer are as follows.
“Pi”Normal operating sound when keys on the control panel are pressed.
“Pi.Pi.Pi”Warning buzzer to indicate operation error or that paper has run out.
“Pi...Pi...”Indicates that the stop key has been pressed or the entered number of sheets to be processed has been reached.
“Pi.Pi...”Indicates that a registration procedure (paper length registration, standard folding correction registration, customfolding registration, etc.) has been completed.
“Pi...Pi...Pi...”Indicates that problems such as paper jamming have occurred.
“Pi...”Indicates that a registered value has been cleared.

19
7. PRECAUTIONS PRIOR TO USEThe following explains precautions to be understood prior to using this unit.
7-1. Paper UsedIf using folded or curled paper, flatten first prior to use.
Always pile up paper when storing. Also do not store paper in humid places.NoteNote
Make sure that the printing ink on the paper has dried completely prior to use.
Otherwise, the ink will dirty the paper feed ring and folding roller, and this will not only lead to reduced foldingperformance, but the ink will also adhere to and dirty the folded paper.
Use paper that has been cut at right angles.
Otherwise, problems such as folding misalignment will result.
Fan paper just copied or printed wellprior to use.
Paper just copied or printed contains considerablestatic electricity, and if not fanned well, problemssuch as double-feed will result.
In some cases, paper may not be fed smoothly into the folding plate due to the environment (temperature,humidity), paper thickness, paper type, paper grain direction, paper states (curled, etc.), and processing speed,etc., and as a result, the paper may not be folded properly.In such cases, lower the processing speed, or improve the paper states (curled, etc.) before use.
NoteNote

20
Paper size
7. PRECAUTIONS PRIOR TO USE
7-2. Precautions on Stacking PaperDo not stack paper on the paper feed traywith the left and right sides of the paperunaligned or some sheets protrudingout.
This unit has an automatic standard paper sizedetection function. It automatically detects paper sizeat the paper feed guides.Therefore, if paper is protruding out from the left orright side, it is unable to detect paper size accuratelyand may determine standard paper as non-standard.It may also result in problems such as paper feederrors and folding misalignment, etc.Be sure to align paper neatly when stacking.
Do not stack paper on the paper feed traywith the lead and trail edges unaligned orsome sheets protruding out.
This will result in unstable paper feed, and result inproblems such as paper feed errors and foldingmisalignment, etc.Be sure to align paper neatly when stacking.
<Paper unaligned onthe left and right sides>
<Paper properly aligned>
<Paper unaligned atthe lead and trail edges>
7-3. Automatic Detection of Paper SizeFive standard paper sizes can automatically be detected by this unit: LGR, LGL, LTR, STMT,and INV.For paper to be automatically detected, paper must be set in the short edge feeding direction.
For some paper, stacking paper on the paper feed tray in the long edge feeding direction will result in papersize detection error.(For example, if LTR paper is stacked in the long edge feeding direction on the paper feed tray, it will bedetected as LGR size.)
When paper is stacked on the paper feed tray according to the corresponding paper size on thetray scale, and the paper feed guides are secured at the scale position, the paper size isautomatically detected. The detectable range is within ±0.28".
When paper size is detected, it will be displayed on the left window.
NoteNote
Fixing screwPaper feed guides
Example ofLTR paper
21
7. PRECAUTIONS PRIOR TO USE
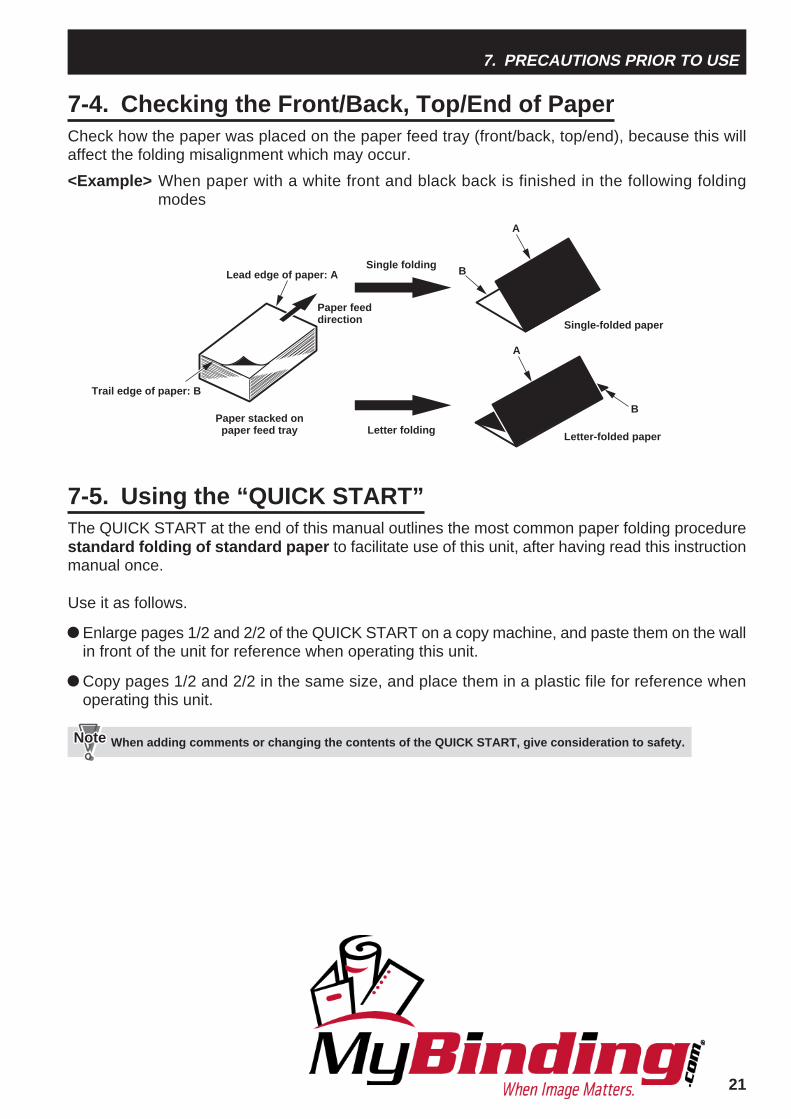
7-4. Checking the Front/Back, Top/End of PaperCheck how the paper was placed on the paper feed tray (front/back, top/end), because this willaffect the folding misalignment which may occur.
<Example> When paper with a white front and black back is finished in the following foldingmodes
Letter folding
Single-folded paper
Letter-folded paper
Single folding
Paper stacked onpaper feed tray
Paper feeddirection
Lead edge of paper: A
Trail edge of paper: B
A
B
B
A
7-5. Using the “QUICK START”The QUICK START at the end of this manual outlines the most common paper folding procedurestandard folding of standard paper to facilitate use of this unit, after having read this instructionmanual once.
Use it as follows.
Enlarge pages 1/2 and 2/2 of the QUICK START on a copy machine, and paste them on the wallin front of the unit for reference when operating this unit.
Copy pages 1/2 and 2/2 in the same size, and place them in a plastic file for reference whenoperating this unit.
When adding comments or changing the contents of the QUICK START, give consideration to safety.NoteNote

22
8. PAPER FOLDING METHODSThe paper folding methods of this unit can broadly be divided into the following three types.
(1) Standard folding of standard paperThis is the basic paper folding operation of this unit. With this method, the “standard paper” designated by thisunit is set to the standard folding mode displayed on the control panel and paper folding is performed.
(2) Standard folding of non-standard paper (folding by entering paper length)With this method, the length of paper other than the standard paper designated by this unit (this is called “non-standard paper”) is registered, this paper is set to the standard folding mode displayed on the control panel, andpaper folding is performed. The length of the paper registered is calculated to match the standard folding mode,and the positions (folding positions) of the folding stoppers of the folding plates are automatically set.
(3) Custom foldingSet the positions (folding positions) of the folding stoppers of folding plates 1 and 2 manually. As the stopperposition (folding position) can be specified, it allows non-standard folding to be performed freely.
There are certain restrictions (unfoldable areas) according to the paper length, folding plate length, etc. for theabove methods. For specific details of folding methods and restrictions, refer to the following chapters onfolding methods.
“9. STANDARD FOLDING OF STANDARD PAPER” (☞ p.23)“11. STANDARD FOLDING OF NON-STANDARD PAPER” (☞ p.35)“12. CUSTOM FOLDING” (☞ p.38)
NoteNote

23
ON
OFF
9. STANDARD FOLDING OF STANDARD PAPERStandard folding of standard paper is the basic operation of this unit.
9-1. Standard PaperThe standard paper designated by this unitconsists of the following five types: LGR, LGL,LTR, STMT, and INV.All of these sizes are valid only when stackedon the paper feed tray in the short edgefeeding direction.
The above standard paper may not be usable forcertain paper thickness in some cases.(Refer to “21. SPECIFICATIONS” (☞ p.59).)
NoteNote
9-2. Standard Folding ModesSix standard folding modes are available as shown below.
Single fold Double fold Irregularaccordion fold
Letter fold Accordionfold
Brochurefold
9-3. Operation Procedure
Turn on the power switch.1Do not touch the power switch withwet hands. Otherwise electrichazards may occur.
WARNING!Power switch
Stack paper on the paper feed tray.Do not overstack paper. Paper can be stacked up to aheight of approx. 1.8".Push in the paper until the lead edge touches thepaper feed inlet lightly.
2
Max. stacking amount: Approx. 1.8"
Paper size
Ledger (LGR)
Legal (LGL)
Letter (LTR)
Statement (STMT)
Invoice (INV)
L × W
17" × 11"
14" × 8.5"
11" × 8.5"
8.5" × 7"
8.5" × 5.5"
Display

24
9. STANDARD FOLDING OF STANDARD PAPER
Move the paper feed guides to thecorresponding paper size on the paperfeed tray scale. Tighten the fixingscrews to secure.
The left and right paper feed guides move together.Be sure to tighten the fixing screws of the left and rightpaper feed guides. Otherwise, the guides will movewhile the unit is operat ing, causing foldingmisalignment along the sides of the paper.Be sure to adjust the paper feed guides to the paperfeed tray scales. If the guides are positionedincorrectly, the automatic paper size detectionfunction will not work, and the test key and start key,etc. will not operate.
3
Do not press the paper with the paper feedguides too strongly. Otherwise, paper feederrors such as mis-feed will occur.
NoteNote
Fixing screw
Paper feedguides
Check the paper size displayed on theleft window.
Paper size will not be displayed even if standard papersize is used if the paper feed guides are not set at thedesignated positions.Set the paper feed guides at the correct positions.
5
eSee
eSee
Lower the paper set lever and set thepaper feed tray.
Lowering the lever raises the tray to the paper feedposition.Raising the lever lowers the tray to the paper stackingposition.
4
Paper set lever
To set the standard folding mode of non-standardpaper, press the No. of sheets/Paper length key andswitch to the mode for entering paper length.
For details on standard folding of non-standard paper, refer to “11. STANDARDFOLDING OF NON-STANDARD PAPER”(☞ p.35).
To set the custom folding mode, press the customfolding registration key 1 or 2 until the buzzer sounds“pi.pi...” (about two seconds).
For details on custom folding, refer to “12.CUSTOM FOLDING” (☞ p.38).
Example ofLTR paper

25
-1 1 2 3 4 5 60
6
0123456
9. STANDARD FOLDING OF STANDARD PAPER
Set the paper feed pressure adjustinglever to “0”.
Move the adjusting lever to the left and right whilepulling upwards.If paper slips and mis-feed occurs, increase the paperfeed pressure by one from “0” to “1”.Paper feed pressure increases as the scale valueincreases.If several sheets of paper are fed at the same time(double-feed), decrease the paper feed pressure byone from “0” to “–1”.
7Top cover
Open the top cover, and set theseparating pressure adjusting dial to“0”.After setting, close the top cover.
If several sheets of paper are fed at the same time(double-feed), increase the paper separating pressuregradually in steps of 0.5.Paper separating pressure increases as the scalevalue increases.
8
Paper feed pressure adjusting lever
Press the folding mode key to selectthe folding mode.
Each time the folding mode key is pressed, thestandard folding lamp lights up in order from theleftmost single folding lamp towards the right.If custom folding data is registered, the custom foldingregistration lamp will automatically light up after thestandard folding lamp.If not registered, it will not light up.
6 Custom foldingregistration lamp Standard folding lamp
Separating pressure adjusting dial
Press the speed key to set theprocessing speed.
When using thin and flimsy paper, setting themaximum processing speed causes problems such aspaper jam and deformed folding. Set a lowerprocessing speed.When the power is turned on, the last processingspeed used is displayed.
9

26
9. STANDARD FOLDING OF STANDARD PAPER
Press the test key to perform test folding.When the test key is pressed, the number in the right window blinks, and the folding stopper starts moving to the setposition. When it completes moving, the number stops blinking and lights up, and test folding starts.Test folding feeds two sheets of paper and allows the finish to be checked.Test folded paper are not counted in the number of sheets processed.
10
If the unit does not start even if the test key is pressed, the automatic paper size detection function may notbe working. Check if the paper feed guides are at the appropriate paper size on the scale.When the automatic paper size detection function starts working, the paper size will be displayed on theleft window.(Refer to “7-3. Automatic Detection of Paper Size” (☞ p.20).)
NoteNote
Folded paper
Check the finish of test folding.Check for folding misalignment using the second testfolded sample.
If folding problems occur, refer to the following pagesaccording to the folded state.
Folding misalignment along the verticallength of the paper ................................... (☞ p.29)Folding misalignment along the sides ofthe paper ................................................. (☞ p.28)Deformed folding ..................................... (☞ p.34)
11 <Normal folding>
<Folding misalignmentalong sides of paper>
<Deformed folding>
<Folding misalignment alongvertical length of paper>

27
9. STANDARD FOLDING OF STANDARD PAPER
Select the counter type.The counter can be selected from “subtract counter” which displays the preset number of sheets to be folded and foldsaccording to this value or “add counter” which displays the number of sheets already folded.With the subtract counter, the unit will automatically stop when the set number of sheets to be folded is reached. Thismethod is convenient if the number of sheets to be folded has been decided.The count is displayed on the right window. When the subtract counter is selected, a period will be displayed at the bottomright. The number of digits displayed is three at maximum (999.) for the subtract counter and four at maximum (9999) forthe add counter.
12
When the power is turned ON, the counter will start counting from 0 by the add counter. To use the subtractcounter, set the number of sheets to be processed every time the power is turned ON.
NoteNote
Setting the subtract counter
q Check that the counter is displayed on the rightwindow. If the paper length is displayed, press theNo. of sheets/Paper length key to display thecounter.
w Use the Paper length/Stacker roller position key andset the number of sheets to be processed between“1.” and “999.”.Pressing the “+” key each time increases the numberof sheets set by one, and pressing the “–” keydecreases by one. To increase/decrease the valuecontinuously, press the “+” or “–” key continuously.
To reset the value to 0, press the clear key.However setting to 0 will set the addcounter.
NoteNote
Setting the add counter
q Check that the counter is displayed on the rightwindow. If the paper length is displayed, press theNo. of sheets/Paper length key to display thecounter.
w When the counter shows 0, no settings are required.If it shows a value other than 0, press the clear key toreset the counter to 0.
No. of sheets/Paper length key
Right window(Counter)Clear key
Press the start key to start folding.To cancel operations halfway through, press the stopkey. Pressing the start key another time resumesoperations.The buzzer will sound “pi…pi…” if the counter reaches0 while using the subtract counter, and the unit willstop automatically. (The counter will once again showthe set number of sheets to be processed.)If the paper feed tray runs out of paper, the buzzersounds “pi.pi.pi”, and the unit will stop automatically.
13
Right window(Counter)
No. of sheets/Paper length key
Paper length/Stacker rollerposition key
Clear key
Period

28
10. FOLDING MISALIGNMENT
After completing folding operations,return the skew correction knob to thestandard position.
The position at which the round hole of the paper feedtray and pin match is the standard position.
2
Depending on the paper type, thickness, printing state, processing speed, etc., paper of the samesize may be folded differently and folding misalignment may occur.Folding misalignment consists of two types; “folding misalignment along the sides of the paper”and “folding misalignment along the vertical length of the paper”. Other than this, “deformedfolding” may also occur due to paper characteristics, etc.
The following describes how to correct folding misalignments and deformed folding.
<Example of folding misalignment along sides of paper>
Rotate the skew correction knob andadjust.
When the folding misalignment is as shown in FigureA, rotate the knob to the right (clockwise).
1
Folding misalignment at this part
Paper ejection direction
Before adjusting with the skew correctionknob, check that the paper feed guides areset correctly. Gaps between the paper andpaper feed guides will cause foldingmisalignment along the sides to occureasily.
Fixing screwPaper feed guides
<Foldingmisalignment A>
Skew correction knob
Paper ejectiondirection
When the folding misalignment is as shown in FigureB, rotate the knob to the left (counter-clockwise).
<Foldingmisalignment B> Skew correction knob
Skew correction knob
Pin
<Standardposition>
Paper ejectiondirection
Round hole
10-1. Correcting Folding MisalignmentAlong Sides of Paper
When the folded paper is misaligned alongthe sides as shown in the figure due to slightmisalignment when the paper was trimmed,paper printing state, dirty folding roller, etc.,correct using the skew correction knob of thepaper feed tray.

29
10. FOLDING MISALIGNMENT
10-2. Correcting Folding Misalignment Along Vertical Length of PaperWhen the folded paper is misaligned alongthe vertical length as shown in the figure dueto the paper thickness, type, printing state,etc., adjust the positions of the foldingstoppers of folding plates 1 and 2 to correctthe misalignment.
<Example of folding misalignment alongvertical length of paper>
Folding misalignmentat this part
Paper ejection direction
Adjust the positions of the folding stoppers using the folding stopper adjusting keys of foldingplates 1 and 2 on the control panel.Pressing the “+” key moves the folding stoppers of folding plates 1 and 2 in the A direction of thefigure. Pressing the “–” key moves in the B direction of the figure.Each press moves the folding stopper by 0.005".(One folding stopper is provided inside folding plates 1 and 2 respectively. Folding stopperscannot be seen from outside.)
The value corrected using the folding stopper adjusting key is displayed on the right window.The left window displays “F1” when corrected using the folding plate 1 adjusting key and “F2”when corrected using the folding plate 2 adjusting key.
1
2 3
4
A
A
B
B
Folding stopper
Folding rollers 1 to 4
Paper feed ring
Paper feed tray
Folding plate 1
Stacker roller
Folding stopper
Folding plate 2
Flow of paper
Corrected values can be registered using the adjustment registration key.
“ Adjustment registration procedure” (☞ p.32)eSee
Corrected values cannot be registered in the standard folding of non-standard paper. To register the foldingstopper position, use the custom folding registration function.
NoteNote
Folding plate 1folding stopper adjusting key
Folding plate 2folding stopper adjusting key

30
Double fold
Irregularaccordion fold
Letter fold
Accordionfold
Brochure fold
* Range of paper length which cannot be corrected to ±0.2". The correction value differs according to the paper length.
10. FOLDING MISALIGNMENT
Correction restrictions
The positions of the folding stoppers of folding plates 1 and 2 may not be adjustable to ±0.2"according to the length of the paper used. This restriction is due to the length of the paper andlength of folding plates 1 and 2.The restricted folding plate and correction details differ according to the folding mode and paperlength. Refer to the following table.
Foldingmode
Minimum paper lengththat can be used
7.2"
7.2"
5.6"
5.6"
5.1"
Restricted range ofpaper length*
7.2" to 8.1"
7.2" to 7.4"
7.2" to 8.1"
5.6" to 6.0"
5.6" to 6.1"
16.8" to 17.0"
16.7" to 17.0"
Restricted folding plate andcorrection details
Correction by “–” key of folding plate 2
Correction by “–” key of folding plate 1
Correction by “–” key of folding plate 2
Correction by “–” key of folding plate 2
Correction by “–” key of folding plate 2
Correction by “+” key of folding plate 1
Correction by “+” key of folding plate 2
If the correction value is within the restricted range when this correction value is set using thefolding stopper adjusting key, the folding stoppers will stop at the maximum possible correctionvalue position. Set a valid correction value again using the folding stopper adjusting key.
Correction range
For standard folding, the adjustable rangeusing the folding stopper adjusting key iswithin ±0.2" from the center of the paper.
If set exceeding ±0.2", the buzzer sounds“pi.pi.pi”, and the folding stoppers will stop atthe ±0.2" position of the adjustable range.
Center
Paper
Conveyance direction
Correction by the “+” keyWithin +0.2"
Correction by the “–” keyWithin –0.2"

31
10. FOLDING MISALIGNMENT
Example of correcting folding misalignment along vertical length of paper by folding mode
Correct folding misalignment along the verticallength of the paper in standard folding usingthe folding stopper adjusting keys of foldingplates 1 and 2, referring to the followingexample.
The positions of the “+” and “–” folding stopperadjusting keys of folding plates 1 and 2 arelocated opposite to each other.
NoteNote
The folding stopper moves by 0.005" every time the folding stopper adjusting key is pressed.Pressing the adjusting key continuously moves the folding stopper continuously within therange set.
The standard adjustable range is within ±0.2". Some paper may not be correctable in this rangedue to restrictions.
“ Correction restrictions” (☞ p.30)
When correction of more than ±0.2" from the standard paper size is required, consider suchpaper as non-standard paper.
“11. STANDARD FOLDING OF NON-STANDARD PAPER” (☞ p.35)
eSee
eSee
Adjusting key of folding plate 1
Folding mode Correction methodState offolded plane A
A is long
A is short
Press the “+” key.
Press the “–” key.
A is long
A is short
Press the “+” key.
Press the “–” key.
A is long
A is short
Press the “–” key.
Press the “+” key.
A is long
A is short
Press the “+” key.
Press the “–” key.
A is long
A is short
Press the “–” key.
Press the “+” key.
A is long
A is short
Press the “+” key.
Press the “–” key.
Adjusting key of folding plate 2
Folding mode Correction methodState offolded plane B
B is long
B is short
Press the “–” key.
Press the “+” key.
B is long
B is short
Press the “–” key.
Press the “+” key.
B is long
B is short
Press the “+” key.
Press the “–” key.
B is long
B is short
Press the “+” key.
Press the “–” key.
B is long
B is short
∗ Folding plate 2 is not used in single folding.
Press the “+” key.
Press the “–” key.
Sin
gle
fold
Dou
ble
fold
Irre
gula
rac
cord
ion
fold
Lette
r fo
ldA
ccor
dion
fold
Bro
chur
e fo
ld
Sin
gle
fold
Dou
ble
fold
Irre
gula
rac
cord
ion
fold
Lette
r fo
ldA
ccor
dion
fold
Bro
chur
e fo
ld
A
A
Ejection direction
Ejection direction
Ejection direction
Ejection direction
Ejection direction
Ejection direction
B
A
AB
B
B
A
A B
Ejection direction
Ejection direction
Ejection direction
Ejection direction
Ejection direction
Folding plate 1folding stopper adjusting key
Folding plate 2folding stopper adjusting key

32
10. FOLDING MISALIGNMENT
Adjustment registration procedure
The adjustment value of folding misalignment along the vertical length of the paper can beregistered using the adjustment registration key.
A total of 30 different adjustment values can be registered (6 standard folding modes × 5standard paper sizes (LGR, LGL, LTR, STMT, and INV)).
By registering adjustment, no adjustments need to be performed when performing foldingoperations under the same conditions (paper, folding mode, processing speed, etc.) as those atregistration.
The adjustment registration function cannot be used for standard folding of non-standard paper and customfolding. Use the custom folding registration function.
NoteNote
Stack paper on the paper feed tray, andset the paper feed guides.
1Fixing screw
Paper feed guides
Press the test key to perform testfolding.
Test folded paper are not counted in the number ofsheets processed.
4
Paper set lever
Lower the paper set lever and set thepaper feed tray.
2
Press the folding mode key to selectthe folding mode.
Each time the folding mode key is pressed, thestandard folding lamp lights up in order towards theright. Folding modes whose lamps are blinkingindicate that adjustment registration has beenperformed.
3
Standard folding lamp

33
Check for folding misalignment alongthe vertical length of the paper from thetest folding results.
Check for folding misalignment using the second testfolded sample.
5
Folded paper
Correct folding misalignment along thevertical length of the paper using thefolding stopper adjusting keys offolding plates 1 and 2. (☞ p.29)
6
A f t e r a d j u s t i n g t h e f o l d i n gmisalignment, press the adjustmentregistration key until the buzzersounds “pi.pi...” (about two seconds).
When adjustment registration completes, the lamp ofthe folding mode selected stops lighting and starts toblink.The adjustment value data registered is preservedeven after the power is turned off.
7
Blinking (End of adjustment registration)
10. FOLDING MISALIGNMENT
Correcting adjustment registration dataWhen the registration data of the paper size and folding modeto be corrected is set again and registered according to theabove steps 1 to 7, the previous data will be rewritten.
Erasing adjustment registration data
Display the registration data of the paper size and foldingmode to be erased, and press the adjustment registrationkey until the buzzer sounds “pi.pi...” for about two seconds,and continue pressing for another two seconds until thebuzzer sounds “pi...” (total four seconds).
When the registration data is erased, the lamp of the foldingmode selected stops blinking and lights up.
The adjustment registration data must be erasedby registered paper size and folding mode. Thedata cannot be erased for all sizes and modestogether.
NoteNote
Lit (When adjustment registration is erased)

34
10. FOLDING MISALIGNMENT
(1) Is appropriate paper within the specifications used?Do not use paper outside the specifications. Particularly, deformed folding occurs frequently in the use of thin,flimsy paper not appropriate for the paper folder.
“21. SPECIFICATIONS” (☞ p.59)
(2) Is the processing speed too fast?Lower the processing speed when deformed folding occurs for thin and flimsy paper.
eSee
(3) Was the paper fanned appropriatelyprior to stacking on the paper feedtray?Fan paper well prior to stacking.
(4) Is the paper stacked correctly on thepaper feed tray?Stack paper on the paper feed tray after aligningwell, and set the paper feed guides at the correctpositions. Also tighten the fixing screws of thepaper feed guides firmly.
Fixing screw
Paper feed guides
10-3. Correcting Deformed FoldingThe paper fed to the folding plates may befolded without reaching the folding stoppersinside the folding plates due to the usingenvironment (temperature, humidity), paperthickness, paper type, paper grain direction,paper state such as curling, processing speed,etc., resulting in deformed folding.If this occurs, check the following.
<Example of deformed folding>

35
11. STANDARD FOLDING OF NON-STANDARD PAPERStandard folding of non-standard paper is the process of registering the length of non-standardpaper, setting the paper to a standard folding mode (six types) displayed on the control panel.
Non-standard paper
Paper other than the five standard paper specified by this unit LGR, LGL, LTR, STMT, and INV are called non-standard paper.
Standard paper size is the size of the paper stacked on the paper feed tray in the short edge feeding direction.Standard paper which is stacked on the paper feed tray in the long edge feeding direction is considered non-standard paper.
NoteNote
Standard folding
Six standard folding modes are available as shown below.
Single fold Double fold Irregularaccordion fold
Letter fold Accordionfold
Brochurefold
11-1. Paper Size RestrictionsPaper sizes which can be used are the sizeswithin the range shown on the right.( ) shows the minimum foldable size underconditions given.
“15-3. Folding Small Size Paper” (☞ p.46)eSee
The paper sizes which can be used may varywith the paper type, thickness, and printingstate.
NoteNote
Paper
Paper feed direction
Length: 7.2" (5.1") to 17.0"
Width: 5.1" (3.0") to 11.7"
11-2. Operation Procedure
Stack paper on the paper feed tray, andset the paper feed guides.
1 Fixing screwPaper feed guides

36
11. STANDARD FOLDING OF NON-STANDARD PAPER
Press the No. of sheets/Paper lengthkey and switch to the mode for enteringthe paper length.
“L. ∗∗∗ ” is displayed on the right window.(“∗∗∗ ” is the value in the previous use.)
3
Using non-standard paper in settings forstandard paper will result in detectionerrors due to the priority functioning of theautomatic paper size detection, and theunit will not operate.
NoteNote
Measure the length of the non-standardpaper used, and enter the length usingthe Paper length/Stacker roller positionkey.
Pressing the “+” key increases the value, and pressingthe “–” key decreases the value.The paper length which can be entered ranges from5.1" to 17.0".
4
Register the entered paper length.After entering the paper length, continue pressing theNo. of sheets/Paper length key until the buzzersounds “pi.pi...” (about two seconds).When registration completes, “L.P” is displayed on theleft window, and the right window switches from thepaper length to the number of sheets to be processed.
5
The paper length data registered ispreserved even after the power is turnedoff.
NoteNote
Lower the paper set lever and set thepaper feed tray.
2
Paper set lever
Press the folding mode key to selectthe folding mode.
The registered paper length is calculated to match theselected standard folding mode, and the positions(folding positions) of the folding stoppers of foldingplates 1 and 2 are calculated.
6

37
11. STANDARD FOLDING OF NON-STANDARD PAPER
Press the test key to perform testfolding.
The folding stoppers of folding plates 1 and 2 move tothe folding positions calculated in step 6, and testfolding starts.Test folded paper are not counted in the number ofsheets processed.
7
Check the finish of test folding.Check the finish using the second test folded sample.When folding misalignment occurs, refer to “10.FOLDING MISALIGNMENT” (☞ p.28).
8
In the standard folding of non-standardpaper, the positions of the folding stopperscan be adjusted, but the adjustment valuescannot be registered. To register thepositions of the folding stoppers, use thecustom folding registration function.(Refer to “12. CUSTOM FOLDING”(☞ p.38).)
NoteNoteFolded paper
Other steps are the same as standard folding of standard paper.
“9. STANDARD FOLDING OF STANDARD PAPER” (☞ p.23)eSee
To return to standard paper standard foldingsettings
Press the No. of sheets/Paper length key.“L.P” displayed on the left window disappears.

38
12. CUSTOM FOLDINGCustom folding is the method of folding paperby setting the positions (folding positions) ofthe folding stoppers of folding plates 1 and 2manually. As the folding position can bespecified, folding methods not available withstandard folding can be performed freely.
Prepare a sample of the requiredaccordion fold manually with the paperused.
1
Measure the dimensions of the foldedplanes A and B of the sample, andfolded paper length C.
2
<Standard single folding> <Example ofcustom single folding>
12-1. Paper Size RestrictionsPaper sizes which can be used are the sizeswithin the range shown below.( ) shows the minimum foldable size underconditions given.
The paper sizes which can be used may varywith the paper type, thickness, and printingstate.
NoteNote
Paper
Paper feed direction
Length: 7.2" (5.1") to 17.0"
Width: 5.1" (3.0") to 11.7"
However, the length of the folded plane (seefigure below) which can be folded by foldingplates 1 and 2 is restricted.
Folding plate 1: 1.65" to 12.79"Folding plate 2: 0"*/1.85" to 8.54"
* As folding plate 2 is not used in single folding, it is 0".
Length offolded plane
Incorrectly measuring the paper length orsetting the folding stopper position can causepaper jamming inside the folding plate. If paperjams, refer to “17-3. When Paper Jams InsideFolding Plate” (☞ p.49).
NoteNote
12-2. Operation ProcedureThe following describes the custom foldingprocedure taking accordion fold as anexample.
Press the custom folding registrationkey 1 or 2 until the buzzer sounds“pi.pi...” (about two seconds) to switchto the custom folding mode.
3
C (4.33")
Paper feeddirection
A(3.35")
B(3.74")
Be sure to press the custom foldingregistration key before starting customfolding settings.
NoteNote
Stack paper on the paper feed tray, andset the paper feed guides.
4Fixing screw
Paper feed guides

39
12. CUSTOM FOLDING
Lower the paper set lever and set thepaper feed tray.
5
Paper set lever
Set the folding stopper positions offolding plates 1 and 2.
Press the “+” or “–” key of the folding plate 1 foldingstopper adjusting key and move the folding stopper tothe measured dimensions A (3.35") of the sample.“F1” which means folding plate 1 is displayed on theleft window, and the position of the folding stopper isdisplayed on the right window in inch.Press the “+” or “–” key of the folding plate 2 foldingstopper adjusting key and move the folding stopper tothe measured dimensions B (3.74") of the sample.“F2” which means folding plate 2 is displayed on theleft window, and the position of the folding stopper isdisplayed on the right window in inch.
6
The “F1” and “F2” on the left window andfolding stopper position on the rightwindow are displayed only while theadjusting key is pressed. When the key isreleased, the left window displays “CF”and the right window displays the numberof sheets to be processed.
NoteNote
Set the position of the stacker roller.The position of the stacker roller needs to be changedaccording to the folded paper length.Pressing the “+” or “–” key of the Paper length/Stackerroller position key while pressing the stop key displays“roL. 1 to 6” on the right window. The stacker rollerthen moves to the position displayed.Refer to the following table for approximate setpositions.
7
Right windowdisplay
roL.1
roL.2
roL.3
roL.4
roL.5
roL.6
Folded paperlength
To 3.35"
3.36" to 4.13"
4.14" to 4.72"
4.73" to 5.31"
5.32" to 5.91"
From 5.92"
Approximate stacker roller set position
In this example, the folded paper length C is 4.33".Therefore select “roL.3” by pressing the Paper length/Stacker roller position key while pressing the stop key.
Stacker roller

40
12. CUSTOM FOLDING
Press the test key to perform testfolding.
Test folded paper are not counted in the number ofsheets processed.
8
Check the finish of test folding.Check the finish using the second test folded sample.If the folding position needs to be adjusted, set theposition of the folding stopper again using the foldingstopper adjusting keys of folding plates 1 and 2.If paper is not ejected smoothly, change the position ofthe stacker roller.
9
Folded paper
After completing all settings, registerthe custom folding setting.
Continue pressing the custom folding registration key1 or 2 until the buzzer sounds “pi.pi...” (about twoseconds).The registered data is preserved even after the poweris turned off.
10
Other steps are the same as standard folding of standard paper.
“9. STANDARD FOLDING OF STANDARD PAPER” (☞ p.23)eSee

41
13. CROSS FOLDINGCross folding is folding single-folded paperanother time as shown in the figure. Manycross folding styles are available according tosettings.
<Single folding>
<Cross single folding>
<Cross brochure folding>
∑ dent
13-1. Cross Folding MethodsThe following three cross folding methods areavailable on this unit.
(1) Cross folding of standard paperStandard paper consists of five types LGR, LGL,LTR, STMT, and INV (short edge feeding of paper)and is paper whose size can be automaticallydetected.
(2) Cross folding of non-standard paperNon-standard paper is paper other than standardpaper specified by this unit. It is paper within thefollowing size range.( ) shows the minimum foldable size underconditions given.
Paper
Paper feed direction
Length: 7.2" (5.1") to 17.0"
Width: 5.1" (3.0") to 11.7"
(3) Cross folding of paper at desiredfolding positionThis is the cross folding of standard and non-standard paper at the desired folding position.Both standard and non-standard paper areprocessed in the same way, and the foldingposition is registered in the custom folding mode.
13-2. Precautions on CrossFolding
Pay attention to the following in cross folding.
The maximum thickness of paper used is28 lb.
The maximum thickness depends on conditions suchas using environment (temperature, humidity), papersize, paper type, paper grain direction, paper printingstate, etc.
Press along the folded line of single-folded paper with the fingers.
If the folded line is not folded properly, paper feed willbe unstable.
Paper ∑ dent and folding misalignment along thesides of the paper may occur if the folded line ofsingle-folded paper is not folded properly ora c c o r d i n g t o t h e u s i n g e n v i r o n m e n t(temperature, humidity), paper thickness, papersize, paper type, paper grain direction, etc. Thisis not a malfunction of the unit.
NoteNote

42
13. CROSS FOLDING
13-3. Cross Folding ofStandard Paper
The following describes the cross folding ofstandard paper, taking cross single foldingshown in the figure as an example.
Cross folding
Paper feeddirection
Max. stackingamount:Approx. 1.0"
Set knob
Paper feed guide Cross folding guide
Single fold standard paper accordingto the procedure of “9. STANDARDFOLDING OF STANDARD PAPER”(☞ p.23).
1
To prevent folding misalignment alongthe sides of the paper and feed papersmoothly, fold the folded line of thesingle-folded paper firmly with thefingers.
2
Stack the single-folded paper on thepaper feed tray with the folded linefacing the left, and set the paper feedguides.
Do not stack too many sheets of paper on the paperfeed tray, the amount of which should be about halfthe height of the paper feed guide (approx. 1.0").Push in the paper until the lead edge touches thepaper feed inlet lightly.
3
Open the top cover, move the auxiliarypaper feed ring (movable) to the foldedline of the paper, and secure it.
Move the auxiliary paper feed ring by loosening the setknob. After moving, tighten the set knob to secure.
4
Set the separating pressure adjustingdial to “0”.
Set the paper separating pressure as low as possible.Setting it high will cause the single-folded paper toopen during paper feed, resulting in paper feed error.Paper separating pressure decreases as the scalevalue decreases.
5
Set the paper feed pressure adjustinglever to “3”.
Set the paper feed pressure within the “3” to “5” rangeon the scale.If paper slips and mis-feed occurs, increase the paperfeed pressure to “4” or “5”.Paper feed pressure increases as the scale valueincreases.
6
Attach the cross folding guide storedinside the top cover to the paper feedguide on the left side.
7
Auxiliary paper feed ring(movable)
Top cover
Close the top cover.8
Paper feed guides

43
13. CROSS FOLDING
Weight roller
Place the weight roller of the crossfolding guide on the folded line.
9To replenish paper, lift the cross foldingguide.
NoteNote
Set the folding mode to single folding,perform test folding, and check thefinish.
11
Other steps are the same as standard foldingof standard paper.
“9. STANDARD FOLDING OF STANDARDPAPER” (☞ p.23)eSee
13-4. Cross Folding ofNon-standard Paper
Single fold non-standard paperaccording to the procedure of “11.STANDARD FOLDING OF NON-STANDARD PAPER” (☞ p.35).
1
Press the No. of sheets/Paper lengthkey and switch to the mode for enteringpaper length.
2
Press the No. of sheets/Paper lengthkey until the buzzer sounds “pi.pi...”(about two seconds), to register thepaper length.
4
Perform steps 2 to 11 of “13-3. CrossFolding of Standard Paper” (☞ p.42).
5
Other steps are the same as standard foldingof standard paper.
“9. STANDARD FOLDING OF STANDARDPAPER” (☞ p.23)eSee
13-5. Cross Folding Paper atthe Desired Folding Position
After registering custom foldingaccording to the procedure of “12.CUSTOM FOLDING” (☞ p.38), singlefold paper in the custom folding mode.
1
Register the single-folded paper forcustom folding at the desired foldingposition according to the procedure of“12. CUSTOM FOLDING” (☞ p.38)again.
2
Perform steps 2 to 11 of “13-3. CrossFolding of Standard Paper” (☞ p.42).
3
Set the folding plate 1 folding stopperposition as desired when registeringcustom folding. Set the folding plate 2folding stopper position to 0" as foldingplate 2 is not used in single folding.
NoteNote
Other steps are the same as standard foldingof standard paper.
“9. STANDARD FOLDING OF STANDARDPAPER” (☞ p.23)eSee
Lower the paper set lever and set thepaper feed tray.
10
Length ofsingle-folded paper
Paper feed direction
Measure the length of the single-foldedpaper, and enter the length using thePaper length/Stacker roller positionkey.
3
44
14. USING ART PAPER AND COATED PAPER
14-1. Characteristics of Art Paper and Coated PaperArt paper and coated paper often stick to each other due to the printing ink and become difficult toseparate, resulting in double-feed. When using these types of paper, follow the procedure below.
Stack paper on the paper feed tray after neatly aligning the paper, and set the paperfeed guides.
For precautions on paper, refer to “7. PRECAUTIONS PRIOR TO USE” (☞ p.19).
2
Set the paper feed pressure adjusting lever to “3”.Set the paper feed pressure within the “3” to “5” range on the scale.If paper slips and mis-feed occurs, increase the paper feed pressure to “4” or “5”.Paper feed pressure increases as the scale value increases.
3
Open the top cover, and set the separating pressure adjusting dial to “2.5”.After setting, close the top cover.
If double-feed occurs, increase the paper separating pressure by 0.5 at a time.Paper separating pressure increases as the scale value increases.
4
Press the test key to perform test folding, and check the finish.If deformed folding occurs, the paper may not have reached the folding plate folding stopper. One solution is to lower theprocessing speed.
5
Some recycled art paper and coated paper may be flimsy and inappropriate for folding.NoteNote
14-2. Operation Procedure
Fan the paper well.1Art paper and coated paper need to be fanned well compared to fine quality paper such as copy paper.NoteNote
Do not stack too many sheets of paper on the paper feed tray, the amount of which should be about half theheight of the paper feed guide (approx. 1.0"). If too many sheets are stacked, the paper will stick to eachother from its weight and become difficult to separate, resulting in double-feed.
NoteNote
Do not use fine quality paper such as copy paper with the paper feed pressure and paper separatingpressure settings for art paper and coated paper. Due to the high paper feed pressure, double-feed occursmore easily. In addition, due to the high paper separating pressure, the paper may be damaged at the leadedge. When using fine quality paper, always return to paper feed pressure and paper separating pressuresettings to levels suitable for fine quality paper.
NoteNote
Other steps are the same as standard folding of standard paper.
“9. STANDARD FOLDING OF STANDARD PAPER” (☞ p.23)eSee

45
15. USING SPECIAL PAPER
15-1. Double Folding Thick PaperWhen double folding fine quality paper larger than 10" in width and thicker than 28 lb, the stiffnessof the paper makes it difficult for it to enter between the two folding rollers.For such paper, set the thick paper mode.
This mode is intended only for thick paper. Do not use it for folding other types of paper.Use of this mode results in unstable paper feed, and quickens wear of parts such as the paper feed ring.
NoteNote
Thick paper mode
In this mode, the folding rollers rotate quickly to help paper enter between the folding rollers.
Setting the thick paper mode
Press the “+” speed key and set the maximum processingspeed, and press it again for another two seconds.The maximum speed lamp blinks, indicating that the thickpaper mode has been set.
Clearing the thick paper mode
Press the “–” speed key. The maximum speed lamp stopsblinking and lights up, indicating that the thick paper mode hasbeen cleared.This setting will also be cleared when the power is turned off. Blinking (Thick paper mode)
This function may not be that effective, depending on the paper thickness and stiffness.NoteNote
15-2. Using Recycled PaperSome recycled paper may be thin, flimsy and easy to curl when copied, and thereforeinappropriate for folding. When folding such paper, pay attention to the following points.
Fan paper well prior to stacking on the paper feed tray.
Set the processing speed as low as possible.If set to high, wrinkles or deformed folding will result.
Set the paper feed pressure as low as possible.If set to high, double-feed will result.
Set the paper separating pressure as low as possible.If set to high, the center of the lead edge of the paper may be scratched or turned over.

46
-1 1 2 3 4 5 60
6
0123456
15. USING SPECIAL PAPER
15-3. Folding Small Size PaperPaper size ranges within 5.1" to 7.1" in length and 3.0" to 5.0" in width (fed by short edge feeding)can be folded in the following conditions.
Paper size ranges within 5.1" to 5.5" in length and 3.0" to 4.2" in width can only be single foldedor brochure folded.Paper size ranges within 5.6" to 7.1" in length and 4.3" to 5.0" in width can be single folded, letterfolded, accordion folded, and brochure folded, but not double folded and irregular accordionfolded.
eSee
When the folding mode key is pressed, the lamps of unselectable folding modes will be skipped withoutlighting.
Paper within the above size ranges are non-standard paper. As the automatic paper sizedetection function does not work for these paper sizes, there is a need to register the paperlength.
“11. STANDARD FOLDING OF NON-STANDARD PAPER” (☞ p.35)
The thickness of paper which can be used ranges from 16 to 20 lb.
Stack paper on the paper feed tray after fanning it well. However, stack less than usual, within astacking height of 1.4".
Do not set the maximum processing speed. Set as low as possible.
NoteNote
Continuous-feed occurs easily when high processing speeds are set. This is because the paper is small andlight, and is not a malfunction.
NoteNote
Set the paper feed pressure to “0” or “–1”.
Set the paper separating pressure to “0”,and increase the value by 0.5 at a timeaccording to the paper feed conditions.
Top cover
Separating pressure adjusting dial
Paper feed pressure adjusting lever

47
16. STACKER ROLLER
16-1. Changing the Stacker Roller PositionIf paper ejection conditions are poor, there isa need to change the position of the stackerroller. Pressing the Paper length/Stackerroller position key while pressing the stopkey displays “roL. 1 to 6” on the rightwindow, and the stacker roller moves to thisdisplayed position.
Step 7 in “12-2. Operation Procedure”(☞ p.39)eSee
Stacker roller
Right windowdisplay
roL.1
roL.2
roL.3
roL.4
roL.5
roL.6
Folded paperlength
To 3.35"
3.36" to 4.13"
4.14" to 4.72"
4.73" to 5.31"
5.32" to 5.91"
From 5.92"
Approximate stacker roller set position
Applicable standard paper size and folding mode
LTR ........... Double foldLGL ........... Double foldSTMT ........ Double fold, letter fold, accordion foldINV ............ Double fold, letter fold, accordion fold
LGR ........... Double foldLTR ........... Letter fold, accordion foldSTMT ........ Irregular accordion fold, brochure foldINV ............ Irregular accordion fold, brochure fold
STMT ........ Single foldINV ............ Single fold
LGL ........... Letter fold, accordion foldLTR ........... Brochure fold
LGR ........... Letter fold, accordion fold, brochure foldLGL ........... Brochure foldLTR ........... Single fold, irregular accordion fold
LGR ........... Single fold, irregular accordion foldLGL ........... Single fold, irregular accordion fold
16-2. Changing the Stacker Roller HeightSome thick and stiff paper may not beejected smoothly because they may openup after folding. If this happens, change theheight of the stacker roller and widen thespace for the paper to pass in ejection.
Lift the stacker roller and hold it with sub-support.
After completing folding operations, be sure toreturn the stacker roller to the standard position.Leaving it in the raised state will result in pooralignment of ejected paper.
NoteNote
Sub-support
Stacker roller
Refer to the following table for the position for setting the stacker roller according to the foldedpaper length.

48
17. WHEN PAPER JAMMING OCCURS
17-1. When Paper Jamsat Paper Feed Section
The right window shows “J1-1”.
If the top cover has been opened to remove jammed paper as described below, be sure to close it after removing.This unit will not operate if the cover is open and the right window will show the error message “OPEN”.
NoteNote
Open the top cover, and pull out paperjammed near the paper feed ring. Afterremoval, close the top cover.
If the paper jams again, increase the paperfeed pressure using the paper feed pressureadjusting lever.
Top cover Top cover
17-2. When Paper JamsNear Paper Feed Ring
The right window shows “J1-2”.
Open the top cover, and pull out paperjammed near the paper feed ring. Afterremoval, close the top cover.
If the paper cannot be pulled out easily, raisethe paper set lever and lower the paper feedtray, and then pull out the paper.
Paper set lever

49
17. WHEN PAPER JAMMING OCCURS
17-3. When Paper JamsInside Folding Plate
The right window shows “J1-3”.
While pressing the stop key, press the clearkey.The folding stoppers of folding plates 1 and 2move to the home position, pushing out thepaper inside the folding plates to the paperreceiving tray.
17-4. When Paper WindsAround Folding Roller
The right window shows “J1-3”.
Turn off the power.1Disconnect control cord 1 of foldingplate 1 from the No.1 connector.
2
Lock lever
No.1 connector
Control cord 1
Folding plate 1
Top cover
Jam correction knob
Folding roller
Release the lock lever, and removefolding plate 1.
3Be sure to hold folding plate 1 with bothhands.Do not subject folding plate 1 to shock,otherwise it may damage, foldingaccuracy will drop.
NoteNote
Open the top cover, and while rotatingthe jam correction knob, remove thepaper around the folding rollers.
4
If paper does not come out easily, insert a scale, etc.into the lead edge of the paper which had woundaround the folding rollers from between the foldingrollers, and remove the paper while rotating the jamcorrection knob.
Be careful not to damage the folding rollerswith the scale.
NoteNote

50
17. WHEN PAPER JAMMING OCCURS
After completing the above, set foldingplate 1 back to the original position.
5
Push the lock lever towards “LOCK”,and insert control cord 1 into the No.1connector.
6
Rotate the jam correction knob tocheck that folding plate 1 is secured. Ifthe knob rotates smoothly, it meansthat folding plate 1 is secured.
If not secured properly, the right window will show“-F1-” when the power is turned on.
7
Close the top cover.817-5. When Paper Jams
Near Folding Plate 1The right window shows “J1-3”.
Turn off the power.1Disconnect control cord 1 of foldingplate 1 from the No.1 connector.
2
No.1 connector
Control cord 1
Lock leverFolding plate 1
Release the lock lever, and removefolding plate 1.
3Be sure to hold folding plate 1 with bothhands.Do not subject folding plate 1 to shock,otherwise it may damage, foldingaccuracy will drop.
NoteNote
Open the top cover, and while rotatingthe jam correction knob, pull out thejammed paper.
4
After completing the above, set foldingplate 1 back to the original position.
5
Push the lock lever towards “LOCK”,and insert control cord 1 into the No.1connector.
6
Rotate the jam correction knob tocheck that folding plate 1 is secured. Ifthe knob rotates smoothly, it meansthat folding plate 1 is secured.
If not secured properly, the right window will show“-F1-” when the power is turned on.
7
Close the top cover.8

51
12
12
17. WHEN PAPER JAMMING OCCURS
17-6. When Paper JamsNear Folding Plate 2
The right window shows “J1-3”.
Turn off the power.1
Lock lever
No.2 connector
Control cord 2
Folding plate 2
Disconnect control cord 2 of foldingplate 2 from the No.2 connector, andrelease the lock lever.
2
Remove folding plate 2.
q While slightly lifting the handle, slide foldingplate 2 downwards to the “2 ( )” mark.
w While slightly lifting the handle, further slidefolding plate 2 downwards and remove.
3
To ensure safety, be sure to follow theabove procedure. Performing this workincorrectly may result in folding plate 2dropping, injuries, or damage of foldingplate 2.Be sure to hold folding plate 2 holdingthe handle with both hands.Do not subject folding plate 2 to shock,otherwise it may damage, foldingaccuracy will drop.
NoteNote
Open the top cover, and while rotatingthe jam correction knob, pull out thejammed paper.
4
Folding plate 2
After completing the above, set foldingplate 2 back to the original position.
Set folding plate 2 in the reverse order of step 3.Secure at the “1 ( )” mark.
5
Push the lock lever towards “LOCK”,and insert control cord 2 into the No.2connector.
6
Rotate the jam correction knob tocheck that folding plate 2 is secured. Ifthe knob rotates smoothly, it meansthat folding plate 2 is secured.
If not secured properly, the right window will show“-F2-” when the power is turned on.
7
Close the top cover.8
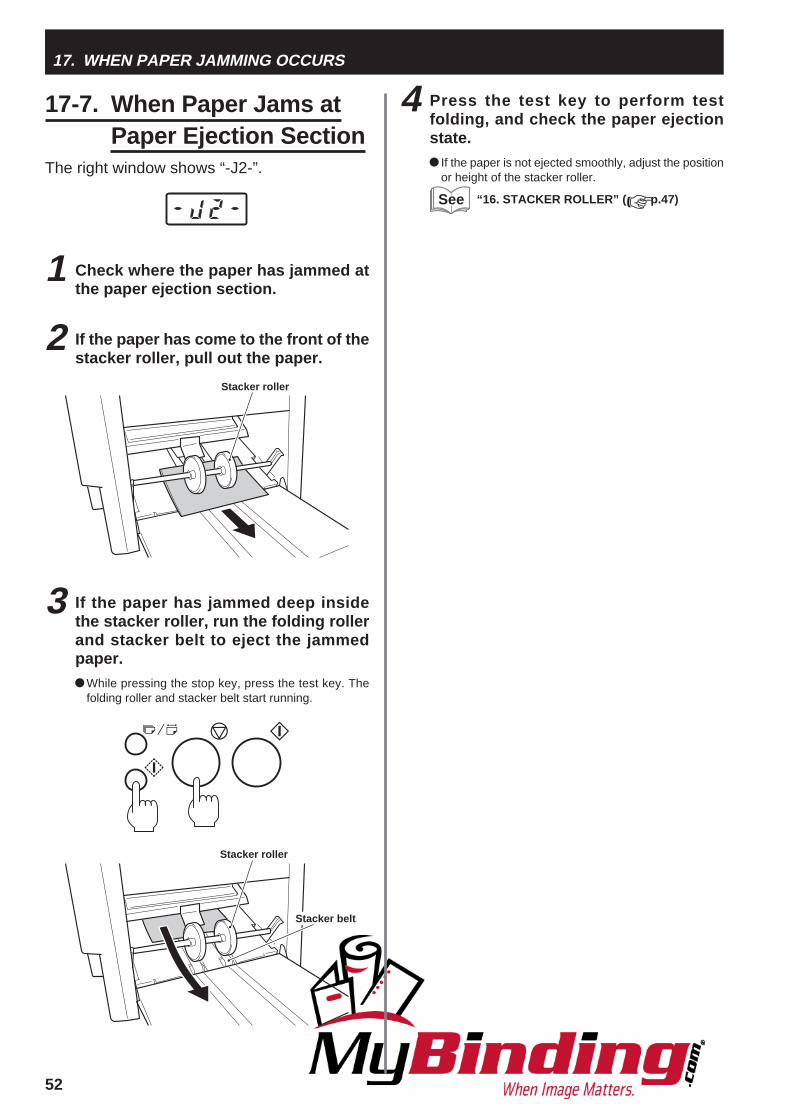
52
17. WHEN PAPER JAMMING OCCURS
Stacker roller
Stacker roller
Stacker belt
17-7. When Paper Jams atPaper Ejection Section
The right window shows “-J2-”.
Check where the paper has jammed atthe paper ejection section.
1
If the paper has come to the front of thestacker roller, pull out the paper.
2
If the paper has jammed deep insidethe stacker roller, run the folding rollerand stacker belt to eject the jammedpaper.
While pressing the stop key, press the test key. Thefolding roller and stacker belt start running.
3
Press the test key to perform testfolding, and check the paper ejectionstate.
If the paper is not ejected smoothly, adjust the positionor height of the stacker roller.
“16. STACKER ROLLER” (☞ p.47)
4
eSee

53
18. ERROR MESSAGESWhen paper jamming, errors, malfunctions occur, details are displayed on the left or right window.The following describes the error messages and solutions.If the unit still does not operate normally even after implementing the following solutions, contactyour nearest dealer.
Be sure to disconnect the power cord from the outlet before implementing a solution.NoteNote
(1) Error message displayed on the left window
Display Details of display
No paper on the paper feed tray
Solution
Stack paper on the paper feed tray.
(2) Error messages displayed on the right window
Display Details of display
The top cover is open.
Folding plate 1 is not set correctly.
Folding plate 2 is not set correctly.
Paper is not fed normally due to mis-feeding (slips), etc.
Paper jamming at paper feed section
Paper jamming inside this unit
Paper jamming at paper ejection section
The stacking direction of the paper on thepaper feed tray is incorrect (example:stacking LTR in long edge feedingdirection detects LGR).
The paper feed tray is not set at the paperfeed position.
Malfunction of main motor.Abnormal load on the motor due to paperjamming, etc.
Malfunction of stacker roller motor.Abnormal load on the motor due to paperjamming, etc.
Malfunction of folding plate 1 motor.Control cord 1 of folding plate 1 is notconnected properly.
Malfunction of folding plate 2 motor.Control cord 2 of folding plate 2 is notconnected properly.
Solution
Close the cover.
Set back correctly.
Set back correctly.
Adjust the paper feed pressure and paperseparating pressure.
Remove the jammed paper.
Remove the jammed paper.
Remove the jammed paper.
Stack paper in the correct direction.
Lower the paper set lever to set the paperfeed tray at the paper feed position.
Remove the jammed paper.
Remove the jammed paper.
Check the connection of control cord 1.
Check the connection of control cord 2.
(Alternately displayed)
(Alternately displayed)
(Alternately displayed)
(Alternately displayed)

54
19. TROUBLESHOOTINGBefore calling your dealer, check the following.
Is there paper stacked on the paperfeed tray?Is paper placed properly over the paperswitch of the paper feed tray?Has paper jammed?Is the top cover open?Is non-standard paper used in standardpaper settings?
Is the paper size displayed on the leftwindow?
Is there a gap between the paper feedguide and paper?Is the control cord of folding plate 1 or 2disconnected?
Is the power cord inserted into theoutlet?Is the top cover open?Has paper jammed?
Is the control cord of folding plate 1 or 2disconnected?
Are folding plates 1, 2 set properly?Has static electricity occurred in thepaper?
Has the paper been fanned well?Is the paper curled?Is the paper conveyance route jammedwith paper chips, etc.?Is the folding roller dirty?
Is the position of the stacker roller of thepaper ejection section incorrect?Has static electricity occurred in thepaper?
Is the paper feed pressure value set toohigh?Is the paper separating pressure valueset too low?Is the paper separator dirty?
Is the paper sticking to each other anddifficult to separate?
Is paper outside the specificationsused?
Stack paper.
Place paper over the paper switch sothat it is properly pressed.Remove jammed paper.Close the top cover.Change to non-standard paperoperations.
“11. STANDARD FOLDING OF NON-STANDARD PAPER” (☞ p.35)
Adjust the paper feed guides accuratelyto the paper size on the paper feed trayscale.Adjust the paper feed guides to thepaper firmly, ensuring no gaps.Turn off the power, and insert thatcontrol cord into the connector.
Insert the power cord into the outlet.
Close the top cover.Remove jammed paper.
Turn off the power, and insert thatcontrol cord into the connector.
Set folding plates 1, 2 again.Lower the processing speed.Fan the paper well.Humidify with a humidifier as required.
Fan the paper well.Correct the paper curl before use.Inspect the inside of the unit, andremove paper chips.Clean with a cloth moistened withalcohol.Set the stacker roller position correctlyagain.Use a commercially available staticelectricity removal spray.Humidify with a humidifier as required.
Decrease the paper feed pressure.
Increase the paper separa t ingpressure.Clean with a cloth moistened withalcohol.Check that the printing ink of the paperhas dried and there is no staticelectricity, and then fan the paper well.Do no t use paper ou ts ide thespecifications.
Problem Check Correct
The unit does not starteven when the start key ispressed.
The main motor does notrotate.
The folding stopper offolding plate 1 or 2 doesnot operate.
Paper is not folded at thenormal folding position.
Paper jam occurs.
Paper is double-fed.
NoteNote If the motor is subject to abnormal load due to paper jamming, etc., power to themotor will be cut off. Investigate the cause of the paper jam carefully. Aftercorrecting the cause, turn on the power again and resume operations.
eSee

55
19. TROUBLESHOOTING
Is the paper feed pressure value set toolow?Is the paper separating pressure valueset too high?Is the paper feed ring dirty?
Is the paper sticking to each other anddifficult to separate?
Is paper outside the specificationsused?
Was the processing speed changedfrom halfway?
Was the paper type (paper quality,thickness) changed from halfway?
Is more paper than the standardamount stacked on the paper feed tray?Are the paper feed guides set properly?
Are the fixing screws of the paper feedguides loose?Is paper cut properly?
Is small paper outside the specificationsused?Is the paper feed pressure value set toohigh?Is there a gap between the paper feedguide and paper?Is paper aligned?
Is thin, flimsy paper used?
Is paper outside the specificationsused?Is the paper feed pressure value set toohigh?Has the paper been fanned well?
Increase the paper feed pressure.
Decrease the paper separat ingpressure.Clean with a cloth moistened withalcohol.Check that the printing ink of the paperhas dried and there is no staticelectricity, and then fan the paper well.Do no t use paper ou ts ide thespecifications.
Return to the speed before change.When changing the speed, the foldingstopper positions of folding plates 1 and2 must be adjusted.Use paper before change.When changing paper, the foldingstopper positions of folding plates 1 and2 must be adjusted.
Reduce the paper amount.
Set the paper feed guides correctlyagain.Tighten the fixing screws properly.
Correct the folding misalignment alongthe sides of the paper using the skewcorrection knob.
Do no t use paper outs ide thespecifications.Decrease the paper feed pressure.
Adjust the paper feed guides to thepaper firmly, ensuring no gaps.Align the paper well before stacking onthe paper feed tray.Lower the processing speed.
Do no t use paper ou ts ide thespecifications.Decrease the paper feed pressure.
Fan the paper well.
Problem Check Correct
Paper slips at the paperfeed section.
Folding misalignmentalong the vertical lengthof the paper occurs.
Folding misalignmentalong the sides of thepaper occurs.
C o n t i n u o u s - f e e d i n goccurs with small paper.
Single-folded thick paperjams at the folding rollers.

56
Release the lock lever, and removefolding plate 1.
2Be sure to hold folding plate 1 with bothhands.Do not subject folding plate 1 to shock,otherwise it may damage, foldingaccuracy will drop.
NoteNote
20. CLEANING THE UNITThe adherence of paper dust, printing ink, etc. on the folding rollers, paper feed rings causesproblems such as paper feed errors, folding misalignment, etc. Clean as follows.
Prior to cleaning, be sure to disconnect the power cord from the outlet.After cleaning, make sure that the areas that were cleaned are completely dry before resuming paper foldingoperations.After cleaning, be sure to close the top cover properly. If not closed properly, the unit will not operate.
NoteNote
20-1. Cleaningthe Folding Rollers
Remove folding plate 1 to clean the foldingrollers.
No.1 connector
Control cord 1
Lock leverFolding plate 1
Top cover
Folding roller
Jam correction knob
Disconnect control cord 1 of foldingplate 1 from the No.1 connector.
1
Open the top cover.3
While rotating the folding rollers withthe jam correction knob, clean themwith a cloth moistened with alcohol.
4
Close the top cover.8
Set folding plate 1 back to the originalposition.
5
Push the lock lever towards “LOCK”,and insert control cord 1 into the No.1connector.
6
Rotate the jam correction knob tocheck that folding plate 1 is secured. Ifthe knob rotates smoothly, it meansthat folding plate 1 is secured.
If not secured properly, the right window will show“-F1-” when the power is turned on.
7
Do not use flammable sprays or solvent inside or near the unit (e.g. when cleaning theunit). Such flammable gas may ignite and cause a fire or combustion. Take precautionsagainst fire and ensure ventilation when using alcohol, and store the alcohol in a safeplace after use. Also note that use of other solvents can damage the rubber rollers andresin inside the unit, resulting in malfunctions.
WARNING!

57
20-2. Cleaningthe Paper Feed Rings
20. CLEANING THE UNIT
20-3. Cleaningthe Paper Separator
Open the top cover.1While rotating the paper feed rings byhand, c lean them with a c lothmoistened with alcohol.
2Immediately after cleaning, the dirt on thepaper feed ring may stick to the paper.Therefore perform test folding until all dirthas been removed.
NoteNote
Paper feed ring
Top cover
Top cover
Middle paper feed ring
Close the top cover.3
Open the top cover.1Loosen the fixing screw of the middlepaper feed ring, and move it aside.
2
Close the top cover.5
Clean the paper separator with a clothmoistened with alcohol.
3
Paper separator
Move the paper feed ring to its originalposition, and tighten the screw.
4
20-4. Cleaning the PaperFeed Inlet Sensor
The paper feed inlet of this unit has a sensorfor checking the paper feed state. This sensormay fail with the error message “J1-2” whenprinting powder and paper dust accumulate onit.
When this message appears, clean the sensorwith an Air Duster (a commercially available airspray for e l iminat ing dust for o f f iceequipment).
Open the top cover.1Insert the nozzle of the Air Duster intothe hole of the sensor cover and paperfeed inlet, and spray briefly.
2Use a non-flammable type. Read theinstructions on use carefully, and be sureto observe them.The Air Duster gas will cool the sensorand metallic parts, causing temporarycondensation. After cleaning, leave forabout five minutes before use.
NoteNote
Hole of sensor cover
Paper feed inlet
Close the top cover.3

58
20. CLEANING THE UNIT
20-5. Cleaning the PaperEjection Outlet Sensor
The paper ejection outlet of this unit has asensor for checking the paper ejection state.This sensor may fail with the error message“-J2-” when printing powder and paper dustaccumulate on it.
When this message appears, clean the sensorwith an Air Duster (a commercially available airspray for eliminating dust for office equipment)as well as a paintbrush, etc.This sensor consists of two sensors located atthe top and bottom of the paper ejection outlet.First clean the upper sensor and then thelower sensor.
Disconnect control cord 1 of foldingplate 1 from the No.1 connector,release the lock lever, and then removefolding plate 1.
1Cleaning the upper sensor
Lock leverFolding plate 1
Insert the nozzle of the Air Duster intothe hole of the top cover R shown in thefigure, and spray briefly.
2
Set folding plate 1 back to the originalposition.
3Push the lock lever towards “LOCK”,and insert control cord 1 into the No.1connector.
4
Hole of top cover R
Cleaning the lower sensor
Disconnect control cord 2 of foldingplate 2 from the No.2 connector,release the lock lever, and then removefolding plate 2.
1
Lock leverFolding plate 2
No.2 connector
Control cord 2
Insert the paintbrush straight in fromthe hole of the power supply coveralong the guide, and gently clean thetop of the sensor with the brush.
2
Do not rub the top of the sensor with themetal portion of the paintbrush, as this maydamage the film protecting the sensor,causing sensor problems.
NoteNote
Set folding plate 2 back to the originalposition.
3
Push the lock lever towards “LOCK”,and insert control cord 2 into the No.2connector.
4
Hole of power supply cover
Film
Paper ejectionoutlet sensor(lower side)
Hole of powersupply cover
Guide
Paintbrush
4.17"

59
11.7" (W) × 17.0" (L) (Along paper feed direction)
5.1" (W) × 7.2" (L) (Along paper feed direction)However paper size ranges within 5.1" to 7.1" in length and 3.0" to 5.0" in width can befolded under certain conditions.
Fine quality paper, recycled paper, drawing paper, specific art paper,specific coated paper
Single fold, double fold, irregular accordion fold, letter fold, accordion fold,brochure fold, specific cross fold (14 to 28 lb paper), other non-standard fold
14 to 40 lb∗ However LGR paper can be up to 40 lb thick for single folding only. For other folding
modes, thickness can be up to 32 lb. 40 lb thick paper below INV size cannot bedouble folded or irregular accordion folded.
500 sheets (fine quality paper 16 lb)
250 sheets/minuteCondition: When 16 lb LTR size fine quality paper is single folded
3-ring friction feed with skew correction function
Paper presence detection
Automatic detection of following standard paper sizes: LGR, LGL, LTR, STMT, andINV (fed by short edge feeding)
Mis-feed, continuous-feed, paper jam
Add counter/subtract counter selectable
Opening/closing of top coverWith/without folding plates 1, 2
Folding stopper position adjustment registration (30 ways), custom foldingregistration (2 ways)
100 to 240 V AC 50/60 Hz
1.4 to 0.7 A (95 W)
42.76" (W) × 20.63" (D) × 19.57" (H)
25.79" (W) × 20.63" (D) × 19.57" (H)
94 lb
Max.
Paper sizeMin.
Paper quality
Folding mode
Paper weight
Paper feed tray capacity
Maximum processingspeed
Paper feed method
Paper feed tray controlfunction
Paper size detectionfunction
Paper feed errordetection function
Counter
Other detectionfunctions
Additional functions
Power supply
Current consumption
In useDimensions
In storage
Mass (Weight)
21. SPECIFICATIONS
Model DF-915
Specifications and dimensions are subject to change without prior notice for improvements.
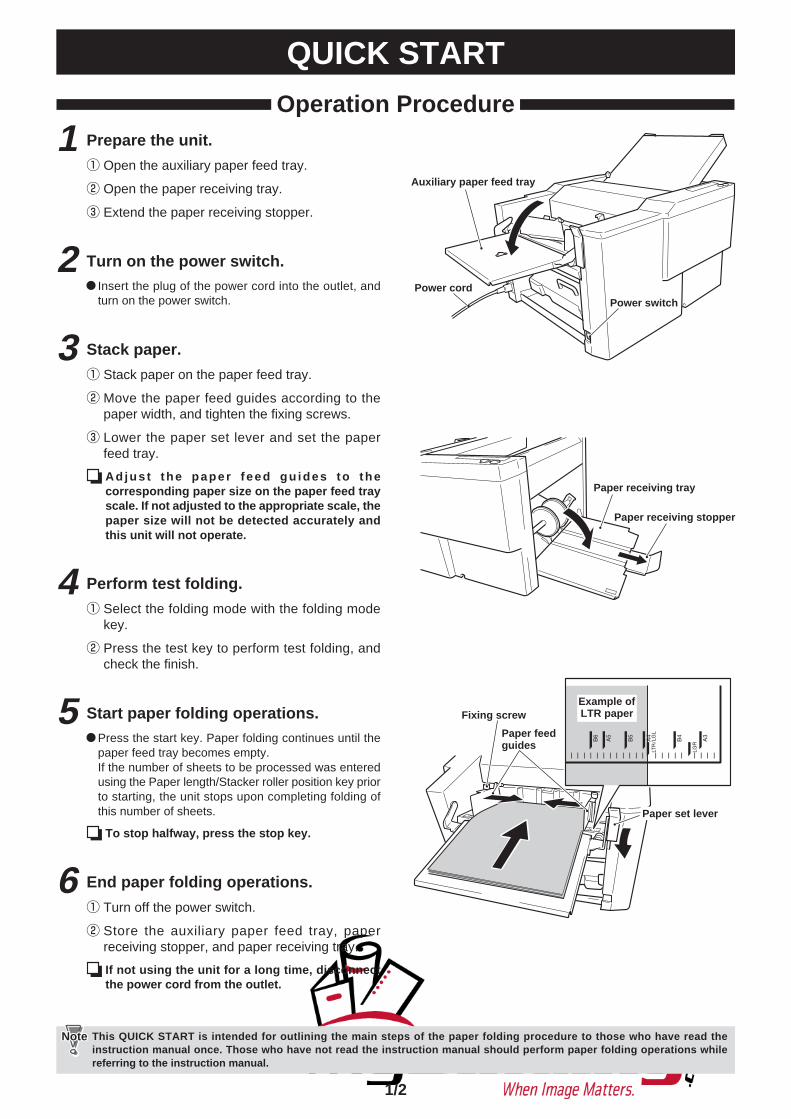
1/2
QUICK START
Operation Procedure
Auxiliary paper feed tray
Power cordPower switch
Paper receiving stopper
Paper receiving tray
Fixing screw
Paper feedguides
Prepare the unit.
q Open the auxiliary paper feed tray.
w Open the paper receiving tray.
e Extend the paper receiving stopper.
1
This QUICK START is intended for outlining the main steps of the paper folding procedure to those who have read theinstruction manual once. Those who have not read the instruction manual should perform paper folding operations whilereferring to the instruction manual.
NoteNote
Turn on the power switch.Insert the plug of the power cord into the outlet, andturn on the power switch.
2
Stack paper.
q Stack paper on the paper feed tray.
w Move the paper feed guides according to thepaper width, and tighten the fixing screws.
e Lower the paper set lever and set the paperfeed tray.
Adjus t the paper f eed gu ides to thecorresponding paper size on the paper feed trayscale. If not adjusted to the appropriate scale, thepaper size will not be detected accurately andthis unit will not operate.
3
Perform test folding.
q Select the folding mode with the folding modekey.
w Press the test key to perform test folding, andcheck the finish.
4
Start paper folding operations.Press the start key. Paper folding continues until thepaper feed tray becomes empty.If the number of sheets to be processed was enteredusing the Paper length/Stacker roller position key priorto starting, the unit stops upon completing folding ofthis number of sheets.
To stop halfway, press the stop key.
5
End paper folding operations.
q Turn off the power switch.
w Store the auxiliary paper feed tray, paperreceiving stopper, and paper receiving tray.
If not using the unit for a long time, disconnectthe power cord from the outlet.
6
Paper set lever
Example ofLTR paper

2/2
Control Panel
Duplo Paper Folder DF-915
Letter folding
Paper stacked onpaper feed tray
Single folding Double folding
Paper feed direction
Paper ejection direction Paper ejection direction Paper ejection direction
Lead edge of paper: A
Trail edge of paper: B
A
B
B
A BA
Front/Back, Top/End of Paper in Stacking and EjectionThe front, back, top, and end of the paper folded by a folding mode differ according to how thepaper is placed on the paper feed tray.
Key for selecting thestandard folding mode
Folding mode keyThe lamp of the selectedfolding mode lights up.
Standard folding lampDisplays the standardpaper size, etc.
Left windowDisplays the number of sheetsprocessed and error messages.
Right window (Counter)
Refer to the instructionmanual for customfolding registration andcorrection of standardfolding. (☞ p.29, 38)
Keys for changing the processing speed.Pressing the “+” key on the right increases theprocessing speed, and pressing the “–” key onthe left decreases.
Speed key
Start key
Stop key
Key for erasing thecount displayed bythe counter
Clear key
Key for test foldingTest keyRefer to the instruction
manual for paper lengthregistration. (☞ p.35)
Refer to the instructionmanual for settings ofsubtract counter, paperlength, and stacker rollerposition. (☞ p.27, 36, 47)

This manual is printed on recycled paper to help protect the environment.
DUPLO CORPORATIONDuplo building, 1-6, Oyama 4 chome, Sagamihara, Kanagawa 229-1180, Japan
TEL : +81-42-775-3602FAX : +81-42-775-3606E-mail : [email protected]
12H-90494-05050200M-0