installing lights - monsterdisplays.com · magnetic connectors will click on contact slide the...
TRANSCRIPT
www.globotechusa.com
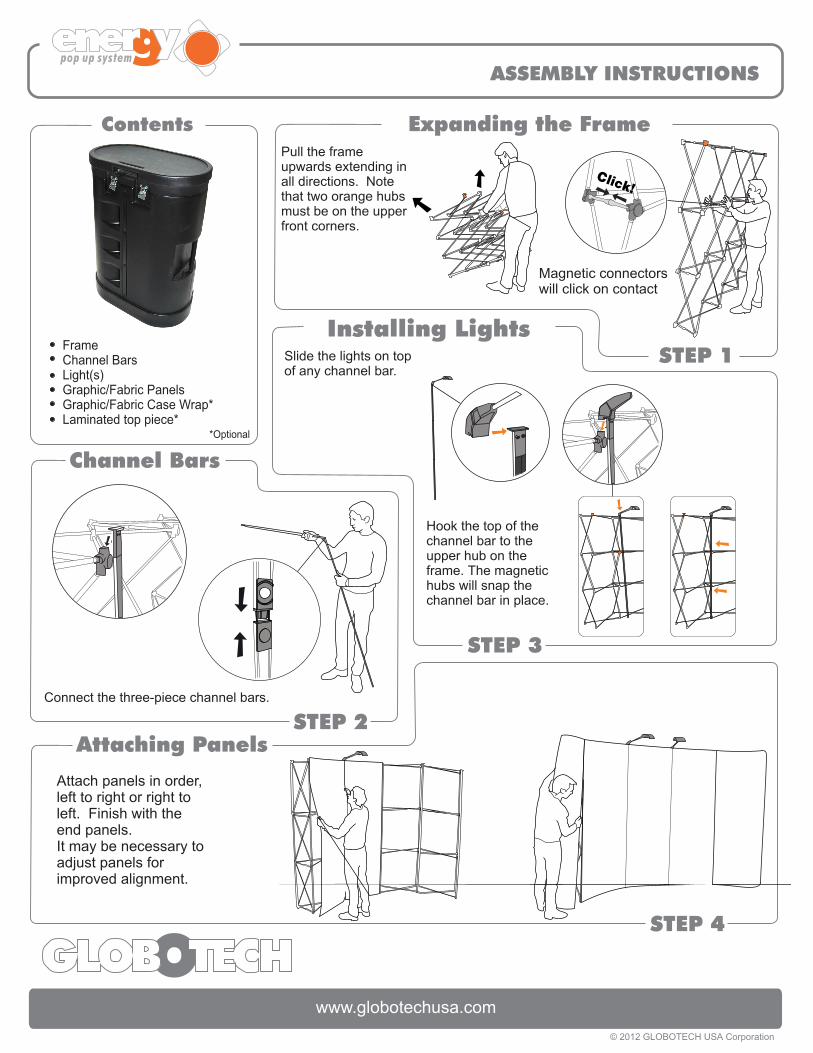
Contents Expanding the Frame
Channel Bars
Attaching Panels
Attach panels in order, left to right or right to left. Finish with the end panels.It may be necessary to adjust panels for improved alignment.
ASSEMBLY INSTRUCTIONS
STEP 1
© 2012 GLOBOTECH USA Corporation
Installing Lights
STEP 3
STEP 2
STEP 4
Magnetic connectors will click on contact
Slide the lights on top of any channel bar.
Connect the three-piece channel bars.
Hook the top of the channel bar to the upper hub on the frame. The magnetic hubs will snap the channel bar in place.
Pull the frame upwards extending in all directions. Note that two orange hubs must be on the upper front corners.
FrameChannel BarsLight(s)Graphic/Fabric PanelsGraphic/Fabric Case Wrap*Laminated top piece*
*Optional
www.globotechusa.com
Contents Expanding the Frame
Channel Bars
Attaching Panels
Attach panels in order, left to right or right to left. Finish with the end panels.It may be necessary to adjust panels for improved alignment.
ASSEMBLY INSTRUCTIONS
STEP 1
© 2012 GLOBOTECH USA Corporation
Installing Lights
STEP 3
STEP 2
STEP 4
Magnetic connectors will click on contact
Slide the lights on top of any channel bar.
Connect the three-piece channel bars.
Hook the top of the channel bar to the upper hub on the frame. The magnetic hubs will snap the channel bar in place.
Pull the frame upwards extending in all directions. Note that two orange hubs must be on the upper front corners.
FrameChannel BarsLight(s)Graphic/Fabric PanelsGraphic/Fabric Case Wrap*Laminated top piece*
*Optional
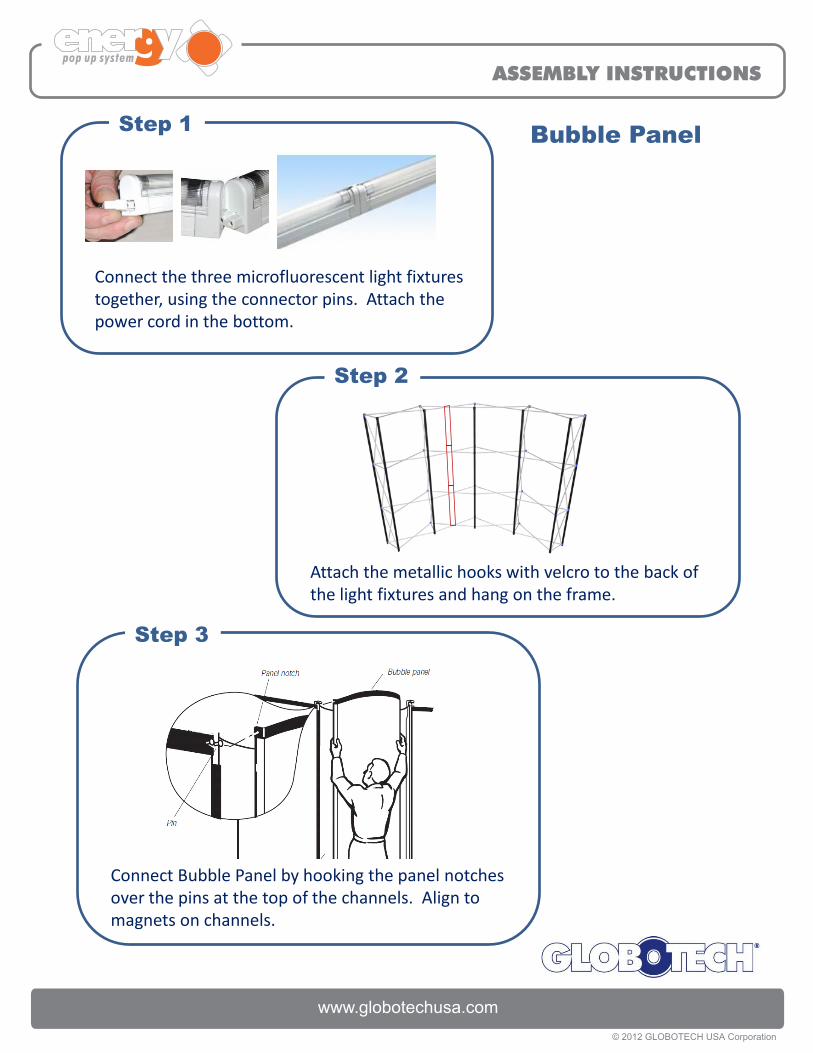
Bubble PanelStep 1
Connect the three microfluorescent light fixtures together, using the connector pins. Attach the power cord in the bottom.
Step 2
Attach the metallic hooks with velcro to the back of the light fixtures and hang on the frame.
Step 3
Connect Bubble Panel by hooking the panel notches over the pins at the top of the channels. Align to magnets on channels.
ASSEMBLY INSTRUCTIONS

www.globotechusa.com
Contents Expanding the Frame
Channel Bars
Attaching Panels
Attach panels in order, left to right or right to left. Finish with the end panels.It may be necessary to adjust panels for improved alignment.
ASSEMBLY INSTRUCTIONS
STEP 1
© 2012 GLOBOTECH USA Corporation
Installing Lights
STEP 3
STEP 2
STEP 4
Magnetic connectors will click on contact
Slide the lights on top of any channel bar.
Connect the three-piece channel bars.
Hook the top of the channel bar to the upper hub on the frame. The magnetic hubs will snap the channel bar in place.
Pull the frame upwards extending in all directions. Note that two orange hubs must be on the upper front corners.
FrameChannel BarsLight(s)Graphic/Fabric PanelsGraphic/Fabric Case Wrap*Laminated top piece*
*Optional

Detach the channel bars from the frame and pack in their carry bag
DISMANTLING AND PACKAGING
Remove panels starting at the bottom and carefully pulling upward, then unhook from the hubs at the top
1
2
3
4
Case to counter conversion
Note:When stored, panels must be rolled with fabric/print outside.
DISASSEMBLY INSTRUCTIONS
GLOBOTECH extends warranties to all its product lines to ensure customer satisfaction.
The pop up frame is backed by a limited lifetime warranty against manufacturer’s physical defects in materials or workmanship under normal use by the original owner.
For other pop up components, channel bars, cases, light fixtures, accessories, the warranty period is one year.
Graphics are backed with a 90 day limited warranty on delamination or defects.
Please contact us for details at 800-682-9059.
LIMITED WARRANTY
Wrap the frabric/graphic panel around the case as shown.
Place the top piece onto the top of the case
Collapse the frame by gently pulling the left and right sides together
Pack the components as shown
www.globotechusa.com
© 2012 GLOBOTECH USA Corporation