installing information console - opentextotadocs.opentext.com/...information-console.pdf ·...
TRANSCRIPT

Installing Information Console

Information in this document is subject to change without notice. Examples provided are fictitious. No part of this document may be reproduced or transmitted in any form, or by any means, electronic or mechanical, for any purpose, in whole or in part, without the express written permission of Actuate Corporation.
© 1995 - 2015 by Actuate Corporation. All rights reserved. Printed in the United States of America.
Contains information proprietary to:Actuate Corporation, 951 Mariners Island Boulevard, San Mateo, CA 94404
www.opentext.comwww.actuate.com
The software described in this manual is provided by Actuate Corporation under an Actuate License agreement. The software may be used only in accordance with the terms of the agreement. Actuate software products are protected by U.S. and International patents and patents pending. For a current list of patents, please see http://www.actuate.com/patents.
Actuate Corporation trademarks and registered trademarks include:Actuate, ActuateOne, the Actuate logo, Archived Data Analytics, BIRT, BIRT 360, BIRT Analytics, The BIRT Company, BIRT Content Services, BIRT Data Analyzer, BIRT for Statements, BIRT iHub, BIRT Metrics Management, BIRT Performance Analytics, Collaborative Reporting Architecture, e.Analysis, e.Report, e.Reporting, e.Spreadsheet, Encyclopedia, Interactive Viewing, OnPerformance, The people behind BIRT, Performancesoft, Performancesoft Track, Performancesoft Views, Report Encyclopedia, Reportlet, X2BIRT, and XML reports.
Actuate products may contain third-party products or technologies. Third-party trademarks or registered trademarks of their respective owners, companies, or organizations include: Mark Adler and Jean-loup Gailly (www.zlib.net): zLib. Adobe Systems Incorporated: Flash Player, Source Sans Pro font. Amazon Web Services, Incorporated: Amazon Web Services SDK. Apache Software Foundation (www.apache.org): Ant, Axis, Axis2, Batik, Batik SVG library, Commons Command Line Interface (CLI), Commons Codec, Commons Lang, Commons Math, Crimson, Derby, Hive driver for Hadoop, Kafka, log4j, Pluto, POI ooxml and ooxml-schema, Portlet, Shindig, Struts, Thrift, Tomcat, Velocity, Xalan, Xerces, Xerces2 Java Parser, Xerces-C++ XML Parser, and XML Beans. Daniel Bruce (www.entypo.com): Entypo Pictogram Suite. Castor (www.castor.org), ExoLab Project (www.exolab.org), and Intalio, Inc. (www.intalio.org): Castor. Alessandro Colantonio: CONCISE Bitmap Library. d3-cloud. Day Management AG: Content Repository for Java. Dygraphs Gallery. Eclipse Foundation, Inc. (www.eclipse.org): Babel, Data Tools Platform (DTP) ODA, Eclipse SDK, Graphics Editor Framework (GEF), Eclipse Modeling Framework (EMF), Jetty, and Eclipse Web Tools Platform (WTP). Bits Per Second, Ltd. and Graphics Server Technologies, L.P.: Graphics Server. Dave Gandy: Font Awesome. Gargoyle Software Inc.: HtmlUnit. GNU Project: GNU Regular Expression. Google Charts. Groovy project (groovy.codehaus.org): Groovy. Guava Libraries: Google Guava. HighSlide: HighCharts. headjs.com: head.js. Hector Project: Cassandra Thrift, Hector. Jason Hsueth and Kenton Varda (code.google.com): Protocole Buffer. H2 Database: H2 database. IDAutomation.com, Inc.: IDAutomation. IDRsolutions Ltd.: JPedal JBIG2. InfoSoft Global (P) Ltd.: FusionCharts, FusionMaps, FusionWidgets, PowerCharts. InfoVis Toolkit. Matt Inger (sourceforge.net): Ant-Contrib. Matt Ingenthron, Eric D. Lambert, and Dustin Sallings (code.google.com): Spymemcached. International Components for Unicode (ICU): ICU library. JCraft, Inc.: JSch. jQuery: jQuery, JQuery Sparklines. Yuri Kanivets (code.google.com): Android Wheel gadget. LEAD Technologies, Inc.: LEADTOOLS. The Legion of the Bouncy Castle: Bouncy Castle Crypto APIs. Bruno Lowagie and Paulo Soares: iText. Membrane SOA Model. MetaStuff: dom4j. Microsoft Corporation (Microsoft Developer Network): CompoundDocument Library. Mozilla: Mozilla XML Parser. MySQL Americas, Inc.: MySQL Connector/J. Netscape Communications Corporation, Inc.: Rhino. NodeJS. nullsoft project: Nullsoft Scriptable Install System. OOPS Consultancy: XMLTask. OpenSSL Project: OpenSSL. Oracle Corporation: Berkeley DB, Java Advanced Imaging, JAXB, Java SE Development Kit (JDK), Jstl, Oracle JDBC driver. PostgreSQL Global Development Group: pgAdmin, PostgreSQL, PostgreSQL JDBC driver. Progress Software Corporation: DataDirect Connect XE for JDBC Salesforce, DataDirect JDBC, DataDirect ODBC. Quality Open Software: Simple Logging Facade for Java (SLF4J), SLF4J API and NOP. Raphael. RequireJS. Rogue Wave Software, Inc.: Rogue Wave Library SourcePro Core, tools.h++. Sencha Inc.: Extjs, Sencha Touch. Shibboleth Consortium: OpenSAML, Shibboleth Identity Provider. Matteo Spinelli: iscroll. StAX Project (stax.codehaus.org): Streaming API for XML (StAX). Sam Stephenson (prototype.conio.net): prototype.js. SWFObject Project (code.google.com): SWFObject. ThimbleWare, Inc.: JMemcached. Twittr: Twitter Bootstrap. VMWare: Hyperic SIGAR. Woodstox Project (woodstox.codehaus.org): Woodstox Fast XML processor (wstx-asl). World Wide Web Consortium (W3C) (MIT, ERCIM, Keio): Flute, JTidy, Simple API for CSS. XFree86 Project, Inc.: (www.xfree86.org): xvfb. ZXing Project (code.google.com): ZXing.
All other brand or product names are trademarks or registered trademarks of their respective owners, companies, or organizations.
Document No. 141215-2-640350 June 19, 2015

i
ContentsAbout Installing Information Console . . . . . . . . . . . . . . . . . . . . . . . . . . . . . . v
Chapter 1Understanding Information Console . . . . . . . . . . . . . . . . . . . . . . . . . . . . . . 1About Actuate Information Console . . . . . . . . . . . . . . . . . . . . . . . . . . . . . . . . . . . . . . . . . . . . . . . . . . 2Planning Information Console installations . . . . . . . . . . . . . . . . . . . . . . . . . . . . . . . . . . . . . . . . . . . . 3
Setting up Information Console . . . . . . . . . . . . . . . . . . . . . . . . . . . . . . . . . . . . . . . . . . . . . . . . . . . 3Information Console architecture . . . . . . . . . . . . . . . . . . . . . . . . . . . . . . . . . . . . . . . . . . . . . . . . . . 4Information Console load balancing . . . . . . . . . . . . . . . . . . . . . . . . . . . . . . . . . . . . . . . . . . . . . . . 4Deploying a load balancer for an BIRT iHub cluster . . . . . . . . . . . . . . . . . . . . . . . . . . . . . . . . . . 5Using a cluster of application servers . . . . . . . . . . . . . . . . . . . . . . . . . . . . . . . . . . . . . . . . . . . . . . 5Using proxy servers with Information Console . . . . . . . . . . . . . . . . . . . . . . . . . . . . . . . . . . . . . . 6Disabling administrative capabilities . . . . . . . . . . . . . . . . . . . . . . . . . . . . . . . . . . . . . . . . . . . . . . . 8
Chapter 2Installing a stand-alone Information Console . . . . . . . . . . . . . . . . . . . . . . . 9Preparing to install Actuate Information Console . . . . . . . . . . . . . . . . . . . . . . . . . . . . . . . . . . . . . 10
Setting ClearType text properties . . . . . . . . . . . . . . . . . . . . . . . . . . . . . . . . . . . . . . . . . . . . . . . . . 10Setting up Information Console . . . . . . . . . . . . . . . . . . . . . . . . . . . . . . . . . . . . . . . . . . . . . . . . . . .11
Creating a new application from an existing Information Console . . . . . . . . . . . . . . . . . . . . . . . 13Using the WAR or EAR file to install . . . . . . . . . . . . . . . . . . . . . . . . . . . . . . . . . . . . . . . . . . . . . . . . 14
About deployment formats . . . . . . . . . . . . . . . . . . . . . . . . . . . . . . . . . . . . . . . . . . . . . . . . . . . . . . 15Avoiding cache conflicts after installing . . . . . . . . . . . . . . . . . . . . . . . . . . . . . . . . . . . . . . . . . . . 21Testing the installation . . . . . . . . . . . . . . . . . . . . . . . . . . . . . . . . . . . . . . . . . . . . . . . . . . . . . . . . . . 21
Chapter 3Configuring Actuate Information Console . . . . . . . . . . . . . . . . . . . . . . . . . 23Information Console web application structure and contents . . . . . . . . . . . . . . . . . . . . . . . . . . . 24
Information Console pages . . . . . . . . . . . . . . . . . . . . . . . . . . . . . . . . . . . . . . . . . . . . . . . . . . . . . . 25Information Console directory structure . . . . . . . . . . . . . . . . . . . . . . . . . . . . . . . . . . . . . . . . . . . 26
Configuring a custom Information Console web application . . . . . . . . . . . . . . . . . . . . . . . . . . . . 29Setting the default locale . . . . . . . . . . . . . . . . . . . . . . . . . . . . . . . . . . . . . . . . . . . . . . . . . . . . . . . . 30Controlling the Message Distribution service load balancing . . . . . . . . . . . . . . . . . . . . . . . . . 31Setting the JavaScript MIME types for Apache Tomcat . . . . . . . . . . . . . . . . . . . . . . . . . . . . . . . 31Configuring connections to iHub using volumeProfile.xml . . . . . . . . . . . . . . . . . . . . . . . . . . . 32
Modifying global style elements . . . . . . . . . . . . . . . . . . . . . . . . . . . . . . . . . . . . . . . . . . . . . . . . . . . . 34Information Console configuration . . . . . . . . . . . . . . . . . . . . . . . . . . . . . . . . . . . . . . . . . . . . . . . . . . 37
Configuring Information Console using web.xml . . . . . . . . . . . . . . . . . . . . . . . . . . . . . . . . . . . 38Configuring locales . . . . . . . . . . . . . . . . . . . . . . . . . . . . . . . . . . . . . . . . . . . . . . . . . . . . . . . . . . . . . 43

ii
Configuring time zones . . . . . . . . . . . . . . . . . . . . . . . . . . . . . . . . . . . . . . . . . . . . . . . . . . . . . . . . . .43Customizing messages and text according to locale . . . . . . . . . . . . . . . . . . . . . . . . . . . . . . . . . .44Configuring the connection to iHub Server . . . . . . . . . . . . . . . . . . . . . . . . . . . . . . . . . . . . . . . . .45Changing the location of online help . . . . . . . . . . . . . . . . . . . . . . . . . . . . . . . . . . . . . . . . . . . . . . .46Restricting access to Information Console features using functionality levels . . . . . . . . . . . .47Enabling advanced scheduling . . . . . . . . . . . . . . . . . . . . . . . . . . . . . . . . . . . . . . . . . . . . . . . . . . . .51
Information Console JavaScript reference . . . . . . . . . . . . . . . . . . . . . . . . . . . . . . . . . . . . . . . . . . . . .52Using Information Console Java servlets . . . . . . . . . . . . . . . . . . . . . . . . . . . . . . . . . . . . . . . . . . . . . .53
base servlet . . . . . . . . . . . . . . . . . . . . . . . . . . . . . . . . . . . . . . . . . . . . . . . . . . . . . . . . . . . . . . . . . . . . .53Invoking a servlet . . . . . . . . . . . . . . . . . . . . . . . . . . . . . . . . . . . . . . . . . . . . . . . . . . . . . . . . . . . . . . .53Java servlets reference . . . . . . . . . . . . . . . . . . . . . . . . . . . . . . . . . . . . . . . . . . . . . . . . . . . . . . . . . . .54
Information Console JavaBeans overview . . . . . . . . . . . . . . . . . . . . . . . . . . . . . . . . . . . . . . . . . . . . .57Information Console JavaBeans package reference . . . . . . . . . . . . . . . . . . . . . . . . . . . . . . . . . . .57Information Console JavaBeans class reference . . . . . . . . . . . . . . . . . . . . . . . . . . . . . . . . . . . . . .58Information Console UserInfoBean class reference . . . . . . . . . . . . . . . . . . . . . . . . . . . . . . . . . . .60
Chapter 4Configuring Report Studio . . . . . . . . . . . . . . . . . . . . . . . . . . . . . . . . . . . . . 67Enabling or disabling functionality . . . . . . . . . . . . . . . . . . . . . . . . . . . . . . . . . . . . . . . . . . . . . . . . . . .68
Configuring toolbar and context menu items . . . . . . . . . . . . . . . . . . . . . . . . . . . . . . . . . . . . . . . .68Specifying the default position of aggregate values . . . . . . . . . . . . . . . . . . . . . . . . . . . . . . . . . .76Using sample data in a preview . . . . . . . . . . . . . . . . . . . . . . . . . . . . . . . . . . . . . . . . . . . . . . . . . . .76Configuring advanced data operations . . . . . . . . . . . . . . . . . . . . . . . . . . . . . . . . . . . . . . . . . . . . .76
Configuring the application environment . . . . . . . . . . . . . . . . . . . . . . . . . . . . . . . . . . . . . . . . . . . . .77
Chapter 5Customizing and integrating Report Studio . . . . . . . . . . . . . . . . . . . . . . . 81About report templates . . . . . . . . . . . . . . . . . . . . . . . . . . . . . . . . . . . . . . . . . . . . . . . . . . . . . . . . . . . . .82Design considerations . . . . . . . . . . . . . . . . . . . . . . . . . . . . . . . . . . . . . . . . . . . . . . . . . . . . . . . . . . . . . .82
Separating or combining visual and data elements . . . . . . . . . . . . . . . . . . . . . . . . . . . . . . . . . . .82Designing themes . . . . . . . . . . . . . . . . . . . . . . . . . . . . . . . . . . . . . . . . . . . . . . . . . . . . . . . . . . . . . . .83Improving usability . . . . . . . . . . . . . . . . . . . . . . . . . . . . . . . . . . . . . . . . . . . . . . . . . . . . . . . . . . . . .83
Creating a report template . . . . . . . . . . . . . . . . . . . . . . . . . . . . . . . . . . . . . . . . . . . . . . . . . . . . . . . . . .85Providing data with a report template . . . . . . . . . . . . . . . . . . . . . . . . . . . . . . . . . . . . . . . . . . . . . . . .87
Using a CSV file as a data source . . . . . . . . . . . . . . . . . . . . . . . . . . . . . . . . . . . . . . . . . . . . . . . . . .87Excluding a data set . . . . . . . . . . . . . . . . . . . . . . . . . . . . . . . . . . . . . . . . . . . . . . . . . . . . . . . . . . . . .88
Creating themes for a report template . . . . . . . . . . . . . . . . . . . . . . . . . . . . . . . . . . . . . . . . . . . . . . . .88Publishing a template . . . . . . . . . . . . . . . . . . . . . . . . . . . . . . . . . . . . . . . . . . . . . . . . . . . . . . . . . . . . . .91Setting the default template category . . . . . . . . . . . . . . . . . . . . . . . . . . . . . . . . . . . . . . . . . . . . . . . . .95Publishing resources associated with a template . . . . . . . . . . . . . . . . . . . . . . . . . . . . . . . . . . . . . . .95Types of data sources . . . . . . . . . . . . . . . . . . . . . . . . . . . . . . . . . . . . . . . . . . . . . . . . . . . . . . . . . . . . . .97Using data objects as a data source . . . . . . . . . . . . . . . . . . . . . . . . . . . . . . . . . . . . . . . . . . . . . . . . . . .97
Deploying data objects . . . . . . . . . . . . . . . . . . . . . . . . . . . . . . . . . . . . . . . . . . . . . . . . . . . . . . . . . . .98

iii
Deploying cross tab templates . . . . . . . . . . . . . . . . . . . . . . . . . . . . . . . . . . . . . . . . . . . . . . . . . . . 99Creating data objects . . . . . . . . . . . . . . . . . . . . . . . . . . . . . . . . . . . . . . . . . . . . . . . . . . . . . . . . . . . . . . 99
Building a data object . . . . . . . . . . . . . . . . . . . . . . . . . . . . . . . . . . . . . . . . . . . . . . . . . . . . . . . . . . . 99Deploying data objects . . . . . . . . . . . . . . . . . . . . . . . . . . . . . . . . . . . . . . . . . . . . . . . . . . . . . . . . . 100
Creating a custom data source . . . . . . . . . . . . . . . . . . . . . . . . . . . . . . . . . . . . . . . . . . . . . . . . . . . . . 102Sample ODA data source . . . . . . . . . . . . . . . . . . . . . . . . . . . . . . . . . . . . . . . . . . . . . . . . . . . . . . . 102Extended sample ODA example . . . . . . . . . . . . . . . . . . . . . . . . . . . . . . . . . . . . . . . . . . . . . . . . . 106Developing an open data access (ODA) data driver . . . . . . . . . . . . . . . . . . . . . . . . . . . . . . . . 108Developing a custom query builder . . . . . . . . . . . . . . . . . . . . . . . . . . . . . . . . . . . . . . . . . . . . . . 109Configuring the extended custom data source . . . . . . . . . . . . . . . . . . . . . . . . . . . . . . . . . . . . . .112
Chapter 6Configuring BIRT Viewer . . . . . . . . . . . . . . . . . . . . . . . . . . . . . . . . . . . . . . 115Configuring the Actuate BIRT Viewer toolbar using iv_config.xml . . . . . . . . . . . . . . . . . . . . . . .116Configuring Actuate BIRT Viewer using web.xml . . . . . . . . . . . . . . . . . . . . . . . . . . . . . . . . . . . . 120Configuring default export formats . . . . . . . . . . . . . . . . . . . . . . . . . . . . . . . . . . . . . . . . . . . . . . . . 124Configuring a BIRT Viewer or Report Studio extension . . . . . . . . . . . . . . . . . . . . . . . . . . . . . . . 128
Index . . . . . . . . . . . . . . . . . . . . . . . . . . . . . . . . . . . . . . . . . . . . . . . . . . . . . . 133

iv
A b o u t I n s t a l l i n g I n f o r m a t i o n C o n s o l e v
A b o u t I n s t a l l i n gI n f o r m a t i o n C o n s o l e
Installing Information Console discusses how to administer a BIRT iHub System volume. The chapters in this guide are:
■ About Installing Information Console. This chapter provides an overview of this guide.
■ Chapter 1. Understanding Information Console. This chapter introduces Actuate iHub Information Console.
■ Chapter 2. Installing a stand-alone Information Console. This chapter discusses installing Actuate iHub Information Console.
■ Chapter 3. Configuring Actuate Information Console. This chapter discusses configuring Actuate iHub Information Console.
■ Chapter 4. Configuring Report Studio. This chapter introduces Report Studio.
■ Chapter 5. Customizing and integrating Report Studio. This chapter describes setting up report templates and data sources for Report Studio.
■ Chapter 6. Configuring BIRT Viewer. This chapter discusses configuring BIRT Viewer.

vi I n s t a l l i n g I n f o r m a t i o n C o n s o l e

C h a p t e r 1 , U n d e r s t a n d i n g I n f o r m a t i o n C o n s o l e 1
C h a p t e r
1Chapter 1Understanding
Information ConsoleThis chapter contains the following topics:
■ About Actuate Information Console
■ Planning Information Console installations

2 I n s t a l l i n g I n f o r m a t i o n C o n s o l e
About Actuate Information ConsoleUsers access iHub resources using a suite of web-based visualization applications called Information Console. The Information Console is a web application that connects to the iHub server and includes a web-based repository content manager that can access visualization tools and web components to service user requests. For example, to open a BIRT Dashboard, Information Console activates the Dashboard application, which is part of the visualization suite. Additionally, the Actuate APIs extend many of the features of these services so they can be implemented in custom applications. For more information on the Actuate APIs, see Integrating Applications into BIRT iHub.
The components and visualization tools available from Information Console are:
■ BIRT Interactive ViewerA web viewer for BIRT report content which also supports printing and saving reports to many formats.
■ BIRT DashboardsA BIRT dashboard manager and editor, that creates and displays custom web and mobile viewing arrangements with interactive elements.
■ Report StudioA BIRT design and document editor that manages presentation and whose editing permissions can be finely defined by the administrator or the original report designer.
The following functionality is not available from Information Console installed as a separate web application:
■ BIRT iHub Administration
■ Advanced Schedule
■ Manage Volume
■ Advanced Jobs
To access this functionality, you must use the embedded Information Console in BIRT iHub.
Actuate Information Console is independent and customizable. You can deploy Information Console on machines separate from iHub as a standalone application, WAR, or EAR, and all of its component applications deploy with it. In addition, every iHub installation also contains an embedded Information Console that can be accessed remotely.
Information Console accesses and stores documents on a volume managed by iHub. Information Console technology is scalable and supports clustering. On a Windows system, the default context root for Information Console is the name of

C h a p t e r 1 , U n d e r s t a n d i n g I n f o r m a t i o n C o n s o l e 3
the WAR or EAR file, or <installation directory>\iHub3\modules\BIRTiHub\iHub\web\iportal for Information Console embedded in the BIRT iHub application or setup as a standalone application. On a UNIX-based system, the default context root for Information Console is the name of the WAR or EAR file or $Home/iHub/web/iportal for Information Console embedded in the BIRT iHub application or setup as a standalone application.
Planning Information Console installationsBefore installing Information Console, you must prepare the operating system and network environments to ensure that you have all the necessary software and configuration resources in place. This section describes how to prepare these environments before starting the Information Console installation process and discusses deployment concerns that may affect your Information Console installation and how you wish to deploy reports to the web.
Setting up Information ConsoleYou can install Information Console in several ways:
■ As a separate web application packaged in a WAR or EAR fileThis method employs a third-party web or application server that manages the network traffic to the Information Console application. An Information Console WAR or EAR can use native load balancing for iHub clusters, redundancy to support constant report services over the web, and iHub security measures as well as third-party load balancing and security measures.
■ As a windows serviceThis method uses the iHub installer to install Information Console as a windows service with an embedded web server to handle network traffic. The windows service installation can integrate with iHub security and load balancing, but does not employ a third-party web or application server, so requires different configuration procedures than a WAR or EAR deployment.
■ Automatically on the same host with iHubThis method provides reports locally on each iHub machine. For more information about installing iHub, see Installing and Upgrading BIRT iHub on Linux or Installing and Upgrading BIRT iHub on Windows.
For enterprise architectures, installing Information Console on several web servers is recommended.
To deploy a report to the web, you need:
■ An Information Console installation.
■ An application server or JSP or servlet engine such as IBM WebSphere.

4 I n s t a l l i n g I n f o r m a t i o n C o n s o l e
■ One or more Actuate designer tools and Actuate BIRT iHub System with Information Console administration.
■ Actuate BIRT iHub administrator privileges.
■ Permission to read, write, and modify operating system directories as necessary. For example, the directory Java uses to hold temporary files is defined by the java.io.tmpdir property and is by default the value of the TMP system variable in the Windows environment and /var/tmp in the UNIX and Linux environments. Read and write permission must be provided to the application server running Information Console for this directory.
Information Console architectureThe general Information Console network architecture is illustrated in Figure 1-1.
Figure 1-1 Information Console architecture overview
A user submits a request by choosing a link on a web page that specifies an Information Console URI. As shown in Figure 1-1, the web or application server receives the URI as an HTTP request and passes the request to the servlet or page engine. The engine invokes Information Console, interprets the URI, and communicates with the BIRT iHub using the Actuate Information Delivery API (IDAPI). The IDAPI manages the request and returns the results to Information Console and the servlet or page engine. The web server returns the results to the web browser. Then, the web browser displays the results for the user.
Information Console manages requests as part of a JSP engine within a web or application server. There is no default user interface for the engine. On a Windows system, Information Console installation places an Information Console link on the Start menu.
Information Console load balancingInformation Console supports two kinds of load balancing to ensure high availability and task distribution for efficient processing, as shown in Figure 1-2.
Web or Application server
Servlet or Page engine
Information Console Actuate BIRT
iHub System
Firewall
Web browser
Database Server
Firewall
SOAP portActuate load balancing
IDAPI Proxy

C h a p t e r 1 , U n d e r s t a n d i n g I n f o r m a t i o n C o n s o l e 5
Figure 1-2 Load-balancing architecture for Information Console
■ Actuate Message Distribution service (MDS) balances the request load among BIRT iHub machines in an BIRT iHub cluster.The Message Distribution service eliminates the need for a third-party network load balancer in front of the BIRT iHub tier. iHub determines which machines in a cluster have MDS running and detects when the MDS machines go offline. MDS distributes the load among the available servers and does not attempt to send a request to an offline machine.
■ Clustered Information Console machines can use a third-party application to balance the load among the application servers.
Deploying a load balancer for an BIRT iHub clusterTo deploy a load balancer or proxy layer in front of the BIRT iHub tier, disable the Actuate load-balancing support by setting the MDS_ENABLED configuration parameter to False in the web.xml Information Console configuration file. For EAR and WAR installations, set this value before deployment. When installing as a Windows service, you can make the configuration change after installing.
Using a cluster of application serversIf the application servers running Information Console support session state management, you can configure Information Console and the application servers to share and maintain a web browsing session state across a cluster of Information Console instances. Configuring the application servers to track the state of each Information Console instance supports reusing authentication information. In other words, you can log in to an Information Console instance and send a request using another Information Console instance without logging in again using the second instance.
Web browser
Web browser
Web browser
Third-party application server load balancer
Volume
Volume
Volume
Actuate BIRT iHub
StateServer or SqlServer
Information Console
Application server
Information Console
Application server
Application server
Actuate BIRT iHub
System Console

6 I n s t a l l i n g I n f o r m a t i o n C o n s o l e
Sharing session state information takes advantage of the application servers’ failover features. If a user is on a cluster application server running Information Console and that application server fails, another application server running Information Console can manage the user’s session.
If you do not use an application server to track session state information, managing the session state is fast, but you lose a user’s state information when you restart Information Console or your application server.
An application server works with one or more database servers to manage session state information. All application servers must have access to the database server to store and retrieve session state information. For specific information about configuring your installation, see your application server documentation.
Using proxy servers with Information ConsoleWhen setting up a proxy server with Information Console, there are steps you must take if your internal application server port is protected by a firewall. In this situation, when the proxy server changes the URL to point to the new context’s port, that port is unavailable due to the firewall. The usual solution is to configure a reverse proxy, but if you are using multiple proxies and a reverse proxy is not practical for your installation, Information Console can perform the redirection.
To redirect a page without using a reverse proxy, Information Console forwards the URL to redirect to the processRedirect.jsp page and updates the browser’s location bar accordingly. This action processes on the client. The browser takes the current URL location and updates the rest of the URI using the redirected URL. You must also set the ENABLE_CLIENT_SIDE_REDIRECT configuration parameter in the <context root>/WEB-INF/web.xml file to True and modify the redirect attributes in the <context root>/WEB-INF/struts-config.xml file. The necessary modifications are included as comments in the file. You just need to comment out the lines that have the redirect attribute set to True and uncomment the lines that forward to the processRedirect.jsp page.
For example, the following code is the struts-config.xml entry for the login action:
<!-- Process a user login --><action
path="/login"name="loginForm"scope="request"input="/iportal/activePortal/private/login.jsp"type="com.actuate.activeportal.actions.AcSsoLoginAction"validate="false"><forward name="loginform"
path="/iportal/activePortal/private/login.jsp"/>

C h a p t e r 1 , U n d e r s t a n d i n g I n f o r m a t i o n C o n s o l e 7
<!-- <forward name="success" path="/iportal/activePortal/private/common/processredirect.jsp?redirectPath=/getfolderitems.do" />
--><forward name="success" path="/dashboard/jsp/myfiles.jsp"
redirect="true"/><forward name="dashboard" path="/dashboard" redirect="true"/><forward name="ajcLogin" path="/ajclanding.jsp"
redirect="true"/><forward name="landing" path="/landing.jsp" redirect="false"/><forward name="activate" path="/activate.jsp" redirect="false"
/><forward name="wait" path="/checksaml.jsp" redirect="false" />
</action>
By default the forward statement for success points to myfiles.jsp with the redirect attribute set to True. This code instructs the application server to send a redirect with the myfiles.jsp URL when the user logs in.
From behind a firewall and proxy, this redirect method fails because the redirect sent by the application server points to the application server port instead of the firewall and proxy port. For success, comment out the line having redirect="true". Uncomment the line that points to processRedirect.jsp. The following code shows the updated entry in struts-config.xml:
<!-- Process a user login --><action
path="/login"name="loginForm"scope="request"input="/iportal/activePortal/private/login.jsp"type="com.actuate.activeportal.actions.AcSsoLoginAction"validate="false"><forward name="loginform"
path="/iportal/activePortal/private/login.jsp"/><forward name="success" path="/iportal/activePortal/private
/common/processredirect.jsp?redirectPath=/getfolderitems.do" />
<!-- <forward name="success" path="/dashboard/jsp/myfiles.jsp" redirect="true"/>-->
<forward name="dashboard" path="/dashboard" redirect="true"/><forward name="ajcLogin" path="/ajclanding.jsp"
redirect="true"/><forward name="landing" path="/landing.jsp" redirect="false"/><forward name="activate" path="/activate.jsp" redirect="false"
/><forward name="wait" path="/checksaml.jsp" redirect="false" />
</action>

8 I n s t a l l i n g I n f o r m a t i o n C o n s o l e
This change needs to be made for all the actions in struts-config.xml that send a redirect to the browser.
Disabling administrative capabilitiesFor most users, the Administrative features in Information Console are not used and should not be exposed. To remove all administrative capabilities from an Information Console installation, locate the /admin directory in the application or application WAR. For example, for the Information Console embedded in iHub, the /admin directory is located in the <iHub install directory>\modules\BIRTiHub\iHub\web\iportal directory. Once the /admin directory is removed, restart the Actuate iHub 3.1 Service.

C h a p t e r 2 , I n s t a l l i n g a s t a n d - a l o n e I n f o r m a t i o n C o n s o l e 9
C h a p t e r
2Chapter 2Installing a stand-alone
Information ConsoleThis chapter contains the following topics:
■ Preparing to install Actuate Information Console
■ Creating a new application from an existing Information Console
■ Using the WAR or EAR file to install

10 I n s t a l l i n g I n f o r m a t i o n C o n s o l e
Preparing to install Actuate Information ConsoleBefore installing Information Console, you must prepare the operating system environment to ensure that you have all the necessary software and configuration resources in place. This section describes how to prepare the environment before starting the Information Console installation process. This section discusses deployment concerns that affect your Information Console installation and how you wish to deploy reports to the web.
To deploy a report to the web, you need:
■ The Information Console WAR or EAR file appropriate to your web or application server.
■ An application server or JSP or servlet engine such as the Actuate embedded servlet engine or IBM WebSphere.
■ One or more Actuate designer tools and Actuate BIRT iHub System with Information Console administration.
■ Actuate BIRT iHub administrator privileges.
■ Permission to read, write, and modify operating system directories as necessary. For example, the directory Java uses to hold temporary files is defined by the java.io.tmpdir property and is by default the value of the TMP system variable in the Windows environment and /var/tmp in the UNIX and Linux environments. Read and write permission must be provided to the application server running Information Console for this directory.
For optimal appearance of Information Console pages, ensure that ClearType is set on the Windows system used to access Information Console.
Setting ClearType text propertiesUsing ClearType text on a Windows system provides the optimal appearance for BIRT iHub pages. All Information Console users need this configuration setting.
How to configure ClearType text
To configure ClearType text, perform the following steps.
1 In Windows Control Panel—Appearance and Personalization, choose Adjust ClearType text. ClearType Text Tuner appears.
2 Select Turn on ClearType. Choose Next.
3 For each of the pages in ClearType Text Tuner, select the sample that looks best to you and then choose Next.
4 In You have finished tuning the text on your monitor, choose Finish.

C h a p t e r 2 , I n s t a l l i n g a s t a n d - a l o n e I n f o r m a t i o n C o n s o l e 11
Setting up Information ConsoleYou install Information Console in either of two ways:
■ As a stand-alone web application. This method enables native load balancing for iHub clusters, redundancy to support constant report services over the web, and secure networks using firewalls and proxy severs.
■ Automatically on the same host with iHub. This method provides reports locally on each iHub machine.
For enterprise architectures, installing Information Console on several web or application servers is recommended.
BIRT iHub Visualization Platform installs Information Console automatically on the machine where it resides. Typically, a manual Information Console installation is done to provide network access to iHub from a remote machine.
To access online documentation, such as the online help and PDF files of the product manuals, navigate to the following location:
http://developer.actuate.com
Installing Information Console as a stand-alone application
This procedure installs Information Console as a separate web application without integrating a new node with an iHub cluster.
1 Install Information Console on the client system using the install script.
1 Extract iHub3.zip to a folder on the file system just as you would for an iHub Installation.
2 Open acinstall.properties for editing.
3 Modify the value of the ac.package parameter to include c, which is the code for Information Console, and m, which is the code for JDK, if you do not have a JDK already installed on the system, as shown in the following code:
ac.package=m,c
4 Save acinstall.properties and close it.
5 Choose Start and type cmd. Then, type Ctrl+Shift+Enter to run the command window as Administrator.
6 Navigate to the iHub extraction folder and type install. The installer installs Information Console and the JDK the Actuate iHub 3.1 Service uses.
7 Exit the command line.
2 Navigate to the <context root>\WEB-INF directory and open web.xml for editing.

12 I n s t a l l i n g I n f o r m a t i o n C o n s o l e
3 Find the SAMLEntityID parameters and change the parameter value to the iportal service URL for the iHub Server. For example, if the iHub server was deployed on server1, the SAMLEntityID parameter would look like the following:
<context-param><description>The SP ID for SAML SSO</description><param-name>SAMLEntityID</param-name><param-value>http://server1:8700/iportal</param-value>
</context-param>
4 Save web.xml and close it.
5 Restart the Actuate iHub 3.1 Service.
1 Choose Start➛Control Panel. Open Administrative Tools.
2 In Administrative Tools, choose Services.
3 In Services, select Actuate iHub 3.1 Service and choose restart.
6 Open a web browser and navigate to the system console for the iHub Server. The default URL for the system console is shown in the following URL:
http://iHubSystem:8500/sysconsole
iHubSystem is the fully qualified domain name or IP address of the iHub Server system.
7 Choose Clusters. Open the context menu for a cluster and choose edit.
8 Choose Single Sign-On, and choose iHub User Management (default) from the Select User Management drop-down menu.
9 Choose Add Service provider.
10 In Add Service Provider, in Server URL type the iportal application URL for the Information Console. Entity Id fills automatically, as shown in Figure 2-1.
Figure 2-1 Adding a Service Provider for Information Console

C h a p t e r 2 , I n s t a l l i n g a s t a n d - a l o n e I n f o r m a t i o n C o n s o l e 13
Choose OK, then choose Save. On the confirmation dialog, choose OK
Creating a new application from an existing Information Console
To deploy an existing Information Console as a separate application, copy the Information Console context root and then modify the configuration files to match the new location. Use the new application to access different iHub volumes or provide different functionality or appearance to users.
How to create a new application from an existing Information Console application
The steps in this procedure copy the Information Console application that is part of the standard iHub folder structure on a Windows system to a new folder on the same server.
1 Copy the existing iportal context root and content to a new folder. For example, copy:
C:\Actuate3\BIRTiHubVisualization\modules\BIRTiHub\iHub\web\iportal
to:
C:\Actuate3\BIRTiHubVisualization\modules\BIRTiHub\iHub\web\marcom
2 Edit the SAML settings in the WEB-INF\web.xml file to specify the new context root, as shown in the following code:
<context-param><description>The SP ID for SAML SSO</description><param-name>SAMLEntityID</param-name><param-value>http://mysystem:8700/marcom</param-value>
</context-param>
3 Edit the context root settings in the WEB-INF\shindig.properties file. Replace all instances of iportal with the new context root, as shown in the following code:
...shindig.signing.global-callback-url=
http://mysystem:8700/marcom/gadgets/oauthcallback...shindig.content-rewrite.proxy-url=/marcom/gadgets/proxy?url=#shindig.content-rewrite.concat-url=
/gadgets/concat?container=default&shindig.content-rewrite.concat-url=/marcom/gadgets/concat?...

14 I n s t a l l i n g I n f o r m a t i o n C o n s o l e
4 Edit the context root settings in the WEB-INF\classes\containers\default\container.js file. Replace all instances of iportal with the new context root. The first two instances are shown in the following code:
"gadgets.jsUriTemplate" : "http://%host%/marcom/gadgets/js/%js%",
..."gadgets.uri.js.path" : "/marcom/gadgets/js",
5 Add the new context root to the iHub configuration file, C:\Actuate3\BIRTiHubVisualization\modules\BIRTiHub\iHub\etc\acpmdconfig.xml, as shown in the following code:
<Contextpath="/marcom"docBase="C:/Actuate3/BIRTiHubVisualization/modules/BIRTiHub
/iHub/web/marcom"workDir="C:/Actuate3/BIRTiHubVisualization/modules/BIRTiHub
/Hub/data/web/work/localhost/marcom"crossContext="true"welcome = "login.jsp"sessionCookiePath="/"samlEntityID="http://mysystem:8700/marcom"
/>
6 Shut down the iHub server by stopping the Actuate iHub 3.1 Service.
7 Remove the working folder for the embedded iHub Tomcat server by deleting the following folder:
C:\Actuate3\BIRTiHubVisualization\modules\BIRTiHub\iHub\web\work
8 Restart the Actuate iHub 3.1 Service.
Using the WAR or EAR file to installDepending on your application server, you can deploy Information Console as a WAR or EAR file. See your application server documentation about how to deploy a WAR or EAR file. For details about application servers for which Actuate supports WAR and EAR deployments, see the Supported Products Matrix for this release on the Actuate Support site at the following URL:
http://support.actuate.com/documentation/spm
This section describes how to configure Information Console to run on one machine, and communicate with a BIRT iHub server located on another machine. After performing these configuration tasks, you deploy the Information Console WAR or EAR file to install Information Console.

C h a p t e r 2 , I n s t a l l i n g a s t a n d - a l o n e I n f o r m a t i o n C o n s o l e 15
About deployment formatsTable 2-1 lists the Information Console WAR and EAR files Actuate provides for installing Information Console, and the application server Actuate supports for each file.
Only the JBoss and WebSphere application servers support EAR deployment.
General deployment tasksYou must configure the Information Console WAR and application server for integration. You must also verify that you have a standard J2EE installation.
To integrate your application server with Information Console, complete the following tasks:
■ Download the WAR or EAR file appropriate to your application server from the software distribution site.
■ Configure the application server to operate with BIRT iHub server.
■ Configure the Information Console WAR to integrate with the application server as described in “Preparing the WAR file,” later in this chapter.
■ Deploy Information Console to the application server.
Preparing the serverActuate recommends the following configuration for best performance:
■ Use at least a two-CPU machine for Information Console.
■ If BIRT iHub system uses more than four CPUs, configure one CPU for Information Console for every two CPUs that iHub uses.
Set the following configuration values on the application server:
■ On a machine with 1 GB of available physical memory, set the Java heap size to a value between 256 MB and 512 MB. If more memory is available, increase this value based on performing load tests on the server machine.
■ Set the number of threads to a value between 50 and 75.
Table 2-1 BIRT Information Console deployment formats
File Application server
WL_ActuateInformationConsole.war BEA WebLogic
TOMCAT_ActuateInformationConsole.war Apache Tomcat, Jetty HTTP and Application Server
JBOSS_ActuateInformationConsole.ear JBoss
WAS_ActuateInformationConsole.ear IBM WebSphere

16 I n s t a l l i n g I n f o r m a t i o n C o n s o l e
Preparing the WAR fileTo prepare the Information Console for deployment, open the WAR file and perform the following tasks:
■ Modify volumeProfile.xml to support communication between Information Console and BIRT iHub server.
■ Modify the following files to enable shindig 2.0 support for Information Console:
■ container.js
■ shindig.properties
■ Modify web.xml to enable shindig 2.0 support for Information Console and specify values for Information Console configuration parameters.
■ Remove the el-api.jar file from the WAR file if necessary.
The following sections describe these tasks. As a best practice, make a backup copy of a file before modifying it.
Modifying volumeProfile.xml
Replace the following variables with their appropriate values in the WEB-INF\volumeProfile.xml code shown in Listing 2-1:
■ $$SERVER_URL$$URL of the machine hosting BIRT iHub Server. For example, http://URUP:8000.
■ $$VOLUME$$Name of the volume to which Information Console connects. For example, Default Volume.
Listing 2-1 Modifying WEB-INF\volumeProfile.xml
<VolumeProfiles>...
<Profile><Default>true</Default><ProfileName>enterprise</ProfileName><RepositoryType>enterprise</RepositoryType>
<ServerUrl>$$SERVER_URL$$</ServerUrl><Volume>$$VOLUME$$</Volume></Profile>
</VolumeProfiles>
Add further Profile entries if your iHub system supports more than one volume.

C h a p t e r 2 , I n s t a l l i n g a s t a n d - a l o n e I n f o r m a t i o n C o n s o l e 17
Modifying container.js
Replace the following variables with their appropriate values in the WEB-INF\classes\containers\default\container.js code shown in Listing 2-2.
■ $$IPORTAL_CONTEXT$$Context root of the Information Console web application
■ $$IPORTAL_MACHINE$$Fully qualified domain name of the Information Console web application
Listing 2-2 Modifying WEB-INF\classes\containers\default\container.js
"gadgets.jsUriTemplate" : "http://%host%/$$IPORTAL_CONTEXT$$/gadgets/js/%js%",
..."gadgets.uri.js.host" : "http://$$IPORTAL_MACHINE$$/","gadgets.uri.js.path" : "/$$IPORTAL_CONTEXT$$/gadgets/js",..."gadgets.uri.oauth.callbackTemplate" :
"//%host%/$$IPORTAL_CONTEXT$$/gadgets/oauthcallback"..."gadgets.osDataUri" : "http://%host%/$$IPORTAL_CONTEXT$$/rpc"...// Default Js Uri config: also must be overridden."gadgets.uri.js.host": "${Cur['defaultShindigTestHost']}","gadgets.uri.js.path": "/$$IPORTAL_CONTEXT$$/gadgets/js",
// Default concat Uri config; used for testing."gadgets.uri.concat.host" :
"${Cur['defaultShindigProxyConcatAuthority']}","gadgets.uri.concat.path" : "/$$IPORTAL_CONTEXT$$/gadgets/concat","gadgets.uri.concat.js.splitToken" : "false",
// Default proxy Uri config; used for testing."gadgets.uri.proxy.host" :
"${Cur['defaultShindigProxyConcatAuthority']}","gadgets.uri.proxy.path" : "/$$IPORTAL_CONTEXT$$/gadgets/proxy",
// This config data will be passed down to javascript. Please// configure your object using the feature name rather than// the javascript name.
// Only configuration for required features will be used.// See individual feature.xml files for configuration details.
// This config data will be passed down to javascript. Please// configure your object using the feature name rather than// the javascript name.
// Only configuration for required features will be used.

18 I n s t a l l i n g I n f o r m a t i o n C o n s o l e
// See individual feature.xml files for configuration details.
"gadgets.features" : {"core.io" : {
// Note: /proxy is an open proxy. Be careful how you expose this!
// Note: Here // is replaced with the current protocol http/https
"proxyUrl" : "//%host%/$$IPORTAL_CONTEXT$$/gadgets/proxy?container=default&refresh=%refresh%&url=%url%%rewriteMime%",
"jsonProxyUrl" : "//%host%/$$IPORTAL_CONTEXT$$/gadgets/makeRequest"
},"views" : {
"profile" : {"isOnlyVisible" : false,"urlTemplate" :
"http://$$IPORTAL_MACHINE$$/$$IPORTAL_CONTEXT$$/gadgets/profile?{var}",
"aliases": ["DASHBOARD", "default"]},"canvas" : {
"isOnlyVisible" : true,"urlTemplate" :
"http://$$IPORTAL_MACHINE$$/$$IPORTAL_CONTEXT$$/gadgets/canvas?{var}",
"aliases" : ["FULL_PAGE"]}
},...
"opensocial" : {// Path to fetch opensocial data from// Must be on the same domain as the gadget rendering server"path" : "http://%host%/$$IPORTAL_CONTEXT$$/rpc",// Path to issue invalidate calls"invalidatePath" : "http://%host%/$$IPORTAL_CONTEXT$$/rpc",
..."osapi" : {
// The endpoints to query for available JSONRPC/REST services"endPoints" : [ "http://%host%/$$IPORTAL_CONTEXT$$/rpc" ]
},...
Modifying shindig.properties
Replace the following variables with their appropriate values in the WEB-INF\classes\shindig.properties code shown in Listing 2-3:

C h a p t e r 2 , I n s t a l l i n g a s t a n d - a l o n e I n f o r m a t i o n C o n s o l e 19
■ $$IPORTAL_MACHINE$$Fully qualified domain name of the Information Console web application
■ $$IPORTAL_PORT$$TCP port assigned to the Information Console web application
■ $$IPORTAL_CONTEXT$$Context root of the Information Console web application
Listing 2-3 Modifying WEB-INF\shindig.properties
...shindig.signing.global-callback-url=
http://$$IPORTAL_MACHINE$$:$$IPORTAL_PORT$$/$$IPORTAL_CONTEXT$$/gadgets/oauthcallback
...shindig.content-rewrite.proxy-url=
/$$IPORTAL_CONTEXT$$/gadgets/proxy?url=#shindig.content-rewrite.concat-url=
/gadgets/concat?container=default&shindig.content-rewrite.concat-url=
/$$IPORTAL_CONTEXT$$/gadgets/concat?...
Modifying web.xml
Set properties in WEB-INF\web.xml for supporting shindig 2.0, and for configuring Information Console.
How to modify WEB-INF\web.xml
1 Locate the definition for INSTALL_MODE and change the value from standalone to enterprise.
2 Replace the following variables with their appropriate values in the web.xml code shown in Listing 2-4. Use a text editor that accepts UTF-8 encoding to edit web.xml.
■ $$IPORTAL_MACHINE$$Name of the machine hosting the Information Console web application
■ $$IPORTAL_PORT$$TCP port assigned to the Information Console web application
Listing 2-4 Modifying the <param-value> element in WEB-INF\web.xml
...<context-param>
<param-name>system.properties</param-name><param-value>
shindig.host=$$IPORTAL_MACHINE$$

20 I n s t a l l i n g I n f o r m a t i o n C o n s o l e
shindig.port=$$IPORTAL_PORT$$</param-value></context-param> ...
3 Review the Information Console configuration parameters shown in Table 2-2 and update as necessary.
Removing el-api.jar file from the WAR file
Perform this task only if you are deploying Information Console using one of the following WAR files:
■ WAS_ActuateInformationConsole.warTo deploy Information Console to the IBM WebSphere application server. WAS_ActuateInformationConsole.ear contains WAS_ActuateInformationConsole.war.
■ WL_ActuateInformationConsole.warTo deploy Information Console to the Oracle WebLogic application server.
Remove the WEB-INF/lib/el-api.jar file from the WAR file if the /lib directory for your application server also contains el-api.jar. The presence of el-api.jar in
Table 2-2 Information Console configuration parameters
Parameter name Description Action
BIRT_RESOURCE_PATH
The location of the standard templates and properties files that Report Studio uses. This location can be in a WAR file or on a disk.
If you specify a location on disk, copy the contents of the Information Console resources folder to this physical location on the file system.
DEFAULT_LOCALE
The default locale is en_US. You can leave this value unchanged. A user can select a locale at login.
If you change the locale, select the new locale from the locales in /WEB-INF/Localemap.xml.
DEFAULT_TIMEZONE
The default time zone is Pacific Standard Time (PST). You can leave this value unchanged. A user can select a time zone at login.
If you change the time zone, select the new time zone from the time zones in the TimeZones.xml file, in the WEB-INF directory.
LOG_FILE_LOCATION
The location of the files that log Information Console activity.
You must create this physical location on the file system.
TEMP_FOLDER_LOCATION
The location where Information Console creates temporary files.
You must create this physical location on the file system.
TRANSIENT_STORE_PATH
The location where Information Console creates temporary files.
You must create this physical location on the file system.
C h a p t e r 2 , I n s t a l l i n g a s t a n d - a l o n e I n f o r m a t i o n C o n s o l e 21
both the Information Console WEB-INF/lib directory and the application server /lib directory may cause errors.
Deploying Information Console clientExit the WAR file and deploy the WAR or EAR file to your application server.
About clusters of serversIf the application server supports clustering, see the application server documentation for more information about setting up clusters and deploying web applications such as Information Console.
Avoiding cache conflicts after installingInformation Console uses Java Server Page (JSP) technology. Application servers and browsers cache pages. A browser can use a cached copy of a page instead of the new page. After you install, using a cached copy of some pages can lead to errors or missing functionality.
To avoid this problem, clear the application server cache after you install Information Console. With some application servers, you must restart the application server. For more information about the necessary steps for clearing the cache, see the application server documentation.
If possible, also clear the browser cache to ensure that the browser does not use an old copy of the page from its cache. Alternatively, you can refresh recently visited pages or clear the browser cache if a problem occurs. For more information about clearing the browser’s cache and refreshing a page, see the browser documentation.
Testing the installationComplete the steps in the following section to test the Information Console installation.
How to test the installation
1 Start the Actuate iHub 3.1 Service or the application server and web server, if necessary.
2 To start using Information Console, type the Information Console URL into the address bar of your web browser. For example, if Tomcat is your application server, type a URL similar to the following:
http://Actuate1:8080/iportal/
■ Actuate1 is the name of your computer, and 8080 is the default port to access Information Console when using Tomcat as the application server.
■ iportal is the default context root for Information Console.

22 I n s t a l l i n g I n f o r m a t i o n C o n s o l e
The Information Console login page appears.
3 On the Information Console login page, type a user name and password.
4 Choose Log In.

C h a p t e r 3 , C o n f i g u r i n g A c t u a t e I n f o r m a t i o n C o n s o l e 23
C h a p t e r
3Chapter 3Configuring Actuate
Information ConsoleThis chapter contains the following topics:
■ Information Console web application structure and contents
■ Configuring a custom Information Console web application
■ Modifying global style elements
■ Information Console configuration
■ Information Console JavaScript reference
■ Using Information Console Java servlets
■ Information Console JavaBeans overview

24 I n s t a l l i n g I n f o r m a t i o n C o n s o l e
Information Console web application structure and contents
Actuate Information Console generates web pages using a set of default JSPs. Information Console JSPs use cascading style sheets, JavaScript, and custom tags to generate dynamic web page content. The JavaScript and tags provide access to other JSPs, JavaBeans, and Java classes.
The Information Console web application organizes these inter-operating components into a Model-View-Controller (MVC) architecture. To operate a web application, the MVC components perform the following functions:
■ Model contains the logic for sending requests to and processing responses from the repository. This component is the data model for Information Console.
■ View contains the pages that display data prepared by actions. This component is the presentation portion of Information Console.
■ Controller contains the servlets that implement actions. This component is the program control logic for Information Console and manages actions initiated from the browser.
The controller maps actions, designated by URLs with the .do extension, to an actionServlet. The actionServlet is configured with action paths specified in <Actuate home>\iPortal\iportal\WEB-INF\struts-config.xml.
Typically, an action path leads to a JSP with parameters as a web resource. Information Console file and directory names are case-sensitive. The first time you use a JSP, your web server compiles it into a servlet. Servlets are compiled Java programs or JSPs that run as part of a network service such as a web server. After compiling a JSP into a servlet, a web server can fulfill subsequent requests quickly, provided that the JSP source does not change between requests.
Users make requests to view the contents of a repository, run and view reports, and so on. Each JSP processes any URL parameters by passing them to JSP tags, including Actuate custom tags or your own custom tags.
You specify the user’s Actuate BIRT iHub System and volume as URL parameters. To specify the locale and time zone to which to connect, use parameter values in an Information Console request within a URL or by specifying the desired values in the login form. For example, the following URL specifies the en_US locale for U.S. English, and the Pacific standard time for the timezone parameter:
http://localhost:8700/iportal/login.do?locale=en_US&timezone=PST

C h a p t e r 3 , C o n f i g u r i n g A c t u a t e I n f o r m a t i o n C o n s o l e 25
Information Console pagesInformation Console uses JSPs and servlets to generate web pages dynamically before sending them to a web browser. The JSPs use custom tags, custom classes, and JavaScript to generate dynamic web page content. The JavaScript, classes, and tags provide access to other pages, JavaBeans, and Java classes. For example, application logic in Information Console can reside on the web server in a JavaBean.
Web browsers can request a JSP with parameters as a web resource. The first time a web browser requests a page, the page is compiled into a servlet. Servlets are Java programs that run as part of a network service such as a web server. Once a page is compiled, the web server can fulfill subsequent requests quickly, provided that the page source is unchanged since the last request.
The dashboards servlet and JSPs support the dashboards and gadgets interface for Information Console. The dashboard pages reside in <context root>\dashboard\jsp. To provide dashboard access, enable the BIRT 360 license option.
The filesfolders JSPs and custom tags support accessing repository files and folders. These JSPs and custom tags reside in <context root>\iportal\activePortal\private\filesfolders.
The submit request JSPs and custom tags support submitting new jobs. The submit request JSPs reside in <context root>\iportal\activePortal\private\newrequest. For specific information about running jobs using Information Console, see Using Information Console.
The options JSPs and custom tags support managing user option settings. The options pages reside in <context root>\iportal\activePortal\private\options.
The viewing JSPs and custom tags support the following functionality, depending on the report type:
■ Searching report data
■ Using a table of contents to navigate through a report
■ Paginating or not paginating a report
■ Fetching reports in supported formats
For specific information about viewing reports using Information Console, see Using Information Console.
Use the default pages, customize the pages, or create entirely new pages to deploy your reporting web application.
26 I n s t a l l i n g I n f o r m a t i o n C o n s o l e
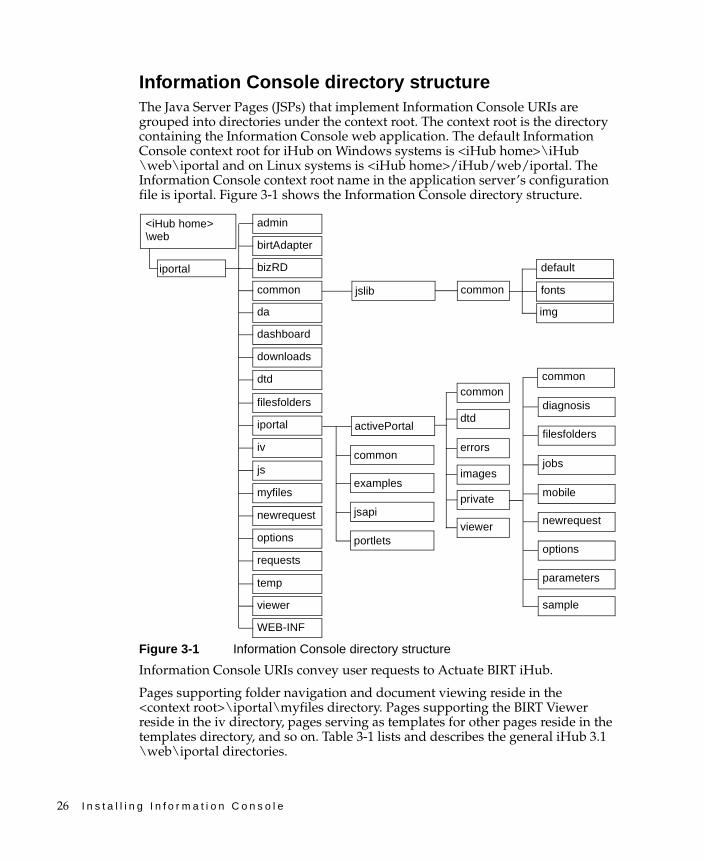
Information Console directory structureThe Java Server Pages (JSPs) that implement Information Console URIs are grouped into directories under the context root. The context root is the directory containing the Information Console web application. The default Information Console context root for iHub on Windows systems is <iHub home>\iHub\web\iportal and on Linux systems is <iHub home>/iHub/web/iportal. The Information Console context root name in the application server’s configuration file is iportal. Figure 3-1 shows the Information Console directory structure.
Figure 3-1 Information Console directory structure
Information Console URIs convey user requests to Actuate BIRT iHub.
Pages supporting folder navigation and document viewing reside in the <context root>\iportal\myfiles directory. Pages supporting the BIRT Viewer reside in the iv directory, pages serving as templates for other pages reside in the templates directory, and so on. Table 3-1 lists and describes the general iHub 3.1 \web\iportal directories.
common
dtd
errors
private
viewer
images
common
diagnosis
jobs
newrequest
options
parameters
filesfolders
<iHub home>\web
common
da
iv
filesfolders
requests
viewer
activePortal
common
examples
jsapi
portlets
iportal
sample
options
bizRD
admin
dashboard
downloads
dtd
myfiles
newrequest
temp
js
WEB-INF
birtAdapter
iportal
mobile
jslib common
default
fonts
img

C h a p t e r 3 , C o n f i g u r i n g A c t u a t e I n f o r m a t i o n C o n s o l e 27
Table 3-2 lists and describes the directories in the common/jslib/common path.
Table 3-1 <Context root> directories
Directory Contents
This directory landing.jsp, the default starting page for accessing Information Console functionality.
admin UI files for application administration. Do not change.
birtAdapter BIRT Viewer integration files.
bizRD Pages that support Report Studio.
common Common files for the user interface, style, and images.
da BIRT Data Analyzer support files.
dashboard Dashboard support files.
downloads Downloaded files.
dtd Document type definitions.
filesfolders Pages that support working with files and folders.
images Information Console user interface images and icons.
iportal The Information Console application internals.
iv Pages that support BIRT Interactive Viewer.
js JavaScript files that control specific web page elements such as search, toolbar, and table of contents.
META-INF The Information Console manifest file used by Information Console embedded in an iHub installation.
myfiles Files for listing repository content controlled by myfiles.jsp.
newrequest Pages that support new requests, such as parameter processing, scheduling, and job status pages.
options Options-specific pages, such as notification pages.
requests Pages in this directory provide backward compatibility for custom web applications referencing these pages by URL. Use the action paths and the private\jobs directory for new customization projects.
temp Working directory for transient content.
viewer Pages that support legacy report viewing.
WEB-INF Files that manage session information such as current user login, roles, and volume.

28 I n s t a l l i n g I n f o r m a t i o n C o n s o l e
Table 3-3 lists and describes the iportal directories.
Table 3-4 lists and describes the <context root>\iportal\activePortal directories.
Table 3-2 <Context root>/common/jslib/common directories
Directory Contents
default Style sheets for most pages in the Information Console
font Font definition files.
img Icon, button, and logo files.
Table 3-3 <Context root>/iportal directories
Directory Contents
activePortal Pages that support login and authentication and directories for the remaining pages
common Common elements included in the common template.
jsapi JavaScript pages to support the JavaScript API demonstration page
Table 3-4 <Context root>/iportal/activePortal directories
Directory Contents
This directory Pages that support login and authentication and directories for the remaining folder and document pages for the Information Console application.
common Common elements included in all reporting web pages, such as banner and side menu elements.
dtd Document type definitions.
errors Error pages.
images Images for reporting web pages, such as buttons, icons, lines, and arrows.
private Most Information Console folders and documents web pages. Users cannot directly access pages in this directory using URLs. These pages are customizable.
private\common
Common elements included in all reporting web pages, such as banner and side menu elements.
private\diagnosis
Self-diagnostic utility page.
private\filesfolders
Pages that support working with files and folders.

C h a p t e r 3 , C o n f i g u r i n g A c t u a t e I n f o r m a t i o n C o n s o l e 29
Configuring a custom Information Console web application
Information Console’s configuration determines many of its essential methods. Configuring your web application customizes how it operates internally, and affects the user’s experience. Perform cosmetic customization tasks using the Information Console style sheets, as described in “Modifying global style elements,” later in this chapter.
Set configuration parameters for the Information Console application to tune performance and to control service and application execution. For example, you can perform the following tasks using configuration parameters:
■ Setting the default locale
■ Controlling the Message Distribution service load balancing
Configure the Information Console application by changing configuration file contents, such as web.xml. The following section describes the customization procedure using the text editor.
Actuate provides separate WAR and EAR files for deploying Information Console to commonly used application servers. If you customize Information Console and need to deploy to multiple application server platforms, you make the same changes in each deployment WAR or EAR file.
How to customize Information Console configuration parameters
Use the following procedure to customize configuration parameters for Information Console. In this procedure, it is assumed that <context root>\WEB-INF\web.xml is the configuration file.
1 Make a backup copy of web.xml.
private\jobs Pages that support requests such as completed requests, successful submission, and details pages by redirecting.
private\mobile Pages that support BIRT Mobile subscriptions.
private\newrequest
Pages that support new requests, such as parameter processing, scheduling, and job status pages.
private\parameters
Pages that support table parameters.
private\sample Example custom requester page.
viewer Pages that support report viewing.
Table 3-4 <Context root>/iportal/activePortal directories
Directory Contents

30 I n s t a l l i n g I n f o r m a t i o n C o n s o l e
2 Using a text editor that supports UTF-8 encoding, edit web.xml to change parameter values. Parameter definitions use the following format:
<param-name><keyword></param-name><param-value><value></param-value>
■ <keyword> is the name of the parameter.
■ <value> is the parameter value.
Do not enclose the keyword and value within quotes, and use no spaces between <param-name>, the keyword or value, and </param-name>. For example, the definition for the default locale parameter is:
<param-name>DEFAULT_LOCALE</param-name><param-value>en_US</param-value>
3 Save web.xml.
4 Restart the application server or servlet engine that runs Information Console and clear your browser cache.
Setting the default localeThe default locale and time zone for Information Console are set when you install it. To change the default settings, you modify the values of the DEFAULT_LOCALE and DEFAULT_TIMEZONE configuration parameters.
How to set a default Information Console locale and time zone
1 Using a UTF-8 compliant code editor, open the web.xml configuration file.
2 Navigate to the lines that define DEFAULT_LOCALE, similar to the following code:
<param-name>DEFAULT_LOCALE</param-name><param-value>en_US</param-value>
Change the current locale id, en_US in the above example, to the desired locale id in param-value. Valid locale id strings are listed in <context root>\WEB-INF\localemap.xml.
3 Navigate to the lines that define DEFAULT_TIMEZONE, similar to the following code:
<param-name>DEFAULT_TIMEZONE</param-name><param-value>America/Los_Angeles</param-value>
Change the current time zone id, Pacific Standard Time in the above example, to the desired default time-zone in param-value. Valid time zone id strings are listed in <context root>\WEB-INF\TimeZones.xml.
4 Save web.xml.

C h a p t e r 3 , C o n f i g u r i n g A c t u a t e I n f o r m a t i o n C o n s o l e 31
5 Restart the application server or servlet engine that runs Information Console and clear your browser cache.
6 Open the Information Console web application. The login page for the custom application appears.
Controlling the Message Distribution service load balancingThe default load balancing for Information Console is set when you install it. To change the default settings, you modify the values of the MDS_ENABLED and MDS_REFRESH_FREQUENCY_SECONDS configuration parameters.
If you are using third-party load balancing, you need to refer to their documentation to configure load balancing. See “Information Console load balancing” in Chapter 1, “Understanding Information Console.”
How to enable the Message Distribution service
The Message Distribution service (MDS) is enabled by default. This procedure assumes it has been disabled.
1 Using a UTF-8 compliant code editor, open the web.xml configuration file.
2 Navigate to the lines that define MDS_ENABLED, similar to the following code:
<param-name>MDS_ENABLED</param-name><param-value>false</param-value>
Change the current value, if it is false, to true.
3 Navigate to the lines that define MDS_REFRESH_FREQUENCY_SECONDS, similar to the following code:
<param-name>MDS_REFRESH_FREQUENCY_SECONDS</param-name><param-value>0</param-value>
Change the current refresh frequency in seconds, 0 in the above example, to the desired number of seconds so that MDS will attempt to discover new nodes added to the cluster or remove nodes dropped from the cluster.
4 Save web.xml.
5 Restart the application server or servlet engine that runs Information Console and clear your browser cache.
Setting the JavaScript MIME types for Apache TomcatApache Tomcat 6.0.39 or newer requires a text MIME type for the JavaScript mime-mapping configuration for Information Console and iHub to support the Actuate JavaScript API.

32 I n s t a l l i n g I n f o r m a t i o n C o n s o l e
How to change the mime-mapping configuration for Information Console
1 Navigate to the following directory:
~\Actuate\iHub3\modules\BIRTiHub\iHub\web\iportal\WEB-INF
2 Open web.xml for editing and navigate to the mime-mapping section shown in Listing 3-1.
Listing 3-1 mime-mapping in web.xml for Information Console
<mime-mapping><extension>js</extension><mime-type>application/javascript</mime-type>
</mime-mapping>
3 Change the value of the mime-type parameter to the following:<mime-type>text/javascript</mime-type>
4 Save and close web.xml.
5 Restart the Actuate iHub 3.1 Service.
For more information about BIRT iHub Information Console web.xml configuration, see Managing Volumes and Users.
Configuring connections to iHub using volumeProfile.xmlTo include an Information Console installation in an iHub cluster, register the Information Console as a service provider. However, you can also configure the Information Console to access any specific iHub instance and volume by configuring a connection in the volume profile. Because the volume profile conceals the iHub and volume values from the users of Information Console, the system administrator can change the location of these resources without affecting the URLs accessed by the users. To access iHub resources using a volume profile, add a __vp=ProfileName parameter to the URL.
Customize volume profiles by creating or modifying entries in the following file:
<context root>\WEB-INF\volumeProfile.xml
For example, the following is a volume profile definition for the server1 server:
<VolumeProfiles><Profile>
<Default>true</Default><ProfileName>server1</ProfileName><RepositoryType>enterprise</RepositoryType><ServerUrl>http://server1:8000</ServerUrl><Volume>volume1</Volume><DashboardTemplatePath></DashboardTemplatePath>

C h a p t e r 3 , C o n f i g u r i n g A c t u a t e I n f o r m a t i o n C o n s o l e 33
</Profile></VolumeProfiles>
■ <ProfileName> is the name of this profile.
■ <RepositoryType> has one of two values, either enterprise or workgroup.
■ <ServerUrl> contains the iHub URL, for example, http://server1:8000. If RepositoryType is workgroup, ServerUrl is ignored.
■ <volume> is the volume name. If RepositoryType is workgroup, volume is ignored.
■ <Default> is optional. Valid values are true and false. A value of true sets this profile as the default volume profile, and the server and volume in this profile is used if no volume profile is provided in the URL. Information Console handles only the first profile with default set to true as the default profile.
■ <DashboardTemplatePath> is optional. This repository path is the location of the dashboard file that loads when a user creates a new dashboards.
To make a new profile available to Information Console, add a new <Profile> element to the list in <VolumeProfiles> in volumeProfile.xml. Then, restart Information Console. For example, the following profile accesses the volume2 volume on the server2 server:
<Profile><Default>false</Default><ProfileName>server2</ProfileName><RepositoryType>enterprise</RepositoryType><ServerUrl>http://server2:8000</ServerUrl><Volume>volume2</Volume><DashboardTemplatePath></DashboardTemplatePath>
</Profile>
Using a volume profile defined in volumeProfile.xmlInformation Console connects to the server and volume defined by the default volume profile entry when the URL does not include the __vp parameter or the volume parameter. For example, to connect to the default volume and server, use the following URL:
http://infoconsole:8700/iportal/getfolderitems.do?userid=userName&password=validPassword
Information Console connects to the server and volume defined by a volume profile when the URL contains a __vp parameter with a valid profile name and the URL does not have a volume parameter. For example, to connect to volume2 on server2 defined by the volume profile example above, use the following URL:
http://infoconsole:8700/iportal/getfolderitems.do?userid=userName&password=validPassword&__vp=server2

34 I n s t a l l i n g I n f o r m a t i o n C o n s o l e
Overriding the volume specified in a volume profileInformation Console supports using a volume profile to access a volume even if the volume is not specified in a volume profile definition. To override the volume specified by a volume profile, add the volume parameter to the URL. A URL with a valid _ _vp parameter and volume parameter connects to the server in the volume profile, but the volume assigned to the volume parameter. For example, to connect to volume3 on server2 explicitly, use the following URL:
http://infoconsole:8700/iportal/getfolderitems.do?userid=userName&password=validPassword&__vp=server2&volume=volume3
If the URL contains a volume parameter but not a __vp parameter, Information Console connects to the server in the default volume profile and the volume assigned to the volume parameter. For example, to connect to volume3 on the default server, use the following URL:
http://infoconsole:8700/getfolderitems.do?userid=userName&password=validPassword&volume=volume3
If the URL does not provide login credentials, Information Console opens the login page for the default volume, not for the value set by the _volume parameter. For example, the following URL does not redirect to the login page for volume4:
http://infoconsole:8900/iportal/newrequest/do_executereport.jsp?__requesttype=immediate&__executableName=/Home/administrator/OrdersByCustomer.rptdesign&serverurl=http://infoconsole:8000&__saveOutput=true&repositoryType=Enterprise&volume=volume4
If login credentials are unknown, use the __vp parameter to specify a volume profile that includes the required volume.
Understanding temporary volume profilesIf a request URL contains serverurl, repositorytype, or volume parameters not defined in volumeProfile.xml, Information Console generates a temporary profile name for this set of volume properties. A temporary name is not persistent and is lost every time the application restarts. If the request URL does not contain serverurl, volume, and repositorytype parameters, Information Console uses the default profile for the request URL. If there is no default profile defined, Information Console generates a temporary server profile having a random name and uses SERVER_DEFAULT, DEFAULT_VOLUME, and REPOSITORY_TYPE defined in WEB-INF/web.xml as the default values for serverurl, volume, and repositorytype.
Modifying global style elementsAlthough JSPs can use HTML to set colors, fonts, and other stylistic elements directly, the JSPs also use cascading style sheets (CSS), templates, and shared

C h a p t e r 3 , C o n f i g u r i n g A c t u a t e I n f o r m a t i o n C o n s o l e 35
images to control the global styles of an Information Console web application. To modify the appearance of the entire Information Console web application, change global style elements.
Global style definitions are located in the <context root>\common\jslib\themes\default\yggdrasil.css file. To change the company logo displayed in the banner, modify the background:url property of the .ac .navbar .actuate class definition. This class definition in yggdrasil.css includes other properties, as shown in the following code:
.ac .navbar .actuate {text-indent: -9876px;outline: none;float: left;display: block;margin: 12px 0px 0px 0px;padding-right: 11px;background: url(../img/actuate_logo_navbar.png) no-repeat;width: 98px;height: 25px;border-right: #555 1px solid;
}
To change the logo, replace the default value of actuate_logo_navbar.png with a custom logo file name, either as an absolute path, or as the same relative path as the default image by saving the image file in the <context root>\common\jslib\themes\img directory.
To change the background color or height of the top navigation bar, modify the value of the .ac .navbar-inner class definition.This class definition in yggdrasil.css includes other properties, which is shown in the following code:
.ac .navbar-inner {position: relative;height: 43px;padding-left: 15px;padding-right: 0px;background: #363636;-webkit-box-shadow: 0px 3px 3px rgba(0, 0, 0, 0.125);-moz-box-shadow: 0px 3px 3px rgba(0, 0, 0, 0.125);box-shadow: 0px 3px 3px rgba(0, 0, 0, 0.125);border-bottom: #222222 1px solid;z-index: 100;*zoom: 1;
}
Replace the default value of the height parameter to change the height of the top navigation bar and change the value of the background parameter to change the color of the top navigation bar.

36 I n s t a l l i n g I n f o r m a t i o n C o n s o l e
How to customize the company logo and banner color
1 Copy your custom logo image file to the following directory:
<context root>\common\jslib\themes\img
2 Open the yggdrasil.css file for editing.
3 Navigate to the following lines:
background: url(../img/actuate_logo_navbar.png) no-repeat;width: 98px;height: 25px;
4 Change the filename of the background image to the name of custom logo image file and change the width and height dimensions to match the custom image dimensions. For example, if the custom image file was called examplecorp_logo.gif and it had a height of 153 pixels and a width of 37 pixels, you would use the following entry:
background: url(../img/ExampleCorp_logo.gif) no-repeat;width: 153px;height: 37px;
5 Navigate to the following lines:
.ac .navbar-inner {position: relative;height: 43px;padding-left: 15px;padding-right: 0px;background: #363636;
6 Change the value of the height and the background to complement the custom logo. For example, if the custom logo has a yellow background and requires 60 pixels of height with its padding to be centered vertically on the navigation bar, you would use the following entry:
.ac .navbar-inner {position: relative;height: 60px;padding-left: 15px;padding-right: 0px;background: #FFFF00;
7 Save web.xml. Then, restart the Actuate iHub 3.1 Service to apply the changes.
1 Choose Start➛Control Panel. Open Administrative Tools.
2 In Administrative Tools, choose Services.
3 In Services, select Actuate iHub 3.1 Service and choose Restart.

C h a p t e r 3 , C o n f i g u r i n g A c t u a t e I n f o r m a t i o n C o n s o l e 37
8 Open the Information Console application in a web browser to view the new custom navigation bar. For example, if you specified an image, examplecorp_logo.png, your landing page appears as shown in Figure 3-2.
Figure 3-2 Viewing a custom logo and banner in Information Console
Information Console configurationThe Information Console application is configured using files in the context root’s WEB-INF directory. For example, the web.xml configuration file for your context root is located:
<context root>\WEB-INF\web.xml
Table 3-5 lists the configuration files discussed in this chapter.
Table 3-5 Information Console configuration files
File Features Description
erni_config.xml Report Studio
Configures Report Studio functionality
functionality-level.config Information Console
Configures the Information Console user interface by iHub user groups
iv_config.xml BIRT Viewer Configures BIRT Viewer user interface
localemap.xml All Configures languages and locales
TimeZones.xml All Configures time zones
web.xml All Configures features of Information Console including security, networking, caching, labeling and storage

38 I n s t a l l i n g I n f o r m a t i o n C o n s o l e
Configuring Information Console using web.xmlWeb.xml contains parameters that control Information Console features. Table 3-6 describes the configuration parameters for the Information Console application.
Table 3-6 Information Console web.xml parameters
Parameter name Description
AC_DOC_BASE The path to the online documentation. The default value is:http://prod.actuate.com/documentation/ihub31
BIRT360PLUS_URL URL for the Metrics Management web resources required for performance analytics gadgets, available in the gadget gallery.
BIRT_RENDER_FORMAT_EMITTER_ID_MAPPING
Specifies which emitter will be used for a specific BIRT report. Valid entries are of the format "render_format:emitter_ID" separated by a semicolon. The default value is:html:org.eclipse.birt.report.engine.emitter.html;
xhtml:com. actuate.birt.report.engine.emitter.xhtml;pdf:org.eclipse.birt.report.engine.emitter.pdf;postscript:org.eclipse.birt.report.engine.emitter.postscript;xls:com.actuate.birt.report.engine.emitter.xls;ppt:org.eclipse.birt.report.engine.emitter.ppt;pptx:com.actuate.birt.report.engine.emitter.pptx;doc:org.eclipse.birt.report.engine.emitter.word;docx:com.actuate.birt.report.engine.emitter.docx
CACHE_CONTROL Specifies how a web browser caches information using one of the following values:■ NO-CACHE indicates that the browser does not cache
information and forwards all requests to the server. With NO-CACHE, the back and forward buttons in a browser do not always produce expected results, because choosing these buttons always reloads the page from the server.If multiple users access Information Console from the same machine, they can view the same cached data. Setting CACHE_CONTROL to NO-CACHE prevents different users viewing data cached by the browser.
■ NO-STORE indicates that information is cached but not archived.
■ PRIVATE indicates that the information is for a single user and that only a private cache can cache this information. A proxy server does not cache a page with this setting.
■ PUBLIC indicates that information may be cached, even if it would normally be non-cacheable or cacheable only within an unshared cache.

C h a p t e r 3 , C o n f i g u r i n g A c t u a t e I n f o r m a t i o n C o n s o l e 39
CACHE_CONTROL (continued)
■ Unset (no value) is the default value. The browser uses its own default setting when there is no CACHE_CONTROL value.
Caching information reduces the number of server requests that the browser must make and the frequency of expired page messages. Caching increases security risks because of the availability of information in the cache. For additional information about cache control, see the HTTP/1.1 specifications.
CONNECTION_TIMEOUT
Controls how many seconds Information Console waits for a request to complete before dropping the connection to the application server or BIRT iHub. Set this value to limit wait times. The default value is 0, meaning the connection is never dropped.
COOKIE_DOMAIN Specifies the host name of the server setting the cookie. The cookie is only sent to hosts in the specified domain of that host. The value must be the same domain the client accesses. Information Console automatically sets this parameter. For example, if the client accesses http://www.actuate.com/iportal/login.do, the domain name is actuate.com.
COOKIE_ENABLED Indicates whether to use cookies to store information between user logins. The default value is True. If False, Information Console does not use cookies. Without cookies, many Information Console features are unavailable or do not persist across sessions. For example, without cookies, user name, language, and time zone settings always use their default values when a new browser session begins.
COOKIE_HTTPONLY Sets the HTTPonly property of cookie stored by Information Console. In supported browsers, this property prevents third-party scripts from accessing cookies generated by Information Console. The default value is true, which enables the HTTPOnly flag.
COOKIE_SECURE Indicates whether to access and write cookies securely. If true, cookies are only written if a secure connection, such as HTTPS, is established. The default value is false, which enables cookies for all connection types.
DATAFIELDS_DISPLAY_ORDER
Specifies display order of Fields and Folders. Default value is "ascending". Valid values are: "ascending", "descending", "none".
DEFAULT_LOCALE Specifies the default locale. Information Console sets this parameter value during installation. The locale map is <context root>\WEB-INF\localemap.xml.
DEFAULT_PAGE_BREAK_INTERVAL
Specifies the number of rows to display in one page when viewing a report. If set to 0, there are no page breaks.
(continues)
Table 3-6 Information Console web.xml parameters (continued)
Parameter name Description

40 I n s t a l l i n g I n f o r m a t i o n C o n s o l e
DEFAULT_TIMEZONE Specifies the default time zone. Information Console sets this parameter value during installation. The time zone map is <context root>\WEB-INF\TimeZones.xml.
ENABLE_CLIENT_SIDE_REDIRECT
Specifies whether URL redirection is done on the client side or the server side. Set the value to True for client side redirection. The default value is False. For more information about URL redirection, see “Using proxy servers with Information Console” in Chapter 1, “Understanding Information Console.”
ENABLE_DEBUG_LOGGING
Indicates whether to record debugging messages in a log file called Debug.log. Set the value to True to enable debug messages in the log file. The default value is False.
ENABLE_ERROR_LOGGING
Indicates whether to log errors. This parameter’s default value is True, which enables error logging. If you set this parameter to True, Information Console creates two error log files:■ Admin.log records general errors.■ Soapfault.log records iHub communication errors.
ENABLE_JUL_LOG Indicates whether to log Information Console activity. This parameter’s default value is TRUE, which enables logging. If you set this parameter to TRUE, Information Console creates log files named reportService.<Service number>.<System name>.<Information Console start up time stamp>.<File number>.log.
ERROR_LOG_FILE_ROLLOVER
Specifies the time period to wait before starting a new log file. Options are Daily, Monthly, Weekly, and Yearly. The default value is Monthly.
EXECUTE_DASHBOARD_GADGET_GENERATION_WAIT_TIME
Specifies the time to wait, in seconds, for a gadget to generate when running a dashboard design file. This parameter’s default value is 2 seconds.
EXECUTE_REPORT_WAIT_TIME
Specifies the time to wait, in seconds, for a report to execute. This parameter’s default value is 20 seconds. For more information about the wait time parameter, see Integrating Applications into BIRT iHub.
FORCED_GC_INTERVAL
Indicates the length in seconds of the interval that the Information Console application waits between forced garbage collections. To disable garbage collection, set this parameter to 0, the default value. Use this parameter to tune application server performance. 600 seconds is the recommended value. If the value is too low, the application server performs garbage collection too frequently, slowing the system. If the value is too high, you waste memory. If disabled, the application server controls garbage collection.
Table 3-6 Information Console web.xml parameters (continued)
Parameter name Description

C h a p t e r 3 , C o n f i g u r i n g A c t u a t e I n f o r m a t i o n C o n s o l e 41
GADGET_GENERATION_WAITING_TIME
Specifies the time to wait, in seconds, for an individual gadget to generate. This parameter’s default value is 10 seconds.
IDAPI_TIMEOUT Specifies the number of seconds to wait for a SOAP message response. This value must be larger than the maximum time necessary to run a report design or Information Console generates a time-out error for some reports. Its default value is 7200.
INSTALL_MODE Indicates whether Information Console is installed with iHub. The value is set when Information Console is installed. Do not change this setting.
JUL_LOG_CONSOLE_LEVEL
The level of Information Console activity to log to the console. Valid values are OFF, SEVERE, WARNING, INFO, CONFIG, FINE, FINER, FINEST, in order of the number of messages to log. The default value is OFF.
JUL_LOG_FILE_COUNT
Specifies the number of log files for a particular time stamp, if the value of ENABLE_JUL_LOG is TRUE.
JUL_LOG_FILE_LEVEL
The level of Information Console activity to log in a file. Valid values are OFF, SEVERE, WARNING, INFO, CONFIG, FINE, FINER, FINEST, in order of the number of messages to log. The default value is WARNING.
JUL_LOG_FILE_SIZE_KB
The maximum size, in kilobytes, for an Information Console activity log file. When a log file reaches this size, Information Console creates a new log file and increments its file number. If the log file number reaches the value of JUL_LOG_FILE_COUNT, Information Console resets the file number to zero and overwrites the first log file for the time stamp.
LOG_FILE_LOCATION
Indicates which directory contains the log files. If the value is not an absolute directory path name, Information Console locates the directory in the Information Console home directory. The default value is logs in the Information Console home directory.
LOGIN_TIMEOUT Specifies the number of seconds to wait before a session times out. The minimum login time-out is 300 seconds. The maximum value is equivalent to java.lang.Long. Its default value is 1200 seconds.
MAX_BACKUP_ERROR_LOGS
Specifies the maximum number of backup error log files to keep. The default value is 10.
MAX_LIST_SIZE Limits the number of items returned when getting folder items, jobs, job notices, scheduled jobs, and subscriptions to reduce network traffic. The default value is 150.
(continues)
Table 3-6 Information Console web.xml parameters (continued)
Parameter name Description

42 I n s t a l l i n g I n f o r m a t i o n C o n s o l e
MOBILE_APP_DOWNLOAD
The URL target of the download button displayed by Information Console when viewed in mobile/touch device.
PROGRESSIVE_REFRESH
Controls the interval in seconds at which an Actuate report refreshes itself when running a progressive report. The report refreshes first after 15 seconds, then after 60 seconds, and then after the PROGRESSIVE_REFRESH interval. If the value is less than 60, Information Console uses 60 seconds. This parameter’s default value is 1800 seconds.
PROGRESSIVE_VIEWING_ENABLED
Specifies whether a paginated report starts to display in the browser as soon as the first page has been generated. Valid values are true and false. The default value is true.
PROXY_BASEURL Indicates a proxy server’s URL if the network uses one between Information Console and the client. The default value is blank, which indicates that the network does not use a proxy server.
REDIRECT_TO_OUTSIDE_DOMAIN
Specifies whether an outside domain is a legal value for the targetpage URL parameter. If set to false, targetpage cannot redirect traffic to any outside domain. The default value is false.
SECURITY_ADAPTER_CLASS
Specifies the fully qualified class of the security adapter, which must extend com.actuate.iportal.security.iPortalSecurityAdapter, that controls access to Information Console functionality. The default value is no name.
SESSION_DEFAULT_PARAMETER_VALUE_ID
Specifies the name of the object that stores the HTTP session-level report parameters. This object is an instance of the com.actuate.parameter.SessionLevelParameter class, which is extensible. The default value is SessionDefaultParameterValue.
sessionTimeout The number of milliseconds the Information Console Ajax Proxy maintains an idle session. The default value is 5000.
TRANSIENT_STORE_MAX_SIZE_KB
Limits the amount of disk space that Information Console uses for temporary files. The default value is 102400, which is 100 MB.
TRANSIENT_STORE_PATH
Path to Information Console transient files. The default value is set when Information Console is installed. When deploying more than one context root or separate server, set a unique path for each.
TRANSIENT_STORE_TIMEOUT_MIN
Specifies, in minutes, how long to retain Information Console transient files. The default value is 40, which is 40 minutes.
UPLOAD_FILE_TYPE_LIST
Specifies the valid file types, by extension, for upload with Information Console. The default value is blank, which indicates any file type.
Table 3-6 Information Console web.xml parameters (continued)
Parameter name Description

C h a p t e r 3 , C o n f i g u r i n g A c t u a t e I n f o r m a t i o n C o n s o l e 43
Information Console can use a volume profile to access a specific iHub instance and volume when it is not part of the iHub cluster. Because the volume profile conceals the iHub and volume values from the users of Information Console, the system administrator can change the location of these resources without affecting the URLs accessed by the users. To access iHub resources using a volume profile, add a __vp=ProfileName parameter to the URL.
Configuring locales<context root>\WEB-INF\localemap.xml contains the locales available to Information Console. Add locales to this file using the same format as the existing locales. To see each locale in the file, search for one of the following strings:
<Locale
or:
<DisplayName>
Searching for <Locale places the cursor on the line having the ID for the locale. Searching for <DisplayName> places the cursor on the line having the descriptive name for the locale.
Typically, the locale names have the following syntax:
<language>_<country>
For example, ar_EG is Arabic (Egypt). A language spoken in multiple countries has multiple locale names for which the language code is the same and the country code has several values. For example, en_US is the locale for English (United States), en_AU is the locale for English (Australia), and en_BZ is the locale for English (Belize). Some countries have several locales, one for each language. For example, Canada has both en_CA for English (Canada) and fr_CA for French (Canada). You specify a default locale for a custom web application in <context root>\WEB-INF\web.xml.
Configuring time zones<context root>\WEB-INF\TimeZones.xml contains the time zones available to Information Console. Add time zones to this file by using the same format as the
UPLOAD_SECURITY_MANAGER
Specifies the fully qualified class of the security adapter, which must extend com.actuate.iportal.security.IUploadSecurityAdapter, that controls access to the upload functionality. The default value is no name.
Table 3-6 Information Console web.xml parameters (continued)
Parameter name Description

44 I n s t a l l i n g I n f o r m a t i o n C o n s o l e
existing time zones. To see each time zone in the file, search for one of the following strings:
<TimeZone
or:
<DisplayName>
Searching for <TimeZone places the cursor on the line having the ID for the time zone. Searching for <DisplayName> places the cursor on the line having the descriptive name for the time zone.
Some time zone names have short abbreviations for the ID. All time zone names have a full descriptive ID, such as Samoa Standard Time or Greenwich Standard Time. The DisplayName provides the relative time from Greenwich Standard Time and one or more locations that the time zone includes. You specify a default time zone for a custom web application in <context root>\WEB-INF\web.xml.
Customizing messages and text according to localeError messages and text for Information Console are encoded in resource files compressed in the <context root>/WEB-INF/lib/resources.jar file. The properties files contain entries for the interface text and error codes Information Console generates. Chart labels are encoded in resource files compressed in the <context root>/WEB-INF/lib/actuatechartitem.jar file.
For reference, the <context root>/WEB-INF/ErrorMessage.txt file lists the default error codes used by Information Console. The \com\actuate\reportcast\resources\ErrorMessages.properties file within the resources.jar archive contains error messages for the default locale. Information Console uses messages from this file if no locale-specific message for the error exists. Not all of the codes exist in the default ErrorMessages.properties because iHub directly generates many of them in the SOAP messages sent to Information Console.
Override iHub and Information Console messages using a locale-specific error messages file. In addition to the default ErrorMessages.properties file, Information Console provides several localized error message files, such as ErrorMessages_de_DE.properties. This file contains the German language messages for the Germany locale. To specify error messages to a certain locale, modify the existing error message file for that locale or create a new file for the locale. By convention, the format of a locale-specific error message file name includes the language and locale codes at the end of the file name separated by underscore characters.
For example:
ErrorMessages_de_DE.properties
■ de is the language code for German.
■ DE is the Germany country code.

C h a p t e r 3 , C o n f i g u r i n g A c t u a t e I n f o r m a t i o n C o n s o l e 45
These values for language and locale codes are defined in localemap.xml.
Because alphabets for different languages are dissimilar and Information Console uses ASCII encoding for these files, you must convert new or edited files into ASCII format. To convert the files to ASCII, modify the properties file using an editor that saves to the UTF-8 format and convert the file to ASCII using the Java native2ascii utility using the -encoding UTF-8 switch. The native2ascii utility installs with any Java Developer Kit in the <JDK home>/bin directory. Model the format of new messages after those in the ErrorMessage.properties file.
When your modifications are complete, recompress the resources.jar archive using the Java jar utility, retaining the original directory structure for the archive. Copy the new resources.jar file to the <context root>/WEB-INF/lib directory, restart the Actuate iHub 3.1 Service, and log in using the locale for the modified messages file. Confirm that the new messages file was loaded by examining the error messages generated by Information Console using that specific locale.
Error messages appear in pop-up windows when an error is encountered. The window is an operating system window, not an HTML frame. If you use a language-specific version of Windows corresponding to the locale you are viewing, the localized message shows up correctly. If you have not loaded the Windows language pack for a language, the text of a message appears as empty squares instead of text.
Configuring the connection to iHub ServerInformation Console provides the ability to connect to iHub Server, a volume, and manage reports on remote systems. Configure the repository, network, and Message Distribution service for Information Console using parameters in web.xml. These parameters control Information Console’s connection to iHub and the volume. Table 3-7 describes the configuration parameters for networking with iHub.
Table 3-7 iHub connection web.xml parameters
Parameter name Description
AUTO_SAVE_DASHBOARD_DELAY
Controls how long, in seconds, the dashboard engine should wait before sending a save message to persist the personal dashboard file. To disable auto save, set this value to 0.
DASHBOARD_SHARED_RESOURCES
Specifies the path for the shared dashboard and gadget resources on the volume. The gadget gallery displays the contents of this folder under the shared folder and is the default location when sharing dashboards.
(continues)

46 I n s t a l l i n g I n f o r m a t i o n C o n s o l e
Changing the location of online helpActuate provides online help for Information Console using the internet by default. To access online documentation when the internet is not available, you
MAX_CONNECTIONS_PER_SERVER
Indicates the maximum number of Information Console connections to BIRT iHub. Actuate pools connections to increase efficiency. Choose a number of connections that satisfies the most requests concurrently without requiring an unreasonable amount of memory. Begin with a value equal to the number of threads available in your application server. The value for this parameter must be greater than 0. The default value is 150.
MDS_ENABLED Indicates whether to enable the Message Distribution service. The default value is True, which enables the Message Distribution service. For more information about the Message Distribution service, see “Information Console load balancing” in Chapter 1, “Understanding Information Console.”
MDS_REFRESH_FREQUENCY_SECONDS
Indicates, in seconds, how quickly Information Console detects an offline or new node in a cluster. If MDS_ENABLED is True, Information Console refreshes the list of available nodes from BIRT iHub at the time interval specified. The default value is 300 seconds.
REPOSITORY_CACHE_TIMEOUT_SEC
Specifies how long a repository cache remains valid. When the cache becomes invalid, any user actions refresh the cache for the time-out duration. The default value is 900 seconds.
SERVER_QUERY_TIMEOUT
Specifies how long Information Console waits for a response before the socket times out for the BIRT iHub connection. Its default value is eight seconds.
TEMP_FOLDER_LOCATION
Specifies the directory Information Console uses to temporarily store files from a volume if viewing the file requires a location on the web server. If the value is not an absolute directory path name, Information Console locates the directory in the Information Console home directory. The default value is temp in the Information Console home directory. The Information Console user must have write permission for the directory. When deploying more than one Information Console application instance or context root on the same machine, you must set a unique path for each.
VOLUME_PROFILE_LOCATION
Path to the volume profile configuration file from the context root. Default value is /WEB-INF/VolumeProfile.xml.
Table 3-7 iHub connection web.xml parameters (continued)
Parameter name Description

C h a p t e r 3 , C o n f i g u r i n g A c t u a t e I n f o r m a t i o n C o n s o l e 47
must change the help location by configuring web.xml. First, extract the documentation from aic_doc.zip from the Actuate download site into your Information Console EAR or WAR file. Change the help location specified in web.xml to a web application folder. Then, redeploy the Information Console application.
How to switch the help location for Information Console
Use the following procedure to switch the help location for Information Console.
1 Copy aic_doc.zip from the Actuate download site. Extract the contents of aic_doc.zip into a temporary directory. The online help files are located in the <temporary directory>\help directory.
2 Using a UTF-8 compliant code editor, open the web.xml configuration file in the Information Console EAR or WAR file.
3 Navigate to the lines that define AC_DOC_BASE, similar to the following code:
<param-name>AC_DOC_BASE</param-name><param-value>
http://prod.actuate.com/documentation/ihub31</param-value>
4 Change the AC_DOC_BASE value to local, as shown in the following code:
<param-name>AC_DOC_BASE</param-name><param-value>local</param-value>
5 Save web.xml.
6 Recompress your EAR or WAR file using the Java jar utility and redeploy it to the application server or servlet engine as an application.
7 Restart the application server or servlet engine that runs Information Console.
Restricting access to Information Console features using functionality levelsActuate Information Console provides functionality levels that control which features are available to a user. By default, each user can access all of the functionality level features. To restrict access to features for user groups, the Actuate Information Console administrator can modify functionality levels and add additional levels by editing the configuration file. The standard location for the Actuate Information Console configuration file is <context root>\WEB-INF\functionality-level.config.
When configuring security roles, make sure that any roles specified in the configuration file also exist in the volume. Because all users automatically belong to the All security role, all users receive the functionality associated with the Basic or the Open functionality level plus the functionality associated with any other roles they have. When restricting access to features, remove the feature from the

48 I n s t a l l i n g I n f o r m a t i o n C o n s o l e
Open functionality level or comment out the Open level completely and use the Basic functionality level. Understanding the provided functionality levels.
There are four default functionality levels provided in comments. When the comment tags are removed, the provided functionality levels give the following access.
Users with the Basic level can perform the following tasks:
■ Access Documents and Job history
■ Delete their own files.
Basic level users cannot perform any other modifications.
Users at the Intermediate level have all the Basic level access, and can also perform the following tasks:
■ Search documents.
■ Create their own job notifications with attachments.
■ Upload and download files.
■ Use the interactive viewer, if this option is licensed.
Users at the Advanced level have all the Intermediate level access, plus they can perform the following tasks:
■ Create and delete folders.
■ Share files and folders.
■ Set job priority.
Users at the Administrator level can perform all Advanced level tasks.
Use Actuate Information Console administration to associate the levels with users in the volume by assigning the appropriate roles to each user.
Customizing functionality levelsCustomize or add functionality levels by modifying or creating a level definition in functionality-level.config. A functionality level definition consists of five parts:
■ Level nameThe level name must be a unique alphanumeric string, enclosed within <Name> and </Name> tags.
■ Matching security roleThe name of the security role that corresponds to the functionality level. Both the security level and the functionality level must exist before the functionality level can be assigned to a user. Enclose the role name with <Role> and </Role> tags.

C h a p t e r 3 , C o n f i g u r i n g A c t u a t e I n f o r m a t i o n C o n s o l e 49
■ Available featuresTable 3-8 describes the five available features.
Features are specified one per line and are enclosed within <FeatureID> and </FeatureID> tags. When a feature is omitted from a functionality level, the corresponding side menu or banner item is hidden to anyone assigned that functionality level. For example, the Search feature is not provided in the Basic functionality level, so the Search link does not appear for users with the Basic functionality level.
■ Available subfeaturesSubfeatures correspond to actions that you can perform through Actuate Information Console. Most subfeatures are associated with a feature. A subfeature cannot be included in a functionality level if its corresponding feature is not included. The subfeatures are described in Table 3-9.
Table 3-8 Features for functionality levels
Feature Description
Documents Provides access to files and folders
Jobs Allows submitting and accessing jobs
Mobile Provides access to BIRT mobile viewing
Search Provides access to the file search facility
Table 3-9 Subfeatures for functionality levels
Subfeature Feature Description
AddFile Documents Permits adding files when the user has the appropriate privileges
AdvancedData NA Permits the modifying and synchronizing of data sets in Report Studio
CreateFolder Documents Permits creating folders when the user has the appropriate privileges
DashboardBusinessUser
NA Permits use of dashboards
DashboardDeveloper
NA Permits design and administration of dashboards
DeleteFile Documents Permits deleting files when the user has the appropriate privileges
DeleteFolder Documents Permits deleting folders when the user has the appropriate privileges
(continues)

50 I n s t a l l i n g I n f o r m a t i o n C o n s o l e
Subfeatures are specified one per line, enclosed within <SubfeatureID> and </SubfeatureID> tags.
The following code shows a sample functionality level entry:
<Level><Name>ViewAndSearch</Name><Role>All</Role><FeatureID>Jobs</FeatureID><FeatureID>Documents</FeatureID><FeatureID>Search</FeatureID><SubfeatureID>ShareFile</SubfeatureID><SubfeatureID>DeleteFile</SubfeatureID>
</Level>
The level is named ViewAndSearch and is available to all security roles. Users with ViewAndSearch functionality can run jobs, access documents, and search for files. In addition, they can share and delete their own files.
Preserving functionality levels and featuresThe functionality-levels.config file is overwritten during upgrade installations. This change ensures that new levels, features, and subfeatures are available to you with your new Actuate Information Console installation. If you have modified your existing functionality-level.config file, make a backup of the changes before the upgrade. Use the backed-up file to access your changes and merge them into the new functionality-level.config file.
DownloadFile Documents Permits downloading files when the user has the appropriate privileges
InteractiveViewing NA Permits opening Interactive Viewer
JobPriority Jobs Permits setting job priority, up to the user’s maximum job priority
SelfNotificationWithAttachment
Jobs Activates e-mail notification for successful jobs
ShareDashboard NA Permits sharing dashboards when the user has the appropriate privileges
ShareFile Documents Permits sharing files when the user has the appropriate privileges
Table 3-9 Subfeatures for functionality levels (continued)
Subfeature Feature Description

C h a p t e r 3 , C o n f i g u r i n g A c t u a t e I n f o r m a t i o n C o n s o l e 51
Enabling advanced schedulingAdvanced scheduling enables you to create complex or event-based schedules. By default, advanced scheduling is not enabled in standalone Information Console. To enable advanced scheduling, you must do the following:
■ Deploy the following shared libraries to the web server’s global shared lib space, for example <tomcat_home_directory>\lib:
■ com.actuate.common.jar
■ com.actuate.repository.jar
■ com.actuate.sso.jar
■ Set the context for iPortal by adding the following line to context.xml:<Context crossContext="true" sessionCookiePath="/"/>
You can deploy context as META-INF/context.xml within your web applications, or deploy it as part of a global context deploy descriptor file.
Once you have enabled advanced scheduling, test it as described in the following procedure.
How to test advanced scheduling
1 Log in to Information Console as a user with administrator privilege.
2 Navigate to a folder that contains a report design.
3 Click the down-arrow to the left of the report design name and choose Schedule.
4 In Schedule, choose Advanced Scheduling.
5 In Schedule, schedule a job to run right now. Choose OK.
6 Close the Results window.
7 Navigate to My Jobs—Completed. After a few moments, the completed job should appear as shown in Figure 3-3.
Figure 3-3 Completed job

52 I n s t a l l i n g I n f o r m a t i o n C o n s o l e
Information Console JavaScript referenceThis section describes the Information Console JavaScript files. Information Console JavaScript files provide functionality and dynamic content to Information Console web applications. Information Console JavaScript files reside in <context root>\iportal\js.
Table 3-10 lists and describes the Information Console JavaScript files.
Table 3-10 Information Console JavaScript files
Name Description
allscripts.js Defines global variables, resources, and common methods such as deleteFile and viewActiveRequests
array.js Contains functionality for handling arrays and array elements
browsertype.js Determines the web browser in use and provides functionality appropriate to the browser, such as opening a file in a new window and capturing a keystroke event
converter.js Provides character encoding
cookie.js Provides cookie functionality, including reading, writing, and clearing browser cookies
drift.js Adjusts layers and window display for Information Console
encoder.js Contains the encode and unencode methods
htmlselect.js Provides methods for manipulating option controls
layer.js Provides layer functionality, such as createLayer, deleteLayer, getWidth, showLayer
popupmenu.js Defines the methods for manipulating pop-up menus
report.js Provides the JavaScript components for report viewing
resize.js Provides the JavaScript component for resizing a page for Information Console
saveas.js Provides the JavaScript component for saving a file as another file or object
strutscommon.js Provides JavaScript components for using the Struts framework with Information Console
viewnav.js Displays the Information Console toolbar

C h a p t e r 3 , C o n f i g u r i n g A c t u a t e I n f o r m a t i o n C o n s o l e 53
Using Information Console Java servletsJava servlets extend web server functionality. Information Console uses Java servlets to manage binary content and to perform tasks such as uploading and downloading binary files. Actuate provides an abstract framework of servlets that provide common functionality to Information Console. You cannot modify the Actuate Java servlets.
base servletSome Actuate servlets derive from the base servlet:
com.actuate.reportcast.servlets.AcServlet
The base servlet has no URI parameters. It provides Actuate servlets with the functionality for performing the following tasks:
■ Parse and validate parameters specified in Information Console URI directives.
■ Create XML API structures based on Information Console requests.
■ Submit XML streams to the Actuate SOAP API.
■ Handle responses from the Actuate SOAP API, including detecting errors.
■ Store constant session information, such as the name space and SOAP endpoint.
■ Read from and write to cookies.
■ Stream report data or errors to the web browser.
Invoking a servletInvoke servlets using the following syntax:
http://<application server>:<port>/<context root>/servlet/<servlet alias>
■ application server is the name of the machine hosting the application server.
■ port is the port on which the application server listens for requests.
■ context root is the Information Console context root.
■ servlet is a keyword indicating that a servlet follows.
■ servlet alias is the name to which the servlet is mapped in the Information Console installation’s web.xml file. A typical location for web.xml is C:\Actuate3\BIRTiHubVisualization\modules\BIRTiHub\iHub\web\iportal\WEB-INF\web.xml.

54 I n s t a l l i n g I n f o r m a t i o n C o n s o l e
Servlet names are case-sensitive. Do not modify the servlets, their names, or their mapping in web.xml.
Java servlets referenceTable 3-11 lists and describes the Information Console Java servlets.
This section provides the detailed reference for Information Console servlets.
DownloadFile servletDownloads a file from the volume.
Name com.actuate.reportcast.servlets.FileDownloadServlet
Invoke the DownloadFile servlet as:
http://<web server>:<port>/<context root>/servlet/DownloadFile
URIparameters
Table 3-12 lists and describes the URI parameters for the DownloadFile servlet.
Table 3-11 Actuate Information Console servlets
Information Console servlet Description
DownloadFile servlet Downloads a file from the volume
Interactive Viewer servlet Displays a BIRT report document
IDP User Password servlet Displays a shibboleth-compliant login form
Table 3-12 Parameters for DownloadFile URI
URI parameter Description
fileId The unique identifier of an object, usually retrieved with the selectFilesFolders JSP tag.
name The name of the object to download.
showDownloadDialog If true, a download prompt appears before moving a copy of the file. Otherwise, the servlet displays the file in the browser.
version If name is specified, the version number of the object to view. If version is not specified, the latest version is retrieved.

C h a p t e r 3 , C o n f i g u r i n g A c t u a t e I n f o r m a t i o n C o n s o l e 55
Interactive Viewer servletDisplays an Actuate BIRT report document with tools to affect the document and design files. The viewer has two modes, standard and interactive.
The Standard Viewer displays the report with toolbar options to save, print, show the TOC, and launch interactive mode, as shown in Figure 3-4.
Figure 3-4 Standard Viewer
The Interactive Viewer displays the report with toolbar options to navigate the report and provides context menus to edit and format report elements, as shown in Figure 3-5.
Figure 3-5 Interactive Viewer
Name com.actuate.iv.servlet.IVServlet
Invoke the Interactive Viewer servlet as:
http://<web server>:<port>/<context root>/iv
URIparameters
Table 3-13 lists and describes the URI parameters for the Interactive Viewer servlet.
Table 3-13 Parameters for IV URI
URI parameter Description
__bookmark Name of the element of a report to display instead of the whole report file
__floatingfooter Boolean value to add a margin under the footer

56 I n s t a l l i n g I n f o r m a t i o n C o n s o l e
IDP User Password servletDisplays a Shibboleth compliant login form used to log in to iHub 3, as shown in Figure 3-6.
__format A format for the displayed report: ■ pdf: Adobe PDF■ xls: MS Excel■ doc: MS Word■ ppt: MS PowerPoint■ ps: PostScript■ html: HTML■ flashchartsxml, flashgadgetsxml: used to display a fusion chart■ reportlet: used together with __bookmark to show a particular
part/element of the report
__from_page_range The page range of a report to display
__from_page_style The page style to use for a report in pdf or ps formats:■ auto: The page size and content size remains the same.■ actuateSize: Change the page size to fit the content.■ fitToWholePage: Change the content size to fit the page size.Used with the __format parameter
__imageid Name of the report file to display
__instanceid Name of the report file to display
__launchiv Boolean value that enables interactivity
__locale Code for a locale
__page A number for a page to render
__report Name of the report file to display
__rtl Name of the report file to display
repositoryType The name of the object to download
serverURL Contains the URL that accesses iHub, such as http://ESL02835:8000
userid The user’s identifier, required to log in to BIRT iHub
volume Contains a string value specifying the volume for this report
Table 3-13 Parameters for IV URI
URI parameter Description

C h a p t e r 3 , C o n f i g u r i n g A c t u a t e I n f o r m a t i o n C o n s o l e 57
Figure 3-6 IDP Login form
Name edu.internet2.middleware.shibboleth.idp.authn.provider.UsernamePasswordLoginServlet
Invoke the IDP User Password servlet as:
http://<web server>:<port>/idp/Authn/UserPassword
URIparameters
Table 3-13 lists and describes the URI parameters for the Interactive Viewer servlet.
Information Console JavaBeans overviewThis section describes the Information Console JavaBeans. Information Console JavaBeans provide functionality, business logic, and dynamic content to Information Console web applications. Information Console JavaBeans are in aciportal.jar, which resides in <context root>\WEB-INF\lib.
The Javadoc is provided for the JavaBeans in <Actuate product root>\iHub3\modules\BIRTiHub\iHub\web\mgmtconsole\help\api Refer to the Javadoc for a list of JavaBean methods and their arguments.
Information Console JavaBeans package referenceTable 3-15 lists and describes the Actuate packages used in Information Console.
Table 3-14 Parameters for IDP Login URI
URI parameter Description
j_password Name of the element of a report to display instead of the whole report file
j_username The user’s identifier, required to log in to BIRT iHub
58 I n s t a l l i n g I n f o r m a t i o n C o n s o l e
Information Console JavaBeans class referenceThis section lists and describes the Information Console JavaBean classes by topic.
DocumentsTable 3-16 lists and describes Information Console com.actuate.activeportal.forms classes that support the Document pages.
Table 3-15 Information Console packages
Package Contents
com.actuate.activeportal.beans
JavaBeans that maintain information used by the Action classes.
com.actuate.activeportal.forms
JavaBeans derived from the Jakarta Struts org.apache.struts.action.ActionForm object. These JavaBeans store and validate the request parameters in HTTP requests.
com.actuate.activeportal.list
An interface, IContentList, that defines the behavior of lists of items such as files and folders. Several classes in com.actuate.activeportal.forms use this interface.
Table 3-16 Document classes
Class Description
BrowseFileActionForm Supports browsing through the available files, including using filters to search.
CreateFolderActionForm Supports creating a folder in the volume.
FileFoldersPrivilegeActionForm
Stores information about file and folder access rights, the available users and roles, and so forth. Information Console uses this information to set up file and folder privileges.
FileListActionForm Retrieves a list of folders or files. This ActionForm supports setting filters specifying characteristics of objects. Stores the most recent list of items returned from iHub.
GeneralFilterActionForm The base ActionForm for several other ActionForms. Provides methods that handle filters to select which items the iHub returns. For example, you can request all folders and only the most recent version of all executable files.
GetFileDetailsActionForm Stores the details of a file or folder. AcGetFileDetailsAction gets the details and stores them in this JavaBean.
SearchFilesActionForm Stores information about the filter set by the user in the Search page. Jakarta Struts uses the filter to retrieve the list of files from the iHub and store them in this form.

C h a p t e r 3 , C o n f i g u r i n g A c t u a t e I n f o r m a t i o n C o n s o l e 59
GeneralTable 3-17 describes the Information Console com.actuate.activeportal.beans class that supports general functionality.
Table 3-18 lists and describes Information Console com.actuate.activeportal.forms classes that support general functionality.
JobsTable 3-19 lists and describes Information Console com.actuate.activeportal.forms classes that support jobs.
Table 3-17 General bean class
Class Description
LinkBean Generates an HTML link tag using the link, linkAttributes, and text properties. By default, the link class is hyperlink. After setting these properties, use the toString() method to generate an HTML link tag in the following format:<A HREF="link" linkAttributes>text</A>
Table 3-18 General forms classes
Class Description
BaseActionForm The base ActionForm for all other Information Console ActionForms. Provides methods related to postback.
PingActionForm Stores information used by the ping action. Ping detects the status of Information Console and iHub communication.
Table 3-19 Job classes
Class Description
GeneralFilterActionForm Serves as a base ActionForm for several other ActionForms. Provides methods that handle filters to select which items the iHub returns. For example, you can request all folders and only the most recent version of all executable files.
GetJobDetailsActionForm Stores detail information on jobs. AcGetJobDetailsAction uses this class to store and retrieve the job detail information for display.
JobActionForm The base ActionForm for SubmitJobActionForm. Stores values used in submitting a job, such as the document, parameters, and schedule.
SelectJobsActionForm Contains the list of job properties for a scheduled, running, pending, or completed job.

60 I n s t a l l i n g I n f o r m a t i o n C o n s o l e
UsersTable 3-20 lists and describes Information Console com.actuate.activeportal.beans classes that support handling users.
Table 3-21 lists and describes Information Console com.actuate.activeportal.forms classes that support handling users.
Information Console UserInfoBean class referenceTable 3-22 lists and describes the methods other than set methods available in the Information Console com.actuate.activeportal.beans.UserInfoBean class.
SubmitJobActionForm Contains the information for submitting a job from the requester page. This class extends JobActionForm.
Table 3-19 Job classes
Class Description
Table 3-20 User bean classes
Class Description
FeatureOptionsBean Stores the features available to the current user. It contains Information Console functionality levels and reporting features on the iHub the user is using. Access this class using UserInfoBean.getFeatureBean().
ProfileBean Stores the user profile settings obtained from the iHub. Access this class by using UserInfoBean.getProfile().
UserAgentBean Detects what kind of browser the user is using from the HTTP header user-agent. After instantiating this JavaBean, you must call setRequest(HttpServletRequest request). Get the browser type by calling isIE(), isNS4(), and isNS6() methods.
UserInfoBean Contains information about the user, such as the user’s volume name, iHub URL, and authentication ID assigned by the iHub. Several methods also affect the display and highlighting of features.
Table 3-21 User form classes
Class Description
LoginForm Stores information about the user ID, server URL, volume, and other information specified during login.
UserOptionsActionForm Stores the selected choices on the options page, including the view, experience level, and e-mail ID. This form supports changing these options.

C h a p t e r 3 , C o n f i g u r i n g A c t u a t e I n f o r m a t i o n C o n s o l e 61
Table 3-22 UserInfoBean methods
Method Description
getAcLocale() Gets the AcLocale object specifying the Actuate locale for the current user.
getAdminRights() Gets the administrator rights of the current user. If the user is not an administrator or operator, this method returns null. An administrator or application sets these rights when creating a user.
getAuthid() Gets a String containing the authentication ID returned by the iHub for this user during login. Use this authentication ID in IDAPI calls.
getCurrentfolder() Gets a string containing the name of the most recent folder accessed by the user.
getDefaultServerURL() Gets a string for the URL to use for the default server for the user.
getDefaultVolume() Gets the volume name from the VOLUME_DEFAULT tag in <context root>\WEB-INF\web.xml.
getFeatureOptionsBean() Gets a JavaBean that stores the features and iHub options that are available to the current user.
getFeatures() Gets a list of all features defined in the functionality-level.config file.
getFilter() Gets a string containing the filter the user most recently typed into the search field of the Documents page. If the user has not typed a filter, this method returns null.
getHomefolder() Gets a string specifying the user’s home folder. An administrator or application sets this value when creating a user.
getIportalid() Gets a string specifying the Information Console session id.
getLocale() Gets the current login user’s java.util.Locale object.
getMaxJobPriority() Gets the maximum job priority permitted for this user. An administrator or application sets this value when creating a user.
getOnlylatest() Gets the string “true” if the filter on the Documents page specifies showing only the most recent version of each file.
getPassword() Gets a string containing the user’s password.
getProfile() Gets the ProfileBean. This JavaBean stores information about the user’s settings on the Information Console options page. This information includes current view, experience level, and so on.

62 I n s t a l l i n g I n f o r m a t i o n C o n s o l e
getProperty(java.lang.String name)
Gets a string containing the value of a custom property having the name passed as a parameter. Create custom properties and set their values using setProperty().
getRepositoryType() Gets a string specifying the type of repository that the user is accessing as:workgroup: local file systementerprise: a volume
getRoleNames() Gets an array of strings containing a list of the user’s feature roles.
getServerurl() Gets the URL of the server to which the current user is logged in. This URL includes the protocol and the port. For example: http://localhost:9000.
getShowdocuments() Gets the string “true” if the filter on the Documents page specifies including documents.
getShowexecutables() Gets the string “true” if the filter on the Documents page specifies including executable files.
getShowfolders() Gets the string “true” if the filter on the Documents page specifies including folders.
getSideBarFeatures() Gets the list of features available to this user on the side menu, tabs, the tree, or equivalent structure. Some features, such as customization, are not part of this set.
getSidebarSelected() Gets the URL for the feature selected on the side menu, tab, tree, or equivalent structure. This method is used to highlight a feature in the sidebar.
getSubfeatures() Gets a collection containing a list of all subFeatures defined in <context root>\WEB-INF\functionality-level.config.
getSystemname() Gets a string containing the name of the iHub machine.
getTimezone() Gets the AcTimeZone object specifying the time zone for the current user.
getUserAgent() Gets the UserAgentBean object for the user. UserAgentBean detects the user’s browser type.
getUserid() Gets the userID of the current user.
getView() Gets the string specifying the current view for this user.
getVolume() Gets the string specifying the volume that the user is accessing.
init() Initializes the UserInfoBean members.
(continues)
Table 3-22 UserInfoBean methods (continued)
Method Description

C h a p t e r 3 , C o n f i g u r i n g A c t u a t e I n f o r m a t i o n C o n s o l e 63
UserInfoBean calls set methods when the user logs in to set the values that the get methods return. Typically, your application should not call the set methods as the bean would then be inconsistent with the information stored in the repository or external security application. These set methods only change the values in the bean, so the results of the calls are not deterministic.
Table 3-23 lists and describes set methods that are available in the Information Console com.actuate.activeportal.beans.UserInfoBean class.
isAlwaysGetFolderList() Returns True if the Documents page should always show the folder list, even if it is not selected on the filter.
isHomeFolderSet() Returns True if the user has a home folder specified in the volume.
isShowFilters() Returns True if the filter panel is shown for all lists of documents, jobs, and subscriptions.
isViewInNewBrowserWindow()
Returns True if the report viewer is specified to launch in a new browser window.
toString() Returns a string representation of the object.
Table 3-22 UserInfoBean methods (continued)
Method Description
Table 3-23 UserInfoBean set methods
Method Description
setAcLocale(com.actuate.reportcast.utils.AcLocale acLocale)
Sets the Actuate locale for the current user with the specified AcLocale object. Also changes the Java locale.
setAlwaysGetFolderList(boolean b)
Set to True if the Documents page should always show the folder list, even if it is not selected on the filter.
setAuthid(java.lang.String authid)
Sets the authentication ID to the string passed in as a parameter. The authentication ID is returned by the BIRT iHub and set for the user during login. Use getAuthid() to use this authentication ID in IDAPI calls.
setCurrentfolder(java.lang.String currentfolder)
Sets the string specifying the most recent folder name accessed by the user.
setDefaultServerURL(java.lang.String defaultServerURL)
Sets the URL to use as a default value for users.
setDefaultVolume(java.lang.String defaultVolume)
Sets the volume to use if no volume name is specified by the URL in the request. By default, Information Console sets the default volume to the value in the VOLUME_DEFAULT tag in <context root>\WEB-INF\web.xml.

64 I n s t a l l i n g I n f o r m a t i o n C o n s o l e
setFeatureOptions(FeatureOptionsBean featureOptionsBean)
Sets a list of all Information Console features and iHub options that are available to the current user.
setFilter(java.lang.String filter)
Sets the string specifying the filter to use as a default value in the Documents page. Information Console sets this String to the filter that the user most recently typed into the search field of the Documents page.
setHomefolder(java.lang.String string)
Sets the string specifying the user’s home folder. An administrator or application sets this value when creating a user.
setMaxJobPriority(int priority)
Sets the maximum job priority permitted for this user. An administrator sets this value for a user.
setOnlylatest(java.lang.String onlylatest)
Sets value to indicate if only latest version of the documents are to be displayed in the file folder list. “true” sets Information Console to show only the most recent version of each file.
setPassword(java.lang.String password)
Sets the password to the value of the string passed as a parameter.
setProfile() Sets the ProfileBean. This JavaBean stores information about the user’s settings on the Information Console options page. This information includes current view, experience level, and so on.
setProperty(java.lang.String name, java.lang.String value)
Sets the value of a custom property. Create custom properties and set their values using this method. The parameters are the name of the custom property and the value to set.
setRoleNames(java.lang.String[] strings[])
Sets a list of the user’s feature roles, such as Administrator.
setServerurl(java.lang.String surl)
Sets the server URL currently used by the user. This URL includes the protocol and the port, for example: http://localhost:9000.
setShowdocuments(java.lang.String showdocuments)
Sets the value to indicate if documents are to be displayed in the file folder list. “true” sets Information Console to display documents.
setShowexecutables(java.lang.String showexecutables)
Sets the value to indicate if executables are to be displayed in the file folder list. “true” sets Information Console to display executables.
setShowFilters(boolean showFilters)
Set to True to specify that Information Console display the filter panel for all pages showing lists of files, jobs, or subscriptions.
(continues)
Table 3-23 UserInfoBean set methods (continued)
Method Description

C h a p t e r 3 , C o n f i g u r i n g A c t u a t e I n f o r m a t i o n C o n s o l e 65
setShowfolders(java.lang.String showfolders)
Sets the value to indicate if folders are to be displayed in the file folder list. “true” sets Information Console to display folders.
setSideBarFeatures(com.actuate.activeportal.functionality.config.Feature[] feature)
Sets the list of features available to this user on the side menu, tabs, the tree, or equivalent structure. This list is a subset of the features available to the user.
setSidebarSelected(java.lang.String sideBarSelected)
Sets the feature highlighted on the side menu, tab, tree, or equivalent structure. To highlight a feature, pass a string containing the URI invoked by the feature. To not highlight any features, pass a string, such as “No highlighting”, that does not match the URI for any feature in the side menu. By default, Information Console highlights the Documents feature.
setSystemname(java.lang.String systemName)
Sets the iHub system name to the value of the string parameter.
setTimezone(com.actuate.reportcast.utils.AcTimeZone timezone)
Sets the AcTimeZone object specifying the user’s time zone.
setUserAgent(UserAgentBean userAgent)
Sets the UserAgentBean for this user. The UserAgentBean specifies the user’s browser type.
setUserid(java.lang.String userid)
Sets the user ID for the user.
setView(java.lang.String string)
Sets the current view for the user. The string contains the name of the constant for the desired view. The available constants are:■ AcConstants.VIEW_CATEGORY■ AcConstants.VIEW_LIST■ AcConstants.VIEW_DETAIL■ AcConstants.VIEW_ICON
setViewInNewBrowserWindow(boolean _newWindow)
Set to True to specify that the report viewer launch in a new browser window.
setVolume(java.lang.String volume)
Sets the value of the string specifying the name of the volume the user is accessing.
Table 3-23 UserInfoBean set methods (continued)
Method Description

66 I n s t a l l i n g I n f o r m a t i o n C o n s o l e

C h a p t e r 4 , C o n f i g u r i n g R e p o r t S t u d i o 67
C h a p t e r
4Chapter 4Configuring Report StudioThis chapter contains the following topics:
■ Enabling or disabling functionality
■ Configuring the application environment

68 I n s t a l l i n g I n f o r m a t i o n C o n s o l e
Enabling or disabling functionalityReport Studio provides a full range of tools to support the report design process. Administrators can limit Report Studio functionality by user roles. For example, if the Report Studio users you support have little experience designing reports, you can simplify the design process by disabling more advanced functionality, such as creating calculated columns, aggregating data, and joining multiple information objects. Alternatively, if you want users to format report content only by selecting a corporate-designed theme, you can disable the formatting functionality.
Configuring toolbar and context menu itemsYou configure the toolbar and context menu functionality that is available to users by editing attributes in the Report Studio configuration file, erni_config.xml. This file is located in:
<context root>\WEB-INF
Customizations you make to erni_config.xml apply at the application level. If you want different sets of functionality available to different groups of users, you need to create multiple instances of the web application, then customize the functionality of each Report Studio instance.
In erni_config.xml, the <actionSets> element defines all the user actions that can be enabled or disabled. The actions are organized by category, for example, file operations, calculations, and formatting. The <actionSet> element defines the category, and the <action> element defines a specific action. Listing 4-1 shows the hierarchy of elements.
Listing 4-1 An example of an <actionSet> element in erni_config.xml
<actionSets><actionSet>
<name>FileOperations</name><visible>true</visible><action>
<name>New</name><enabled>true</enabled>
</action><action>
<name>Open</name><enabled>true</enabled>
</action><action>
<name>Save</name><enabled>true</enabled>
</action>

C h a p t e r 4 , C o n f i g u r i n g R e p o r t S t u d i o 69
<action><name>SaveAs</name><enabled>true</enabled>
</action></actionSet>
By default, all actions are enabled. You can disable actions in the following ways:
■ To disable a particular action, change the action’s <enabled> attribute from true to false.
■ To disable all actions within a category in one step, change the action set’s <visible> attribute from true to false.
For the changes to take effect, restart the appropriate Windows service. When you relaunch Report Studio, the toolbar displays different buttons and the context menus display different items, depending on which action or actions you disabled.
Configurable actionsTable 4-1 lists toolbar and context menu actions that you can enable or disable. Some of the actions appear in both the toolbar and context menus, and some appear in context menus only. While you can disable any of the actions defined in erni_config.xml, it does not make sense to disable all the actions. For example, disabling both the New and Open actions under file operations prevents a user from creating or opening reports.
Table 4-1 User actions that you can enable or disable through erni_config.xml
Action set Action Description
Calculations Aggregation Performs a calculation over a specified set of data rows.
Calculation Creates a calculated column, based on a specified expression.
ChangeSubtotal Changes the subtotal function, applied to a column in a summary table.
Chart Inserts a chart.
DataFields Shows the data fields in the report, and supports adding or deleting fields in the report.
EditCalculation Changes a calculated column.
Filter Filters table rows, based on a specified condition.
(continues)

70 I n s t a l l i n g I n f o r m a t i o n C o n s o l e
ColumnHeaderOperations
DeleteRow Deletes the row of the selected column header.
InsertRow Inserts a row above or below the selected column header.
Merge Merges the selected column header with the header on the right, left, or above.
Split Splits the selected merged columns.
ColumnOperations ColumnWidth Changes the width of the selected column.
HideColumn Hides the selected column.
MergeColumns Merges the selected columns.
MoveToDetail Moves the selected item in the group header row to the table’s detail row.
MoveToGroup Moves the selected item in the table’s detail row to the group header row.
NoRepeat If duplicate data values appear in the selected column, displays only the first instance.
ReorderColumns Changes the order of the columns in the table.
RepeatValues Displays duplicate data values in the selected column.
ShowColumns Shows the selected columns.
CrosstabOperations Analyze Opens Data Analzyer.
Delete Deletes a cross tab.
Edit Opens the cross tab builder.
SwitchView Switches the cross tab view.
ManageData ManageData Opens the Manage Data dialog.
DeleteColumn DeleteColumn Deletes a column from a table in the report.
EditText EditText Enables editing of the selected static text.
FileOperations New Creates a new report design file.
Open Opens an existing report design.
Save Saves the current report design.
SaveAs Saves the current report design file under a different name or in a new location.
Table 4-1 User actions that you can enable or disable through erni_config.xml (continued)
Action set Action Description
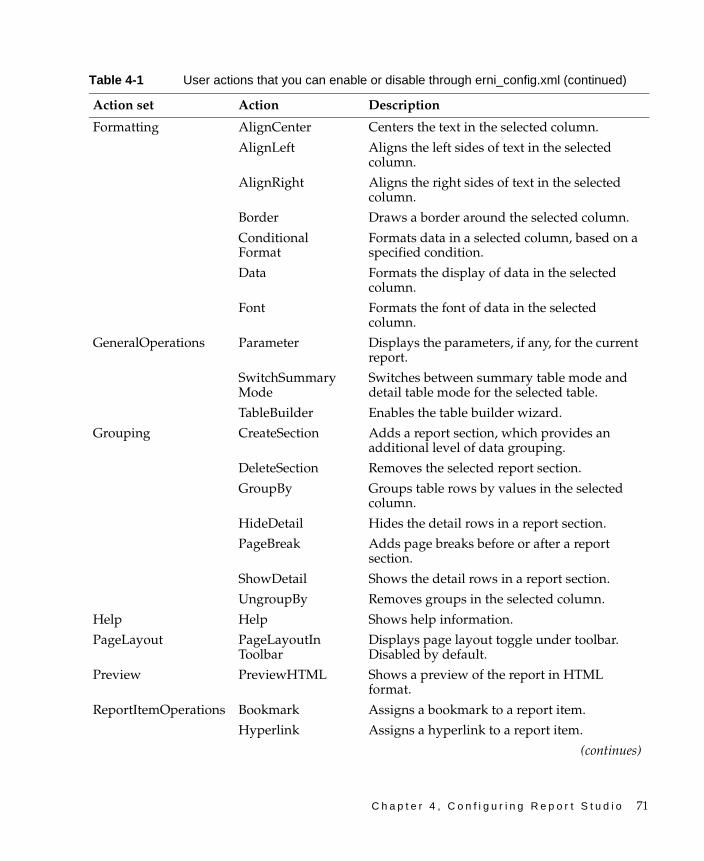
C h a p t e r 4 , C o n f i g u r i n g R e p o r t S t u d i o 71
Formatting AlignCenter Centers the text in the selected column.
AlignLeft Aligns the left sides of text in the selected column.
AlignRight Aligns the right sides of text in the selected column.
Border Draws a border around the selected column.
ConditionalFormat
Formats data in a selected column, based on a specified condition.
Data Formats the display of data in the selected column.
Font Formats the font of data in the selected column.
GeneralOperations Parameter Displays the parameters, if any, for the current report.
SwitchSummaryMode
Switches between summary table mode and detail table mode for the selected table.
TableBuilder Enables the table builder wizard.
Grouping CreateSection Adds a report section, which provides an additional level of data grouping.
DeleteSection Removes the selected report section.
GroupBy Groups table rows by values in the selected column.
HideDetail Hides the detail rows in a report section.
PageBreak Adds page breaks before or after a report section.
ShowDetail Shows the detail rows in a report section.
UngroupBy Removes groups in the selected column.
Help Help Shows help information.
PageLayout PageLayoutInToolbar
Displays page layout toggle under toolbar. Disabled by default.
Preview PreviewHTML Shows a preview of the report in HTML format.
ReportItemOperations Bookmark Assigns a bookmark to a report item.
Hyperlink Assigns a hyperlink to a report item.
(continues)
Table 4-1 User actions that you can enable or disable through erni_config.xml (continued)
Action set Action Description

72 I n s t a l l i n g I n f o r m a t i o n C o n s o l e
Configuration examplesThis section provides examples of editing attributes in erni_config.xml, and the resulting changes to the Report Studio page.
Figure 4-1 shows the default Report Studio page with all actions enabled. The formatting actions on the toolbar and context menu are called out, so that you can see the difference in the toolbar and context menu when these actions are disabled.
Listing 4-2 shows a change to the Formatting action set. Its <visible> attribute, shown in bold, is set to false. Note, however, that all the actions under the Formatting action set are still enabled.
Listing 4-2 Visibility of the Formatting action set, changed to false
<actionSet><name>Formatting</name><visible>false</visible><action>
<name>AlignLeft</name><enabled>true</enabled>
</action><action>
<name>AlignCenter</name><enabled>true</enabled>
</action>
SectionOperations SectionHeading Shows the data fields in the report, and supports adding fields to the selected section heading.
Sorting AdvancedSort Sorts the table rows by the values of multiple columns.
SortAscending Sorts, in ascending order, the table rows by the values of the selected column.
SortDescending Sorts, in descending order, the table rows by the values of the selected column.
TemplateTableOperations
AutoSummarizeOn If set to true, creates a summary table by default. If set to false, creates a detail table by default.
UndoRedo Redo Redo the last action.
Undo Undo the last action.
Table 4-1 User actions that you can enable or disable through erni_config.xml (continued)
Action set Action Description

C h a p t e r 4 , C o n f i g u r i n g R e p o r t S t u d i o 73
<action><name>AlignRight</name><enabled>true</enabled>
</action><action>
<name>Font</name><enabled>true</enabled>
</action><action>
<name>Border</name><enabled>true</enabled>
</action><action>
<name>ConditionalFormat</name><enabled>true</enabled>
</action><action>
<name>Data</name><enabled>true</enabled>
</action></actionSet>
Figure 4-1 Default Report Studio page
Formatting actions
FormatActions

74 I n s t a l l i n g I n f o r m a t i o n C o n s o l e
Figure 4-2 shows the updated Report Studio page. None of the formatting actions appear in the toolbar or the context menu. Setting the <visible> attribute of an action set to false disables all actions within the action set.
Figure 4-2 Updated toolbar and context menu, with no formatting functions
Listing 4-3 shows changes to the Font and Data actions within the Formatting action set. The Formatting action set’s <visible> attribute is set to true. The Font and Data actions are disabled. The other actions in the action set are still enabled.
Listing 4-3 Font and Data (formatting) actions disabled
<actionSet><name>Formatting</name><visible>true</visible><action>
<name>AlignLeft</name><enabled>true</enabled>
</action><action>
<name>AlignCenter</name><enabled>true</enabled>
</action><action>
<name>AlignRight</name><enabled>true</enabled>
</action>

C h a p t e r 4 , C o n f i g u r i n g R e p o r t S t u d i o 75
<action><name>Font</name><enabled>false</enabled>
</action><action>
<name>Border</name><enabled>true</enabled>
</action><action>
<name>ConditionalFormat</name><enabled>true</enabled>
</action><action>
<name>Data</name><enabled>false</enabled>
</action></actionSet>
Figure 4-3 shows the updated Report Studio page. Alignment actions are available on the toolbar and the context menu, but not Font and Data formatting actions.
Figure 4-3 Updated toolbar and context menu, without Font and Data formatting
Alignment actions

76 I n s t a l l i n g I n f o r m a t i o n C o n s o l e
Specifying the default position of aggregate valuesThe default location of aggregate values is in a group’s header. To place the values in a group’s footer, set EnableNewAggregationStyle to false in erni_config.xml:
<featureConfigs><featureConfig>
<name>EnableNewAggregationStyle</name><value>false</value>
</featureConfig>...</featureConfigs>
Using sample data in a previewActual data is used to generate a preview by default. To improve preview performance, you can configure Report Studio to use sample data instead, which uses dummy values. To enable sample data in a preview, set EnableSampleDataInPreview to true in erni_config.xml:
<featureConfigs>...
<featureConfig><name>EnableSampleDataInPreview/name><value>true</value>
</featureConfig>...</featureConfigs>
Configuring advanced data operationsYou can enable or disable the following advanced data options in Available Data in the report design area of Report Studio:
■ Modify enables the user to change the data set by joining it with one or more information objects.
■ Synchronize Data Sets enables the user to update the data set in the report design with the current data in the information object on the volume.
Figure 4-4 shows the data options in Available Data.
By default, these data options are disabled by default and they are in effect only when the data sources are information objects. The Modify and Synchronize Data Sets buttons do not appear unless enabled by configuration.
You can enable these options by editing attributes in one of Information Console’s configuration files, functionality-level.config. For information about all the functionality options listed in functionality-level.config, see Chapter 3, “Configuring Actuate Information Console.”

C h a p t e r 4 , C o n f i g u r i n g R e p o r t S t u d i o 77
Figure 4-4 Advanced data options
Listing 4-4 highlights in bold the advanced data option that can enable the advanced data option user interface buttons.
Listing 4-4 Intermediate and Advanced levels in functionality-level.config
<Level><Name>All</Name>...<SubfeatureID>InteractiveViewing</SubfeatureID><SubfeatureID>AdvancedData</SubfeatureID><SubfeatureID>DashboardDeveloper</SubfeatureID>
</Level>
Unlike the functionality options you set in erni_config.xml, the options you set in functionality-level.config apply at when a user logs in, not at the application level. The Information Object integration service must be enabled for the buttons to function.
Configuring the application environmentYou can change the values of the configuration parameters in the following file:
<context root>\WEB-INF\web.xml
Report Studio parameters control how Report Studio operates a web application and how it interoperates with Information Console. Table 4-2 describes the configuration parameters for Report Studio.
Synchronize Data Sets option
Modify option

78 I n s t a l l i n g I n f o r m a t i o n C o n s o l e
Table 4-2 Report Studio web.xml parameters
Parameter name Description
BIRT_REPORT_DESIGN_CACHE_TIMEOUT
Specifies the amount of time, in seconds, before a cached BIRT report design is purged if it has not been used. The default value is 1800, which is 30 minutes.
BIRT_REPORT_DESIGN_CACHE_TOTAL_NUMBER_OF_ENTRIES
Specifies the maximum number of BIRT report designs to cache. The default value is 50.
BIRT_REPORT_DOCUMENT_CACHE_ENABLED
Specifies whether to cache BIRT report documents when they are previewed or generated. The default value is true.
BIRT_REPORT_PAGE_COUNT_CACHE_ENABLED
Specifies whether to cache the number of pages in transient or persistent BIRT report documents when they are previewed or generated. The default value is true.
BIRT_RESOURCE_PATH Path to Actuate BIRT shared resources, including libraries and templates for Actuate BIRT report designs and Report Studio. The default value is <context root>\resources.
BIRT_SCRIPT_LIB_PATH Path to script libraries. The default value is <context root>\scriptlib.
DATAFIELDS_DISPLAY_ORDER
Sort order of fields and folders in Available Data pane: ascending, descending, or none. The default value is ascending.
DEFAULT_DATA_CACHE_ROW_COUNT
The number of data rows to display in Report Studio when designing a report. The default value is 100.
DEFAULT_LOCALE The default locale. The default locale is en_US. Users can select a locale when they log in.
DEFAULT_PAGE_BREAK_INTERVAL
The number of rows to display on one page when viewing a report. A value of 0 indicates no page breaks.
DEFAULT_REPORT_TEMPLATE_CATEGORY_NAME
The default BIRT report template category to load when a user opens Report Studio. The default value is Standard.
DEFAULT_TIMEZONE The default time zone. The default time zone is Pacific Standard Time (PST).
MAX_BRSTUDIO_DESIGN_SESSION
The maximum number of designs a user can edit concurrently in Report Studio. The default is 10.
MAX_BRSTUDIO_USER_SESSION
The maximum number of concurrent Report Studio sessions on the server. The default is 256.
MAX_DATA_CACHE_ROW_COUNT
Limits the number of data rows that a user can choose to display in Report Studio when designing a report. The default value is 200.

C h a p t e r 4 , C o n f i g u r i n g R e p o r t S t u d i o 79
MAX_NUMBER_OF_VALUES_FOR_DYNAMIC_PARAMETER
The number of values shown in the parameter dialog box for a dynamic value parameter in Report Studio:■ A positive number value N means only the first N values
appear the parameter dialog box. ■ A value of 0 means all values from the data source appear in
the parameter dialog box. The default value is 0.■ A value of -1 means only the first N values appear where
N is the current data cache row count setting for the current design session.
MAX_NUMBER_OF_VALUES_FOR_DYNAMIC_PARAMETER only applies to a dynamic value parameter. All the values appear for a static value parameter no matter how many values it has. For a static value parameter, the full list appears in the parameter dialog box when the user chooses Save and View.
MEMORY_DATA_CACHE_ROW_COUNT
Specifies the number of data rows to cache in memory. The default value is 50.
MORE_VALUE_ROW_COUNT
Specifies the number of rows to fetch when a user chooses to filter a report on a column in Report Studio. The default value is 200.
PERSISTENT_ARCHIVEFILECACHE_TIMEOUT_SECONDS
Specifies the amount of time, in seconds, before a cached file that was created from a repository file is purged if it has not been used. The default value is 7200, which is 120 minutes.
SEARCH_ENABLE_COLUMN_HEADERS
Indicates whether to include column headings in report search results when the output format is CSV or TSV. Set this parameter to true, the default value, to include column headings.
SEARCH_USE_QUOTE_DELIMITER
Indicates whether to enclose search results in quotation marks when the output format is CSV or TSV. The default value is true, which encloses the results in quotation marks.
TRANSIENTARCHIVEFILECACHE_TIMEOUT_SECONDS
Specifies the amount of time, in seconds, before a cached file generated without saving it to the repository is archived if it has not been used. The default value is 1200, which is 30 minutes.
Table 4-2 Report Studio web.xml parameters
Parameter name Description

80 I n s t a l l i n g I n f o r m a t i o n C o n s o l e

C h a p t e r 5 , C u s t o m i z i n g a n d i n t e g r a t i n g R e p o r t S t u d i o 81
C h a p t e r
5Chapter 5Customizing and
integrating Report StudioThis chapter contains the following topics:
■ About report templates
■ Design considerations
■ Creating a report template
■ Providing data with a report template
■ Creating themes for a report template
■ Publishing a template
■ Setting the default template category
■ Publishing resources associated with a template
■ Types of data sources
■ Using data objects as a data source
■ Creating data objects
■ Creating a custom data source

82 I n s t a l l i n g I n f o r m a t i o n C o n s o l e
About report templatesA report template defines a basic report structure on which new reports are based. The Report Studio user always creates a new report by selecting a template first.
Report Studio includes several predefined templates. Often, however, users request custom templates that better suit the data they want to present. In addition, an organization typically requires reports with a particular look and feel. You create templates using the Report Design perspective in Actuate BIRT Designer Professional, an Eclipse-based application for creating reports.
Design considerationsA template typically contains visual elements, such as tables, charts, and labels. It can, however, also contain defined data sets, which specify the data to display in a report. A template can even be a complete report that presents professionally formatted data.
Before you begin creating templates, gather the following basic information:
■ What data will the Report Studio user use in a report?
■ How does the user want to present the data?
■ What does the user need as a starting point for a report?
The rest of this section provides tips for creating effective templates.
Separating or combining visual and data elementsWhen designing a template, one of the key decisions you make is whether to include both visual and data elements in the template or keep them separated. Good design typically dictates that templates contain only visual elements, and that data objects or data objects contain the data. You might decide, however, to create templates that include data, because some users, particularly inexperienced users, prefer to view a report without having to do anything other than select the template.
Templates that contain only visual elements are more versatile. A single template can be used for different reports that present different data. The user can mix and match data objects or data objects with templates. From a development and administrative perspective, separating presentation from data can be efficient and optimal, because template design and data retrieval can be accomplished by developers with design expertise and data-retrieval expertise, respectively. This strategy, however, requires that the template designer and the data architect coordinate to ensure that the templates and data are suitable for use together.

C h a p t e r 5 , C u s t o m i z i n g a n d i n t e g r a t i n g R e p o r t S t u d i o 83
Designing themesReport Studio provides several options for formatting the contents of a report. The standard toolbar provides the user with formatting options to modify the font, color, style, text alignment, and other properties of individual report items. The report design area on the left side of Report Studio displays themes, if any are provided, that the user can select to apply a set of styles to the entire report.
A theme is a collection of styles. The concept and functionality of styles are similar to styles in Microsoft Word and cascading style sheets (CSS). Designers create a theme to apply a consistent style, or look and feel, to a report. A theme, for example, can specify the colors used in a report, the font used for different text, label, or data items, the spacing or alignment of items, border styles, and so on.
Report Studio provides four themes with the default templates, as shown in Figure 5-1.
Figure 5-1 Themes provided with the default templates
When you create a template, consider creating different themes, so that the user can choose from multiple styles. While the creation of a theme is optional, it is standard practice among designers, similar to the use of cascading style sheets with web pages. Themes are stored in a BIRT library file, separate from the template file.
Defining all the styles in a theme within a library, rather than applying formats to individual report items in the template, makes it easier to maintain and update the appearance of a template. When a user requests new or modified styles to use with a particular template, you only update the theme in the library, then publish the latest version of the library. You do not need to modify the template file.
Improving usabilityA template should be intuitive to use. The user should be able to quickly determine how to use the elements in a template, and be able to freely edit most

84 I n s t a l l i n g I n f o r m a t i o n C o n s o l e
elements. The following are some guidelines for improving the usability of a template:
■ Set the general properties of the template file:
■ The display name of the template
■ A brief description of the template
■ The image to use as the thumbnail image of the template
These properties are not required. However, if you do not specify a display name, the name of the template file is used. If you do not supply a description, the word “null” appears, and if you do not specify an image, the user sees a gray box with the x icon. Figure 5-2 shows what the user sees on the Report Template page when a template’s properties are set and when the properties are not set.
Figure 5-2 Displaying two templates: one with properties set, one without properties set
■ Decide which report elements in the template are editable. Examples of editable elements include label elements for displaying report titles, section titles, or column headings, and empty tables into which users insert data. Examples of non-editable elements include company logos and standard copyright statements.
■ Provide meaningful names for each report element, so the Report Studio user can easily identify the type and purpose of the element. If you do not specify a name, Report Studio displays the name of the element type, such as Text or Label. If your template contains three labels, and you do not specify a name for any of the labels, Report Studio displays Label three times in the View menu. The View menu lists all the elements in the template, so users can choose whether to display the elements in the report. Figure 5-3 shows one of the default templates with several elements listed in the View menu. The elements have descriptive names.

C h a p t e r 5 , C u s t o m i z i n g a n d i n t e g r a t i n g R e p o r t S t u d i o 85
■ Provide instructions for using each editable element. For example, a table can display a message, such as “To insert data in this report, drag the columns you want from Available Data and drop them in this table.” Figure 5-3 shows a table with detailed instructions.
Creating a report templateYou use Actuate BIRT Designer Professional to create report templates. You design a template in the same way that you design a BIRT report. In fact, you can create a report design then save it as a template. The file-name extension for a template file is .rpttemplate. If you are creating templates for users worldwide, you can localize the text in the templates the same way you localize text in a BIRT report. The templates that ship with Report Studio are localized, and the text in each template appears in the language specified by the locale the user chooses when logging in to Actuate Information Console.
This section describes the key steps for creating a template but does not provide information about the report elements you can use in a template.
Figure 5-3 Report Items listing all the template elements
List of elements in the template

86 I n s t a l l i n g I n f o r m a t i o n C o n s o l e
How to create a report template
1 In the Report Design perspective, create a new template using the following procedure:
1 Choose File➛New➛Template.
2 In New Template—Template, select the folder in which to create the template file, specify a file name, then choose Next.
3 In New Template—Set Template Property:
1 In Display Name, specify a display name for the template. This name identifies the template when the template is displayed on the Report Template page in Report Studio.
2 In Description, provide a description of the template. This description appears as a tooltip when the user hovers the mouse pointer over the template in Report Studio.
3 In Template Image, browse to the thumbnail image of the template. This step assumes that you have already created the image you want to use as the thumbnail image and placed it in Shared Resources.
4 Choose Finish. A blank report page appears in the layout editor.
2 Drag elements from the palette, and drop them in the layout editor.
3 For elements that you want Report Studio users to edit for their report designs, identify those elements as template report items. Only labels and tables can be edited in Report Studio:
1 Right-click the element, then choose Create Template Report Item.
2 Specify a descriptive name for the element, so the Report Studio user can easily identify the purpose of the element.
3 Provide instructions for using the element.
Figure 5-4 shows an example of an element name and instructions for using the element.
Figure 5-4 Specifying name and instructions for an editable element

C h a p t e r 5 , C u s t o m i z i n g a n d i n t e g r a t i n g R e p o r t S t u d i o 87
4 For elements that you do not want the Report Studio user to edit, you should also specify a descriptive name, so that the Report Studio user can easily identify the purpose of the element and decide whether to include the element in the report. In Property Editor, type a name for the Name property. Figure 5-5 shows setting a label’s name as Copyright.
Providing data with a report templateIf you are creating a template that you want the Report Studio user to use with an data object or a data object, add an editable table element to the template. When a template contains an editable table element, Report Studio prompts the user to select what type of data source they choose, data objects or information objects. Then the report wizard displays a list of the objects from the selected type, published on the server and available to you. You can choose a data object or an information object to use in your report.
If you are creating a template that includes data, create a data source and data set that specifies the data that the Report Studio user can display in the report. You can define multiple data sources and multiple data sets in a template. When the user selects a template with multiple data sets, Report Studio prompts the user to select one of the data sets to use for the report. In addition to the standard data source types, you can use information objects and data objects as data sources as well.
Using a CSV file as a data sourceA Report Studio report design can use a comma-separated values (CSV) file as a data source if the CSV file is a predefined data set in a report template. To use the
Figure 5-5 Specifying a name for a label element that users cannot edit

88 I n s t a l l i n g I n f o r m a t i o n C o n s o l e
file as a data source, you must copy the CSV file to the appropriate directory. To determine which directory to use, download the .rptdesign file to a local directory as an XML file. In the XML code, locate the <data-sources> element, shown in the following example:
<data-sources><oda-data-source
extensionID="org.eclipse.datatools.connectivity.oda.flatfile"name="Data Source" id="266"><text-property name="displayName">Data Source</text-property><property name="HOME">C:\</property><property name="CHARSET">UTF-8</property><property name="INCLTYPELINE">YES</property>
</oda-data-source></data-sources>
The HOME property shows the directory in which to place the CSV file.
Excluding a data setYou can exclude a data set in a template from the Select Data dialog in Report Studio. For example, you want to display stock quote data from a web service in the report, but you do not want the user to manipulate the data. To exclude a data set from the Select Data dialog, set the data set’s UsageInBRS property to excluded in the template’s XML representation. For example, the following code excludes the Orders data set:
<oda-data-set extensionID="org.eclipse.birt.report.data.oda.jdbc.JdbcSelectDataSet" name="Orders" id="8"><list-property name="userProperties">
<structure><property name="name">UsageInBRS</property><property name="type">string</property><property name="isVisible">true</property>
</structure></list-property><property name="UsageInBRS">excluded</property>
Creating themes for a report templateAs described earlier in this chapter, you create themes to provide the user with different sets of styles to apply to a report. You use Actuate BIRT Designer Professional to create the themes in a library. After you create the library, you associate the library with the template.

C h a p t e r 5 , C u s t o m i z i n g a n d i n t e g r a t i n g R e p o r t S t u d i o 89
A library can contain any number of themes, and a theme can contain any number of styles. Actuate BIRT Designer Professional provides support for two types of styles. You are able to do the following:
■ Create a custom style, and apply it to a report element. For example, you can create a style named Report Title, then apply the style to a label that displays the report title.
■ Apply style properties to predefined style names, or selectors. These predefined style names correspond to the different types of report elements. For example, you can apply style properties to a predefined style named table-header, and all table headers in the report are formatted accordingly. This technique is similar to defining styles in CSS where you associate styles with HTML elements, such as <H1> or <P>.
How to create a theme
1 Create a library:
1 Choose File➛New➛Library.
2 In New Library, specify the folder in which to create the library, specify a file name, then choose Finish. If a message box appears, choose OK.
2 Choose Outline view. Outline view, shown in Figure 5-6, displays the types of report elements you can add to a library.
Figure 5-6 Outline view
3 In Outline view, expand Themes.
4 Right-click defaultTheme. Choose Rename to change the name of the theme.
5 Right-click the theme, and choose New Style to create a style for the theme.
6 In New Style, select one of the following options:
■ To apply style properties to a specific type of report element, select Predefined Style, and select a style from the drop-down list.
■ To create a user-named style, select Custom Style, and specify a unique descriptive name, such as Report Title or Copyright.
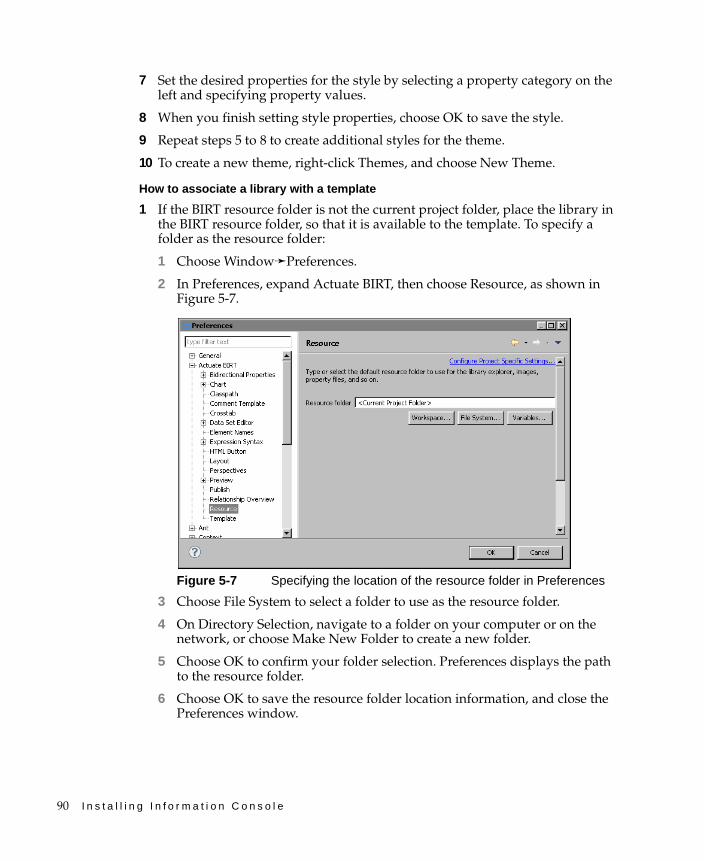
90 I n s t a l l i n g I n f o r m a t i o n C o n s o l e
7 Set the desired properties for the style by selecting a property category on the left and specifying property values.
8 When you finish setting style properties, choose OK to save the style.
9 Repeat steps 5 to 8 to create additional styles for the theme.
10 To create a new theme, right-click Themes, and choose New Theme.
How to associate a library with a template
1 If the BIRT resource folder is not the current project folder, place the library in the BIRT resource folder, so that it is available to the template. To specify a folder as the resource folder:
1 Choose Window➛Preferences.
2 In Preferences, expand Actuate BIRT, then choose Resource, as shown in Figure 5-7.
Figure 5-7 Specifying the location of the resource folder in Preferences
3 Choose File System to select a folder to use as the resource folder.
4 On Directory Selection, navigate to a folder on your computer or on the network, or choose Make New Folder to create a new folder.
5 Choose OK to confirm your folder selection. Preferences displays the path to the resource folder.
6 Choose OK to save the resource folder location information, and close the Preferences window.

C h a p t e r 5 , C u s t o m i z i n g a n d i n t e g r a t i n g R e p o r t S t u d i o 91
7 In the layout editor or Navigator, select the library, then choose File➛Copy Library to Shared Resource Folder. Share Library displays the library name and the location of the resource folder.
8 Choose Finish to confirm placing a copy of the library in the resource folder.
2 Open the template file, and choose Outline view.
3 In Outline view, right-click Libraries, and choose Use Library, as shown in Figure 5-8.
Figure 5-8 Choosing Use Library in the template file’s outline view
4 In Use Library, expand Shared Resources to display the libraries in the BIRT resource folder. Figure 5-9 shows an example of Use Library.
Figure 5-9 Displaying libraries in the resource folder
5 Select the library that contains the themes you want to use with the template, then choose OK.
Publishing a templateTemplates must be published in specific locations. Otherwise, Report Studio cannot display the templates. Report Studio displays templates by categories. The default user interface has only one category named Standard. When you publish

92 I n s t a l l i n g I n f o r m a t i o n C o n s o l e
a template, you can create a new category or select an existing category in which to display your template.
If you create and publish a wide variety of templates, you can organize the templates into different categories. You can, for example, organize templates by report types (budget reports, expense reports, stock purchase plan reports) or by departments in your organization (Human Resources, Sales, Customer Support).
Figure 5-10 shows an example of Report Studio customized to display three template categories by report types.
Figure 5-10 Displaying template categories on Report Template
The Standard category appears at the top of the list because it is the default category supplied with Report Studio. All other categories that you create are listed in alphabetical order. You can designate a different template category as the default category. This task is described later in this section.
Templates must be published to the \<Server resource folder>\BizRDRptTemplates folder on the iHub volume. The general steps are:
■ Use the default resource folder, named Resources, at the root level of the iHub volume.

C h a p t e r 5 , C u s t o m i z i n g a n d i n t e g r a t i n g R e p o r t S t u d i o 93
■ Publish the template, using Actuate BIRT Designer Professional. The first time you publish a template, the BizRDRptTemplates folder is created within the iHub volume’s resource folder. Do not change the name of the BizRDRptTemplates folder. Report Studio looks for templates in this folder, and the folder name is not configurable.
Each of these steps is described in detail in this section.
How to create a resource folder on an iHub volume
1 Log in to Information Console as Administrator.
2 Create a new folder that you can designate as the resource folder.
3 Choose Manage Volume, as shown in Figure 5-11.
4 On the General Properties page, in Resource folder, specify a resource folder name. The default resource folder name, Resources, appears in Figure 5-11.
How to publish a report template
1 In Actuate BIRT Designer Professional, in Navigator, right-click the template file, then choose Publish Templates to Server. Publish Templates appears with the template file selected, as shown in Figure 5-12.
Figure 5-11 Specifying the iHub volume’s resource folder

94 I n s t a l l i n g I n f o r m a t i o n C o n s o l e
Figure 5-12 Publish Templates
2 In Publish Templates, select a server profile from the drop-down list. A server profile specifies the connection properties to connect to a specific iHub volume. If there is no appropriate profile, create a new profile:
1 Choose Add.
2 Specify the connection information in New Server Profile:
1 In Profile name, type a unique name that identifies the new profile.
2 In Server, type the name or IP address of the computer on which Actuate BIRT iHub is installed.
3 In Port number, type the number of the port to access BIRT iHub.
4 In Volume, select the iHub volume.
5 In User name, type the user name for accessing the volume.
6 In Password, type the password for accessing the volume.
3 Choose Finish to save the Server profile.
3 In Publish Templates, in Template Category, select an existing category from the list to which to publish the template. Alternatively, create a new category by choosing Browse and then specifying the name of the new category.
4 In Version, select the desired versioning option. To copy the privileges from the last published version of the template, select Copy permissions from last version.
5 Choose Publish Files, then choose Close after the file is published.

C h a p t e r 5 , C u s t o m i z i n g a n d i n t e g r a t i n g R e p o r t S t u d i o 95
The first time you publish a template to an iHub volume, you must grant users access to the appropriate template folders and files. For more information about assigning privileges for folders and files on an iHub volume, see Managing Volumes and Users.
Setting the default template categoryBy default, the Report Template dialog displays the templates in the predefined category, Standard, as shown earlier in Figure 5-10. To view and select a template in another category, the user has to select a different category from the Category drop-down list. Typically, you want to make your custom templates more visible. You can configure Report Studio so that the Report Template dialog displays a different category of templates by default.
How to set the default template category
1 Open web.xml for editing. This file is in:
<context root>\WEB-INF
2 Change the value of the DEFAULT_REPORT_TEMPLATE_CATEGORY_NAME parameter from Standard to the name of the category whose templates you want the Report Template dialog to display by default. The following example shows the Sales category set as the default template category:
<param-name>DEFAULT_REPORT_TEMPLATE_CATEGORY_NAME</param-name><param-value>Sales</param-value>
3 Restart the appropriate Windows service for the change to take effect.
Publishing resources associated with a templateTypically, each template uses the following external resources that you must also publish to specific locations:
■ An image file that provides the user with a thumbnail image of the template
■ A library file that contains the themes the user can select to apply to the report
If a template contains localized text and you have created resource files that translate text into different languages, you must also publish these resource (.properties) files. You publish resources used by a template to the resource folder in the iHub volume. The process to create and designate an iHub volume resource folder is described earlier in this section.

96 I n s t a l l i n g I n f o r m a t i o n C o n s o l e
How to publish resources associated with a template
1 Using the file system, copy the files to the BIRT resource folder (a different location from the iHub volume resource folder). The location of the BIRT resource folder is specified in the Preferences page, which you access by choosing Window➛Preferences, then choosing Actuate BIRT➛Resource.
2 Choose File➛Publish➛Publish Files.
3 In Publish Files, in Publish Files, type the resources folder path in the Destination dialog box, and then select the files to publish as resources.
4 Select the check box next to Publish Resources and select the resources to publish as resources. Publish Files displays the files to publish as resources, as shown in Figure 5-13.
Figure 5-13 Selecting files for publishing to a specified iHub volume
5 Select the files to publish.
6 In Server profile, select the profile that specifies the connection properties to the iHub volume where you want to publish the files. Publish location

C h a p t e r 5 , C u s t o m i z i n g a n d i n t e g r a t i n g R e p o r t S t u d i o 97
displays the name of the volume’s resource folder. All BIRT resource files are published to that resource folder. You cannot change the location. Figure 5-13 shows an example of selections made in Publish Resources.
7 Choose Publish Files. After the files are published, choose Close.
Types of data sourcesTo create a new report, first the Report Studio user selects a template on which to base the report. Next, the user selects the data to display. You provide Report Studio users access to data in any of the following ways:
■ Create and publish BIRT data objects.
■ Create and publish report templates that include defined data sets. Use this method if you want to provide templates that combine both presentation and data elements.
■ Create a custom data source and integrate it with Report Studio. Use this method if the data is stored in a proprietary system or if you want to design a custom user interface for selecting data.
This chapter describes all of these methods except creating and publishing report templates that include defined data sets. This method is described in “Providing data with a report template,” earlier in this chapter.
Using data objects as a data sourceA data object can include any number of data sources, data sets, data cubes, and report parameters. The data objects can be used as predefined data sources in Report Studio. Business users can select already published data objects as data sources, or templates that are designed to use data objects as data sources.
The data objects created for business reports should be designed with the business report requirements in mind. They should provide the data in a structure that is appropriate for business users and for the report elements that users can add to a report.
When you design data objects for business reports always consider the following:
■ Report parameters in a data object do not link to parameters created in Report Studio, so you typically do not include report parameters in a data object that you create for Report Studio users.
■ In Report Studio, a chart uses data from a table in a report. The chart does not use data directly from a data set or a cube.

98 I n s t a l l i n g I n f o r m a t i o n C o n s o l e
■ Report Studio cross tab reports require specialized cross tab templates and the data sources used in the templates must be data objects.
Deploying data objectsThere are two types of data objects, and either one can be a data source:
■ Data object designA data object design specifies a data source and a data set and data cubes. A report developer or data modeler creates the data object design in BIRT Designer Professional. A data object design has a .datadesign extension.
■ Data object storeA data object store contains the materialized data generated by a data object design. A volume administrator creates the data object store in Information Console administration. A data object store has a .data extension.
If the user uses a data object design as a data source, the report retrieves data from databases and other data sources when it runs. The advantage of this approach is that the report retrieves current data. The disadvantage is that it increases the load on production databases.
If the user uses a data object store as a data source, the report retrieves materialized data from the data object store when it runs. The advantage of this approach is that it does not increase the load on production databases. The disadvantage is that the report may not retrieve current data.
A volume administrator controls which users have access to data objects by assigning privileges on the .datadesign and .data files. If the volume administrator does not want to increase the load on production databases, they can give users access to .data files but not .datadesign files.
To deploy a data object, a report developer, data modeler, and volume administrator cooperate in performing the following tasks:
■ A report developer or data modeler creates a data object design in BIRT Designer Professional.
■ The report developer or data modeler places the .datadesign file in the BIRT Resource folder.
■ The report developer or data modeler publishes the .datadesign file to the iHub /Resources folder.
■ A volume administrator schedules a job for the .datadesign file that generates a .data file.
■ A volume administrator assigns privileges for users on the .datadesign and .data files. To give a user access to a .datadesign file, assign read and execute privileges. To give a user access to a .data file, assign read privilege.

C h a p t e r 5 , C u s t o m i z i n g a n d i n t e g r a t i n g R e p o r t S t u d i o 99
Deploying cross tab templatesA user creating a cross tab report must use a template that contains a cross tab element. The cross tab template that installs with iHub resides in <iHub install directory>\modules\BIRTiHub\iHub\Jar\BIRT\platform\plugins\org.eclipse.birt.resources_<version>\templates\crosstab.rpttemplate. A template developer can modify this template or create a new one.
Creating data objectsA data object is a BIRT object that contains all the information necessary to connect to an external data source, retrieve data from that data source, and structure the data in a way that supports business analysis. A data object is a collection of the following BIRT objects:
■ Data sources
■ Data sets
■ Data cubes
A data object can include any number of data sources, data sets, and data cubes. Data objects enable Report Studio users to focus on the data to present in a report, rather than on how to obtain the data. Building a data object entails creating a data object file, then adding data sources, data sets, and cubes to the data object.
Building a data objectBuilding a data object entails creating a data object file, then adding data sources, data sets, and cubes to the data object.
How to create a data object
1 In the Report Design perspective, choose File➛New➛Data Object.
2 In New Data Object, select the folder in which to store the data object and choose Next.
3 Edit the default file name to specify a new name. The extension must be .datadesign and the file name must not contain the following characters:
[ ] * / \ : & ?
Use a descriptive name that enables users to determine the contents of the data object. A descriptive name is particularly important if users have access to multiple data objects.
4 Choose Finish. The report editor displays a blank data object design, as shown in Figure 5-14.

100 I n s t a l l i n g I n f o r m a t i o n C o n s o l e
Figure 5-14 Displaying a blank data object design
5 Add data sources, data sets, and cubes to the data object.
Deploying data objectsData object files must reside in a project’s Shared Resources folder. By default, a project’s Shared Resources folder is the project folder. If the Shared Resources folder is not the project folder, you must copy data object files to the Shared Resources folder before publishing. To check the location of the Shared Resources folder, in BIRT Designer Professional, choose Window➛Preferences and then Actuate BIRT➛Resource.
When you publish data object files to an iHub volume, the files are published to the IO Designs folder in the iHub volume’s resource folder. The resource folder’s default location is /Resources. You must have write privilege on the resource folder.
How to copy data object files to the shared resources folder
1 In Navigator, select the appropriate .datadesign or .data file.
2 Choose File➛Copy to Resources➛Copy Information Objects to Shared Resources Folder.
3 In Share Data Object, shown in Figure 5-15, type the name of the destination file and select any subfolder of the resource directory by choosing Browse.

C h a p t e r 5 , C u s t o m i z i n g a n d i n t e g r a t i n g R e p o r t S t u d i o 101
Figure 5-15 Copying a data object file to Shared Resources
4 Choose Finish.
How to publish data object files as resources
1 Choose File➛Publish➛Publish Files.
2 In Publish Files, in Server profile, choose an server profile from the drop-down list.
3 In Project, select the appropriate project from the drop-down list.
4 Select Publish Resources.
5 Select the appropriate files and folders, as shown in Figure 5-16.
Figure 5-16 Publishing data object files as resources
6 In Version:
1 Select Replace the latest version to replace the latest version of each file, or Create a new version to create a new version of each file.
2 To copy permissions from the last version of each file, select Copy permissions from last version. If you do not select Copy permissions from last version, you must set the permissions for each file using Information Console.
7 Choose Publish Files.
A confirmation dialog, shown in Figure 5-17, appears.

102 I n s t a l l i n g I n f o r m a t i o n C o n s o l e
Figure 5-17 Publishing confirmation dialog
8 In Publishing, choose OK.
9 In Publish Files, choose Close.
Creating a custom data sourceAnother way to provide users access to data is to create a custom user interface to a data source and integrate the user interface with Report Studio. Report Studio supports the usage of BIRT and custom data sources. There are three supported scenarios you can implement:
■ You use a BIRT JDBC data source, and the out-of-box functionality to configure the user interface for selecting the data.
■ You use a BIRT driver to connect to your data source. You create your own user interface for selecting the data. This scenario is appropriate in all cases when your data source is not a BIRT JDBC data source, but it is still supported by BIRT, such as XML, Web Services, etc.
■ You use your own custom ODA driver to connect to your data source and you build your own user interface for selecting the data.
Actuate provides two examples that reference the supported scenarios:
■ Sample ODA data source. The example demonstrates how to configure a user interface for selecting data when using the BIRT JDBC driver.
■ Extended sample ODA data source. The example creates a custom user interface for selecting data and uses a BIRT driver to connect to the data source.
Sample ODA data sourceCreating a custom user interface to connect to a BIRT JDBC data source does not require additional coding. You must configure the data source and data set and describe the data set columns in the erni_config.xml file, as shown in Listing 5-1.

C h a p t e r 5 , C u s t o m i z i n g a n d i n t e g r a t i n g R e p o r t S t u d i o 103
Listing 5-1 Configuring the sample data source in erni_config.xml
<odaconfig><name>OdaSample</name><displayName>Sample ODA data source</displayName><description>A sample ODA data source</description><datasourceExtensionId>
org.eclipse.birt.report.data.oda.jdbc</datasourceExtensionId><datasourceDisplayName>CLASSICMODELS</datasourceDisplayName><datasetExtensionId>
org.eclipse.birt.report.data.oda.jdbc.JdbcSelectDataSet</datasetExtensionId><datasetDisplayName>CLASSICMODELS.PAYMENTS</datasetDisplayName><odaDriverClass>
org.eclipse.birt.report.data.oda.sampledb.Driver</odaDriverClass><odaURL>jdbc:classicmodels:sampledb</odaURL><odaUser>ClassicModels</odaUser>
<!-- <odaPassword></odaPassword> --><!-- Data Type can be DECIMAL(3)/INTEGER(4)/FLOAT(6)
/DATE-TIME(93)/DATE(91)/TIME(92)/BOOLEAN(16)/STRING(12)--><odaColumns>
<odaColumn><name>CUSTOMERNUMBER</name><dataType>INTEGER</dataType>
</odaColumn><odaColumn>
<name>PAYMENTDATE</name><dataType>DATE</dataType>
</odaColumn><odaColumn>
<name>CHECKNUMBER</name><dataType>STRING</dataType>
</odaColumn><odaColumn>
<name>AMOUNT</name><dataType>FLOAT</dataType>
</odaColumn></odaColumns><dataObject>CLASSICMODELS.PAYMENTS</dataObject>
<!-- <queryText></queryText> --><enabledInWorkgroupMode>true</enabledInWorkgroupMode><enabledInEnterpriseMode>false</enabledInEnterpriseMode><entryPoint></entryPoint>
</odaconfig>

104 I n s t a l l i n g I n f o r m a t i o n C o n s o l e
To test the sample ODA data source with Report Studio, you must first enable the data source, named OdaSample, by setting the data source’s <enabledInEnterpriseMode> attribute in erni_config.xml to true. The erni_config.xml file is stored in the following location:
<context root>\WEB-INF
Typically, in standard installations the <context root> is as follows:
<ACTUATE_HOME>\BIRTiHubVisualization\modules\BIRTiHub\iHub\web\iportal
After you enable the sample data source, restart the appropriate Windows service for iHub or Information Console, and open Report Studio. When prompted, select one of the standard report templates. The Data Source dialog box, as shown in Figure 5-18, prompts you to select a data source. Select Sample ODA data source.
Figure 5-18 Selecting a data source
Based on the XML definition in erni_config.xml, the product displays a sample ODA editor with a table, containing the configured database columns, as shown in Figure 5-19.
Figure 5-19 Selecting data in the sample ODA editor
The check boxes appearing next to the column names allow the user to select the data for the report. The editor gives the user ability to create a parameter for filtering the data in the last column.

C h a p t e r 5 , C u s t o m i z i n g a n d i n t e g r a t i n g R e p o r t S t u d i o 105
Table 5-1 lists all the configuration attributes and their descriptions.
Table 5-1 Attributes of a sample ODA data source
Attribute Description
<name> The unique name of the data source. This name follows certain naming conventions. There can be no spaces, for example.
<displayName> The data source name that appears in the Data Source dialog box, as shown in Figure 5-18.
<description> The data source description that appears in the Available Data pane.
<datasetExtensionId> Identifies the ID of the data set extension of the data driver.
<datasourceDisplayName> The display name of the data source.
<datasourceExtensionId> Identifies the ID of the data source extension of the data driver.
<datasetDisplayName> The display name of the data set.
<odaURL> The database URL to use to connect to the data source.
<odaUser> The user name, used to connect to the database.
<odaPassword> The database password.
<odaColumn><name> The name of the database column to be included in the user interface.
<odaColumn><dataType> The type of the database column. Can be one of the following:DECIMAL(3), INTEGER(4), FLOAT(6),
DATE-TIME(93),DATE(91), TIME(92), BOOLEAN(16), STRING(12)
<dataObject> The name of the database table if single table is used.
<queryText> The text of the query if the columns are from different tables.
<enabledInWorkgroupMode> Not used.
<enabledInEnterpriseMode> Indicates whether this data source is available to users.
<entryPoint> A URL or servlet that points to the first web page of your custom query builder.

106 I n s t a l l i n g I n f o r m a t i o n C o n s o l e
Configuring the ODA data source requires knowledge about your JDBC data source and data set. If you do not know this information, you can obtain the database connection properties from your database administrator. It is a good practice to create first a sample report in BIRT Designer Professional and validate the connection and the database query. You use the XML source of the created report to identify the correct values for the sample ODA configuration. Look for the attribute values in the <data-sources> and <data-sets> tags at the beginning of the report XML.
Listing 5-2 shows portions of the report XML that contain the configuration attributes and their values.
Listing 5-2 Report XML source
<data-sources><oda-data-source
extensionID="org.eclipse.birt.report.data.oda.jdbc" name="Data Source" id="7">…<property
name="odaDriverClass">org.eclipse.birt.report.data.oda.sampledb.Driver</property>
<property name="odaURL">jdbc:classicmodels:sampledb</property>
<property name="odaUser">ClassicModels</property></oda-data-source>
</data-sources><data-sets>
<oda-data-set extensionID="org.eclipse.birt.report.data.oda.jdbc.JdbcSelectDataSet" name="Data Set" id="8">…<xml-property name="queryText"><![CDATA[select * from
CLASSICMODELS.PAYMENTS]]></xml-property>
Extended sample ODA exampleTo implement an extended custom data source, you perform the following programming and configuration tasks:
■ Develop an open data access (ODA) data driver to connect to and retrieve data from a data source.
■ Develop a query builder that prompts the user to select data, processes the user’s selection, and creates the query to get the data.
■ Configure the custom data source for use with Report Studio.

C h a p t e r 5 , C u s t o m i z i n g a n d i n t e g r a t i n g R e p o r t S t u d i o 107
An example of an extended ODA data source installs with Report Studio. The data source accesses data from an integrated sample database named ClassicModels. To test this custom data source with Report Studio, you must first enable the data source, named OdaSampleExt, by setting the data source’s <enabledInEnterpriseMode> attribute in erni_config.xml to true. The erni_config.xml file is stored in the following locations:
<ACTUATE_HOME>\BIRTiHubVisualization\modules\BIRTiHub\iHub\web\iportal\WEB-INF
Listing 5-3 shows in bold the <enabledInEnterpriseMode> attribute whose value you change from false to true. Look for the ODA data source named OdaSampleExt.
Listing 5-3 Configuring the extended sample data source in erni_config.xml
<odaconfig><name>OdaSampleExt</name><displayName>Extended sample ODA data source</displayName><description>An extended sample ODA data source</description><datasourceExtensionId>org.eclipse.birt.report.data.oda.jdbc
</datasourceExtensionId><datasetExtensionId>org.eclipse.birt.report.data.oda.jdbc
.JdbcSelectDataSet</datasetExtensionId><enabledInWorkgroupMode>true</enabledInWorkgroupMode><enabledInEnterpriseMode>true</enabledInEnterpriseMode><entryPoint>/OdaSample</entryPoint>
</odaconfig>
After you enable the extended sample data source, restart the appropriate Windows service, and open Report Studio. When prompted, select one of the standard report templates. The Data Source dialog box, as shown in Figure 5-20, prompts you to select a data source. Select Extended sample ODA data source.
Figure 5-20 Selecting a data source
A query builder page, as shown in Figure 5-21, prompts you to select the data to use in the report.

108 I n s t a l l i n g I n f o r m a t i o n C o n s o l e
Figure 5-21 Building a query
After you select the data and choose OK, the query builder closes, and the data you selected appears under Available Data, as shown in Figure 5-22.
Figure 5-22 Selected data appears under Available Data
Developing an open data access (ODA) data driverYou develop an ODA data driver by implementing run-time interfaces that the ODA framework defines. The ODA framework is an Eclipse Data Tools Platform (DTP) project component that provides a way for an application to access data from standard and proprietary data sources. For information about ODA and developing data drivers, go to the following site:
http://www.eclipse.org/datatools/project_connectivity/connectivity_doc/OdaOverview.htm
Another resource is Addison-Wesley’s Integrating and Extending BIRT book. Actuate also provides an example about how to develop a flat file ODA driver. You can find the source code for this example in:
<ACTUATE_HOME>\oda\examples\FlatFileExample
The extended data source example uses a predefined ODA JDBC driver to connect to the ClassicModels sample database. The source code for this driver

C h a p t e r 5 , C u s t o m i z i n g a n d i n t e g r a t i n g R e p o r t S t u d i o 109
(org.eclipse.birt.report.data.oda.jdbc) is available in the Eclipse DTP CVS repository.
After you develop a custom ODA driver, you must copy the driver to the following folders, depending on the deployment environment:
In iHub:
<ACTUATE_HOME>\iHub2\MyClasses\eclipse\plugins
In Information Console:
<ACTUATE_HOME>\MyClasses\eclipse\plugins
Developing a custom query builderYou develop a query builder using standard web application components, JavaServer Pages (JSPs) and servlets. After creating the necessary components, you perform a series of tasks to integrate the components with Information Console. This section describes the sample query builder, on which you can base your own query builder. This section also describes the procedures for compiling and deploying your own query builder components.
The sample query builder consists of the following components:
■ ClassicModelQueryBuilder.jsp. This JSP displays the page in Figure 5-21. It also contains JavaScript functions to build the string that contains information about the data that the user selected and to send the request to a servlet. To view the code, see ClassicModelQueryBuilder.jsp in the following location:
<context root>\bizRD\oda\sample
■ SampleServlet.java. This servlet communicates with ClassicModelQueryBuilder.jsp, creates a design session, and creates the query using information from the JSP. To view the code, see SampleServlet.java in the following location:
<context root>\iportal\examples\oda\classes\com\actuate\erni\oda\ClassicModels
Creating the servletA servlet performs the main tasks for getting and managing data for Report Studio users, and it is the key piece of any custom query builder. The example servlet, SampleServlet.java, extends the HTTPServlet class, and performs the following tasks:
■ Manages design sessions for concurrent Report Studio users
■ Uses ODA API to define the basic methods for constructing a query, result set, and column objects

110 I n s t a l l i n g I n f o r m a t i o n C o n s o l e
■ Processes the information sent by ClassicModelQueryBuilder.jsp, and creates a query
■ Returns dynamic content that appears in Available Data, as shown in Figure 5-22
The servlet contains declarations of the ODA data driver’s data source and data set extensions:
private final static String Datasource_Extension_Id = "org.eclipse.birt.report.data.oda.jdbc";
private final static String Dataset_Extension_Id = "org.eclipse.birt.report.data.oda.jdbc.JdbcSelectDataSet";
These extension IDs are used to construct the definitions of the data source connection and data set query in the report design.
The servlet supports the GET method only. Its doGet method retrieves request parameters, creates a unique ODA design session, and stores a session ID in the ODA session, so that other requests in the same session can access the same ODA session object. In any given session, the servlet can receive multiple requests with different parameter values. Table 5-2 describes the supported parameters.
The servlet executes a different action, depending on the parameter values. Table 5-3 describes the actions taken with the different inedit and state values.
Table 5-2 Session request parameters
Parameter Description
inedit Indicates whether the user has started editing the values on the query builder page. Values are null or true.
state Shows the editing status. Values are null, ok, or cancel.
selection Contains information about the selected data fields.
sessionId Contains the session ID.
Table 5-3 Actions corresponding to inedit and state values
inedit value state value Action
null any Generates a new session ID. Stores the ID and the callback URL in the session map. Changes the inedit parameter to true and sends a response to the calling page.
not null null Redirects the response to ClassicModelQueryBuilder.jsp.

C h a p t e r 5 , C u s t o m i z i n g a n d i n t e g r a t i n g R e p o r t S t u d i o 111
Compiling the servletAfter you develop your servlet, you must compile the class. You can use a javac compiler from the command prompt or any Java IDE, such as Eclipse. To compile a servlet class, the following JAR files must be in your Java classpath:
■ com.actuate.iportal.jar
■ org.eclipse.emf.common.jar
■ org.eclipse.emf.ecore.jar
■ org.eclipse.datatools.connectivity.oda.design.jarThese files are in the following location:
<context root>\WEB-INF\lib
■ servlet.jarYou can find this file in different places, depending on the Actuate products installed on your computer. For example, servlet.jar can be found in the following location:
<ACTUATE_HOME>\iHub\servletcontainer\webapps\acrsse\WEB_INF\lib
Deploying the servletAfter you compile the servlet class, deploy the servlet to your application. You can deploy your servlet as a class file, or packaged as a JAR file. The SampleServlet.class servlet is deployed to your application packaged in iportal.jar.
If you deploy the servlet using a JAR file, copy the JAR file to the following location:
<context root>\WEB-INF\lib
If you deploy the servlet as a class file, copy the servlet class to the following location:
<context root>\WEB-INF\classes
not null ok The user has finished selecting data fields. The servlet deletes the session ID, and parses the value in the selection parameter to build the query. The response is redirected to a Report Studio page.
not null cancel The user cancelled out of the query builder page. The servlet deletes the session ID.
Table 5-3 Actions corresponding to inedit and state values
inedit value state value Action

112 I n s t a l l i n g I n f o r m a t i o n C o n s o l e
Registering the servletAfter you compile your servlet, you also need to register the servlet with the web application. To register the servlet, you add two entries to web.xml, which is stored in the following location:
<context root>\WEB-INF
The first entry, under the <servlet> element, defines a name for the servlet and specifies the compiled class that executes the servlet. The following example shows the <servlet> entry for the sample servlet:
<servlet><servlet-name>OdaSampleServlet</servlet-name><servlet-class>
com.actuate.erni.oda.ClassicModels.SampleServlet</servlet-class>
</servlet>
The second entry, under the <servlet-mapping> element, defines the URL pattern that calls this servlet. The following example shows the <servlet-mapping> entry for the sample servlet:
<servlet-mapping><servlet-name>OdaSampleServlet</servlet-name><url-pattern>/OdaSample</url-pattern>
</servlet-mapping>
Configuring the extended custom data sourceAfter you finish developing all the components of a custom data source, you configure the data source for use with Report Studio. Data sources available to Report Studio are defined in the following configuration file:
<context root>\WEB-INF\erni_config.xml
Listing 5-3 shows the definition of the extended sample data source. To add your custom data source, create a new <odaconfig> element in erni_config.xml.
Table 5-4 describes each attribute, within the <odaconfig> element, that you configure.
Table 5-4 Attributes of an extended custom data source
Attribute Description
<name> The unique name of the data source. This name follows specific naming conventions. There can be no spaces, for example.
<displayName> The data source name that appears in the Data Source dialog box, as shown in Figure 5-18.

C h a p t e r 5 , C u s t o m i z i n g a n d i n t e g r a t i n g R e p o r t S t u d i o 113
<description> The data source description that appears in the user interface.
<datasetExtensionId> Identifies the ID of the data set extension that was created in the ODA data driver. The value should match the data set extension ID that is specified in the servlet.
<datasourceExtensionId> Identifies the ID of the data source extension that was created in the ODA data driver. The value should match the data source extension ID that is specified in the servlet.
<enabledInWorkgroupMode> Not used.
<enabledInEnterpriseMode> Indicates whether this data source is available to users.
<entryPoint> A URL or servlet that points to the first web page of your custom query builder.
Table 5-4 Attributes of an extended custom data source
Attribute Description

114 I n s t a l l i n g I n f o r m a t i o n C o n s o l e

C h a p t e r 6 , C o n f i g u r i n g B I R T V i e w e r 115
C h a p t e r
6Chapter 6Configuring BIRT Viewer
This chapter contains the following topics:
■ Configuring the Actuate BIRT Viewer toolbar using iv_config.xml
■ Configuring Actuate BIRT Viewer using web.xml
■ Configuring default export formats
■ Configuring a BIRT Viewer or Report Studio extension

116 I n s t a l l i n g I n f o r m a t i o n C o n s o l e
Configuring the Actuate BIRT Viewer toolbar using iv_config.xml
Actuate BIRT Viewer provides a toolbar and context menus that support many of the formatting, sorting, and grouping tasks you perform on data. The toolbar and menus also support adding or deleting columns or groups, and working with fonts and text alignment. You also can print reports and export content or data. Enable or disable each of these features using the configuration file iv_config.xml. Its location is:
<context root>\WEB-INF\iv_config.xml
The iv_config.xml file contains lists of features that are enabled or disabled. The following section of iv_config.xml shows the default feature control for all users:
<FeatureControl><Role>All/Role><Features>
<Feature><FeatureName>SaveDesign</FeatureName><Availablity>true</Availablity>
</Feature><Feature>
<FeatureName>SaveDocument</FeatureName><Availablity>true</Availablity>
</Feature>…
</Features></FeatureControl>
All <FeatureControl> tags are placed within the <FeatureConfiguration> element. Each feature is described by the <Feature> tag, and its availability is described with the <Availability> tag. If a particular feature is available, availability is set to true. If the feature is not available, it is set to false. The parameter value in the <Role> tag corresponds to a user group and role configured in the functionality-level.config file. Interactive Viewer checks whether a role is specified in functionality-level.config before applying an iv_config.xml configuration to a user group, and custom roles must exist in both files for iv_config.xml configuration to apply. For more information on setting up user group configurations using functionality-level.config, see “Restricting access to Information Console features using functionality levels” in Chapter 3, “Configuring Actuate Information Console.”
Exception stack trace display is also controlled in the iv_config.xml file. When an exception occurs, the viewer can display a stack trace can be displayed in the exception dialog. The trace is used for support purposes, and is set to false by default. This value is not associated with user roles and is placed outside the

C h a p t e r 6 , C o n f i g u r i n g B I R T V i e w e r 117
<FeatureControl> tag. The format of the iv_config.xml file appears as shown in the following code:
<IVConfig><!-- flag to sign the report is running in iportal or BRDPro
--> <RunningMode>Iportal</RunningMode> <!-- customize file name generator --> <ExportNameConfig>
com.actuate.iv.utility.filename.DefaultFileNameGenerator</ExportNameConfig><!-- Config features --><FeatureConfiguration>
<!-- All --><FeatureControl>
…</FeatureControl><FeatureControl>
…</FeatureControl>…
</FeatureConfiguration></IVConfig>
Table 6-1 lists the features that can be set, and how the availability tag affects them.
Table 6-1 Actuate BIRT Viewer feature set
Feature Availability tag description
AdvancedSort Shows or hides the Advanced Sort item in the context menu
Aggregation Shows or hides the Aggregation item in the context menu
Analyze Enables or disables the Analyze item in the cross tab toolbar and context menu
AutoEnableIV Enables or disables interactivity by default
CalculatedColumn Shows or hides the New Computed Column and Edit Computed Column items in the context menu
ChartSubType Shows or hides the Chart Subtype item in the context menu
ChartProperty Shows or hides the Chart Property item in the context menu
(continues)

118 I n s t a l l i n g I n f o r m a t i o n C o n s o l e
ColumnEdit Shows or hides the Hide Column, Show Column, and Delete Column items in the context menu
CollapseExpand Shows or hides the Hide Detail and Show Detail items in the context menu
ColumnResize Shows or hides the Column Width item in the context menu
ConditionalFormat Shows or hides the Conditional Formatting item in the context menu
EditReport Shows or hides the Enable Interactivity item in the toolbar main menu
ExportData Shows or hides the Export Data menu item in the toolbar main menu
ExportElement Shows or hides the Export Content menu item in the context menu
ExportElementData Shows or hides the Export Data menu item in the context menu
ExportReport Shows or hides the Export Content menu item in the toolbar main menu
FacebookComments Shows or hides the Facebook Comment menu item in the toolbar main menu
FlashGadgetFormat Shows or hides the Format Flash Gadget item from the gadget context menu
FlashGadgetType Shows or hides the Change Type from the gadget context menu
Filter Shows or hides the Filter item in the context menu
Format Shows or hides the Format, Change Font, and Alignment items in the context menu
GrandTotal Enables or disables the Grand Total option in the aggregation dialog
GroupEdit Shows or hides the Move To Group, Add Group, and Delete Group items in the context menu
HideShowItems Shows or hides the Hide/Show Item menu item in the toolbar main menu
Highlight Shows or hides highlighting
HoverHighlight Shows or hides the mouse over rectangles on page elements
Table 6-1 Actuate BIRT Viewer feature set (continued)
Feature Availability tag description

C h a p t e r 6 , C o n f i g u r i n g B I R T V i e w e r 119
LinkToThisPage Shows or hides the Link To This Page item in the main menu
MainMenu Enables or disables the toolbar’s main menu
MoveColumn Shows or hides the Move to Left and Move to Right items in the context menu
PageBreak Shows or hides the Page Break item in the context menu
PageNavigation Shows or hides the page navigation icons in the navigation bar
Parameter Shows or hides the Parameter item in the toolbar
Print Shows or hides the Print menu item in the toolbar main menu
Resize Enables or disables the Resize feature
ReorderColumns Shows or hides the Reorder Columns item in the context menu
SaveDesign Shows or hides the Save Design menu item in the toolbar main menu
SaveDocument Shows or hides the Save Document menu item in the toolbar main menu
ScrollControl Shows or hides the scroll control panel in page content
ServerPrint Shows or hides the Server Print menu item in the toolbar main menu
ShareFormat Shows or hides the Copy Format menu item in the context menu
ShareStyle Shows or hides the Copy Style menu item from the context menu
ShowTooltip Shows or hides tooltips
Sort Shows or hides the Sort Ascending and Sort Descending items in the context menu
SubTotal Enables or disables the SubTotal option in the aggregation dialog
SuppressDuplicate Shows or hides the Repeat Values and Do Not Repeat Values items in the context menu
SwitchView Shows or hides the Switch View item in the context menu
(continues)
Table 6-1 Actuate BIRT Viewer feature set (continued)
Feature Availability tag description

120 I n s t a l l i n g I n f o r m a t i o n C o n s o l e
Configuring Actuate BIRT Viewer using web.xmlActuate BIRT Interactive Viewer (IV) parameters in web.xml affect how BIRT reports are run and viewed. Table 6-2 describes these configuration parameters for BIRT reports, BIRT Viewer, and Interactive Viewer.
Toc Shows or hides the TOC menu item in the toolbar main menu
TextEdit Shows or hides the edit text icon on text elements
Toolbar Shows or hides the toolbar
ToolbarHelp Shows or hides the toolbar Help menu item
TopBottomNFilter Shows or hides the Top/BottomN item in the context menu
Table 6-1 Actuate BIRT Viewer feature set (continued)
Feature Availability tag description
Table 6-2 Actuate BIRT Viewer web.xml parameters
Parameter name Description
ALLOW_EXPORT_PAGE_LIMIT
Indicates the maximum number of pages that can be exported or printed at a time from Actuate BIRT Viewer. For example, if the value of this parameter is 200, no more than 200 pages will be exported or printed from a report using the viewer.
ALLOW_IV_PAGE_LIMIT Specifies whether Information Console checks for a page limit before triggering an operation.
AUTOSUGGEST_DELAY Configure the delay before the parameters page opens an automatic suggestion for a parameter. The value is measured in milliseconds, and the default value is 500.
AUTOSUGGEST_FETCH_SIZE
The number of autosuggest parameter values to load on the parameters page. The default value is -1, which loads all values.
AUTOSUGGEST_LIST_SIZE
The number of autosuggest parameter values to display on the Parameters page when active. If more values exist than are displayed, the user can scroll through the other values. The default value is 10.
BIRT_ARCHIVE_ MEMORY_TOTALSIZE
The total memory available for BIRT report document files, in kilobytes. The default value is 50 megabytes.
BIRT_CHART_CONVERT_TO_IMAGE_TIME_OUT
Sets the time out for conversion from chart to image in a BIRT report. The default value is 6.

C h a p t e r 6 , C o n f i g u r i n g B I R T V i e w e r 121
BIRT_CHART_MAX_ROW The maximum number of rows bound to a chart in a BIRT report. The default value is 10000 rows.
BIRT_CHART_MAX_VARIABLE_SIZE
The maximum size for a variable used in a Flash chart, measured in bytes. The default value is 0, which allows a variable to be of any size.
BIRT_CUBE_FETCH_LIMIT_COLUMN_EDGE
The maximum column limit for accessing a data cube. The value must be a non-negative integer; 0 indicates no limit.
BIRT_CUBE_FETCH_LIMIT_ROW_EDGE
The maximum row limit for accessing a data cube. The value must be a non-negative integer; 0 indicates no limit.
BIRT_DATA_RESULTSET_MAX_BUFFER_SIZE
The result set buffer size, in megabytes, for a data set in a BIRT report. The default value is 10 megabytes.
BIRT_HTMLRENDEROPTION_ENGCASSTYLE
Enables the agentStyleEngine property for the HTML render option for a BIRT report. This setting is related to using a browser’s internal CSS capabilities when rendering reports in HTML. It provides better column alignment and faster rendering, especially in a browser other than Microsoft Internet Explorer. The default value is true.
BIRT_JDBC_CONNECTION_POOL_SIZE
Specifies the number of idle connections cached by BIRT JDBC connection pool. The default value is 10.
BIRT_JDBC_CONNECTION_POOL_TIMEOUT
Specifies how long an idle connection will remain in the BIRT JDBC connection pool in seconds. The default value is 3600.
BIRT_LINKED_DATA_MODEL_DATA_MODEL_SIZE
Sets an upper limit on data loaded into memory by a data model at runtime, measured in megabytes. The default value is 0.
BIRT_RESOURCE_PATH The path to Actuate BIRT shared resources, including libraries and templates for the BIRT report designs and Report Studio. The default value is <context root>\resources.
BIRT_SCRIPT_LIB_PATH Path for the BIRT script libraries (JARs). The default value is <context root>\scriptlib.
BIRT_VIEWER_LOCALE Locale that determines formatting for numbers and dates on BIRT reports. The default value is the locale of the machine on which Information Console is installed.
(continues)
Table 6-2 Actuate BIRT Viewer web.xml parameters (continued)
Parameter name Description

122 I n s t a l l i n g I n f o r m a t i o n C o n s o l e
CACHE_CONTROL Specifies how a web browser caches information using one of the following values:■ NO-CACHE indicates that the browser does not cache
information and forwards all requests to the server. With NO-CACHE, the back and forward buttons in a browser do not always produce expected results, because choosing these buttons always reloads the page from the server.If multiple users access Information Console from the same machine, they can view the same cached data. Setting CACHE_CONTROL to NO-CACHE prevents different users viewing data cached by the browser.
■ NO-STORE indicates that information is cached but not archived.
■ PRIVATE indicates that the information is for a single user and that only a private cache can cache this information. A proxy server does not cache a page with this setting.
■ PUBLIC indicates that information may be cached, even if it would normally be non-cacheable or cacheable only within an unshared cache.
■ UNSET (no value) is the default value. The browser uses its own default setting when there is no CACHE_CONTROL value.
Caching information reduces the number of server requests that the browser must make and the frequency of expired page messages. Caching increases security risks because of the availability of information in the cache. For additional information about cache control, see the HTTP/1.1 specifications.
DEFAULT_LOCALE The default locale. The default locale is en_US. Users can select a locale when they log in.
DEFAULT_TIMEZONE The default time zone. The default time zone is Pacific Standard Time (PST).
DISPLAY_ATTRIBUTE_ITEM
Sets whether to collapse attribute nodes in the dimension tree. False sets nodes to collapse; True sets nodes to expand. The default value is false.
Table 6-2 Actuate BIRT Viewer web.xml parameters (continued)
Parameter name Description

C h a p t e r 6 , C o n f i g u r i n g B I R T V i e w e r 123
EXPORT_AS_ATTACHMENT
Determines whether a Microsoft Excel, PowerPoint, or Word report for BIRT Viewer is opened in the Microsoft Internet Explorer browser or a separate application.■ When the value is true, the exported report opens in a
separate Microsoft Word, Microsoft PowerPoint, or Microsoft Excel application.
■ When the value is false, the exported report opens in the browser window with Microsoft Word, Microsoft PowerPoint, or Microsoft Excel embedded inside the browser.
The Firefox browser always opens these report formats in a separate application.
IV_ENABLE_IV Determines whether the Enable Interactivity option is usable in the BIRT Viewer control menu. If false, the Enable Interactivity option is disabled.
JAVA_REPORT_API_IMAGE_CACHE_EXPIRATION
Specifies how long in seconds to cache images for Actuate BIRT reports and business reports. The default value is 86,400, which is one day.
JREM_TASK_QUEUE_SIZE Specifies the maximum queue length for the Java Report Engine thread pool. The default value is 1000.
JREM_THREAD_POOL_SIZE
Specifies the maximum number of threads in the Java Report Engine thread pool. The default value is 10.
JREM_THREADPOOL_MAXSYNC_TASKRUNTIME
Specifies the maximum time a synchronous report generation is allowed to run. The default value is 600.
JREM_THREADPOOL_MONITORTHREAD_POLLINGINTERVAL
Controls the interval in seconds at which the Java Report Engine thread pool checks for Java report execution time-out or queue time-out. The default value is 30.
JREM_THREADPOOL_SYNC_TASKQUEUE_TIMEOUT
Specifies the maximum time, in seconds, that a Java synchronous request stays in the Java Report Engine task queue before timing out, in seconds. The default value is 300.
NUMBER_OF_FILTER_VALUES
Specifies the number of distinct values to display when a user chooses to filter a report on a column in BIRT Viewer. The default value is 200.
DEFAULT_COLUMN_PAGE_BREAK_INTERVAL
Specifies the number of columns to display on one page when viewing a cross tab. Must be a non-negative number. Default value is 10.
(continues)
Table 6-2 Actuate BIRT Viewer web.xml parameters (continued)
Parameter name Description

124 I n s t a l l i n g I n f o r m a t i o n C o n s o l e
Configuring default export formatsYou can export a BIRT report to various formats from the BIRT viewer. These formats include doc, docx, pptx, pdf, postscript, ppt, pptx, xls, and xlsx. BIRT iHub and BIRT Designer Professional provide a sample .xml file for each format, which you can use to configure the default export options for that format. For example, you can configure the sample .xml file for the XLSX format to set Enable pivot table if it fits on one page to false by default in Export Content, the dialog that appears when you choose to export a BIRT report to XLSX format, as shown in Figure 6-1.
On BIRT iHub, the location of the folder containing the sample .xml files is:
<BIRT iHub installation folder>\Jar\BIRT\platform\plugins\com.actuate.birt.report.engine.emitter.config_<RELEASE_NUMBER>.v<date_stamp>
On BIRT Designer Professional, the location of the folder containing the sample .xml files is:
<BDPro installation folder>\eclipse\plugins\com.actuate.birt.report.engine.emitter.config_<RELEASE_NUMBER>.v<date_stamp>
Each XML file has the following name:
org.eclipse.birt.report.engine.emitter.<FORMAT_TYPE>.xml
DEFAULT_PAGE_BREAK_INTERVAL
Specifies the number of rows to display in one page when viewing a report. If set to 0, there are no page breaks.
DEFAULT_ROW_PAGE_BREAK_INTERVAL
Specifies the number of rows to display on one page when viewing a cross tab. Must be a non-negative number. Default value is 40.
PROXY_BASEURL Indicates a proxy server’s URL if the network uses one between the BIRT Viewer web application and the client. The default value is blank, which indicates that the network does not use a proxy server.
REPOSITORY_CACHE_TIMEOUT_SEC
Specifies, in seconds, how long to retain temporary files that BIRT Viewer creates when a user modifies the appearance of a report. The default value is 900, which is 15 minutes.
TEMP_FOLDER_LOCATION
Path to the folder where temporary files are created.
Table 6-2 Actuate BIRT Viewer web.xml parameters (continued)
Parameter name Description

C h a p t e r 6 , C o n f i g u r i n g B I R T V i e w e r 125
For example, Listing 6-1 shows the XML you can modify in org.eclipse.birt.report.engine.emitter.xlsx.xml, to configure the export options for the XLSX output format.
Figure 6-1 Viewing default export property values on Export Content
Listing 6-1 Sample .xml file content
<RenderOptions><!-- Enables the emitter. Set to "false" will hide this emitter
in export content dialog. --><!--
<emitter enabled="true"/>--><!--
<option name="excelRenderOption.wrappingText" default="true" enabled="true"/>
<option name="ChartDpi" default="192" enabled="true"/><option name="excelRenderOption.ExportChartsAsImages"
default="false" enabled="true"/><option name="excelRenderOption.EnableLiveFormula"
default="true" enabled="true"/><option name="excelRenderOption.hideGridlines" default="false"
enabled="true"/><option name="excelRenderOption.multipleSheet" default="true"
enabled="true"/>

126 I n s t a l l i n g I n f o r m a t i o n C o n s o l e
<option name="excelRenderOption.AutoFitPivotTable" default="true" enabled="true"/>
<option name="excelRenderOption.EnablePivotTable" default="true" enabled="true"/>
--></RenderOptions>
The <RenderOptions> element contains the following child elements:
■ <emitter>Specifies whether the output format is a selectable option in Export Content—Export Format. Possible values are true or false. If this element is commented out in the .xml file, the value of <emitter> is true.
■ <option>Represents an export option in Export Content. Contains the following attributes, which support configuring the export option:
■ nameName of the export option. Required.
■ defaultDefault value of the export option. The value of the export option if the user does not change it or if the export option on Export Content is hidden. Required.
■ enableDetermines whether the export option appears on Export Content. If set to true, the option appears. If set to false, the option is hidden. Optional. The value of <enable> is true if this attribute is omitted in the <option> element.
How to configure default document export options
1 Stop the Actuate iHub Service.
2 Modify the .xml file for the export format for which you want to configure default output export options. Table 6-3 lists the default settings parameters for each output format.
3 Start the Actuate iHub Service.
Table 6-3 Configurable default settings for exporting content
Format Option name Permissible values
All formats
ChartDpi Sets the chart resolution. Value can be any integer greater than 0.
DOCX EmbedHtml Permissible values are true or false.

C h a p t e r 6 , C o n f i g u r i n g B I R T V i e w e r 127
PDF, PostScript
pdfRenderOption.bidiProcessing
Enables bidirectional text support. Permissible values are true or false.
PDF, PostScript
pdfRenderOption.textWrapping
Enables text wrapping. Permissible values are true or false.
PDF pdfRenderOption.hyphenation
Enables splitting words with a hyphen at line breaks. Permissible values are true or false.
PDF, PostScript
pdfRenderOption.fontSubstitution
Enables font substitution for unknown fonts. Permissible values are true or false.
PDF, PostScript
pdfRenderOption.pageOverflow
Controls rendering content when the content exceeds the page size. Integer values indicate the following options:■ 1: clips the content■ 2: scales the content to fit the page■ 4: (default) divides the content into
multiple pages■ 8: expands the page to fit content
PDF pdfRenderOption.embeddedFonts
Embeds fonts in the output document. Permissible values are true or false.
PDF RenderChartInSVG Renders charts as vector graphics. Permissible values are true or false.
PDF repaginateForPDF Permissible values are true or false.
PPT/PPTX BIDIProcessing Enables bidirectional text support. Permissible values are true or false..
PPT/PPTX TextWrapping Enables text wrapping. Permissible values are true or false.
PPT/PPTX FontSubstitution Sets font substitution for unknown fonts. Permissible values are true or false.
XLS/XLSX excelRenderOption.wrappingText
Enables text wrapping. Permissible values are true or false.
XLS/XLSX excelRenderOption.EnablePivotTable
Enables pivot tables. Permissible values are true or false.
(continues)
Table 6-3 Configurable default settings for exporting content (continued)
Format Option name Permissible values

128 I n s t a l l i n g I n f o r m a t i o n C o n s o l e
In BIRT iServer Release 11 Service Pack 4 and BIRT iHub 2, you configured default export options for a particular output format by creating a RenderDefaults.cfg file, and placing it in the JAR file for that output format emitter. The main advantage of configuring export options using an XML file as described in this section is that you do not need to work with a JAR file.
For backward compatibility, Hub 3 supports configuring default export options using a RenderDefaults.cfg file. iHub uses this file if the XML file this section describes does not exist. If neither file exists, iHub uses the default export options specified in the RenderOptions.xml file the format emitter JAR file contains.
Configuring a BIRT Viewer or Report Studio extensionThe Actuate BIRT API provides the IBirtViewerExtension, IBirtViewerContext, IBirtViewerOp, and IBirtViewer Session Java interfaces to extend the functionality of BIRT Viewer and Report Studio. These interfaces are part of the com.actuate.birtviewer.extension package. This package is provided in javaserver.jar, which is located in the following folder:
<iHub installation folder>\modules\BIRTiHub\iHub\jar
Classes implementing these interfaces are associated with the BIRT Viewer web application when they are added in the birtviewer-extension.xml configuration file, which is located in the following folder:
<iHub installation folder>\modules\BIRTiHub\iHub\etc
For example, to enable myIVExtension.jar to operate on BIRT Viewer, add an entry to birtviewer-extension.xml as follows:
XLS/XLSX excelRenderOption.AutoFitPivotTable
Enables BIRT Viewer to automatically adjust content for display in pivot tables. Permissible values are true or false.
XLS/XLSX excelRenderOption.ExportChartsAsImages
Renders charts as images only. Permissible values are true or false.
XLS/XLSX excelRenderOption.EnableLiveFormula
Enables formulas for derived values. Permissible values are true or false.
XLS/XLSX excelRenderOption.hideGridlines
Hides grid lines. Permissible values are true or false.
XLS/XLSX excelRenderOption.multipleSheet
Enables multiple worksheet output. Permissible values are true or false.
Table 6-3 Configurable default settings for exporting content (continued)
Format Option name Permissible values
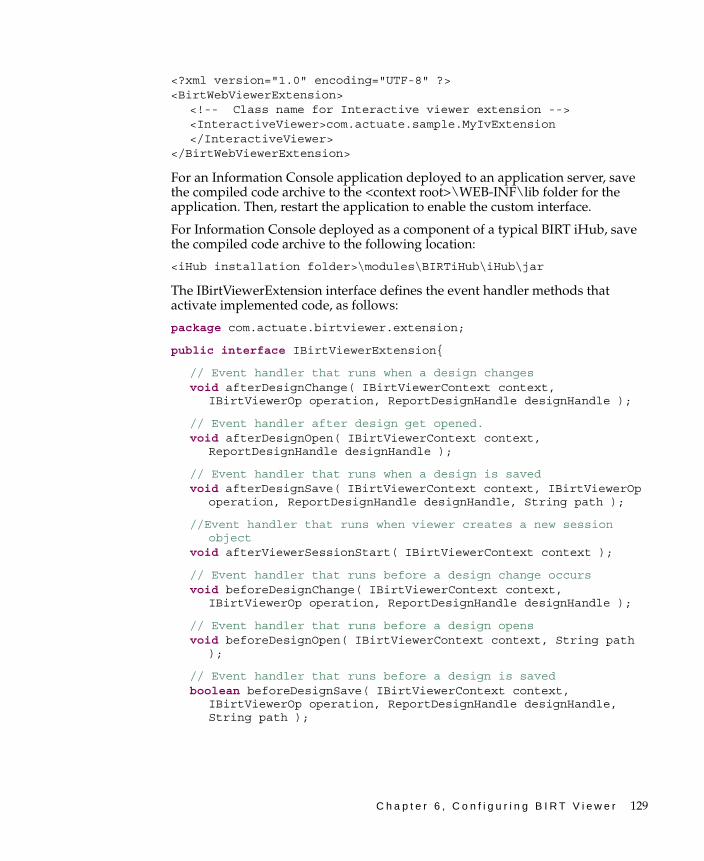
C h a p t e r 6 , C o n f i g u r i n g B I R T V i e w e r 129
<?xml version="1.0" encoding="UTF-8" ?> <BirtWebViewerExtension>
<!-- Class name for Interactive viewer extension --> <InteractiveViewer>com.actuate.sample.MyIvExtension</InteractiveViewer>
</BirtWebViewerExtension>
For an Information Console application deployed to an application server, save the compiled code archive to the <context root>\WEB-INF\lib folder for the application. Then, restart the application to enable the custom interface.
For Information Console deployed as a component of a typical BIRT iHub, save the compiled code archive to the following location:
<iHub installation folder>\modules\BIRTiHub\iHub\jar
The IBirtViewerExtension interface defines the event handler methods that activate implemented code, as follows:
package com.actuate.birtviewer.extension;
public interface IBirtViewerExtension{
// Event handler that runs when a design changesvoid afterDesignChange( IBirtViewerContext context,
IBirtViewerOp operation, ReportDesignHandle designHandle );
// Event handler after design get opened.void afterDesignOpen( IBirtViewerContext context,
ReportDesignHandle designHandle );
// Event handler that runs when a design is savedvoid afterDesignSave( IBirtViewerContext context, IBirtViewerOp
operation, ReportDesignHandle designHandle, String path );
//Event handler that runs when viewer creates a new session object
void afterViewerSessionStart( IBirtViewerContext context );
// Event handler that runs before a design change occursvoid beforeDesignChange( IBirtViewerContext context,
IBirtViewerOp operation, ReportDesignHandle designHandle );
// Event handler that runs before a design opensvoid beforeDesignOpen( IBirtViewerContext context, String path
);
// Event handler that runs before a design is savedboolean beforeDesignSave( IBirtViewerContext context,
IBirtViewerOp operation, ReportDesignHandle designHandle, String path );

130 I n s t a l l i n g I n f o r m a t i o n C o n s o l e
// Event handler before soap response get sent back.void beforeResponse( IBirtViewerContext context, IBirtViewerOp
operation, GetUpdatedObjectsResponse response );
// Triggered when session object gets destroyed.void beforeViewerSessionClose( IBirtViewerSession session );
}
The IBirtViewerContext interface defines methods that retrieve information from the HTTP session, as follows:
package com.actuate.birtviewer.extension;
public interface IBirtViewerContext {
// Gets the base URL for the viewerString getAppBaseUrl( );
// Gets reportlet id/bookmark if user is working on a reportlet.
String getReportletId( );
// Gets the extended session objectIBirtViewerSession getSession( );
// Gets the current user nameString getUserName( );
// Gets the volume profile nameString getVolumeProfile( );
// Gets the resource folder nameString getVolumeResourceFolder( );
}
The IBirtViewerOp interface defines methods that retrieve information from the extended session for BIRT Viewer, as follows:
package com.actuate.birtviewer.extension;
public interface IBirtViewerOp {
// Gets column ids if target element is a tableString[] getColumnIIds( );
// Gets the operation nameString getName( );
// Gets the target element instance idsString[] getTargetIIds( );
// Get target element typeString getTargetType( );
}

C h a p t e r 6 , C o n f i g u r i n g B I R T V i e w e r 131
The IBirtViewerSession interface defines methods that retrieve and set a session from the extended session for BIRT Viewer, as follows:
package com.actuate.birtviewer.extension;
public interface IBirtViewerSession {
// Check whether key exists.boolean containsKey( String key );
//Get attribute from session.Object getAttribute( String key );
//Set attribute into session.void setAttribute( String key, Object attribute );
}

132 I n s t a l l i n g I n f o r m a t i o n C o n s o l e

I n d e x 133
IndexAaccess permissions. See privilegesaccessing
dashboards 25data 97, 102data objects 98Encyclopedia volumes 45, 65external data sources 99iHub Information Console client
functionality 38, 53, 57Interactive Viewer 50JSPs 26report files 58Report Studio functionality 68repository items 25resources 20, 32, 43sample data source configurations 104shared resources 78, 91, 100
AC_DOC_BASE parameter 38AcGetFileDetailsAction class 58AcGetJobDetailsAction class 59AcServlet class 53Action class 58action element 68action forms 58, 59action paths 24action sets 69ActionForm class 58actions 24, 49
custom query builder 110enabling or disabling 68, 69, 72, 76
actionServlet component 24actionSet element 68actionSets element 68activity logs 40, 41Add Group command 118AddFile subfeature 49adding
aggregate data 76bookmarks 71data items to data objects 99data objects 97
features 50folders 49, 58functionality categories 68functionality levels 47, 48, 50, 77hyperlinks 59iHub profiles 94locales 43page breaks 71, 78, 123report elements to libraries 89report elements to templates 82, 84, 86resource folders 90, 93styles 89text file data sources 87themes 83, 88–91time zones 43tooltips 86user actions 68user roles 76volume profiles 32–34, 43–46web pages 25
administration console applications 11Administrator functionality level 48administrators 68, 98Advanced functionality level 48Advanced Sort command 117AdvancedData subfeature 49advancedSort action 72AdvancedSort feature 117agentStyleEngine property 121aggregate data
adding to tables 76disabling user actions for 69
aggregation action 69Aggregation command 117Aggregation feature 117alignCenter action 71alignLeft action 71Alignment command 118alignRight action 71ALLOW_EXPORT_PAGE_LIMIT parameter
120ALLOW_IV_PAGE_LIMIT parameter 120allscripts.js 52

134 I n s t a l l i n g I n f o r m a t i o n C o n s o l e
analytics gadgets 38analyze action 70Analyze button 117Analyze command 117Analyze feature 117Apache Tomcat servers
deploying to 15application context root 104application context roots 26application programming interfaces 128application server cache 21application server configurations 15application servers 3, 5, 10, 14, 15, 21applications 123
accessing data sources and 108changing 35configuring 37configuring Report Studio environment
for 77deploying web 21designing custom reporting 4, 24, 29, 35developing 109enabling or disabling BIRT functionality
for 68, 69, 72, 76registering servlets with 112setting default locale for 39, 43setting default time zone for 40setting global styles for 34–35
archiving 120area charts
See also chartsarray elements 52array.js 52arrays 52ascending sort order 72ASCII formats 45attachments 50authentication IDs 61, 63authentication information 5AutoEnableIV feature 117AUTO_SAVE_DASHBOARD_DELAY
parameter 45AUTOSUGGEST_DELAY parameter 120AUTOSUGGEST_FETCH_SIZE parameter
120AUTOSUGGEST_LIST_SIZE parameter 120autoSummarizeOn action 72
Availability tag 116Available Data options 76axes values
See also charts
Bbanner
hiding features in 49bar charts
See also chartsBaseActionForm class 59Basic functionality level 48BEA WebLogic servers 15beans 57, 63beans package 58, 60binary files 53BIRT Design Engine API 128BIRT Designer Professional 89, 99BIRT iHub. See iHub SystemBIRT objects 99BIRT report documents 55BIRT reports
See also reportsBIRT repository. See Encyclopedia volumesBIRT Viewer 37
displaying reports and 120extending functionality of 128opening Interactive Viewer from 123
BIRT Viewer interface 116BIRT Viewer Toolkit
deploying 15BIRT360PLUS_URL parameter 38BIRT_ARCHIVE_ MEMORY_TOTALSIZE
parameter 120BIRT_CHART_MAX_ROW parameter 121BIRT_CHART_MAX_VARIABLE_SIZE
parameter 121BIRT_CUBE_FETCH_LIMIT_
COLUMN_EDGE parameter 121BIRT_CUBE_FETCH_LIMIT_ROW_EDGE
parameter 121BIRT_DATA_RESULTSET_MAX_BUFFER_
SIZE parameter 121BIRT_HTMLRENDEROPTION_
ENGCASSTYLE parameter 121

I n d e x 135
BIRT_JDBC_CONNECTION_POOL_ TIMEOUT parameter 121
BIRT_JDBC_CONNECTION_POOL_SIZE parameter 121
BIRT_RENDER_FORMAT_ EMITTER_ID_MAPPING parameter 38
BIRT_REPORT_ DOCUMENT_ CACHE_ENABLED parameter 78
BIRT_REPORT_ PAGE_COUNT_ CACHE_ENABLED parameter 78
BIRT_REPORT_DESIGN_ CACHE_TOTAL_ NUMBER_OF_ENTRIES parameter 78
BIRT_REPORT_DESIGN_CACHE_TIMEOUT parameter 78
BIRT_RESOURCE_PATH parameter 20, 78, 121
BIRT_SCRIPT_LIB_PATH parameter 78, 121birtviewer-extension.xml 128BIRT_VIEWER_LOCALE parameter 121BizRDRptTemplates folder 92bookmark action 71bookmark parameter 55bookmarks
adding 71border action 71borders 71branding 68, 83browsefile action 58BrowseFileActionForm class 58browsers. See web browsersbrowsertype.js 52browsing 58buffer size parameter 121
Ccache 78, 79, 122, 123cache (web pages) 21CACHE_CONTROL parameter 38, 122caching web pages 38, 46CalculatedColumn feature 117calculation action 69Calculations action set 69cascading style sheets 121case sensitivity 24, 54categories (templates) 91, 94, 95Change Font command 118
Change Type command 118changes, undoing or redoing 72changeSubtotal action 69changing
actions 69configurations 30folder names 93functionality levels 50images 36–37locales 20, 30reporting applications 35reports 78servlets 53, 54styles 83table type 71time zones 20, 30user interface elements 37user roles 76
character encoding 45, 52character strings. See stringscharacters
data object design file names 99chart action 69chart DPI settings 126Chart Property command 117Chart Subtype command 117ChartProperty feature 117charts
binding to rows 121disabling user actions for 69selecting data for 97
ChartSubType feature 117class files 111class reference (JavaBeans) 58, 60classes 109, 111, 112, 128ClassicModelQueryBuilder.jsp 109ClassicModels sample database 107, 108clearing web browser cache 21ClearType text 10client applications 11cluster nodes 46clusters 2, 3, 5, 11
deploying iHub Information Console client and 21
code 108, 109CollapseExpand feature 118

136 I n s t a l l i n g I n f o r m a t i o n C o n s o l e
column headersdisabling user actions for 70searching 79
column names 105column types 105Column Width command 118ColumnEdit feature 118ColumnHeaderOperations action set 70ColumnOperations action set 70ColumnResize feature 118columns
See also fieldsdisabling user actions for 70setting page breaks for 123
columnWidth action 70comma-separated values files 79, 87comments (templates) 85compilers 111compiling JSPs 24compiling servlet classes 111computed columns
disabling user actions for 69concurrent sessions 78conditional formats 71Conditional Formatting command 118conditionalFormat action 71ConditionalFormat feature 118configuration files 37, 116, 120, 128configuration parameters 77, 120
changing 30iHub connections 45iHub Information Console client 29, 38Information Console 29
configurationsaccessing iHub Information Console client
functionality and 38accessing text file data and 88changing messages and 44changing user actions and 68, 69, 72, 76connecting to iHub and 32, 43, 45creating custom applications and 29–37customizing data sources and 112customizing Report Studio and 68defining features and 49defining functionality levels and 47, 48, 50defining subfeatures and 49
deploying iHub Information Console client and 15
deploying iHub Visualization Platform client and 15
disabling load balancing and 5generating locale-specific sites and 43invoking servlets and 53redirecting web pages and 6registering query builder servlet and 112running multiple applications and 5running Report Studio and 77running sample data sources and 102, 105,
107setting up firewalls and 6, 7specifying default template category and
95specifying time zones and 43
configuringapplication servers 15ClearType text 10
connecting toClassicModels database 108Encyclopedia volumes 94ODA data sources 105, 110
connection parameters 24connection pool 121connection pools 46connection properties 94, 106connection timeout intervals 121connections
accessing data and 99accessing Encyclopedia and 24dropping 39establishing iHub 45running Information Console and 21setting maximum number of 46timing out 41
CONNECTION_TIMEOUT parameter 39console applications 11context menus 116
limiting functionality 68, 69context root 104context roots 26converter.js 52cookie.js 52COOKIE_DOMAIN parameter 39COOKIE_ENABLED parameter 39

I n d e x 137
cookies 39, 52COOKIE_SECURE parameter 39Copy Format command 119Copy Information Objects to Shared
Resources Folder command 100Copy Library to Shared Resource Folder
command 91Copy Style command 119copyright statements 87country codes 43, 44CPUs
running Information Console and 15Create Template Report Item command 86createfolder action 58CreateFolder subfeature 49CreateFolderActionForm class 58createSection action 71creating
custom data sources 102–113custom query builders 109–112data objects 97, 99features 50folders 49, 58functionality categories 68functionality levels 47, 48, 50hyperlinks 59iHub profiles 94information objects 99libraries 89ODA drivers 108report templates 82, 85–87reports 82resource folders 90, 93styles 89template categories 94text file data sources 87themes 83, 88–91tooltips 86web applications 4, 24web pages 25
cross tab elements 99cross tab reports 98cross tab templates 98, 99cross tabs
disabling user actions for 70setting page breaks for 123
Crosstab Builder 70
CrosstabOperations action set 70CSV files 79, 87cubes 121customizing
data sources 102–113functionality levels 48–50Information Console 14, 29messages 44query builder 109–112Report Studio 68reporting applications 4, 24styles 89user interfaces 102
DDashboardBusinessUser subfeature 49DashboardDeveloper subfeature 49dashboards 25, 45, 49dashboards servlet 25DASHBOARD_SHARED_RESOURCES
parameter 45data
See also valuesaccessing 97, 102disabling user actions for 71displaying 24filtering 58, 59, 64hiding 88including in templates 82, 87previewing 76retrieving 98, 99synchronizing 49updating 76viewing restrictions for 122
data action 71Data Analyzer 70data buffer 121data cache 79data cubes 121data fields
disabling user actions for 69.data files 98data filters
disabling user actions for 69specifying number of rows to retrieve 79
data filters. See filters

138 I n s t a l l i n g I n f o r m a t i o n C o n s o l e
data itemsadding to data objects 99
data models 24data object data sources 97, 98data object design file names 99data object designs 98data object store data sources 98data object stores 98data objects
adding data items to 99building reports and 97controlling access to 98creating 97, 99deploying 98designing 99–100retrieving data from 87, 98
data pointsSee also charts
data repositorySee also Encyclopedia volumes
data rowscaching 79disabling user actions for 70displaying 78retrieving 79setting maximum number of 78
data rows. See rowsdata series
See also chartsdata set extensions 105, 110, 113data sets 121
configuring custom data sources for 102hiding 88including in templates 82, 87joining 76retrieving 87selecting 87
Data Source dialog box 105, 112data source extensions 105, 110, 113data sources
accessing data in 97, 102accessing external 99configuring 112connecting to ODA 105, 108, 110creating templates and 87customizing 102–113naming 105, 112
retrieving data from 98, 99selecting 97setting up CSV flies as 87setting up data objects as 97testing custom 104, 106, 107
data stores 20Data Tools Platform projects (Eclipse) 108database connection properties 106database servers 6databases 98, 105.datadesign files 98dataFields action 69DATAFIELDS_DISPLAY_ORDER parameter
78dataObject element 105datasetDisplayName element 105datasetExtensionId element 105, 113datasourceExtensionId element 105, 113data-sources element 88date-and-time formats 121debugging messages 40default context root 26default Encyclopedia volume 63default error codes 44default locale 20, 30, 39, 43, 63, 78, 122default settings 30, 31default template category 92default templates 83default time zone 20, 40, 78, 122DEFAULT_COLUMN_PAGE_BREAK_
INTERVAL parameter 123DEFAULT_DATA_CACHE_ROW_COUNT
parameter 78DEFAULT_LOCALE parameter 20, 30, 39, 78,
122DEFAULT_PAGE_BREAK_ INTERVAL
parameter 78DEFAULT_PAGE_BREAK_INTERVAL
parameter 39, 124DEFAULT_REPORT_TEMPLATE_
CATEGORY_NAME parameter 78, 95DEFAULT_ROW_PAGE_BREAK_
INTERVAL parameter 124DEFAULT_TIMEZONE parameter 20, 30, 40,
78, 122delete action 70Delete Column command 118

I n d e x 139
Delete Group command 118deleteColumn action 70DeleteColumn action set 70DeleteFile subfeature 49DeleteFolder subfeature 49deleteRow action 70deleteSection action 71deleting
folders 49report files 49, 50
deployingcross tab templates 99data objects 98information objects 100query builder servlet 111reports 3, 10Visualization Platform 2, 14–21WAR files 14
deploying BIRT Viewer Toolkit 15descending sort order 72description element 105, 113Description property 86design cache 78Design Engine API 128design files 70design tools 68designing
data objects 97, 99–100report templates 82, 85reports 68
designing custom web applications 4, 24, 29, 34, 35
designs 121editing 78limiting functionality 68, 70purging 78saving 85
detail rows 71detail table mode 71developing
custom query builders 109–112ODA data drivers 108web applications 109
directories 26directory names 24directory paths
cross tab templates 99
flat file ODA drivers 108sample query builder 109sample query builder servlet 111script libraries 78shared resources 78template files 92text file data sources 88
disk space 42Display Name property 86display names 43, 44, 84, 86, 105, 112displaying
data 24data rows 78distinct values 123files and folders list 39folders 65libraries 91locales 43page layouts 71report elements 89report executables 64report templates 84, 91reports 25, 26, 42, 52, 55table of contents 120
displayName element 105, 112DisplayName tag 43, 44distinct values 123.do file name extensions 24Do Not Repeat Values command 119doc format value 56document cache 78document classes 58document files 64documentation v
Visualization Platform deployments and 14
documents 78See also reportsexporting specific pages 120
Documents attribute (features) 49Documents page 58domains 39DownloadFile servlet 54DownloadFile subfeature 50downloading
binary files 53reports 54

140 I n s t a l l i n g I n f o r m a t i o n C o n s o l e
DPI settingschart resolution 126
drift.js 52drivers 102, 105, 108DTP project components (Eclipse) 108dynamic data 52dynamic value parameters 79
EEAR deployments 16Eclipse DTP project components 108edit action 70Edit Computed Column command 117edit text icon 120editable report elements 84, 86, 87editCalculation action 69EditReport feature 118editText action 70EditText action set 70emitters 38Enable Interactivity command 118, 123ENABLE_CLIENT_SIDE_REDIRECT
parameter 6, 40enabled attribute 69ENABLE_DEBUG_LOGGING parameter 40enabledInEnterpriseMode element 104, 105,
107, 113enabledInWorkgroupMode element 105, 113ENABLE_ERROR_LOGGING parameter 40ENABLE_JUL_LOG parameter 40EnableNewAggregationStyle attribute 76EnableSampleDataInPreview attribute 76encode method 52encoder.js 52encoding 45, 52Encyclopedia volumes
accessing 45, 65adding objects to 49connecting to 24, 94creating folders for 58creating resource folders for 93deleting objects in 49downloading from 50, 54publishing information objects to 100, 101publishing template resources to 95publishing templates to 92, 93
running Visualization Platform and 2specifying default 63
entryPoint element 105, 113erni_config.xml 68, 112error codes 44error log files 40, 41error messages
localizing 44–45ERROR_LOG_FILE_ROLLOVER parameter
40errors 40, 116errors (console applications) 21event handler methods 129Excel formats
configuring default settings for 128Excel spreadsheets 123exceptions 116executable files
displaying 64EXECUTE_DASHBOARD_GADGET_
GENERATION_ WAIT_TIME parameter 40EXECUTE_REPORT_WAIT_TIME parameter
40executing
Java servlets 53jobs 25
Export Content command 118Export Data command 118export options 123EXPORT_AS_ATTACHMENT parameter 123ExportData feature 118ExportElement feature 118ExportElementData feature 118exporting
report content 120specific report pages 120
ExportReport feature 118extended sample ODA data source 102, 106,
108, 112extension IDs 105, 110, 113external data sources 99
FFacebook Comment command 118FacebookComments feature 118failover 6
I n d e x 141
feature definitions 49feature lists 61, 64, 65Feature tag 116FeatureConfiguration tag 116FeatureControl tag 116FeatureID tag 49FeatureOptionsBean class 60features 49–50, 60, 65, 68, 76, 116, 117fields
See also columnsdisabling user actions for 69
file cache 79file IDs 54file lists 39, 58, 64file name extensions 99file names 24, 99file numbers 41file paths 121, 124filefoldersprivilege action 58FileFoldersPrivilegeActionForm class 58fileId parameter 54FileListActionForm class 58FileOperations action set 70files
accessing 25, 58archiving 120converting to ASCII 45deleting 49, 50disabling user actions for 70downloading 54getting information about 58purging 78, 79saving 52sharing 50
filesfolders JSPs 25filter action 69filter action forms 58, 59Filter command 118Filter feature 118filtering
data 58, 59, 64filters 64
disabling user actions for 69retrieving distinct values and 123specifying number of rows to retrieve 79
Firefox browser 123firewalls 6, 7
flashchartsxml format value 56FlashGadgetFormat feature 118FlashGadgetType feature 118flat file ODA drivers 108floatingfooter parameter 55folder lists 39, 58, 63, 64folder names 63, 93folders
accessing 25copying ODA driver files to 109creating 49, 58creating resource 90, 93creating temporary files and 124deleting 49deploying query builder class files to 111displaying 65getting home 61navigating through 26publishing information objects and 100publishing resource files to 96publishing templates to 92specifying resource 20specifying type 64viewing information about 58viewing library files in 91
font action 71footers 55, 76FORCED_GC_INTERVAL parameter 40Format command 118format emitters 128Format feature 118Format Flash Gadget command 118format parameter (Interactive Viewer) 56formats
displaying reports and 56limiting functionality 68, 71
formattingreports 83
Formatting action set 71formatting options 83forms package 58from_page_range parameter 56from_page_style parameter 56functionality categories 68functionality levels 76
adding 47, 48, 50associating with users 47, 48

142 I n s t a l l i n g I n f o r m a t i o n C o n s o l e
functionality levels (continued)changing 50customizing 48–50naming 48preserving 50specifying features for 49specifying subfeatures for 49
functionality options 77functionality-level.config 76functions 109
See also methods
Ggadget gallery 45GADGET_ GENERATION_ WAITING_TIME
parameter 41gadgets 40, 41gadgets interface 25garbage collection 40GeneralFilterActionForm class 58, 59GeneralOperations action set 71generating
web pages 4, 24, 25generating reports 123getAcLocale method 61getAdminRights method 61getAuthid method 61getCurrentfolder method 61getDefaultServerURL method 61getDefaultVolume method 61getFeatureBean method 60getFeatureOptionsBean method 61getFeatures method 61getfiledetails action 58GetFileDetailsActionForm class 58getFilter method 61getHomefolder method 61getIportalid method 61getjobdetails action 59GetJobDetailsActionForm class 59getLocale method 61getMaxJobPriority method 61getOnlylatest method 61getPassword method 61getProfile method 60, 61getProperty method 62
getRepositoryType method 62getRoleNames method 62getServerurl method 62getShowdocuments method 62getShowexecutables method 62getShowfolders method 62getSideBarFeatures method 62getSidebarSelected method 62getSubfeatures method 62getSystemname method 62getTimezone method 62getUserAgent method 62getUserid method 62getView method 62getVolume method 62global style elements 34–35global variables 52Grand Total option 118GrandTotal feature 118graphs. See chartsgroup footers 76group headers 76groupBy action 71GroupEdit feature 118Grouping action set 71groups
aggregating data and 76disabling user actions for 71
Hheap size 15help 71, 85, 86help action 71Help action set 71Help menu 120Hide Column command 118Hide Detail command 118Hide/Show Item command 118hideColumn action 70hideDetail action 71HideShowItems feature 118hiding
data 88toolbars 120
Highlight feature 118highlighting 118

I n d e x 143
home directory 26home folders 61, 64HOME property 88hosts 39HoverHighlight feature 118HTML code 34html format value 56HTML formats 71
rendering to 121htmlselect.js 52HTTP requests 4, 42, 60HTTP sessions 130HTTPServlet class 109hyperlink action 71hyperlinks
creating 59disabling user actions for 71
IIBirtViewerContext interface 130IBirtViewerExtension interface 129IBirtViewerOp interface 130IBirtViewerSession interface 131IBM WebSphere servers 15IContentList interface 58IDAPI_TIMEOUT parameter 41idle connections 121iHub
balancing workload on 4, 5, 31connecting to 32, 43, 45, 64copying ODA driver files to 109creating profiles for 94deploying Visualization Platform and 2installing Visualization Platform with 3, 11,
41publishing information objects to 100, 101publishing template resources to 95publishing templates to 92, 93running Report Studio and 78sending requests over 4, 26
iHub profile property 94iHub System 4, 10, 24
integrating application servers with 15iHub system names 65image cache 123image files 95
imageid parameter 56images 84, 86, 95
changing 36–37inedit parameter 110information 63Information Console
accessing functionality 38, 53, 57adding web pages to 25adjusting layers for 52assigning CPUs to 15caching web pages for 21changing default settings for 30, 31configuring as web applications 29–37configuring proxy servers for 6, 7configuring Report Studio for 77copying ODA driver files for 109creating custom applications for 4, 24customizing 14defining user actions and 76deploying 2, 14–21installing 3, 10, 11, 14, 41integrating custom query builder with 109localizing messages for 44–45logging in to 22missing functionality for 21overview 4resizing pages for 52running multiple instances of 5setting connection parameters for 21setting context paths for 21setting log file location for 20setting port number for 21starting 4, 21testing installations for 21viewing available locales for 43
Information Delivery API 4information object files 100information object projects
selecting 101information objects
creating 99deploying 100enabling or disabling BIRT functionality
for 76, 77publishing 100, 101
informational text 85init method 62

144 I n s t a l l i n g I n f o r m a t i o n C o n s o l e
insertRow action 70installation
testing 21Visualization Platform 3, 10, 14
installing Visualization Platform 3, 11, 41INSTALL_MODE parameter 41instanceid parameter 56interactive features 117Interactive Viewer 50, 55
displaying reports and 120starting 123
Interactive Viewer servlet 55InteractiveViewing subfeature 50Intermediate functionality level 48Internet Explorer 123IO Design perspective 99iportal context root 21, 26iportal directory 28iportal.jar 111isAlwaysGetFolderList method 63isHomeFolderSet method 63isIE method 60isNS4 method 60isNS6 method 60isShowFilters method 63isViewInNewBrowserWindow method 63iv_config.xml 116, 117IV_ENABLE_IV parameter 123
JJ2EE installations 15Jakarta Struts Framework 52JAR files 128JAR files (query builder servlet) 111Java classes 128Java heap size 15Java programming interfaces 128Java Server Pages 21JavaBean methods 57JavaBeans 57, 63JavaBeans class reference 58JavaBeans package reference 57javac compiler 111Javadoc 57JAVA_REPORT_API_IMAGE_CACHE_
EXPIRATION parameter 123
JavaScript API 28JavaScript code 24JavaScript components 52JavaScript files
developing web applications and 52JavaScript functions 109JavaScript reference 52JavaServer Pages (JSPs) 109JBoss servers 15JDBC connection pool 121JDBC data sources 102, 105JDBC database connections 106JDBC drivers 108job action forms 59job classes 59JobActionForm class 59JobPriority subfeature 50jobs
executing 25getting information about 59sending notifications for 50setting priorities for 50, 64setting properties for 59submitting 25, 60
Jobs attribute (features) 49joins 76JREM_TASK_QUEUE_SIZE parameter 123JREM_THREADPOOL_MAXSYNC_
TASKRUNTIME parameter 123JREM_THREADPOOL_MONITORTHREAD
_ POLLINGINTERVAL parameter 123JREM_THREAD_POOL_SIZE parameter 123JREM_THREADPOOL_SYNC_TASKQUEUE
_TIMEOUT parameter 123JSP engine 3, 4, 10JSPs 21
accessing 26compiling 24generating web pages and 24–25implementing URIs and 26implementing URLs and 24selecting templates for 26
JUL_LOG_CONSOLE_LEVEL parameter 41JUL_LOG_FILE_COUNT parameter 41JUL_LOG_FILE_LEVEL parameter 41JUL_LOG_FILE_SIZE_KB parameter 41

I n d e x 145
Llabels 44landing page 27language codes 43, 44languages 37launchiv parameter 56layer functionality 52layer.js 52Level tag 50libraries 78, 83, 89, 90, 121library files 90, 95line charts
See also chartsLink tag 59Link To This Page command 119LinkBean class 59links 4LinkToThisPage feature 119Linux systems 4, 10, 26list package 58lists 39, 41, 58load balancing 4, 5, 31locale codes 43, 44locale IDs 43locale names 43locale parameter 56Locale tag 43locales
accessing repository for 24adding 43configuring 43creating error messages for 44–45selecting templates for 85, 95setting default 20, 30, 39, 43, 63, 78, 122specifying 121
localizing messages 44–45log file numbers 41log files 20, 40, 41LOG_FILE_LOCATION parameter 20, 41logging in to
Visualization Platform 22logging levels 41login action 6login forms 60login information 39, 60LoginForm class 60
loginsgetting user information for 60redirecting 6
LOGIN_TIMEOUT parameter 41
MMainMenu feature 119Manage Data dialog box 70manageData action 70ManageData action set 70Management Console 4, 10, 48, 53
adding resource folders and 93manuals. See documentationMAX_BACKUP_ERROR_LOGS parameter
41MAX_BRSTUDIO_DESIGN_SESSION
parameter 78MAX_BRSTUDIO_USER_SESSION
parameter 78MAX_CONNECTIONS_PER_SERVER
parameter 46MAX_DATA_CACHE_ROW_COUNT
parameter 78MAX_LIST_SIZE parameter 41MAX_NUMBER_OF_VALUES_FOR_
DYNAMIC_PARAMETER parameter 79MDS_ENABLED parameter 5, 31, 46MDS_REFRESH_FREQUENCY_SECONDS
parameter 31, 46memory 40, 46MEMORY_DATA_CACHE_ROW_COUNT
parameter 79menus 49, 52, 116
limiting functionality 68, 69merge action 70mergeColumns action 70Message Distribution Service 5, 31, 46messages (templates) 85method calls 63methods 52, 57, 110
See also functionsMetrics Management gadgets 38Metrics Management web resources 38Mobile attribute (features) 49MOBILE_APP_DOWNLOAD parameter 42Model-View-Controller architecture 24

146 I n s t a l l i n g I n f o r m a t i o n C o n s o l e
Modify button 76MORE_VALUE_ROW_COUNT parameter 79Move To Group command 118Move to Left command 119Move to Right command 119MoveColumn feature 119moveToDetail action 70moveToGroup action 70
Nname element 105, 112name parameter
DownloadFile servlet 54names
changing folder 93predefined styles and 89report elements 84servlets 112
namingdata object design files 99data sources 105, 112editable report items 86functionality levels 48non-editable report items 87report elements 84report templates 86resource folders 93
naming restrictions 24, 54native2ascii utility 45networked environments 11, 124networks 2, 5, 42new action 70New Computed Column command 117New Data Object dialog 99New iHub Profile wizard 94New Library wizard 89New Style command 89New Style wizard 89New Template wizard 86New Theme wizard 90non-editable report elements 84, 87noRepeat action 70notifications
sending 50NUMBER_OF_FILTER_VALUES parameter
123
numeric formats 121
Oobjects 99ODA data set extensions 105, 110, 113ODA data source configurations 106ODA data source extensions 105, 110, 113ODA data sources 102, 106, 112ODA design sessions 110ODA drivers 102, 108ODA framework 108ODA session IDs 110odaColumn dataType element 105odaColumn name element 105odaconfig element 112odaPassword element 105OdaSample data source 104OdaSampleExt data source 107odaURL element 105odaUser element 105online documentation vopen action 70opening
Interactive Viewer 50, 123reports 123Visualization Platform 21web browser windows 65
option controls 52options JSPs 25options page 60Outline view 89output format emitters 128
Ppackages 57Page Break command 119page breaks 39, 71, 78, 123page engine 4page layout toggle 71page layouts
displaying 71page navigation icons 119page parameter 56page ranges 56page styles 56pageBreak action 71

I n d e x 147
PageBreak feature 119PageLayout action set 71pageLayoutInToolbar action 71PageNavigation feature 119parameter action 71Parameter button 119parameter definitions 30Parameter feature 119parameters
adding custom query builder and 110adding data objects and 97changing 30configuring Report Studio and 77configuring report viewers and 120configuring Visualization Platform and 38connecting to Encyclopedia and 24, 45customizing reporting applications and 29deploying Visualization Platform and 21disabling user actions for 71loading JSPs and 24loading web pages and 25prompting for 120setting number of values displayed 79
Parameters dialog box 79parameters page 120passwords
getting 61setting 64
paths 121, 124cross tab templates 99dashboard resources 45flat file ODA drivers 108log files 41sample query builder 109sample query builder servlet 111script libraries 78shared resources 78template files 92temporary files 42, 46text file data sources 88
pdf format value 56PDF formats
configuring default settings for 127performance 40, 121
previewing data and 76retrieving data and 98
performance analytics gadgets 38
permissions. See privilegesPERSISTENT_ ARCHIVEFILECACHE_
TIMEOUT_SECONDS parameter 79ping action 59PingActionForm class 59poling intervals 123pop-up menus 52popupmenu.js 52ports 6
Visualization Platform 21PostScript formats
configuring default settings for 127PowerPoint documents 123PowerPoint formats
configuring default settings for 127ppt format value 56predefined data sources 97predefined styles 89predefined themes 83presentation models 24presentations 82Preview action set 71previewHTML action 71previewing
data 76Print command 119Print feature 119printing
reports 120prioritizing jobs 50, 64private cache 38privileges 4, 10, 58
accessing data objects and 98publishing information objects and 100,
101publishing templates and 94
process redirect page 6ProfileBean class 60ProfileName parameter 32, 43profiles 32, 43, 46, 60, 64
selecting iHub 94progressive viewing 42PROGRESSIVE_REFRESH parameter 42PROGRESSIVE_VIEWING_ENABLED
parameter 42projects
selecting 101

148 I n s t a l l i n g I n f o r m a t i o n C o n s o l e
properties 64Encyclopedia connection 94JDBC database connection 106report template 84, 86styles 89, 90
.properties files 95properties files 20protecting data. See securityproxy servers 5, 6, 7, 42, 122, 124PROXY_BASEURL parameter 42, 124ps format value 56Publish Resources dialog box 96Publish Resources to iHub command 96Publish Templates dialog box 93Publish Templates to iHub command 93Publish to iHub command 101publishing
information objects 100, 101resources 95–97templates 91–95
purging cached files 78, 79
Qqueries 105, 110
See also SQL statementsquery builder
developing custom 109–112setting entry point for 105, 113
query builder page 107query builder servlet 109–112queryText element 105queue 123
Rrecords. See rowsredirect attribute 6redirection 6, 40redo action 72refresh intervals 31, 46refreshes (web pages) 21registering query builder servlet 112relational databases
See also databasesremote servers 11renaming themes 89rendering reports 121
Reorder Columns command 119reorderColumns action 70ReorderColumns feature 119Repeat Values command 119repeatValues action 70report design cache 78report design files 70Report Design perspective 82, 86report design tools 68report designs 121
editing 78limiting functionality 68, 70purging 78saving 85
report document cache 78report document files 64report documents 78
See also reportsexporting specific pages 120
report elementsadding to libraries 89adding to templates 82, 84, 86applying styles to 89naming 84, 86
report emitters 38Report Encyclopedia. See Encyclopedia
volumesreport executable files 64report files
accessing 25, 58archiving 120deleting 49, 50downloading 54getting information about 58saving 52sharing 50
report itemsassigning bookmarks to 71assigning hyperlinks to 71formatting 83including in templates 86
__report parameter 56report parameters 97report section headings
adding fields to 72report sections
disabling user actions for 72

I n d e x 149
Report Studio 20, 37, 121configuring 77creating text file data sources for 87customizing 68data sources supported 102, 112disabling actions for 69, 72, 74, 76enabling ODA drivers for 109limiting functionality of 68, 77predefined data sources in 97predefined themes in 83report parameters and 97report template categories in 91, 94setting up sample data sources for 102, 107unavailable features and 76
report template categories 91, 94, 95Report Template dialog box 84, 95report template files 85, 86, 92report templates 20, 121
accessing resources for 95adding report elements to 82, 84, 86adding themes to 83, 88–91associating libraries with 90building cross tabs and 98, 99changing styles in 83creating 82, 85–87designing reports and 82, 83disabling user actions for 72displaying 84, 91excluding data sets in 88localizing 85, 95naming 86providing data with 87providing descriptions for 84, 86providing images for 84, 86publishing 91–95setting properties for 84, 86specifying default category for 78, 95specifying editable report elements for 86specifying non-editable report elements
for 87report viewers 55report.js 52reporting system. See iHub Systemreporting tasks 116ReportItemOperations action set 71reportlet format value 56reports
changing 78controlling user actions for 68, 69, 72, 76creating 82deploying 3, 10designing 68displaying 25, 26, 42, 52, 55downloading 54exporting content 120formatting 83generating 123including in templates 82opening 123printing 120refreshing 42rendering HTML 121running 40selecting data for 102selecting data sources for 97setting page breaks for 71, 78, 124standardizing 83structuring 82, 83submitting requests for 4
repositoriesaccessing items in 25downloading from 56
repositorySee also Encyclopedia volumes
REPOSITORY_CACHE_TIMEOUT_SEC parameter 46, 124
repositoryType parameter 56request parameters 110requests 110, 122, 123
limiting number of items returned 41loading web pages and 25running multiple applications and 5sending 5, 24, 26submitting 4timing out 39
Resize feature 119resize.js 52resource files 44, 97Resource folder property 93resource folders 20, 90, 93, 96resources 24, 25, 32, 43, 52, 121
accessing 20accessing shared 78, 91, 100deploying data objects and 98

150 I n s t a l l i n g I n f o r m a t i o n C o n s o l e
resources (continued)publishing information objects and 101publishing template 92, 95–97thumbnail images and 86
result set buffer 121reverse proxies 6Role tag 48roles 68, 76
creating 47, 64defining functionality levels and 47, 48
rowsbinding to charts 121caching 79disabling user actions for 70displaying 78retrieving 79setting maximum number of 78setting page breaks for 124
.rpttemplate files 85rtl parameter 56running
Java servlets 53jobs 25reports 40
Ssample data 76sample database 107, 108sample ODA configurations 102, 105, 107sample ODA data source 102sample query builder 109sample query builder servlet 109, 111SampleServlet.class servlet 111SampleServlet.java 109save action 70Save Design command 119Save Document command 119saveAs action 70saveas.js 52SaveDesign feature 119SaveDocument feature 119saving
dashboards 45report designs as templates 85report files 52
scatter charts
See also chartsscript libraries 78, 121scroll control panel 119ScrollControl feature 119Search attribute (features) 49Search page 58search results 79SEARCH_ENABLE_COLUMN_HEADERS
parameter 79searchfiles action 58SearchFilesActionForm class 58SEARCH_USE_QUOTE_DELIMITER
parameter 79section headings
adding fields to 72sectionHeading action 72SectionOperations action set 72sections
disabling user actions for 72security 39, 122security roles 68, 76SECURITY_ADAPTER_CLASS parameter 42Select Data dialog box 88selection parameter 110selectjobs action 59SelectJobsActionForm class 59SelfNotificationWithAttachment subfeature
50sending notifications 50sending requests 24, 26series
See also chartsServer Print command 119server URLs 64ServerPrint feature 119servers 15, 122, 124
See also iHub serversbalancing workload among 5, 31deploying Information Console to 15deploying Visualization Platform over 2deploying Visualization Platform to 15dropping connections to 39extending functionality of 53installing Visualization Platform on 3, 11maintaining session states for 5optimizing performance for 40preventing cache conflicts for 21

I n d e x 151
running multiple applications and 5sending requests over 4, 25setting up firewalls and 6, 7
serverURL parameterInteractive Viewer servlet 56
servlet element 112servlet engine 3, 4, 10servlet names 54, 112servlet.jar 111servlet-mapping element 112servlets 24, 25, 53–54
creating query builder and 109, 109–112servlets reference 54session IDs 110session state 5SESSION_DEFAULT_PARAMETER_
VALUE_ID parameter 42sessionId parameter 110sessions 5, 39, 41, 42, 78, 110sessionTimeout parameter 42Set Template Property page 86setAcLocale method 63setAlwaysGetFolderList method 63setAuthid method 63setCurrentfolder method 63setDefaultServerURL method 63setDefaultVolume method 63setFeatureOptions method 64setFilter method 64setHomefolder method 64setMaxJobPriority method 64setOnlylatest method 64setPassword method 64setProfile method 64setProperty method 64setRequest method 60setRoleNames method 64setServerurl method 64setShowdocuments method 64setShowexecutables method 64setShowFilters method 64setShowfolders method 65setSideBarFeatures method 65setSidebarSelected method 65setSystemname method 65setTimezone method 65setUserAgent method 65
setUserid method 65setView method 65setViewInNewBrowserWindow method 65setVolume method 65Share Information Objects dialog box 100shared resources 78, 91, 100ShareFile subfeature 50ShareFormat feature 119ShareStyle feature 119Show Column command 118Show Detail command 118showColumns action 70showDetail action 71ShowTooltip feature 119side menu 49Sort Ascending command 119Sort Descending command 119Sort feature 119sort order 72sortAscending action 72sortDescending action 72Sorting action set 72source code 108, 109split action 70spreadsheets 123SQL statements
See also queriesstack trace (exceptions) 116Standard Viewer 55starting
Interactive Viewer 123Visualization Platform 21
starting Visualization Platform 4state parameter 110static text 70static value parameters 79strutscommon.js 52style definitions 35style sheets 121styles 35, 83, 89SubfeatureID tag 50subfeatures 49submitjob action 60SubmitJobActionForm class 59, 60submitting jobs 25, 60SubTotal feature 119subtotal functions 69

152 I n s t a l l i n g I n f o r m a t i o n C o n s o l e
SubTotal option 119summary table mode 71summary tables
converting to detail tables 71disabling user actions for 69
summary valuesSee also aggregate data
SuppressDuplicate feature 119Switch View command 119switchSummaryMode action 71switchView action 70SwitchView feature 119Synchronize Data Sets button 76synchronizing data 49system names 65
TTable Builder
enabling or disabling 71table elements 87table of contents 120table type conversions 71tableBuilder action 71tables
disabling user actions in 72displaying aggregate data in 76setting number of rows in 78
tab-separated values files 79tags
adding locales and 43adding time zones and 43defining functionality levels and 48defining subfeatures and 50
temp directory 46TEMP_FOLDER_LOCATION parameter 20,
46, 124template categories 91, 94, 95Template Category property 94template files 85, 86, 92Template Image property 86Template page 86templates 20, 121
accessing resources for 95adding report elements to 82, 84, 86adding themes to 83, 88–91associating libraries with 90
building cross tabs and 98, 99building JSPs and 26changing styles in 83creating 82, 85–87designing reports and 82, 83disabling user actions for 72displaying 84, 91excluding data sets in 88localizing 85, 95naming 86providing data with 87providing descriptions for 84, 86providing images for 84, 86publishing 91–95setting properties for 84, 86specifying default category for 78, 95specifying editable report elements for 86specifying non-editable report elements
for 87TemplateTableOperations action set 72temporary files 20, 42, 46, 78, 79, 124temporary server profiles 34testing
sample ODA data sources 104, 106, 107Visualization Platform installations 21
text 44disabling user actions for 70localizing 85, 95providing informational 85
text file data sources 87text files 45text strings. See stringsTextEdit feature 120themes
creating 83, 88–91renaming 89selecting 68, 83updating 83
Themes list 89third-party applications 5thread pool 123threads 15thumbnail images 86, 95time formats 121time zone IDs 44time zones 20, 30, 37, 40, 43, 65, 78, 122time-out values 39, 41, 42

I n d e x 153
TimeZone tag 44TOC command 120Toc feature 120Toolbar feature 120ToolbarHelp feature 120toolbars 52, 68, 69, 83, 116, 120tooltips 86, 119Top/BottomN command 120TopBottomNFilter feature 120toString method 59, 63trace (exception stack) 116TRANSIENT ARCHIVEFILECACHE_
TIMEOUT_SECONDS parameter 79transient files 20, 42, 46, 78, 79, 124TRANSIENT_STORE_MAX_SIZE_KB
parameter 42TRANSIENT_STORE_PATH parameter 20, 42TRANSIENT_STORE_TIMEOUT_SEC
parameter 42TSV files 79types. See data types
Uunavailable features 76undo action 72UndoRedo action set 72unencode method 52ungroupBy action 71Uniform Resource Locators. See URLsUNIX systems 4, 10, 26updating
actions 69data 49, 76themes 83
upgrades 50UPLOAD_FILE_TYPE_LIST parameter 42uploading binary files 53UPLOAD_SECURITY_MANAGER
parameter 43URIs
implementing 26loading servlets and 53redirecting web pages and 6submitting requests and 4, 26
URLs 124
connecting to iHub System and 24, 32, 43, 64
custom query builder 113ODA data drivers 108ODA data source connections 105query builder 105query builder servlet 112redirecting web pages and 6, 40setting up firewalls and 6specifying default 63transmitting actions and 24Visualization Platform 21
UsageInBRS property 88Use Library command 91Use Library dialog box 91user classes 60user IDs 56, 57, 65user interfaces 102
changing elements in 34–37enabling features for 47, 49enabling subfeatures for 49submitting requests and 4
user option settings 25user profiles 60, 64user-agent header 60UserAgentBean class 60UserAgentBean objects 65userid parameter 56, 57UserInfoBean class 60, 60–65UserOptionsActionForm class 60users
changing roles for 76getting passwords for 61limiting Report Studio functionality for 68,
69, 72, 76providing tooltips for 86returning information about 60selecting functionality levels 60setting features for 65setting functionality levels for 47, 48setting passwords for 64
Vvalue parameters 79values
See also data

154 I n s t a l l i n g I n f o r m a t i o n C o n s o l e
values (continued)creating tooltips for 86
variables 121version parameter
DownloadFile servlet 54Version property 94versioning options 94view constants 65viewer servlet 55viewers 55viewing
data 24data rows 78distinct values 123files and folders list 39folders 65libraries 91locales 43page layouts 71report elements 89report executables 64report templates 84, 91reports 25, 26, 42, 52, 55table of contents 120
viewing restrictions 122viewnav.js 52views 65visible attribute 69, 74visual report elements 82Visualization Platform 120, 121Visualization Platform technology 2volume administrators 98volume parameter
Interactive Viewer servlet 56volume profiles 32–34, 43–46VOLUME_PROFILE_LOCATION parameter
46VolumeProfiles tag 32volumes. See Encyclopedia volumes
Wwait values 39, 40WAR deployments 16
WAR files 14, 16web applications 4, 21, 77, 109, 112web browsers 21
detecting 52, 60displaying reports and 122, 123loading web pages for 25maintaining session state for 5opening new windows for 65preserving login information for 39redirecting 6, 40rendering reports and 121setting cache for 38, 122specifying 65
web pages 21adding 25caching 38, 46generating 4, 24, 25loading 25resizing 52submitting requests and 4
web resources 24, 25web servers 3, 11, 15web sites 3, 10web.xml 38, 77, 112, 120WEB-INF directory 37WebLogic servers 15WebSphere servers 15window displays 52Windows language pack 45Windows systems 4, 10, 26
installing Visualization Platform for 14Word documents 123
Xx-axis values
See also chartsxls format value 56XML files 88
Yy-axis values
See also charts