installing content server with ibm websphere … 1. introduction prerequisites 7 installing content...
TRANSCRIPT
Version 7.5 Patch 2
Installing Content Server with IBM WebSphere Portal Server
Document Publication Date: Jun. 15, 2011
FATWIRE CORPORATION PROVIDES THIS PUBLICATION “AS IS” WITHOUT WARRANTY OF ANY KIND, EITHER EXPRESSED OR IMPLIED, INCLUDING BUT NOT LIMITED TO THE IMPLIED WARRANTIES OF MERCHANTABILITY OR FITNESS FOR A PARTICULAR PURPOSE. In no event shall FatWire be liable for any loss of profits, loss of business, loss of use of data, interruption of business, or for indirect, special, incidental, or consequential damages of any kind, even if FatWire has been advised of the possibility of such damages arising from this publication. FatWire may revise this publication from time to time without notice. Some states or jurisdictions do not allow disclaimer of express or implied warranties in certain transactions; therefore, this statement may not apply to you.
Copyright © 2009–2011 FatWire Corporation. All rights reserved.
This product may be covered under one or more of the following U.S. patents: 4477698, 4540855, 4720853, 4742538, 4742539, 4782510, 4797911, 4894857, 5070525, RE36416, 5309505, 5511112, 5581602, 5594791, 5675637, 5708780, 5715314, 5724424, 5812776, 5828731, 5909492, 5924090, 5963635, 6012071, 6049785, 6055522, 6118763, 6195649, 6199051, 6205437, 6212634, 6279112 and 6314089. Additional patents pending.
FatWire, Content Server, Content Server Bridge Enterprise, Content Server Bridge XML, Content Server COM Interfaces, Content Server Desktop, Content Server Direct, Content Server Direct Advantage, Content Server DocLink, Content Server Engage, Content Server InSite Editor, Content Server Satellite, and Transact are trademarks or registered trademarks of FatWire Corporation in the United States and other countries.
iPlanet, Java, J2EE, Solaris, Sun, and other Sun products referenced herein are trademarks or registered trademarks of Sun Microsystems, Inc. AIX, IBM, WebSphere, Tivoli, DB2 and other IBM products referenced herein are trademarks or registered trademarks of IBM Corporation. WebLogic is a registered trademark of BEA Systems, Inc. Microsoft, Windows, SQL Server and other Microsoft products referenced herein are trademarks or registered trademarks of Microsoft Corporation. Oracle is a registered trademark of the Oracle Corporation. UNIX is a registered trademark of The Open Group. Any other trademarks and product names used herein may be the trademarks of their respective owners.
This product includes software developed by the Apache Software Foundation (http://www.apache.org/) and software developed by Sun Microsystems, Inc. This product contains encryption technology from Phaos Technology Corporation. This product includes software developed by DOM4J Project (http://www.dom4j.org). This product includes software developed by the Indiana University Extreme! Lab. For further information please visit http://www.extreme.indiana.edu/.
You may not download or otherwise export or reexport this Program, its Documentation, or any underlying information or technology except in full compliance with all United States and other applicable laws and regulations, including without limitations the United States Export Administration Act, the Trading with the Enemy Act, the International Emergency Economic Powers Act and any regulations thereunder. Any transfer of technical data outside the United States by any means, including the Internet, is an export control requirement under U.S. law. In particular, but without limitation, none of the Program, its Documentation, or underlying information of technology may be downloaded or otherwise exported or reexported (i) into (or to a national or resident, wherever located, of) Cuba, Libya, North Korea, Iran, Iraq, Sudan, Syria, or any other country to which the U.S. prohibits exports of goods or technical data; or (ii) to anyone on the U.S. Treasury Department’s Specially Designated Nationals List or the Table of Denial Orders issued by the Department of Commerce. By downloading or using the Program or its Documentation, you are agreeing to the foregoing and you are representing and warranting that you are not located in, under the control of, or a national or resident of any such country or on any such list or table. In addition, if the Program or Documentation is identified as Domestic Only or Not-for-Export (for example, on the box, media, in the installation process, during the download process, or in the Documentation), then except for export to Canada for use in Canada by Canadian citizens, the Program, Documentation, and any underlying information or technology may not be exported outside the United States or to any foreign entity or “foreign person” as defined by U.S. Government regulations, including without limitation, anyone who is not a citizen, national, or lawful permanent resident of the United States. By using this Program and Documentation, you are agreeing to the foregoing and you are representing and warranting that you are not a “foreign person” or under the control of a “foreign person.”
Installing Content Server with IBM WebSphere Portal ServerDocument Publication Date: Jun. 15, 2011Product Version: 7.5 Patch 2
FatWire Technical Supportwww.fatwire.com/Support
FatWire HeadquartersFatWire Corporation330 Old Country RoadSuite 303Mineola, NY 11501www.fatwire.com
3
Table of
Contents
1 Introduction . . . . . . . . . . . . . . . . . . . . . . . . . . . . . . . . . . . . . . . . . . . . . . . . . . . . .5About This Guide . . . . . . . . . . . . . . . . . . . . . . . . . . . . . . . . . . . . . . . . . . . . . . . . . . . . . . . . 6
How This Guide Is Organized . . . . . . . . . . . . . . . . . . . . . . . . . . . . . . . . . . . . . . . . . . . 6Graphics in This Guide . . . . . . . . . . . . . . . . . . . . . . . . . . . . . . . . . . . . . . . . . . . . . . . . . 6Acronyms and Variables. . . . . . . . . . . . . . . . . . . . . . . . . . . . . . . . . . . . . . . . . . . . . . . . 6
Prerequisites. . . . . . . . . . . . . . . . . . . . . . . . . . . . . . . . . . . . . . . . . . . . . . . . . . . . . . . . . . . . . 7Installation Quick Reference . . . . . . . . . . . . . . . . . . . . . . . . . . . . . . . . . . . . . . . . . . . . . . . . 8
I. Set Up the Database. . . . . . . . . . . . . . . . . . . . . . . . . . . . . . . . . . . . . . . . . . . . . . . . . . 8II. Set Up the Portal Server . . . . . . . . . . . . . . . . . . . . . . . . . . . . . . . . . . . . . . . . . . . . . . 8III. Install and Configure Content Server . . . . . . . . . . . . . . . . . . . . . . . . . . . . . . . . . . . 9
Part 1. Database
2 Setting Up a Database . . . . . . . . . . . . . . . . . . . . . . . . . . . . . . . . . . . . . . . . . . . 13
Part 2. Portal Server
3 Installing and Configuring WebSphere Portal Server . . . . . . . . . . . . . . . . . 17Start/Stop Commands and Default Ports . . . . . . . . . . . . . . . . . . . . . . . . . . . . . . . . . . . . . 18Configuring LDAP for WebSphere Portal . . . . . . . . . . . . . . . . . . . . . . . . . . . . . . . . . . . . 18Adding Required WebSphere Portal Entries to the LDAP Server . . . . . . . . . . . . . . . . . . 23Installing WebSphere Portal . . . . . . . . . . . . . . . . . . . . . . . . . . . . . . . . . . . . . . . . . . . . . . . 24Integrating the WebSphere Portal with LDAP . . . . . . . . . . . . . . . . . . . . . . . . . . . . . . . . . 33Configuring the WebSphere Portal Server Instance for Database Communications . . . . 48
A. Creating a J2C Authentication . . . . . . . . . . . . . . . . . . . . . . . . . . . . . . . . . . . . . . . . 48B. Creating a JDBC Provider . . . . . . . . . . . . . . . . . . . . . . . . . . . . . . . . . . . . . . . . . . . 52C. Creating a JDBC Data Source . . . . . . . . . . . . . . . . . . . . . . . . . . . . . . . . . . . . . . . . 57
Installing Content Server 7.5 Patch 2 with IBM WebSphere Portal Server
Table of Contents4
Verifying the WebSphere Portal Installation . . . . . . . . . . . . . . . . . . . . . . . . . . . . . . . . . . 66
Part 3. Content Server
4 Installing Content Server. . . . . . . . . . . . . . . . . . . . . . . . . . . . . . . . . . . . . . . . . 73Installing Content Server on the WebSphere Portal . . . . . . . . . . . . . . . . . . . . . . . . . . . . . 74Post-Installation Steps . . . . . . . . . . . . . . . . . . . . . . . . . . . . . . . . . . . . . . . . . . . . . . . . . . . . 82
A. Verifying the Installation . . . . . . . . . . . . . . . . . . . . . . . . . . . . . . . . . . . . . . . . . . . . 82Logging in to the Advanced Interface . . . . . . . . . . . . . . . . . . . . . . . . . . . . . . . . . 82Logging in to the Dash Interface . . . . . . . . . . . . . . . . . . . . . . . . . . . . . . . . . . . . . 82
B. Integrating Content Server with LDAP . . . . . . . . . . . . . . . . . . . . . . . . . . . . . . . . . 84Next Step . . . . . . . . . . . . . . . . . . . . . . . . . . . . . . . . . . . . . . . . . . . . . . . . . . . . . . . . . . . . . . 85
5 Configuring Portlets . . . . . . . . . . . . . . . . . . . . . . . . . . . . . . . . . . . . . . . . . . . . 87Configuring Content Server Portlets in WebSphere Portal . . . . . . . . . . . . . . . . . . . . . . . 88
Adding Content Server Users to the wpsadmin Group. . . . . . . . . . . . . . . . . . . . . . . . 88Configuring Portlets . . . . . . . . . . . . . . . . . . . . . . . . . . . . . . . . . . . . . . . . . . . . . . . . . . 93Adding New Pages . . . . . . . . . . . . . . . . . . . . . . . . . . . . . . . . . . . . . . . . . . . . . . . . . . . 94Adding Portlets to Pages . . . . . . . . . . . . . . . . . . . . . . . . . . . . . . . . . . . . . . . . . . . . . . . 99
Setting Up Content Server for Its Business Purpose . . . . . . . . . . . . . . . . . . . . . . . . . . . . 107
Installing Content Server 7.5 Patch 2 with IBM WebSphere Portal Server
5
Chapter 1
Introduction
This document provides guidelines for installing Content Server on WebSphere Portal Server 6.1, connecting to the supported database of your choice.
This chapter provides information that will help you prepare for the Content Server installation. It contains the following sections:
• About This Guide
• Prerequisites
• Installation Quick Reference
Note
Anyone using this guide is expected to have experience installing and configuring databases, and portal servers. Selected information regarding the configuration of third-party products is given in this guide. For detailed information about a particular third-party product, refer to that project’s documentation.
Installing Content Server 7.5 Patch 2 with IBM WebSphere Portal Server
Chapter 1. Introduction
About This Guide6
About This GuideThis guide covers the installation, configuration, and maintenance of the WebSphere Portal Server, as required to support Content Server. This includes configuration of one or more WebSphere Portal Server instances, and backend databases.
How This Guide Is OrganizedThe content of this guide is organized by function rather than the order in which installation steps are completed. For example, a function such as portal deployment is associated with the portal server. It is presented in Part II (which covers the portal server), even though it is performed, later, when Content Server is installed (Part III). Each major component of the Content Server installation is covered in its own part. A summary of the installation steps in the required order is given at the end of this chapter (see “Installation Quick Reference,” on page 8).
Graphics in This GuideMany steps in this guide include screen captures of dialog boxes and similar windows that you interact with in order to complete the steps. The screen captures are presented to help you follow the installation process. They are not intended to be sources of specific information, such as parameter values, options to select, or product version number.
Acronyms and VariablesThis guide uses the following acronyms and variables:
Name used in this guide Description
CS Content Server
DM Deployment Manager
lbe LDAP Browser/Editor
WAS WebSphere Application Server
<appserv_node> The name of the application server node.
<DM_console_port> The port number on which the Deployment Manager console is listening for connections.
<DM_host> The host name or IP address of the Deployment Manager host.
<server_name> The name of the WebSphere Portal server.
<WAS_home> Path to the directory where WebSphere Portal Server is installed. The path includes the name of the directory.
<WAS_host> The host name of the machine running the WebSphere Portal Server.
Installing Content Server 7.5 Patch 2 with IBM WebSphere Portal Server
Chapter 1. Introduction
Prerequisites7
PrerequisitesBefore installing and configuring Content Server with WebSphere Portal Server, make sure the prerequisites are satisfied:
• You have read the Supported Platform Document (SPD) and you are installing licensed copies of the certified software.
• The LDAP server is supported by WebSphere Portal 6.1.0.1 (Tivoli Directory Server is recommended).
• You have downloaded the required WebSphere Portal 6.1.0.1 installation archives (the archives are determined by the operating system you are using). For more information about which archives are required, refer to the following URL:
http://www-01.ibm.com/support/docview.wss?uid=swg21363952
• Under UNIX, the shell ksh command is installed and present in the Path.
• Complete the following steps:
1. Install the LDAP server. Instructions can be found in Configuring Third-Party Software.
2. Ensure that your operating system meets requirements. For information about your operating system’s requirements, visit the following URL:
http://www-01.ibm.com/support/docview.wss?uid=swg24012959
3. Unzip all WebSphere portal archives (the zip and tgz files that you downloaded) into a temporary directory (you may have to overwrite a few files during the extraction process).
- For .zip files, execute: unzip -d <files name>
Example: #unzip -d C1U2UML.zip
- For .tgz files, execute: tar -xvzf <file name>
Example: #tar -xvzf C1TQ8ML.tgz
Note
The Supported Platform Document is available on the e-docs site:
http://support.fatwire.com
The site is password protected. New e-docs users can obtain their passwords from FatWire Technical Support at the same site.
Note
• The installation documented in this guide is based on a 32-bit Linux installation. The following packages were downloaded for this operating system: C1TL1ML, C1TQ8ML, C1U2UML, C1U2XML, C1U30ML, and C1U34ML.
• WebSphere Portal 6.1.0.1 contains WebSphere 6.1.0.19 and IBM Java 1.5 (SR8a). Therefore, no updates are required for the Application Server or the JDK.
Installing Content Server 7.5 Patch 2 with IBM WebSphere Portal Server
Chapter 1. Introduction
Installation Quick Reference8
4. (Optional) If you need to free up disk space, remove the zip and tgz files.
Installation Quick ReferenceAfter you install and configure the J2EE components that support Content Server, you will run the Content Server installer, which will guide you through the installation process. You will run the installer on each development, delivery, and management system on which you plan to use Content Server. During the Content Server installation, you will have the option to install sample sites and sample content.
The steps below summarize the installation and configuration of Content Server and its supporting software. Keep the steps handy as a quick reference to installation procedures and to chapters that provide detailed instructions.
To install Content Server and its supporting software
Complete the steps below for each development, content management, and production environment.
I. Set Up the DatabaseSet up your choice of supported databases by installing the database management system, creating a database for Content Server, and configuring the database. For instructions, see Configuring Third-Party Software.
II. Set Up the Portal ServerInstall and configure WebSphere Portal Server by following the steps described in Chapter 3, “Installing and Configuring WebSphere Portal Server, and summarized below:
1. Configure the LDAP server for the WebSphere Portal Server, and add the required WebSphere Portal entries to the LDAP server. For more information and detailed instructions, see “Configuring LDAP for WebSphere Portal,” on page 18.
2. Install WebSphere Portal Server and integrate it with LDAP. For more information and detailed instructions, see “Installing WebSphere Portal,” on page 24, and “Integrating the WebSphere Portal with LDAP,” on page 33.
3. Configure the WebSphere Portal instance for database communications, as shown in “Configuring the WebSphere Portal Server Instance for Database Communications,” on page 48. This step requires you to:
a. Create a J2C Authentication. For instructions, see “A. Creating a J2C Authentication,” on page 48.
b. Create a JDBC Provider. For instructions, see “B. Creating a JDBC Provider,” on page 52.
Note
The names of the systems in your Content Server environment might differ from the names used in this document. Typically, the management system is also called “staging,” and the delivery system is also called “production.”
Installing Content Server 7.5 Patch 2 with IBM WebSphere Portal Server
Chapter 1. Introduction
Installation Quick Reference9
c. Create a JDBC Data Source. For instructions, see “C. Creating a JDBC Data Source,” on page 57.
III. Install and Configure Content Server1. Install Content Server by running the supplied installer. The installer provides online
help at each screen, should you need guidance. For more information, see Chapter 4, “Installing Content Server.”
2. Complete the Content Server installation by performing the following steps:
a. Verify that Content server has been installed properly. For instructions, see “A. Verifying the Installation,” on page 82
b. Integrate the Content Server installation with LDAP. For instructions, see “B. Integrating Content Server with LDAP,” on page 84.
c. Configure the portlets by adding new pages and then adding portlets to the new pages. For instructions and detailed informations, see Chapter 5, “Configuring Portlets.”
d. Once the entire installation is completed and verified, set up Content Server for its business purpose. For instructions, see the Content Server Administrator’s Guide and the Content Server Developer’s Guide.
Installing Content Server 7.5 Patch 2 with IBM WebSphere Portal Server
Chapter 1. Introduction
Installation Quick Reference10
Installing Content Server 7.5 Patch 2 with IBM WebSphere Portal Server
11
Par t 1
Database
This part contains a short chapter summarizing the databases that Content Server uses. Instructions on creating and configuring databases are given in Configuring Third-Party Software.
This part contains the following chapter:
• Chapter 2, “Setting Up a Database
Installing Content Server 7.5 Patch 2 with IBM WebSphere Portal Server

12
Installing Content Server 7.5 Patch 2 with IBM WebSphere Portal Server

13
Chapter 2
Setting Up a Database
Content Server requires access to a database that is configured specifically for Content Server. Supported databases (and other third-party components) are listed in the Supported Platform Document (SPD), available on the e-docs site at:
http://support.fatwire.com
(New e-docs users can obtain their passwords from FatWire Technical Support at the same site.)
Before installing any other of Content Server’s supporting software, you must complete the following steps:
1. Install the database management system. For instructions, refer to the product vendor’s documentation.
2. Create and configure a database for Content Server. For instructions, consult our guide Configuring Third-Party Software. Note that database configuration is identical across different application servers.
Installing Content Server 7.5 Patch 2 with IBM WebSphere Portal Server
Chapter 2. Setting Up a Database14
Installing Content Server 7.5 Patch 2 with IBM WebSphere Portal Server
15
Par t 2
Portal Server
This part contains information about installing and configuring WebSphere Portal Server to support Content Server.
This part contains the following chapter:
• Chapter 3, “Installing and Configuring WebSphere Portal Server
Installing Content Server 7.5 Patch 2 with IBM WebSphere Portal Server

16
Installing Content Server 7.5 Patch 2 with IBM WebSphere Portal Server
17
Chapter 3
Installing and Configuring WebSphere Portal Server
This chapter provides you with instructions about installing the WebSphere Portal on your operating system.
This section includes the following:
• Start/Stop Commands and Default Ports
• Configuring LDAP for WebSphere Portal
• Installing WebSphere Portal
• Configuring the WebSphere Portal Server Instance for Database Communications
• Verifying the WebSphere Portal Installation
Installing Content Server 7.5 Patch 2 with IBM WebSphere Portal Server
Chapter 3. Installing and Configuring WebSphere Portal Server
Start/Stop Commands and Default Ports18
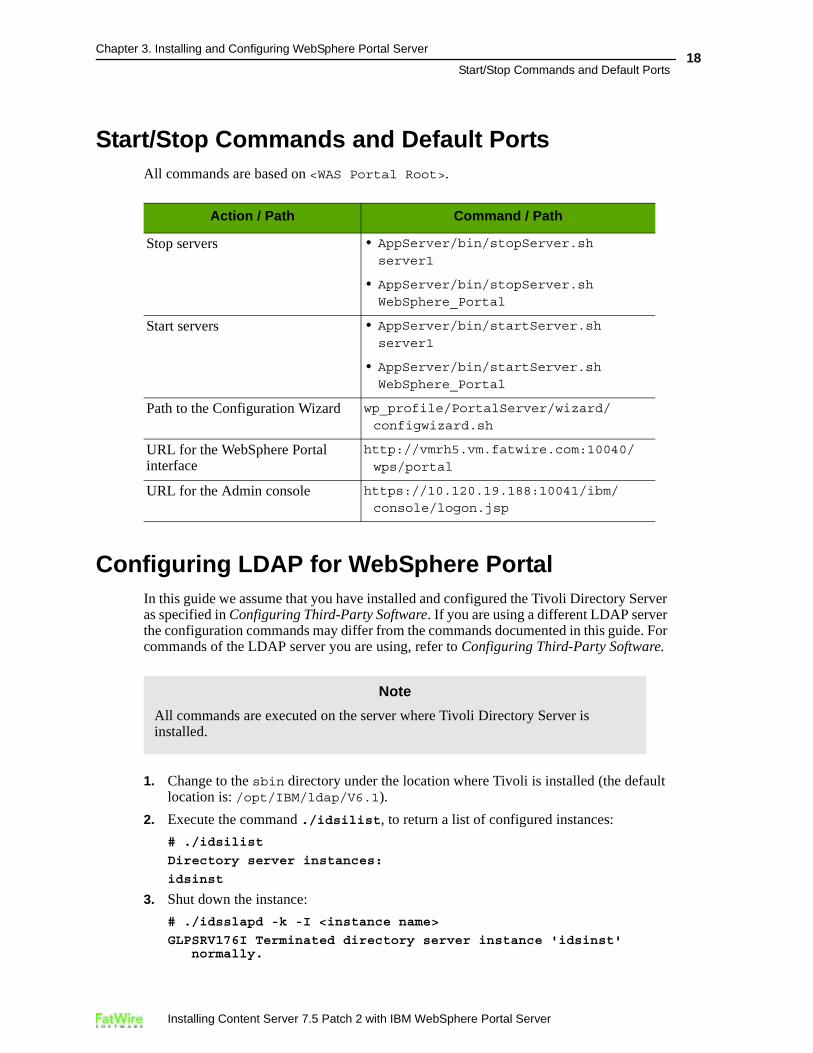
Start/Stop Commands and Default PortsAll commands are based on <WAS Portal Root>.
Configuring LDAP for WebSphere PortalIn this guide we assume that you have installed and configured the Tivoli Directory Server as specified in Configuring Third-Party Software. If you are using a different LDAP server the configuration commands may differ from the commands documented in this guide. For commands of the LDAP server you are using, refer to Configuring Third-Party Software.
1. Change to the sbin directory under the location where Tivoli is installed (the default location is: /opt/IBM/ldap/V6.1).
2. Execute the command ./idsilist, to return a list of configured instances:
# ./idsilist
Directory server instances:
idsinst
3. Shut down the instance:
# ./idsslapd -k -I <instance name>
GLPSRV176I Terminated directory server instance 'idsinst' normally.
Action / Path Command / Path
Stop servers • AppServer/bin/stopServer.sh server1
• AppServer/bin/stopServer.sh WebSphere_Portal
Start servers • AppServer/bin/startServer.sh server1
• AppServer/bin/startServer.sh WebSphere_Portal
Path to the Configuration Wizard wp_profile/PortalServer/wizard/configwizard.sh
URL for the WebSphere Portal interface
http://vmrh5.vm.fatwire.com:10040/wps/portal
URL for the Admin console https://10.120.19.188:10041/ibm/console/logon.jsp
Note
All commands are executed on the server where Tivoli Directory Server is installed.
Installing Content Server 7.5 Patch 2 with IBM WebSphere Portal Server

Chapter 3. Installing and Configuring WebSphere Portal Server
Configuring LDAP for WebSphere Portal19
4. Start the LDAP server “Configuration Tool” using the following command:
# ./idsxcfg -I <instance name>
The “Configuration Tool” window loads:
Installing Content Server 7.5 Patch 2 with IBM WebSphere Portal Server
Chapter 3. Installing and Configuring WebSphere Portal Server
Configuring LDAP for WebSphere Portal20
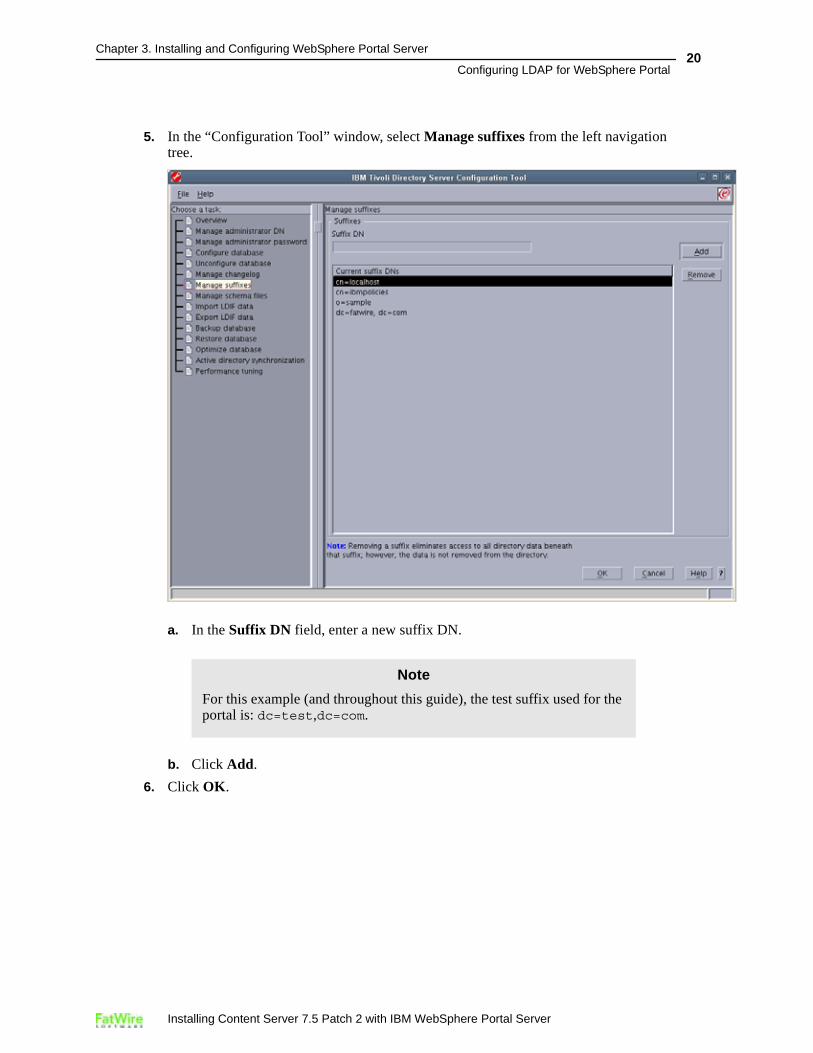
5. In the “Configuration Tool” window, select Manage suffixes from the left navigation tree.
a. In the Suffix DN field, enter a new suffix DN.
b. Click Add.
6. Click OK.
Note
For this example (and throughout this guide), the test suffix used for the portal is: dc=test,dc=com.
Installing Content Server 7.5 Patch 2 with IBM WebSphere Portal Server
Chapter 3. Installing and Configuring WebSphere Portal Server
Configuring LDAP for WebSphere Portal21
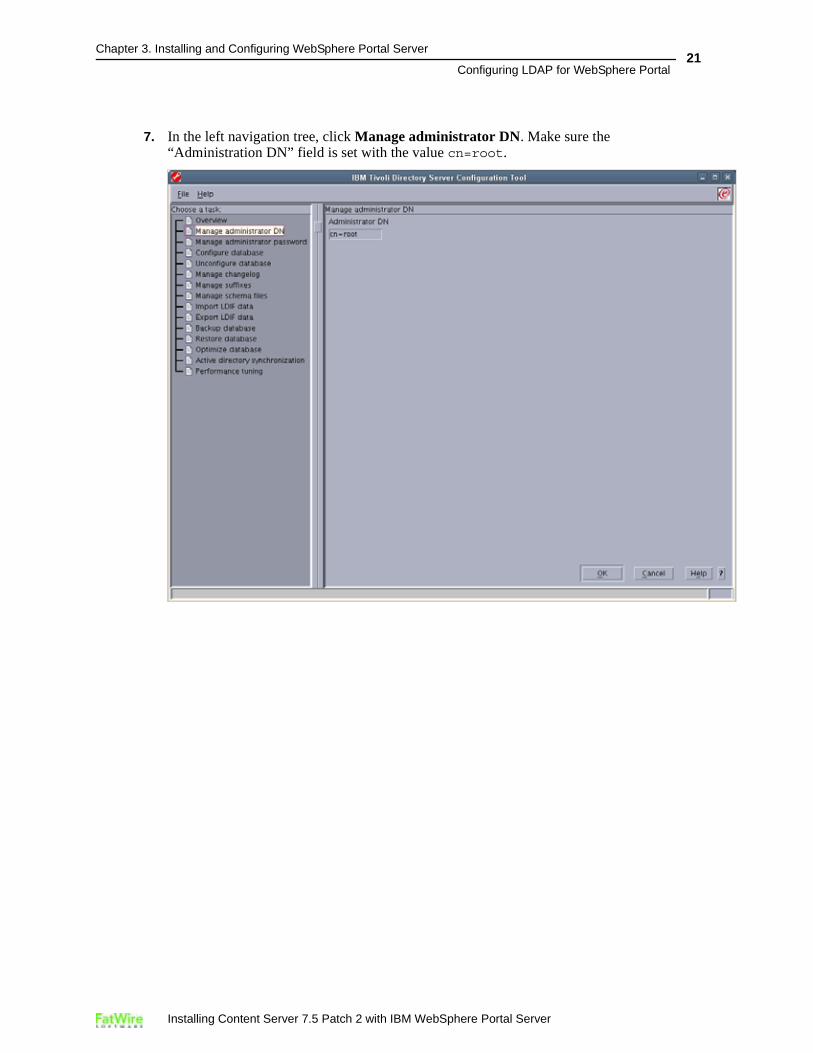
7. In the left navigation tree, click Manage administrator DN. Make sure the “Administration DN” field is set with the value cn=root.
Installing Content Server 7.5 Patch 2 with IBM WebSphere Portal Server
Chapter 3. Installing and Configuring WebSphere Portal Server
Configuring LDAP for WebSphere Portal22
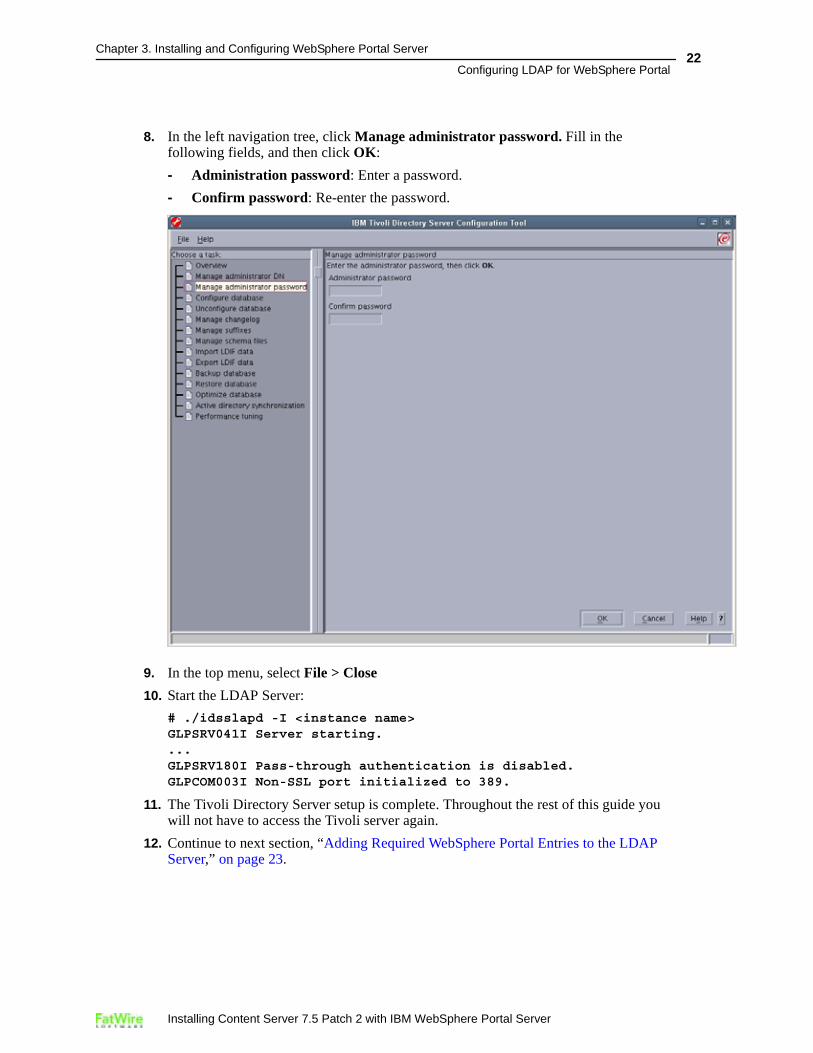
8. In the left navigation tree, click Manage administrator password. Fill in the following fields, and then click OK:
- Administration password: Enter a password.
- Confirm password: Re-enter the password.
9. In the top menu, select File > Close
10. Start the LDAP Server:
# ./idsslapd -I <instance name>GLPSRV041I Server starting. ...GLPSRV180I Pass-through authentication is disabled. GLPCOM003I Non-SSL port initialized to 389.
11. The Tivoli Directory Server setup is complete. Throughout the rest of this guide you will not have to access the Tivoli server again.
12. Continue to next section, “Adding Required WebSphere Portal Entries to the LDAP Server,” on page 23.
Installing Content Server 7.5 Patch 2 with IBM WebSphere Portal Server
Chapter 3. Installing and Configuring WebSphere Portal Server
Adding Required WebSphere Portal Entries to the LDAP Server23
Adding Required WebSphere Portal Entries to the LDAP Server
To set up WebSphere Portal with LDAP authentication, a number of entries must be added to the LDAP server via an LDIF file.
1. Navigate to the PortalUsers.ldif file, located in the WebSphere Portal installer directory (the temporary directory where install.sh is located).
2. Edit the PortalUsers.ldif file:
a. Open the PortalUsers.ldif file in a text editor.
b. Replace every occurrence of dc=yourco,dc=com with the suffix in the LDAP server (for this guide the suffix is dc=test,dc=com).
For example, locate the following section:dn: dc=yourco,dc=com objectclass: domain objectclass: top # Add lines according to this scheme that correspond to your suffix dc: yourco,dc=com dc: yourco
and replace it with:dn: dc=test,dc=com objectclass: domain objectclass: top # Add lines according to this scheme that correspond to your suffix dc: test,dc=com dc: test
c. Save the modified file.
3. Start an LDAP browser (LDAP Browser\Editor lbe is suggested).
For information and instructions about starting LDAP Browser\Editor lbe (or if you wish to start an LDAP browser other than LDAP Browser/Editor lbe), see Configuring Third-Party Software.
4. Import the LDIF file that you created in step 2.
5. Close lbe.
The LDAP server setup for the WebSphere Portal is complete.
6. Continue to the next section to install WebSphere Portal.
Installing Content Server 7.5 Patch 2 with IBM WebSphere Portal Server
Chapter 3. Installing and Configuring WebSphere Portal Server
Installing WebSphere Portal24
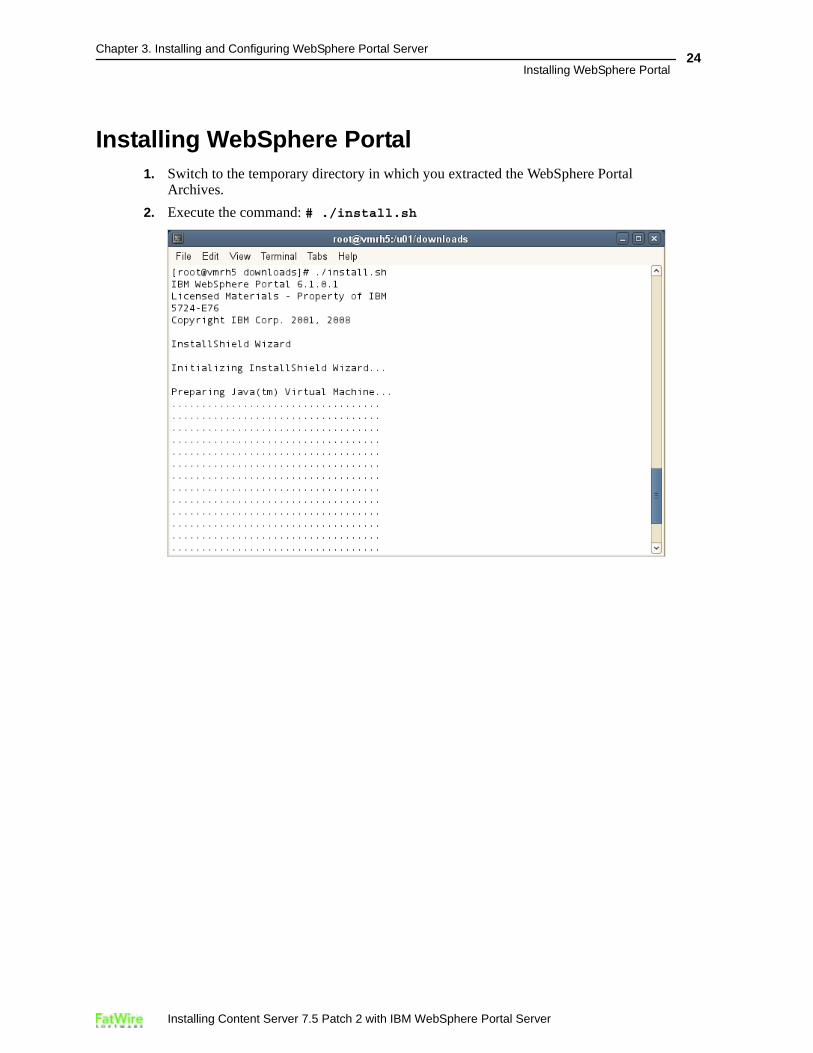
Installing WebSphere Portal1. Switch to the temporary directory in which you extracted the WebSphere Portal
Archives.
2. Execute the command: # ./install.sh
Installing Content Server 7.5 Patch 2 with IBM WebSphere Portal Server

Chapter 3. Installing and Configuring WebSphere Portal Server
Installing WebSphere Portal25
3. The WebSphere portal installer opens. Click Next.
Installing Content Server 7.5 Patch 2 with IBM WebSphere Portal Server
Chapter 3. Installing and Configuring WebSphere Portal Server
Installing WebSphere Portal26
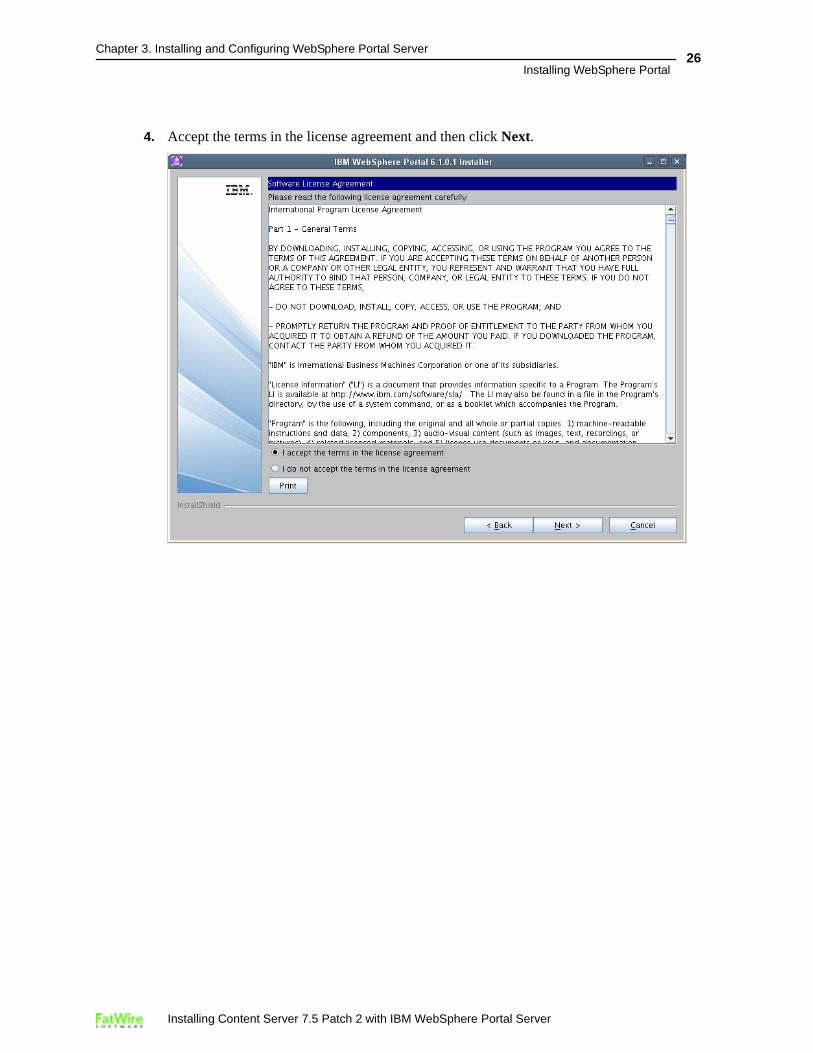
4. Accept the terms in the license agreement and then click Next.
Installing Content Server 7.5 Patch 2 with IBM WebSphere Portal Server
Chapter 3. Installing and Configuring WebSphere Portal Server
Installing WebSphere Portal27
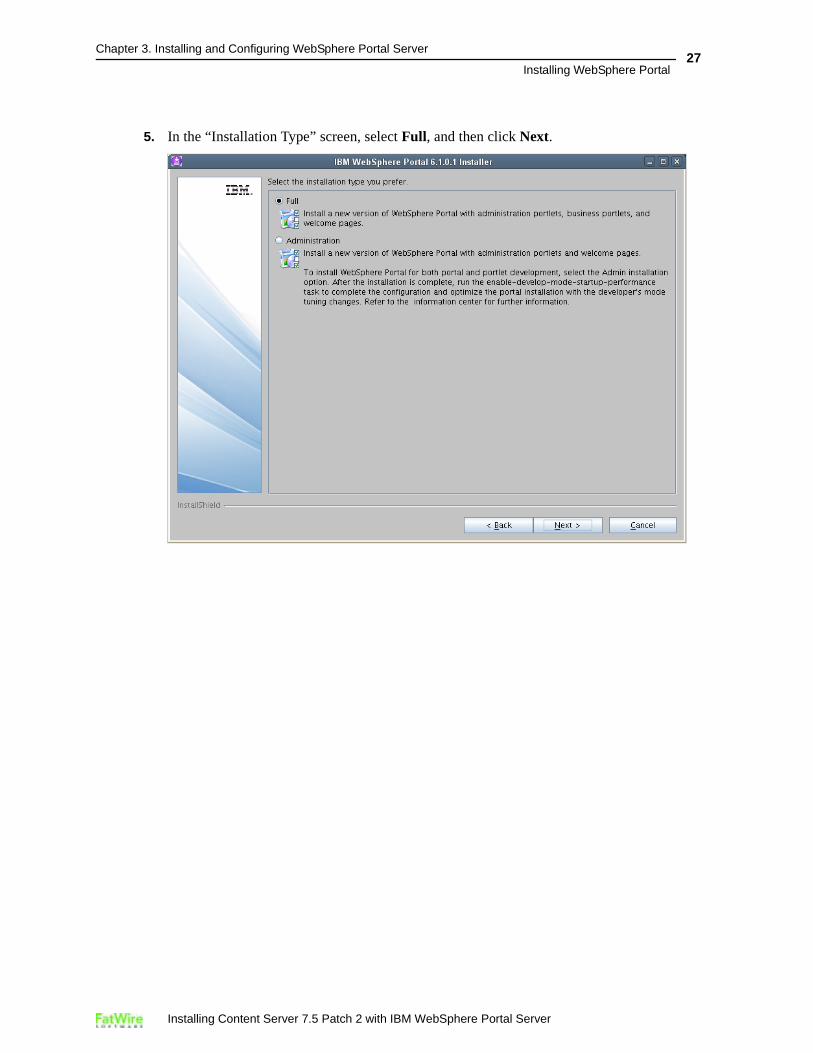
5. In the “Installation Type” screen, select Full, and then click Next.
Installing Content Server 7.5 Patch 2 with IBM WebSphere Portal Server

Chapter 3. Installing and Configuring WebSphere Portal Server
Installing WebSphere Portal28
6. Once the initial validation is completed, fill in the Node name and Host name fields, and then click Next.
Note
If the system has a proper DNS name, the fields will be pre-populated with the value of the DNS name.
Installing Content Server 7.5 Patch 2 with IBM WebSphere Portal Server
Chapter 3. Installing and Configuring WebSphere Portal Server
Installing WebSphere Portal29
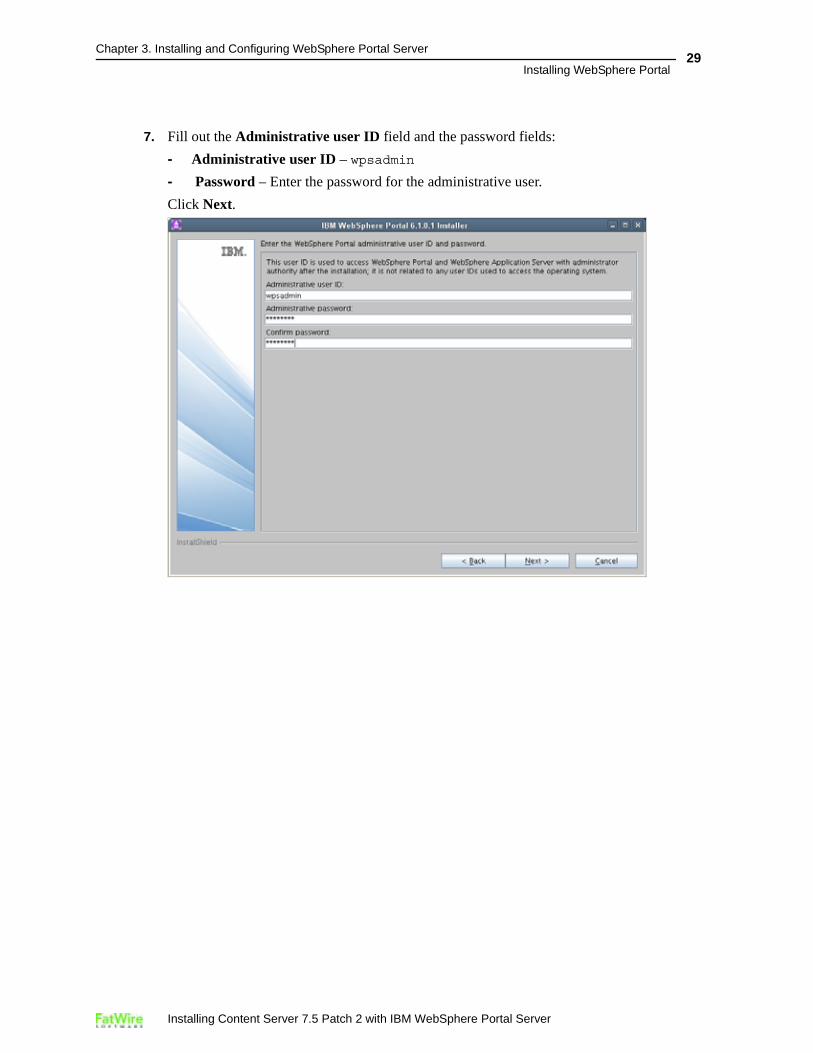
7. Fill out the Administrative user ID field and the password fields:
- Administrative user ID – wpsadmin
- Password – Enter the password for the administrative user.
Click Next.
Installing Content Server 7.5 Patch 2 with IBM WebSphere Portal Server
Chapter 3. Installing and Configuring WebSphere Portal Server
Installing WebSphere Portal30
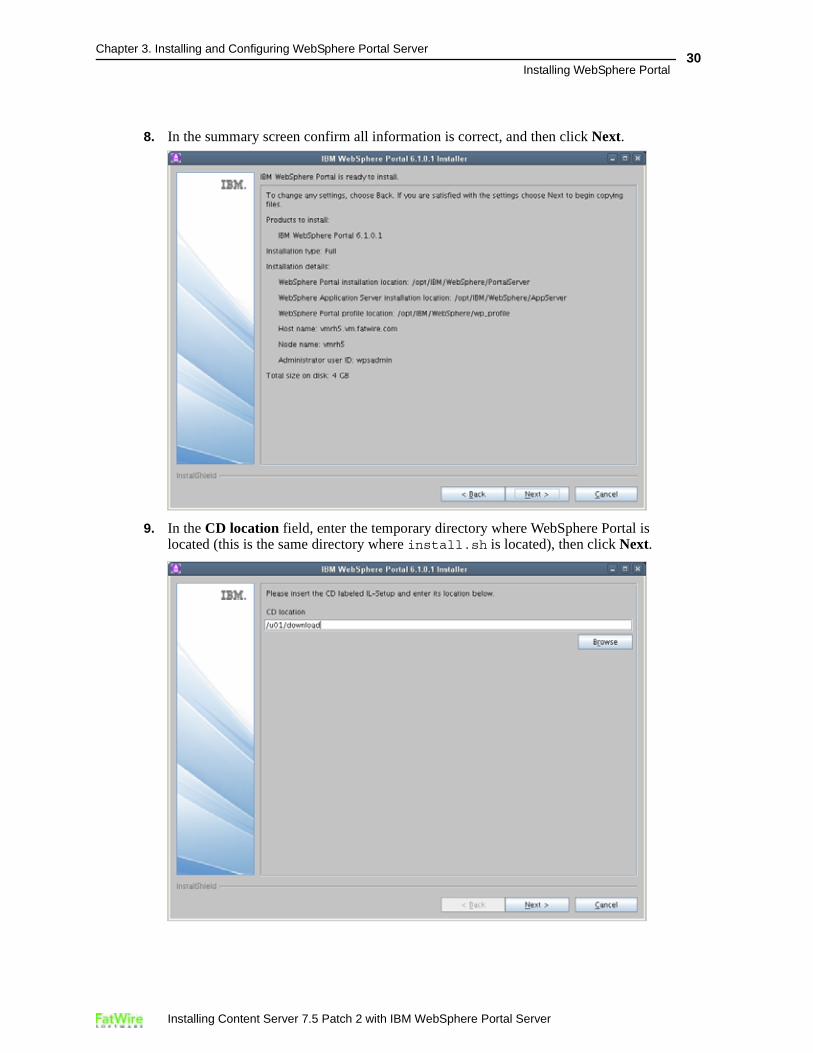
8. In the summary screen confirm all information is correct, and then click Next.
9. In the CD location field, enter the temporary directory where WebSphere Portal is located (this is the same directory where install.sh is located), then click Next.
Installing Content Server 7.5 Patch 2 with IBM WebSphere Portal Server
Chapter 3. Installing and Configuring WebSphere Portal Server
Installing WebSphere Portal31
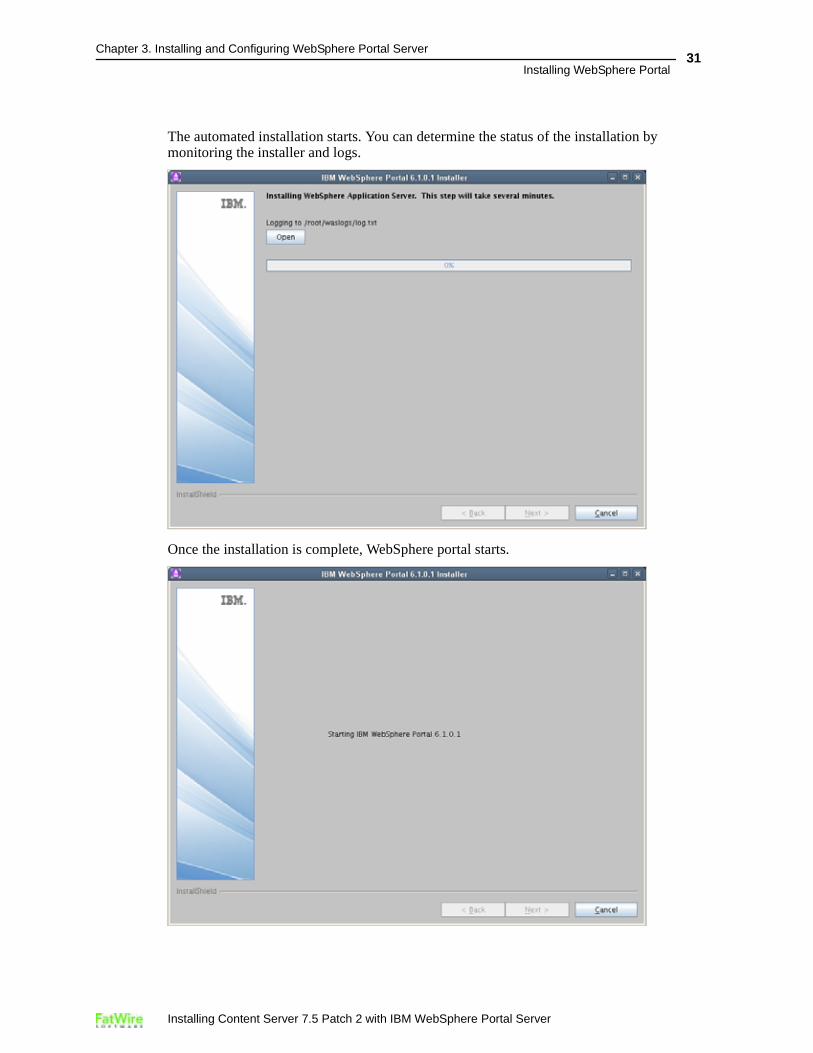
The automated installation starts. You can determine the status of the installation by monitoring the installer and logs.
Once the installation is complete, WebSphere portal starts.
Installing Content Server 7.5 Patch 2 with IBM WebSphere Portal Server
Chapter 3. Installing and Configuring WebSphere Portal Server
Installing WebSphere Portal32
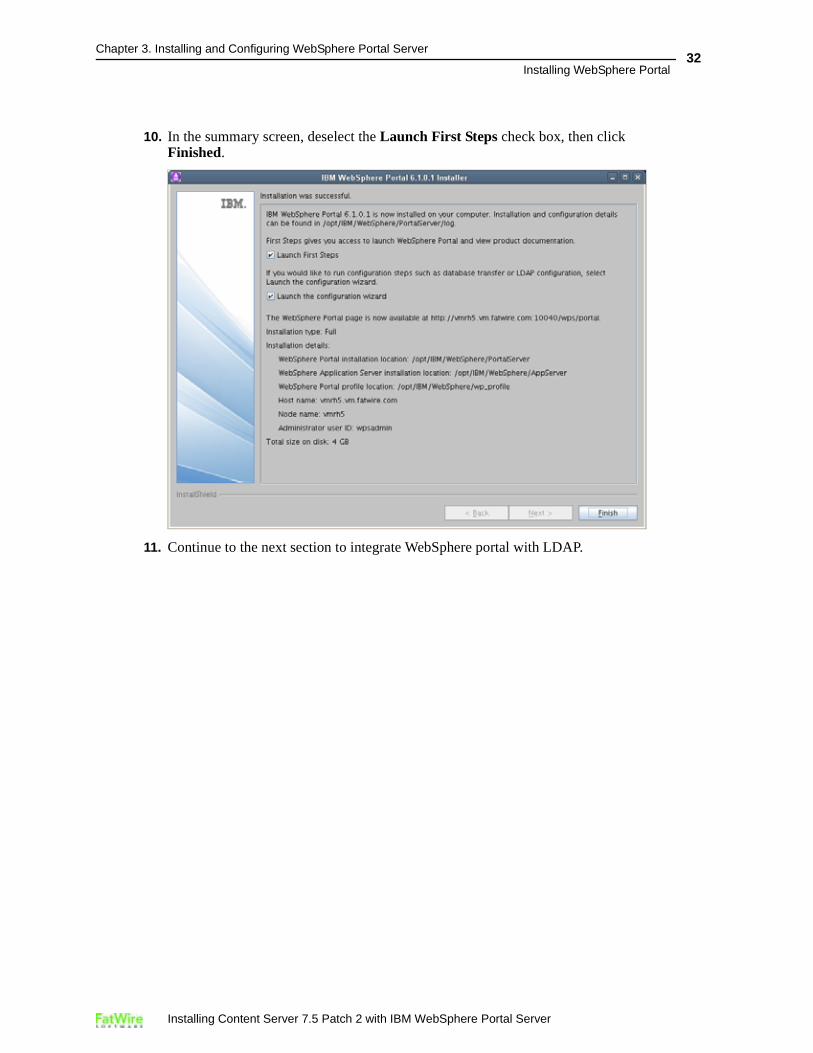
10. In the summary screen, deselect the Launch First Steps check box, then click Finished.
11. Continue to the next section to integrate WebSphere portal with LDAP.
Installing Content Server 7.5 Patch 2 with IBM WebSphere Portal Server
Chapter 3. Installing and Configuring WebSphere Portal Server
Integrating the WebSphere Portal with LDAP33
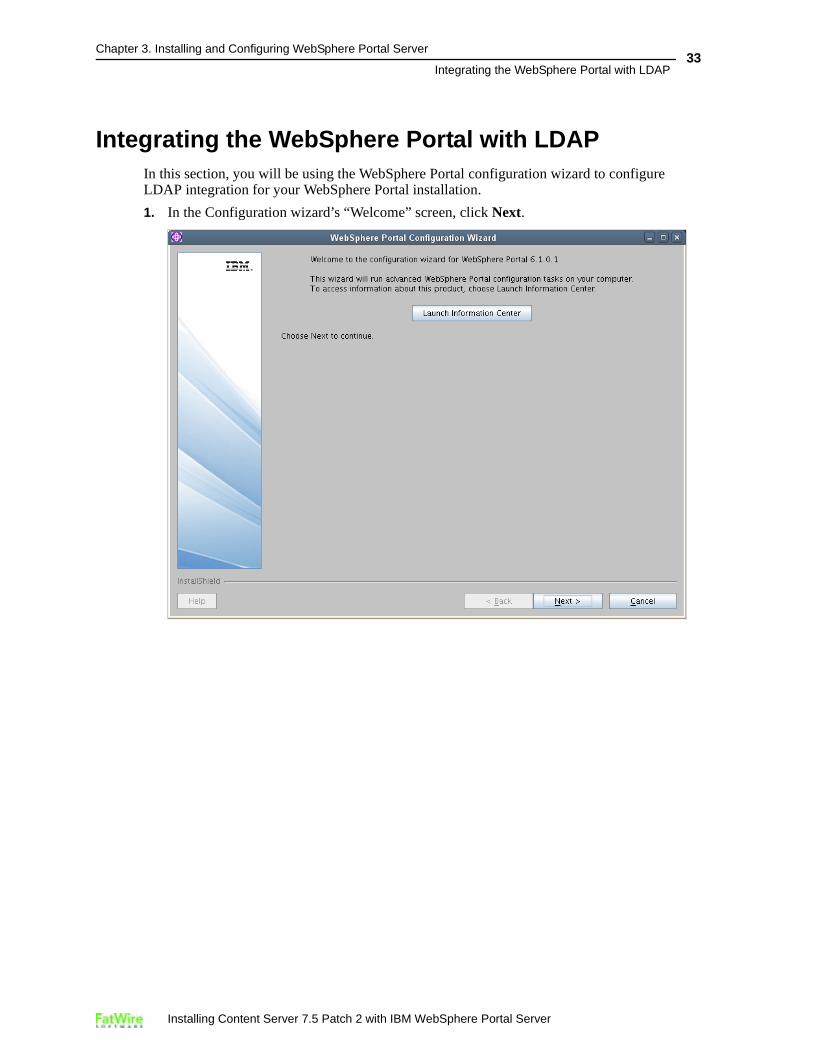
Integrating the WebSphere Portal with LDAPIn this section, you will be using the WebSphere Portal configuration wizard to configure LDAP integration for your WebSphere Portal installation.
1. In the Configuration wizard’s “Welcome” screen, click Next.
Installing Content Server 7.5 Patch 2 with IBM WebSphere Portal Server
Chapter 3. Installing and Configuring WebSphere Portal Server
Integrating the WebSphere Portal with LDAP34
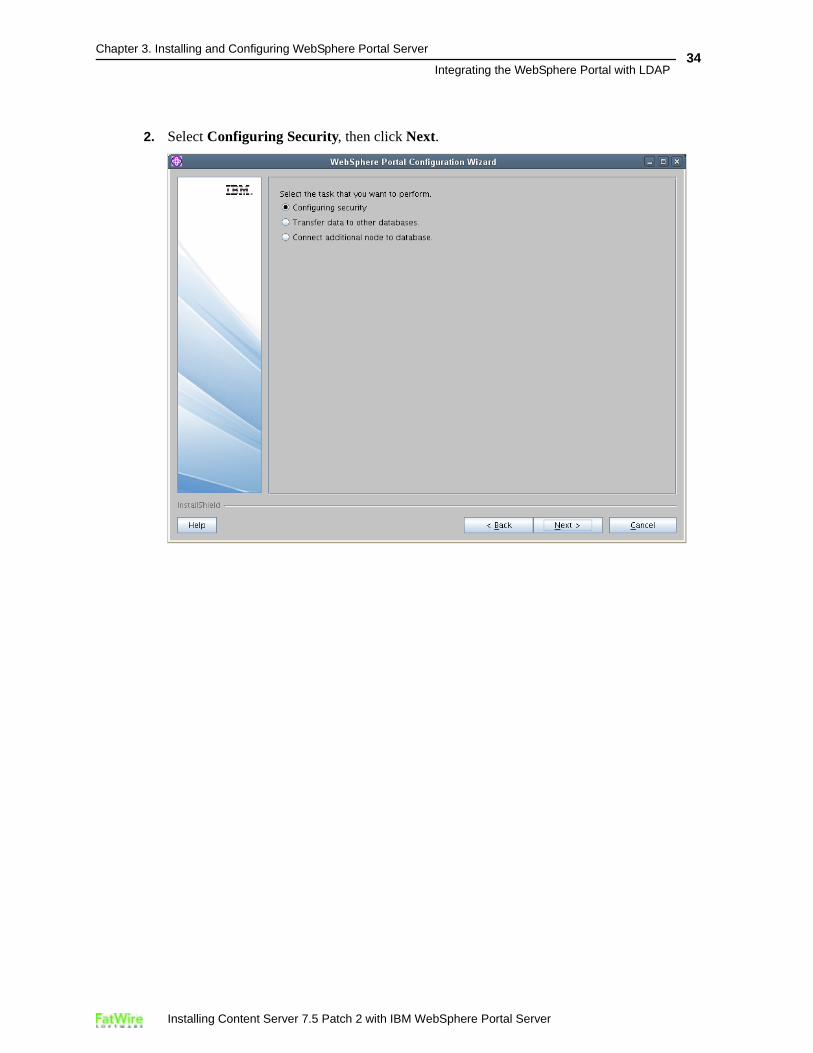
2. Select Configuring Security, then click Next.
Installing Content Server 7.5 Patch 2 with IBM WebSphere Portal Server
Chapter 3. Installing and Configuring WebSphere Portal Server
Integrating the WebSphere Portal with LDAP35
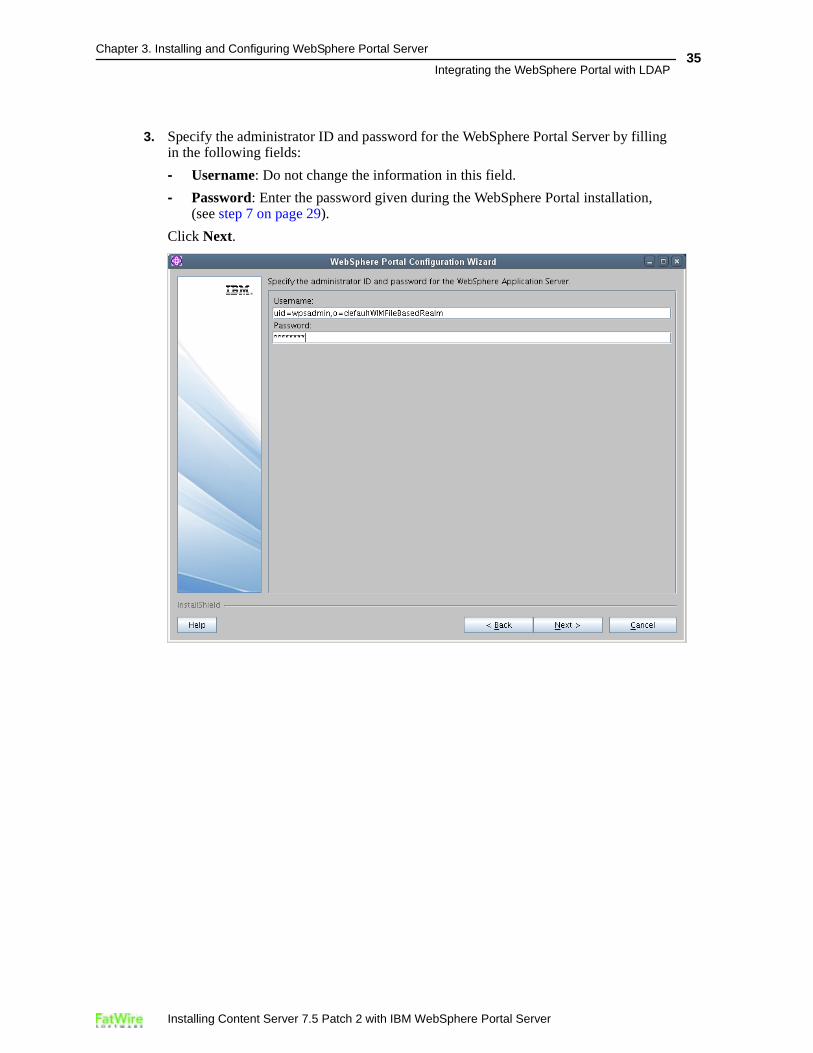
3. Specify the administrator ID and password for the WebSphere Portal Server by filling in the following fields:
- Username: Do not change the information in this field.
- Password: Enter the password given during the WebSphere Portal installation, (see step 7 on page 29).
Click Next.
Installing Content Server 7.5 Patch 2 with IBM WebSphere Portal Server
Chapter 3. Installing and Configuring WebSphere Portal Server
Integrating the WebSphere Portal with LDAP36
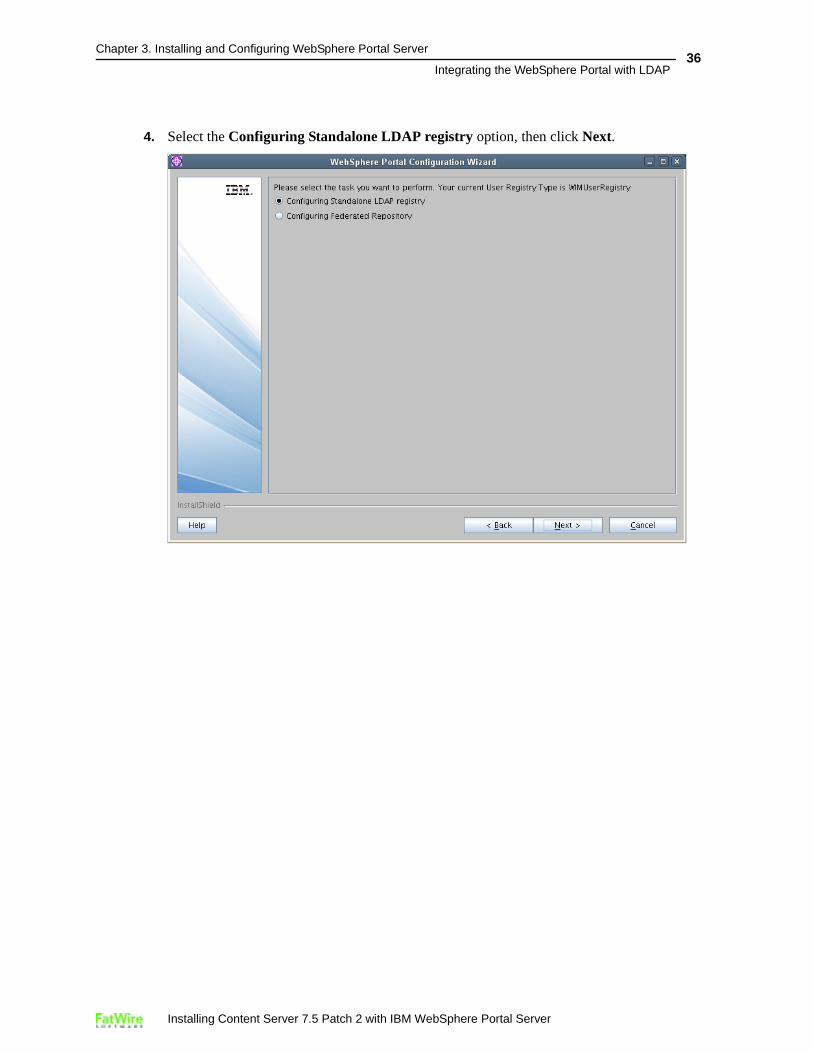
4. Select the Configuring Standalone LDAP registry option, then click Next.
Installing Content Server 7.5 Patch 2 with IBM WebSphere Portal Server
Chapter 3. Installing and Configuring WebSphere Portal Server
Integrating the WebSphere Portal with LDAP37
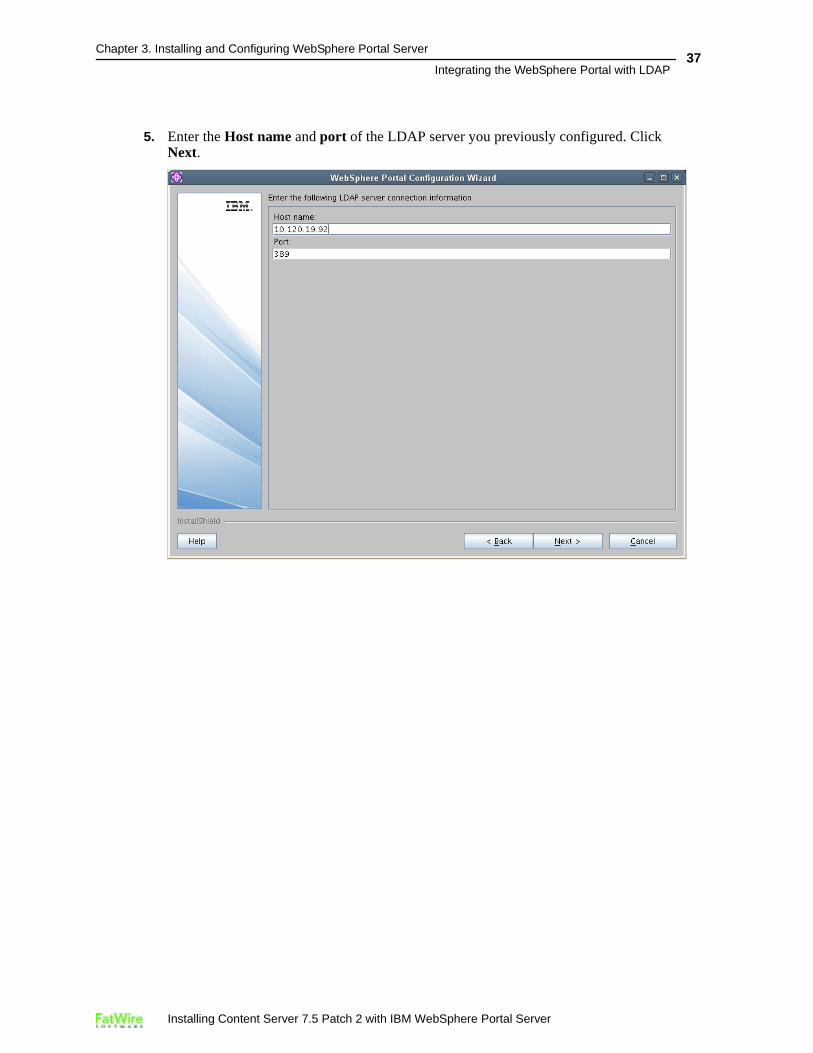
5. Enter the Host name and port of the LDAP server you previously configured. Click Next.
Installing Content Server 7.5 Patch 2 with IBM WebSphere Portal Server
Chapter 3. Installing and Configuring WebSphere Portal Server
Integrating the WebSphere Portal with LDAP38
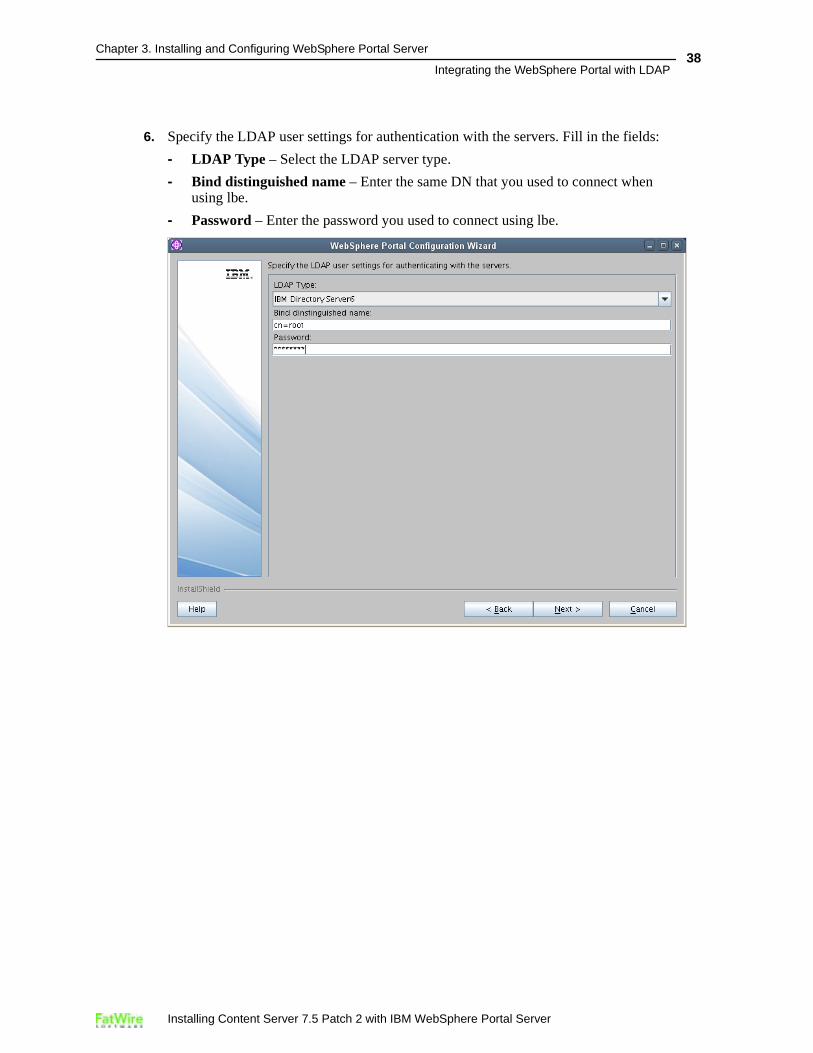
6. Specify the LDAP user settings for authentication with the servers. Fill in the fields:
- LDAP Type – Select the LDAP server type.
- Bind distinguished name – Enter the same DN that you used to connect when using lbe.
- Password – Enter the password you used to connect using lbe.
Installing Content Server 7.5 Patch 2 with IBM WebSphere Portal Server

Chapter 3. Installing and Configuring WebSphere Portal Server
Integrating the WebSphere Portal with LDAP39
7. In this screen, specify the primary administrative user and group. Fill in the fields:
- Primary administrative user name and Primary Portal administrative user name – Set the user names to wpsadmin, and set the DN to the value you entered in step 5 on page 20 when setting up the LDAP server (in this guide the DN value is DC=TEST,DC=COM).
- Password fields – for both the “Primary administrative user name” and the “Primary Portal administrative user name,” enter the password you used when setting up lbe.
- Primary Portal administrative group name – Enter the user name wpsadmin, and the DN that you entered when setting up the LDAP server step 5 on page 20 (in this guide the DN value is DC=TEST,DC=COM).
Click Next.
Installing Content Server 7.5 Patch 2 with IBM WebSphere Portal Server
Chapter 3. Installing and Configuring WebSphere Portal Server
Integrating the WebSphere Portal with LDAP40
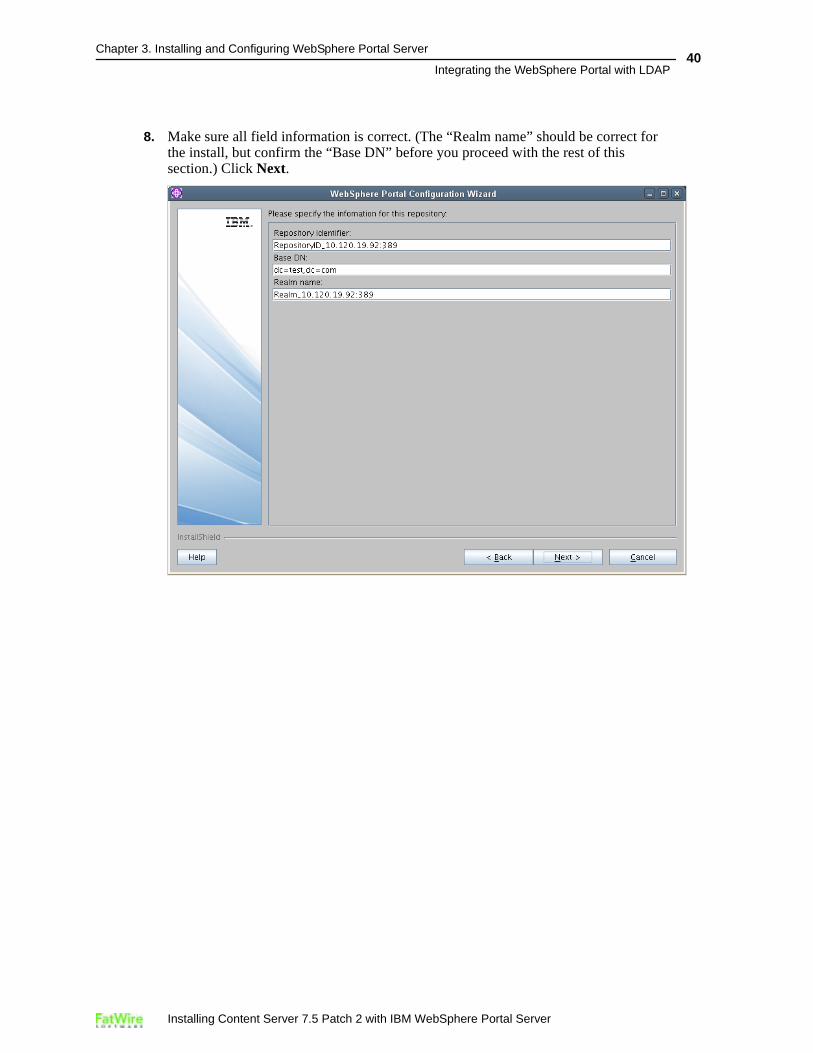
8. Make sure all field information is correct. (The “Realm name” should be correct for the install, but confirm the “Base DN” before you proceed with the rest of this section.) Click Next.
Installing Content Server 7.5 Patch 2 with IBM WebSphere Portal Server
Chapter 3. Installing and Configuring WebSphere Portal Server
Integrating the WebSphere Portal with LDAP41
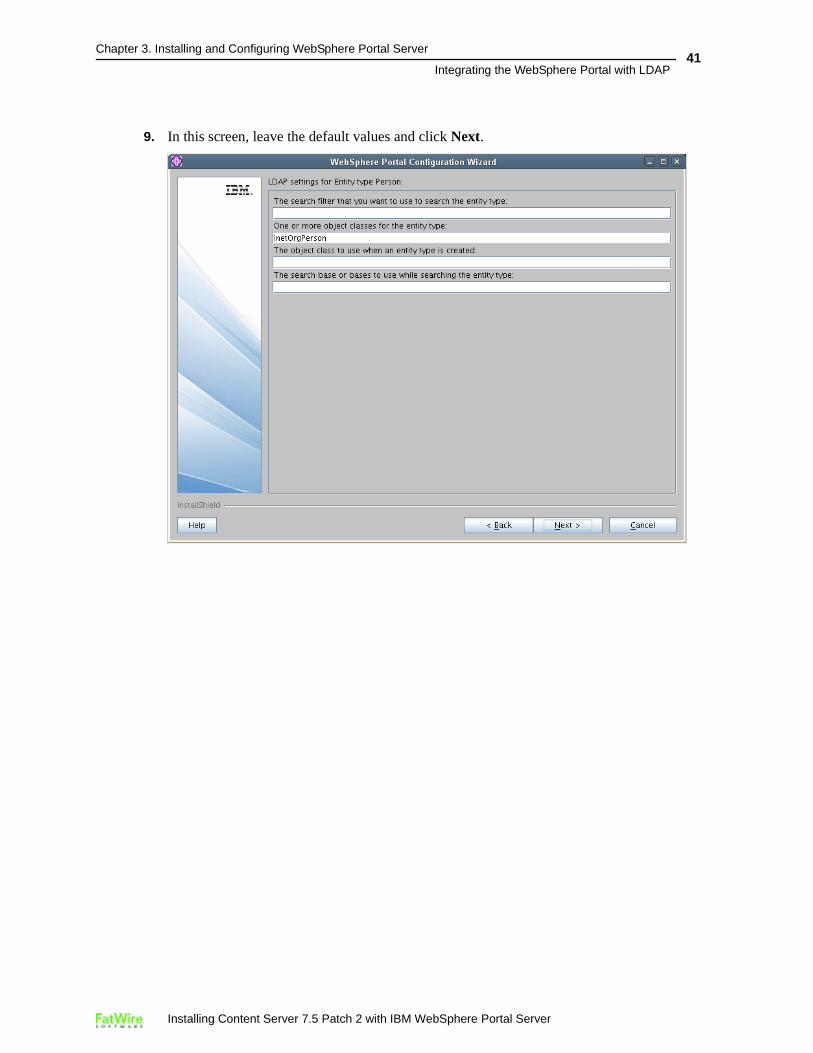
9. In this screen, leave the default values and click Next.
Installing Content Server 7.5 Patch 2 with IBM WebSphere Portal Server

Chapter 3. Installing and Configuring WebSphere Portal Server
Integrating the WebSphere Portal with LDAP42
10. In this screen, leave the default values and then click Next.
Installing Content Server 7.5 Patch 2 with IBM WebSphere Portal Server

Chapter 3. Installing and Configuring WebSphere Portal Server
Integrating the WebSphere Portal with LDAP43
11. In this screen, leave the default values and then click Next.
Installing Content Server 7.5 Patch 2 with IBM WebSphere Portal Server

Chapter 3. Installing and Configuring WebSphere Portal Server
Integrating the WebSphere Portal with LDAP44
12. In this screen, leave the default values and then click Next.
Note
Write down the values of the User and Group parents. These values will be needed when integrating Content Server with LDAP.
Installing Content Server 7.5 Patch 2 with IBM WebSphere Portal Server
Chapter 3. Installing and Configuring WebSphere Portal Server
Integrating the WebSphere Portal with LDAP45
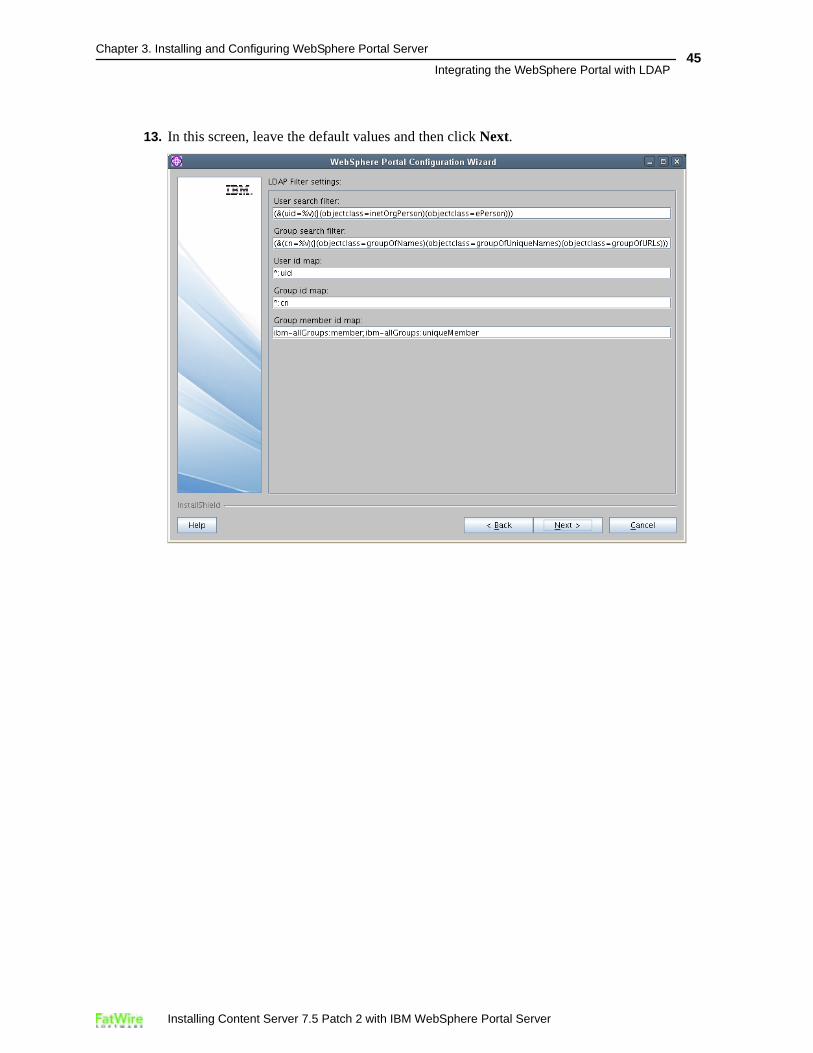
13. In this screen, leave the default values and then click Next.
Installing Content Server 7.5 Patch 2 with IBM WebSphere Portal Server
Chapter 3. Installing and Configuring WebSphere Portal Server
Integrating the WebSphere Portal with LDAP46
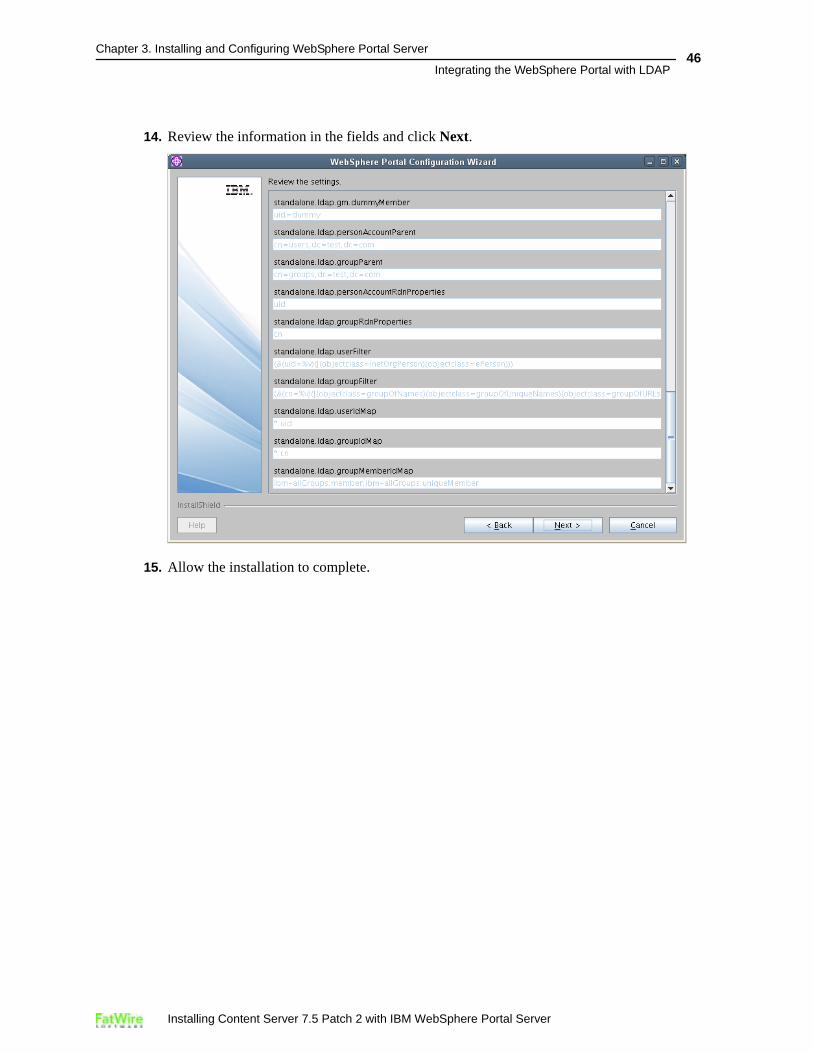
14. Review the information in the fields and click Next.
15. Allow the installation to complete.
Installing Content Server 7.5 Patch 2 with IBM WebSphere Portal Server

Chapter 3. Installing and Configuring WebSphere Portal Server
Integrating the WebSphere Portal with LDAP47
16. Click Finish.
17. Continue to the next step to configure database communications.
Installing Content Server 7.5 Patch 2 with IBM WebSphere Portal Server
Chapter 3. Installing and Configuring WebSphere Portal Server
Configuring the WebSphere Portal Server Instance for Database Communications48
Configuring the WebSphere Portal Server Instance for Database Communications
Before installing Content Server, a data source is required. The data source must be created under the Server named WebSphere_Portal. This section explains how to configure the WebSphere Portal Server instance you created in the previous section to communicate with the database Content Server will be using.
This section contains the following steps:
• A. Creating a J2C Authentication
• B. Creating a JDBC Provider
• C. Creating a JDBC Data Source
A. Creating a J2C Authentication The J2C authentication contains the login information that the WebSphere Portal Server will use to connect to the Content Server database. A J2C authentication is the first of three components required to set up your WebSphere Portal Server instance to connect to your database.
To create a J2C authentication
1. Log in to the Deployment Manager console:
a. Point your browser to the following URL:
http://<DM_host>:<DM_console_port>/admin
b. Enter your user name and password.
c. Click Log in.
The Deployment Manager console loads.
Note
Before completing the steps in the rest of this chapter, start the following WebSphere Portal Server components, in the order shown:
1. Deployment Manager
2. Node Agent
3. Application Server
The list of commands for starting and stopping WebSphere Portal components is available in “Start/Stop Commands and Default Ports,” on page 18.
Note
The default Deployment Manager console port is 9060.
Installing Content Server 7.5 Patch 2 with IBM WebSphere Portal Server
Chapter 3. Installing and Configuring WebSphere Portal Server
Configuring the WebSphere Portal Server Instance for Database Communications49
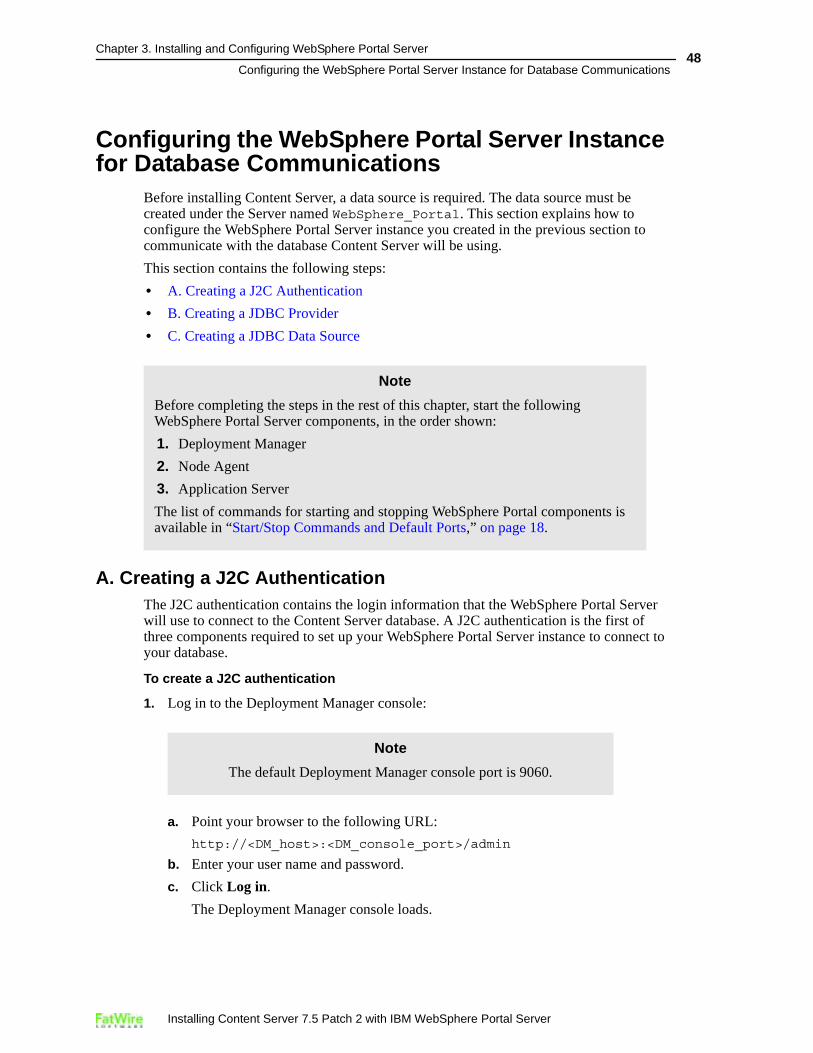
2. In the left-hand pane, expand the Security node.
3. Under the Security node, select Secure administration, applications, and infrastructure.
4. In the “Authentication” area in the right-hand pane, expand the Java Authentication and Authorization Service node and click J2C authentication data.
Installing Content Server 7.5 Patch 2 with IBM WebSphere Portal Server
Chapter 3. Installing and Configuring WebSphere Portal Server
Configuring the WebSphere Portal Server Instance for Database Communications50
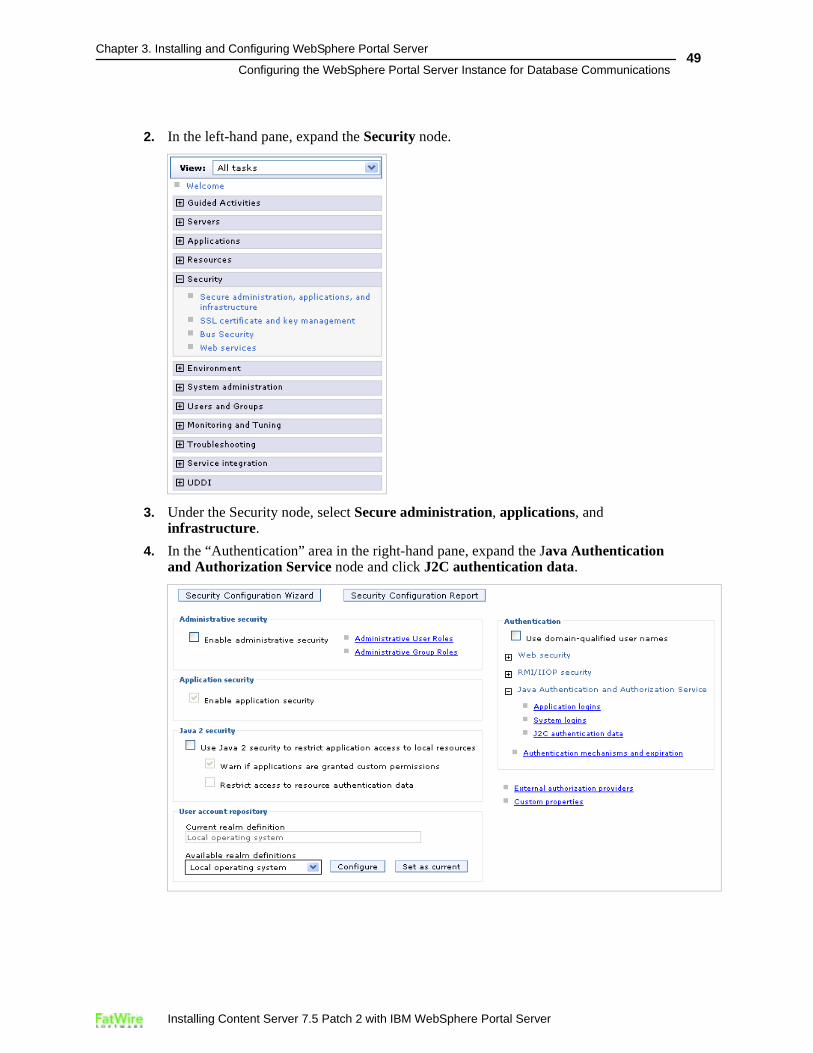
The console displays the “JAAS – J2C authentication data” screen.
5. In the “JAAS – J2C authentication data” screen, click New. The console displays the “Configuration” tab.
6. In the “Configuration” tab, do the following:
a. In the Alias field, enter a unique alias for the J2C authentication.
b. In the User ID and Password fields, enter the credentials of the database user account WebSphere Portal Server will use to connect to the Content Server database. (Re-enter the password for verification).
Installing Content Server 7.5 Patch 2 with IBM WebSphere Portal Server
Chapter 3. Installing and Configuring WebSphere Portal Server
Configuring the WebSphere Portal Server Instance for Database Communications51
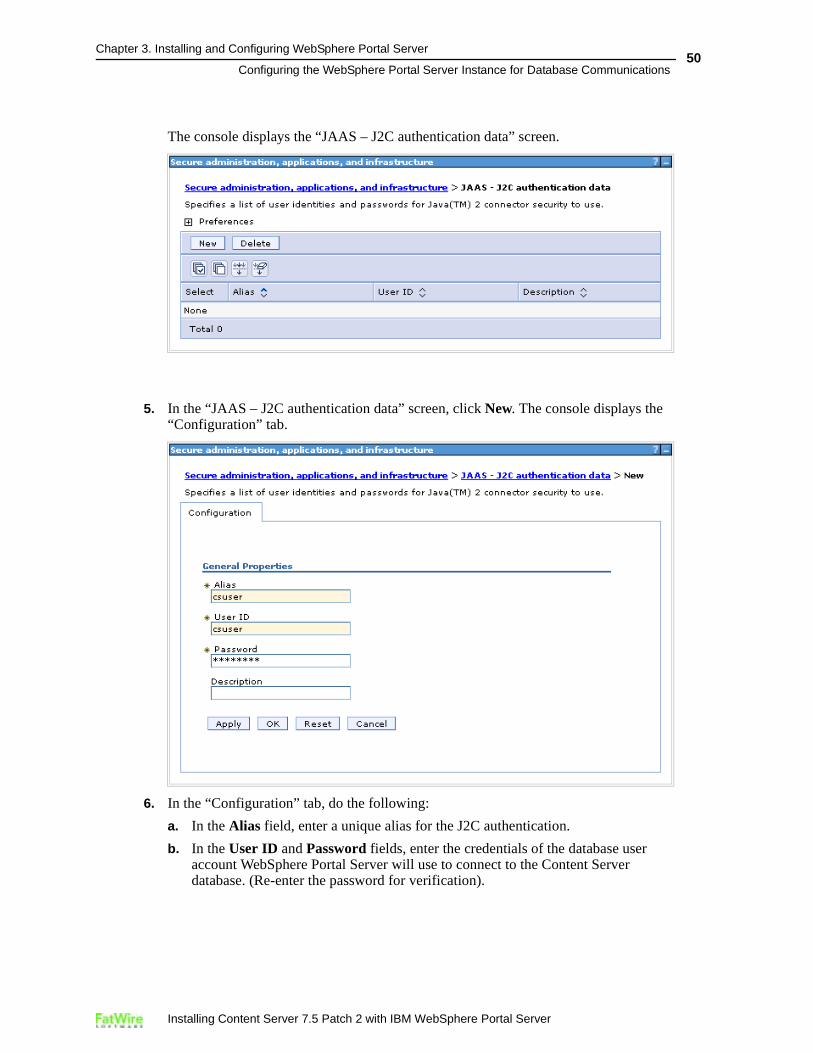
c. When you have finished, click OK. The J2C authentication you created appears in the list in the “JAAS – J2C authentication data” screen.
7. In the “Messages” box, click Save.
8. In the “Save” screen, do the following:
a. Select the Synchronize changes with nodes check box.
b. Click Save.
Installing Content Server 7.5 Patch 2 with IBM WebSphere Portal Server
Chapter 3. Installing and Configuring WebSphere Portal Server
Configuring the WebSphere Portal Server Instance for Database Communications52
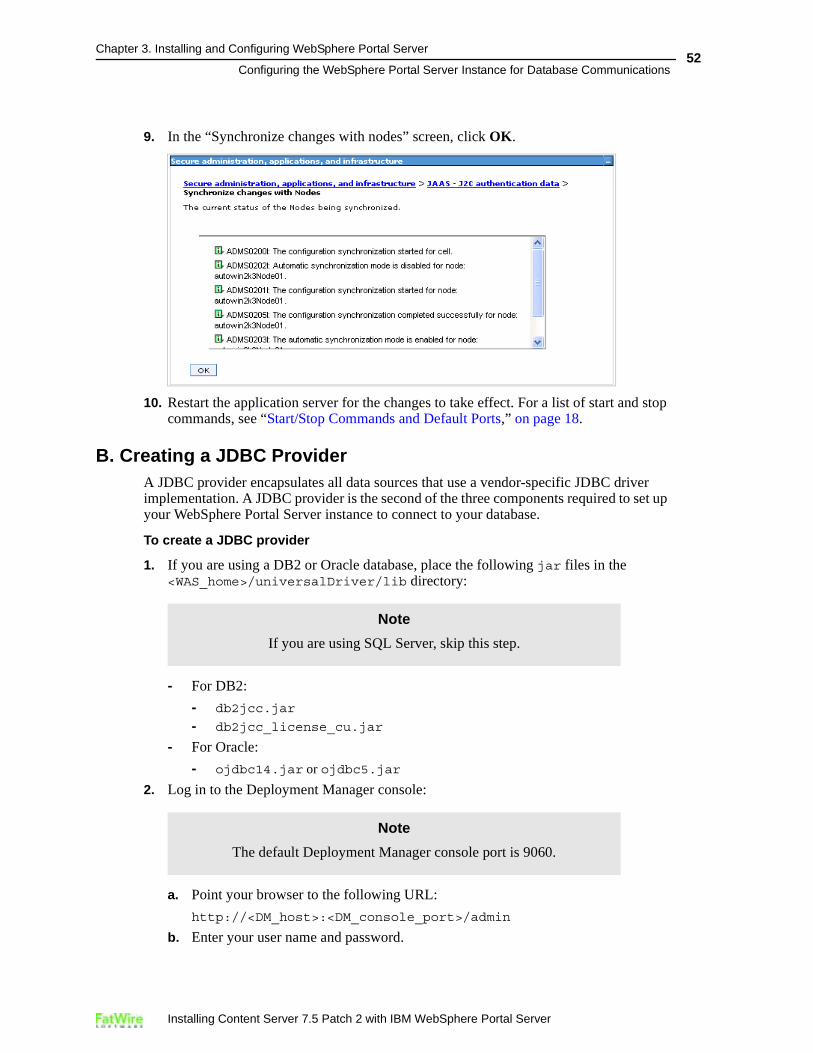
9. In the “Synchronize changes with nodes” screen, click OK.
10. Restart the application server for the changes to take effect. For a list of start and stop commands, see “Start/Stop Commands and Default Ports,” on page 18.
B. Creating a JDBC ProviderA JDBC provider encapsulates all data sources that use a vendor-specific JDBC driver implementation. A JDBC provider is the second of the three components required to set up your WebSphere Portal Server instance to connect to your database.
To create a JDBC provider
1. If you are using a DB2 or Oracle database, place the following jar files in the <WAS_home>/universalDriver/lib directory:
- For DB2:
- db2jcc.jar
- db2jcc_license_cu.jar
- For Oracle:
- ojdbc14.jar or ojdbc5.jar
2. Log in to the Deployment Manager console:
a. Point your browser to the following URL:
http://<DM_host>:<DM_console_port>/admin
b. Enter your user name and password.
Note
If you are using SQL Server, skip this step.
Note
The default Deployment Manager console port is 9060.
Installing Content Server 7.5 Patch 2 with IBM WebSphere Portal Server
Chapter 3. Installing and Configuring WebSphere Portal Server
Configuring the WebSphere Portal Server Instance for Database Communications53
c. Click Log in.
The Deployment Manager console loads.
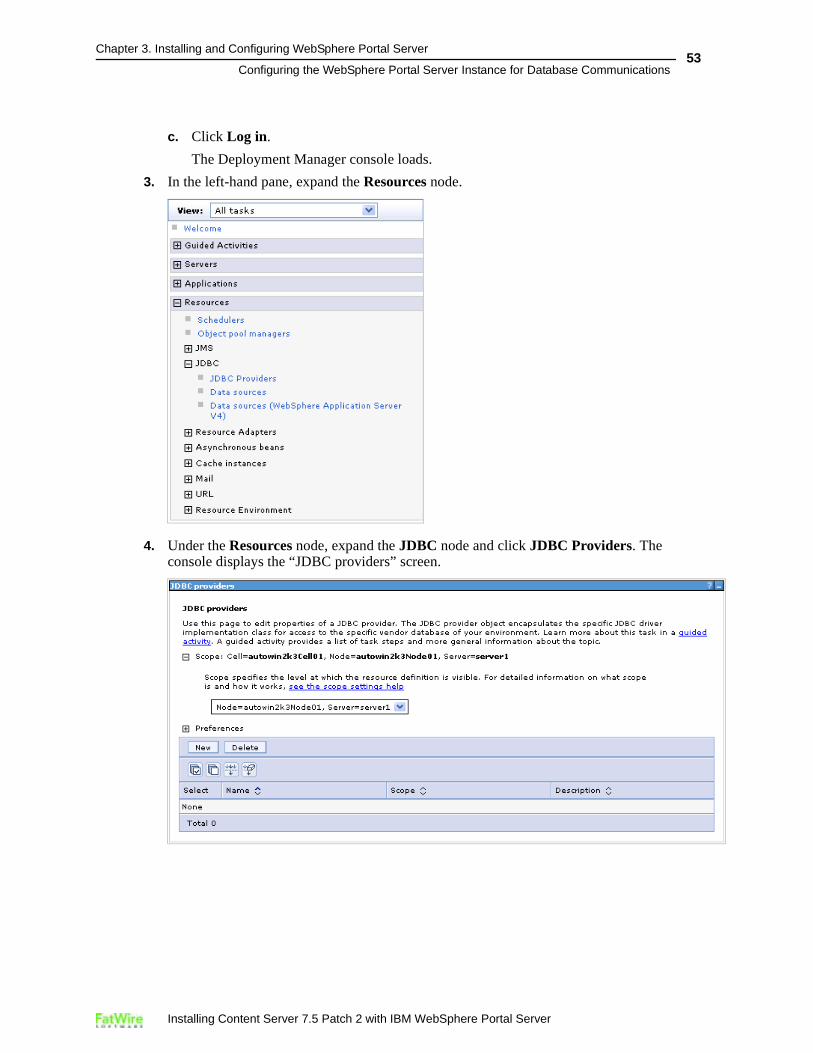
3. In the left-hand pane, expand the Resources node.
4. Under the Resources node, expand the JDBC node and click JDBC Providers. The console displays the “JDBC providers” screen.
Installing Content Server 7.5 Patch 2 with IBM WebSphere Portal Server
Chapter 3. Installing and Configuring WebSphere Portal Server
Configuring the WebSphere Portal Server Instance for Database Communications54
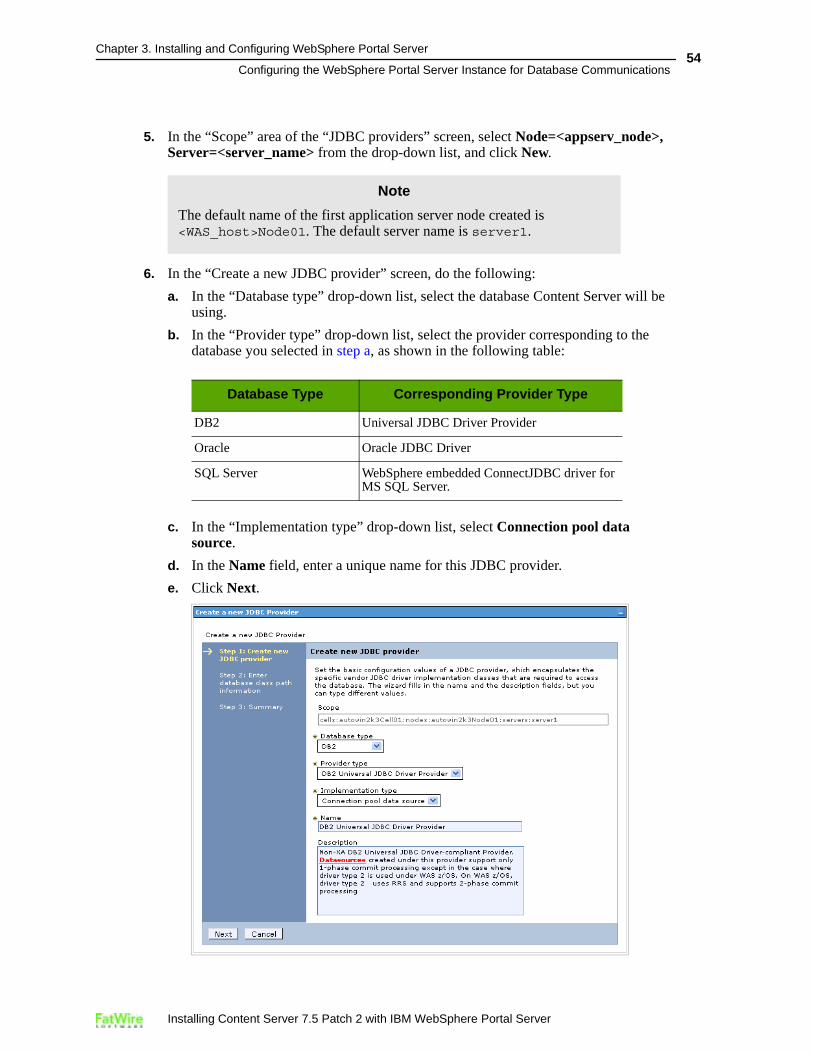
5. In the “Scope” area of the “JDBC providers” screen, select Node=<appserv_node>, Server=<server_name> from the drop-down list, and click New.
6. In the “Create a new JDBC provider” screen, do the following:
a. In the “Database type” drop-down list, select the database Content Server will be using.
b. In the “Provider type” drop-down list, select the provider corresponding to the database you selected in step a, as shown in the following table:
c. In the “Implementation type” drop-down list, select Connection pool data source.
d. In the Name field, enter a unique name for this JDBC provider.
e. Click Next.
Note
The default name of the first application server node created is <WAS_host>Node01. The default server name is server1.
Database Type Corresponding Provider Type
DB2 Universal JDBC Driver Provider
Oracle Oracle JDBC Driver
SQL Server WebSphere embedded ConnectJDBC driver for MS SQL Server.
Installing Content Server 7.5 Patch 2 with IBM WebSphere Portal Server
Chapter 3. Installing and Configuring WebSphere Portal Server
Configuring the WebSphere Portal Server Instance for Database Communications55
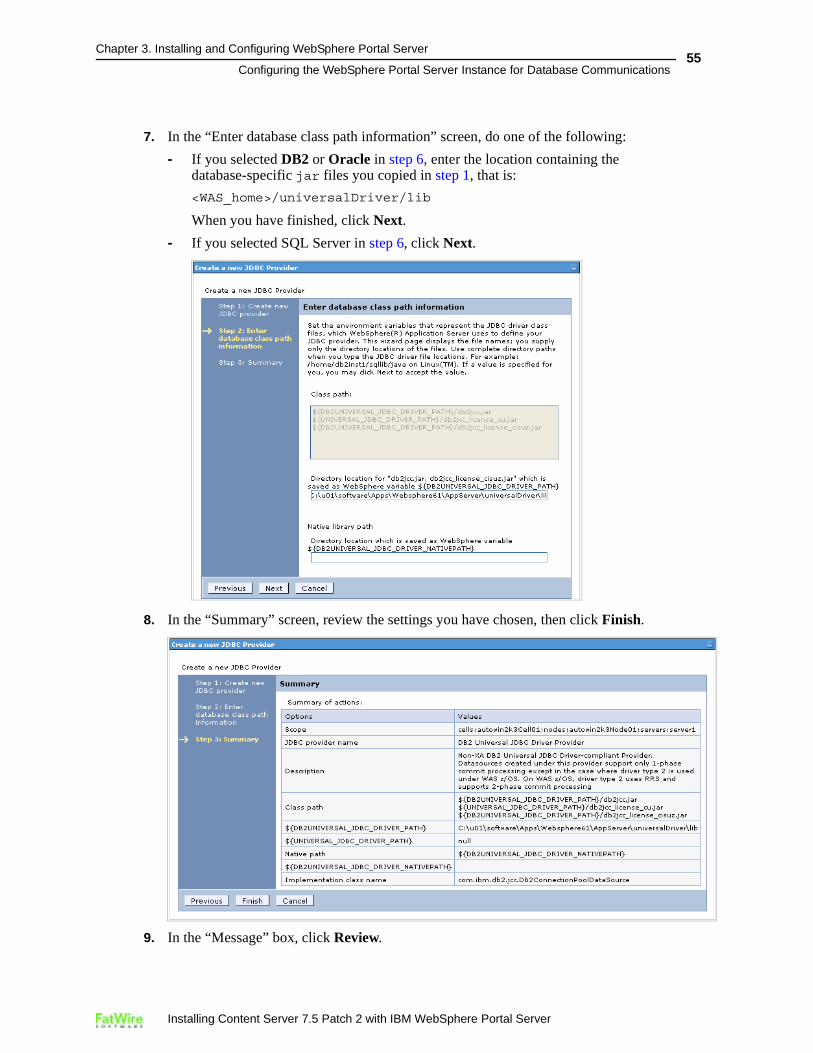
7. In the “Enter database class path information” screen, do one of the following:
- If you selected DB2 or Oracle in step 6, enter the location containing the database-specific jar files you copied in step 1, that is:
<WAS_home>/universalDriver/lib
When you have finished, click Next.
- If you selected SQL Server in step 6, click Next.
8. In the “Summary” screen, review the settings you have chosen, then click Finish.
9. In the “Message” box, click Review.
Installing Content Server 7.5 Patch 2 with IBM WebSphere Portal Server
Chapter 3. Installing and Configuring WebSphere Portal Server
Configuring the WebSphere Portal Server Instance for Database Communications56
10. In the “Save” screen, do the following:
a. Select the Synchronize changes with nodes check box.
b. Click Save.
11. In the “Synchronize changes with nodes” screen, click OK.
The console re-displays the “JDBC Providers” screen. The new JDBC provider appears in the list of providers in the right-hand pane.
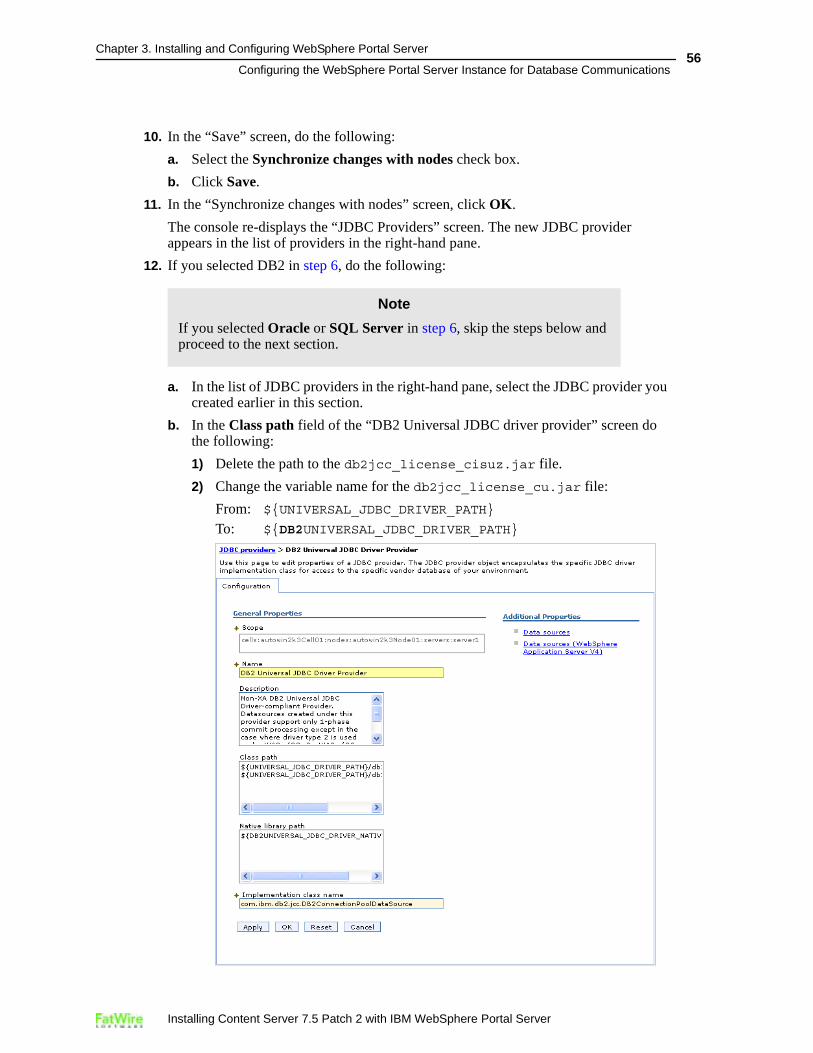
12. If you selected DB2 in step 6, do the following:
a. In the list of JDBC providers in the right-hand pane, select the JDBC provider you created earlier in this section.
b. In the Class path field of the “DB2 Universal JDBC driver provider” screen do the following:
1) Delete the path to the db2jcc_license_cisuz.jar file.
2) Change the variable name for the db2jcc_license_cu.jar file:
From: ${UNIVERSAL_JDBC_DRIVER_PATH}
To: ${DB2UNIVERSAL_JDBC_DRIVER_PATH}
Note
If you selected Oracle or SQL Server in step 6, skip the steps below and proceed to the next section.
Installing Content Server 7.5 Patch 2 with IBM WebSphere Portal Server

Chapter 3. Installing and Configuring WebSphere Portal Server
Configuring the WebSphere Portal Server Instance for Database Communications57
c. Click OK.
d. In the “Messages” box, click Review.
e. In the “Save” screen, do the following:
1) Select the Synchronize changes with nodes check box.
2) Click Save.
f. In the “Synchronize changes with nodes” screen, click OK.
C. Creating a JDBC Data Source
Once you have created the J2C authentication and the JDBC provider, you must create a data source. The data source is the final component required to set up your WebSphere Portal Server instance to connect to your database.
To create a JDBC data source
1. Log in to the Deployment Manager console:
a. Point your browser to the following URL:
http://<DM_host>:<DM_console_port>/admin
b. Enter your user name and password.
c. Click Log in.
The Deployment Manager console opens.
Note
Before starting this procedure, make sure you have done the following:
1. Created a J2C authentication by following the steps in “A. Creating a J2C Authentication.”
2. Created a JDBC provider by following the steps in “B. Creating a JDBC Provider.”
Note
The default Deployment Manager console port is 9060.
Installing Content Server 7.5 Patch 2 with IBM WebSphere Portal Server
Chapter 3. Installing and Configuring WebSphere Portal Server
Configuring the WebSphere Portal Server Instance for Database Communications58
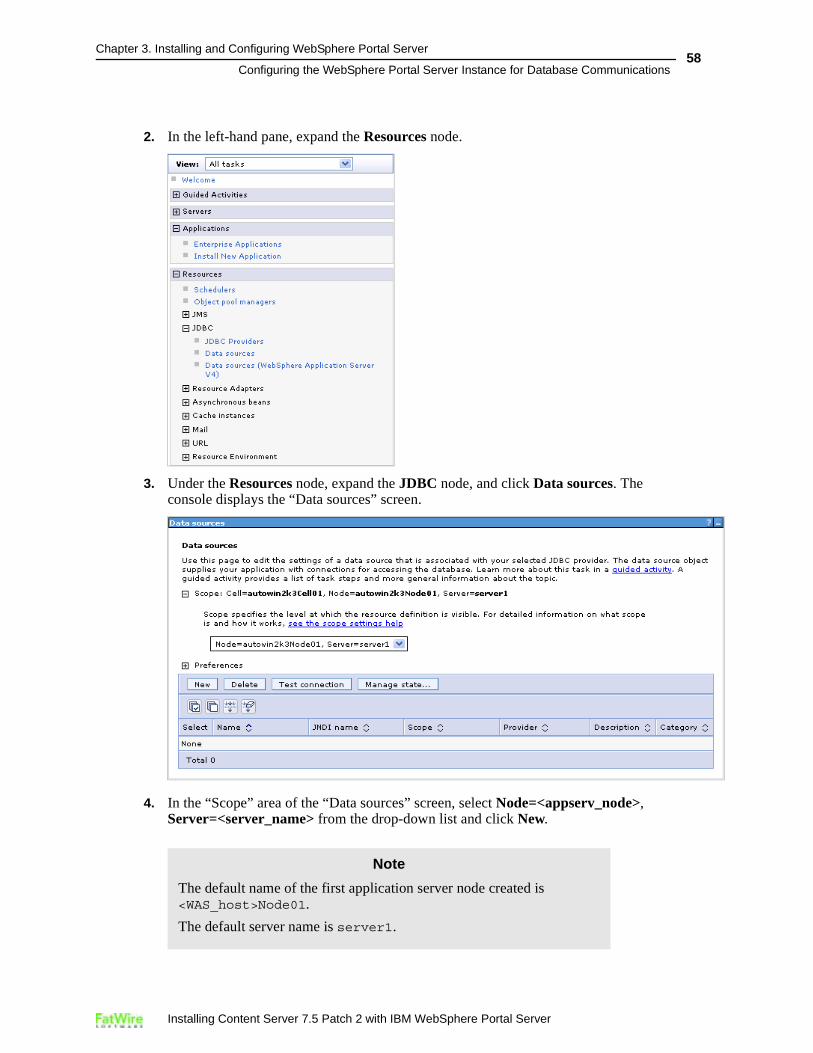
2. In the left-hand pane, expand the Resources node.
3. Under the Resources node, expand the JDBC node, and click Data sources. The console displays the “Data sources” screen.
4. In the “Scope” area of the “Data sources” screen, select Node=<appserv_node>, Server=<server_name> from the drop-down list and click New.
Note
The default name of the first application server node created is <WAS_host>Node01.
The default server name is server1.
Installing Content Server 7.5 Patch 2 with IBM WebSphere Portal Server
Chapter 3. Installing and Configuring WebSphere Portal Server
Configuring the WebSphere Portal Server Instance for Database Communications59
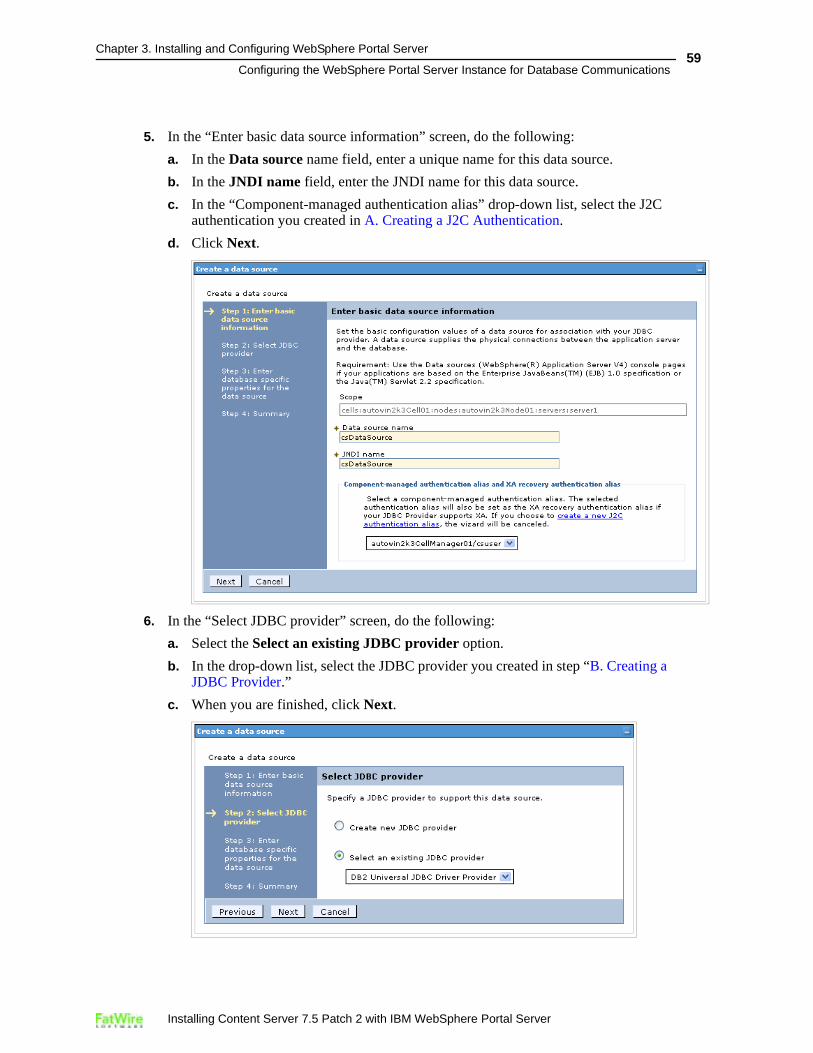
5. In the “Enter basic data source information” screen, do the following:
a. In the Data source name field, enter a unique name for this data source.
b. In the JNDI name field, enter the JNDI name for this data source.
c. In the “Component-managed authentication alias” drop-down list, select the J2C authentication you created in A. Creating a J2C Authentication.
d. Click Next.
6. In the “Select JDBC provider” screen, do the following:
a. Select the Select an existing JDBC provider option.
b. In the drop-down list, select the JDBC provider you created in step “B. Creating a JDBC Provider.”
c. When you are finished, click Next.
Installing Content Server 7.5 Patch 2 with IBM WebSphere Portal Server
Chapter 3. Installing and Configuring WebSphere Portal Server
Configuring the WebSphere Portal Server Instance for Database Communications60
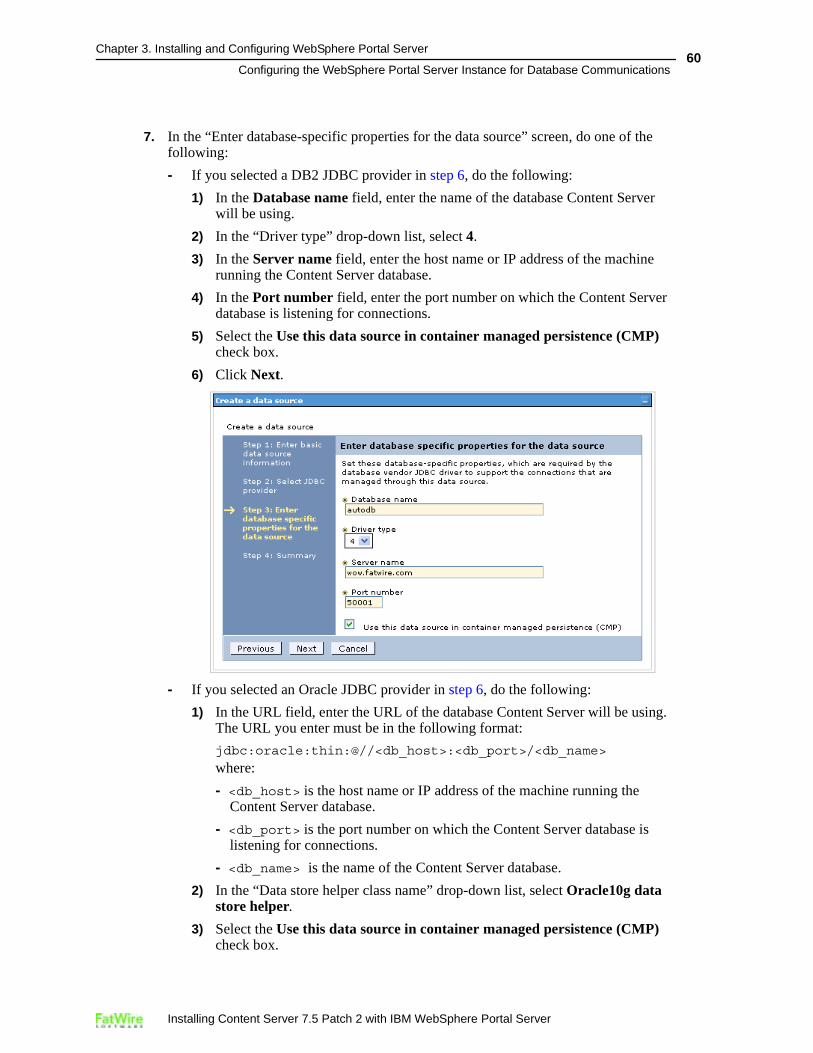
7. In the “Enter database-specific properties for the data source” screen, do one of the following:
- If you selected a DB2 JDBC provider in step 6, do the following:
1) In the Database name field, enter the name of the database Content Server will be using.
2) In the “Driver type” drop-down list, select 4.
3) In the Server name field, enter the host name or IP address of the machine running the Content Server database.
4) In the Port number field, enter the port number on which the Content Server database is listening for connections.
5) Select the Use this data source in container managed persistence (CMP) check box.
6) Click Next.
- If you selected an Oracle JDBC provider in step 6, do the following:
1) In the URL field, enter the URL of the database Content Server will be using. The URL you enter must be in the following format:
jdbc:oracle:thin:@//<db_host>:<db_port>/<db_name>
where:
- <db_host> is the host name or IP address of the machine running the Content Server database.
- <db_port> is the port number on which the Content Server database is listening for connections.
- <db_name> is the name of the Content Server database.
2) In the “Data store helper class name” drop-down list, select Oracle10g data store helper.
3) Select the Use this data source in container managed persistence (CMP) check box.
Installing Content Server 7.5 Patch 2 with IBM WebSphere Portal Server
Chapter 3. Installing and Configuring WebSphere Portal Server
Configuring the WebSphere Portal Server Instance for Database Communications61
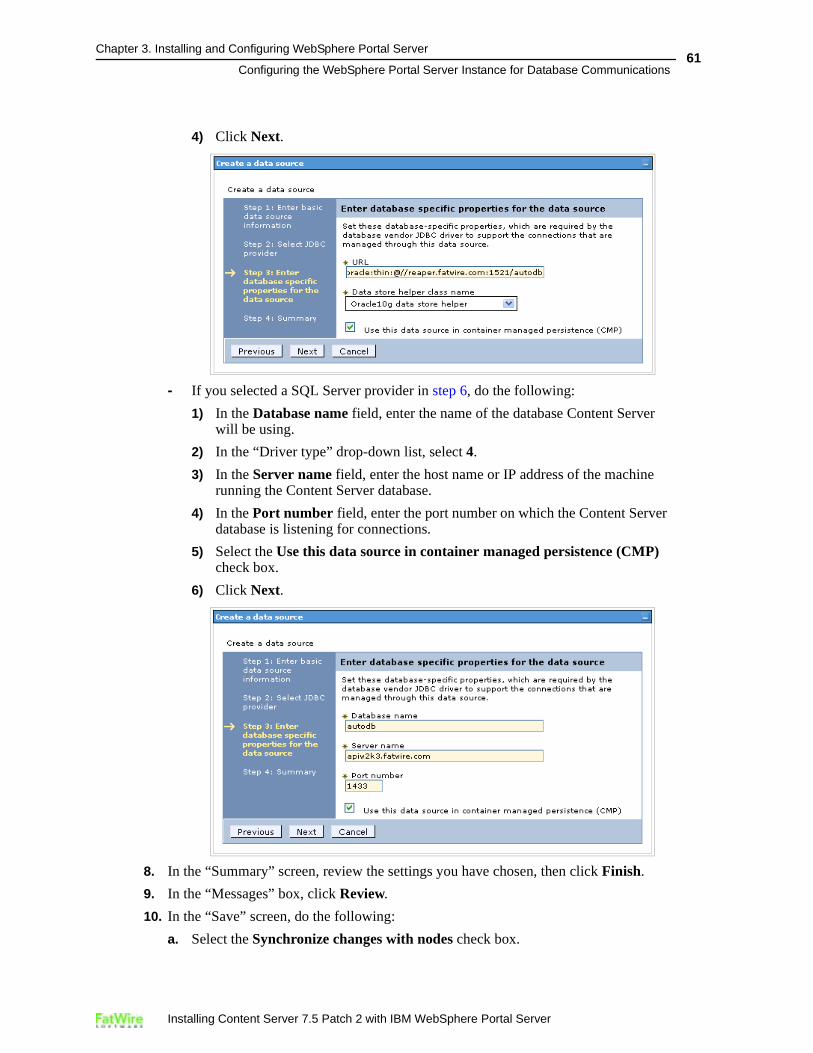
4) Click Next.
- If you selected a SQL Server provider in step 6, do the following:
1) In the Database name field, enter the name of the database Content Server will be using.
2) In the “Driver type” drop-down list, select 4.
3) In the Server name field, enter the host name or IP address of the machine running the Content Server database.
4) In the Port number field, enter the port number on which the Content Server database is listening for connections.
5) Select the Use this data source in container managed persistence (CMP) check box.
6) Click Next.
8. In the “Summary” screen, review the settings you have chosen, then click Finish.
9. In the “Messages” box, click Review.
10. In the “Save” screen, do the following:
a. Select the Synchronize changes with nodes check box.
Installing Content Server 7.5 Patch 2 with IBM WebSphere Portal Server
Chapter 3. Installing and Configuring WebSphere Portal Server
Configuring the WebSphere Portal Server Instance for Database Communications62
b. Click Save.
11. In the “Synchronize changes with nodes” screen, click OK. The console re-displays the “Data sources” screen showing the data source you just created.
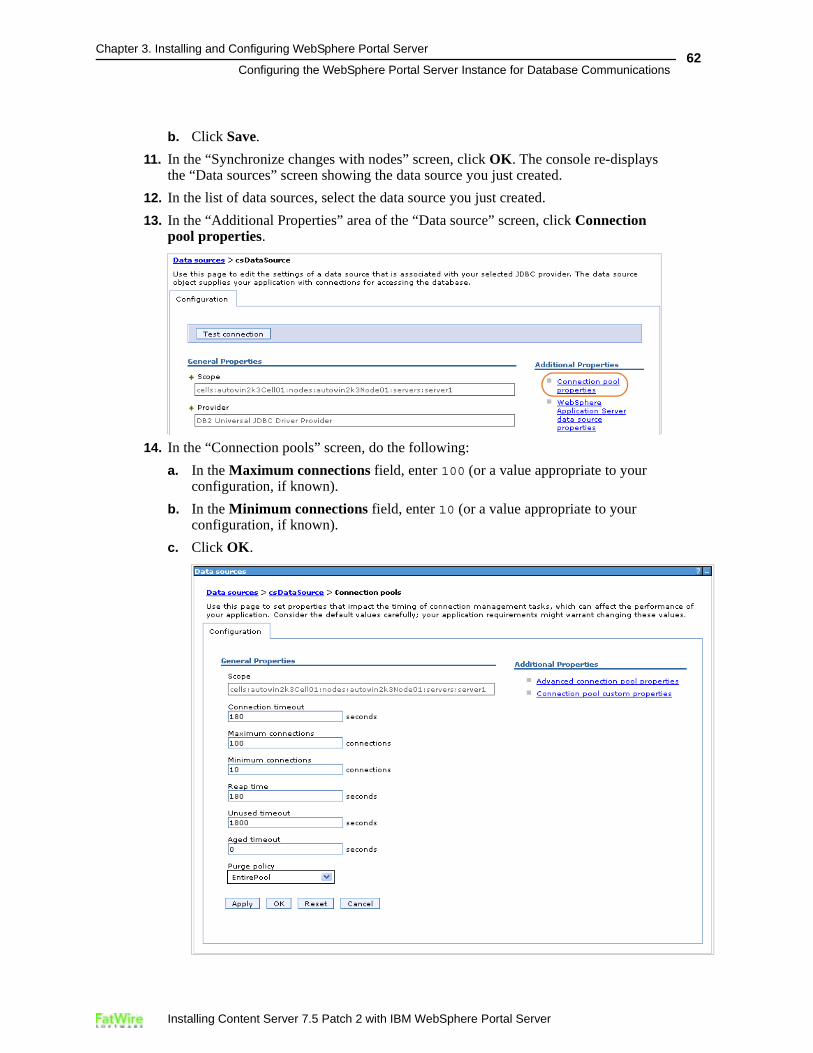
12. In the list of data sources, select the data source you just created.
13. In the “Additional Properties” area of the “Data source” screen, click Connection pool properties.
14. In the “Connection pools” screen, do the following:
a. In the Maximum connections field, enter 100 (or a value appropriate to your configuration, if known).
b. In the Minimum connections field, enter 10 (or a value appropriate to your configuration, if known).
c. Click OK.
Installing Content Server 7.5 Patch 2 with IBM WebSphere Portal Server

Chapter 3. Installing and Configuring WebSphere Portal Server
Configuring the WebSphere Portal Server Instance for Database Communications63
15. In the “Messages” box, click Review.
16. In the “Save” screen, do the following:
a. Select the Synchronize changes with nodes check box.
b. Click Save.
17. In the “Synchronize changes with nodes” screen, click OK.
18. For installations running DB2:
a. In the list of data sources, select the data source you just created.
b. In the “Additional Properties” area of the “Data source” screen, click Custom properties.
Installing Content Server 7.5 Patch 2 with IBM WebSphere Portal Server
Chapter 3. Installing and Configuring WebSphere Portal Server
Configuring the WebSphere Portal Server Instance for Database Communications64
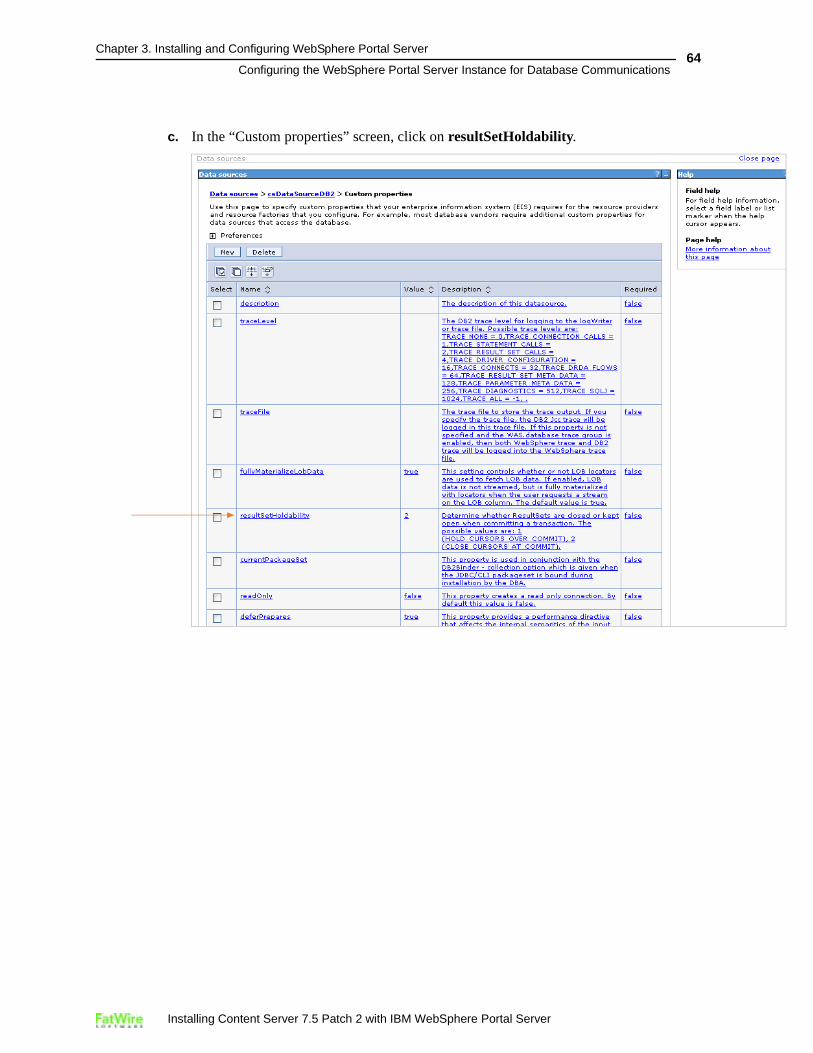
c. In the “Custom properties” screen, click on resultSetHoldability.
Installing Content Server 7.5 Patch 2 with IBM WebSphere Portal Server
Chapter 3. Installing and Configuring WebSphere Portal Server
Configuring the WebSphere Portal Server Instance for Database Communications65
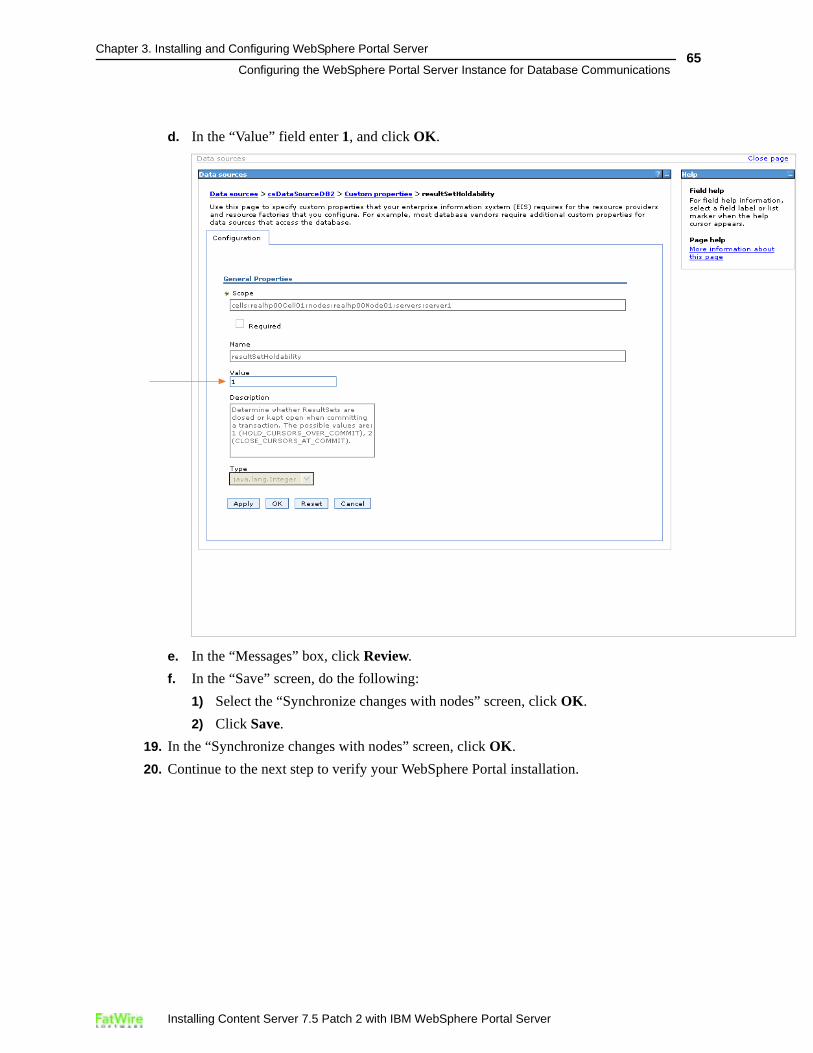
d. In the “Value” field enter 1, and click OK.
e. In the “Messages” box, click Review.
f. In the “Save” screen, do the following:
1) Select the “Synchronize changes with nodes” screen, click OK.
2) Click Save.
19. In the “Synchronize changes with nodes” screen, click OK.
20. Continue to the next step to verify your WebSphere Portal installation.
Installing Content Server 7.5 Patch 2 with IBM WebSphere Portal Server
Chapter 3. Installing and Configuring WebSphere Portal Server
Verifying the WebSphere Portal Installation66
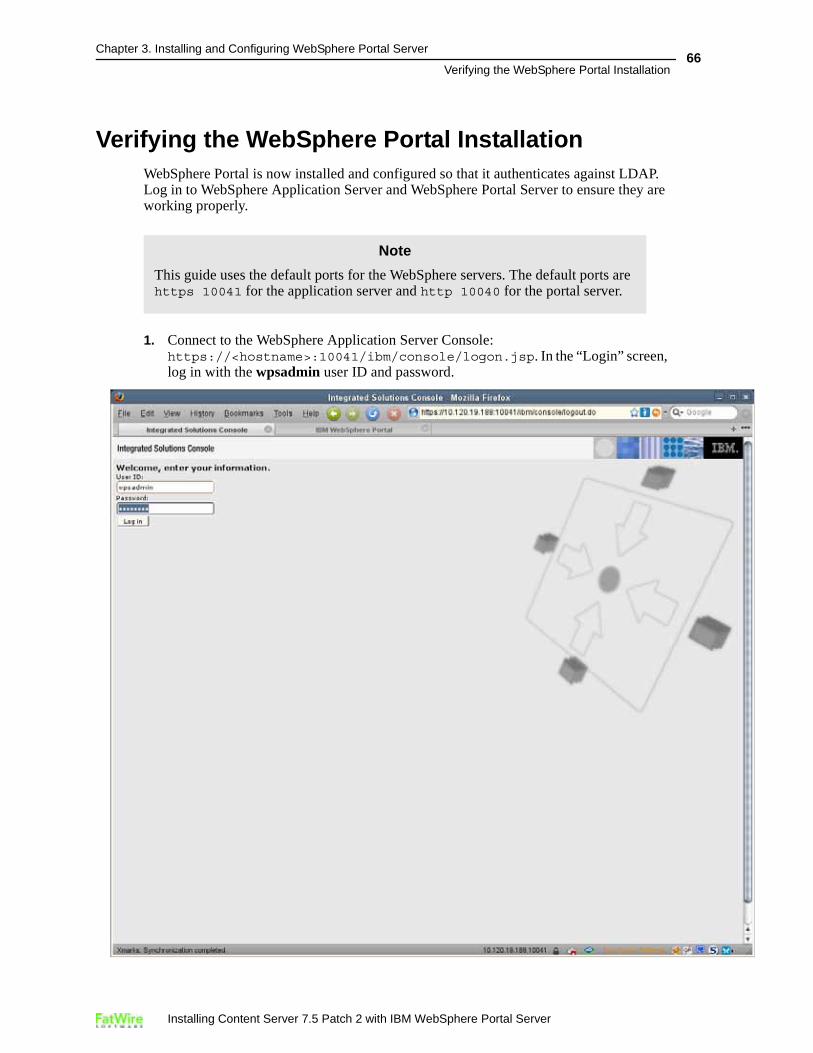
Verifying the WebSphere Portal InstallationWebSphere Portal is now installed and configured so that it authenticates against LDAP. Log in to WebSphere Application Server and WebSphere Portal Server to ensure they are working properly.
1. Connect to the WebSphere Application Server Console: https://<hostname>:10041/ibm/console/logon.jsp. In the “Login” screen, log in with the wpsadmin user ID and password.
Note
This guide uses the default ports for the WebSphere servers. The default ports are https 10041 for the application server and http 10040 for the portal server.
Installing Content Server 7.5 Patch 2 with IBM WebSphere Portal Server
Chapter 3. Installing and Configuring WebSphere Portal Server
Verifying the WebSphere Portal Installation67
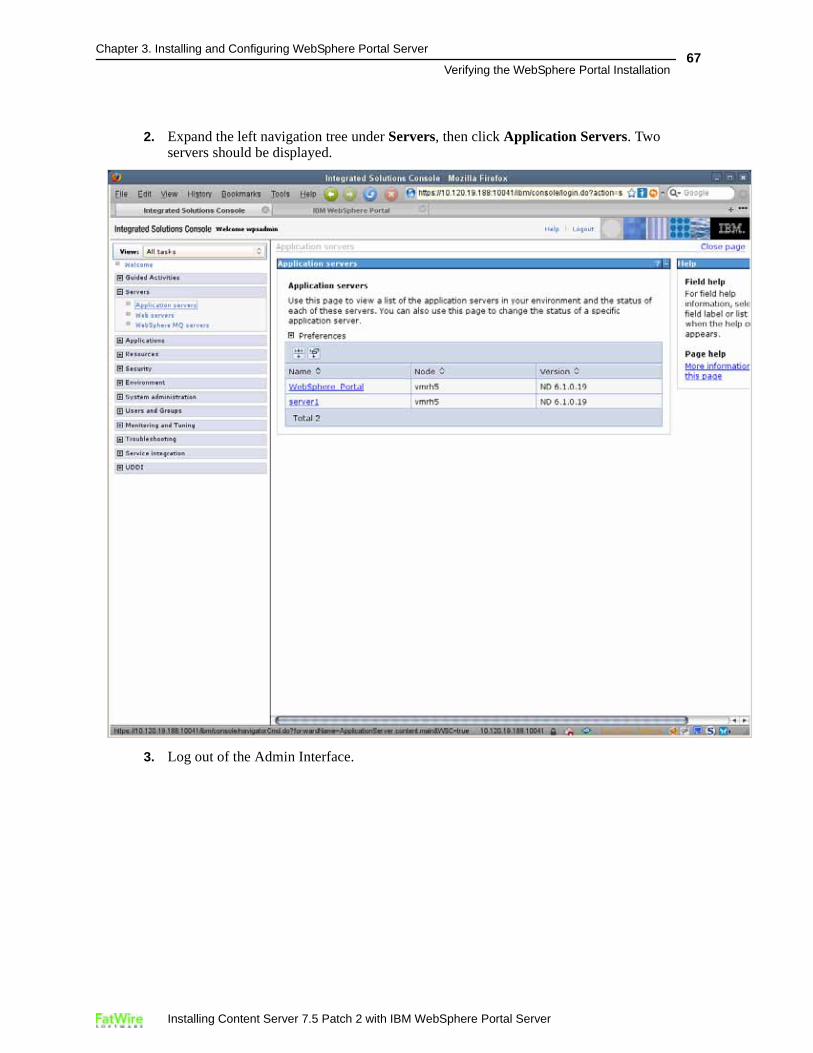
2. Expand the left navigation tree under Servers, then click Application Servers. Two servers should be displayed.
3. Log out of the Admin Interface.
Installing Content Server 7.5 Patch 2 with IBM WebSphere Portal Server
Chapter 3. Installing and Configuring WebSphere Portal Server
Verifying the WebSphere Portal Installation68
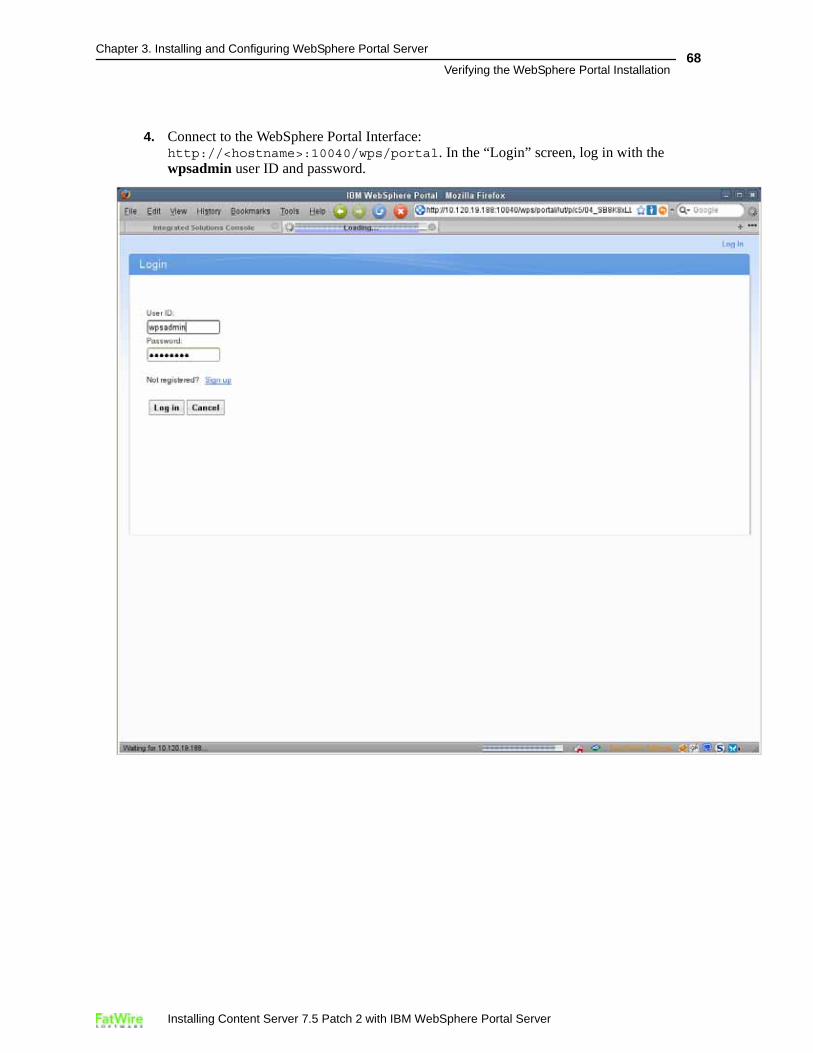
4. Connect to the WebSphere Portal Interface: http://<hostname>:10040/wps/portal. In the “Login” screen, log in with the wpsadmin user ID and password.
Installing Content Server 7.5 Patch 2 with IBM WebSphere Portal Server
Chapter 3. Installing and Configuring WebSphere Portal Server
Verifying the WebSphere Portal Installation69
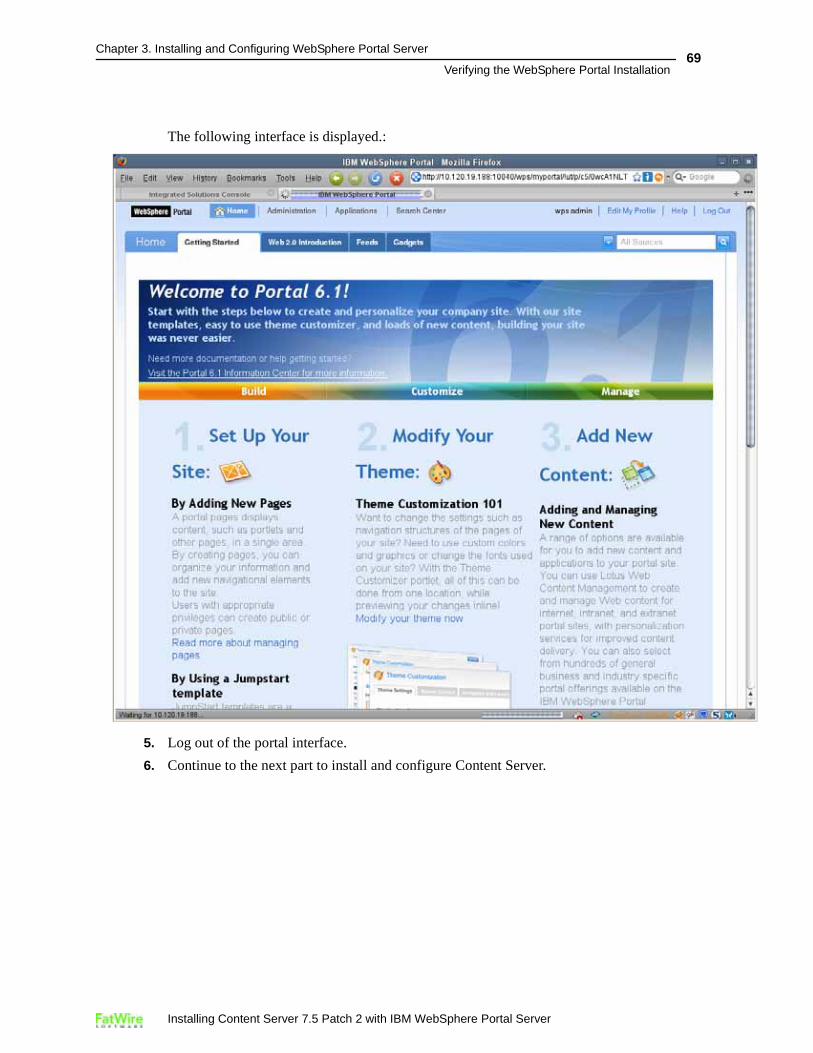
The following interface is displayed.:
5. Log out of the portal interface.
6. Continue to the next part to install and configure Content Server.
Installing Content Server 7.5 Patch 2 with IBM WebSphere Portal Server

Chapter 3. Installing and Configuring WebSphere Portal Server
Verifying the WebSphere Portal Installation70
Installing Content Server 7.5 Patch 2 with IBM WebSphere Portal Server

71
Par t 3
Content Server
This part shows you how to install Content Server and configure portlets for the users.
This part contains the following chapters:
• Chapter 4, “Installing Content Server”
• Chapter 5, “Configuring Portlets”
Installing Content Server 7.5 Patch 2 with IBM WebSphere Portal Server

72
Installing Content Server 7.5 Patch 2 with IBM WebSphere Portal Server
73
Chapter 4
Installing Content Server
Now that you have confirmed that the portal is set up and working properly, you can install Content Server on the WebSphere portal.
This chapter contains the following sections:
• Installing Content Server on the WebSphere Portal
• Post-Installation Steps
Installing Content Server 7.5 Patch 2 with IBM WebSphere Portal Server
Chapter 4. Installing Content Server
Installing Content Server on the WebSphere Portal74
Installing Content Server on the WebSphere PortalTo install Content Server with Patch 2 on the WebSphere portal
1. Start the Content Server installer.
2. Select Portal Server Platform, then select WebSphere Portal 6.1.
3. For the installation location, enter: <WAS Portal Home>/wp_profile/installedApps/<node name>/ContentServer.ear/cs.war
4. Continue with the installation. Stop at the midway point, when you see the dialog box that prompts you to deploy.
To deploy, do the following:
5. Modify the cs.war file for use on WebSphere Portal 6.1.
a. Change to: <CS HOME>/ominstallinfo/app/
b. Make a new directory called 1.
c. Rename cs.war to cs_org.war.
d. Change to directory 1.
e. Uncompress cs.war into directory 1.
# jar -xvf ../cs.war
f. Edit the file WEB-INF/classes/commons-logging.properties:
1) Locate and remove the line priority=1.
2) Create a new line at the very beginning of the file that states priority=1.
3) Save the changes.
6. Edit the file WEB-INF/classes/ibm-web-ext.xmi:
a. Go the </webappext:WebAppExtension> tag: <webappext:WebAppExtension xmi:version="2.0"
xmlns:xmi="http://www.omg.org/XMI" xmlns:webappext="webappext.xmi" xmlns:webapplication="webapplication.xmi" xmlns:xsi="http://www.w3.org/2001/XMLSchema-instance" xmi:id="WebAppExtension_2" reloadInterval="5" reloadingEnabled="true" defaultErrorPage="error.jsp" additionalClassPath="" fileServingEnabled="true" directoryBrowsingEnabled="true" serveServletsByClassnameEnabled="false">
<webApp href="WEB-INF/web.xml#WebApp_ID"/>
</webappext:WebAppExtension>
b. Add the following lines before the tag:
<jspAttributes xmi:id="JSPAttribute_1237644990616" name="jdkSourceLevel" value ="15"/>
<jspAttributes xmi:id="JSPAttribute_1237644990617" name="disableJspRuntimeCompilation" value="false"/>
<jspAttributes xmi:id="JSPAttribute_1237644990618" name="reloadEnabled" value= "true"/>
Installing Content Server 7.5 Patch 2 with IBM WebSphere Portal Server
Chapter 4. Installing Content Server
Installing Content Server on the WebSphere Portal75
<jspAttributes xmi:id="JSPAttribute_1237644990619" name="reloadInterval" value ="10"/>
The new file now looks like this:<webappext:WebAppExtension xmi:version="2.0"
xmlns:xmi="http://www.omg.org/XMI" xmlns:webappext="webappext.xmi" xmlns:webapplication="webapplication.xmi" xmlns:xsi="http://www.w3.org/2001/XMLSchema-instance" xmi:id="WebAppExtension_2" reloadInterval="5" reloadingEnabled="true" defaultErrorPage="error.jsp" additionalClassPath="" fileServingEnabled="true" directoryBrowsingEnabled="true" serveServletsByClassnameEnabled="false">
<webApp href="WEB-INF/web.xml#WebApp_ID"/>
<jspAttributes xmi:id="JSPAttribute_1237644990616" name="jdkSourceLevel" value ="15"/>
<jspAttributes xmi:id="JSPAttribute_1237644990617" name="disableJspRuntimeCompilation" value="false"/>
<jspAttributes xmi:id="JSPAttribute_1237644990618" name="reloadEnabled" value= "true"/>
<jspAttributes xmi:id="JSPAttribute_1237644990619" name="reloadInterval" value ="10"/>
</webappext:WebAppExtension>
c. Save the changes.
7. Compress the changes into a new cs.war file:
a. Change to: <CS HOME>/ominstallinfo/app/1
b. Run the following command:
# jar -cvf ../cs.war *
8. Copy the cs.war file (located in <CS HOME>/ominstallinfo/app/) to your local file system (from which you are starting the browser).
Complete the installation:
9. Log in to the portal: http://<hostname>:10040/wps/portal
Installing Content Server 7.5 Patch 2 with IBM WebSphere Portal Server

Chapter 4. Installing Content Server
Installing Content Server on the WebSphere Portal76
10. On the top menu bar, click Administration.
Installing Content Server 7.5 Patch 2 with IBM WebSphere Portal Server
Chapter 4. Installing Content Server
Installing Content Server on the WebSphere Portal77
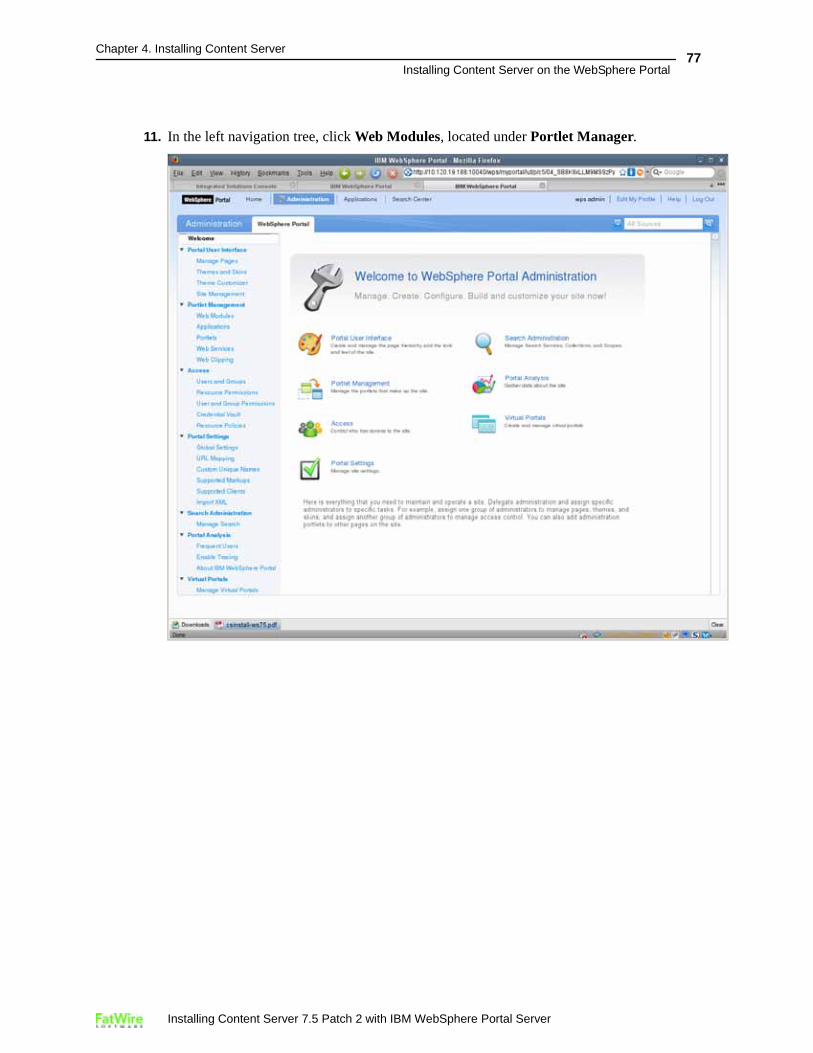
11. In the left navigation tree, click Web Modules, located under Portlet Manager.
Installing Content Server 7.5 Patch 2 with IBM WebSphere Portal Server
Chapter 4. Installing Content Server
Installing Content Server on the WebSphere Portal78
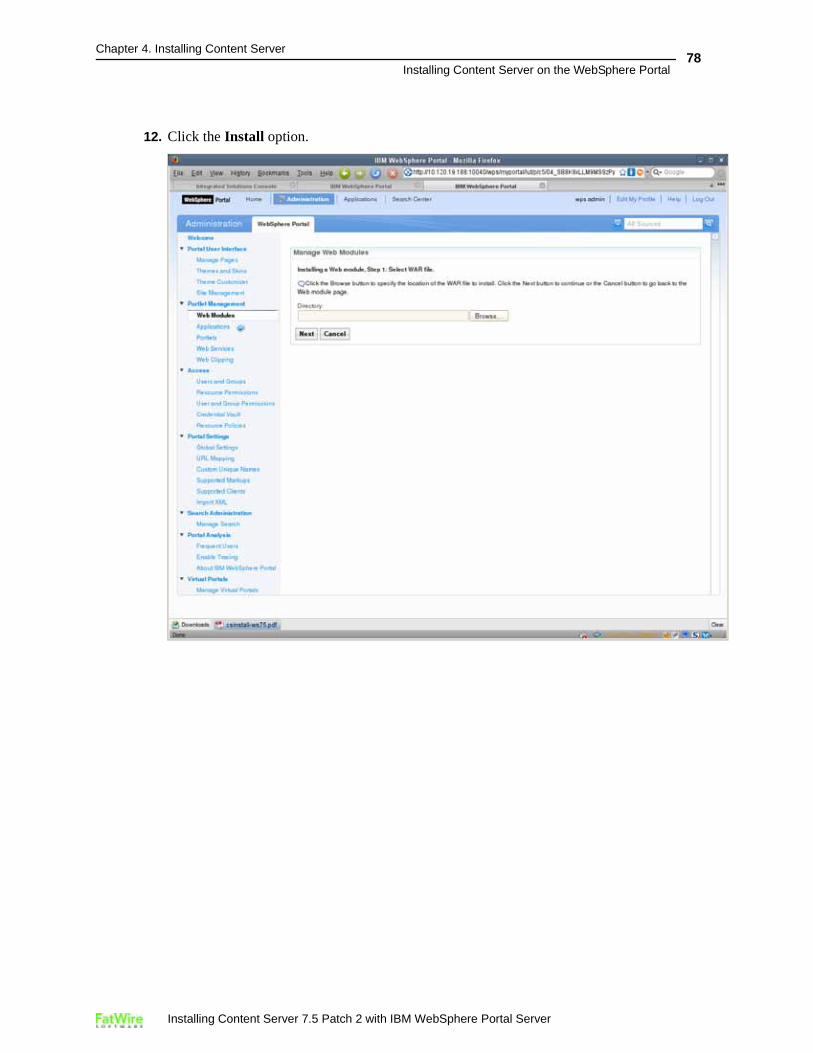
12. Click the Install option.
Installing Content Server 7.5 Patch 2 with IBM WebSphere Portal Server
Chapter 4. Installing Content Server
Installing Content Server on the WebSphere Portal79
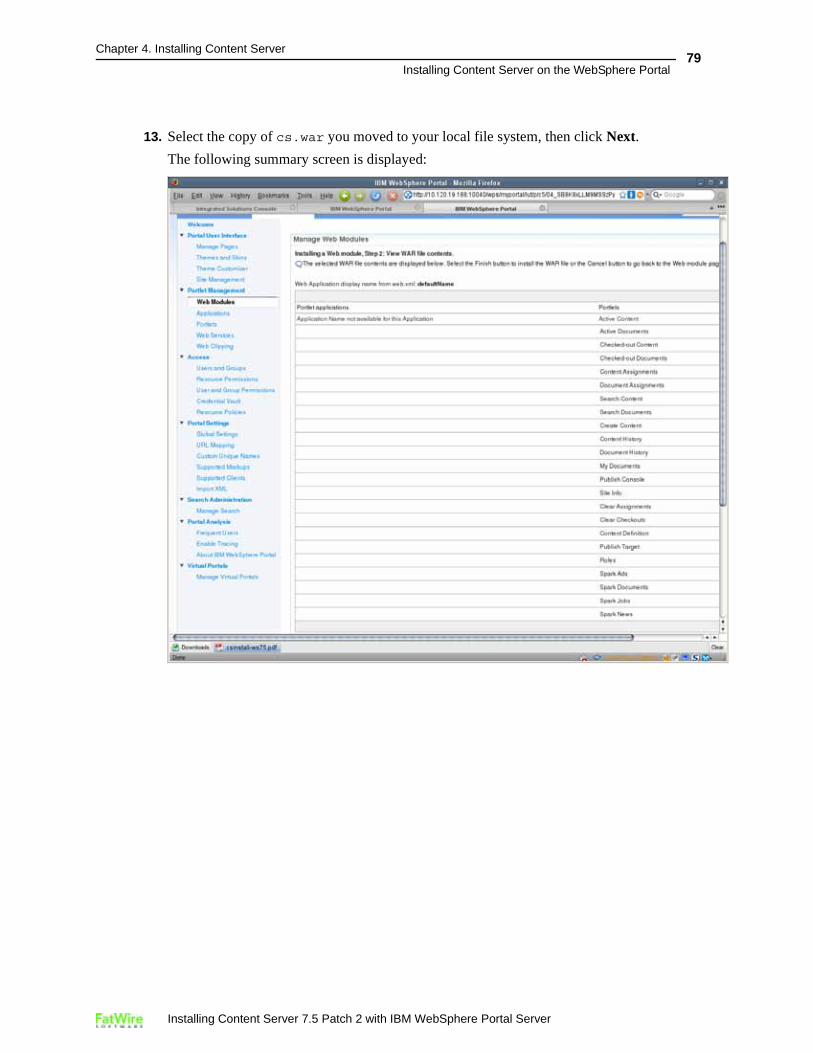
13. Select the copy of cs.war you moved to your local file system, then click Next.
The following summary screen is displayed:
Installing Content Server 7.5 Patch 2 with IBM WebSphere Portal Server
Chapter 4. Installing Content Server
Installing Content Server on the WebSphere Portal80
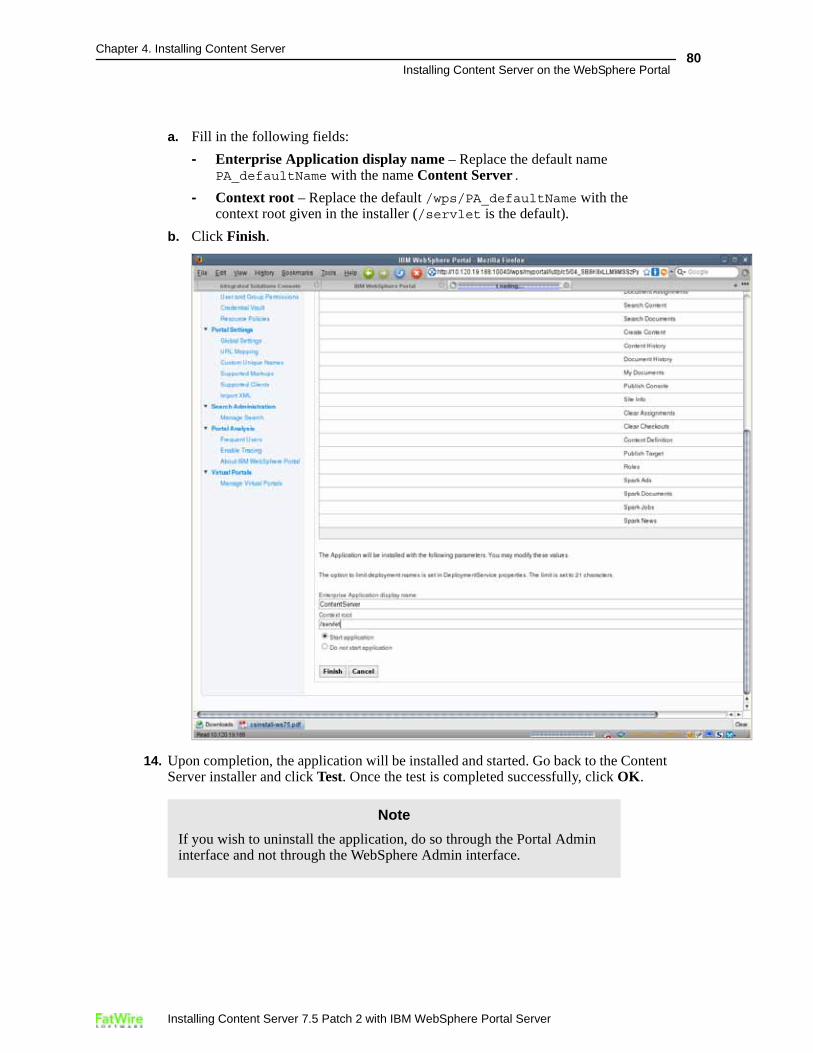
a. Fill in the following fields:
- Enterprise Application display name – Replace the default name PA_defaultName with the name Content Server.
- Context root – Replace the default /wps/PA_defaultName with the context root given in the installer (/servlet is the default).
b. Click Finish.
14. Upon completion, the application will be installed and started. Go back to the Content Server installer and click Test. Once the test is completed successfully, click OK.
Note
If you wish to uninstall the application, do so through the Portal Admin interface and not through the WebSphere Admin interface.
Installing Content Server 7.5 Patch 2 with IBM WebSphere Portal Server
Chapter 4. Installing Content Server
Installing Content Server on the WebSphere Portal81
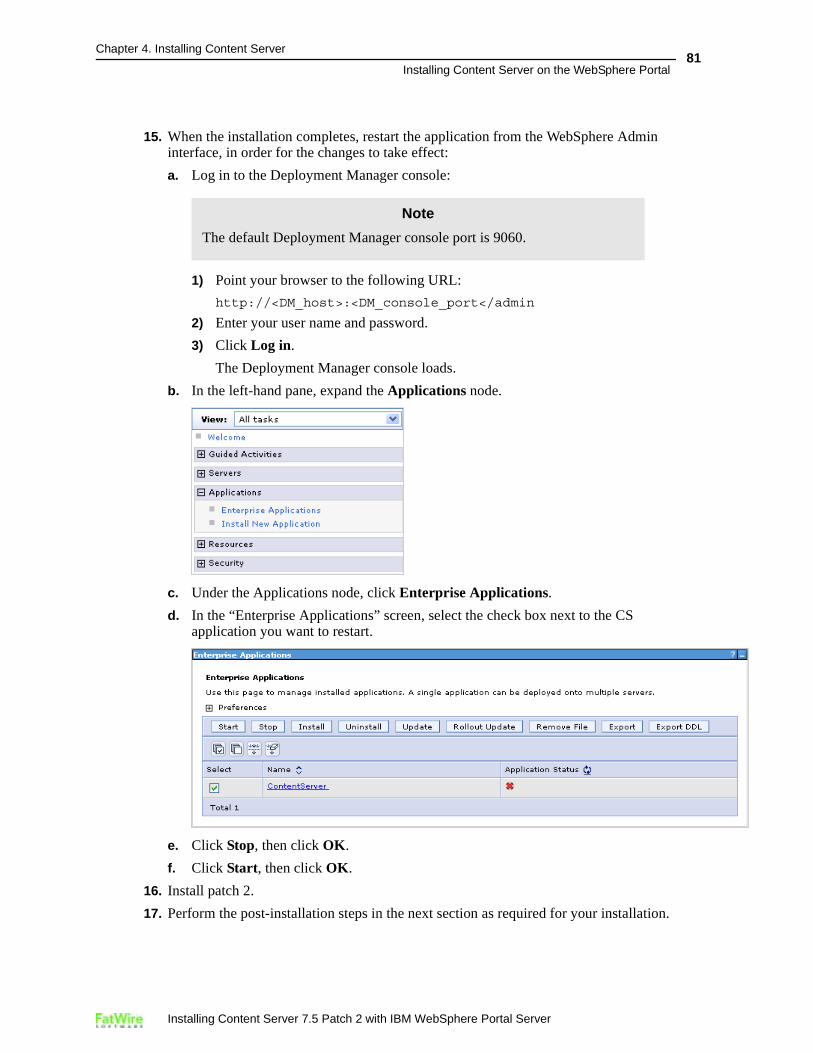
15. When the installation completes, restart the application from the WebSphere Admin interface, in order for the changes to take effect:
a. Log in to the Deployment Manager console:
1) Point your browser to the following URL:
http://<DM_host>:<DM_console_port</admin
2) Enter your user name and password.
3) Click Log in.
The Deployment Manager console loads.
b. In the left-hand pane, expand the Applications node.
c. Under the Applications node, click Enterprise Applications.
d. In the “Enterprise Applications” screen, select the check box next to the CS application you want to restart.
e. Click Stop, then click OK.
f. Click Start, then click OK.
16. Install patch 2.
17. Perform the post-installation steps in the next section as required for your installation.
Note
The default Deployment Manager console port is 9060.
Installing Content Server 7.5 Patch 2 with IBM WebSphere Portal Server
Chapter 4. Installing Content Server
Post-Installation Steps82
Post-Installation StepsWhen the Content Server installation completes successfully, perform the following steps:
A. Verifying the Installation
B. Integrating Content Server with LDAP
A. Verifying the InstallationVerify the installation by logging in to Content Server as the administrator.
Logging in to the Advanced Interface1. Point your browser to the following URL:
http://<hostname>:<port>/<context>/Xcelerate?LoginPage.html
Content Server displays the Advanced interface login form.
2. Enter the following credentials:
- User name: fwadmin
- Password: xceladmin
3. Click Login.
One of the following happens:
- If you did not install any sample sites, you are logged in to the built-in Content Server management site. Only system administration functionality is available.
- If you installed one sample site, you are logged in to that site.
- If you installed more than one sample site, Content Server displays the “Select Site” screen. In such cases, select the sample site you wish to log in to.
- If the screen continues to refresh, it means the jsproot was set incorrectly.
a) From the WebSphere Admin interface, stop the application.
b) Fix the jsproot in futuretense.ini and restart the application.
Logging in to the Dash Interface1. Point your browser to the following URL:
http://<hotname>:<port>/<context>
Content Server displays the Dash interface login page.
2. Enter the following credentials:
- User name: fwadmin
- Password: xceladmin
3. Click Login.
One of the following happens:
- If you did not install any sample sites, Content Server displays a message notifying you of that fact. You will not be able to log in to the Dash interface until at least one site exists on your system.
Installing Content Server 7.5 Patch 2 with IBM WebSphere Portal Server
Chapter 4. Installing Content Server
Post-Installation Steps83
- If you installed more than one sample site, Content Server displays the “Select Site” screen. Select the sample site you wish to log in to.
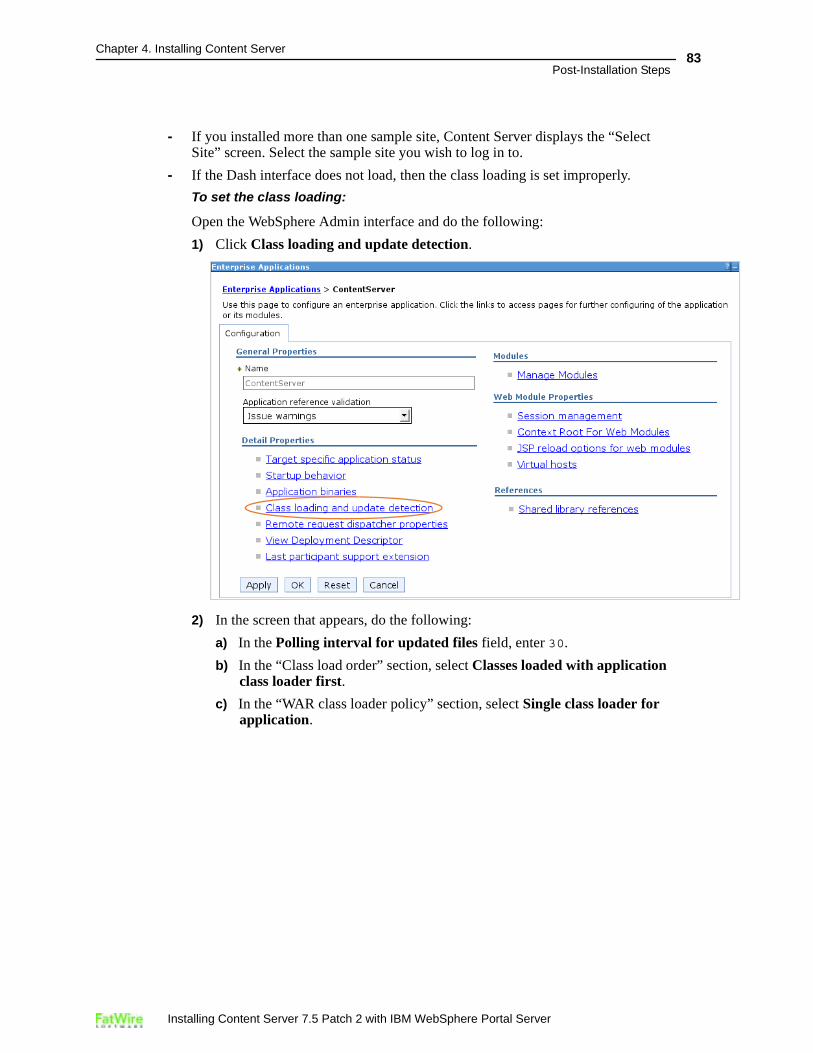
- If the Dash interface does not load, then the class loading is set improperly.
To set the class loading:
Open the WebSphere Admin interface and do the following:
1) Click Class loading and update detection.
2) In the screen that appears, do the following:
a) In the Polling interval for updated files field, enter 30.
b) In the “Class load order” section, select Classes loaded with application class loader first.
c) In the “WAR class loader policy” section, select Single class loader for application.
Installing Content Server 7.5 Patch 2 with IBM WebSphere Portal Server
Chapter 4. Installing Content Server
Post-Installation Steps84
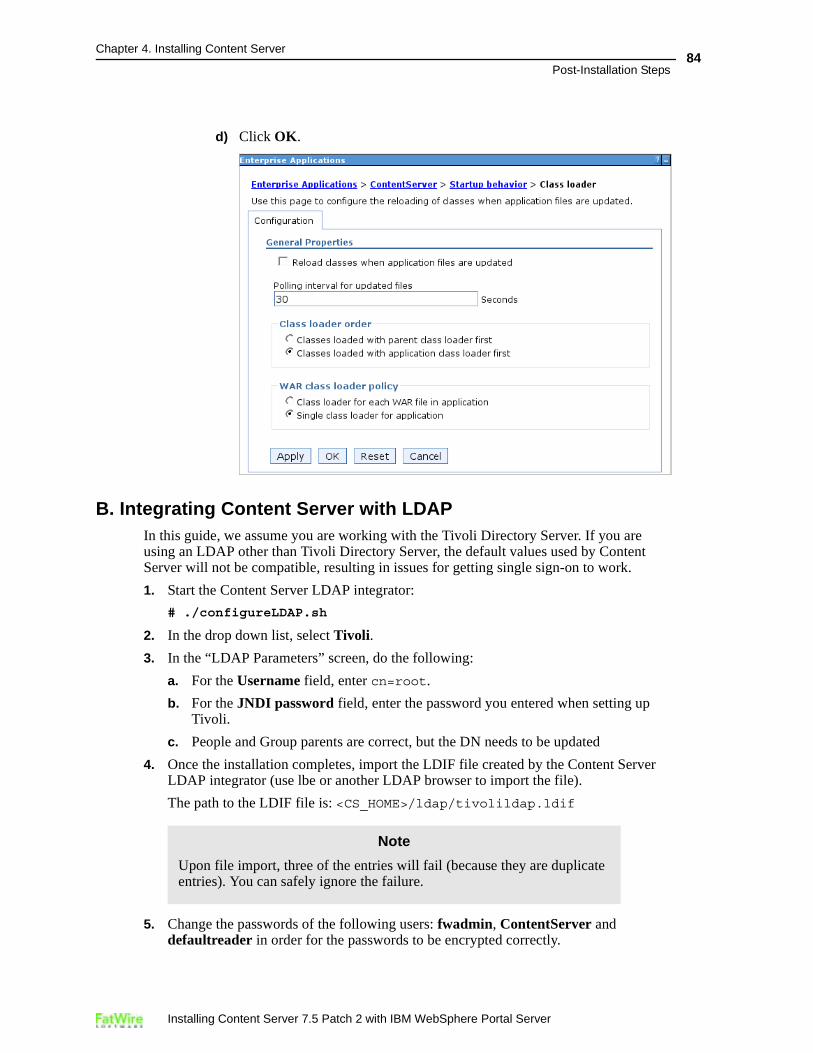
d) Click OK.
B. Integrating Content Server with LDAPIn this guide, we assume you are working with the Tivoli Directory Server. If you are using an LDAP other than Tivoli Directory Server, the default values used by Content Server will not be compatible, resulting in issues for getting single sign-on to work.
1. Start the Content Server LDAP integrator:
# ./configureLDAP.sh
2. In the drop down list, select Tivoli.
3. In the “LDAP Parameters” screen, do the following:
a. For the Username field, enter cn=root.
b. For the JNDI password field, enter the password you entered when setting up Tivoli.
c. People and Group parents are correct, but the DN needs to be updated
4. Once the installation completes, import the LDIF file created by the Content Server LDAP integrator (use lbe or another LDAP browser to import the file).
The path to the LDIF file is: <CS_HOME>/ldap/tivolildap.ldif
5. Change the passwords of the following users: fwadmin, ContentServer and defaultreader in order for the passwords to be encrypted correctly.
Note
Upon file import, three of the entries will fail (because they are duplicate entries). You can safely ignore the failure.
Installing Content Server 7.5 Patch 2 with IBM WebSphere Portal Server

Chapter 4. Installing Content Server
Next Step85
For each user do the following:
a. Click the user name under the cs=users tree.
b. On the right side, double-click the userpassword entry.
c. In the dialog, click Set.
d. Enter the password and click Save as.
e. (Optional) To verify your password, click Verify and re-enter the password.
Once your password has been successfully verified, the message “password verified” is displayed.
f. Click Apply.
6. Confirm that the integration is successful by logging in to the Content Server administrator interface and the WebSphere portal interface, using the fwadmin user account.
Next StepGo to Chapter 5 to configure the Content Server portlets.
Installing Content Server 7.5 Patch 2 with IBM WebSphere Portal Server
Chapter 4. Installing Content Server
Next Step86
Installing Content Server 7.5 Patch 2 with IBM WebSphere Portal Server
87
Chapter 5
Configuring Portlets
This chapter contains instructions for configuring pages, tabs, and portlets for your Content Server installation.
This chapter contains the following sections:
• Configuring Content Server Portlets in WebSphere Portal
• Setting Up Content Server for Its Business Purpose
Installing Content Server 7.5 Patch 2 with IBM WebSphere Portal Server
Chapter 5. Configuring Portlets
Configuring Content Server Portlets in WebSphere Portal88
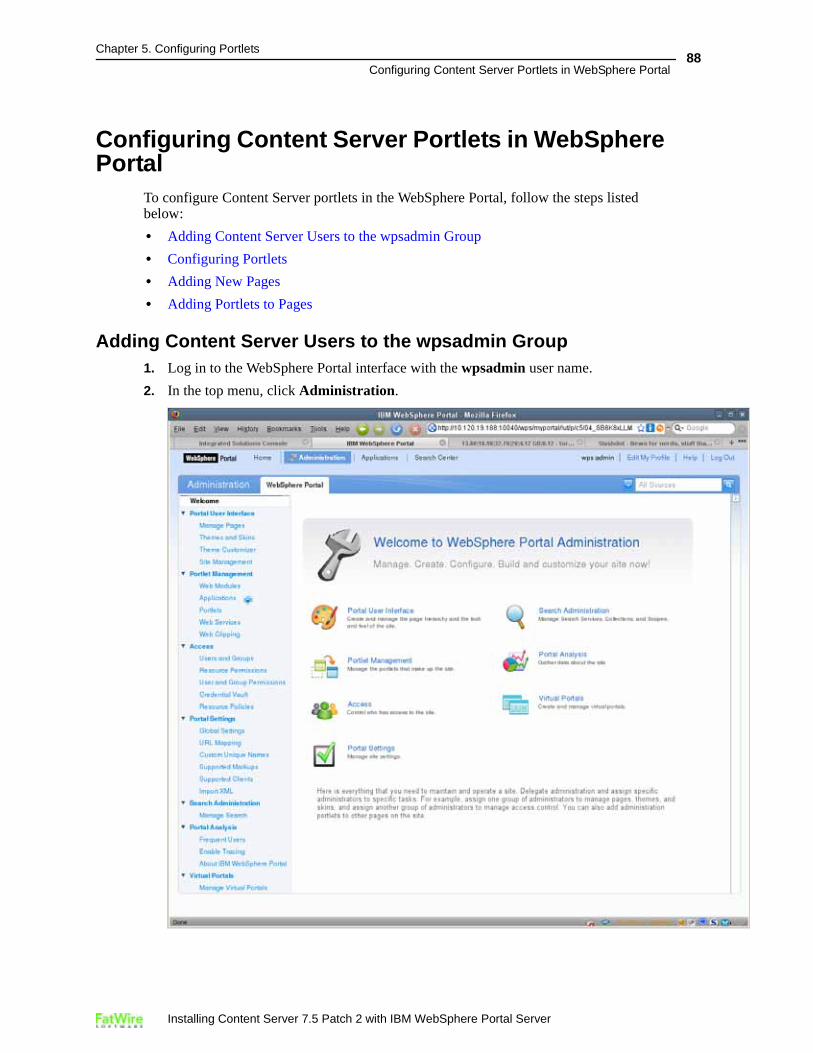
Configuring Content Server Portlets in WebSphere Portal
To configure Content Server portlets in the WebSphere Portal, follow the steps listed below:
• Adding Content Server Users to the wpsadmin Group
• Configuring Portlets
• Adding New Pages
• Adding Portlets to Pages
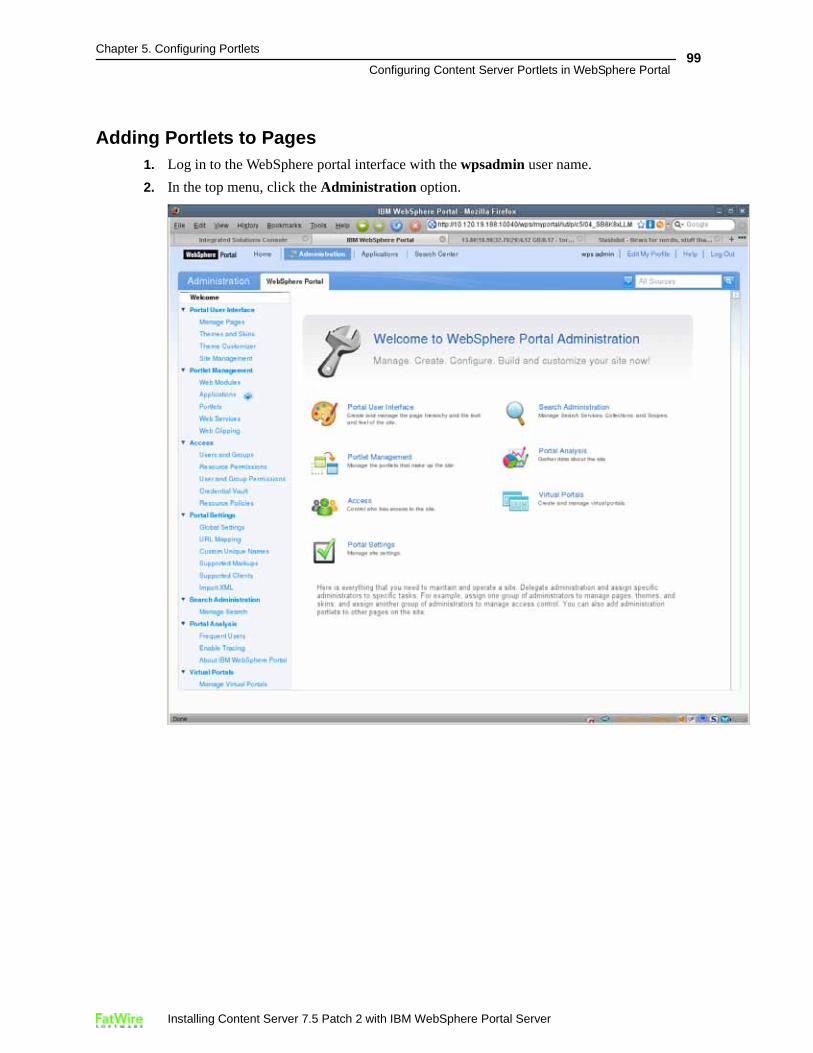
Adding Content Server Users to the wpsadmin Group1. Log in to the WebSphere Portal interface with the wpsadmin user name.
2. In the top menu, click Administration.
Installing Content Server 7.5 Patch 2 with IBM WebSphere Portal Server
Chapter 5. Configuring Portlets
Configuring Content Server Portlets in WebSphere Portal89
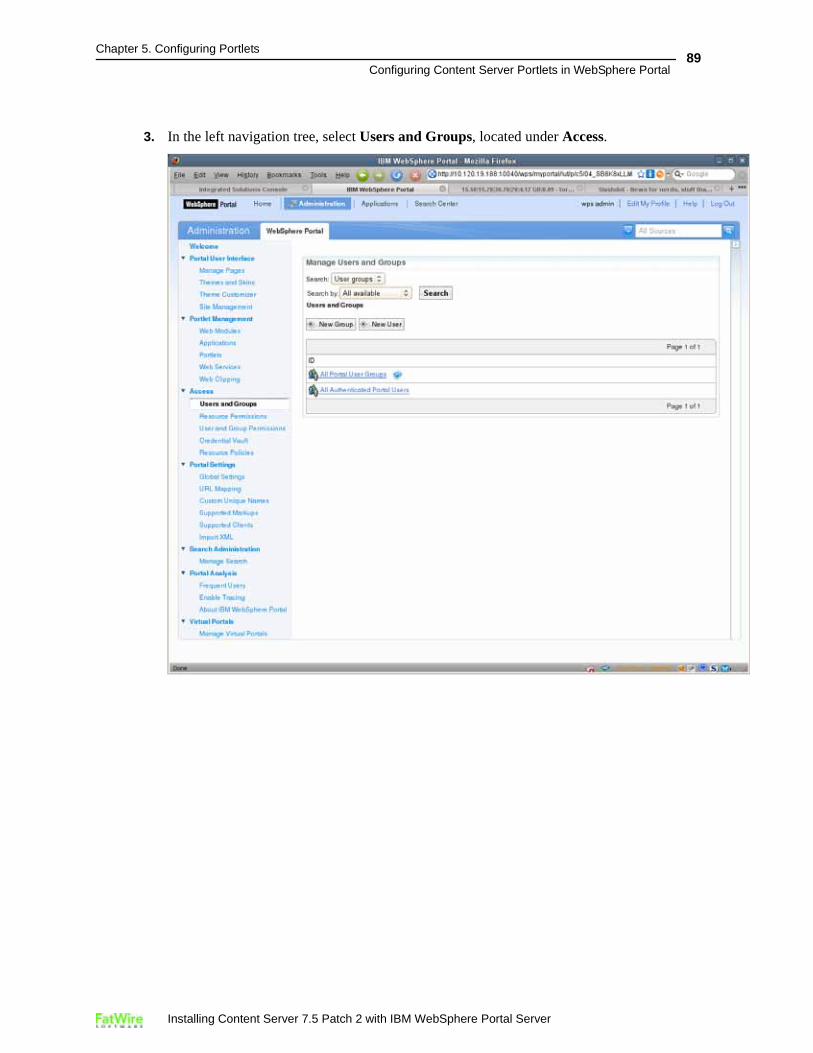
3. In the left navigation tree, select Users and Groups, located under Access.
Installing Content Server 7.5 Patch 2 with IBM WebSphere Portal Server
Chapter 5. Configuring Portlets
Configuring Content Server Portlets in WebSphere Portal90
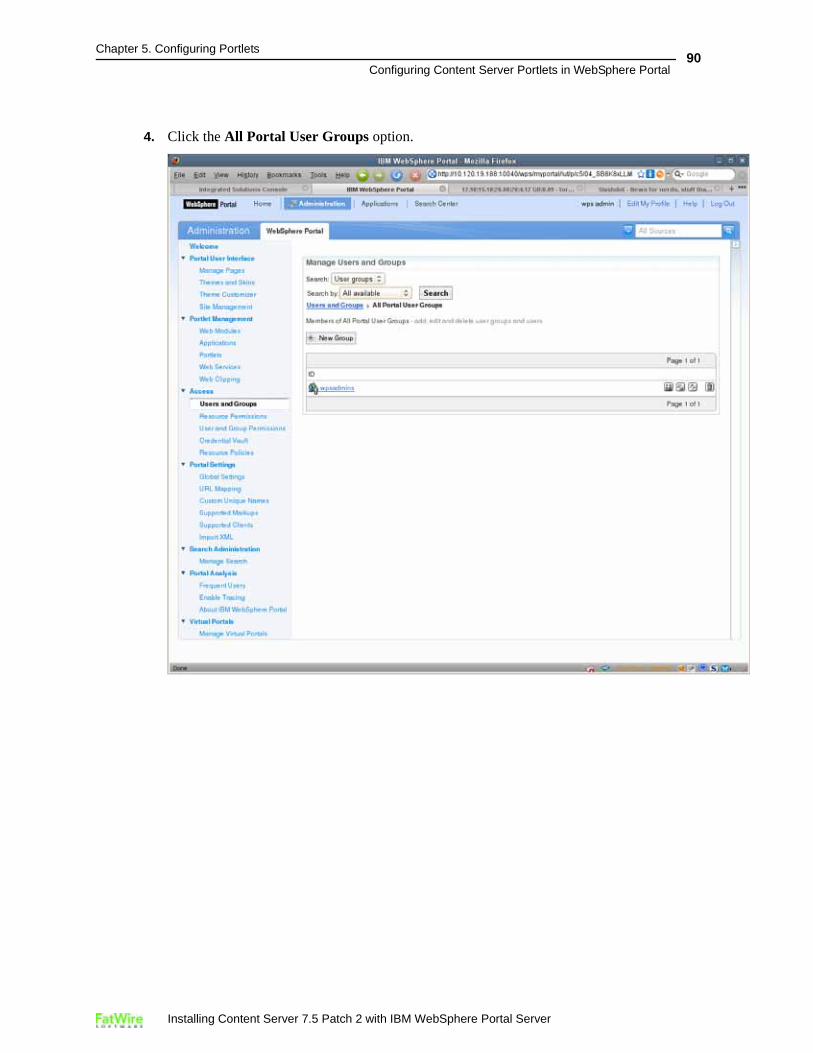
4. Click the All Portal User Groups option.
Installing Content Server 7.5 Patch 2 with IBM WebSphere Portal Server
Chapter 5. Configuring Portlets
Configuring Content Server Portlets in WebSphere Portal91
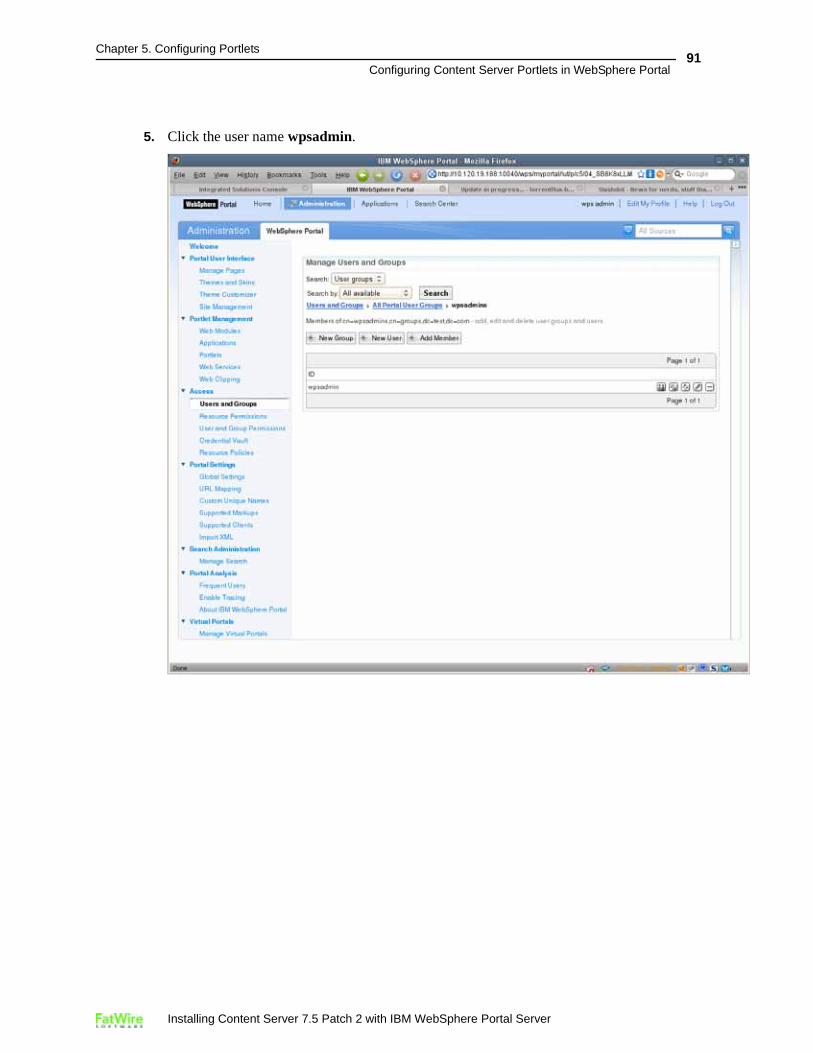
5. Click the user name wpsadmin.
Installing Content Server 7.5 Patch 2 with IBM WebSphere Portal Server
Chapter 5. Configuring Portlets
Configuring Content Server Portlets in WebSphere Portal92
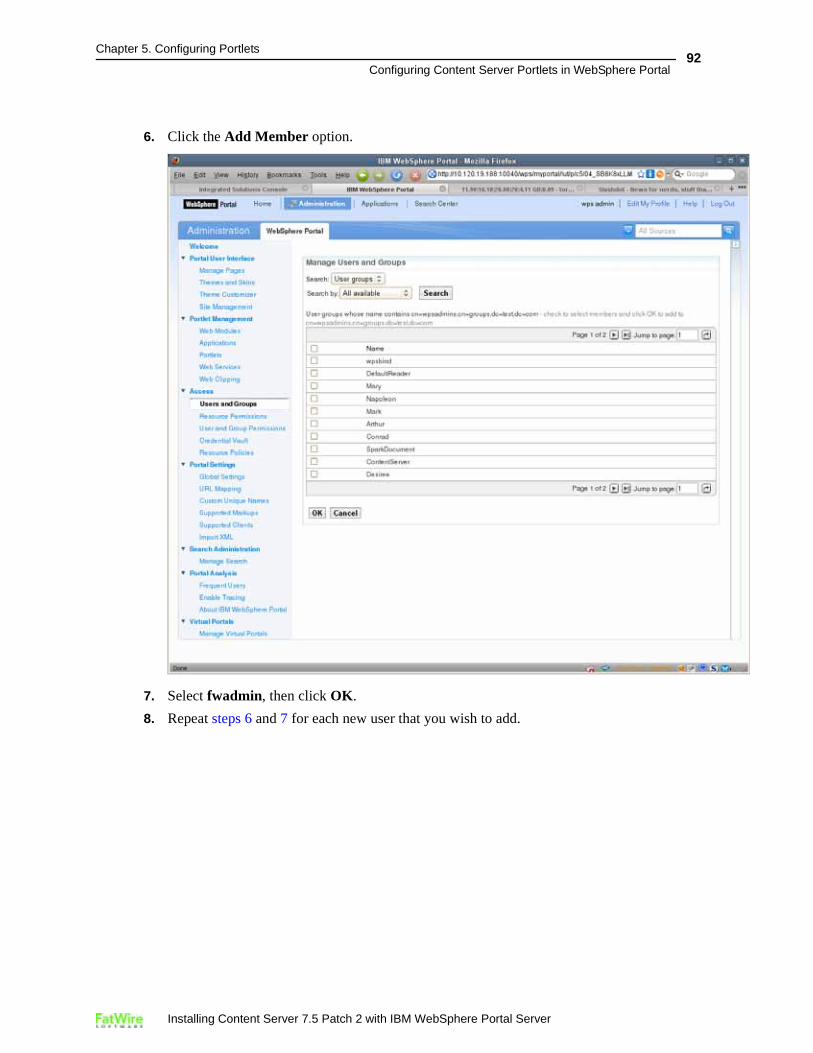
6. Click the Add Member option.
7. Select fwadmin, then click OK.
8. Repeat steps 6 and 7 for each new user that you wish to add.
Installing Content Server 7.5 Patch 2 with IBM WebSphere Portal Server
Chapter 5. Configuring Portlets
Configuring Content Server Portlets in WebSphere Portal93
Configuring PortletsIn the WebSphere portal server, there exists a hierarchy of pages and channels. A page is a parent object and can contain many channels (child objects).
A tab in the portal interface is an instance of a page and the portlets it contains are channels. To display the portlets on your site, you must first create the appropriate tabs, and then populate them with the appropriate portlets.
The table below shows which portlets belong to which tabs. Use this information when naming your tabs and populating them with portlets.
Table 1: Object Names
Page Name Tab Name Portlet Namea
a. These are portlet names as they are displayed in the portal interface. The portlet object names you need to select from the drop-down list when creating portlet channels are the same, except they have a cs. prefix and contain no spaces.
When creating portlet channels, type the portlet channel names exactly as the portlet names shown above, but without the spaces.
FatWire_Content FatWire Content Active Content, Checked Out Content, Content Assignments, Search Content, Create Content, Content History, Publish Console
FatWire_Documents FatWire Documents Active Documents, Checked Out Documents, Document Assignments, Search Documents, Document History, My Documents
FatWire_Admin Admin RolesAdmin, ClearCheckouts, ContentDefinition, Clear Assignments, Publish Target
Spark_Display Spark Display SparkAd, Spark Documents, SparkJobs, SparkNews
Installing Content Server 7.5 Patch 2 with IBM WebSphere Portal Server
Chapter 5. Configuring Portlets
Configuring Content Server Portlets in WebSphere Portal94
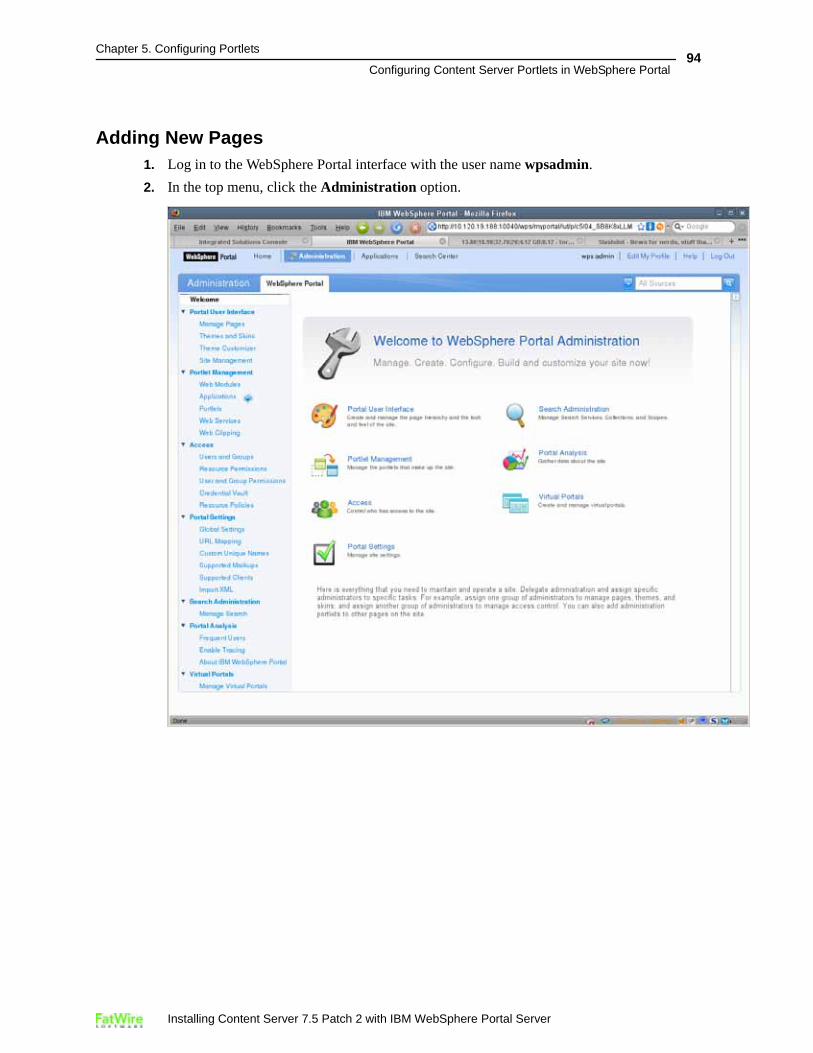
Adding New Pages1. Log in to the WebSphere Portal interface with the user name wpsadmin.
2. In the top menu, click the Administration option.
Installing Content Server 7.5 Patch 2 with IBM WebSphere Portal Server
Chapter 5. Configuring Portlets
Configuring Content Server Portlets in WebSphere Portal95
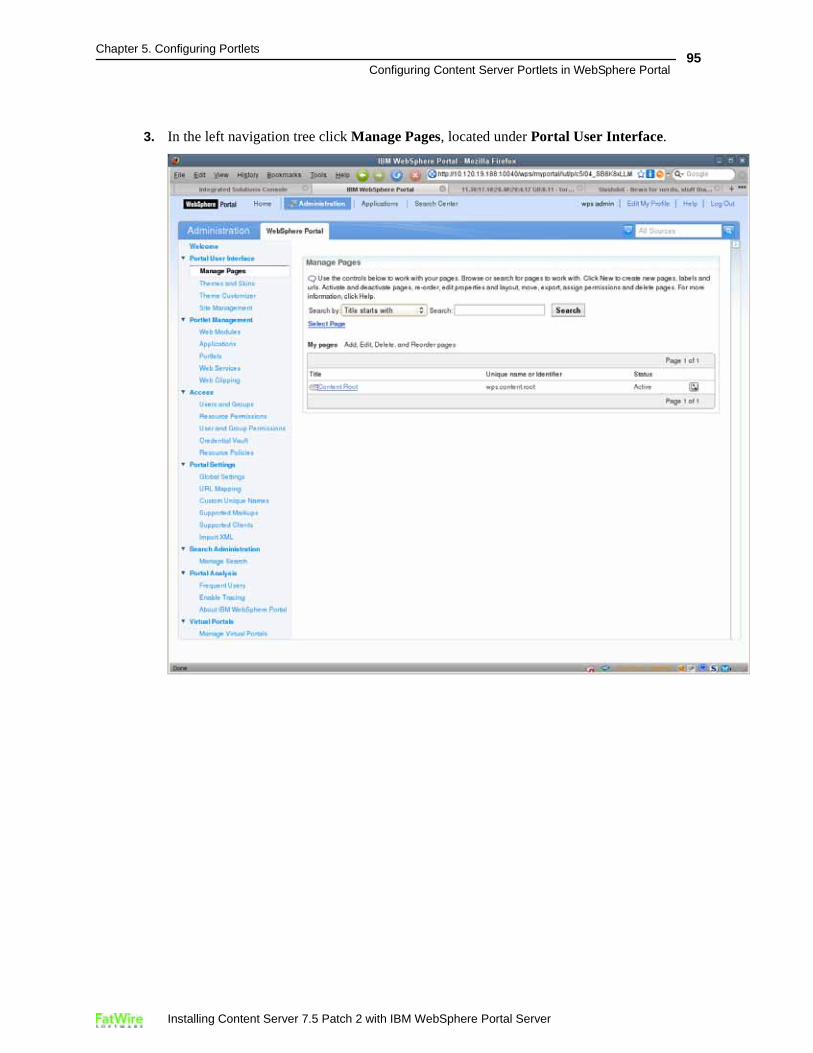
3. In the left navigation tree click Manage Pages, located under Portal User Interface.
Installing Content Server 7.5 Patch 2 with IBM WebSphere Portal Server

Chapter 5. Configuring Portlets
Configuring Content Server Portlets in WebSphere Portal96
4. Click the Content Root option.
Installing Content Server 7.5 Patch 2 with IBM WebSphere Portal Server
Chapter 5. Configuring Portlets
Configuring Content Server Portlets in WebSphere Portal97
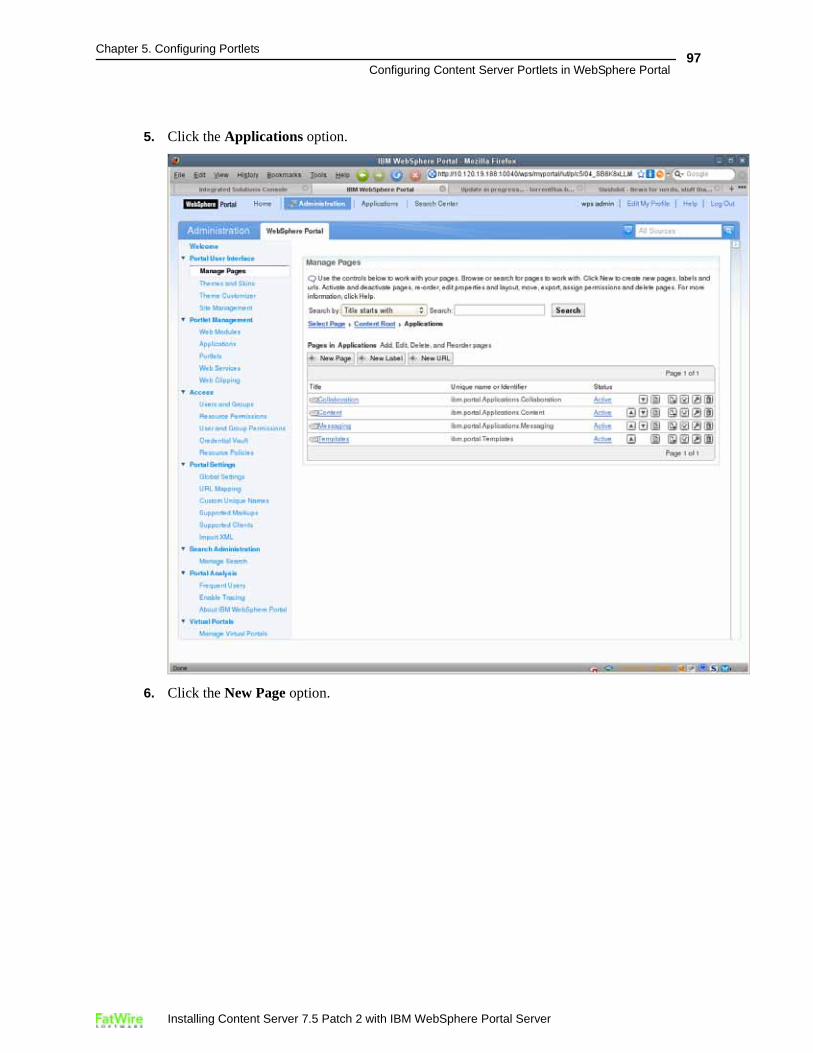
5. Click the Applications option.
6. Click the New Page option.
Installing Content Server 7.5 Patch 2 with IBM WebSphere Portal Server
Chapter 5. Configuring Portlets
Configuring Content Server Portlets in WebSphere Portal98
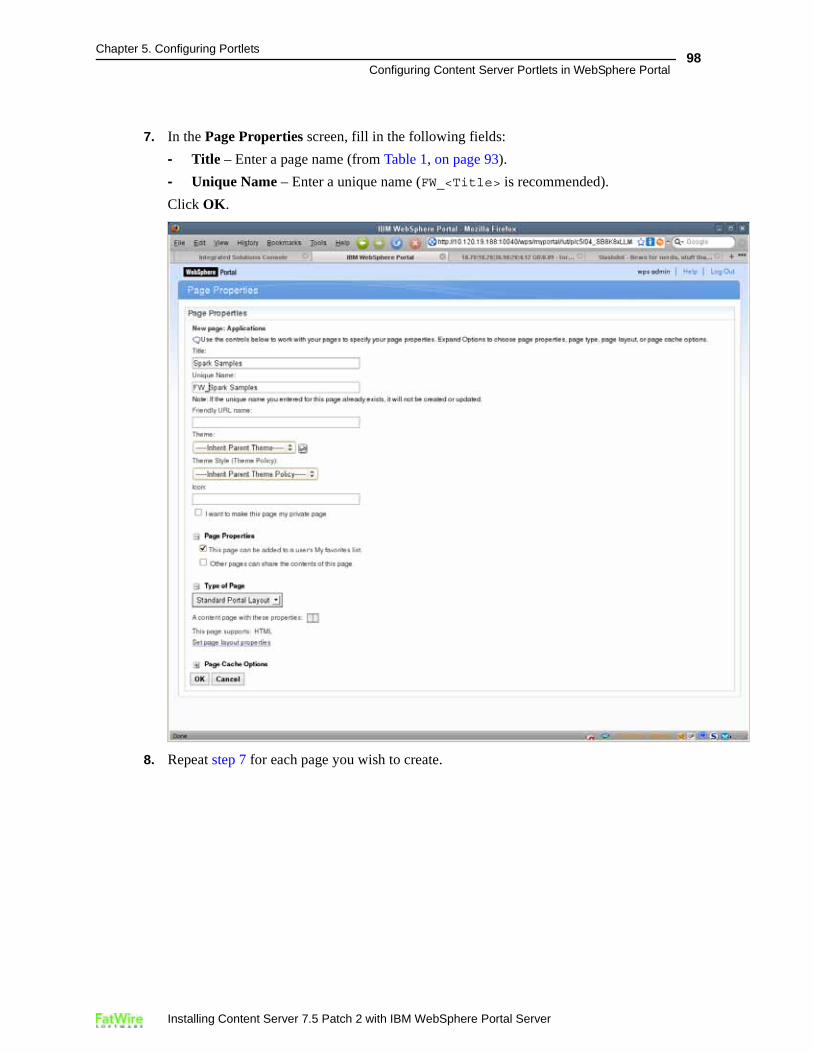
7. In the Page Properties screen, fill in the following fields:
- Title – Enter a page name (from Table 1, on page 93).
- Unique Name – Enter a unique name (FW_<Title> is recommended).
Click OK.
8. Repeat step 7 for each page you wish to create.
Installing Content Server 7.5 Patch 2 with IBM WebSphere Portal Server
Chapter 5. Configuring Portlets
Configuring Content Server Portlets in WebSphere Portal99
Adding Portlets to Pages1. Log in to the WebSphere portal interface with the wpsadmin user name.
2. In the top menu, click the Administration option.
Installing Content Server 7.5 Patch 2 with IBM WebSphere Portal Server
Chapter 5. Configuring Portlets
Configuring Content Server Portlets in WebSphere Portal100
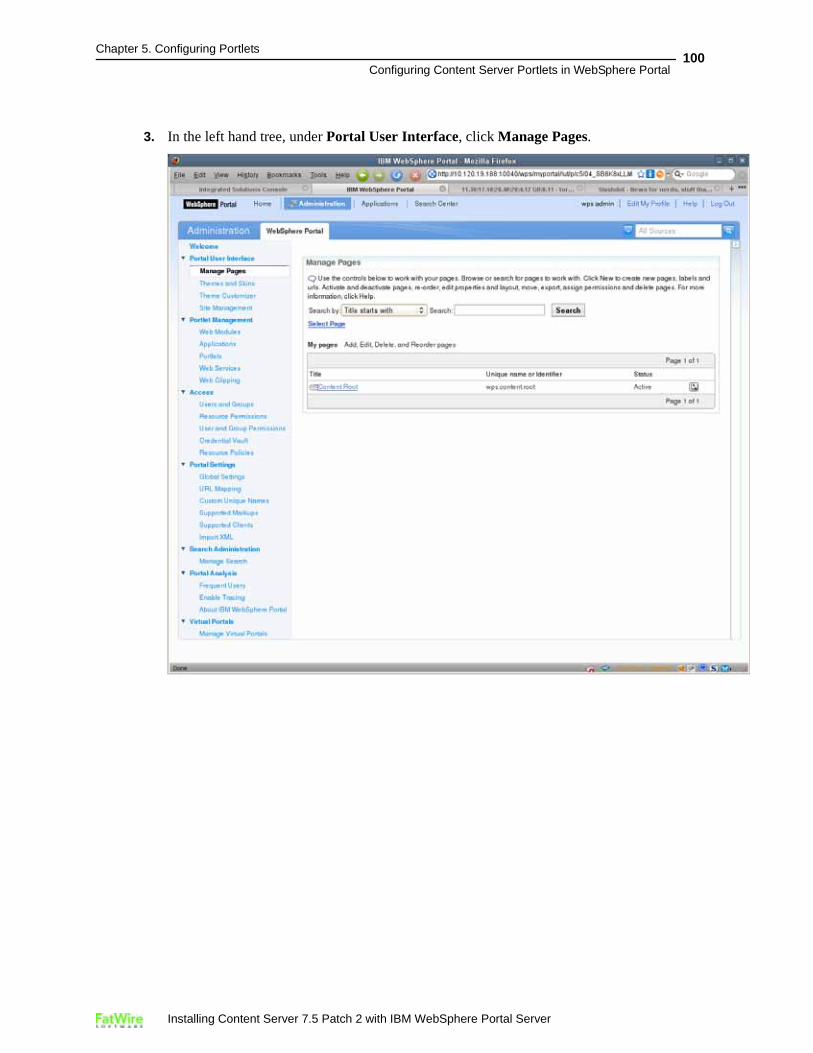
3. In the left hand tree, under Portal User Interface, click Manage Pages.
Installing Content Server 7.5 Patch 2 with IBM WebSphere Portal Server
Chapter 5. Configuring Portlets
Configuring Content Server Portlets in WebSphere Portal101
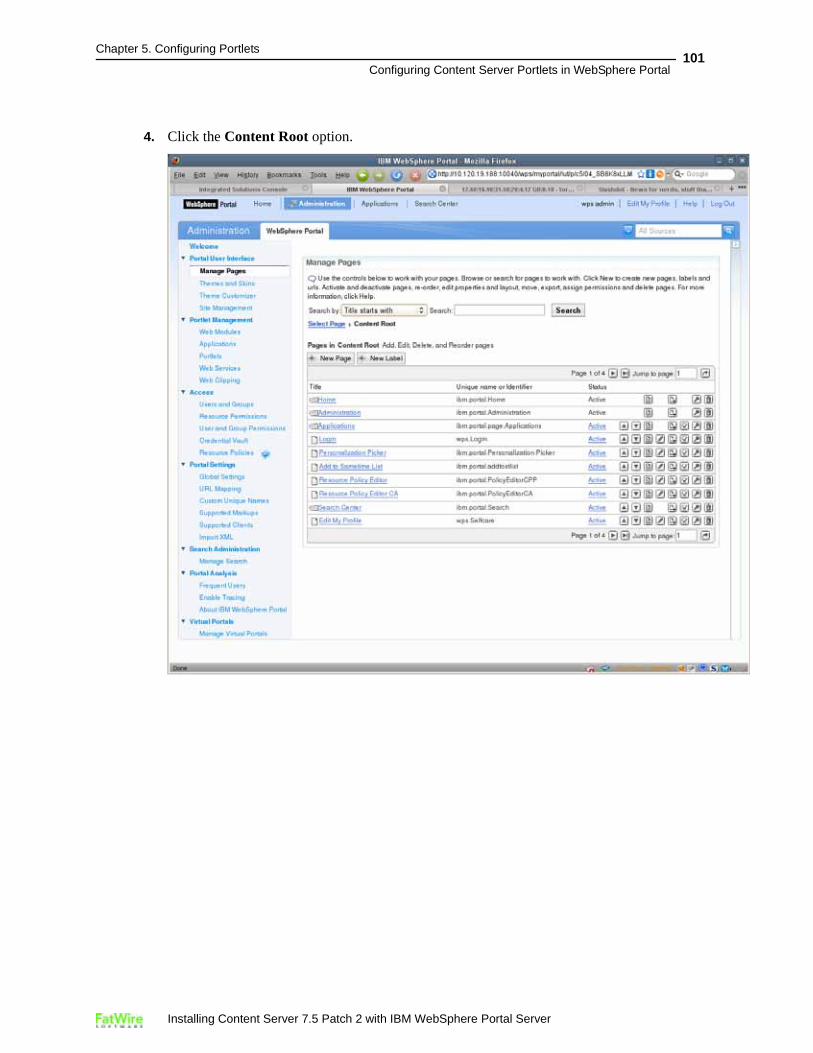
4. Click the Content Root option.
Installing Content Server 7.5 Patch 2 with IBM WebSphere Portal Server
Chapter 5. Configuring Portlets
Configuring Content Server Portlets in WebSphere Portal102
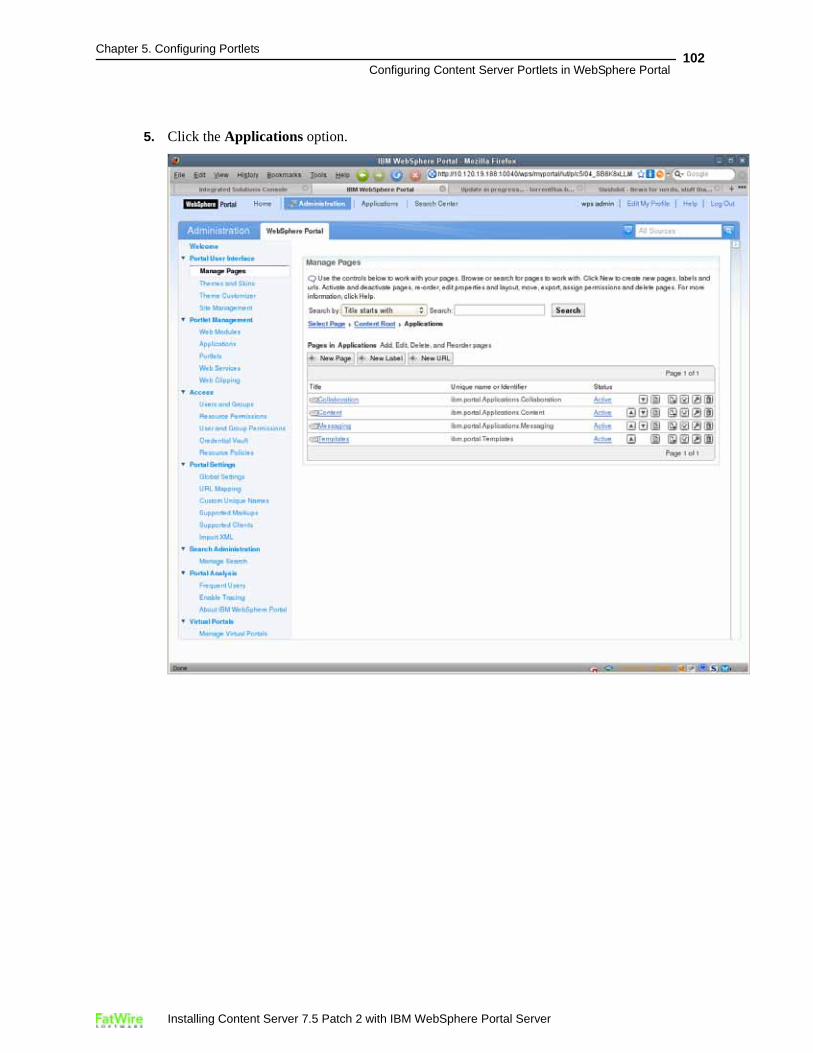
5. Click the Applications option.
Installing Content Server 7.5 Patch 2 with IBM WebSphere Portal Server
Chapter 5. Configuring Portlets
Configuring Content Server Portlets in WebSphere Portal103
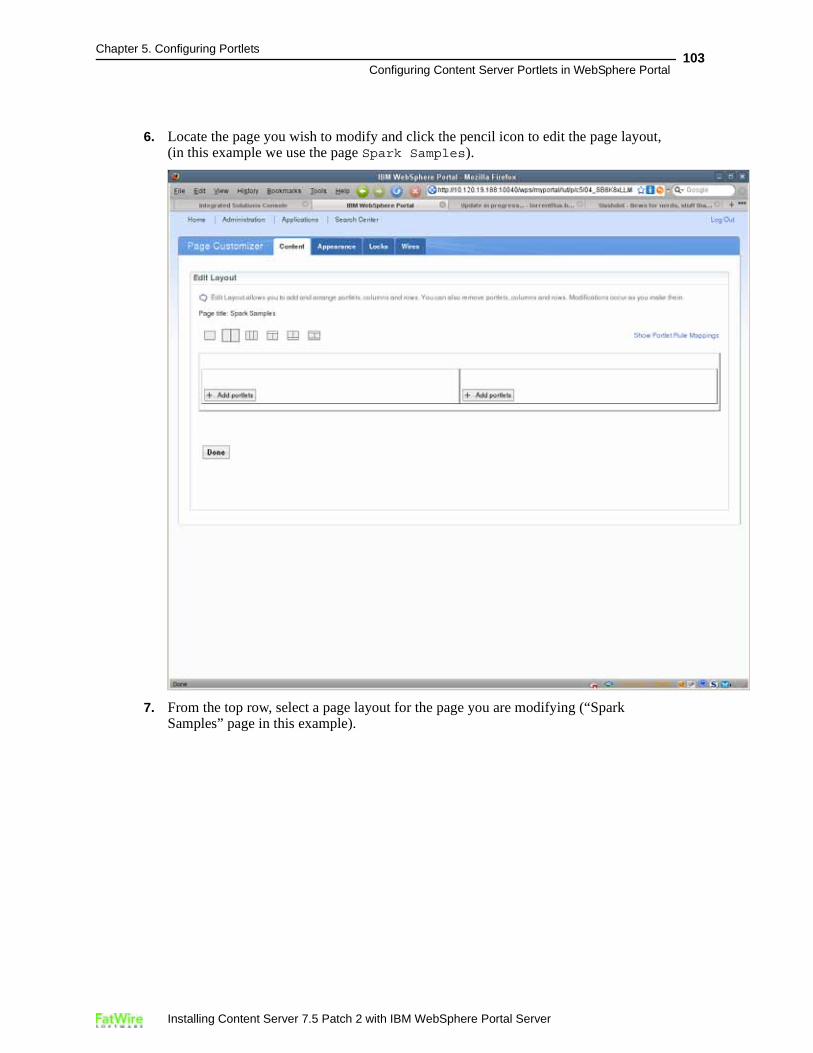
6. Locate the page you wish to modify and click the pencil icon to edit the page layout, (in this example we use the page Spark Samples).
7. From the top row, select a page layout for the page you are modifying (“Spark Samples” page in this example).
Installing Content Server 7.5 Patch 2 with IBM WebSphere Portal Server
Chapter 5. Configuring Portlets
Configuring Content Server Portlets in WebSphere Portal104
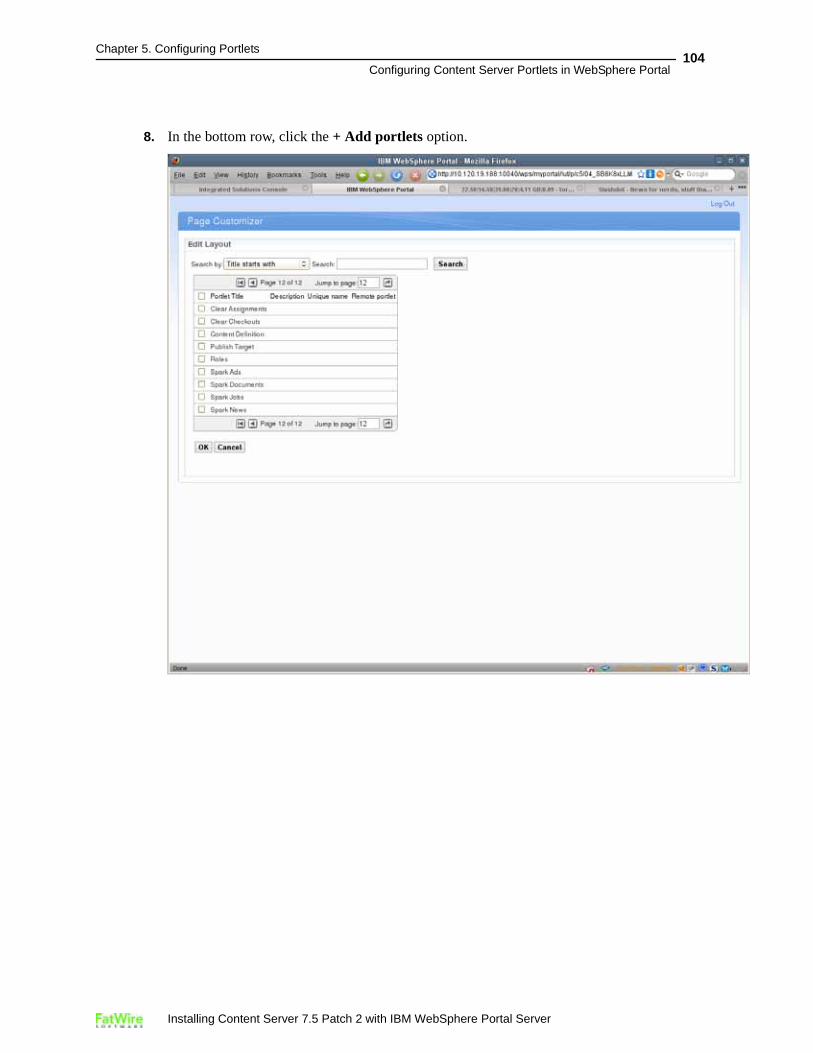
8. In the bottom row, click the + Add portlets option.
Installing Content Server 7.5 Patch 2 with IBM WebSphere Portal Server

Chapter 5. Configuring Portlets
Configuring Content Server Portlets in WebSphere Portal105
9. Select the check boxes next to the portlets you wish to add from the list, then click OK.
10. Repeat step 9 for each column on the page.
11. Click Done.
Note
Content Server Portlets are located at the end of the “Portlets” list.
Installing Content Server 7.5 Patch 2 with IBM WebSphere Portal Server
Chapter 5. Configuring Portlets
Configuring Content Server Portlets in WebSphere Portal106
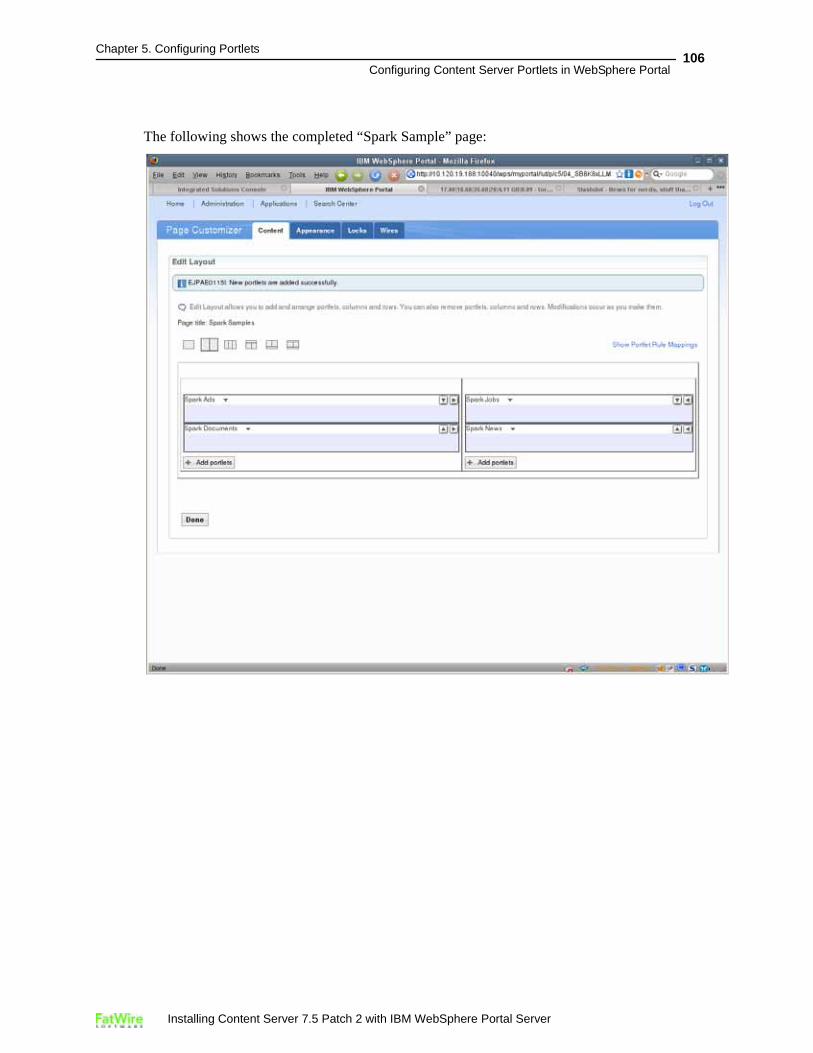
The following shows the completed “Spark Sample” page:
Installing Content Server 7.5 Patch 2 with IBM WebSphere Portal Server
Chapter 5. Configuring Portlets
Setting Up Content Server for Its Business Purpose107
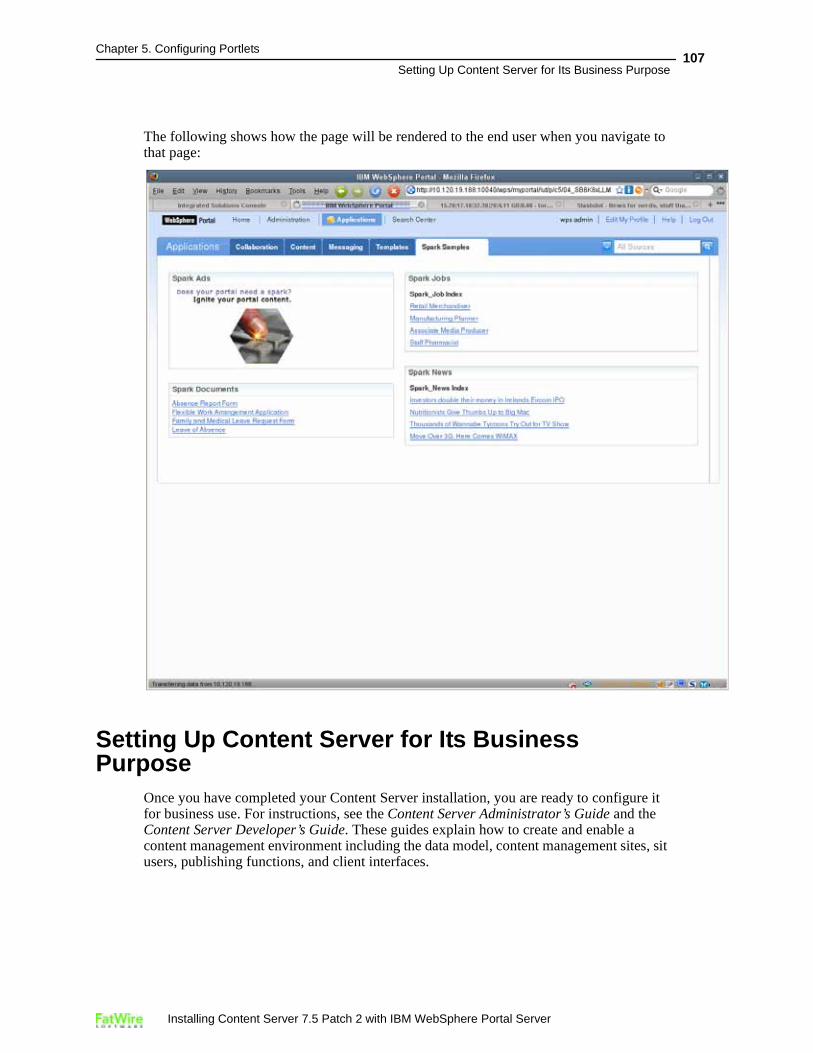
The following shows how the page will be rendered to the end user when you navigate to that page:
Setting Up Content Server for Its Business Purpose
Once you have completed your Content Server installation, you are ready to configure it for business use. For instructions, see the Content Server Administrator’s Guide and the Content Server Developer’s Guide. These guides explain how to create and enable a content management environment including the data model, content management sites, sit users, publishing functions, and client interfaces.
Installing Content Server 7.5 Patch 2 with IBM WebSphere Portal Server
Chapter 5. Configuring Portlets
Setting Up Content Server for Its Business Purpose108
Installing Content Server 7.5 Patch 2 with IBM WebSphere Portal Server