installation of trees and shrubs in the landscape tony a. glover, county extension coordinator –...
TRANSCRIPT

Installation of Trees and Shrubs in the Landscape
Tony A. Glover, County Extension Coordinator – Cullman, Al

Landscape Tree Facts
– Trees growing in commercial settings live an average of 13 years
– Trees in residential areas average 37 years
– Trees in rural, undisturbed sites average 150 years
– Why?????
Quercus nigra
The Water Oak is a relatively short-
lived tree.

Why???????
•Compacted soils•No topsoil•Limited space for roots•Improper staking•Mechanical injuries•Construction•Pedestrian and vehicle abuse
•Adding/Removing soil
• Improper planting• Over-pruning• Improper fertilization

Types of Tree Stock
Bare-Root Ball and Burlap (B&B) Container

Selecting a Tree
• Qualities to look for:– Healthy, well balanced
crown with good color to the foliage
– Straight trunk with evenly distributed branches with wide angels
– Healthy white roots with good lateral distribution
– No insect or disease problems

Planting and establishing trees

Steps for proper planting
What’s wrong with this picture?

Step 1: Look up!
This is your last chance to be sure you have selected the right tree for the right place.
If there is a wire, security light, or building nearby:
• Plant elsewhere, or• Plant a small-maturing tree

Step 2: Dig Shallow Wide Hole

Measure the distance between the top most root and the bottom of the root ball.
Dig the hole to about 90 to 95% of this depth.

Dig the planting hole as wide as possible
• The planting hole should be at least 1.5 times the diameter of the root ball or better yet till a larger area
• This provides loose soil for the expansion of new roots.

Step 3: Proper Depth Placement
• The point where the top-most root meets the trunk of the tree or shrub should be no more than 2 inches deep in the root ball. Wash the soil/bark away as much as possible.

Desirable root ball
• The point where the top-most root emerges from the trunk is at the surface.

Root ball quality
• (RIGHT) Too much soil on top of the root ball can indicate a poor-quality root ball.
• (LEFT) Trees with the top-most root near the surface of the root ball have more of a root system.
Good-quality root ball Poor quality root ballRemove excess soil

Container grown plants• Remove excess soil from the top of the root ball.• Get the plant back to a near bare root plant
Three inches of soil and media were removed from the top of this ball before upper roots were located
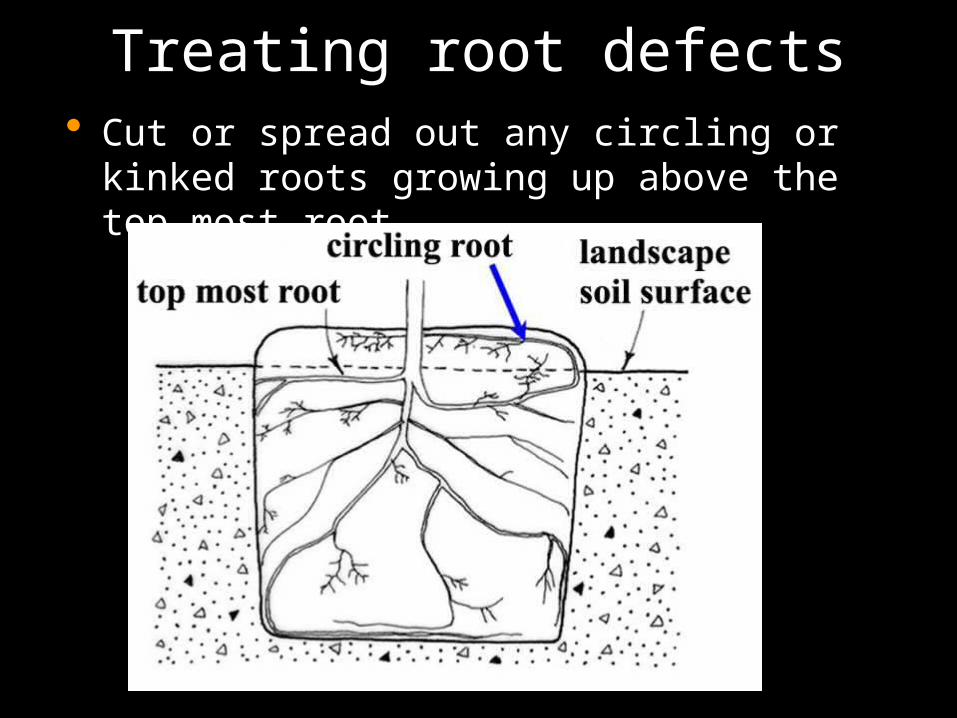
Treating root defects• Cut or spread out any circling or kinked roots
growing up above the top-most root.

Defects at top of ball
• At minimum remove soil/bark from top of root ball and cut circling and crossed roots
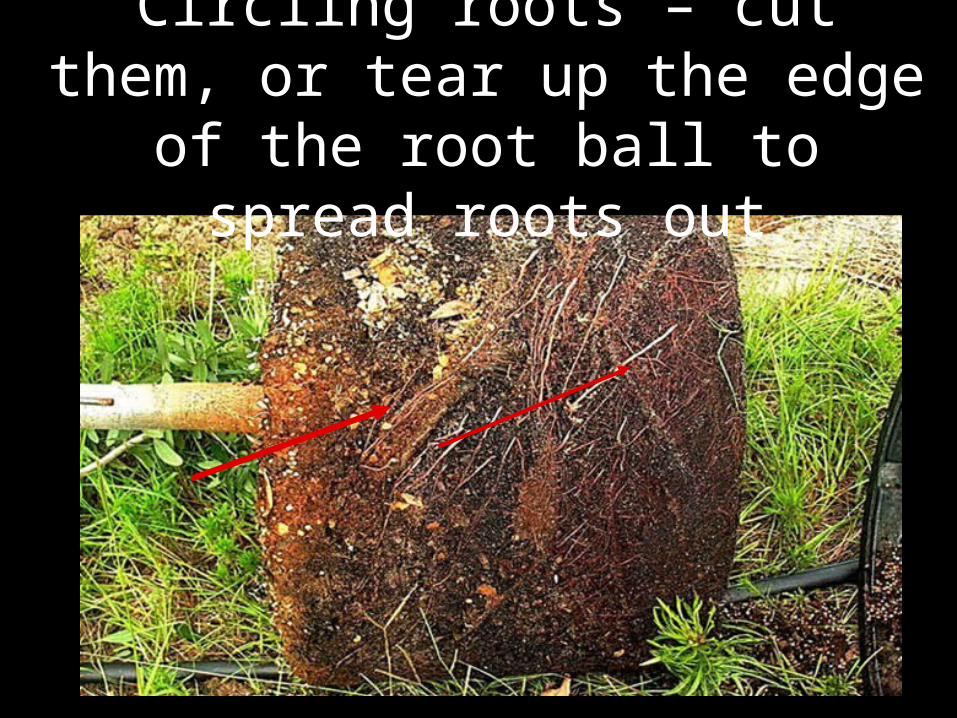
Circling roots – cut them, or tear up the edge of the root ball to spread
roots out

Cutting circling roots
• New roots will grow quickly into backfill soil following cutting and stem girdling roots are less likely to form.

Even Better When Time Allows• Remove all the soil
medium from container plants


Defects can be inside root ball
• Be sure to look for roots that circle when trees were in a smaller container
• These are difficult to cut because they are hidden in the interior of the ball.

Trees with circling root defects are often found leaning or fallen after a storm.

Step 4 – Placing Large Trees

Lifting tree into the planting hole
• To avoid damage when setting the tree in the hole, lift the tree with straps or rope around the root ball, not by the trunk.

Step 5: Position the tree in the soil
• Many professionals agree that it is better to plant the tree a little high than too deeply.
• When the top-most root is too deep in the root ball, set the top of the ball several inches higher than the landscape soil to adjust as shown above.

TOO DEEP! - add soil to bottom of hole

•Soil intercepts water meant for the root ball causing roots to dry
out.
Effect of planting depth on stress after planting

Step 6: Straighten the tree
• Before adding backfill, be sure to check that the tree is straight by looking at it from two perpendicular directions.

Step 7: Balled-in-burlap trees• Burlap should at least be removed from the bottom of
the trunk and the top of root ball. Even better if removed entirely – some “burlap” is synthetic and will not rot.

Remove all synthetic burlap
• Synthetic burlap melts into a plastic goo while real burlap flames and turns to ash when lit.
• If burlap is synthetic, be sure to remove all of it with a pruner, knife or other sharp blade.

Synthetic burlap can girdle roots• Roots grow through
artificial burlap with little difficulty, but as the roots attempt to expand in diameter, they become girdled.
• Each of these roots is very easy to break off at the burlap because there is very little wood that developed through the burlap.

Wire baskets• Baskets made from heavy gauge wire are often used
to help keep a root ball intact during shipping and handling.
• There is no research documenting the detrimental effects of wire baskets on trees but this can’t be good.

Step 8: Backfill – do not amend

• Slice a shovel into the soil at the edge of the hole to enlarge the hole or better yet till a large ring around planting hole.
• Use the same soil taken out of the hole as backfill.• Firm the soil against the root ball.

Moderately pack the backfill soil

Water the backfill to settle

Step 9: Add mulch• About two inches of the root ball should remain above
ground after all the backfill soil is added.• Mulch sides and water trench area but do not mulch
directly over the root ball – except for possibly a 1” aesthetic layer.

Mulching
• Apply a 3-inch thick layer of mulch to at least an eight-foot diameter circle
• Apply a thinner 1” layer of mulch over the root ball if necessary, but keep it off the trunk
• Better yet leave it bare over the root ball the first year.

Long Term: Mulching
• Mulch as large an area as possible to allow the tree roots to expand without competition from turf roots.
• What would you do differently than pictured here?

Improper mulching• If turfgrass grows up to the
trunk, trees often perform poorly.
• Turf and weeds rob trees of moisture and nutrients and some produce chemicals that inhibit tree growth.
• Lawn mowing equipment or weed eater damages trunk (no matter how careful you are)

Improper mulching
• Never pile mulch in a volcano-like manner against the trunk. This can rot the trunk, cut off oxygen to roots, keep vital irrigation and rain water out, and can keep roots too wet in poorly drained soils. Stem girdling roots form from this on some trees.

Too much mulch over time
• These hollies were dying one by one – quickly
• Landscape fabric was used 10 years prior at planting
• Mulch was added each year
Most roots were on top of the fabric in the mulch

Adding a berm
• A 3 to 4-inch berm could be constructed at the edge of the root ball to prevent water from running off as seen here.

Step 10: Staking and guying

Traditional staking methods
• All these systems require removal within one year of planting.
• This is the system to use if you remove soil/media as described earlier
Figure 1 Figure 3Figure 2

Alternative staking methods
• This inexpensive alternative staking system does not need to be removed because they simply decay in a few years.
• Use this method on smaller B&B plants that are not very top heavy – deciduous trees planted in the fall/winter
Figure 4

One last step: Prune to finish the job• Remove broken
branches.• Perform structural
pruning if needed (but leave all foliage possible for the first year).
• Do not prune to compensate for root loss (water instead).

Fertilizer at planting?• Not necessary – fertilizing at planting time
is not likely to improve survival or growth. A small benefit might occur in very poor sandy soils.
• Soluble fertilizers could burn roots if too much is applied, which could injure or kill the tree.

Establishment
Establishment period: the time it takes for a tree to regenerate enough roots to stay alive without irrigation.
•Roots grow to pre-transplanting length•Trunk and shoot growth match pre-transplant
rate•Time: about 3 - 4 months/ inch trunk caliper is
a good estimate

Irrigation: is it volume or frequency?
• It’s frequency!• Experiment done on 4-inch
hardened-off B&B trees where 1.5, 3, or 5 gallons of water were applied per inch trunk caliper.
Results show that volume did not matter (in the range tested) but frequency did.

Summary of proper planting
Visit the website Trees and Hurricanes:
http://treesandhurricanes.ifas.ufl.edu
For more information on related topics…

Acknowledgements
• Original presentation combined from Auburn University, University of Georgia and Florida (special thanks to:Dr. Edward F. Gilman and Traci Partin of IFAS)