installation manual - daikin · installation manual english ... • the installation place must be...
TRANSCRIPT
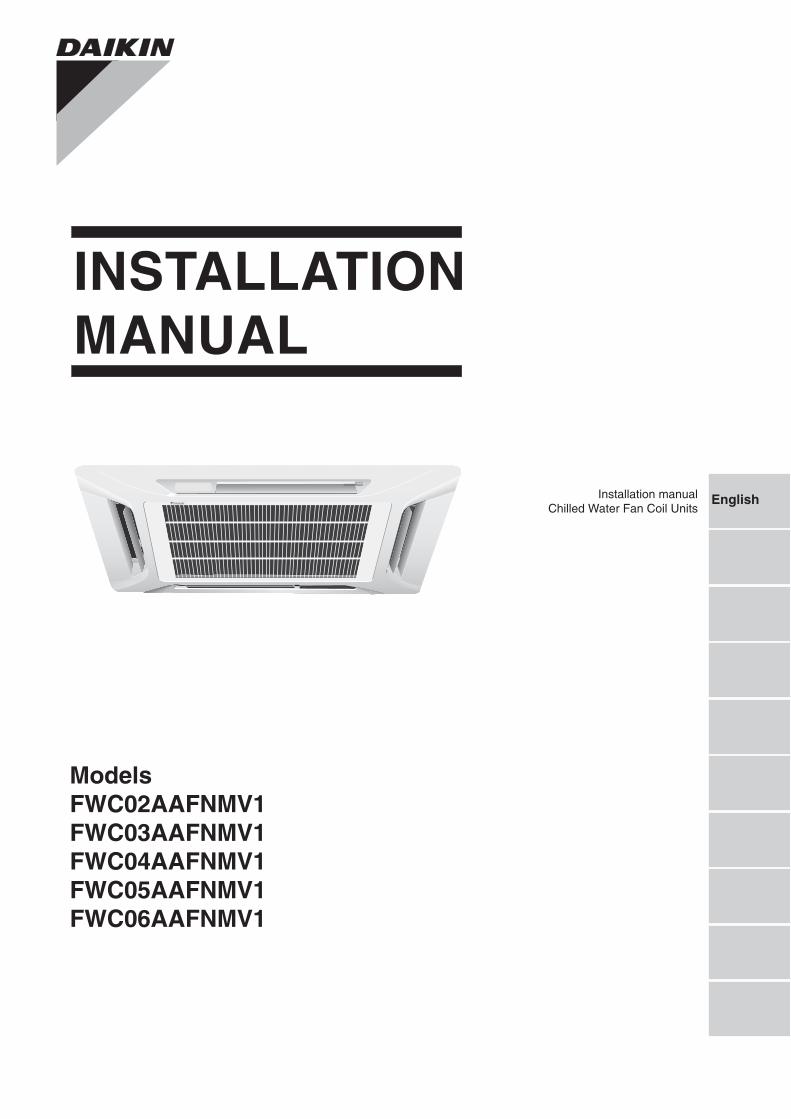
INSTALLATIONMANUAL
ModelsFWC02AAFNMV1FWC03AAFNMV1FWC04AAFNMV1FWC05AAFNMV1FWC06AAFNMV1
EnglishInstallation manualChilled Water Fan Coil Units

1
En
gli
s h
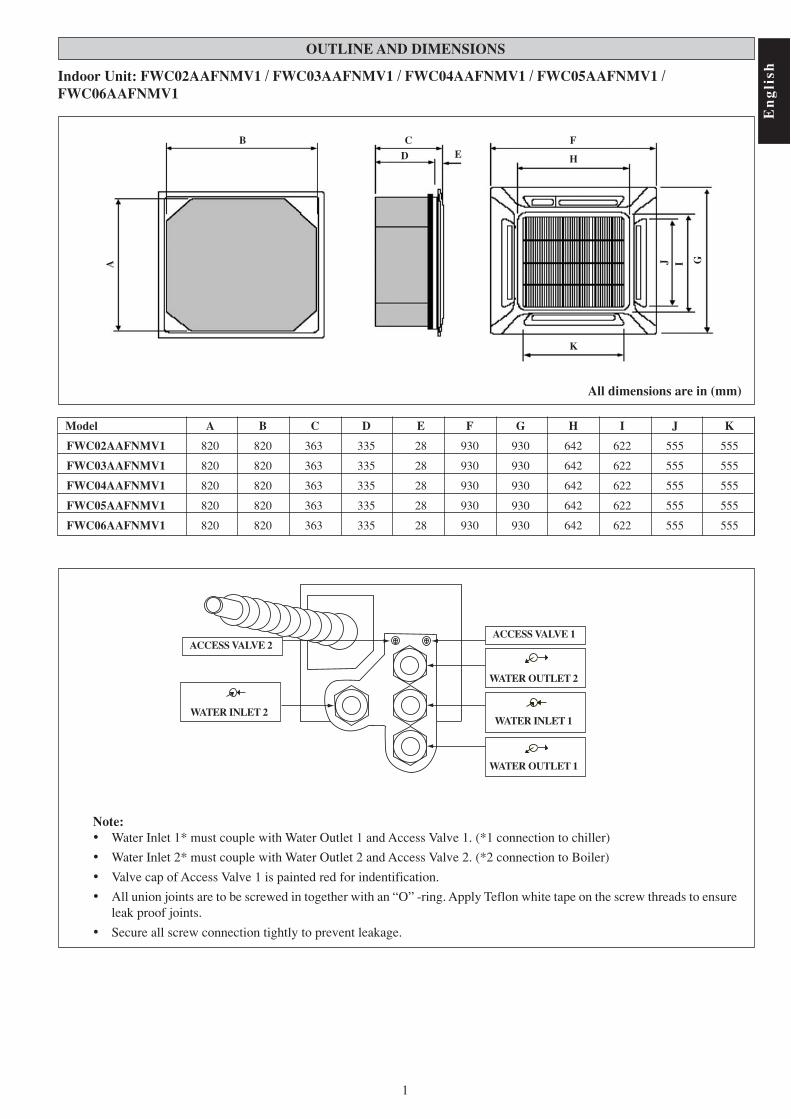
OUTLINE AND DIMENSIONS
Indoor Unit: FWC02AAFNMV1 / FWC03AAFNMV1 / FWC04AAFNMV1 / FWC05AAFNMV1 /FWC06AAFNMV1
Model A B C D E F G H I J K
FWC02AAFNMV1 820 820 363 335 28 930 930 642 622 555 555
FWC03AAFNMV1 820 820 363 335 28 930 930 642 622 555 555
FWC04AAFNMV1 820 820 363 335 28 930 930 642 622 555 555
FWC05AAFNMV1 820 820 363 335 28 930 930 642 622 555 555
FWC06AAFNMV1 820 820 363 335 28 930 930 642 622 555 555
Note:• Water Inlet 1* must couple with Water Outlet 1 and Access Valve 1. (*1 connection to chiller)
• Water Inlet 2* must couple with Water Outlet 2 and Access Valve 2. (*2 connection to Boiler)
• Valve cap of Access Valve 1 is painted red for indentification.
• All union joints are to be screwed in together with an “O” -ring. Apply Teflon white tape on the screw threads to ensureleak proof joints.
• Secure all screw connection tightly to prevent leakage.
All dimensions are in (mm)
B
A
C
D EF
H
K
J I G
WATER OUTLET 2
WATER INLET 1
WATER OUTLET 1
ACCESS VALVE 1
WATER INLET 2
ACCESS VALVE 2
2
SAFETY PRECAUTIONS
! CAUTIONPlease take note of the following important points wheninstalling.• Ensure that te drainage piping is connected properly.
If the drainage piping is not connected properly, it maycause water leakage which will dampen the furniture.
• Ensure that the unit’s panel is closed after service orinstallation.
Unsecured panels will cause the unit to operate noisily.
• Air swing connector and LED wire connector shall beinside the control box.
• Sharp edges and coil surfaces are potential locations whichmay cause injury hazards. Avoid from being in contactwith these places.
• Before turning off the power supply set the remotecontroller’s ON/OFF switch to the “OFF” position toprevent the nuisance tripping of the unit. If this is not done,the unit’s fans will start turning automatically when powerresumes, posing a hazard to service personnel or the user.
• Do not operate any heating apparatus too close to the airconditioner unit. This may cause the plastic panel to melt ordeform as a result of the excessive heat.
• Ensure the color of wires of the outdoor unit and theterminal markings are same to the indoors respectively.
• IMPORTANT : DO NOT INSTALL OR USE THE AIRCONDITIONER UNIT IN A LAUNDRY ROOM.
! WARNING• Installation and maintenance should be performed by
qualified persons who are familiar with local code andregulation, and experienced with this type of appliance.
• All field wiring must be installed in accordance with thenational wiring regulation.
• Ensure that the rated voltage of the unit corresponds tothat of the name plate before commencing wiring workaccording to the wiring diagram.
• The unit must be GROUNDED to prevent possible hazarddue to insulation failure.
• All electrical wiring must not touch the water piping orany moving parts of the fan motors.
• Confirm that the unit has been switched OFF beforeinstalling or servicing the unit.
• Risk of electric shock, can cause injury or death.Disconnect all remain electric power supplies beforeservicing.
• DO NOT pull out the power cord when the power is ON.This may cause serious electrical shocks which may resultin the fire hazards.
• Keep the indoor and outdoor units, power cable andtransmission wiring, at least 1m from TVs and radios, toprevent distorted pictures and static. {Depending on thetype and source of the electrical waves, static may be heardeven when more than 1m away}.
NOTICEDisposal requirementsYour air conditioning product is marked with this symbol. This means that electrical and electronic products shall notbe mixed with unsorted household waste.Do not try to dismantle the system yourself: the dismantling of the air conditioning system, treatment of the refrigerant,of oil and of other parts must be done by a qualified installer in accordance with relevant local and national legislation.Air conditioners must be treated at a specialized treatment facility for re-use, recycling and recovery. By ensuring thisproduct is disposed of correctly, you will help to prevent potential negative consequences for the environment andhuman health. Please contact the installer or local authority for more information.Batteries must be removed from the remote controller and disposed of separately in accordance with relevant localand national legislation.
3
En
gli
s h
2. Unit Installation• Measure and mark the position for the hanging rod. Drill the hole for the
angle nut on the ceiling and fix the hanging rod.• The installation template is extended according to temperature and
humidity. Check on dimensions in use.• The dimensions of the installation template are the same as those of the
ceiling opening dimensions.• Before ceiling laminating work is completed, be sure to fit the installation
template to the indoor unit.
Note: Be sure to discuss the ceiling drilling work with the installersconcerned.
3. Unit Hanging• Confirm the pitch of the hanging rod.• Hold the unit and hang it on the hanging rod with the nut and washer.• Adjust the unit height to 35.0mm between the indoor unit bottom surface
and the ceiling surface.• Confirm with a level gauge that the unit is installed horizontally and
tighten the nut and bolt to prevent unit failing and vibration.• Open the ceiling board along the outer edge of the paper installation
template.
890.0 mm (Ceiling Board Opening)
790.0 mm (Hanging Rod)
890.
0 m
m (
Cei
ling
Boa
rd O
peni
ng)
620.
5 m
m (
Han
ging
Rod
)
35.0 mm
CeilingBoard
Indoor Unit
4. Drain Pump Work• Drain pipe must be in downward gradient for smooth drainage.• Avoid installing the drain pipe in up and down slope to prevent reversed
water flow.• During the drain pipe connection, be careful not to exert extra force on
the drain connector at indoor unit.• The outside diameter of the drain connection at the flexible drain hose
is 20mm.• Be sure to execute heat insulation (polyethylene foam with thickness
more than 8.0mm) on the drain piping to avoid the condensed waterdripping inside the room.
Indoor Unit
Pipe Clamp
Good Bad
INSTALLATION OF THE INDOOR UNIT
Min. 0.5 m Min. 0.5 m Min. 0.5 m
Max
. 0.3
m
Min
2.5
m ~
Max
3.0
m
Min
. 1.0
m
Floor
Bea
m
1. Preliminary Site Survey
• Electrical supply and installation is to conform to local authority’s (e.g. National Electrical Board) codes and regulations.• Voltage supply fluctuation must not exceed ±10% of rated voltage. Electricity supply lines must be independent of welding
transformers which can cause high supply fluctuation.• Ensure that the location is convenient for wiring, piping and drainage.• The indoor unit must be installed in such that is free from any obstacles in path of cool air discharge and warm air return, and must
allow spreading of air throughout the room (near the center of the room)• Provide clearance for the indoor unit from the wall and obstacles as shown in the figure.• The installation place must be strong enough to support a load 4 times the indoor unit weight to avoid amplifying noise and
vibration.• The installation place (hanging ceiling surface) must be levelled and the height in the ceiling is 350mm or more.• The indoor unit must be away from heat and steam sources (avoid installing it near an entrance).
Obstacle
4
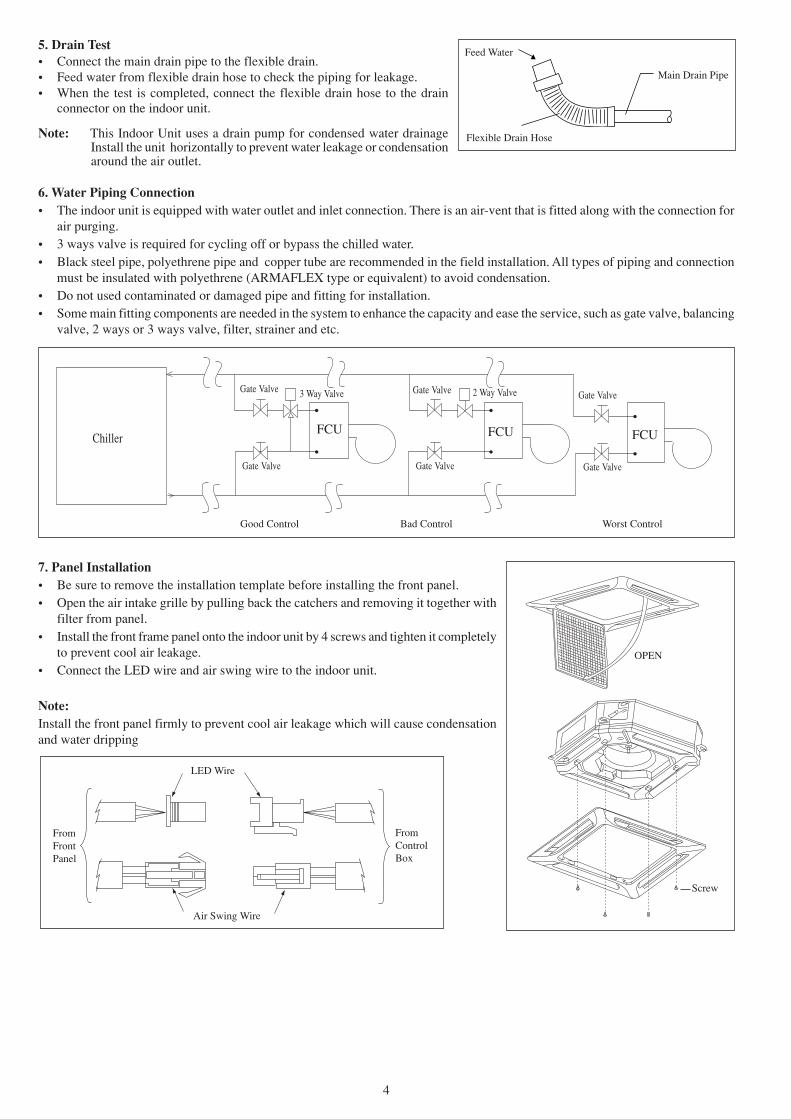
6. Water Piping Connection• The indoor unit is equipped with water outlet and inlet connection. There is an air-vent that is fitted along with the connection for
air purging.• 3 ways valve is required for cycling off or bypass the chilled water.• Black steel pipe, polyethrene pipe and copper tube are recommended in the field installation. All types of piping and connection
must be insulated with polyethrene (ARMAFLEX type or equivalent) to avoid condensation.• Do not used contaminated or damaged pipe and fitting for installation.• Some main fitting components are needed in the system to enhance the capacity and ease the service, such as gate valve, balancing
valve, 2 ways or 3 ways valve, filter, strainer and etc.
5. Drain Test• Connect the main drain pipe to the flexible drain.• Feed water from flexible drain hose to check the piping for leakage.• When the test is completed, connect the flexible drain hose to the drain
connector on the indoor unit.
Note: This Indoor Unit uses a drain pump for condensed water drainageInstall the unit horizontally to prevent water leakage or condensationaround the air outlet.
7. Panel Installation• Be sure to remove the installation template before installing the front panel.• Open the air intake grille by pulling back the catchers and removing it together with
filter from panel.• Install the front frame panel onto the indoor unit by 4 screws and tighten it completely
to prevent cool air leakage.• Connect the LED wire and air swing wire to the indoor unit.
Note:Install the front panel firmly to prevent cool air leakage which will cause condensationand water dripping
FromFrontPanel
LED Wire
Air Swing Wire
Chiller FCU FCUFCU
Good Control Bad Control Worst Control
Gate Valve
Gate Valve
Gate Valve
Gate Valve
Gate Valve
Gate Valve
2 Way Valve3 Way Valve
FromControlBox
Main Drain Pipe
Feed Water
Flexible Drain Hose
OPEN
Screw
5
En
gli
s h
RED
LEVEL SWITCH
WH
ITE
PURPLE
AIR SWINGMOTOR G
/Y
G/Y
BLA
CK
WH
ITE
RE
D
FAN MOTOR
BLACK
G/Y
BLU
EB
LUE
G/Y
PART NO: 08 02 4 091942
RED
BLACK
HVLV CVLV L/L1 N/L2 N/L2
BR
OW
N (
FL)
OR
AN
GE
(FM
)
A.C L.C
M.C
PU
RP
LE (
FH
)
RED BLACK G/Y
DRAINPUMP
AUX.CONTACT
POWERSUPPLY
HTR
N
LNE
TO 3WAY
VALVE
TO 3WAY
VALVE
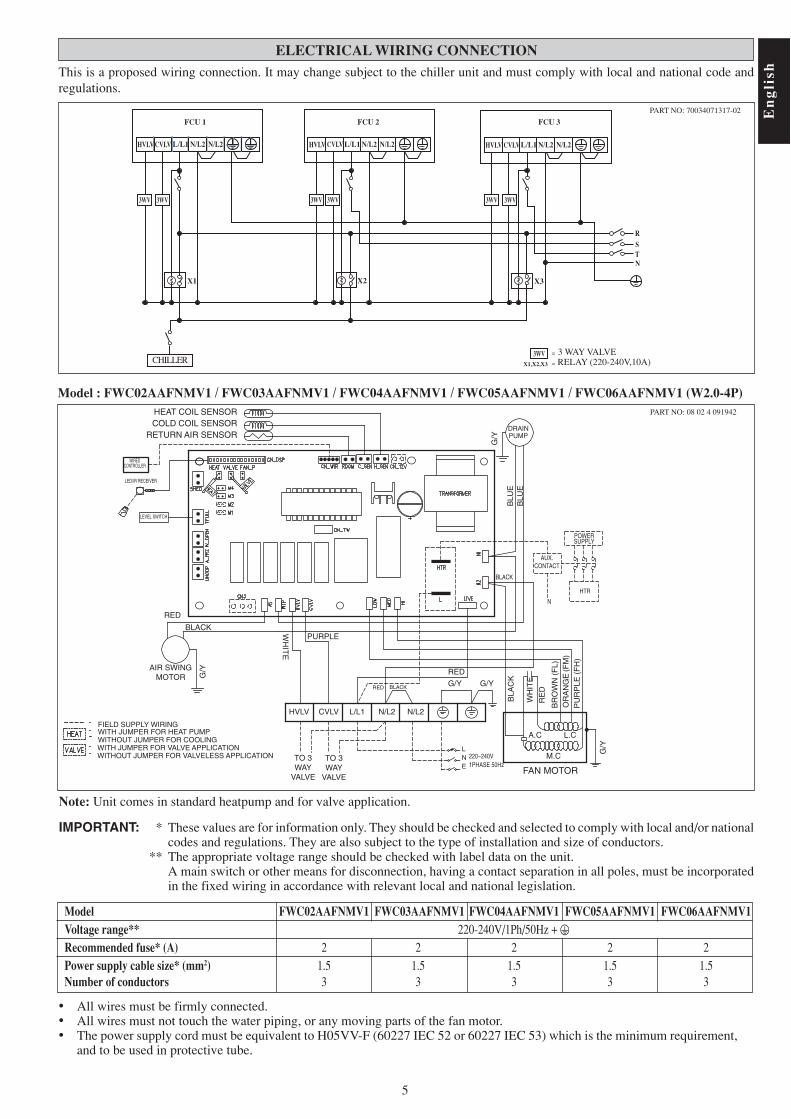
ELECTRICAL WIRING CONNECTION
This is a proposed wiring connection. It may change subject to the chiller unit and must comply with local and national code andregulations.
L/L1 N/L2 N/L2
FCU 1 FCU 2 FCU 3
HVLV CVLV L/L1 N/L2 N/L2HVLV CVLV CVLVL/L1 N/L2 N/L2HVLV
3WV 3WV 3WV 3WV3WV 3WV
X1 X2 X3
RSTN
3WVX1,X2,X3
=
=
3 WAY VALVERELAY (220-240V,10A)CHILLER
PART NO: 70034071317-02
HEAT COIL SENSORCOLD COIL SENSOR
RETURN AIR SENSOR
Model : FWC02AAFNMV1 / FWC03AAFNMV1 / FWC04AAFNMV1 / FWC05AAFNMV1 / FWC06AAFNMV1 (W2.0-4P)
FIELD SUPPLY WIRINGWITH JUMPER FOR HEAT PUMPWITHOUT JUMPER FOR COOLINGWITH JUMPER FOR VALVE APPLICATIONWITHOUT JUMPER FOR VALVELESS APPLICATION
Model FWC02AAFNMV1 FWC03AAFNMV1 FWC04AAFNMV1 FWC05AAFNMV1 FWC06AAFNMV1Voltage range** 220-240V/1Ph/50Hz + !Recommended fuse* (A) 2 2 2 2 2Power supply cable size* (mm2) 1.5 1.5 1.5 1.5 1.5Number of conductors 3 3 3 3 3
Note: Unit comes in standard heatpump and for valve application.
IMPORTANT: * These values are for information only. They should be checked and selected to comply with local and/or nationalcodes and regulations. They are also subject to the type of installation and size of conductors.
** The appropriate voltage range should be checked with label data on the unit.A main switch or other means for disconnection, having a contact separation in all poles, must be incorporatedin the fixed wiring in accordance with relevant local and national legislation.
• All wires must be firmly connected.• All wires must not touch the water piping, or any moving parts of the fan motor.• The power supply cord must be equivalent to H05VV-F (60227 IEC 52 or 60227 IEC 53) which is the minimum requirement,
and to be used in protective tube.
WIREDCONTROLLER
LED/IR RECEIVER
220~240V1PHASE 50Hz
6
OPERATING RANGE
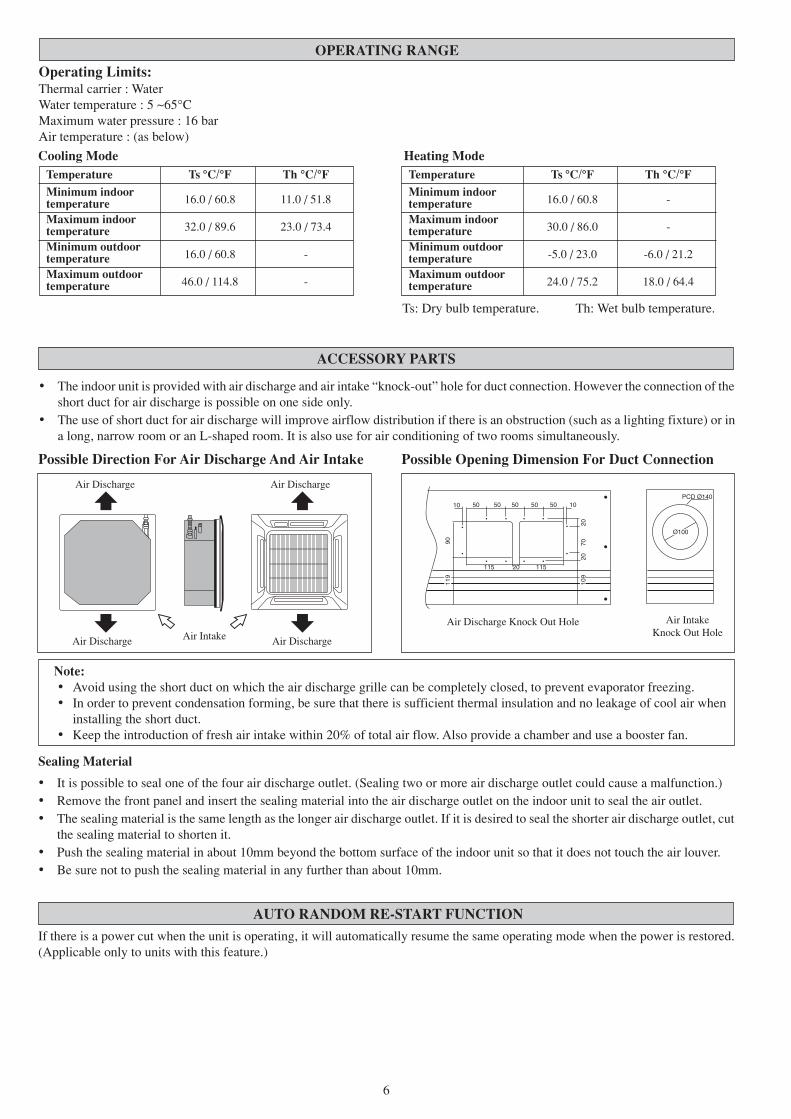
Operating Limits:Thermal carrier : WaterWater temperature : 5 ~65°CMaximum water pressure : 16 barAir temperature : (as below)
Cooling ModeTemperature Ts °C/°F Th °C/°F
Minimum indoor16.0 / 60.8 11.0 / 51.8temperature
Maximum indoor32.0 / 89.6 23.0 / 73.4temperature
Minimum outdoor16.0 / 60.8 -temperature
Maximum outdoor46.0 / 114.8 -temperature
Heating Mode
Ts: Dry bulb temperature. Th: Wet bulb temperature.
Temperature Ts °C/°F Th °C/°F
Minimum indoor16.0 / 60.8 -temperature
Maximum indoor30.0 / 86.0 -temperature
Minimum outdoor-5.0 / 23.0 -6.0 / 21.2temperature
Maximum outdoor24.0 / 75.2 18.0 / 64.4temperature
• The indoor unit is provided with air discharge and air intake “knock-out” hole for duct connection. However the connection of theshort duct for air discharge is possible on one side only.
• The use of short duct for air discharge will improve airflow distribution if there is an obstruction (such as a lighting fixture) or ina long, narrow room or an L-shaped room. It is also use for air conditioning of two rooms simultaneously.
ACCESSORY PARTS
Possible Opening Dimension For Duct ConnectionPossible Direction For Air Discharge And Air Intake
Note:• Avoid using the short duct on which the air discharge grille can be completely closed, to prevent evaporator freezing.• In order to prevent condensation forming, be sure that there is sufficient thermal insulation and no leakage of cool air when
installing the short duct.• Keep the introduction of fresh air intake within 20% of total air flow. Also provide a chamber and use a booster fan.
Air Discharge Knock Out Hole Air IntakeKnock Out Hole
10 50 50 50 50 50 10
2070
2010
9
119
90
Ø100
PCD Ø140
115 20 115
Air Intake
Air DischargeAir Discharge
Air Discharge Air Discharge
Sealing Material
• It is possible to seal one of the four air discharge outlet. (Sealing two or more air discharge outlet could cause a malfunction.)• Remove the front panel and insert the sealing material into the air discharge outlet on the indoor unit to seal the air outlet.• The sealing material is the same length as the longer air discharge outlet. If it is desired to seal the shorter air discharge outlet, cut
the sealing material to shorten it.• Push the sealing material in about 10mm beyond the bottom surface of the indoor unit so that it does not touch the air louver.• Be sure not to push the sealing material in any further than about 10mm.
AUTO RANDOM RE-START FUNCTION
If there is a power cut when the unit is operating, it will automatically resume the same operating mode when the power is restored.(Applicable only to units with this feature.)
7
En
gli
s h
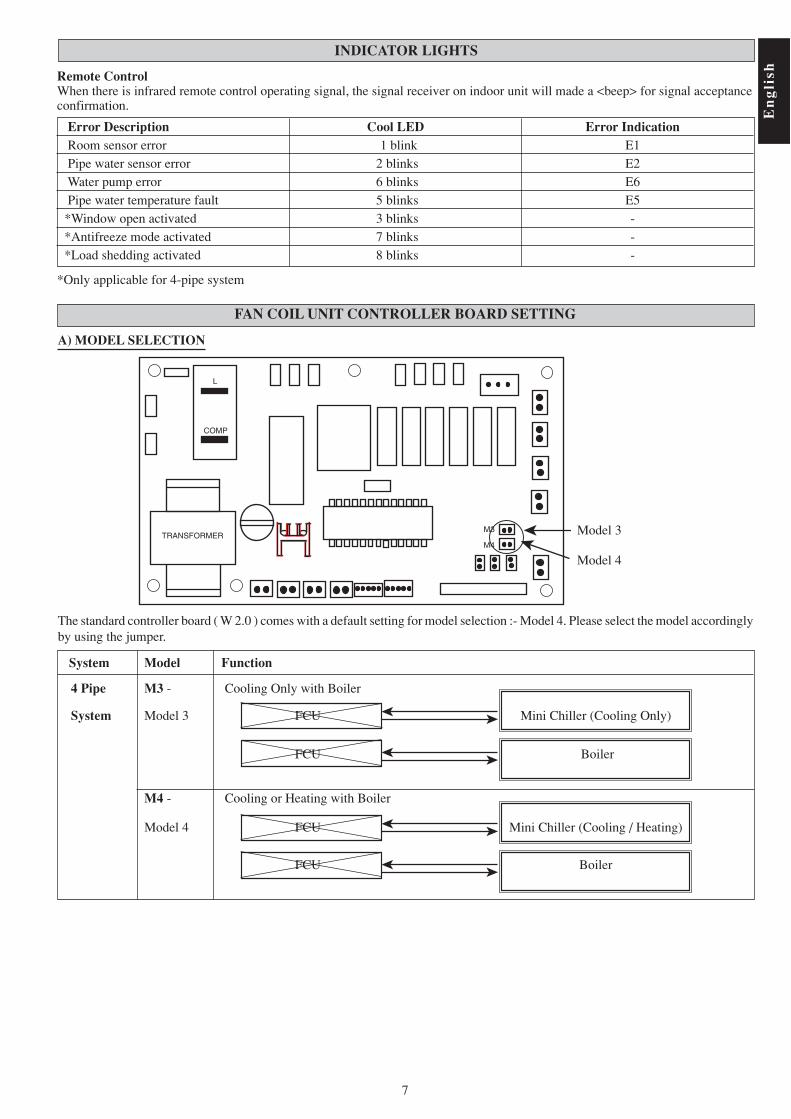
Error Description Cool LED Error Indication Room sensor error 1 blink E1 Pipe water sensor error 2 blinks E2 Water pump error 6 blinks E6 Pipe water temperature fault 5 blinks E5*Window open activated 3 blinks -*Antifreeze mode activated 7 blinks -*Load shedding activated 8 blinks -
INDICATOR LIGHTS
Remote ControlWhen there is infrared remote control operating signal, the signal receiver on indoor unit will made a <beep> for signal acceptanceconfirmation.
*Only applicable for 4-pipe system
FAN COIL UNIT CONTROLLER BOARD SETTING
A) MODEL SELECTION
The standard controller board ( W 2.0 ) comes with a default setting for model selection :- Model 4. Please select the model accordinglyby using the jumper.
Model 3
Model 4
System Model Function
M4
M3
L
COMP
TRANSFORMER
4 Pipe M3 - Cooling Only with Boiler
System Model 3 FCU Mini Chiller (Cooling Only)
FCU Boiler
M4 - Cooling or Heating with Boiler
Model 4 FCU Mini Chiller (Cooling / Heating)
FCU Boiler
8
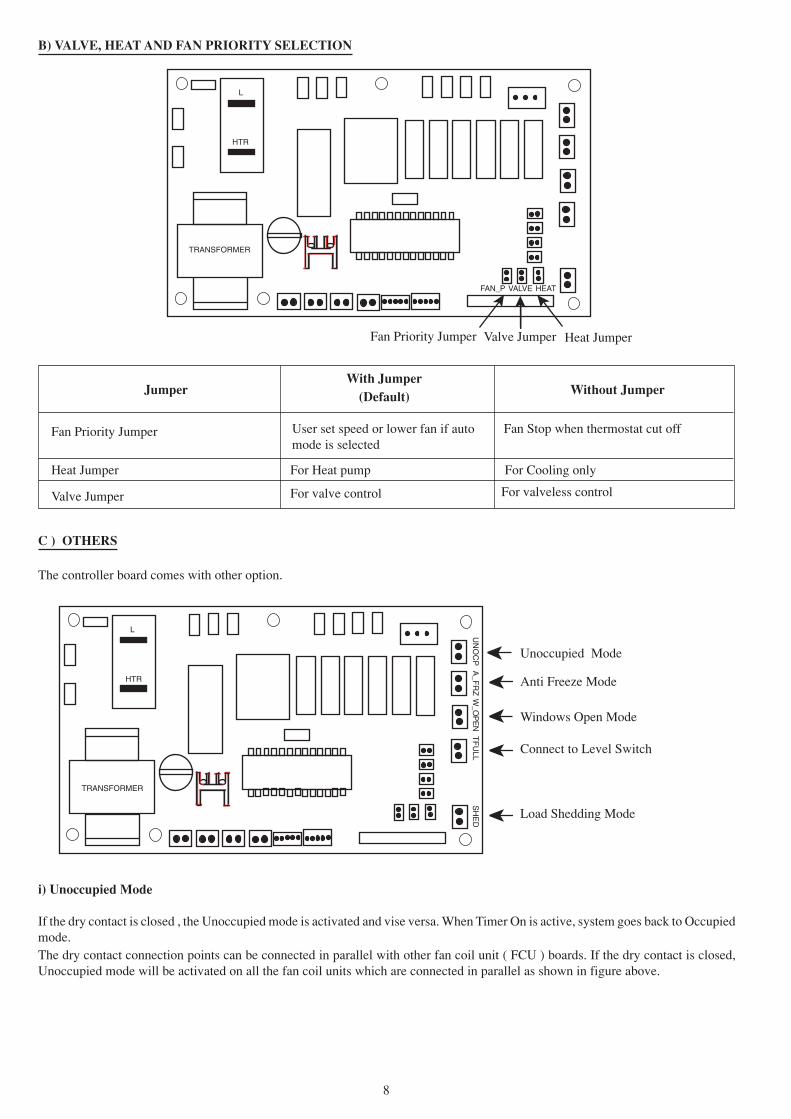
B) VALVE, HEAT AND FAN PRIORITY SELECTION
JumperWith Jumper
Without Jumper(Default)
Fan Priority Jumper User set speed or lower fan if automode is selected
Fan Stop when thermostat cut off
Valve Jumper For valve control For valveless control
Fan Priority Jumper Heat JumperValve Jumper
C ) OTHERS
The controller board comes with other option.
Unoccupied Mode
Anti Freeze Mode
Windows Open Mode
Load Shedding Mode
i) Unoccupied Mode
If the dry contact is closed , the Unoccupied mode is activated and vise versa. When Timer On is active, system goes back to Occupiedmode.The dry contact connection points can be connected in parallel with other fan coil unit ( FCU ) boards. If the dry contact is closed,Unoccupied mode will be activated on all the fan coil units which are connected in parallel as shown in figure above.
Connect to Level Switch
FAN_P VALVE HEAT
L
HTR
TRANSFORMER
UN
OC
P
L
HTR
TRANSFORMER
A_F
RZ
W_O
PE
NT
FU
LLS
HE
D
Heat Jumper For Heat pump For Cooling only
9
En
gli
s h
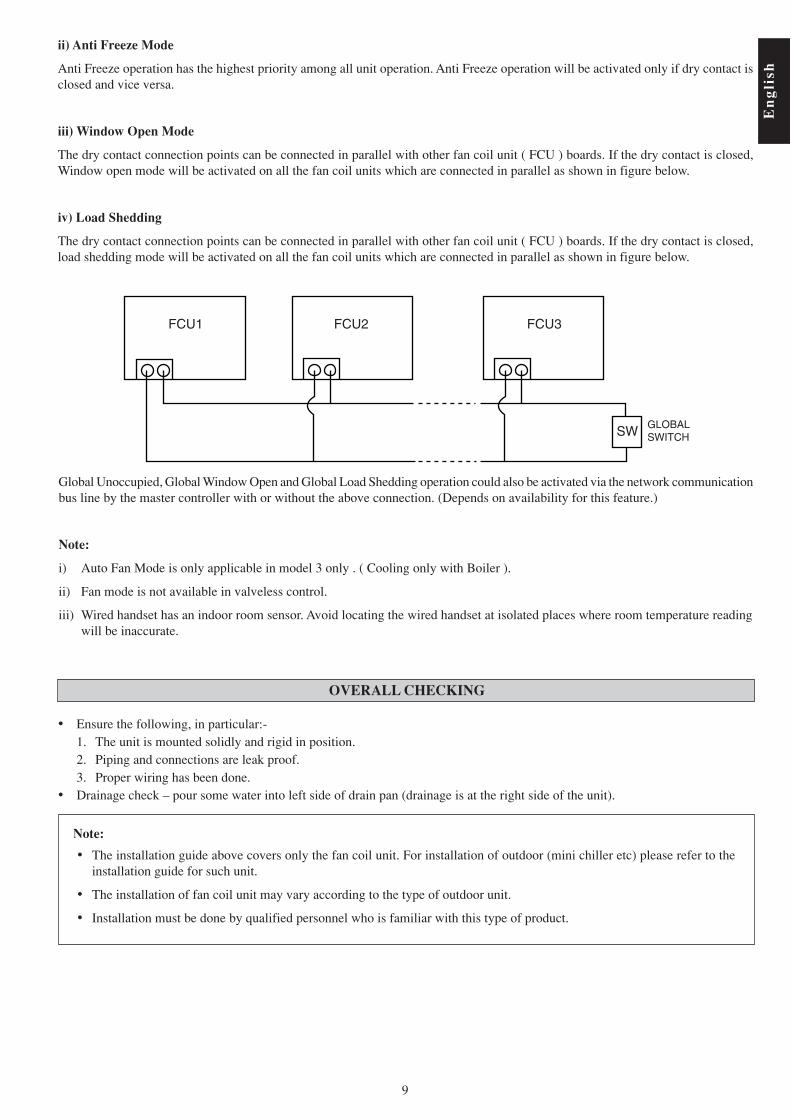
ii) Anti Freeze Mode
Anti Freeze operation has the highest priority among all unit operation. Anti Freeze operation will be activated only if dry contact isclosed and vice versa.
iii) Window Open Mode
The dry contact connection points can be connected in parallel with other fan coil unit ( FCU ) boards. If the dry contact is closed,Window open mode will be activated on all the fan coil units which are connected in parallel as shown in figure below.
iv) Load Shedding
The dry contact connection points can be connected in parallel with other fan coil unit ( FCU ) boards. If the dry contact is closed,load shedding mode will be activated on all the fan coil units which are connected in parallel as shown in figure below.
SW GLOBALSWITCH
FCU1 FCU2 FCU3
Global Unoccupied, Global Window Open and Global Load Shedding operation could also be activated via the network communicationbus line by the master controller with or without the above connection. (Depends on availability for this feature.)
Note:
i) Auto Fan Mode is only applicable in model 3 only . ( Cooling only with Boiler ).
ii) Fan mode is not available in valveless control.
iii) Wired handset has an indoor room sensor. Avoid locating the wired handset at isolated places where room temperature readingwill be inaccurate.
OVERALL CHECKING
• Ensure the following, in particular:-1. The unit is mounted solidly and rigid in position.2. Piping and connections are leak proof.3. Proper wiring has been done.
• Drainage check – pour some water into left side of drain pan (drainage is at the right side of the unit).
Note:
• The installation guide above covers only the fan coil unit. For installation of outdoor (mini chiller etc) please refer to theinstallation guide for such unit.
• The installation of fan coil unit may vary according to the type of outdoor unit.
• Installation must be done by qualified personnel who is familiar with this type of product.
10
SERVICE AND MAINTENANCE
When any malfunction of the air conditioner unit is noted, immediately switch off the power supply to the unit.Check the following fault conditions and causes for some simple troubleshooting tips.
TROUBLESHOOTING
Causes / Action
- Protection against frequent starting. Wait for 3 to 4 minutesfor the compressor to start operating.
- Power failure, or the fuse need to be replaced.
- The power plug is disconnected.
- It is possible that your delay timer has been set incorrectly.
- If the fault persist after all these verifications, pleasecontact the air conditioner unit installer.
- The air filter is dirty.
- The doors or windows are open.
- The air suction and discharge are clogged.
- The regulated temperature is not high enough.
- Odors may be caused by cigarettes, smoke particles,perfume etc. which might have adhered onto the coil.
- This is caused by air humidity after an extended long periodof operation.
- The set temperature is too low, increase the temperaturesetting and operate the unit at high fan speed.
- Switch off unit and call dealer.
If the fault persists, please call your local dealer / serviceman.
Service parts
Indoor air filter
Indoor unit
Maintenance procedures
1. Remove any dust adhered on the filter by using a vacuum cleaner orwash in lukewarm water (below 40ºC) with neutral cleaning detergent.
2. Rinse the filter well and dry before placing it back into the unit.
3. Do not use gasoline, volatile substances or chemical to clean the filter.
1. Clean any dirt or dust on the grille or panel by wiping it off with softcloth soaked in lukewarm water (below 40ºC) with neutral detergentsolution.
2. Do not use gasoline, volatile substances or chemical to clean the indoorunit.
Period
At least once every2 weeks.
More frequently if necessary.
At least once every2 weeks.
More frequently if necessary.
Fault
1. The compressor does not start operate after 3 minutes fromstarting the air conditioner unit.
2. The air conditioner unit does not operate.
3. The air flow is too low.
4. Discharge air flow has bad odor.
5. Condensation on the front air grille of the indoor unit.
6. Water flowing out from the air conditioner unit.

MEMO

Head office: Zandvoordestraat 300, B-8400 Oostende, BelgiumUmeda Center Bldg., 2-4-12, Nakazaki-Nishi,Kita-ku, Osaka, 530-8323 Japan
Tokyo office:JR Shinagawa East Bldg., 2-18-1, Konan,Minato-ku, Tokyo, 108-0075 Japanhttp://www.daikin.com/global/
Part No.: R08019029237