installation instructions seamless acoustic...
TRANSCRIPT

Installation Instructions
Seamless Acoustic Ceiling
StarSilent Acoustic Plaster System

StarSilent Installation Instructions — Pyrok Inc. p. 2
Contents A General information 3 B Tools 4 C Required quantities of materials 4 D Continuous surfaces and joints 5 E Ceiling loads 5 Installation 1. Installing the hangers 6 2. Fitting the wall junction profile 7 3. Installing the carrier channel grid 8 4. Installing the hot channel grid 9 5. Extending the carrier and hot channel grids 10 6. Aligning the framing 11 7. Ceiling installations and additional loads 12 8. Wall junction without wall angle 13 9. Wall junction with wall angle 14 10. Installing the first StarSilent Panel 15 11. Installing the next StarSilent Panel 16 12. Further course of the Panel installation procedure 17 13. Filling and grinding 18 14. Checking evenness 19 15. Important tips for the final coating 20 16. Intermediate coating of StarSilent Base Coat 21 17. StarSilent Finish Coat 22

StarSilent Installation Instructions — Pyrok Inc. p. 3
A General information These instructions are intended to be of assistance when installing the panelling. These instructions cannot cover all aspects relating to installation. They do not
release applicators from their responsibility to provide professional workmanship and quality. Training or instruction prior to beginning application is recommended.
The Panels are to be stored indoors on an even surface. They are to be protected
from damp and weathering influences and are to be stored in the appropriate installation conditions for at least 1 day prior to installation.
The StarSilent Panels may only be installed after establishing the appropriate
equilibrium humidity and temperature in the room. Sudden heating or cooling during the installation and drying period may lead to cracking.
Special design details and the latest documentation are available from sales
representatives of Pyrok Inc. The ceiling is not 100 % glancing light-free. The quality of the StarSilent Top
surface is highly dependent on the degree of care applied to installing the ceiling and due compliance with the instructions for application. In assessing the quality of StarSilent ceilings it is to be noted that these ceilings are manually crafted under varying conditions. Consequently, they cannot possess the uniformity of industrially manufactured products.
For the purposes of agreeing with the client on the required appearance for the
finished surface, a mockup of at least 50ft² is recommended. .

StarSilent Installation Instructions — Pyrok Inc. p. 4
B Tools Chalk line SDS impact drill Hammer Profile cutter Manual circular saw with guide bar Keyhole saw, handsaw, circular hole saw Building screwdriver with bit stop Cartridge Cutter 4 x 4 mm notched trowel Plastic trowel Smoother, 24 inches Narrow scraper Sanding board Work aids Surface scaffold Rotary laser, water level, spirit level, straight edge (min. 6 feet) Building spotlight Dust protection mask, goggles, overalls C Required quantities of materials StarSilent Panels Zinc coated drywall screws, 1 inch at screw spacing of 8 inches StarSilent adhesive StarSilent basecoat plaster StarSilent finish coat plaster
StarSilent Installation Instructions — Pyrok Inc. p. 5
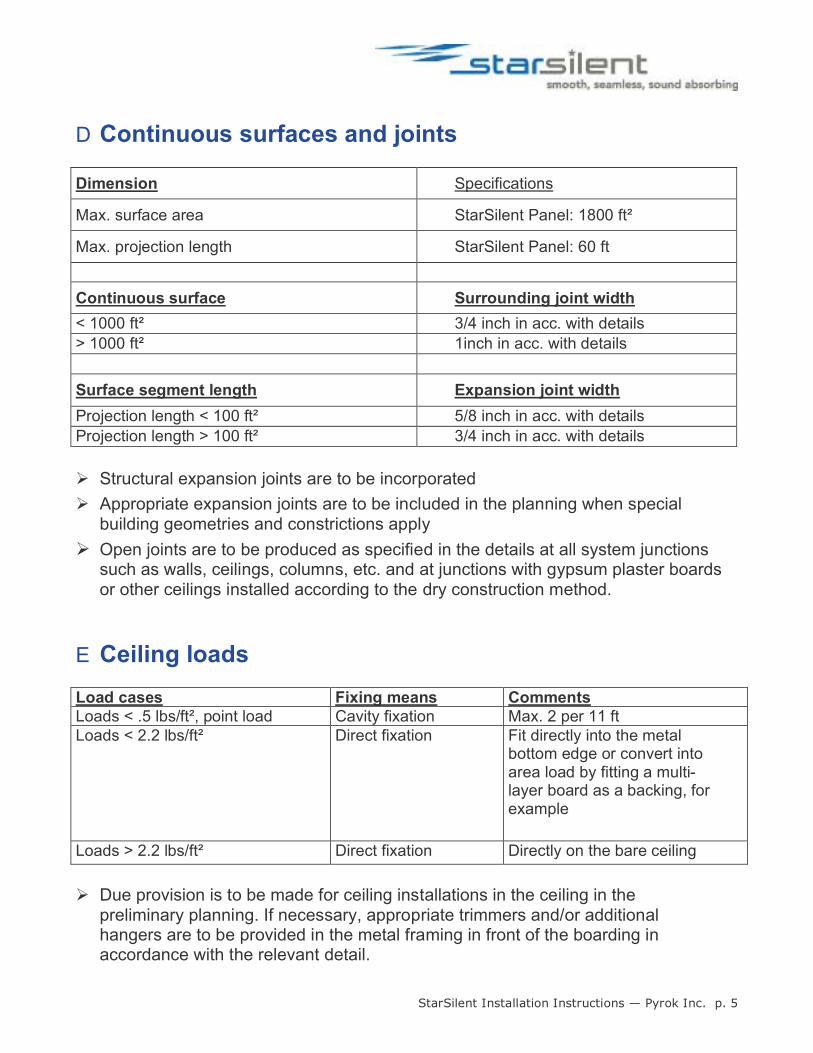
D Continuous surfaces and joints Dimension Specifications
Max. surface area StarSilent Panel: 1800 ft²
Max. projection length StarSilent Panel: 60 ft Continuous surface Surrounding joint width < 1000 ft² 3/4 inch in acc. with details > 1000 ft² 1inch in acc. with details Surface segment length Expansion joint width Projection length < 100 ft² 5/8 inch in acc. with details Projection length > 100 ft² 3/4 inch in acc. with details Structural expansion joints are to be incorporated Appropriate expansion joints are to be included in the planning when special
building geometries and constrictions apply Open joints are to be produced as specified in the details at all system junctions
such as walls, ceilings, columns, etc. and at junctions with gypsum plaster boards or other ceilings installed according to the dry construction method.
E Ceiling loads Load cases Fixing means Comments Loads < .5 lbs/ft², point load Cavity fixation Max. 2 per 11 ft Loads < 2.2 lbs/ft² Direct fixation Fit directly into the metal
bottom edge or convert into area load by fitting a multi-layer board as a backing, for example
Loads > 2.2 lbs/ft² Direct fixation Directly on the bare ceiling Due provision is to be made for ceiling installations in the ceiling in the
preliminary planning. If necessary, appropriate trimmers and/or additional hangers are to be provided in the metal framing in front of the boarding in accordance with the relevant detail.

StarSilent Installation Instructions — Pyrok Inc. p. 6
1. Installing = the hangers Installing ¼ pencil rod to structural ceiling with approved fixing methods as shown
in Figure 1 Quick-fit hangers with tension spring, slotted iron hoops, etc. are not permissible
Max. hanger spacing 48 inches in direction of coarse grid Work aids: Chalk line or laser aligning device Note: When the complete framing is in place, the rails of the fine grid point in the
direction of the main light source. When glazing is in place on more than one side, the fine grid is to be laid preferably in east-west direction.
Figure 1

StarSilent Installation Instructions — Pyrok Inc. p. 7
2. Fitting wall junction profiles We recommend installing the StarSilent Panel with an open surrounding joint to all
adjoining structural components. A perforated L-angle (e.g. Protektor 3612 or 9309) can optionally be installedin
accordance with Figure 9. Install perforated angle such that the perforated side piece is positioned against the top side of the acoustic panel.
A laser aligning device is recommended Figure 2

StarSilent Installation Instructions — Pyrok Inc. p. 8
3. Installing the carrier channel grid Utilize 1 ½ inch cold rolled channel A laser aligning device is recommended Max. spacing of the coarse grid profiles 48 inches, as shown in Fig. 3 Figure 3

StarSilent Installation Instructions — Pyrok Inc. p. 9
4. Installing the hot channel grid Utilize 7/8 inch 20 gauge hot channel Connect 7/8 inch hot channel to carrier channel using furring channel clips Max. spacing of the fine grid profiles 16 inches, as shown in Fig. 4 Grid spacing 8 inches in areas subject to risk of shock Figure 4
StarSilent Installation Instructions — Pyrok Inc. p. 10
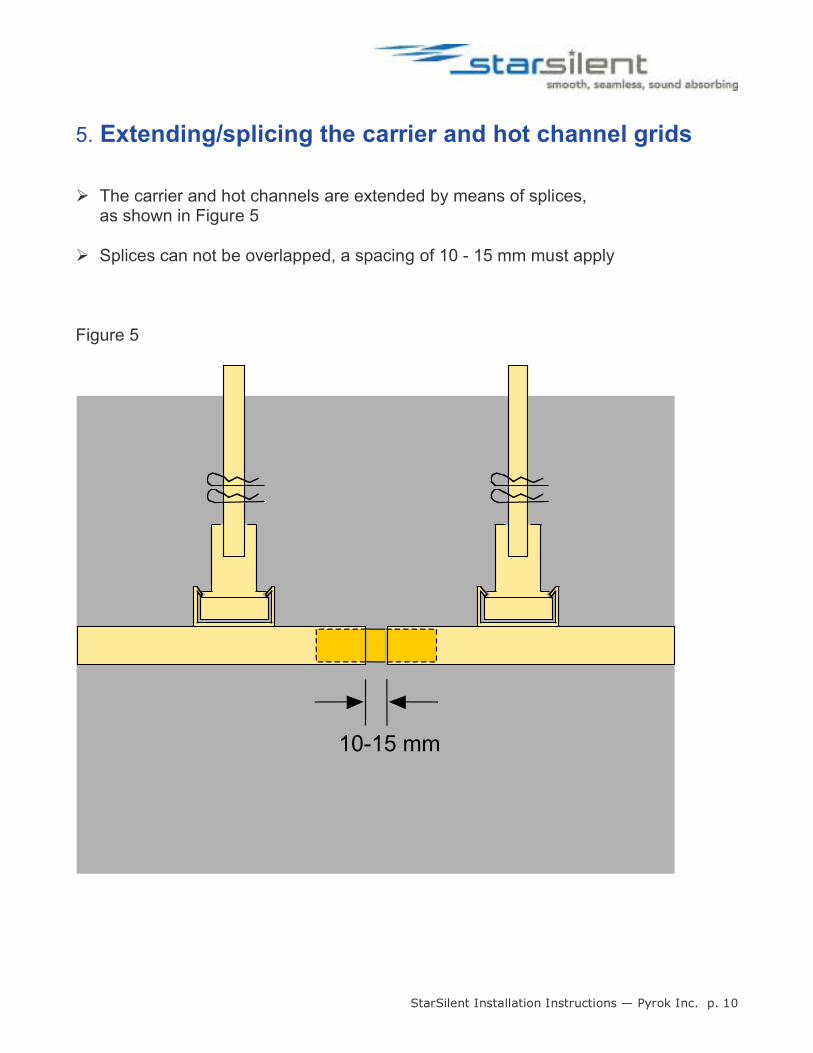
5. Extending/splicing the carrier and hot channel grids The carrier and hot channels are extended by means of splices,
as shown in Figure 5 Splices can not be overlapped, a spacing of 10 - 15 mm must apply Figure 5
10-15 mm
StarSilent Installation Instructions — Pyrok Inc. p. 11
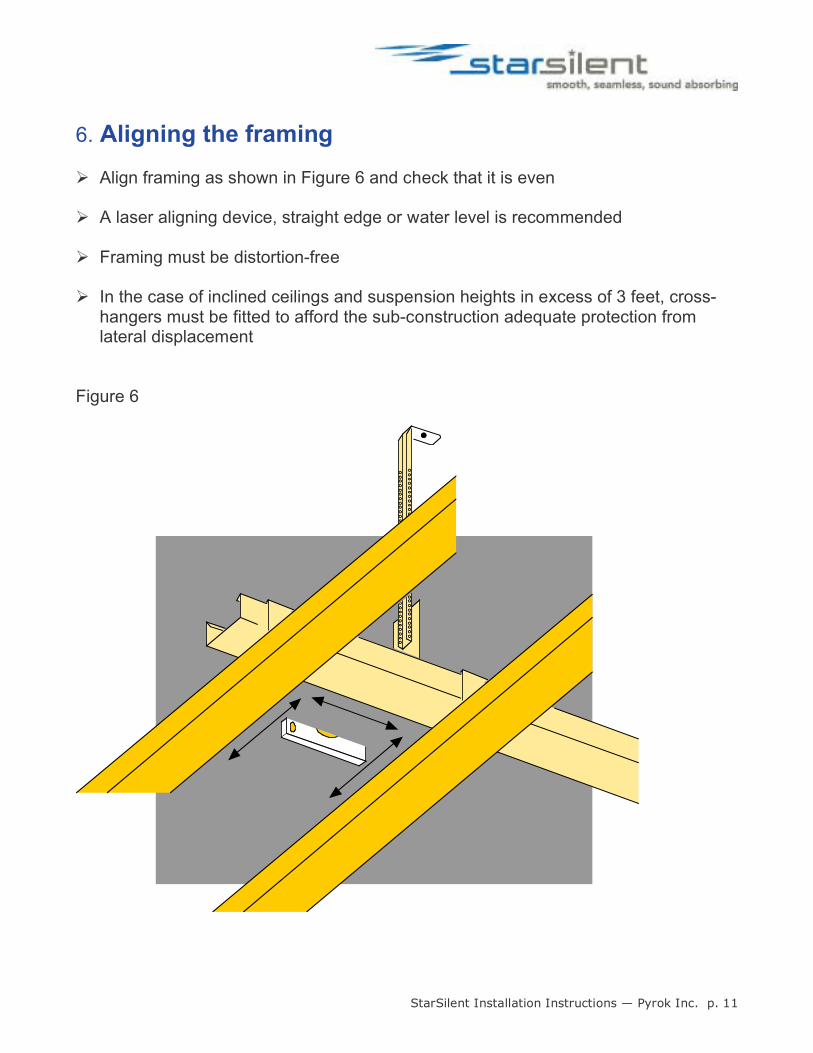
6. Aligning the framing Align framing as shown in Figure 6 and check that it is even A laser aligning device, straight edge or water level is recommended Framing must be distortion-free In the case of inclined ceilings and suspension heights in excess of 3 feet, cross-
hangers must be fitted to afford the sub-construction adequate protection from lateral displacement
Figure 6

StarSilent Installation Instructions — Pyrok Inc. p. 12
7. Ceiling installations Produce cut-outs for lights, ventilation, inspection flaps etc. in accordance with
specified reflected ceiling plan and design framing accordingly Should cut-outs be located in the area of the hot channel despite due planning, the
framing is to be detached in front of the boarding and trimming is to be fitted by means of non-positive joints, as shown in Figure 7
Load transfer points and fixtures are to be produced in accordance with the
technical manual on acoustics If the cold rolled channel is detached it must be secured with additional hangers, as
shown in Figure 7 Do not cut the cold rolled channel after installing the panelling, as experience
shows that this will lead to cracks in the ceiling lining Figure 7
opening

StarSilent Installation Instructions — Pyrok Inc. p. 13
8. Wall junction detail, StarSilent Panel Open wall junction without perforated L-angle Fix fine grid to compression-resistant sub-construction at approx. 2 inches from the
wall and produce open connection joint (Figure 8) We strongly recommend using a starter profile for forming edges (e.g. Protektor
1132) Continuous ceiling surface ≤ 1000 ft², min. joint width 3/4 inches
Continuous ceiling surface ≥ 1000 ft², min. joint width 1 inch Figure 8

StarSilent Installation Instructions — Pyrok Inc. p. 14
9. Wall junction, StarSilent Panel Open wall junction with perforated L-angle Install hot channel to rigid framing at a distance of around 2 inches from the wall,
as shown in Figure 9 We strongly recommend using a starter profile for forming edges (e.g. Protektor
1132) Continuous ceiling surface ≤ 1000 ft², min. joint width 3/4 inch
Continuous ceiling surface ≥ 1000 ft², min. joint width 1 inch Perforated L-profile (e.g. Protektor 3612 or 9309) must be fitted all round rear of
acoustic Panel N.B.: Do not screw StarSilent Panel to surrounding angle.
Figure 9

StarSilent Installation Instructions — Pyrok Inc. p. 15
10. Installing the first StarSilent Panel We recommend installing the StarSilent Panel with an open surrounding joint to all
adjoining structural components. Install StarSilent panel to framing in lengthways direction, as shown in Figure 10 Begin fitting the panelling from a centre line in the room Use zinc coated drywall screws We recommend using a screwdriver with bit stop Countersink screw heads in the Panel to a max. depth of 1 mm Screw spacing approx. 8 inches, spacing from edge of Panel approx. 3/4 inch Never screw Panels to surrounding profiles Figure 10

StarSilent Installation Instructions — Pyrok Inc. p. 16
11. Installing the following Panels A coating of StarSilent adhesive is to be applied to 2 sides (long side and end side)
of the following Panels to be installed. Required quantity of adhesive: approx. 0.3 kg/m² (for small format).
Slide Panels into position as shown in Fig. 11 and screw to installed ceiling. To
ensure full-surface filling, StarSilent adhesive must squeeze from the joint along its entire length.
StarSilent adhesive must not enter into the area between the Panel and the
framing. Leave issuing StarSilent adhesive to dry briefly, then knock off and remove. Do not
spread StarSilent adhesive on the grid on the Panel's surface. Figure 11
wrong right

StarSilent Installation Instructions — Pyrok Inc. p. 17
12. Further course of the panelling process To avoid cross joints, install StarSilent Panel with staggered transverse joints as
shown in Figure 12 at an offset of at least 16 inches Minimum temperature during installation 50°F at max. rel. humidity of 75% Figure 12

StarSilent Installation Instructions — Pyrok Inc. p. 18
13. Filling and grinding Only the screw heads and any damage on the Panels or mesh require filling with
StarSilent adhesive Use as little filler as possible, so as to avoid impairing the ceiling's acoustics-
enhancing properties StarSilent adhesive can be used as a filler Allow the ceiling panelling to dry for at least 24 h before beginning filling work Grind ceiling flat after drying with sanding board and grinding mesh as shown in
Figure 13 We recommend the use of goggles and dust protection mask P1 when
carrying out the work in accordance with Figures 13, 15 and 16 Figure 13

StarSilent Installation Instructions — Pyrok Inc. p. 19
14. Checking evenness Check that the ceiling is even at the Panel joints using a straight smoother (24
inches) (Figure 14) Smoother must not wobble or reveal cavities over the Panel joints. It is
recommendable to use a building spotlight to produce glancing light in the direction of the expected main light source (e.g. indirect lighting, windows).
Figure 14

StarSilent Installation Instructions — Pyrok Inc. p. 20
15. Important tips for the final coating It is recommended to produce a mockup of at least 50 ft² beforehand Sufficient personnel are to be provided for the fine coating (1 man per 3-5 feet of
working width; the deployed number of personnel is to be stepped up accordingly in case of difficult connection details or similar)
To avoid shadow effects from the outset, at least 2 sides should produce glancing
light in succession. In this connection, be sure to take due account of the direction of incident light which is to be expected in future use
A surface scaffold is required for the coating The finished coating has a thickness of approx. 2 mm For the coating the temperature has to be higher than 50° F and the air humidity
less then 75 %. The finest coating is applied to the StarSilent Panel in the form of an intermediate
coating (StarSilent Base Coat) and a top coat (StarSilent Finish Coat)

StarSilent Installation Instructions — Pyrok Inc. p. 21
16. Intermediate coating of StarSilent Top Basic Apply the intermediate coating of StarSilent Top Basic over the entire surface using
a trowel and smooth using a 4 x 4 mm toothed trowel in a criss-cross motion, with the 2nd smoothing stroke corresponding to the main direction of incident light. To ensure uniform coating thicknesses, the same person should always carry out smoothing with the toothed notched in a certain direction
Then level the surface in a single operation, using a scraper/smoother Use surplus material directly, rather than collecting separately. Stir material
occasionally with a trowel After drying (min. 36 hours for smaller surfaces, correspondingly longer for larger
surfaces), sand the surface gently with a sanding board or grinding mesh to remove flash
Required quantity of StarSilent Base Coat Basic: approx. 1 pail / 80ft². Add approx.
16-20 oz. of water to the material per container to obtain the required consistency for application, according to the given climatic conditions
Figure 15

StarSilent Installation Instructions — Pyrok Inc. p. 22
17. Top coat of StarSilent Finish Coat Apply the coat of StarSilent Finish over the entire surface using a trowel and
smooth using a 4 x 4 mm notched trowel in a criss-cross motion, with the 2nd smoothing stroke corresponding to the main direction of incident light. To ensure uniform coating thicknesses, the same person should always carry out smoothing with the toothed trowel in a certain direction Collect surplus material separately. After new adjusting the consistency it can be used later for other ceilings.
Then level the surface in a single operation, using a scraper/smoother. Dispose
surplus material from this operation Required quantity of StarSilent Top Finish: approx. 1 pail / 72 ft². Add approx. 16-
20 oz. of water to the material per container to obtain the required consistency for application, according to the given climatic conditions
Level with a plastic trowel for approx. 15 - 45 minutes, according to room
temperature and humidity (surface takes on matt appearance) Figure 16