installation instructions and glidermatic gts+
TRANSCRIPT

Glidermatic GTS+ Installation Instructions & owner’s manual Page 1
Glidermatic GTS+
Heavy Duty Automatic Tilt and Sectional Door Operator
Installation Instructions and
Glidermatic GTS+ Owners Manual
Glidermatic GTS+ Installation Instructions & owner’s manual Page 2
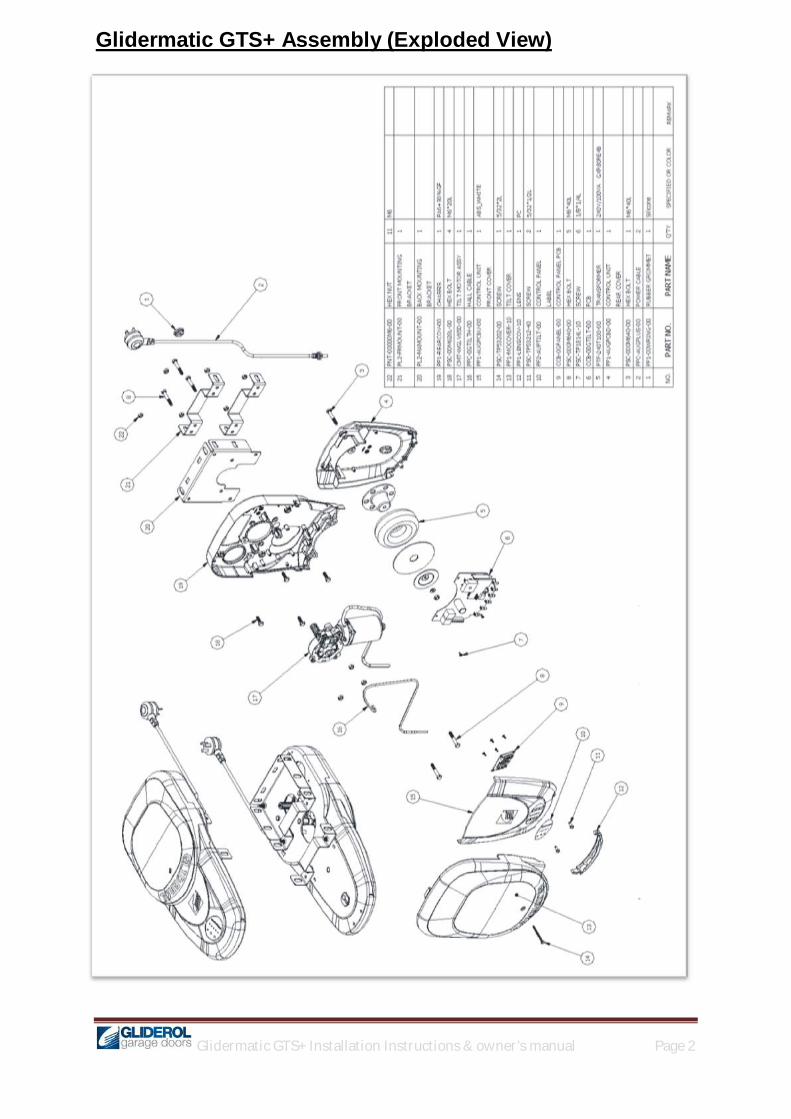
Glidermatic GTS+ Assembly (Exploded View)

Glidermatic GTS+ Installation Instructions & owner’s manual Page 3
Stage 1 - Install the Lintel Bracket
It is essential the door header be substantial as nearly all the force generated by the opener is concentrated via the header bracket.
Determine the centre of the door and continue this vertical line through the header. Open the Door and find the highest point to which the top of the door reaches, using an
appropriate straight edge and level. Transfer this height to the header and lower the door. Increase the distance from this height by 30mm if possible. Grab the lintel bracket and place the flat bottom of the flanges at the height determined,
fixing with screws (not supplied).
Note: Headroom requirements and the need to avoid obstructions sometimes makes it necessary to move the bracket higher.
Stage 2 - Attach Track to Power Unit
Place the track end over the geared shaft of the power unit and slide down. Ensure track and unit are correctly aligned.

Glidermatic GTS+ Installation Instructions & owner’s manual Page 4
Stage 3 - Lock Track to Power Unit
Place the 2 x ‘U’ brackets over the track and slot holes into threaded studs. Place and tighten brackets with M6 nuts provided.
Stage 4 - Attach Track to Lintel Bracket
Slot the other end of the track between the flanges of the installed lintel bracket. Insert large pin provided and lock with ‘R’ Clip.

Glidermatic GTS+ Installation Instructions & owner’s manual Page 5
Stage 5 - Attach Bracket and Arms to Carriage
Assemble components below to the carriage (attached to the track). All fasteners provided.
Stage 6 - Measure Height of Ceiling
Raise the track and power unit and rest it above the roller tracks. Manually slide the carriage back to the power unit. Raise the door to the open position.

Glidermatic GTS+ Installation Instructions & owner’s manual Page 6
Stage 7 - Secure the Power Unit
Cut the ‘L’ brackets to the measured length (as per stage 6). Find secure installation point in ceiling. Attach ‘L’ brackets to power unit with the remaining M8 fasteners (supplied
Install power unit to ceiling. (Fasteners not supplied).
NOTE: Ensure the track is line up centre with the door.
Stage 8 - Install flat Hinge to Door
Slide door back down to the closed position. Manually move the carriage back to the Lintel bracket end and lock into one of the manual lock holes’. Attach the flat hinge bracket to the door, as per the guide on the next page.
Measure height of ceiling to the bottom of the track. This distance will be required for the length of the ‘L’ brackets.
Note: While fixing the Hinge bracket and connecting pusher arm and boomerang arm together make sure the carriage pin engages to one of the three holes on the shaft whilst the door in fully close position, this gives the option to lock the door in manual operation.

Glidermatic GTS+ Installation Instructions & owner’s manual Page 7
Note: If the bracing is fitted to the top panel where applicable as shown above, make sure the boomerang arm does not touch the bracing during the normal operation of the door, if it does interfere adjust the position of the hinge bracket on the vertical stile to ensure there is no interference.
Bracing if applicable

Glidermatic GTS+ Installation Instructions & owner’s manual Page 8
PCB Index
1 Motor Connector 5 Hall Connector
2 Transformer Connector 6 Control Panel Connector
3 Wireless Photocell Connector 7 EAS Receiver Connector
4 External Light Connector 8 External I/O Terminal

Glidermatic GTS+ Installation Instructions & owner’s manual Page 9
User Interface
Transmitter Coding – By Controller
1. Press and hold [ENTER] for 2 seconds to enter menu selection 2. Using [UP] and [DOWN] to select Learn option, and press [ENTER]
3. While the [INDICATOR] is lit, press the desired operation key on transmitter 4. A beep will signal for successful coding. Two beeps signal for a transmitter already in memory 5. Unit will automatically exit the setup after 3 seconds Transmitter Coding – By Transmitter
1. Using an already programmed transmitter, press and hold OPEN & STOP keys simultaneously for 2 seconds
2. Unit will beep three times to signal for Learn Mode 3. Press the desired operation key on the new transmitter 4. A beep will signal for successful coding. Two beeps signal for a
transmitter already in memory 5. Unit will automatically exit the setup after 3 seconds
OPEN / MENU UP
STOP / MENU ENTER
CLOSE / MENU DOWN
MENU
SETTING INDICATOR
[KEY1] STOP
[KEY2] OPEN
[KEY3] CLOSE

Glidermatic GTS+ Installation Instructions & owner’s manual Page 10
Transmitter Key Setting
1. Press and hold [ENTER] for 2 seconds to enter menu selection 2. Using [UP] and [DOWN] to select Key option, and press [ENTER] 3. [INDICATOR] will lit to show current key configuration 4. Using [UP] and [DOWN], select the desire transmitter key setting
from the below options Single Button Configuration: Any one of the three buttons in the transmitter can be used to control all three functions Stop/Open/Close. Useful when one transmitter can operate more than one door and a maximum of three doors.
5. Press [ENTER] to confirm selection, and a beep will signal for successful setup.
Transmitter Code Erase
1. Press and hold [ENTER] for 2 seconds to enter menu selection 2. Using [UP] and [DOWN] to select Learn option 3. To erase all transmitter code in memory, press and hold [ENTER] for 5 seconds 4. When [INDICATOR] diminishes, all codes have been erased
KEY 2
KEY 1
KEY 3
[KEY1] Stop/Open/Close
[KEY1] STOP [KEY2] OPEN [KEY3] CLOSE
OPEN / STOP / CLOSE
Three Button Configuration: Each buttons in the transmitter can be used to control individual functions like functions Stop/Open/Close of eth same door.

Glidermatic GTS+ Installation Instructions & owner’s manual Page 11
Limit Setting – By Controller
1. Press and hold [ENTER] for 2 seconds to enter menu selection 2. Using [UP] and [DOWN] to select Limit option, and press and hold [ENTER] until all menu LEDs
blink
3. While the menu LEDs blink, proceed to setup the TOP limit, by using transmitter’s OPEN & CLOSE keys, and confirm TOP limit position by pressing STOP key
4. Then set the BOTTOM limit, also by using transmitter’s OPEN & CLOSE keys, and confirm BOTTOM limit position by pressing STOP key
5. Once limits are set, the unit will automatically perform a full calibration cycle 6. When the door is closed after calibration, the limits are successfully setup
Limit Resetting – By Transmitter
1. Using an already programmed transmitter, press and hold OPEN & CLOSE keys simultaneously for 10 seconds
2. While the menu LEDs blink, proceed to setup the TOP limit, by using transmitter’s OPEN & CLOSE keys, and confirm TOP limit position by pressing STOP key
3. Then set the BOTTOM limit, also by using transmitter’s OPEN & CLOSE keys, and confirm BOTTOM limit position by pressing STOP key
4. Once limits are set, the unit will automatically perform a full calibration cycle 5. When the door is closed after calibration, the limits are successfully setup
Force Setting
1. Press and hold [ENTER] for 2 seconds to enter menu selection 2. Using [UP] and [DOWN] to select Force option, and press [ENTER] 3. [INDICATOR] will lit to show current force configuration
4. Using [UP] and [DOWN], to adjust the force in the below manner
6. Press [ENTER] to confirm selection, and a beep will signal for successful setup.
Increase – Low Sensitivity
Decrease – High Sensitivity
[KEY1] STOP [KEY2] OPEN [KEY3] CLOSE

Glidermatic GTS+ Installation Instructions & owner’s manual Page 12
Automatic Closing Setting
1. Press and hold [ENTER] for 2 seconds to enter menu selection 2. Using [UP] and [DOWN] to select Auto option, and press [ENTER] 3. [INDICATOR] will lit to show current configuration
4. Using [UP] and [DOWN], to adjust the automatic closing setting in the below manner
80s 70s 60s 50s 40s 30s 20s 10s OFF
Above shows a setting for 50s automatic closing
5. Press [ENTER] to confirm selection, and a beep will signal for successful setup. LED Control
Under 3 Keys transmitter mode, the LED can be switched on and off using the STOP key. This will also output to the EXTLIGHT terminal on-board.
Vacation Mode
Transmitter signal can be locked out by pressing STOP & CLOSE keys simultaneously and holding it for 3 seconds on the transmitter. To deactivate, press the same keys again and hold it for 3 seconds.
Key Ring Transmitter
Battery Type 3V CR2016x2 (Lithium Cell)
To replace batteries: 1. Remove the screw on the back case. 2. Replace the old batteries with new ones (3V CR2016x2) and ensure plastic strip remain intact in clip. 3. Locate back of case and secure with screw.
Plastic Strip
Note: If Auto Close is enabled it is important to fit an auxiliary safety device like Photo beams to avoid human entrapment or door accidently hitting any object.
Glidermatic GTS+ Installation Instructions & owner’s manual Page 13
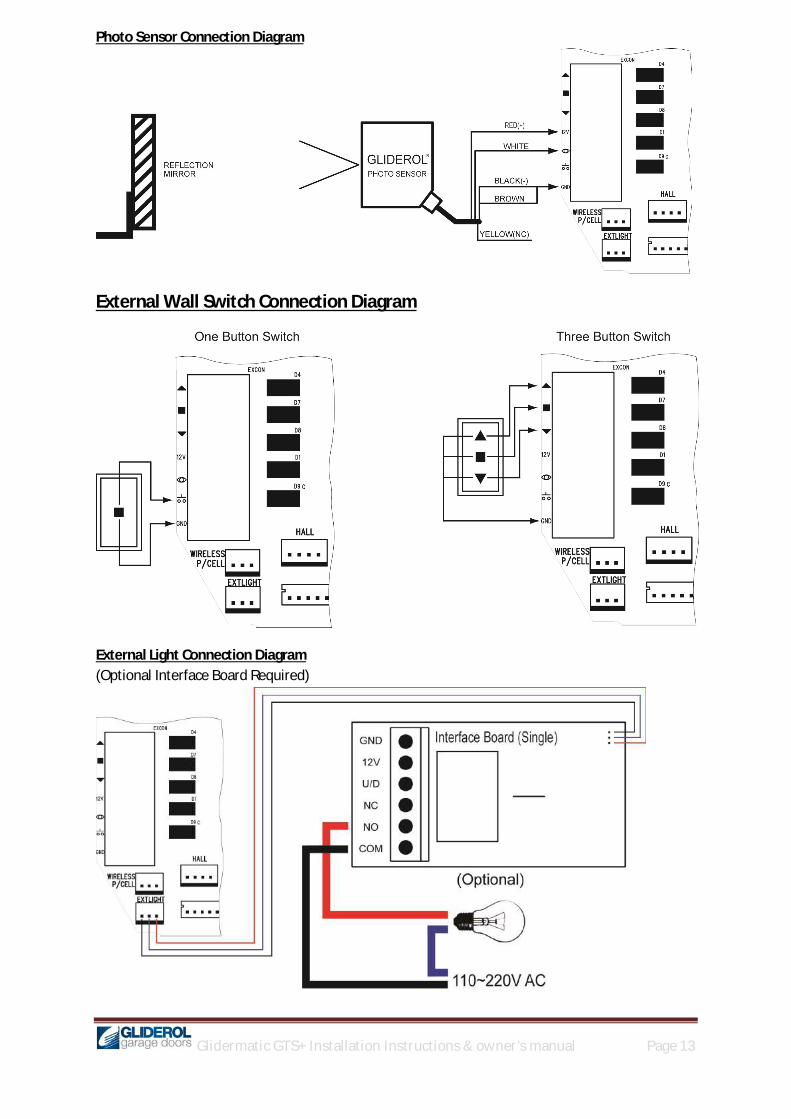
Photo Sensor Connection Diagram
External Wall Switch Connection Diagram
External Light Connection Diagram (Optional Interface Board Required)

Glidermatic GTS+ Installation Instructions & owner’s manual Page 14
Technical Specifications:
CHARACTERISTICS SYMBOL MIN. TYP. MAX. UNIT
Input Voltage 218 240 262 VAC
System Power Dissipation 100 W
Transformer Power 100 VA
Transformer Output Voltage TR 21.6 24 26.4 VAC
Work Voltage of Motor MOTOR 18 24 34 VDC
Lamp Power LED1~LED6 0.36 W
Buzzer Voltage BZ1 12 VDC
Fuse FUSE 15 A
Carrier Frequency Range Handset 389.9 390 390.1 MHz
Modulation Handset AM
Deviation Handset 100 100 KHz
RF Output Power Handset 8 uW
Transmitter Battery Handset 6 VDC
Demodulation Mode RF1 AM
Receiver Sensitivity RF1 ‐90 ‐100 dB
Date Rate RF1 1K Hz
Operation Temperature ‐20 25 85 ℃
Output Voltage in circuit board terminal (0.5 amps Max)
12 V

Glidermatic GTS+ Installation Instructions & owner’s manual Page 15
Plug-in EAS Receiver (Optional)
1. Remove the screw and motor cover
2. Remove the LED lens and two screws
3. Lift up the control panel cover to find the PC board

Glidermatic GTS+ Installation Instructions & owner’s manual Page 16
4. Plug the EAS receiver into the EAS receiver sockets properly
5. Replace control panel cover, LED lens and motor cover and secure with screws
EAS Receiver Index
GHI Transmitter Coding
1. Press and hold [1] SW1, until [2] LED blinks twice 2. Press buttons 4&5 simultaneously on the GHI transmitter to code 3. [2] LED will blink twice to confirm successful programming
GHI Transmitter Code Erase
1. Press and hold [1] SW1 continuously, until [2] LED blinks and goes out finally 2. After [2] LED goes out, all codes have been erased
1
2 3
Glidermatic GTS+ Installation Instructions & owner’s manual Page 17
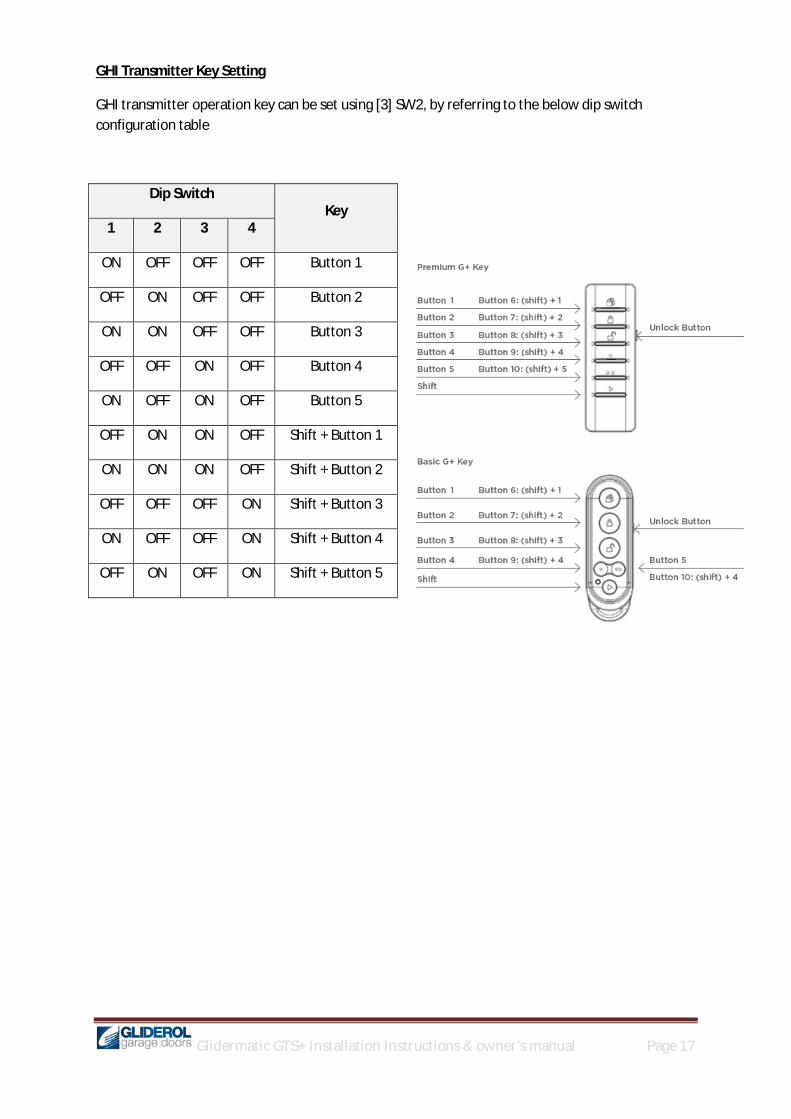
GHI Transmitter Key Setting
GHI transmitter operation key can be set using [3] SW2, by referring to the below dip switch configuration table
Dip Switch Key
1 2 3 4
ON OFF OFF OFF Button 1
OFF ON OFF OFF Button 2
ON ON OFF OFF Button 3
OFF OFF ON OFF Button 4
ON OFF ON OFF Button 5
OFF ON ON OFF Shift + Button 1
ON ON ON OFF Shift + Button 2
OFF OFF OFF ON Shift + Button 3
ON OFF OFF ON Shift + Button 4
OFF ON OFF ON Shift + Button 5

Glidermatic GTS+ Installation Instructions & owner’s manual Page 18
The Glidermatic brand and its complete product range is wholly owned and operated by Gliderol Garage Doors. Manufacturers Product Warranties Statement Our goods come with guarantees that cannot be excluded under the Australian Consumer Law. You are entitled to a replacement or refund for a major failure and for compensation for any other reasonably foreseeable loss or damage. You are also entitled to have the goods repaired or replaced if the goods fail to be of acceptable quality and the failure does not amount to a major failure. In addition, we offer our Gliderol Warranty as set out below. The benefits given to you by our Gliderol Warranty are in addition to other rights and remedies you may have under the Australian Consumer Law. Our Gliderol Warranty does not exclude, restrict or modify any such statutory rights or remedies which cannot be excluded. For products sold and installed by Gliderol, the Gliderol Warranty extends to cover defects of manufacture and costs of delivery and/or re-installation of any product repaired or replaced under the terms of the Gliderol Warranty. In all other circumstances, where the products are supplied by a third party, the Gliderol Warranty covers defects of manufacture only and does not include costs of reinstallation or delivery. This is not intended to exclude, restrict or modify any right or remedy to which you may otherwise be entitled in respect of delivery or re-installation under the Australian Consumer Law. Schedule of Warranty Period for Individual Components Our Gliderol Warranty applies for the periods (the Applicable Warranty Period) stated as follows: Gliderol Panelglide Sectional Overhead Door 1 year on all components, labour & workmanship, if fitted by an authorised Gliderol Distributor or Gliderol Technician. 3 months warranty on spring tension. 1 year on parts only, if fitted by parties other than an authorised Gliderol Distributor or Gliderol Technician. Gliderol strongly recommends that the Gliderol Panelglide Sectional Overhead Door be serviced by an authorised Gliderol Distributor or Gliderol Technician every 18-24 months to ensure longevity of the products life. Gliderol Timba-glide/Aluglide Sectional Overhead Door 1 year on all components, labour & workmanship, if fitted by an authorised Gliderol Distributor or Gliderol Technician. (Excludes timber surface coatings applied by a third party other than Gliderol, which have no warranty). 3 month warranty on spring tension. 1 year on parts only, if fitted by parties other than an authorised Gliderol Distributor or Gliderol Technician. Gliderol strongly recommends that the Gliderol Timba-glide/Aluglide Sectional Overhead Door be serviced by an authorised Gliderol Distributor or Gliderol Technician every 12-18 months to ensure longevity of the products life. Gliderol GTS 2000 & GTS+ Sectional Overhead Door Operator Domestic / Residential use – GTS 2000 & GTS+ - 5 years on motor only. 1 year on all components, labour & workmanship, if fitted by an authorised Gliderol Distributor or Gliderol Technician. (Excludes batteries, fuses & lights globes, which have no warranty) GTS+ Optima - 5 years on motor only. 1 years on electronics, components, labour & workmanship, if fitted by an authorised Gliderol Distributor or Gliderol Technician. (Excludes batteries, fuses & lights globes, which have no warranty) 1 year on parts only on GTS+ 2000, GTS+ and GTS+ Optima, if fitted by parties other than an authorised Gliderol Distributor or Gliderol Technician. Gliderol strongly recommends that the Gliderol GTS+ 2000, GTS+ & GTS+ Optima Sectional Overhead Door Operator be serviced by an authorised Gliderol Distributor or Gliderol Technician every 18-24 months to ensure longevity of the products life. Product Warranty Conditions Warranty Conditions 1. Subject to the following specific limitations and exceptions, and in addition to all rights and remedies to which you may be entitled under the Australian Consumer Law, Gliderol warrants all new doors, motors and electronic components of Gliderol's manufacture, sold and installed by Gliderol, to be free from defect in workmanship under normal use and service for the Applicable Warranty Period prescribed above. 2. During the Applicable Warranty Period, Gliderol will make good any defect as described in clause 1 above by repairing or replacing the affected product or part (at its option) PROVIDED THAT notice of any claimed defect in materials or workmanship in or resulting from installation of any door shall have been given to Gliderol within the period from date of installation as prescribed above. 3. For products sold through or installed by an authorised Gliderol Distributor or other party (other than an accredited Installer Contractor nominated by Gliderol), our Gliderol Warranty covers only defects of manufacture and does not include:- • Any defects caused by or related to the installation of that product, nor • The cost of delivering or re-installing a product that is repaired or replaced. This limitation does not exclude, restrict or modify any right or remedy to which you may otherwise be entitled in respect of delivery or re-installation under the Australian Consumer Law or other applicable laws, which may not be excluded. 4. Our Gliderol Warranty does not apply to any defect, loss or damage arising or caused directly or indirectly by or as a result of:- (i) Any masonry rendered or other surfaces cracking or collapsing during installation of the door (ii) Any defect or deterioration of timber including drying out after installation (iii) Any weakening or collapse of the structure to which the doors are affixed occurring any time after installation (iv) Any damage to or deterioration in the condition of the doors occurring in transit by customer nominated or appointed carrier or occurring after delivery and prior to installation (v) Any defect (including defects in component parts or accessories) rising from or attributable to the failure to carry out normal preventive maintenance or adjustment (vi) To any additional defect damage or deterioration arising from or attributable to the operation of the door after it is known to be defective (vii) Any door being installed within 800 metres of the sea or other body of water of equivalent or greater salt concentration or in an area subject to industrial fall out (viii) Any fault or surge in customer’s electricity supply (ix) The door striking an immovable object during travel
Glidermatic GTS+ Installation Instructions & owner’s manual Page 19
Product Warranty Conditions Cont.. 5. Items excluded from our Gliderol Warranty are: (i) Batteries (ii) Fuses (iii) Globes (iv) Sensitivity adjustments 6. Water damage voids the Gliderol Warranty on all electronic components. 7. While Gliderol doors are long lasting and hard wearing under normal conditions our Gliderol Warranty does not extend to inherent defects in steel or other material used in the manufacture. Gliderol will however, where possible, procure and assign to the customer the benefit of the warranty of the manufacturer of the steel or other material. 8. If Gliderol has at request of a customer procured painting, powder coating or other surface application to its product, the Gliderol Warranty does not extend to such painting, powder-coating or other surface application. For this purpose, Gliderol at all times acts as agent of customer. Gliderol may, as a service to the customer but without any legal obligation to do so, assist customer to obtain redress in respect of any defect. 9. Except as is provided by the Gliderol Warranty and subject to any rights or remedies to which you may be entitled under the Australian Consumer Law or other applicable law which may not be excluded, , this Gliderol Warranty supersedes and excludes all representations, warranties and conditions whether expressed or implied by law and Gliderol shall have no liability or otherwise than herein provided for any loss and damage (including consequential loss and damage, loss of use or profits) by reason of delay, defective or faulty materials or workmanship, negligence or any act, matter or thing done permitted or omitted to be done by Gliderol. 10. Gliderol reserves the right to touch up on site Colorbond and or pre-painted surfaces on its range of garage doors but, no responsibility will be taken for the possibility of any paint rubs or scuffing on the internal wash coat finish or external painted surface. 11. To make a claim under our Gliderol Warranty: (a) if you purchased your product directly from Gliderol, you must send your claim to one of the addresses listed at the end of this warranty; or (b) if you purchased your product from an authorised Gliderol Distributor or other non-Gliderol entity, you must make your claim through that authorised Distributor or other non-Gliderol entity. Proof of purchase MUST be provided at the time of the Gliderol Warranty claim. Any cost incurred by you in making a claim under our Gliderol Warranty will be borne by you. 12. The Gliderol Warranty is given by: Name: Gliderol International Pty Ltd Company address: 32 Jacobsen Crescent, Holden Hill SA 5088 Company telephone number: +61 8 8360 0002 Company email address: [email protected] CONDITIONS OF SALE AND INSTALLATION DIRECTLY FROM GLIDEROL 1. The following conditions of sale and installation apply only to products sold directly by Gliderol. These conditions do not apply to the sale of products by authorised Gliderol Distributors or other non-Gliderol entities. 2. THIS IS A QUOTATION ONLY – recommending type and size of doors suitable for the job. Confirmation as an order should be given by customer to Gliderol’s Representative or to Gliderol’s Office, “in writing” whereupon this quotation shall become a Contract for Sale and where applicable also a contract for Installation. 3. The details given in the quotation are subject to any alteration or preparation to be carried out by customer as specied on front of this quotation. 4. Where openings are not complete or actual accurate measurements cannot be taken on site, the Gliderol Doors sizes and costs given in this quotation are estimated only and would be subject to revision when accurate measurements can be taken on completion of the opening. 5. Manufacture of Gliderol Doors will not commence until accurate site measurements are available and can be checked. 6. Where Gliderol Doors are made to suit floor levels, lintel heights or opening sizes guaranteed by the customer, any departure from the given sizes will be the responsibility of the customer as will any costs involved in alteration of made-up Gliderol Doors. 7. Any delivery, and/or installation dates given are approximate only and Gliderol accepts no liability for delay from any cause whatsoever. If by any reason or Act of God, war, government or semi-government enactment, regulation or restriction, lock-out, strike, industrial dispute, fire, tempest, flood, failure or inability to obtain licenses, transport or materials or any other cause beyond Gliderol’s control of delivery or installation is delayed Gliderol may extend the time of delivery or installation or if Gliderol is unable to deliver or install, the contract shall be voidable at Gliderol’s option with no right to either party for damage, loss, cost or expense. 8. If these conditions of sale (which shall only be varied, modified or rescinded by written agreement executed by Gliderol) shall differ in any respect from the customer’s acceptance or confirmation then these conditions shall prevail. 9. This quotation is open for acceptance for a period of 60 days from the date of quotation. Acceptance thereafter will be at the option of Gliderol and subject to its written agreement. 10. PRICE VARIATION: The prices quoted are based on current list prices for Gliderol Doors and Material and Labour at date of quotation. Any variation in these prices before completion of the Contract would be to customer’s account. 11. TERMS OF PAYMENT: (i) Unless specfically varied in writing by Gliderol the terms of payment are in full on delivery (ii) If credit is extended the terms of payment are Nett 7 days. (iii) Default in payment in accordance with invoiced terms for payment will result in the customer becoming liable to pay all Gliderol's recovery costs and interest fixed at 5% of invoice value. (iv) The customer acknowledges that all right title and interest in the goods particularised hereon shall remain the property of the vendor Manufacturer until such time as payment in full has been made. At any time after delivery and prior to payment the vendor, Gliderol shall have the right to enter into and upon any premise upon which the goods may be stored or installed and remove same without its incurring any liability in relation thereto and the customer hereby appoints the vendor Manufacturer his or her servant agent and attorney for the such purposes. (v) Deposit is non-refundable if the job is cancelled by the customer/customers’ agent if the door has commenced manufacture. 12. To secure to Gliderol the payment of the price the customer as owner lessee or tenant of the premises hereby charges the customers interest in the premises with the payment of the price. Gliderol may at any time after (but not before) default by the customer lodge a caveat over the customers interest in the premises. 13. Any discount applicable will not be granted if the account is unpaid after 7 days. 14. Gliderol does not itself carry out installation but will nominate an accredited Installer Contractor to carry out the work on its behalf. Installation is then a matter of separate contract with the Installer whose particulars are either provided in this Quotation or will be provided upon con-firmation by the customer. Gliderol has taken all reasonable care to ensure that any Installer Contractor nominated is competent, experienced and skilled in the installation of Gliderol’s doors. Gliderol will at all times use its influence to ensure any installation complaint is dealt with promptly and resolved to the reasonable satisfaction of the customer. The customer’s attention is also directed to the terms of the warranty herein. 15. The installation costs cover only the work specified on the quotation and do not, unless specially stated, include rectification of existing out-of-square openings or removal of old doors and fittings or electricity or gas fittings or the like. 16. Whilst reasonable care will be taken while drilling and fixing, Gliderol and its Installers will not be responsible for the failure, from any cause whatsoever, of any masonry or rendered surfaces while drilling or fixing by cracking or collapsing. 17. The Term “Take down old doors” or similar words used in this quotation refers only to the taking of old doors off the structure and does NOT in any way imply removal or taking away of any old doors from the property or of disposing of such doors.

Glidermatic GTS+ Installation Instructions & owner’s manual Page 20
Warranty Form
Name Address
Product Type Installation Date
Supplier (Distributor)
Installer Phone No
Address
Installers Signature
NOTE: THIS FORM MUST BE COMPLETED BY THE INSTALLER AND PRODUCED AS PROOF OF PURCHASE DATE WHEN MAKING A SERVICE CALL UNDER WARRANTY, OTHERWISE SUCH CALLS ARE LIABLE TO SERVICE CHARGES.
FOR SALES AND SERVICE, CONTACT GLIDEROL INTERNATIONAL PTY LTD ABN 92 007 928 949
Head Office Gliderol Garage Doors 32 Jacobsen Crescent, Holden Hill, SA 5088 Phone (08) 8360 0000 Fax (08) 8261 9700
Victoria Gliderol Garage Doors 23 Kitchen Road, Dandenong, VIC 3175 Phone (03) 9793 5455 Fax (03) 82619700
New South Wales Gliderol Garage Doors 45 Summit Street, Smithfield, NSW 2164 Phone (02) 9725 1033 Fax (02)9725 1115
Queensland Gliderol Garage Doors 241 Elliot Road, Banyo,QLD 4014 Phone (07) 3260 9000 Fax (07) 3260 9055
Western Australia Gliderol Garage Doors 48 Luisini Road Wangara WA, 6065 Phone (08) 9408 4427 Fax (08) 9309 2777
OR YOUR LOCAL SUPPLIER