installation guide - microfocus.com · (postgres 9.1.3) installation, setup, tuning, and...
TRANSCRIPT
Installation Guide GWAVA 6.5
Copyright © 2012. GWAVA, Inc. All rights reserved. Content may not be reproduced without permission. http://www.gwava.com
2 Copyright © 2013 GWAVA INC.
Copyright Notices
The content of this manual is for informational use only and may change without notice. GWAVA Inc. assumes no responsibility or liability for any errors or inaccuracies that may appear in this documentation. GroupWise and WebAccess are registered trademarks of Novell, and copyrighted by Novell. Windows is copyrighted by Microsoft. © 2005 GWAVA Inc. All rights reserved. WASP® and GWAVA ® are registered trademarks of GWAVA Inc. GroupWise® and WebAccess® are registered trademarks of Novell, Inc.
Overview GWAVA is a complete solution package for protecting email systems from viruses, spam, and undesired content. Though initially designed to integrate with Novell GroupWise mail systems, GWAVA has the ability to act as an SMTP proxy to scan, filter, and monitor all mail systems. GWAVA can be installed on either a Windows or a Linux server, and is also available in a linux-based appliance image.
Licensing GWAVA may be run as a trial for a period of 30 days before a license is required. The trial period of GWAVA is full featured for a complete experience of what GWAVA has to offer, however, after the 30 day period, mail will no longer be scanned and GWAVA will not function until a license is purchased and applied to the GWAVA system. To purchase or acquire a license for the GWAVA system, contact a sales representative for your area or obtain a license by visiting https://licenses.gwava.com/ .
Support GWAVA support may be found at: Online: http://support.gwava.com Email: [email protected] Telephone: +1-801-437-5678 (Monday to Friday, 9:00 AM – 5:00 PM Eastern Standard Time) EMEA TEL: +49256130249190 (Monday to Friday, 8:30 AM – 5:00 PM Central European Time)
Obtaining GWAVA GWAVA may be downloaded from
http://www.gwava.com/trial-downloads-of-gwava-products.html#c7138
or it may be obtained by contacting your sales representative. Please see
http://www.gwava.com/company/contact-us.html to locate a sales representative for your area.

3 Copyright © 2013 GWAVA INC.
Minimum System Requirements Supported Operating Systems: (with appropriate Java installed) Linux Novell Open Enterprise Server 2.x (Linux) SUSE Linux Enterprise Server 10.x SUSE Linux Enterprise Server 11.x Windows Windows 2003 Server Windows 2008 Server Microsoft Visual C++ (Required for Windows installer) Hardware Recommendations: Hardware recommendations are made according to approximate system load, and are dependent on OS and configuration type. General configuration settings are assumed. All RAM recommendations are for existing, unused ram, not total system RAM. (If connection dropping is used on an SMTP scanner, the expected performance rises significantly.) 3,000 Messages per hour
Modern Multi-core 2.4 GHz Processor
1.5 GB Free RAM
40 GB Hard Drive space 10,000 Messages per hour
Modern Xeon / Opteron Class 3 GHz Processor
4 GB Free RAM
100 GB Hard Drive space Supported GroupWise Versions (For GroupWise integration) GroupWise 7.0 SP 3 GroupWise 8.0 SP 2 GroupWise 2012
Supported Databases Internal Database: SQLite
External Supported Database: Postgres 9.1.3

4 Copyright © 2013 GWAVA INC.
Installation
Linux GWAVA provides a native RPM installer for Linux. The rpm installer wraps together all pertinent information into a very painless installation experience. Download the GWAVA-i586.rpm file to the desired server and run the installer either through the GUI with ‘install software’ or with the rpm command. rpm –ivh gwava-<version number>.rpm
The installation will set GWAVA to run automatically, use no proxy, and update virus definitions within an hour after installation. The GWAVA installer does not open any ports in the system firewall. To access GWAVA Management, port 49282 must be open. The default commands for stopping and starting GWAVA on linux are: rcgwavaman start rcgwavaman stop GWAVA is installed, but must be activated. To continue, make sure that the GWAVA service is running and then open a browser and navigate to the setup and server activation: http://<server_ip>:49282
5 Copyright © 2013 GWAVA INC.
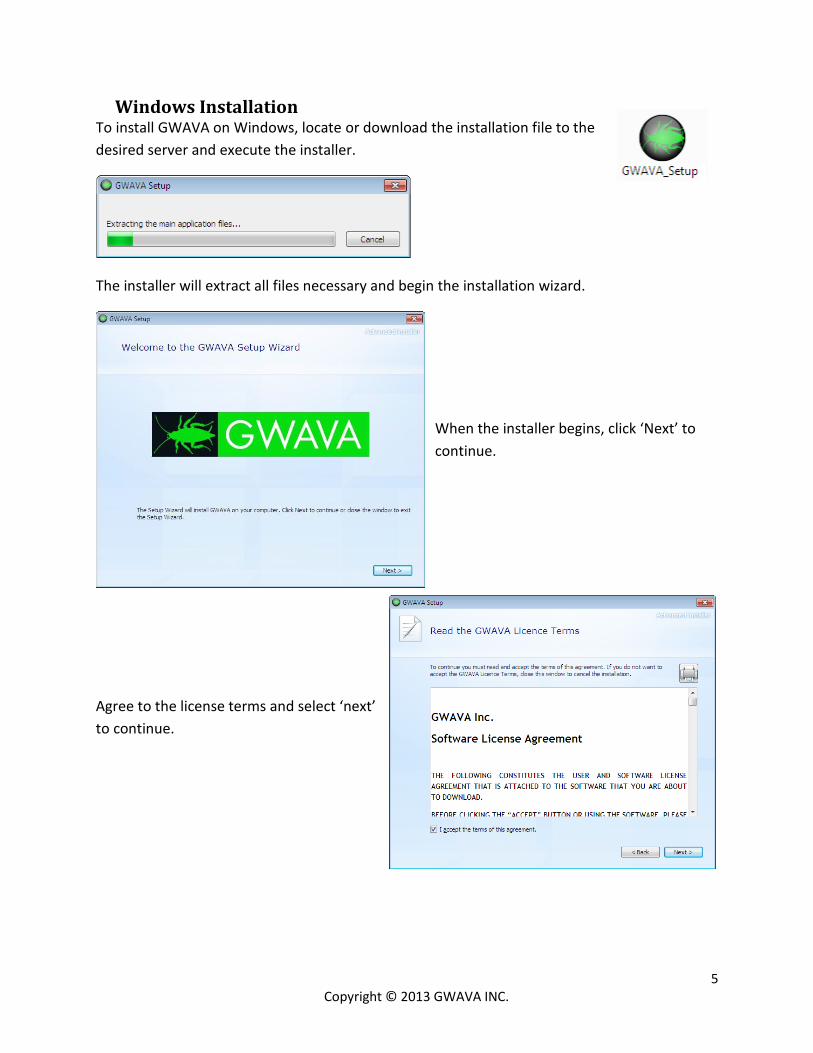
Windows Installation To install GWAVA on Windows, locate or download the installation file to the
desired server and execute the installer.
The installer will extract all files necessary and begin the installation wizard.
When the installer begins, click ‘Next’ to
continue.
Agree to the license terms and select ‘next’
to continue.
6 Copyright © 2013 GWAVA INC.
GWAVA installs to the default location
shown, if a different location is desired,
specify the new location and select ‘Next’
to continue.
If a Proxy is utilized or desired to be used
in the system, enable the proxy setting and
input the relevant information.
If your Proxy uses a username and
password, the information must be
provided for GWAVA to function correctly.
All post installation tasks options are
offered. Select the appropriate desired
tasks and click ‘Next’ to continue.
To access the GWAVA Management page,
port 49282 must be opened in the
firewall.
7 Copyright © 2013 GWAVA INC.
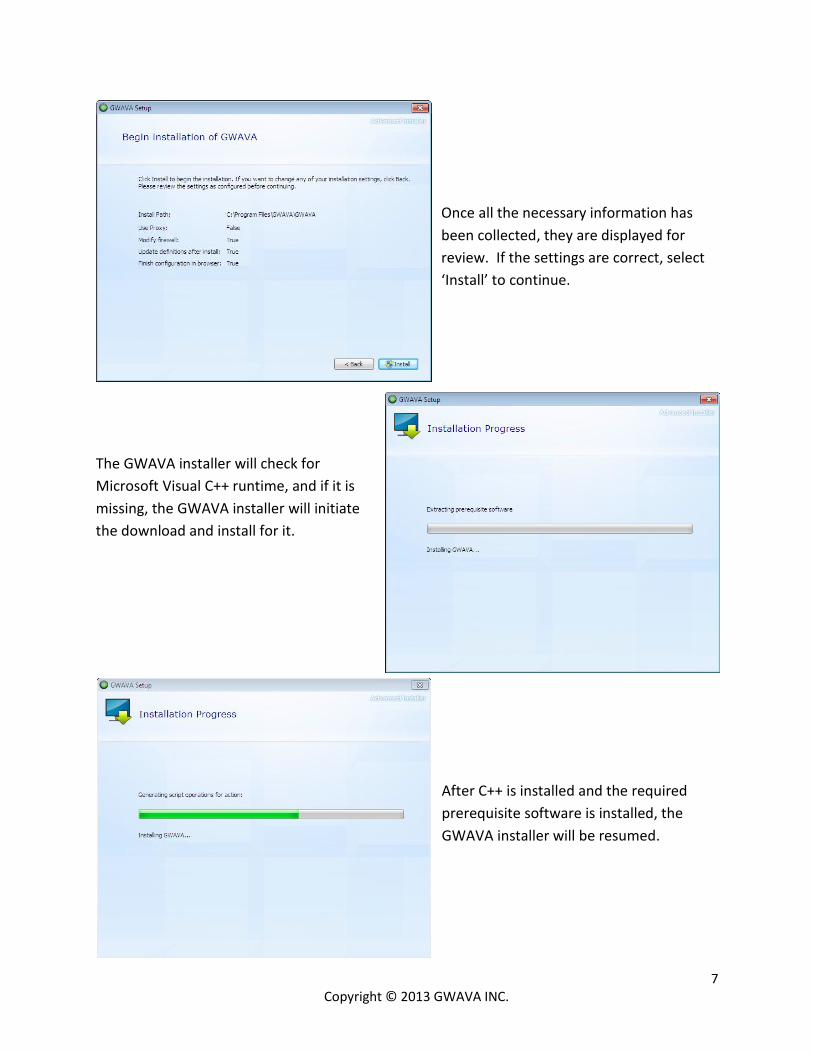
Once all the necessary information has
been collected, they are displayed for
review. If the settings are correct, select
‘Install’ to continue.
The GWAVA installer will check for
Microsoft Visual C++ runtime, and if it is
missing, the GWAVA installer will initiate
the download and install for it.
After C++ is installed and the required
prerequisite software is installed, the
GWAVA installer will be resumed.

8 Copyright © 2013 GWAVA INC.
When the installer finishes installing
GWAVA, click ‘close’ to exit the wizard.
On Windows, by default the GWAVA server is run as a system service.
The GWAVA system is now installed, running, and is waiting for Server Activation.
9 Copyright © 2013 GWAVA INC.
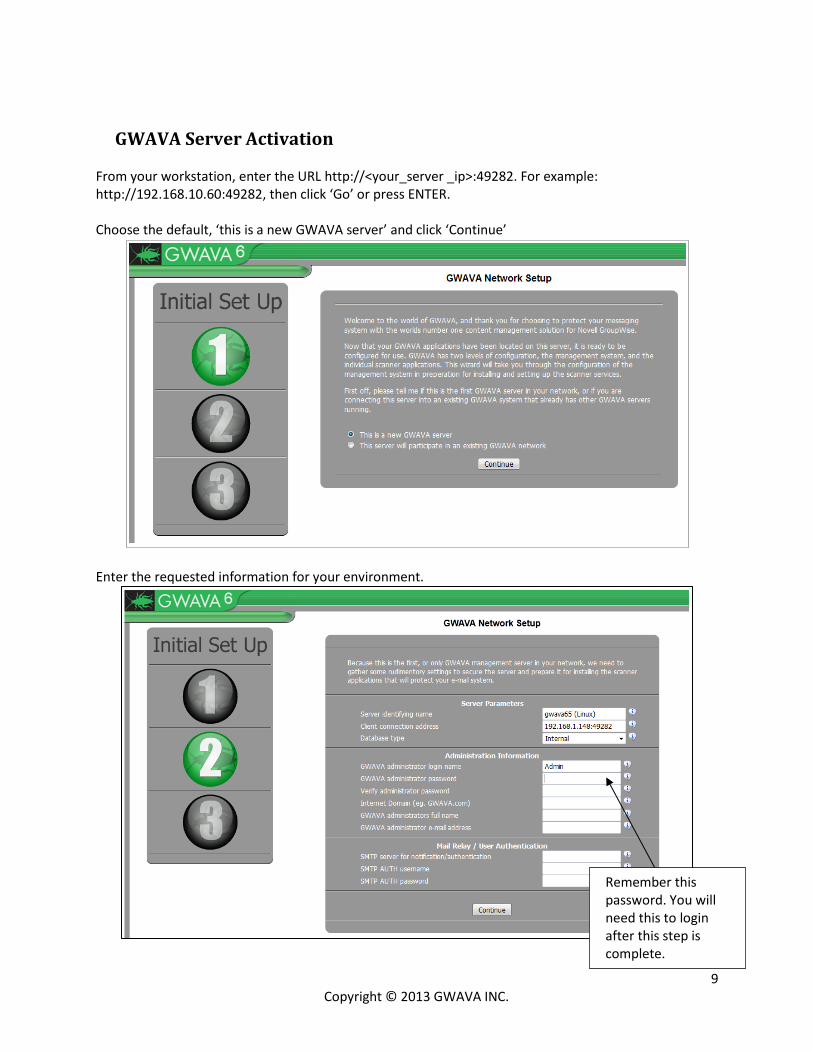
GWAVA Server Activation From your workstation, enter the URL http://<your_server _ip>:49282. For example: http://192.168.10.60:49282, then click ‘Go’ or press ENTER. Choose the default, ‘this is a new GWAVA server’ and click ‘Continue’
Enter the requested information for your environment.
Remember this password. You will need this to login after this step is complete.

10 Copyright © 2013 GWAVA INC.
GWAVA comes with an internal database, SQLite, which is sufficient and which requires no tuning or separate installation, and if the internal database is selected, no further database configuration is required. However, for those who desire an external and more robust database engine, GWAVA also supports Postgres db. (Postgres 9.1.3) Installation, setup, tuning, and maintenance of the Postgres database is the responsibility of the administrator.
GWAVA requires the basic connection information for Postgres: IP address or DNS name and database name. The account login name and password for Postgres must be an account with database creation rights – or if connecting to an existing database, the username and password with full rights to that database. Specify whether GWAVA will create the database automatically or whether GWAVA is to connect to an existing database. Because GWAVA can create a database with everything required, it is recommended to allow GWAVA to create the database. When configuration has been completed, select ‘Continue’.
11 Copyright © 2013 GWAVA INC.
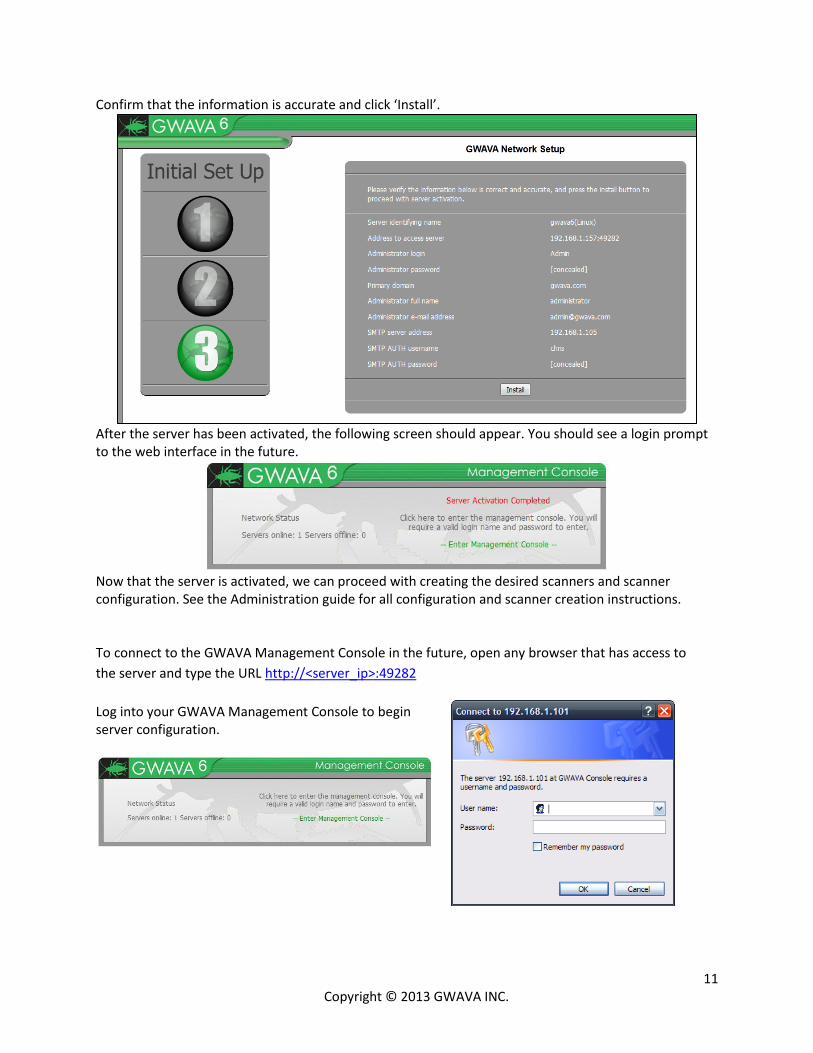
Confirm that the information is accurate and click ‘Install’.
After the server has been activated, the following screen should appear. You should see a login prompt to the web interface in the future.
Now that the server is activated, we can proceed with creating the desired scanners and scanner configuration. See the Administration guide for all configuration and scanner creation instructions. To connect to the GWAVA Management Console in the future, open any browser that has access to
the server and type the URL http://<server_ip>:49282
Log into your GWAVA Management Console to begin server configuration.