installation guide breeze and cloud 9 for sclm
TRANSCRIPT

Chicago Interface Group, Inc.
Installation Guide Breeze and Cloud 9
for SCLM

Chicago Interface Group, Inc. 858 West Armitage Avenue #286 Chicago, IL 60614 USA Phone: (773) 524-0998 Fax: (815) 550-6088 Email: [email protected] Web: www.cigi.net Breeze and Cloud 9 are trademarks of Chicago Interface Group, Inc. HTTP, SCLM, and z/OS are registered trademarks of IBM.
All rights reserved. Copyright by Chicago Interface Group, 2005 Documentation Version August 17, 2005

Installation Guide: Breeze and Cloud 9 for SCLM - i -
Contents
INSTALLATION OVERVIEW ............................................... 6
Manual Scope ...................................................................................................... 6 Who Should Use This Book ............................................................................ 6 Where to Find More Information ..................................................................... 6 Hardcopy Publications ..................................................................................... 6 Separate SCLM Installation ............................................................................. 7 Global Modification and Case Sensitive Unix Values ..................................... 7
A STEP-BY-STEP APPROACH .......................................... 8
Before You Begin: Review Software and Hardware Considerations ........... 10 System Requirements .................................................................................... 10 Software Requirements .................................................................................. 11 VSAM Exclusion ........................................................................................... 11 Product Space Requirements ......................................................................... 11 Unix System Services Requirements Warning .............................................. 11 Site-Specific Placeholders ............................................................................. 11 SCLM/ISPF Dataset Names .......................................................................... 12
Placeholder Worksheet .................................................................................... 13
Dataset Worksheet............................................................................................ 14
Step 1. Transfer the software from the CD to z/OS ...................................... 15 Installation CD ............................................................................................... 15
Step 2: Unpack the transferred software ........................................................ 15 Unpack the software ...................................................................................... 15 Required software .......................................................................................... 15
Step 3: Unpack the PDS members created from Step 2 ................................ 16 Demo data ...................................................................................................... 16 Product passwords ......................................................................................... 16
Step 4: Make Global JCL Changes ................................................................. 17 Edit CIGJCL99 .............................................................................................. 17 Edit Job Card ................................................................................................. 17
Step 3: Extract All JCL Members from CIGJCL99 ..................................... 18 Modify and Submit CIGC9JX1 ..................................................................... 18

Step 4: Rename Alternate Rexx Run Time Modules (optional) ................... 19 Modify and Submit CIGC9RRT .................................................................... 19
CHECKPOINT #1 ............................................................................................ 21
Step 5: Allocate the CIG Suite Databases ....................................................... 22 Modify and Submit CIGS2DBS .................................................................... 22 CIGS2DBS JCL ............................................................................................. 22
Step 6: Set Up the CIGINI Initialization File ................................................. 24 Modify and Submit CIGS2INI ...................................................................... 24 CIGS2INI JCL and Input ............................................................................... 24 Define Common Section ................................................................................ 26 Define Cloud 9 Section .................................................................................. 27 Define Breeze for SCLM Section .................................................................. 27
Step 7: Expand the Database Indexes ............................................................. 29 Modify and Submit CIGC9JS5 ...................................................................... 29
CHECKPOINT #2 ............................................................................................ 31
Cloud 9 Section: Configure USS and HTTP Server Components................ 32 Preparation ..................................................................................................... 32 HTTP Stand-alone Server .............................................................................. 32 Sample HTTPD Configuration Files ............................................................. 32 Additional Information .................................................................................. 32
Step 9: Modify the C9HTTPD Configuration Member ................................ 33 Portno and rootdir Review ............................................................................. 33 Rootdir and portno Values ............................................................................. 33 ADDTYPEs ................................................................................................... 34 Modify and save C9HTTPD .......................................................................... 34
Step 10: Modify the C9EVARS Configuration Member ............................... 35 Review the C9EVARS member .................................................................... 35 Modify and Save C9EVARS ......................................................................... 36
Step 11: Customize the Cloud 9 HTTP Server JCL and Supporting Control Files .................................................................................................................... 37
Step 11(a): Copy Product Load Library into Authorized Library .............. 37 Effects Other JCL .......................................................................................... 37
Step 11(b): Modify CIGC9SRV ....................................................................... 37 Timeout Parameter......................................................................................... 37 Security Level for User ID/Password ............................................................ 37 Modify and Submit CIGC9SRV .................................................................... 38
Step 11(c): Modify Batch Shells ...................................................................... 39 Modify CIGC9IBM ....................................................................................... 39 Modify CIGC9DYN REXX shell .................................................................. 42 Modify CIGC9MIG ....................................................................................... 44
CHECKPOINT #3 ............................................................................................ 47

Installation Guide: Breeze and Cloud 9 for SCLM - iii -
Step 12: Create and Populate the USS Cloud 9 Directories .......................... 48 Modify CIGC9SUM ...................................................................................... 48 Modify and Submit CIGC9SUX .................................................................... 50
Step 13: Review Authorization Requirements for C9RSDRV...................... 54 Troubleshooting ............................................................................................. 56 CA-Endevor Bridge ....................................................................................... 56
Step 14: Cloud 9 Server Installation Verification .......................................... 57
To Test the Cloud 9 Server: ............................................................................. 57 Start the Server .............................................................................................. 57 Shut Down the Server .................................................................................... 57 Restart the Server ........................................................................................... 57
CHECKPOINT #4 ............................................................................................ 58
Step 15: Invoking and Logging On to Cloud 9 ............................................... 59 C9ivp.htm ...................................................................................................... 59 Cloud9.htm .................................................................................................... 60 Execute cloud9.htm ....................................................................................... 60 Diagnostics .................................................................................................... 61
Step 16: Perform Profile Setup ........................................................................ 62
Step 17: Perform Batch and Interactive IVPS ............................................... 63 Test the Batch Interface ................................................................................. 64 Exit Cloud 9 ................................................................................................... 64
Step 18: Perform Batch SLR IVP ................................................................... 65 Modify and Submit CIGSOJ06...................................................................... 65
Step 19: Invoking the JES2 SDSF Viewer ...................................................... 67 Sdsf.htm ......................................................................................................... 67 Display SDSF Output List ............................................................................. 68
CHECKPOINT #5 ............................................................................................ 69
Breeze Section: .................................................................................................. 70
Step 20: Customize the Breeze HTTP Server JCL and Supporting Control Files .................................................................................................................... 70
Step 20(a): Modify CIGSMSRV ...................................................................... 70 JCL to Invoke the Breeze HTTP Server ........................................................ 70 Authorized Dataset Requirement ................................................................... 70 Timeout Parameter......................................................................................... 70 Port Number/$Control Member Note: ........................................................... 70 Port Number Note .......................................................................................... 70 Sample JCL to Start the CTS Server: ............................................................ 71
Step 20(b): Review the CIGSMPKG and CIGSMPRT Browser JCL Shells ............................................................................................................................ 73
JCL for Job Submission from the Breeze HTTP Server ................................ 73 CIGSMPKG................................................................................................... 73

CIGSMPRT ................................................................................................... 74
21: Modify the SCLM Log-On Proc to Include CIG ISPF Component Libraries ............................................................................................................ 78
Step 22: Connect the Breeze product to SCLM ............................................. 79
Step 22(a): Review and Modify IBM Skeleton FLMLIBS ............................ 79 Modify Skeleton FLMLIBS........................................................................... 79 IBM Skeleton FLMLIBS ............................................................................... 80
Step 22(b): Update the FLMCNTRL Definition in the Project Definition Table .................................................................................................................. 82
Review CIGSMFLM ..................................................................................... 82
CHECKPOINT #6 ............................................................................................ 84
Step 23: Breeze HTTP Server Installation Verification ................................ 85
To test the Breeze HTTP server: ..................................................................... 85 Start the Server .............................................................................................. 85 Shut Down the Server .................................................................................... 85 Restart the Server ........................................................................................... 85 Database Considerations ................................................................................ 85
CHECKPOINT #7 ............................................................................................ 86
Step 24: Invoking, Testing, and Distributing Breeze ..................................... 87 Execute BRZIVP.HTML ............................................................................... 87 BRSCLM ....................................................................................................... 87 Execute Brsclm.html ..................................................................................... 89 Logging onto Breeze and Testing Minimum Functions. ............................... 90 How will Your End-Users Access Breeze? ................................................... 90
Step 25: Package Detail Report IVP ............................................................... 92
CIGSMJ06 −−−− Batch Reporting Utility ............................................................ 92 Modify CIGSMJ06 ........................................................................................ 92 Sample Report Output ................................................................................... 93
CHECKPOINT #8 ............................................................................................ 94
Step 26: Email – Optional Delivery System for Breeze Applet..................... 95
Configure the SMTP Server to Support Email .............................................. 95 How does it Work? ........................................................................................ 95 Configure the SMTP Interface ....................................................................... 95 Create the Configuration Member $$$$SMTP .............................................. 95
Configure the $$HTML Member. ................................................................... 97 Test the Interface ........................................................................................... 98
Step 27: Set Up Database Backup and Restore Jobs .................................. 100 Modify CIGSMJ05 ...................................................................................... 100

Installation Guide: Breeze and Cloud 9 for SCLM - v -
Appendix A: Cloud 9 Unix Directory Structure .......................................... 103 Level 1 – Cloud 9 ‘rootdir’ .......................................................................... 103 Level 2 – CGI-BIN Directory ...................................................................... 104 Level 2 – cloud9 Directory .......................................................................... 105 Level 3 – Profiles Directory: ....................................................................... 105 Level 3 – JCL Directory .............................................................................. 106
APPENDIX B: BREEZE AND CLOUD 9 COMPONENTS MODIFIED DURING INSTALLATION ............................. 107
JCL Members (located in JCLLIB and resident on the host) Modified During Installation ................................................................................................... 107 Cloud 9 JCL/REXX Shells Resident in Cloud 9 rootdir. ............................. 107 HTTP Server Parameters Modified during Installation and Copied to Cloud 9 rootdir .......................................................................................................... 108
JCL Members (located in JCLLIB) Modified during Installation ............. 108
Javalib Members (located in JAVALIB) Modified during Installation ..... 108
Table of Figures .............................................................................................. 109

Installation Overview
Manual Scope This manual contains the CIG Suite for SCLM installation procedures. The Suite consists of two components, Breeze and Cloud 9. The components will be addressed individually where appropriate. This manual is organized into five major sections:
• Before you begin
• Create and populate libraries
• Allocate and populate all demo databases
• Configuring Cloud 9 and running the IVPs
• Configuring Breeze and running the IVPs These steps should be followed in the order that they are presented. Once you have successfully completed all of the steps and executed all IVP jobs, you will be ready to set up profiles and use the product. This manual is written for systems programmers who will be configuring and administering the Cloud 9 and Breeze Web servers and product components. Readers should be familiar with the Unix System Services (USS) environment, Heirarchical File System (HFS) structure, Resource Access Control Facility (RACF) profiles needed to suppoer USS and started tasks (or equivalent for the installed security product), and the IBM HTTP server. Where necessary, this book references information in other publications that may be of use. The following table lists various manuals and redbooks that may be used for reference.
Title of Publication Order Number IBM HTTP Server for OS/390: HTTP Server Planning, Installing, and Using
SC31-8690-xx
OS/390 UNIX System Services Planning
SC28-1890-xx
Who Should Use This Book
Where to Find More Information
Hardcopy Publications

Installation Guide: Breeze and Cloud 9 for SCLM - 7 -
OS/390 UNIX System Services Messages and Codes
SC28-1908-xx
OS/390 UNIX System Services Command Reference
SC28-1892-xx
ISPF SCLM Developer’s and Project Manager’s Guide
SC34-4750-xx
ISPF SCLM Reference SC28-1320-xx
1. Reference Publications
This manual does not cover the implementation and loading of the SCLM product, which is the source of data to the Cloud 9 and Breeze interfaces.
During this installation, you will globally modify several JCL members and Unix files. The Unix files contain case-sensitive values. It is imperative that prior to globally modifying the JCL and Unix members, you issue the CAPS OFF command to ensure that automatic upper casing of the Unix members does not occur. For your convenience, the following icon will be placed in each step where case-sensitive Unix values are an issue.
Separate SCLM Installation
Global Modification and Case Sensitive Unix Values
ABC

A Step-by-Step Approach
BEFORE YOU BEGIN…
� Review system, software, and hardware considerations.
� Implement site standards.
CREATE AND POPULATE LIBRARIES
1. Create CIGC9JS0 and offload the master JCL file.
2. Make global JCL changes.
3. Extract all JCL members from CIGC9J99.
4. Modify JCL and copy remaining datasets from tape.
CREATE PRODUCT INITIALIZATION MODULE
5. Allocate and initialize demo SLR Long Name Registry database.
6. Allocate and initialize the demo Breeze database.
7. Set up the CIGINI initialization file.
8. Expand the database indexes.
Cloud 9 Only: CONFIGURE UNIX AND HTTP SERVER COMPONENTS
9. Modify Unix rules file member – C9HTTPD
10. Modify Unix environment var member – C9EVARS
11. Authorize loadlib, review and customize the CIG Cloud 9 server JCL
12. Create root directories, copy product to HTTP Unix directories, and set Unix file permissions.
13. Ensure that permission authorization is turned on for the SCLM interface module, C9RSDRV.
Cloud 9 Only: PERFORM INSTALLATION VERIFICATION PROCEDURES (IVPs)
14. Run the CIG Cloud 9 server invocation IVP.
15. Run the CIG Cloud 9 invocation and logon IVP.
16. Run the profile setup IVP.
17. Run the CIG Cloud 9 batch and interactive IVPS.
18. Run the SLR batch IVP.
19. Run the JES2 SDSF Viewer invocation and IVP.

Installation Guide: Breeze and Cloud 9 for SCLM - 9 -
Breeze Only: Configure the Breeze Server and Logon Procedure
20. Review and customize the CIG Server JCL.
21. Modify the SCLM log-on proc
22. Modify the SCLM ISPF skeleton FLMLIBS and Projdefs
Breeze Only: Perform Breeze IVP processing
23. Run the CTS server invocation IVP.
24. Run the Breeze applet invocation and logon IVP.
25. Run the Breeze Package Detail Report IVP.
26. Configure and test email delivery system.
2. CIG Product Installation Step-by-Step

Before You Begin: Review Software and Hardware Considerations
In this step you will review the system, software, and hardware requirements for product installation. To successfully install Cloud 9, the following system requirements must be in place at your installation:
z/OS Operating System Version 1.1 or higher
IP address Numerical IP address of mainframe or named server on mainframe
Port number for the Breeze HTTP server
1024 or higher*
Port number for Cloud 9 HTTP server
1024 or higher
Product Load Library One authorized load library
Web application Server IBM z/OS HTTP server must be installed and configured on the mainframe. Only the HTTP component is required, not the entire HTTP product.
Web browser
REXX RunTime Libraries Cloud 9 CGI processing requires the IBM Rexx Run Time environment. The alternate Run Time environment is shipped with Cloud 9 in the Loadlib. If you have the full Rexx Run Time configured, then you will want to run a post install job to delete the alternate run time modules.(CIGC9RRT).
SMTP server This is the email interface to Breeze.
Sysout class and name of the SMTP server
Using for setting up the $$$$SMTP member for email.
3. System Requirements
*This port number must be higher than 1024, as port numbers lower than this are reserved for internal system services.
System Requirements

Installation Guide: Breeze and Cloud 9 for SCLM - 11 -
The Breeze and Cloud 9 for SCLM require that SCLM be implemented for at least one project on the z/OS. Contact your systems administrator to ensure that these requirements are in place. CIG products must be excluded from all VSAM buffering products. This should be done on a global basis. Failure to exclude CIG databases may result in file corruption. The table below outlines the space requirements for the Cloud 9 and Breeze product software and supporting libraries. Note that the following estimates are based on 3390 track allocations.
Data Set Names
Primary Secondary Directory Blocks
Record format
Record Length
Flhq1.flhq2.LOADLIB 110 10 60 U 0
Flhq1.flhq2.CGI 30 15 45 VB 256
Flhq1.flhq2.JCLLIB.CASE 15 15 15 FB 80
Flhq1.flhq2.JCLLIB 30 10 45 FB 80
Flhq1.flhq2.HTML 30 10 45 VB 256
Flhq1.flhq2.DEMODATA 15 15 10 VB 4096
Flhq1.flhq2.prf 15 15 10 FB 256
Flhq1.flhq2.jpg 15 15 10 VB --
Flhq1.flhq2.ISPMLIB 10 10 15 FB 80
Flhq1.flhq2.ISPPLIB 40 15 15 FB 80
Flhq1.flhq2.ISPSLIB 15 15 45 FB 80
Flhq1.flhq2.ISRCLIB 30 15 45 FB 80
Flhq1.flhq2.JAVALIB 30 30 25 VB 32,756
4. Space Requirements
Unix System Services (USS) has special requirements that must be accounted for during the install of Cloud 9. These installation steps will impact implementation and future security requirements. Your site implementation of USS may require your USS administrator to submit these jobs under USS’s ROOT ID. More information can be found in IBM’s USS manual. It is important that the installer discuss the USS requirements with their USS administrator. The following placeholders represent values that are customer-specific.
Software Requirements
VSAM Exclusion
Product Space Requirements
Unix System Services Requirements Warning
Site-Specific Placeholders
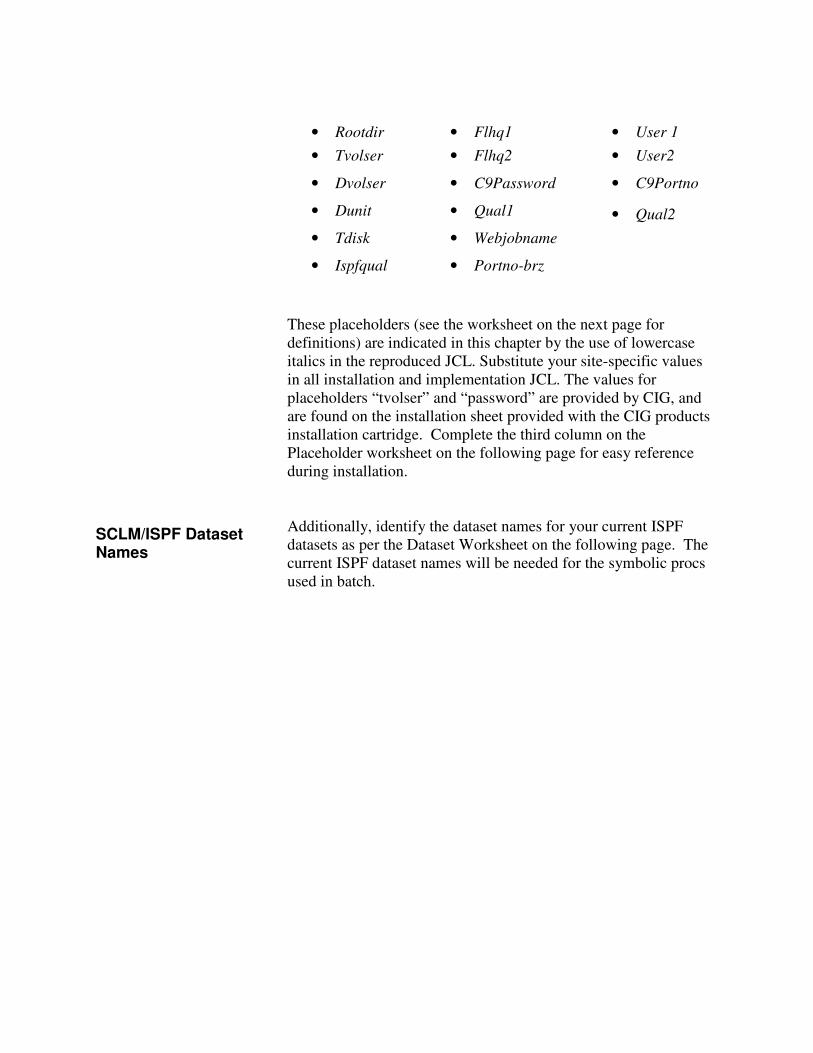
These placeholders (see the worksheet on the next page for definitions) are indicated in this chapter by the use of lowercase italics in the reproduced JCL. Substitute your site-specific values in all installation and implementation JCL. The values for placeholders “tvolser” and “password” are provided by CIG, and are found on the installation sheet provided with the CIG products installation cartridge. Complete the third column on the Placeholder worksheet on the following page for easy reference during installation. Additionally, identify the dataset names for your current ISPF
datasets as per the Dataset Worksheet on the following page. The current ISPF dataset names will be needed for the symbolic procs used in batch.
• Rootdir • Flhq1 • User 1
• Tvolser • Flhq2 • User2
• Dvolser • C9Password • C9Portno
• Dunit • Qual1 • Qual2
• Tdisk • Webjobname
• Ispfqual • Portno-brz
SCLM/ISPF Dataset Names

Installation Guide: Breeze and Cloud 9 for SCLM - 13 -
Remove this worksheet from the manual for easy reference during later installation steps.
Placeholder Worksheet
Place Holder
Definition Your Site Value
Tvolser Tape volume serial number from the CIG products installation sheet.
Dvolser Volume serial number of the disk used to store permanent data sets (if needed).
Dunit Unit label for permanent disk data sets (usually SYSDA).
Tdisk Unit label for temporary disk data sets: usually SYSDA).
Flhq1 High-level qualifier for the CIG Product datasets.
Flhq2 Second-level qualifier for the CIG Product datasets.
Ispfqual High-level qualifier for the standard ISPF datasets.
Password Cloud 9 Password Breeze Password
Qual1 High-level qualifier for non-CIG products such as system datasets.
Qual2 Second-level qualifier for non-CIG products such as system datasets.
Portno-c9 Port number place holder for the HTTP server
Portno-brz Port number place holder for the Breeze CTS server
Rootdir Root directory for Cloud 9 HTTP server
IP-ADDR IP address for accessing the HTTP Server
User1 Primary User Id for HTTP tasks
User2 Secondary User Id for HTTP tasks
Webjobname HTTP server job name
5. Site-specific Customization
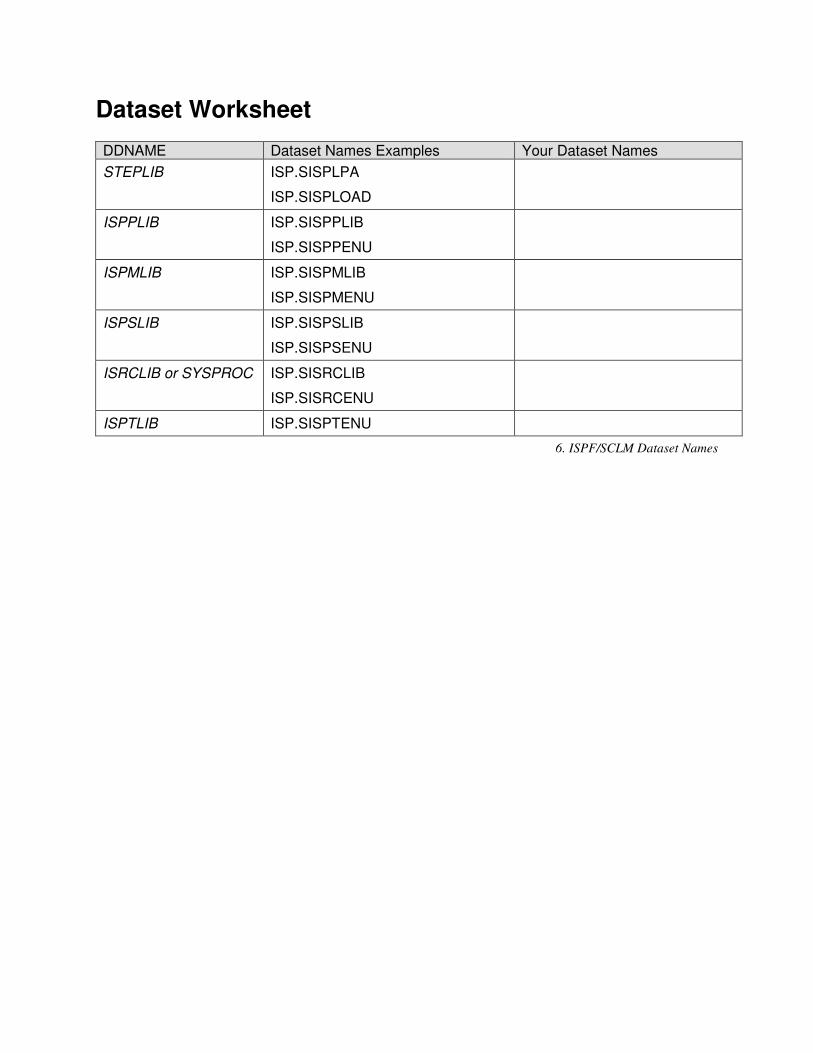
Dataset Worksheet
DDNAME Dataset Names Examples Your Dataset Names
STEPLIB ISP.SISPLPA
ISP.SISPLOAD
ISPPLIB ISP.SISPPLIB
ISP.SISPPENU
ISPMLIB ISP.SISPMLIB
ISP.SISPMENU
ISPSLIB ISP.SISPSLIB
ISP.SISPSENU
ISRCLIB or SYSPROC ISP.SISRCLIB
ISP.SISRCENU
ISPTLIB ISP.SISPTENU
6. ISPF/SCLM Dataset Names

Installation Guide: Breeze and Cloud 9 for SCLM - 15 -
Step 1. Transfer the software from the CD to z/OS
Product components are shipped on a CD; there are three product installation files. The CIG.CIGZIP is file required for product installation. The first step for the installer is to binary transfer the file CIG.CIGZIP from the CD to a z/OS sequential file. The z/OS dataset should be named flhq1.flhq2.CIGZIP, with flhq1.flhq2 being the high level dataset qualifiers. The z/OS sequential file requires the following attributes: DCB=(LRECL=1024, RECFM=FB,DSORG=PS),SPACE=(CYLS,(10,10)),RLSE). The CIG.CIGZIP file contains the software being installed. Next, text transfer the file CIGV2J00.txt on the CD to a sequential z/OS dataset with the attributes DCB=(LRECL=80,RECFM=FB,DSORG=PS),SPACE=(TRKS,(1,1). The target z/OS should be called flhq1.flhq2.CIGV2J00. CIGV2J00 is TRSMAIN JCL used to Unpack the CIGZIP dataset. Modify flhq1.flhq2.CIGV2J00 based on instructions included in the JCL member, and then submit the batch job.
Step 2: Unpack the transferred software Modify flhq1.flhq2.CIGV2J00 based on instructions included in the JCL member, and then submit the batch job. A PDS containing individual Packed TRSMAIN members will be created. Each individual member corresponding to a product component that you will need to subsequental run a TRSMAIN Unpack against, depending upon the software product or products you are installing.
The IBM TRSMAIN utility is used to expand the compressed installation libraries. If your installation does not have the TRSMAIN utility, then you can get a copy of the utility from the following website: http://techsupport.services.ibm.com/390/trsmain.html
Installation CD
Unpack the software
Required software

Step 3: Unpack the PDS members created from Step 2 Review the CIGV2ALL and CIGV2LOD JCL members and decide the appropriate steps within the JCL streams that should be executed based on the products you are installing. Do no skip any of the first nine steps. Modify the CIGV2INI file to reflect the product components that you are installing. You can comment out or delete the unwanted sections in the CIGINI file and rerun the CIGV2INI member.
The demo data provided is not meant to be valid, but rather meant to show be used during the IVP process only. To delete the data in the demo databases, you will need to review, modify, and execute the JCL members CIGV2FLT, CIGV2PKG, and CIGV2SLR.
The product CD came with a cover letter listing either the permanent or temporary product passwords. Reference this document for the proper passwords to be included in the CIGINI compilation.
Demo data
Product passwords

Installation Guide: Breeze and Cloud 9 for SCLM - 17 -
Step 4: Make Global JCL Changes In this step you will make global changes to all JCL members. All JCL source is contained in the JCL member called CIGJCL99. To accomplish the global changes, perform the following actions.
1. Using ISPF EDIT, access member CIGJCL99 in the JCLLIB you offloaded from the installation tape.
2. Substitute your site-specific values (identified on the Installation Worksheet.) for those values shown below in bold italics.
Note: The case sensitive changes will be made on each member specifically.
• CHANGE ALL TVOLSER xxxxxx
• CHANGE ALL DVOLSER xxxxx
• CHANGE ALL DUNIT xxxxx
• CHANGE ALL TDISK xxxxx
• CHANGE ALL FLHQ1.FLHQ2 xxxxx.xxxxx
• CHANGE ALL QUAL1.QUAL2. xxxxx.xxxxx
• CHANGE ALL USER1 xxxxxxx
• CHANGE ALL USER2 xxxxxxx
• CHANGE ALL ISPFQUAL xxxxxxxx
• CHANGE ALL PORTNO-BRZ 9999 As a final task in this step, you should edit the member called JOBCARD located in the JCL library. This member can be copied at the top of each JCL member that you will be executing in subsequent steps.
Edit CIGJCL99
Edit Job Card

Step 3: Extract All JCL Members from CIGJCL99 In this step, you will extract all JCL members contained in the member CIGJCL99. The JCL members were packed into a single sequential member, in IEBUPDTE format, for the purpose of global modification. To accomplish this extraction, perform the following actions.
3. Using ISPF EDIT, access member CIGC9JX1 in the JCLLIB you offloaded from the installation tape.
4. Copy your job card values at the top of the JCL member.
5. Substitute your site-specific values (identified on the Installation Worksheet.) for those values shown below in bold italics.
6. Submit the job.
Note that this job should terminate with COND CODE=0. If it does not:
1. Review your job card parameters and the JCL for errors.
2. Resubmit the job.
//**(JOBCARD)
//**
//* ------------------------------------------------------------------
//* NAME: CIGC9JX1 *
//* PURPOSE: THE PURPOSE OF THIS JCL IS TO TAKE THE SEQUENTIAL *
//* JCL FILE AND POPULATE THE JCL PARTITIONED DATASET. *
//* SCOPE: JCL FOR THE CIG SUITE FOR SCLM V2 *
//* INCLUDES ALL JCL FOR BREEZE AND CLOUD 9 V2 *
//* ------------------------------------------------------------------
//* * * * N O T I C E * * *
//* THIS PROGRAM IS A PROPRIETARY PRODUCT OF CHICAGO INTERFACE
//* GROUP, INC. @ COPYRIGHT 2001 CHICAGO INTERFACE GROUP, INC.
//* ALL RIGHTS RESERVED.
//* ---------------------------------------------------------------- *
//* MODIFY THIS JCL TO MEET YOUR SITE'S JCL NAMING STANDARDS. *
//* *
//* 1) INCLUDE A JOBCARD *
//* 2) CHANGE FLHQ1 AND FLHQ2 AS PER WORKSHEET. *
//* ---------------------------------------------------------------- *
//STEP1 EXEC PGM=IEBUPDTE
//SYSIN DD DSN=FLHQ1.FLHQ2.JCLLIB(CIGJCL99),DISP=SHR
//SYSUT1 DD DSN=FLHQ1.FLHQ2.JCLLIB,DISP=SHR
//SYSUT2 DD DSN=FLHQ1.FLHQ2.JCLLIB,DISP=SHR
//SYSPRINT DD SYSOUT=*
8. CIGC9JX1
Modify and Submit CIGC9JX1
Installation Guide: Breeze and Cloud 9 for SCLM - 19 -
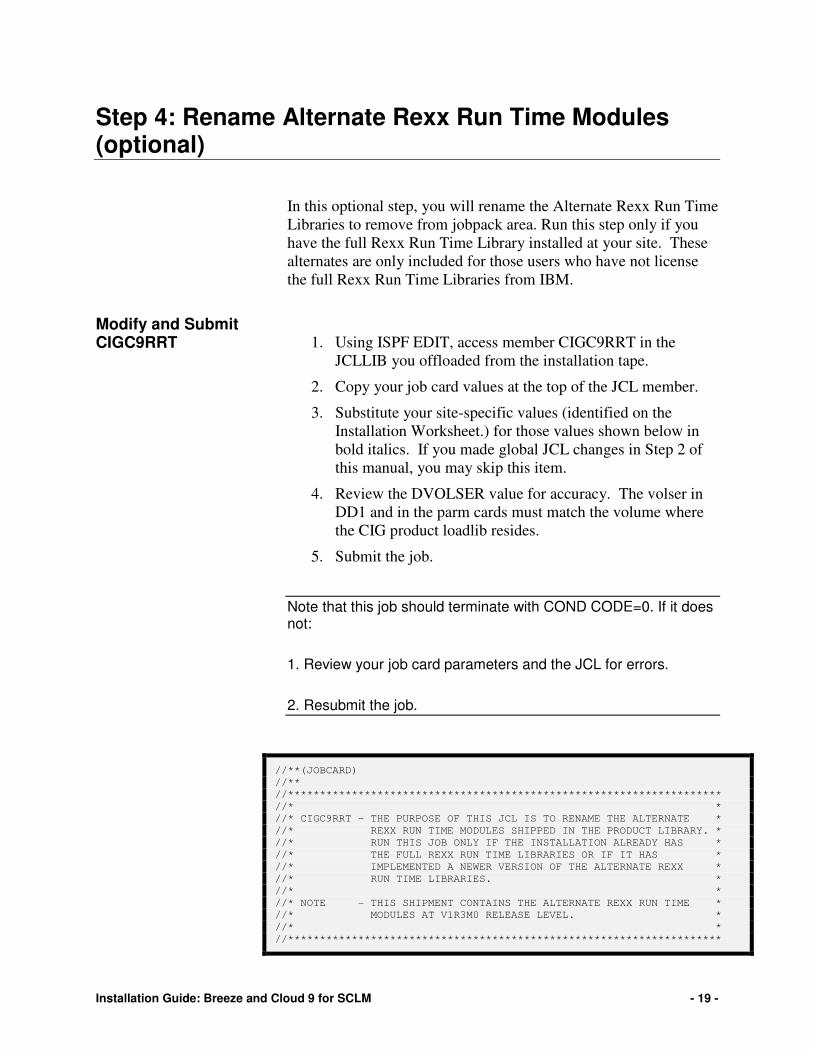
Step 4: Rename Alternate Rexx Run Time Modules (optional)
In this optional step, you will rename the Alternate Rexx Run Time Libraries to remove from jobpack area. Run this step only if you have the full Rexx Run Time Library installed at your site. These alternates are only included for those users who have not license the full Rexx Run Time Libraries from IBM.
1. Using ISPF EDIT, access member CIGC9RRT in the JCLLIB you offloaded from the installation tape.
2. Copy your job card values at the top of the JCL member.
3. Substitute your site-specific values (identified on the Installation Worksheet.) for those values shown below in bold italics. If you made global JCL changes in Step 2 of this manual, you may skip this item.
4. Review the DVOLSER value for accuracy. The volser in DD1 and in the parm cards must match the volume where the CIG product loadlib resides.
5. Submit the job.
Note that this job should terminate with COND CODE=0. If it does not:
1. Review your job card parameters and the JCL for errors.
2. Resubmit the job.
//**(JOBCARD)
//**
//********************************************************************
//* *
//* CIGC9RRT - THE PURPOSE OF THIS JCL IS TO RENAME THE ALTERNATE *
//* REXX RUN TIME MODULES SHIPPED IN THE PRODUCT LIBRARY. *
//* RUN THIS JOB ONLY IF THE INSTALLATION ALREADY HAS *
//* THE FULL REXX RUN TIME LIBRARIES OR IF IT HAS *
//* IMPLEMENTED A NEWER VERSION OF THE ALTERNATE REXX *
//* RUN TIME LIBRARIES. *
//* *
//* NOTE - THIS SHIPMENT CONTAINS THE ALTERNATE REXX RUN TIME *
//* MODULES AT V1R3M0 RELEASE LEVEL. *
//* *
//********************************************************************
Modify and Submit CIGC9RRT

//* *
//* REQUIRED JCL MODIFICATION: *
//* 1) INCLUDE A JOBCARD *
//* 2) CHANGE THE FOLLOWING AS PER THE INSTALLATION WORKSHEET. *
//* - FLHQ1 AND FLHQ2 *
//* - DUNIT *
//* - DVOLSER *
//* 3) REVIEW THE DVOLSER NUMBER, IT MUST MATCH THE VOLSER WHERE *
//* THE CIG PRODUCT RESIDES. *
//* *
//* *
//********************************************************************
//*********************************************************************
//* *
//* RENAME THE ALTERNATE REXX RUN TIME MODULES. *
//* *
//*********************************************************************
//RENAME EXEC PGM=IEHPROGM
//SYSPRINT DD SYSOUT=*
//DD1 DD VOL=SER=DVOLSER,DISP=OLD,UNIT=DUNIT
//SYSIN DD *
RENAME VOL=DUNIT=DVOLSER,DSNAME=FLHQ1.FLHQ2.LOADLIB, X
NEWNAME=ZAGKCPT,MEMBER=EAGKCPT
RENAME VOL=DUNIT=DVOLSER,DSNAME=FLHQ1.FLHQ2.LOADLIB, X
NEWNAME=ZAGRTALT,MEMBER=EAGRTALT
RENAME VOL=DUNIT=DVOLSER,DSNAME=FLHQ1.FLHQ2.LOADLIB, X
NEWNAME=ZAGRTPRC,MEMBER=EAGRTPRC
RENAME VOL=DUNIT=DVOLSER,DSNAME=FLHQ1.FLHQ2.LOADLIB, X
NEWNAME=ZAGRTPRQ,MEMBER=EAGRTPRQ
RENAME VOL=DUNIT=DVOLSER,DSNAME=FLHQ1.FLHQ2.LOADLIB, X
NEWNAME=ZAGRTXIN,MEMBER=EAGRTXIN
RENAME VOL=DUNIT=DVOLSER,DSNAME=FLHQ1.FLHQ2.LOADLIB, X
NEWNAME=ZAGRTXLD,MEMBER=EAGRTXLD
RENAME VOL=DUNIT=DVOLSER,DSNAME=FLHQ1.FLHQ2.LOADLIB, X
NEWNAME=ZAGRTXTR,MEMBER=EAGRTXTR
RENAME VOL=DUNIT=DVOLSER,DSNAME=FLHQ1.FLHQ2.LOADLIB, X
NEWNAME=ZAGRTXVH,MEMBER=EAGRTXVH
RENAME VOL=DUNIT=DVOLSER,DSNAME=FLHQ1.FLHQ2.LOADLIB, X
NEWNAME=ZRXCMPTM,MEMBER=IRXCMPTM
10. CIGC9CRRT

Installation Guide: Breeze and Cloud 9 for SCLM - 21 -
CHECKPOINT #1 At this point the following libraries should be allocated and populated. Using ISPF 3.4, verify that these files have been created and contain data.
Data Set Names
Completed?
Flhq1.flhq2.CGI Flhq1.flhq2.DEMODATA Flhq1.flhq2.HTML Flhq1.flhq2.JCLLIB Flhq1.flhq2.JPG
Flhq1.flhq2.LOADLIB
Flhq1.flhq2.PRF Flhq1.flhq2.ISPMLIB Flhq1.flhq2.ISPPLIB Flhq1.flhq2.ISPSLIB Flhq1.flhq2.ISRCLIB Flhq1.flhq2.JAVALIB Flhq1.flhq2.JCLLIB.CASE Task Completed? Review CIGC9RRT jcl to rename Alternate Rexx Run Time modules?
11. Checkpoint 1

Step 5: Allocate the CIG Suite Databases In this step, you will allocate and initialize the SLR, long name registry database and the Breeze Package database. Cloud 9 long name support is further discussed as an advanced feature in the Cloud 9 V2 Planning and Admin Guide. The purpose of these files at this point of the install is for the IVP process. To create this database perform the following tasks:
1. Using ISPF EDIT, access member CIGS2DBS in the JCLLIB you offloaded from the installation tape.
2. Copy your job card values to the top of the member.
3. Substitute your site-specific values (identified on the Installation Worksheet.) for those values shown below in bold italics. If you made global JCL changes in Step 2 of this manual, you may skip this item.
4. Submit the job.
Note that this job should terminate with COND CODE=8 for the delete function the first time and then COND CODE=0. If it does not:
1. Review your job card parameters and the JCL for errors.
2. Resubmit the job.
//**(JOBCARD)
//**
//********************************************************************
//* FOR THE CIG SUITE FOR SCLM V2 *
//********************************************************************
//* CIGS2DBS - THE PURPOSE OF THIS JCL IS TO ALLOCATE AND LOAD THE *
//* THE SAMPLE DATABASES PROVIDED ON THE CIG PRODUCT TAPE.*
//* SLR AND THE BREEZE DATABASE. *
//********************************************************************
//* *
//* REQUIRED JCL MODIFICATION: *
//* 1) INCLUDE A JOBCARD *
//* 2) CHANGE THE FOLLOWING AS PER THE INSTALLATION WORKSHEET. *
//* - FLHQ1 AND FLHQ2 *
//* - VOLUMES(DVOLSER) *
//* *
//* THE FOLLOWING MAY NOT REQUIRED FOR SMS INSTALLATIONS: *
//* - VOLUMES(DVOLSER) *
//* *
//********************************************************************
//* *
//* DO NOT MODIFY THE VSAM PARAMETERS PROVIDED IN THIS JCL. DOING SO *
Modify and Submit CIGS2DBS
CIGS2DBS JCL

Installation Guide: Breeze and Cloud 9 for SCLM - 23 -
//* WILL PRODUCE UNEXPECTED RESULTS FROM THE FASTLIST *
//* APPLICATION. *
//* *
//********************************************************************
//ALLOC EXEC PGM=IDCAMS
//SYSPRINT DD SYSOUT=*
//INDD01 DD DSN=FLHQ1.FLHQ2.DEMODATA(V2SLR),DISP=SHR
//INDD02 DD DSN=FLHQ1.FLHQ2.DEMODATA(V2BREEZE),DISP=SHR
//SYSIN DD *
DELETE FLHQ1.FLHQ2.SLR
DEFINE CLUSTER -
(NAME('FLHQ1.FLHQ2.SLR') -
IMBED SPEED UNIQUE FREESPACE(30 30) -
VOLUMES(DVOLSER) TRACKS(60 40) -
SHR(4 3) -
KEYS(254 0) -
RECORDSIZE(512 1024)) -
DATA (CISZ(16000)) -
INDEX (CISZ(4096))
REPRO INFILE(INDD01) OUTDATASET('FLHQ1.FLHQ2.SLR')
*
DELETE FLHQ1.FLHQ2.PKGDB
DEFINE CLUSTER -
(NAME('FLHQ1.FLHQ2.PKGDB') -
SPEED UNIQUE FREESPACE(30 30) -
VOLUMES(CIGV04) -
CYLINDERS(1,1) -
SHR(4 3) -
KEYS(80 0) -
RECORDSIZE(80 720)) -
DATA (CISZ(16000)) -
INDEX (CISZ(4096))
REPRO INFILE(INDD02) OUTDATASET('FLHQ1.FLHQ2.PKGDB')
/*
12. CIGS2DBS

Step 6: Set Up the CIGINI Initialization File In this step you will create the CIGINI member, a text format file that contains various product parameters such as product password, database names, and the product load library name. For test purposes we will create a new version of the module. The CIGINI load module must be located in the Cloud 9 steplib or linklist area. Create the CIGINI load module by executing the JCL in member CIGS2INI of the JCLLIB dataset. As input to the job, you will need to do the following:
1. Using ISPF EDIT, access member CIGS2INI in the JCLLIB you offloaded from the installation tape.
2. Copy your job card values to the top of the member.
3. Substitute your site-specific values (identified on the Installation Worksheet) for those values shown below in bold italics. If you made global JCL changes in Step 2 of this manual, you may skip this item.
4. Update Cloud 9 and Breeze passwords.
5. Verify that the SYSLMOD points to the CIG product library or intended execution library.
6. Submit the job.
Note that this job should terminate with COND CODE=0. If it does not:
1. Review your job card parameters and the JCL for errors.
2. Resubmit the job.
//* (JOBCARD)
//* ------------------------------------------------------------------*
//* NAME: CIGS2INI *
//* PURPOSE: PARSE, COMPILE AND LINK THE CIGINI MODULE. *
//* CREATE CIGINI FOR CLOUD 9 V2 AND BREEZE V1.1 *
//* ------------------------------------------------------------------*
//* TO USE THIS JCL, YOU MUST: *
//* 1) PERFORM MODIFICATION ON CIGINI INPUT. *
//* SAMPLE PROVIDED BY CIG WILL NOT COMPILE AS DELIVERED. *
//* 2) INSERT A VALID JOB CARD WITH VALID CLASS *
//* 3) MAKE SURE THAT THE STEPLIB POINTS TO THE CIG PRODUCT *
//* INCLUDES THE DATASET THAT CONTAINS THE CIGINI AND *
//* CIGFEXEC. *
Modify and Submit CIGS2INI
CIGS2INI JCL and Input

Installation Guide: Breeze and Cloud 9 for SCLM - 25 -
//* 4) CHANGE FLHQ1, FLHQ2, QUAL1 AND QUAL2 AS PER YOUR *
//* INSTALLATION SHEET *
//* 5) CHANGE THE UNIT=TDISK TO THE APPROPRIATE UNIT *
//* NAME FOR TEMPORARY FILES. *
//* 6) MAKE SURE THE SYSLMOD POINTS TO THE CIGT PRODUCT *
//* LIBRARY OR INTENDED EXECUTION LIBRARY. *
//* *
//*-------------------------------------------------------------------*
//* *
//* STEP 1: PARSE CIGINI SYNTAX. BUILD INPUT FOR ASSEMBLER. *
//* *
//*-------------------------------------------------------------------*
//PARSE EXEC PGM=ICOMPILE
//STEPLIB DD DSN=FLHQ1.FLHQ2.LOADLIB,DISP=SHR
//CIGIN DD *
*************************************************************
* THE FOLLOWING IS THE INPUT TO THE CIGINI COMPILER.
* THE SECTION INCLUDED IS FOR CLOUD9.
*************************************************************
* !!!!!!!!!!!!!!!!!!!!!!!!!!!!!!!!!!!!!!!!!!!!!!!!!!!!!!!!!!!!!
* ! NOTE THAT THERE ARE TWO PRODUCT LOADLIB STATEMENTS IN !
* ! THE INPUT. THIS IS BECAUSE, THE CLOUD9 SERVER REQUIRES !
* ! AN AUTHORIZED LOADLIB. IF THE DATASET USED IN THE SERVER !
* ! JCL IS DIFFERENT THAN THE INSTALL LIBRARY, THE CIGINI !
* ! WILL HAVE TO BE COMPILED POINTING TO THE AUTHORIZED !
* ! LOAD LIBRARY. !
* !!!!!!!!!!!!!!!!!!!!!!!!!!!!!!!!!!!!!!!!!!!!!!!!!!!!!!!!!!!!!
*************************************************************
DEFINE COMMON SECTION
PRODUCT LOADLIB = 'FLHQ1.FLHQ2.LOADLIB'
* PRODUCT LOADLIB = 'FLHQ1.FLHQ2.AUTHLIB'
WORK UNIT = TDISK
VIO UNIT = TDISK
DO NOT ALLOW ALTERNATE CIGINI FILE
JAVASERVERCONTROL DSNAME = 'FLHQ1.FLHQ2.JAVALIB'
MEMBER = $CONTROL
*************************************************************
* CLOUD 9 FOR SCLM.
*************************************************************
DEFINE CLOUD9 SECTION
PASSWORD = 'PASSWORD'
SLRVSAM DSNAME = 'FLHQ1.FLHQ2.SLR'
ENDEVORBRIDGE
*************************************************************
* BREEZE FOR SCLM.
*************************************************************
DEFINE BRSCLM SECTION
PASSWORD = 'PASSWORD'
VSAM DSNAME = 'FLHQ1.FLHQ2.PKGDB'
/*
//CIGPUNCH DD DSN=&&TEMP,DISP=(NEW,PASS),
// UNIT=TDISK,SPACE=(10,10),
// DCB=(BLKSIZE=3120,LRECL=80,RECFM=FB)
//CIGLOG DD SYSOUT=*
//*-------------------------------------------------------------------*
//* *
//* STEP 2: ASSEMBLE THE CIGINI INPUT CREATED IN STEP 1. *
//* *
//* NOTE: CHOOSE THE DESTINATION OF YOUR CIGINI FILE. *
//* *
//*-------------------------------------------------------------------*
//* ASMA90 (HL-ASM)
//* IEV90 (ASSEMBLER-H)
//ASM EXEC PGM=ASMA90,
// REGION=3072K,
// COND=(0,NE),

// PARM='NODECK,OBJECT,NOTERM,LIST,XREF(SHORT)'
//SYSIN DD DSN=&&TEMP,DISP=(OLD,DELETE)
//SYSLIB DD DSN=SYS1.MACLIB,DISP=SHR
//SYSLIN DD DSN=&&SYSLIN,
// UNIT=TDISK,SPACE=(TRK,(3,5)),
// DISP=(NEW,PASS,DELETE),
// DCB=(RECFM=FB,LRECL=80,BLKSIZE=3200)
//SYSPUNCH DD DUMMY
//SYSUT1 DD UNIT=TDISK,SPACE=(TRK,(5,15))
//SYSPRINT DD SYSOUT=*
//*-------------------------------------------------------------------*
//* *
//* STEP 3: LINK EDIT THE CIGINI MODULE *
//* *
//* NOTE: CHOOSE THE DESTINATION OF YOUR CIGINI FILE. IF YOU ARE *
//* PLANNING ON USING AN ALTERNATE CIGINI MODULE, YOU MUST *
//* FIRST BUILD A CIGINI THAT RESIDES IN A STEPLIB DATASET. *
//*-------------------------------------------------------------------*
//LINK EXEC PGM=IEWL,
// REGION=2048K,
// PARM='LIST,NCAL,XREF,LET,RENT,REUS',
// COND=(0,NE)
//SYSPRINT DD SYSOUT=*
//SYSLIN DD DSN=&&SYSLIN,
// DISP=(OLD,DELETE,DELETE)
//SYSLMOD DD DSN=FLHQ1.FLHQ2.LOADLIB(CIGINI),DISP=SHR
//SYSUT1 DD UNIT=TDISK,SPACE=(TRK,(5,15)) � 13. CIGS2INI
This section is always required. The COMMON Section describes parameters required by all CIG products.
Syntax Purpose Usage
DEFINE PRODUCT LOADLIB = flhq1.flhq2.LOADLIB
Defines the name of the CIG product load library.
Default: None
Required
WORK UNIT = tdisk Defines DASD unit name for temporary disk files.
Default: None
Required
VIO UNIT = tdisk
Defines DASD unit name for temporary disk files in those situations where CIG products can take advantage of VIO disk access.
Required
JAVASERVERCONTROL DSNAME = 'flhq1.flhq2.javalib'
Defines the dataset where various Breeze and EMAIL control files can be found.
The product defaults to this file being the same as the file in the
Required
Define Common Section

Installation Guide: Breeze and Cloud 9 for SCLM - 27 -
server JCL //JAVALIB ddname. However, it is not required to be the same file.
MEMBER = $control This member contains the port number for the Breeze server. The default name is $control.
Required.
14. Common Section
Syntax Purpose
PASSWORD = password
This required keyword and variable are checked during invocation of the product. It must be a valid temporary or permanent password provided by CIG.
Required.
SLRVSAM DSNAME = flhq1.flhq2.slr
This keyword and variable is checked when transferring files from and to the browser. The SLR is for supporting long names for distributed types.
Required
ENDEVORBRIDGE This optional keyword is used when the user will be converting from CA-Endevor to SCLM.
Optional.
15. CIGINI Syntax for Cloud 9
Syntax Purpose
PASSWORD = password
This keyword and variable are checked during invocation of the product. It must be a valid temporary or permanent password provided by CIG.
Required.
VSAM DSNAME = flhq1.flhq2.PKGDB
This keyword and variable should point to the Breeze database defined prior to this step
Required
16. CIGINI Syntax for Breeze
Define Cloud 9 Section
Define Breeze for SCLM Section


Installation Guide: Breeze and Cloud 9 for SCLM - 29 -
Step 7: Expand the Database Indexes In this step you will expand the indexes of the previously defined and populated CIG Suite databases. This expansion is required to able to write to the databases. To expand the database indexes:
1. Using ISPF EDIT, access member CIGC9JS5 in the JCLLIB you offloaded from the installation tape.
2. Copy your job card values to the top of the member.
3. Substitute your site-specific values (identified on the Installation Worksheet) for those values shown below in bold italics. If you made global JCL changes in Step 2 of this manual, you may skip this item.
4. Make sure the database names reflect any changes implemented
5. Submit the job.
Note that this job should terminate with COND CODE=0. If it does not:
3. Review your job card parameters and the JCL for errors.
4. Resubmit the job.
//**(JOBCARD)
//**
//********************************************************************
//* *
//* CIGC9JS5 - THE PURPOSE OF THIS JCL IS TO EXPAND THE VSAM *
//* INDEXS FOR THE CLOUD 9 LONG NAME REGISTRY *
//* AND THE BREEZE DATABASE. *
//* NOTE: THIS IS FOR THE CIG SUITE FOR SCLM V2. *
//********************************************************************
//* *
//* REQUIRED JCL MODIFICATION: *
//* 1) INCLUDE A JOBCARD *
//* 2) CHANGE THE FOLLOWING AS PER THE INSTALLATION WORKSHEET. *
//* - FLHQ1 AND FLHQ2 *
//* *
//********************************************************************
//* *
//* STEP 1: FORCE A VSAM SPLIT FOR THE SLR. *
//* *
//********************************************************************
//STEP1 EXEC PGM=CIGVSM2L,PARM='FLHQ1.FLHQ2.SLR'
Modify and Submit CIGC9JS5

//STEPLIB DD DSN=FLHQ1.FLHQ2.LOADLIB,DISP=SHR
//********************************************************************
//* *
//* STEP 2: FORCE A VSAM SPLIT FOR THE BREEZE PACKAGE DATABASE. *
//* *
//********************************************************************
//STEP2 EXEC PGM=CIGVSM2L,PARM='FLHQ1.FLHQ2.PKGDB'
//STEPLIB DD DSN=FLHQ1.FLHQ2.LOADLIB,DISP=SHR
17. CIGC9JS5

Installation Guide: Breeze and Cloud 9 for SCLM - 31 -
CHECKPOINT #2 At this point the demo SLR database and the Breeze databases should be created and populated and the CIGINI initialization module should be created and stored in the product load library.
Task Completed?
Allocate and initialize the SLR database?
Allocate and populate the Breeze database?
Build a CIGINI file that points to the demo database?
Expand the indexes of the SLR and Breeze databases?
18. Checkpoint 2

Cloud 9 Section: Configure USS and HTTP Server Components
Before you begin the HTTP server parameters, it is important to review a few key topics.
The HTTP server example is delivered as a stand-alone HTTP server. Your installation may have a HTTP server already running and you might want to merge the Cloud 9 application into the active HTTP configuration. This can be done, but you should not attempt this without the cooperation of the HTTP server administrator.
The C9HTTPD and C9EVARS examples are set as defaults. They are minimally configured for Cloud 9 only. The can be used “as is” but it is recommended that you review and modify these members to meet your installations specific settings. Please review these configuration members with your site’s HTTP server administrator.
There are two additional manuals can be of assistance when configuring your HTTP server:
HTTP Server Planning, Installing and Using
OS/390 e-business Infrastructure: IBM HTTP 5.1 Customization and Usage (This is a Red Book)
Also see the “Where to Find Information’ section in this manual.
Preparation
HTTP Stand-alone Server
Sample HTTPD Configuration Files
Additional Information

Installation Guide: Breeze and Cloud 9 for SCLM - 33 -
Step 9: Modify the C9HTTPD Configuration Member
In this step you will review and modify the C9HTTPD member off loaded from the cartridge into the flhq1.flhq2.HTML file. This member is named the rules file in the HTTP server configuration terminology and is pointed to by the server JCL parameter list. Because many of the members contain case-sensitive values, please issue the CAPS OFF command to ensure that automatic upper casing does not occur. The following shows just the lines that will change based on site-specific HTTP directories. Typically, the HTTP administrator must configure these lines. Please work with your HTTP administrator prior to updating the C9HTTPD and C9EVARS members. The following shows just the lines that will change in the rules file based on the rootdir and portno-c9. Your HTTP administrator should review this member.
- - - - - - - - - - - - - - - - 17 Line(s) not Displayed
ServerRoot rootdir/
- - - - - - - - - - - - - - - - 2 Line(s) not Displayed
Port c9portno
- - - - - - - - - - - - - - - - 18 Line(s) not Displayed
PidFile rootdir/httpd-pid
#AccessLog rootdir/logs/httpd-log
#AgentLog rootdir/logs/agent-log
#RefererLog rootdir/logs/referer-log
#ErrorLog rootdir/logs/httpd-errors
#CgiErrorLog rootdir/logs/cgi-error
- - - - - - - - - - - - - - - - 11 Line(s) not Displayed
AccessReportRoot rootdir/reports
- - - - - - - - - - - - - - - - 48 Line(s) not Displayed
Exec /cgi-bin/* rootdir/cgi-bin/*
Pass /html/* rootdir/html/*
Pass /* rootdir/*
- - - - - - - - - - - - - - - 193 Line(s) not Displayed
19. C9HTTPD Expected Change Area Only
Portno and rootdir Review
Rootdir and portno Values

This rules file also contains ADDTYPE definitions that control the MIME commands and file transfer defaults between the browser and the mainframe. As the implementation continues, these ADDTYPES may need to be expanded to accommodate additional file types and requirements.
1. Issue the CAPS off command to ensure case sensitivity.
2. Using ISPF EDIT, access member C9HTTPD in the HTML dataset you offloaded from the installation tape.
3. Issue the following global commands against the member:
• X ALL
• F rootdir ALL
• F portno-c9 ALL
• Change rootdir rootdir ALL (Ensure that the end format of the rootdir is /rootdir/)
• Change portno-c9 portno-c9 ALL
4. Save the member.
Once you have modified all of the UNIX components associated with the install, you will copy them to the appropriate Unix directory—which is covered in Step 12.
ADDTYPEs
Modify and save C9HTTPD
ABC

Installation Guide: Breeze and Cloud 9 for SCLM - 35 -
Step 10: Modify the C9EVARS Configuration Member
In this step you will review and modify the C9EVARS member off loaded from the cartridge into the flhq1.flhq2.HTML file. This member is named the environment variable file in the HTTP configuration terminology and is pointed to by the server JCL parameter list. Because many of the members contain case-sensitive values, please issue the CAPS OFF command to ensure that automatic upper casing does not occur. The following shows the shipped contents of the C9EVARS member. The HTTP administrator must configure this file, as many of the parameters are site specific. Note that:
1. The rootdir variable from the Cloud 9 Installation Worksheet is required.
2. The STEPLIB directive is delivered as STEPLIB=CURRENT. This means that the HTTP server spawned tasks default to the STEPLIB in the current server JCL. If your installation uses STEPLIB=DSN1, DSN2, etc; all of the datasets in the Steplib list must be authorized, as Cloud 9 requires an authorized environment.
#-----------------------------------------------------------------------
# Name: C9EVARS (Will be named /rootdir/httpd.envvars in UNIX.)
# Purpose: Cloud9 Server Environment variable parameters
# Usage: This file is pointed to in the CIGC9SRV JCL.
#-----------------------------------------------------------------------
#To customize this file change rootdir as per
# the Cloud9 installation worksheet.
#
#Various install and configuration paths are currently set /usr/...
# This and all other parms using /usr/ must be reviewed with
# the HTTP administrator as these set up issues are global
# in nature versus CIG Cloud9 specific usage.
#-----------------------------------------------------------------------
PATH=/bin:.:/usr/sbin:/usr/lpp/internet/bin:/usr/lpp/internet/sbin:/usr/lp
p/ldap/bin:/rootdir/bin:<JAVA_HOME>/bin
SHELL=/bin/sh
TZ=EST5EDT
LANG=C
LC_ALL=en_US.IBM-1047
NLSPATH=/usr/lib/nls/msg/%L/%N:/usr/lpp/internet/%L/%N:/usr/lpp/ldap/lib/n
ls/msg/%L/%N
LIBPATH=/usr/lpp/internet/bin:/usr/lpp/internet/sbin:/usr/lpp/ldap/lib:<JA
VA_HOME>/lib/mvs/native_threads
JAVA_HOME=<JAVA_HOME>
CLASSPATH=.:/usr/lpp/internet/server_root/CAServlet:<JAVA_HOME>/lib/classe
s.zip
STEPLIB=CURRENT
SERVER_ROOT=/rootdir/
Review the C9EVARS member

20. C9EVARS
1. Issue the CAPS OFF command to ensure case sensitivity.
2. Using ISPF EDIT, access member C9EVARS in the HTML library you offloaded from the installation tape.
3. Perform the following global commands against the member:
• Change rootdir rootdir ALL (Ensure that the rootdir end format is /rootdir/)
4. Save the member.
Once you have modified all of the UNIX components associated with the install, you will copy them to the appropriate Unix directory—which is covered in Step 12.
Modify and Save C9EVARS
ABC

Installation Guide: Breeze and Cloud 9 for SCLM - 37 -
Step 11: Customize the Cloud 9 HTTP Server JCL and Supporting Control Files
Step 11(a): Copy Product Load Library into Authorized Library The Cloud 9 server must run from an authorized library. If the product load library used to offload the cartridge is not an authorized dataset, then you must copy the product load library into the authorized library for server execution.
WARNING: If the authorized library name has changed from the offload library, make sure you review your application JCL members CIGC9IBM, CIGC9MIG, and CIGC9DYN for possible steplib changes.
Step 11(b): Modify CIGC9SRV The CIGC9SRV member is the recommended JCL for invoking the CIG Cloud 9 HTTP server. It uses many default HTTP settings that may be modified and tailored by your HTTP administrator. We recommend that you invoke the server as is for initial installation and customize it later.
WARNING: This job must not time out. Do not remove the TIME=NOLIMIT parameter on the EXEC statement. This job can also be made a started task.
The job card for the server must contain a USS supervisor-level user id and password.
Effects Other JCL
Timeout Parameter
Security Level for User ID/Password

To start the Cloud 9 server, perform the following tasks: 1. Using ISPF EDIT, access member CIGC9SRV in the
JCLLIB.CASE library you offloaded from the installation tape. This library was not included in the global editting process to ensure case sensitivity.
2. Copy a Unix Supervisor-Level job card with password to the
top of the member. This jobcard REQUIRES a userid and password with enough authority to load the HTTP application. If the userid authority is not sufficient, then the server task will end with an 'insufficient authority' message on the console.
3. Change Jobname to equal WEBJOBNAME. This should be
the value from your placeholder worksheet and must match the WEBJOBNAME in the C9HTTDP member or rootdir/httpd.conf file.
A sample job card is provided in the JCL member below.
4. Substitute your site-specific values as per the instructions in the
top of the member. 5. Save the member (Do not submit this job).
//* (Sample Jobcard)
//*
//*WEBJOBNAME JOB (ACCT#),'COMMENT',CLASS=A,REGION=0M,
//* MSGCLASS=H,MSGLEVEL=(1,1),USER=XXXX,PASSWORD=XXXXXXX
//*
//* !!!!!!!!!!!!!!!!!!!!!!!!!!!!!!!!!!!!!!!!!!!!!!!!!!!!!!!!!!!!!!!
//* ! This jobcard REQUIRES the userid and password with enough !
//* ! authority to load the HTTP application. If the userid !
//* ! authority is not sufficient, then the server task will end !
//* ! with an 'insufficient authority' message on the console. !
//* !!!!!!!!!!!!!!!!!!!!!!!!!!!!!!!!!!!!!!!!!!!!!!!!!!!!!!!!!!!!!!!
//* ! WEBJOBNAME - The value from the placeholder worksheet. !
//* ! (The server job name must match the WEBJOBNAME !
//* ! in the c9httdp member or rootdir/httpd.conf file.) !
//* !!!!!!!!!!!!!!!!!!!!!!!!!!!!!!!!!!!!!!!!!!!!!!!!!!!!!!!!!!!!!!!
//*
//*-------------------------------------------------------------------
//* THIS IS THE CLOUD 9 V2 DEFAULT IBM HTTP WEB SERVER JCL
//*-------------------------------------------------------------------
//*
//* Instructions:
//* 1. Change flhq1.flhq2 to the value in the cloud9 worksheet.
//* 2. Change rootdir to the value in the cloud9 worksheet.
//* 3. Change portno-c9 to the value in the cloud9 worksheet.
//* 4. Change WEBJOBNAME to value in the cloud9 worksheet.
//* 5. Be careful to use the proper case when changing values.
Modify and Submit CIGC9SRV
ABC

Installation Guide: Breeze and Cloud 9 for SCLM - 39 -
//* 6. If the flhq1.flhq2.loadlib is not authorized, then
//* copy current contents of flhq1.flhq2.loadlib into existing
//* authorized dataset or get flhq1.flhq2.loadlib authorized.
//* 7. After changing the rootdir and portno-c9 values, review the
//* execution parm. The parm string should go up through col 71
//* and then continue in col 16 on the next line.
//*
//*-------------------------------------------------------------------
//* *
//* PRINTINI: PRINT THE CIGINI DEFINITIONS FOR DIAGNOSTIC PURPOSES. *
//* *
//*-------------------------------------------------------------------
//PRINTINI EXEC PGM=CIGFEXEC,PARM=PRINTINI
//STEPLIB DD DSN=FLHQ1.FLHQ2.LOADLIB,DISP=SHR
//CIGPRINT DD SYSOUT=*
//*-------------------------------------------------------------------
//* The parm variable on the EXEC statement is of the format:
//* (LEPARMS/ICSPARMS).
//*
//* Refer to the following manuals for more information:
//* 1. HTTP Server Planning,Installing, and Using SC31-8690-02
//* 2. Redbook:OS/390 e-business Infrastructure: IBM HTTP Server 5.1
//* - Customization and Usage SG24-5603-00
//*-------------------------------------------------------------------
//CIGWEB EXEC PGM=IMWHTTPD,TIME=NOLIMIT,
// ACCT=(ACCT#),
// PARM=('ENVAR("_CEE_ENVFILE=rootdir/httpd.envvars")/-r rootdir/
// httpd.conf -B -p portno-c9')
//********************************************************************
//* This JCL requires an authorized dataset. Review instruction *
//* number 6 above. *
//********************************************************************
//STEPLIB DD DSN=FLHQ1.FLHQ2.LOADLIB,DISP=SHR
// DD DSN=TCPIP.SEZATCP,DISP=SHR
//SYSIN DD DUMMY
//OUTDSC OUTPUT DEST=HOLD
//SYSPRINT DD SYSOUT=*,OUTPUT=(*.OUTDSC)
//SYSERR DD SYSOUT=*,OUTPUT=(*.OUTDSC)
//STDOUT DD SYSOUT=*,OUTPUT=(*.OUTDSC)
//STDERR DD SYSOUT=*,OUTPUT=(*.OUTDSC)
//SYSOUT DD SYSOUT=*,OUTPUT=(*.OUTDSC)
//CEEDUMP DD SYSOUT=*,OUTPUT=(*.OUTDSC) � 21. CIGC9SRV
Step 11(c): Modify Batch Shells The following is the CIGC9IBM batch jcl member. To prepare this member for use, please perform the following steps:
1. Using ISPF EDIT, access member CIGC9IBM in the standard JCLLIB library you offloaded from the installation tape.
Modify CIGC9IBM

2. Do not fill in the jobcard values. The jobcard will be provided from the job card information in your Cloud 9 profile.
3. Substitute your site-specific values (identified on the Installation Worksheet.) for those values shown below in bold italics. If you made global JCL changes in Step 2 of this manual, you may skip this item.
4. Substitute the ISPF dataset names for your installation.
5. Save the member.
)DOT
%JOBCARD%
)ENDDOT
//* ----------------------------------------------------------------- *
//* NAME: CIGC9IBM *
//* PURPOSE: CLOUD 9 FOR SCLM V2 *
//* SCLM BATCH SKELETON *
//* ----------------------------------------------------------------- *
//* *
//* REQUIRED JCL MODIFICATION: *
//* 1) CHANGE THE FOLLOWING AS PER THE INSTALLATION WORKSHEET. *
//* - FLHQ1 AND FLHQ2 *
//* - ISPFQUAL *
//* - TDISK *
//* *
//* NOTE: BREEZE USERS MUST MODIFY THIS MODULE PER EMBEDDED *
//* INSTRUCTION. BREEZE DATASET NAMES MAY ALSO NEED TO BE *
//* MODIFIED. *
//*-------------------------------------------------------------------*
//* RESIDES IN THE HTTP SERVER AT: *
//* /ROOTDIR/CLOUD9/JCL/CIGC9IBM *
//*-------------------------------------------------------------------*
)IF ACTION=MIGRATE
//COPY EXEC PGM=IKJEFT01
)DOT
%COPYFILES%
)ENDDOT
//SYSTSPRT DD SYSOUT=*
//SYSTSIN DD *
)DOT
%OCOPYSYNTAX%
)ENDDOT
/*
)ENDIF
//*-------------------------------------------------------------------
//GENER EXEC PGM=IEBGENER
//SYSUT1 DD *
)DOT
%SCLMSYNTAX%
)ENDDOT
//SYSUT2 DD DSN=&&CLIST(TEMPNAME),UNIT=TDISK,
// SPACE=(TRK,(10,10,2),RLSE),
// DISP=(NEW,PASS),DCB=(LRECL=80,
// BLKSIZE=1600,DSORG=PO,RECFM=FB)
//SYSPRINT DD DUMMY
//SYSIN DD DUMMY
)IF ACTION=DELETE
//DGRPTS DD DSN=&&DELLIST,DISP=(NEW,PASS), DELETE
// SPACE=(TRK,(5,10),RLSE),
// DCB=(LRECL=80,BLKSIZE=80,RECFM=F)
)ENDIF

Installation Guide: Breeze and Cloud 9 for SCLM - 41 -
)IF ACTION=BUILD
//COPYBULD EXEC PGM=CLZTFILE JAVA
//STEPLIB DD DSN=FLHQ1.FLHQ2.LOADLIB,DISP=SHR
//SYSIN DD * JAVA
)DOT
%SCLMSYNTAX%
)ENDDOT
//SYSOUT DD DSN=&&BSYNTAX,DISP=(NEW,PASS), JAVA
// SPACE=(TRK,(10,10),RLSE),UNIT=TDISK, JAVA
// DCB=(LRECL=80,BLKSIZE=0,DSORG=PS,RECFM=FB) JAVA
)ENDIF
//******************************************************************
//* BREEZE USERS: UNCOMMENT LINES WITH "BREEZE USERS"
//******************************************************************
//TSO EXEC PGM=IKJEFT01,REGION=4096K,TIME=1439,DYNAMNBR=200
//STEPLIB DD DSN=FLHQ1.FLHQ2.LOADLIB,DISP=SHR
//SYSTSIN DD *
ISPSTART CMD(%TEMPNAME)
//SYSTSPRT DD SYSOUT=(*)
//SYSPROC DD DSN=&&CLIST,DISP=(OLD,DELETE)
//* DD DSN=FLHQ1.FLHQ2.ISRCLIB,DISP=SHR BREEZE USERS
//******************************************************************
//* ISPF LIBRARIES
//ISPMLIB DD DSN=ISPFQUAL.SISPMENU,DISP=SHR
//* DD DSN=FLHQ1.FLHQ2.ISPMLIB,DISP=SHR BREEZE USERS
//ISPSLIB DD DSN=ISPFQUAL.SISPSENU,DISP=SHR
// DD DSN=ISPFQUAL.SISPSLIB,DISP=SHR
//* DD DSN=FLHQ1.FLHQ2.ISPSLIB,DISP=SHR BREEZE USERS
//ISPPLIB DD DSN=ISPFQUAL.SISPPENU,DISP=SHR
//* DD DSN=FLHQ1.FLHQ2.ISPPLIB,DISP=SHR BREEZE USERS
//ISPTLIB DD UNIT=VIO,DISP=(NEW,PASS),SPACE=(CYL,(1,1,5)),
// DCB=(LRECL=80,BLKSIZE=19040,DSORG=PO,RECFM=FB)
// DD DSN=ISPFQUAL.SISPTENU,DISP=SHR
//ISPTABL DD UNIT=VIO,DISP=(NEW,PASS),SPACE=(CYL,(1,1,5)),
// DCB=(LRECL=80,BLKSIZE=19040,DSORG=PO,RECFM=FB)
//ISPPROF DD UNIT=VIO,DISP=(NEW,PASS),SPACE=(CYL,(1,1,5)),
// DCB=(LRECL=80,BLKSIZE=19040,DSORG=PO,RECFM=FB)
//ISPLOG DD SYSOUT=*,
// DCB=(LRECL=120,BLKSIZE=2400,DSORG=PS,RECFM=FB)
//ISPCTL1 DD DISP=NEW,UNIT=VIO,SPACE=(CYL,(1,1)),
// DCB=(LRECL=80,BLKSIZE=800,RECFM=FB) TEMPORARY FILE
//ZFLMDD DD *
ZFLMNLST=FLMNLENU ZFLMTRMT=ISR3278 ZDATEF=YY/MM/DD
/*
//*CIGLOG DD SYSOUT=* BREEZE USERS
//*CIGLOG0 DD SYSOUT=* BREEZE USERS
//*CIGLOG1 DD DSN=&&CIGLOG1,DISP=(NEW,DELETE), BREEZE USERS
//* UNIT=TDISK,SPACE=(CYL,(1,1)), BREEZE USERS
//* DCB=(LRECL=132,BLKSIZE=0,RECFM=FB) BREEZE USERS
//*CIGLOG2 DD DSN=&&CIGLOG2,DISP=(NEW,DELETE), BREEZE USERS
//* UNIT=TDISK,SPACE=(CYL,(1,1)), BREEZE USERS
//* DCB=(LRECL=132,BLKSIZE=0,RECFM=FB) BREEZE USERS
//*CIGLOG3 DD DSN=&&CIGLOG3,DISP=(NEW,DELETE), BREEZE USERS
//* UNIT=TDISK,SPACE=(CYL,(1,1)), BREEZE USERS
//* DCB=(LRECL=132,BLKSIZE=0,RECFM=FB) BREEZE USERS
//******************************************************************
//* SCLM OUTPUT FILES
//******************************************************************
//FLMMSGS DD SYSOUT=(*)
)IF ACTION=BUILD
//BLDMSGS DD SYSOUT=*, BUILD
// DCB=(LRECL=80,BLKSIZE=80,RECFM=F)
//BLDREPT DD SYSOUT=*, BUILD
// DCB=(LRECL=80,BLKSIZE=3120,RECFM=FBA)
//BLDLIST DD SYSOUT=*, BUILD
// DCB=(LRECL=259,BLKSIZE=3120,RECFM=VB)
//BLDEXIT DD DSN=&&BLDEXIT,DISP=(NEW,DELETE), BUILD
// SPACE=(TRK,(5,10),RLSE),
// DCB=(LRECL=160,BLKSIZE=3200,RECFM=FB)
//BSYNTAX DD DSN=&&BSYNTAX,DISP=(OLD,PASS) JAVA

)ENDIF
)IF ACTION=PROMOTE
//PROMMSGS DD SYSOUT=*, PROMOTE
// DCB=(LRECL=80,BLKSIZE=80,RECFM=FB,DSORG=PS)
//PROMREPT DD SYSOUT=*, PROMOTE
// DCB=(LRECL=80,BLKSIZE=3120,RECFM=FB,DSORG=PS)
//PROMEXIT DD DSN=&&PROMEXIT,DISP=(NEW,DELETE), PROMOTE
// SPACE=(TRK,(5,10),RLSE),
// DCB=(LRECL=160,BLKSIZE=3200,RECFM=FB)
//COPYERR DD SYSOUT=*, PROMOTE
// DCB=(RECFM=FBA,LRECL=133,BLKSIZE=1330)
)ENDIF
)IF ACTION=MIGRATE
//U2LSTS DD SYSOUT=*, MIGRATE
// DCB=(LRECL=80,BLKSIZE=80,RECFM=F)
//U2MSGS DD SYSOUT=*, MIGRATE
// DCB=(LRECL=80,BLKSIZE=80,RECFM=F)
)ENDIF
)IF ACTION=DELETE
//DGLIST DD SYSOUT=*, DELETE
// DCB=(LRECL=137,BLKSIZE=3120,RECFM=VBA)
//DGMSGS DD SYSOUT=*, DELETE
// DCB=(LRECL=80,BLKSIZE=80,RECFM=F)
//DGREPT DD DSN=&&DELLIST,DISP=(MOD,PASS) DELETE
//DGEXIT DD DSN=&&DELEXIT,DISP=(NEW,DELETE), DELETE
// SPACE=(TRK,(5,10),RLSE),
// DCB=(LRECL=160,BLKSIZE=3200,RECFM=FB)
)ENDIF
)IF ACTION=VERRECOV
//DBUMSGS DD SYSOUT=*, VERRECOV
// DCB=(LRECL=80,BLKSIZE=80,RECFM=F)
)ENDIF
//*--------------------------------------------------------------------
)IF ACTION=DELETE
//DELMSGS EXEC PGM=IEBGENER
//SYSUT1 DD DSN=&&DELLIST,DISP=(OLD,PASS)
//SYSUT2 DD SYSOUT=*
//SYSPRINT DD DUMMY
//SYSIN DD DUMMY
//*
//DELETE EXEC PGM=IKJEFT01,REGION=4096K,DYNAMNBR=200
//STEPLIB DD DSN=FLHQ1.FLHQ2.LOADLIB,DISP=SHR
//SYSTSIN DD *
EX 'FLHQ1.FLHQ2.CGI(CLZTRJDL)'
//SYSTSPRT DD SYSOUT=*
//DELLIST DD DSN=&&DELLIST,DISP=(OLD,PASS)
//LISTOUT DD SYSOUT=*,
// DCB=(LRECL=80,BLKSIZE=80,RECFM=F)
//UNIXLOC DD DSN=FLHQ1.FLHQ2.CGI(CLZTULOC),DISP=SHR
)ENDIF � 21. CIGC9IBM
The following is the CIGC9DYN SCLM REXX shell for used for dynamic allocation of ISPF libraries for WEB based SCLM functions. To prepare this member for use, please perform the following steps:
1. Using ISPF EDIT, access member CIGC9DYN in the JCLLIB you offloaded from the installation tape.
Modify CIGC9DYN REXX shell

Installation Guide: Breeze and Cloud 9 for SCLM - 43 -
2. Substitute your site-specific values (identified on the Installation Worksheet.) for those values shown below in bold italics. If you made global JCL changes in Step 2 of this manual, you may skip this item.
3. Substitute the ISPF dataset names for your installation.
4. Save the member.
/* -------------------------------------------------------------- */
/* NAME: CIGC9DYN */
/* PURPOSE: CLOUD 9 FOR SCLM */
/* ISPF ALLOCATIONS FOR SCLM WEB BASED FUNCTIONS. */
/* -------------------------------------------------------------- */
/* */
/* REQUIRED MODIFICATION: */
/* 1) CHANGE THE FOLLOWING AS PER THE INSTALLATION WORKSHEET. */
/* - ISPFQUAL */
/* */
/* NOTE: BREEZE USERS MUST MODIFY THIS MODULE PER EMBEDDED */
/* INSTRUCTION. BREEZE DATASET NAMES MAY ALSO NEED TO BE */
/* MODIFIED. */
/* */
/* -------------------------------------------------------------- */
/* RESIDES IN HTTP SERVER AT: */
/* ROOTDIR/CLOUD9/JCL/CIGC9DYN */
/* -------------------------------------------------------------- */
ALLOC FI(C9TEMP) NEW DSORG(PO) CYLINDERS,+
SPACE(1,1) DIR(5) LRECL(80) BLKSIZE(19040) RECFM(F,B),+
DSN('%TEMPNAME%')
ALLOC FI(ISPTLIB) DSN('%TEMPNAME%' +
'ISPFQUAL.SISPTENU') SHR
/* COMMENT THE FOLLOWING LINES IF RUNNING BREEZE */
ALLOC FI(ISPMLIB) DSN('ISPFQUAL.SISPMENU') SHR
ALLOC FI(ISPSLIB) DSN('ISPFQUAL.SISPSENU') SHR
ALLOC FI(ISPPLIB) DSN('ISPFQUAL.SISPPENU') SHR
/* ** UNCOMMENT THE FOLLOWING LINES IF RUNNING BREEZE * */
/* ALLOC FI(SYSEXEC) DSN('FLHQ1.FLHQ2.ISRCLIB') SHR REUSE */
/* ALLOC FI(ISPMLIB) DSN('FLHQ1.FLHQ2.ISPMLIB' + */
/* 'ISPFQUAL.SISPMENU') SHR REUSE */
/* ALLOC FI(ISPSLIB) DSN('FLHQ1.FLHQ2.ISPSLIB' + */
/* 'ISPFQUAL.SISPSENU') SHR REUSE */
/* ALLOC FI(ISPPLIB) DSN('FLHQ1.FLHQ2.ISPPLIB' + */
/* 'ISPFQUAL.SISPPENU') SHR REUSE */
/* ALLOC FI(CIGLOG) NEW DELETE DSORG(PS) CYLINDERS,+ */
/* SPACE(1,1) LRECL(120) BLKSIZE(2400) RECFM(F,B) */
/* ALLOC FI(CIGLOG0) NEW DELETE DSORG(PS) CYLINDERS,+ */
/* SPACE(1,1) LRECL(120) BLKSIZE(2400) RECFM(F,B) */
/* ALLOC FI(CIGLOG1) NEW DELETE DSORG(PS) CYLINDERS,+ */
/* SPACE(1,1) LRECL(132) BLKSIZE(13200) RECFM(F,B) */
/* ALLOC FI(CIGLOG2) NEW DELETE DSORG(PS) CYLINDERS,+ */
/* SPACE(1,1) LRECL(132) BLKSIZE(13200) RECFM(F,B) */
/* ALLOC FI(CIGLOG3) NEW DELETE DSORG(PS) CYLINDERS,+ */
/* SPACE(1,1) LRECL(132) BLKSIZE(13200) RECFM(F,B) */
/* ************** END OF BREEZE STATEMENTS ************ */
/* ** UNCOMMENT THE FOLLOWING IF RUNNING JAVA SUPPORT */
/* ALLOC FI(SYSEXEC) DSN('FLHQ1.FLHQ2.CGI') SHR REUSE */
/* ALLOC FI(UNIXLOC) DSN('FLHQ1.FLHQ2.CGI(CLZTULOC)') SHR REUSE*/
/* ************** END OF JAVA SUPPORT STATEMENTS ****** */
/* -------------------------------------------------------------- */
/* THE FOLLOWING COMMANDS ALLOCATE TEMPORARY ISPF FILES USED */

/* BY SCLM DURING PROCESSING. */
/* -------------------------------------------------------------- */
ALLOC FI(ISPTABL) NEW DELETE DSORG(PO) CYLINDERS,+
SPACE(1,1) DIR(5) LRECL(80) BLKSIZE(19040) RECFM(F,B)
ALLOC FI(ISPPROF) NEW DELETE DSORG(PO) CYLINDERS,+
SPACE(1,1) DIR(5) LRECL(80) BLKSIZE(19040) RECFM(F,B)
ALLOC FI(ISPLOG) NEW DELETE DSORG(PS) CYLINDERS,+
SPACE(1,1) LRECL(120) BLKSIZE(2400) RECFM(F,B)
ALLOC FI(ISPCTL1) NEW DELETE DSORG(PS) CYLINDERS,+
SPACE(1,1) LRECL(80) BLKSIZE(800) RECFM(F,B)
/* -------------------------------------------------------------- */
/* THE FOLLOWING DATASETS ARE USED BY SPECIFIC TRANSLATORS. */
/* -------------------------------------------------------------- */
ALLOC FI(SYSPRINT) NEW DELETE DSORG(PS) CYLINDERS,+
SPACE(1,1) LRECL(120) BLKSIZE(2400) RECFM(F,B)
/* END OF ALLOCATIONS */ � 22. CIGC9DYN
The following is the CIGC9MIG JCL shell used only with the CA-Endevor bridge. To prepare this member for use, please perform the following steps:
1. Using ISPF EDIT, access member CIGC9MIG in the JCLLIB you offloaded from the installation tape.
2. Skip the step of adding your job card values. The jobcard will be provided from the job card information in your Cloud 9 profile ( see step xx).
3. Substitute your site-specific values (identified on the Installation Worksheet.) for those values shown below in bold italics. If you made global JCL changes in Step 2 of this manual, you may skip this item.
4. Substitute the ISPF dataset names for your installation.
5. Review the number of level ddnames allowed for conversion.
6. Save the member.
)DOT
%JOBCARD%
)ENDDOT
//* ----------------------------------------------------------------- *
//* NAME: CIGC9MIG *
//* PURPOSE: CLOUD 9 FOR SCLM V2 *
//* CONVERT CA-ENDEVOR ELEMENT SOURCE TO SCLM SOURCE. *
//* ----------------------------------------------------------------- *
//* *
//* REQUIRED JCL MODIFICATION: *
//* 1) CHANGE THE FOLLOWING AS PER THE INSTALLATION WORKSHEET. *
//* - FLHQ1 AND FLHQ2 *
//* - QUAL1 AND QUAL2 *
Modify CIGC9MIG

Installation Guide: Breeze and Cloud 9 for SCLM - 45 -
//* - ISPFQUAL *
//* - TDISK *
//* *
//* ----------------------------------------------------------------- *
//* Resides in HTTP at: *
//* ROOTDIR/CLOUD9/JCL/CIGC9MIG *
//*------------------------------------------------------------------ *
//* THIS JCL WILL CREATE SYNTAX TO CONVERT ENDEVOR ELEMENTS *
//* INTO SCLM MEMBERS. HERE IS THE STEPS: *
//* STEP0: COPY THE CONTROL CARDS INTO A TEMPORARY DATASET *
//* STEP1: READ THE INPUT FROM CIGTSIN. *
//* IF CVTFLAG=1 THEN *
//* WRITE RETRIEVE SCL STATEMENTS. *
//* WRITE TSO COMMAND FILE FLMCMD SAVE STATEMENTS. *
//* SET RC=6. *
//* IF CVTFLAG=2 THEN *
//* WRITE PRINT SUMMARY SCL STATEMENTS. *
//* SET RC=0. *
//* STEP2: IF STEP1.RC=0 THEN *
//* CALL ENDEVOR AND PROCESS THE PRINT SCL STATEMENTS. *
//* STEP3: IF STEP1.RC=0 THEN *
//* READ OUTPUT CREATED FROM STEP2 AND WRITE RETRIEVE *
//* LEVEL SCL STATEMENTS. EACH LEVEL RETRIEVED WILL BE *
//* INTO A SEPARATE LEVELS DATASET. IN TOTAL, 100 *
//* TEMPORARY DATASETS WILL BE SETUP (ONE FOR EACH *
//* POSSIBLE LEVEL. THIS STEP WILL ALSO CREATE *
//* A TSO FILE CONTAINING COMMANDS TO *
//* 1) COPY THE RETRIEVED LEVEL INTO A TARGET SCLM DATASET*
//* VIA SOME TYPE OF COPY UTILITY (E.G., OCOPY) *
//* 2) EXECUTE A FLMCMD SAVE COMMAND *
//* THIS TSO COMMAND FILE WILL BE EXECUTED IN STEP 5. *
//* STEP4: CALL ENDEVOR TO EXECUTE THE RETRIEVE SCL CREATED IN STEP 3.
//* STEP5: CALL TSO (IKJEFT01) AND EXECUTE THE TSO FILE CREATED IN *
//* STEP 3. THIS STEP WILL POPULATE THE TARGET SCLM LOCATION *
//* WITH ENDEVOR ELEMENTS RETRIEVED IN STEP 4. *
//*-------------------------------------------------------------------*
//STEP0 EXEC PGM=IEBGENER
//* CVTFLAG=1 MEANS CONVERT CURRENT ELEMENT LEVEL ONLY
//* CVTFLAG=2 MEANS CONVERT ALL ELEMENT LEVELS
//SYSUT1 DD *
)DOT
%SCLMSYNTAX%
)ENDDOT
//SYSUT2 DD DSN=&&CCARDS,UNIT=TDISK,
// SPACE=(TRK,(10,10),RLSE),DISP=(NEW,PASS),
// DCB=(LRECL=80,BLKSIZE=3120,RECFM=FB)
//SYSPRINT DD DUMMY
//SYSIN DD DUMMY
//*----------------------------------------------------------------
//STEP1 EXEC PGM=IKJEFT01
//SYSTSIN DD *
EXEC 'FLHQ1.FLHQ2.JCLLIB(C9LSCVT1)'
//SYSTSPRT DD SYSOUT=*
//CIGTSIN DD DSN=&&CCARDS,DISP=(OLD,PASS)
//SCLOUT DD DSN=&&SCL,DISP=(NEW,PASS),
// UNIT=TDISK,SPACE=(CYL,(1,1)),
// DCB=(LRECL=80,BLKSIZE=3120,RECFM=FB)
//FLMCMD DD DSN=&&CLIST(TEMPNAME),DISP=(NEW,PASS),
// UNIT=TDISK,SPACE=(CYL,(1,1,10)),
// DCB=(LRECL=80,BLKSIZE=3120,RECFM=FB)
//*----------------------------------------------------------------
//* PROCESS PRINT SUMMARY SCL STATEMENTS
//*----------------------------------------------------------------
//STEP2 EXEC PGM=NDVRC1,PARM=C1BM3000,DYNAMNBR=1500,REGION=4096K,
// COND=(0,NE)
//STEPLIB DD DSN=QUAL1.QUAL2.ENDEVOR,DISP=SHR
//C1MSGS1 DD SYSOUT=*
//BSTIPT01 DD DSN=&&SCL,DISP=(OLD,DELETE)
//C1PRINT DD DSN=&&PRINT,DISP=(NEW,PASS),
// UNIT=TDISK,SPACE=(CYL,(1,1)),
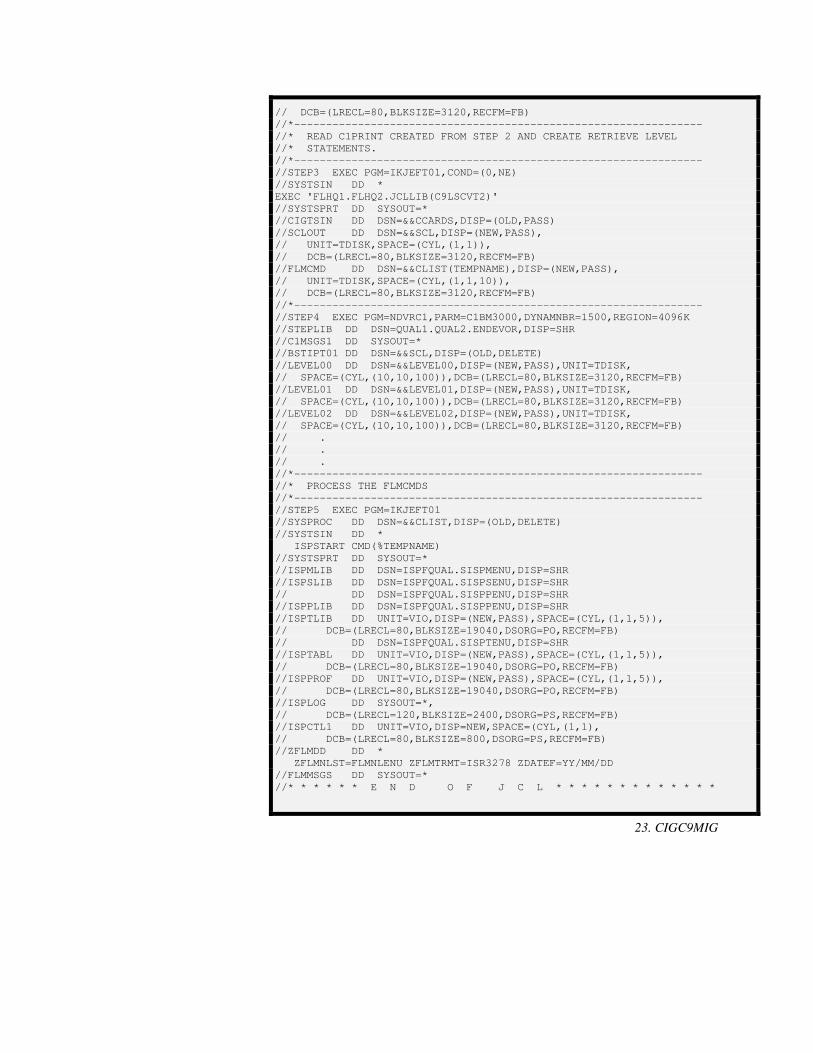
// DCB=(LRECL=80,BLKSIZE=3120,RECFM=FB)
//*----------------------------------------------------------------
//* READ C1PRINT CREATED FROM STEP 2 AND CREATE RETRIEVE LEVEL
//* STATEMENTS.
//*----------------------------------------------------------------
//STEP3 EXEC PGM=IKJEFT01,COND=(0,NE)
//SYSTSIN DD *
EXEC 'FLHQ1.FLHQ2.JCLLIB(C9LSCVT2)'
//SYSTSPRT DD SYSOUT=*
//CIGTSIN DD DSN=&&CCARDS,DISP=(OLD,PASS)
//SCLOUT DD DSN=&&SCL,DISP=(NEW,PASS),
// UNIT=TDISK,SPACE=(CYL,(1,1)),
// DCB=(LRECL=80,BLKSIZE=3120,RECFM=FB)
//FLMCMD DD DSN=&&CLIST(TEMPNAME),DISP=(NEW,PASS),
// UNIT=TDISK,SPACE=(CYL,(1,1,10)),
// DCB=(LRECL=80,BLKSIZE=3120,RECFM=FB)
//*----------------------------------------------------------------
//STEP4 EXEC PGM=NDVRC1,PARM=C1BM3000,DYNAMNBR=1500,REGION=4096K
//STEPLIB DD DSN=QUAL1.QUAL2.ENDEVOR,DISP=SHR
//C1MSGS1 DD SYSOUT=*
//BSTIPT01 DD DSN=&&SCL,DISP=(OLD,DELETE)
//LEVEL00 DD DSN=&&LEVEL00,DISP=(NEW,PASS),UNIT=TDISK,
// SPACE=(CYL,(10,10,100)),DCB=(LRECL=80,BLKSIZE=3120,RECFM=FB)
//LEVEL01 DD DSN=&&LEVEL01,DISP=(NEW,PASS),UNIT=TDISK,
// SPACE=(CYL,(10,10,100)),DCB=(LRECL=80,BLKSIZE=3120,RECFM=FB)
//LEVEL02 DD DSN=&&LEVEL02,DISP=(NEW,PASS),UNIT=TDISK,
// SPACE=(CYL,(10,10,100)),DCB=(LRECL=80,BLKSIZE=3120,RECFM=FB)
// .
// .
// .
//*----------------------------------------------------------------
//* PROCESS THE FLMCMDS
//*----------------------------------------------------------------
//STEP5 EXEC PGM=IKJEFT01
//SYSPROC DD DSN=&&CLIST,DISP=(OLD,DELETE)
//SYSTSIN DD *
ISPSTART CMD(%TEMPNAME)
//SYSTSPRT DD SYSOUT=*
//ISPMLIB DD DSN=ISPFQUAL.SISPMENU,DISP=SHR
//ISPSLIB DD DSN=ISPFQUAL.SISPSENU,DISP=SHR
// DD DSN=ISPFQUAL.SISPPENU,DISP=SHR
//ISPPLIB DD DSN=ISPFQUAL.SISPPENU,DISP=SHR
//ISPTLIB DD UNIT=VIO,DISP=(NEW,PASS),SPACE=(CYL,(1,1,5)),
// DCB=(LRECL=80,BLKSIZE=19040,DSORG=PO,RECFM=FB)
// DD DSN=ISPFQUAL.SISPTENU,DISP=SHR
//ISPTABL DD UNIT=VIO,DISP=(NEW,PASS),SPACE=(CYL,(1,1,5)),
// DCB=(LRECL=80,BLKSIZE=19040,DSORG=PO,RECFM=FB)
//ISPPROF DD UNIT=VIO,DISP=(NEW,PASS),SPACE=(CYL,(1,1,5)),
// DCB=(LRECL=80,BLKSIZE=19040,DSORG=PO,RECFM=FB)
//ISPLOG DD SYSOUT=*,
// DCB=(LRECL=120,BLKSIZE=2400,DSORG=PS,RECFM=FB)
//ISPCTL1 DD UNIT=VIO,DISP=NEW,SPACE=(CYL,(1,1),
// DCB=(LRECL=80,BLKSIZE=800,DSORG=PS,RECFM=FB)
//ZFLMDD DD *
ZFLMNLST=FLMNLENU ZFLMTRMT=ISR3278 ZDATEF=YY/MM/DD
//FLMMSGS DD SYSOUT=*
//* * * * * * E N D O F J C L * * * * * * * * * * * * *
23. CIGC9MIG

Installation Guide: Breeze and Cloud 9 for SCLM - 47 -
CHECKPOINT #3 At this point the host based modification and configuration work should be complete. Prior to continuing with the next part of the install, which will involve copying files to Unix and performing IVPs, verify that the following has been completed.
Task Completed?
C9HTTD has been modified? C9EVARS has been modified? CIGC9SRV has been reviewed and modified?
The userid and password on the server JCL has the authority to submit a server task?
The server jobname is the same as the WEBJOBNAME parameter in the C9HTTD member?
The CIGC9IBM batch JCL member has been reviewed and modified?
The CIGC9DYN allocation shell has been reviewed and modified?
The CIGC9MIG batch JCL member has been reviewed and modified?
The steplib in the CIGC9SRV JCL is the same as in CIGC9IBM?
The steplib in CIGC9MIG JCL reflect your Endevor steplib?
The steplib in CIGC9SRV is an authorized dataset?
24. Checkpoint 3

Step 12: Create and Populate the USS Cloud 9 Directories
In this step, you will create Cloud 9 USS Root and product directories and populate them with the Cloud 9 product and configuration files you modified in the previous steps. Because many of the members contain case-sensitive values, please issue the CAPS OFF command to ensure that automatic upper casing does not occur. The following is the REXX exec CIGC9SUM that will be input to the second step of CIGC9SUX. To prepare the member for use, please perform the following steps:
1. Issue the CAPS OFF command.
2. Using ISPF EDIT, access member CIGC9SUM in the JCLLIB.CASE library you offloaded from the installation tape. This library was not included in the global editting process to ensure case sensitivity.
WARNING: Unix files are case sensitive—do not change the case on any file names contained in this REXX exec.
3. Substitute your site-specific values (identified on the Installation Worksheet.) as per the instructions in the top of the member.
4. Save the member.
/* ******************************** REXX *************************** */
/* THIS REXX WILL MODIFY THE SECURITY ATTRIBUTES OF EVERY */
/* UNIX BASED COMPONENT FOR CLOUD 9 FOR SCLM V2. */
/* MODIFY THE rootdir VARIABLE AS PER THE WORKSHEET. */
/* MODIFY THE user1 and user2 VARIABLEs AS PER THE WORKSHEET. */
/* ******************************** REXX *************************** */
trace all
call syscalls 'ON'
address syscall
CHMOD 'rootdir/cloud9/jcl/CIGC9DYN' 777
CHMOD 'rootdir/cloud9/jcl/CIGC9IBM' 777
CHMOD 'rootdir/cloud9/jcl/CIGC9MIG' 777
CHMOD 'rootdir/httpd.conf' 777
CHMOD 'rootdir/httpd.envvars' 777
CHMOD 'rootdir/httpd.mvsds' 777
Modify CIGC9SUM
ABC

Installation Guide: Breeze and Cloud 9 for SCLM - 49 -
CHMOD 'rootdir/httpd-pid' 644
CHMOD 'rootdir/cgi-bin/CLZREX00' 777
CHMOD 'rootdir/cgi-bin/CLZREXIT' 777
CHMOD 'rootdir/cgi-bin/C9RADDS' 777
CHMOD 'rootdir/cgi-bin/C9REDRV' 777 0 0 1
CHMOD 'rootdir/cgi-bin/C9RENDVR' 777
CHMOD 'rootdir/cgi-bin/C9RSDRV' 777 0 0 1
CHMOD 'rootdir/cgi-bin/C9RINDEX' 777
CHMOD 'rootdir/cgi-bin/C9RLMBR' 777
CHMOD 'rootdir/cgi-bin/C9RLUNIX' 777
CHMOD 'rootdir/cgi-bin/C9RMENU' 777
CHMOD 'rootdir/cgi-bin/C9RMLIST' 777
CHMOD 'rootdir/cgi-bin/C9RPROF' 777
CHMOD 'rootdir/cgi-bin/C9RSCLD' 777
CHMOD 'rootdir/cgi-bin/C9RSCLM' 777
CHMOD 'rootdir/cgi-bin/C9RSCLMA' 777
CHMOD 'rootdir/cgi-bin/C9RSPDSA' 777
CHMOD 'rootdir/cgi-bin/C9RULIST' 777
CHMOD 'rootdir/cgi-bin/CIGRSDSF' 777
CHMOD 'rootdir/cgi-bin/CIGRSDSM' 777
CHMOD 'rootdir/cloud9.htm' 777
CHMOD 'rootdir/c9ivp.htm' 777
CHMOD 'rootdir/sdsf.htm' 777
CHMOD 'rootdir/cloud9/c9menu.htm' 777
CHMOD 'rootdir/cloud9/c9splash.htm' 777
CHMOD 'rootdir/cloud9/CIGHSDSB.htm' 777
CHMOD 'rootdir/cloud9/CIGHSDSM.htm' 777
CHMOD 'rootdir/cloud9/CIGHSDSS.htm' 777
CHMOD 'rootdir/cloud9/profiles/user1.jpg' 777
CHMOD 'rootdir/cloud9/profiles/user1.prf' 777
CHMOD 'rootdir/cloud9/profiles/user2.jpg' 777
CHMOD 'rootdir/cloud9/profiles/user2.prf' 777
25. CIGC9SUM

1. Issue the CAPS OFF command to ensure case sensitivity.
2. Using ISPF EDIT, access member CIGC9SUX in the JCLLIB.CASE library you offloaded from the installation tape. This library was not included in the global editting process to ensure case sensitivity.
3. Copy your job card values to the top of the member.
4. WARNING: Unix files are case sensitive—do not change the case on any file names contained in this JCL.
5. Substitute your site-specific values (identified on the Installation Worksheet) as per the instructions in the top of the member.
6. Submit the job.
Note that this job should terminate with COND CODE=0. If it does not:
1. Review your job card parameters and the JCL for errors.
2. Resubmit the job.
//*(JOBCARD)
//* ------------------------------------------------------------------
//* NAME: CIGC9SUX V2
//* PURPOSE: JCL TO CREATE AND POPULATE THE CLOUD 9 UNIX DIRECTORIES.
//* USAGE: Make sure profile of 'caps off' prior to modifying this
//* member. Unix directory and file names are case sensitive.
//* USAGE: Set to 'number off' prior to modifying this
//* member.
//* ------------------------------------------------------------------
//* * * * N O T I C E * * *
//* THIS PROGRAM IS A PROPRIETARY PRODUCT OF CHICAGO INTERFACE
//* GROUP, INC. @ COPYRIGHT 2002 CHICAGO INTERFACE GROUP, INC.
//* ALL RIGHTS RESERVED.
//* ------------------------------------------------------------------
//*
//* ** **
//* ** PRODUCT INSTALLATION/SETUP ISSUES **
//* ** **
//* THE FOLLOWING IS A LIST OF MODIFICATIONS REQUIRED DURING PRODUCT
//* INSTALLATION AND INITIAL SETUP:
//*
//* 1) ADD A VALID JOB CARD
//* 2) CHANGE rootdir to the root directory value in the
//* in your worksheet.
//* 3) Change USER1 and USER2 to actual userids. Use Upper Case.
//* These files are demo profile files for the IVP.
//* 4) Change FLHQ1 and FLHQ2 as per worksheet.
Modify and Submit CIGC9SUX
ABC
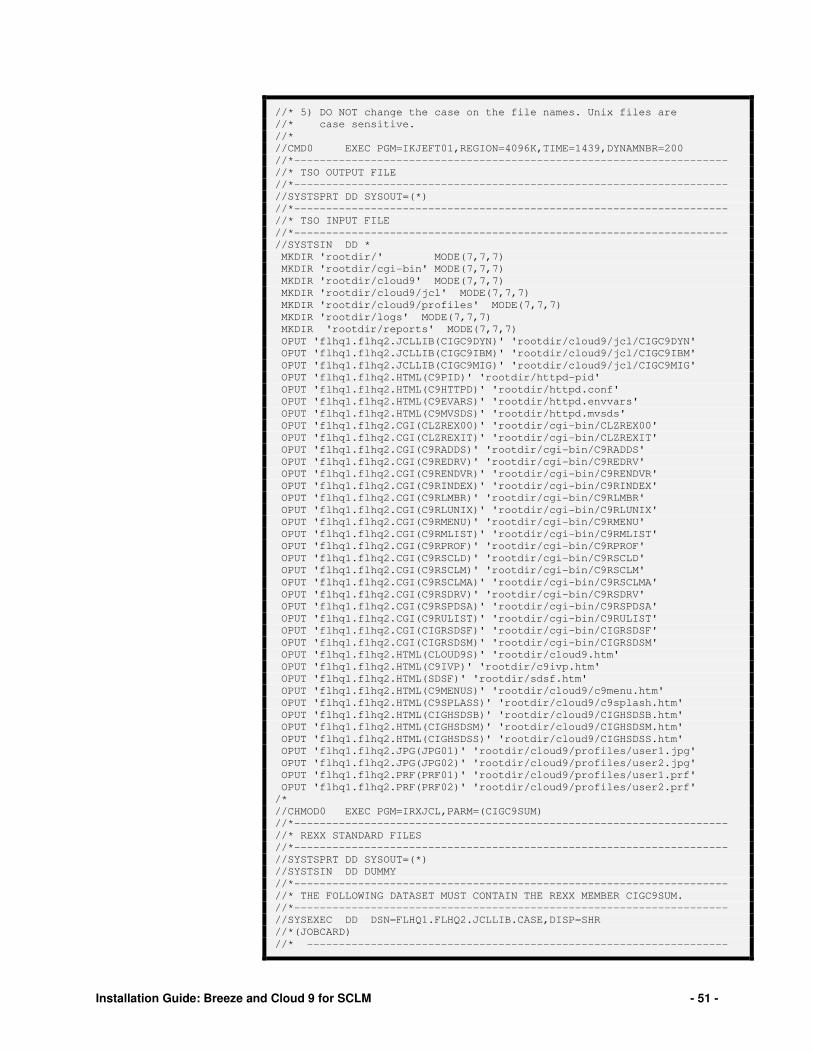
Installation Guide: Breeze and Cloud 9 for SCLM - 51 -
//* 5) DO NOT change the case on the file names. Unix files are
//* case sensitive.
//*
//CMD0 EXEC PGM=IKJEFT01,REGION=4096K,TIME=1439,DYNAMNBR=200
//*--------------------------------------------------------------------
//* TSO OUTPUT FILE
//*--------------------------------------------------------------------
//SYSTSPRT DD SYSOUT=(*)
//*--------------------------------------------------------------------
//* TSO INPUT FILE
//*--------------------------------------------------------------------
//SYSTSIN DD *
MKDIR 'rootdir/' MODE(7,7,7)
MKDIR 'rootdir/cgi-bin' MODE(7,7,7)
MKDIR 'rootdir/cloud9' MODE(7,7,7)
MKDIR 'rootdir/cloud9/jcl' MODE(7,7,7)
MKDIR 'rootdir/cloud9/profiles' MODE(7,7,7)
MKDIR 'rootdir/logs' MODE(7,7,7)
MKDIR 'rootdir/reports' MODE(7,7,7)
OPUT 'flhq1.flhq2.JCLLIB(CIGC9DYN)' 'rootdir/cloud9/jcl/CIGC9DYN'
OPUT 'flhq1.flhq2.JCLLIB(CIGC9IBM)' 'rootdir/cloud9/jcl/CIGC9IBM'
OPUT 'flhq1.flhq2.JCLLIB(CIGC9MIG)' 'rootdir/cloud9/jcl/CIGC9MIG'
OPUT 'flhq1.flhq2.HTML(C9PID)' 'rootdir/httpd-pid'
OPUT 'flhq1.flhq2.HTML(C9HTTPD)' 'rootdir/httpd.conf'
OPUT 'flhq1.flhq2.HTML(C9EVARS)' 'rootdir/httpd.envvars'
OPUT 'flhq1.flhq2.HTML(C9MVSDS)' 'rootdir/httpd.mvsds'
OPUT 'flhq1.flhq2.CGI(CLZREX00)' 'rootdir/cgi-bin/CLZREX00'
OPUT 'flhq1.flhq2.CGI(CLZREXIT)' 'rootdir/cgi-bin/CLZREXIT'
OPUT 'flhq1.flhq2.CGI(C9RADDS)' 'rootdir/cgi-bin/C9RADDS'
OPUT 'flhq1.flhq2.CGI(C9REDRV)' 'rootdir/cgi-bin/C9REDRV'
OPUT 'flhq1.flhq2.CGI(C9RENDVR)' 'rootdir/cgi-bin/C9RENDVR'
OPUT 'flhq1.flhq2.CGI(C9RINDEX)' 'rootdir/cgi-bin/C9RINDEX'
OPUT 'flhq1.flhq2.CGI(C9RLMBR)' 'rootdir/cgi-bin/C9RLMBR'
OPUT 'flhq1.flhq2.CGI(C9RLUNIX)' 'rootdir/cgi-bin/C9RLUNIX'
OPUT 'flhq1.flhq2.CGI(C9RMENU)' 'rootdir/cgi-bin/C9RMENU'
OPUT 'flhq1.flhq2.CGI(C9RMLIST)' 'rootdir/cgi-bin/C9RMLIST'
OPUT 'flhq1.flhq2.CGI(C9RPROF)' 'rootdir/cgi-bin/C9RPROF'
OPUT 'flhq1.flhq2.CGI(C9RSCLD)' 'rootdir/cgi-bin/C9RSCLD'
OPUT 'flhq1.flhq2.CGI(C9RSCLM)' 'rootdir/cgi-bin/C9RSCLM'
OPUT 'flhq1.flhq2.CGI(C9RSCLMA)' 'rootdir/cgi-bin/C9RSCLMA'
OPUT 'flhq1.flhq2.CGI(C9RSDRV)' 'rootdir/cgi-bin/C9RSDRV'
OPUT 'flhq1.flhq2.CGI(C9RSPDSA)' 'rootdir/cgi-bin/C9RSPDSA'
OPUT 'flhq1.flhq2.CGI(C9RULIST)' 'rootdir/cgi-bin/C9RULIST'
OPUT 'flhq1.flhq2.CGI(CIGRSDSF)' 'rootdir/cgi-bin/CIGRSDSF'
OPUT 'flhq1.flhq2.CGI(CIGRSDSM)' 'rootdir/cgi-bin/CIGRSDSM'
OPUT 'flhq1.flhq2.HTML(CLOUD9S)' 'rootdir/cloud9.htm'
OPUT 'flhq1.flhq2.HTML(C9IVP)' 'rootdir/c9ivp.htm'
OPUT 'flhq1.flhq2.HTML(SDSF)' 'rootdir/sdsf.htm'
OPUT 'flhq1.flhq2.HTML(C9MENUS)' 'rootdir/cloud9/c9menu.htm'
OPUT 'flhq1.flhq2.HTML(C9SPLASS)' 'rootdir/cloud9/c9splash.htm'
OPUT 'flhq1.flhq2.HTML(CIGHSDSB)' 'rootdir/cloud9/CIGHSDSB.htm'
OPUT 'flhq1.flhq2.HTML(CIGHSDSM)' 'rootdir/cloud9/CIGHSDSM.htm'
OPUT 'flhq1.flhq2.HTML(CIGHSDSS)' 'rootdir/cloud9/CIGHSDSS.htm'
OPUT 'flhq1.flhq2.JPG(JPG01)' 'rootdir/cloud9/profiles/user1.jpg'
OPUT 'flhq1.flhq2.JPG(JPG02)' 'rootdir/cloud9/profiles/user2.jpg'
OPUT 'flhq1.flhq2.PRF(PRF01)' 'rootdir/cloud9/profiles/user1.prf'
OPUT 'flhq1.flhq2.PRF(PRF02)' 'rootdir/cloud9/profiles/user2.prf'
/*
//CHMOD0 EXEC PGM=IRXJCL,PARM=(CIGC9SUM)
//*--------------------------------------------------------------------
//* REXX STANDARD FILES
//*--------------------------------------------------------------------
//SYSTSPRT DD SYSOUT=(*)
//SYSTSIN DD DUMMY
//*--------------------------------------------------------------------
//* THE FOLLOWING DATASET MUST CONTAIN THE REXX MEMBER CIGC9SUM.
//*--------------------------------------------------------------------
//SYSEXEC DD DSN=FLHQ1.FLHQ2.JCLLIB.CASE,DISP=SHR
//*(JOBCARD)
//* ------------------------------------------------------------------

//* NAME: CIGC9SUX V2
//* PURPOSE: JCL TO CREATE AND POPULATE THE CLOUD 9 UNIX DIRECTORIES.
//* USAGE: Make sure profile of 'caps off' prior to modifying this
//* member. Unix directory and file names are case sensitive.
//* USAGE: Set to 'number off' prior to modifying this
//* member.
//* ------------------------------------------------------------------
//* * * * N O T I C E * * *
//* THIS PROGRAM IS A PROPRIETARY PRODUCT OF CHICAGO INTERFACE
//* GROUP, INC. @ COPYRIGHT 2002 CHICAGO INTERFACE GROUP, INC.
//* ALL RIGHTS RESERVED.
//* ------------------------------------------------------------------
//*
//* ** **
//* ** PRODUCT INSTALLATION/SETUP ISSUES **
//* ** **
//* THE FOLLOWING IS A LIST OF MODIFICATIONS REQUIRED DURING PRODUCT
//* INSTALLATION AND INITIAL SETUP:
//*
//* 1) ADD A VALID JOB CARD
//* 2) CHANGE rootdir to the root directory value in the
//* in your worksheet.
//* 3) Change USER1 and USER2 to actual userids. Use Upper Case.
//* These files are demo profile files for the IVP.
//* 4) Change FLHQ1 and FLHQ2 as per worksheet.
//* 5) DO NOT change the case on the file names. Unix files are
//* case sensitive.
//*
//CMD0 EXEC PGM=IKJEFT01,REGION=4096K,TIME=1439,DYNAMNBR=200
//*--------------------------------------------------------------------
//* TSO OUTPUT FILE
//*--------------------------------------------------------------------
//SYSTSPRT DD SYSOUT=(*)
//*--------------------------------------------------------------------
//* TSO INPUT FILE
//*--------------------------------------------------------------------
//SYSTSIN DD *
MKDIR 'rootdir/' MODE(7,7,7)
MKDIR 'rootdir/cgi-bin' MODE(7,7,7)
MKDIR 'rootdir/cloud9' MODE(7,7,7)
MKDIR 'rootdir/cloud9/jcl' MODE(7,7,7)
MKDIR 'rootdir/cloud9/profiles' MODE(7,7,7)
MKDIR 'rootdir/logs' MODE(7,7,7)
MKDIR 'rootdir/reports' MODE(7,7,7)
OPUT 'flhq1.flhq2.JCLLIB(CIGC9DYN)' 'rootdir/cloud9/jcl/CIGC9DYN'
OPUT 'flhq1.flhq2.JCLLIB(CIGC9IBM)' 'rootdir/cloud9/jcl/CIGC9IBM'
OPUT 'flhq1.flhq2.JCLLIB(CIGC9MIG)' 'rootdir/cloud9/jcl/CIGC9MIG'
OPUT 'flhq1.flhq2.HTML(C9PID)' 'rootdir/httpd-pid'
OPUT 'flhq1.flhq2.HTML(C9HTTPD)' 'rootdir/httpd.conf'
OPUT 'flhq1.flhq2.HTML(C9EVARS)' 'rootdir/httpd.envvars'
OPUT 'flhq1.flhq2.HTML(C9MVSDS)' 'rootdir/httpd.mvsds'
OPUT 'flhq1.flhq2.CGI(CLZREX00)' 'rootdir/cgi-bin/CLZREX00'
OPUT 'flhq1.flhq2.CGI(CLZREXIT)' 'rootdir/cgi-bin/CLZREXIT'
OPUT 'flhq1.flhq2.CGI(C9RADDS)' 'rootdir/cgi-bin/C9RADDS'
OPUT 'flhq1.flhq2.CGI(C9REDRV)' 'rootdir/cgi-bin/C9REDRV'
OPUT 'flhq1.flhq2.CGI(C9RENDVR)' 'rootdir/cgi-bin/C9RENDVR'
OPUT 'flhq1.flhq2.CGI(C9RINDEX)' 'rootdir/cgi-bin/C9RINDEX'
OPUT 'flhq1.flhq2.CGI(C9RLMBR)' 'rootdir/cgi-bin/C9RLMBR'
OPUT 'flhq1.flhq2.CGI(C9RLUNIX)' 'rootdir/cgi-bin/C9RLUNIX'
OPUT 'flhq1.flhq2.CGI(C9RMENU)' 'rootdir/cgi-bin/C9RMENU'
OPUT 'flhq1.flhq2.CGI(C9RMLIST)' 'rootdir/cgi-bin/C9RMLIST'
OPUT 'flhq1.flhq2.CGI(C9RPROF)' 'rootdir/cgi-bin/C9RPROF'
OPUT 'flhq1.flhq2.CGI(C9RSCLD)' 'rootdir/cgi-bin/C9RSCLD'
OPUT 'flhq1.flhq2.CGI(C9RSCLM)' 'rootdir/cgi-bin/C9RSCLM'
OPUT 'flhq1.flhq2.CGI(C9RSCLMA)' 'rootdir/cgi-bin/C9RSCLMA'
OPUT 'flhq1.flhq2.CGI(C9RSDRV)' 'rootdir/cgi-bin/C9RSDRV'
OPUT 'flhq1.flhq2.CGI(C9RSPDSA)' 'rootdir/cgi-bin/C9RSPDSA'
OPUT 'flhq1.flhq2.CGI(C9RULIST)' 'rootdir/cgi-bin/C9RULIST'
OPUT 'flhq1.flhq2.CGI(CIGRSDSF)' 'rootdir/cgi-bin/CIGRSDSF'
OPUT 'flhq1.flhq2.CGI(CIGRSDSM)' 'rootdir/cgi-bin/CIGRSDSM'

Installation Guide: Breeze and Cloud 9 for SCLM - 53 -
OPUT 'flhq1.flhq2.HTML(CLOUD9S)' 'rootdir/cloud9.htm'
OPUT 'flhq1.flhq2.HTML(C9IVP)' 'rootdir/c9ivp.htm'
OPUT 'flhq1.flhq2.HTML(SDSF)' 'rootdir/sdsf.htm'
OPUT 'flhq1.flhq2.HTML(C9MENU)' 'rootdir/cloud9/c9menu.htm'
OPUT 'flhq1.flhq2.HTML(C9SPLASH)' 'rootdir/cloud9/c9splash.htm'
OPUT 'flhq1.flhq2.HTML(CIGHSDSB)' 'rootdir/cloud9/CIGHSDSB.htm'
OPUT 'flhq1.flhq2.HTML(CIGHSDSM)' 'rootdir/cloud9/CIGHSDSM.htm'
OPUT 'flhq1.flhq2.HTML(CIGHSDSS)' 'rootdir/cloud9/CIGHSDSS.htm'
OPUT 'flhq1.flhq2.HTML(SDSF)' 'rootdir/cloud9/sdsf.htm'
OPUT 'flhq1.flhq2.JPG(JPG01)' 'rootdir/cloud9/profiles/user1.jpg'
OPUT 'flhq1.flhq2.JPG(JPG02)' 'rootdir/cloud9/profiles/user2.jpg'
OPUT 'flhq1.flhq2.PRF(PRF01)' 'rootdir/cloud9/profiles/user1.prf'
OPUT 'flhq1.flhq2.PRF(PRF02)' 'rootdir/cloud9/profiles/user2.prf'
/*
//CHMOD0 EXEC PGM=IRXJCL,PARM=(CIGC9SUM)
//*--------------------------------------------------------------------
//* REXX STANDARD FILES
//*--------------------------------------------------------------------
//SYSTSPRT DD SYSOUT=(*)
//SYSTSIN DD DUMMY
//*--------------------------------------------------------------------
//* THE FOLLOWING DATASET MUST CONTAIN THE REXX MEMBER CIGC9SUM.
//*--------------------------------------------------------------------
//SYSEXEC DD DSN=FLHQ1.FLHQ2.JCLLIB,DISP=SHR
26. CIGC9SUX
After this job has been submitted and executes successfully, the Cloud 9 directories should be populated and ready for testing.

Step 13: Review Authorization Requirements for C9RSDRV
The module C9RSDRV is the interface module for invoking authorized, realtime processes in the HTTP server.
To check the attributes of the C9RSDRV authorized program interface module:
1. Access Unix System services
2. Drive a list of unix files.
a. For example, if you are using an ISPF Unix shell, issue the following command:
tso % ish
b. When the command line appears, type
rootdir/cgi-bin/
3. Issue the attribute ‘a’ line command for C9RSDRV.
rootdir/cgi-bin/
Select one or more files with / or action codes.
Type Filename
_ Dir .
_ Dir ..
_ File archive.cgi
_ File cigadd.cgi
_ File cigadde.cgi
_ File CIGCNVRT
a File C9RSDRV
_ File CIGFTYPE
_ File CIGGETP
_ File CIGGETV
File CIGGETV2
27. Unix Authority

Installation Guide: Breeze and Cloud 9 for SCLM - 55 -
4. From the Edit pulldown menu, select Option 1 Mode Fields.
.---------------------------------------------------.
/ | Edit Help |
S | .------------------------------. --------------- |
| | 1. Mode fields... | es |
| | 2. Owning user... | |
_ | | 3. Owning group... | |
_ | | 4. User auditing... | More: + |
_ | | 5. Auditor auditing... | |
_ | | 6. File format... | |
_ | | 7. Extended Attributes... | |
_ | '------------------------------' |
a | Group owner . . . : TEST(200) |
_ | Last modified . . : 03/17/2000 19:29 GMT |
_ | Last changed . . . : 03/25/2000 15:49 GMT |
_ | Last accessed . . : 04/05/2000 22:37 GMT |
| Created . . . . . : 03/17/2000 19:29 GMT |
_ | Link count . . . . : 1 |
_ | Set UID bit . . . : 0 |
_ | |
_ | |
_ '---------------------------------------------------'
_ File cigpdsa.cgi
28. Unix Options
5. From the "Change the Mode" panel (shown below) ensure that the sticky bit (the access permission setting) is set to 1.
.---------------------------------------------------.
| Edit Help |
| ------------------------------------------------ |
| Display File Attributes |
| |
| Pathname : /u/cig/cgi-bin/C9RSDRV |
| .------------------------------------. |
| File typ | Change the Mode | |
| Permissi | | |
| File siz | Change any values and press | |
| File own | Enter. | |
| Group ow | | |
| Last mod | Permissions . . . . 777 | |
| Last cha | Set UID bit . . . . 0 | |
| Last acc | Set GID bit . . . . 0 | |
| Created | Sticky bit . . . . . 1 | |
| Link cou | | |
| Set UID | | |
| | | |
| '------------------------------------' |
'---------------------------------------------------'
29. Change the Mode
If you encounter any problems with this step, double-check that the following items are in place:
• The real module resides in the linklist or steplib.
• A dummy stub entry, with a length of zero, resides in the CGI directory.
• The C9RSDRV file has the access permission enabled (referred to as "sticky bit" in USS terminology).
If you are using the CA-Endevor Bridge CIGINI option, you will also need to perform the authorization check Step 13 for the CGI called CIGEDRV.
Troubleshooting
CA-Endevor Bridge

Installation Guide: Breeze and Cloud 9 for SCLM - 57 -
Step 14: Cloud 9 Server Installation Verification
To Test the Cloud 9 Server: 1. Submit the CIGC9SRV job, located in the JCLLIB.CASE
you offloaded from the installation tape. 2. View the //SYSPRINT DD and //SYSOUT DD in the job
output and verify that it looks like the output below.
********************************* TOP OF DATA ******* IMW0234I Starting.. httpd IMW0235I Server is ready. ******************************** BOTTOM OF DATA ***** ********************************* TOP OF DATA ********************* ............ This is IBM HTTP Server V5R1M0 ............ Built on Feb 17 1999 at 20:10:29. ............ Started at Sat Mar 25 16:17:31 2000 ............ Running as "P390", UID:0, GID:0. ******************************** BOTTOM OF DATA *******************
30. SYSPRINT and SYSOUT DD Output
To quiesce the server job, enter one of the following commands: If entered on an MVS console: STOP cloud9-job-name,X If entered via a console interface, such as SDSF: /STOP cloud9-name
Because the Cloud 9 server uses TCP/IP stack and a cancel does not always clean up storage, CIG recommends the MVS console command method over simply canceling the job. Issuing the console command will allow the HTTP server job to end cleanly.
1. Re-submit the server JCL (CIGC9SRV) for the next test.
Start the Server
Shut Down the Server
Restart the Server

CHECKPOINT #4 At this point, you should have successfully completed the following tasks:
Task Completed? Copied the USS files to the rootdir? Submitted the server JCL – CIGC9SRV?
Reviewed the sysout files showing the port # and verifying that this is port # you expected?
Issued a Quiesce of the server to test command and clean up?
Resubmitted the server for the next test?
31. Checkpoint 4

Installation Guide: Breeze and Cloud 9 for SCLM - 59 -
Step 15: Invoking and Logging On to Cloud 9
The c9ivp.htm HTML file should have been copied to the rootdir of your HTTP configuration. Run this IVP to verify the basic HTTP install and security access. If you can’t get through this step, you have not set up the HTTP task and possibly the security correctly. Access C9IVP.HTM directly from HTTP directories:
1. On your desktop, launch your browser.
2. Modify the following statement with your IP address and port number and type it in the browser’s address window (labeled “Location” in Netscape Navigator and “Address” in Internet Explorer):
http://ip-address:portno-c9/c9ivp.htm
3. You will be prompted with a log-in panel. Enter your TSO user id and password and click “ok”.
You should see the following message on your browser:
32. c9ivp.htm Invocation
C9ivp.htm

If you were successful invoking the c9ivp.htm, then you are ready to test the invocation of the actual Cloud 9 product. The purpose of this test is to verify that the basic configuration has been performed successfully and that Cloud 9 is accessable via the Web. To test installation of the application, execute the cloud9.htm file in one of the two following ways: Access Cloud 9 directly from HTTP directories:
4. On your desktop, launch your browser.
5. Modify the following statement with your IP address and port number and type it in the browser’s address window (labeled “Location” in Netscape Navigator and “Address” in Internet Explorer):
http://ip-address:portno-c9/cloud9.htm
The browser will request the html file directly from HTTP and execute the Cloud 9 application.
6. When the Cloud 9 product is invoked you will be prompted with a login panel. Enter your TSO user id and password and click “ok” to begin using Cloud 9.
From a file on your desktop: 1. Download the cloud9.htm file and save the file as
cloud9.htm to your C:\Windows\Desktop directory. Windows™ will create a desktop icon for the file (samples of which are shown below).
2. From your desktop, double-click on the cloud9htm icon.
This will launch your web browser and execute the Cloud 9 application.
3. When the Cloud 9 product is invoked you will be prompted
with a logon panel, shown below. Enter your TSO user id and password and click “ok” to begin using Cloud 9.
Cloud9.htm
Execute cloud9.htm

Installation Guide: Breeze and Cloud 9 for SCLM - 61 -
33. Logon prompt
If you can not invoke the Cloud 9 application, use the following list to attempt to determine the problem:
1. Is the Cloud 9 server active? How do you know?
2. Are there any error messages in the SYSOUT queue or on the CONSOLE?
3. From your browser are you using the correct ip-address/port combination? How do you know?
4. Are you using a Cloud 9 supported browser? (Netscape 4.6 or Explorer 5.0)
5. Can you access any other HTTP applications?
6. Verify that the Unix directories are configured as per Appendix A in this manual.
Diagnostics

Step 16: Perform Profile Setup
During the execution of CIGC9SUX a profile and picture for two userids was stored in the Cloud 9 root directory. If you are logged on as one of those userids, then you can view the profile at this time.
34. Cloud 9 Profile
Setup your profile at this time with real values and JOB CARD information.

Installation Guide: Breeze and Cloud 9 for SCLM - 63 -
Step 17: Perform Batch and Interactive IVPS
To test the connection to the host, perform the following steps:
1. Select List SCLM Files from the menu.
2. At the Basic Search panel, fill in a valid SCLM project name and optionally other filters.
3. Click Submit.
35. SCLM Query
4. Verify that the list returned has the same format as below:

36. SCLM List
5. Use this list to perform batch and interactive IVP processes.
• Check one of the members on the list
• Select Build action.
• Fill in all options and click submit.
• Check the expansion of the JCL in the hold queue to validate that CIGC9IBM was modified correctly.
• Review the batch JCL that was submitted and ensure CIGC9IBM was found and modified correctly.
To close your browser, either:
6. Select Close from the file pull-down menu Or 7. Click on the “X” in the upper right hand corner of the
browser window.
Test the Batch Interface
Exit Cloud 9

Installation Guide: Breeze and Cloud 9 for SCLM - 65 -
Step 18: Perform Batch SLR IVP Earlier in the install you created a demo version of the SLR database. At this time execute the SLR IVP to review the CIGINI setup and the demo database display and update.
1. Using ISPF EDIT, access member CIGSOJ06 in the JCLLIB you offloaded from the installation tape.
2. Add a valid job card.
3. Substitute your site-specific values (identified on the Installation Worksheet.) for those values shown below in bold italics. If you made global JCL changes in Step 2 of this manual, you may skip this item.
4. Submit the member
5. Review output
The following is the CIGSOJ06 member for testing the SLR setup and update.
//**(JOBCARD)
//**
//********************************************************************
//* CLOUD 9 FOR SCLM VERSION OF IVP *
//********************************************************************
//* *
//* CIGSOJ06 - THE PURPOSE OF THIS JCL TO RUN THE SLR DATA IVP. *
//* STEP 1 WILL PRINT THE CIGINI DEFINITIONS. *
//* STEP 2 WILL LIST IVP SLR RULE DEFINITIONS. *
//* STEP 3 WILL ADD DATASET AND SCLM TYPE DEFINITIONS *
//* AND THEN LIST ALL RULES IN THE DATABASE. *
//* NOTE: - SEE THE CLOUD 9 V2 PLANNING AND ADMINISTATION GUIDE *
//* FOR MORE INFORMATION ON LONG NAME USAGE AND SETUP. *
//* NOTE: - THE SYNTAX PROVIDED IS FOR AN EXAMPLE ONLY. *
//* IT IS RECOMMENDED THAT STEP3 SYNTAX BE TAILORED TO *
//* ACTUAL LOCAL VALUES. *
//********************************************************************
//* *
//* REQUIRED JCL MODIFICATION: *
//* 1) INCLUDE A JOBCARD *
//* 2) CHANGE THE FOLLOWING AS PER THE INSTALLATION WORKSHEET. *
//* - FLHQ1 AND FLHQ2 *
//* *
//********************************************************************
//* *
//* STEP 1: PRINT THE CIGINI DEFINITIONS. *
//* *
//********************************************************************
//STEP1 EXEC PGM=CIGFEXEC,PARM=PRINTINI
//STEPLIB DD DSN=FLHQ1.FLHQ2.LOADLIB,DISP=SHR
//CIGPRINT DD SYSOUT=*
//********************************************************************
//* *
//* STEP 2: LIST THE CURRENT CONTENTS OF THE SLR DATABASE *
//* *
//********************************************************************
Modify and Submit CIGSOJ06

//STEP2 EXEC PGM=C9LSLR
//STEPLIB DD DSN=FLHQ1.FLHQ2.LOADLIB,DISP=SHR
//CIGPUNCH DD SYSOUT=*
//CIGLOG DD SYSOUT=*
//CIGIN DD *
LIST NAME RULES.
/*
//********************************************************************
//* *
//* STEP 3: ADD DATASET AND TYPE DEFINITIONS TO SLR DATABASE. *
//* USE AS IS OR TAILOR WITH LOCAL VALUES. *
//* *
//********************************************************************
//STEP3 EXEC PGM=C9LSLR
//STEPLIB DD DSN=FLHQ1.FLHQ2.LOADLIB,DISP=SHR
//CIGPUNCH DD SYSOUT=*
//CIGLOG DD SYSOUT=*
//CIGIN DD *
ADD NAME RULE FOR SCLM TYPE HTML CASE SENSITIVE .
ADD NAME RULE FOR SCLM TYPE JAVA CASE SENSITIVE .
ADD NAME RULE FOR SCLM TYPE JSCRIPT CASE SENSITIVE .
ADD NAME RULE FOR SCLM TYPE XML CASE SENSITIVE .
ADD NAME RULE FOR SCLM TYPE UNIXMAKE CASE SENSITIVE .
ADD NAME RULE FOR SCLM TYPE DOC CASE INSENSITIVE .
LIST NAME RULES.
/*
37. CIGSOJ06

Installation Guide: Breeze and Cloud 9 for SCLM - 67 -
Step 19: Invoking the JES2 SDSF Viewer
The sdsf.htm HTML file should have been copied to the rootdir of your HTTP configuration. Run this IVP to verify the basic SDSF access. Access sdsf.htm directly from HTTP directories:
1. On your desktop, launch your browser.
2. Modify the following statement with your IP address and port number and type it in the browser’s address window (labeled “Location” in Netscape Navigator and “Address” in Internet Explorer):
http://ip-address:portno-c9/sdsf.htm
You should see the following application on your browser:
38. sdsf.htm Invocation
Sdsf.htm
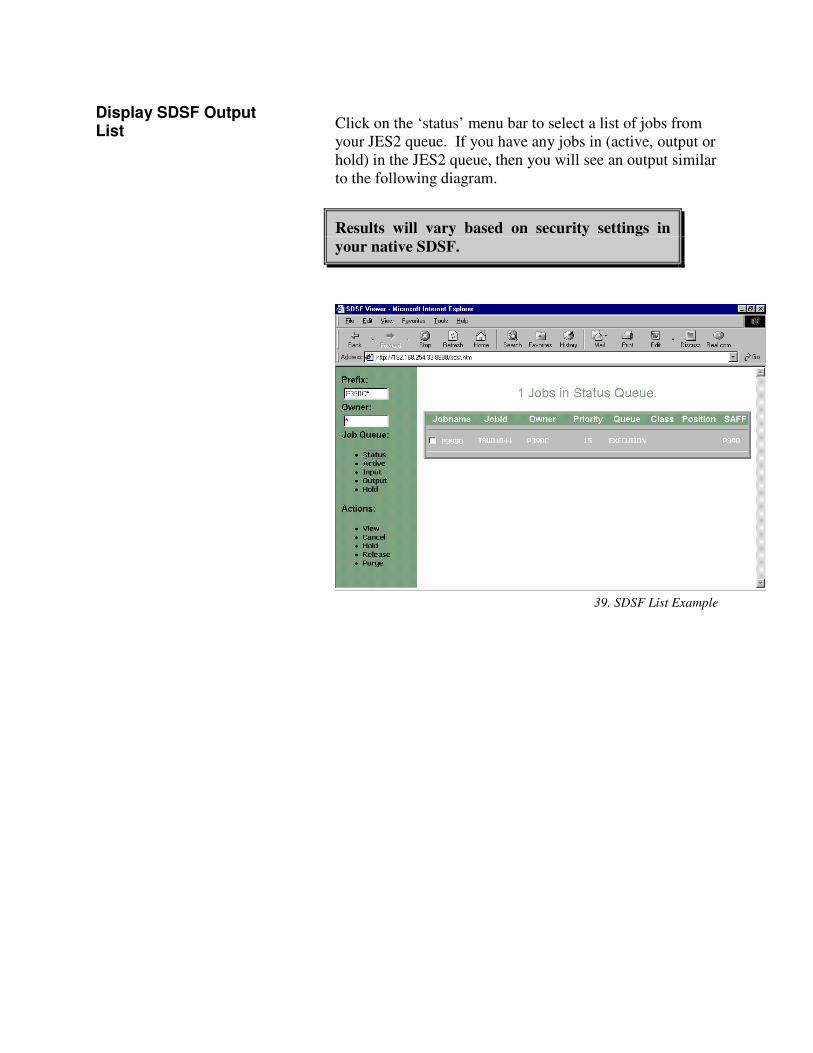
Click on the ‘status’ menu bar to select a list of jobs from your JES2 queue. If you have any jobs in (active, output or hold) in the JES2 queue, then you will see an output similar to the following diagram.
Results will vary based on security settings in your native SDSF.
39. SDSF List Example
Display SDSF Output List

Installation Guide: Breeze and Cloud 9 for SCLM - 69 -
CHECKPOINT #5 At this point, you should have successfully completed the following tasks:
Task Completed?
Invoked c9ivp.htm to verify basic HTTP configuration?
Invoked cloud9.htm and invoked the Cloud 9 application?
Logon onto the application, passing the security check?
Viewed demo profile and updated with real data?
Displayed members and ran SCLM jobs? Exited successfully from Cloud 9? Executed CIGSOJ06 IVP for the SLR database?
Setup the backup, delete and define JCL for the SLR?
Invoked the sdsf.htm JES2 SDSF viewer?
40. Checkpoint 5

Breeze Section:
Step 20: Customize the Breeze HTTP Server JCL and Supporting Control Files
Step 20(a): Modify CIGSMSRV The following JCL member—CIGSMSRV—to invoke the Breeze HTTP server is located in the JCLLIB offloaded from the installation tape.
Even though the global change process may have modified this member, it is important that CIGSMSRV (as well as CIGSMPKG and CIGSMPRT) be reviewed for non-standard JCL issues.
If the product load library used to offload the cartridge is not an authorized dataset, then you must copy the product load library into the authorized library for server execution. The Breeze HTTP server must run from an authorized library due to RACROUTE calls made at logon time. Note, also, that this job must not timeout. If the job is being run in batch, then you must specify a time parameter of TIME=NOLIMIT on the job card. This job can also be made a started task. The Breeze server uses the portno-brz from the execution parm. If this value is not provided, then the Breeze server will use the portno number provided in the $CONTROL member in the JAVACONTROLSERVER dataset pointed to in the CIGINI file. The $CONTROL method is the old method and was found to be hard to diagnose. For ease diagnostics, it is advised that the portno be provided in the execution parameter.
Warning: It is recommended that the Breeze port be reserved in TCP/IP for Breeze usage only. This will guarantee that the port is used only by Breeze. Port reservation is generally handled by the network systems programmer, and is implemented by updating the TCPIP.PROFILE dataset.
JCL to Invoke the Breeze HTTP Server
Authorized Dataset Requirement
Timeout Parameter
Port Number/$Control Member Note:
Port Number Note

Installation Guide: Breeze and Cloud 9 for SCLM - 71 -
Note again that the port number must be higher than 1024, as port numbers lower than 1024 are reserved for internal system services. If the port number on the JCL PARM is incorrect or unavailable, there will be an error message in the CIGLISTN trace dd stating that the communication path cannot be established on the port provided.
//* (JOBCARD)
//* ------------------------------------------------------------------
//* NAME....: CIGSMSRV
//* PURPOSE : JCL TO INVOKE THE BREEZE FOR SCLM V2 SERVER.
//*
//* ------------------------------------------------------------------
//* * * * N O T I C E * * *
//* THIS PROGRAM IS A PROPRIETARY PRODUCT OF CHICAGO INTERFACE
//* GROUP, INC. @ COPYRIGHT 2002 CHICAGO INTERFACE GROUP, INC.
//* ALL RIGHTS RESERVED.
//* ------------------------------------------------------------------
//*
//* ** **
//* ** PRODUCT INSTALLATION/SETUP ISSUES **
//* ** **
//* THE FOLLOWING IS A LIST OF MODIFICATIONS REQUIRED DURING PRODUCT
//* INSTALLATION AND INITIAL SETUP:
//*
//* 1. INCLUDE A VALID JOB CARD
//* 2. CHANGE THE FLHQ1.FLHQ2 TO POINT TO THE PRODUCT
//* LOADLIB, JAVA CONTROL AND JCL LIBRARIES.
//* 3. CHANGE THE PORTNO-BRZ TO THE VALUE FROM THE
//* CIG SUITE INSTALLATION WORKSHEET.
//* 4. MAKE SURE THE TCP LIBRARY IS INCLUDED IN THE
//* STEPLIB.
//* 5. INCLUDE THE THREE DD FILES NEEDED FOR BATCH
//* JOB SUBMISSION:
//* CIGSMPKG - BREEZE PACKAGE SHELL
//* CIGSMPRT - BREEZE PRINT SERVICES SHELL
//* CIGINRDR - INTERNAL READER
//********************************************************************
//* *
//* PRINTINI: PRINT THE CIGINI DEFINITIONS FOR DIAGNOSTIC PURPOSES. *
//* *
//********************************************************************
//PRINTINI EXEC PGM=PRINTINI
//STEPLIB DD DSN=FLHQ1.FLHQ2.LOADLIB,DISP=SHR
//CIGPRINT DD SYSOUT=*
//*********************************************************************
//* SERVER JCL
//*********************************************************************
//CIGLISTN EXEC PGM=CIGLISTN,PARM='PORTNO=PORTNO-BRZ'
//STEPLIB DD DSN=FLHQ1.FLHQ2.LOADLIB,DISP=SHR
// DD DSN=TCPIP.SEZATCP,DISP=SHR
//*- - - - - - - - - - - - - - - - - - - - - - - - - - - - - - - - - -
//CIGJAVA DD DSN=FLHQ1.FLHQ2.JAVALIB,DISP=SHR
//CIGLOG DD SYSOUT=*
//CIGOUT DD SYSOUT=*
//*- - - - - - - - - - - - - - - - - - - - - - - - - - - - - - - - - -
//CIGINRDR DD SYSOUT=(A,INTRDR),DCB=(LRECL=80,BLKSIZE=800,RECFM=FB)
//CIGSMPKG DD DSN=FLHQ1.FLHQ2.JCLLIB(CIGSMPKG),DISP=SHR
//CIGSMPRT DD DSN=FLHQ1.FLHQ2.JCLLIB(CIGSMPRT),DISP=SHR
//*
//*- - - - - - - - - - - - - - - - - - - - - - - - - - - - - - - - - -
//* TO TURN ON INTERNAL TRACES UNCOMMENT THE FOLLOWING DD STATEMENTS
//* DO NOT RUN IN PRODUCTION WITH THE TRACES TURNED ON. THE TRACES
//* WILL CAUSE PERFORMANCE PROBLEMS.
Sample JCL to Start the CTS Server:

//*- - - - - - - - - - - - - - - - - - - - - - - - - - - - - - - - - -
//*CIGXLSTN DD SYSOUT=*
//*CIGXSUBT DD SYSOUT=*
//*CIGFTP DD SYSOUT=*
//*- - - - - - - - - - - - - - - - - - - - - - - - - - - - - - - - - -
41. CIGSMSRV

Installation Guide: Breeze and Cloud 9 for SCLM - 73 -
Step 20(b): Review the CIGSMPKG and CIGSMPRT Browser JCL Shells
There are two JCL shells pointed to by the CIGSMSRV: CIGSMPKG and CIGSMPRT. These members are JCL shells that set certain controls used by Breeze to submit SCLM print and batch package jobs. Please review the job card portion of the JCL members to verify that the job card information is correct for your installation.
Note also the following:
1. The job name must remain JC1. The CTS server builds the job name from browser data.
2. The CIGSMPRT and CIGSMPKG JCL shells include a //USERID, PASSWORD directive, so that the job submitted through the server is owned by the User not the server. The server manipulates the job card prior to submission. Please review the job submission security issues with your security administrator to see how security is set up for your installation. You may wish to use one of the alternate job card configuration options commented in the JCL. The default method, though, is the most common.
The following CIGSMPKG JCL shell is located in the JCLLIB offloaded from the installation tape.
//JC1 JOB (ACCT#),'NAME',CLASS=A,REGION=4096K,
// MSGCLASS=H,MSGLEVEL=(1,1),
//JC1_USER,PASSWORD
//* -----------------------------------------------------------------
//* NAME: CIGSMPKG
//* PURPOSE: JCL TO SUBMIT VOTES FOR BREEZE FOR SCLM FROM BROWSER.
//*-------------------------------------------------------------------
//* JOB CARD USAGE NOTE:
//* //JC1 IS REPLACED WITH USERID PLUS A J
//* //JC1_USER OR //JC1_USER,PASSWORD MUST BE THE LAST JOB STATEMENT.
//* THESE DIRECTIVES WILL BE REPLACED WITH // USER=USERID OR
//* // USER=USERID,PASSWORD.
//*-------------------------------------------------------------------
//*
//* ** **
//* ** PRODUCT INSTALLATION/SETUP ISSUES **
//* ** **
//* THE FOLLOWING IS A LIST OF MODIFICATIONS REQUIRED DURING PRODUCT
//* INSTALLATION AND INITIAL SETUP:
//*
//* 1. IMPORTANT!! LEAVE JOB NAME AS //JC1. SERVER EXPECTING
JCL for Job Submission from the Breeze HTTP Server
CIGSMPKG

//* TO BUILD JOB NAME FROM BROWSER DATA.
//* 2. IMPORTANT!! THE //CIGIN DD MUST REMAIN AN INSTREAM
//* DD CARD. THE SERVER WILL BE BUILDING THE SYNTAX AND
//* INSERTING.
//* 3. DETERMINE WHICH JOBCARD YOUR SITE WILL REQUIRE
//* 4. INCLUDE VALID JOB CARD INFORMATION ( ACCT#, CLASS, ETC)
//* 5. CHANGE THE STEPLIB AND CONLIB TO POINT TO THE
//* CURRENT BREEZE PRODUCT LIBRARIES AT THE YOUR INSTALLATION.
//*
//********************************************************************
//* BATCH PACKAGE JCL SHELL FOR BROWSER.
//* POINT TO THIS MEMBER IN THE CIGSMSRV SERVER JCL ( DD=CIGSMPKG)
//********************************************************************
//VOTE EXEC PGM=CIGSAPV1,DYNAMNBR=1500
//STEPLIB DD DSN=FLHQ1.FLHQ2.LOADLIB,DISP=SHR
//SYSTERM DD SYSOUT=*
//SYSPRINT DD SYSOUT=*
//********************************************************************
//* PACKAGE SCL REQUEST DATASET.
//* INSTREAM DATA BUILT BY THE SERVER. DO NOT CHANGE DD CIGIN.
//********************************************************************
//CIGIN DD *
/*
//CIGLOG DD SYSOUT=*
//CIGRPT DD SYSOUT=*
42. CIGSMPKG
The following CIGSMPRT JCL shell is located in the JCLLIB offloaded from the installation tape. Note that this member is actually the standard SCLM batch JCL plus formatting and file return steps. Because this is SCLM batch JCL, the ‘CMD0’ step requires knowledge of the full suite of ISPF/SCLM datasets typically included in TSO batch. These datasets should have been identified in Step 2 as the ISPF/SCLM site-specific dataset names. Please refer to the Dataset worksheet for this information.
//JC1 JOB (ACCT#),'NAME',CLASS=A,REGION=4096K,
// MSGCLASS=H,MSGLEVEL=(1,1),
//JC1_USER,PASSWORD
//* ------------------------------------------------------------------
//* NAME: CIGSMPRT
//* PURPOSE: JCL TO SUBMIT PRINT, CHANGES OR ACCOUNTING REQUESTS.
//* RETURNS A FILE TO THE SERVER, WHICH IS WAITING FOR THE
//* FILE FOR A PREDETERMINED AMOUNT OF TIME.
//*--------------------------------------------------------------------
//* JOB CARD USAGE NOTE:
//* //JC1 IS REPLACED WITH USERID PLUS A J
//* //JC1_USER OR //JC1_USER,PASSWORD MUST BE THE LAST JOB STATEMENT.
//* THESE DIRECTIVES WILL BE REPLACED WITH // USER=USERID OR
//* // USER=USERID,PASSWORD.
//*--------------------------------------------------------------------
//*
//* ** **
//* ** PRODUCT INSTALLATION/SETUP ISSUES **
//* ** **
//* THE FOLLOWING IS A LIST OF MODIFICATIONS REQUIRED DURING PRODUCT
//* INSTALLATION AND INITIAL SETUP:
CIGSMPRT

Installation Guide: Breeze and Cloud 9 for SCLM - 75 -
//*
//* 1. IMPORTANT!! LEAVE JOB NAME AS //JC1. SERVER EXPECTING
//* TO BUILD JOB NAME FROM BROWSER DATA.
//* 2. MODIFY THE DIRECTIVE HLQ1=FLQH1 TO TELL THE SERVER THE
//* HIGH LEVEL QUALIFIER FOR TEMPORARY FILES. THE SERVER WILL
//* GENERATE THE ACTUAL DATASET USING THE FOLLOWING NAMING
//* STANDARD: FLHQ1.USERID.DYYMMDD.THHMM
//* 9/12/2001 &SYSUID IS NOW SUPPORTED AS THE FIRST NODE.
//*
//* 3. IMPORTANT!! THE VARIOUS PROC OVERRIDE STATEMENTS AT THE
//* END OF THIS MEMBER MUST REMAIN IN THE ORDER THAT THEY
//* APPEAR AND MUST RETAIN THEIR NAMES AS GIVEN. THESE SCLM
//* INPUT STREAMS ARE CREATED BY THE SERVER IN RESPONSE TO
//* THE REQUEST FROM THE BROWSER.
//* 4. INCLUDE VALID JOB CARD INFORMATION ( ACCT#, CLASS, ETC)
//* 5. MODIFY UNIT=TDISK AS PER WORKSHEET.
//* 6. MODIFY UNIT=DUNIT AS PER WORKSHEET.
//* 7. VERIFY THAT THE CMD0 STEPLIB HAS BOTH THE
//* CURRENT ISPF/SCLM AND BREEZE PRODUCT LIBRARIES.
//* 8. THIS JCL REQUIRES THE FULL SUITE OF ISPF/SCLM
//* LIBRARIES TO BE INCLUDED IN THE CMD0 STEP. PLEASE REVIEW
//* THE LIBRARY NAMES WITH THE PERSON HOW MAINTAINS THE
//* LOGON PROC FOR SCLM ACCESS. THE CURRENT NAMES LISTED
//* MAY NOT BE VALID FOR YOUR ENVIRONMENT.
//*
//*********************************************************************
//* *
//*********************************************************************
//BRSCLM PROC
//GENER0 EXEC PGM=IEBGENER
//SYSPRINT DD SYSOUT=*
//SYSIN DD DUMMY
//SYSUT1 DD DUMMY
//SYSUT2 DD DSN=&&CLIST0(TEMPNAME),UNIT=TDISK,
// SPACE=(TRK,(1,1,2),RLSE),
// DISP=(NEW,PASS),
// DCB=(LRECL=80,BLKSIZE=20400,DSORG=PO,RECFM=FB)
//******************************************************************
//CMD0 EXEC PGM=IKJEFT01,REGION=4096K,TIME=1439,DYNAMNBR=200
//******************************************************************
//* STEPLIB LIBRARIES (BREEZE AND SCLM PRODUCTS)
//******************************************************************
//STEPLIB DD DSN=FLHQ1.FLHQ2.LOADLIB,DISP=SHR
// DD DSN=ISP.SISPLPA,DISP=SHR
//*
//******************************************************************
//* ISPF LIBRARIES
//******************************************************************
//ISPMLIB DD DSN=FLHQ1.FLHQ2.ISPMLIB,DISP=SHR
// DD DSN=ISP.SISPMENU,DISP=SHR
//*
//ISPSLIB DD DSN=FLHQ1.FLHQ2.ISPSLIB,DISP=SHR
// DD DSN=ISP.SISPSENU,DISP=SHR
// DD DSN=ISP.SISPSLIB,DISP=SHR
//*
//ISPPLIB DD DSN=FLHQ1.FLHQ2.ISPPLIB,DISP=SHR
// DD DSN=ISP.SISPPENU,DISP=SHR
//*
//ISPTLIB DD UNIT=VIO,DISP=(NEW,PASS),SPACE=(CYL,(1,1,5)),
// DCB=(LRECL=80,BLKSIZE=19040,DSORG=PO,RECFM=FB),
// DSN= TEMPORARY TABLE LIBRARY
// DD DSN=ISP.SISPTENU,DISP=SHR
//*
//ISPTABL DD UNIT=VIO,DISP=(NEW,PASS),SPACE=(CYL,(1,1,5)),
// DCB=(LRECL=80,BLKSIZE=19040,DSORG=PO,RECFM=FB),
// DSN= TEMPORARY TABLE LIBRARY
//*
//ISPPROF DD UNIT=VIO,DISP=(NEW,PASS),SPACE=(CYL,(1,1,5)),
// DCB=(LRECL=80,BLKSIZE=19040,DSORG=PO,RECFM=FB),
// DSN= TEMPORARY TABLE LIBRARY

//*
//ISPLOG DD SYSOUT=*,
// DCB=(LRECL=120,BLKSIZE=2400,DSORG=PS,RECFM=FB)
//*
//ISPCTL1 DD DISP=NEW,UNIT=VIO,SPACE=(CYL,(1,1)),
// DCB=(LRECL=80,BLKSIZE=800,RECFM=FB) TEMPORARY FILE
//SYSTERM DD SYSOUT=*
//CIGVTRAX DD SYSOUT=*
//CIGTRACE DD DUMMY
//CIGLOG DD SYSOUT=*
//*
//******************************************************************
//* TEMPORARY CLIST CONTAINING COMMAND TO BE EXECUTED
//******************************************************************
//SYSPROC DD DSN=&&CLIST0,DISP=(OLD,DELETE)
// DD DSN=FLHQ1.FLHQ2.ISRCLIB,DISP=SHR
// DD DSN=ISP.SISPCLIB,DISP=SHR CLIST LIBRARY OW01230
// DD DSN=SYS1.CLIST,DISP=SHR CLIST LIBRARY OW01230
//*
//******************************************************************
//* BUILD USER EXIT OUTPUT FILE
//******************************************************************
//BLDEXIT DD DUMMY
//******************************************************************
//* OUTPUT CARD
//******************************************************************
//BLDREPT DD DUMMY
//BLDLIST DD DUMMY
//BLDMSGS DD DUMMY
//SYSPRINT DD SYSOUT=(*)
//******************************************************************
//* NLS TABLE AND TRANSLATION TABLE NAME FILE
//******************************************************************
//ZFLMDD DD DUMMY
//******************************************************************
//* SCLMCMD FILES
//******************************************************************
//FLMMSGS DD SYSOUT=(*)
//******************************************************************
//* TSO OUTPUT FILE
//******************************************************************
//SYSTSPRT DD SYSOUT=(*)
//******************************************************************
//* TSO INPUT FILE
//******************************************************************
//SYSTSIN DD DUMMY
//******************************************************************
//* SUPERC OR IEBCOPY INPUT FILES
//******************************************************************
//NEWDD DD DUMMY
//OLDDD DD DUMMY
//SYSIN DD DUMMY
//******************************************************************
//* DESIGNATED OUTPUT &&DSN NAME.
//* THE ACTUAL DDNAME CHANGES WITH FUNCTION.
//******************************************************************
//CIGTEMP DD DSN=&&CIGTEMP,
// DISP=(NEW,PASS),
// UNIT=TDISK,SPACE=(TRK,(45,45))
//******************************************************************
//* GENERAL FORMAT STEP
//* PGM NAME IS DYNAMICALLY GENERATED
//******************************************************************
//FORMAT EXEC PGM=CIGFBR14
//STEPLIB DD DSN=FLHQ1.FLHQ2.LOADLIB,DISP=SHR
//CIGIN DD DUMMY
//SYSIN DD DSN=&&CIGTEMP,DISP=(OLD,PASS)
//******************************************************************
//* THE OUTPUT FILE NAME MUST BE CIGPRINT.
//* THE DATASET NAME WILL BE BUILT DYNAMICALLY BASED ON USERID,
CIGSMPRT Continued..

Installation Guide: Breeze and Cloud 9 for SCLM - 77 -
//* DATE AND TIME. THIS FILE DEFINITION MUST BE MODELED AFTER THE
//* FOLLOWING JCL. THE HLQ1= PARAMETER MUST BE ON THE FIRST LINE OF
//* CIGPRINT DD AND IT MUST BE THE ONLY PARAMETER ON THE LINE.
//* THE GENERATED NAME OF THE FILE WILL BE:
//* FLHQ1.USERID.DYYMMDD.THHMM
//******************************************************************
//* EFFECTIVE 9/12/2001 HLQ1=&SYSUID IS SUPPORTED. THIS USAGE WILL
//* CAUSE THE SERVER TO USER THE USERID AS THE FIRST NODE OF THE DSN.
//******************************************************************
//CIGPRINT DD HLQ1=FLHQ1
// DISP=(NEW,CATLG,KEEP),
// UNIT=DUNIT,SPACE=(TRK,(45,45)),
// DCB=(LRECL=133,BLKSIZE=26600,RECFM=FB)
//*
//******************************************************************
//* IF THE RETURN CODE IS HIGHER THAN ZERO, THEN SEND ERROR MESSAGES.
//* THE SYSOUT LINE BELOW WILL BE DISGARDED.
//* THE SYSOUT LINE WILL BE BUILT FROM THE DATASET NAME ALREADY
//* GENERATED IN A PREVIOUS STEP.
//******************************************************************
//IFERR IF (CMD0.RC > 4 | FORMAT.RC > 0) THEN
//ERROR EXEC PGM=LISTFILE
//STEPLIB DD DSN=FLHQ1.FLHQ2.LOADLIB,DISP=SHR <==BREEZE PRODUCT LIB
//SYSIN DD DSN=&&CIGTEMP,DISP=(OLD,DELETE)
//SYSOUT DD DSN=*.FORMAT.CIGPRINT,
// DISP=MOD
//ENDIFERR ENDIF
//*
//BRSCLM PEND
//BREEZE EXEC PROC=BRSCLM
//*
//* THIS IS THE COMMAND INPUT THAT CREATES %TEMPNAME.
//* FIRST PORTION IS DYNAMICALLY CREATED BY SERVER.
//*
//GENER0.SYSUT1 DD *
SET ZISPFRC = &LASTCC
ISPEXEC VPUT (ZISPFRC) SHARED
/*
//*
//* THIS IS ADDITIONAL SYSIN TYPE INPUT DEPENDENT UPON REQUEST TYPE.
//*
//CMD0.ZFLMDD DD *
ZFLMNLST=FLMNLENU ZFLMTRMT=ISR3278 ZDATEF=YY/MM/DD
/*
//CMD0.SYSTSIN DD *
ISPSTART CMD(%TEMPNAME) TRACEX
/*
//CMD0.SYSIN DD *
/*
//*
//* THIS IS ADDITIONAL CIGIN TYPE INPUT DEPENDENT UPON REQUEST TYPE.
//*
//FORMAT.CIGIN DD *
/*
//*
43. CIGSMPRT
CIGSMPRT Continued..

21: Modify the SCLM Log-On Proc to Include CIG ISPF Component Libraries
The CIG ISPF component libraries must be included in the same logon procedure that is used to access SCLM. This could also be a startup CLIST. The Breeze components are invoked on behalf of the SCLM application and do not execute outside of this environment. Please see the systems personnel responsible for maintaining the SCLM logon proc. The following datasets must be included to ensure that foreground SCLM access includes the CIG exits and ISPF application pieces.
Data Set Names
DDNAME
Flhq1.flhq2.LOADLIB Steplib or linklist Flhq1.flhq2.ISPMLIB ISPMLIB Flhq1.flhq2.ISPPLIB ISPPLIB Flhq1.flhq2.ISPSLIB ISPSLIB Flhq1.flhq2.ISRCLIB SYSPROC or ISRCLIB
44. CIG component libraries
Additionally, the Breeze for SCLM product requires the following work files. Please ensure that these files are allocated to the logon proc.
//*--------------------------------------------------------------------
//* CIG WORK FILES
//*--------------------------------------------------------------------
//CIGLOG DD SYSOUT=*
//CIGLOG0 DD DUMMY
//CIGLOG1 DD DSN=&&CIGLOG1,
// DISP=NEW,UNIT=SYSALLDA,SPACE=(CYL,(1,1)),
// DCB=(LRECL=132,BLKSIZE=13200,RECFM=FB)
//CIGLOG2 DD DSN=&&CIGLOG2,
// DISP=NEW,UNIT=SYSALLDA,SPACE=(CYL,(1,1)),
// DCB=(LRECL=132,BLKSIZE=13200,RECFM=FB)
//CIGLOG3 DD DSN=&&CIGLOG3,
// DISP=NEW,UNIT=SYSALLDA,SPACE=(CYL,(1,1)),
// DCB=(LRECL=132,BLKSIZE=13200,RECFM=FB)
45. Breeze Work Files

Installation Guide: Breeze and Cloud 9 for SCLM - 79 -
Step 22: Connect the Breeze product to SCLM
Step 22(a): Review and Modify IBM Skeleton FLMLIBS The primary skeleton that requires modification in this step is actually an IBM skeleton, FLMLIBS, a sample of which is shown below. A copy of FLMLIBS is included in the ISPSLIB offloaded from the installation tape.
Note that this skeleton might already be in use at your installation. If it is, you will need to incorporate the modifications required for Breeze with your current module.
As indicated below in the sample skeleton (included on the installation tape) to use this skeleton, you must do the following:
1. Review the naming conventions of your ISPF libraries. FLMLIBS reflects default naming standards and should be modified to meet your installation’s requirements.
2. Unless they are linklisted, ensure that the STEPLIB points to your installation’s ISPF load libraries.
You should review this step with your ISPF system programmer.
3. Ensure that the steplib also points to the CIG product libraries that contain the CIGINI modules.
Modify Skeleton FLMLIBS
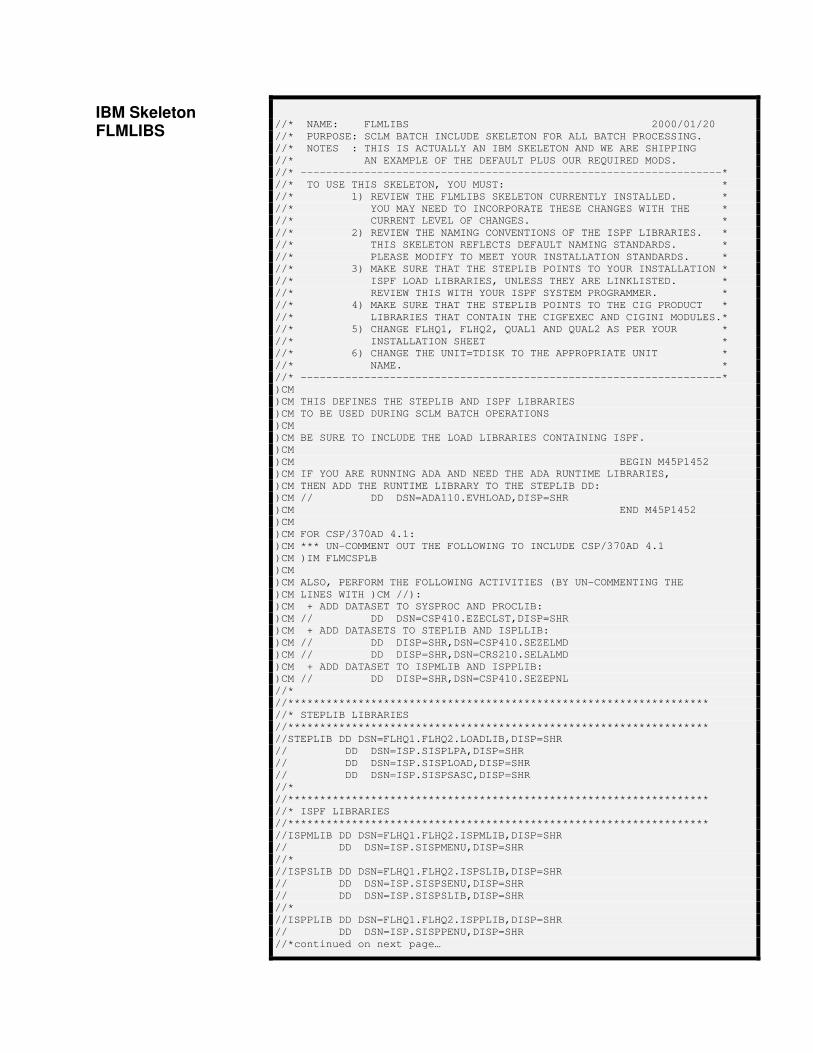
//* NAME: FLMLIBS 2000/01/20
//* PURPOSE: SCLM BATCH INCLUDE SKELETON FOR ALL BATCH PROCESSING.
//* NOTES : THIS IS ACTUALLY AN IBM SKELETON AND WE ARE SHIPPING
//* AN EXAMPLE OF THE DEFAULT PLUS OUR REQUIRED MODS.
//* ------------------------------------------------------------------*
//* TO USE THIS SKELETON, YOU MUST: *
//* 1) REVIEW THE FLMLIBS SKELETON CURRENTLY INSTALLED. *
//* YOU MAY NEED TO INCORPORATE THESE CHANGES WITH THE *
//* CURRENT LEVEL OF CHANGES. *
//* 2) REVIEW THE NAMING CONVENTIONS OF THE ISPF LIBRARIES. *
//* THIS SKELETON REFLECTS DEFAULT NAMING STANDARDS. *
//* PLEASE MODIFY TO MEET YOUR INSTALLATION STANDARDS. *
//* 3) MAKE SURE THAT THE STEPLIB POINTS TO YOUR INSTALLATION *
//* ISPF LOAD LIBRARIES, UNLESS THEY ARE LINKLISTED. *
//* REVIEW THIS WITH YOUR ISPF SYSTEM PROGRAMMER. *
//* 4) MAKE SURE THAT THE STEPLIB POINTS TO THE CIG PRODUCT *
//* LIBRARIES THAT CONTAIN THE CIGFEXEC AND CIGINI MODULES.*
//* 5) CHANGE FLHQ1, FLHQ2, QUAL1 AND QUAL2 AS PER YOUR *
//* INSTALLATION SHEET *
//* 6) CHANGE THE UNIT=TDISK TO THE APPROPRIATE UNIT *
//* NAME. *
//* ------------------------------------------------------------------*
)CM
)CM THIS DEFINES THE STEPLIB AND ISPF LIBRARIES
)CM TO BE USED DURING SCLM BATCH OPERATIONS
)CM
)CM BE SURE TO INCLUDE THE LOAD LIBRARIES CONTAINING ISPF.
)CM
)CM BEGIN M45P1452
)CM IF YOU ARE RUNNING ADA AND NEED THE ADA RUNTIME LIBRARIES,
)CM THEN ADD THE RUNTIME LIBRARY TO THE STEPLIB DD:
)CM // DD DSN=ADA110.EVHLOAD,DISP=SHR
)CM END M45P1452
)CM
)CM FOR CSP/370AD 4.1:
)CM *** UN-COMMENT OUT THE FOLLOWING TO INCLUDE CSP/370AD 4.1
)CM )IM FLMCSPLB
)CM
)CM ALSO, PERFORM THE FOLLOWING ACTIVITIES (BY UN-COMMENTING THE
)CM LINES WITH )CM //):
)CM + ADD DATASET TO SYSPROC AND PROCLIB:
)CM // DD DSN=CSP410.EZECLST,DISP=SHR
)CM + ADD DATASETS TO STEPLIB AND ISPLLIB:
)CM // DD DISP=SHR,DSN=CSP410.SEZELMD
)CM // DD DISP=SHR,DSN=CRS210.SELALMD
)CM + ADD DATASET TO ISPMLIB AND ISPPLIB:
)CM // DD DISP=SHR,DSN=CSP410.SEZEPNL
//*
//******************************************************************
//* STEPLIB LIBRARIES
//******************************************************************
//STEPLIB DD DSN=FLHQ1.FLHQ2.LOADLIB,DISP=SHR
// DD DSN=ISP.SISPLPA,DISP=SHR
// DD DSN=ISP.SISPLOAD,DISP=SHR
// DD DSN=ISP.SISPSASC,DISP=SHR
//*
//******************************************************************
//* ISPF LIBRARIES
//******************************************************************
//ISPMLIB DD DSN=FLHQ1.FLHQ2.ISPMLIB,DISP=SHR
// DD DSN=ISP.SISPMENU,DISP=SHR
//*
//ISPSLIB DD DSN=FLHQ1.FLHQ2.ISPSLIB,DISP=SHR
// DD DSN=ISP.SISPSENU,DISP=SHR
// DD DSN=ISP.SISPSLIB,DISP=SHR
//*
//ISPPLIB DD DSN=FLHQ1.FLHQ2.ISPPLIB,DISP=SHR
// DD DSN=ISP.SISPPENU,DISP=SHR
//*continued on next page…
IBM Skeleton FLMLIBS

Installation Guide: Breeze and Cloud 9 for SCLM - 81 -
//ISPTLIB DD UNIT=&VIOUNIT.,DISP=(NEW,PASS),SPACE=(CYL,(1,1,5)),
// DCB=(LRECL=80,BLKSIZE=19040,DSORG=PO,RECFM=FB),
// DSN=&TABLESP TEMPORARY TABLE LIBRARY
// DD DSN=ISP.SISPTENU,DISP=SHR
//*
//ISPTABL DD UNIT=&VIOUNIT.,DISP=(NEW,PASS),SPACE=(CYL,(1,1,5)),
// DCB=(LRECL=80,BLKSIZE=19040,DSORG=PO,RECFM=FB),
// DSN=&TABLESP TEMPORARY TABLE LIBRARY
//*
//ISPPROF DD UNIT=&VIOUNIT.,DISP=(NEW,PASS),SPACE=(CYL,(1,1,5)),
// DCB=(LRECL=80,BLKSIZE=19040,DSORG=PO,RECFM=FB),
// DSN=&TABLESP TEMPORARY TABLE LIBRARY
//*
//ISPLOG DD SYSOUT=*,
// DCB=(LRECL=120,BLKSIZE=2400,DSORG=PS,RECFM=FB)
//*
//ISPCTL1 DD DISP=NEW,UNIT=VIO,SPACE=(CYL,(1,1)),
// DCB=(LRECL=80,BLKSIZE=800,RECFM=FB) TEMPORARY FILE
//* TAILORING DATASET
//* OW01230
//SYSTERM DD SYSOUT=*
//*
//*--------------------------------------------------------------------
//* TEMPORARY CLIST CONTAINING COMMAND TO BE EXECUTED
//*--------------------------------------------------------------------
//SYSPROC DD DSN=&&&&CLIST&STEP,DISP=(OLD,DELETE)
// DD DSN=FLHQ1.FLHQ2.ISRCLIB,DISP=SHR
// DD DSN=ISP.SISPCLIB,DISP=SHR CLIST LIBRARY OW01230
// DD DSN=SYS1.CLIST,DISP=SHR CLIST LIBRARY OW01230
//*--------------------------------------------------------------------
//* CIG WORK FILES
//*--------------------------------------------------------------------
//CIGLOG DD SYSOUT=*
//CIGLOG0 DD DUMMY
//CIGLOG1 DD DSN=&&CIGLOG1,
// DISP=NEW,UNIT=SYSALLDA,SPACE=(CYL,(1,1)),
// DCB=(LRECL=132,BLKSIZE=13200,RECFM=FB)
//CIGLOG2 DD DSN=&&CIGLOG2,
// DISP=NEW,UNIT=SYSALLDA,SPACE=(CYL,(1,1)),
// DCB=(LRECL=132,BLKSIZE=13200,RECFM=FB)
//CIGLOG3 DD DSN=&&CIGLOG3,
// DISP=NEW,UNIT=SYSALLDA,SPACE=(CYL,(1,1)),
// DCB=(LRECL=132,BLKSIZE=13200,RECFM=FB)
//*
)CM 5647-A01 (C) COPYRIGHT IBM CORP 1989, 1997 */
)CM
)CM M41P2154 940104 - CHANGED COMMENT FOR IMBED OF FLMCSPLB.
)CM UPDATED FLMCSPLB DD STATEMENTS SO THAT ALL
)CM CONTINUATIONS BEGAN BEFORE COLUMN 16.
)CM
)CM M41P2164 940104 - APAR ROLLUP OW01230.
)CM CORRECTED FILE TAILORING DISP STATEMENT AND
)CM THE SYSPROC STATEMENT ADDED BY OY46468.
)CM SYSROUTE OF OY51820.
)CM
)CM M42P3925 950125 - FIX FOR APAR OY51372
)CM CONCATENATE TEMPORARY DATA SET AS FIRST DATASET
)CM FOR ISPTLIB SO MESSAGE ISPT036 WILL NOT OCCUR
)CM IF TWO JOBS HAVE THE SAME DATASET.
)CM
)CM M42P4360 950527 - ADDED SISPSASC DATA SET TO STEPLIB AND ADDED
)CM SYSTERM DD.
)CM
)CM M45P1452 970505 - REMOVED ADA RUNTIME LIBRARIES FROM STEPLIB DD
)CM ALLOCATION AND INSTEAD ADDED COMMENTS ON HOW
)CM TO ADD THEM, IF NEEDED.
)CM
46. FLMLIBS
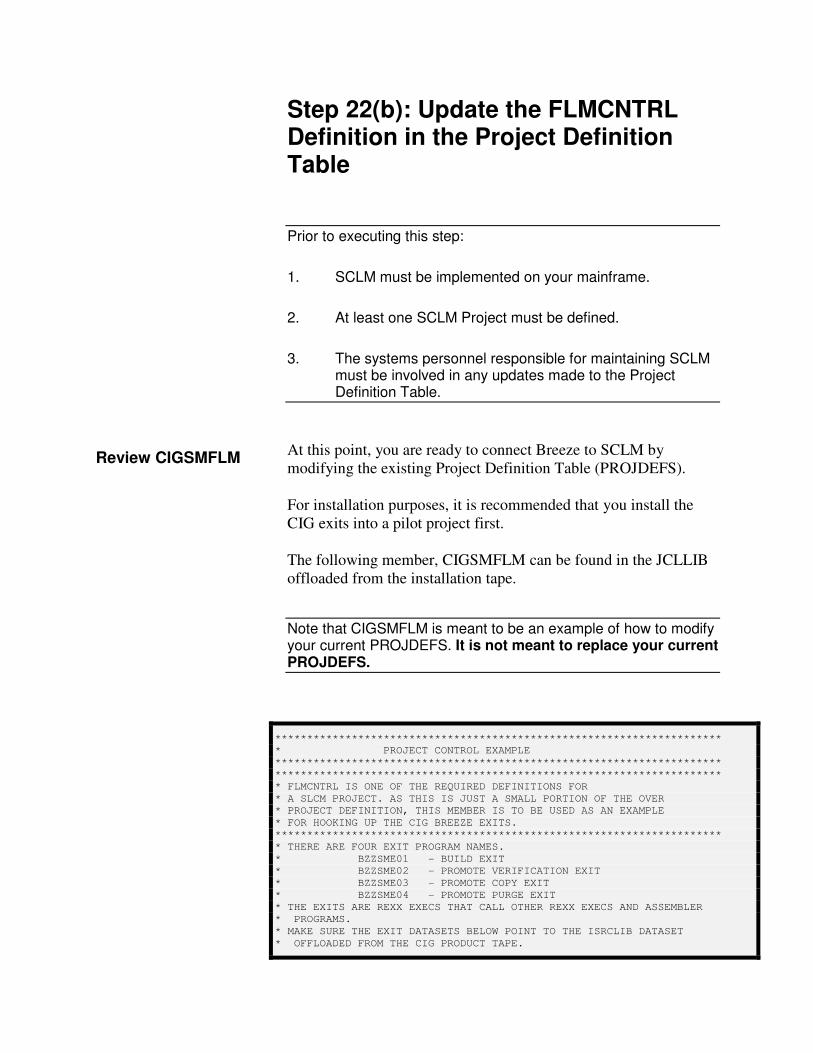
Step 22(b): Update the FLMCNTRL Definition in the Project Definition Table
Prior to executing this step:
1. SCLM must be implemented on your mainframe.
2. At least one SCLM Project must be defined.
3. The systems personnel responsible for maintaining SCLM must be involved in any updates made to the Project Definition Table.
At this point, you are ready to connect Breeze to SCLM by modifying the existing Project Definition Table (PROJDEFS). For installation purposes, it is recommended that you install the CIG exits into a pilot project first. The following member, CIGSMFLM can be found in the JCLLIB offloaded from the installation tape.
Note that CIGSMFLM is meant to be an example of how to modify your current PROJDEFS. It is not meant to replace your current PROJDEFS.
**********************************************************************
* PROJECT CONTROL EXAMPLE
**********************************************************************
**********************************************************************
* FLMCNTRL IS ONE OF THE REQUIRED DEFINITIONS FOR
* A SLCM PROJECT. AS THIS IS JUST A SMALL PORTION OF THE OVER
* PROJECT DEFINITION, THIS MEMBER IS TO BE USED AS AN EXAMPLE
* FOR HOOKING UP THE CIG BREEZE EXITS.
**********************************************************************
* THERE ARE FOUR EXIT PROGRAM NAMES.
* BZZSME01 - BUILD EXIT
* BZZSME02 - PROMOTE VERIFICATION EXIT
* BZZSME03 - PROMOTE COPY EXIT
* BZZSME04 - PROMOTE PURGE EXIT
* THE EXITS ARE REXX EXECS THAT CALL OTHER REXX EXECS AND ASSEMBLER
* PROGRAMS.
* MAKE SURE THE EXIT DATASETS BELOW POINT TO THE ISRCLIB DATASET
* OFFLOADED FROM THE CIG PRODUCT TAPE.
Review CIGSMFLM

Installation Guide: Breeze and Cloud 9 for SCLM - 83 -
**********************************************************************
**********************************************************************
FLMCNTRL ACCT=SCLMHQ1.ACCOUNT.FILE, C
MAXVIO=999999, C
BEXT1CM=TSOLNK, C
BEXT1DS=FLHQ1.FLHQ2.ISRCLIB, C
BLDEXT1=BZZSME01, C
PEXT1CM=TSOLNK, C
PEXT1DS=FLHQ1.FLHQ2.ISRCLIB, C
PRMEXT1=BZZSME02, C
PEXT2CM=TSOLNK, C
PEXT2DS=FLHQ1.FLHQ2.ISRCLIB, C
PRMEXT2=BZZSME03, C
PEXT3CM=TSOLNK, C
PEXT3DS=FLHQ1.FLHQ2.ISRCLIB, C
PRMEXT3=BZZSME04, C
VIOUNIT=VIO
47. CIGSMFLM
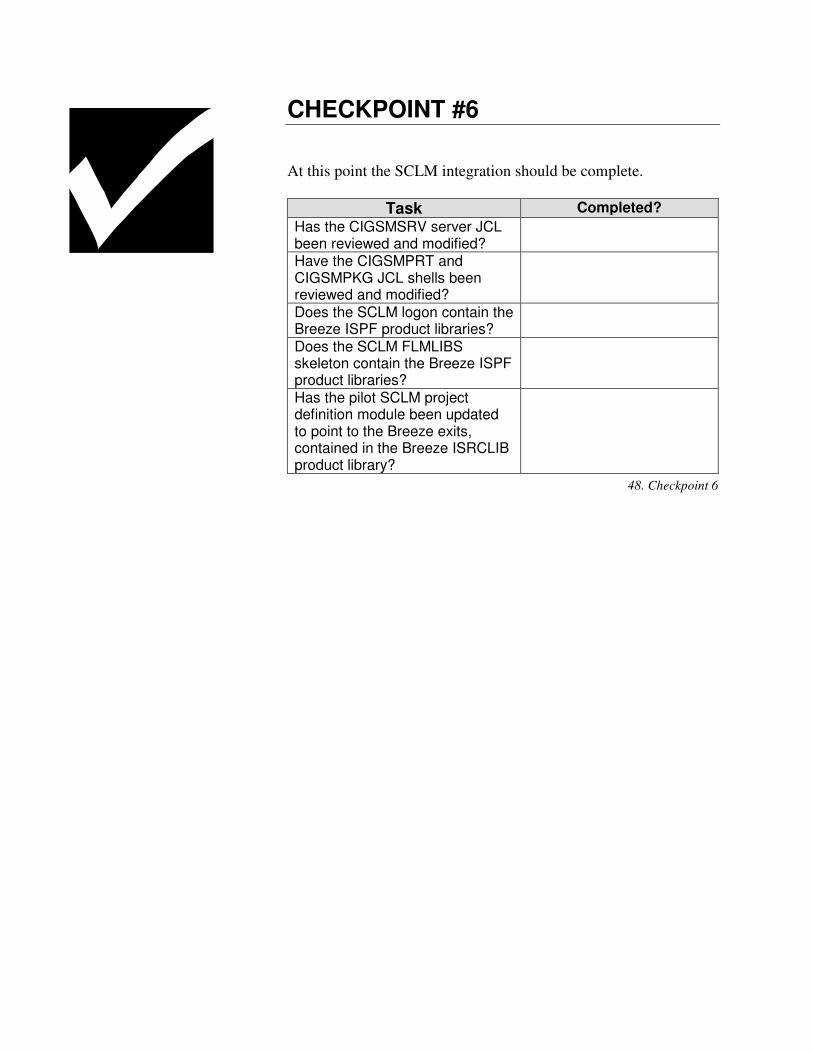
CHECKPOINT #6 At this point the SCLM integration should be complete.
Task Completed?
Has the CIGSMSRV server JCL been reviewed and modified?
Have the CIGSMPRT and CIGSMPKG JCL shells been reviewed and modified?
Does the SCLM logon contain the Breeze ISPF product libraries?
Does the SCLM FLMLIBS skeleton contain the Breeze ISPF product libraries?
Has the pilot SCLM project definition module been updated to point to the Breeze exits, contained in the Breeze ISRCLIB product library?
48. Checkpoint 6

Installation Guide: Breeze and Cloud 9 for SCLM - 85 -
Step 23: Breeze HTTP Server Installation Verification
To test the Breeze HTTP server: 1. Submit the CIGSMSRV job. 3. View the CIGOUT DD in the job output to verify that the
port number listed matches the one you coded in Step 14. It should look like the output below.
20:59:37 FST0001I P390 20:59:37 FST0001I WE ARE USING THE FOLLOWING IP NUMBER 999,999,999,999 20:59:37 FST0001I WE WILL BE LISTENING ON PORT 00001799
49. CIGOUT DD Output
1. To quiesce the server job, enter one of the following commands: If entered on an MVS console: F cts-job-name,X If entered via a console interface, such as SDSF: /F cts-job-name,X
Because the Breeze HTTP server task utilizes the TCP/IP stack and a cancel does not always clean up storage, CIG recommends the MVS console command method over simply canceling the job. Issuing the console command will allow the Breeze HTTP server job to end cleanly.
1. Re-submit the server JCL (CIGSMSRV) for the next test. When the Breeze HTTP server task is started, the Breeze package database is initialized and allocated to the Breeze HTTP server task.
Start the Server
Shut Down the Server
Restart the Server
Database Considerations

Note that while the Breeze HTTP server is running, users will not be able to delete, define, or reorg the database.
CHECKPOINT #7 At this point, you should have successfully completed the following tasks:
Task Completed? Reviewed the CIGOUT file showing the port # and verifying that this is port # you expected?
Issued a Quiesce of the server to test command and clean up?
Resubmitted the server for the next test?
50. Checkpoint 7

Installation Guide: Breeze and Cloud 9 for SCLM - 87 -
Step 24: Invoking, Testing, and Distributing Breeze Prior to invoking the Breeze Applet, there is prebuilt IVP to verify Internet access and security. Once this file can be successfully executed, you are ready to continue on with Breeze Applet testing.
1. On your desktop, launch your browser.
2. Modify the following statement with your IP address and port number and type it in the browser’s address window:
http://ip-address:port-brz/brzivp.html
The browser will request the html file directly from your mainframe and send back the following message. The html will be loaded from the flhq1.flhq2.JAVALIB dataset included in the server JCL.
51. Brzivp.html Expected Results
You are now ready to build and exec the brsclm.html file! An html file controls the execution of the Breeze product.
Execute BRZIVP.HTML
BRSCLM

The purpose of this step is to modify the html and explain different ways to invoke the applet using the html file. A sample HTML (BRSCLM) file is included in the CIG JAVALIB that was offloaded from the installation tape. The only customization required is that you need to add your installation’s IP address and port number to both the ARCHIVE and CODEBASE http statements, shown below in bold.
Please review all HTML comments prior to making any changes.
<!doctype html public "-//w3c//dtd html 4.0 transitional//en">
<html>
<head>
<meta http-equiv="Content-Type" content="text/html; charset=iso-8859-
1">
<meta name="GENERATOR" content="Mozilla/4.6 [en] (Win95; I)">
<title>BREEZE for SCLM from Chicago Interface Group</title>
</head>
<BODY BGCOLOR="#99CCFF">
<CENTER>
<! >
<! Modify ONLY the archive and codebase lines below. >
<! Insert your ip-address:port in the two commands. >
<! Copy this member into the JAVALIB dataset pointed to by the >
<! CIGJAVA ddname in the server JCL. >
<body>
<applet CODE=Brsclm.class
archive="http://ip-addr:port-brz/brsclmja.jar"
codebase="http://ip-addr:port-brz/"
WIDTH=700 HEIGHT=500></applet>
</body>
</html>
52. BRSCLM
Once the modifications are complete, you must copy this member into the JAVALIB dataset pointed to by your server JCL.

Installation Guide: Breeze and Cloud 9 for SCLM - 89 -
To test installation of the applet, execute the Brsclm.html file in one of the two following ways: From a file on the mainframe:
7. On your desktop, launch your browser.
8. Modify the following statement with your IP address and port number and type it in the browser’s address window:
http://ip-address:port-brz/Brsclm.html
The browser will request the html file directly from your mainframe and execute the Breeze applet.
9. When the Breeze product is fully downloaded from the mainframe you will be prompted with a log-in panel. Enter your TSO user ID and password and click “ok” to begin using Breeze.
From a file on your desktop: 4. Download the BRSCLM member from your mainframe
and save the file as Brsclm.html to your C:\Windows\Desktop directory. Windows will create a desktop icon for the file (samples of which are shown below).
5. From your desktop, double-click on the Brsclm.html icon. This will launch your web browser and execute the Breeze applet.
6. When the Breeze product is fully downloaded from the
mainframe you will be prompted with a log-in panel. Enter your TSO user ID and password and click “ok” to begin using Breeze.
Execute Brsclm.html

• Regardless of which method you selected for Breeze invocation, you should have been presented with the Breeze logon screen (shown below).
53. Breeze Log-in
Drive a list of packages:
• Because you have not yet been identified to Breeze as an approver, your first response will be <no data returned from host >. To drive a list of packages, click on Packages by Status and a list of packages should be returned.
Exit Breeze:
• Close your browser by either:
• selecting “Close” from the File pull-down menu, or
• clicking on the “X” in the upper right hand corner of the browser window.
Users can access Breeze in one of two ways: 1. You can distribute the Brsclm.html file as an email
attachment to all approvers who need to access Breeze.
Logging onto Breeze and Testing Minimum Functions.
How will Your End-Users Access Breeze?

Installation Guide: Breeze and Cloud 9 for SCLM - 91 -
Each user can then save the Brsclm.html file to their C:\Windows\Desktop directory and then access Breeze at any time by double-clicking on the file icon, as discussed previously.
2. If your installation takes advantage of the email notification
utility discussed in Step 26, users will receive an email when there are packages in need of their approval. Contained within this email is a link to the Breeze product.

Step 25: Package Detail Report IVP
CIGSMJ06 −−−− Batch Reporting Utility
In this step you will run a report to ensure that Breeze is properly installed and that the CIGINI has been configured correctly. JCLLIB member CIGSMJ06, shown below, will execute report commands to verify the successful implementation of the Breeze product. Modify and submit this JCL to produce the installation verification report shown on the next page.
//**(JOBCARD)
//* ------------------------------------------------------------------*
//* NAME: CIGSMJ06 *
//* PURPOSE: JCL FOR BREEZE DEMO DATABASE IVP AND GENERAL USAGE. *
//* ------------------------------------------------------------------*
//* TO USE THIS JCL, YOU MUST: *
//* 1) INSERT A VALID JOB CARD WITH VALID CLASS AND REGION=0M *
//* 2) MAKE SURE THAT THE STEPLIB POINTS TO THE CIG PRODUCT *
//* INCLUDES THE DATASET THAT CONTAINS THE CIGINI. *
//* 3) CHANGE FLHQ1 FLHQ2 AS PER YOUR *
//* INSTALLATION SHEET *
//* ------------------------------------------------------------------*
//* *
//* THIS IS THE JCL TO RUN THE BREEZE FOR SCLM PACKAGE DETAIL *
//* REPORT. *
//* *
//* ------------------------------------------------------------------*
//REPORT EXEC PGM=CIGS0000
//STEPLIB DD DSN=FLHQ1.FLHQ2.LOADLIB,DISP=SHR
//CIGLOG DD SYSOUT=*
//CIGRPT DD SYSOUT=*
//CIGIN DD *
* ------------------------------------------------------ *
* SAMPLE MEMBER FOR BREEZE FOR SCLM IVP JCL JOB.
* FOR MORE SYNTAX OPTIONS, REVIEW THE REPORT UTILITY
* SYNTAX IN THE BREEZE FOR SCLM ADMIN GUIDE.
* ------------------------------------------------------ *
REPORT PACKAGES 'DEMO*'
OPTIONS ALL .
54. CIGSMJ06
Modify CIGSMJ06

Installation Guide: Breeze and Cloud 9 for SCLM - 93 -
The sample report is shown below.
1DATE 00/02/03 TIME 13:59:35 B R E E Z E F O R S C L M, RELEASE 1.1
P A C K A G E D E T A I L R E P O R T
FOR PACKAGE: DEMOPK1 COMMENT: BREEZE FOR SCLM DEMO DATA 1
STATUS INFORMATION : APPROVED
EXECUTION WINDOW : 00/02/03 12:29 THROUGH 02/12/31 23:59
LAST UPDATE INFORMATION : P390C$ 00/02/03 12:29
LAST BUILD INFORMATION : P390C$ 00/02/03 12:29
LAST PROMOTE INFORMATION :
ACTUAL CONTENT OF PACKAGE:
X MEMBER PROJECT GROUP TYPE LANGUAGE
TEST01 SCLMTEST DEV1 SOURCE TEXT
SCLMTEST TEST SOURCE TEXT
TEST02 SCLMTEST DEV1 SOURCE TEXT
SCLMTEST TEST SOURCE TEXT
APPROVERS CURRENTLY ASSIGNED:
APPROVER GROUP QUORUM STATUS
OPSGUYS 01 APPROVED
APPROVER GROUP USER DATE TIME DECISION
OPSGUYS P390B 00/02/03 01:30 FOR
OPSGUYS P390L 00/02/03 01:50 FOR
LOG RECORDS RECORDED:
ACTIVITY USER DATE TIME RC
BUILD P390C$ 00/02/03 12:29 00
APPROVE P390B 00/02/03 01:30 00
APPROVE P390L 00/02/03 01:45 00
CURRENT NOTES:
THIS IS FOR THE BREEZE FOR SCLM IVP JOBS.
55. Package Detail Report
Sample Report Output

CHECKPOINT #8 At this point, you should have successfully completed the following tasks:
Task Completed?
Successfully invoked the BRZIVP.HTML IVP to ensure the server location and accessability?
Modified the BRSCLM html and copied into the JAVALIB dataset?
Invoked the Breeze applet from a browser using the ‘file from a mainframe’ approach?
Invoked Breeze applet from the desktop? Logon onto the application, passing the security check?
Displayed a list of packages on the screen?
Attempted to use browse function from content panel?
Exited successfully from the applet? Ran the detail report using jcl provided? Reviewed the report output?
56. Checkpoint 8

Installation Guide: Breeze and Cloud 9 for SCLM - 95 -
Step 26: Email – Optional Delivery System for Breeze Applet
Configure the SMTP Server to Support Email The Email interface serves as a companion piece to the standard approver notification. Once selected as an approver, anytime there are packages in need of approval the user will receive an email that contains an html link to the Breeze product. With its TCP/IP services, IBM bundles a Simple Mail Transfer Protocol server (SMTP). In order to enable Breeze to pass the messages to SMTP for handling, you must: � Format the commands and the body of the message text � Write that data to a sysout class that has the SMTP server
associated with it as a sysout writer.
In order to configure the email interface, you will need to collect the following items and information from your systems programming personnel:
� The name of the SMTP address space. � The sysout class to write the SMTP data to. � The fully qualified machine name. (for example,
p390.companyname.com)
Once you have the information you need from the systems programming personnel, you will be ready to create configuration member ‘$$$$SMTP’ in the flhq1.flhq2.JAVALIB dataset. This member, an example of which is shown below, contains several lines of configuration information, with the data starting in the first column on both lines.
How does it Work?
Configure the SMTP Interface
Create the Configuration Member $$$$SMTP

Q,BOB
P390.CIGI.NET
INTERNAL_READER=B,INTRDR
//SMTPRDR JOB 'SEND',REGION=4096K,MSGCLASS=X,CLASS=A,MSGLEVEL=(1,1),
// NOTIFY=&SYSUID
//STEP010 EXEC PGM=IKJEFT01
//SYSTSPRT DD SYSOUT=*
//SYSTSIN DD *
57. $$$$SMTP
Line 1 contains class,addressspacename terminated by a blank. For example:
B,SMTP
(Note that the default SMTP address name is SMTP.)
Line 2 also begins in column 1 and contains the fully qualified machine name (or IP address) terminated by a blank. For example:
local.myname.com
FROMUSER= is the override for SMTP Mail from User ID. If your installation requires a valid SMTP mail ID, you must code one into this syntax. If your installation does not require a valid SMTP mail ID, you may leave this blank, as Breeze will default to your TSO user ID.
INTERNAL_READER is the class and program that handles the internal reader for batch TSO send commands.
Col 1 is the output
class. Col 2 is a comma.
Col 3 begins the SMTP
address name.

Installation Guide: Breeze and Cloud 9 for SCLM - 97 -
// Section is the REQUIRED JCL required through the SYSTSIN DD* line. Be sure to include a valid jobcard. The formatted send commands will be appended to this JCL and submitted to the internal reader.
Configure the $$HTML Member.
The Breeze email interface expects to find a member called $$HTML in the Java Control Dataset pointed to in the CIGINI. By default this is also the flhq1.flhq2.JAVALIB pointed to in the server JCL. This is the HTML that will be sent to the approver’s email user ID at the time of package CAST.
$$HTML needs to be modified to include your IP address and port number as defined early in this manual and then copied into the JAVASERVERCONTROL dataset pointed to in your CIGINI file. Any other changes will be cosmetic to the end user.
Please review the modification comments prior to making any modifications. In HTML comments are denoted using a '<!' as the first characters and '>' as the last.
The following $$HTML member can be found in the sample library provided on the product tape. The bolded section of the http statement must be modified to reflect the location of your server.
There are SCLM packages that need to be approved (or
vetoed) by you. Click on the link below to perform review
and approve/veto processing.
http://ip-addr:port-brz/brsclm.html
58. $$HTML

� The sample member TESTTO is shown below. It can be
found in the samplib library downloaded from the install tape. Modify this member called ‘TESTTO’ and save into the Java dataset. Since the test program (‘TESTMAIL’) will use this member, TESTTO should contain actual email addresses, preferably ones that you can access on-site.
USERID1
EMAIL-ADDRESS1
USERID2
EMAIL-ADDRESS2
USERID3
EMAIL-ADDRESS3
59. Sample Member TESTTO
� Use the sample JCL CIGSMJX4 below for your test:
//**(JOBCARD)
//**
//* ------------------------------------------------------------------
//* NAME: CIGSMJX4 *
//* PURPOSE: THE PURPOSE OF THIS JCL IS TO TEST THE SMTP CONTROL *
//* MEMBER $$$$SMTP AND THE SETUP OF EMAIL. *
//* *
//* ------------------------------------------------------------------
//* * * * N O T I C E * * *
//* THIS PROGRAM IS A PROPRIETARY PRODUCT OF CHICAGO INTERFACE
//* GROUP, INC. @ COPYRIGHT 2000 CHICAGO INTERFACE GROUP, INC.
//* ALL RIGHTS RESERVED.
//* ---------------------------------------------------------------- *
continued on next page…
//* MODIFY THIS JCL TO MEET YOUR SITE'S JCL NAMING STANDARDS. *
//* *
//* 1) INCLUDE A JOBCARD *
//* 2) CHANGE FLHQ1 AND FLHQ2 AS PER WORKSHEET. *
//* ---------------------------------------------------------------- *
//TESTE EXEC PGM=TSTEMAIL
//STEPLIB DD DSN=FLHQ1.FLHQ2.LOADLIB,DISP=SHR
//CIGOUT DD SYSOUT=*
//CIGLOG DD SYSOUT=*
//SYSUDUMP DD SYSOUT=*
60. CIGSMJX4
Test the Interface
Installation Guide: Breeze and Cloud 9 for SCLM - 99 -
� Return Codes:
• When the return code is zero but no email has been received, you need to examine the output of the job. The SMTP server will periodically drain the spool queues that specify the SMTP server as the writer. If you see output for CIGEMAIL, it means that either the SMTP server has not yet drained the queue, or that the name of the SMTP started task that you specified as the writer name is incorrect.
• If the return code is not zero, you will need to examine the CIGLOG output for messages.
TESTO is a sample member for the purpose of validating that the $$$$SMTP control member is configured correctly and that the SMTP server at your installation is running.
The actual Breeze notification interface utilizes email addresses that are stored in the Breeze database and does not store or look for email attributes in TESTO or any other location.

Step 27: Set Up Database Backup and Restore Jobs
The VSAM files used by Breeze require regular maintenance and monitoring. In this step you will set up the database backup and maintenance job for the Breeze Package database. Note that this job will need to be implemented for all Breeze databases. The JCL member to accomplish this—CIGSMJ05—is located in the JCLLIB.
//**(JOBCARD)
//**
//* ----------------------------------------------------------------- *
//* NAME: CIGSMJ05 *
//* PURPOSE: THE PURPOSE OF THIS JCL IS REORG AND REBUILD THE *
//* BREEZE FOR SCLM DATABASE. *
//* ---------------------------------------------------------------- *
//* *
//* MODIFY THIS JCL TO MEET YOUR SITE REQUIREMENTS IN THE FOLLOWING *
//* WAYS. *
//* *
//* 1) INCLUDE A JOBCARD *
//* 2) CHANGE FLHQ1 AND FLHQ2 AS PER WORKSHEET. *
//* 3) CHANGE DVOLSER TO THE VOL SER OF THE DISK USED TO *
//* STORE THE BREEZE DATABASE. *
//* 4) CHANGE DUNIT TO A VALID DISK DEVICE UNIT NAME. *
//* 5) CUSTOMIZE STEP2 AND STEP3 TO INCLUDE YOUR PACKAGE *
//* REGISTRY CONTROL FILE NAME. *
//* 6) SIZE THE BOTH THE STEP2 SPACE PARAMETERS AND THE *
//* STEP3 SPACE PARAMETERS TO REFLECT PRODUCTION DATA *
//* BASE SIZE. *
//* ----------------------------------------------------------------- *
//* *
//* STEP1: DELETE THE OLD VERSION OF THE BACKUP, IF IT EXISTS. *
//* DELETE THE OLD VERSION OF THE SORT FILE. IF IT EXISTS. *
//* STEP2: CREATE A SEQUENTIAL BACKUP OF THE PACKAGE DATABASE USING *
//* STANDARD IDCAMS REPRO SERVICES.DATA ONLY. *
//* STEP3: SORT THE DATA, OMITTING '..DEL' TYPE RECORDS. *
//* STEP4: DELETE, DEFINE, AND REPRO THE PACKAGE DATABASE. *
//* *
//* ----------------------------------------------------------------- *
//* ----------------------------------------------------------------- *
//* *
//* STEP1: DELETE THE OLD VERSION OF THE BACKUP, IF IT EXISTS. *
//* *
//* ----------------------------------------------------------------- *
//STEP1 EXEC PGM=IDCAMS
//SYSPRINT DD SYSOUT=*
//SYSIN DD *
DELETE 'FLHQ1.PACKAGE.SEQ' PURGE
DELETE 'FLHQ1.PACKAGE.SORT2' PURGE
IF MAXCC <= 8 THEN DO
SET MAXCC = 0
SET LASTCC = 0
END
//* ----------------------------------------------------------------- *
//* *
//* STEP2: CREATE A SEQUENTIAL BACKUP OF THE PACKAGE DATABASE USING *
//* STANDARD IDCAMS REPRO SERVICES. *
//* *
Modify CIGSMJ05

Installation Guide: Breeze and Cloud 9 for SCLM - 101 -
//* ----------------------------------------------------------------- *
continued on next page…
//STEP2 EXEC PGM=IDCAMS,
// COND=(0,LT)
//OUTDD02 DD DSN=FLHQ1.PACKAGE.SEQ,DISP=(NEW,CATLG,DELETE),
// UNIT=DUNIT,SPACE=(CYL,(10,5),RLSE),
// DCB=(RECFM=VB,LRECL=604,BLKSIZE=6160)
//INDD02 DD DSN=FLHQ1.FLHQ2.PKGDB.DATA,DISP=OLD,
// AMP='BUFNI=10,BUFND=10'
//SYSPRINT DD SYSOUT=*
//SYSIN DD *
REPRO IFILE(INDD02) OFILE(OUTDD02)
/*
//* ----------------------------------------------------------------- *
//* *
//* STEP3: SORT THE DATA AND DELETE ALL RECORDS THE QUALIFY FOR A *
//* LOGICAL DELETE. *
//* *
//* ----------------------------------------------------------------- *
//STEP3 EXEC PGM=SORT,
// COND=(0,LT)
//SORTIN DD DSN=FLHQ1.PACKUTIL.SEQ,DISP=SHR
//SORTOUT DD DSN=FLHQ1.PACKAGE.SORT2,DISP=(NEW,CATLG,DELETE),
// UNIT=DUNIT,SPACE=(CYL,(10,5),RLSE),
// DCB=(RECFM=VB,LRECL=604,BLKSIZE=6160)
//SORTWK01 DD UNIT=TDISK,SPACE=(CYL,(25,25))
//SORTWK02 DD UNIT=TDISK,SPACE=(CYL,(25,25))
//SORTWK03 DD UNIT=TDISK,SPACE=(CYL,(25,25))
//SORTWK04 DD UNIT=TDISK,SPACE=(CYL,(25,25))
//SYSPRINT DD SYSOUT=*
//SYSOUT DD SYSOUT=*
//SYSIN DD *
SORT FIELDS=(5,80,CH,A)
OMIT COND=(85,2,CH,EQ,X'0000',&,87,3,CH,EQ,C'DEL')
RECORD TYPE=V,LENGTH=(604,,,80)
SUM FIELDS=NONE
/*
//* ----------------------------------------------------------------- *
//* *
//* STEP4: DELETE AND DEFINE THE CURRENT PACKAGE DATABASE, REPRO *
//* THE BACKUP INTO THE NEW FILE. *
//* *
//* ----------------------------------------------------------------- *
//* ----------------------------------------------------------------- *
//* *
//* DO NOT MODIFY THE VSAM PARAMETER PROVIDED IN THIS JCL. DOING SO *
//* WILL PRODUCE UNEXPECTED RESULTS FROM THE BREEZE FOR SCLM *
//* APPLICATION. *
//* *
//* ----------------------------------------------------------------- *
//STEP4 EXEC PGM=IDCAMS,
// COND=(0,LT)
//SYSPRINT DD SYSOUT=*
//INDD01 DD DSN=FLHQ1.PACKAGE.SORT2,DISP=SHR
//SYSIN DD *
DELETE FLHQ1.FLHQ2.PKGDB
DEFINE CLUSTER -
(NAME('FLHQ1.FLHQ2.PKGDB') -
SPEED UNIQUE FREESPACE(30 30) -
TRACKS(60 40) -
VOLUMES(DVOLSER) -
SHR(4 3) -
KEYS(80 0) -
RECORDSIZE(80 600)) -
DATA (CISZ(16000)) -
INDEX (CISZ(4096))
REPRO INFILE(INDD01) OUTDATASET('FLHQ1.FLHQ2.PKGDB')
/*
//* ----------------------------------------------------------------- *
//* EXPAND THE INDEX TO 2 LEVELS *

//* ----------------------------------------------------------------- *
//STEP5 EXEC PGM=CIGVSM2L,PARM='FLHQ1.FLHQ2.PKGDB'
//STEPLIB DD DSN=FLHQ1.FLHQ2.LOADLIB,DISP=SHR
61. CIGSMJ05

Installation Guide: Breeze and Cloud 9 for SCLM - 103 -
Appendix A: Cloud 9 Unix Directory Structure The following charts represent the Unix directory structure and files expected by the Cloud 9 application. The ‘rootdir’ value is site specific, all other directory names and file names are not. This includes the case of the file names. /rootdir/ Type Filename Type Filename _ Dir . _ Dir .. _ Dir cgi-bin _ Dir cloud9 _ File cloud9.htm _ File c9ivp.htm _ File httpd.conf _ File httpd.envvars _ File httpd.mvsds _ File httpd-pid _ Dir logs _ Dir reports
Level 1 – Cloud 9 ‘rootdir’

/rootdir/cgi-bin/ Type Filename Dir . Dir .. File CIGRSDSF File CIGRSDSM File C9RADDS File C9REDRV File C9RINDEX File C9RLMBR File C9RLUNIX File C9RMENU File C9RMLIST File C9RPROF File C9RSCLD File C9RSCLM File C9RSCLMA File C9RSDRV File C9RSPDSA File C9RULIST
Level 2 – CGI-BIN Directory
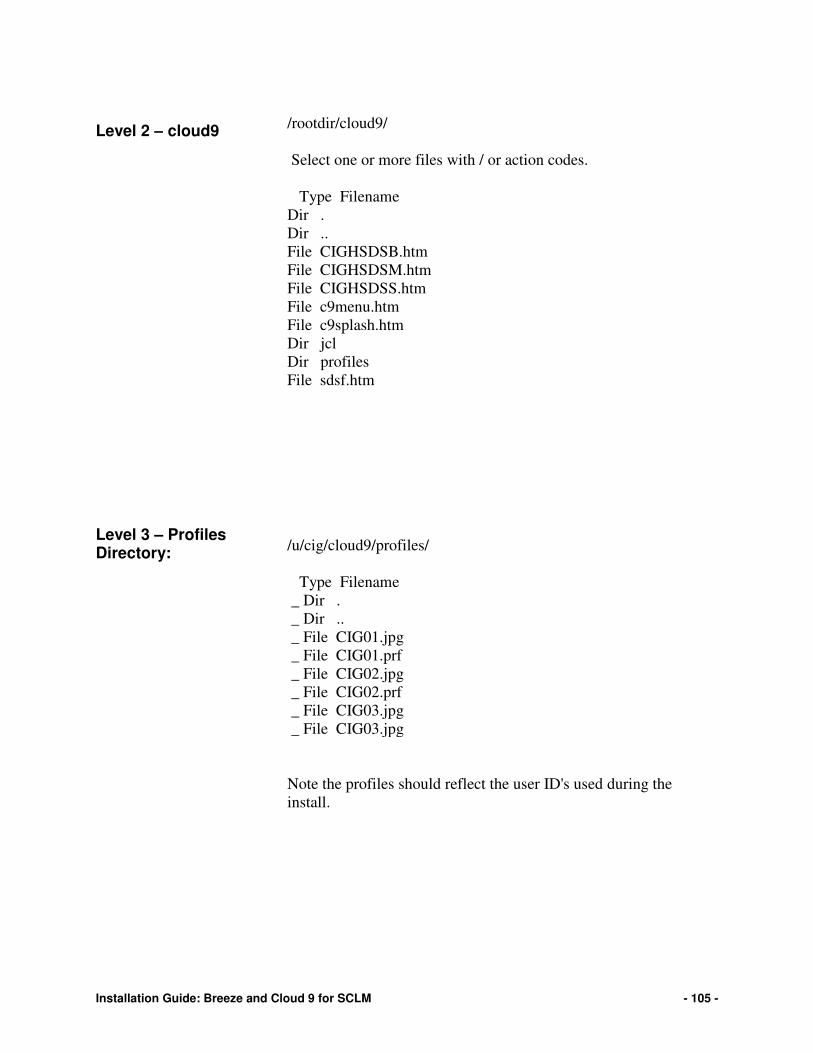
Installation Guide: Breeze and Cloud 9 for SCLM - 105 -
/rootdir/cloud9/ Select one or more files with / or action codes. Type Filename Dir . Dir .. File CIGHSDSB.htm File CIGHSDSM.htm File CIGHSDSS.htm File c9menu.htm File c9splash.htm Dir jcl Dir profiles File sdsf.htm /u/cig/cloud9/profiles/ Type Filename _ Dir . _ Dir .. _ File CIG01.jpg _ File CIG01.prf _ File CIG02.jpg _ File CIG02.prf _ File CIG03.jpg _ File CIG03.jpg Note the profiles should reflect the user ID's used during the install.
Level 2 – cloud9
Level 3 – Profiles Directory:

/u/cig/cloud9/jcl/ Type Filename _ Dir . _ Dir .. _ File CIGC9DYN _ File CIGC9IBM _ File CIGC9MIG
Level 3 – JCL Directory

Installation Guide: Breeze and Cloud 9 for SCLM - 107 -
Appendix B: Breeze and Cloud 9 Components Modified During Installation
The following JCL, Parameter, and HTML members are modified during the installation process. The names are provided here as an overview of CIG naming standards and component functionality.
CIGC9SRV JCL for the HTTP server task CIGC9JX1 JCL to extract and build JCL PDS members CIGC9SUX JCL to copy members to Cloud 9 rootdir CIGC9SUM REXX input to CIGC9SUX to reset
permissions on files copied to rootdir in CIGC9SUX
CIGSOJ01 JCL to build and init SLR database CIGSOJ03 JCL to create and init empty SLR database CIGSOJ04 JCL for SLR backup, delete, and define CIGSOJ05 JCL for stand alone VSAM index expansion CIGSOJ06 JCL for SLR IVP CIGC9JS0 JCL to offload master JCL file CIGC9JS2 JCL to offload all files from cartridge CIGS2INI JCL to build the CIGINI file CIGS2DBS JCL to build both the SLR and Breeze demo
databases CIGC9JX5 JCL to build secondary indexes for both the
SLR and Breeze demo databases CIGC9MIG JCL shell for Endevor conversion CIGC9IBM JCL shell for SCLM actions CIGC9DYN REXX shell for SCLM dynamic allocations
JCL Members (located in JCLLIB and resident on the host) Modified During Installation
Cloud 9 JCL/REXX Shells Resident in Cloud 9 rootdir.

C9CNFG Sample HTTP HTTPD.CONF file C9EVARS Sample HTTP HTTPD.ENVVARS file
JCL Members (located in JCLLIB) Modified during Installation CIGSMJD1 JCL to clean-up and maintain Breeze database CIGSMJX1 JCL to explode sequential JCL to PDS files CIGSMJX2 JCL to explode sequential skeletons to PDS files CIGSMJX3 JCL to translate BRZHTML into ASCII format CIGSMJX4 JCL to test the EMAIL interface CIGSMJ02 JCL to offload remainder of product cartridge CIGSMJ03 JCL to build Breeze database with demo data CIGSMJ04 JCL to create CIGINI CIGSMJ05 JCL for define/backup of Breeze database CIGSMJ06 JCL to run batch reports CIGSMPKG JCL shell used in server for approval process CIGSMPRT JCL shell used by server for browse requests CIGSMSRV JCL to invoke the CTS Server CIGSMJU1 JCL to update individual approver records CIGSMJG1 JCL to update approver group records CIGSMJIJ JCL to assign and update inventory locations CIGSMJP1 JCL to run source monitoring utility CIGSMJA1 JCL to build cross reference reports CIGSMJV1 JCL to cast and tally approver votes CIGSMJS1 JCL to run the promote submit utility CIGSMJD1 JCL to run the package delete utility
Javalib Members (located in JAVALIB) Modified during Installation $$HTML Sample HTML file for EMAIL $$$$SMTP Sample SMTP control file TESTTO Sample member SMTP setup test $CONTROL Sample port definition parameter BRSCLM Sample HTML for Breeze Applet invocation
HTTP Server Parameters Modified during Installation and Copied to Cloud 9 rootdir

Installation Guide: Breeze and Cloud 9 for SCLM - 109 -
Table of Figures 1. Reference Publications ..................................................... 7 2. CIG Product Installation Step-by-Step .............................. 9 3. System Requirements .................................................... 10 4. Space Requirements ...................................................... 11 5. Site-specific Customization ............................................ 13 6. ISPF/SCLM Dataset Names ........................................... 14 8. CIGC9JX1 ...................................................................... 18 10. CIGC9CRRT ................................................................ 20 11. Checkpoint 1 ................................................................ 21 12. CIGS2DBS ................................................................... 23 13. CIGS2INI ...................................................................... 26 14. Common Section .......................................................... 27 15. CIGINI Syntax for Cloud 9 ............................................ 27 16. CIGINI Syntax for Breeze ............................................. 27 17. CIGC9JS5 .................................................................... 30 18. Checkpoint 2 ................................................................ 31 19. C9HTTPD Expected Change Area Only ....................... 33 20. C9EVARS ..................................................................... 36 21. CIGC9SRV ................................................................... 39 21. CIGC9IBM .................................................................... 42 22. CIGC9DYN ................................................................... 44 23. CIGC9MIG .................................................................... 46 24. Checkpoint 3 ................................................................ 47 25. CIGC9SUM .................................................................. 49 26. CIGC9SUX ................................................................... 53 27. Unix Authority ............................................................... 54 28. Unix Options ................................................................. 55 29. Change the Mode ......................................................... 55 30. SYSPRINT and SYSOUT DD Output .......................... 57 31. Checkpoint 4 ................................................................ 58 32. c9ivp.htm Invocation ..................................................... 59 33. Logon prompt ............................................................... 61 34. Cloud 9 Profile .............................................................. 62 35. SCLM Query ................................................................. 63 36. SCLM List ..................................................................... 64 37. CIGSOJ06 .................................................................... 66 38. sdsf.htm Invocation ...................................................... 67 39. SDSF List Example ...................................................... 68 40. Checkpoint 5 ................................................................ 69 41. CIGSMSRV .................................................................. 72 42. CIGSMPKG .................................................................. 74 43. CIGSMPRT .................................................................. 77 44. CIG component libraries ............................................... 78 45. Breeze Work Files ........................................................ 78

46. FLMLIBS ...................................................................... 81 47. CIGSMFLM .................................................................. 83 48. Checkpoint 6 ................................................................ 84 49. CIGOUT DD Output...................................................... 85 50. Checkpoint 7 ................................................................ 86 51. Brzivp.html Expected Results ....................................... 87 52. BRSCLM ...................................................................... 88 53. Breeze Log-in ............................................................... 90 55. Package Detail Report .................................................. 93 56. Checkpoint 8 ................................................................ 94 57. $$$$SMTP ................................................................... 96 58. $$HTML ........................................................................ 97 59. Sample Member TESTTO ............................................ 98 60. CIGSMJX4 ................................................................... 98 61. CIGSMJ05 .................................................................. 102

Installation Guide: Breeze and Cloud 9 for SCLM - 111 -