installation & configuration guide - citrix.com · vmware vrealize operations management pack...
TRANSCRIPT
VMware Vrealize operations ManageMent pack For
Citrix XenDesktop & XenApp
Installation & Configuration Guide

2 Blue Medora VMware vRealize Operations Management Pack for Citrix XenDesktop & XenApp Installation & Configuration Guide
NOTE: This document supports the version of each product listed, as well as all subsequent versions, until a new edition replaces it.
You can find the most up-to-date technical documentation on the Blue Medora support site at: http://support.bluemedora.com.
The Blue Medora website also provides the latest product updates. If you have comments about this documentation, submit your feedback to: [email protected].
1. Purpose...................................................................................................................................................................... 32. Installation and Configuration Requirements....................................................................... 3
2.1 Prerequisites for Collecting Session Latency Metrics................................. 33. Licensing Requirements............................................................................................................................ 34. Upgrading the Management Pack.................................................................................................. 4
4.1 Deleting existing XenDesktop dashboards within vRealize Operations ......................................................................................................................................................... 44.2 Deleting existing XenDesktop adapter instances and objects............ 4
5. Installing the Management Pack ..................................................................................................... 55.1 Uploading the Installation File.............................................................................................. 55.2 Adding a License Key................................................................................................................... 7
6. Configuring the Management Pack............................................................................................... 86.1 Creating an Adapter Instance and Credential...................................................... 86.2 Manually Discover Resources...........................................................................................116.3 Configure the Properties File..............................................................................................136.4 Validate Data Collection..........................................................................................................14
7. Appendix I: Management Pack Folders and Files.......................................................158. Appendix II: Revision Notes...............................................................................................................15
taBle oF contents

3 Blue Medora VMware vRealize Operations Management Pack for Citrix XenDesktop & XenApp Installation & Configuration Guide
1. purposeThe Blue Medora VMware vRealize Operations (vROps) Management Pack for Citrix XenDesktop & XenApp Installation and Configuration Guide describes how to install and configure the Management Pack for Citrix XenDesktop and XenApp. The intended audience is anyone who needs to install and configure the Management Pack within vROps.
2. Installation and Configuration RequirementsBefore installing and configuring the Management Pack, ensure your system meets the following requirements:
Table 1: Management Pack Installation & Configuration Requirements
vRealize Operations (vROps) Requirements
Citrix XenDesktop and XenApp Requirements
Version(s) vRealize Operations v6.0.x & v6.1.x(Advanced or Enterprise editions)
Citrix XenDesktop 7.1, 7.5, & 7.6 (VDI, Enterprise, and Platinum)
Citrix XenApp 7.5 & 7.6 (Advanced, Enterprise, and Platinum)
Credentials vROps username/password Citrix Receiver username/password
NOTE: The Management Pack uses a username, password, and domain to connect to the OpenData (OData) API on the specified Delivery Controller. You will need this information to create a credential for the adapter instance.
The user must be a XenApp or XenDesktop administrator. You require read-only privileges; however, the data returned is determined by XenApp or XenDesktop administrator roles and permissions. For further clarification see: http://support.citrix.com/proddocs/topic/xenapp-xendesktop-76/cds-ms-odata-access.html.
Connection vROps hostname or IP address Citrix Receiver domain (delivery controller IP address)
NOTE: In order for the XenDesktop and XenApp Site resource to establish a relationship with its corresponding SQL Server Database, the vROps machine must be on the same domain as the XenDesktop Delivery Controller.
2.1 Prerequisites for Collecting Session Latency Metrics
NOTE: This section is applicable only to Windows PowerShell users, as the Management Pack only collects session latency metrics for Windows VDAs. In order to collect Latency metrics and establish an SQL Server relationship, it is required that users have a Windows collector on the same Active Directory Domain as DDC/VDAs.
To allow session latency calls on a specific VDA, you must:
• Ensure the vROps machine is on the same domain as the VDA machines in the Site. • Allow an exception for Windows PowerShell through the Firewall. • Enable PowerShell Remoting on the VDA.
NOTE: For most systems, the 64-bit PowerShell should be allowed through the Firewall, not the 32-bit.
To enable Windows PowerShell Remoting on the VDA:1. Open PowerShell as an Administrator (i.e., elevated Administrative privileges).
2. Run the command: enable-psremoting on the VDA to be monitored.
3. You must set the trusted hosts on the server with the agent. Run the command: Set-Item WSMan:\ localhost\Client\TrustedHosts -value <Xendesktop-server-name> -force -concatenate
3. Licensing RequirementsA license key will be provided by Blue Medora when the Management Pack is purchased and must be added as a Citrix XenDesktop License within vRealize Operations before the Management Pack can be configured and used. Refer to section 5.2, Adding a License Key, for details.
Run

4 Blue Medora VMware vRealize Operations Management Pack for Citrix XenDesktop & XenApp Installation & Configuration Guide
4. Upgrading the Management PackBefore upgrading to a newer version of the Management Pack (i.e., uploading a new .pak file), we recommend the following “clean-up” tasks:
• Delete existing XenDesktop Dashboards
• Delete existing XenDesktop adapter instances and objects
4.1 Deleting existing XenDesktop dashboards within vRealize Operations
If you do not remove the dashboards from a previous version of the Management Pack before upgrading, you will see duplicate XenDesktop dashboards in the Dashboard List drop-down menu after installation.
To remove existing Management Pack dashboards:
1. Navigate to Content > Dashboards.
2. Multi-select all XenDesktop & XenApp dashboards.
3. Click Delete Dashboard.
4. Click Yes when the confirmation dialog box appears to delete the selected dashboards.
Figure 1: Delete Dashboards
4.2 Deleting existing XenDesktop adapter instances and objects
Users must also remove previous adapter instances and their related objects, as the old instances will not collect data and creating new instances makes new related objects instead of using existing objects.
After deleting existing dashboards and installing the new version of the Management Pack, click the Delete all adapter instances and related objects button, then configure the new adapter instance(s).
Figure 2: Delete “Old” Adapter Instance(s) and Objects
5 Blue Medora VMware vRealize Operations Management Pack for Citrix XenDesktop & XenApp Installation & Configuration Guide
5. Installing the Management Pack This section includes the following topics:
• Uploading the Installation File
• Adding the License Key
5.1 Uploading the Installation File
The Citrix XenDesktop Management Pack is installed using a .pak file.
5.1.1 Prerequisites
• Obtain the Management Pack installation file from http://www.bluemedora.com/products.• Read the release notes that are included with the .pak file.
5.1.2 Procedure
1. Save the .pak file in a temporary folder.
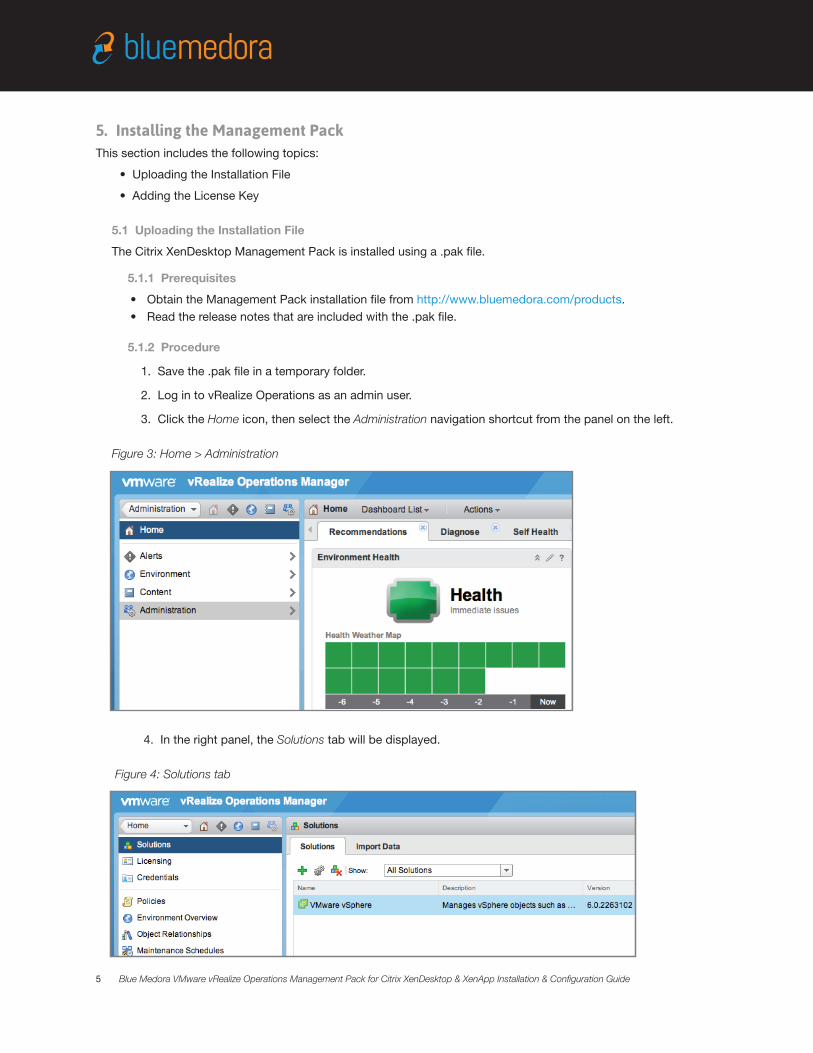
2. Log in to vRealize Operations as an admin user.
3. Click the Home icon, then select the Administration navigation shortcut from the panel on the left.
Figure 3: Home > Administration
4. In the right panel, the Solutions tab will be displayed.
Figure 4: Solutions tab

6 Blue Medora VMware vRealize Operations Management Pack for Citrix XenDesktop & XenApp Installation & Configuration Guide
5. Click the Add icon ( ) to upload the .pak file to the vRealize Operations server. In the dialog that appears (refer to Figure 5), browse to the location of the saved .pak file, then click Upload.
NOTE: The .pak file upload may take several minutes to complete. Status information appears in the Installation Details text box throughout the installation process
Figure 5: Select the .pak file to upload
6. Click the Next button when the upload has finished. Read the End User License Agreement (EULA) and click the ‘I accept the terms of this agreement’ checkbox to accept, then click the Next button.
7. Click the Finish button when the installation process is complete.
NOTE: The installation utility creates the xendesktop_adapter folder and citrix_xendesktop_adapter.jar file in the $ALIVE_BASE/user/plugins/inbound folder. Refer to Appendix 1 for more information on folders and files.

7 Blue Medora VMware vRealize Operations Management Pack for Citrix XenDesktop & XenApp Installation & Configuration Guide
5.2 Adding a License Key
The Management Pack requires a valid license for full operation. Complete the following steps to license the Management Pack.
5.2.1 Install the License
1. In vRealize Operations Manager, navigate to Administration > Licensing > License Keys.
2. Click the Add icon ( ). In the dialog that appears, select ‘Citrix XenDesktop Adapter’.
Figure 6: Add License
3. Enter your Blue Medora license key, then click Validate. If successful, “License key validated successfully” will be displayed.
5.2.2 Add the License to a Group
NOTE: Adding a license to a group is only necessary if using vROps 6.0.0. In later versions, the License will automatically be added to a group.
1. Navigate to License Groups.
2. Select the license group ‘CitrixXenDesktopAdapter Licensing’, then click the Edit icon ( ).
3. Check the newly added XenDesktop adapter license.
4. Enter a name for this license group, then click Next.
5. Select the resources to include/exclude in this group, then click Next.
6. Click Finish.
7. Navigate back to License Keys and click the Refresh License Usage icon ( ).
5.2.3 Add Default Policy to the License Group
A default policy for the adapter was created and should be added to your Licensing Group for the best possible experience on vRealize Operations 6.0+.
To set the policy:
1. Navigate to Policies > Policy Library.
2. Select the ‘Blue Medora Default Policy for Citrix XenDesktop Adapter’.
3. Click the Set Default Policy icon ( ) and accept the confirmation dialog.

8 Blue Medora VMware vRealize Operations Management Pack for Citrix XenDesktop & XenApp Installation & Configuration Guide
6. Configuring the Management PackTo configure the Management Pack, you must add a credential and an adapter instance in vRealize Operations. Depending on your configuration, you might need to perform additional steps.
This section includes the following topics:
• Creating an Adapter Instance and Credential• Manually Discovering Resources (if necessary)• Configuring the Adapter Properties File• Validating Management Pack Data Collection
6.1 Creating an Adapter Instance and Credential
You must create an adapter instance for the Management Pack. The adapter instance defines the adapter type and identifies the Site from which the adapter instance retrieves data.
NOTE: If your environment is configured to support multiple Sites, and they are monitored by vRealize Operations, you must create an adapter instance for each individual Site.
6.1.1 Prerequisites
• Install the Management Pack for Citrix XenDesktop & XenApp. Refer to section 5, Installing the Management Pack.• Ensure you have the correct OData username, password, and domain available.
6.1.2 Procedure
1. Log in to vRealize Operations as an administrator.
2. Click on the Administration navigation shortcut ( ). The Solutions view should automatically open.
3. Select ‘Citrix XenDesktop Adapter’ from the Solutions list.
Figure 7: Solutions List
4. Click the Configure icon ( ). The following window will appear.

9 Blue Medora VMware vRealize Operations Management Pack for Citrix XenDesktop & XenApp Installation & Configuration Guide
Figure 8: Manage Solution
NOTE: If adding multiple adapter instances, click the Add icon ( ) above the list of Instance Names on the left.
5. In the Manage Solution window, enter the following information:
Adapter Settings:• Display Name: A name for this particular instance of the Management Pack• Description: Optional; most helpful for describing multiple adapter instances of the Management Pack
Basic Settings:• Delivery Controller: IP address of the Delivery Controller
• Credential: Click the Add icon ( ), then select the credential type (refer to Figure 9).
Advanced Settings:
• Collector: Automatically selected• Support Autodiscovery: Default value is True, which means the adapter instance will create resources automatically. Select False if you wish to discover resources manually.• Maximum Events: Default value is 10,000, but can be modified• Maximum Session Resources: Default value is 1,000, but can be modified• Maximum User Resources: Default value is 1,000, but can be modified• Maximum Inactive User Resources: Default value is 1,000, but can be modified

10 Blue Medora VMware vRealize Operations Management Pack for Citrix XenDesktop & XenApp Installation & Configuration Guide
6. In the Manage Credential dialog that appears:
• Enter an appropriate name for the credential instance in the Credential name text box. • Enter the OData User Name, Password, and Domain. • Enter the vRealize Operations User Name and Password.
NOTE: The vRealize user name/password must have access to vRealize Suite API.
• If using PowerShell on Windows, enter the PowerShell User Name, Password, and Domain.
Figure 9: Manage Credential
7. Click OK to add the credential for the adapter instance.
8. Click Test Connection to ensure vRealize Operations can connect properly to the delivery controller.
9. Click Save Settings to save your adapter instance configuration.
6.1.3 What To Do Next
If you set the Autodiscovery option to False, you must manually discover Xen® resources as described in the next section.
11 Blue Medora VMware vRealize Operations Management Pack for Citrix XenDesktop & XenApp Installation & Configuration Guide
6.2 Manually Discover Resources
With manual discovery, the Management Pack sends a request to the Delivery Controller to return resources, and you then select the resources to import into vRealize Operations. The discovery mode that you configure determines whether the Management Pack imports only the selected resource, or the selected resource and all of its child resources.
6.2.1 Prerequisites
Create an adapter instance. Refer to section 6.1, Adding an Adapter Instance and Credential, for details.
6.2.2 Procedure
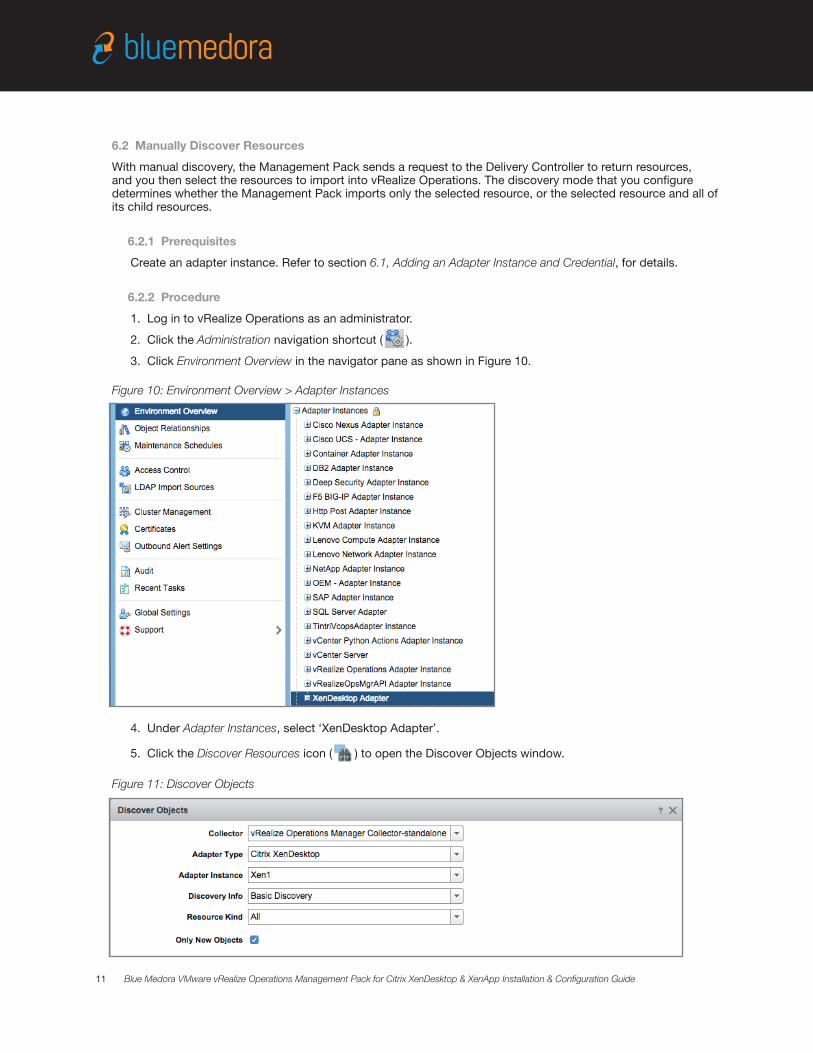
1. Log in to vRealize Operations as an administrator.
2. Click the Administration navigation shortcut ( ).
3. Click Environment Overview in the navigator pane as shown in Figure 10.
Figure 10: Environment Overview > Adapter Instances
4. Under Adapter Instances, select ‘XenDesktop Adapter’.
5. Click the Discover Resources icon ( ) to open the Discover Objects window.
Figure 11: Discover Objects

12 Blue Medora VMware vRealize Operations Management Pack for Citrix XenDesktop & XenApp Installation & Configuration Guide
6. In the Discover Objects window, select the following information from the drop-down menus:
• Collector: Unless additional collectors have been added, the only available collector is your vRealize Operations server.
• Adapter Type: Citrix XenDesktop
• Adapter Instance: The name of the instance previously configured
• Discovery Info: Basic Discovery
• Resource Kind(s): Select only the specific resource kind(s) you want to discover, or select All.
• Only New Objects: Select if you only want new objects to be collected.
7. Click OK to start the discovery process.
8. The discovery process can take several seconds to several minutes. When it has finished, the Discovery Results window lists your resources similar to what is shown in Figure 12.
Figure 12: Discovery Results
9. Double-click each resource kind that contains resources to add. 10. Select options for each kind of resource (Refer to Table 2).

13 Blue Medora VMware vRealize Operations Management Pack for Citrix XenDesktop & XenApp Installation & Configuration Guide
Table 2: Resource Options
11. Click OK. The Discovery Results window closes and the new resources appear.
6.2.3 What To Do Next
If you did not select the option to start metric collection when you defined a resource, you can start metric collection after the resource is defined. To start collecting metrics for a resource, choose the resources, then click the Start Collecting icon ( ).
6.3 Configure the Properties File
There are many settings embedded within the properties file that can be modified to configure the Management Pack for your particular preferences. The following settings can be found in the xendesktop.properties file within the xendesktop_adapter/conf/ folder. You can modify the entries in the file, re-save the file, and they will be read in during the next collection.
create_relationship_between_applications_and_machines_in_the_same_delivery_group=trueDescription: The Citrix XenDesktop platform does not create a relationship between Applications and Machines within the OData model, but this visual convenience is added when the property is set to true (default).
relationship_sync_interval=10 Description: On the adapter instance, you can set a collection interval of how often the adapter instance queries the monitored target. Because many resource relationships tend to slow down vROps, you can opt to only collect relationships less often (e.g., every 10 collections).
parallelize_odata_calls=trueDescription: This setting allows for a quicker return on data calls. The default setting is true.
timeout_for_applications_in_seconds=timeout_for_application_instances_in_seconds=timeout_for_catalogs_in_seconds=timeout_for_connections_in_seconds=timeout_for_connection_failure_logs_in_seconds=timeout_for_desktop_groups_in_seconds=timeout_for_hypervisors_in_seconds=timeout_for_load_indexes_in_seconds=timeout_for_machine_failure_logs_in_seconds=timeout_for_machines_in_seconds=timeout_for_sessions_in_seconds=timeout_for_users_in_seconds=
Description: These settings allow for adjusting acceptable times to return an OData result, or when the data calls should timeout, in seconds. When values are not specified, the calls are limited to whatever the collection interval is set to for the adapter instance resource.
Example: If you want to limit the Applications call to 10 seconds, it would appear as follows:timeout_for_applications_in_seconds=10
OPTION DESCRIPTION
Import Import the resources but do not start collecting data. Resources appear in the resource list as Not Collecting; data is not stored; analysis is not performed.
Collect Import the resources and start collecting data. When you select the Collect check box, the Import check box is also selected.
14 Blue Medora VMware vRealize Operations Management Pack for Citrix XenDesktop & XenApp Installation & Configuration Guide
6.4 Validate Data Collection
After you add an adapter instance, you will want to validate the data that it collects in vRealize Operations.
6.4.1 Prerequisites
Create an adapter instance. Refer to section 6.1, Adding an Adapter Instance and Credential, for details.
6.4.2 Procedure
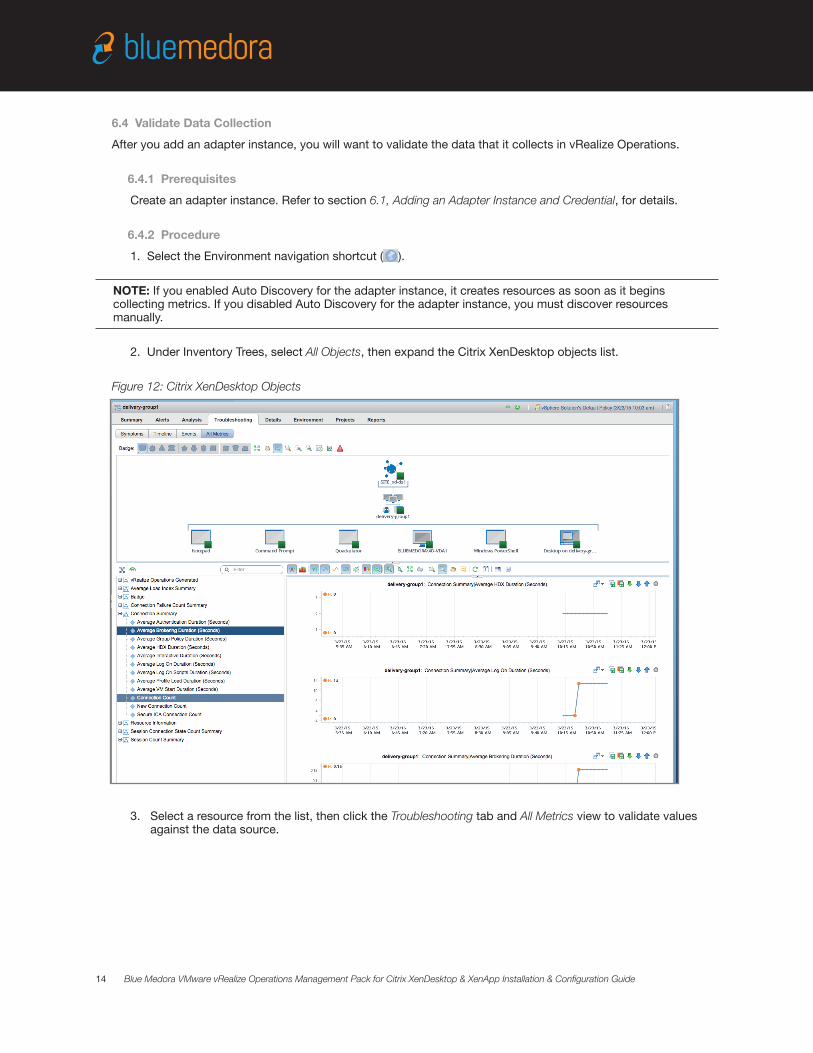
1. Select the Environment navigation shortcut ( ).
NOTE: If you enabled Auto Discovery for the adapter instance, it creates resources as soon as it begins collecting metrics. If you disabled Auto Discovery for the adapter instance, you must discover resources manually.
2. Under Inventory Trees, select All Objects, then expand the Citrix XenDesktop objects list.
Figure 12: Citrix XenDesktop Objects
3. Select a resource from the list, then click the Troubleshooting tab and All Metrics view to validate valuesagainst the data source.
15 Blue Medora VMware vRealize Operations Management Pack for Citrix XenDesktop & XenApp Installation & Configuration Guide
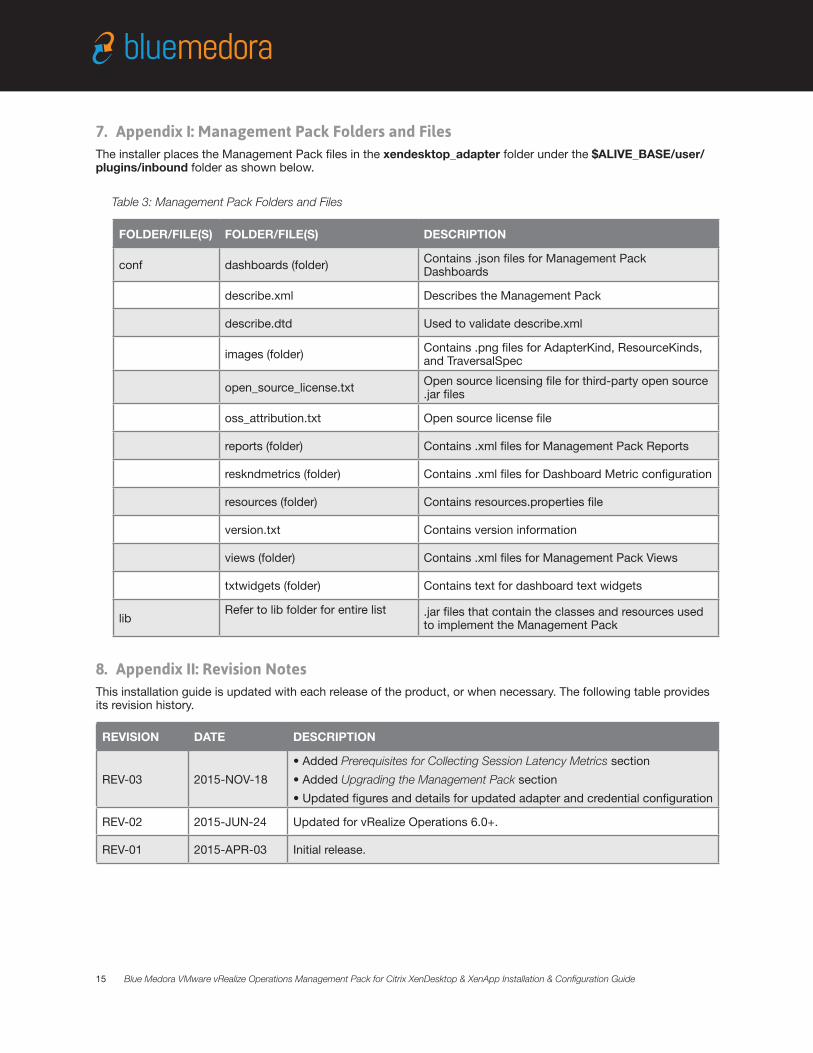
7. Appendix I: Management Pack Folders and FilesThe installer places the Management Pack files in the xendesktop_adapter folder under the $ALIVE_BASE/user/plugins/inbound folder as shown below.
Table 3: Management Pack Folders and Files
8. appendix ii: revision notesThis installation guide is updated with each release of the product, or when necessary. The following table provides its revision history.
FOLDER/FILE(S) FOLDER/FILE(S) DESCRIPTION
conf dashboards (folder) Contains .json files for Management Pack Dashboards
describe.xml Describes the Management Pack
describe.dtd Used to validate describe.xml
images (folder) Contains .png files for AdapterKind, ResourceKinds, and TraversalSpec
open_source_license.txt Open source licensing file for third-party open source .jar files
oss_attribution.txt Open source license file
reports (folder) Contains .xml files for Management Pack Reports
reskndmetrics (folder) Contains .xml files for Dashboard Metric configuration
resources (folder) Contains resources.properties file
version.txt Contains version information
views (folder) Contains .xml files for Management Pack Views
txtwidgets (folder) Contains text for dashboard text widgets
libRefer to lib folder for entire list .jar files that contain the classes and resources used
to implement the Management Pack
REVISION DATE DESCRIPTION
REV-03 2015-NOV-18
• Added Prerequisites for Collecting Session Latency Metrics section
• Added Upgrading the Management Pack section
• Updated figures and details for updated adapter and credential configuration
REV-02 2015-JUN-24 Updated for vRealize Operations 6.0+.
REV-01 2015-APR-03 Initial release.
Copyright © 2015 Blue Medora Inc. All rights reserved. U.S. and international copyright and intellectual property laws protect this product. Blue Medora is a registered trademark or trademark of Blue Medora in the United States and/or other jurisdictions.
The Citrix name (including Citrix XenDesktop, XenApp, and Xen®) and logo are trademarks or registered trademarks of Citrix Systems, Inc. in the United States and/or other jurisdictions. All other marks and names mentioned herein may be trademarks of their respective companies.
Blue Medora
3225 N Evergreen Dr. NE Suite 103
Grand Rapids, MI 49525
www.bluemedora.com
You can find the most up-to-date technical documentation on the Blue Medora support site at: http://support.bluemedora.com.
The Blue Medora website also provides the latest product updates. If you have comments about this documentation, submit your feedback to: [email protected].