installation and operating instructions - parmco (ppov-6s... · ppov-6s-pyro-1 for your...
TRANSCRIPT

Installationand OperatingInstructions
As part of Parmco Appliances commitment to improving and updating product ranges,we reserve the right to alter, change and update technical specifications and appearance
attributes of all Parmco Appliances products. E&OE.
Model: PPOV-6S-PYRO-1
For your convenience, we recommend to attach the serial number label HERE.
Dear Valued Customer,
Thank you and congratulations on purchasing your new Parmco appliance.
All Parmco products are made to the highest quality and design standards. We are sure you will enjoy your new appliance.
As a note, please read through these instructions carefully, as these will assist you in gaining a complete understanding of the functions and features offered by your appliance.
Please take special note of all detailed technical information and installation instructions. It is essential that you only allow a qualified technician to install this appliance to ensure the safety and reliability of this appliance.
Furthermore, not using appropiate personnel to install this appliance may affect any future warranty claims lodged, so please check with Parmco Appliances before any installation is carried out.
We hope you enjoy your new appliance. If you would like to find out more about this product or any other products in Parmco’s extensive range, visit us on the web at www.parmco.co.nz.
Regards,The Parmco Team

1
Important Safety Information PAGE
Before Using this Appliance 2
For your Safety 2
Product description 3
Oven Functions 5
Operating Instructions 6
Cooking Guide 10
Maintenance 11
Installation Instructions 13
Accessories 17
IMPORTANT NOTE
It is the law in New Zealand that this appliance must be installed by authorised persons. The installation must comply with all the appropriate New Zealand Standards and Regulatory Requirements with particular reference to the New Zealand Electrical Standards. Any attempt to install this or any other Parmco product without an authorised person could result in damage to the product and a possible health hazard. Not having an authorised person install this appliance may result in all associated warranties from Parmco Appliances being null and void.
INDEX
2
We recommend that for best performance and to extend the life of your appliance you read the instructions in this owner’s manual thoroughly before using your new appliance. It will provide you with all the information you need to ensure its safe installation, proper use and maintenance. Retain this owner’s manual for future reference. To maintain the efficiency and safety of this appliance we recommend the following: BEFORE USING THIS APPLIANCE Read the instructions thoroughly Remove all plastic protective films on the appliance before operating the appliance. Remove the plastic film on the oven glass door (when provided). To condition the oven for its first use, it is necessary to allow oils and residues used
to protect the appliances during manufacturing to burn off. Heat the empty oven at maximum temperature for 45 minutes on fanbake. This allows unpleasant smells and smoke from protective oils used during manufacture and from new thermal insulation to burn off.
Allow the unit to cool off and wash the oven out with soapy water and then rinse. The oven only operates when the time has been set. FOR YOUR SAFETY This appliance is designed for non-commercial, household use only and must not be
altered in any way. This appliance can only be used safely when it is correctly connected to an efficient
earthing system in compliance with New Zealand Electrical Standards requirements. Before maintenance or cleaning, always ensure that the appliance is disconnected
from the mains. Always use oven gloves to remove and replace cookware in the oven. Packaging items such as plastic bags, polystyrene, nails, etc that this appliance is
delivered in are potentially dangerous, and therefore appropriate measures must be taken to prevent children from coming into contact with them.
This appliance must only be used by adults. Make sure that children do not touch the controls or play with the appliance. Young children should be supervised to ensure they do not play with the appliance.
Do not allow children to sit on or play with the oven door. Do not use the drop down door as a stool to reach overhead cabinets. This appliance is not intended for use by persons (including children) with reduced
physical, sensory, mental capabilities, or lack of experience and knowledge, unless they have been given supervision or instruction concerning the use of this appliance by a person responsible for their safety.
During use the appliance becomes hot. Care should be taken to avoid touching heating elements inside the oven.
Keep the appliance thoroughly cleaned. Food residues may cause fire risks. DO NOT use a steam cleaner to clean this appliance.
IMPORTANT SAFETY INFORMATION

3
NEVER line the oven with aluminium sheets as doing so may damage the enamel and elements.
WARNING: Accessible parts may become hot during use. To avoid burns young children should be kept away.
Do not use harsh abrasive cleaners or sharp metal scrapers to clean the oven door glass since they can scratch the surface, which may result in shattering of the glass.
After using the appliance, please ensure that all controls are in the “OFF” position. Avoid touching the oven with wet body parts. Avoid improper or dangerous use of this appliance. Do not obstruct the ventilation or heat dissipation slots. Do not allow power cables of other appliances to come into contact with hot parts
of this appliance. This appliance is intended for indoor use only. Avoid exposing the appliance to
atmospheric elements such as direct sunlight and rain. DO NOT USE OR STORE FLAMMABLE MATERIALS IN THE APPLIANCE OR NEAR THIS
APPLIANCE. Steam and Condensation Often owners of new ovens will see a higher level of steam and condensation than
they are used to in their previous appliance. This is normal and contributes to keeping the food moist during cooking. The amount of condensation will depend on the type of food (fresh, defrosted, frozen) being cooked and the cooking style (water in the roasting dish).Climatic conditions also contribute to the generation of condensation.
When food is heated it produces steam in the same way a boiling kettle does.
When steam comes into contact with the oven door glass it will condensate and produce droplets. To reduce condensation, ensure that the oven is well heated before placing food in the oven cavity. Oven pre-heating is necessary before any cooking!
It is normal for steam to escape the oven when opening the door. To reduce the
build up of condensation pre-heat the oven for longer periods and occasionally open the door and carefully wipe away the condensation. Adjusting your cooking practices will also ensure a minimum build up of condensation.

4
It is important to remember that this oven may perform differently to the way your previous appliance worked. To obtain the best cooking results, please experiment with temperature, rack height and cooking times.
Positioning the Oven Trays & Shelves The baking tray, grill tray and wire shelves can be located in any of the nine height positions. When fitting the wire racks or trays please ensure that they are located between the two wires that are closest together on the side racks. Wire racks have a safety stop so that they cannot be fully withdrawn by accident. To fully withdraw the wire racks simply lift the front edge slightly and withdraw the rack from the oven. The baking tray does not have a stop position and can be fully withdrawn from the oven without interruption. BE CAREFUL NOT TO ACCIDENTALLY FULLY WITHDRAW THE TRAY. NOTE: Place the baking tray provided on the bottom shelf position to prevent any spillages from dripping onto the bottom of the oven. Never place anything (including foil and oven trays) directly onto the bottom of this oven when it is in operation as this could damage the enamel. Only place your cookware (dishes, trays, aluminium foil etc) on the oven shelves provided with this appliance.
PRODUCT DESCRIPTION

5
Symbol Function description
Oven light: Turns on the oven light. Please note this function is not a cooking mode.
Defrost: The air circulation at room temperature enables quicker thawing of the frozen food without using any heat. It's a gentle but quick way to speed up the defrost time.
Bottom heat: A concealed element at the bottom of the oven provides strong heat to the base of food without browning. This is ideal for slow cooking dishes such as casseroles, stews, pastry and pizzas, where a crispy base is desired. The temperature can be set within the range of 60-120 C°; the default temperature is set to 60°
Conventional cooking: The top and bottom elements are on at the same time. The oven needs to be pre-heated first to the desired temperature. This function is deal for cooking a single layer of foods such as cakes, breads, etc. To achieve best results, place the food in the centre of the oven. The temperature can be set between 50-250 C°; the default temperature is set to 220C°
Conventional cooking with fan: Both top and bottom elements plus the fan are working at the same time to provide even more heat, saving up to 30-40% energy. This function is suitable for big roasts using a high cooking temperature or grilling. The temperature can be set between 50-250C°; the default temperature is set to 220C°.
Grill: The inner grill element switches on and off to maintain temperature. For best results, use the top shelves for small items and the lower shelves for larger items. The temperature can be set between 180-240C°; the default temperature is set to 210C°. Always grill with the door closed.
Double grill: The inside radiant element and top element are both operating. The temperature can be set between 180-240C°; the default temperature is 210C°. Always grill with the door closed.
Double grill with fan: The inside radiant element and top element are working together with the fan. The temperature can be set between 180-240C°; the default temperature is set to 210C°. Always grill with the door closed.
Fan forced cooking: An element around the convection fan provides an additional source of heat for convection style of cooking. In the fan forced mode, the fan automatically comes on to circulate heat evenly throughout the oven. The temperature can be set between 50-240C°; the default temperature is set to 180C°.
Pyrolytic function: When this function is selected, the LED display will show “PYA”. The default temperature is set to 450 C° and the timer can be set between 1:30-2:00 hours.
OVEN FUNCTIONS

6
1. SETTING THE CLOCK When the appliance is connected to the electrical supply, the Clock symbol will display “0:00” on the control panel.
Press and the hour indicator will flash. Rotate "K2" clockwise to adjust the hour digits, time should be within 0-23 hrs. Press and the minute’s indicator will flash. Rotate "K2" clockwise to adjust the minutes digits, time should be within
0-59 min. Press to finish the clock settings. " : " will flash.
Note: The clock is 24 hours, and must be set for the oven to function! 2. SETTING FUNCTION AND TEMPERATURE
Rotate "K1" to choose the desired cooking function and the indicator will come on.
Rotate "K2" to adjust the temperature.
Press to confirm the start of cooking. The default temperature for that cooking function will be displayed. The selected temperature will flash until the temperature has been reached, then it will beep and stop flashing.
Note: The step quantities for time adjustments of the coding switch are:
0 -- 0:30min: step 1 minute 0:30--9:00 hours: step 5 minutes
The step quantity for temperature adjustment is 5° C, and for the grill function is
30° C.
Rotate "K1" to adjust the cooking time when cooking begins, then press to
start cooking. If is not pressed within 3 seconds, the oven will revert to the previous time and continue cooking.
Rotate "K2"to adjust the temperature when cooking begins. The corresponding
indicator will flash, and then press to start cooking. If is not pressed within 3 seconds, the oven will revert to the default temperature setting.
3. ENQUIRING FUNCTION During cooking, you can select the enquiring function; after 3 seconds the oven will return to the current working state.
During cooking, press to check the current time. If the clock was set, press to check the remaining time.
OPERATING INSTRUCTIONS

7
4. CHECKING ACTUAL TEMPERATURE IN THE OVEN
Press the and at the same. The oven temperature will momentarily be displayed on the control panel. 5. CHILD LOCK FUNCTION
To LOCK:
Press the and simultaneously for 3 seconds. A long beeping sound will indicate the child lock function has been activated and the symbol will illuminate.
To UNLOCK:
Press the and simultaneously for 3 seconds. A long beeping sound will indicate the child lock function has been deactivated and the symbol will disappear. Note: To quickly stop cooking while in cooking mode, press the stop button. 6. TIMER FUNCTION The oven has a 9 hours timer function. The timer can only be used when the oven is in standby mode and the clock is set. To set the timer, follow the instructions below:
Press the timer button Rotate "K2" to set the hour.
Press the timer button again Rotate "K2" to set the minutes.
Press to start the time.
Note: After the time is set, the oven buzzer will sound 10 times, and the symbol
disappears. You can cancel the timer by pressing the button. 7. START/PAUSE/CANCEL FUNCTION
If the cooking time has been set, press to start cooking. If the cooking is
paused, press to resume cooking.
During cooking, press once to pause cooking. Press twice to cancel the cooking.
8. ENERGY SAVING To save energy the display can be turned off.
While in standby and timer mode, press for three seconds. The LED display will go off and set in the energy-saving mode.
If there is no operation in 10 minutes while in standby mode, the LED display will turn off into the energy saving mode.
While the oven is in energy-saving mode, you can press or rotate any key to exit this mode; the display will turn on.
8
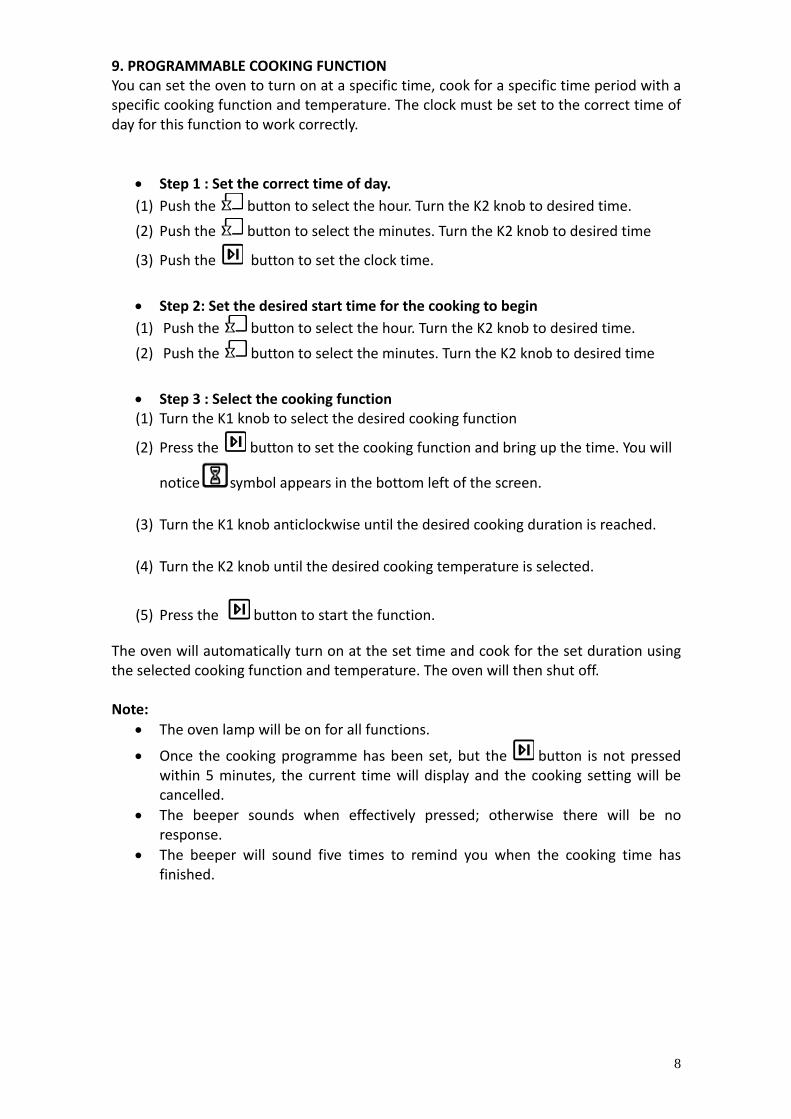
9. PROGRAMMABLE COOKING FUNCTION You can set the oven to turn on at a specific time, cook for a specific time period with a specific cooking function and temperature. The clock must be set to the correct time of day for this function to work correctly.
Step 1 : Set the correct time of day. (1) Push the button to select the hour. Turn the K2 knob to desired time.
(2) Push the button to select the minutes. Turn the K2 knob to desired time
(3) Push the button to set the clock time.
Step 2: Set the desired start time for the cooking to begin (1) Push the button to select the hour. Turn the K2 knob to desired time.
(2) Push the button to select the minutes. Turn the K2 knob to desired time
Step 3 : Select the cooking function (1) Turn the K1 knob to select the desired cooking function
(2) Press the button to set the cooking function and bring up the time. You will
notice symbol appears in the bottom left of the screen.
(3) Turn the K1 knob anticlockwise until the desired cooking duration is reached.
(4) Turn the K2 knob until the desired cooking temperature is selected.
(5) Press the button to start the function.
The oven will automatically turn on at the set time and cook for the set duration using the selected cooking function and temperature. The oven will then shut off. Note:
The oven lamp will be on for all functions.
Once the cooking programme has been set, but the button is not pressed within 5 minutes, the current time will display and the cooking setting will be cancelled.
The beeper sounds when effectively pressed; otherwise there will be no response.
The beeper will sound five times to remind you when the cooking time has finished.

9
10. PYROLYTIC FUNCTION The pyrolytic function allows you to select an automatic oven cavity self-cleaning mode. During this mode, the oven is heated to approximately 450 C°. Any food residues from roasting, grilling and baking are burnt to ash.
Rotate "K1" to select the pyrolytic function
Press to confirm the cleaning cycle. The default time is 2 hours. If desired, rotate "K1"to change the duration of the pyrolytic cycle. Only two set
times can be selected: 1:30 or 2:00 hours. Note:
If the oven door is not closed, the pyrolytic mode will not start and the display will show “DOOR PYA”.
When the oven reaches temperatures higher than 200 C° the door will lock. To cancel the pyrolytic function press the cancel button and the oven will reset to normal operation, but if the temperature is higher than 300 C°, the oven door will lock and the LED will display “COOL”. The door will unlock when the “cooling” cycle is finished.
If the door is opened during heating, the relay for the heating will stop and the display will show “DOOR”; the buzzer will sound continuously until the door is closed or the cancel button is pressed.
Note: BEFORE STARTING THE PYROLYTIC FUNCTION
All trays and racks must be removed before starting the cleaning cycle. Remove the chrome side rails by unscrewing the screw from the bottom of each
side, then lift up the racks and slide out. After cleaning please use a damp cloth and wipe the internal oven cavity and inner door glass.
Reinstall the racks by reversing the process used for removing them.

10
Selector knob setting
Food Type
Weight (in KG)
Rack heightFrom
bottom
PreHeat Time (mins)
Temp Deg C
Cook Time (mins)
Traditional Cooking
Duck 1 3 15 200 65.75
Roast Beef 1 3 15 200 70-75
Roast Pork 1 3 15 200 70-80
Roast Lamb 1 3 15 200 70-80
Biscuits 3 15 180 15-20
Tarts 3 15 180 30-35
Browning 3/4 15 220
Grill Fish 1 4 5 MAX 8-10
Kebabs 1 4 5 MAX 6-8
Vegetables 1 3/4 5 MAX 10-15
Veal 1 4 5 MAX 15-20
Cutlets 1 4 5 MAX 15-20
Hamburgers 1 4 5 MAX 7-10
Toasted sandwiches
4 4 MAX 2-3
Fan Assisted Grill
Chicken 1.5 3 5 MAX 55-60
Baking Tarts 0.5 3 15 180 20-30
Fruit cakes 1 2/3 15 180 40-45
Sponge cake 0.5 3 15 160 25-30
Small cakes On 2 racks
0.6 2-4 15 190 20-25
Biscuits on 3 racks
0.7 1-3-5 15 180 20-25
Meringues on 3 racks
0.5 1-3-5 15 90 180
Please note the above is a guide only and you will need to vary temperatures, times and rack height combinations to achieve the results you want.
COOKING GUIDE

11
Cleaning the oven: Before cleaning your appliance or performing maintenance, make sure that the cooking mode selection knob and cooking temperature selection knob is set to the “OFF” position. To extend the life of your oven, it must be cleaned frequently. The inside of the oven should be cleaned soon after use when the oven is still warm (not hot) with warm soapy water. The soapy water should be rinsed away and the interior dried thoroughly. Avoid using abrasive detergents, scourers, acidic cleaners etc, as these may damage the enamel. If stains are particularly tough to remove, use cleaners specifically recommended cleaning ovens and following the instructions provided. Never use a steam cleaner to clean the inside of this oven. If you are using the oven for an extended period of time, or if you are cooking dishes that contain a lot of water, condensation may form on the oven door. Dry it using a soft cloth and try reducing the cooking temperature. There is a rubber seal surrounding the oven. Check the condition of the seal on a regular basis. If necessary, clean it but avoid using abrasive products. If the seal is damaged please contact Parmco Appliances service department. We recommend you avoid using the oven until it has been repaired. Never place anything (including foil and oven trays) on the bottom of the oven when it is in operation as this may result in damage to the enamel. Clean the glass door using non-abrasive products or sponges and dry it with a soft cloth. Do not use abrasive cleaners or sharp scrapers to clean the oven door glass as they can scratch the surface and may result in the shattering of the glass.
How to remove the oven door Removing the oven door whilst cleaning gives better access to the oven. Open the door fully. Locate the hinge assembly (1). Lift the hinge tab to the open position (2). Gently close the door until the hinge assembly is against the door (3). Lift the door up and out at the same time. To replace the door reverse the above procedure, making sure that the hinge is
correctly located on the small rebate in the hinge arm (4).
MAINTENANCE
1 2 3
12
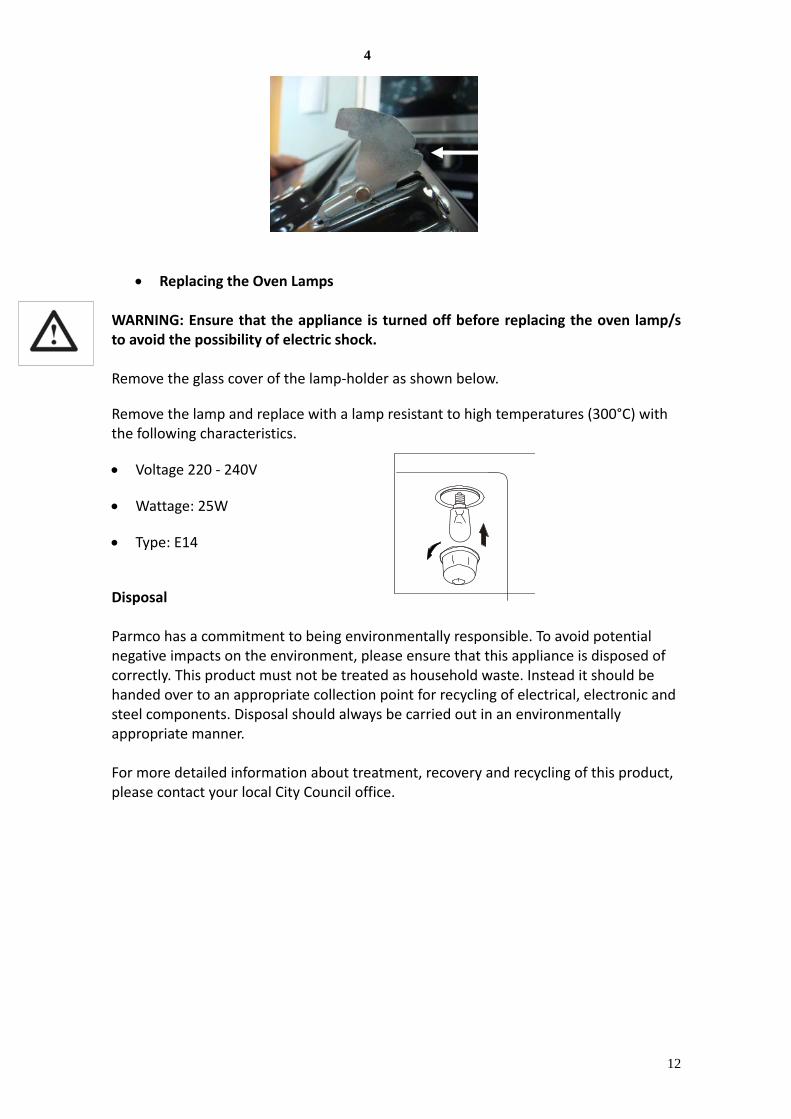
Replacing the Oven Lamps WARNING: Ensure that the appliance is turned off before replacing the oven lamp/s to avoid the possibility of electric shock. Remove the glass cover of the lamp-holder as shown below.
Remove the lamp and replace with a lamp resistant to high temperatures (300°C) with the following characteristics.
Voltage 220 - 240V
Wattage: 25W
Type: E14
Disposal Parmco has a commitment to being environmentally responsible. To avoid potential negative impacts on the environment, please ensure that this appliance is disposed of correctly. This product must not be treated as household waste. Instead it should be handed over to an appropriate collection point for recycling of electrical, electronic and steel components. Disposal should always be carried out in an environmentally appropriate manner. For more detailed information about treatment, recovery and recycling of this product, please contact your local City Council office.
4

13
Installation of this appliance and its connection to the electrical mains must only be
carried out by authorised personnel. Before any service procedure, it is important to ensure that the appliance is DISCONNECTED from the electrical mains.
DO NOT MODIFY THIS APPLIANCE. After removing the appliance from the packaging, make sure that it is undamaged.
Otherwise, contact your dealer before operating this appliance. Make sure that this appliance is installed in accordance with the ventilation
requirements.
This appliance shall only be installed by an authorised person. This appliance shall only be installed in complete accordance with the Electrical Standards of New Zealand. All local regulations, building code requirements and all other statutory requirements must be met. Data Label The data label is located at the rear of the appliance. A duplicate data label is supplied to adhere to a suitable accessible area next to the appliance. The data label on the appliance must NEVER be removed. Before any procedure, it is important to check that the appliance is DISCONNECTED from the electrical mains. Parmco declines all responsibility for any damage deriving from installations that are in breach of the regulations in force or from failure to comply with these installation instructions.
IMPORTANT NOTE
It is the law in New Zealand that this appliance must be installed by authorised persons. The installation must comply with all the appropriate New Zealand Standards and Regulatory Requirements, with particular reference to the New Zealand Electrical Standards. Any attempt to install this or any other Parmco product without an authorised person could result in damage to the product and possible health hazard. Not having an authorised person install this appliance may result in all associated warranties from Parmco Appliances being null and void.
INSTALLATION INSTRUCTIONS
NOTES TO THE AUTHORISED INSTALLER
14
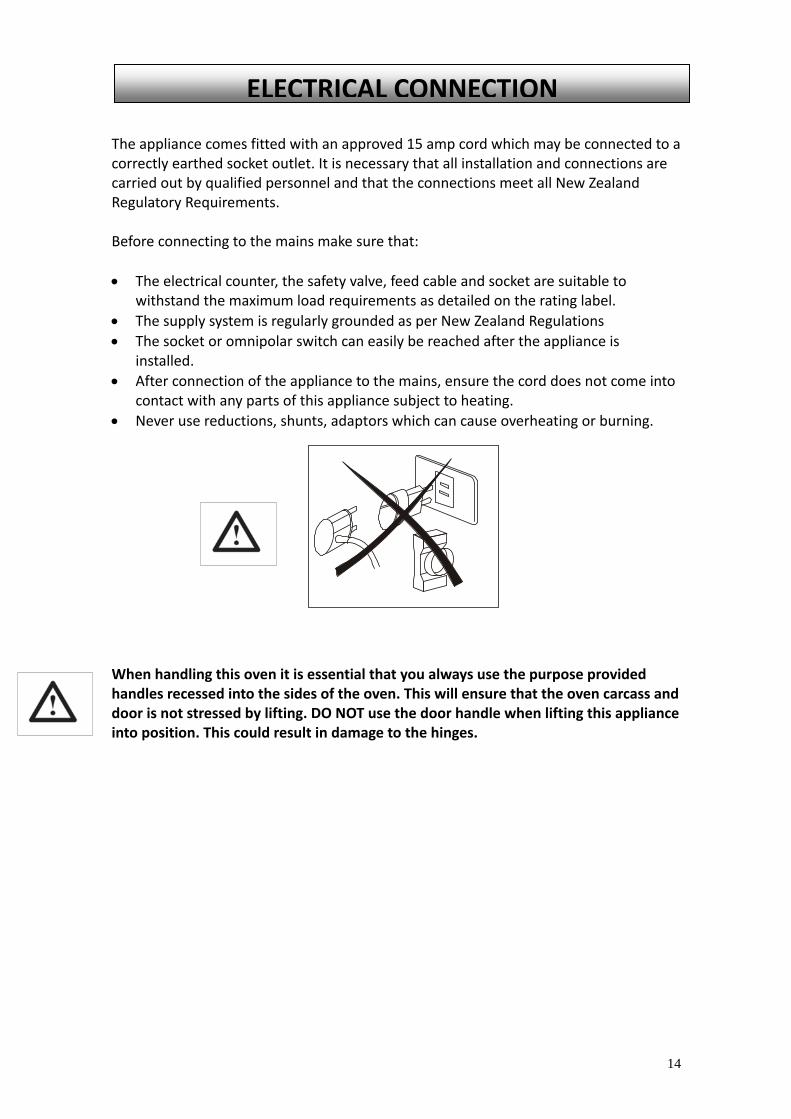
The appliance comes fitted with an approved 15 amp cord which may be connected to a correctly earthed socket outlet. It is necessary that all installation and connections are carried out by qualified personnel and that the connections meet all New Zealand Regulatory Requirements. Before connecting to the mains make sure that: The electrical counter, the safety valve, feed cable and socket are suitable to
withstand the maximum load requirements as detailed on the rating label. The supply system is regularly grounded as per New Zealand Regulations The socket or omnipolar switch can easily be reached after the appliance is
installed. After connection of the appliance to the mains, ensure the cord does not come into
contact with any parts of this appliance subject to heating. Never use reductions, shunts, adaptors which can cause overheating or burning. When handling this oven it is essential that you always use the purpose provided handles recessed into the sides of the oven. This will ensure that the oven carcass and door is not stressed by lifting. DO NOT use the door handle when lifting this appliance into position. This could result in damage to the hinges.
ELECTRICAL CONNECTION

15
Securing the oven to the cabinet
1. Fit oven into the cabinet recess. 2. Open the oven door. 3. Secure the oven in the kitchen cabinet using the two
instance holders "A" which fit the holes in the oven frame cavity, then use the two screws "B"
Electrical connection
Installation Please note the rear panel of the cabinetry must be removed to ensure adequate ventilation. The power switch or socket that connects to the appliance should not be located in the installation housing, but rather in an adjacent cabinet or above the worktop.
INSTALLATION INTO CABINETRY
16
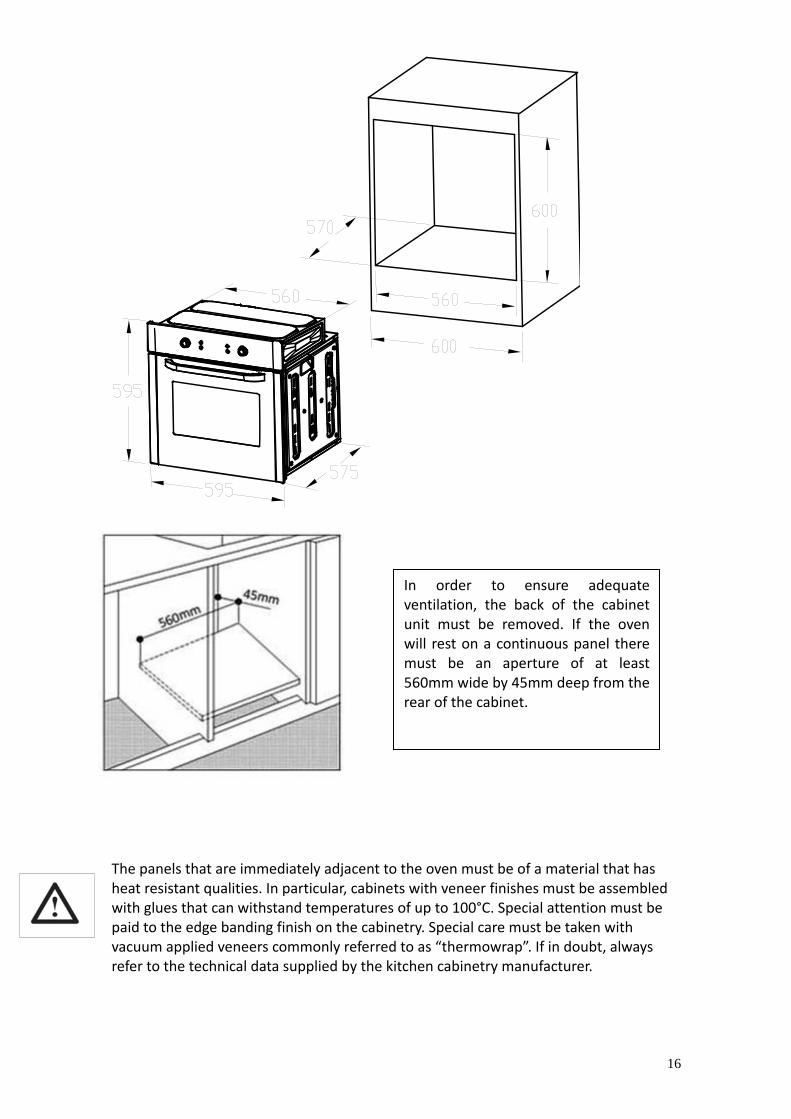
The panels that are immediately adjacent to the oven must be of a material that has heat resistant qualities. In particular, cabinets with veneer finishes must be assembled with glues that can withstand temperatures of up to 100°C. Special attention must be paid to the edge banding finish on the cabinetry. Special care must be taken with vacuum applied veneers commonly referred to as “thermowrap”. If in doubt, always refer to the technical data supplied by the kitchen cabinetry manufacturer.
In order to ensure adequate ventilation, the back of the cabinet unit must be removed. If the oven will rest on a continuous panel there must be an aperture of at least 560mm wide by 45mm deep from the rear of the cabinet.

17
Wire shelves: For grilling dishes, to support cake pans or roasting dishes. Slider bracket: These shelves support the rails on the right and left hand side of the oven and can be removed for cleaning.
Drip pan/Shallow tray: To be used for roasting, grilling and to collect fat/spillage of meat juices. Correct placement of the shelves between the side rails is imperative for safety operation. This will ensure that during the tray or shelf removal, hot food items will not slide out!
ACCESSORIES

Parmco Appliances extended 5 year
warrantyThe Warranty:
• Subjecttothetermsandconditionscontainedwithinthiswarranty,iftheproductisnotofAcceptableQuality(asdefinedintheConsumerGuaranteesAct)within5yearsofthedateoforiginalpurchase,thenParmcoSalesundertakestorepairor,atit’ssolediscretion,replacetheproduct.
• Thewarrantydoesnotcoverthecostsoftransport,mileageortravellingtimeiftheproductislocatedbeyond30kmofarecognisedServiceAgent.
• Thiswarrantyisofferedasanextrabenefit,anddoesnotaffectotherlegalrights,whichcannotbemodifiedorexcludedbyagreement.
• ThiswarrantyonlyappliestogoodssuppliedandinstalledintheNorthandSouthIslandsofNewZealand.
• TheprovisionsofthiswarrantyareinadditiontotherightsandremediesavailabletoconsumersundertheConsumerGuaranteesAct1993.
• Productspurchasedassecondsorthirdsmayormaynotcarryawarranty.Pleasecheckwithyourreselleratthetimeofpurchaseforthewarrantyperiodbeingoffered.
The Warranty is not valid:
• Iftheproductisnotinstalledandoperatedinaccordancewiththeoperatinginstructions.
• Iftheproductisnotinstalledtocomplywiththeelectrical,gas,plumbingandotherRegulationsandCodesofPracticeinNewZealand.
• IftheproductisoperatedonvoltagesorfrequenciesoutsidethenormalrangefordomesticappliancesinNewZealand.
• Iftheproductisnotusedinnormaldomesticuse,orifitisusedinabusinessasdefinedintheConsumerGuaranteesAct.
• Ifanyserialnumberhasbeenremovedordefaced.• Ifproofofdateofpurchaseisnotsupplied,exceptatthesolediscretionofParmcoSales.Proofofpurchasecanbefortheproductitself,orifinstalledwithakitchenorhousethenproofofpurchasecanbefromaParmcoresellerofproductssuppliedbyParmco.
• Iftheproductsarepurchasedinasecondhandconditionfromotherparties(includingbutnotlimitedtoTradeMe,Sella,etc.)
Liability under this warranty will not be accepted for:• Wearandtearfromnormaldomesticuse.• Damageintransport.• Damagecausedtotheproductbyneglect,abuse,negligence,wilfulactormisuse.
• Anycostsassociatedwiththerepair,replacement,removalorreinstallationofproductsinstalledinadamagedcondition.
• Anydefectcausedbyaccident,misuse,neglect,tamperingwithorunauthorisedmodificationsoftheapplianceoranyattemptatinternaladjustmentorrepairbyanypersonotherthananAuthorisedServiceAgent.
• Servicecallsthatrelateprincipallytothefollowing:• Instructiononhowtousetheproduct.• Repairorreplacementofhousefuses,electricalwiring,gasfittingorplumbing.
• Wearandtearcausedbynormaluseoftheproduct.• Normalorscheduledmaintenanceincludingblockedfiltersorducting.• Consumableitemssuchaslightbulbs.• Anydamagetoceramicglasshobscausedbyspillswhencooking.• Anybreakageordamageofglassitems.• Anydamagecausedbynonrecommendedproductusedforcleaning,maintaining,lubricatingorsimilar.
• Anyaspectrelatingtotheinstallationoftheproduct,ordamagecausedduringinstallationincludingblockedaccessforrepair.
• Anythirdparty(includingreseller)orconsequentiallossordamage(directorindirect)howeverarising.
New Zealand Owned & Operated
for 25 Years
Product Dateofpurchase
Dealer/RetailersName
PleaseretainthisWarrantycardtogetherwithreceiptorotherproofofpurchasedatewhenseekingserviceduringthewarrantyperiod
PleasecontactParmcoat095735678ifyourapplianceneedsservicingunderwarranty.Please
haveyourmodelnumberandproofofpurchaseready.WarrantyrepairsmustbeauthorizedbyParmco.
p: 09 573 5678 f: 09 573 5699
e: [email protected] w: www.parmco.co.nz
Subject to updates without prior notice, please visit www.parmco.co.nz for the latest version. E & O.E. 727626112014