installation and operating instructions for growerselect...
TRANSCRIPT

Hog Slat Inc. Newton Grove, NC USA June 2016 1
Poultry Feeding System
Installation and Operating Instructions for GrowerSELECT Classic Flood Feed Pan (Includes Spanish Translation)
General Installation Notes:
Installation of this equipment and related OEM (Original Equipment Manufacturer) equipment should be in accordance with these instructions, OEM’s installation instructions and local codes (if applicable). Failure to follow specified instructions may cause damage to equipment and/or personal injury or death Take special note of any Warnings or Safety Decals on the equipment and in manuals. Always wear protective clothing and any applicable Personal Protective Equipment (Safety Glasses and/or Ear Plugs) when working with the equipment. Discarded materials, equipment and boxes should be recycled in accordance with local and national codes.
Note: Power Units are to be wired in accordance with all Local, State and National Wiring Codes. All wiring sizes and fuse capacities are to be sized according to National Electrical Code specifications or other applicable regulations.
GROWER SELECT “CLASSIC FLOOD” FEED PAN INSTALLATION – MANAGEMENT GUIDE
Thank you for purchasing the “GrowerSELECT, Classic Flood” feed pan. This feed pan is designed to be used with 1 ¾” diameter galvanized feeder tube / auger type feed delivery systems. It will not perform as designed with any other diameter tubing or feed delivery system. Contact your local Hog Slat/Georgia Poultry store for advice on installing the “GrowerSELECT, Classic Flood” pan on any existing system before you attempt installation.
*RECOMMNEDED BIRDS PER PAN:
Broilers 4 – 5 lb. at market 60 – 90 birds per pan Broilers 6 – 7 lb. at market 55 – 75 birds per pan Broilers 8 – 9 lb. at market 50 – 65 birds per pan Commercial Layer Pullet 0 – 20 weeks 40 – 60 birds per pan Commercial Layer 18 + weeks 30 – 40 birds per pan *Note: Recommendations on number of birds per pan are made in “general” terms. Your climate, density, breed, genetics, house design and general management should be taken into consideration before determining the best number of pans for your facility. Hog Slat/Georgia Poultry makes no guarantees or warranties on performance based on these recommendations. Proper ventilation, feeder and drinker access, health care and the recommendations of your specific breed can change the number of birds per pan that best suits your needs. You should also consult with your integrator or genetics/breeder company for their industry standards.

Hog Slat Inc. Newton Grove, NC USA June 2016 2
Poultry Feeding System
Hog Slat Inc. Newton Grove, NC USA June 2016 3
Poultry Feeding System
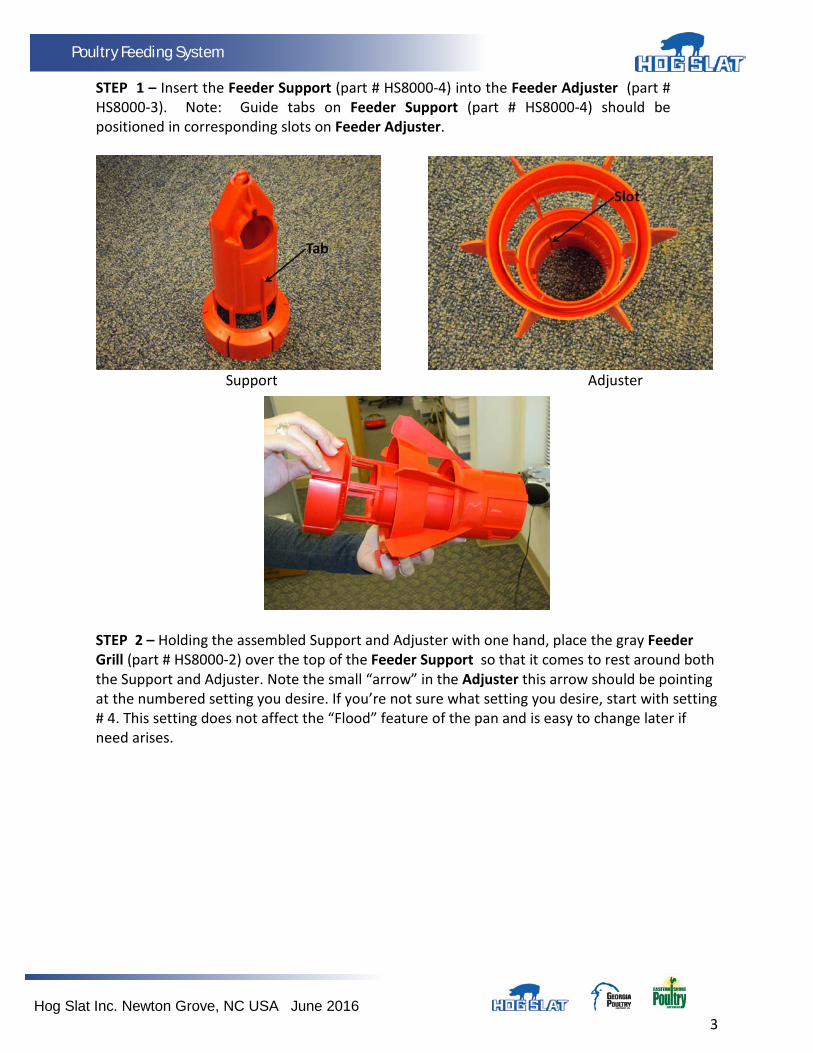
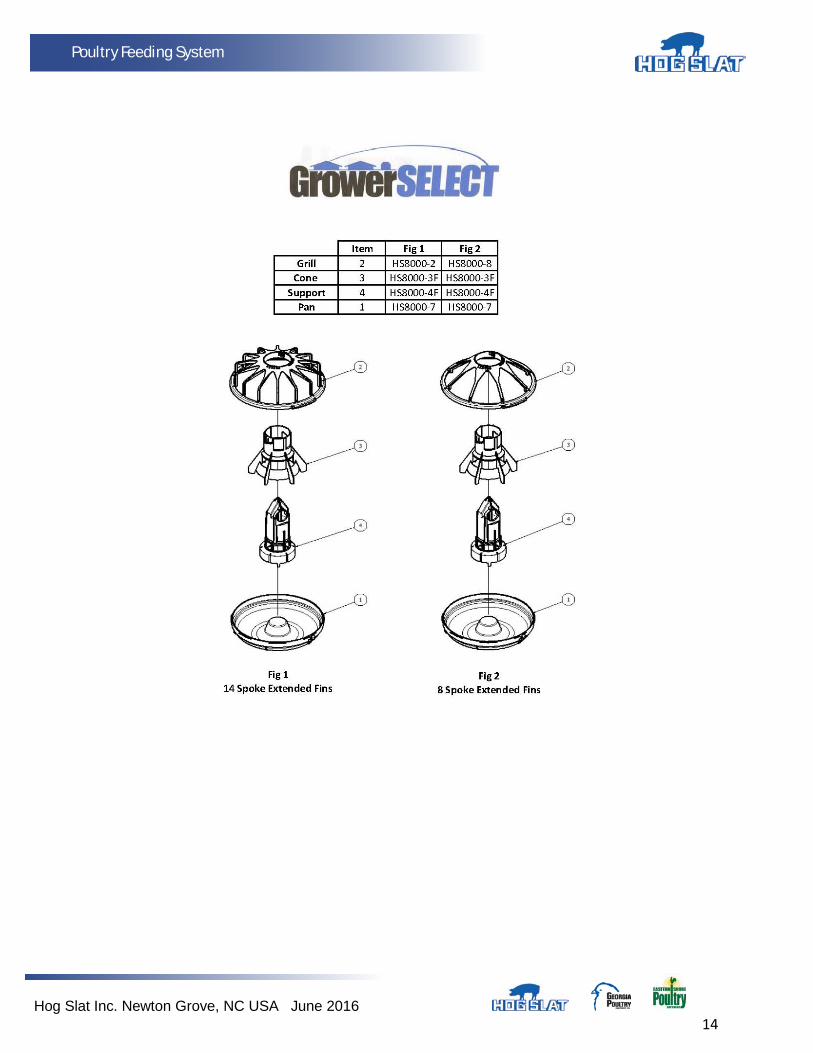
STEP 1 – Insert the Feeder Support (part # HS8000-4) into the Feeder Adjuster (part # HS8000-3). Note: Guide tabs on Feeder Support (part # HS8000-4) should be positioned in corresponding slots on Feeder Adjuster.
Support Adjuster
STEP 2 – Holding the assembled Support and Adjuster with one hand, place the gray Feeder Grill (part # HS8000-2) over the top of the Feeder Support so that it comes to rest around both the Support and Adjuster. Note the small “arrow” in the Adjuster this arrow should be pointing at the numbered setting you desire. If you’re not sure what setting you desire, start with setting # 4. This setting does not affect the “Flood” feature of the pan and is easy to change later if need arises.
Hog Slat Inc. Newton Grove, NC USA June 2016 4
Poultry Feeding System
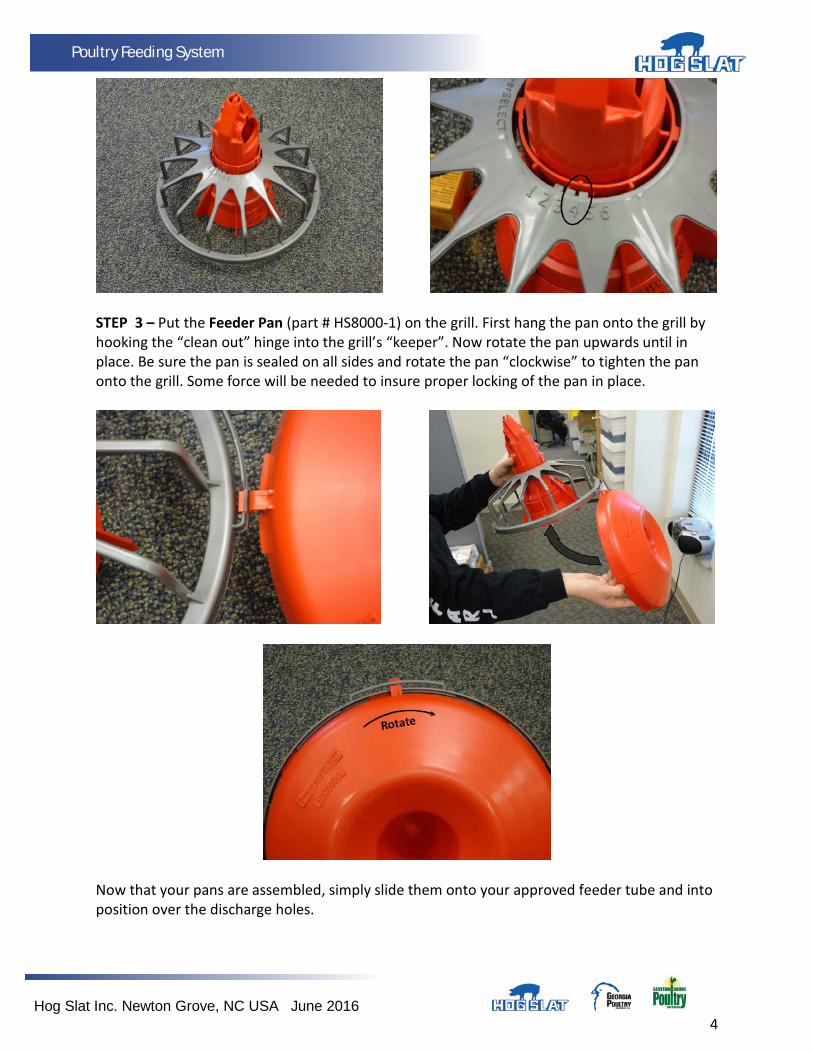
STEP 3 – Put the Feeder Pan (part # HS8000-1) on the grill. First hang the pan onto the grill by hooking the “clean out” hinge into the grill’s “keeper”. Now rotate the pan upwards until in place. Be sure the pan is sealed on all sides and rotate the pan “clockwise” to tighten the pan onto the grill. Some force will be needed to insure proper locking of the pan in place.
Now that your pans are assembled, simply slide them onto your approved feeder tube and into position over the discharge holes.
Hog Slat Inc. Newton Grove, NC USA June 2016 5
Poultry Feeding System
One important note concerning your feeder tubes
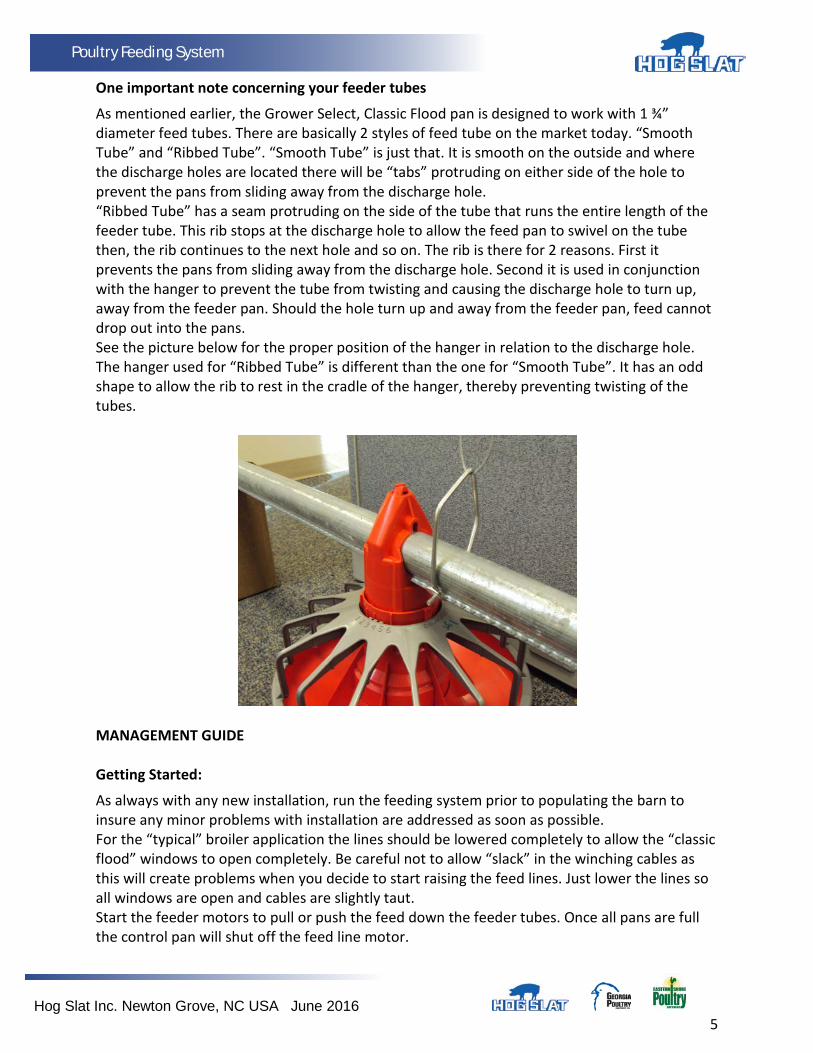
As mentioned earlier, the Grower Select, Classic Flood pan is designed to work with 1 ¾” diameter feed tubes. There are basically 2 styles of feed tube on the market today. “Smooth Tube” and “Ribbed Tube”. “Smooth Tube” is just that. It is smooth on the outside and where the discharge holes are located there will be “tabs” protruding on either side of the hole to prevent the pans from sliding away from the discharge hole. “Ribbed Tube” has a seam protruding on the side of the tube that runs the entire length of the feeder tube. This rib stops at the discharge hole to allow the feed pan to swivel on the tube then, the rib continues to the next hole and so on. The rib is there for 2 reasons. First it prevents the pans from sliding away from the discharge hole. Second it is used in conjunction with the hanger to prevent the tube from twisting and causing the discharge hole to turn up, away from the feeder pan. Should the hole turn up and away from the feeder pan, feed cannot drop out into the pans. See the picture below for the proper position of the hanger in relation to the discharge hole. The hanger used for “Ribbed Tube” is different than the one for “Smooth Tube”. It has an odd shape to allow the rib to rest in the cradle of the hanger, thereby preventing twisting of the tubes.
MANAGEMENT GUIDE Getting Started:
As always with any new installation, run the feeding system prior to populating the barn to insure any minor problems with installation are addressed as soon as possible. For the “typical” broiler application the lines should be lowered completely to allow the “classic flood” windows to open completely. Be careful not to allow “slack” in the winching cables as this will create problems when you decide to start raising the feed lines. Just lower the lines so all windows are open and cables are slightly taut. Start the feeder motors to pull or push the feed down the feeder tubes. Once all pans are full the control pan will shut off the feed line motor.

Hog Slat Inc. Newton Grove, NC USA June 2016 6
Poultry Feeding System
Feeding the flock at Day 1:
The flood windows allow large amounts of feed into the pans. This makes the “Classic Flood” an excellent feeder for starting baby chicks. However, this also can be a problem if the system is allowed to operate on “Full Automatic” DO NOT OPERATE THE SYSTEM IN FULL AUTOMATIC WITH THE FLOOD WINDOWS OPEN. THIS WILL CREATE THE OPPORTUNITY FOR EXCESSIVE FEED WASTAGE. We recommend that you “manually feed” the birds while the feed pans are in full flood with the windows open. By “manually feeding” we mean that the system is turned off and is operated 2 – 3 times per day for the first 5 – 7 days. After day 7 you will need to “manually feed” them 3 or more times per day through 14 days of age. A time clock or the timer on your existing controller can do this for you if you wish. You should consult with your integrator or breeder/genetics supplier for their feeding recommendations for your specific barns and climate. Even though the “Classic Flood” does an exceptional job of feeding young chicks, supplemental feeding is recommended. This is typically done through the aid of turn down spout type feed dispensers where by the feed is dispensed into a plastic or paper chick lid. Feed availability is the key to getting off to a good start and most producers incorporate this practice in modern chicken facilities. If you are not sure what you need, please contact your local Georgia Poultry or Hog Slat store for advice on what will work best for your situation. Moving on up:
As the birds get taller, so too should the “Classic Flood” be raised to accommodate the larger size of your flock. When to go from “Flood” to “Non-Flood” is something that will change with each flock and is somewhat dependent on the time of year, breed of bird, feed density, and other variables. Basically you will decide to raise the feeders out of the “Flood” stage around day 15 of age. This is a simple process. When the line itself is raised, the windows will close to stop the flooding and now the feed enters the pan from underneath the “adjustment” cone. The first time you raise the lines to close the windows, you should do it when the birds have eaten down most of the feed from the pans. This will allow the windows to close easier. Raise the lines so that the bottom of the pans barely clear the litter. Sometimes there will be uneven places in your litter, don’t be alarmed, birds will quickly level out the litter. At this age and to market you want to use the birds’ neck to help you conserve feed. In other words, the birds can now reach into the pan for feed and so you want to operate your pans at the optimum height so as to insure good growth without feed wastage. Continue to raise your feed lines so that the pans are at the optimum height on a regular schedule. (At least 3 times per week, but consult with your integrator and/or genetics provider for specific recommendations) Note also, you have suspension system that is equipped with individual drops with cable adjusters. This is to fine tune the level of your pans with the contours of the floor to maximize performance.

Hog Slat Inc. Newton Grove, NC USA June 2016 7
Poultry Feeding System
Fine tuning:
Remember earlier when we recommended setting your pans on # 4. If you find this is not enough feed in the pans during the grow out period, you can simply “turn the pan” to level 5. If you find that it’s too much feed, you can reduce it by turning the pan to level 3. There are 6 settings on the “Classic Flood” so you can find the one that best suits your bird and feed consistency. However, we recommend if you do make changes, make them gradually. Adjust only one number or setting at the time and then only do a few pans. Give it a couple of days to see what the results are and then make the decision to adjust more or all of the pans accordingly. As with all things concerning raising your birds, gradual changes are best. Generally speaking:
Feeder pans only work when properly fed. Sounds simple, but the same problems we’ve seen for 30 years still exist today. If control pans, motors and switches aren’t working properly, the pans are not going to get feed to them when needed and this will cost you in bird performance. Be sure you are maintaining your electrical systems that provide feed to these pans, as well as the augers and tubes too. Shocker wires are a must with any “swinging” style feeder. The Grower Select, Classic Flood is no exception to this rule. Many producers today don’t run electricity on the training or shocker wires. You should in order to prevent fecal contamination in the feed, prevent premature rusting of the galvanized feeding tubes, clamps etc…. but even if you don’t run electricity through a shocker box, you must have the shocker wire in place and it must be held tight by springs to insure that your feeder pan will come back to “0” after it swings. Otherwise the feeder pan will get pushed up to one side by aggressive birds and spill feed or get caught and stay in that position allowing feed to flow onto the ground.
Hog Slat Inc. Newton Grove, NC USA June 2016 8
Poultry Feeding System
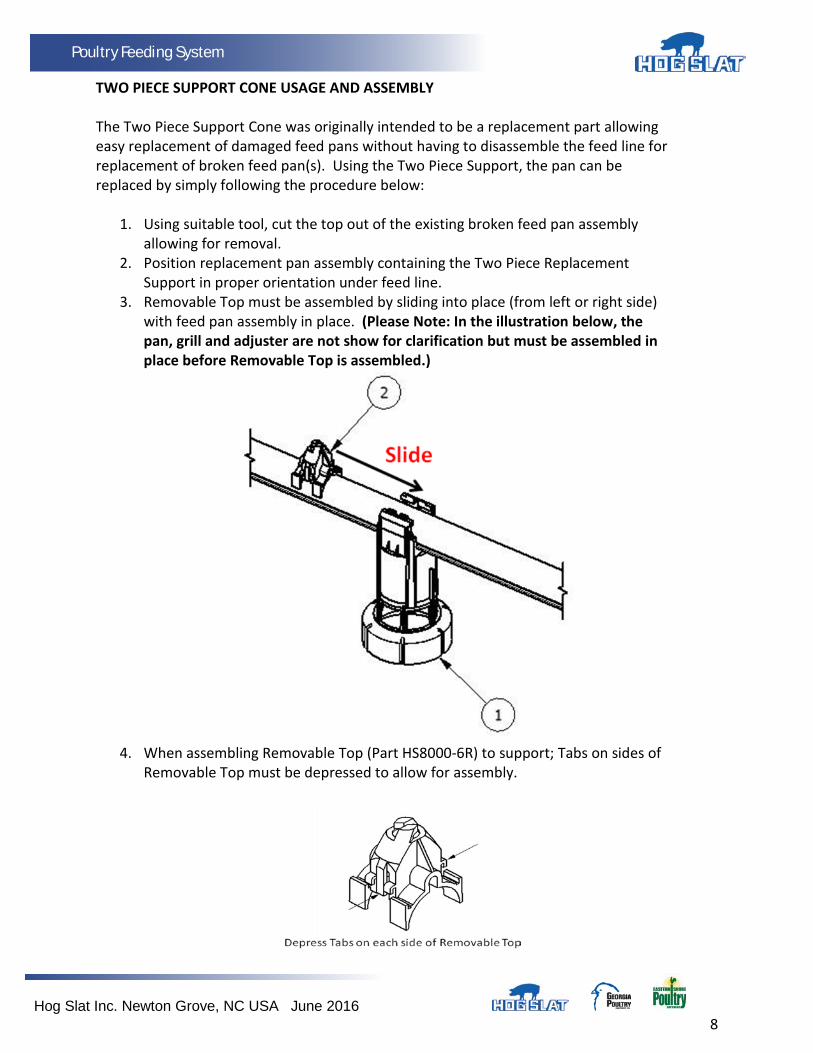
TWO PIECE SUPPORT CONE USAGE AND ASSEMBLY The Two Piece Support Cone was originally intended to be a replacement part allowing easy replacement of damaged feed pans without having to disassemble the feed line for replacement of broken feed pan(s). Using the Two Piece Support, the pan can be replaced by simply following the procedure below:
1. Using suitable tool, cut the top out of the existing broken feed pan assembly allowing for removal.
2. Position replacement pan assembly containing the Two Piece Replacement Support in proper orientation under feed line.
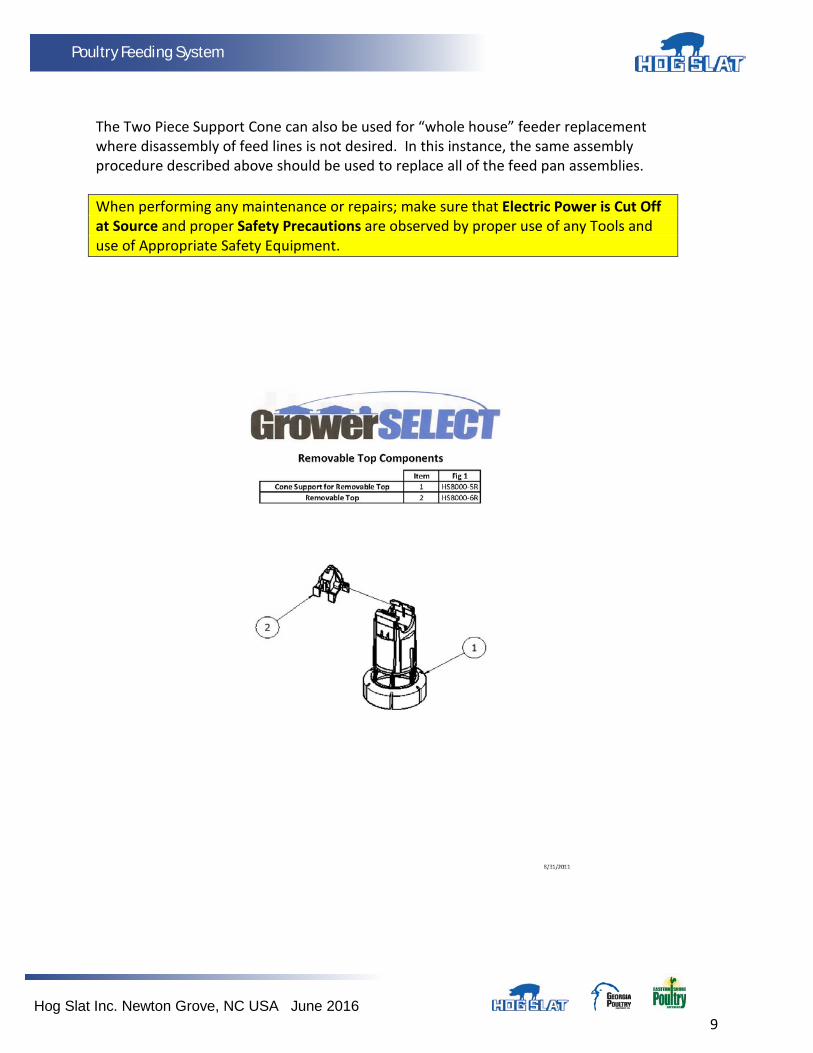
3. Removable Top must be assembled by sliding into place (from left or right side) with feed pan assembly in place. (Please Note: In the illustration below, the pan, grill and adjuster are not show for clarification but must be assembled in place before Removable Top is assembled.)
4. When assembling Removable Top (Part HS8000-6R) to support; Tabs on sides of
Removable Top must be depressed to allow for assembly.
Hog Slat Inc. Newton Grove, NC USA June 2016 9
Poultry Feeding System
The Two Piece Support Cone can also be used for “whole house” feeder replacement where disassembly of feed lines is not desired. In this instance, the same assembly procedure described above should be used to replace all of the feed pan assemblies. When performing any maintenance or repairs; make sure that Electric Power is Cut Off at Source and proper Safety Precautions are observed by proper use of any Tools and use of Appropriate Safety Equipment.
Hog Slat Inc. Newton Grove, NC USA June 2016 10
Poultry Feeding System
Hog Slat Limited Warranty Hog Slat warrants products to be free from defects in material or workmanship for a period of twenty-four (24) months from the date of original purchase. Hog Slat will credit, repair, or replace, at its option any product deemed defective within this time period. Labor costs associated with the replacement or repair of the product are not covered by the Seller/Manufacturer.
Warranty Extension Coverage The Limited Warranty period is extended for the following products: GrowerSelect HS8000 Poultry Feeder 5 Years (from the date of installation)
Conditions and Limitations 1. The product must be installed by and operated in accordance with the instructions
published by the Seller/Manufacturer or Warranty will be void.
2. Warranty is void if all components are not original equipment supplied by the Seller/Manufacturer.
3. This product must be purchased from and installed by an authorized
retailer/distributor or certified representative thereof or the Warranty will be void.
4. Malfunctions or failure resulting from misuse, abuse, negligence, alteration, accident, or lack of proper maintenance shall not be considered defects under the Warranty.
5. This Warranty applies only to components/systems for the care of poultry and livestock. Other applications in industry or commerce are not covered by this Warranty.
6. This Warranty applies only to the Original Purchaser of the product.
The Seller/Manufacturer shall not be liable for any Consequential or Special Damage which any purchaser may suffer or claim to suffer as a result of any defect in the product. “Consequential” or “Special Damages” as used herein include, but are not limited to, lost or damaged products or goods, costs of transportation, lost sales, lost orders, lost income, increased overhead, labor and incidental costs and operational inefficiencies. THIS WARRANTY CONSTITUTES THE SELLER/MANUFACTURER’S ENTIRE AND SOLE WARRANTY AND THIS MANUFACTURER EXPRESSLY DISCLAIMS ANY AND ALL OTHER WARRANTIES, INCLUDING, BUT NOT LIMITED TO, EXPRESS AND IMPLIED WARRANTIES AS TO MERCHANTABILITY, FITNESS FOR PARTICULAR PURPOSES SOLD AND DESCRIPTION OR QUALITY OF THE PRODUCT FURNISHED HEREUNDER. Hog Slat Retailers/Distributors are not authorized to modify or extend the terms and conditions of this Warranty in any manner or to offer or grant any other warranties for GrowerSelect products in addition to those terms expressly stated above. An officer of Hog Slat must authorize any exceptions to this Warranty in writing. The Seller/Manufacturer reserves the right to change models and specifications at any time without notice or obligation to improve previous models.
Hog Slat Inc. Newton Grove, NC USA June 2016 11
Poultry Feeding System
THIS PAGE IS INTENTIONALLY LEFT BLANK

Hog Slat Inc. Newton Grove, NC USA June 2016 12
Poultry Feeding System
This equipment must be installed in accordance with all State and Local Codes and applicable Regulations
which should be followed in all cases. Authorities having jurisdiction should be consulted before
installations are made.
Hog Slat, Inc. PO Box 300
Newton Grove, NC 28366
Phone: (910) 594-0219 Fax: (910) 594-1392
www.hogslat.com
Copyright © 2012 by Hog Slat, Inc
Part Number: HSMANUAL-001 Rev A5 HSART-070 Market: Poultry

Hog Slat Inc. Newton Grove, NC USA June 2016 13
Poultry Feeding System
Instrucciones de Instalación y Funcionamiento de Comedero de Plato GrowerSELECT Classic Flood
Notas Generales sobre la Instalación: *FOE: Fabricante Original de Equipo
La instalación de este equipo y equipos relacionados (FOE) deben estar de acuerdo con estas instrucciones, instrucciones de instalación del FOE y los códigos locales (si es aplicable). Si no se siguen las instrucciones especificadas puede causar daños al equipo y / o lesiones personales o hasta la muerte. Preste especial atención a las advertencias o calcomanías de seguridad en el equipo y en los manuales. Siempre use ropa de protección y equipo de protección personal (gafas de seguridad y / o tapones para los oídos), aplicable cuando se trabaja con el equipo. Materiales desechados, equipos y cajas deben ser reciclados de acuerdo con los códigos locales y nacionales Nota: Unidades Motrices debe ser alambradas de acuerdo con todos los códigos de alambrado eléctrico locales, estatales y nacionales aplicables. Todos los tamaños de cable/alambre y capacidades de los fusibles deben ser medidos o calculados de acuerdo a las especificaciones del Código Eléctrico Nacional aplicables u otras normativas.
Instalación- Guía de Manejo Comedero de Plato GROWER SELECT “CLASSIC FLOOD”
Gracias por comprar el Comedero de Plato "GrowerSELECT, Classic Flood Feed Pan". Este distribuidor de alimentos está diseñado para ser utilizado con tubo galvanizado de alimento de 1 ¾ "de diámetro / sistema de entrega de alimento tipo gusano barrena. No va a funcionar como debiera si es usado con otro diámetro de tubería de alimentación o sistema de entrega de alimentación. Póngase en contacto con su tienda local de Hog Slat / Georgia Poultry para el asesoramiento sobre la instalación del comedero de plato "GrowerSELECT, Classic Flood Pan" o cualquier sistema existente antes de intentar la instalación.
*AVES RECOMENDADAS POR PLATO:
Ave de engorde 4 – 5 lb. En el mercado 60 – 90 aves por plato Ave de engorde 6 – 7 lb. En el mercado 55 – 75 aves por plato Ave de engorde 8 – 9 lb. En el mercado 50 – 65 aves por plato Ave ponedora comerciales joven 0 – 20 semanas 40 – 60 aves por plato Ponedora comercial 18 + semanas 30 – 40 aves por plato * Nota: Recomendaciones sobre el número de aves por plato se hacen en términos "generales". Su clima, la densidad, la raza, la genética, diseño de la casa y la administración general debe tenerse en cuenta antes de determinar el mejor número de platos para su local. Hog Slat / Georgia Poultry no ofrece ninguna garantía o garantías sobre el rendimiento en base a estas recomendaciones. La ventilación adecuada, alimentación y acceso a bebederos, el cuidado de la salud y las recomendaciones de su raza específica pueden cambiar el número de aves por plato que mejor se adapte a sus necesidades. También debe consultar con su integrador o empresa genética/crianza para informarse sobre los estándares de la industria.
Hog Slat Inc. Newton Grove, NC USA June 2016 14
Poultry Feeding System

Hog Slat Inc. Newton Grove, NC USA June 2016 15
Poultry Feeding System
PASO 1 - Inserte el Soporte del Comedero (parte # HS8000-4) en el Ajustador de Comedero (parte # HS8000-3). Nota: Guie pestañas/bordes en el Soporte de Comedero (parte # HS8000-4) estas se deben colocar en las ranuras correspondientes en el Ajustador de Comedero.
Soporte Ajustador
PASO 2 - Sosteniendo el Soporte montado y Ajustador con una mano, coloque la Rejilla del Comedero color gris (parte # HS8000-2) sobre la parte superior del Soporte del Comedero de manera que llegue a descansar alrededor de ambos; el Soporte y el Ajustador. Tenga en cuenta la pequeña "flecha" en el Ajustador esta flecha debe estar orientada en la posición numerada deseada. Si no está seguro qué posición desea, comience con el ajuste # 4. Este ajuste no afecta a la función de "inundación" del plato y es fácil de cambiar más adelante si surge la necesidad.
Hog Slat Inc. Newton Grove, NC USA June 2016 16
Poultry Feeding System
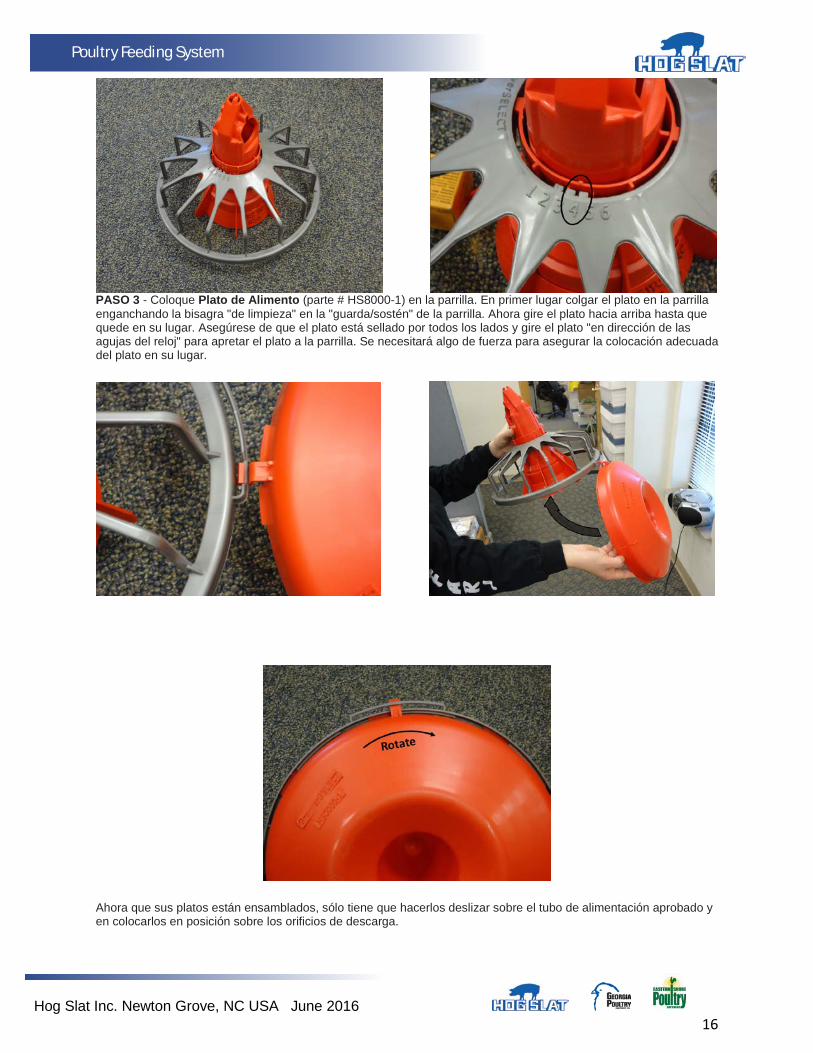
PASO 3 - Coloque Plato de Alimento (parte # HS8000-1) en la parrilla. En primer lugar colgar el plato en la parrilla enganchando la bisagra "de limpieza" en la "guarda/sostén" de la parrilla. Ahora gire el plato hacia arriba hasta que quede en su lugar. Asegúrese de que el plato está sellado por todos los lados y gire el plato "en dirección de las agujas del reloj" para apretar el plato a la parrilla. Se necesitará algo de fuerza para asegurar la colocación adecuada del plato en su lugar.
Ahora que sus platos están ensamblados, sólo tiene que hacerlos deslizar sobre el tubo de alimentación aprobado y en colocarlos en posición sobre los orificios de descarga.

Hog Slat Inc. Newton Grove, NC USA June 2016 17
Poultry Feeding System
Una nota importante en relación con sus tubos de alimentación Como se mencionó anteriormente, el Comedero de Plato Grower Select Classic Flood está diseñado para trabajar con tubos de alimentación de 1 ¾ " de diámetro. Básicamente, existen 2 estilos de tubo de alimentación en el mercado hoy en día. "Tubo Liso" y "Tubo con Borde". "Tubo liso" es sólo eso. Es liso en el exterior y donde los agujeros de descarga están situados habrán "lengüetas" que sobresalen de cada lado del agujero para evitar que las bandejas se deslicen fuera del agujero de descarga. "Tubo con Borde" tiene una costura que sobresale en el lado del tubo que recorre toda la longitud del tubo de alimentación. Este borde se detiene en el orificio de descarga para permitir que el plato distribuidor de alimentos gire en el tubo, a continuación el borde sigue hasta el hoyo siguiente y así sucesivamente. El borde esta allí por 2 razones. En primer lugar, evita que los platos se deslicen lejos del orificio de descarga. En segundo lugar se utiliza en conjunción con el soporte de suspensión para evitar que el tubo se tuerza causando que el orificio de descarga gire hacia arriba lejos del plato alimentador. Si el orificio girar hacia arriba lejos del plato de alimentación, el alimento no puede caer en los platos. Ver la imagen siguiente para posición correcta del soporte de suspensión en relación con el orificio de descarga. El soporte de suspensión que se utiliza para "Tubo con Borde" es diferente de aquel para el "Tubo Liso". Tiene una forma extraña para permitir que el borde descanse en la moldura del soporte de suspensión, lo que impide la torsión de los tubos.
GUÍA DE MANEJO Iniciando: Como siempre con cualquier nueva instalación, haga funcionar el sistema de alimentación antes de llenar las casetas para asegurar que cualquier problema menor con la instalación estén corregidos tan pronto como sea posible. Para la aplicación "típica" de pollos de engorde las líneas se deben bajar por completo para permitir que las ventanas "de inundación –classic flood" habrán por completo. Tenga cuidado de no permitir "holgura" en los cables del malacate ya que esto crea problemas a la hora de decidirse a comenzar a levantar las líneas de alimentación. Sólo baje las líneas de modo que todas las ventanas están abiertas y los cables estén un poco tensos. Iniciar los motores de alimentación para tirar o empujar el alimento hacia los tubos de alimentación. Una vez que todos los platos estén llenos el plato de control apagará el motor de la línea de alimentación.
Hog Slat Inc. Newton Grove, NC USA June 2016 18
Poultry Feeding System
Alimentando el rebaño en el Día 1: Las ventanas de inundación permiten grandes cantidades de alimento en los platos. Esto hace que el tipo de alimentación por inundación "Classic Flood” sea una excelente alimentación para el inicio de los pollitos. Sin embargo, esto también puede ser un problema si el sistema se le permite operar en "llenado completamente automático/Full Automatic" NO OPERE EL SISTEMA EN LLENADO COMPLETAMENTE AUTOMÁTICO (Full Automatic) CON LAS VENTANAS DE INUNDACIÓN ABIERTAS. ESTO CREARA LA OPORTUNIDAD DE DESPERDICIO EXCESIVO DEL ALIMENTO. Le recomendamos que "alimente manualmente" a las aves, mientras que los platos distribuidores de alimentos están en inundación completa con las ventanas abiertas. Por "alimentar manualmente" nos referimos a que el sistema se apaga y se acciona 2 - 3 veces al día durante los primeros 5 - 7 días. Después de 7 días tendrá que "alimentar manualmente" 3 o más veces al día hasta que cumplan 14 días de edad. Un reloj de tiempo o el interruptor en el controlador existente pueden hacer esto para usted si usted así lo desea. Usted debe consultar con su integrador o / criador genético sobre recomendaciones de alimentación para sus galpones específicos y el clima. A pesar de que el tipo de alimentación por inundación "Classic Flood” hace un trabajo excepcional en la alimentación de los pollos jóvenes, se recomienda la alimentación suplementaria. Esto normalmente se realiza a través de la ayuda dada al bajar los dispensadores de alimentación de tipo canal donde el alimento se dispensa en una bandeja para pollo de plástico o papel. La disponibilidad del alimento es la clave para un buen comienzo y la mayoría de los productores incorporan esta práctica en instalaciones modernas de pollo. Si no está seguro de lo que necesita, póngase en contacto con su tienda local de Georgia Poultry o de Hog Slat para el asesoramiento sobre lo que funciona mejor para su situación.
Siguiendo hacia adelante: Como las aves obtienen más altura, también debería elevarse el sistema llenado de inundación “Classic Flood" para acomodar el tamaño más grande de su camada. Cuando ir de "inundación" a "No-inundación" es algo que va a cambiar con cada camada y depende en cierta medida de la época del año, de la raza del ave, densidad de la alimentación, y otras variables. Básicamente usted va a decidir elevar los comederos en la etapa de "inundación" alrededor del día 15 de edad. Este es un proceso simple. Cuando se eleva la propia línea, las ventanas se cierran para detener la inundación y ahora la alimentación entra en la bandeja por debajo del cono de "ajuste". La primera vez que levanta las líneas para cerrar las ventanas, usted debe hacerlo cuando las aves se han comido la mayor parte de la alimentación de los platos. Esto permitirá que las ventanas cierren más fácilmente. Levante las líneas de modo que la parte inferior de los platos apenas esta más elevada que la camada. A veces habrá desigualdad en su camada, no se alarme, las aves se nivelan rápidamente. A esta edad y para comercializar usted desea utilizar el cuello de las aves para ayudar a conservar alimento. En otras palabras, las aves pueden ahora alcanzar el plato para la alimentación y por eso usted deseara operar los platos a la altura óptima con el fin de asegurar un buen crecimiento sin desperdicio de alimento. Continuar elevando sus líneas de alimentación de manera que los platos están a la altura óptima en un horario regular. (Por lo menos 3 veces por semana, pero consulte con su proveedor integrador y / o proveedor genético para obtener recomendaciones específicas) Note también que usted tenga suspensión en el sistema y que está equipado con caídas individuales con reguladores de cable. Esto es para ajustar con precisión el nivel de sus platos con los contornos del suelo para maximizar el rendimiento.

Hog Slat Inc. Newton Grove, NC USA June 2016 19
Poultry Feeding System
En sintonía: Recuerde que antes, cuando le recomendamos configurar sus platos en el número # 4. Y si encuentras que esto no es suficiente alimento en los platos durante el período de crecimiento, sólo tiene que simplemente "girar el plato" para el nivel 5. Y si usted encuentra que es demasiado alimento, se puede reducir girando el plato para el nivel 3. Hay 6 ajustes en el comedero de plato de inundación tipo "Classic Flood” para que pueda encontrar el que mejor se adapte a sus aves y alimentar con consistencia. Sin embargo, se recomienda si usted hace cambios, que los haga gradualmente. Ajuste sólo un número o valor numérico a la vez y sólo hacerlo en unos cuantos platos. Darle un par de días para ver cuáles son los resultados y luego tomar la decisión de ajustar más o todos los platos seguidamente. Al igual que con todas las cosas relativas a la crianza de sus aves, los cambios graduales son mejores. Generalmente hablando:
Los platos alimentadores sólo funcionan cuando se alimentan correctamente. Parece sencillo, pero los mismos problemas que hemos visto durante 30 años todavía existen hoy. Si platos controladores, motores e interruptores no están funcionando correctamente, los platos no van a recibir el alimento cuando sea necesario y esto le costará en el rendimiento de las aves. Asegúrese de que está dando manteniendo a sus sistemas eléctricos que proporcionan el alimento a estos platos, así como los gusanos barrena y tubos también. Cables de impacto (Shocker Wires) son una necesidad con cualquier sistema de alimento tipo "oscilante". La alimentación por inundación Grower Select “ Classic Flood” no es una excepción a esta regla. Muchos productores de hoy no pasan electricidad en los cables de formación o de impacto (shocker wires). Usted debería hacerlo con el fin de evitar la contaminación fecal en la alimentación, evitar la oxidación prematura de los tubos de alimentación galvanizados, abrazaderas etc .... Pero incluso si usted no pasa electricidad a través de una caja de impacto (shocker box), usted debe tener el cable de impacto (shocker wire) en su lugar y se debe mantener bien sujeto por medio de resortes para asegurar que el plato de alimentación regrese a la posición "0" después de que se balancea. De lo contrario el plato de alimento será empujado hacia arriba a un lado por las aves más agresivas y el alimento se derramara o quedara atrapado y al permanecer en esa posición le permitirá a que el alimento fluya hacia el suelo.

Hog Slat Inc. Newton Grove, NC USA June 2016 20
Poultry Feeding System
CONO DE SOPORTE DE DOS PIEZAS USO Y ENSAMBLADO El Cono de Soporte de dos piezas inicialmente estaba destinado a ser una pieza de reemplazo que permite una fácil sustitución de los platos distribuidores de alimentos dañados sin tener que desmontar la tubería de alimentación para el reemplazo de los platos de alimentación rota (s). Utilizando el soporte de dos piezas, el plato se puede sustituir simplemente siguiendo el procedimiento siguiente:
5. Usando la herramienta adecuada, cortar la parte superior del conjunto de plato de alimentación roto existente permitiendo la eliminación.
6. Coloque en posición el plato de reemplazo que contiene el soporte de dos piezas en orientación correcta con la línea de alimentación.
7. Parte superior removible debe ser montado deslizándole en su lugar (desde el lado izquierdo o derecho) con el plato de alimento ensamblado en su lugar. (Nota: En la ilustración abajo, el plato, parrilla y ajustador no se muestran por aclaración, pero deben ser montados en su lugar antes de que la parte superior removible sea ensamblada.)
8. Cuando se está ensamblado la Parte Superior Removible (Parte HS8000-6R) para soporte; Las
pestañas en los lados de la Parte Superior Removible debe estar reprimidas (apretadas) para permitir el montaje.

Hog Slat Inc. Newton Grove, NC USA June 2016 21
Poultry Feeding System
El Cono de Soporte de Dos Piezas también se puede utilizar para "toda la casa" para la sustitución de comederos cuando no se desea el desmontaje de líneas de alimentación. En este caso, el mismo procedimiento de montaje descrito anteriormente se debe utilizar para reemplazar todos los platos de alimentación. Al realizar cualquier mantenimiento o reparación; asegurarse de que Energía Eléctrica sea interrumpida o cortada de la fuente y Precauciones de Seguridad adecuadas sean seguidas mediante el uso apropiado de las herramientas y el uso de equipo de seguridad apropiado.

Hog Slat Inc. Newton Grove, NC USA June 2016 22
Poultry Feeding System
Garantía Limitada Hog Slat Hog Slat garantiza a los productos de estar libres de defectos de material o mano de obra durante un período de (24) veinte y cuatro meses a partir de la fecha de compra original. Hog Slat acreditará, reparara o reemplazara, a su elección, cualquier producto considerado defectuoso dentro de este período de tiempo. Los costos laborales asociados a la sustitución o reparación del producto no están cubiertos por el Vendedor / Fabricante.
Cobertura de Extensión de Garantía El período de garantía limitada se extiende para siguientes productos: Comedero de Aves GrowerSelect HS8000 5 Años (A partir de la fecha de instalación)
Condiciones y Limitaciones 7. El producto debe ser instalado y operado en acuerdo con las instrucciones publicadas por
el Vendedor / Fabricante sino es así las garantías serán nulas.
8. La Garantía se anula si todos los componentes no son los equipos originalmente proporcionados por el Vendedor / Fabricante.
9. Este producto debe ser comprado e instalado por un vendedor minorista / distribuidor
autorizado o representantes certificado de la misma o la garantía será nula.
10. Mal funcionamiento o avería resultado del mal uso, abuso, negligencia, alteración, accidente, o la falta de mantenimiento adecuado no se considerarán defectos bajo la Garantía.
11. Esta Garantía sólo se aplica a los componentes / sistemas para el cuidado de las aves
de corral y animales (livestock). Otras aplicaciones en la industria o el comercio no están cubiertos por esta Garantía.
12. Esta garantía se aplica solamente al comprador original del producto.
El Vendedor / Fabricante no será responsable de ningún daño Consecuente o Especial, que cualquier comprador pueda sufrir o reclamar haber sufrido como resultado de cualquier defecto en el producto. "Consecuente" o "Daños Especiales" como se usa en el presente documento incluyen, pero no están limitados a, productos o bienes perdidos o dañados, los costos de transporte, pérdida de ventas, pérdida de pedidos, pérdida de ingresos, el aumento de gastos generales, mano de obra y costos incidentales y de ineficiencias operativas. ESTA GARANTIA CONSTITUYE GARANTÍA COMPLETA Y EXCLUSIVA DEL VENDEDOR / FABRICANTE Y ESTE FABRICANTE RECHAZA EXPRESAMENTE CUALQUIER OTRA GARANTÍA, INCLUYENDO, PERO NO LIMITADO A, LAS GARANTIAS EXPRESAS O IMPLICITAS DE COMERCIALIZACION, IDONEAS PARA FINES ESPECIFICOS DE VENTA Y DESCRIPCIÓN O CALIDAD DEL PRODUCTO SUMINISTRADO EL PRESENTE DOCUMENTO. Los Distribuidores Minoristas / Distribuidores de Hog Slat no están autorizados para modificar o ampliar los términos y condiciones de esta garantía en cualquier forma o no podrán ofrecer u otorgar ninguna otra garantía para los productos GrowerSelect además de los términos expresamente indicados anteriormente. Cualquier representante oficial de Hog Slat debe autorizar excepciones a esta Garantía por escrito. El Vendedor / Fabricante se reserva el derecho de modificar modelos y especificaciones en cualquier momento sin previo aviso o la obligación de mejorar los modelos anteriores.

Hog Slat Inc. Newton Grove, NC USA June 2016 23
Poultry Feeding System
ESTA PÁGINA SE HA DEJADO EN BLANCO INTENCIONALMENTE
Hog Slat Inc. Newton Grove, NC USA June 2016 24
Poultry Feeding System
Este equipo debe ser instalado de acuerdo con todos los Códigos Estatales y Locales y reglamentos aplicables que deben seguirse en todos los casos. Las autoridades competentes deben ser consultadas antes de
que se efectúen las instalaciones.
Hog Slat, Inc. PO Box 300
Newton Grove, NC 28366
Phone: (910) 594-0219 Fax: (910) 594-1392
www.hogslat.com
Copyright © 2012 by Hog Slat, Inc
Part Number: HSMANUAL-001 Rev A5 HSART-070 Market: Poultry Trl/aw052016