install microsoft xp to ebox-3300 - roboard.com xp_rb-100.pdf · the heart of robotics install...
TRANSCRIPT
The Heart of Robotics www.roboard.com
Install Microsoft XP Home/Pro to RoBoard RB-100
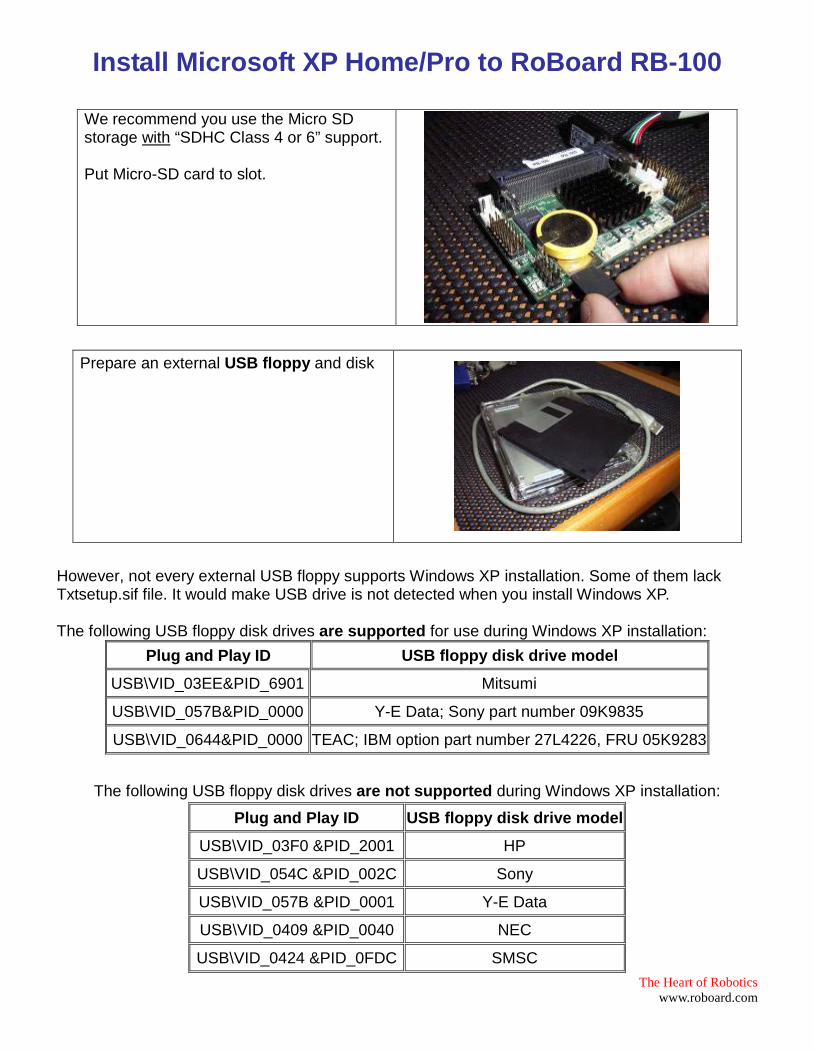
We recommend you use the Micro SD storage with “SDHC Class 4 or 6” support. Put Micro-SD card to slot.
Prepare an external USB floppy and disk
However, not every external USB floppy supports Windows XP installation. Some of them lack Txtsetup.sif file. It would make USB drive is not detected when you install Windows XP. The following USB floppy disk drives are supported for use during Windows XP installation:
Plug and Play ID USB floppy disk drive model
USB\VID_03EE&PID_6901 Mitsumi
USB\VID_057B&PID_0000 Y-E Data; Sony part number 09K9835
USB\VID_0644&PID_0000 TEAC; IBM option part number 27L4226, FRU 05K9283
The following USB floppy disk drives are not supported during Windows XP installation:
Plug and Play ID USB floppy disk drive model
USB\VID_03F0 &PID_2001 HP
USB\VID_054C &PID_002C Sony
USB\VID_057B &PID_0001 Y-E Data
USB\VID_0409 &PID_0040 NEC
USB\VID_0424 &PID_0FDC SMSC

The Heart of Robotics www.roboard.com
We have to use USB floppy (Mitsumi; Y-E Data; Sony 09K9835; TEAC; IBM 27L4226, FRU 05K9283 ) which support Windows XP installation. For more information, please check Microsoft website http://support.microsoft.com/kb/916196
Connect USB floppy to workstation (desktop)
Copy a file (txtsetup.oem) and a folder (windows) to UPS floppy. These files are IDE driver for RoBoard. You can download “IDE driver for Windows XP” from following address http://www.roboard.com/download_ml.htm
Prepare a Windows XP CD and an external USB CD-ROM or DVD-ROM.

The Heart of Robotics www.roboard.com
Plug external USB floppy and external USB CD-ROM to RB-100 by External USB ports. After connecting keyboard, mouse, VGA Card, Ethernet line, and power line, turn on the power.
After turning on the power, press ‘Delete’ instantly. We will enter a BIOS setting screen. Setting BIOS can make RB-100 have better performance, especially on Windows system.
Go to Advanced IDE Configuration Onboard IDE Operate Mode set it to “Native Mode” Go to Advanced IDE Configuration ATA(PI) 80Pin Cable Detection set it to “Device” It means the transfer speed will be decided by storage (CF card, hard disk, embedded disk). When we set it
Go to PCIPnp PCI IDE BusMaster set “Enabled”

The Heart of Robotics www.roboard.com
Go to Advanced USB Configuration USB 2.0 Controller Mode set “FullSpeed”. Actually, FullSpeed(USB 1.0) is slower than HiSpeed(USB 2.0). However, when we install XP by CD(DVD)-Rom, there is a detective problem on HiSpeed. So, we choose FullSpeed temporarily. After we finish installation process, we can change back to HiSpeed.
Go to Boot Boot Device Priority set CD (DVD)-ROM be the 1st boot device; set the SD card, which you want to install XP, be the 2nd boot device; set external USB floppy be the 3rd boot device. Alternative: When RoBoard is booting, we also can press “F11” to choose 1st bootable device.
After done all of the setting, go to Exit Save Changes and Exit. We also can use shortcut “F10”
When RoBoard starts to boot, we press any key (Enter, space, number …etc) to boot from CD.

The Heart of Robotics www.roboard.com
Press “F6” when we see this notice on the bottom. It tells us to load third party SCSI or RAID driver.
Press “S” when we see this screen. This screen tells us to install additional drivers.
The system will read external USB floppy and find drivers automatically – Vortex86DX D1010 ATA/ATAPI Controller. Press “Enter” to select it.

The Heart of Robotics www.roboard.com
We will see this screen again, this time, press “Enter” to continue.
Press “F8” to agree the license agreement.
Setup the partition of disk (SD card). You can delete (L) or create (C) a partition. It depends on your need. In this case, I use whole disk (one partition).
Choose system you will use. In this case, I use Fat32. If disk space is larger than 32G, fat32 will not support, and NFTS would be the only choice. For saving time, I choose Quick format.

The Heart of Robotics www.roboard.com
We press “Enter” to continue. It will start to format, and all of your data on the disk will be erased.
After format, Windows files will be copied form CD(DVD)-ROM to disk. Because our USB speed is currently set to 1.0, it will take long time to finish this job.
After copy all files, system will reboot. You will see this screen again. This time don’t press any key. Because files are already in the disk, we don’t need to boot from CD(DVD) again.
When you see this screen. The windows are working installation process.

The Heart of Robotics www.roboard.com
Because the IDE driver has not passed Windows test, it will show this warning screen. However, we still want to install the driver, so press “Yes” to continue.
The same, to install the driver, press “Yes” to continue.
Follow the guide and setup by your need (time area, input…etc).

The Heart of Robotics www.roboard.com
Input product key.
Setup computer name and account name. Password is not necessary in this step.
It will reboot. System will detect screen resolution.

The Heart of Robotics www.roboard.com
Windows XP install successfully! In first boot, it will setup environment for a while.
However, this is not the end. To improve video performance and active internet function, I strongly recommend to install specific drivers. You can download (1) RB-100 LAN Driver for Windows XP ,(2) RB-100 VGA Driver for Windows XP from following address : http://www.roboard.com/download_ml.htm After download folder of “LAN” and “VGA”, save these to USB flash drive.
Go to Start Control Panel System Hardware Device Manager.

The Heart of Robotics www.roboard.com
Under “Other devices”, there are two devices with question marks. Fistly, we choose Ethernet Controller. Click right button of mouse on this item, and then click left button to choose Update Driver
Choose “No, not this time”
Select install from a list or specific location (Advanced). Press Next to continue.
Cancel search removable media, and choose Include this location in the search. Then click Browse. Choose USB flash drive which we save.
The Heart of Robotics www.roboard.com
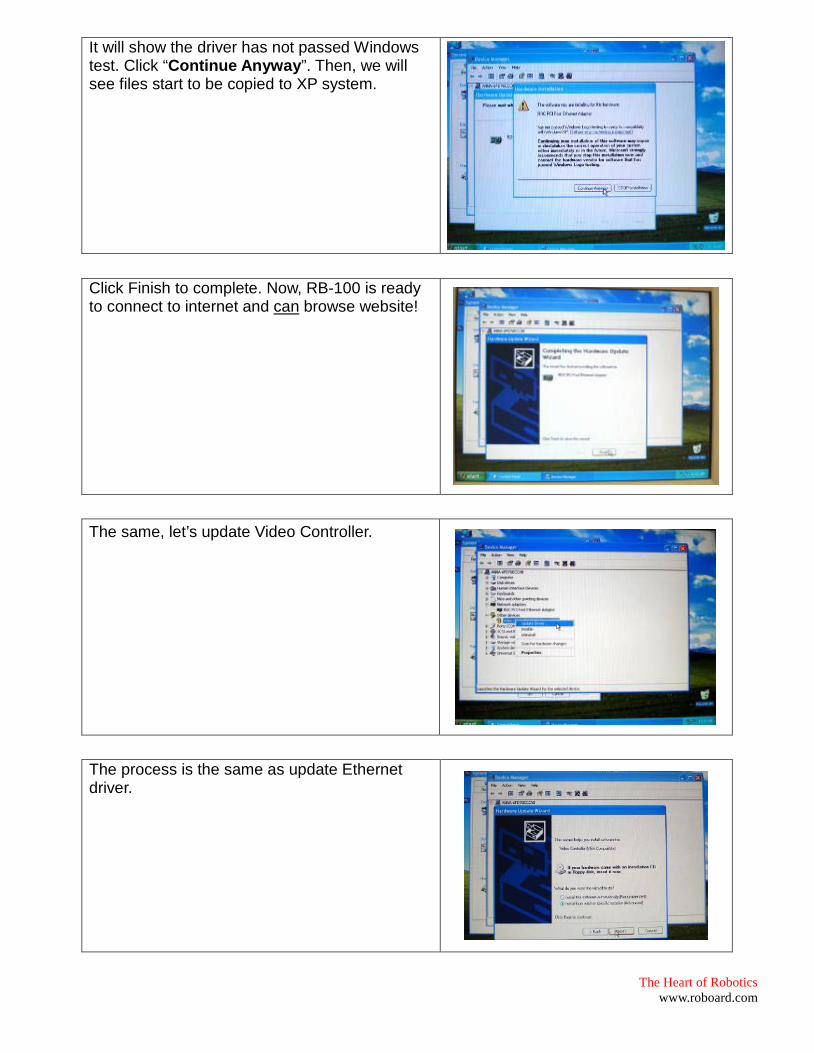
It will show the driver has not passed Windows test. Click “Continue Anyway”. Then, we will see files start to be copied to XP system.
Click Finish to complete. Now, RB-100 is ready to connect to internet and can browse website!
The same, let’s update Video Controller.
The process is the same as update Ethernet driver.

The Heart of Robotics www.roboard.com
Select R1.09.03_WHQL Setup WinXP&2K
Continue Anyway
The files start to copy.

The Heart of Robotics www.roboard.com
After complete the job. We can go to Display Property to check. We will see Display is “Default Monitor on XGI Volari Z7/Z9/Z9s/Z11 v1.09.03” and it can support very high resolution now.
Restart RB-100 manually and press “Delete” to enter the BIOS setting. Go to Advanced USB Configuration USB 2.0 Controller Mode set “HiSpeed”. Now, RB-100 go back to support USB 2.0 with higher transfer speed. By the way, we also can remove Windows XP CD-ROM from the CD(DVD)-ROM. Congratulation! We done the job of installation Windows XP.