install apache on windows 8 create your own server · install apache on windows 8 – create ......
TRANSCRIPT
Source: http://www.techscio.com/install-apache-on-windows-8/
Install Apache on windows 8 – Create your own server
Step 1: Downloading Apache Go to Apache download page and download the latest stable version of Apache for your operating
system.
Windows users can directly download from here.
Step 2: Install Apache a) Now browse to the folder where you have downloaded the file. It would be something like “http-
2.x.xx-win32-x86.msi”.
b) Double click on that to start the installation process.
c) Click next and accept the licence agreement.
d) Next it will ask you for Network Domain name, server name and Administrator’s email address.
Type localhost for both network domain name and server name. And for email address type

admin@localhost or any custom email.
e) Next if you go for typical option it will install apache in default ‘Program Files’ folder. You can go
with typical if you don’t want to change the installation path. But I like to install Apache inside a
custom folder (like C:ServerApache) to keep it organized. So, I’ll go ahead with custom installation.
f) Click on the change button to change the installation path. Now create a new folder Apache where
you want to install apache. (I generally prefer to install apache, php and mysql inside one folder like
‘server’. eg: C:ServerApache, C:ServerPHP, and C:ServerMySQL. It is all up to you where you want
to install it.


g) Finally click on the Install button
e) After the installation is finished you can see a small icon in the windows system tray saying ”
Running all apache services”
Step 3: Confirming that Apache is working To confirm that everything is working fine and all apache services are working, go to your
web browser and type http://localhost . You will see a message “It works!”.
The above “It works!” is an index.html file located in the htdocs folder located in your apache
installation folder.

Step 4: Configuring Apache (Optional) If you want to change the location of you web files (i.e. if you want to change htdocs folder to your
custom location) then go to your apache installation directory and inside that you will find a ‘conf’
folder double click on that and then open httpd.conf with notepad.
Now find <Directory "C:/Server/Apache/htdocs"> and replace it with <Directory
"C:/Server/WebDocs">. (If your apache installation folder was something else then your directory
path may be something else). And also make sure that you have created a folder named “WebDocs”
inside C:/Server folder.
Next find DocumentRoot "C:/Server/Apache/htdocs" and replace it with DocumentRoot
"C:/Server/WebDocs"
Thus you have successfully installed Apache on your system.
Install PHP
Step 1: Downloading PHP Go to http://windows.php.net/download/ and download the latest thread safe version zip file binaries.
For example, while writing this tutorial the latest version was 5.4.10. Therefore, I downloaded the
corresponding threadsafe version.
Step 2: Install PHP PHP does not have any installation wizard. So, we need to manually install PHP. The following are
the steps to install PHP
a) Make a new folder named “PHP” in C: drive or wherever you want to install php (I recommend
making a new folder in C:Server folder as shown in the below screenshot)

b) Now extract the content of the downloaded zip file to this new folder.
c) Now in the extracted files you’ll see a file named “php.ini-development”. Make a duplicate copy of
the file by pressing CTRL+C and CTRL+V.
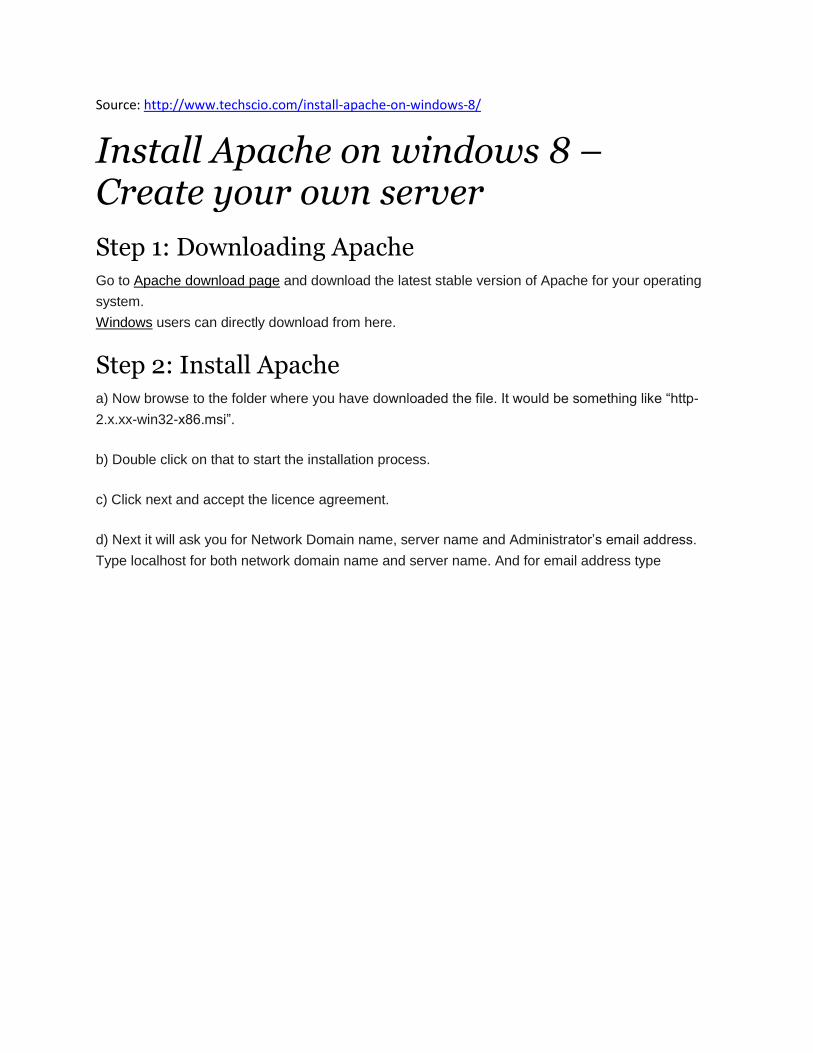
d) Now rename the duplicate file to “php.ini”. (Make sure that you have enabled to show file
name extensions)
It will ask for a confirmation to change the file name extension. Just press “Yes”.

NOTE: There are two versions of php.ini i.e. php.ini-development and php.ini-production. ‘php.ini-
development’ is for development purpose and ‘php.ini-production’ is best suited for Production
purpose or live websites.
Step 3: Configuring Apache to work with PHP In the previous step you have just extracted the php files to your computer. It won’t work on
your web-server unless you configure your Apache server to work with php. To configure Apache to
work with php open start menu and search for “edit apache” (alternatively you can browse to your
apache installation folder and open “conf” folder, inside which you will find “httpd.conf” file) and open
the file with notepad.
Make the following changes in the httpd.conf file:
1. Find “loadmodule” section (using ctrl+f). And add the following line. (If your php installation path
was different then make the changes accordingly)
LoadModule php5_module "c:/Server/PHP/php5apache2_2.dll"
2. Find “Addtype” section and add the following line. (Make sure that this is added before
</IfModule>

AddType application/x-httpd-php .php
3. Now at the end of the file just add this line. (This is used to tell Apache where PHP is installed)
PHPIniDir "C:/Server/PHP"
4. (Optional) If you want “index.php” to work as index file instead of “index.html” then just
change DirectoryIndex index.html to DirectoryIndex index.html index.php
Step 4: Enabling PHP extensions Open php.ini file from the PHP installation folder (C:ServerPHP).
To enable php extensions just add the following line below ; extension_dir = "ext"
extension_dir = C:ServerPHPext
Step 5: Testing Make a new text file in your server root directory ( If you are following my tutorial then the root
directory is “C:ServerWebDocs” or if you haven’t change your root directory then it is
“C:%apacheInstallationPath%htdocs”. If you want to change your DocumentRoot folder then follow
this guide)
Now inside the text file copy this code
<?php phpInfo(); ?>
and save the file as index.php (Remember to keep the filetype as “all files”).
Now go to your web browser and type localhost. If everything is working fine then it will show info
about the php installation on your system.

Thus you have successfully installed PHP on your system. Now that you have php working
and if you want to develop websites using php and databases, sooner or later you will require
to install MySQL.
Install MySQL
Step 1: Downloading MySQL Before starting with download first make sure which version of windows are you using (64 bit or 32
bit). To know about your system details just open Run (windows key + R) and type “dxdiag.exe”
(without quotes) and press enter. There you will get complete information about your system.
Now go to http://www.mysql.com/downloads/mysql/ and select Microsoft Windows from the
dropdown. Then download the msi installer for your system type (32 or 64 bit) (if you have 64 bit OS
then download 64 bit msi installer only).

Step 2: Install MySQL a) Now go to your downloads folder (where you have download the mysql file) and double click on
the file to run it.
b) On the next screen accept the licence agreement.
c) Choose Custom installation on next screen ( if you want you can choose typical, that will install
mySQL in program files)
d) For custom installation, Change the MySQL installation path to C:ServerMySQL
e) Now click on Install button to begin the MySQL installation process.
f) When the installation finishes it will prompt you to Launch the MySQL instance configuration
Wizard. Allow it to launch the configuraton wizard and click on finish.

Step 3: Configuring MySQL Instance a) First it will ask for detailed or standard configuration. Select Detailed Configuration.
b) On the next screen, select developer Machine
c) Next select Multifunctional Database
d) On next screen, keep the default values.
e) Next select decision support
f) Next enable TCP/IP network, enable strict mode and also add firewall exception.

g) Next select Standard Character set
h) Enable both install as windows service and add bin directory to windows path
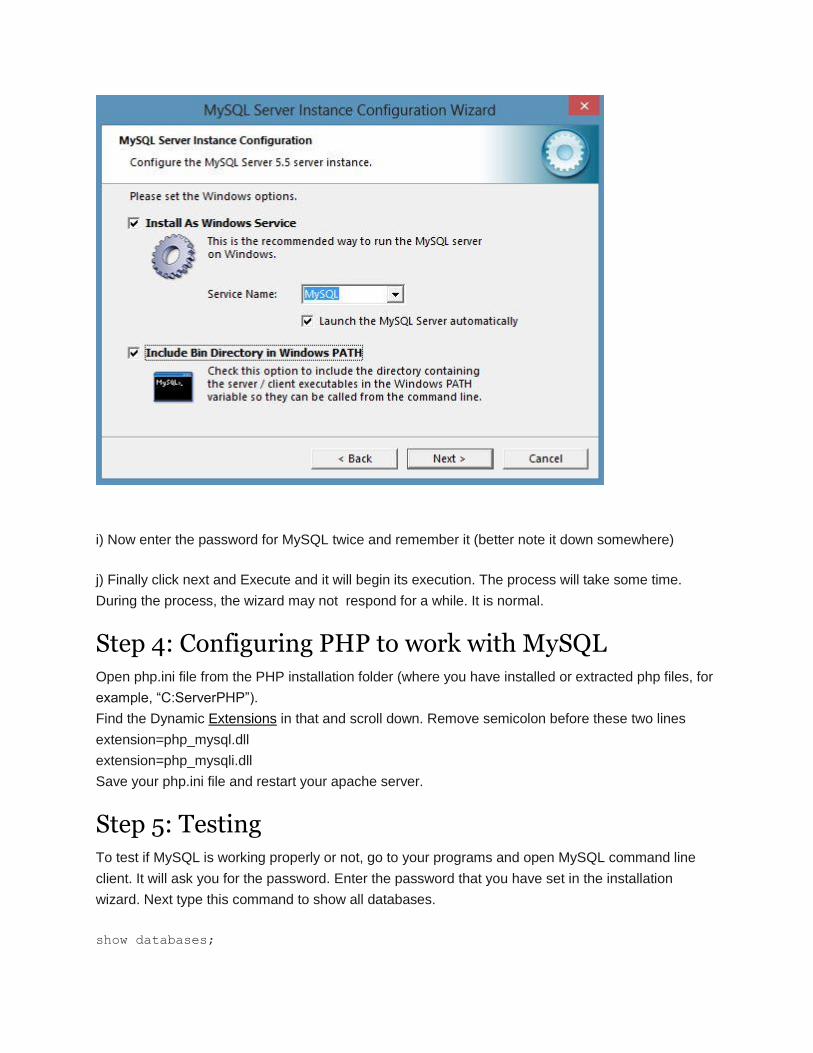
i) Now enter the password for MySQL twice and remember it (better note it down somewhere)
j) Finally click next and Execute and it will begin its execution. The process will take some time.
During the process, the wizard may not respond for a while. It is normal.
Step 4: Configuring PHP to work with MySQL Open php.ini file from the PHP installation folder (where you have installed or extracted php files, for
example, “C:ServerPHP”).
Find the Dynamic Extensions in that and scroll down. Remove semicolon before these two lines
extension=php_mysql.dll
extension=php_mysqli.dll
Save your php.ini file and restart your apache server.
Step 5: Testing To test if MySQL is working properly or not, go to your programs and open MySQL command line
client. It will ask you for the password. Enter the password that you have set in the installation
wizard. Next type this command to show all databases.
show databases;

Don’t forget to put semicolon in the end of the statement.
Now if it shows you the results then you have successfully installed MySQL on your system.