innova service manual v5 - abm international · model: innova longarm quilting machine service...
TRANSCRIPT

ABM International, Inc. Series: 1018, 1022 & 1026 V5.0 Model: Innova Longarm Quilting Machine Service Guide
Proprietary information of ABM INTERNATIONAL, Inc. furnished for customer use only. No other uses are authorized without the prior written permission of
ABM INTERNATIONAL, INC.
1
ABM International, Inc.
INNOVA 18, 22 & 26 SERVICE MANUAL

ABM International, Inc. Series: 1018, 1022 & 1026 V5.0 Model: Innova Longarm Quilting Machine Service Guide
Proprietary information of ABM INTERNATIONAL, Inc. furnished for customer use only. No other uses are authorized without the prior written permission of
ABM INTERNATIONAL, INC.
2
ABM technicians are standing by 24 hours everyday to talk to you about set-up, operation or any other matters pertaining to Innova. To reach the service department, dial (936)441-4401 and ask for a service technician. Section Heading Page 1.0 TOOLS REQUIRED FOR MAINTENANCE 3 2.0 INSTALLING A NEEDLE IN THE INNOVA 4 3.0 THREADING THE INNOVA 6 4.0 OILING THE INNOVA 7 5.0 ROTARY THREAD TENSION ASSEMBLY 8 6.0 SETTING THE NEEDLE BAR HEIGHT 9 7.0 SETTING THE HOOK TIMING 11 8.0 ADJUSTING THE HOOK POSITIONING FINGER 13 9.0 ADJUSTING THE PRESSER FOOT HEIGHT 14 10.0 SETTING THE NEEDLE UP POSITION 15 11.0 ADJUSTING THE HANDLE BAR HEIGHT 17 12.0 REPLACEMENT OF HANDLE BAR BUTTON 18 13.0 ADJUSTING THE HOOK DRIVE MECHANISM – BELT / GE AR 19 14.0 SEWING HEAD AXLE ADJUSTMENT 22 15.0 REMOVAL AND INSTALLATION OF INNOVA PARTS 23

ABM International, Inc. Series: 1018, 1022 & 1026 V5.0 Model: Innova Longarm Quilting Machine Service Guide
Proprietary information of ABM INTERNATIONAL, Inc. furnished for customer use only. No other uses are authorized without the prior written permission of
ABM INTERNATIONAL, INC.
3
1.0 TOOLS REQUIRED FOR MAINTENANCE Small Ball-peen Hammer (2) ½” open or box-end wrench Adjustable wrench Metric Allen keys Standard Allen keys Flash light Standard screw driver Small Standard screw driver – Precision set Utility knife Vice grips Needle nose pliers Tape measure
ABM International, Inc. Series: 1018, 1022 & 1026 V5.0 Model: Innova Longarm Quilting Machine Service Guide
Proprietary information of ABM INTERNATIONAL, Inc. furnished for customer use only. No other uses are authorized without the prior written permission of
ABM INTERNATIONAL, INC.
4
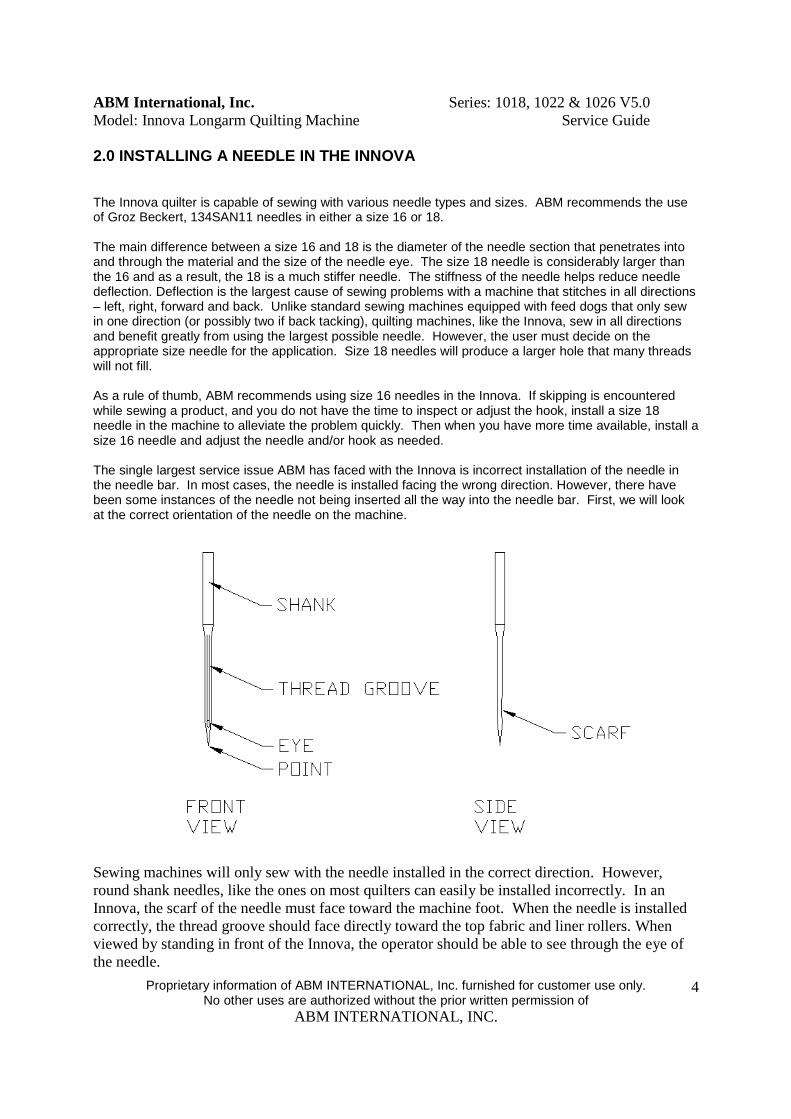
2.0 INSTALLING A NEEDLE IN THE INNOVA The Innova quilter is capable of sewing with various needle types and sizes. ABM recommends the use of Groz Beckert, 134SAN11 needles in either a size 16 or 18. The main difference between a size 16 and 18 is the diameter of the needle section that penetrates into and through the material and the size of the needle eye. The size 18 needle is considerably larger than the 16 and as a result, the 18 is a much stiffer needle. The stiffness of the needle helps reduce needle deflection. Deflection is the largest cause of sewing problems with a machine that stitches in all directions – left, right, forward and back. Unlike standard sewing machines equipped with feed dogs that only sew in one direction (or possibly two if back tacking), quilting machines, like the Innova, sew in all directions and benefit greatly from using the largest possible needle. However, the user must decide on the appropriate size needle for the application. Size 18 needles will produce a larger hole that many threads will not fill. As a rule of thumb, ABM recommends using size 16 needles in the Innova. If skipping is encountered while sewing a product, and you do not have the time to inspect or adjust the hook, install a size 18 needle in the machine to alleviate the problem quickly. Then when you have more time available, install a size 16 needle and adjust the needle and/or hook as needed. The single largest service issue ABM has faced with the Innova is incorrect installation of the needle in the needle bar. In most cases, the needle is installed facing the wrong direction. However, there have been some instances of the needle not being inserted all the way into the needle bar. First, we will look at the correct orientation of the needle on the machine.
Sewing machines will only sew with the needle installed in the correct direction. However, round shank needles, like the ones on most quilters can easily be installed incorrectly. In an Innova, the scarf of the needle must face toward the machine foot. When the needle is installed correctly, the thread groove should face directly toward the top fabric and liner rollers. When viewed by standing in front of the Innova, the operator should be able to see through the eye of the needle.

ABM International, Inc. Series: 1018, 1022 & 1026 V5.0 Model: Innova Longarm Quilting Machine Service Guide
Proprietary information of ABM INTERNATIONAL, Inc. furnished for customer use only. No other uses are authorized without the prior written permission of
ABM INTERNATIONAL, INC.
5
In some instances, the needle has not been inserted into the needle bar completely. Upon close inspection, a portion of a hole can be seen just above the needle bar thread guide. When inserted completely, the needle will contact the top of this hole. It may be easier to view the first time by removing the needle set screw and needle bar thread guide. Additionally, if the needle is difficult to hold, it may help to use a set of needle nose pliers. If pliers are used, pay careful attention not to snap off the needle in the needle bar.

ABM International, Inc. Series: 1018, 1022 & 1026 V5.0 Model: Innova Longarm Quilting Machine Service Guide
Proprietary information of ABM INTERNATIONAL, Inc. furnished for customer use only. No other uses are authorized without the prior written permission of
ABM INTERNATIONAL, INC.
6
3.0 Threading the sewing head 1. Pull thread from cone 2. Pass thread through upper thread guide on motor cover. MAKE SURE THE THREAD GUIDE IS POSITIONED DIRECTLY OVER THE CENTER OF THE CONE OF THREAD. 3. Pass thread through upper hole of thread post. Thread should go through the hole from the right to the left. 4. Bring thread around the post and back into the bottom hole of thread post. Thread should go through the hole from right to left. 5. Pass thread through the upper thread guide of the pre-tension. 6. Bring the thread clockwise around the pre-tension discs and pass through the lower thread guide hole of the pre-tension. NOTE: DO NOT WRAP THE THREAD COMPLETELY AROUND THE DISC. THE THREAD SHOULD TRAVEL FROM THE TOP HOLE TO THE BOTTOM HOLE AND PASS THROUGH THE DISCS ON THE RIGHT SIDE ONLY. 7. Pass the thread through thread guide 8. Wrap the thread completely around the rotary tension assembly TWICE - clockwise. Pass thread over check spring. NOTE: OIL FELTS ON ROTARY TENSION TO ENSURE SMOOTH MOVEMENT. 9. Pass the thread through thread guide 10. Pass the thread through the take-up finger. Make sure thread runs from right to left. 11. Pass thread through thread guide 12. Pass thread through thread guide at the bottom of the needle Bar bushing. 13. Pass the thread through the needle bar thread guide located on the end of the needle bar. 14. Insert thread through the eye of the needle from left to right. Pull thread to check for proper threading. As the thread is pulled through the needle, the check spring #8 should move and thread should pull from the cone #1.

ABM International, Inc. Series: 1018, 1022 & 1026 V5.0 Model: Innova Longarm Quilting Machine Service Guide
Proprietary information of ABM INTERNATIONAL, Inc. furnished for customer use only. No other uses are authorized without the prior written permission of
ABM INTERNATIONAL, INC.
7
4.0 OILING THE INNOVA 1. Remove the bobbin case and apply 4-5 drops of oil to the inside of the hook basket every bobbin change.
NOTE: Oiling the hook is required. Failure to do so will cause poor stitching, thread breakage, noisy operation and premature hook failure.
2. Apply oil to felts on rotary tension. Inspect felts for dryness periodically. Oil as necessary.
3. If you perform maintenance to the take-up, needle bar or presser bar assemblies, apply a small amount of oil to the locations listed below. NOTE: This is not necessary, but good preventive maintenance.

ABM International, Inc. Series: 1018, 1022 & 1026 V5.0 Model: Innova Longarm Quilting Machine Service Guide
Proprietary information of ABM INTERNATIONAL, Inc. furnished for customer use only. No other uses are authorized without the prior written permission of
ABM INTERNATIONAL, INC.
8
5.0 ROTARY THREAD TENSION ASSEMBLY Removal 1. Loosen set screw located in the front of the sewing head. Use a 2.5mm Allen wrench. 2. Pull firmly on tension assembly, rubber O-ring will make it tight coming out. Adjustment of Check Spring 1. Loosen the screw located at the bottom of the tension assembly. Rotate post clockwise to tighten the spring; counter-clockwise to loosen the spring tension.
Adjustment of Thread Tension 1. Rotate nut on Tension Assembly clockwise for tighter tension; counter-clockwise for looser tension. Note: Felts for Rotary Tension may need light oil to function smoothly.
Installation of Tension Assembly 1. Push tension assembly, o-ring side first into hole in casting. Set check spring position to about 10 o’clock. Tighten set screw.
ABM International, Inc. Series: 1018, 1022 & 1026 V5.0 Model: Innova Longarm Quilting Machine Service Guide
Proprietary information of ABM INTERNATIONAL, Inc. furnished for customer use only. No other uses are authorized without the prior written permission of
ABM INTERNATIONAL, INC.
9
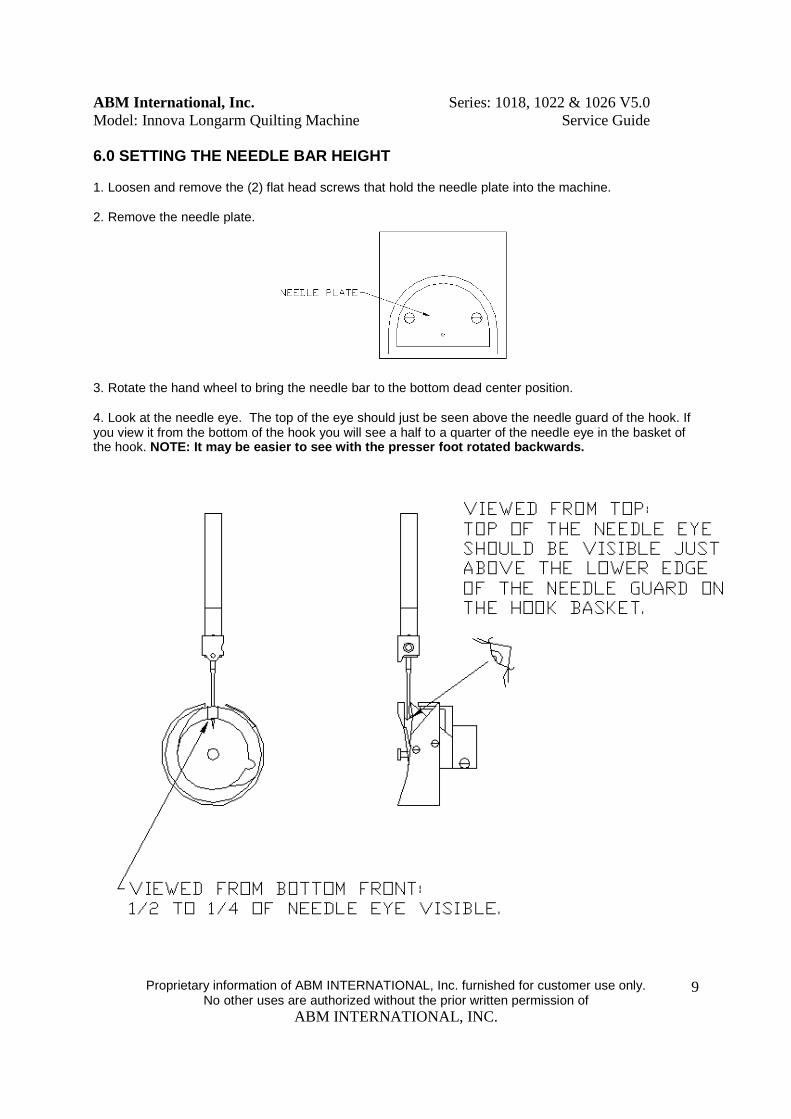
6.0 SETTING THE NEEDLE BAR HEIGHT 1. Loosen and remove the (2) flat head screws that hold the needle plate into the machine. 2. Remove the needle plate.
3. Rotate the hand wheel to bring the needle bar to the bottom dead center position. 4. Look at the needle eye. The top of the eye should just be seen above the needle guard of the hook. If you view it from the bottom of the hook you will see a half to a quarter of the needle eye in the basket of the hook. NOTE: It may be easier to see with the presser foot rotated backwards.

ABM International, Inc. Series: 1018, 1022 & 1026 V5.0 Model: Innova Longarm Quilting Machine Service Guide
Proprietary information of ABM INTERNATIONAL, Inc. furnished for customer use only. No other uses are authorized without the prior written permission of
ABM INTERNATIONAL, INC.
10
5. If adjustment is needed, loosen the needle bar clamping screw and move needle bar to the correct position.
6. Tighten the needle bar clamping screw. 7. Operate the machine at 75 RPM and listen to make sure that the needle bar thread guide does not strike the needle bar bushing assembly while running. If the needle bar is set too high, the thread guide will tap against the bottom of the needle bar bushing when running. Readjust if necessary.

ABM International, Inc. Series: 1018, 1022 & 1026 V5.0 Model: Innova Longarm Quilting Machine Service Guide
Proprietary information of ABM INTERNATIONAL, Inc. furnished for customer use only. No other uses are authorized without the prior written permission of
ABM INTERNATIONAL, INC.
11
7.0 SETTING THE HOOK TIMING
1. Remove the (2) screws that hold the needle plate. 2. Remove the needle plate 3. Loosen the (2) screws located on the back of the hook. NOTE: Some hooks have (3) screws.
4. While holding the hook, use the hand wheel to rotate the machine clockwise until the needle bar is on the upstroke after bottom dead center. NOTE: Be careful not to hit the hook with the needle. 5. Adjust the position of the hook front to back so that the needle just touches the needle guard on the basket when the needle is at bottom dead center. 6. Adjust the rotational position of the hook so that the hook point enters the scarf of the needle no higher than halfway up the scarf and no lower than 1/4 the of the scarf. It is important to make sure that the hook point does not strike the eye or side of the needle during operation. NOTE: It may be easier to leave one screw lightly tightened to the shaft to hold hook position while adjusting the timing. The hook should be able to be rotated with some pressure on the hook without moving needle height. Use the hand wheel to help hold needle bar position while rotating hook.

ABM International, Inc. Series: 1018, 1022 & 1026 V5.0 Model: Innova Longarm Quilting Machine Service Guide
Proprietary information of ABM INTERNATIONAL, Inc. furnished for customer use only. No other uses are authorized without the prior written permission of
ABM INTERNATIONAL, INC.
12
5. Tighten the (2) screws on the hook. 6. Set the positioning finger distance so that the post of the finger is even with the outer edge of the groove in the basket. NOTE: The finger must still be in notch of basket to keep it from rotating and damaging the hook.
7. Re-install the needle plate.
ABM International, Inc. Series: 1018, 1022 & 1026 V5.0 Model: Innova Longarm Quilting Machine Service Guide
Proprietary information of ABM INTERNATIONAL, Inc. furnished for customer use only. No other uses are authorized without the prior written permission of
ABM INTERNATIONAL, INC.
13
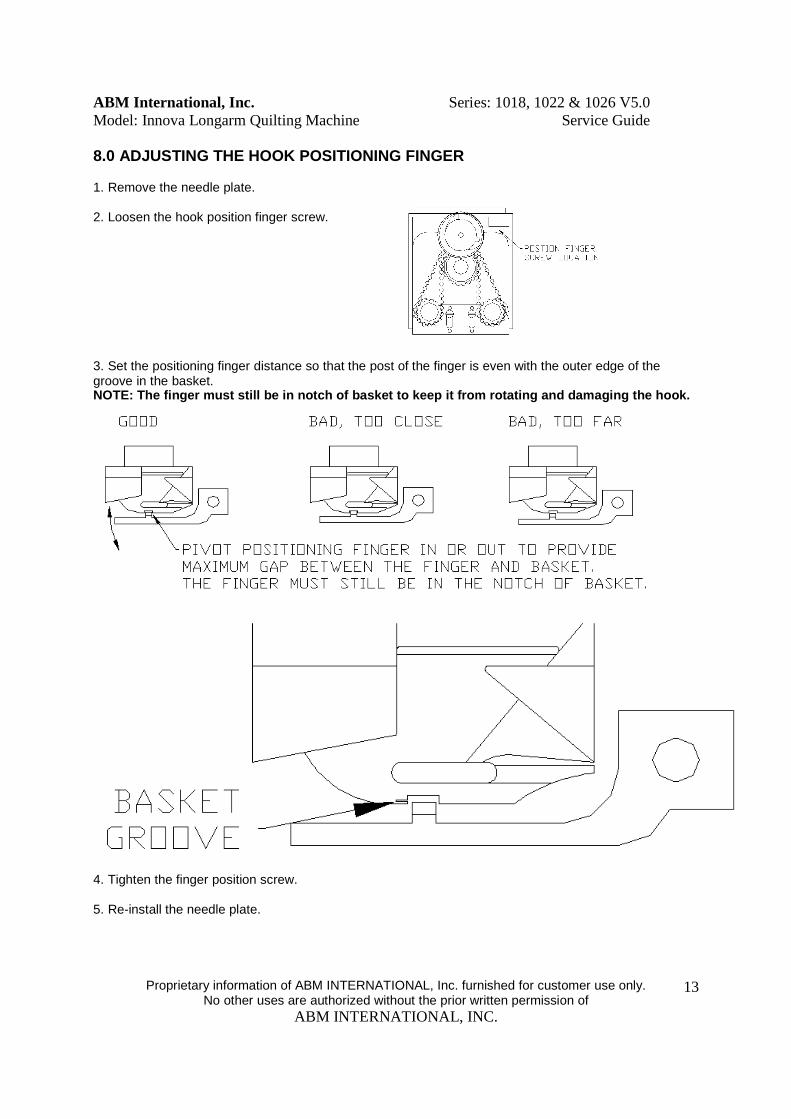
8.0 ADJUSTING THE HOOK POSITIONING FINGER 1. Remove the needle plate. 2. Loosen the hook position finger screw.
3. Set the positioning finger distance so that the post of the finger is even with the outer edge of the groove in the basket. NOTE: The finger must still be in notch of basket to keep it from rotating and damaging the hook.
4. Tighten the finger position screw. 5. Re-install the needle plate.

ABM International, Inc. Series: 1018, 1022 & 1026 V5.0 Model: Innova Longarm Quilting Machine Service Guide
Proprietary information of ABM INTERNATIONAL, Inc. furnished for customer use only. No other uses are authorized without the prior written permission of
ABM INTERNATIONAL, INC.
14
9.0 ADJUSTING THE PRESSER FOOT HEIGHT Foot height should be no less than 0.073”. NOTE: You may use (1) dime OR (1) nickel as a gage to check height. Thicker materials may require the foot to be set higher. 1. Turn the hand wheel so that the presser foot moves to its lowest position. 2. Loosen presser bar clamp screw. 3. Set appropriate presser bar height. Be sure to keep needle centered in foot. 4. Tighten presser bar clamp screw. 5. Turn the hand wheel a few revolutions to ensure the presser bar does not interfere with the needle bar crank.

ABM International, Inc. Series: 1018, 1022 & 1026 V5.0 Model: Innova Longarm Quilting Machine Service Guide
Proprietary information of ABM INTERNATIONAL, Inc. furnished for customer use only. No other uses are authorized without the prior written permission of
ABM INTERNATIONAL, INC.
15
10.0 SETTING THE NEEDLE UP POSITION 1. Set machine to operate in manual mode by pressing #5 on the PLC display unit. 2. Set needle position to stop at up by pressing button #4 on the plc until screen reads UP in top right corner. 3. Remove the thread from the needle and remove the bobbin case. 4. Remove the rear cover and motor cover.
6. Press the green button to start the machine. Allow it to run for a few seconds. 7. Press green button to stop machine. DO NOT ALTER THE POSITION OF WHERE THE MACHINE STOPS. THIS IS THE ELECTRONIC NEEDLE UP POSITION.

ABM International, Inc. Series: 1018, 1022 & 1026 V5.0 Model: Innova Longarm Quilting Machine Service Guide
Proprietary information of ABM INTERNATIONAL, Inc. furnished for customer use only. No other uses are authorized without the prior written permission of
ABM INTERNATIONAL, INC.
16
8. Using a pencil place a reference mark on the motor drive pulley.
9. Loosen the 4 screws on the motor mount and move the motor to the lowest position. 10. Hold the motor pulley so that the mark stays in the same position. Turn the sewing head drive shaft counter-clockwise (facing the machine from the rear) and jump the belt on the motor pulley until the needle is at its highest point and the take up lever is approximately ¾ of an inch from the top of the slot. NOTE: THE TAKEUP LEVER SHOULD STILL BE TRAVELING UPWARDS IF THE SHAFT WERE TURNED COUNTER-CLOCWISE.
11. Do not let the motor pulley turn while raising the motor to tighten the belt. Tighten the (4) motor screws. 12. Run machine to check the up and down needle stop positions. 13. Repeat steps 9 thru 12 until you obtain the desired positions. 14. Replace the rear cover and motor cover.

ABM International, Inc. Series: 1018, 1022 & 1026 V5.0 Model: Innova Longarm Quilting Machine Service Guide
Proprietary information of ABM INTERNATIONAL, Inc. furnished for customer use only. No other uses are authorized without the prior written permission of
ABM INTERNATIONAL, INC.
17
11.0 ADJUSTING THE HANDLE BAR HEIGHT
1. Loosen the screw on the handle bar clamp.
2. Rotate the handle bar to desired position.
3. Tighten the screw on the handle bar clamp. WARNING: Only tighten the screw until handle bar will not move. Over-tightening of the screw will break the clamping unit.
ABM International, Inc. Series: 1018, 1022 & 1026 V5.0 Model: Innova Longarm Quilting Machine Service Guide
Proprietary information of ABM INTERNATIONAL, Inc. furnished for customer use only. No other uses are authorized without the prior written permission of
ABM INTERNATIONAL, INC.
18
12.0 REPLACEMENT OF HANDLE BAR BUTTON
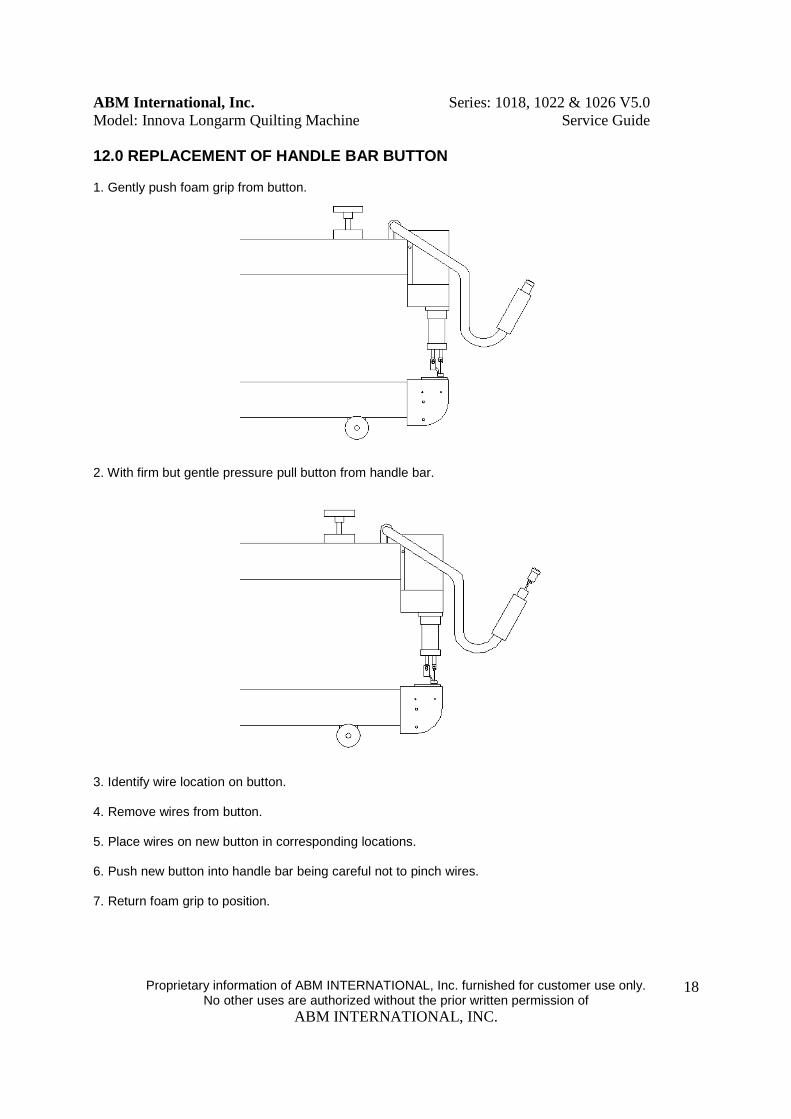
1. Gently push foam grip from button.
2. With firm but gentle pressure pull button from handle bar.
3. Identify wire location on button. 4. Remove wires from button. 5. Place wires on new button in corresponding locations. 6. Push new button into handle bar being careful not to pinch wires. 7. Return foam grip to position.

ABM International, Inc. Series: 1018, 1022 & 1026 V5.0 Model: Innova Longarm Quilting Machine Service Guide
Proprietary information of ABM INTERNATIONAL, Inc. furnished for customer use only. No other uses are authorized without the prior written permission of
ABM INTERNATIONAL, INC.
19
13.0 ADJUSTING THE HOOK DRIVE MECHANISM – BELT / GE AR The INNOVA long arm quilting machine is equipped with either a belt or composite gear driven hook assembly (See Figure 13.1). On a belt drive system, the main drive shaft turns the large center pulley which drives the belt around two idlers and the small upper hook drive pulley. The gear drive system consists of a composite gear mounted to an aluminum hub that turns the small pinion gear on the hook drive shaft.
Figure 13.1 - Hook belt drive and gear drive assembly
Though most machines will never require adjustment, it may be necessary to service the belt or gear drive assembly. This service can be preformed with standard hand tools including a flat blade screw driver and Inch hex key set. To adjust the belt, remove the guard plate held in place by the four screws on either side of the machine base. Upon closer inspection, the belt drive assembly consists of four pulleys. For adjustment purposes, we are only concerned with the lower two idler pulleys and the tension plate (See Figure 13.2).
Figure 13.2 – Idler pulleys and tension plate
The tension plate allows for adjustment of the tension of the hook drive belt. If the tension is too loose or too tight or if the tension plate is misaligned, an audible “chirp” is usually heard from the machine at certain speeds. The various procedures are as follows: NOTE: Before performing any belt drive adjustments, remove the needle from the needle bar and remove any loose clothing or jewelry. Additionally, remove the bobbin case from the hook and clean all thread, dust and debris from around the hook assembly.

ABM International, Inc. Series: 1018, 1022 & 1026 V5.0 Model: Innova Longarm Quilting Machine Service Guide
Proprietary information of ABM INTERNATIONAL, Inc. furnished for customer use only. No other uses are authorized without the prior written permission of
ABM INTERNATIONAL, INC.
20
Adjusting Belt Tension: Referring to figure 13.2, loosen, but do not remove, both screws labeled B. Using the correct hex key, tightening screw C will tighten the belt (move the hex key from left to right). Loosening screw C will loosen the belt (move the hex key from right to left). Retighten the two screws B and run the machine in manual mode to check for proper tension. Do not over-tension the belt. A small amount of deflection should be present when you press in on the belt between the lower idler and upper hook pulleys. When proper tension is achieved, install the guard plate into the machine base. Adjusting Tension Plate Alignment: Referring to figure 13.3, during the belt tension procedure, it is possible for the tension plate to become misaligned. This misalignment may result in an audible “chirp” from the belt. To correct the misalignment, loosen the two screws labeled B in figure 13.2 and lightly pry between the tension plate and hook assembly housing with a small screw driver. Retighten the two screws labeled B and confirm proper operation of the belt drive. When proper alignment is achieved, install the guard plate into the machine base.
Figure 13.3: Tension plate misalignment
Adjusting Belt Tracking: Tracking adjustments are no longer needed with the addition of flanged pulleys on the tensioner. Note: It is normal for the belt to “walk” in and out on the pulleys a small amount when the machine is running.

ABM International, Inc. Series: 1018, 1022 & 1026 V5.0 Model: Innova Longarm Quilting Machine Service Guide
Proprietary information of ABM INTERNATIONAL, Inc. furnished for customer use only. No other uses are authorized without the prior written permission of
ABM INTERNATIONAL, INC.
21
Adjusting Gear Lash: The lash, spacing between two adjacent gears teeth, is adjustable. To adjust the lash, slightly loosen but do not remove the four lash adjustment screws in figure 13.4. The screws should be snug but loose enough to allow the whole aluminum hook housing to move if lightly tapped with a rubber mallet.
Figure 13.4 Gear drive assembly – lash adjustment screws
Tap the housing up to increase lash or tap the housing down to reduce lash. Too much lash will cause the hook to wiggle excessively and timing will be sloppy. Not enough lash will cause the gears to whine and will make the machine difficult to turn. Make sure the needle is centered in the needle plate hole before re-tightening the lash adjustment screws. When proper lash is achieved, install the guard plate into the machine base.

ABM International, Inc. Series: 1018, 1022 & 1026 V5.0 Model: Innova Longarm Quilting Machine Service Guide
Proprietary information of ABM INTERNATIONAL, Inc. furnished for customer use only. No other uses are authorized without the prior written permission of
ABM INTERNATIONAL, INC.
22
14.0 SEWING HEAD AXLE ADJUSTMENT Setting the sewing head axle alignment is necessary to insure a smooth rolling assembly. The axles will need to be adjusted if any side to side or front to back rocking motion is noticed when the machine is rolled on the frame. Additionally, a visual inspection of the sewing head wheel axle can pin point the axle that needs adjustment (See figure 9.2).
Figure 9.1: Sewing head and carriage assembly.
The two screws, found on the bottom side of the sewing head wheel axle, are used to adjust the assembly. You will need a ¼” hex key for the adjustment. Only loosen the screw closest to the wheel that is not touching the rail. As the screw is loosened, the axle will lower and bring the wheel into contact with the rail. Do not loosen the screw too much or the wheel on the opposite side may lift off of the rail. Check to insure that all of the play is removed from the assembly by moving the sewing head front to back and left to right. The sewing head should roll smoothly. The adjustment is complete.
Figure 9.2: Sewing head axle adjustment.

ABM International, Inc. Series: 1018, 1022 & 1026 V5.0 Model: Innova Longarm Quilting Machine Service Guide
Proprietary information of ABM INTERNATIONAL, Inc. furnished for customer use only. No other uses are authorized without the prior written permission of
ABM INTERNATIONAL, INC.
23
15.0 REMOVAL AND INSTALLATION OF INNOVA PARTS Removal of Needle Bar Rotate head 90 degrees, so that the needle bar is horizontal. Loosen needle bar clamp screw using a standard flat screw driver. Access is through face-plate, while needle is in the bottom dead center (BDC) position. Carefully slide needle bar out bottom of bushing assembly. Installation of Needle Bar Rotate head 90 degrees, so bushing assembly is in the horizontal position. Gently slide oiled needle bar through needle bar bushing assembly and clamp. Set needle bar to proper height. Tighten clamp screw. Removal of Presser Bar Rotate head 90 degrees, so presser bar is in horizontal position. With needle bar in top dead center (TDC) position, loosen presser bar clamp screw using a 3mm Allen key. Gently slide presser bar out of bushing assembly. Installation of Presser Bar Rotate head 90 degrees, so bushing assembly is in the horizontal position. Gently slide oiled presser bar through bushing assembly. Secure with a 3mm hex key at proper height with clamp screw. Take-up Assembly Removal Remove the needle bar. Remove the presser bar. Using a 2.5mm hex key, loosen the set screw, located on the left side at the rear of the head casting. Using a 3mm Allen key, loosen the (2) set screws in the counter-weight. Using pliers gently tug on the Take-up Lever Pin to remove. Note position of Crank Pin and rotate shaft until you can remove the Take-up Assembly from the Counter-weight and Casting. Installation of Take-up Assembly Slide Crank Pin into Counter-weight making sure that the flat is in same position that the original was removed. Tighten the (2) counter-weight screws using 3mm Allen key. Place Take-up Lever Pin through Take-up Lever and into casting, making sure that it seats with very light pressure against Take-up Lever. Tighten screw on the flat of the Take-up Lever Pin using 2.5mm hex key.