infinitas dminfinitasdm.com/idm_instructionmanual.pdfinfinitas dm | to witc nc. 2016 11 5. dm drawer...
TRANSCRIPT

1INFINITASDM | Atom Switch, Inc. | 2016
I N F IN I TASDM
Instruction Manual

2INFINITASDM | Atom Switch, Inc. | 2016
Table of ContentGetting Started ...............................................................3
1. Campaign Save File Locations ........................................................... 3Creating A New Campaign ...................................................3
1. Using The ATLAS .................................................................................. 42. Renaming, Deleting, or Clearing a Map ........................................... 53. Assigning a Map Image ....................................................................... 54. Loading a Map ..................................................................................... 6
The Map View .................................................................61. Map View Toolbar ............................................................................... 72. Map Layers .......................................................................................... 83. The Documents Tab ............................................................................ 94. Map Links ...........................................................................................105. DM Drawer ..........................................................................................11
The Player’s View .......................................................... 141. Mobile vs Desktop Player’s View ..................................................... 14
Additional Information .................................................... 151. Expanded Content ............................................................................ 152. Custom Stamps and Tokens ............................................................. 153. Find us Online ................................................................................... 17
I N F IN I TASDM

3INFINITASDM | Atom Switch, Inc. | 2016
Getting Started
Creating A New Campaign
1. Campaign Save File Locations
WindowsWin 7,8,10: \Users\[User Name]\AppData\LocalLow\Atom Switch, Inc_\InfinitasDM
AndroidAndroid 4.4+: \android\data\com.atomswitch.infinitasdm\files\
(Location will default to SD storage if available)
AppleMacOS: ~/Library/Application Support/Atom Switch, Inc_/InfinitasDM/ OR
Mac Drive/Users/[Your User]/Library/Application Support/unity.Atom Switch, Inc..InfinitasDM
iOS: Saves are accessed via iTunes. A guide to copying app files via iTunes can be
found at: https://support.apple.com/en-us/HT201301
A. Select “New Campaign” from the main menu. B. Enter a campaign name, then select Create.
A
B
Campaigns that are created in INFINITASDM are compatible across both desktop (Windows, MacOS) and mobile (Android, iOS) platforms.
These files can easily be accessed and shared by navigating to their save location, where the [fileName].db files can be copied or shared. You can find the save locations for each platform below:
Campaigns are created and loaded from the Main Menu. All campaign files located in your platform’s save directory will be accessible by selecting the Load Campaign button.
Steam DLC: \SteamLibrary\steamapps\common\InfinitasDM\contents\

4INFINITASDM | Atom Switch, Inc. | 2016
1. Using The ATLASAfter creating or loading a Campaign the user will be sent to the Atlas for that campaign file. The Atlas is the central hub containing all of the Campaign’s maps and is tiered into 3 primary, nesting categories: Worlds, Regions, and Locations.
Each tier acts as a container for lower tiers. Each World can consist of a set of Region maps, which can then consist of a set of Location maps.
A B
The Atlas is organized into 3 panels, 2 of which are visible at any time. By default, a campaign will start with Worlds and Regions displayed. When a Region is selected, it will move to display Regions and Locations.
A. The currently loaded campaign file.
B. The ‘Back’ ButtonReturn from a deeper panel on the 2 Panel Map Browser tree, or return to the Main Menu if at the top (World) map tree level.
C. Add a new mapAdding a map to the World panel will add a new world map. To add a map to the Region panel, a World must be selected that the Region will be nested under. The same is true for a Location, which must have a Region selected, which the Location will then be nested under.
D. Assign Map ImageCreate or Assign a map image to an existing map entry.
E. Load MapLoad and enter Map View for the selected map.
C
D
E
The Atlas
5INFINITASDM | Atom Switch, Inc. | 2016
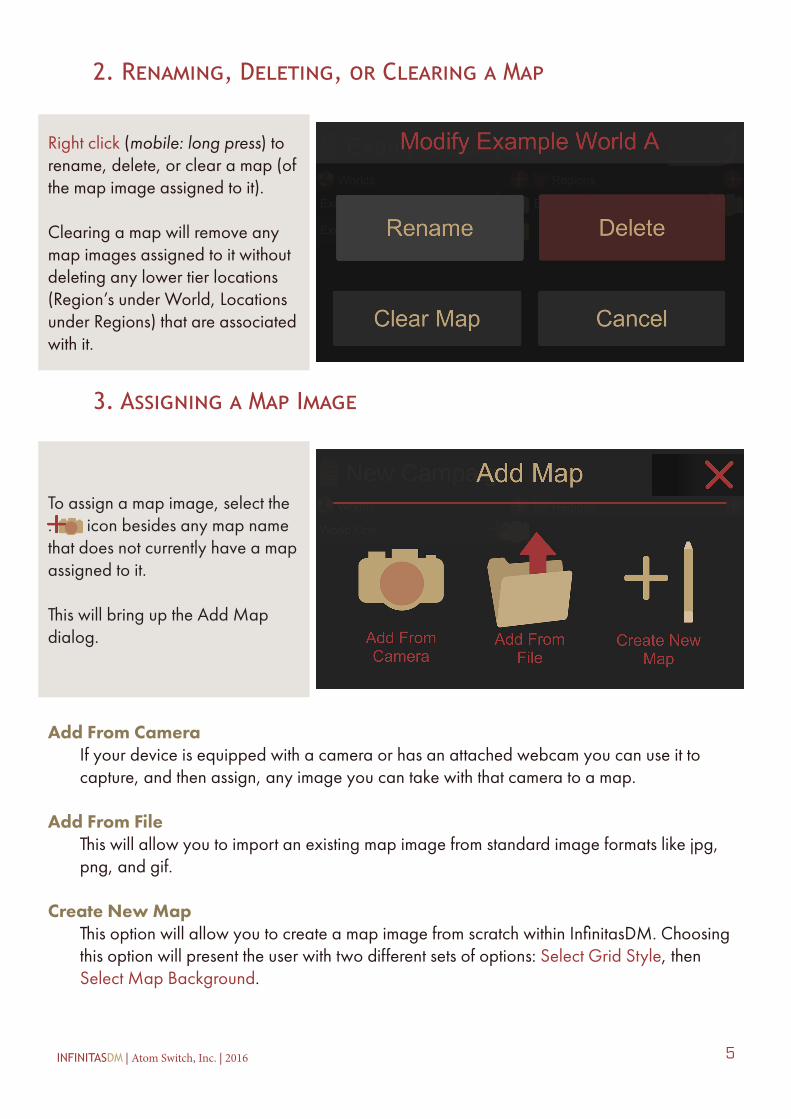
2. Renaming, Deleting, or Clearing a Map
3. Assigning a Map Image
Right click (mobile: long press) to rename, delete, or clear a map (of the map image assigned to it).
Clearing a map will remove any map images assigned to it without deleting any lower tier locations (Region’s under World, Locations under Regions) that are associated with it.
To assign a map image, select the . icon besides any map name that does not currently have a map assigned to it.
This will bring up the Add Map dialog.
Add From CameraIf your device is equipped with a camera or has an attached webcam you can use it to capture, and then assign, any image you can take with that camera to a map.
Add From FileThis will allow you to import an existing map image from standard image formats like jpg, png, and gif.
Create New MapThis option will allow you to create a map image from scratch within InfinitasDM. Choosing this option will present the user with two different sets of options: Select Grid Style, then Select Map Background.

6INFINITASDM | Atom Switch, Inc. | 2016
4. Loading a Map
Select Grid Style
Select Map Background
Select the style of grid (or no grid) that will fill the map space.
Select the background that will fill the map space.
Once a map has been assigned, it can then be loaded from the Atlas. To load a map, select the icon besides any map that has a map image assigned to it.
The Map View is heart and soul of InfinitasDM. This is where maps are displayed, the player view is run from, documents are created, Map Links are placed, and all of the exploration, interaction, and combat takes place in your campaigns.
The Map View

7INFINITASDM | Atom Switch, Inc. | 2016
1. Map View Toolbar
EraserThe Eraser tool allows the user to erase marks made on the map with the Pencil and Line tools, as well as erasing Fog of War when the Fog of War tool is enabled. The size of the Eraser can be changed from within the DM Drawer.
PencilThe Pencil tool allows the user to draw onto the map. The color and size of the Pencil can be changed from within the DM Drawer. When Fog of War is enabled it can be used to add fog of war to the map.
Line ToolThe Line tool functions similar to the Pencil, except that it creates straight lines. Click or tap once to set the start point of the line, then click or tap again to set the endpoint, creating a straight line between the two.
Fog of WarThe Fog of War tool is a toggle switch. By default fog of war can not be edited by the drawing tools. When activated, the pencil and eraser tools will add to or remove fog of war from the map, respectively. Like the normal Pencil tool, Fog of War can be added in any color chosen from the DM Drawer.
Documents TabThe Documents Tab is the container and viewer for all of the documents tied to each map. From here documents can be created and viewed. The Documents Tab is covered in more detail on Page 9.

8INFINITASDM | Atom Switch, Inc. | 2016
2. Map Layers
There are 3 different layers accessible on each map. Anything drawn or placed on a layer can only be edited when that layer is selected. Click or tap on a layer to cycle between Selected and Visible, Hidden, and Visible But Unselected.
DM LayerThe top most layer on the layer stack, anything drawn or placed onto the DM Layer will *only* be visible to the DM/GM, and will not be displayed on the Player View.
Layer IThe middle layer, if the map was created with InfinitasDM’s Create New Map feature, Layer I will be displayed above any grid that was chosen when the map was created.
Layer IIThe bottom layer, if the map was created with InfinitasDM’s Create New Map feature, Layer II will be displayed below any grid that was chosen when the map was created.
Layer Selected Layer Visible Layer Hidden

9INFINITASDM | Atom Switch, Inc. | 2016
3. The Documents Tab
The Documents Tab is the container and viewer for all of the documents tied to each map. From here documents can be created and viewed.
The Documents Tab provides two services:
Document Tree Document ViewerA list of the current map’s documents, as well as allowing navigation to the documents of other maps.
Used to display individual documents.
A
B
C
A. The current Map (Left) / Document (Right).
B. Min/Max ButtonBoth the Documents Tree and Document Viewer can be maximized (or returned to a tab) by clicking or pressing on the this icon in the top right corner of the tab.
C. +New DocumentThis button will create a new document, which can then be edited, viewed, and assigned to a Map Link by clicking or pressing on the this icon in the top right corner of the tab.
D. Up A LevelThis is a global “back” button within the Documents Tab. Starting from a Document the tab will travel in the following order: [Location] Document > Maps of Same Region + Docs for Current Location > Maps of same World + Docs for Current Region > World Maps.
E. Next / Last ArrowsWhile viewing a Document, these arrows will cycle between all other documents for the current map. While viewing the Document Tree they will cycle between all maps of the same tier (World, Region, Location).
E. ExitThis will close the documents tab.
D E F

10INFINITASDM | Atom Switch, Inc. | 2016
4. Map Links
Map Links can be placed onto the map and then connected to a Document or Map to enable quick access to either function.
Placing A Map LinkTo place a Map Link, click or press and hold on any space on the map not currently occupied by an existing Token, Stamp, or Map Link. This will bring up the Map Link Dialog.
Click or Press on any of the Link types to place one onto the map.
Map Links can be removed in the same way as Tokens and Stamps. Click or press and hold on any existing Map Link. This will “pick up” the object, allowing the user to drag it to the Eraser (which has now become a Trash Can icon) to remove it.
• Double click or tap on any existing Map Link to assign a map or document to it.• Single click or tap on any existing Map Link to load/access the linked map or document• Triple click or tap on any existing Map Link to cycle between the Link remaining “visible” or
“hidden” to the Player’s View.
Location Map Links allow quick access to other maps in your campaign file, while Encounter, Point of Interest, and NPC Map Links allow quick access to document files.

11INFINITASDM | Atom Switch, Inc. | 2016
5. DM Drawer
A. Mini Atlas
The Mini-Atlas is located in the leftmost segment of the DM Drawer and offers a quick way to navigate to alternate maps. Much like the full sized atlas, the Back button at it’s top will allow the user to access maps from higher tier regions (from Location, to Region, to World).
B. Tokens and Stamps
Tokens and Stamps occupy the center segment of the DM Drawer, both of which can be placed onto the map by clicking/pressing and holding on them. Once triggered, the DM Drawer will close, allowing the user to position the token or stamp to the desired location, releasing the click or press to place the item onto the map.
To remove a Token or Stamp, click or press and hold on the stamp, this will “lift” the item. While still holding the press or click, drag the Token or Stamp to the Eraser, which has now become a Garbage Can icon.
To access: Pull out the tab located on the left side of the Map View screen.
A B C
The drawer is broken up into three main sections, along with three function buttons at the bottom.

12INFINITASDM | Atom Switch, Inc. | 2016
Tokens
The top row of tokens are Character Tokens, and can be placed directly onto the map. The second row of tokens are Status Tokens, and must be placed on top of Character Tokens that have already been placed onto the map.
Stamps
Stamps are simple icons that can be placed onto the map to quickly add detail and denote significant items or events. Stamps will be placed onto the map in whichever color is currently selected and will be placed onto the currently selected Layer.
Use the scroll bar or a swiping gesture to move between the different sets of stamps that are available.
Token Menu
Double clicking or tapping on a Character Token that has been placed on the map will open the Token Menu.
This will allow the user to Name a token, cycle between 3 different token sizes (1x, 2x, 4x), and remove any Status Tokens that have been applied to it.
Character Tokens
Status Tokens

13INFINITASDM | Atom Switch, Inc. | 2016
Pencil Tools
Pencil tools occupy the far right side of the DM Drawer and contain a number of options for the Eraser, Pencil and Line Tools.
DM Drawer Buttons
These are the primary function buttons located at the bottom of the DM Drawer menu.
Atlas
Below the Mini Atlas is the Atlas button, which will take the user to the full Atlas.
Cast / Screen Share
Below the Tokens and Stamps is the Screen Cast button. This will enable second screen sharing (Windows/MacOS) or Cast support (Android/iOS) to activate the Player’s View on a secondary display. This is covered in more depth in the Player’s View section.
Quit
Below the Pencil Tools is the Quit button. This will return the user to the InfinitasDM Main Menu screen.
Pencil Color
Select the color that the Pencil and Line tool will draw with (including Fog of War), as well as the color that stamps will be placed with. Black is selected by default.
Pencil Size
This will control the size of the Eraser, Pencil, and Line Tool.
Pencil Color
Selecting a pattern will apply a mask to the Pencil and Line Tool that will allow the user to easily define depth and shape by using one of the available patterns. Solid (no pattern) is selected by default.

14INFINITASDM | Atom Switch, Inc. | 2016
The Player’s View is a second-screen view that is cast from the app to a secondary display, allowing the players to follow along while the DM/GM controls the action from their computer, phone, or tablet.
The Player’s View
Key differences between the Player’s View and the DM View:
• Fog of War is completely Opaque on the Player’s View, while it is semi-transparent for the DM/GM
• Anything drawn or placed on the DM Layer will not be visible on the Player’s View
• The Player’s View will show none of the user interface elements or control that is on the DM View.
Map View (DM/GM) Player’s View
1. Mobile vs Desktop Player’s View
Desktop
Activating the Player’s View on Windows and MacOS platforms will automatically switch the app to full-screen mode (a requirement and current limitation of Unity3D) and send out the Player’s View to any currently connected secondary display. This could include, but is not limited to, any additional monitor, television, projector, or other passive display that you can connect to your computer or laptop.
For MacOS devices, this also supports sending that secondary display to an AirPlay connected display.

15INFINITASDM | Atom Switch, Inc. | 2016
For downloadable campaign files, Player Tokens, and more, check out our store at
store.atomswitch.com
Mobile
For Android and iOS, the Player’s View is cast out using GoogleCast. This means you can easily send out the player’s view to any display you can connect a ChromeCast device to.
Pressing the Cast button from within the DM Drawer will bring up a dialog to select your desired GoogleCast device. Simply select your device from the list and the Player’s View will be cast to the display it is connected to.
Additional Information1. Expanded Content
Custom Player Tokens and Stamps can be added added to InfinitasDM. Installation of these must be done manually on each platform you use InfinitasDM on. Please refer to the following
instructions for each platform.
1. Adding Custom Token and Stamp Art

16INFINITASDM | Atom Switch, Inc. | 2016
To install custom Character Tokens and Stamps, please follow the directions for the appropriate platform.
Windows / Mac / Android (device connected via USB):
1. Select the desired Character Tokens or Stamp images and copy them to the clipboard (ctrl + c or right click > copy on Windows, command + c or right click on mac)
2. Navigate to the InfinitasDM Camapaign Save file location
Windows 7/8/10 - \Users\[User Name]\AppData\LocalLow\Atom Switch, Inc_\InfinitasDM
MacOS - ~/Library/Application Support/Atom Switch, Inc_/InfinitasDM/
Android - \android\data\com.atomswitch.infinitasdm\files\
3. Create a new folder within that save location called “playerTokens” for Tokens, and “stamps” for Stamps
4. Paste the images directly into the corresponding folder (InfinitasDM will not see token or Stamp images placed in subfolders within /playerTokens/ or /stamps/)
5. The new Tokens and Stamps will now be accessible from the DM Drawer. New tokens and Stamps will be arranged in alphabetical order (by their file name) to the right of the default Tokens / Stamps. Click and drag from Right to Left within the respective DM Drawer panels to scroll through your new tokens / stamps, or use the scroll bar at the bottom of the Panel.
iOS:
1. Connect your iOS device to your computer and load up iTunes
2. Create a new folder on your computer called “playerTokens” for Player Tokens, or “stamps” for Stamps.
3. Copy all desired custom Tokens or Stamps and place them into their respective folders
4. In iTunes, with your device connected to your computer, select your device and access the “Apps” section for it
For more information on selecting your device and accessing the apps section for it within iTunes, please refer to this guide: https://support.apple.com/en-us/HT201301
5. Scroll down to the File Sharing section at the bottom of the Apps page
6. Find InfinitasDM within the File Sharing Apps list and select it
7. Drag the “playerTokens” or “stamps” folder from your computer and drop it into the “InfinitasDM Documents” section to th eright of the Apps list.
Custom Stamps and Tokens

17INFINITASDM | Atom Switch, Inc. | 2016
For news, update details, support, and more please visit our website, the app’s forums, or reach out to us by email at [email protected] and [email protected]
NOTE: You *MUST* Drag and Drop the entire folder. You can not add a folder to this section any other way way and the files MUST be in a folder labled “playerTokens” in order for InfinitasDM to see them
8. Sync iTunes with your iOS device
9. The new tokens will now be accessible from the DM Drawer. New tokens will be arranged in alphabetical order (by their file name). Click and drag from Right to Left within the Character Token panel to scroll through your new tokens, or use the scroll bar at the bottom of the Character Token Panel.
Token and Stamp Art Rules
-Tokens must be a .JPG or .PNG file type, .GIF files will not load correctly
-Stamps must be a .PNG file type with Transparency enabled
-Token artwork that contains transparency must be .PNG images
-Stamps must be white in color with a transparent background
Token and Stamp Art Best Practices
-Token and Stamp images are best created at 512x512 pixels in size. Image sizes larger or smaller than this will automatically be normalized to a 512x512 scale.
Missing Custom Token / Stamp Artwork
If you created a campaign file on a device with custom Stamps or Tokens, thenloaded the campaign on a different device that does not have that Stampartwork installed it/they will be replaced with this image:
To fix the issue, install the missing Stamp artwork onto all devices you will run the campaign on. Once the missing artwork is installed, the “null” images will be replaced with the approprate Stamp artwork.
infinitasdm.com
forums.atomswitch.com
twitter.com/atomswitch
Atom Switch on Patreon
3. Find us Online