infection control management project volume 8: … control management project volume 8: guidelines...
TRANSCRIPT
Infection Control Management Project
Volume 8: Guidelines for Infection Control in Operation Theatre
1. Protocols
2. Reference Text
3. Tool for Monitoring
January 2011
Infection Control Management Project
Volume 8: Guidelines for Infection Control in Operation Theatre
Adapted by AAA team from: 1. WHO Poster, How to Handwash & How to Hand rub, October 2006 2. Dr Geeta Mehta. (2002). Guidelines on Prevention and Control of Hospital
Associated Infections. New Delhi: World Health Organization. 3. Dr.T.V.Rao MD, D. M. (2008, February 07). Surveillance, Sterilization and
Disinfection of Operation Theatres in the Developing World. Retrieved December 07, 2010, from Articlesbase.com: http://www.articlesbase.com/medicine-articles/surveillance-sterilization-and-disinfection-of-operation-theatres-in-the-developing-world-327599.html

1
Infection Control in Operation Theatre
You Must: 1. Consider each operation as a potential source of infection for both patient and staff.
2. Be immunized against HBV and have adequate anti-HB titres.
3. Perform surgical scrubs and gowning correctly. 4. Strictly follow operating room clothing and protective equipment discipline.
5. Follow the correct procedure in the event of a sharps injury.
6. Restrict staff number and their movements.
7. Avoid preoperative shaving and prepare surgical site correctly.
8. Administer antibiotic surgical prophylaxis at the time of induction of anaesthesia
10. Keep infected cases at the end of the operating list and treat infected cases before surgery if possible 11. Maintain a clean operating room environment:
a. Correctly maintain the operation theatre air ventilation system.
b. Follow OT cleaning procedures. 12. Decontaminate, properly process and sterilize
equipment. 13. Promptly and properly dispose of theatre waste.
2
List of Acronyms AIDS Acquired Immune Deficiency Syndrome ER Emergency Room HBV Hepatitis B Virus HCV Hepatitis C Virus HCW Health Care Workers HIV Human Immunodeficiency Virus HLD High Level Disinfection OT Operation Theatre PEP Post-Exposure Prophylaxis PPE Personal Protective Equipment
3
Reference Text
1. Consider each operation as a potential source of infection for both patient and staff
As a standard precaution, the staff should consider every patient as a potential source of infection (especially for HBV, HCV and HIV) for them regardless of the known or supposed serological status. Patients should also be considered susceptible to infections during operation. Hence all measures for infection prevention must be taken for all patients.
2. Be immunized against HBV Infection Testing personnel on entry and immunization
• All healthcare providers (HCPs) should be screened and tested for antibodies to HBsAg at the time of employment.
• All medical students should be screened on their entry in into clinical posting.
• Immunize personnel without previous immunization against hepatitis B with the 3 dose vaccination. Follow up 3 months after the completion of the course to test antibody level.
• Those who do not respond should be offered a fourth dose or a further 3 doses, depending on the antibody level.
Previously immunized personnel
• Personnel with titres below 10 mIU/ml should be given a booster dose of HBV vaccination.
• Follow-up by testing antibody levels after completion of the vaccination course.
• Those who do not respond should be offered a fourth dose or a further 3 doses, depending on the antibody level.
Persistent non-responders should be informed about the need for HBIG within 48 hours of parenteral exposure to HBV. Pregnancy should not be considered a contraindication to HBIG or HBV vaccination.
3. Perform surgical scrubs and gowning correctly Surgical scrubbing ensures the removal or killing of transient micro-organisms and a substantial reduction and suppression of the resident microbial flora. Preparation prior to scrub procedure
• Correctly position a new disposable facemask over the nose and mouth.

4
• Cover all hair under a theatre cap.
• Do not wear ANY jewellery on hands and wrists.
• Ensure that the water is of even temperature and with a steady flow.
• Make sure that hands are raised above the elbows at all times.
• Do not splash theatre clothing.
• Make sure that all staff is in suitable surgical attire, with sleeves above the elbow (rolled if necessary).
• Cover beard with a specially designed hood.
• Cover and contain all hair within a surgical hat.
• Ensure fingernails of all HCWs to be short and free from polish or artificial nails.
Procedure for scrubbing up
• Scrub within the recommended time of 3 minutes for the first time in the morning and again in the afternoon. Subsequent scrub times of 2 minutes duration are sufficient.
• Scrubbing for more than 3 minutes can cause minor abrasions to hands
which may predispose towards cross contamination.
Method
• Turn on water to achieve a suitable temperature.
• Commencing at the fingertips, place one hand under running water and follow through to elbow level; repeat this procedure with the opposite hand. This removes dirt and transient flora.
• Clean under each finger nail and around the nail bed with a nail cleaner prior
to performing the first surgical scrub of the day.
• Using your elbow, depress approximately 5 ml of the antimicrobial from the dispenser.
• Holding hands above the level of the elbow, apply antimicrobial agent to hands and forearms up to the elbows. Using a circular motion, begin at the fingertips of one hand and lather and wash between the fingers, continuing

5
from fingertip to elbow. Repeat the process for the other hand and arm. Continue rubbing for 3 minutes.
• Do not use scrubbing brush as it can lead to skin damage, and an increase in skin shedding.
• Rinse each arm separately, fingertips first, holding hands above the level of the elbow.
• Hands must be rinsed thoroughly from fingertip to elbow, allowing excess water to drain from the elbows into the sink.
• Using two sterile towels dry from the fingertips keeping hands above the elbow, using a separate towel to dry each hand.
• Keep hands above the level of the waist and do not touch anything before putting on sterile gown and surgical gloves.
• Subsequent washes should focus on two-thirds of the forearms to avoid compromising the cleanliness of the hands.
• Avoid splashing surgical clothing – if this becomes excessively wet it can compromise the protection afforded by the gown.
Drying
6
• Hands must be dried thoroughly –as wet surfaces transfer micro organisms more effectively than dry.
• The skin should be blotted dry with sterile single use towels, as rubbing the skin dry will disturb skin cells. Do not use the gown for drying.
• The principles of working from the fingertips to the elbows and using one towel per hand must be adhered to.
• Dry hands, first by placing the opposite hand behind the towel and blotting the skin, then by using a corkscrew movement to dry from hand to elbow. The towel must not be returned to the hand once the arm has been dried but must be discarded immediately.
• Repeat the process for the other hand.
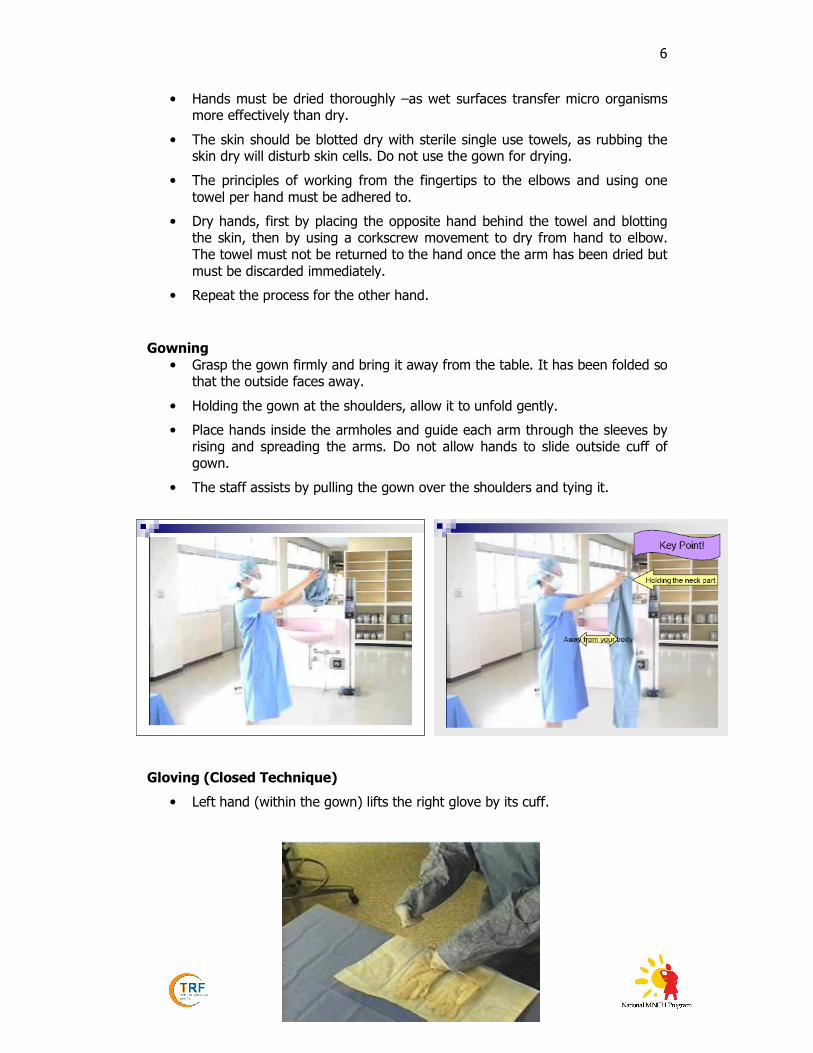
Gowning
• Grasp the gown firmly and bring it away from the table. It has been folded so that the outside faces away.
• Holding the gown at the shoulders, allow it to unfold gently.
• Place hands inside the armholes and guide each arm through the sleeves by rising and spreading the arms. Do not allow hands to slide outside cuff of gown.
• The staff assists by pulling the gown over the shoulders and tying it.
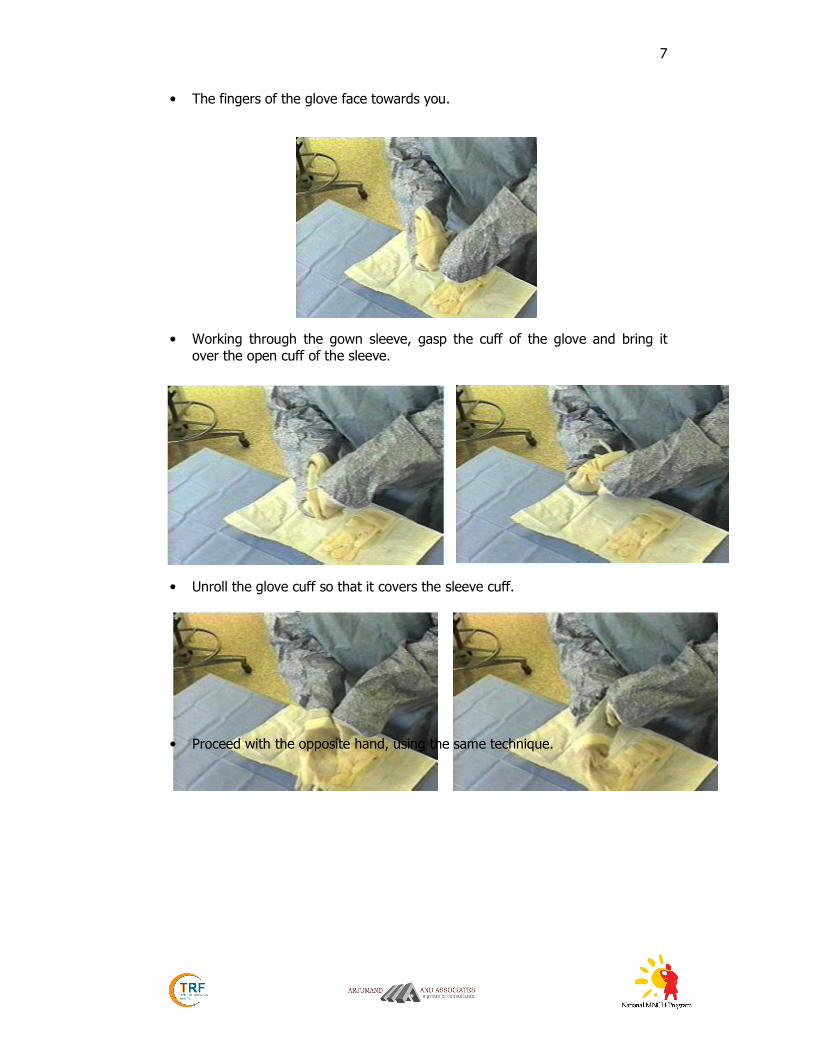
Gloving (Closed Technique)
• Left hand (within the gown) lifts the right glove by its cuff.
7
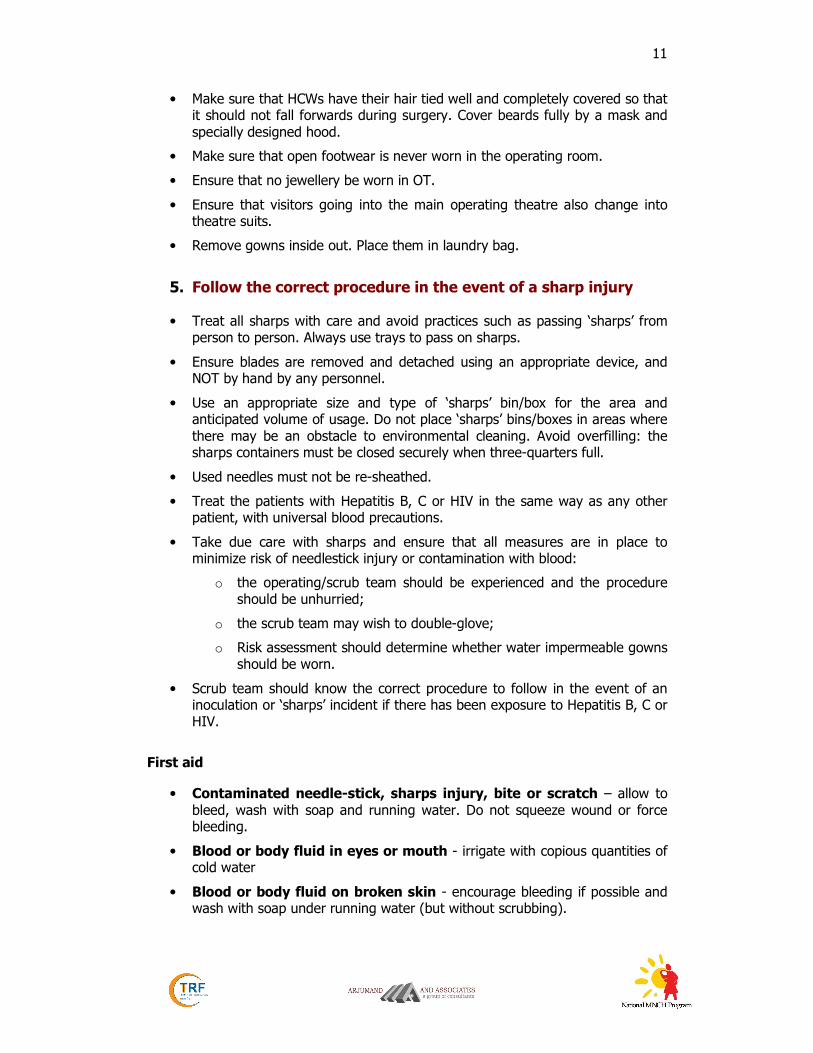
• The fingers of the glove face towards you.
• Working through the gown sleeve, gasp the cuff of the glove and bring it over the open cuff of the sleeve.
• Unroll the glove cuff so that it covers the sleeve cuff.
• Proceed with the opposite hand, using the same technique.

8
• When both gloves are on, pull glove cuffs over gown sleeves and adjust gloves for comfort.
• Hold both hands higher than elbows and away from surgical attire prior to gowning.

9
Double Gloving
Double gloving reduces the rate of HBV/HCV transmission to the surgeon coming into contact with body fluids by 10% more than with single gloves.
The transmission of HBV and HCV from surgeon to patient and vice versa has occurred in the absence of breaks in technique and with apparently intact gloves. Even the best quality, new latex rubber surgical gloves may leak, while if exposed to fat in wounds, these gradually become weaker losing integrity. Double gloving is not of much benefit against sharp injuries.
Double gloving is indicated when:
• Large amounts of blood or other body fluids (e.g., vaginal deliveries and Caesarean sections) is expected.
• Risk of contracting blood borne pathogens, such as HCV, HBV, HIV, is high (>5% prevalence).
Use Elbow-length (Gauntlet) Gloves
Blood contact with the skin and mucous membranes of providers occurs in 25% of vaginal deliveries and 35% of caesarean sections. In addition, large volumes of amniotic fluid contaminated with blood are routine in obstetrics.
• Where the hand and forearm need to be inserted into the vagina (manual removal of a retained placenta) or deep into the uterus to deliver the infant’s head (caesarean section), elbow-length, “gauntlet” gloves, help protect the provider from significant blood and amniotic fluid contamination. The mother will be protected as well.
If gauntlet gloves are not available, an inexpensive, effective alternative can be easily made from sterile surgical gloves. The steps for making them are:
STEP 1: Perform surgical hand scrub, including the forearms up to the elbows, as detailed in Chapter 3 using an alcohol-based antiseptic agent.
STEP 2: Cut the four fingers completely off each glove just below where all the fingers join the glove.

10
STEP 3: Put fingerless sterile or high-level disinfected gloves on both hands and pull up onto the forearms.
STEP 4: Put intact sterile or high-level disinfected surgical gloves on both hands so that the distal (lower) end of the fingerless glove is completely covered.
4. Strictly follow operating room clothing and protective equipment discipline
• Do not keep mobile phones in OT, or at least keep them on silent mode.
• Make sure that staff changes outside clothing for a clean scrub suit on entering the OT. Also ensure that they do not wear operating room clothing outside the OT.
• Make sure that the OT gown is impermeable, with cuffed wrist and sterile. Remove the contaminated surgical gown as soon as possible and put it in a bag for laundering. An impermeable apron may be worn underneath a cloth gown.
• Use a new fluid-repellent mask for each operation and make sure it covers the nose and mouth.
• Ensure that mask is not left hanging around the neck.
• Change mask if moist.
• Use protective eye wear in routine, and especially when blood or other body fluids will be encountered.
• Make sure that single use sterile gloves are worn during surgery and disposed of immediately after use. Do not walk around OT wearing gloves. Practice hand hygiene after removing gloves.
11
• Make sure that HCWs have their hair tied well and completely covered so that it should not fall forwards during surgery. Cover beards fully by a mask and specially designed hood.
• Make sure that open footwear is never worn in the operating room.
• Ensure that no jewellery be worn in OT.
• Ensure that visitors going into the main operating theatre also change into theatre suits.
• Remove gowns inside out. Place them in laundry bag.
5. Follow the correct procedure in the event of a sharp injury
• Treat all sharps with care and avoid practices such as passing ‘sharps’ from person to person. Always use trays to pass on sharps.
• Ensure blades are removed and detached using an appropriate device, and NOT by hand by any personnel.
• Use an appropriate size and type of ‘sharps’ bin/box for the area and anticipated volume of usage. Do not place ‘sharps’ bins/boxes in areas where there may be an obstacle to environmental cleaning. Avoid overfilling: the sharps containers must be closed securely when three-quarters full.
• Used needles must not be re-sheathed.
• Treat the patients with Hepatitis B, C or HIV in the same way as any other patient, with universal blood precautions.
• Take due care with sharps and ensure that all measures are in place to minimize risk of needlestick injury or contamination with blood:
o the operating/scrub team should be experienced and the procedure should be unhurried;
o the scrub team may wish to double-glove;
o Risk assessment should determine whether water impermeable gowns should be worn.
• Scrub team should know the correct procedure to follow in the event of an inoculation or ‘sharps’ incident if there has been exposure to Hepatitis B, C or HIV.
First aid
• Contaminated needle-stick, sharps injury, bite or scratch – allow to bleed, wash with soap and running water. Do not squeeze wound or force bleeding.
• Blood or body fluid in eyes or mouth - irrigate with copious quantities of cold water
• Blood or body fluid on broken skin - encourage bleeding if possible and wash with soap under running water (but without scrubbing).
12
Report incident and discuss with consultant immediately
• Discuss type of injury, donor HIV status if known, etc.
• Start post-exposure prophylaxis (PEP) for HIV if preliminary risk assessment is of a significant risk of HIV.
• Start PEP as soon as possible - ideally within 1 hour which reduces risk of transmission by 80%. It may be appropriate to give the first dose of PEP after a fuller assessment, after the HIV status of the 'donor' is known.
• Where the donor is unknown, epidemiological likelihood of HIV in the source needs to be considered, although in most cases PEP will not be justified.
• PEP for HIV currently consists of a 28-day course of treatment with a triple combination of antiretroviral drugs, has significant side-effects and needs careful follow-up.
• Provide Hepatitis B immunoglobulin within 72 hours if the source is known to be HBsAg positive, or status is unknown and the exposed person has negative serology.
• Offer HBV vaccination to all health workers who have never been immunized or are non-immune.
• Advise the exposed person to have safe sex for three months, not to donate blood until all necessary screening tests are clear, and to see a physician if a fever develops.
Investigations
• Take blood for virology, (HIV, hepatitis B, hepatitis C) from the injured
worker.
• Start PEP where appropriate and consider the need for antibiotic therapy or hepatitis B immunisation. Recheck HIV status 3 months later and hepatitis serology 3 and 6 months later.
• Perform liver function tests and repeated at 3 and 6 months.
• Check β-HCG for female workers to exclude pregnancy.
Documentation
• Maintain needle stick/sharps injury record, with details of PEP and other follow-up procedures to help in auditing such events, and also to see how to prevent such injuries in the future.
Follow-up
• Ensure there is adequate follow-up of both healthcare provider and donor. They may need specific advice about having to take sick leave if medication is required and the possible requirement for psychological support.

13
6. Restrict staff number and their movements • Make sure that unnecessary movement is restricted and only people
absolutely needed for an assigned work are present. This will greatly reduce bacterial count.
7. Avoid preoperative shaving and prepare surgical site • Avoid preoperative shaving with razor, as it causes abrasions and increases
risk of infections.
• Use clippers (or scissors), clearing only the incision area.
Preparation of the surgical site
• Prepare the patient’s skin at the site of incision as well as a wide margin with 10% povidon-iodine, or 4% chlorhexidine. Allow these to dry before making the incision.
• Cover the skin by impervious drapes or with sufficient thickness of pervious material to prevent fluid penetration during the surgery.
8. Administer antibiotic surgical prophylaxis
• Administer antibiotic surgical prophylaxis administered intravenously with the induction of anaesthesia.
9. Keep infected cases at the end of the operating list, and treat infected cases before surgery, if possible.
• Keep infected cases, such as with MRSA, draining wounds, exfoliative skin
condition or known multidrug resistant infection where possible, at the end of the operating list.
• Decontaminate the theatre and equipment following the procedure. Do not perform any surgeries until proper decontamination measures are taken.
• Treat patients with infection where possible, before elective surgery.
10. Maintain a clean operating room environment
a. Correctly maintain the operation theatre air ventilation system
Parameters that should be in place if possible based on the available resources are:
• Maintain positive pressure ventilation with respect to the corridors and adjacent areas in the operating theatre where surgical procedures are performed.
• Make sure that the number of operating theatres supplied by air handling units (AHUs) are consistent with the number specified by the AHU manufacturer. Ensure routine maintenance of the AHUs and they should not be turned off unless being serviced.
• Maintain 15-20 air changes per hour.
14
• Filter all air with appropriate pre-filters (e.g. filtration efficiency of 30%) followed by final filter (e.g. 90%)
• Ensure that air enters at the ceiling and is exhausted near the floor. Remove furniture or other portable items such that they do not block the exhaust at floor level.
• Keep the door to the OT closed during surgery to avoid mixing corridor air with the operating room air.
• Maintain air conditioners, and AC units. Window air conditioners do not guarantee air quality.
• Control Humidity levels and maintain between 50-55%.
• Control Temperature levels and maintain between 18-24 degrees.
• Check equipment every week as part of OT maintenance.
Follow OT cleaning procedures (see Cleaning Schedule)
• Remove the dust only with cloth wetted with clean water at the beginning of the day. Clean theatre furniture, lamps, sitting tables, trolley tops, operation tables, procedure tables. Do not use chemicals/disinfectants unless the areas are contaminated with blood or body fluids.
• Clean operation tables or contaminated surfaces with disinfectant solutions between the procedures. Decontaminate with bleaching solution/ chlorine solution (10% available chlorine). In case of spillages of blood/ body fluids. Keep the floor dry during and between operations.
• Clean all the table tops, sinks, door handles with detergent followed by low level disinfectant, at the end of the day.
Keep the operation theatre dry for the next day’s work.
• Use a dry mop in the OT for the floors. Forbid the use of broom as it disperses the infected material all around and on the equipment. Follow dry mopping by wet mopping with detergent mixed with warm water. Finally mop with disinfectant, such as a phenol based disinfectant, in the concentration of 1 in 10. Low concentrations of phenol will not serve the purpose.
• Disinfect mop with bleach after use and allowed to dry before reuse.
• Contain used linen in hampers or in soiled laundry bags at the point of use. Place linen that is saturated with body fluids in fluid proof bags.

15
Routine Environmental Cleaning Schedule for Operation Theatres
No. Places and items
Beginning of day
Between patients
End of the day
Cleaning Agent
How to clean
1. Doors Yes Detergent Damp cloth
2. Floor Yes Yes Yes Detergent
followed by Disinfectant
Dry Mop, then wet
mop
3. Corridor Yes 4 times a
day Yes
Detergent followed by Disinfectant
Dry Mop, then wet
mop
4. Operation
table sides, base, legs
Yes Yes Yes Disinfectant Damp cloth
5. Chairs and
wheel chairs Yes As needed Yes
Detergent followed by Disinfectant
Damp cloth
6. Procedure
Trolley Yes Yes Yes Disinfectant Damp cloth
7. Emergency trolley top
Yes As needed Yes Disinfectant Damp cloth
8. Emergency
trolley inside Yes (weekly) Disinfectant Damp cloth
9. Mayo stands Yes Yes Yes Disinfectant Damp cloth
10 Lamps and
lights Yes Yes Disinfectant Damp cloth
11. I/V stands Yes As needed Yes Disinfectant Damp cloth
12. Stretchers Yes Yes Yes Disinfectant Damp cloth
13. Furniture Yes Disinfectant Damp cloth
14. Computers
Monitor Yes Disinfectant Damp cloth
15. Computers
key board and mouse
Yes Disinfectant Dusters
16. Counters Yes Yes Detergent Damp cloth
17. Visibly soiled floors, walls
Yes Yes
Yes
Detergent followed by disinfectant
Damp cloth
18. Sink Yes As needed Yes Detergent
19. Sharps
Discard when
sharps container ¾ filled
20. Waste
Discard when
container ¾ filled
21 Linen Soiled linen should be bagged at
Yes Detergent Hot cycle and
bleach
16
the source
• Routine cleaning is sufficient to provide a safe environment.
• Do not keep extension board/wires on floor and avoid clutter in the OT.
• Do not use bleach on metallic objects since it can cause corrosion
• Each week empty the storage shelves, wipe them, dry them and restack.
11. Decontaminate/sterilize equipment and instruments
• Ensure that the supply of surgical instruments is sufficient to maintain an adequate supply for concurrent operations and sterilizations.
12. Promptly dispose theatre waste Prompt disposal of theatre waste is of top priority. Any spillage of body fluids is highly hazardous and prompts rapid multiplication of nosocomial pathogens, warranting rapid action. For detailed guidelines refer to the Guideline for Hospital Administrators.
• Discard all waste appropriately, while soiled linen and gowns must not be dumped on the operation theatre floor.
• Educate all staff on waste management practices and procedures, and the dangerous effects of hospital waste.
PPE Guidelines for all Health Care Personnel handling Waste
• Remember that during handling, barriers in the form of PPE are not compromised. Proactively avoid injuries from sharps, spills and splashes.
• Provide latex Gloves for health care providers.
• Provide utility Gloves for sanitary workers.
• Provide face mask/glasses, closed toe shoes, impermeable apron or gown.
• Remove gloves promptly after use, before touching non-contaminated items and any other environmental surfaces.
• Remove the soiled gown, clothing and equipment as promptly as possible.
• Clean equipment as per instructions and do not forget hand hygiene.
General principles of waste collection
• Easy access to supply of colour-coded bags and containers.
• Fill bags to maximum of 3/4 capacity.
• NEVER put hands inside the bags/containers.
• NEVER press any filled bag to make more room.
17
• The bags to be tied and handled by neck only while transportation.
• Staff must wear protective clothing, gloves, mask, aprons etc while handling infected waste.
• Never allow any person to put their hands inside the bags.
• If bags tear, they should be replaced/re-bagged in new clean bags.
• Double glove and use a face visor in OTs as a routine.
Transport of Wastes
• Small wheeled trolley should be used for primary transportation.
• Trolley should be dedicated only to transportation of waste.
• Trolley should be decontaminated and cleaned at the end of the day, and at least once daily.
The waste of the red buckets or sharps container must NEVER be sorted.
Waste collection and disposal system at OT
For solid wastes, each OT should have:
• 1 White Bin (or plain bucket) with White (or Green) liner.
• 1 BLUE Bin for Recyclable Materials – Dry General Waste.
• 1 Red Bin with Red liner and lid – for Anatomic Waste.
• 1 Red Bin with Red Liner and Lid – for Pathologic Waste other than anatomic waste.
• 1 Yellow Sharps Container - adequately sized puncture resistant container.
• 1 Needle cutter - at the Counter for preparing Injectables – for collection of needles.
For liquid wastes, each OT should have:
• 1 disinfected urine jug/urinal
• 1 sputum cup
• Appropriate sized sinks and toilets that are routinely decontaminated for disposal of liquid wastes.
Solid Waste Collection and Disposal Infectious Solid Waste
• Infectious Solid Waste is considered of two types with different final disposal techniques.

18
• Collect in 2 separate RED BINS, one for Anatomic Waste (with body parts, placenta, organs), and Pathologic Waste (small tissues, bandages, cotton, gauze, etc.).
• Anatomic waste is to be buried for ethical reasons.
• Pathologic waste is to be either incinerated or buried.
• First Red Bucket with Lid with Red Bag for Pathologic Waste Infectious Waste collection consisting of:
o Human tissues
o Blood bags and all blood products
o Soiled bandages, gauze
o Urinary catheter tubing and bag, IV tubing
o Surgical drains and bags, NGT, ET tube
o Used IV and arterial catheters
o Diapers
• Bag should be incinerated as it is.
• Second Red Bucket with Lid with Red Bag for Anatomic Waste
• Anatomical wastes consist of
o Recognizable human organs, body parts etc
o Amputated parts
o Organs
o Placenta
o Products of conception
• During handling and collection, Medical and paramedical staff must:
o Use closed handling trays for collection as part is dissected or
removed from the body during surgery. In case closed trays are not available, use a cloth-lined tray for collecting and covering the body part.
o Keep the body part in a safe place during surgery.
o The nurse/OTA will dispose the anatomic waste safely in the RED bin.
o The bin should have a self closing mechanism, lined with an opaque, red plastic bag.
o Cover appropriately for transport.
o Tag the bag (with sex of the patient, and name of the body parts or organs), before being collected by the sanitary worker.
19
o Tie the red plastic bag when 3/4th full for collection.
o Ensure prompt collection from the relevant staff only.
Sharps Waste Any item that may cause puncture or cuts is defined as a “sharp.” These comprise of needles, syringes, scalpels, blades, glass. Be especially careful to prevent injuries when using sharps. Sharps Waste consisting of metallic sharps are to be collected in a yellow sharps container, which can be buried, with the addition of 0.5% Chlorine Solution serving both as a decontaminant, and a corrosive to break down the metal over the next few years.
• Sharps Waste consists of:
o IV Needles
o Suture needles
o Scalpel blades
o Knives
o Broken Glass
Important Guidelines
• Use needle and syringe ONLY ONCE.
• Minimize handling.
• DO NOT pass directly from hand to hand.
• Do not recap or bend needles, prior to disposal.
• Do not disassemble the needle and syringe after use.
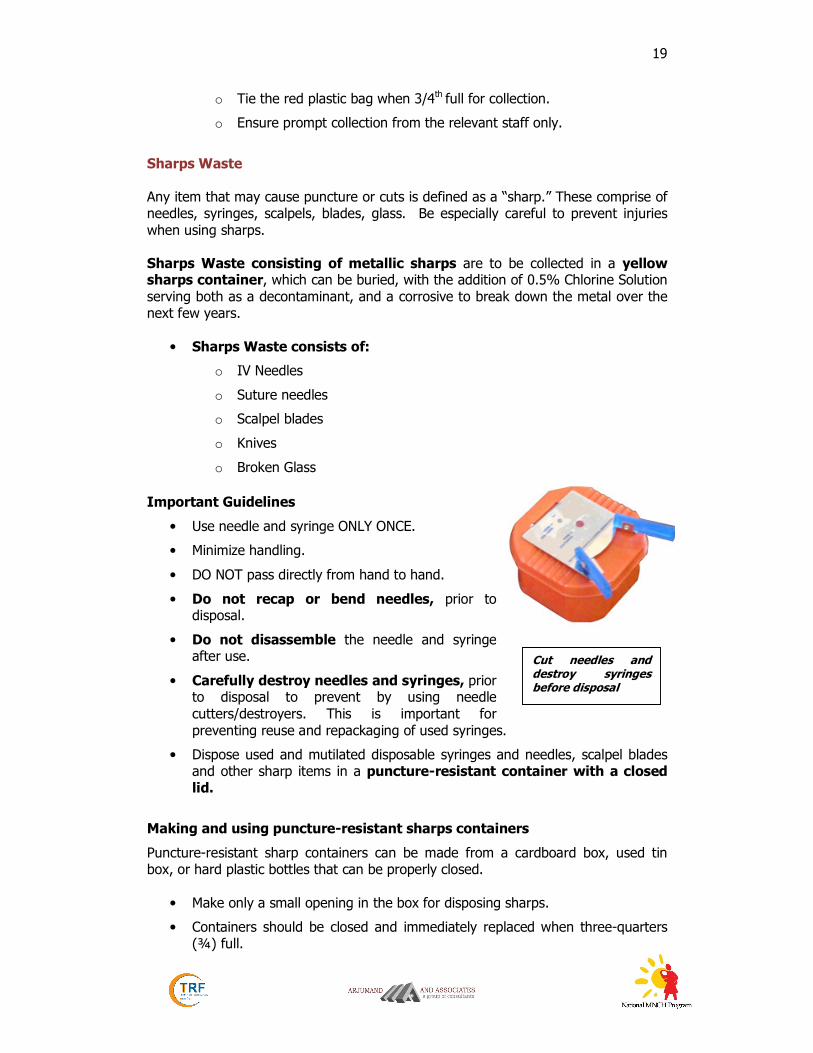
• Carefully destroy needles and syringes, prior to disposal to prevent by using needle cutters/destroyers. This is important for preventing reuse and repackaging of used syringes.
• Dispose used and mutilated disposable syringes and needles, scalpel blades and other sharp items in a puncture-resistant container with a closed lid.
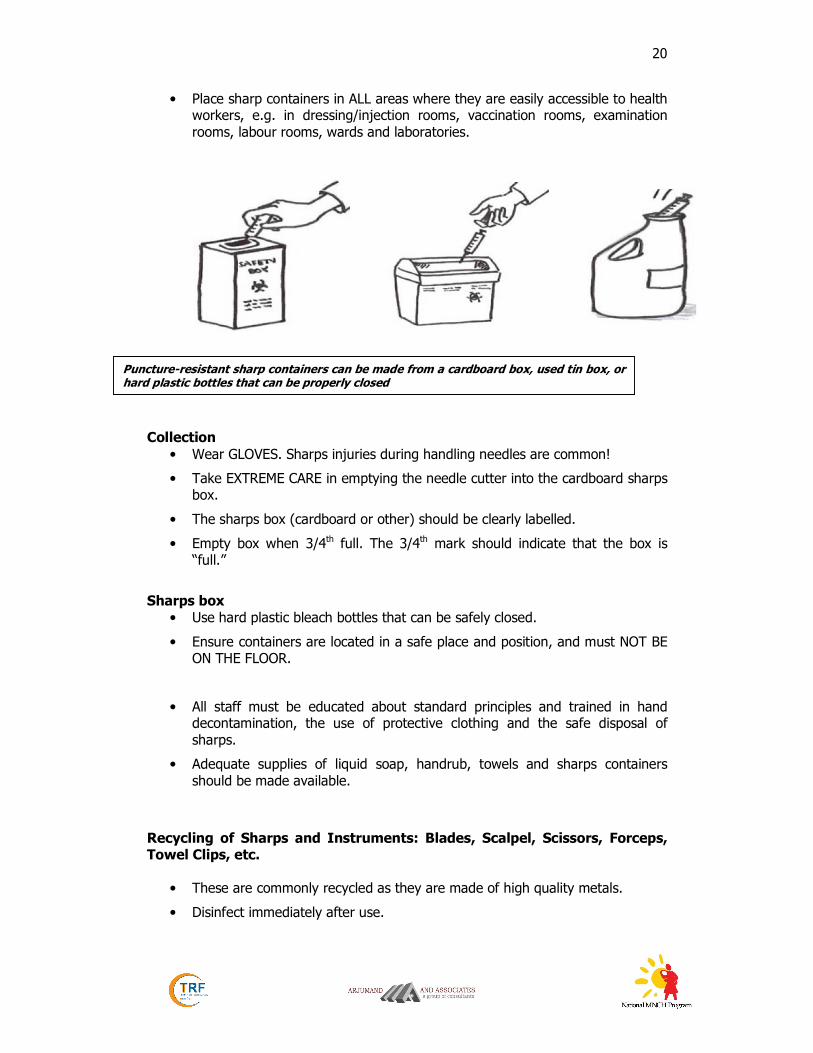
Making and using puncture-resistant sharps containers
Puncture-resistant sharp containers can be made from a cardboard box, used tin box, or hard plastic bottles that can be properly closed.
• Make only a small opening in the box for disposing sharps.
• Containers should be closed and immediately replaced when three-quarters (¾) full.
Cut needles and destroy syringes before disposal
20
• Place sharp containers in ALL areas where they are easily accessible to health workers, e.g. in dressing/injection rooms, vaccination rooms, examination rooms, labour rooms, wards and laboratories.
Collection
• Wear GLOVES. Sharps injuries during handling needles are common!
• Take EXTREME CARE in emptying the needle cutter into the cardboard sharps box.
• The sharps box (cardboard or other) should be clearly labelled.
• Empty box when 3/4th full. The 3/4th mark should indicate that the box is “full.”
Sharps box
• Use hard plastic bleach bottles that can be safely closed.
• Ensure containers are located in a safe place and position, and must NOT BE ON THE FLOOR.
• All staff must be educated about standard principles and trained in hand decontamination, the use of protective clothing and the safe disposal of sharps.
• Adequate supplies of liquid soap, handrub, towels and sharps containers should be made available.
Recycling of Sharps and Instruments: Blades, Scalpel, Scissors, Forceps, Towel Clips, etc.
• These are commonly recycled as they are made of high quality metals.
• Disinfect immediately after use.
Puncture-resistant sharp containers can be made from a cardboard box, used tin box, or hard plastic bottles that can be properly closed

21
• If being discarded, decontamination and cleaning is the minimum procedure before sending for recycling. If possible, this should be followed by sterilization.
Broken Glass
• Collect carefully without using hands. Make use of brushes and collection instruments.
• Disinfect and send for safe recycling if possible.
• If infected, and cannot be handled safely, e.g. smaller pieces or crushed glass, then bury with pathological waste.
• Broken glass is preferably NOT TO BE INCINERATED as it damages the incinerator.
General Recyclable Waste
• To be collected in Blue Bin
• Bin should be placed next to the counter where injectables are prepared by the Anaesthesiologist, for easy access.
• Do not allow edibles (tea, coffee, etc) in the OT areas.
• Recyclable waste consists of:
o Paper and packaging
o Glass bottles (but not broken glass)
o Plastic drips
o Injectables
o Paper and packaging
o Cardboard
o Plastic sheeting/plastic bags
Liquid waste
• Drain liquid wastes (body fluids, etc) into the toilet. Decontaminate instruments such as bed pans after each use by using 0.5% Chlorine solution for at least 10 minutes.

22
Incinerate Burial if
incineration is not available
Burial Incinerate if
burial is not an option
Cut needles from syringes, and follow guidelines for sharps
disposal
RED BIN
for Pathologic waste
other than Anatomic waste
Decontaminate with 0.5% Chlorine Solution Before
Disposal
RED BIN for
Anatomic waste (gross body parts
and organs)
Disposable syringes
(and metallic sharps-suture needles, scalpels)
Infectious Solid Waste General Waste
Sewer by flushing into
toilet or sink
Neutralization tank especially for Lab
Waste
Infectious Liquid Waste
Safe Recycling (e.g. through
Shredding after
decontamination)
SHARPS BOX
for Needle collection
PLASTICS COLLECTION BOX for Mutilated Syringes
BLUE BIN or Open big mouthed Container
WHITE BIN for
Household type/Wet
Waste
Burial (preferred)
for corrosive breakdown of
metal
Municipal Site Or composting
if possible
Recycling Through Rag
Pickers or Companies
Decontaminate if needed or o rule out mixing with infectious waste
Decontaminate before disposing into sewer or neutralization tank
Waste Segregation and Disposal Overview at OT

23
Monitoring Tool for Operation Theatre
Operation Theatre __________________________________________ Date: __/__/__ 1 OT Staff and Discipline YES NO NA
Staff with dermatitis, boils restricted from OT team
OT staff immunized for hepatitis B virus
OT traffic of staff properly restricted
Does staff change before entering the clean area
OT dress worn outside the OT by staff
OT staff sometimes eat and drink inside OT
2 OT Design YES NO NA
OT separated from main flow of hospital traffic
Is there a clean or restricted zone
Is access unidirectional from clean area into sterile area
Is OT room cooler and less humid than outer area
Are there functioning HEPA Filters
How many air exchanges per hour:
Is there positive pressure in OT
Are doors and windows of OT closed during surgery
Is more than 1 surgery in the same OT room performed at times
3 Surgical Scrub Room, Gown and Glove YES NO NA
Agent used for scrub:
Tap operated by: Hand Elbow Pedal Sensor
Surgical scrub correctly performed by: surgeon technician nurse student
Towel or paper used for drying is sterile
Scrub facility clean
Dispensers filled and functioning
Gown in sterile individual packing
Gowning correctly performed by: surgeon technician nurse student
Same gown used for more than one surgery at a time
Sterile gloves available
Gloves are reused after: washing disinfection
24
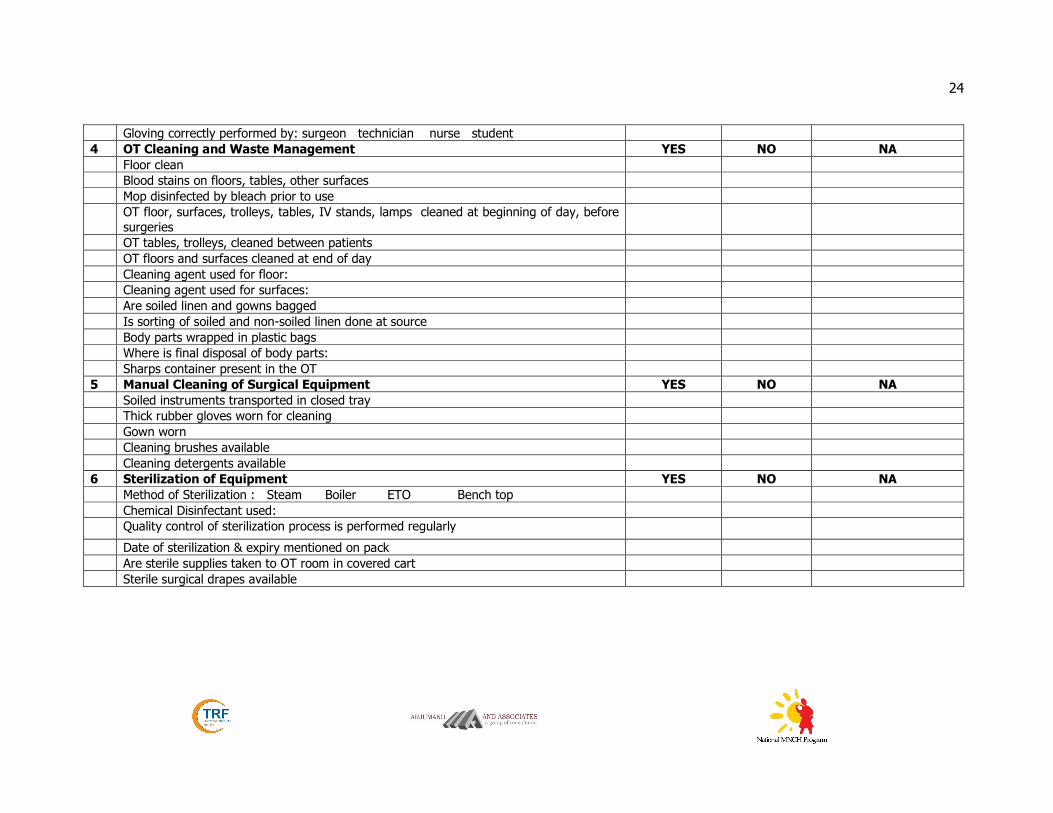
Gloving correctly performed by: surgeon technician nurse student
4 OT Cleaning and Waste Management YES NO NA
Floor clean
Blood stains on floors, tables, other surfaces
Mop disinfected by bleach prior to use
OT floor, surfaces, trolleys, tables, IV stands, lamps cleaned at beginning of day, before
surgeries
OT tables, trolleys, cleaned between patients
OT floors and surfaces cleaned at end of day
Cleaning agent used for floor:
Cleaning agent used for surfaces:
Are soiled linen and gowns bagged
Is sorting of soiled and non-soiled linen done at source
Body parts wrapped in plastic bags
Where is final disposal of body parts:
Sharps container present in the OT
5 Manual Cleaning of Surgical Equipment YES NO NA
Soiled instruments transported in closed tray
Thick rubber gloves worn for cleaning
Gown worn
Cleaning brushes available
Cleaning detergents available
6 Sterilization of Equipment YES NO NA
Method of Sterilization : Steam Boiler ETO Bench top
Chemical Disinfectant used:
Quality control of sterilization process is performed regularly
Date of sterilization & expiry mentioned on pack
Are sterile supplies taken to OT room in covered cart
Sterile surgical drapes available