individual providerone training packet - public … manual for individual providers 1 | page...
TRANSCRIPT

TRAINING MANUAL for Individual Providers 1 | P a g e Updated: 8.23.2017
Individual ProviderOne Training Packet
Welcome to Individual ProviderOne (IPOne). This packet contains step-by-step instructions for Individual Providers (IPs) on how to register and use the IPOne payment system. One-on-one support is available in-person or via web conference. Contact the IPOne Call Center to schedule a training. If instructions in a language other than English is needed, contact the IPOne Call Center to request training in a preferred language.
IPOne Call Center: 844-240-1526
Operating Hours:
Monday – Friday, 7:00 AM to 7:00 PM Pacific Time.
Saturday, 8:00 AM to 1:00 PM Pacific Time.
TRAINING MANUAL for Individual Providers 2 | P a g e Updated: 8.23.2017
Training Introduction and Table of Contents Use this Training Manual to reference instructions on how to use IPOne. The manual provides a step-by-step process on: how to register with- and log into- the system (including how to complete an e-timesheet or mail/fax a paper timesheet); and, how to use the self-service options and other IPOne services available to Individual Providers (IPs).
Table of Contents
1. Training Introduction & Table of Contents 2
2. Individual ProviderOne Training Manual Glossary 3
3. What is Individual ProviderOne? 7
4. How to Create an IPOne User Account 8
5 How to Change a Password 12
6 How to Unlock a Password 13
7. How to Set Up My Payment Preference 14
8. How to Update and Verify My Tax Information 18
9. How to View Authorization Information 21
10 Where the Authorization Letter is found 24
11. Benefits of Submitting Timesheets Online 26
12. How to Submit a Timesheet Online 27
13. Error Messages potentially seen when submitting an Electronic Timesheet 37
14. How to Submit a Paper Timesheet 38
15. How to Avoid Making a Mistake on a Paper Timesheet 42
16. IP payment schedule 43
17. How to Look Up Payment Information 44
18. How to Read an Earnings Statement 47
19. Administrative Time 48
20. Frequently Asked Questions (FAQs) 50
21. Still have questions? 54

TRAINING MANUAL for Individual Providers 3 | P a g e Updated: 8.23.2017
Individual ProviderOne Training Manual Glossary
Glossary Term Definition of Term
Administrative Time One 15-minute unit of time paid to an IP each pay period for which the IP is paid. Please note that Administrative Time became effective with the pay period beginning 07/01/2017.
ALINE Debit Card This payment method is available to IPs who want to receive their pay on a debit card. If a payment method is not selected, then the IP will be enrolled to get their pay on a debit card.
Application for Employment Tax Exemptions
Under certain circumstances, some IPs are exempt from social security and unemployment taxes (known as FICA/FUTA/SUI). This requirement applies to all IPs who meet specific age, student status or family relationship criteria, including parent providers contracted through DDA or ALTSA. This form tells IPOne if the IP meets these criteria and must have the exemption applied to their earnings.
Authorizations Approval between the client, DSHS, and a provider to provide services. An authorization includes the type and amount of care, begin and end dates of the service, and the maximum number of units up to which the provider is authorized work.
BetterOnline Public Partnership Limited’s (PPL) name for the Individual ProviderOne Portal, the online electronic payment system that allows IPs to sign in, submit timesheets, receive pay for hours worked, and manage their claims.
Call Center Multilingual staff who are available to assist IPs with questions about IPOne. They are available by phone Monday through Saturday.
Case Manager A person who authorizes services for clients. This can be a Case Resource Manager (CRM) for Developmental Disabilities Administration (DDA), a Case Manager (CM) for Area Agency on Aging (AAA), or a Social Worker (SW) for Home and Community Services (HCS).
Client The individual to whom a provider provides care services. The client is the IP’s employer.

TRAINING MANUAL for Individual Providers 4 | P a g e Updated: 8.23.2017
Glossary Term Definition of Term
Client Responsibility The portion of the payment for services that the client is responsible to pay. This amount is deducted from provider payments and is collected from the client directly. ProviderOne assigns the amount of Client Responsibility according to the highest cost of care across authorized services. DDA clients do not have Client Responsibility.
Direct Deposit (DD) This payment method is available to IPs who want to receive their pay deposited directly into their bank account(s).
Denied Timesheets These are timesheets that cannot be paid due to a program rule. Denied timesheets are not approved and cannot be paid. Denial reasons are available to view in the Portal under Pend Messages.
Department of Health
The Washington State agency which maintains provider credentials (for both Home Care Aide certification and nursing licensure) and sends this information to IPOne via electronic interface.
Distribution Percentage For IPs who have elected to receive Direct Deposit (DD): the percentage of an IP’s pay which gets deposited into their bank account. Currently there is no option to distribute pay into multiple accounts.
Electronic Timesheet (e-timesheets)
The online document that IPs complete and submit for payment.
E-Timesheet Template An electronic timesheet with some fields filled in by the IP and saved for their use each pay period. This is a time-saver that allows them to submit online timesheets quickly.
Employer The individual who receives services from the IP. For tax and similar payment purposes, the client is the employer and the IP is the employee.
Error Messages The messages provide information about a problem with a payment or an authorization. Error messages may indicate ineligibility. Services should not be provided when either the client or the IP are ineligible. Contact the case manager or the call center for resolution.

TRAINING MANUAL for Individual Providers 5 | P a g e Updated: 8.23.2017
Glossary Term Definition of Term
Form W-4 The Internal Revenue Service (IRS) form that is used to specify the Federal Income Tax (FIT) amount that the IP wants withheld from their paycheck.
Health Benefits Trust Health Benefits Trust (HBT) is the entity within SEIU 775 which administers the health care benefits available to IPs.
Individual Provider (IP) The person who has contracted with DSHS to provide personal care or respite care services to a client. Individual Providers are represented by the Service Employees International Union (SEIU) 775.
Individual ProviderOne (IPOne)
The payment system that IPs use to enter timesheets and receive paychecks.
Operations Center Offsite locations where timesheets are processed for payment to IPs. These locations also process tax forms and generate W2 tax documents.
Pay Period The span of days for which IPs record their time worked on timesheets and for which they receive payment. There are two pay periods in each month; the 1st day through the 15th day, and the 16th day through the end of the month.
Payment Schedule A list of dates for each calendar year which shows the timesheet due dates for each submission method (electronic and paper/fax) along with the paydays for that year. This schedule is available online at www.IPOne.org.
Pend Messages Messages posted on a timesheet to advise of a problem with processing a specific date or range of dates for payment. IPs receive an automated outbound call via phone to be alerted of problems. The pending problem must be resolved before payment can be issued. If a “Pend” message posts on a timesheet and is not resolved before payroll processing is completed, the payment is denied.
Portal (also called BetterOnline Portal)
The name used for the IPOne payment system; the online electronic payment system that allows IPs to sign in, submit timesheets, receive pay for hours worked, and manage claims.

TRAINING MANUAL for Individual Providers 6 | P a g e Updated: 8.23.2017
Glossary Term Definition of Term
ProviderOne Identification Number
The unique nine-digit number assigned to IPs which identifies them in the payment system. This number is located in the Welcome Letter.
Service Code A unique code linked to a specific type of service which is authorized for the provider to perform for the client. Each code authorized is listed on the authorization letter. Service codes are typically a combination of letters and numbers (example: “T1019” is a code for personal care).
Task Specific authorized activities that IPs complete for a client as part of the clients care plan. Tasks must be recorded on the timesheet when it is submitted for payment.
Timesheet Status
An indicator of whether a timesheet met all the criteria to be paid and where the timesheet is in the payroll process. See Frequently Asked Questions for a list of statuses and what they mean.
Training Partnership The education entity, overseen by a partnership between the SEIU 775 and DSHS, which provides training and administers training requirements to IPs.
User Account An account created when an IP has selected a User Name and Password in IPOne. User accounts contain personal information (such as address, phone or other contact information), timesheets and Earnings Statements, as well as any authorizations for services.
User Name The unique combination of letters and/or numbers selected by an IP and attached to their account in IPOne. IPs use their User Name and Password each time they log in to the IPOne portal.

TRAINING MANUAL for Individual Providers 7 | P a g e Updated: 8.23.2017
What is Individual ProviderOne?
Individual ProviderOne, also known as IPOne, is the online system that enables IPs to submit timesheets and receive payment. IPOne also provides real-time access to information regarding hourly rate, authorization, and claims. The State of Washington’s Department of Social and Health Services (DSHS) has contracted with Public Partnerships, LLC (PPL) to operate and support IPOne, including:
Multilingual Call Center staff to assist with questions about IPOne; and,
An Operations Center to process timesheets, send payments, and mail W2s.

TRAINING MANUAL for Individual Providers 8 | P a g e Updated: 8.23.2017
How to Create an IPOne User Account
IPOne is a secure website. Only authorized users are able to view information, and information is limited based on the user’s role. All users must have a username and password to log in. The following instructions are for IPs to use in creating an account.
1. Go online to www.IPOne.org and click on the BetterOnline Login link for the IPOne web portal.
2. Select Sign Up.
TRAINING MANUAL for Individual Providers 9 | P a g e Updated: 8.23.2017
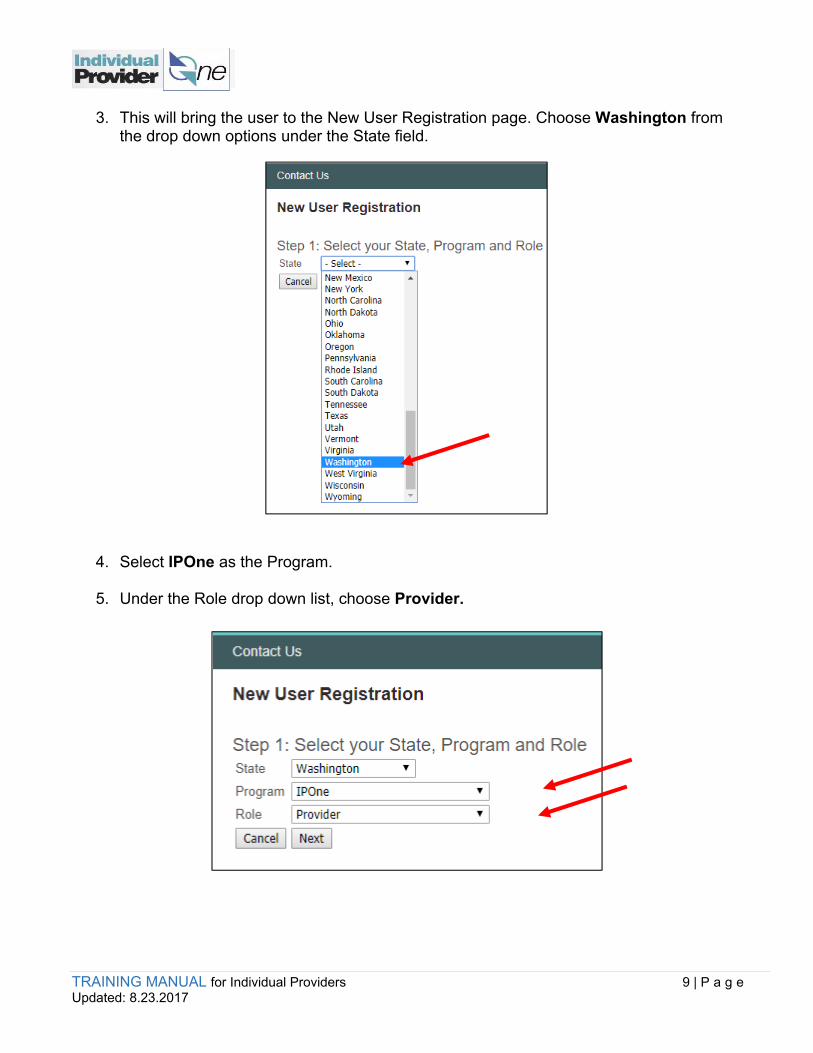
3. This will bring the user to the New User Registration page. Choose Washington from the drop down options under the State field.
4. Select IPOne as the Program.
5. Under the Role drop down list, choose Provider.
TRAINING MANUAL for Individual Providers 10 | P a g e Updated: 8.23.2017
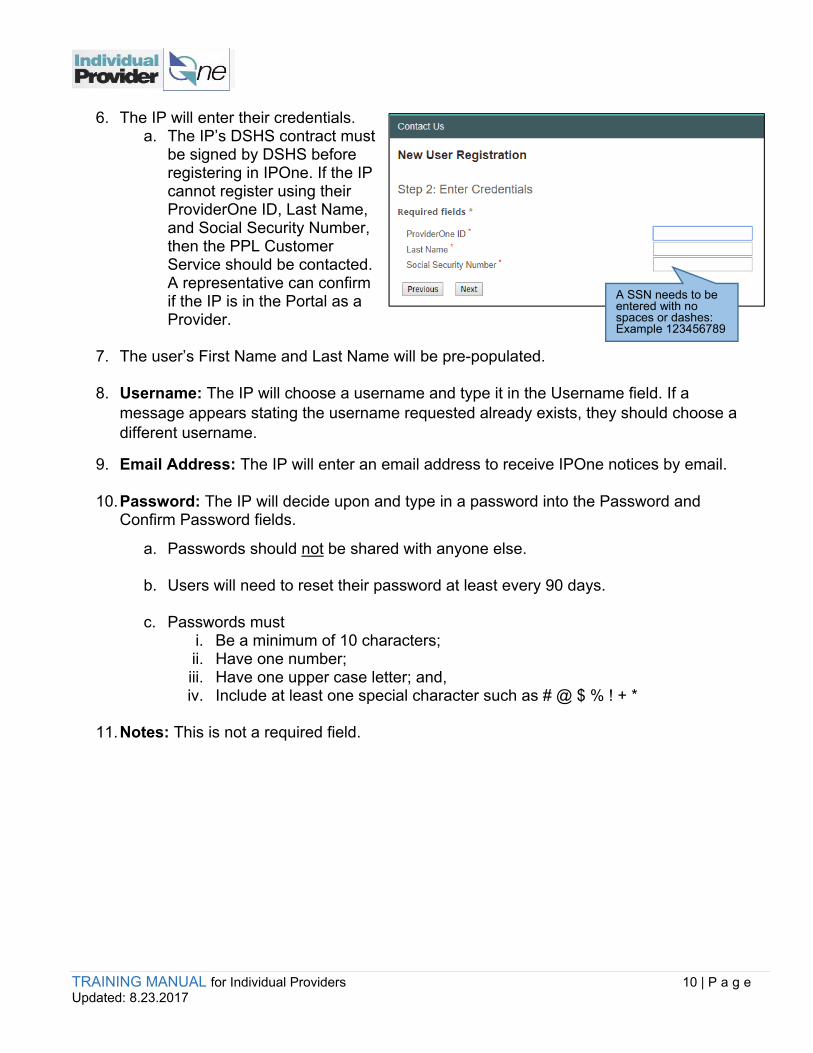
6. The IP will enter their credentials. a. The IP’s DSHS contract must
be signed by DSHS before registering in IPOne. If the IP cannot register using their ProviderOne ID, Last Name, and Social Security Number, then the PPL Customer Service should be contacted. A representative can confirm if the IP is in the Portal as a Provider.
7. The user’s First Name and Last Name will be pre-populated.
8. Username: The IP will choose a username and type it in the Username field. If a
message appears stating the username requested already exists, they should choose a different username.
9. Email Address: The IP will enter an email address to receive IPOne notices by email.
10. Password: The IP will decide upon and type in a password into the Password and Confirm Password fields.
a. Passwords should not be shared with anyone else.
b. Users will need to reset their password at least every 90 days.
c. Passwords must i. Be a minimum of 10 characters; ii. Have one number; iii. Have one upper case letter; and, iv. Include at least one special character such as # @ $ % ! + *
11. Notes: This is not a required field.
A SSN needs to be entered with no spaces or dashes: Example 123456789

TRAINING MANUAL for Individual Providers 11 | P a g e Updated: 8.23.2017
12. Security Questions: The user will choose three security questions from the drop down menus and enter answers into the data fields to the right of each question.
13. Click Submit. The user will review the information for accuracy, then click on the Submit button if all information is correct. The user will receive a notice that registration was done successfully and IPOne can be used.
14. After registration is successfully completed, the user will be prompted to login to the
Portal. The user can then log in with the username and password and immediately start using IPOne.
These questions provide a layer of security to protect the user’s privacy and are needed to use the “forgot password or username” link. Only the user can change the registration information.

TRAINING MANUAL for Individual Providers 12 | P a g e Updated: 8.23.2017
How to Change a Password
There are two ways to change an IPOne BetterOnline Portal password.
Option 1: Use the Change Password function in the Portal. After a user logs into an
account they can:
1. Click on Change Password in the top right corner; then,
2. Enter a new password; then,
3. Click Submit.
Option 2: Contact the Call Center. The user can:
1. Call 844-240-1526.
2. A representative will verify the caller as the correct user before assisting with
changing the desired new password.
3. The representative will change the password in IPOne and confirm that the user
can successfully login.

TRAINING MANUAL for Individual Providers 13 | P a g e Updated: 8.23.2017
How to Unlock a Password
After three failed login attempts a user will be locked out of their IPOne account for security purposes. If this occurs, the user can use the “forgot password” link. The user will need to verify their credentials and use the answers from their security questions to get unlocked.
They can also call PPL’s Call Center. After a representative completes the caller verification process, the account can be unlocked or reset.

TRAINING MANUAL for Individual Providers 14 | P a g e Updated: 8.23.2017
How to set up a Payment Preference
IPs can follow the process below to have their paycheck sent directly to a bank account, a debit card, or mailed to them via a paper check.
Note: If an IP does not select a payment option, they will be automatically enrolled to receive their pay on a debit card.
Step 1: Log on to IPOne.
Step 2: Click on the ‘Direct Deposit Setup’ tab at the top of the page.
Step 3: Click + Add New Account

TRAINING MANUAL for Individual Providers 15 | P a g e Updated: 8.23.2017
Step 4: Choose Direct Deposit, Debit Card, or Paper Check
Direct Deposit (a safe and efficient way to receive a paycheck)
a. Start by choosing Account Type – choose Checking or Savings from the drop down.
b. Enter the Bank Account Number and Transit Number found on the bottom of the personal check for the desired account. If an IP does not have a personal check, then it is recommended that the IP visit their local bank or call their bank and ask for this information.
Bank Account Number: This number is usually 10-12 digits for a checking or savings account.
Transit Number (Also called a Routing Number): This number is a 9-digit code.
c. Nickname: Choose a nickname for each account added.
d. Distribution Percentage: The amount from an IP’s paycheck that they want to have deposited into their bank account. The percentage must equal 100%. Enter 100% as the Distribution Percentage. At this time, there is no option to distribute paychecks into multiple accounts.

TRAINING MANUAL for Individual Providers 16 | P a g e Updated: 8.23.2017
e. Review the Direct Deposit Information to make sure it is correct. When confirmed, click ‘Submit’. If submitted correctly, the Current Status of the line will change to “APPROVED”.
Debit Card
If the Debit Card payment option is selected, then the IP will receive the debit card and information about the card in the mail.
To learn more about the card, read the information provided in the Welcome Packet or go to www.IPOne.org for a Hints & Tips reference document called “Debit Card Information”.
1. Under Account Type, choose Debit Card.
2. Click Submit.
3. After clicking Submit the IP will note that the Current Status will change to
“REQUESTED”.
TRAINING MANUAL for Individual Providers 17 | P a g e Updated: 8.23.2017
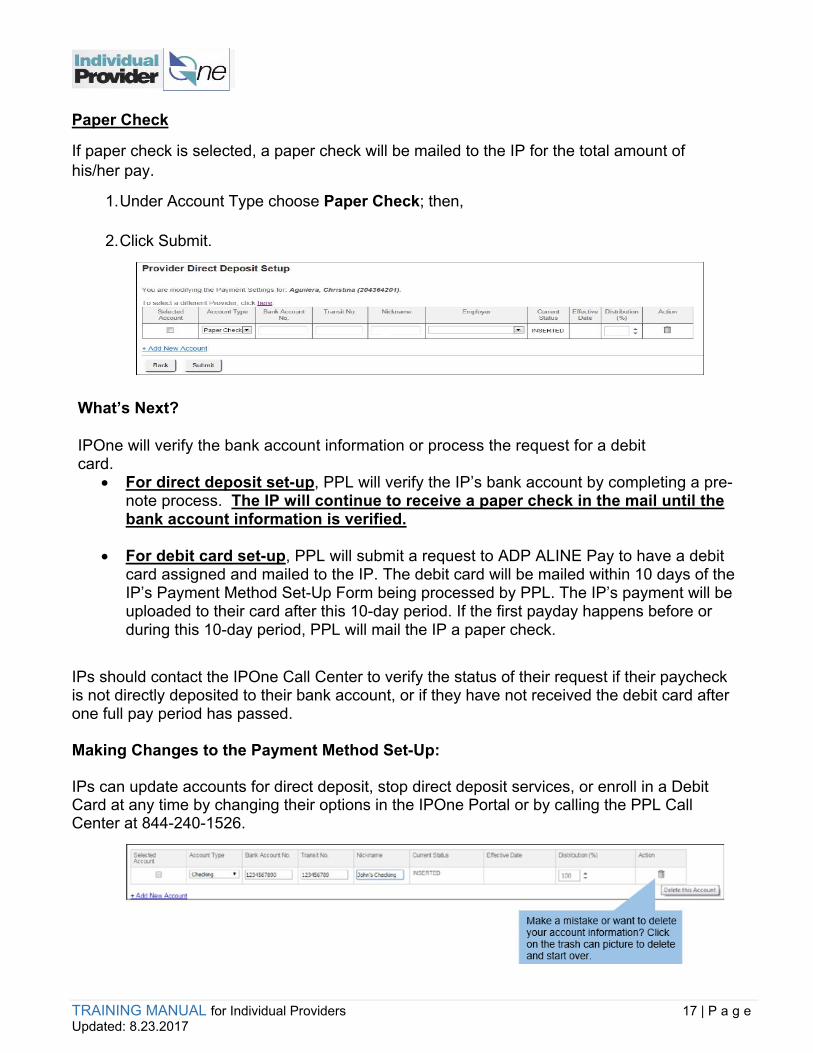
Paper Check
If paper check is selected, a paper check will be mailed to the IP for the total amount of his/her pay.
1. Under Account Type choose Paper Check; then,
2. Click Submit.
What’s Next?
IPOne will verify the bank account information or process the request for a debit card.
For direct deposit set-up, PPL will verify the IP’s bank account by completing a pre-note process. The IP will continue to receive a paper check in the mail until the bank account information is verified.
For debit card set-up, PPL will submit a request to ADP ALINE Pay to have a debit card assigned and mailed to the IP. The debit card will be mailed within 10 days of the IP’s Payment Method Set-Up Form being processed by PPL. The IP’s payment will be uploaded to their card after this 10-day period. If the first payday happens before or during this 10-day period, PPL will mail the IP a paper check.
IPs should contact the IPOne Call Center to verify the status of their request if their paycheck is not directly deposited to their bank account, or if they have not received the debit card after one full pay period has passed. Making Changes to the Payment Method Set-Up: IPs can update accounts for direct deposit, stop direct deposit services, or enroll in a Debit Card at any time by changing their options in the IPOne Portal or by calling the PPL Call Center at 844-240-1526.

TRAINING MANUAL for Individual Providers 18 | P a g e Updated: 8.23.2017
How to Update and Verify Tax Information
Withholding Federal Income Tax
If an IP wants to have taxes taken from their paycheck, change either claiming status or number of allowances, or indicate an optional additional amount that they want to be withheld from each paycheck, they need to complete and submit an Internal Revenue Service (IRS) Form W-4.
An IP can get an IRS Form W-4 by:
1. Downloading it at http://www.irs.gov/pub/irs-pdf/fw4.pdf, or
2. Calling the IRS office at 1-800-829-3676 and asking them to send a form.
The tax deductions requested on the Form W-4 remain in effect unless the IP contacts the IPOne call center to make a change.
Filling out the W-4:
1. Complete required fields: Boxes 1, 2, 3 and 5.
2. Boxes 4, 6, and 7 are optional.
3. Leave boxes 8, 9, and 10 blank.
4. Sign and date the form at the bottom of the page where it says “Employee’s signature”, and “Date”.
5. Mail or fax the form to:

TRAINING MANUAL for Individual Providers 19 | P a g e Updated: 8.23.2017
Applying for Tax Exemptions:
An IP may be required to take specific employment tax exemptions for FICA/FUTA because of age, student status, or relationship to the employer/client. IPs can download the Application for Employment Tax Exemptions Based on Age, Student Status, and Family Relationship form from the PPL website at: http://www.publicpartnerships.com/programs/washington/IPOne/index.html, or call the IPOne Call Center and ask them to send the form by mail. The IP should complete the form and return it by fax or U.S. mail as noted at the bottom of the form. The form is followed by a guide explaining the tax exemptions for which the IP may qualify. The IP must file one form for each client/employer for whom they work.
The Exemption Form looks like this:

TRAINING MANUAL for Individual Providers 20 | P a g e Updated: 8.23.2017
Verify Tax Information:
Users can view taxes deducted from paychecks by looking at:
An IP’s electronic Earnings Statement on the IPOne portal; or,
An IP’s paper Earnings Statement, if these are received in the mail.
An IP can contact the IPOne Call Center if they have questions about the Form W-4 or the Application for Tax Exemptions form.
REMINDER: IPOne staff cannot give tax advice. Please consult a tax advisor for questions on withholdings and exemptions.

TRAINING MANUAL for Individual Providers 21 | P a g e Updated: 8.23.2017
How to View Authorization Information
Users can view authorization summary information. IPOne will store all authorization records for easy access and these can be viewed anytime. Review instructions below on how to access this information.
1. Log in to IPOne; then,
2. Click on Authorization Summary found on the top left of the page.
3. The default view of this page will display all active authorization records. A Provider may search for a specific authorization or use a combination of any the following filters:
Client Last Name Client First Name Client ID Authorization ID Service Type Status

TRAINING MANUAL for Individual Providers 22 | P a g e Updated: 8.23.2017
4. Once filters have been defined to help narrow down the results, click Search.
5. When the Authorization is found, click on the blue link in the first column under Authorization ID to review the detail within the authorization record.
6. This will take the user to the Authorization Detail page, which provides information about authorized services. The Authorization Detail page shows information found in the authorization letter that is sent to the IP each time a change in services is made. The authorization letter includes monthly authorization information.
TRAINING MANUAL for Individual Providers 23 | P a g e Updated: 8.23.2017
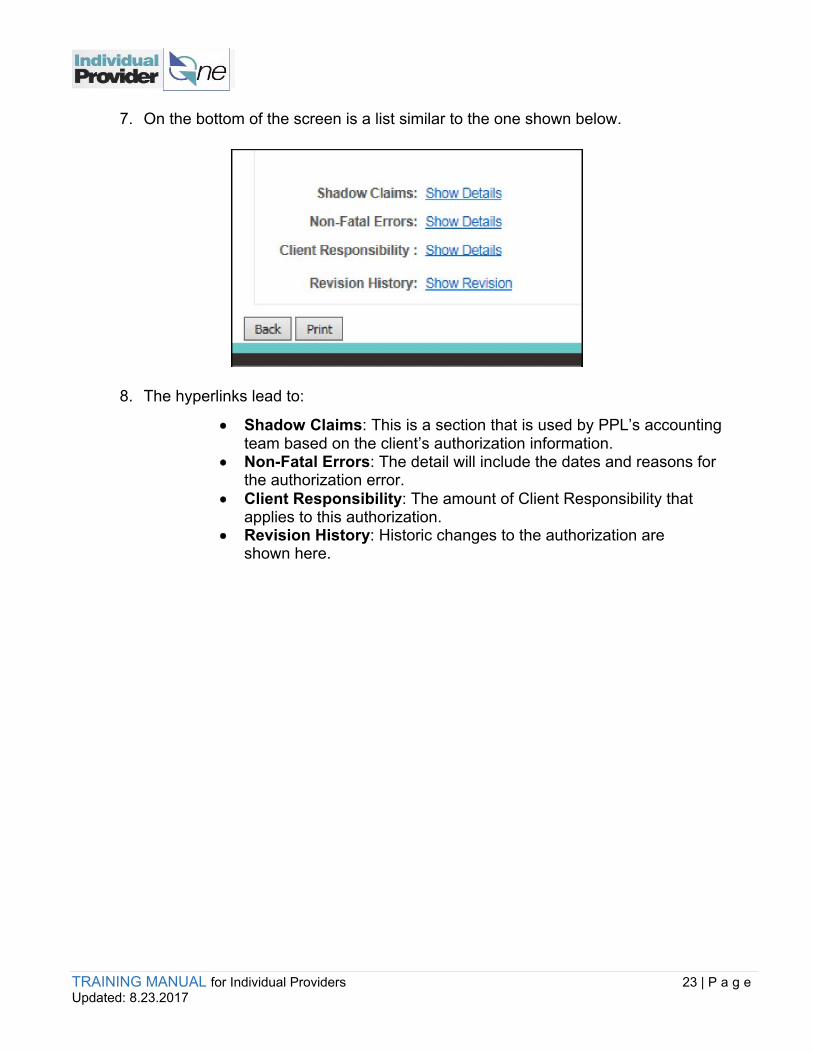
7. On the bottom of the screen is a list similar to the one shown below.
8. The hyperlinks lead to:
Shadow Claims: This is a section that is used by PPL’s accounting team based on the client’s authorization information.
Non-Fatal Errors: The detail will include the dates and reasons for the authorization error.
Client Responsibility: The amount of Client Responsibility that applies to this authorization.
Revision History: Historic changes to the authorization are shown here.

TRAINING MANUAL for Individual Providers 24 | P a g e Updated: 8.23.2017
Where the Authorization Letter is found
1. Log in to IPOne.
2. Click on Provider Profile on the top of the page, and then click on Documents.
3. This will lead to the Provider Forms page. Under the Existing Documents column
is a list of the authorization letters that have been generated for the selected Provider ID number.

TRAINING MANUAL for Individual Providers 25 | P a g e Updated: 8.23.2017
4. Click on the link to view a document, or check one or more of the items and click Create PDF to create a PDF of these letters which can be printed or saved to the user’s personal files.
5. The example below is of an Authorization Letter.
6. For questions about authorizations or workweek limits, please contact the client’s case manager.

TRAINING MANUAL for Individual Providers 26 | P a g e Updated: 8.23.2017
Benefits of Submitting Timesheets Online
In the IPOne payment system, timesheets can be submitted electronically (e-timesheets) by using a computer, laptop, or tablet. The advantages of electronic submission are shown below.
e-timesheets paper timesheets
IPOne tells the user immediately that the e-timesheet has been successfully submitted, or if there are corrections needed.
When a user faxes a paper timesheet there is a chance that mistakes were made or the fax may not be readable when received. When a user mails a paper timesheet they are dependent upon the U.S. Mail service for delivery to get the timesheet to IPOne on time.
When a user enters an e-timesheet, they can save their entries and fix mistakes or make adjustments before they submit the timesheet for payment. The system will tell the user immediately of a mistake or if there are authorization errors that may need action by the client’s case manager.
If a user submits a paper timesheet containing a mistake or if there are authorization errors, problems may not be discovered and corrected. The IP may not get paid on time.
If an IP provides personal care and another type of service to the same client (such as transportation), the user can submit all service types on the same e- timesheet.
If an IP provides personal care and another type of service to the same client, the user must submit a separate paper timesheet for each type of service.
If an IP works the same days of the week each week, they can create and save an e- timesheet template that will save the type of service, tasks, and number of hours entered. Using a template takes less time than creating a new e-timesheet every time.
If an IP works the same schedule each pay period and uses a paper timesheet, they have to fill out the number of hours and tasks every time for each service provided.

TRAINING MANUAL for Individual Providers 27 | P a g e Updated: 8.23.2017
How to submit a Timesheet online
Entering E-Timesheets 1. Log in to IPOne with the IP’s username and password.
2. Click on the Timesheets tab.
3. Click Create Timesheet to enter a new timesheet.
4. Choose the client for the timesheet being submitted.
If the IP works for more than one employer, a list of all of the clients to whom the IP provides services will appear.
5. Click on the Create Timesheet link for the client for whom time worked is being submitted.
6. Click on the calendar picture to select the first date for which to submit time.

TRAINING MANUAL for Individual Providers 28 | P a g e Updated: 8.23.2017
7. After selecting the Start date, a blank timesheet will appear for the entire pay period.
8. Select the service provided.
If only one service was provided during this pay period, select the Service dropdown at the top of the page where it says Select a common service.
The user will see the service codes and descriptions authorized by the client’s Case Manager. All dates in the timesheet will be pre-populated with these service codes.
If more than one service was provided during this period, select the service codes for each date worked.

TRAINING MANUAL for Individual Providers 29 | P a g e Updated: 8.23.2017
9. Locate the line for the first date of service provided. If listing tasks are required for the service code selected, the Tasks button next to the service will be clickable and required. Click on the button for a pop up of tasks to choose from. Check off the tasks performed during this shift. Click OK when complete.
If the Tasks button is grayed out and not clickable, there is no need to check off tasks.
10. Select the amount of hours and 15 minute increments of time worked by using the drop down menu under Hours Worked. For example, if the IP worked two hours and 15 minutes the user would select 2 hours in the first drop down and 15 minutes in the second drop down menu.

TRAINING MANUAL for Individual Providers 30 | P a g e Updated: 8.23.2017
Note: If the user has selected a common service to populate each line with a service code, for any days that were not worked the user should enter 0 hours.
11. If the IP provided more than one type of service in a day, click the Add a Service button and another line will appear below the one already created for the same day. Enter the other service code(s) provided in the second row, and make sure that the hours worked by each service are separately entered.
12. If the IP worked the same time and jobs on multiple days in a pay period, IPOne makes e-timesheets easier by allowing the user to copy and paste.
Enter one line into the timesheet and click the Copy button.

TRAINING MANUAL for Individual Providers 31 | P a g e Updated: 8.23.2017
13. Find the date(s) worked where the same services and hours were provided each day and click Paste. In this example, a copy of the Saturday line is pasted into Monday.
Transportation
If the IP provided personal care service and also provided transportation on the same day, add the mileage reimbursement to the timesheet. IPs must have an authorization for mileage reimbursement to claim miles on their timesheet.
1. Click in the field called Additional Service and choose the service code for mileage (S0215-U1).
2. In the next field called Miles, enter the miles of transportation provided. Note: the user will only be able to submit for mileage reimbursement if personal care service was provided on the same day.
3. Follow the steps previously described to complete an e-timesheet and select the
appropriate code from the Service drop down.
4. Once the timesheet is completely filled out, click the Next button at the bottom of the screen.
5. At this time, IPOne determines whether there are any errors on the timesheet. This allows the user to immediately correct and resubmit the timesheet, and avoid delays in getting paid.

TRAINING MANUAL for Individual Providers 32 | P a g e Updated: 8.23.2017
6. If there is an error on the timesheet, a message will appear at the top of the page in
red, and also next to the line where the error is found.
7. Once the error is corrected, click the “Next” button at the bottom of the screen. Please call the IPOne Call Center for assistance in correcting any remaining errors.
8. If the entire timesheet is correct, IPOne will take the user to the Confirm
Timesheet page.
9. From this confirmation page, the user has the following options: a. Edit – Will return the user back to the Create Timesheet page
to make any desired changes.
b. Save My Work – The user can save entries to be submitted later. To find saved timesheets, search for them using Timesheet Search. It is recommended that the user SAVE entries and not
submit them until the timesheet due date or until the last day worked for the pay period. Submitting a timesheet multiple times before the end of the pay period may cause system slowness.
c. Submit – Review the timesheet for accuracy, confirm the
Attestation Statement, and submit the timesheet for payroll processing.
Note: the IP must agree to- and check off- the Attestation Statement in order to submit the timesheet for processing.
Do not Submit until the timesheet is complete. After timesheets are Paid, the user can adjust the
timesheet to add any services or units as needed.

TRAINING MANUAL for Individual Providers 33 | P a g e Updated: 8.23.2017
d. Print Timesheet – Allows the user to print the timesheet.
10. Once the user clicks Submit and the e-timesheet has been successfully
submitted, the user will see confirmation of the receipt of the e-timesheet in IPOne.
Create and Use Timesheet Templates
The IP can enter an e-timesheet quickly by creating a Timesheet Template. This is an option in IPOne to help those IPs with a regularly scheduled work week to save even more time when submitting e-timesheets.
1. On the Create Timesheet page, instead of entering a timesheet, click in Manage Templates.
2. Click Create New Template.
3. Find the Client for whom the user is setting up this Timesheet Template.
Click on the Create Timesheet Template link next to the client’s name.

TRAINING MANUAL for Individual Providers 34 | P a g e Updated: 8.23.2017
4. On the Submit Timesheet Template page, enter the regularly scheduled shift for that employer/client.
5. Enter a Template Name at the bottom of that page to name this template. This
helps the user to easily identify it every time.
6. Click Next after having entered the details of the regularly scheduled workweek.
7. The user will see a Confirm Timesheet Template page appear. Review the information and click Submit if correct. This will be a template to use going forward for entering e-timesheets.

TRAINING MANUAL for Individual Providers 35 | P a g e Updated: 8.23.2017
8. To use the timesheet template, chose the template from the Load Template dropdown at the top of each e-timesheet.
9. Make any needed changes in the times and services to the timesheet after the template is loaded. Submit when ready.
How to Claim Paid Time Off (PTO)
1. Log in to IPOne with the IP’s username and password.
2. Click on the PTO Hours link to go the page to view the available PTO and enter the number of PTO hours to claim.
3. On the screen shown below: a. Look at the number of PTO hours available to claim.

TRAINING MANUAL for Individual Providers 36 | P a g e Updated: 8.23.2017
b. Use the drop down menu arrows to view and select the number of PTO hours and minutes to claim. Minutes will show in 15 minute increments.
c. Click on the Save button.
4. PTO hours will be paid on the next scheduled payroll.
5. The bottom part of the screen allows the user to:
View a summary of the PTO hours just submitted and the balance of PTO hours still available.
View a yearly summary of the total PTO hours submitted thus far in the calendar year.
Click on the History button to view a list of PTO Hour Claims.

TRAINING MANUAL for Individual Providers 37 | P a g e Updated: 8.23.2017
Error Messages potentially seen when submitting an Electronic Timesheet
E-timesheet will reflect a red error message when there is a problem that needs to be resolved before the hours can be paid. Below are some common problems of why an e-timesheet might display an error message and what a user can do or whom they can contact. An example of an error message:
Below are some of the most common error messages and how a user can fix them in order to successfully submit an e-timesheet:
Error Message Steps to Fix the Issue One or more of the days claimed are older than one year. The IP will only be paid for units claimed in the last 365 days.
Delete the dates that are older than one year and resubmit the timesheet or contact the call center if work was provided outside of 365 days.
Time entries are not within the timesheet period.
Delete the dates outside of the pay period. Submit dates for days 1-15 OR 16-31.
Entries cannot be in the future. Delete dates in the future from the timesheet prior to submission or wait until that day has actually occurred before submitting the timesheet.
You are not authorized to provide <service name> service, please see your Authorization Letter for details.
Review the authorization letter. Contact the case manager if there are any questions.
You have claimed more <hours> than have been authorized.
Review the amount of hours available on the authorization and revise the timesheet hours.
Mileage can only be submitted for days you are providing Personal Care Services.
Remove mileage reimbursement on days the IP did not claim personal care.
You did not check a task for one or more days that you entered units worked.
For services that require a task, enter at least one task for each day worked.

TRAINING MANUAL for Individual Providers 38 | P a g e Updated: 8.23.2017
How to submit a Paper Timesheet
IPOne will send IPs client-specific paper timesheets in the mail for their use for the first six (6) months only. After the first six-month supply is used, if they still want to submit paper timesheets they must call the Call Center to request another six-month supply. If they have not received their timesheets when they are ready to claim they can contact the IPOne Call Center. See “Who to Contact” on the last page of this manual. Before mailing in a timesheet, be sure to review the next unit on this training: “How to Avoid Making a Mistake on My Paper Timesheet” to reduce the risk of submitting a timesheet with an error.
Reminder: Users can go to IPOne to submit an e-timesheet!

TRAINING MANUAL for Individual Providers 39 | P a g e Updated: 8.23.2017

TRAINING MANUAL for Individual Providers 40 | P a g e Updated: 8.23.2017

TRAINING MANUAL for Individual Providers 41 | P a g e Updated: 8.23.2017
Please remember that e-timesheets are a simpler, faster, and easier way to submit claims. For more information on submitting e-timesheets, please review the earlier sections of this guide.
Mail timesheets to: Public Partnerships, LLC Individual ProviderOne PO Box 98698 Seattle, WA 98198
If faxing a timesheet, make sure all of the boxes and numbers are filled in with dark ink so the fax machine can read the scanned version.
Paid Time Off (PTO) PTO can be marked on the paper timesheet here: It’s the same as filling in paper timesheet hours:

TRAINING MANUAL for Individual Providers 42 | P a g e Updated: 8.23.2017
How to avoid making a mistake on a Paper Timesheet
When submitting timesheets on paper, review the below Dos and Do Nots.
DO DO NOT
Do fill in the timesheet carefully and clearly. Remember it is being read by a machine. Write neatly so that the timesheet can be read.
Do not cross out any information or write within the margins. Instead use a new, clean timesheet. If the timesheet cannot be read properly, the payment may be delayed.
Do fill in all required fields. The IP will not be paid on time unless all of the required fields are completed.
Do not submit a timesheet via email or fax to any fax number other than the one on the timesheet.
Do use separate timesheets for each of the Clients/Employers. If the IP works with more than one Client/Employer, make sure to use separate timesheets for each.
Do not use lightly colored ink or a pencil to fill out a timesheet. Use a black pen only.
Do submit a timesheet the day after the pay period ends in order to get paid on time. Submit the timesheet by the 16th and the 1st of each month worked.
Do not enter dashes into blank boxes.
Do check a task for each line item of time completed. Each day worked requires that the user checks authorized task(s) the IP completed during that time.
Do not write additional items if they are not the tasks listed within the client support plan. The tasks designated are the ones the client is approved to receive.
Do use dates that are within the payment pay period.
Do not submit for future dates of service – payment is based on work already done. The IP will not be paid for future dates.
Do ensure the timesheet is signed by the IP prior to sending in a paper timesheet.
Do not overlap pay periods or this may cause delay in payment for one or both pay periods.
Contact the IPOne Call Center team for help filling in a timesheet.

TRAINING MANUAL for Individual Providers 43 | P a g e Updated: 8.23.2017
IP payment schedule
Paychecks are sent/deposited twice a month.
Assuming that each payroll period is submitted separately and on-time, IPs receive payment for the first half of the month’s payroll (1st – 15th) in one paycheck and payment for the second half of the month’s payroll (16th – 31st) in a second paycheck.
Please review the payroll schedule closely to ensure timesheets are submitted on time. The current payroll schedule can be found at www.IPOne.org.
*If a timesheet is submitted after the scheduled timesheet due date, it will be processed and paid out in the next available payroll, which could result in over a two-week delay in receiving payment.
Things to Remember...
o Submit timesheets or e-timesheets on or before the due dates on the payroll schedule. Users can submit timesheets earlier if the IP is done working, but the IP will still be paid according to the payroll schedule. IPs cannot submit a timesheet for hours not yet worked.
o It is recommended that users SAVE timesheets and not submit a timesheet until the timesheet due date or until the last day worked for the pay period. Submitting a timesheet multiple times before the end of a pay period may cause system delays.
o To ensure the IP gets paid on time, submitting timesheets online is recommended. IPOne will give immediate feedback if there are any issues with an e-timesheet. Users will get confirmation immediately when an e-timesheet has been successfully submitted. If timesheets are received after the deadline, they will not get paid out until the following pay period. Keep holidays in mind when submitting paper timesheets. If paper timesheets are received with errors, they will be submitted for processing in the next available pay period after the issues are corrected.
o Users can check the status of an e-timesheet in the BetterOnline
IPOne Web Portal. After submitting an e-timesheet a user should confirm that the e-timesheet status shows as Approved to ensure the timesheet has been received and is ready to be processed for payment.
REMINDER: You must submit a
timesheet in order to receive payment.

TRAINING MANUAL for Individual Providers 44 | P a g e Updated: 8.23.2017
How to look up payment information
Users can look up several pieces of information related to paychecks using IPOne, including the status of a timesheet, paychecks by date range, and Earnings Statement(s).
1. Log into IPOne.
2. Once logged in, the Search Timesheet page will open. The page will default to all timesheets with the Timesheet Status: Unpaid.
3. On the Search Timesheet page, search for a timesheet or a group of timesheets
using any combination of search criteria. To search for all of one IP’s timesheets in any payment status, choose All for Timesheet Status and click on Search.
4. Under the ‘status’ column, the current status of each timesheet is viewable. Statuses
are: GOOD TO PAY, PAID, SAVED, IN PROCESS, SUBMITTED, PENDING, or DENIED (Timesheet Status terms and their definitions can be found at the end of this unit).

TRAINING MANUAL for Individual Providers 45 | P a g e Updated: 8.23.2017
5. To search for a timesheet within a certain date range, click on the calendar icon for Timesheet Start Date Range or Timesheet Submitted Date Range and select the desired date range. Then click Search.
6. To view an Earnings Statement, search for a paid timesheet and look for the Check Number in blue hyperlink. Click on the blue hyperlink and the Earnings Statement will open up for viewing. Users can download or print the Earnings Statement. Earnings Statements are stored in IPOne for an indefinite period of time.

TRAINING MANUAL for Individual Providers 46 | P a g e Updated: 8.23.2017
Timesheet Status Terms and Definitions Status What It Means
Paid Payment is on its way or the IP has been paid for a timesheet period in the past.
Saved A timesheet entry has been saved, but not yet submitted for payroll processing.
Approved (applies to Online
Timesheets) An entered timesheet has been reviewed and is approved to be processed for payment.
In Process (applies to paper
timesheets only) A paper timesheet has been submitted and received, but it has not yet been tested or reviewed for payroll processing.
Good to Pay A timesheet that has passed all of the payment rules. It is ready to be paid on the next scheduled payday.
Pending A timesheet is not approved and requires further action. Refer to the “Error Message(s)” you may see IF you submit an electronic timesheet.
Denied A timesheet is not approved and cannot be paid.

TRAINING MANUAL for Individual Providers 47 | P a g e Updated: 8.23.2017
How to read an Earnings Statement
Below is a sample Earnings Statement and helpful information.
Note: If Client Responsibility is owed by the client, this amount can be found in the authorization letter and appears on the Earnings Statement in the Description section under “COPAY”.

TRAINING MANUAL for Individual Providers 48 | P a g e Updated: 8.23.2017
Administrative Time
Administrative Time is taxable, paid time allotted to each Individual Provider. Individual Providers will automatically receive one fifteen (15) minute unit of Administrative
Time for each paid pay period they worked and submitted a timesheet in Good to Pay status, after July 1, 2017.
If the IP is not paid in the pay period, or the timesheet is not in Good to Pay status, the IP will not be paid Administrative Time.
Administrative Time is paid per the current hourly rate and is included in taxable wages. Administrative Time is subject to overtime calculations, and accrues both CCH and PTO.
Administrative Time is included in the sum of the IP’s total hours worked for the period. Administrative Time will not be affected by Client Responsibility and is not estate
recoverable. Administrative Time applies to all timesheet submission formats including faxed, mailed-in
paper timesheets and electronic submitted timesheets online.
Sample Earnings Statement with Administrative Time

TRAINING MANUAL for Individual Providers 49 | P a g e Updated: 8.23.2017
Administrative Time Frequently Asked Questions (FAQs)
Q: What is Administrative Time? A: Administrative Time is taxable, paid time allotted to each IP.
Q: When will IPs become eligible for Administrative Time? A: Administrative Time takes effect with the pay period beginning July 1, 2017. Pay periods worked on or after July 1, 2017 are eligible to receive Administrative Time. Q: Will Administrative time be paid retroactively? A: Administrative Time will not be applied to pay periods prior to July 1, 2017. Q: How much will IPs be paid for Administrative Time? A: Administrative Time is paid as one 15-minute unit per paid pay period. Administrative Time is paid according to the IP’s current hourly rate. Q: How do IPs claim Administrative Time? A: IPs do not claim Administrative Time. IPOne will automatically generate a timesheet to pay Administrative Time for each paid pay period the IP worked and the timesheet is in Good to Pay status after July 1, 2017. Q: Can IPs edit Administrative Time timesheets? A: No. Any attempt to edit an Administrative Timesheet in the portal will result in an error message being displayed, and no edit will be processed.
Q: Can IPs be paid for additional Administrative Time? A: No. IPs will be paid for only one, 15-minute unit of Administrative Time for each payroll period in which they are paid.
Q: Where can Administrative Time payments be viewed? A: Administrative Time is displayed on Earnings Statements at the Description section near the top of the page.
Q: Is Administrative Time taxable? A: Yes. Paid Administrative Time is included in taxable wages and will be taxed with other wages according to the IP’s W-4 on file.
Q: Will Administrative Time paid count towards an IP’s CCH/PTO balance? A: Yes. Paid Administrative Time is included in calculations for both CCH and PTO accruals.
Q: Who can an IP contact if there are questions regarding Administrative Time? A: Please call the SEIU Member Resource Center at 1 (866) 371-3200.

TRAINING MANUAL for Individual Providers 50 | P a g e Updated: 8.23.2017
Frequently Asked Questions (FAQs)
Below is a list of FAQs for quick reference. For more detailed information, please review this training manual and/or contact the IPOne Call Center.
Authorizations
Q: How does an IP know how many hours of care they are authorized to provide and claim for payment? A: Users can log in to IPOne to see how many hours an IP is authorized to provide to each client. IPs also receive an authorization letter in the mail which informs them of how many hours they should work each pay period. The authorization amount does not reflect workweek limits. Please contact the client’s Case Manager with any questions or concerns about authorized hours.
IPOne System
Q: How does an IP know that IPOne has all of their correct information? A: Users can log into IPOne and review their personal information online. They can change this information online or contact the IPOne Call Center for information and assistance.
Q: What should a user do if they have been locked out of IPOne? A: Users can reset their password using the link on the login screen for “Forgot Username or Password”. If this does not work, contact the IPOne Call Center to ask for agent assistance with unlocking an account.
Payments
Q: What should an IP do if they missed receiving a payment? A: The IP should log into the IPOne system and:
Review their personal information to make sure that their address and/or bank account information is correct.
Check to see if their timesheet has a status of “Paid”. Paid means they should have received or will be receiving a payment shortly. If there is another status listed, there could be an issue with the payment. Contact the IPOne Call Center if the paycheck is not in the bank account within 48 hours after payment is issued via Direct Deposit, or within 3-5 business days if the IP is paid with a paper paycheck.
Review the payment schedule. The current payment schedule can be found at http://www.publicpartnerships.com/programs/washington/ipone/index.html
Q: How can an IP update federal tax withholding information? A: To update or change Federal Income Tax withholding information, submit a new W-4 form. This form can be downloaded at https://www.irs.gov/uac/about-form-w4 or call PPL to have the current W-4 mailed. Completed tax forms can either be faxed or mailed to PPL.

TRAINING MANUAL for Individual Providers 51 | P a g e Updated: 8.23.2017
Q: How can IPs update their employment tax withholding? A: To request an exemption to employment taxes the IP will need to submit a new Application for Employment Tax Exemptions Based on Age, Student Status, and Family Relationship form. This form can be downloaded at http://www.publicpartnerships.com/programs/washington/ipone/documents/training/IPOne%20Application%20for%20Tax%20Exemptions.pdf or call PPL to have the current form mailed. Completed tax forms can either be faxed or mailed to PPL.
Q: How can IPs change their direct deposit set-up? A: IPs can log into IPOne to change their Direct Deposit setup. They can also obtain a direct deposit form by contacting the IPOne Call Center team to request a paper form.
Q: How can IPs view or print Earnings Statements for each payday? A: Log into IPOne to view Earnings Statements online. If the IP does not have access to a computer and would like their Earnings Statements mailed to them, they can check the box to request this on the Electronic Payment form in the Welcome Packet. If they would like to obtain past Earnings Statements without logging into the IPOne portal, they can contact the IPOne Call Center to make this request.
Q: How can IPs request wage verification? A: IPs must request wage verification by sending a written request by fax or mail to IPOne. The fax number is 1-855-901-6904 or the request can be mailed to:
Public Partnerships, LLC WA IPOne 7776 S Pointe Pkwy W, Suite150 Phoenix, AZ 85044
Deductions
Q: What is the difference between the ‘Health & Welfare Deduction’ and ‘Health and Welfare, Var’ description lines on my Earnings Statement? A: The ‘Health & Welfare Deduction’ is the amount deducted for the health insurance option selected during enrollment. This monthly premium amount is collected in full by IPOne. ‘Health and Welfare, Var’ is the variable cost-share health benefit amount that is determined by the Health Benefits Trust (HBT). It is deducted by IPOne based on the data IPOne receives from HBT about the coverage selected.
Q: Who can an IP contact to change or correct the amount for ‘Health and Welfare, Var’ or ‘Health & Welfare Deduction’? A: IPs can call the SEIU 775 Benefits Group at 1-866-371-3200 or visit their website at http://www.myseiubenefits.org. Agents there can assist the IP with the deduction amount and provide them with information about how to change the amount deducted.

TRAINING MANUAL for Individual Providers 52 | P a g e Updated: 8.23.2017
Timesheets
Q: How can IPs enter hours worked? A: With IPOne, there are three ways to enter hours worked: online using a computer or tablet, by faxing, or by mailing paper timesheets.
Q: How do IPs submit a timesheet for payment? A: The best way to submit hours worked in IPOne is to electronically submit an e-timesheet with the use of a computer or tablet. IPs can also fax or mail paper timesheets if they do not have access to a computer.
Q: How will an IP know if a timesheet is ready to be paid? A: The IP can log onto IPOne and search for the timesheet status to see if it shows as ‘Paid’. They can also call the IPOne Call Center and the automated system will inform them of the status of the last submitted timesheet.
Q: What are the different timesheet statuses and what do they mean? A: There are seven timesheet statuses and each serve a different purpose to help an Individual Provider understand where their timesheet is in the payment process. Below are the statuses and their meaning.
1. Saved: A timesheet entry has been saved, but not yet submitted for payroll processing.
2. Approved (applies to electronic timesheets): A submitted timesheet has been reviewed by the system and is approved to be processed for payment.
3. In Process (applies to paper timesheets only): A paper timesheet has been submitted and received, but it has not yet been tested or reviewed for payroll processing.
4. Pending: A timesheet is not approved and requires further action. Refer to the “Error Message(s)” you may see IF you submit an electronic timesheet.
5. Denied: A timesheet is not approved and cannot be paid.
6. Good to Pay: A timesheet that has passed all of the payment rules. It is ready to be paid on the next scheduled payday.
7. Paid: Payment is on its way or the IP has been paid for a timesheet period in the past.
If a timesheet is not in one of these status, the provider should contact the Call Center for more information.
TRAINING MANUAL for Individual Providers 53 | P a g e Updated: 8.23.2017
Training Materials/Guides
Q: Where can IPs get help or more training? A: For additional training on IPOne, please reference the written training manual. IPs can also call the IPOne Call Center for additional information.
Q: Are there instructions available in other languages? A: Yes, there are instructions on how to complete timesheets and how to log on to IPOne available in languages other than English. Visit the below website and click on Contact Call Center for the Multilingual Telephone list.
http://www.publicpartnerships.com/programs/washington/IPOne/index.html

TRAINING MANUAL for Individual Providers 54 | P a g e Updated: 8.23.2017
Still have questions?
Please contact the IPOne Call Center for assistance.
Multilingual, IPOne Call Center staff are available to assist with payment questions and the use of IPOne.
Open Monday - Friday, from 7 am to 7 pm PST; and Saturday from 8 am to 1 pm PST.
Toll-free phone numbers available for the top 12 language needs in Washington; other languages will be supported by alternative option.